1
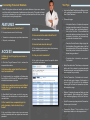
New Users Guide
Still Have Questions?
Retail Portal
A Retail Portal users manual is available under the
Help tab. You can also contact the Appriss Operations
Center at 1-877-502-2501 or via e-mail at aocd@
appriss.com to answer any other questions you
may have.
Frequently Asked Questions
& Effective Tool
Tips to Maximize Your Retail
Portal Experience
R 02/11
Connecting Precursor Retailers
Tool Tips
Retail Portal gives retailers an instant, up-to-date database of precursor records
and other data from thousands of retailers across the country. This guide will serve
not only as a reference for our most commonly asked questions, but also provide
effective tips for using the application.
• Log into the Retail Portal’s secure Web portal via
your company’s prescribed method. Enter your
User ID and Password.
• Transaction page
FEATURES
Q. What features are in Retail Portal?
A. You may have access to the following:
• Transaction - enter precursor purchase transactions
• Reports - purchase logs
DATA
Q. How current is the data in Retail Portal?
A. Data in Retail Portal is real-time.
Q. How far back does the data go?
ACCESS
Q. What do I do if I forget my user name or
password?
A. Click the “Forgot Password” link to retrieve the
requested information.
Q. Is there a time when Retail Portal would
ever be unavailable?
A. It could possibly be unavailable on Wednesdays
from 4:00 a.m. to 6:00 a.m. EST during the regularly
scheduled maintenance window.
Q. My new co-worker wants access to Retail
Portal. Can I just let him use my user name
and password?
A. Each Retail Portal license is valid for one user.
Contact your site administrator to request additional
user accounts.
Q. Do I need to have a separate login for
each pharmacy I work at since I am a
floater? A. No, we will set up a floater role, so you can access
multiple pharmacies with one unique user name and
password.
A. The data goes as far back as when the pharmacy
began submitting transactions.
Q. Can you void a transaction?
A. Yes, refer to the user manual for specific details
on how this can be done.
• Information Section: Complete the required
fields as noted with an asterisk. After entering
the ID Number, Type, and Issuing Agency,
click on the Find icon. If the customer has
previously made a purchase, the rest of the
customer’s information will automatically
populate the information fields.
• Describe Product Section: Begin typing the
first few letters of the product name or the first
few numbers of the UPC and a list will appear.
Select the product and enter the number of
boxes being purchased.
• Complete other information as required.
Click submit.
• Safety Override button: This allows you to proceed
with a sale if the customer’s purchase exceeds
allowable amounts, becomes belligerent, and you
are concerned for your safety.
• Confirm Transaction: If information is incorrect,
click edit and make changes. If information is
correct, click YES to add it to the database.
Selecting NO will end the transaction and clear
the transaction page.
• Returns: Complete the required fields as noted
with an asterisk. After entering the ID Number,
Type, and Issuing Agency, click on the Find icon.
• Voids: To remove a purchase, enter the Transaction
Number and click submit.
• Transaction Report: This provides a list of
transactions based on a date range entered.