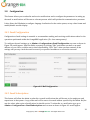
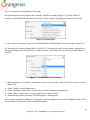
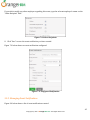
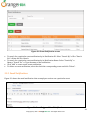
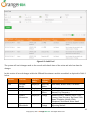
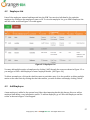
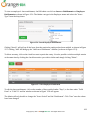
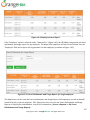
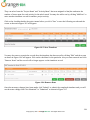
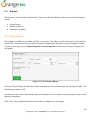
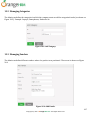
1
Administrator’s User Manual for OrangeHRM Version Live 3.0 All Rights Reserved. Published in the United States of America. This publication is protected by copyright, and permission must be obtained from the publisher prior to any prohibited reproduction, storage in retrieval system, or transmission in any form or by any means, electronic mechanical, photocopying, and recording or likewise. For more information please contact us on [email protected] . 1 C opyright © 2013 OrangeHRM Inc. All Rights Reserved. Contents Administrator’s User Manual for OrangeHRM Version Live 3.0 ........................................................ 1 1.0 Audience ............................................................................................................................................... 6 2.0 The System ........................................................................................................................................... 6 3.0 Admin Module ..................................................................................................................................... 7 3.1 User Management ........................................................................................................................... 8 3.1.1 Users............................................................................................................................................ 8 3.1.2 User Roles ................................................................................................................................ 11 3.1.3 Authentication Configuration ............................................................................................. 12 3.2 Job ..................................................................................................................................................... 18 3.2.1 Job Titles................................................................................................................................... 18 3.2.2 Pay Grade ................................................................................................................................. 19 3.2.3 Employment Status ................................................................................................................ 21 3.2.4 Job Categories ......................................................................................................................... 22 3.2.5 Work Shifts .............................................................................................................................. 23 3.3 Organization ................................................................................................................................... 24 3.3.1 General Information .............................................................................................................. 24 3.3.2 Locations .................................................................................................................................. 25 3.3.3 Structure .................................................................................................................................. 26 3.4 Qualifications ................................................................................................................................. 28 3.4.1 Skills .......................................................................................................................................... 28 3.4.2 Education ................................................................................................................................. 29 3.4.3 Licenses .................................................................................................................................... 30 3.4.4 Languages ................................................................................................................................ 31 3.4.5 Memberships........................................................................................................................... 32 3.5 Nationalities ................................................................................................................................... 33 3.6 Manage News.................................................................................................................................. 34 3.7 Documents ...................................................................................................................................... 36 3.8 Configuration ................................................................................................................................. 39 3.8.1 Email Configuration ............................................................................................................... 39 3.8.2 Email Subscriptions ............................................................................................................... 39 3.8.3 Localization ............................................................................................................................. 41 3.8.4 Modules .................................................................................................................................... 42 3.9 Notifications ................................................................................................................................... 43 3.9.1 How to Create Event Notifications...................................................................................... 43 3.9.2 Managing Event Notifications.............................................................................................. 45 2 C opyright © 2013 OrangeHRM Inc. All Rights Reserved. 3.9.3 Email Notifications................................................................................................................. 46 3.10 Audit Trail ................................................................................................................................... 47 4.0 PIM Module ........................................................................................................................................ 50 4.1 Configuration ................................................................................................................................. 51 4.1.1 Optional Fields ........................................................................................................................ 51 4.1.2 Custom Fields .......................................................................................................................... 52 4.1.3 Data Import ............................................................................................................................. 53 4.1.4 Reporting Methods ................................................................................................................ 54 4.1.5 Termination Reasons ............................................................................................................ 55 4.2 Employee List ................................................................................................................................. 57 4.3 Add Employee ................................................................................................................................ 57 4.3.1 Employee’s Personal Details ............................................................................................... 58 5.0 Leave Module ..................................................................................................................................... 79 5.1 Configure ......................................................................................................................................... 80 5.1.1 Leave Period ............................................................................................................................ 81 5.1.2 Leave Types ............................................................................................................................. 82 5.1.3 Work Week .............................................................................................................................. 97 5.1.4 Holidays.................................................................................................................................... 98 5.2 Leave Entitlements ..................................................................................................................... 100 5.2.1 HR Admin View of Leave Entitlements ............................................................................ 100 5.2.2 ESS Supervisor View of Leave Entitlements ................................................................... 103 5.2.3 ESS-Employee View of Leave Entitlements .................................................................... 105 5.3 Reports .......................................................................................................................................... 106 5.4 Leave List ...................................................................................................................................... 109 5.4.1 View/Action Leave Request ............................................................................................... 109 5.4.2 Search Leave List .................................................................................................................. 110 5.4.3 Export to CSV ......................................................................................................................... 111 5.5 Assign Leave ................................................................................................................................. 112 5.6 My Leave ........................................................................................................................................ 113 5.7 Apply .............................................................................................................................................. 114 5.8 Leave Calendar............................................................................................................................. 115 5.8.1 Leave Calendar for Admins ................................................................................................ 117 5.8.2 Leave Calendar for Supervisors ........................................................................................ 120 6.0 Time Module .................................................................................................................................... 121 6.1 Time Sheets .................................................................................................................................. 122 6.1.1 Project Info; Customers, Projects and Activities ........................................................... 122 6.1.2 Entering and Submitting a Timesheet ............................................................................. 125 3 C opyright © 2013 OrangeHRM Inc. All Rights Reserved. 6.1.3 Approving Employee Timesheet ...................................................................................... 127 6.1.4 Export to CSV ......................................................................................................................... 130 6.2 Attendance .................................................................................................................................... 131 6.2.1 Configuration ........................................................................................................................ 132 6.2.2 Punch In/Punch Out ............................................................................................................ 132 6.2.3 My Records ............................................................................................................................ 133 6.2.4 Employee Records................................................................................................................ 134 6.2.5 Export to CSV ......................................................................................................................... 135 6.3 Reports .......................................................................................................................................... 136 6.3.1 Project Report ....................................................................................................................... 136 6.3.2 Employee Reports ................................................................................................................ 137 6.3.3 Attendance Summary .......................................................................................................... 138 7.0 Recruitment Module ...................................................................................................................... 139 7.1 Candidates .................................................................................................................................... 139 7.1.1 Candidates List...................................................................................................................... 141 7.1.2 Shortlist .................................................................................................................................. 143 7.1.3 Reject....................................................................................................................................... 144 7.1.4 Schedule Interview .............................................................................................................. 144 7.1.5 Mark Interview Passed ....................................................................................................... 145 7.1.6 Mark Interview Failed ......................................................................................................... 146 7.1.7 Offer Job.................................................................................................................................. 147 7.1.8 Decline Offer.......................................................................................................................... 148 7.1.9 Hire .......................................................................................................................................... 149 7.2 Vacancies....................................................................................................................................... 150 7.2.1 Applying for a Vacancy........................................................................................................ 152 8.0 Performance Module ..................................................................................................................... 154 8.1 KPI List........................................................................................................................................... 154 8.2 Add KPI .......................................................................................................................................... 154 8.3 Copy KPI ........................................................................................................................................ 155 8.4 Add Review ................................................................................................................................... 157 8.5 Reviews.......................................................................................................................................... 158 9.0 Announcements .............................................................................................................................. 160 9.1 News ............................................................................................................................................... 160 9.2 Documents .................................................................................................................................... 160 10.0 Dashboard..................................................................................................................................... 161 10.1 Quick Launch Panel ................................................................................................................. 162 10.2 Task List Group ........................................................................................................................ 163 4 C opyright © 2013 OrangeHRM Inc. All Rights Reserved. 10.3 Admin Users View Charts....................................................................................................... 164 11.0 Directory ....................................................................................................................................... 165 12.0 Asset Tracker ............................................................................................................................... 166 12.1 Managing Brands ..................................................................................................................... 166 12.2 Managing Categories ............................................................................................................... 167 12.3 Managing Vendors ................................................................................................................... 167 12.4 Assigning & Viewing Assets ................................................................................................... 168 12.4.1 Assigning Assets to Employees ......................................................................................... 168 12.4.2 Viewing Assets of Employees............................................................................................. 168 5 C opyright © 2013 OrangeHRM Inc. All Rights Reserved. 1.0 Audience This document is intended as a complete guide for using OrangeHRM Live 3.0. This document is specially designed for non-specialists; specialists may find the document a useful point of reference. By reading this guide, you will learn how to use OrangeHRM Live through the elements of the graphical user interface and what's behind some of the advanced features that are not always obvious at first sight. It will hopefully guide you around some common problems that frequently appear for users of OrangeHRM Live. 2.0 The System Log-in to the OrangeHRM System using the Administrator (admin) account. Figure 1.0: Login Panel 6 C opyright © 2013 OrangeHRM Inc. All Rights Reserved. 3.0 Admin Module The Admin Module provides you with full control of all settings that affect the action of your OrangeHRM implementation. Through the Admin Module, you can: ● ● ● Define the company hierarchy, pay grades, work shifts, projects, memberships, qualifications etc. Add other administrators, and set access levels for each user Handle security issues ● Configure email notifications ● Configure language localization and date format that will be reflected throughout the whole system. ● Enable/Disable Module display The Admin Module is the central control of the system and setting it up accurately is important for smooth operation. Figure 1.1: Admin Module The Admin Module consists of: User Management: Add multiple HR Admins who will control the system, create logins for general users through ESS Users, assign Regional HR Admins, create new custom User Roles. Job: Allows the HR admin to define job titles, specifications, pay grades, employment status, job categories and work shifts. Organization: Allows the HR admin to enter/store general company info, structure of the organization and locations of sites. Qualifications: Define various skills set, education background, license types, languages and memberships. Nationalities: Define different nationalities. Manage News: Compose and publish company-wide news articles and events with employees. Documents: Compose and share corporate documents and memos with employees. Notifications: Create email notifications to trigger for certain events. Configuration: Configure all email notifications, language localization and enable/disable module display. Audit Trail: View all additions/changes made to the PIM and Recruitment module. 7 C opyright © 2013 OrangeHRM Inc. All Rights Reserved. 3.1 User Management This feature allows the HR Admin to administer users by creating logins and defining privileges by assigning User Roles (Admin or ESS). Also, if the Regional Admin feature is enabled, users can be created and defined as admins for specific regions and locations, which gives more functionality across the system (PIM and Leave modules). Also, this section allows the admin to create new custom user roles with specific privileges. 3.1.1 Users To add a system user, go to Admin>> User Management>> Users and click “Add”, a screen as shown in Figure 1.2 would appear. Figure 1.2: Add User *Note: An employee list needs to be created first under the PIM Module to create user logins. Alternatively, a user login could be created when adding employees under the PIM Module. To create a user login the following needs to be entered: ● User Role: You can assign user roles for each user (Global Admin, Regional Admin, ESS, or Custom) to define their user rights and privileges. The defined user roles with fixed privileges include: o Global Admin: has access to all the modules in the system and can view and access all employees’ information within the system working in different locations/regions of the organization. o Regional Admin: has access to all the modules in the system and can only view and access all the employees’ information within the system working in one region/location of the organization. 8 C opyright © 2013 OrangeHRM Inc. All Rights Reserved. o ESS: limited access to the system. It could be an ESS-Supervisor or ESS-Employee. ESS-Supervisor: where the user has access to his/her particulars and his/her subordinates’ particulars (Can be assigned via PIM> Employee List> Employee> Report-to). ESS-Employee: where the user has access only to his/her particulars. *Note: Custom User Roles can also be created (as shown in Section 3.1.2: User Roles). Employee Name: name of the employee whom user role can be assigned to. Employees need to be added to the system first under PIM>>Add Employee. If an HR Admin is an existing employee, he/she needs to be defined in the PIM Module. ● Username: define a username for the employee. ● Status: Enabled or disabled. Select enable to allow employee to access the system with the defined user role. ● Password/Confirm Password: provide a password for the employee and confirm password for security purposes. ● Once the fields are added, click “Save” and the entry will be listed as shown in Figure 1.3. You may also add multiple entries of user logins. The default system user available will be Admin and has full access to the system. *Note: Notifications are not automatically sent when a new User is created. System User Logins need to be communicated manually to employees (usually via email). Figure 1.3: System Users List 9 C opyright © 2013 OrangeHRM Inc. All Rights Reserved. To delete a system user, click on the check box next to the “Username”. It is also possible to delete multiple entries at the same time by clicking the check box entries you wish to delete and simply clicking “Delete”. Regional Admin If you want to assign ‘Regional Admin’ access to an employee, follow the same process as described above; however select “Regional Admin” as the user type. A screen will now open, where the region can be selected, as shown in Figure 1.4. Figure 1.4: Select User Regions Select the region/country from the drop down selection. Multiple regions and locations can be selected. Click “Save” once done. To change the region of a Regional Admin, click on “Modify Region” under the ‘Action’ column as shown in Figure 1.5. Figure 1.5: User List A screen as shown in Figure 1.6 should appear. Make the relevant changes and click “Save” once done. 10 C opyright © 2013 OrangeHRM Inc. All Rights Reserved. Figure 1.6: Modify Region *Note: Global Admin users can manage accounts across all countries, while Regional Admin users can only manage user account in their region. 3.1.2 User Roles As explained in 3.1.1, the following user roles (types) are pre-defined in the system; Global Admin, Regional Admin, ESS User (Employee & Supervisor). In addition to these user roles, it is possible to create new user roles. The User Roles section allows for the Global Admin to create custom user roles with configurable privileges and rights to: To access employee data. To add, delete, and terminate employees. To create new User Roles, the Global Admin must go to Admin >> User Role and click on “Add” (Figure 1.7). Figure 1.7: Configure New User Role 11 C opyright © 2013 OrangeHRM Inc. All Rights Reserved. Once the selections are made and the privileges set, the Global Admin can click “Save” and a screen with all the custom user roles will appear, as shown in Figure 1.8. Figure 1.8: User Role list To edit the privileges of these User Roles, the Global Admin will need to click on the name of the User Role and make the relevant changes. To delete a User Role, the Global Admin will need to tick the checkbox next to the entry and click on “Delete”. Multiple entries can be deleted at once. 3.1.3 Authentication Configuration This section allows the Admin to configure a number of Security Authentication add-on options. When clicking on Admin>> User Management >> Authentication Configuration, the screen as shown in Figure 1.9 will appear. Figure 1.9: Configure Security Authentication Add-on 12 C opyright © 2013 OrangeHRM Inc. All Rights Reserved. Authentication add-on Status A dropdown selection with two options; Enabled and Disabled. Should be enabled to allow the admin to configure the other security authentication options. User can reset the password If "User can reset password" setting is checked by Admin, the login page will display a link: "Forgot your password?" link when a user attempts to log on to the system (Figure 2.0). Figure 2.0: Login Screen (with ‘Forgot your password’ option) Upon clicking the "Forgot your password?" link in the login screen user will be prompt for the below screen (Figure 2.1). Figure 2.1: Login Screen (with ‘Forgot your password’ option) The User should be able to enter OrangeHRM username or work email (PIM->Contact Details -> Work email) to recover the password. If employee ‘Work Email’ or ‘Other Email’ is not set, the system should prompt a message: "Work email is not set. Please contact HR admin in order to reset the password". 13 C opyright © 2013 OrangeHRM Inc. All Rights Reserved. If the ‘Work email’ or ‘Other email’ has been set, then the following screen as shown in Figure 2.2 should appear once a username or email is entered and “Search” is clicked. Figure 2.2: Reset Password screen The user can then select whether he/she wants to reset the primary password (password), secondary password or both. Upon clicking “Reset Password”, the system will send an email notification to that employees work email address. This email will contain a link to reset the password (as shown in Figure 2.3). The screen as shown in Figure 2.4 will be shown once “Reset Password” is clicked. Figure 2.3: Password Reset Email Notification 14 C opyright © 2013 OrangeHRM Inc. All Rights Reserved. Figure 2.4: Enter Password Reset Code The ‘Reset Code’ then needs to be pasted in the Password Reset Code field, and then “Reset Password” should be clicked. Alternatively, the user can open the link in the email. The user can now enter the new password (as shown in Figure 2.5). The password reset options are provided based on the prior selections made by user. That is "primary password", "secondary password", or "both passwords". Figure 2.5: Enter New Password Once the new password(s) has been entered, click “Save” and the following screen as shown in Figure 2.6 will appear. Figure 2.6: Password Reset Successful Enable CAPTCHA after [?] failed attempts If the user tries to log on to the system with an incorrect password for a defined number of times, the system activates the CAPTCHA based on configuration (Figure 2.7). 15 C opyright © 2013 OrangeHRM Inc. All Rights Reserved. Figure 2.7: Retry Login with CAPTCHA The user will need to successfully fill the correct code to Login to the system. Block access after [?] failed attempts for [DD:HH:MM] If the user tries to log on to the system with an incorrect password for a defined number of times, the system will block access to the system for a specified amount of time (Figure 2.8). Figure 2.8: Blocked Access Once access is restricted, system sends an email to the associated (with user name) employee's work email address. If the work email is not set, the system gives a warning message (Figure 2.9). 16 C opyright © 2013 OrangeHRM Inc. All Rights Reserved. Figure 2.9: Access Restricted Email Notification Enable Secondary Password If this option is set, when a user attempts to log on to the system, if the user account has no associated secondary password (That is logging on to the system for the first time), the system will prompt the user to enter a secondary password (Figure 3.0). Figure 3.0: Set Secondary Password Once the password is set, the user will need to enter it every time he/she logs in to the system. The secondary password screen will appear only after the main password is entered successfully (Figure 3.1). Figure 3.1: Enter Secondary Password 17 C opyright © 2013 OrangeHRM Inc. All Rights Reserved. 3.2 Job All job related information can be defined in this feature. The sub menu consists of the following items: ● ● ● ● ● Job Titles Pay Grades Employment Status Job Categories Work Shifts 3.2.1 Job Titles The job titles specific to the company can be defined in this option. To add an entry, go to Admin>> Job>> Job Titles and click “Add”. A screen as shown in Figure 3.2 would appear. Click “Save” once the fields are added. Figure 3.2: Add Job Title A list of job title(s) will appear as shown in Figure 3.3. You may also enter multiple job titles. You may view Job Title details by clicking on the name of the “Job Title”. 18 C opyright © 2013 OrangeHRM Inc. All Rights Reserved. Figure 3.3: Job Title List To delete a Job Title click on the check box next to the Job Title name. It is also possible to delete multiple entries at the same time by clicking the check box entries you wish to delete and simply clicking “Delete”. 3.2.2 Pay Grade The HR Admin can define the pay grade by setting a minimum salary, maximum salary, step increase, and the currency to be paid in. To add an entry, go to Admin>>Job>> Pay Grades and click “Add” and a screen as shown in Figure 3.4 would appear. Click “Save” once the field is added. Figure 3.4: Add Pay Grade Once you click “Save” the screen in Figure 3.5 would appear and you can now define the currency and the minimum/maximum salary for each pay grade created. You can define the pay grade by clicking “Add” under “Assigned Currencies” and then providing the pay details under “Add Currency”. Click “Save” to save the currency for the Pay Grade. 19 C opyright © 2013 OrangeHRM Inc. All Rights Reserved. Figure 3.5: Assign Pay Grade Currency You can assign multiple currencies here and each currency defined will be listed as shown in Figure 3.6. Figure 3.6: Pay Grade- Currency List You can edit details of a particular currency by clicking on the “Currency” name. All pay grades added will be listed as shown in figure in 3.7. To view Pay Grade details click on the name of the Pay Grade. 20 C opyright © 2013 OrangeHRM Inc. All Rights Reserved. Figure 3.7: Pay Grades List To delete a Pay Grade click on the check box next to the “Pay Grade” name. It is also possible to delete multiple entries at the same time by clicking the check box entries you wish to delete and simply clicking “Delete”. 3.2.3 Employment Status Employment Status allows you to define the status of employment employees are hired for or if they are terminated. To add an entry, go to Admin>> Job>> Employment Status and click “Add” and a screen as shown in Figure 3.8 would appear. Click “Save” once the field is added. Figure 3.8: Add Employment Status A list of Employment Status as shown in Figure 3.9 would appear once an Employment Status is added. To edit an Employment Status, click on the name of the “Employment Status”. 21 C opyright © 2013 OrangeHRM Inc. All Rights Reserved. Figure 3.9: Employment Status List To delete an Employment Status click on the check box next to the “Employment Status” name. It is also possible to delete multiple entries at the same time by clicking the check box entries you wish to delete and simply clicking “Delete”. 3.2.4 Job Categories This feature allows the HR Admin to create job categories specific to the company to aggregate job classifications. To add an entry, go to Admin>> Job>> Job Categories and click on “Add” and a screen as shown in Figure 4.0 would appear. Click “Save” once the field is added. Figure 4.0: Add Job Category A list of Job Category as shown in Figure 4.1 would appear once a “Job Category” is added. To view Job Category details, click on the name of a “Job Category”. You may also add multiple entries of Job Categories. 22 C opyright © 2013 OrangeHRM Inc. All Rights Reserved. Figure 4.1: Job Category List To delete a Job Category click on the check box next to the “Job Category” name. It is also possible to delete multiple entries at the same time by clicking the check box entries you wish to delete and simply clicking “Delete”. 3.2.5 Work Shifts In this feature the HR Admin can define work shifts for an individual or a group of employees. To add an entry, go to Admin>> Job>> Work Shifts and click “Add” and a screen as shown in Figure 4.2 would appear. Figure 4.2: Add Work Shift 23 C opyright © 2013 OrangeHRM Inc. All Rights Reserved. You may assign employees to the particular shift by selecting the employee’s name from the “Available Employees” box and “Add” him/her to the “Assigned Employees” box. Click “Save” once the fields are added. *Note: An Employee list needs to be created first under the PIM Module before assigning employees to a particular work shift. A list of work shifts as shown in Figure 4.3 would appear once a “Work Shift” is added. To view Work Shift details, click on “Work Shift” name. You may also add multiple entries of work shifts. Figure 4.3: Work Shifts List To delete a work shift click on the check box next to the “Work Shift”” name. It is also possible to delete multiple entries at the same time by clicking the check box entries you wish to delete and simply clicking “Delete”. 3.3 Organization All information about the organization, the structure and locations are defined here. The sub menu consists of the following items: ● ● ● General Information Locations Structure 3.3.1 General Information Basic details of the company can be entered on this screen. To start adding information, go to Admin>> Organization>> General Information and click “Edit”. Click “Save” once fields are entered as shown in Figure 4.4. 24 C opyright © 2013 OrangeHRM Inc. All Rights Reserved. Figure 4.4: General Information 3.3.2 Locations Under Locations, the HR admin can add the details of the company’s sites and branches. You are also able to track the number of employees working for a particular location once employees are tagged to the locations when building up the PIM Module. To add a location go to Admin>>Organization>>Location and click “Add” and the screen as shown in Figure 4.5 would appear. Click “Save” once the fields are added. 25 C opyright © 2013 OrangeHRM Inc. All Rights Reserved. Figure 4.5: Add Location Once a location is added, it will be listed as shown in Figure 4.6. You may also enter multiple locations. You may view location details by clicking on “Location Name”. Figure 4.6: Location List To delete a location click on the check box next to the location name. It is also possible to delete multiple entries at the same time by clicking the check box entries you wish to delete and simply clicking “Delete”. 3.3.3 Structure This feature allows the admin to define the hierarchy of the company by defining sub units. Since the parent company is already defined in the ‘General Information’, it would automatically appear in the ‘Company Structure’ screen. 26 C opyright © 2013 OrangeHRM Inc. All Rights Reserved. *Note: You need to define the company name of the parent company before you create the Company Structure. To add a sub- unit to the company structure, go to Admin>> Organization>> Structure and click on [+] as shown in Figure 4.7 and the screen shown in Figure 4.8 would appear. Figure 4.7: Add Sub-Unit Figure 4.8: Sub-Unit Details *Note: Company Structure may be defined according to the company’s specifications and hierarchy. When entering the fields, you need to specify if the sub-unit is a Department, Division or Team. Once you have entered the field, click “Save” and the Sub-Unit will appear as shown in Figure 4.9. Figure 4.9: Sub-Unit Structure You may also add further sub-units by clicking [+] option next to the relevant fields to indicate the hierarchy levels of the company and create a pyramidal structure of your organization as shown in Figure 5.0. 27 C opyright © 2013 OrangeHRM Inc. All Rights Reserved. Figure 5.0: Company Structure Hierarchy To delete an entry, you can simply click “[x]” next to the relevant sub units. Click “Done” below the screen to save the information. You can also collapse/expand the sub-units by clicking on the (-) and (+) on the right hand side of the sub-units to further view the company structure hierarchy. 3.4 Qualifications This feature allows you to define all information with regards to employees’ qualifications. The sub-menu consists of: ● ● ● ● Skills Education Licenses Languages 3.4.1 Skills You can define various sets of skills which can be later used on the PIM Module. To add an entry go to Admin>> Qualifications>> Skills and click “Add” and a screen as shown in Figure 5.1 would appear. Click “Save” once the fields are added. 28 C opyright © 2013 OrangeHRM Inc. All Rights Reserved. Figure 5.1: Add Skill A list of skill(s) as shown in Figure 5.2 would appear once a “Skill” is added. You may also add multiple entries of skills. Figure 5.2: Skills List To delete a skill click on the check box next to the “skill” name. It is also possible to delete multiple entries at the same time by clicking the check box entries you wish to delete and simply clicking “Delete”. 3.4.2 Education You can define various types of educational qualifications which can be later used in the PIM Module. To add an entry select Admin>> Qualifications>> Education and click “Add”, a screen as shown in Figure 5.3 would appear. Click “Save” once the field is added. 29 C opyright © 2013 OrangeHRM Inc. All Rights Reserved. Figure 5.3: Add Education A list of educational qualifications as shown in Figure 5.4 would appear once an “Education” entry is added. You may also add multiple entries of educational qualifications. Figure 5.4: Education List To delete an educational qualification click on the check box next to the “Education” name. It is also possible to delete multiple entries at the same time by clicking the check box entries you wish to delete and simply clicking “Delete”. 3.4.3 Licenses You can define various types of licenses which can be later used in the PIM Module. To add an entry go to Admin>> Qualifications>> Licenses and click “Add”, a screen as shown in Figure 5.5 would appear. Click “Save” once the field is added. 30 C opyright © 2013 OrangeHRM Inc. All Rights Reserved. Figure 5.5: Add License Type A list of license type(s) as shown in Figure 5.6 would appear once a “License” type is added. You may also add multiple entries of licenses. Figure 5.6: Licenses List To delete a license type click on the check box next to the “License” name. It is also possible to delete multiple entries at the same time by clicking the check box entries you wish to delete and simply clicking “Delete”. 3.4.4 Languages Different types of languages that employees in your company speak can be defined here and can be used in The PIM Module later. To add an entry, go to Admin>> Qualifications>>Languages and click “Add”, a screen as shown in Figure 5.7 would appear. Click “Save” once the field is added. 31 C opyright © 2013 OrangeHRM Inc. All Rights Reserved. Figure 5.7: Add Language A list of languages as shown in Figure 5.8 would appear once a “Language” type is added. You may also add multiple entries of languages. Figure 5.8: Language List To delete language types click on the check box next to the “Language” name. It is also possible to delete multiple entries at the same time by clicking the check box entries you wish to delete and simply clicking “Delete”. 3.4.5 Memberships This feature allows the HR Admin to define different membership details of the employees which can be later used in the PIM Module. To add a membership, go to Admin>> Qualifications>> Membership and click “Add”, a screen as shown in Figure 5.9 would appear. Click “Save” once the field is added. 32 C opyright © 2013 OrangeHRM Inc. All Rights Reserved. Figure 5.9: Add Membership A list of membership(s) as shown in Figure 6.0 would appear once a “Membership” is added. To view membership details, click on “Membership” name. You may also add multiple entries of memberships. Figure 6.0: Memberships List To delete a membership, click on the check box next to the “Membership”” name. It is also possible to delete multiple entries at the same time by clicking the check box entries you wish to delete and simply clicking “Delete”. 3.5 Nationalities This feature allows the HR Admin to define the different nationalities that present in the company which can later be used in the PIM Module. Various nationalities are already pre-defined. To add a nationality, go to Admin>> Nationalities and click “Add”, a screen as shown in Figure 6.1 would appear. Click “Save” once the field is added. 33 C opyright © 2013 OrangeHRM Inc. All Rights Reserved. Figure 6.1: Add Nationality A list of nationalities as shown in Figure 6.2 would appear once a “Nationality” is added. You may also add multiple entries of nationalities. Figure 6.2: Nationalities List To delete a nationality, click on the check box next to the “Nationality”” name. It is also possible to delete multiple entries at the same time by clicking the check box entries you wish to delete and simply clicking “Delete”. 3.6 Manage News This section enables the HR Admin to publish news articles and share information with all employees in the company. All news articles are published to the “Announcements” section (explained in Section 9: Announcements). 34 C opyright © 2013 OrangeHRM Inc. All Rights Reserved. To add a News item, go to Admin>> Manage News and click “Add”, a screen as shown in Figure 6.3 would appear. Figure 6.3: Add News Topic – the topic of the news article Description – the main body of the news article can be filled in this section. Standard document formatting options are available (font change, styles, etc). Publish To – recipients of this news article. Options include ‘Admin’, ‘Supervisor’, and ‘All Employees’. Published Date – date the news article was published. Click “Save” once the all fields are is added to save the article. After saving, attachments can be added to the article. Articles can be saved and published at a later time. Click “Publish” to publish the article. Figure 6.4 shows all the available news items that have been created, with the “Topic Name”, who it can be “Published To” and the “Status” of the news item. 35 C opyright © 2013 OrangeHRM Inc. All Rights Reserved. Figure 6.4: News items The Admin can search for specific news items using the “Topic” and “Status” criteria in the search bar. To archive a news item, simply select the entry and click on “Archive”. To re-arrange the order of the news items, click on “Arrange Order”. To delete a news item, click on the check box next to the entry. It is also possible to delete multiple entries at the same time by clicking the check box entries you wish to delete and simply clicking “Delete”. 3.7 Documents This section enables the HR Admin to publish and share company related documents with all employees in the company. All documents are published to the “Announcements” section (explained in Section 9: Announcements). To add a Document, go to Admin>> Documents >>Manage Categories and click “Add”, a screen as shown in Figure 6.5 would appear. The Admin can add and delete categories. 36 C opyright © 2013 OrangeHRM Inc. All Rights Reserved. Figure 6.5: Add/Manage Document Categories To add a document, the Admin must then go to Admin>> Documents >> Manage. A screen as shown in Figure 6.6 would appear. Figure 6.6: Add Documents 37 C opyright © 2013 OrangeHRM Inc. All Rights Reserved. Topic – the topic of the news article Category – select from the dropdown menu which category the document belongs to. Description – the main body of the news article can be filled in this section. Standard document formatting options are available (font change, styles, etc.) Publish To – recipients of this news article. Options include ‘Admin’, ‘Supervisor’, and ‘All Employees’. Published Date – date the news article was published. Click “Save” once the all fields are is added to save the document. After saving, attachments can be added. Documents can be saved and published at a later time. Click “Publish” to publish the document. Figure 6.7 shows all the available documents that have been created, with the “Category”, “Topic”, who it can be “Published To” and the “Status” of the document. Figure 6.7: Document list The Admin can search for specific documents items using the “Topic”, “Status” and “Category” criteria in the search bar. To archive a document, simply select the entry and click on “Archive”. To delete a document, click on the check box next to the entry. It is also possible to delete multiple entries at the same time by clicking the check box entries you wish to delete and simply clicking “Delete”. 38 C opyright © 2013 OrangeHRM Inc. All Rights Reserved. 3.8 Configuration This feature allows you to subscribe and receive notifications and to configure the parameters in setting up the email so notifications will be sent to relevant persons which will quicken the communication processes. It also allows the HR admin to configure language localization for the entire system, set up a date format and enable/disable module display. 3.8.1 Email Configuration Configuration of mail settings is essential to accommodate sending and receiving notifications related to the operations performed within the OrangeHRM application (Ex: leave management). To configure the mail settings, go to Admin>> Configuration>>Email Configuration, a screen as shown in Figure 6.8 would appear. Enter the fields accurately by clicking “Edit”, and then a test mail to an email address of your choice could be sent to check functionality. Click “Save” when you have entered all the settings and you may check the email account if you specified an address to receive the test mail. Figure 6.8: Mail Configuration 3.8.2 Email Subscriptions This feature will allow the admin to subscribe to email notifications that will be sent to the employees and supervisors in the system. A copy of the mail will be sent to the email address specified by the Admin. He/she can also select what copies of notifications he should receive. To subscribe to a notification type, go to Admin>> Configuration>> Email Subscriptions and a screen as shown in Figure 6.9 would appear. 39 C opyright © 2013 OrangeHRM Inc. All Rights Reserved. Figure 6.9: HR Admin Notification Subscription The HR Admin may also add other subscribers to the following notifications by clicking on the notification types and you will be directed to the screen as shown in Figure 7.0. Once the fields are added, click “Save”. Figure 7.0: Add Subscriber The entry will then be listed as shown in Figure 7.1 and multiple entries of subscribers for a particular notification type may also be added or deleted. Figure 7.1: Subscriber List for a Notification Type 40 C opyright © 2013 OrangeHRM Inc. All Rights Reserved. When you click “Back” you will be directed to the “Email Notification” screen as shown in Figure 7.2 with the added notification subscriber reflected on the screen. Figure 7.2: Email Notification List of Subscribers 3.8.3 Localization Language Localization This feature enables the HR Admin to configure the language settings and translate the OrangeHRM system to the language of your choice. To configure localization settings, go to Admin>> Configuration>> Localization and the screen as shown in Figure 7.3 would appear. Click “Edit” to edit the fields. The default language of the system is US English however you may also use an already set up browser language to translate the system to the language of choice. For example: If you are using Firefox as your browser and it’s translated in UK English language and you want to use this particular language, click on the “Use Browser Language if set” and select from the “Supported Language” provided. Figure 7.3: Localization 41 C opyright © 2013 OrangeHRM Inc. All Rights Reserved. The Localizit language pack tool can also be obtained from the website by clicking on “Language and font help” as shown in Figure 7.3, where you will be diverted to the web page, or by simply browsing through the OrangeHRM Website (www.orangehrm.com >> Community>> Translators). Date Format Localization This feature allows the HR Admin to set up the date format that will be reflected throughout the whole system as shown in Figure 7.3. Once you have configured the localization settings, click “Save”. 3.8.4 Modules This feature enables the HR Admin to configure the display/hide settings of the modules of the system. To configure the module display settings, go to Admin>> Configuration>> Modules and the screen as shown in Figure 7.4 will appear. Click “Edit “to edit module display. You may select from the list the modules you want to be displayed or hidden. Click “Save” one module configuration is completed. Figure 7.4: Module Configuration 42 C opyright © 2013 OrangeHRM Inc. All Rights Reserved. 3.9 Notifications The OrangeHRM Event Notifications lets administrators create employee/event notifications to notify employees via email on important impending events. Pre- requisites: 1. In order to have your Event Notifications plug-in up and running, set up the email notifications configuration settings on Admin>>Email Notifications>> Configuration. 2. The company email address of each employee should be added to the employee record in the PIM module>> Contact Details>> Work Email. 3.9.1 How to Create Event Notifications 1. On the “Admin” tab, select “Notifications”. 2. Click “Add” to create a new event notification. Figure 7.5 should appear. Figure 7.5: Add Event Notification window 3. Give your notification a unique “Event Name”. This would appear as the subject of the email notification. 4. Enter the “Employee Name” of whom this event is applicable to. By default the system will notify “All the Employees” in the system. 5. Select the “Event” from the drop down menu. 43 C opyright © 2013 OrangeHRM Inc. All Rights Reserved. *Note: Event types are predefined in the system. The following Event types shown in the screenshot should be available (Figure 7.6). These fields are available in the PIM module and should have data, in order to notify an employee on any selected event. Figure 7.6: Event Types 6. Select when the employee needs to be notified from the “Notified Before” drop down menu (Figure 7.7). E.g. An employee’s Contract Expiry Date is 10/06/2013. The employee needs to be notified 1 week prior to the Contract Expiry Date (03/06/2013), in order to renew. This can be done by selecting “Notified Before” “1 Week”. Figure 7.7: Notification Period Selection 7. Under Recipients, you can select who needs to receive this particular event notification you have created (Figure 7.8). Check “Admin” to notify admin users. Check “Immediate Supervisors” to notify the particular employee’s supervisor/s. Check “Chain of Supervisors” to notify supervisors down the chain. By default the system will notify “All the Employees” in the system. You can notify a particular employee, by typing the relevant employee’s name in the “Employee Name” field and selecting the “Employee” check box under Recipients. 44 C opyright © 2013 OrangeHRM Inc. All Rights Reserved. If you wish to notify any other employee regarding this event, type the relevant employee’s name on the “Other Recipient” field. Figure 7.8: Select Recipients 8. Click “Save” to save the event notification you have created. Figure 7.9 below shows an event notification configured. Figure 7.9: Configured Notification 3.9.2 Managing Event Notifications Figure 8.0 below shows a list of event notifications created. 45 C opyright © 2013 OrangeHRM Inc. All Rights Reserved. Figure 8.0: Event Notification screen To search for a particular event notification by its Notification ID: Select “Search By”>>ID>>”Search For”>>Enter the ID>>Search. To search for a particular event notification by its Notification Name: Select “Search By”>> Name>>”Search For”>> Type the name of the notification. Click “Add” to create a new event notification. To delete an event notification, select the check the corresponding event and click “Delete”. 3.9.3 Email Notifications Figure 8.1 shows the email notification that an employee receives on a particular event. Figure 8.1: Event Triggered Email Notification 46 C opyright © 2013 OrangeHRM Inc. All Rights Reserved. The table below lists the Notifications which are emailed for each Event Type in the system. Notification Name Date of Birth Field Driving License Expiry Date Immigration Expiry Dates Employee>License Expiry Date Employee contract’s Expiry Dates Memberships Expiry dates Licenses Expiry Dates Retirement Notification Employee->DOB Employee>Immigration Documents>Passport/Visa Expiry Date Employee>Job Contract>End Date Employee>Memberships> Renewal Date Notification Subject DOB Notification Driving License Expiry Notification Immigration Expiry Notification Employee Contracts Notification Memberships Expiry Notification Process System will send emails to recipients about employees’ date of birth each year based on the settings. System will send emails to recipients about employee/s License expiry. If there are multiple records, the system will send emails to each separately, based on the settings. An email will be sent when reaching the contract end date. An email will be sent when the membership end date is reached. If there are multiple records, system should send email notifications for each separately. Employee>Employee Licenses Expiry An email will be sent when reaching the Licenses> Renewal Date Notification license expiry date. Employee>DOB + param Retirement Once an event notification is created for year Notification “Retirement Date”, System should send an email notification according to the defined settings. E.g.- : If an employee date of birth is on 1970-06-01 and the number of years for the retirement is 55, then the system needs to send a notification on 2024-12-01 if you select 6 months prior notification and should send notification on 2025-05-01 if you select 1 month prior notification. Table 1: Notifications 3.10 Audit Trail The audit trail allows administrators to track changes made to the records in the system by ESS users, supervisors and HR administrators in detail. You can view the changes made to the information within the system by navigating to Admin>> Audit Trail. The screen as shown in Figure 8.2 will open. 47 C opyright © 2013 OrangeHRM Inc. All Rights Reserved. Figure 8.2: Audit Trail The system will track changes made to the records with date & time of the action and who has done the changes. In this version all record changes within the PIM and Recruitment module are audited as depicted in Table 2 below. Module Sections Affected Entity Captured Actions Affected Fields PIM Personal Details Job Title Salary Employee First Name, Middle Name, Last Name Contact Information Employee Add, Edit, Delete Change Update, Delete Change Supervisor/ Subordinate Supervisor Employee Employee Add, Change Job Title Name Currency, Pay Grade, Salary Component, Amount, Pay Frequency Address Street 1, Address Street 2, City, Country, State/Province, Zip/Postal Code, Home Telephone, Mobile, Work Telephone, Work Email, Other Email Supervisor Name, Subordinate Name, Reporting Method 48 C opyright © 2013 OrangeHRM Inc. All Rights Reserved. Work Experience Recruitment Job Vacancy Employee Add, Edit, Leave Type ID, Leave Type Name Delete Job Add, Edit, Vacancy ID, Job Title, Hiring Manager, Vacancy Delete Description, Status Table 2: Audit records for each module and section Table 3 shows a few examples of PIM audit records. Date and Time of Action Action Action Owner (Username) Affected Employee Action Description 2011-06-10 19:07:36 admin ADD EMPLOYEE Kayla Esther Abbey New employee record was added to the system. (Name: Kayla Esther Abbey) 2011-06-14 11:47:48 admin ADD EMPLOYEE Ashley Abel New employee record was added to the system. (Name: Ashley Abel) 2011-06-14 11:47:57 admin UPDATE PERSONAL DETAILS Kayla Esther Abbey Middle name was changed from 'Ester' to 'Esther' 2011-06-14 12:26:42 admin DELETE EMPLOYEE Kayla Esther Abbey Employee record was deleted from the system Table 3: Example on PIM > Personal Details audit records 1. To view actions performed by a user within a particular module, select the relevant module from the Module drop down and select the section from the “Section” drop down. By clicking on the search button, it will list the changes done on each record. 2. To filter your search by specific actions performed within the system, select the pre-defined actions from the Actions drop down menu. 3. To view actions performed by a particular user, type the name of the employee as the “Action Owner”. (The system will automatically search for the particular employee’s name within the system). 4. To track changes made to a particular employee’s record, type the name of the employee in the “Affected Employee” field. 5. To view the changes on done specific time period, enter the date range in from and to field. 6. To filter your search by the sections within the selected module, select the drop down from the “Section” field. Figure 8.3 shows an example of the audit trail section. 49 C opyright © 2013 OrangeHRM Inc. All Rights Reserved. Figure 8.3: Audit trail 4.0 PIM Module This core module maintains all relevant employee related information, including different types of personal information, detailed qualifications, work experience, job related information etc. Information captured in this module is utilized by all other modules, thus eliminating data redundancy. Records can be either entered manually one by one or imported from a CSV file. You cannot import all the details but you can edit the remaining fields. The functionality of the PIM Module differs depending on the rights of the user. The HR Admin can: Configure optional/custom fields, data import from CSV, define reporting methods and termination reasons that will be used throughout the module. View all employee details Add employee on the list. Generate employee report 50 C opyright © 2013 OrangeHRM Inc. All Rights Reserved. ESS-Supervisor can: View his personal details as well as his/her subordinates. ESS-Employee: 4.1 Has no access to the PIM module but can view his personal details under the ‘My Info’ Module. Able to edit certain bits of information (contact info, dependents, emergency contacts, etc). Configuration This allows the HR Admin to add optional fields and custom fields to the module, define various termination reasons, reporting methods and import data from CSV. 4.1.1 Optional Fields This feature allows the admin to add fields to the “Personal Details” screen that may be specific to the company or country. To configure the “Optional Fields” settings, go to PIM>> Configuration>> Optional Fields and the screen as shown in Figure 8.4 will appear. Figure 8.4: Optional Fields Configuration You may click on the checkbox beside the field you want to add and click “Save” once the fields are selected. The field(s) selected will then be reflected under the “Personal Details” screen as shown in Figure 8.5. 51 C opyright © 2013 OrangeHRM Inc. All Rights Reserved. Figure 8.5: Optional Fields added to Personal Details Screen 4.1.2 Custom Fields This feature allows the Admin to customize and add fields to all the screen of the PIM Module that may be specific and relevant to the company. To add a custom field, go to PIM>>Configuration>>Custom Fields, click “Add” and the screen as shown in Figure 8.6 will appear. Figure 8.6: Add Custom Field 52 C opyright © 2013 OrangeHRM Inc. All Rights Reserved. Define the “Field Name” you want to add, the “Screen” you want the field to appear in, the mode of entering the data whether it’s a “Drop Down” selection or “Text or Number” and the if it’s a “Drop Down”, the options the employees can select from. Click “Save” once you have entered the details and the fields defined for a particular screen will then be added. The entry added will then be listed as shown in Figure 8.7. You may add a maximum of 10 fields per screen. Figure 8.7: Define Custom Fields You may also add multiple entries of custom fields. To delete a custom field click on the check box next to the Custom Field Name. It is also possible to delete multiple entries at the same time by clicking the check box entries you wish to delete and simply clicking “Delete”. 4.1.3 Data Import This feature allows the Admin to import data from a CSV file. To import data, go to PIM>> Configuration>> Data Import and the screen as shown in Figure 8.8 will appear. Figure 8.8: CSV Data Import 53 C opyright © 2013 OrangeHRM Inc. All Rights Reserved. The following guidelines are stated for a smooth flow of data import: Column order should not be changed: the column format of the CSV File should be the same as the “Sample CSV File”. Click on Sample CSV File: “Download” to view the column format. First Name and Last Name are compulsory All data fields should be in YYYY-MM-DD format: if you have configured the date format under “Localization” the date will then be converted from YYYY-MM-DD to the localized date format. If gender is specified, value should be either male or female Each import should be configured for 100 records or less – maximum of 100 records can be imported. Multiple import files may be required: you may carry out multiple imports but maximum of 100 records or less per data import. Sample CSV File: “Download” - to view the column format. To import data, select the file by clicking “Browse” and select the CSV file you want to upload. Click “Upload” once you have selected the file. The data will then be populated on the “Employee List” screen. 4.1.4 Reporting Methods The HR admin can define the reporting method between an ESS-Employee and an ESS-Supervisor. To define the reporting method, go to PIM>> Configuration>> Reporting Methods and click “Add”, the screen as shown in Figure 8.9 will appear. Figure 8.9: Add Reporting Method 54 C opyright © 2013 OrangeHRM Inc. All Rights Reserved. “Direct” and “Indirect” Reporting Methods are already pre-defined. To add, enter the reporting method “Name” and click “Save” The reporting method name will then be listed as shown in Figure 9.0. Figure 9.0: Reporting Method You may also add multiple entries of reporting methods. To delete a reporting method click on the check box next to the Reporting Method Name. It is also possible to delete multiple entries at the same time by clicking the check box entries you wish to delete and simply clicking “Delete”. 4.1.5 Termination Reasons This feature allows the HR Admin to define various termination reasons that is used by the company. To add a termination reason, go to PIM>>Configuration>>Termination Reason and click “Add”, the screen as shown in Figure 9.1 would appear. Click “Save” once the fields are added. Figure 9.1: Add Termination Reason The entry will then be added to the list as shown in Figure 9.2. 55 C opyright © 2013 OrangeHRM Inc. All Rights Reserved. Figure 9.2: Termination Reasons The following are default termination reasons: Contract not renewed Deceased Dismissed Laid-off Other Physically Disabled/Compensated Resigned Resigned-Company Requested Resigned-Self Proposed Retired You may also add multiple entries of termination reasons. To delete a termination reason click on the check box next to the “Termination Reason” name. It is also possible to delete multiple entries at the same time by clicking the check box entries you wish to delete and simply clicking “Delete”. 56 C opyright © 2013 OrangeHRM Inc. All Rights Reserved. 4.2 Employee List Lists all the employees entered and imported into the PIM. You can view/edit details of a particular employee by clicking on the employee’s name or ID. To view the employee list, go to PIM>>Employee List and the screen as shown Figure 9.3 would appear. Figure 9.3: Employee List You may add multiple entries of employees by clicking “Add” through the screen as shown in Figure 9.3 or you may go to PIM>> Add Employee to enter employee details. (See Figure 9.4). To delete an employee, click on the check box next to particular entry. It is also possible to delete multiple entries at the same time by clicking the check box entries you wish to delete and simply clicking “Delete”. 4.3 Add Employee A new employee is added to the system here. Other than importing details this feature allows to add an employee and define a very informative profile. To add an employee, go to PIM>>Add Employee and the screen as shown in Figure 9.4 will appear. 57 C opyright © 2013 OrangeHRM Inc. All Rights Reserved. Figure 9.4: Add Employee Enter the relevant fields and you may also add a picture of the employee. To add a picture, click on “Choose File” and select the picture from the relevant path and click “Open”. Employee code is generated automatically, but can be changed if required. You may also create a user login for the employee through this screen. Click “Save” once completed. *Note: Please note that the maximum file size of the picture cannot exceed 1 megabyte. 4.3.1 Employee’s Personal Details The following information needs to be obtained from each employee to create a complete employee profile that may be used by the company. These features are explained in details as we go on. 58 C opyright © 2013 OrangeHRM Inc. All Rights Reserved. Figure 9.5: Employee Details Column Personal Details One you have added and saved the employee name with his/her picture and the user logins, the screen as shown in Figure 9.6 will appear. You can also edit the personal details listed below by clicking “Edit” on the bottom of the screen. Clicks “save” once the fields are added. You can edit the following; * Code – Employee Id/No * Last Name * First Name * Middle Name * Nick Name * Nationality – Select from a list of pre-defined nationalities * Date of Birth * Other Id * Marital Status – Select from the drop down * Smoker – If the employee is a smoker click on the box * Gender – Click on the relevant gender * Driver’s License Number * License Expiry Date * Military Service 59 C opyright © 2013 OrangeHRM Inc. All Rights Reserved. Figure 9.6: Personal Details Click “Save” once completed. You may also upload any attachment that would support the details you have entered on the form by clicking “Add” under the “Attachment” and selecting a file from a relevant path and upload the following file by clicking “Upload” as shown in Figure 9.7. Figure 9.7: Attachments 60 C opyright © 2013 OrangeHRM Inc. All Rights Reserved. You may upload multiple entries of supporting attachments. You may edit the following attachments by clicking “Edit” on the right hand end of a particular entry as shown in Figure 9.8. To delete an attachment, click on the check box next to particular entry. It is also possible to delete multiple entries at the same time by clicking the check box entries you wish to delete and simply clicking “Delete”. Figure 9.8: Manage Attachments Contact Details Contact information of an employee can be entered from here. Click on “Contact Details” from the Employee Details column and the screen as shown in Figure 9.9 will appear. Figure 9.9: Contact Details 61 C opyright © 2013 OrangeHRM Inc. All Rights Reserved. Click “Edit” to enter the information. You can edit the following; 1. Country – Select the country from the drop down 2. Street 1 3. Street 2 4. City/Town 5. State/Province – If the country is United Sates you can select from the drop down or 6. you need to enter it manually 7. ZIP Code 8. Home Telephone 9. Mobile 10. Work Telephone 11. Work Email 12. Other Email Once you completed this form click “Save”. Emergency Contact Contact details of an employee which will be needed during an emergency can be entered here. Select “Emergency Contacts” from the Employee Details column and the screen as shown in Figure 10.0 will appear. Figure 10.0: Add Emergency Contact Enter the “Name” of the person you wish the company to contact in case of emergency, the “Relationship” of the employee to the contact person provided and a “Home Telephone” or “Mobile Number” the company can reach him/her. 62 C opyright © 2013 OrangeHRM Inc. All Rights Reserved. Click “Save” once the fields are added the emergency contact will be listed as shown in Figure 10.1. Figure 10.1: Assigned Emergency Contacts You may add multiple entries of emergency contact person. To delete an entry, click on the check box next to particular entry. It is also possible to delete multiple entries at the same time by clicking the check box entries you wish to delete and simply clicking “Delete”. You may also upload any attachment that would support the details you have entered on the form by clicking “Add” under the “Attachment” and selecting a file from a relevant path and upload the following file by clicking “Upload”. Dependents If an employee has any dependents you can enter them here. To add a dependent, click on “Dependents” from the Employee Details column and the screen as shown in Figure 10.2 will appear. Figure 10.2: Add Dependent 63 C opyright © 2013 OrangeHRM Inc. All Rights Reserved. Enter the “Name” of the dependent of the employee, the “Relationship” of the dependent to the employee and the “Date of Birth” of the dependent. Click “Save” once you have entered the following fields and the dependent will be listed as shown in Figure 10.3. Figure 10.3: Assigned Dependents You may add multiple entries of dependents. To delete an entry, click on the check box next to particular entry. It is also possible to delete multiple entries at the same time by clicking the check box entries you wish to delete and simply clicking “Delete”. You may also upload any attachment that would support the details you have entered on the form by clicking “Add” under the “Attachment” and selecting a file from a relevant path and upload the following file by clicking “Upload”. Immigration Immigration information can be entered here. To add immigration information of a particular employee, select “Immigration” from the Employee Details column and the screen as shown in Figure 10.4 will appear. 64 C opyright © 2013 OrangeHRM Inc. All Rights Reserved. Figure 10.4: Add Immigration Select the document type (Passport or Visa) you wish to add details of, the “Number” whether it is a passport number or a visa number, the “ Issued Date” , “Expiry Date”, the “Eligible Status” of his Passport/Visa and the “Eligible Review Date” as to when the eligibility status was reviewed. You may write a comment if necessary. Click “Save” once the fields are added and the following immigration documents will be listed as shown in Figure 10.5. Figure 10.5: Assigned Immigration Documents You may add multiple entries of immigration documents. To delete an entry, click on the check box next to particular entry. It is also possible to delete multiple entries at the same time by clicking the check box entries you wish to delete and simply clicking “Delete”. 65 C opyright © 2013 OrangeHRM Inc. All Rights Reserved. You may also upload any attachment that would support the details you have entered on the form by clicking “Add” under the “Attachment” and selecting a file from a relevant path and upload the following file by clicking “Upload”. Job You could describe the role of the employee in the company through this feature. To define the employee’s job, select “Job” from the Employee Details column and the screen as shown in Figure 10.6 will appear. Click “Edit” to enter the job details of the employee. Enter the following fields and click “Save” once done. Figure 10.6: Job You may also upload any attachment that would support the details you have entered on the form by clicking “Add” under the “Attachment” and selecting a file from a relevant path and upload the following file by clicking “Upload”. 66 C opyright © 2013 OrangeHRM Inc. All Rights Reserved. You may also terminate the employment of an employee by clicking “Terminate Employment” and the screen as shown in Figure 10.7 will appear. Figure 10.7: Terminate Employment You may select the employment “Termination Reason”, the “Date” (the current date is the default date) the employee was terminated and a note regarding the termination of employment. The termination reasons have been pre-defined under Configuration>> Termination Reasons. Click “Confirm” to confirm the termination. The employee name will no longer appear in the employee list database. Salary Information with regards to salary of an employee is entered here. To define the employee’s salary information, select “Salary” from the Employee Details column and the screen as shown in Figure 10.8 will appear. Figure 10.8: Add Salary Component 67 C opyright © 2013 OrangeHRM Inc. All Rights Reserved. Enter the following fields: Pay Grade: the pay grade category that the employee falls under (Pre-defined under Admin Module) Salary Component: The different compensation that an employee obtains from the company Pay Frequency: The frequency that an employee is paid his/her salary Currency: The currency that employee is paid in( pre-defined under Admin Module) Amount: based on an employee’s pay grade category, a minimum and maximum salary amount is specified (Pre-defined under Admin Module) and cannot be less than or greater than the specified amount. Comment : you may enter any important comment regarding the salary information Direct Deposit If salaries of employees are to be transferred or deposited into accounts, those details can be specified here (as shown in Figure 10.9). Figure 10.9: Add Direct Deposit Details Click on the “Add Direct Deposit Details” check box and enter the following details: o Account Number: o Account Type: Savings/ Checking/Others. If “Others” is selected, you need to specify other account types that an employee may have. o Routing Number: routing number of the checks. o Amount: the amount to be deposited. 68 C opyright © 2013 OrangeHRM Inc. All Rights Reserved. Once you have entered the following details, click “Save” and the following salary components with the direct deposit details will be listed as shown in Figure 11.0. Figure 11.0: Assigned Salary Components You may enter multiple salary components. . To delete an entry, click on the check box next to particular entry. It is also possible to delete multiple entries at the same time by clicking the check box entries you wish to delete and simply clicking “Delete”. You may also upload any attachment that would support the details you have entered on the form by clicking “Add” under the “Attachment” and selecting a file from a relevant path and upload the following file by clicking “Upload”. Report To Here you can define to whom the particular employee will report-to or who his subordinates are. Once this is done the particular supervisor will be able to view the following when he logs in; PIM of the particular employee Leave Summary of his subordinates Leave List of his subordinates Attendance Report of his subordinates Time Sheets of his subordinates You can set an employee to report-to more than one supervisor and a supervisor can have many subordinates who report to him. To define the supervisors and the subordinates of a particular employee, select “Report to” from the Employee Details column and the screen as shown in Figure 11.1 will appear. 69 C opyright © 2013 OrangeHRM Inc. All Rights Reserved. Figure 11.1: Report-to To assign a supervisor/subordinate for a particular employee, click “Add” under “Assigned Supervisors” or “Assigned Subordinate” and the screen as shown in Figure 11.2 and Figure 11.3 will appear respectively. Figure 11.2: Add Supervisor Figure 11.3: Add Subordinate 70 C opyright © 2013 OrangeHRM Inc. All Rights Reserved. Enter the “Name” of the supervisor/subordinate and select from the “Reporting Method” selections. Click “Save” once the fields are entered. Once the supervisor/subordinates have been defined they will be listed as shown in Figure 11.4. Figure 11.4: Assigned Supervisors/Assigned Subordinates You may enter multiple entries of supervisors or subordinates for a particular employee. To delete an entry, click on the check box next to particular entry. It is also possible to delete multiple entries at the same time by clicking the check box entries you wish to delete and simply clicking “Delete”. You may also upload any attachment that would support the details you have entered on the form by clicking “Add” under the “Attachment” and selecting a file from a relevant path and upload the following file by clicking “Upload”. Qualifications Work Experience Previous work experiences of an employee can be entered here. To enter employee’s previous work experience, select “Qualification” under the Employee Details column and click “Add” under “Work Experience” and the screen as shown in Figure 11.5 will appear. 71 C opyright © 2013 OrangeHRM Inc. All Rights Reserved. Figure 11.5: Add Work Experience Click “Save” once all the fields are entered and the particular work experience will be listed as shown in Figure 11.6. Figure 11.6: Work Experience You may enter multiple entries of work experience. To delete an entry, click on the check box next to particular entry. It is also possible to delete multiple entries at the same time by clicking the check box entries you wish to delete and simply clicking “Delete”. Education Education details of an employee can be entered here. To enter employee’s education background, select “Qualification” under the Employee Details column and click “Add” under “Education” and the screen as shown in Figure 11.7 will appear. 72 C opyright © 2013 OrangeHRM Inc. All Rights Reserved. Figure 11.7: Add Education Click “Save” once all the fields are entered and the particular work experience will be listed as shown in Figure 11.8. Figure 11.8: Education You may enter multiple entries of education. To delete an entry, click on the check box next to particular entry. It is also possible to delete multiple entries at the same time by clicking the check box entries you wish to delete and simply clicking “Delete”. Skills If an employee has any special talents or skills they can be entered here. To enter an employee’s skills, select “Qualification” under the Employee Details column and click “Add” under “Skills” and the screen as shown in Figure 11.9 will appear. 73 C opyright © 2013 OrangeHRM Inc. All Rights Reserved. Figure 11.9: Add Skill Click “Save” once all the fields are entered and the particular work experience will be listed as shown in Figure 12.0. Figure 12.0: Skills You may enter multiple entries of skills. To delete an entry, click on the check box next to particular entry. It is also possible to delete multiple entries at the same time by clicking the check box entries you wish to delete and simply clicking “Delete”. Languages You can enter the various languages that your employees are competent in, with the level of competency. To enter an employee’s language of competency, select “Qualification” under the Employee Details column and click “Add” under “Language” and the screen as shown in Figure 12.1 will appear. 74 C opyright © 2013 OrangeHRM Inc. All Rights Reserved. Figure 12.1: Add Language Click “Save” once all the fields are entered and the particular work experience will be listed as shown in Figure 12.2. Figure 12.2: Languages You may enter multiple entries of languages. To delete an entry, click on the check box next to particular entry. It is also possible to delete multiple entries at the same time by clicking the check box entries you wish to delete and simply clicking “Delete”. License Here you can enter the licenses an employee can have. To enter an employee’s licenses, select “Qualification” under the Employee Details column and click “Add” under “License” and the screen as shown in Figure 12.3 will appear. 75 C opyright © 2013 OrangeHRM Inc. All Rights Reserved. Figure 12.3: Add License Click “Save” once all the fields are entered and the particular work experience will be listed as shown in Figure 12.4. Figure 12.4: Licenses You may enter multiple entries of licenses. To delete an entry, click on the check box next to particular entry. It is also possible to delete multiple entries at the same time by clicking the check box entries you wish to delete and simply clicking “Delete”. Attachments Supporting documents of a particular employee that might be needed by the management can be attached here. For example you can attach documents like personal profile, certificates or the resume of an employee. Please note that each document cannot exceed 1 megabyte, but you can attach more than one document. To attach click “Browse” select the file and click Upload” to upload it, as shown in Figure 12.5 76 C opyright © 2013 OrangeHRM Inc. All Rights Reserved. Figure 12.5: Add Attachments Once you have uploaded the file, the file will be listed as shown in Figure 12.6. Figure 12.6: Manage Attachments To delete an entry click on the check box next to the particular entry and click “Delete”. Multiple selections can be deleted simultaneously. Membership If employees are members of any committee, institute etc. those details can be entered here. To enter employee’s membership details, select “Membership” from the Employee Details column and click “Add” and the screen as shown in Figure 12.7 will appear. 77 C opyright © 2013 OrangeHRM Inc. All Rights Reserved. Figure 12.7: Add Membership Details Click “Save” once all the fields are entered and the particular work experience will be listed as shown in Figure 12.8. Figure 12.8: Assigned Memberships You may enter multiple entries of memberships. To delete an entry, click on the check box next to particular entry. It is also possible to delete multiple entries at the same time by clicking the check box entries you wish to delete and simply clicking “Delete”. You may also upload any attachment that would support the details you have entered on the form by clicking “Add” under the “Attachment” and selecting a file from a relevant path and upload the following file by clicking “Upload”. 78 C opyright © 2013 OrangeHRM Inc. All Rights Reserved. 5.0 Leave Module A comprehensive leave management module with extensive possibilities of defining leave types, company holidays, applying for and assigning of leave for the employees of the company. It caters for all application and approval processes and is able to display information on leave entitlement, balance, usage history etc. What is Advanced Leave? The Advanced Leave module (available in OrangeHRM Live) enables setting up of custom leave periods, country-based leave types, application restrictions, leave accrual rules and carry forward rules. The module also features a leave calendar which can be used by supervisors, HR administrators and employees to plan leave. A reporting feature is also included. Key Features: Set up leave types with hire-date based leave periods & custom leave periods. Set up leave rules specific to each country or region. You can have Global and Regional administrators Configure apply-restriction criteria for each leave type. Set up annual, monthly and quarterly accrual rules based on Job Title, Employment Status and Years of Service. ● Set up leave carry forward rules with expiration dates for leave carried forward. ● Leave calendar with detailed view of leave statuses. ● Generate Reports to view the Leave Entitlements and Usage Reports of employees within any given leave period. ● ● ● ● ● How Do Different Users Utilize Advanced Leave? The functionality of the Advanced Leave Module differs depending on the rights of the user. Global Admin can: ● ● ● ● ● View and assign leave entitlements for each leave type for all employees in all the locations/regions of the organization. Configure leave periods, leave types, work week and holidays Assign Leave for any employee See scheduled leave and taken leave for any employee Generate leave entitlement reports and usage reports 79 C opyright © 2013 OrangeHRM Inc. All Rights Reserved. ● ● If an employee has been assigned global admin user role, then he/she will see the ‘Apply’ ‘My Leave’, ‘My Entitlements’ and ‘My Leave Entitlements and Usage Report’ options along with the rest of the features. View the leave calendar which will display all types of leaves for a month for all or individual departments. Regional Admin can: ● Perform all actions as the global admin but is limited within the assigned region(s). (Please see Section 3.1 for more details on Regional Admin) ESS-Supervisor can: ● ● ● ● ● ● View his Personal and Employee (subordinate) Leave Entitlements and Usage Reports View Leave List Apply Leave Assign Leave for his/her subordinates Approve/Reject Leave for his/her subordinates View leave calendar which will display all types of leaves for a given month for all subordinates or for his division. ESS-Employee can: ● ● ● ● 5.1 View his Leave Entitlements and Usage Report. View his detailed leave application Apply for leave View his leave calendar which will display all his leave during a particular month. Configure The HR admin is able to configure the following that will be reflected throughout the Leave Module as shown in Figure 12.9. 80 C opyright © 2013 OrangeHRM Inc. All Rights Reserved. Figure 12.9: Configure Leave Period Leave Types Work Week Holidays 5.1.1 Leave Period The HR Admin and other users with admin rights are able to define the leave period that will be used when applying/assigning leave. To define a leave period, go to Leave>> Configure>> Leave Period and a screen as shown in Figure 13.0 will appear. Click “Edit” to enter fields. Figure 13.0: Define Leave Period You can define the “Start Month” and “Start Date” from the drop down menus. The system will automatically set the “End Date” as to have a one-calendar year leave period. Click “Save” and the current leave period will be stated below the “End Date”. This will be the default leave period. 81 C opyright © 2013 OrangeHRM Inc. All Rights Reserved. 5.1.2 Leave Types The administrator and other users with admin rights can define leave types used within the organization. Leave types can be defined with country-based leave rules, custom/hire-date based leave periods, applyrestriction rules, leave accrual rules and leave carry forward rules. To add leave types, go to Leave>> Configure>> Leave Types and the screen as shown in Figure 13.1 will appear. Figure 13.1: Add Leave Type Enter the leave type ‘Name’ and select the ‘Country’ from the drop down selection in which the following leave type applies to. By clicking the “Is Entitlement Situational” option, that leave type will be excluded from reports unless there is some activity. e.g. maternity leave, jury duty leave. Click Save to create the leave type. Once a leave type is added, it will be listed as shown in Figure 13.2. You may add multiple entries of leave types. You may view/edit leave type by clicking on the “Leave Type” name. To delete a leave type, click on the check box next to the “Leave Type” name. It is also possible to delete multiple entries at the same time by clicking the check box entries you wish to delete and simply clicking “Delete”. 82 C opyright © 2013 OrangeHRM Inc. All Rights Reserved. Figure 13.2: Leave Types List To configure the leave rules, click on “Leave Rule”, and a window as shown in Figure 13.3 should appear. Figure 13.3: Configure Leave Rules General The following rules can be selected and be applied for the leave type and the country defined: ● ● ● ● ● ● Leave Period can be selected from the dropdown menu: ○ Default - default leave period that was set in section 5.1.1. ○ Hire Date Based Leave Period - leave period calculated from the date that employees were hired. Duration can also be selected (Figure 13.4). ○ Custom Leave Period - leave period can be manually set by selecting a ‘Start Month’, ‘Start Date’ and ‘Duration’ (Figure 13.5). Admin or Supervisor can assign leave to employees. Employee can apply for this leave. Admin can add and adjust leave entitlements. Enable leave accrue. Enable leave carry forward. 83 C opyright © 2013 OrangeHRM Inc. All Rights Reserved. Figure 13.4: Hire Date Based Leave Period Figure 13.5: Custom Leave Period Click on the checkbox of the particular leave rule to apply. Note: “Leave Accrual” and “Leave Carry Forward” rules can only be configured by ticking the appropriate boxes in the “General” rule window, and then clicking “Save”. 84 C opyright © 2013 OrangeHRM Inc. All Rights Reserved. Who Can Apply The administrator can define the employee eligibility of the leave type defined based on employees’: ● Job Titles - Select the job titles of the employees who will be able to apply for the defined leave, as shown in Figure 13.6. Figure 13.6 Leave Eligibility based on Job Title ● Employment Status - Select the employment statuses of the employees who will be able to apply for the defined leave, as shown in Figure 13.7. Figure 13.7: Leave Eligibility based on Employment Status ● Years of Service - Define the years of service to be eligible to apply for the defined leave, as shown in Figure 13.8. 85 C opyright © 2013 OrangeHRM Inc. All Rights Reserved. Figure 13.8: Leave Eligibility based on Years of Service Click “Save” once you have configured the leave eligibility. Apply Restrictions The administrator can set up employee ‘Apply Restrictions’ for the following leave type defined as shown in Figure 13.9. Figure 13.9: Apply Restriction 86 C opyright © 2013 OrangeHRM Inc. All Rights Reserved. Apply Restriction Rules: 1. Don't allow more than current leave net balance. The administrator can set this apply restriction for the following leave type and restrict employee from applying for more than the current leave net balance. It is thus calculated as Net Balance = [Entitlement + Brought Forward] - [Taken + Scheduled + Carried Forward + Pending Approval] Example: On Nov 06, 2012 John applied for 11 days annual leave. The annual leave entitlement for John is 20 days for leave period Jan-01-2012 to Dec-31-2012. John has already taken 5 days of his annual leave where he also has 3days pending approval annual leave, and 2 days scheduled leave. He has brought forward 7 days annual leave from leave period Jan-01-2011 to Dec-31-2011 to the current year (Jan-01-2012 to Dec-31-2012). Leave carry forward rule is set (See Figure) where maximum number of leave to be carried forward to the next leave period (Jan-01-2013 to Dec-31-2013) is 5 days where leave carry forward date is Dec 31st of the current. Leave Carried Forward would still be unknown until it is calculated on Dec 31st and remains “0” days. To know if John is eligible to apply for 6 days annual leave: Net balance = [20+3]-[5+7+3+3] Net Balance = 23-18 Net Balance = 5 Since the net balance for the current year is 5 days, and John has applied for 11 days annual leave. He is restricted from applying for 11 days which exceed his current net balance. The following error message would appear if the employee applies for leave outside the net balance (Figure 14.0). 87 C opyright © 2013 OrangeHRM Inc. All Rights Reserved. Figure 14.0: Net Balance Apply Restriction 2. Don’t allow partial day leave Administrators can also set this apply restriction to restrict employee from applying for the defined leave type as a partial day leave. When employees applies for a partial day leave via Leave>>Apply Leave the following error message would appear as shown in Figure 14.1. Figure 14.1: Do not allow partial leave/half day leave 88 C opyright © 2013 OrangeHRM Inc. All Rights Reserved. 3. Don't allow if employee answer NO to below question. Show the error message that comes afterwards. Question: Error Message: This apply restriction can be set when employees apply for the leave type defined. Follow up questions can be applied when employees apply for the defined leave type and if employee answers “NO” for the question defined, employee would receive an error message that is also set up by the administrator. Enter Question and Error Message in their respective boxes as shown in Figure 14.2. Figure 14.2: Question & Error Message When employee applies for the leave type defined via Leave>>Apply Leave the screen as shown in Figure 14.3 will appear. Figure 14.3: Apply Restriction Question If the employee selects “No” and clicks “Save”, the error message as shown in Figure 14.4 will appear. 89 C opyright © 2013 OrangeHRM Inc. All Rights Reserved. Figure 14.4: Apply Restriction Error Message 4. Don’t allow if service period less than ( ) months The administrator can set this apply restriction to restrict employees from applying for this leave if they have only worked for the organization outside the service period restriction defined. (See employee joined date via PIM>>Click on Employee>> Job>>Joined Date). If the defined maximum period of service is 6months, and when the employee’s service period is less than 6months from the time he/she has joined the company and applies for leave via Leave>> Apply Leave the following error message as shown in Figure 14.5 will appear. Figure 14.5: Service Period Eligibility 90 C opyright © 2013 OrangeHRM Inc. All Rights Reserved. 5. Don’t allow if number of consecutive leave exceeds ( ) days The administrator can set this apply restriction to restrict employees from applying for this leave if the leave request is for a specific number of consecutive days defined. If the maximum number of consecutive leave days is only set to 2 days and if the employee applies for 3 consecutive days leave the error message as shown in Figure 14.6 will appear. Figure 14.6: Apply restriction due to exceeding number of consecutive leave 6. Don't allow if no child found aged less than ( ) months The administrator can set this apply restriction to restrict employees from applying for this leave if the system finds no dependents (child) under PIM>> Employee List>> Click on Employee Name>>Dependents. If the age limit of a dependent (child) is defined as less than a certain period (2 months for example), it further restricts employee from applying for the defined leave if in case the employee’s dependent’s age (child) is over the limit defined and the error message as shown in Figure 14.7 would appear. 91 C opyright © 2013 OrangeHRM Inc. All Rights Reserved. Figure 14.7: Dependent’s (Child) Age limit apply restriction Click “Save” once you have configured the Apply Restriction for the leave type defined. Accrual Rules The administrator can set up accrual rules for the leave type defined. To configure leave accrual rules, click on “Accrual Leave” and the screen as shown in Figure 14.8 will appear. Figure 14.8: Configuring Accrual Rules Select the accrual frequency from the drop down selection 92 C opyright © 2013 OrangeHRM Inc. All Rights Reserved. Annually 1. Accrue Every – drop down selection in ‘years’, depends on the ‘Leave Period’ selected under the ‘General’ tab. If you select the: Default leave period: Accrue Every 1 year (Figure 14.9.1) Figure 14.9.1: Accrue Every (for Default Leave Period) Hire Date Based leave period OR Custom leave period: The following options are available to select depending on the duration of the leave period (Figure 14.9.2). Leave Period Duration (Years) 1 2 Options to accrue every given number of years 1 - Accrues on each year 1 - Accrues on each year 2 - Accrues on year 1 of each leave period 3 1 - Accrues on each year of the leave period 3 - Accrues on year 1 of each leave period 4 1 - Accrues on each year of the leave period 2 - Accrues on year 1 and year 3 of each leave period 4 - Accrues on year 1 of each leave period 5 1 - Accrues on each year of the leave period 5 - Accrues on year 1 of each leave period Figure 14.9.2: Accrue Every (for Hire Date Based Leave Period & Custom Leave Period) 2. Days of Crediting to Employee – Default leave period: can be manually entered (MM/DD format), as shown in Figure 14.9.3. 93 C opyright © 2013 OrangeHRM Inc. All Rights Reserved. Figure 14.9.3: Day of Crediting to Employee (Default Leave Period) Hire Date Based leave period: Default day of crediting will be the employees joined date anniversary (hired date) as shown in Figure 14.9.4. This value cannot be changed. Figure 14.9.4: Day of Crediting to Employee (Hire Date Based Leave Period) Custom leave period: Default day of crediting will be the start date of the leave period (Month and date) as shown in Figure 14.9.5. This value can be changed. Figure 14.9.5: Day of Crediting to Employee (Custom Leave Period) Monthly 1. Accrue Every – allows for the admin to define to accrue of leave every selected number of months. Appears in a drop down selection in months, as shown in Figure 14.9.6. 94 C opyright © 2013 OrangeHRM Inc. All Rights Reserved. Figure 14.9.6: Accrue Every (Monthly) 2. Day of Crediting to Employee – the options include; First Day of Month, Last Day of Month, Hire Date and Hire Date Monthly Anniversary (if leave type's leave period is Hire Date based), as shown in Figure 14.9.7. Figure 14.9.7: Day of Crediting to Employee (Monthly) Leave Entitlements per Employee Group This section defines how a set of employees are grouped, and the number of days of leave this group accrues per defined leave frequency. It is possible to define any number of employee groups. The groups are applied in the order they are defined. An employee can only belong to one group (the first one that the employee is selected into) The following rules and settings can be configured per group (Figure 14.9.8): o Group Name o Number of days of Leave Accrued: System accrues the specified number of days of leave to employees who are selected to this group, per defined frequency, on the defined date. o Accrue Entitlements Up To a Maximum of [ ] Days 95 C opyright © 2013 OrangeHRM Inc. All Rights Reserved. Figure 14.9.8: Employee Groups Employees get selected to a group based on the following filters: o Job Title (Figure 14.9.9) OR o Employment Status (Figure 14.9.10) OR o Years of Service (Figure 14.9.11) Figure 14.9.9: Job Titles Figure 14.9.10: Employment Status Figure 14.9.11: Years of Service Enter the following fields and click “Save”. 96 C opyright © 2013 OrangeHRM Inc. All Rights Reserved. Carry Forward Rules The administrator can set up carry forward rules for the leave type defined. To configure leave carry forward rules, click on “Carry Forward Rules” and the screen as shown in Figure 15.0 will appear. Figure 15.0: Configuring Carry Forward Rules Enter the following fields: 1. Expire After: duration after which carried forward leave will expire. Options include: a. Months b. Weeks c. Days 2. Maximum number of leave to carry forward: ○ Specify the maximum number (enter number of leave on the blank box) ○ All remaining days Click “Save” once done. 5.1.3 Work Week The administrator and any other users with admin rights will be able to define the work weeks for all employees based in different locations/countries. To define work week, go to Leave>> Configure>> Work Week and the screen as shown in Figure 15.1 will appear. Click “Edit” to define the work week. Select the country where the work week applies to from the drop down selection. In this feature, you can define the days that the company in a particular country operates whether they are: 1. Full Day 2. Half Day 3. Non-Working Day 97 C opyright © 2013 OrangeHRM Inc. All Rights Reserved. Figure 15.1: Configuring Work Week Click “Save” once you have configured the work week settings. 5.1.4 Holidays The administrator and other users with admin rights can define holidays that will be applicable to the companies located in different countries and will be taken into consideration while calculating leave duration. To define “Holidays”, go to Leave>> Configure>> Holidays and click “Add”, a screen as shown in Figure 15.2.1 will appear. Figure 15.2.1: Add Holiday 98 C opyright © 2013 OrangeHRM Inc. All Rights Reserved. Enter the “Name of the Holiday”, the “Date” it will occur and checking the “Repeats Annually” will mean that the holiday will occur on the same date in the following years and select whether the holiday stated will be considered as a “Full Day /Half Day” holiday. Select the country where the holiday is applicable for, the company locations would be populated, where the administrator can further select the company locations the holiday is applicable to. Note: Locations need to be defined first under Admin>>Organization>>Locations. Click “Save” once you have defined the holiday. Once a holiday is added, it will be listed as shown in Figure 15.2.2. Figure 15.2.2: List of Holidays You also have the option to also “Search” for the holidays that are occurring within particular period as well as the country and company locations associated with that country. You may add multiple entries of holidays. You may view/edit holidays by clicking on the “Holiday” name. To delete a holiday, click on the check box next to the “Holiday” name. It is also possible to delete multiple entries at the same time by clicking the check box entries you wish to delete and simply clicking “Delete”. 99 C opyright © 2013 OrangeHRM Inc. All Rights Reserved. 5.2 Leave Entitlements This feature allows users to add (Admin Users only) and view employee leave entitlements. The menu will show data depending on the user type: Admin: will see “Add Entitlements” and “Employee Entitlements” and has full rights. ESS User-Supervisor: will see “Employee Entitlements” (subordinates only) and “My Entitlements” and has viewing rights only. ESS User: will see “My Entitlements” and has viewing rights only. 5.2.1 HR Admin View of Leave Entitlements This feature enables the HR Admin and other users with admin rights to Add and View Leave Entitlements for each leave type for all employees. To add an entitlement to employees, click on Leave>>Entitlements>>Add Entitlements and the screen shown in Figure 15.3 will appear. Figure 15.3: Add Leave Entitlement The HR Admin can select the employee to assign leave to by typing his/her name in the “Employee” textbox. The “Leave Type” (defined under Configure>>Leave Types) can then be selected from the dropdown menu. 100 C opyright © 2013 OrangeHRM Inc. All Rights Reserved. The “Leave Period” can then be selected. The number of days to assign to that employee can then be given in the “Entitlement” textbox, as shown in Figure 15.4. Figure 15.4: Add Leave Entitlement to an employee If the Admin selects “Add to Multiple Employees”, then the “Employee” field gets replaced with a “Location” and “Sub Unit” field. The Admin can now select a specific location and a sub-unit, and assign a leave entitlement for a certain “Leave Type” to all employees in that location and sub-unit by clicking “Save”, as shown in Figure 15.5. Figure 15.5: Add Leave Entitlement to Employees by Location and Sub-Unit 101 C opyright © 2013 OrangeHRM Inc. All Rights Reserved. To view an employee’s leave entitlement, the HR Admin can click on Leave>> Entitlements >> Employee Entitlements as shown in Figure 15.6. The Admin can type in the Employee name and select the “Leave Type” from the drop down. Figure 15.6: Search Employee Entitlements Clicking “Search” will pull up all the leave that that particular employee has been entitled, as shown in Figure 15.7. Clicking “Add” will bring up the “Add Leave Entitlement” window (as shown in Figure 15.3). To delete an entry, click on the check box next to particular entry. It is also possible to delete multiple entries at the same time by clicking the check box entries you wish to delete and simply clicking “Delete”. Figure 15.7: View Employee Entitlement To edit the leave entitlement, click on the number of days entitled under “Days”, or the date under “Valid From” or “Valid To” and the window as shown in Figure 15.8 will appear. The Admin will only be able to change the “Leave Period” and the “Entitlement”. Click “Save” once the values have been changed. 102 C opyright © 2013 OrangeHRM Inc. All Rights Reserved. Figure 15.8: Edit Employee Entitlement 5.2.2 ESS Supervisor View of Leave Entitlements An ESS –Supervisor is only able to “View” his own leave entitlement (Leave>> Entitlements >> My Entitlements) and his subordinates leave entitlements (Leave>>Entitlements>>Employee Entitlements) when he/she logs in (Figure 15.9). *Note: An HR Admin will enter the leave entitlement on behalf of an ESS-Supervisor and an ESS-Employee. Figure 15.9: ESS-Supervisor Entitlements menu To view his/her own leave entitlement, the ESS Supervisor has to click on Leave>> Entitlements >> My Entitlements. He/she can then search by “Leave Type”. Clicking “Search” will show all available leave entitlements as shown in Figure 16.0. 103 C opyright © 2013 OrangeHRM Inc. All Rights Reserved. Figure 16.0: ESS-Supervisor- My Entitlements To view a subordinates leave entitlement, the Supervisor has to click on Leave>>Entitlements >>Employee Entitlements and then type in the name of the subordinate under “Employee”, and select the “Leave Type”, as shown in Figure 16.1. Figure 16.1: ESS-Supervisor - Subordinate Entitlement Search Clicking “Search” will then show the leave that has been entitled to that subordinate, as shown in Figure 16.2. 104 C opyright © 2013 OrangeHRM Inc. All Rights Reserved. Figure 16.2: ESS-Supervisor View of Subordinate Entitlement 5.2.3 ESS-Employee View of Leave Entitlements An ESS-Employee is only able to “View” his leave entitlement when he/she logs in. To view, go to Leave>> Entitlements>> My Entitlements and a screen as shown in Figure 16.3 will appear. Figure 16.3: ESS-Employee View of Leave Entitlements 105 C opyright © 2013 OrangeHRM Inc. All Rights Reserved. 5.3 Reports This feature allows users to generate Leave Entitlements and Usage Reports of employees. The HR Admin can select between two main criteria when generating reports: “Leave Type” and “Employee”. (Figure 16.2). Figure 16.2: Generate Reports For If the HR Admin selects “Leave Type”, he will then be presented with the following fields to select from (Figure 16.3). Figure 16.3: Leave Type Report Generation view Once the appropriate fields are selected, the Admin can then click “View” and will be presented with the leave report of all employees based on the previously selected criteria (Figure 16.4). 106 C opyright © 2013 OrangeHRM Inc. All Rights Reserved. Figure 16.4: Employee Leave Report If the “Employee” option is selected under “Generate For” (Figure 16.2) the HR Admin can generate the leave entitlement and usage report for any employee. The name of the employee will need to be inserted into the “Employee” filed, and a report will be generated for that employee (as shown in Figure 16.5). Figure 16.5: Leave Entitlements and Usage Report of a single employee The Admin user can see view the Leave Entitlements and Usage Report of all employees, as well as himself/ herself if he/she is also an employee. ESS –Supervisor users can view the Leave Entitlements and Usage Reports of only his/her subordinates, as well as for themselves (Leave>>Reports >> My Leave Entitlements and Usage Report). 107 C opyright © 2013 OrangeHRM Inc. All Rights Reserved. If an employee is an Admin user or ESS Supervisor or then he/she will see an extra menu item under Leave>>Reports called My Leave Entitlements and Usage Report (Figure 16.6). Figure 16.6: Admin Employee and ESS Supervisor menu view If the user is an ESS User, then he will only see the “My Leave Entitlements and Usage Report” option under Leave>>Reports, as shown in Figure 16.7. Figure 16.7: ESS User menu view When clicked on, the following screen will appear as shown in Figure 16.8. Figure 16.8: My Leave Entitlements and Usage Report 108 C opyright © 2013 OrangeHRM Inc. All Rights Reserved. 5.4 Leave List The leave list is available to the Admin and ESS – Supervisors. It shows the entire leave request by the employees. Global Admin: can see and manage leave application and for all employees based in all the locations/regions of the organization. Regional Admin: can see and manage leave application for all employees based in all the assigned locations/regions of the organization. ESS-Supervisor: can see and manage leave application of his/her subordinates. ESS-Employee: has no access to this feature. 5.4.1 View/Action Leave Request When an employee applies for a leave his Supervisor (and Admin as well, if configured under Notifications) will receive a mail with a link to the leave list and upon clicking on that link either the Supervisor or the Admin can approve, reject or cancel the leave. Alternatively, an HR Admin or an ESS-Supervisor may also log into the system and action the following leave requests. To view “Leave List”, go to Leave>>Leave List and the screen as shown in Figure 16.9 will appear. You may also action the following leave request by selecting an action from the “Action” drop down menu. Figure 16.9: Admin/ESS Supervisor Leave List Click “Save” once an action has been selected. The following leave request in which an action has been applied will no longer appear in the leave list as shown in Figure 17.0. A mail will be then sent to the employee and he can view the status of his leave application. 109 C opyright © 2013 OrangeHRM Inc. All Rights Reserved. Figure 17.0: Leave Status Notified to Employee. Alternatively, you may action the following leave request by selecting an action from the drop down menu of “Actions” or you may click the “Date” / “Status” to view the a detailed information of the leave request and action them individually as shown in Figure 17.1. Select necessary actions to the leave request and click “Save” Figure 17.1: Leave Request in Detail Once the necessary actions have been made to the leave requests, they will no longer appear in the leave list. A mail will be then sent to the employee and he can view the status of his leave application. 5.4.2 Search Leave List You can view leave using the search toolbar as shown in Figure 17.2 by: Specifying the period using the “From” and “To” dates Selecting the status or combination of status of the following: o Rejected o Canceled o Pending Approval (selected by default) 110 C opyright © 2013 OrangeHRM Inc. All Rights Reserved. o Approved o Taken Search for the employee Search by Sub-Unit You may also include past employees with your search. Location (specified under Admin>>Organization>>Locations). Figure 17.2: Leave List Search 5.4.3 Export to CSV The admin/ESS Supervisor is also able to export the leave list to a CSV file by clicking on either the “Export Summary to CSV” button or “Export Detail to CSV” (as shown in Figure 17.3). Figure 17.3: Export to CSV 111 C opyright © 2013 OrangeHRM Inc. All Rights Reserved. By clicking on “Export Summary to CSV”, the following information will be captured in a CSV file: ● Date ● Employee Name (Full Name) ● Leave Type ● Number of Days ● Status ● Comments By clicking on “Export Detail to CSV”, the following information will be captured in a CSV file: ● Date ● Employee Name ● Leave Type ● Status ● Duration(hours) ● Comments 5.5 Assign Leave This feature is only available to an HR Admin (Global and Regional) and ESS-Supervisor. To assign leave, go to Leave>> Assign Leave and the screen as shown in Figure 17.4 will appear. Global Admin: can assign leave for all employees based in all the locations/regions of the organization. Regional Admin: can see assign leave for all employees based in all the assigned locations/regions of the organization. ESS-Supervisor: can see assign leave for his/her subordinates. ESS-Employee: has no access to this feature. Figure 17.4: Assign Leave 112 C opyright © 2013 OrangeHRM Inc. All Rights Reserved. Select the name of the employee, you can do this by entering the first letter of his name and you will see list of employees with that letter and you can select the relevant employee, then select the leave type, the dates in which the leave is to be taken and you can add a comment if necessary. The system also shows the remaining leave balance for the specific leave type. Click “Assign” when you are done and the employee will be notified via e-mail. The leave balance will also be deducted. When the employee logs in to the system and checks his/her leave by going to Leave>> My Leave, he/she will see the leave that was assigned to him/her as shown in Figure 17.5. Figure 17.5: ESS-Employee “My Leave” View 5.6 My Leave This feature item is available for ESS-Employee and ESS Supervisors. This is also available to employees in the system that have been assigned Global Admin and Regional Admin user role. Personal leave details can be viewed here. To view, go to Leave>> My Leave and the screen as shown in Figure 17.6 will appear. Figure 17.6: My Leave View 113 C opyright © 2013 OrangeHRM Inc. All Rights Reserved. An employee can choose to cancel a pending approval leave or a scheduled leave however he cannot make any changes to any other leave status. He/she can view complete details of leaves by clicking on the “Date” or “Status”. To cancel a leave request click on the “Actions” drop down, select “Cancel” and click “Save”. If the email notifications functionality has been configured (see section 3.9 for more information), email notifications on leave application, cancellations, rejections and approvals will be sent to the employee who has applied for leave, as well as to the Admin Users who have subscribed for the leave management mail notifications. 5.7 Apply All users (except for the Admin unless he is an employee) can apply for leave using this feature. To apply for leave go to Leave>>Apply and the screen shown as shown in Figure 17.7 will appear. Figure 17.7: Apply Leave Select the leave type from the drop down menu and the “From Date” and “To Date” you require the leave, once you select the dates you will see the “From Time”, “To Time” and “Duration”. You can enter the times and the “Duration” would automatically populate. The “Leave Balance” would also appear indicating how may leave balance you have for the particular leave type. You may also add a comment on why you need the leave. 114 C opyright © 2013 OrangeHRM Inc. All Rights Reserved. Once you have filled in the details click “Apply” and a mail will be sent to the Supervisor (as well as the Admin, if configured under Notifications) for approval. The status of your leave application can be seen in “My Leave” as shown in Figure 17.8. Figure 17.8: My Leave View 5.8 Leave Calendar The administrators, ESS-Employee and ESS-Supervisor can have access to the leave calendar. To view the leave calendar go to Leave>> Leave Calendar and the screen as shown in Figure 17.9 will appear. Global Admin: can view the monthly leave calendar of all employees based in all the locations/regions of the organization. Regional Admin: can view the monthly leave calendar of all employees based in all the assigned locations/regions of the organization. ESS-Supervisor: can view his personal monthly leave calendar and of his/her subordinates. ESS-Employee: can view his personal monthly leave calendar. *Note: Leave calendars can be generated based on Monthly or Yearly views. The default view is set to Monthly. 115 C opyright © 2013 OrangeHRM Inc. All Rights Reserved. Figure 17.9: Leave Calendar (Monthly view) Legend colors have been used to signify different leave types and their statuses. An administrator whether global admin or regional admin can change the legend colors of leave types by clicking “Change Legend Colors” and the screen as shown in Figure 18.0 will appear. Once the changes have been made, click “Save”. 116 C opyright © 2013 OrangeHRM Inc. All Rights Reserved. Figure 18.0: Change Legends Colors 5.8.1 Leave Calendar for Admins Figure 18.1 below shows the search criteria which could be used by administrators to view a monthly leave calendar. Figure 18.1: Leave Calendar search criteria (Monthly) ● Employee Name: The administrator and the supervisor can view the leave calendar of a particular employee by typing the employee’s name. ● Sub-Unit: An administrator and supervisor can view the leave details of employees within a sub-unit. 117 C opyright © 2013 OrangeHRM Inc. All Rights Reserved. ● Year/Month: to view leave details of an employee within a particular time period. ● Employment Status: Administrators and supervisors can view leave details of employees with a particular employment status. ● Include Past Employee: Administrator and supervisor can view leave details of past employees as well. ● Location: Administrators and supervisors can view leave details of employees who are based in specific locations. Once the options are selected, click “View” (Figure 18.2). Figure 18.2: Leave Calendar To view the Yearly calendar view, the user must click “Switch to Yearly View” (Figure 18.3). 118 C opyright © 2013 OrangeHRM Inc. All Rights Reserved. Figure 18.3: Change to Yearly view The employees name can then be typed in, and a year selected. Once the user clicks “View”, he will be shown with the yearly calendar view for that employee (Figure 18.4). Figure 18.4: Yearly calendar view 119 C opyright © 2013 OrangeHRM Inc. All Rights Reserved. 5.8.2 Leave Calendar for Supervisors Supervisors can view leave details of their subordinates as well as their personal leave details in the leave calendar. A supervisor can run search criteria to view their subordinate’s leave details or their personal leave details. Figure 18.5 shows the leave calendar for a particular month. Highlighted in pink are the personal leave details of the supervisor first in the list. The list also shows the subordinates’ leave details in the same leave calendar. Figure 18.5: ESS Supervisor Leave Calendar (monthly view) 120 C opyright © 2013 OrangeHRM Inc. All Rights Reserved. 6.0 Time Module The Time Module automates attendance maintenance and punch in/out. The functionality of the module allows the employees of the company to create and submit weekly timesheets and the Supervisors to modify, approve and reject the timesheets. These timesheets are created based on Activities within Projects that are being done for various Customers. While attendance is tracked through punch in/out employees can specify the time spent of projects assigned to them. Depending on each user the functions vary: The Admin can: Add Project Information; Customers, Projects and Activities View / Edit / Approve / Reject Employee Timesheets View any employee’s attendance records Configure attendance settings for all employees View project reports for any project undertaken by the company Export timesheet and attendance data (CSV) for all employees The ESS–Supervisor can: View project information, and view/edit/add project activities if he/she is the project admin. Enter, modify and submit personal timesheets View / Edit / Approve / Reject/Add timesheets of his subordinates Enter his/her punch in/out time Enter time events spent on the project activities View his subordinates’ employee attendance records View subordinate’s project reports and attendance summary Export timesheet and attendance data (CSV) for all subordinates The ESS User can: View project information, and view/edit/add project activities if he/she is the project admin Enter, modify and submit personal timesheets Enter punch in/out time Enter the time events for the activities of the projects he/she is working on View personal timesheets and attendance records 121 C opyright © 2013 OrangeHRM Inc. All Rights Reserved. 6.1 Time Sheets 6.1.1 Project Info; Customers, Projects and Activities Here information regarding projects, customers, project activities and project administrator can be defined, which can be later used for project management activities. Customers You can enter details of your customers that can be used to define projects and project activities. To add a customer, go to Time>> Project Info>> Customers and click “Add”, a screen as shown in Figure 18.6 would appear. Click “Save” once the fields are added. Figure 18.6: Add Customer The customer will then be listed as shown in Figure 18.7. You may also add multiple entries of customers. To view details of a customer, click on the customer’s name. Figure 18.7: Customers List To delete an entry, click on the check box next to the “Customer” name. It is also possible to delete multiple entries at the same time by clicking the check box entries you wish to delete and simply clicking “Delete”. 122 C opyright © 2013 OrangeHRM Inc. All Rights Reserved. Projects The administrators are able to define the projects, which were/are/will be managed by the company. To add a project, go to Time>> Project Info>> Projects and click “Add”, a screen as shown in Figure 18.8 would appear. Click “Save” once the fields are added. Figure 18.8: Add Project To add a project, the following needs to be entered: Customer Name: needs to be defined first before adding a project name or you may simply add a customer by clicking on “Add Customer” below the “Customer Name” field. ● Name: Name of the project to be done for the customer ● Project Admin: The employee assigned for the project. You may assign more employees for the project. ● Description: A brief description of the project. ● Once you click “Save” the screen as shown in Figure 18.9 would appear and project activities can be added for the particular project. To add a project activity, Click “Add” and “Save” once the field is added. Figure 18.9: Add Project Activities 123 C opyright © 2013 OrangeHRM Inc. All Rights Reserved. You may also copy a project activity from another project using the “Copy From” option. To copy a project activity from another project, click “Copy From”, fill in the desired Project name that you wish to copy an activity from, select the required Activity from the list, and then add the activity that needs to be copied by clicking on “Copy” as shown in Figure 19.0. Figure 19.0: Copy Project Activity The selected project activity will then be added to the list of project activities as shown in Figure 19.1. Figure 19.1: Copied Project Activity Listed A list of projects for a particular customer will then be listed as shown in Figure 19.2. Figure 19.2: Project List You may also add multiple entries of projects. To delete an entry, click on the check box next to the “Customer” name. It is also possible to delete multiple entries at the same time by clicking the check box entries you wish to delete and simply clicking “Delete”. 124 C opyright © 2013 OrangeHRM Inc. All Rights Reserved. 6.1.2 Entering and Submitting a Timesheet This feature functions in different ways depending on the user type. The Admin will be able to view timesheets of employees while a Supervisor can also do the same and in addition, can enter his timesheet details however, a normal ESS User can only enter his timesheet details. When an ESS-Employee or an ESS-Supervisor wants to enter his/her timesheet, they can go to Time>> Timesheets>> My Timesheets and the screen as shown in Figure 19.3 will appear. This option is not available to the Admin. Figure 19.3: Enter Timesheet The current week will populate under the “Timesheet for week”. You may also add a timesheet for another week period by clicking “Add Timesheet” and another field, “Select a Day to Create Timesheet” will appear in which you can select the first day of the week from the drop down menu and the system will automatically calculate a one-week time period from the date entered as shown in Figure 19.3. *Note: Once you have added a timesheet for a specific week, you cannot move from one timesheet of a specific week period to another unless you have entered the details for the current one. Once you have determined the week period for the timesheet, you can now enter the timesheet details by clicking “Edit” and the screen as shown in Figure 19.4 will appear. Figure 19.4: Edit Timesheet *Note: Project Info needs to be defined first to enable employees to add a timesheet for the projects he/she was assigned to. 125 C opyright © 2013 OrangeHRM Inc. All Rights Reserved. They can select from the “Project Name” and “Activity Name” that was assigned to him/her and enter the number of hours spent for each activity for the whole week. You may also add a row by clicking “Add Row” to enter another timesheet record for another project activity. Click on the checkbox beside the project name before you click “Save” to save the following records and the screen as shown in Figure 19.5 will appear. Figure 19.5: Save Timesheet You may also remove a particular record after the timesheet has been saved by clicking “Edit” and the screen as shown in Figure 19.6 will appear. Click on the checkbox for the particular row you want removed and click “Remove Rows” and the record will no longer appear on the timesheet record. Figure 19.6: Remove Rows Once the necessary changes have been made, click “Submit” to submit the completed timesheet and you will see the status change from “Not Submitted” to “Submitted” as shown in Figure 19.7. 126 C opyright © 2013 OrangeHRM Inc. All Rights Reserved. Figure 19.7: Submit Timesheet The action performed by the user on the timesheet will appear below the screen indication the “Action” performed, who it was “Performed By” and the “Date” it was performed. Once the timesheet has been submitted it will be sent to the HR Admin (if the HR Admin has subscribed to the following notification type) and his/her supervisor. 6.1.3 Approving Employee Timesheet ESS-Supervisor Approve/Reject Timesheet When an employee submits a time sheet it will be sent to his supervisor. The supervisor will see the submitted timesheets by going to Time>> Timesheets>> Employee Timesheets and the screen as shown in Figure 19.8 will appear. The ESS-Supervisor will only see the timesheets submitted by his/her subordinate. Figure 19.8: ESS Supervisor View Timesheet Details 127 C opyright © 2013 OrangeHRM Inc. All Rights Reserved. The supervisor may search and view employee’s timesheet through the “Select Employee” and by entering the employee name and clicking “View”. Timesheet with pending action can also be viewed on the screen. Click “View” to see the details of the timesheet under “Timesheets Pending Action” and the screen as shown in Figure 19.9 will appear. Figure 19.9: ESS-Supervisor View/Edit/Approve/Reject Timesheet The supervisor can approve or reject a timesheet and also enter a comment. They can also edit the timesheet by clicking “Edit”, if there are any discrepancies before approving or rejecting the timesheet. Once approved or rejected the particular employee will also be updated with the status and the status will change from “Submitted” to either “Approved” or “Rejected”. The action performed by the supervisor will then be listed under “Actions Performed on the Timesheet” as shown in Figure 20.0. Figure 20.0: Actions Performed on the Timesheet by ESS-Supervisor 128 C opyright © 2013 OrangeHRM Inc. All Rights Reserved. HR Admin Approve/Reject Employee Timesheet The HR Admin can view all employees’ timesheet. When an employee submits a time sheet, the HR Admin and other users with admin rights can also View / Edit / Approve / Reject an Employee Timesheets. To action an employee timesheet, go to Time>> Time Sheets>> Employee Time sheets and the screen as shown in Figure 20.1 will appear. Figure 20.1: HR Admin View Timesheet Details The HR Admin may search and view employee’s timesheet through the “Select Employee” box and by entering the employee name and clicking “View”. Timesheets with pending action can also be viewed on the screen. Click “View” to see the details of the each timesheet under “Timesheets Pending Action” and the screen as shown in Figure 20.2 will appear. Figure 20.2: HR Admin View/Edit/Approve/Reject Timesheet The HR Admin can approve or reject a timesheet and also enter a comment. They can also edit the timesheet by clicking “Edit”, if there are any discrepancies before approving or rejecting the timesheet. 129 C opyright © 2013 OrangeHRM Inc. All Rights Reserved. Once approved or rejected the particular employee will also be updated with the status and the status will change from “Submitted” to either “Approved” or “Rejected”. The action performed by the HR Admin will then be listed under “Actions Performed on the Timesheet” as shown in Figure 20.3. Figure 20.3: Actions Performed on the Timesheet by HR Admin 6.1.4 Export to CSV The admin/ESS-Supervisor can export the timesheet data into a CSV file by going to Time>> Timesheets>> Export to CSV. They can select the appropriate filter criteria (only the ‘From’ and ‘To’ fields are mandatory) as well as the addition fields they wish to display, as shown in Figure 20.4. Figure 20.4: Export Timesheet data as CSV 130 C opyright © 2013 OrangeHRM Inc. All Rights Reserved. Clicking the “Export to CSV” button will export the relevant timesheet data into a .CSV file, as shown in Figure 20.5. Figure 20.5: Exported CSV timesheet report 6.2 Attendance All attendance records are maintained and recorded under “Attendance” menu. Depending on the user, the attendance functions vary. The Admin can: Generate project, attendance and employee reports for all the employees Configure user rights with regards to attendance Export timesheet and attendance data (CSV) for all employees The ESS – Supervisor can: Punch In/Out View personal reports Generate project, attendance and employee reports for subordinates Export timesheet and attendance data (CSV) for subordinates The ESS User can: Punch In/Out View personal time reports. 131 C opyright © 2013 OrangeHRM Inc. All Rights Reserved. 6.2.1 Configuration The admin can select what privileges the employees and supervisors will have on the punch in/out and attendance. For configuration, go to Time>> Attendance>> Configuration and the screen as shown in Figure 20.6 will appear. Click “Save” once done. Figure 20.6: Attendance Configuration 6.2.2 Punch In/Punch Out This feature allows capturing the number of hours an employee spends working for the company. This feature is only available to the ESS – Supervisor and ESS User. To access the Punch In/Out tab, go to Time>> Attendance>>Punch In/Out and the screen as shown in Figure 20.7 will appear. Figure 20.7: Punch In 132 C opyright © 2013 OrangeHRM Inc. All Rights Reserved. If the HR Admin has configured the attendance settings, the “Time” for both punch in/out could be changed otherwise the system will automatically capture the “system time”. Once you click “In” the screen as shown in Figure 20.8 will appear. To punch out, click “Out”. Figure 20.8: Punch Out 6.2.3 My Records This feature is available to both ESS-Employee and ESS-Supervisor. Once you have punched in and punched out, the details of your personal attendance record will be shown under “My Records”. To view details, go to Time>> Attendance>> My Records and the screen as shown in Figure 20.9 will appear. Figure 20.9: View My Records Enter the date you want to view the attendance record and the screen as shown in Figure 21.0 will appear. Figure 21.0: “My Records” in Details 133 C opyright © 2013 OrangeHRM Inc. All Rights Reserved. If the HR Admin has configured the attendance settings the following options: “Edit” and “Delete could be seen and selected. To edit the record, click “Edit” and to delete the record, click on the checkbox beside the record and click “Delete”. 6.2.4 Employee Records This feature is available to both ESS-Supervisor (can view his/her subordinates attendance records) and HR Admin (can view all employees attendance records). To view employee records, go to Time>> Attendance>> Employee Records and the screen as shown in Figure 21.1 will appear. Figure 21.1: View Employee Records You may enter the “Employee Name” and the “Date” you want to view the attendance record for and the screen as shown in Figure 21.2will appear. Figure 21.2: Employee Record in Detail If the HR Admin has configured the attendance settings the following options: “Edit”, “Delete” and “Add Attendance Record” could be seen and selected. To edit the record, click “Edit”; enter the appropriate data and click “Save”. To delete the record, click on the checkbox beside the record and click “Delete”. To add another attendance record, click “Add Attendance Records” and enter the appropriate details. *Note: To add another attendance record, click on the “Add Attendance Records” twice; once to punch in and once again to punch out. 134 C opyright © 2013 OrangeHRM Inc. All Rights Reserved. 6.2.5 Export to CSV The admin/ESS-Supervisor can export the attendance data into a CSV file by going to Time>> Attendance>> Export to CSV. They can select the appropriate search criteria that they wish to search by, as shown in Figure 21.3. Figure 21.3: Export Attendance data as CSV Clicking the “Export to CSV” button will export the relevant timesheet data into a .CSV file, as shown in Figure 21.4. Figure 21.4: Export Attendance data as CSV 135 C opyright © 2013 OrangeHRM Inc. All Rights Reserved. 6.3 Reports This feature is only available to both an ESS – Supervisor and the HR Admin. They can view the following in details: Project Report Employee Report Attendance Summary 6.3.1 Project Report This feature is available to the Admin and ESS – Supervisors. The Admin can view can reports for all projects and the ESS – Supervisors can view reports of projects administered by them or projects assigned to them. To view project reports go to Time>> Reports>> Project Reports and the screen as shown in Figure 21.5 will appear. Figure 21.5: View Project Report Select the “Project Name” from the drop down menu and the “Project Date Range” by selecting the dates. The default project name is “All”. You may also click on the “Only Include Approved Timesheets” if you want to view only projects reports with approved timesheets. Click “View” once completed and the screen as shown in Figure 21.6 will appear. 136 C opyright © 2013 OrangeHRM Inc. All Rights Reserved. Figure 21.6: Project Report 6.3.2 Employee Reports These reports are available to both HR Admin and ESS-Supervisor. The Admin can view can reports of all projects that all employees have been assigned to and the ESS – Supervisors can view reports of projects that his subordinates were assigned to. Here the Admin and ESS -Supervisor can track the time employees spent on particular activities. To view an employee report, go to Time>> Reports>>Employee Reports and the screen as shown in Figure 21.7 will appear. Figure 21.7: View Employee Report Select the “Employee Name” from the drop down list, the “Project Name” he/she was assigned to and the “Activity Name “he/she took part in and define the “Project Date Range by selecting from the dates. The default project name and project activity is “All”. 137 C opyright © 2013 OrangeHRM Inc. All Rights Reserved. You may also click on the “Only Include Approved Timesheets” if you want to view only employee reports with approved timesheets. Click “View” once completed and the screen as shown in Figure 21.8. Figure 21.8: Employee Report 6.3.3 Attendance Summary These reports are available to both HR Admin and ESS-Supervisor. The Admin can view can the attendance summary of all employees while an ESS – Supervisors can view the attendance summary of his/her subordinates. Here the Admin and ESS -Supervisor can track the time employees have spent working in the company. To view an employee’s attendance summary, go to Time>> Reports>>Attendance Summary and the screen as shown in Figure 21.9 will appear. Figure 21.9: View Attendance Summary Report 138 C opyright © 2013 OrangeHRM Inc. All Rights Reserved. Select the “Employee Name” from the drop down list, his/her “Job Title” and “Sub- Unit” he/she falls under and his/her “Employment Status”. The default job title/sub-unit/employment status is “All”. You may also select the date range you want to view the report for. Click “View” and the screen as shown in Figure 22.0 will appear. Figure 22.0: Attendance Summary Report 7.0 Recruitment Module The Recruitment Module manages the recruitment process of a company. The Admin can create Vacancies which will be listed on the link via jobs.php. A link has to be made on the website to take the applicant to jobs.php. When applicants are rejected, approved or when interviews are scheduled, mails are sent to them. Successful applicants are added to the system. 7.1 Candidates Here the Admin can view the overall status of employee’s applications and search for candidates using the criteria provided. To perform a candidate search go to Recruitment Module>> Candidates and the screen as shown in Figure 22.1 will appear. 139 C opyright © 2013 OrangeHRM Inc. All Rights Reserved. Figure 22.1: Candidates Job Title: search for the candidates who have applied for a specific job title that may not be necessarily posted. Vacancy: search for the candidates who have applied for a vacancy posted on the website. Hiring Manager: search for candidates with interviews with a particular hiring managers. Candidate Name: search for a particular candidate Keywords: search for candidates using specific keywords that the candidates may have entered on the application form for easy short-listing for a particular vacancy. Status: search for candidate with the following status of the application: Application Initiated Shortlisted Interview Scheduled Interview Passed Interview Failed Job Offered Offer Declined Rejected Hired Date of Application: search for candidates who have applied for a specific period of time .Select the dates from “From” to ‘To”. Method of Application: search for candidates who have applied for any vacancy via: Manual: through post/email Online: through the job portal 140 C opyright © 2013 OrangeHRM Inc. All Rights Reserved. Search Inside Resume: this feature allows the admin to search for specific keywords within a candidates resume/CV. Archived Options: allows to show/hide candidates that have been tagged as “Archived”. Options include: Without Archived With Archived Only Archived Click ‘Search” to perform the candidate search. 7.1.1 Candidates List Once a candidate applies for a particular vacancy that is posted online, they will be populated on the database under the Recruitment Module. To view candidates list, go to Recruitment >>Candidates and the screen as shown in Figure 22.2 will appear. Figure 22.2: Candidates List Candidates can be added manually onto the system by clicking on the “Add” button. Candidates can be deleted by selecting the appropriate candidate and then clicking on the “Delete” button. The candidate list can be exported to CSV by clicking on the “Export to CSV button. The file generated can be viewed as shown in Figure 22.3. 141 C opyright © 2013 OrangeHRM Inc. All Rights Reserved. Figure 22.3: Candidate List CSV To view candidate’s application status details and perform an action click on the “Candidate” name and the screen as shown in Figure 22.4 will appear. Click “Edit” to select perform an action. Figure 22.4: Candidate’s Application Status Details 142 C opyright © 2013 OrangeHRM Inc. All Rights Reserved. The following information will be populated on the screen: Full Name Email Contact No. Job Vacancy Status : You may select if you want to shortlist or reject the particular candidate Resume o Keep Current: You may retain the current resume o Delete Current: delete the current resume o Replace Current: replace current resume with another resume for which you will be prompted to upload another resume document. Keywords: used to search for candidates with specific qualifications needed for a particular vacancy Comment Date of Application: date of which the application was created. The default application status is “Application Initiated” and the HR Admin can perform the following action for the particular candidate: Shortlist Reject 7.1.2 Shortlist The Admin or the Hiring Manager can choose to shortlist a particular candidate; Select “Shortlist” from the “Action” drop down menu and the screen as shown in Figure 22.5 will appear. Figure 22.5: Shortlist Click “Shortlist” to shortlist the candidate. Click “Back” to show the candidate’s application history. The following action will be reflected under “Candidate’s History” as shown in Figure 22.6. 143 C opyright © 2013 OrangeHRM Inc. All Rights Reserved. Figure 22.6: Candidate’s History 7.1.3 Reject Alternatively, the Admin or Hiring Manager can turn down an application. To do so, select “Reject” from the “Action “drop down menu and click “Save” and the screen as shown in Figure 22.7 will appear. Figure 22.7: Reject 7.1.4 Schedule Interview Once a candidate is shortlisted, they can now be scheduled for an interview, to schedule an interview, select “Schedule Interview” from the “Action” drop down menu and the screen as shown in Figure 22.8 will appear. 144 C opyright © 2013 OrangeHRM Inc. All Rights Reserved. Figure 22.8: Schedule Interview Enter the following fields and click “Save”. Click “Back” and the following action will then be reflected under “Candidate’s History” as shown in Figure 22.9. Figure 22.9: Candidate’s History 7.1.5 Mark Interview Passed Once a candidate has completed his interview, the HR Admin or the Hiring Manager may pass or fail the candidate based on the interview. To mark interview as passed, select “Mark Interview Passed” from the “Action “drop down menu and the screen as shown in Figure 23.0 will appear. 145 C opyright © 2013 OrangeHRM Inc. All Rights Reserved. Figure 23.0: Mark Interview Passed You may write a note and click “Mark Interview Passed” to confirm action. Click ‘Back” and the following action will be reflected under “Candidate’s History” as shown in Figure 23.1. Figure 23.1: Candidate’s History 7.1.6 Mark Interview Failed The HR Admin or the Hiring Manager can also mark the interview failed. To do so, select “Mark Interview Failed” from the “Action” drop down menu and the screen as shown in Figure 23.2 will appear 146 C opyright © 2013 OrangeHRM Inc. All Rights Reserved. Figure 23.2: Mark Interview Failed You may write a note and click “Mark Interview Failed” to confirm the action. Click “Back” and the action will be reflected under “Candidate’s History” as shown in Figure 23.3. Figure 23.3: Candidate’s History 7.1.7 Offer Job The HR Admin or the Hiring Manager may offer the candidate the job. To do so, click “Edit” and select “Offer Job” from the “Action” drop down menu and the screen as shown in Figure 23.4 will appear. 147 C opyright © 2013 OrangeHRM Inc. All Rights Reserved. Figure 23.4: Offer Job You may enter a note and click “Offer Job” to confirm the action. Click “Back” and the action will be reflected under Candidate’s History as shown in Figure 23.5. Figure 23.5: Candidate’s History 7.1.8 Decline Offer If incase the offer was declined by the applicant then it can be listed as a “Decline Offer”. To mark the application as decline offer, click “Edit” and select “Decline Offer” from the “Action” drop down menu and the screen as shown in Figure 23.6 will appear. 148 C opyright © 2013 OrangeHRM Inc. All Rights Reserved. Figure 23.6: Decline Offer You may enter a note and click “Decline Offer” to confirm the action. Click “Back” and the following action will be reflected under the Candidate’s History as shown in Figure 23.7. Figure 23.7: Candidate’s History 7.1.9 Hire The HR Admin or the Hiring Manager may choose to hire the candidate at this point. To hire the candidate, click “Edit” and select “Hire” from the “Action” drop down menu and the screen as shown in Figure 23.8 will appear. 149 C opyright © 2013 OrangeHRM Inc. All Rights Reserved. Figure 23.8: Hire You may add a note and click “Hire” to confirm the action. Click “Back” and the action will be reflected under “Candidate’s History as shown in Figure 23.9. Figure 23.9: Candidate’s History Once the candidate is hired, he/she will be added to the employee database under the PIM Module. 7.2 Vacancies Here the Admin can create a vacancy for a particular job title required by the company. To add a vacancy, go to Recruitment>>Vacancies and click “Add” and the screen as shown in Figure 24.0 will appear. 150 C opyright © 2013 OrangeHRM Inc. All Rights Reserved. Figure 24.0: Add Job Vacancy Enter the following fields: Job title: the position that is needed by the company Vacancy Name: the name in which you want the vacancy to be posted as. Hiring Manager Number of Positions Description: a description of the job role Active: to make the job vacancy active and be posted online. You may unselect “Active” if you want to post the vacancy some other time. Publish in RSS Feed and Webpage: you may publish the vacancy of RSS feed and on the company’s webpage. The following links will appear to show the pathway of the job that was posted as shown in Figure 24.1. 151 C opyright © 2013 OrangeHRM Inc. All Rights Reserved. Figure 24.1: RSS Feed Click “Save “once you have defined the job vacancy and it will be listed as shown in Figure 24.2. Figure 24.2: Job Vacancy List 7.2.1 Applying for a Vacancy Both internal and external applicants can apply for a vacancy through jobs.php. When an applicant visits the company’s website or through the RSS feed they will be directed to the job vacancy portal in jobs.php where they will see all the active vacancies of the company as shown in Figure 24.3. Figure 24.3: Active Job Vacancies The applicant may click “Apply” under the particular Job title and they will be directed to the screen as shown in Figure 24.4. 152 C opyright © 2013 OrangeHRM Inc. All Rights Reserved. Figure 24.4: Apply for Job Vacancy The applicant needs to enter the following fields and click “Submit” to submit the application and the candidate will appear under the candidate database (Recruitment Module>>Candidates) as shown in Figure 24.5. Figure 24.5: Candidate List 153 C opyright © 2013 OrangeHRM Inc. All Rights Reserved. 8.0 Performance Module This module manages and reviews the performance of all employees where a company can understand how well an employee is performing in relation to their strategic goals and objectives. 8.1 KPI List This feature enlists all Key Performance Indicator (KPI) for all job titles. To view KPI List, go to Performance >> KPI List and the screen as shown in Figure 24.6 will appear. Figure 24.6: Key Performance Indicators 8.2 Add KPI The HR Admin can define a KPI for a specific job title. To do so, go to Performance>> Add KPI and the screen as shown in Figure 24.7 will appear. 154 C opyright © 2013 OrangeHRM Inc. All Rights Reserved. Figure 24.7: Add Kep Performance Indicator Enter the “Job Title” you wish to define a KPI for, define the “KPI”, and define the “Minimum” and “Maximum” rating for the KPI. If you select “Make Default Scale” the defined minimum and maximum rating will be pre-populated for all KPIs added in the future. Click “Save” once all the fields are entered. The following Key Performance Indicator will then be listed under KPI List (see Figure 24.6). 8.3 Copy KPI You may copy a KPI from one job title to another through this feature. To do so, go to Performance>> Copy KPI and the screen as shown in Figure 24.8 will appear. 155 C opyright © 2013 OrangeHRM Inc. All Rights Reserved. Figure 24.8: Copy Key Performance Indicators Click “Save” once you have selected the fields. *Note: Once you copy a KPI from one job title to another job title with an existing KPI, the operation will delete the respective existing KPI and replace it with the copied one. Click “OK” to replace the existing KPI. If you want to copy a KPI from one job title to another job title without an existing KPI, the operation will simply just copy the KPI from one job title to another as shown in Figure 24.9. Figure 24.9: Copy Key Performance Indicators Click “Save” once you have selected the fields and the KPI copied will be listed as shown in Figure 25.0. 156 C opyright © 2013 OrangeHRM Inc. All Rights Reserved. Figure 25.0: Key Performance Indicators for Job Title You may enter multiple entries of KPIs for different Job titles. To delete an entry, click on the check box next to particular entry. It is also possible to delete multiple entries at the same time by clicking the check box entries you wish to delete and simply clicking “Delete”. 8.4 Add Review This feature allows a performance review agenda for a particular employee. To enter performance review details for a particular employee, go to Performance>>Add Review and the screen as shown in Figure 25.1 will appear. Figure 19.1: Add Performance Review 157 C opyright © 2013 OrangeHRM Inc. All Rights Reserved. Enter the following details and click “Save”. Click on “View” on top of the screen to view the performance review details and the list of employees with the following performance review details will be listed as shown in Figure 25.2. Figure 25.2: Performance Review List You may enter multiple entries of performance review for employees. To delete an entry, click on the check box next to particular entry. It is also possible to delete multiple entries at the same time by clicking the check box entries you wish to delete and simply clicking “Delete”. 8.5 Reviews This feature allows you to review an employee’s performance based on the KPIs for his/her job role. To review an employee’s performance, go to Performance>>Reviews and the screen as shown in Figure 25.3 will appear. Figure 25.3: Search Performance Reviews 158 C opyright © 2013 OrangeHRM Inc. All Rights Reserved. You may search for a particular performance review of an employee by using the search criteria: From – To: The date period for the particular performance review Job Title: employees with the specified job title to be reviewed Subdivision: the subdivision of the employee’s to be reviews Employee: the employee’s name Reviewer: the reviewer’s name Simply click on the employee name to initiate the performance review and the screen as shown in Figure 25.4 will appear. Figure 25.4: Performance Review of an employee Click “Edit” to enter details: Rating: rate the employee based on the KPI with the assigned Min and Max Rate Reviewers Comments: you may enter a comment based on the KPI Note: you may enter an overall note regarding the employee’s performance review. 159 C opyright © 2013 OrangeHRM Inc. All Rights Reserved. 9.0 Announcements The Announcements section is a where employees can access and view all the News and Documents (Section 5.6 and 5.7) that are shared and published by the company. 9.1 News To view all published News articles, the user must go to Announcements>>News. The screen as shown in Figure 25.5 will appear, showing all the published, un-archived news articles. Figure 25.5: Published News To view those articles that have been archived, the user must click on “Show Archived”. 9.2 Documents To view all published Documents, the user must go to Announcements>> Documents. The screen as shown in Figure 25.6 will appear, showing all the published Documents. 160 C opyright © 2013 OrangeHRM Inc. All Rights Reserved. Figure 25.6: Published Documents To filter through all the documents, users can make a selection from the “Category” drop down menu. Documents can be viewed and attachments can be downloaded. To view those documents that have been archived, the user must click on “Show Archived”. 10.0 Dashboard The Dashboard is a page which provides: o A summary of vital information (Eg: Number of employees in a department, or leave taken by each department) o Quick access to certain tasks (Eg: Leave applications pending for approval) Ideally, it tries to make important information available in one glance/ in one click Dashboard forms the Home page of every user, and can be accessed by clicking on “Dashboard”. Figure 25.7 shows the Dashboard module. 161 C opyright © 2013 OrangeHRM Inc. All Rights Reserved. Figure 25.7: Dashboard 10.1 Quick Launch Panel This panel contains some shortcuts for invoking certain menu items, as shown in Figure 25.8. Figure 25.8: Quick Launch Panel 162 C opyright © 2013 OrangeHRM Inc. All Rights Reserved. Following are the shortcuts shown for ESS users: Apply Leave My Leave My Timesheets Following are the shortcuts shown for Admins: Assign Leave Timesheets Leave List 10.2 Task List Group This panel lists certain tasks a supervisor/admin needs to perform and is not visible for ESS users who are not supervisors. Each sub-panel is displayed vertically next to each other as columns in a table, as shown in Figure 25.9. Figure 25.9: Task List Panels Pending Leave Requests Panel Pending Leave Requests of subordinates are shown with their name and starting date of the leave application (Administrators see a list of employees according to their region and privilege) Clicking on an item takes the user to the detailed view of the leave list Items are ordered according to the leave start date, and then by the employee's last name. Pending Timesheets Panel Submitted timesheets of subordinates are shown with their name and starting date of the week (Administrators see a list of employees according to their region and privilege) Clicking on it takes the user to the page where the timesheet can be either rejected or approved The sub-panel is ordered according to the starting date of the week, and then by the employee's last name 163 C opyright © 2013 OrangeHRM Inc. All Rights Reserved. Scheduled Interviews Panel Interviews scheduled are displayed with the candidate's name and the interview date Clicking on the link will take the user to the interview details page, where the details can be viewed and updated The sub-panel is ordered according to the interview date Admin will see all scheduled reviews, and interviewers will see only interviews scheduled for them 10.3 Admin Users View Charts There are two charts displayed to the Admin users which supplement each other (as shown in Figure 26.0): 1. Chart 1: Number of active employees in the top level sub-units (Pie Chart) 2. Chart 2: Total Number of leave taken from January to the current day by each top level sub-units (bar chart). Figure 26.0: Charts 164 C opyright © 2013 OrangeHRM Inc. All Rights Reserved. 11.0 Directory Corporate directory is the place where users can view public information about the rest of the employees in the company, and can be accessed by clicking on “Directory” in the menu. Figure 26.1 shows the layout of this module. Figure 26.1: Corporate Directory Users can: Access the corporate directory – can be accessed by clicking on “Directory” in the main menu. Search listings – o The following search criteria are available Name - Auto suggestion Job Title - Auto suggestion Location - Drop Down View search results – o All employees are listed in a paginated view sorted by their last name. 165 C opyright © 2013 OrangeHRM Inc. All Rights Reserved. o The following information are considered public and displayed in directory listing: Image (if the photograph is not available, a place-holder image is shown instead) Full name Job Title Subunit Location Contact Number (work phone) Email (work email) 12.0 Asset Tracker Asset Tracker enables you to manage your company assets and inventory into one complete, cost-effective, easy-to-use application that can be applied to any company no matter what industry or sector you are in. The robust OrangeHRM Asset Tracker include integrated Inventory Management and Preventive Maintenance features for a complete solution that helps you maximize your Return on Assets. The Admin can define and manage different brands, categories and vendors of assets in stock. 12.1 Managing Brands The Admin can define the different brands of the company properties. Example: LG, Samsung, Dell, HP etc. You will see the screen shown on Figure 26.2. Figure 26.2: Add Brand 166 C opyright © 2013 OrangeHRM Inc. All Rights Reserved. 12.2 Managing Categories The Admin can define the categories in which the company assets would be categorized under (as shown on Figure 26.3). Example: Laptops, Smartphones, Netbooks etc. Figure 26.3: Add Category 12.3 Managing Vendors The Admin can define different vendors where the product was purchased. The screen is shown on Figure 26.4. Figure 26.4: Add Vendor 167 C opyright © 2013 OrangeHRM Inc. All Rights Reserved. 12.4 Assigning & Viewing Assets Not only admin can add, edit and delete assets but also he can assign assets to employee and view both assigned & unassigned assets. The screens relevant are shown on Figure 26.5 and Figure 26.6. 12.4.1 Assigning Assets to Employees This section allows the Admin to assign assets to employees. Figure 26.5: Assigning Assets Screen 12.4.2 Viewing Assets of Employees The Admin can view both assigned (In-Use) & unassigned (In-Stock) assets of employees, as shown in Figure 26.6. 168 C opyright © 2013 OrangeHRM Inc. All Rights Reserved. Figure 26.6: Viewing Assets Screen I Supervisors can also view assigned assets of the subordinates and assign “In-stock” assets to his/her subordinates. The screen is shown on Figure 26.7. Figure 26.7: Viewing Assets Screen II 169 C opyright © 2013 OrangeHRM Inc. All Rights Reserved. ESS users can also view all assets which are assigned to them by admin or their supervisors. The screen is shown on Figure 26.8. Figure 26.8: Viewing Assets Screen III Please contact us on [email protected] for more information. 170 C opyright © 2013 OrangeHRM Inc. All Rights Reserved.