1
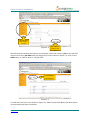
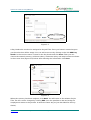
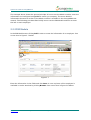
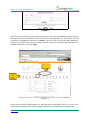
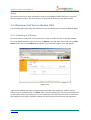
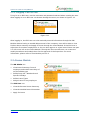
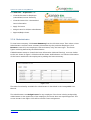
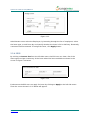
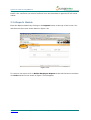
Quick User Guide OrangeHRM 2.2 Document Version 1.0 OrangeHRM ver 2.2 © OrangeHRM Inc. 2005 - 2007 All rights reserved. 1 Quick User Guide for OrangeHRM 2.2 Copyright © OrangeHRM Inc. 2005 - 2007. License The contents of this document are subject to the GNU General Public License (GPL). You may not use this document except in compliance with the License. You can obtain a copy of the License at http://www.fsf.org/licensing/licenses/gpl.html. OrangeHRM version 2.2 © OrangeHRM Inc. 2005 – 2007 All rights reserved. 2 Quick User Guide for OrangeHRM 2.2 Table of contents About this document......................................................................................4 Conventions used in this document........................................................... ......................5 Chapter 1......................................................................................................6 1 Overview.....................................................................................................6 Chapter 2......................................................................................................8 2 Getting started............................................................................................8 2.1 Start & login......................................................................................... ......................8 2.2 Using OrangeHRM .................................................................................................... ..9 2.2.1 Admin Module...........................................................................................................................................9 2.2.2 PIM Module............................................................................................................................................12 2.2.3 Employee Self Service Module (ESS)......................................................................................................14 2.2.3.1 Creating an ESS User................................................................................................................ .14 2.2.3.2 Logging in as ESS User........................................................................................ .....................15 2.2.4 Leave Module..........................................................................................................................................15 2.2.4.1 Administrator.......................................................................................................................... ...16 2.2.4.2 ESS....................................................................................................................................... .....17 2.2.4.3 ESS – Supervisor......................................................................................................... ..............18 2.2.5 Time Module...........................................................................................................................................19 2.2.5.1 ESS User.......................................................................................................... .........................19 2.2.5.2 Administrator and ESS User Supervisor............................................................. .....................20 2.2.6 Reports Module.......................................................................................................................................21 2.2.7 Bug Tracker............................................................................................................................................22 Chapter 3....................................................................................................24 3 Further information....................................................................................24 OrangeHRM ver 2.2 © OrangeHRM Inc. 2005 - 2007 All rights reserved. 3 About this document The purpose of this document is to provide quick basic steps on getting started with OrangeHRM version 2.2. For help on the installation or upgrade, please refer to the Installation Guide or Upgrade Guide respectively. For more detailed information about the features and functionality of OrangeHRM system, please refer to User Manual. The document is divided into the following chapters: Chapter Description Overview Overview of OrangeHRM Getting started This chapter is explaining the login as well as a few features and the logic behind OrangeHRM Further information Briefly explains where to get further information on the use of OrangeHRM version 2.2. OrangeHRM ver 2.2 © OrangeHRM Inc. 2005 - 2007 All rights reserved. 4 Quick User Guide for OrangeHRM 2.2 Conventions used in this document We use the following text formatting conventions: italic Used for document titles, emphasis, and for email addresses, web URLs and file and directory names. Bold Used for emphasis and for the command options you select. Letter gothic Used for literal code, such as configuration files, Java class names, method names and API calls. Letter gothic italic Used for arguments and parameters that will be replaced with an actual value. OrangeHRM version 2.2 © OrangeHRM Inc. 2005 – 2007 All rights reserved. 5 Chapter 1 1 Overview OrangeHRM, emerging in line with the new generation of web HR systems, will assist you in managing your company's most important asset - human resource. OrangeHRM, which is applicable to diverse business industries, is a perfect platform for re-engineering your HR processes and redefining the work flow operations of HR professionals, paving the way to a new level of HR Management. OrangeHRM is based on modular architecture and consists of the following modules: • Admin Module The part of the system where the HR Manager or other appointed personnel perform all system administration tasks. This includes defining company structure, pay grades and other information that serves as the backbone for the rest of the system. Security issues are taken care of through this module as well by defining user rights. • PIM Module This core module maintains all relevant employee related information, including different types of personal information, detailed qualifications and work experience, job related information etc. Picture of employee is included as well. Information captured in this module is utilized by all other modules, thus eliminating data redundancy. • Employee Self Service Module (ESS) Employee self service is a powerful tool providing employees of the company with the ability to view relevant information such as personal information, updating personal information with web - enabled PC without having to hassle the HR staff. The functionality of this module spans through the entire system, making information available anywhere, anytime. Of course all information is subject to company defined security policy, where everyone can only view the OrangeHRM ver 2.2 © OrangeHRM Inc. 2005 - 2007 All rights reserved. 6 Quick User Guide for OrangeHRM 2.2 information he/she is authorized to. Time and cost saving effects from this solution are tremendous. • Leave Module A comprehensive leave management module with extensive possibilities of defining leave types and more. It caters for all application and approval processes and is able to display information on leave entitlement, balance, history etc. Thanks to the web-enabled and selfservice concepts, it significantly streamlines all leave related procedures, eliminates paperwork and saves costs. • Time Module The module automates time tracking related processes. It helps to efficiently organize labour data and improve the workforce management. Time module allows employees to define and submit their timesheets, which can be approved / rejected and modified by their supervisors. • Reports Module This feature produces customized reports according to your needs. Any number of reports can be defined by selecting from a range of search criteria and report fields. Report definitions can be saved to avoid repeating this task. Once the report definition is saved, the report can be generated by providing the required criteria data. • BUG Tracker In the event of any bugs being encountered while using the system, these bugs could be immediately reported on-line using the Bug Tracker module which would be useful for fixing them. OrangeHRM version 2.2 © OrangeHRM Inc. 2005 – 2007 All rights reserved. 7 Quick User Guide for OrangeHRM 2.2 Chapter 2 2 Getting started 2.1Start & login • Make sure that the AMP stack (Apache, MySql and PHP) is running. • Open your web browser and enter the url address for OrangeHRM e.g. http://localhost/orangehrm2/ • Login to OrangeHRM by using the login name and password previously selected in the installation. Login details Figure 2.1 OrangeHRM version 2.2 © OrangeHRM Inc. 2005 – 2007 All rights reserved. 8 2.2Using OrangeHRM After logging in to the system you will see the screen showed below in figure 2.2. From the top menu you can select which module to enter i.e. Admin Module, PIM Module, Leave Module, Time Module Reports Module or Bug Tracker (See Chapter 1, Overview, for brief description of each module). Top Menu Module selection Figure 2.2 Start by clicking on Admin Module in order to setup the system and define the information matching your needs. 2.2.1Admin Module When entering the Admin Module you will start by seeing the screen for the basic information on the company shown in figure 2.3. Start by clicking Edit and enter the information. Afterwards click Save. From the left side menu of the Admin Module you can select the areas you want to define for your company, for example Company structure, Job titles, descriptions, pay grades, Skills and Qualifications, Customers, Projects, etc. The security of the system is also being handled through Admin module, as it allows to define users, group them into groups and assign user rights for the access to the OrangeHRM modules. Fore more see figure 2.3. OrangeHRM ver 2.2 © OrangeHRM Inc. 2005 - 2007 All rights reserved. 9 Quick User Guide for OrangeHRM 2.2 Left side menu Adm. Feature selection Figure 2.3 Action Buttons Edit/Save and Clear We will show the general principle by one example. Move the cursor to Job in the left side menu and click on Job Title and you will get the screen shown in figure 2.4. Click on the Add button in order to enter a new Job Title. Action Buttons Add and Delete Figure 2.4 You will then see the screen shown in figure 2.5. Enter the Job Title Name, Job Description and eventually Job Title Comments. OrangeHRM version 2.2 © OrangeHRM Inc. 2005 – 2007 All rights reserved. 10 Quick User Guide for OrangeHRM 2.2 Figure 2.5 A Pay Grade also needs to be assigned to the Job Title. Since you haven’t entered anyone yet the select box will be empty. You can add a new one by clicking on the link Add Pay Grade. In the new box enter a name for the Pay Grade and click Save. Then you can choose the wanted currency, minimum salary, maximum salary and step increase as shown in the screen shot (Figure 2.6) below. After entering the information click Save. Figure 2.6 When the currency has been assigned, click Back. You will return to the window for Job Title. The info can be changed by clicking Edit. (It’s also possible to add and assign an employment status to the Job title. It works the same way as just described for the Pay Grade). OrangeHRM version 2.2 © OrangeHRM Inc. 2005 – 2007 All rights reserved. 11 Quick User Guide for OrangeHRM 2.2 The example above shows the general principle of how to use the Admin module, enter the information and configure OrangeHRM to match you company. The more detailed information about each section of the Admin module is available in the OrangeHRM user manual. The following part describes briefly how to use the PIM Module and how to enter the info on each employee. 2.2.2PIM Module In the PIM Module start clicking Add in order to enter the information of an employee. See screen shot in figure 2.7 below. Figure 2.7 Enter the information in the fields and click Save. In case a picture of the employee is available it can be attached by clicking Browse. See screen shot in figure 2.8 below. OrangeHRM version 2.2 © OrangeHRM Inc. 2005 – 2007 All rights reserved. 12 Quick User Guide for OrangeHRM 2.2 Figure 2.8 After saving the name info you will enter the main screen for the PIM Module with icons for the different areas of information, such as Personal, Job, Education etc. (See figure 2.9). Try and click on the Job icon and then click Edit. If you then click on the scroll down button for Job Title you will be able to see the names you just entered in the Admin Module. Enter the needed information and click Save. Action Buttons Icon Menu PIM feature selection Figure 2.9 Some of the sections of PIM module (i.e. Job, Education, Languages, Skills, etc.) rely on the information specified in the Admin module. Therefore, it is important to configure the OrangeHRM version 2.2 © OrangeHRM Inc. 2005 – 2007 All rights reserved. 13 Quick User Guide for OrangeHRM 2.2 system and enter the relevant information before entering employee information into the system. The above serves as a basic example of how to use the PIM module and how it connects with the admin module. The next section of the guide is devoted to the ESS module. 2.2.3Employee Self Service Module (ESS) The following part will briefly describe how to use the Employee Self Service Module (ESS). 2.2.3.1 Creating an ESS User First you need to create the user(s) whom you want to enable access to the ESS module. Go to the Admin Module, move the cursor to Users in the left side menu and click on ESS Users. Then click on the Add button and the screen shown in figure 2.10 will appear. Figure 2.10 Type in the wanted User Name and password and select the employee. Make sure the status is set to 'enabled' and click Save. Note, that the employee record must already exist in the system prior to creating user for this employee. The user has now been created and the employee can login to the ESS module using the selected User Name and Password. OrangeHRM version 2.2 © OrangeHRM Inc. 2005 – 2007 All rights reserved. 14 Quick User Guide for OrangeHRM 2.2 2.2.3.2 Logging in as ESS User To log in as an ESS User, use the username and password selected when creating the user. After logging in as an ESS user can browse through the menu, as shown in figure 2.11. Figure 2.11 After logging in, the ESS User can view and edit personal information through the PIM Module without having to trouble HR personnel of the company. User will be able to view his/hers leave summary and apply for leave through the Leave Module. If the ESS User is supervisor for another employee he or she can also approve or reject leave. Please see part 2.2.4 for more info on the Leave Module. Through the Time module user can create the weekly timesheets and submit them for the approval of the Supervisor. For more information, please refer to Time Module part 2.2.6. 2.2.4Leave Module The HR Admin can: • View Leave Summary for each employee and entitle leave days of each available type • Define Days Off – Weekends and Specific Holidays • Define Leave Types • Assign Leave for any employee The ESS User can: • View the Personal Leave Summary • View the detailed leave information • Apply for Leave OrangeHRM version 2.2 © OrangeHRM Inc. 2005 – 2007 All rights reserved. 15 Quick User Guide for OrangeHRM 2.2 The ESS User – Supervisor can: • View the Personal or Employee (subordinate) Leave Summary • View the Leave List – the detailed leave information • Apply for Leave • Assign Leave for his/her subordinates • Approve/Reject leave 2.2.4.1 Administrator To view leave summary click Leave Summary from the left side menu. Then select a Year. Administrator can filter leave summary information by the particular Employee (click Browse to search for the employee code and name) or by the leave type. The Leave Types are being defined by the Administrator. If Administrator wants to view all the leave information (without filtering), a screen similar to the one shown in figure 2.12 below will be shown. Administrator can edit the information of the leaves entitled for the employees by editing the leave summary. Figure 2.12 The other functionality available for administrator is described in the OrangeHRM User Manual. The administrator can Assign Leave for any employee. If the leave is being assigned by administrator or the supervisor of the employee, the leave does not require approval. The screen shown in the figure 2.13 will be used for leave assignment. OrangeHRM version 2.2 © OrangeHRM Inc. 2005 – 2007 All rights reserved. 16 Quick User Guide for OrangeHRM 2.2 Figure 2.13 Administrator must select the Employee, by browsing through the list of employees, select the leave type, to and from day and specify whether the leave is full or half day. Eventually, comments shall be entered. To assign the leave, click Apply button. 2.2.4.2 ESS By clicking on Leaves List from the left side menu, the ESS user can view a list of the leave types and get a summary of the leave taken the leave available as shown in the screen in figure 2.14 below. Figure 2.14 Furthermore the ESS user can apply for leave by clicking on Apply in the left side menu. Then the screen shown in 2.15 below will appear. OrangeHRM version 2.2 © OrangeHRM Inc. 2005 – 2007 All rights reserved. 17 Quick User Guide for OrangeHRM 2.2 Figure 2.15 Select the wanted date and leave type and choose if it is for a full or a half day. If needed, enter a comment in the empty box and click Save. The application for leave will now appear to the supervisor when he or she logs in to ESS module (see description below). If the email notifications are configured, the supervisor will be sent the email, notifying him about the leave, pending for his/her approval. The ESS user can also Cancel leave, which is pending approval or being approved but not yet taken. This can be performed through the Leave List functionality of the system. The leave list can also be used to view the detailed information of the employee leaves. 2.2.4.3 ESS – Supervisor The Supervisor is the ESS user who has the subordinates assigned. The subordinates are being assigned through the “Report-to” section of the PIM module. The supervisor must also be assigned to the employees in the “Report-to” section of their PIM modules. Except for the features already described above, a supervisor can also approve and reject leave through the ESS module when a subordinate is applying for it. To do this click on Approve Leaves in the left side menu. If a subordinate has applied for leave, a screen similar to the one shown below in figure 2.16 should appear. OrangeHRM version 2.2 © OrangeHRM Inc. 2005 – 2007 All rights reserved. 18 Quick User Guide for OrangeHRM 2.2 Figure 2.16 To approve or reject leave, select the wanted command from the drop down box under Status and then click Save. System has the possibility for partial approval or rejection of the leave. To do so, Supervisor shall click on the link with the leave dates, specify the appropriate status for each day of the leave and click Save. The Supervisor has also the possibility of Assigning Leave (as the Administrator does). The difference is that Administrator can assign leave to any employee of the company and Supervisor – only to his/her subordinates. For more information, please refer to part 2.2.4.1 2.2.5Time Module The Time module automates time tracking procedure. 2.2.5.1 ESS User The ESS User of the system can edit and submit for approval his/her weekly timesheets. The user must select Timesheets/Personal Timesheets menu items and choose the week, for which the timesheet shall be edited. The empty weekly timesheet is shown in the figure 2.17 Figure 2.17 Once the week is selected, ESS user shall edit the timesheet for the week by pressing Edit button. The edition of the timesheet can include adding new, editing and deletion of time events. See figure 2.18 for more information OrangeHRM version 2.2 © OrangeHRM Inc. 2005 – 2007 All rights reserved. 19 Quick User Guide for OrangeHRM 2.2 Figure 2.18 To specify the new time event user shall select the customer, project, start time, end time and/or duration of the event and description. The Update button is being used to add the time event to the timesheet. The Insert time button makes it easier for user to specify the exact time in correct format. Once user has finished modification of the timesheet, he can submit it for the approval of the supervisor or HR administrator. To do so, press the Submit button, show in figure 2.17 2.2.5.2 Administrator and ESS User - Supervisor The administrator and Supervisor users can view through, edit and Approve/Reject the timesheets of the employees with the difference that administrator has the access to the timesheets of all employees of the company and supervisor – only to the timesheets of his/her subordinates. The figure 2.19 shows the weekly timesheet of the employee, which is pending for approval. The Figure 2.19 OrangeHRM version 2.2 © OrangeHRM Inc. 2005 – 2007 All rights reserved. 20 Quick User Guide for OrangeHRM 2.2 To approve or reject the timesheet, Supervisor/Administrator must click the appropriate button. The comments can also be entered. Once the timesheet is approved it can not be edited. 2.2.6Reports Module Enter the Reports Module by clicking on the Reports button at the top of the screen. You will then see the screen shown below in figure 2.20 Figure 2.20 To create a new report click on Define Employee Reports at the left-side menu and then click Add and the screen shown in figure 2.21 will appear. OrangeHRM version 2.2 © OrangeHRM Inc. 2005 – 2007 All rights reserved. 21 Quick User Guide for OrangeHRM 2.2 Specify Report Name Define Selection Criteria Fields to be included in report Figure 2.21 From here you can define the report from several different criteria. After completing the specifications click Save. The report will by default be assigned to the user group you belong to. After saving you can manage the assigning of user groups and remove the existing and/or add new ones if needed. To view the report click on View Employee Reports at the left-side menu and then click on the report from the list. 2.2.7Bug Tracker If you happen to encounter any bugs/errors you can immediately report them using the Bug Tracker by clicking on Bug Tracker from the top menu. Enter the different criteria and description and click Save and the bug will be reported to the OrangeHRM team immediately. See figure 2.22 below. OrangeHRM version 2.2 © OrangeHRM Inc. 2005 – 2007 All rights reserved. 22 Quick User Guide for OrangeHRM 2.2 Figure 2.22 OrangeHRM version 2.2 © OrangeHRM Inc. 2005 – 2007 All rights reserved. 23 Quick User Guide for OrangeHRM 2.2 Chapter 3 3 Further information This guide serves as a quick introduction to OrangeHRM version 2.2 showing the main modules and the basic principles of the system. For further guidance and information on each specific feature please refer to the OrangeHRM User Manual. If you have any questions, comments etc. you can contact OrangeHRM by emailing [email protected]. Thank you for using OrangeHRM! OrangeHRM version 2.2 © OrangeHRM Inc. 2005 – 2007 All rights reserved. 24