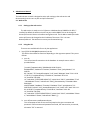
1
24-Hour Road Service Mobile Apps
User-Admin Manual
Fall 2011
Michigan State University Computer Science and Engineering Capstone Team Members:
Paul Fritschen
Justin Hammack
Lingyong Wang
Contents
1.
User Manual ......................................................................................................................................... 3
2.
Smartphone Applications..................................................................................................................... 3
2.1
Logging In ...................................................................................................................................... 3
2.2
Main Screen .................................................................................................................................. 4
2.3
Requesting Road Trouble Service ................................................................................................ 6
2.4
Viewing Insurance Information ................................................................................................. 10
2.5
Finding Nearby Places ................................................................................................................ 12
3.
Administrative Website ..................................................................................................................... 14
4.
Administrator Manual ........................................................................................................................ 16
4.1
Webservice .................................................................................... Error! Bookmark not defined.
4.2
iPhone ......................................................................................................................................... 17
4.3
Android ....................................................................................................................................... 19
4.3.1 Retrieving Insurance Info .......................................................................................................... 19
4.3.2 Sending Logging Data ................................................................................................................ 19
4.4
Website ....................................................................................................................................... 20
1. User Manual
This manual is designed to show how to use both the smartphone applications and the
website. The sections tend to be grouped as tasks that a user can accomplish.
2. Smartphone Applications
The following sections show the different screens that comprise the applications. In
these sections each figure is comprised of a screenshot from the iPhone on the left and a
screenshot from the Android on the right.
The smartphone applications have three primary functions, requesting road trouble
service, viewing insurance information, and finding nearby locations. These functions are
accessed through the main screen after logging in. In the following sections it is shown how to
use each of the functions and the login and main screens.
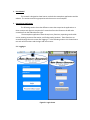
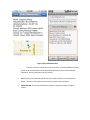
2.1 Logging In
Figure 2.1 Login Screen
The login screen allows the user to input their Auto-Owners Insurance information. This
information is conveyed to a web service that will authenticate the information with the AutoOwners Insurance database. On successful authentication, user insurance data will be
downloaded to the phone and stored in a local database. On this screen the user has the
following two options
Login: The user can login with their Auto-Owners Insurance username and password.
Skip: If the user is not currently an Auto-Owners Insurance member, the user can skip
login to search for nearby places, or use the call functionality of the application.
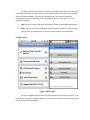
2.2 Main Screen
Figure 2.2 Main Screen
If a user has logged in before, the main screen will be the first screen to show up. From
here the user can make a variety of selections. If the user does not have an internet connection
the “Find” feature will be disabled.
Request Road Trouble Service: The user can click this button to begin the request for
service. From here they will proceed to the Service Request Screens shown in section
2.3.
View Insurance Data: This button will take the user to a screen showing their login
information. This is shown in section 2.4.
Find Service Centers: The user can click this button to find nearby service centers. This
functionality is explained in section 2.5.
Find Hotels: The user can click this button to find nearby hotels. This functionality is
explained in section 2.5.
Find Restaurants: The user can click this button to find nearby restaurants. This
functionality is explained in section 2.5.
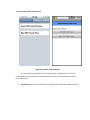
2.3 Requesting Road Trouble Service
Figure 2.3.1 Vehicle Selection Screen
This series of screens guide the user through the steps to acquire service. The first
screen displays a list of vehicles insured under the user’s policy. The user selects the vehicle
that needs service.
Any Vehicle: The user clicks a button corresponding to the vehicle that requires service.
Figure 2.3.2 Edit Location Screen
The map and address seen in the above screen are both automatically populated based
on the smartphone’s GPS location. If this location does not accurately represent the vehicles
location the user can edit the textbox to include a correct address or some other description of
the area.
Send Email to Quest/Send My Location: This user should select this button if the map
and address correspond to their vehicles location. If it is not correct the user should
first edit the address.
Figure 2.3.3 Send Email Screen
The user is taken to the phones native email client. The email address for Quest
as well as all the information contained with the body of the email is automatically
populated. Pressing send continues the process.
Send: The user will select this button if they are ready to email a service request to
Quest. The user will be taken to the call screen shown in the next figure.
Cancel/Discard: This user should select this button if they do not wish to request
service.
Figure 2.3.4 Call Screen
After the email is sent this user is prompted to call Quest. They should ask to
make sure that their email has been received and that service will be provided.
Call Quest: The user will select this button to make a confirmation call to Quest.
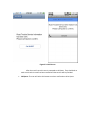
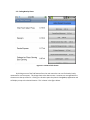
2.4 Viewing Insurance Information
Figure 2.4.1 View Insurance Screen
Clicking the View Insurance button on the main screen brings the user here. The user’s name,
policy number, and list of insured vehicles are displayed. Clicking on a vehicle displays the vehicle color,
year, make, and model, as well as its VIN, and Roadside Trouble Service Limit. This is shown in the
following figure.
Figure 2.4.2 View Vehicle Screen
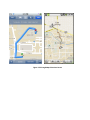
2.5 Finding Nearby Places
Figure 2.5.1 View Vehicle Screen
By clicking on one of the find features from the main menu the user can find nearby hotels,
restaurants or service centers. This brings them to the above screen. Locations are arranged with the
closest one at the top of the list. Clicking on a location opens the phone’s GoogleMaps application and
will display a map to the desired location. This is shown in the figure below.
Figure 2.5.2 GoogleMaps Directions Screen
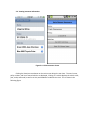
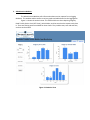
3. Administrative Website
The Administrative Website pulls information about service requests from a logging
database. This website enables access to various graphs and tables based on the logging data.
Figure 3.1 shows the statistics view. This view holds three charts depicting usage by
Road Trouble Service Limit (RTS Limit), Vehicle Make, and the state that the request took place
in. There are filtering options available for these charts. They include state, start and end time,
and start and end date.
Figure 3.1 Statistics View
Figure 3.2 shows the drop down calendar that will appear when clicking one of the date
fields. The Prev and Next buttons are used to change the month, and there is a drop down box
to select the year.
Figure 3.2 Calendar Select
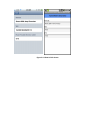
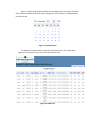
The website has a table view for viewing all transactions at once. This is depicted in
figure 3.3. This table will sort by any column that the user clicks.
Figure 3.3 Table View
4. Administrator Manual
The Administrator manual is designed to assist with setting up the web service and
demonstrating how to use it to push and pull information.
4.1 Web service
4.1.1
Setting up the web service
The web service is ready to run in Eclipse on a Windows Server 2008 R2 with JRE 1.7
installed. By default the web service will use port number 8888. This can be changed in
Servers/Tomcat v6.0 Server at localhost-config/server.xml. The IP address used by the web
service will have to be changed to the IP address of the server. This is in AutoOwners/build.xml. The web service returns json formatted strings.
4.1.2
Using the API
There are two available APIs for use by the applications.
1. http://35.9.22.108:8888/autoowners/user.do
This API has three different functions depending on the arguments passed. They are as
follows:
a. user.do
This will retrieve all transactions in the database. An example return value is
provided below.
{"results":[{"transactionKey":"004824a2-8123-4b74-a22106fe66a94e87","lastName":"Fritschen","firstName":"Paul","policyNumber":"1234567890","rtsLimit":"75","locationDescription":"null","state":"Michigan","date":"2011-12-03
17:45:37.0","inceptionOfPolicy":"2010-08-16","termStart":"2011-0816","termEnd":"2012-0816","vehicleVin":"5GZCZ43D13S812715","vehicleYear":"2001","vehicleMake":"Ford"
,"vehicleModel":"Focus","vehicleColor":"Red"},{"transactionKey":"00ccdabc-90be4442-8cb5e6e5677bbebb","lastName":"Fritschen","firstName":"Paul","policyNumber":"12345678-90","rtsLimit":"100","locationDescription":"null","state":"null","date":"2011-1203 14:25:58.0","inceptionOfPolicy":"2010-08-16","termStart":"2011-0816","termEnd":"2012-0816","vehicleVin":"2ZGCZ13S43D715812","vehicleYear":"2010","vehicleMake":"Nissa
n","vehicleModel":"Sentra","vehicleColor":"Black"} ] }
b. user.do?username=user&password=pass
This will attempt to find an insurance key based on the given username and
password. If the username and password are found, the insurance key is returned,
otherwise “fail” is returned.
c. user.do?insuredKey=123456
This will attempt to find an insurance record based on the passed insured key. If
the record is found, the insured record along with any insured vehicles is returned,
otherwise an empty json set is returned. An example value return and empty json
set are provided below.
{"results":{"insuredKey":"abcd","lastName":"Fritschen","firstName":"Paul","policyNum
ber":"12-345678-90","inceptionOfPolicy":"2010-08-16","termStart":"2011-0816","termEnd":"2012-0816","vehicles":[{"vehicleKey":"2222","vehicleVin":"5GZCZ43D13S812715","rtsLimit":
75,"vehicleYear":2001,"vehicleMake":"Ford","vehicleModel":"Focus","vehicleColor":"
Red"},{"vehicleKey":"2323","vehicleVin":"2ZGCZ13S43D715812","rtsLimit":100,"vehi
cleYear":2010,"vehicleMake":"Nissan","vehicleModel":"Sentra","vehicleColor":"Black
"}]}}
{"results":{"vehicles":[]}}
2. http://35.9.22.108:8888/autoowners/userAdd.do?lastName=Hammack&firstName=Justin
&policyNumber=1234567&rtsLimit=50&locationDescription=Lansing&state=MI&date=2005-040615:32:30&inceptionOfPolicy=2005-04-06&termStart=2005-04-06&termEnd=2005-0406&vehicleVin=212121&vehicleYear=2001&vehicleMake=Ford&vehicleModel=Focus&v
ehicleColor=Red
This will add a service request transaction to the logging database. The call will
return “success” or “fail”
4.2 iPhone
The following demonstrates how to set up the phones database and how to use the web
service.
Setup database:
[DatabaseManager copyDatabseIfNeeded];
Reset database (usually used for debug reason):
[DatabaseManager resetDatabase];
Communicate with database:
If you want to add or read data from database, you just implement the functions in the
DatabaseManager, examples for add and get user info from database.
- (void) addUser:(User *)user {
const char * sql = "insert into userinfo (insuredkey) values (?)";
sqlite3_stmt *insert_statement = nil;
sqlite3_prepare_v2(database, sql, -1, &insert_statement, NULL);
sqlite3_bind_text(insert_statement, 1, [user.insuredKey UTF8String], -1,
SQLITE_TRANSIENT);
sqlite3_step(insert_statement);
sqlite3_finalize(insert_statement);
sqlite3_close(database);
}
- (User *) getUser {
const char *sql = "SELECT insuredkey FROM userinfo";
sqlite3_stmt *statement;
sqlite3_prepare_v2(database, sql, -1, &statement, NULL);
NSString *insuredKey = nil;
//get data and store data
while (sqlite3_step(statement) == SQLITE_ROW) {
//everything is array to make things easier
insuredKey = [NSString stringWithUTF8String:(char *)sqlite3_column_text(statement, 0)];
}
sqlite3_finalize(statement);
sqlite3_close(database);
return [[[User alloc] initWithInsuredKey:insuredKey] autorelease];
}
Using DatabaseManager example (get insurance info):
DatabaseManager *insuranceDetailDatamanager = [[DatabaseManager alloc] init];
User *userDetail= [insuranceDetailDatamanager getUser];
[insuranceDetailDatamanager release];
Using Communicationmanager and API:
apiString is the API url string,
CommunicationManager *connection = [[CommunicationManager alloc] init];
connection.delegate = self;
[connection connectWithAPIString:apiString];
[connection release];
If you set the delegate to self, you have to implement the following function to use to
process the received data. Data is the data returned from server, it can be Json or text
depends on which API you are using
- (void) apiConnection:(CommunicationManager *)connection didReceiveData:(NSData *)data;
4.3 Android
The phone uses the web service to communicate with the AOI database and logging
database.
4.3.1 Retrieving Insurance Info
To use to web service to retrieve information from the Auto-Owners Insurance
database the following functions must be used.
String InsuranceData=comManager.getInsuranceInfo();
This uses an instance of the ConnectionManager to retrieve a String of the
Insurance Data. This information must be parsed to be stored in the phones
internal database. The following command parses the data and stores it in an
array of ContentValues.
ContentValues[] data=parser.parseInsuranceInfo(InsuranceData);
To store this information in the database one must use the following call.
dbhelper.updateInsuranceInfo(data[0]);
Storing vehicles is done in a for loop for the size of the potential amount of
vehicles. Current Implementation supports a maximum of 19 insured vehicles.
dbhelper.addVehicle(data[i];
4.3.2 Sending Logging Data
To send logging data to the logging database the web service must also be used.
This is done by executing the following commands. An instance of the Parser
class takes DatabaseManager object and the index to what vehicle was selected
by the user on the vehicles screen and returns a string. This string is then sent
to an instance of the CommunicationManager.
String sendString=parser.parseTransactionsSend(dbhelper, index);
String check=comManager.sendTransaction(sendString);
4.4 Website
The administrative website uses the web service to retrieve all of the service requests.
The private variable URL in the file HomeController.cs (shown below) should be set to the IP
address of the web service.
// URL for all web service requests
private const string URL = "http://35.9.22.108:8888/autoowners/user.do";
The function GetTransactions in the HomeController is where the http request is sent.
/// <summary>
/// Gets the service request transactions from the web service
/// </summary>
private void GetTransactions()
The JSON response from the web service is deserialized in the function GetTransactions
in the file Transactions.cs under Models. The function takes a json string and returns a list of
transactions. This list will be empty if there is an error deserializing the string. The Transaction
model’s properties must match the columns in the transaction table.
public static List<Transaction> GetTransactions(string jsonString)