1
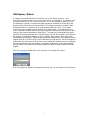
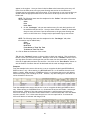
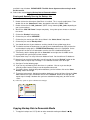
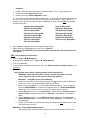
SalonTouch &
SunTouch
Evolution
Interactive designs, inc © 2009
Getting Started Guide
Through out this guide the software name “SalonTouch” will
be used to reference both SalonTouch Evolution and
SunTouch Evolution.
2
Table of Contents
CHAPTER 1: ENVIRONMENT SETUP………………….. ....................................5
System Requirements.................................................................................................................. 5
CHAPTER 2: INSTALLING …………………. ......................................................6
Before Installing........................................................................................................................... 6
Installing ...................................................................................................................................... 6
SQLExpress_Wizard ..................................................................................................................... 8
CHAPTER 3: STARTING SOFTWARE….. ……..................................................9
Starting Software......................................................................................................................... 9
Salon Profile Setup ...................................................................................................................... 9
Security Profile Setup .................................................................................................................. 9
Creating an Employee ............................................................................................................... 10
Adding a Client .......................................................................................................................... 11
Creating Products ...................................................................................................................... 11
Inventory ................................................................................................................................... 11
CHAPTER 4: MAKING A SALE……. ...............................................................13
Setting Up the Printer and Cash Drawer ................................................................................... 13
Opening the Till ......................................................................................................................... 13
Making a Sale............................................................................................................................. 13
Closing the Till ........................................................................................................................... 14
CHAPTER 5: SETTING UP SALON/SPA MODULE ........................................13
Creating Provider Groups .......................................................................................................... 15
Set up Provider Appointment ( Only available in the Salon/Spa Module)................................ 15
Set Up Resource Appointments ................................................................................................ 16
Creating Provider Services......................................................................................................... 16
Book an Appointment ............................................................................................................... 17
CHAPTER 6: SETTING UP TANNING MODULE .............................................18
Creating a Room ........................................................................................................................ 18
Setting Up Timers ...................................................................................................................... 18
Design Activity Screen’s Room Layout ...................................................................................... 19
Understanding the ComManager ………………………………………………………………………...19
3
Creating Tan Services ................................................................................................................ 19
Tanning a Client......................................................................................................................... 21
CHAPTER 7: DATA BACKUP AND RESTORE ...............................................22
Creating SQL Backup Job ........................................................................................................... 22
Copying Backup Data to Removable Media .............................................................................. 23
Restoring Your Data with the SQL_Jobs .................................................................................... 25
Backing Up Your Data with the Enterprise Manager ................................................................ 26
Restoring Your Data with the Enterprise Manager ................................................................... 26
CHAPTER 8: TROUBLESHOOTING TIPS .......................................................28
Problems with Timer Operation................................................................................................ 28
Rebooting the PC....................................................................................................................... 28
CHAPTER 9: FREQUENTLY ASKED QUESTIONS .........................................29
CHAPTER 10: CONTACTING US ....................................................................31
Technical Support...................................................................................................................... 31
Forums....................................................................................................................................... 31
Email .......................................................................................................................................... 31
Latest Downloads ...................................................................................................................... 31
For SalonTouch Suggestions...................................................................................................... 31
For SalonTouch Sales................................................................................................................. 31
Employee Training..................................................................................................................... 31
4
Chapter 1: Environment Setup
System Requirements
The following information describes the minimum and recommended requirements for all PC’s
running SalonTouch in a single salon environment. This information is true for a single standalone PC salon configuration or for a salon with a Local Area Network (LAN) configuration.
Minimum Requirements
Pentium – 2.0 GHz
1024mb RAM (1 Gigabyte)
Windows 2000, Windows XP, Vista Business/Ultimate, or Windows 7
Network Card (required for LAN) 3
Internet Access 2
Recommended Requirements
Pentium Dual Core - 2.0 GHz or faster
3 GB Ram or higher
Windows XP Professional, Vista Business/Ultimate, or Windows 7
CD-R/RW Drive, Zip, Jazz or Peerless Drive 1
Broadband Internet Access 2
Network Card (required for LAN) 3
Anti-virus Software 4
UPS Battery Backup 5
6
1 CD-R/RW, Zip, Jazz or Peerless Drives are devices used to create backup copies of your data in the event something happens to your system.
2 Internet access would allow you to download the latest updates off our web site and receive emails on new updates and promotions.
3 A single network hub or router is required if setting up a LAN. The hub should be able to support the number of systems you plan to connect in
one store.
4 Anti-virus Software protects your system from computer viruses that can destroy your data.
5 UPS Battery Backup is a device the computer system plugs into to provide protection against power surges, brown outs and loss of power.
6 If you are planning to set up a LAN, Windows XP Professional Edition is better designed for this type of configuration.
See the LAN diagram on page 32.
5
Chapter 2: Installing
Before Installing
Please fill out the SalonTouch Registration Card and mail to:
Interactive Designs, Inc.
1475 Alderman Drive
Alpharetta, GA 30005
Set the properties of the Windows taskbar to “Auto Hide”.
Verify the connectivity and user access across your LAN and/or WAN.
Verify the COM port number where the timers are physically connected to the PC’s COM
Port
Verify the brand/type of timers used in each salon.
Verify that all equipment and operating systems meet the requirements above.
Verify that all necessary drivers for peripheral devices are installed and are appropriate for
the operating system you are using and they are working properly.
Make certain that your computer and monitor are turned on.
Verify that Windows XP or Windows 2000 is installed and configured correctly, and all of
the latest Windows Updates have been installed.
An electronic copy of our manual is located on the Start-->All Programs-->SalonTouch->ST_Manual. You’ll need to have a copy of Adobe Acrobat Reader installed in order to
view the files. If you don’t have the Adobe Reader, you can download a free copy from
www.adobe.com.
Installing
1.Insert the SalonTouch CD-ROM into the CD drive. The installation process will automatically
begin (approximately 10-20sec) once the CD drive door is closed.
Note: If the Setup program does not begin automatically, click on Start-->Run and type
in E:\Setup.exe and click the “OK” button. Substitute E: with the drive letter of your
CD-ROM (i.e. F: or G:)
2. At the welcome dialog screen, click the “Next” button to continue. You can click the
Cancel button at any time to abort the installation.
3. The License Agreement screen box will then be displayed. Read the License Agreement
and then click I Agree button if you agree to the terms.
6
4. At the “Get Registration Information” enter your name, your company’s name, and the
SalonTouch license number assigned to this location.
5. On the “Type Of Installation” screen choose “Standard” (This guide is for the Standard
installation only. If you are installing a Wide Area Network, you may wish to select the correct
installation button. At the end of the installation, you may use the MSDE_Wizard program and
the SalonTouch Manual to help with the completion of your WAN setup.)
6.
On the “Destination Location” screen select the drive and folder name where you want to
install the program. We recommend that you leave this at the default location of
C:\SalonTouch. You may install it to another drive (i.e. D:\SalonTouch) but you should leave
the folder name as Salontouch. Click on “Next”.
7. On the “Start Installation” screen click on “Next” to begin the installation.
8. The installation will then proceed to install the program.
9. Finish the installation by clicking on the “Finish” button.
10. You may be prompted to restart your computer, if so then click “OK” to restart your computer
and finish the installation.
7
SQLExpress_Wizard
It is highly recommended that SalonTouch files stay in their default locations. Once
SalonTouch has been installed you will need to browse to the Local Disk C: (or whatever drive
you installed SalonTouch on) SalonTouch folder click the SQLExpress_Wizard icon the.
The SQLExpress _Wizard is a program designed to make the installation and setup of the SQL
Express version of SQL Server quick and simple. This program should be run before initially
starting SalonTouch. It should be run on each computer within your salon. This program
requires that you be logged into your computer as an administrator. This program will ask a
series of questions and with each answer, the program will determine the next step necessary in
setting up the required information for SalonTouch. This program is designed to eliminate the
confusion of having to download and install SQL Express, set SQL Server options, and eliminates
the need to use the Selector program as well as the SQL_Jobs program. Each of the steps
performed by the SQLExpress _Wizard may be performed without the use of the program but the
program helps to insure that no steps are missed within the setup process. When the program is
required to install SQL Express, it will be necessary to reboot your computer and run the program
again to complete the setup (the program is designed to automatically restart after rebooting).
For more details or questions concerning the SQLExpress_Wizard, contact Interactive Designs
Support.
Click OK to accept the default SQL server name to finish installing SQL Express.
Once the SQLExpress_Wizard has completed the setup task, you are ready to start SalonTouch
8
Chapter 3: Starting Software
Starting
Please remember, SalonTouch is designed to create products, services, security, etc. on either
a GLOBAL or a LOCAL level. Anything designated as GLOBAL will apply to multiple salons with
information shared across a WAN. You will only be using LOCAL items for stand-alone and LAN
installations.
Click Start-->All Programs-->SalonTouch-->SalonTouch
Salon Profile Setup
•
When a dialog box pops up asking you to “Choose your correct salon from the drop-down
list”, select “New Salon” ONLY if you are on the main computer and not a workstation.
This list keeps track of all salons that have been configured within SalonTouch. The
workstations should have the salon name you already entered.
•
Next, a screen pops up asking you to “Enter Salon Information”. Enter all information for
this salon, making sure to create a unique name and ID for this salon. The salon name and
ID must be different for each salon.
When a popup tells you that a new employee named “first time entry” has been added,
click” Ok”. This means an initial employee is created and it will have access to all sections
of SalonTouch. It is recommended to log into SalonTouch as this employee until you have
completed setting up SalonTouch for your salon. Should you delete this employee before
creating a new employee with full access privileges you may be locked out of certain
SalonTouch sections (If this happens contact SalonTouch Support).
•
NOTE: Throughout the program you may be asked to enter the password for the current
employee “first time entry” before entering screens. In order to adjust when this popup
appears, or to remove it, refer to the section “Changing the Security Tab Settings”.
Security Setup
SalonTouch will allow you can to control many aspects of the software’s security features. You
can control where you want require security as well as which employees will have access to
those areas. To change or specify when the Security Pad popup appears (asking for an
employee name and password) follow the next procedure. The Security Pad can be set to
popup at most any point during the program.
1. Click on the “Setup” button at the top of the screen.
2. Click on the category labeled “Secuirty” on the left side of the screen. The first
column of check boxes is labeled Require Access. Place a check next to any section in
which you want to require a password access. Any item NOT checked allows full access
for everyone.
3. Click on Save at the bottom of the screen.
A Security Profile gives SalonTouch users access to particular areas of the program and grants
users specific rights. For instance a security profile named “Manager” or “Owner” might have
full rights and full access to all of SalonTouch. A security profile named “Employee” or
“Cashier” might have restricted rights and might not be able to access all areas of the
9
program.
Click the Setup icon located at the top of the main screen.
Click the Security button located at the left side of the main setup screen.
Click on Add Local Security on the left side of the screen.
Select either “Blank Record” or an existing profile which may be used as a template. Using
a template is especially helpful and time saving when creating a new profile that is
very similar to an existing profile.
Single click on your selection and then click the OK button or just double-click your
selection. On the top right corner of the active screen you will see that SalonTouch has
created a blank box where you can enter the name of your security profile. Pleased
enter the name of the profile in the Profile Name field (i.e Owner, Manager, or
Employee). Below the profile name is the Security Level field assign a number for this
profile. This is used for situations where both an owner and a manager may have
access to modify an employee’s profile but you do not want to allow the manager to
change the owner’s employee profile. Whoever is assigned to a profile that has a
higher security level will be able to modify anybody assigned to a profile with a lower
security level. Let’s say for example that the security levels and access rights are set
as follows and everybody is allowed to edit the employee information.
Profile Name
Owner
Manager
Employee
Security Level
100
75
50
Employees’ Information They Can Change
All
Manager and Employee Only, Not Owner’s
Employees Only
The security levels can be any number you want to assign but keep in mind that the
higher levels have access over the lower levels.
Place a check below the profile name in the option boxes on each section where access is
to be granted for this profile, or click on Select button and you can Check All Sections
to grant FULL access for users that will be assigned to this profile.
Click on Save at the bottom of the screen.
Creating an Employee
Click on the Employee button at the top of the screen.
Click on the Manager button on the left side of the screen.
Click on Add New Employee on the left side of the screen.
Enter information on the five tabs provided.
General Tab:
Employee name, address and picture
Personal Tab:
Employee birthday, SSN, Driver’s license, etc.
Licenses Tab:
Employee License Certifications
Security Tab:
Employee password and assigned security profile
Commission Tab: Employee earned commissions
Service Provider: Set if employee will provide salon services (only available in the Hair or Full
Versions of SalonTouch)
Click on Save at the bottom of the screen.
NOTE: The employee’s name, ID, security profile and password must be completed. Some
entries require clicking the button next to the text box. Be sure to complete the
employee’s name and their ID. Select a Security Profile from the drop down box on the
Security panel. The profile created in Chapter 3 should be in the list. Set up a password
for the employee. Employees have a limited view of their record when they enter the
employee section. Any information not completed during setup may be completed at any
time later. If the employee will be a service provider, be sure to check yes on the Service
Provider tab. (Available in the Salon/Spa version of SalonTouch)
10
Adding a Client
1. Click on the “Client” button at the top of the screen.
2. Click on “Add Client” on the left side of the screen.
3. Enter all desired information (some entries require clicking the button next to the text
box). Be sure to complete the client’s name and their ID. SalonTouch automatically
provides the next available ID, but should you decide to use a different ID SalonTouch
will verify that the ID is not in use for the salon. The Client List and Client Records will
display the Client’s ID with the Salon’s ID next to it. Any information not completed at
setup may be completed at any time later.
4. Click on “Save” at the bottom of the screen.
Creating Products
Since you are using the stand-alone or LAN installation you will be setting up LOCAL products
only.
1. Click the “Setup” icon located at the top of the screen.
2. Click the “Products” icon located at the left side of the main screen
3. Click on “Add Local Product” on the left side of the screen.
4. From the pop-up window select either “Blank Record” or from one of the existing
products which may be used as a template. Using an existing template is especially
helpful and time saving when creating a new product that is very similar to an existing
profile. (Single-click on your selection and then click the “OK” button or just double
click your selection.
5. On the “Product” tab enter all the desired information. You must at least give the
product a product group name and a sub group name.
6. Click on “Save” at the bottom of the screen to save this product.
7. On the “Dollars” tab you must setup at least one price entry in order for the product
to appear in the register. The minimum information for a price entry is “Salon”,
“Price” and “Price Starts” date which is the first day that this product will show up in
the register. All other information may be added later. Once you have clicked on
“Save” at the bottom the price entry will move from the white area to the gray area
allowing new entries on the white area. Changes may be performed to gray area
entries. You also have the option of assigning tax to your products from the Dollars
tab. Check yes next to the appropriate tax category.
NOTE: The following items must be completed on the “Dollars” tab (other information
may be added later):
“Salon”, “Price”, “Price Starts”
8. Click on Save at the bottom of the screen to save this product.
Inventory
Inventory may be added only after the general information for a product has been saved. To
adjust the inventory:
1. Click the button labeled “Inventory” on the “Product” tab. SalonTouch is designed to
track multiple costs for a single product.
2. In the pop-up window select the appropriate salon’s ID (if on a WAN) and the
appropriate cost from the drop down list. If the desired cost is not in the list click on
11
the “New Cost” button. This will allow you to enter the new cost amount into the cost
box.
3. Enter the number of units you wish to add or subtract into the “Add to Quantity” box.
If subtracting the quantity enter a minus sign (-) before the number.
4. Click the “Save” button on the pop-up to save the entered information.
12
Chapter 4: Making a Sale
Setting Up the Printer and Cash Drawer
If a cash drawer, receipt printer or report printer is to be used you must configure them in this
section. Make sure all necessary printer drivers are installed and the printer has been added to
your operating system. See Windows help on “Adding a Printer” for more information.
1. Click on the “Setup” button at the top of the screen.
2. Click on ”Printer and Cash drawer” on the left side of the screen.
3. Select the correct printer for the report printer, the receipt printer and the cash
drawer as needed. If any of these items will not be used leave the input boxes blank.
The report printer, the receipt printer and the cash drawer all use drivers to operate
with SalonTouch. Select the appropriate driver for each item.
4. Click on “Save” at the bottom of the screen to save these settings.
Opening the Till
Click on the “Register” button at the top of the screen.
Click on the header labeled “Till” on the left side of the screen.
Click on “Current” on the left side of the screen.
The label on the right side of the screen should read “Saving will Open the till”; otherwise
the till is already open.
Enter the cash count for the beginning balance of the till.
After all information has been entered click on “Save” at the bottom of the screen. The
information for the cash count may not be updated within this section once it has been
saved. To update a previously saved till you must use the “Past” section under the
“Till” header.
Making a Sale
The till must be OPEN before a sale can be made.
2. Click on the “Register” button at the top of the screen.
2. Type in all or part of the last name, first name, ID or a combination then click on the
“Find” button
NOTE: Pressing the <Enter> key is the same as clicking on the “Find” button except
faster.
3. Select the name of the client making the purchase.
4. At the register screen, click on the button that relates to the item to be sold.
Continue to click on the appropriate buttons until the item desired is displayed with
the price beside it. Clicking the desired item at this level will add the item to the list
of items being purchased by the client. Each item selected is displayed on the right
side. You can select multiple quantities of the item by repeatedly clicking the item on
the left.
5. Once all items have been selected click on “Tender” at the bottom of the screen.
6. Click on the button that corresponds with the form of payment being made by the
client. (Until the register options have been setup the only form of payment available
13
is cash. Register options are located by clicking on “Setup” at the top of the screen
and then clicking on Register located on the left side of the screen.) Next enter the
amount of the payment. Continue this pattern until all payment information has been
entered.
7. Click on the OK button to complete the sale.
8. Click on the OK button on the popup message to complete the transaction.
The register has many other features such as sell and redeem gift certificates, use coupons,
discount items, refund items, assign and split commissions, exempt taxes, void items, void
transactions, print old receipts, use In House Credit, use prepays, and do payouts. To learn
more about these and other items open the SalonTouch Manual that is installed on your
computer. To learn how to use the manual go to the Frequently Asked Questions section
later in this guide.
Closing the Till
1. Click on the “Register” button at the top of the screen.
3. Click on the header labeled “Till” on the left side of the screen.
4. Click on “Current” on the left side of the screen.
5. The label on the right side of the screen should read “Saving will Close the till”;
otherwise the till is already closed.
6. Enter the cash count for the ending balance of the till.
7. After all information has been entered click on “Save” on the bottom of the screen.
The information for the cash count may not be updated within this section once you
have saved the till. To update previously saved till information you must use the “Past”
section under the “Till” header.
8. After saving the information it is possible to click on “Balance”t the bottom of the
screen to produce a report that will display the variance for the time period the till
was open.
14
Chapter 5: Setting Up Salon/Spa Module
If you have purchased the Salon and Spa module, you will take the following steps to set up
your facility.
Creating Provider Groups
Setting up provider groups makes set up easier by being able to group your employees into job
classifications. For example, stylists, colorists, massage therapists, etc. You can set up a
general profile for your employee job classifications with a general price, but you may
customize pricing per Provider as well.
1. Click “Setup” on the top toolbar.
2. Click “Provider Groups” on the left toolbar.
3. Click “Local Provider Groups” on the left toolbar.
4. Click “+”, enter the name of the Provider Group you want to create.
5. Click “OK”.
6. Continue these steps for all of your Provider Groups.
7. To view the employees who are members of a group, simply click on the group name.
8. To add employees click “+” on the “Members” list.
9. A pop up box with an employee list will appear, select the employees to add to the group.
10. Click “Cancel” to close the pop up box.
Set up Provider Appointment ( Only available in the Salon/Spa
Module)
Setting up Provider Appointments allows you to customize the
look of your appointment book. You can set the order in which
employees appear as well as color code them.
1. Click “Setup” on the top toolbar.
2. Click “Appointments” on the left toolbar.
3. Click “Provider Appointments” on the left toolbar.
4. Under the General Tab the name and ID’s for each employee setup as a provider will be
displayed.
5. Place a check in the “Display in Appointment Screen” for them to be displayed in
appointment book.
6. Select the display order for the Service Provider, if none are selected SalonTouch will
automatically put them in to alphabetical order.
7. Select “Label Color” and “Font Color” to be used in appointment book, you may want to
make each Provider Group the same colors.
8. To “Allow Double Booking” and/or “Allow Over Booking” put a check in the appropriate
boxes.
9. Click “Save”.
10. Under the “Booking Schedule” enter in the requested information that appointments are
not to be made.
15
11. Use the “Salon Closed” feature to not allow appointments to be made when the salon is
closed.
12. Under the “Fees” tab enter in fees your employees would like to charge for “No show
Fees” and Late Fees”.
13. Click “Save”.
Set Up Resource Appointments
Resource appointments are items that are needed when booking appointments that must be
booked in order to successfully book the service. For example a wax machine in a private
room.
1.
2.
3.
4.
5.
Click “Setup” on the top of the tool bar.
Click “Appointments” on the left tool bar.
Click “Resource appointments” on the left tool bar.
Click “Add Resource” on the left tool bar.
Enter Resource Type, Resource Name, Vendor of resource, check if this appointment allows
double booking, any general info or a booking memo. Enter the dates the resource is not
available, and when the restriction starts and stops.
6. Click “Save”.
Creating Provider Services
Make sure that your employee has been set to be a provider. Since you are using the standalone or LAN installation you will be setting up LOCAL services only.
1. Click the “Setup” icon located at the top of the screen.
2. Click the “Provider Services” icon located at the left side of the main screen
3. Click on “Add Local provider Service” on the left side of the screen.
4. Select either “Blank Record” or an existing profile which may be used as a template.
5. Using a template is especially helpful and time saving when creating a new profile that is
very similar to an existing profile.
6. Single click on your selection and then click the “OK” button or just double click your
selection.
7. Enter Category of “Service”, “Service”, “Item” and “Sub Item” of service, and the salon
the service will be at. You may enter a Bar Code to be identified with the service. You
may enter how you would like to track the service. For example, it may be a “Hair
Service” and would like to track it as so.
8. Select whether this provider service will be taxed. Also, enter the cost.
9. Under the pricing tab select the “Salon” Number, “Provider”, and amount of the service,
when the price starts and ends, click “Save”
10. Click on the “Inventory” tab. Click on the “+/-” next to the inventory used and select
which product will be used for this Provider Service. Click “Save.”
11. You may create a pop up memo on the Provider Service by entering salon number, provider
and memo that you wish to pop up. Click “Save.”
12. Click “Save.”
13. Click the “Booking tab.”
14. Check whether you want to allow “Double Booking”. Enter the number of weeks the
service should be booked. Customize the colors for booking this service. You may want to
create a service code for the service.
16
15. Click the “Timing” tab. Select the salon and provider. You can select to use for new
clients or not. You may customize the booking time of the Provider Service. Click “Save.”
16. Click the “Restrictions” tab.
17. Enter the information for days and times that this service is not available and the date that
these restrictions start and end.
18. Click “Resources”.
19. Enter the resources needed to perform this service.
20. Click “Memos”.
21. Enter the “Salon” number, “Provider” and “Memo” that you would like to pop up when
booking this service.
Book an Appointment
1. Make sure that your employee has been set up to be a Service Provider.
2. Click “Appts.” from the top tool bar.
3. Click on the time frame you would like to book the appointment for under the appropriate
provider.
4. From pop up window, find the client you wish to book.
5. From pop up window, select the service to book.
6. Click “OK”.
7. This will add the appointment into the book.
8. Another way to book an appointment is by clicking “Available” at the top toolbar of the
appointment screen. Then follow steps from above.
9. To check in a client, click on the client appointment. A pop up screen will appear, click
“Check-In”. This will create an open ticket for the client that will list the service that and
the price of the service. The ticket will remain open until the client pays for the service
they received.
10. To cancel an appointment click on the client appointment and the options pop up will
appear. Click “Cancel App.”
11. Move the mouse to the left side of the screen to open more options available in the
appointment book. If you would like to have the options displayed at all times, check the
“Dock Panel” check box located at the bottom of the screen.
17
Chapter 6: Setting Up Tanning Module
If you have purchased the tanning module you will take the following steps to set up your
salon.
Creating a Room
1. Click on the “Setup” button at the top of the screen.
2. Click on “Rooms” on the left side of the screen.
3. Click on “Add New Room” on the left side of the screen.
4. Select either “Blank Record” or an existing room (if any) which may be used as a
template. Using a template is especially helpful and time saving when creating a new
room that is very similar to an existing room.
5. Single click on your selection and then click the OK button OR double-click your
selection in the list.
6. Complete all desired information for this room. The “Box Number” will in most cases
be “00”. The “Box Port” will be the same as the “Room ID”. Choose whatever timer
system that you use in your salon from the drop down list. (i.e Tmax, Intellitan,
Questar, etc.)
NOTE: If you have any rooms configured in SalonTouch that are NOT physically
connected to the timer manager set the “Timer” and “Com Port” to “NONE” and
“NA” respectively. For example, if you have a room designated as massage or nails.
Failure to do so will cause the program to constantly try to communicate with a nonexistent timer therefore slowing your system down.
7. Click on the “Options” tab to configure advanced settings for this room.
8. If taxes will be collected on surcharges for this room set the tax settings for this room.
9. Click on “Save” at the bottom of the screen when you have completed the setup of
each room.
SalonTouch will remind you that the ComManager must be restarted after making changes
to the rooms, however when following these steps it is not necessary to restart
ComManager until you have completed the following section Setting Up Timers.
Setting Up Timers
If SalonTouch is going to control the room timers the timer must be connected to a computer
where SalonTouch is installed. In a LAN environment, this would be considered the server. The
operating system and hardware specs do not have to be that of a ‘true’ server.
1. Click on the “Setup” button at the top of the screen.
2. Click on “Rooms” on the left side of the screen.
3. Click on Timers on the left side of the screen.
4. Select the timer manufacturer under the “Timer” column ONLY on the corresponding COM
port under the “Com Port” column. There should only be one entry in this section. For
example, if your timer manager is connected to the communications port COM2 then click
on the drop-down under the “Timer” column next to the “2” under the “Com Port”
column. The lines for COM port 1 and 3-9 should be blank, only COM port 2 should have en
entry.
5. The baud rate, bit settings and pause values will be set to the defaults for the timer. Click
on “Save” at the bottom to save your settings.
6. Remember to restart the ComManager program after changes are made to rooms.
18
Design Activity Screen’s Room Layout
Before performing this step you must already have rooms added.
1. Click on the “Setup” button at the top of the screen.
2. Click on “Rooms” on the left side of the screen.
3. Click on “Design View” on the left side of the screen.
4. Select a view from the drop down box on the right side of the screen.
5. Pick the view that works best for the design you want.
6. Click on “Default View” located on the right side of the screen to select the current
view as your default.
7. Click on the dark gray cell you want to assign a name. From the list of names that
appear on the right, select the desired name. By clicking on the “New” button you
may enter a name that does not appear in the list.
Understanding the ComManager
•
The ComManager controls all of the communication between SalonTouch and the bed
timers. ComManager must be running while using SalonTouch even if no timer is being
used.
•
The ComManager should only be run on one computer per salon and only on the computer
that is attached to the timer (if a timer is being used).
•
The ComManager should start automatically after SalonTouch it started. If it does not then
make sure that the ComManager.exe file is in the same folder as the SalonTouch.exe that
you are running. The folder location of these files is usually C:\SalonTouch.
•
When the ComManager is running you will see a “spinning” yellow globe in the System Tray
of your computer. The System Tray is the area next to the time on your taskbar.
•
There should only be one ComManager running at all times. If there is more than one
occurrence of ComManager running then close SalonTouch, click on each ComManager icon,
then click on “End”. Restart SalonTouch.
•
If you click on the ComManager icon and you DON’T want to end it, click on Minimize.
Creating Tan Services
Since you are using the stand-alone or LAN installation you will be setting up LOCAL services
only.
5. Click the “Setup” icon located at the top of the screen.
6. Click the “Tan Services” icon located at the left side of the main screen
7. Click on “Add Local Services” on the left side of the screen.
8. Select either “Blank Record” or an existing profile which may be used as a template.
Using a template is especially helpful and time saving when creating a new profile that
is very similar to an existing profile.
5. Single click on your selection and then click the “OK” button or just double click your
selection
6. Enter all desired information on the “Service ID” tab. You must at least give the service a
service group name and a sub group name.
7. Click on “Save” at the bottom of the screen.
8. On the “Dollars” tab you must setup at least one price entry in order for the service to
19
appear in the register. Once you have clicked on Save at the bottom the price entry will
move from the white area to the gray area allowing new entries on the white area.
Changes may be performed to gray area entries. If you charge tax on your services then you
should choose the appropriate tax level for this service at the top of the screen on the
Dollars tab.
NOTE: The following items must be completed on the “Dollars” tab (other information
may be added later):
Salon
Price
Price Starts
9. On the “Surcharges” tab you must make an entry for each bed type that will
be available with this service. Once you have clicked on “Save” at the bottom
the price entry will move from the white area to the gray area allowing new
entries on the white area. Changes may be performed to gray area entries.
NOTE: The following items must be completed on the “Surcharges” tab (other
information may be added later):
Salon
Bed Type
Bed/Facial
From Minute of Total Tan Time
To Minute of Total Tan Time
10. Click on Save at the bottom of the screen.
TIP: Use the “Calculate” button on the top right to check your settings. This can be done
before or after you save the restriction. When you click on the “Calculate” button click on
the drop-down and select a bed type that you have enter into the restrictions, select the
Salon ID (if applicable) and enter the tan time. Now click on the “Show Results” button to
see the number of sessions that will be deducted and the total surcharge to be paid.
Examples:
From the example below we see this service is set to recognize the bed types REGULAR and
SUPER in salon 1 only. When tanning in a REGULAR bed from 1 to 20 minutes the service will
deduct 1 session. When tanning in a SUPER bed from 1 to 10 minutes the service will deduct 1
session and charge a flat surcharge of $5.00. However, any other bed types in this salon will
not be allowed on this service.
From the example below we see this service is set to recognize the bed type SUPER in salon 1
only. When tanning in a SUPER bed from 1 to 10 minutes the service will deduct 1 minute per
minute tanned. However if the time tanned is between 11 and 20 minutes (inclusive) the
service will charge $1.00 for each minute tanned from 11 and 20 minutes but it will not deduct
any more minutes. So if a client uses this service to tan in a super bed for 13 minutes the
service will deduct 10 minutes and charge $3.00.
20
Tanning a Client
The ComManager must be running in order to tan a client.
1. Click on the “Activity” button at the top of the screen.
2.
Click on “Client List” on the left side of the screen.
3.
Type in all or part of the last name, first name or ID or a combination then press
<Enter> or click on the “Find” button and select the name of the client to be tanned.
This will return you to the “Activity” screen.
On the left side of the “Activity” screen you will find several options.
•
“Services” will show all available services for the selected client.
•
“Tan Log” will display the tanning history for the selected client.
•
“Sales Log” will display the purchase history for the selected client.
•
“Client Profile” will display the detailed information for the selected client.
•
“Cancel Selection” will cancel the selected client.
The right side of the screen will give basic information about the client including the
last visit information with the name of the package last used.
4. Click on a room where the client will be tanning.
5. A popup window will appear with a list of options depending on the current availability
of the room. If the room is currently available click on “Put into Room”.
6. A new popup window will appear listing the services available for the selected client.
Select the service the client would like to use from the list. You can also select “Tan”
“Without a Package” or “Sell a Package”.
7. If the service selected is designed to recognize the bed selected then a screen will
appear displaying the max tan time and delay time for the bed. Enter the times desired by
the client (both may be adjusted). Click on the OK” button to continue the tan.
8. SalonTouch will first determine if the service contains enough sessions, point, or
minutes (as applicable) to cover the service requirements. If the service does not meet the
requirements, the option to borrow from other like packages or to override the restriction
will be offered before continuing. Note that when you select override the program will
NOT deduct any sessions, minutes or points from the service.
9. SalonTouch will next determine if the service requires any surcharges. If a surcharge is
required the register screen will appear with the surcharge amount due displayed. This
amount must be tendered before the tan may continue.
21
Chapter 7: Data Backup and Restore
SalonTouch SQL Data Backup and Restore
The following instructions only apply to SalonTouch SQL version (not Access). If you are on a
LAN then these steps need to be performed on each computer that hosts the databases.
NOTE: These instructions are for the SQL Job Viewer v1.8 or higher. If your version is
lower than 1.8 please contact IDI Support to obtain the latest version.
Creating SQL Backup Job
To create backup jobs for your SalonTouch SQL data perform the following steps.
1.
Click on Start > My Computer and double-click on the drive where you installed
SalonTouch (usually C:).
2.
3.
Double-click on the SalonTouch folder and then double-click on the Tools folder.
4.
Wait for the “SQL Job Viewer” to open completely. It may take up to a minute or so to
load the servers.
Click on the Backup tab at the top.
5.
Double-click on the file SQL_Jobs.exe (NOTE: it may show only SQL_Jobs,
depending on your system settings)
6. Click on the “Backup” tab at the top.
7. Click on the “Backup” button on the top left.
In the “Select Server “drop-down select your SQL server name. Your server name may
be listed as “ComputerName\SalonTouch” similar to the example above.
9. In the Select Database drop-down select “ALL SALONTOUCH DATABASES”. You
can select individual databases if you want to backup only one database at a time.
However, it is recommended that you backup all of the databases.
10. Click on the “Add” button and you will see the following screen.
11. In the field at the bottom type in “x:\SalonTouch\Backup_Databases” where “x” is the drive
letter where you installed SalonTouch. Click on “Ok”.
12. On the “Backup” window make sure that the option “Overwrite” is selected.
13. Your screen should look similar to the screen shown in figure 3 above.
14. If so, click on the “Create” button at the bottom. This will take a few minutes to complete. Click
on “Ok” when the”Done” dialogue box appears.
15. Your backup jobs have been created and the first backup has been made. Your data backups
will run automatically each day beginning at 12:00 PM and will be placed in the location you
22
specified in step 10 above. PLEASE NOTE: The SQL Server Agent must be running in order
for this to work.
16. Refer to the section Copying Backup Data to Removable Media.
Viewing and Manually Running the Backup Jobs
1. Click on “Start”--> My Computer”.
2. Double-click on the drive where SalonTouch is installed. This is usually the (C:) drive. Then
”
double-click on the “SalonTouch” folder, then double-click on the “Tools” folder.
3. Double-click on the file “SQL_Jobs.exe” (NOTE: it may show only SQL_Jobs, depending on
your system settings)
4. Wait for the “SQL Job Viewer” to open completely. It may take up to a minute or so to load
the servers.
5. Click on the “Backup” tab at the top.
6. Click on the plus next to “SERVERS”.
7. Click on the plus next to your SQL Server Name in the “Select Server” drop-down.
8. Click on the plus next to “Backup Jobs”.
9. You should now see all your databases and they should all have yellow happy faces.
10. To view the last time the backup was run and the next scheduled backup simply click on the
each database backup job (i.e. STCERTIFICATE backup) so that it is highlighted. On the
right you will see the last run information as well as the next scheduled backup time.
11. To manually start the backup job click on “Start Job” on the right then click “Ok” on the
message that tells you the job has been started.
12. Repeat either step 11 or step 12 for each database listed. You should have 15 databases.
13. Note that if you start the backup job(s) you will need to click on the “Refresh” button on the
top left and then repeat steps 7 through 11 as needed to view the status of the job.
14. See figure 5 on the following page.
15. If you see any red frowning faces then there is a problem. You can try to start the job
manually and/or view the history to see what problem occurred.
16. To view the history, highlight the problem database(s) on the left then click on the “Show
History” button on the right.
17. To start the job manually, highlight the problem database(s) on the left then click on the “Start
Job” button on the right. Remember to click on the “Refresh” button on the top right and
repeat steps 6 through 10 above after you have started the backup job(s) to check on their
status.
If you have any questions, please call Interactive Designs.
Copying Backup Data to Removable Media
”
1. To copy the backups to a CD, Zip disk or other removable media go to “Start”--> My
23
Computer”.
2. Double-click on the drive where you installed SalonTouch. This is usually the C: drive.
3. Double-click on the” SalonTouch” folder.
4.
Double-click on the “Backup Databases” folder.
5. You should see the following database backup files. If you select to backup all databases you
will see all 15, otherwise you will only see the files you chose to backup. If your system is not
setup to show extensions of known file types the .bkf will not show. See the Tips section below
to enable extensions.
STAppointment_Backup.Bkf
STCertificate_Backup.Bkf
STClients_Backup.Bkf
STCommission_Backup.Bkf
STComputer_Backup.Bkf
STEmployee_Backup.Bkf
STFPrints_Backup.Bkf
STHistory_Backup.Bkf
STLocal_Backup.Bkf
STPictures_Backup.Bkf
STProducts_Backup.Bkf
STProgram_Backup.Bkf
STRegister_Backup.Bkf
STSaloninfo_Backup.Bkf
STTanservices_Backup.Bkf
6. Press <Ctrl-A> to highlight all of the backup files shown above.
7. Right-click on any highlighted file then left-click on “Send To”.
Left-click on your CD-R/RW, Zip or other removable drive and follow any instructions that
may appear.
TIPS How to Display File Extensions
1. Click on “Start”--> My Computer”.
2. At the top of the window click on “Tools”--> Folder Options”.
3. Click on the View tab.
4. In the section of checkboxes find the item that reads “Hide extensions of known file types” and
”
”
uncheck it.
5. Click on Ok.
Verify the SQL Server Agent is Running and Set to Run Automatically
WARNING: Follow these directions carefully. Changing anything else in this
section may cause your system to fail or not function properly.
METHOD 1 – Using SQL Server Service Manager
1. Double-click on the SQL Server Service Manager icon
located on your Task Bar next
to the clock. This is usually on the bottom right on your screen.
2. Make sure that the “Server” is set to the proper SQL Server Name. This is usually the
one with \SALONTOUCH on the end of the computer name (i.e. PC10\SALONTOUCH)
and in most cases the correct server instance will automatically be selected.
3. Change Services so that it is set to “SQL Server”. Make sure that “Auto-start service”
when OS starts is checked and it that it says Running… at the bottom. See Figure 6
below.
4. Change Services so that it is set to SQL Server Agent. Make sure that “Auto-start
service when OS starts” is checked and it that it says “Running”… at the bottom. See
Figure 6 below.
5. If either service is not running click on the green play button for both SQL Server and the
SQL Server Agent services.
METHOD 2 – Using Computer Management
You normally do not need to use this method unless you cannot locate the SQL Server
24
Service Manager as described above in Method 1.
Click on “Start” and then right-click on “My Computer”.
Left-click on Manage and the “Computer Management” window will appear.
Click on the plus next to Services and Applications then click on Services.
On the bottom right click on the Standard tab.
Scroll through the list on the right and look for “SQLAgent$[instancename]” where
[instancename] is usually “SalonTouch” (i.e. SQLAgent$SalonTouch) however it
may have another instance name also. It should show Started and Automatic to the
right.
If it doesn’t, double-click on “SQLAgent$SALONTOUCH” and change “Startup Type” to
“Automatic”.
Click on “Apply” then click on the “Start” button and then click on “Ok” once it has been
started.
Close the “Computer Management” window.
Restoring Your Data with the SQL_Jobs
WARNING: Performing these steps WILL OVERWRITE any data within the selected database.
The SQL_Jobs program may be used to easily restore a database from a backup file. Follow
these steps:
1. Within your SalonTouch folder, locate the Extras folder. Within the Extras folder, locate
the program SQL_Jobs.
2. Start the SQL_Jobs program by doubling clicking on it.
3. Once the program opens click on the top tab labeled “BackUp”
4. Click the button labeled “Restore”
5. At the popup window, select the name of the SQL (MSDE) server that hosts the
SalonTouch databases.
6. Select the name of the database you wish to restore
7. If no locations are listed within the “Backup location” list box, or not the correct location,
then click the “…” button.
8. At the popup, select if the backup is located on a device or within a file. Then select the
device or the backup file to be used. Then click the “Close” button.
9. Within the “Backup Location” list box, click the backup location to be used.
10. Click on the backup file you wish to use within the “Available Backups” list box.
11. At the “Type of Restore” option, select “Database”.
12. Put a check in the option “Force restore over existing database”
13. Click the “Restore” button.
The SQL_Jobs will restore the database from the backup file.
25
Backing Up Your Data with the Enterprise Manager
If your salon will be using a full version of SQL Server (not the free MSDE version) you can take
advantage of the Enterprise Manager program that comes with SQL Server in regards to
scheduling backups of your databases. Using the Enterprise Manager follow these steps to
backup your databases:
1. Login to server and open the “E
ENTERPRISE M ANAGER”.
>SQL Server Group
>Your SQL server (Windows
2. Expand “Microsoft SQL Servers
NT)
>Management”.
3. Right-click on “Backup” and select “Backup a Database”.
4. Select the salon’s “STAppointment” database in the drop-down list next to “Database”.
5. Copy the entire text in the “Name” field.
6. Make sure that “Database – Complete” is selected.
7. Select “Overwrite existing media”.
8. Click on the “Add” button.
9. Paste in the text copied earlier after the X:\ in the “File Name” field and then click on “Ok”.
10. Place a check in the “Schedule” box on the bottom right.
11. Click on the ellipses button on the bottom right.
12. On the “Edit Schedule” screen click on the Change button.
13. On the “Edit Recurring Job Schedule” dialog screen select “Daily” and set the time at
“Occurs once at”.
14. Click on “OK” on the Edit Recurring Job Schedule screen AND on the Edit Schedule screen".
15. Click on “Ok”.
16. Repeat steps 3 through 15 for the remaining databases setting the time to a minute later than
the previous database.
17. After you have scheduled the backups for all your databases you MUST verify that all jobs
exist.
18. To verify, go to Microsoft SQL Servers
>SQL Server Group
>Your SQL Server”
(Windows NT)
>Management
>SQL Server Agent
>Jobs in the ENTERPRISE
M ANAGER.
CATEGORY” header one time.
19. Sort the jobs by clicking on the “C
20. The backup jobs category will show as [Uncategorized (Local)]. Make sure that all
database backup jobs exist for the client.
Restoring Your Data with the Enterprise Manager
WARNING: Performing these steps WILL OVERWRITE any data within the selected database.
1. Close SalonTouch on all computers.
2. Insert your backup CD-R/RW, Zip disk or other media where you back up your data into the
appropriate drive.
3.
Within the Enterprise Manager program, find the database you wish to restore. After locating
the database, right click on the name of the database. From the popup menu, select “All
Tasks” then “Restore Database…”
26
4. At the popup window use the default settings for “Restore as database” and “Show Backups of
Database” (both should be the name of the database).
5. Select the option to restore database.
6. Select which backup file you would like to use within the “First backup to restore” dropdown box.
7. Click on the “OK” button to begin the restore process.
You have successfully restored your data. Start SalonTouch and check your data.
Tips to prevent database corruption: At least once a month you should check your hard
drive using Windows check tool. On Windows XP go to My Computer and then rightclick on your Local Disk (C:) or whatever your hard label is set to and then go to
Properties. On the properties page click on the Tools tab and then click on the
Check Now button. Check both “Automatically fix file system errors” and “Scan for
and attempt recovery of bad sectors”. This will take some time depending on the size
of your hard drive so it is not recommended that you run this during business hours.
27
Chapter 8: Troubleshooting Tips
Problems with Timer Operation
Q: My SalonTouch will not send time to my timer.
A: Most timer issues are caused by incorrect settings.
Click on “Setup” and then “Rooms”.
1
Make sure that each room is associated with the correct timer, COM port , box
2
3
number and port number .
Click the Timers on the left side and make sure you have a timer set up on the
correct com port.
If all that checks out, open up the Database Selector and click on the Folders tab.
Make sure that the paths are correct.
1
Communications Port (COM Port) is the port that the timer plugs into in the back of the computer. If there
is only one available serial COM port, it’s usually COM1. If there are multiple ports and you are unsure which
one the timer is connected to, refer to the Device Manager of Windows.
2
3
Box numbers vary with timer manufacturers. Most timers communicate on box # 00.
Port numbers should coincide with the room numbers.
Rebooting the PC
PC’s should be restarted on at least a weekly basis but daily is recommended. There
are numerous problems that can arise from a PC not being restarted frequently enough.
A good place to start with most problems is to restart the PC.
28
Chapter 9: Frequently Asked Questions
Q: Where is the SalonTouch User’s Manual?
A: The user’s manual is installed automatically when you install SalonTouch. To open
the SalonTouch manual click on Start -->All Programs-->SalonTouch-->ST_ Manual.
The binocular icon at the top can be used to search for specific items. If printing
sections of the manual please be sure to note the page numbers located at the bottom
of the Acrobat Reader and NOT at the bottom of the page.
NOTE: Acrobat Reader must be installed to view the manual. If it is not installed you
can install it from the SalonTouch installation CD (see next question).
Q: How do I install the Acrobat Reader so I can view the SalonTouch Manual?
A: Insert the SalonTouch installation CD and exit the installation if it automatically
starts. Next go to Start-->Run. In the “Open” field type in d:\Utils\Acrobat
Reader\Acrd4enu.exe where d: is the drive letter of your CD drive. Follow the
installation directions. After the installation is complete you should now be able to
open the SalonTouch Manual.
Q: I have SalonTouch running and have put someone into a bed. The display shows
that the bed is now in use, but the timer isn’t responding.
A: Go to Start-->All Programs-->SalonTouch-->Database Selector check the
database and ComManager paths. Usually the mapping is incorrect when this occurs. If
you are on the computer connected to the timers make sure that everything under the
tabs “Databases” and”Folders” are mapped locally. Example: C:\SalonTouch.
Q: The program disappears during start up before the log in screen appears.
A: Usually if this happens, it may be a printer problem. Try starting the print spooler.
One way of doing this is to get to a DOS or COMMAND PROMPT, then type in NET START
SPOOLER (san caps). This should fix the problem.
Q: The program disappears after the login screen.
A: In this case, Windows may be missing a file called MSMapi32.ocx.
1. Insert the SalonTouch CD and cancel the auto install if it appears.
2. Click on Start-->Run and type in E:\Setup /x (E: is the drive letter of your
CD-ROM).
3. A window will appear which will provide you with a list of files on the CD.
Scroll through and find the file MSMapi32.ocx. Click on that file to
highlight it and then click on “Ok”.
4. In the “Save As” window click on “My Computer” on the left.
5. Double-click on Local Disk (C:) (the drive with (C:) after the name).
6. Double-click on “Windows” folder.
7. Double-click on “System32” folder and then click on the “Save” button.
8. You’ll also need to register the file. To register click on Start-->Run and
type in regsvr32.exe MSMapi32.ocx then click on “Ok”. If the registration
was successful you will see the message “DllRegisterServer in
MSMapi32.ocx succeeded”. You can also have IDI Tech Support email the
file to you if you cannot find it on the disk ([email protected]).
29
Q: I’m able to send time to the timer, but the display on the SalonTouch main
screen doesn’t show the time.
A: Again, this is a mapping issue. You’ll need to make sure that all fields are mapped
correctly on the “Folder”s tab. (See the first item in this section).
Q: The workstation computer(s) isn’t displaying the information that’s on the
server’s main screen.
A: Generally there are three reasons for this.
The first and most common reason is that you have 2 or more computers in the
salon with the same Salon ID. Go to Setup-->Network and check “This
Computer’s ID is” and make sure that ALL of your computers have a different
ID. It doesn’t matter what ID they have as long as they are all unique. We
recommend that you set the main (server) ID to 1.
The second is that the drive mapping in the Database Selector on the workstation is
wrong and not reading the correct files in the SalonTouch directory on the
Server. To correct this problem go to Start-->All Programs-->SalonTouch->Database Selector and make sure that each database is mapped over the
network to the corresponding database in the Databases folder on the C drive
of the server.
The third is that the LAN hasn’t been enabled on one or both of the machines. In
SalonTouch, click on Setup-->Network to see if the network is enabled. If it is,
the button will read “Disable Local Area Network”. You will need to contact
IDI to get a network activation code if it is not enabled.
Q: SalonTouch is sending time to the timer and it’s displaying on the main screen,
but the time does not count down on the timer or on the main screen.
A: This is a problem with the settings of the user permissions in Windows. The login
name that you’ve been assigned or chosen during the startup of your system doesn’t
have the ability to delete items from the SalonTouch folder, or the shared SalonTouch
folder doesn’t include your login as part of the list of those who are able to read,
write, delete, etc. from the folder.
Q: I can’t run reports.
A: The first thing to check is the Database Selector. Make sure that the paths are
correct on the “Folders” tab. If it’s a server the mapping would be local, if it’s a
workstation the mapping would read from the “Salon_Reports” folder in the
SalonTouch folder on the server. If all of the paths are correct, it may be the report
file itself is missing or corrupt. Contact IDI Technical Support for information on
attaining another report file.
Q: Services and Packages are not showing up in the Register.
A: You need to have” Price” and the “Price Starts” fields entered correctly on the
Dollars tab of the service/package.
Q: I am on a WAN and my fingerprint scanner isn’t working.
A: Make sure that you have the fingerprint scanner plugged in correctly and that it has
been activated in Setup-->Verification System. If the button reads “Activate
System” then it is not activated. Contact IDI Technical Support for an activation code.
30
Chapter 10: Contacting Us
Technical Support
Please see Chapter 5 in this manual for some common troubleshooting assistance.
SalonTouch comes with extensive manual which can be accessed through the program from the
menu toolbar at the top of the screen by selecting “Version” and then “Manual”.
If you are not able to find the information you need in the users manual please contact our
support department at (770) 650-8830 Option #5 and one of our support representatives will be
glad to help you. If you are not on our support plan or do not have limited support coverage
included with a new program purchase, there will be a charge for the call.
Forums
Please go to the following forums to post and read from other SalonTouch users. Our support
team will respond to your posts in a timely manner.
http://www.tantoday.com
http://www.tanningprofessionals.com
Email
You can also email your questions to our support department for free.
[email protected]
Latest Downloads
Download the latest updates to SalonTouch from our web site at:
http://www.idi-usa.com
http://www.salontouchsoftware.com
For SalonTouch Suggestions
Email our development department with your suggestions at:
[email protected]
For SalonTouch Sales
Email our sales department with your inquiries at:
[email protected]
Or call sales at 877-725-6686 or 877-SalonTouch.
Employee Training
As a convenient tool for training your employees, it is recommended that the SalonTouch demo
be used. This instructs users how to do the most common tasks in SalonTouch.
31
LAN Diagram
32