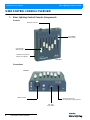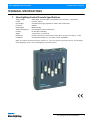
1
Philips Strand Lighting - Dallas
10911 Petal Street
Dallas, TX 75238
Tel: 214-647-7880
Fax: 214-647-8030
Philips Strand Lighting - Auckland
19-21 Kawana Street
Northcote, Auckland 0627
New Zealand
Tel: +64 9 481 0100
Fax: +64 9 481 0101
Philips Strand Lighting - New York
267 5th Ave, 4th Floor
New York, NY 10016
Tel: 212-213-8219
Fax: 212-532-2593
Philips Strand Lighting - Europe
Marssteden 152
Enschede 7547 TD
The Netherlands
Tel: +31 53 4500424
Fax: +31 53 4500425
Philips Strand Lighting - Asia Limited
Room 6-10, 20/F Delta House 3 On Yiu Street
Shatin, N.T. Hong Kong
Tel: + 852 2757 3033
Fax: + 852 2757 1767
Website:
www.strandlighting.com
The material in this manual is for information purposes only and is subject to change without notice. Philips Strand
Lighting assumes no responsibility for any errors or omissions which may appear in this manual. For comments and
suggestions regarding corrections and/or updates to this manual, please visit the Philips Strand Lighting web site at
www.seleconlight.com or contact your nearest Philips Strand Lighting office.
El contenido de este manual es solamente para información y está sujeto a cambios sin previo aviso. Philips Strand
Lighting no asume responsabilidad por errores o omisiones que puedan aparecer. Cualquier comentario, sugerencia
o corrección con respecto a este manual, favor de dirijirlo a la oficina de Philips Strand Lighting más cercana.
Der Inhalt dieses Handbuches ist nur für Informationszwecke gedacht, Aenderungen sind vorbehalten. Philips
Strand Lighting uebernimmt keine Verantwortung für Fehler oder Irrtuemer, die in diesem Handbuch auftreten. Für
Bemerkungen und Verbesserungsvorschlaege oder Vorschlaege in Bezug auf Korrekturen und/oder
Aktualisierungen in diesem Handbuch, moechten wir Sie bitten, Kontakt mit der naechsten Philips Strand LightingNiederlassung aufzunehmen.
Le matériel décrit dans ce manuel est pour information seulement et est sujet à changements sans préavis. La
compagnie Philips Strand Lighting n'assume aucune responsibilité sur toute erreur ou ommission inscrite dans ce
manuel. Pour tous commentaires ou suggestions concernant des corrections et/ou les mises à jour de ce manuel,
veuillez s'il vous plait contacter le bureau de Philips Strand Lighting le plus proche.
Note: Information contained in this document may not be duplicated in full or in part by any person without prior written
approval of Philips Strand Lighting. Its sole purpose is to provide the user with conceptual information on the equipment
mentioned. The use of this document for all other purposes is specifically prohibited.
Document Number: STR-75801
Version as of: 10 November 2010
Sixer Lighting Console Installation & User’s Manual
©2010 Philips Group. All rights reserved.
Sixer Lighting Control Console
Installation & User’s Manual
IMPORTANT INFORMATION
Warnings and Notices
When using electrical equipment, basic safety precautions should always be followed including the following:
a. READ AND FOLLOW ALL SAFETY INSTRUCTIONS.
b. For indoor, dry locations use only. Do not use outdoors.
c. Do not mount near gas or electric heaters.
d. Equipment should be mounted in locations and at heights where it will not readily be subjected to
tampering by unauthorized personnel.
e. The use of accessory equipment not recommended by the manufacturer may cause an unsafe
condition.
f. Not for residential use. Do not use this equipment for other than intended use.
g. Refer service to qualified personnel.
SAVE THESE INSTRUCTIONS.
WARNING: You must have access to a main circuit breaker or other power disconnect device
before installing any wiring. Be sure that power is disconnected by removing fuses or turning the
main circuit breaker off before installation. Installing the device with power on may expose you to
dangerous voltages and damage the device. A qualified electrician must perform this installation.
WARNING: Refer to National Electrical Code® and local codes for cable specifications. Failure to
use proper cable can result in damage to equipment or danger to personnel.
WARNING: This equipment is intended for installation in accordance with the National Electric
Code® and local regulations. It is also intended for installation in indoor applications only. Before
any electrical work is performed, disconnect power at the circuit breaker or remove the fuse to avoid
shock or damage to the control. It is recommended that a qualified electrician perform this
installation.
Additional Resources for DMX512
For more information on installing DMX512 control systems, the following publication is available for purchase
from the United States Institute for Theatre Technology (USITT), "Recommended Practice for DMX512: A Guide
for Users and Installers, 2nd edition" (ISBN: 9780955703522). USITT Contact Information:
USITT
6443 Ridings Road
Syracuse, NY 13206-1111 USA
1-800-93USITT
www.usitt.org
Philips Strand Lighting Limited Two-Year Warranty
Philips Strand Lighting offers a two-year limited warranty of its products against defects in materials or
workmanship from the date of delivery. A copy of Philips Strand Lighting two-year limited warranty containing
specific terms and conditions can be obtained from the Philips Strand Lighting web site at www.strandlighting.com
or by contacting your local Philips Strand Lighting office.
1
Installation & User’s Manual
Sixer Lighting Control Console
TABLE OF CONTENTS
IMPORTANT INFORMATION
Warnings and Notices...................................................................................................................................... 1
Additional Resources for DMX512................................................................................................................. 1
Philips Strand Lighting Limited Two-Year Warranty..................................................................................... 1
TABLE OF CONTENTS
PREFACE
About this Manual .................................................................................................................................................. 3
Getting Started ........................................................................................................................................................ 3
Unpack the Console......................................................................................................................................... 3
SIXER CONTROL CONSOLE OVERVIEW
Sixer Lighting Control Console Components ........................................................................................................ 4
Controls ........................................................................................................................................................... 4
Connections ..................................................................................................................................................... 4
INSTALLATION AND SET UP
Power Requirements............................................................................................................................................... 5
Connecting a DMX512 Network............................................................................................................................ 5
Using The Sixer Control Console........................................................................................................................... 5
OPERATION
Overview.................................................................................................................................................................
Control Functions ...................................................................................................................................................
Cleaning and Care Instructions...............................................................................................................................
Troubleshooting Guide ...........................................................................................................................................
6
6
6
6
TECHNICAL SPECIFICATIONS
Sixer Lighting Control Console Specifications ...................................................................................................... 7
2
TABLE OF CONTENTS
Sixer Lighting Control Console
Installation & User’s Manual
PREFACE
1. About this Manual
The document provides installation and operation instructions for the following products:
• Sixer Lighting Control Console (catalog number 75801 for 230 / 240 volt operation)
• Sixer Lighting Control Console (catalog number 75802 for 120 volt operation)
Please read all instructions before installing or using this product. Retain this manual for future reference. Additional
product information and descriptions may be downloaded at www.strandlighting.com.
2. Getting Started
Unpack the Console
Unpack the console from the packaging and check that the following components are contained within. If any parts
are missing, or damaged, please contact the carrier and your nearest Philips Strand Lighting office.
Sixer Console Components for 120V Markets (catalog number 75801):
• Sixer Lighting Console
• AC to DC Power Supply with US 2 pin connector
• Installation & User’s Manual (this document)
Sixer Console Components for 230 / 240V Markets (catalog number 75802):
• Sixer Lighting Console
• AC to DC Power Supply with UK 3 pin connector and EU 2 pin connector
• Installation & User’s Manual (this document)
About this Manual
3
Sixer Lighting Control Console
Installation & User’s Manual
SIXER CONTROL CONSOLE OVERVIEW
1. Sixer Lighting Control Console Components
Controls
LED Power Indicator
Grand Master
Fader / Slider
Channel Fader /
Slider (6 Each)
9V Battery Compartment
(Battery not supplied)
Front View
Connections
End View
DMX512 Output
9VDC Input Connector
(AC to DC power supply provided)
ON / OFF
Power Switch
4
SIXER CONTROL CONSOLE OVERVIEW
Sixer Lighting Control Console
Installation & User’s Manual
INSTALLATION AND SET UP
1. Power Requirements
The Sixer Lighting Control Console operates on 9 volts DC. It is powered via its supplied AC to DC power supply
(for either 230/240 volt or 120 volt operation - depending on model). Also, the console can operate using a 9 volt
battery (not supplied).
2. Connecting a DMX512 Network
Basic DMX512 installation consists of connecting a Sixer Lighting Control Console to DMX512 controlled devices
in "daisy-chain" fashion. A cable runs from the Sixer Lighting Control Console to the DMX connector on the first
device to be controlled.
Note: For more information on DMX512 networking and systems, refer to "Additional Resources for DMX512" on
page 1. For Sixer Lighting Control Console DMX512 operation, refer to "OPERATION" on page 6.
End View
1
5
2
4
3
DMX512 Connections
DMX512 Signal
XLR Pin
Common (Drain)
1
DMX512 -
2
DMX512 +
3
Note: Remaining pins on connector are not used.
DMX512 Output (out to DMX512
controlled device or devices)
Note: It is recommended that control cable from the Sixer Lighting Console not be connected or disconnected when
power is applied to the controlled devices. Doing so may cause any connected loads to flash up momentarily.
3. Using The Sixer Control Console
Setup and using your Sixer Lighting Console is simple:
1) Connect provided power supply to AC supply source and to Sixer Lighting Console OR insert a 9 volt
battery (not supplied).
2) Connect DMX512 cable to Sixer Lighting Console and to device or devices to be controlled.
3) At Sixer Lighting Console Power Switch, turn ON console.
4) On Sixer Lighting Console, raise Channel Faders as desired to select the intensity for each channel.
5) On Sixer Lighting Console, use Grand Master to proportionally fade all channels.
Power Requirements
5
Sixer Lighting Control Console
Installation & User’s Manual
OPERATION
1. Overview
The Sixer Lighting Control Console offers simple DMX512 control to DMX-controlled devices such as dimmers,
effects units, fixtures, etc. This unit is not designed for complex shows or more than 6-channels of control.
2. Control Functions
The Sixer Lighting Control Console has two simple-to-use controls. Refer to "SIXER
CONTROL CONSOLE OVERVIEW" on page 4 for more information.
MASTER
10
8
Grand Master
6
An inhibitive fader that proportionately controls all other faders. This determines maximum
output of all faders at all times. The Grand Master is always active.
Grand
Master
4
2
0
Channel Fader (6 Individual Channel Faders)
A fader that controls the output of the corresponding dimmer / channel number. To set a level
raise the fader to the required level. To active the channel faders, raise or lower the Grand
Master as desired.
4
Channel
Fader
3. Cleaning and Care Instructions
WARNING! All cleaning should be performed with power completely removed from the console. Never attempt to
open unit. There are no user-serviceable parts. Under no circumstances should ammonia-based cleaners, acetone, or
other harsh solvents be used on or near the Sixer Lighting Console or power supply. These types of cleaners or
solvents can permanently damage the unit.
Being a solid-state device, the Sixer Lighting Console requires very little routine maintenance by the user.
Should the unit become dirty, unplug from power supply or remove battery, and clean unit using a lint-free cleaning
cloth.
If you have any questions regarding the use or care of your Sixer Lighting Console, please contact Philips Strand
Lighting technical support or your local Authorized Dealer.
4. Troubleshooting Guide
The chart below provides possible causes and remedies for various error messages and/or symptoms.
WARNING! Any service and maintenance (including troubleshooting), other than described herein should be
performed by an Authorized Philips Strand Lighting Dealer or Service Center. The Sixer Lighting Console contains
no user-serviceable parts.
Description
6
Symptom
Possible Cause/Remedy
No DMX output.
Console will not control devices
Make sure unit is powered by provided power supply or battery is installed.
Grand Master is set at zero, raise Grand Master.
Channel Fader is set at zero, raise Channel Fader.
Dimmer or DMX-control device is not powered, make sure device is
properly connected to power and device is ON.
Make sure DMX512 cable is connected to console and controlled device
(s).
No power at console.
Power LED Indicator is not ON.
Make sure power switch is ON.
Make sure unit is powered by provided power supply or battery is installed.
If using battery, make sure battery is new / fresh.
OPERATION
Sixer Lighting Control Console
Installation & User’s Manual
TECHNICAL SPECIFICATIONS
1. Sixer Lighting Control Console Specifications
Supply Voltage:
Current:
Input Voltage:
Frequency:
Output Signal:
Ambient Temperature:
Humidity:
Weight:
Dimensions:
Compliance:
9VDC (either AC to DC supply - provided with unit or 9V battery - not provided)
Less than 100 mA
Provided Power Supply (depends on model): 120V or 230 / 240V
50/60Hz
DMX512 (1990)
0 to 35 degrees C (32 to 95 degrees F)
0%-90% Non condensing
1.0 kg (2.2 lbs) - Console only
Console: 148 mm (H) x 166 mm (W) x 42 mm (D) / 5.8 in (H) x 6.5 in (W) x 1.7 in (D)
Provided Power Supply: UL / cUL listed. Console: CE Marked
Note: For complete model specifications, features, etc., refer to the product specification sheet or visit the Philips
Strand Lighting web site at www.strandlighting.com for more details.
Sixer Lighting Control Console Specifications
7