1
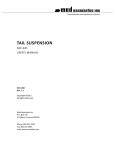
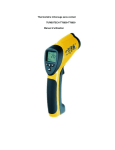
instrumentation and software for research
OPEN FIELD ACTIVITY HARDWARE
WIRING GUIDE
DOC-102
Rev. 1.5
Copyright ©2012
All Rights Reserved
Med Associates Inc.
P.O. Box 319
St. Albans, Vermont 05478
Phone: 802.527.2343
Fax: 802.527.5095
www.med-associates.com
OPEN FIELD ACTIVITY HARDWARE
notes
i
OPEN FIELD ACTIVITY HARDWARE
Table of Contents
Chapter 1 | Introduction ................................................................................................ 3
Hardware Guide............................................................................................................................. 3
Cable Guide .................................................................................................................................... 4
Chapter 2 | Wiring Instructions ................................................................................... 5
Interface Connections .................................................................................................................. 5
Power Connections ....................................................................................................................... 7
IR Strip Connections ..................................................................................................................... 8
Adjusting the Position of the IR Strips ..................................................................................... 10
Chapter 3 | Optional Hardware .................................................................................. 11
SAC Fan and Light Connections ................................................................................................ 11
Hole Board Insert Installation and Wiring ............................................................................... 13
Chapter 4 | Hardware Test .......................................................................................... 15
MED Test ...................................................................................................................................... 15
Testing with Activity Monitor ..................................................................................................... 15
Appendix A | Contact Information............................................................................. 15
ii
MED ASSOCIATES INC.
O P E N FI E L D A C T I V I T Y H AR D W AR E
CHAPTER 1 | INTRODUCTION
Most of the components of the Open Field Activity System are properly connected prior to
shipping from the MED Associates facility. This document is a guide to completing the wiring of
the system and will also assist with wiring a system that has been disassembled.
Hardwar e Gui de
Figure 1.1 - Open Field Activity System
Figure 1.2 – Open Field Chamber, IR Strips and ENV-520 IR Controller
-3DOC-102 Rev. 1.5 Copyright © 2012
MED Associates, Inc.
MED ASSOCIATES INC.
O P E N FI E L D A C T I V I T Y H AR D W AR E
Figure 1.3 – DIG-729USB Interface
Figure 1.4 –SG-506 28-Volt Power Supply
Cable G uide
Figure 1.5 - USB Cable
Figure 1.6 - SG-219C-15 DB-15 Cable
-4DOC-102 Rev. 1.5 Copyright © 2012
MED Associates, Inc.
MED ASSOCIATES INC.
O P E N FI E L D A C T I V I T Y H AR D W AR E
CHAPTER 2 | WIRING INSTRUCTIONS
Interface Connections
1. Using the included USB cable, connect the USB port on the DIG-729 USB device to any
available USB port on the computer.
Figure 2.1 – Connect USB Port on DIG-729USB to USB Port on Computer
2. Using the included DB-15 cable, connect the INTERFACE connector on the back of the DIG-
729 USB device to the female Control Network connector on the ENV-520 Controller in
Chamber 1. If the system includes a sound-attenuating cubicle (SAC), the cables should be
run through the grommet plate on the side of the SAC.
-5DOC-102 Rev. 1.5 Copyright © 2012
MED Associates, Inc.
MED ASSOCIATES INC.
O P E N FI E L D A C T I V I T Y H AR D W AR E
Figure 2.2 – Connect INTERFACE Connector to Control Network Connector
3. To connect additional chambers, use cable part number SG-219C-6 and connect the male
ENV-520 Control Network connector on Chamber 1 to the female ENV-520 Control Network
connector on Chamber 2. Up to eight chambers may be daisy chained in this fashion. If the
system includes sound-attenuating cubicles (SACs), the cables should be run through the
grommet plate on the side of the SACs.
Figure 2.3 – Interface Connections for Additional Chambers
NOTE: Refer to the DIG-729 User’s Manual for further instructions regarding the installation
of device drivers.
-6DOC-102 Rev. 1.5 Copyright © 2012
MED Associates, Inc.
MED ASSOCIATES INC.
O P E N FI E L D A C T I V I T Y H AR D W AR E
Power Connections
1. Using the included power inverter, connect the +6V DC connector on the back of the DIG-
729 USB device to a standard wall outlet.
Figure 2.4 – Connect DIG-729USB to Wall Outlet
2. Use the power cable to connect the connector on the left side of the ENV-520 Controller to
any available connector on the front of the SG-506 Regulated Power Supply. If the system
includes a sound-attenuating cubicle (SAC), the cables should be run through the grommet
plate on the side of the SAC.
Figure 2.5 - Connect ENV-520 to SG-506
3. It is important to remember to supply power to each chamber by connecting the connector
on the left side of each ENV-520 to any available connector on the front of the SG-506
Regulated Power Supply. The SG-506 can accommodate up to eight chambers.
4. Once all the cables have been run, put the top of the grommet plate back in place and
secure the screws.
-7DOC-102 Rev. 1.5 Copyright © 2012
MED Associates, Inc.
MED ASSOCIATES INC.
O P E N FI E L D A C T I V I T Y H AR D W AR E
IR Strip Connections
NOTE:
Prior to connecting the IR strips to the ENV-520, verify that the SG-506 power supply
is switched off. Failure to do so may cause hardware damage.
The IR strips will all be properly connected when the system is received and this wiring should
not be changed, as the software relies on this configuration to accurately record data.
However, if it is necessary to connect the IR strips to the ENV-520 Controller, Figure 2.6 shows
the numbering used to identify each IR strip. Each IR strip is connected to the corresponding
port on the ENV-520, as shown in Figure 2.7 and Figure 2.8.
Figure 2.6 - IR Numbering Guide
-8DOC-102 Rev. 1.5 Copyright © 2012
MED Associates, Inc.
MED ASSOCIATES INC.
O P E N FI E L D A C T I V I T Y H AR D W AR E
1. Connect the IR Transmitters to the corresponding connectors on the ENV-520 Controller
using the ribbon cables with white connectors (part number CAB-ENV-256T). Only the
ribbon cables with the white connectors will fit in the IR Transmitters.
Figure 2.7 - IR Transmitter Connections
2. Connect IR Receivers to the corresponding connectors on the ENV-520 Controller using the
ribbon cables with black connectors (part number CAB-ENV-256R). Only the ribbon cables
with the black connectors will fit in the IR Receivers.
Figure 2.8 - IR Receiver Connections
-9DOC-102 Rev. 1.5 Copyright © 2012
MED Associates, Inc.
MED ASSOCIATES INC.
O P E N FI E L D A C T I V I T Y H AR D W AR E
Adjusting the Position of the IR Strips
The factory set positions of the IR strips may not be appropriate for all applications. Different
ages and strains of subjects may have vastly different physical characteristics.
The closer the IR strips are to the subjects' vertical center (for X & Y arrays), the better the data.
If the I/R strips are too high, the subject may periodically drop below the IR strips, which may
cause erroneous data.
The "Z" I/R Array strips should be placed in the lowest available position capable of detecting
vertical activity and not detecting normal "X" & "Y" activity. If the strips are too high, some
rearings may not be detected, or slight "bouncing" while rearing may cause multiple rearings to
be detected when only one rearing episode was elicited.
To adjust the position of an IR strip, remove the thumbscrews on either end of the strip. Select
the proper position for the strip and secure it in place using the thumbscrews. It is important to
note that the strips should not be moved from one side of the chamber to another.
- 10 DOC-102 Rev. 1.5 Copyright © 2012
MED Associates, Inc.
MED ASSOCIATES INC.
O P E N FI E L D A C T I V I T Y H AR D W AR E
CHAPTER 3 | OPTIONAL HARDWARE
SAC Fan and Light C onnections
If the system includes optional Sound-Attenuating Cubicles (SACs), the fans and lights are wired
as follows (all cables should be run through the grommet plate on the side of the SAC):
Fan Connections
1.
Connect the fan in Chamber 1 to the SG-235PF-6 6’ Y-Cable, as shown below.
2.
Connect the SG-235PF-6 cable to the desired power connector on the SG-500T Power
Supply. Connectors 1 and 2 are switched outputs and 3 and 4 are always on.
3.
Up to three additional Chambers can be connected as shown below.
Figure 3.1 – SAC Fan Connections
- 11 DOC-102 Rev. 1.5 Copyright © 2012
MED Associates, Inc.
MED ASSOCIATES INC.
O P E N FI E L D A C T I V I T Y H AR D W AR E
Light Connections
1.
Connect the lights in Chamber 1 to the SG-216C Y-Adapter Cable.
2.
Connect the male 3-pin Molex connector on the SG-216C Y-Adapter Cable to the female 3pin Molex connector SG-235PM-6 6’ Y-Cable.
3.
Connect the female 2-pin Molex connector on the SG-235PM-6 cable to the desired power
connector on the SG-500T Power Supply. Connectors 1 and 2 are switched outputs that
may be turned on and off. Connectors 3 and 4 are always on.
4.
Up to three additional Chambers can be connected as shown below.
Figure 3.2 - SAC Light Connections
- 12 DOC-102 Rev. 1.5 Copyright © 2012
MED Associates, Inc.
MED ASSOCIATES INC.
O P E N FI E L D A C T I V I T Y H AR D W AR E
Hole B oar d Insert I nstallation and Wiring
NOTE:
Prior to connecting the IR strips to the ENV-520, verify that the SG-506 power supply
is switched off. Failure to do so may cause hardware damage.
1. Place the Hole Board Insert into the chamber and adjust position of the X and Y-axis IR strips
so that the animal’s movement can be tracked while on top of the hole board insert (refer to
Chapter 4).
2. Attach the Hole Board Transmitter and Receiver strips to the chamber below the Hole Board
insert as shown in Figure 3.3.
Figure 3.3 - Open Field Chamber with Hole Board Insert
3. Connect IR Transmitters 1 and 2 to the corresponding connectors on the ENV-520 Controller
using the ribbon cables with white connectors (part number CAB-ENV-256T). Only the
ribbon cables with the white connectors will fit in the IR Transmitters.
- 13 DOC-102 Rev. 1.5 Copyright © 2012
MED Associates, Inc.
MED ASSOCIATES INC.
O P E N FI E L D A C T I V I T Y H AR D W AR E
4. The transmitter cable with three white connectors is used to connect Hole Board
Transmitter 1 and Hole Board Transmitter 2 to the “Transmitter 3” port on the ENV-520
Controller, as shown below.
Figure 3.4 - Hole Board Transmitter Connections
5. Connect IR Receivers 1 and 2 to the corresponding connectors on the ENV-520 Controller
using the ribbon cables with black connectors (part number CAB-ENV-256R). Only the
ribbon cables with the black connectors will fit in the IR Receivers.
6. The receiver cable with three black connectors is used to connect Hole Board Receiver 1 and
Hole Board Receiver 2 to the “Receiver 3” port on the ENV-520 Controller, as shown below.
Figure 3.5 - Hole Board Receiver Connections
7. If necessary, complete the Interface Connections and Power Connections sections of the
Wiring Guide.
- 14 DOC-102 Rev. 1.5 Copyright © 2012
MED Associates, Inc.
MED ASSOCIATES INC.
O P E N FI E L D A C T I V I T Y H AR D W AR E
CHAPTER 4 | HARDWARE TEST
Once the Open Field Activity hardware connections are complete, the MED Test or Activity
Monitor applications may be used to verify that the system is functioning properly.
MED Test
Open the MED Test application and select Misc Modules | ENV-520 to produce the ENV-520
test screen, shown below. Select the node number from the Node pulldown menu. (Refer to
the ENV-520 User’s Manual for detailed information regarding node numbers). Enter the
desired Resolution. Enable 32 Beam if a 32-beam system is being tested. Click Start IRQ to
begin the test. When a beam is broken the corresponding indicator on the test screen will turn
red, as shown below.
Figure 4.1 - MED Test ENV-520 Test Screen
Testing with Activity Monitor
For detailed instructions on using Activity Monitor to test the hardware, refer to the ENV-520
Test section of DOC-038 Activity Monitor User’s Manual.
Appendix A | Contact Information
Please contact MED Associates, Inc. for information regarding any of our products.
Visit our website at www.med-associates.com for contact information.
For technical questions, email [email protected].
- 15 DOC-102 Rev. 1.5 Copyright © 2012
MED Associates, Inc.