1
FLY Mobile Phone
User Manual
Model: FLY MC100
Please read this manual carefully
before operating this product.
1
Thanks for choosing FLY products.
For the safe and efficient operation of this product, please read this
manual and other materials carefully before you first operate it.
Meridian Mobile Pvt. Ltd. shall bear no liability for any losses caused
by improper operation of this product not in compliance with the
instructions and requirements of this manual or by your
misunderstanding of this manual, except for losses caused by the
improper installation or operation of Meridian Mobile professional
maintenance staff.
Meridian Mobile Pvt. Ltd. has performed careful proofreading of this
manual; however, we cannot ensure that there are no mistakes or
omissions of any kind in this manual.
Meridian Mobile Pvt. Ltd. strives to continuously improve the functions
of its products and the quality of its services. Therefore, the company
reserves the right to make changes to any of the products and software
programs described in this Manual as well as the content of this
Manual itself without giving prior notice.
This manual intends to help you to operate this Meridian Mobile
product properly and represents no statements on the software and
hardware configuration of this Product. For detailed information about
the product configuration, please refer to the contract related to this
product (if any) or consult the dealer of this product. The pictures in this
Manual are only for reference. In the event that there are any
inconsistencies between pictures and the actual product, the form of
the actual product shall be taken as final. Many network functions
introduced in this manual are special services provided by the network
service operator, therefore whether these network functions can be
used or not depends on your network service operator.
The content of this Manual is protected by copyright law. Without the
prior authorization of Meridian Mobile, you are not permitted to
duplicate or copy this Manual in any way, transmit in any way via wired
or wireless networks or translate it into any other languages.
In case that you find any inconformity between the actual status of the
product and this manual, or you need the latest information, or you
have any questions or opinions, please contact or visit.
2
CONTENTS
Chapter I Safety and Maintenance----------------------------------------------- 6
Chapter II Before Using Your Phone-------------------------------------------11
2.1 PHONE EXTERIOR ........................................................................... 11
2.2 KEYS DESCRIPTION......................................................................... 12
2.3 DISPLAY......................................................................................... 15
2.4 ICONS ............................................................................................ 16
2.5 BATTERY........................................................................................ 17
2.5.1 Removing and Installing Your Battery.................................... 17
2.5.2 Charging the Battery.............................................................. 18
2.6 CONNECTING THE NETWORK ............................................................ 20
2.6.1 SIM Card ............................................................................... 20
2.6.2 Installing and Removing Your SIM Card ................................ 20
2.6.3 Turning On/Off Your Phone ................................................... 21
2.6.4 Unlocking Your Phone ........................................................... 21
2.6.5 Unlocking Your SIM Card ...................................................... 22
2.6.6 Connecting to Network .......................................................... 23
2.7 MEMORY CARD............................................................................... 24
Chapter III Quick Start Guide -----------------------------------------------------27
3.1 HIGHLIGHT FEATURES ..................................................................... 27
3.2 FEATURE KEYS ............................................................................... 29
3.3 MAKING A CALL .............................................................................. 30
3.3.1 Dial Directly ........................................................................... 30
3.3.2 Dialing an Extension of a Fixed Telephone............................ 30
3.3.3 Dialing International Numbers................................................ 30
3.3.4 Dialing a Number in the List................................................... 31
3.4 DIALING AN EMERGENCY NUMBER .................................................... 31
3.5 ANSWERING/REJECTING INCOMING CALLS ......................................... 31
3.6 ENDING A CALL............................................................................... 31
3.7 CALL OPTIONS ............................................................................... 32
3.8 MAKING A SECOND CALL ................................................................. 33
3.9 ANSWERING A SECOND CALL ........................................................... 33
Chapter IV Feature Menu ----------------------------------------------------------34
4.1 USING THE FEATURE MENU ............................................................. 34
4.1.1 Option Menu.......................................................................... 34
4.1.2 Shortcuts ............................................................................... 34
4.1.3 Quitting the Menu .................................................................. 34
3
4.2 FEATURE MENU STRUCTURE ........................................................... 34
4.3 PHONEBOOK .................................................................................. 40
4.3.1 Quick Search ......................................................................... 40
4.3.2 Search Entry.......................................................................... 41
4.3.3 Add New Entry....................................................................... 42
4.3.4 Copy All ................................................................................. 42
4.3.5 Delete .................................................................................... 43
4.3.6 Caller Group .......................................................................... 43
4.3.7 Owner Number ...................................................................... 43
4.3.8 Setup ..................................................................................... 43
4.3.9 Caller Picture ......................................................................... 44
4.3.10 Caller Ring Tone.................................................................. 44
4.3.11 Caller Video ......................................................................... 44
4.4 MESSAGES..................................................................................... 44
4.4.1 Messages .............................................................................. 44
4.4.2 E-mail .................................................................................... 56
4.4.3 Chat....................................................................................... 60
4.4.4 Voice Mail Server .................................................................. 60
4.4.5 BROADCAST MESSAGE...................................................... 60
4.5 CALL HISTORY ................................................................................ 61
4.5.1 Missed Calls .......................................................................... 61
4.5.2 Dialed calls ............................................................................ 62
4.5.3 Received Calls....................................................................... 62
4.5.4 Delete Call Log ...................................................................... 62
4.5.5 Call Time ............................................................................... 62
4.5.6 SMS Counter ......................................................................... 62
4.5.7 GPRS Counter....................................................................... 62
4.6 SETTINGS ...................................................................................... 62
4.6.1 User Profiles .......................................................................... 63
4.6.2 Phone Setup.......................................................................... 64
4.6.3 Display Characteristic ............................................................ 65
4.6.4 Call Setup.............................................................................. 66
4.6.5 Network Setup ....................................................................... 69
4.6.6 Security Setup ....................................................................... 70
4.6.7 Flight Mode............................................................................ 71
4.6.8 Shortcuts ............................................................................... 72
4.6.9 Restore Factory Settings ....................................................... 72
4.7 MULTIMEDIA ................................................................................... 72
4
4.7.1 Camera.................................................................................. 72
4.7.2 Video Recorder...................................................................... 74
4.7.3 Album .................................................................................... 75
4.7.4 Audio Player .......................................................................... 75
4.7.5 Video Player .......................................................................... 77
4.7.6 Photo Artist............................................................................ 78
4.7.7 Melody Composer ................................................................. 78
4.7.8 Voice Recorder...................................................................... 79
4.7.9 E-book Reader ...................................................................... 80
4.7.10 FM Radio............................................................................. 81
4.8 FUN AND GAMES ............................................................................. 83
4.8.1 Java....................................................................................... 83
4.8.2 Games................................................................................... 84
4.9 TOOLS ........................................................................................... 84
4.9.1 Alarm ..................................................................................... 84
4.9.2 Calendar................................................................................ 85
4.9.3 Calculator .............................................................................. 85
4.9.4 To Do List .............................................................................. 86
4.9.5 Stopwatch.............................................................................. 86
4.9.6 Unit Converter ....................................................................... 86
4.9.7 Currency Converter ............................................................... 87
4.9.8 Bluetooth ............................................................................... 87
4.9.9 World Clock ........................................................................... 89
4.9.10 Health .................................................................................. 90
4.10 SERVICES .................................................................................... 90
4.10.1 STK* .................................................................................... 90
4.10.2 WAP .................................................................................... 90
4.10.3 Data Account ....................................................................... 93
4.11 FILE MANAGER ............................................................................. 94
Chapter V Input Method ------------------------------------------------------------97
5.1 GENERAL DESCRIPTION ................................................................... 97
5.2 DESCRIPTION OF INPUT METHODS .................................................... 97
5.2.1 Smart English Input ............................................................... 97
5.2.2 English Input.......................................................................... 98
5.2.3 Number Input Method ............................................................ 99
Chapter VI Troubleshooting ---------------------------------------------------- 100
Chapter VII Definitions------------------------------------------------------------ 102
Chapter VIII Technical Parameters ------------------------------------------- 104
5
Chapter I Safety and Maintenance
For the efficient and safe operation of your mobile phone, please
observe the guidelines given below.
•Please read this manual carefully before using this phone.
•You are prohibited to use a mobile phone while in the aircraft. If the
alarming and calendar features of your mobile phone can automatically
power on your phone, check and disable these features before
boarding an aircraft.
•The mobile phone should be kept well away from heat sources or
high-voltage surroundings, such as electric appliances and
electric-heated cooking appliances. Use your phone at normal
temperature. Extreme temperatures (over 55℃ or below -10℃) are
harmful to your mobile phone.
•Avoid fire. Power off your mobile phone in areas such as gasoline
stations and fuel storage facilities.
•Do not hold your phone when driving. Do not place your mobile phone
in the area over the air bag or in the air bag deployment area. If a
phone is placed in the air bag deployment area and the air bag inflates,
the phone may be propelled with great force and cause serious injury
to you.
•Use only the standard batteries, charger and accessories specified by
your phone manufacturer. Your mobile phone manufacturer is not
liable for any damages resulting from use of third-party accessories.
•Do not disassemble your mobile phone without permission.
•Your mobile phone may interfere with some electronic devices when
they are at a short distance. Keep your phone away from electronic
devices, such as TV set, radio, personal computer, pacemaker and
hearing aids. Keep your mobile phone away from a credit card or a
magnetic field. Follow the relevant stipulations for special places when
using your mobile phone in hospitals or other special places.
• Avoid mechanical vibration or shock. Avoid beating the display of
your mobile phone with sharp tools.
6
•Use of a mobile phone case or a plastic mobile phone sheath may
damage the film on your phone cover.
•Do not use solutes, such as benzene, thinner or alcohol, to clean the
cover of your mobile phone. Keep your phone away from detergents or
other corrosive chemicals. Clean your mobile phone with clean, soft
cloth.
•Never expose your mobile phone to direct sunlight or heavy smog or
dust.
•Keep your mobile phone dry. Do not use your phone in highly humid
environments, such as the bathroom. This device is not waterproof.
Don't let it get wet or damp.
•If your mobile phone is equipped with an external antenna, do not
touch the antenna if unnecessary. And use only the supplied or
approved replacement antenna. Unauthorized antennas could damage
your phone.
•Grasp the plug (not cord) to disconnect the charger from your phone.
•Never rely on your mobile phone as the only emergency
communication facility, such as for first aid.
•Keep your mobile phone out of children’s reach to preclude any
danger.
Read and follow the precautions given below while using the
battery.
•Please carefully read the instructions and labels on the surface of the
battery before using it.
•Charge your battery in a cool and well-ventilated room. Overheat
charging environment may make the battery heat, fume, burn, deform
or even explode.
•There are special protection circuits and mechanisms inside the
battery. Never disassemble the battery without permission. Otherwise,
a short circuit many be caused or the electrolyte fluid may leak out. If
battery fluid splashes into your eyes, you may be in the danger of
7
losing your eyesight. In this case, rinse with clean water immediately
(but do not knead the eyes) and go to see your doctor.
• Never squash the battery. Avoid mechanical vibration or shock. Avoid
short circuit. Otherwise, the battery or the attached parts may be
damaged. Short circuit may result from direct connection between the
positive pole and the negative pole of the battery, by metal articles
such as coins, pens, or clips. So, never leave the battery together with
metal articles.
•Please keep metal contact points and the battery clean.
•Never use damaged or exhausted battery.
•Replace the battery when it cannot meet the performance
requirements. Your battery can be recharged hundreds of times before
replacement is necessary. The battery is a consumable. Although it
can be recharged hundreds of times, its capacity will decrease
gradually. If you notice a significant decrease in operation time (call
time and standby time), it is probably time to buy a new battery.
•Never expose your battery to direct sunlight or heavy smog or dust.
Never use your battery in a high humidity environment, such as the
bathroom. This device is not waterproof. Don't let it get wet or damp.
•Do not expose your battery to extreme temperatures. Temperatures
above 55℃ or below - 10℃ will affect the battery performance.
•Never dispose of batteries in a fire as they may explode.
• Never leave your battery in water. Otherwise, internal short circuit
may occur, which will make the battery heat, fume, deform, damaged
or even explode.
• The battery must be disposed of properly and may need to be
recycled. Never dispose of batteries as you do with ordinary garbage,
because they may explode or lead to contamination accident.
•Your battery can only be recharged with the specified charger. Never
charge the battery for more than 12 hours in a row.
•Keep your battery out of children's reach to preclude any danger.
8
Please follow the precautions described below when using the
charger.
•Please read the instructions manual and the labels on the surface of
the charger carefully before using it.
• Do not disassemble or modify your charger. Never use your charger
with impaired wire because that may lead to an electric shock, fire and
charger damage.
• Never touch the charger with a wet hand. If your charger comes into
contact with water or other liquids, cut off the power immediately.
• Never short-circuit your charger. Avoid mechanical vibration or shock.
Never expose your charger to direct sunlight or high-humidity
environments (such as the bathroom).This device is not waterproof.
Don't let it get wet or damp.
•Do not use your charger in the vicinity of electronic devices such as
TV sets or radios.
•Pull the charger plug (not the cord) to disconnect the charger.
•You should charge your battery in a well-ventilated environment with
an ambient temperature between -10℃~ + 55℃. Only use a
manufacturer approved charger. Using other chargers may be
dangerous and it also violates the warranty terms stipulated by the
manufacturer.
•Keep your charger in a safe place out of the reach of children to
preclude any danger.
Please follow the following precautions while using the earphone
(which may need to be further purchased).
•Please control the earphone at a proper volume in case of damage to
your hearing.
•Do not drag the earphone wire forcefully in case of breakage.
•The long use of earphone in environments of high temperature or high
humidity can easily lead to earphone damage or shorter service life.
9
•Do not use the earphone while driving a car, riding a bike or walking
on the road in case of traffic accidents.
•Keep your mobile phone out of children’s reach to preclude any
danger.
10
Chapter II Before Using Your Phone
2.1 Phone Exterior
Left Game
Key
Left Speaker
Previous
Play
Next
Micro Card
Slot
String Hole
Earpiece
Right
Game
Key
Display
LeftSoft
Key
Multimedia
Key
Dial Key
OK Key
Microphone
Socket
Right
Soft Key
Login Key
End Key
Navigation
Keys
Number
Keys
11
Right
Speaker
Camera
Volume Key
Battery
Cover
Capture Key
Data
Cable/Earphone/Charger
Socket
2.2 Keys Description
Left
Game
Key
Previous
Play
Next
Left
Soft
Key
Multimedia
Dial
OK Key
12
Right
Game Key
Right
Soft
key
Login
Volume
Key
Capture
Key
End Key
Navigation Key
Number
Keys
Keys
Dial key
End Key
Left
key
soft
Right soft
key
Multimedia
key
Previous
Key
Next Key
Login Key
OK key
Description
Dial a phone number or answer an incoming
call. When the phone is in idle mode, press this
key to access the call history list of dialed calls.
End a call.
Hold down this key to turn on/off your mobile
phone.
Pressing this key in the menu will make the
phone return to the idle mode.
When the background music is on, tap this key
to display the "Turn Off Background Music?"
prompt.
Perform the function shown by the label at the
lower left corner of the display.
Press this key when the phone is idle to enter
the main menu.
Perform the function shown by the label at the
lower right corner of the display.
Press this key to return to the previous page
when in the menu.
Tap this button to delete the character in front of
the cursor when in edit mode. Hold this key
down to delete all of the characters in the editing
area.
Press this key when the phone is idle to access
Phonebook.
Press this key when the phone is idle to access
multimedia feature.
When the player is playing, press this key to
return to the previous file.
When the player is playing, press this key to go
to the next file.
Press this key when the phone is idle to enter
WAP menu.
Press this key when the phone is idle to enter
the shortcut menu.
The OK Key is used to confirm the performed
13
Number
Keys
* Key
# Key
Navigation
Key
Volume
Key
Play Key
Capture
Left Game
Key
Right
Game Key
14
operations and to enter the menu that has been
selected when in the menu.
Number keys are used to input numbers, letters
and special characters.
Hold down the 0 key when the phone is idle to
enter a "+" symbol (international access code).
They can also be used as shortcut keys to
quickly access the options within a menu.
Press this key repeatedly when the phone is idle
to switch among “*”, “P” and “W” in turn.
Press this key to lock the keypad when the main
menu has just been entered.
Hold down this key when the phone is idle to
switch to Vibration mode.
Press this key to switch between different
language input modes when in edit mode.
The key is split into 4 directional keys: up, down,
left and right. Move the curser up, down, left and
right in edit mode.
Press Left Key when the phone is idle to access
Messages; Press Right Key to access Audio
Player; Press Up Key to access Bluetooth;
Press Down Key to access FM.
This key is used to adjust the volume during
calls.
Tap this key to adjust the keypad tone volume
when the phone is idle. Briefly press this key to
adjust the music volume when the background
music is playing.
Press this key when the phone is idle to enter
the Audio Player.
Press this key when the phone is idle to enter
photo preview interface.
Corresponds to A key in Games
Corresponds to B key in Games
Notes: In this manual, “Press a key” means to press a key and release
it immediately, while “hold down a key” means to press a key and hold
it for 2 or more seconds.
2.3 Display
The display can be divided into three sections. The idle dialing
interface is taken as an example for the following description.
Icons Area
Text/Graphics Area
Soft Key Prompt Area
Area
The first line/System
Icons Area
The middle lines/
Text and Graphics
Area
The last line/Soft
Key Prompt Area
Description
Various prompt icons are displayed here.
The area displays information, prompt
information and any information that you enter
(such as the number to dial).
The functions assigned to the two soft keys
are displayed here.
15
2.4 Icons
Icons
/
Description
Signal strength
indicator.
GPRS
Connected
Alert Type is
Ring
Alert Type is
Vibration
Alert Type is
Vibration
and
Ring
Alert Type is
Vibration
then
Ring
Unread SMS
Location
Icons Area
Unread
MMS
message
Alarm Enabled
Icons Area
Call
Divert
Unconditionally
Battery Level
New
missed
calls
GSM connection
encrypted
Bluetooth
enabled
Bluetooth
earphone
connected
Keypad Locked
16
Icons Area
Icons Area
Icons Area
Icons Area
Icons Area
Icons Area
Icons Area
Icons Area
Icons Area
Icons Area
Icons Area
Icons Area
Icons Area
Icons Area
Stopwatch
Enabled
Background
Music Playing
Icons Area
Icons Area
2.5 Battery
In order to get the best performance of your battery, please fully charge
the battery for the first three times only when the battery is completely
flat.
2.5.1 Removing and Installing Your Battery
Follow the steps given below to remove your battery.
① Push the battery cover about 5 millimeters in the direction as shown
by the arrow in the following Figure (2).
② Lift up the compartment cover in the direction as shown by the
arrow in Figure (3), so that the battery compartment cover is
completely separated from the phone.
③ Take out the battery in the direction as shown by the arrow in Figure
(4).
Warning: Make sure that you have powered off your phone and
removed any external power sources before removing the battery.
Never remove the battery when your phone is turned on. Otherwise,
your SIM card and phone may be damaged.
17
Follow the steps given below to install your battery.
① Make sure the metal contacts of your battery and those of the
battery compartment are properly aligned and clip the battery into the
compartment as shown by the arrow in Figure (1);
② Slightly put the compartment cover into the slot of your phone as
shown by the arrow in Figure (2).
③ Slightly push the compartment cover as shown by the arrow in
Figure (3) until it clicks into place.
2.5.2 Charging the Battery
18
Plug the charger into a power socket.
And plug the connector of the charger into the charger jack on one side
of your phone.
The battery level indicator in the Icons Area will flash cyclically. If you
have powered off the phone, a charging prompt will be displayed on
the screen to show that the battery is being charged.
Notes: If the phone has been overused when the battery is low, it may
take a while for the charging prompt to be displayed after the charging
has begun.
Charging is complete when the battery indicator in the system icons
area is full. If the battery is charged when the phone is powered off, a
Charge Complete screen will be displayed. It is normal for your battery,
phone and charger to become warm during charging.
When the charging is completed, disconnect your charger from the AC
power socket as well as your phone.
Notes: You should charge your battery in a well-ventilated environment
with an ambient temperature between -10℃~+55℃. Only use a
manufacturer approved charger. Using other chargers may be
19
dangerous and it also violates the warranty terms stipulated by the
manufacturer.
When your phone turns off automatically or prompts “Battery Low”, the
battery should be charged promptly. If the battery is charged when it
doesn't use up, the charging time will be shortened automatically.
2.6 Connecting the Network
2.6.1 SIM Card
You must insert a valid SIM (Subscriber Identity Module) card before
you can use the mobile phone. The SIM card is provided by your
network service operator.
All information needed to establish a network connection is stored on
the SIM card. The call numbers that you have chosen to save into the
SIM phonebook and the SIMs are also stored on the card.
To avoid losing or damaging the information stored on your SIM card,
never touch the metal contacts of the card. Also, keep the card well
away from electro-magnetic sources. If your SIM card is damaged,
your mobile phone will not be able to be used normally.
Warning: Make sure that you have powered off your phone before
removing the SIM card. Never remove or install a SIM card when the
phone is connected to an external power source. Otherwise, the SIM
card or mobile phone may be damaged.
2.6.2 Installing and Removing Your SIM Card
The metal contacts on your SIM card can be easily scratched. Take
care to remove the SIM card before installing it.
Power off your mobile phone, and remove the battery or disconnect
external power.
Insert SIM card into the SIM card holder in the direction as shown in
Figure (1).
Before removing the SIM card, please power off your mobile phone
and remove other external power source and battery. Slightly press
20
SIM card, slide it in the direction as shown in Figure (2), and take out
SIM card.
SIM card
holder
2.6.3 Turning On/Off Your Phone
Hold down the End Key for a few seconds to turn on/off your mobile
phone.
The phone will not be able to be used properly if it has been turned on
without a SIM card inside. Once a SIM card is inserted, your phone will
automatically check the validity of the SIM card.
And then the following prompts will be shown successively on the
display:
Enter Phone Lock Code - when the phone lock code feature is
enabled.
Enter PIN code - when the PIN code is enabled.
Searching… - The phone keeps searching until it locates a suitable
network.
2.6.4 Unlocking Your Phone
The Phone Lock mechanism can be enabled to protect your phone
from unauthorized use. When this feature is enabled, you have to enter
21
the phone lock code every time you turn on your mobile phone.
Otherwise, your phone can not be used.
Use the Number keys to enter your phone lock code, use the Right
Key to erase input errors and press # or OK to end your input. For
example, if your phone lock code is "1234", you should enter:
1 2 3 4 and <OK> or 1 2 3 4 and <#>
If you have forgotten your phone lock code, you have to contact your
local dealer or authorized maintenance service center to unlock your
mobile phone.
2.6.5 Unlocking Your SIM Card
To protect your SIM card from unauthorized use, your SIM card is
enciphered with a PIN (Personal Identification Number) code. When
this feature is enabled, you have to enter your PIN code every time you
turn on your mobile phone, otherwise, the phone will not work properly.
22
Hold down the End Key to turn on your mobile phone.
Use the Number Keys to enter your PIN Code, use the Right Key to
erase input errors and press # or OK to end. For example, if your SIM
lock code is "1234", you should enter:
1 2 3 4 and <OK> or 1 2 3 4 and <#>
If you enter the wrong PIN code 3 times in a row, your SIM card will be
locked, and your phone will prompt you to enter your PUK code.
Note: Your network operator has set a default PIN (4-8 digits) on your
SIM card. You should change it to a private code as soon as possible.
2.6.6 Connecting to Network
Your phone will automatically search for a proper network. Once a
network connection is established, the name of your network service
operator will be shown in the middle of the upper part of the
Text/Graphics Area. At this stage, your phone is idle. You can make
or answer a call, and you can also:
Press the Left Soft Key to access the main menu.
Press the OK to access the shortcut menu.
Press the Right soft key to access the Phonebook.
Press Play Key to access Audio Player.
23
Press Login Key to access WAP menu.
Press Capture Key to access Camera.
2.7 Memory Card
Your FLY MC100 mobile phone supports multifunctional memory
cards of Micro SD format. Users can store the video, photo, pictures,
MP3, sound recording files, etc. in the Micro SD card.
Installing and Removing Your Micro SD Card
Please follow the steps below to install the card.
Notes: During installation, please pay attention to your operation.
Forceful operation may damage your Micro SD card holder or make it
unable to take out the card after it is inserted. Please do not conduct
the operation forcefully in case of any obstruction or a sloping Micro
SD while inserting the card. Make sure the metal interface of your
Micro SD card faces the display of the phone (see Directional Diagram
of Installing Micro SD Card as reference).
Directional Diagram of Installing Micro SD Card
24
① Remove the Micro SD card cover in the direction as shown by the
arrow in the following Figure (2);
② Keep the metal side of the Micro SD card facing the front side of the
phone and insert the card into the slot as shown by the arrow in the
following Figure (3) until it clicks into place;
③ Return the Micro SD card cover to its original position as shown by
the arrow in the following Figure (4).
Follow the following steps to remove your Micro SD card:
① Remove the Micro SD card cover in the direction as shown by the
arrow in the following Figure (2);
② Slightly press the Micro SD card in the inserting direction and
unlock the card upon the sound of click. Remove the Micro SD card as
shown by the arrow in the following Figure (3);
③ Return the Micro SD card cover to its original position as shown by
the arrow in the following Figure (4).
25
26
Chapter III Quick Start Guide
3.1 Highlight Features
As a mobile phone targeting multimedia, FLY MC100 also has rich,
useful and fast multimedia features besides the basic features of
mobile phones. The following is a brief introduction to these features:
Phonebook: Up to 1,000 entries can be stored on your phone. The
phone supports the Phonebook of business card type and customized
incoming ring tones and associate pictures and clips. Features
including quick search in Phonebook and copying one entry to the SIM
card or phone are supported.
Call History: Information of calls will be stored automatically for
checking. You can conveniently dial a number or send an SMS to a
number stored in the call history. You can also save a number from the
call history to your phonebook.
SMS: EMS is supported by your phone; Phone numbers can be taken
from SMS messages. Information such as contact details and
commonly used phrases can be added into text messages.
MMS: MMS is supported. Messages of multi-media format like text,
picture and audio messages can be received and sent.
Bluetooth: The following bluetooth functions are available: Hand-free
service, earphone service, serial port service, dialing and surfing
service, object transmission service, file transmission service,
advanced audio play service, video and audio remote control service
and SIM access service.
Video Recorder: Your phone is equipped with a video recorder (with
sound).The amount of video that can be recorded depends on the
available space in the phone or memory card.
Video Clips: Full screen and wide screen video play modes are
supported. Video play supports Pause/Play, Fast Forward, Rewind and
other functions.
Audio Player: Your phone supports music files of MP3, *.wav, *.amr
and *.mid formats, as well as the features like background play and
lyric synchronization.
27
Sound Recording: Your phone can record calls or other sounds.
During a call, you can select the recording feature from Options in the
call interface and conveniently record the call. The record file is then
stored in My Documents in the format of .amr or .wav according to
your settings for checking. You can also enter the menu when no call is
in progress to select the Sound Recorder and set the recording file as
the incoming ring tone. The duration for sound recording depends on
the available space of the mobile phone or the memory card.
Camera: Your phone supports 2 megapixel camera feature which is
subject to customized settings like: White balance, time lapse,
continuous shooting, photo effect, shooting mode, photo frame, etc.
Tools: Many practical features are available. Features such as Alarm,
Calendar, Calculator, Stopwatch, To Do List, Stopwatch, Unit
Converter, Currency Converter and World Time are supported.
U Disk: The FLY MC100 supports portable storage feature, i.e. U disk.
Connect the phone and PC with the attached USB data cable when
the phone is off, so that the phone becomes a U disk applicable for
mobile data storage. Connect the USB data cable to PC when the
phone is on and select the storage unit (supporting U disk feature), IP
camera (supporting video feature) or the serial port (supporting PC
synchronization feature).
Notes:
1) If the U disk is activated when the phone is on, you are allowed to
read Micro SD card instead of phone card; meanwhile, the relevant
feature modules of the memory card can not be used temporarily.
2) The feature of IP Camera is only supported in the operation system
of Win 2000 or Windows XP. Different systems may need to install
different drivers.
PC Sync: The PC Sync software on the attached CD should be
installed into your PC. When your phone is turned on, connect your
phone to your PC, and choose “Serial Port” on your mobile phone. Run
the PC Sync software to enjoy the features of PC synchronization.
28
Customized Settings: Your phone can be customized as required.
Setting categories include Profiles, Display Characteristics, Phone
Setup, Call Setup, Network Setup, Security Setup, Shortcuts, etc.
There are multiple options in each category for you to customize. Such
as Incoming Ring Tone, Wall Paper, Time and Date, Scheduled Power
On/Off, etc.
Internet: WAP service is supported by your phone. Access and enjoy
the wireless network with the WAP browser for extensive information.
Java: The Java program is supported by your phone. You can
conveniently download, install and run Java games, Java electronic
books and other Java applications.
Input Method: Input modes like Smart English input, English (both
upper and lower case letters) input, Number input, etc. are available in
your phone for the convenient input of English (upper and lower case
letters), numbers, symbols etc. Please see the chapter on Input
Methods for more information.
3.2 Feature Keys
Feature
Powering on
the phone
Powering off
the phone
Accessing the
Main Menu
Hot Keys
Hold down the
End Key
Hold down the
End Key
Press the Left
Soft Key
Status Description
When your phone is
powered off
When your phone is
powered on
When your phone is idle
Accessing the
Voice Mail
Enter
the
Dialed Calls
List
Accessing the
shortcut
menu
Accessing
Camera
Hold down “1”
Idle interface
Press
Key
the
Dial
When your phone is idle
Press
key
the
OK
When your phone is idle
Press
the
Capture Key
When your phone is idle
29
Preview
Reject Call
Access WAP
Menu
Accessing the
Audio Player
Entering
phone
number
End a call
a
Press the End
Key
Press the Login
Key
Press the Play
Key
Incoming call prompt
screen
When your phone is idle
Press
the
Number Keys
Idle interface
Press
Key
When you are making a
call
the End
When your phone is idle
3.3 Making a Call
3.3.1 Dial Directly
1. Enter the number you intend to call when your phone is idle. You
may need to add area code when dialing a fixed telephone. (Press the
<Clear> soft key to delete the digit in front of the cursor. Hold down the
<Clear> soft key to delete all numbers that have been entered.)
2. Press the Dial key.
3. Press the End Key to end the call that is currently being dialed.
3.3.2 Dialing an Extension of a Fixed Telephone
1. Enter the area code and central phone number.
2. Press “*” key in succession to enter P or W.
3. Enter the number of the extension and press the Dial Key.
3.3.3 Dialing International Numbers
1. Hold down the 0 key to input a + symbol.
2. Enter the code of the country, as well as the area code and phone
number, following which press the Dial Key.
30
For instance, to call a hotline number in Shanghai from other countries,
you should dial:
+86 21 114
3.3.4 Dialing a Number in the List
You can dial numbers that are stored in your call history or phonebook.
1.
2.
Press the Up Key and Down Key to scroll between the
numbers in the list.
Press the Dial Key.
3.4 Dialing an Emergency Number
You can call an emergency number as long as your phone is within the
coverage range of a wireless network. Your phone can be used to call
emergency numbers even if you have not logged onto a network or if
no SIM card has been inserted. Enter 112 and press the Dial Key to
call emergency services.
Note: A prompt to enter the PIN code or Phone Password will appear
when your phone is turned on. Press the "Emergency" soft key to call
emergency services directly.
3.5 Answering/Rejecting Incoming Calls
1. You can answer incoming calls by pressing the Dial Key or the
<Answer> soft key.
2. Press the End key or the <Reject> soft key to reject an incoming
call.
If you have selected Any Key from Answering Mode under the
Profiles, you can answer calls by pressing any key (except for the End
Key, Capture Key, Play Key, Previous Key, Next Key, Volume key,
and Right soft key).
3.6 Ending a Call
Press the End Key to end the current call.
31
3.7 Call Options
Certain options require network support when calls are being
made. Please contact your service operator for any questions
regarding services.
Enter the call options menu by pressing the <Options> soft key when
a call is in progress. The following options are available:
1. Options available for one-way calls include:
z
z
z
z
z
z
z
z
Hold/ Retrieve (requiring network support): Pause the current
call or resume a paused call: Have the current call paused.
The callers cannot hear each other’s voices
End: End the current call.
New Call: Access a new dial interface.
Phone Book: Access the Phonebook menu.
Messages: Access the Messages menu.
Sound Recording: Record the current call.
Mute/Resume: Turn on/off the mute feature. When the mute
function is enabled the person on the other end of the line will
not be able to hear your voice, however, you will still be able
to hear their voice.
DTMF (Duel Tone Multiple Frequency): Turn on/off the DTMF
feature.
2. Options available in Conference calls include:
z
z
z
z
z
z
z
z
32
Swap (requiring network support): Switch between the current
call and the held call.
Conference (requiring network support): Add the current call
to a telephone meeting and hold a multi-party meeting.
Transfer (requiring network support): Transfer the call to a
predefined phone number.
End a Single Call: End the current call.
End All: End all the active calls.
Phone Book: Access the Phonebook menu.
Messages: Access the Messages menu.
Sound Recording: Record the current call.
z
z
Mute: Turn on/off the mute feature. When the mute function is
enabled the person on the other end of the line will not be able
to hear your voice, however, you will still be able to hear their
voice.
DTMF (Duel Tone Multiple Frequency): Turn on/off the DTMF
feature.
3.8 Making a Second Call
You can make a second call (whilst the first is still in progress) if your
network allows.
To make a second call:
1.
2.
Enter the second phone number or access the Phonebook
and find the number that you want to dial.
Press the Dial key. The first call will be put on hold
automatically after the Dial Key has been pressed.
3.9 Answering a Second Call
You can answer a second call (while the first is still in progress) if you
have activated the Call Waiting function and if the network allows.
To answer a second call:
1.
2.
Press the Dial Key to answer a second call. The first call will
be put on hold automatically.
Press the End key to end the current call.
33
Chapter IV Feature Menu
4.1 Using the Feature Menu
4.1.1 Option Menu
Press the Left Soft Key when your phone is idle to access the main
menu. During a call, press the <Options> to access the call options
menu.
In the main menu, submenu or options menu, press the Up/Down keys
to scroll to the feature that you want to use and press the Left soft key
for the options of this feature.
4.1.2 Shortcuts
On many menu interfaces, after selecting a certain menu option, an
index number will be displayed on the upper right corner of the screen.
You can access the shortcuts to the menu with this index number.
For instance, after you access the Messages menu, press the number
key 4 (4 is the corresponding number of the Voice Mail Server) and the
Voice Mail Server will be selected.
4.1.3 Quitting the Menu
When the feature menu is displayed, press the Right soft key to quit a
menu option, or press the End Key to return to the idle mode.
4.2 Feature Menu Structure
FLY MC100 Mobile Phone supports two types of main menu: Matrix
and Page. The contents of these two menus are the same, but the
orders are different. The Page menu structure is given below.
1 Phonebook
1-1 Quick Search
1-2 Search Entry
1-3 Add New Entry
1-4 Copy All
34
1-5 Delete
1-6 Caller Groups
1-7 Owner Number
1-8 Settings
1-9 Caller Picture
1-10 Caller Ring Tone
1-11 Caller Video
2 Messages
2-1 Messages
2-1-1 Write Message
2-1-2 Inbox
2-1-3 Outbox
2-1-4 Sent
2-1-5 Drafts
2-1-6 Delete Folder
2-1-7 Template
2-1-8 Message Settings
2-2 E-mail
2-2-1 Sent and Receive
2-2-2 Write E-mail
3-2-2 Inbox
2-2-4 Unsent
2-2-5 Sent
2-2-6 Drafts
2-2-7 Delete All Folder
2-2-8 Email Profile
35
2-3 Chat
2-4 Voice Mail Server
2-5 Broadcast Message
2-5-1 Receive Mode
2-5-2 Read Message
2-5-3 Languages
2-5-4 Channel Setting
3 Call History
3-1 Missed Calls
3-2 Dialed calls
3-3 Received Calls
3-4 Delete Call Log
3-4-1 Missed Calls
3-4-2 Dialed Calls
3-4-3 Received Calls
3-4-4 Delete All
3-5 Call Time
3-5-1 Last Call Time
3-5-2 Total Dialed
3-5-3 Total Received
3-5-4 Reset All Time
3-6 SMS Counter
3-6-1 Sent
3-6-2 Received
3-7 GPRS Counter
3-7-1 Last Sent
36
3-7-2 Last Received
3-7-3 All Sent
3-7-4 All Received
3-7-5 Reset Counter
4 Phone Setup
4.1 User Profiles
4-1-1 General
4-1-2 Meeting
4-1-3 Outdoor
4-1-4 Indoor
4-1-5 Headset
4-1-6 Bluetooth
4-2 Phone Setup
4-2-1 Time and Date
4-2-2 Schedule Power On/Off
4-2-3 Preferred Input Method
4-2-4 Speed Dial
4-2-5 Dedicated Key
4-2-6 TV Out
4-2-7 BEX Sound Effects Enhanced
4-3 Display Characteristics
4-3-1 Wall Paper
4-3-2 Theme
4-3-3 Power-On Display
4-3-4 Power-Off Display
4-3-5 Main Menu Style
37
4-3-6 Menu Background
4-3-7 Show Date and Time
4-3-8 Show Owner Number
4-3-9 Show Operator Name
4-3-10 LCD Backlight
4-4 Call Setup
4-4-1 Caller ID
4-4-2 Call Waiting
4-4-3 Call Divert
4-4-4 Call Barring
4-4-5 Call Time Reminder
4-4-6 Call Time Display
4-4-7 Auto Redial
4-4-8 Blacklist
4-5 Network Setup
4-5-1 Network Selection
4-5-2 Preferred Network
4-5-3 GPRS Connection
4-6 Security Setup
4-6-1 SIM Lock
4-6-2 Phone Lock
4-6-3 Auto Keypad Lock
4-6-4 Change Password
4-7 Flight Mode
4-8 Shortcuts
4-9 Restore Factory Settings
38
5 Multimedia
5-1 Camera
5-2 Video Recorder
5-3 Album
5-4 Audio Player
5-5 Video Player
5-6 Photo Artist
5-7 Melody Compose
5-8 Voice Recorder
5-9 E-book Reader
5-10 FM Radio
6 Fun and Games
6-1 Java
6-2 Games
7 Tools
7-1 Alarm
7-2 Calendar
7-3 Calculator
7-4 To Do List
7-5 Stopwatch
7-6 Unit Converter
7-7 Currency Converter
7-8 Bluetooth
7-9 World Clock
39
7-10 Health
8 Service
8-1 STK*
8-2 WAP
8-2-1 Homepage
8-2-2 Bookmarks
8-2-3 Recent Pages
8-2-4 Enter Address
8-2-5 Settings
8-3 Data Account Setup
8-3-1 GSM Data
8-3-2 GPRS
9 File Manager
Notes: Menu items with a “*” are only available under certain
circumstances. The actual content of the STK item in the tools menu
depends on the network service provider that provided you with SIM
card.
4.3 Phonebook
You can save phone numbers and names in your SIM Card or your
phone. Your phone supports 1,000 entries. The number of entries that
can be stored in your SIM Card is determined by its capacity.
4.3.1 Quick Search
Browse all entries in Phonebook or carry out quick search by entering
certain contents. You may use letter or number input method in quick
search and a maximum of 5 characters are supported.
40
Enter the name to be searched with letters or numbers to search for
the entry needed.
When the Search menu is displayed, you may press # to change the
input method needed.
4.3.2 Search Entry
Enter the name you want to search.
Highlight an entry in the Phonebook and press Options. The following
options will be available.
•
•
•
•
•
•
•
•
•
•
Dialing: Dial the selected phone number.
Send SMS: Send SMS to the selected phone number.
Send MMS: Send MMS to the selected phone number.
View: View the name, number and other information of the
current entry. If the entry is more than one screen in length,
use the Up and Down keys to scroll up and down. If you
have set up Caller Picture, press View after selecting the
option, and you may view the current associate picture.
Edit: Edit the selected memo.
Delete: Delete the selected entries.
Copy: If the selected entry is stored on the SIM card, copy
the entry into the phone. If the selected entry is stored in the
phone, copy the entry into the SIM card;
Move: If the selected entry is stored on the SIM card, move
the entry into the phone. If the selected entry is stored in the
phone, move the entry into the SIM card.
Duplicate: If the selected entry is stored on the SIM card,
copy the entry into SIM card. If the selected entry is stored in
the phone, copy the entry into the phone.
Send vCard: You can send the current entry to other users
by SMS or MMS or Bluetooth or select Save to Document
to save the entry to the phone or memory card.
Tips: You can press the Dial Key to dial the number directly in the
number list screen or detailed information screen of selected entry. If
multiple numbers exist in the entry, after pressing the Dial Key, a list
will be displayed that will allow you to choose the one you want to dial.
Select the one you want and press the Dial Key again to dial.
41
4.3.3 Add New Entry
New entries in the Phonebook can be stored on the SIM card or phone.
If you choose to save the entry to SIM card, only name and telephone
number will be included in the entry. If you choose to save the entry to
Phone, the following information may be included in the entry: name,
telephone number, home number, company name, E-mail, company
telephone, fax number, birthday, associate pictures, clip link, ring tone
selection and caller group.
Associate Picture: Set the customized incoming picture for the current
entry. You can also choose the suitable image from File Manager
besides the preset image.
Clip Link: Set the customized incoming picture for the current entry.
You can also choose the suitable clip from File Manager besides the
preset clips. It is recommended that you choose a clip of fair size, as
an oversized video may consume plenty of mobile phone resources
when played during an incoming call.
Ring Tone Selection: Set the customized ring tone for the current entry.
If you have set the customized incoming tone, the phone will play such
tone other than the tone set in the Profile when the corresponding
number calls.
Note: If you have set Clip Link, when the corresponding number calls,
the mobile phone uses the sound in the clip as its incoming ring tone,
instead of customized ring tone or incoming ring tone set up at profiles.
Caller Groups: You can arrange the entries stored in the phone in
different groups according to the relations.
4.3.4 Copy All
Copy all call history lists in the SIM card / phone to the phone / SIM
Card.
•
•
42
From SIM card: Copy all call history lists in the SIM Card to
your phone.
From Phone: Copy all call history lists in your phone to the
SIM Card.
Note: When copying entries in the pone to SIM card, only name and
telephone number of the entry will be copied; other information such as
home number and company number will not be copied.
4.3.5 Delete
Delete all entries from the SIM card or phone or delete all call history
from the phone. You can also choose Delete One by One to delete
selected entries.
4.3.6 Caller Group
The phone supports altogether 5 caller groups. You may select caller
group on caller setup screen and view and edit caller details. The caller
details include: Group Name, Incoming Ring Tone, Incoming
Picture, Incoming Clip and Group Member. You may choose right
picture or clip from File Manager for Incoming Picture and Incoming
Clip. You may add and delete group members.
Note: You can only add or delete group members for entries on your
phone.
4.3.7 Owner Number
Owner Number: You can set up a maximum of 2 owner numbers.
Changing this number will not have any effect on the actual number of
the SIM card.
4.3.8 Setup
Options available are Capacity Inquiry, Storage Location, vCard
Settings and My vCard.
Capacity Inquiry: You can check the number of used entries on the
SIM card and phone as well as the capacity for entries.
Storage Location: Set the default storage location for phone numbers.
You may also select storage location when adding an entry.
Fields: You may set up the following options for phone entries:
whether or not to display home number, company name, E-mail,
company telephone, fax number, birthday, associate picture, clip link,
ring tone selection and caller group.
43
My vCard: You may edit and sent my vCard.
4.3.9 Caller Picture
Access the Caller Picture. If there is no photo in default directory for
saving photos in the phone, it will prompt "Blank"; If there are pictures
in the default directory for saving photos in the phone, select one
picture and press OK to set it as Associate Picture of new entry,
existing entry or caller group. JPG, GIF, BMP and PNG are four
formats that are supported as associate picture, with the size not
exceeding 20K.
4.3.10 Caller Ring Tone
Access the Caller Ring Tone. Select a ring tone and press OK to set it
as incoming ring tone of new entry, existing entry or caller group.
4.3.11 Caller Video
Access the Caller Video. If there is no clip in default directory for
saving clips in the phone, it will prompt "Blank"; if there are clips in the
default directory for saving clips in the phone, select one clip and press
OK to set it as incoming clip of new entry, existing entry or caller group.
4.4 Messages
SMS and MMS can be sent and received with the Messages feature.
Chat, E-mail, Voice Mail Server, and CB broadcasting are also
available.
Press the Left soft key when in the phone is idle and select
Messages.
4.4.1 Messages
In Messages, you can create, send, receive, view, edit and arrange
SMS and MMS.
Write Message
You can write and send SMS and MMS with this feature.
SMS
44
With EMS, SMS with texts, images, animations, tones and melodies
can be sent and received. Long message feature is also supported.
Select Options in the message editing interface for the following:
z
z
z
z
z
z
z
z
Done: End the edit, and enter the send options menu.
Use Template: Choose this option to insert the predefined
text at the current cursor location.
Insert Object: Choose this option to display the options menu.
Picture: Insert a picture extracted from the system.
My Picture: Select and insert the pictures in the "Image"
folder of File Manager.
Predefined Animations: Insert an animated icon extracted
from the system at the current cursor location.
My Animations: Select and insert the animations in the
"Image" folder of File Manager.
Melody: Insert the ring tones built in the system.
My Melody: Select and insert the ring tones in the "Audio"
folder of File Manager.
Predefined Sound: Insert a melody extracted from the
system.
Format Text: Set the format of your message text:
Text Size: Options such as Small, Medium and Large are
available.
Text Style: Options such as Bold, Italics, Underline and
Strikethrough are available.
Alignment: Options available include Automatic, Left, Centre,
and Right.
New Paragraph: Choose this option to end the current
paragraph and create a new paragraph.
Insert PHB Number: Select and insert the contact number in
the Phonebook.
Insert PHB Name: Select and insert the contact name in the
Phonebook.
Insert Bookmark: Insert the content of the bookmark.
Input Method: You can choose Input Method to enter the text
of your message.
45
Press Done to access the send options menu after the edit for the
following available operations:
•
•
•
•
•
Send Only: Input the receiver's number and send the
message.
Save and Send: If the message has been sent successfully,
a copy will be stored in the Sent. The message will be stored
in the Outbox if sending fails.
Save To Draft: Save the message in the Drafts.
Send to Many: Send the message to multiple numbers.
Send by Group: Send the message to all numbers in a
certain caller group in the Phonebook.
MMS
Texts, pictures and sounds can be contained in MMS. The phone will
not be able top send or receive an MMS message if its size exceeds a
certain limit.
Notes: MMS can only be used if it is supported by your network
operator or service operator. MMS will not be able to be received or
displayed if the phone does not support the format of MM that is
provided.
Its most obvious characteristic is its support for multimedia. An MMS
message may contain more content and information. Data that can be
sent includes text, pictures, sounds, and many other forms of
multimedia. MMS multimedia messages can be sent from phone to
phone or from the internet to a phone.
Enter MMS. Edit and send MMS in the following way:
1.
2.
46
Select To, Cc and Bcc respectively to edit the phone
numbers and E-mail addresses of the receivers, men of Cc
and men of Bcc.
Select Subject to edit the subject of the message, thus
making its orientation more clear.
3.
z
z
z
z
z
z
z
z
z
z
z
z
z
z
z
z
z
z
z
z
z
z
4.
•
Select Edit Content to edit the content of your MMS message.
Press Options in the interface for the following operations:
Done: Complete the edit of the MMS.
Input Method: You can choose Input Method to enter the text
of your message.
Add Image: Add a picture from File Manager on the frame.
Replace Image: Replace the added picture on the frame.
Remove Image: Remove the existing picture on the frame.
Add Audio: Add a sound from File Manager on the frame.
Replace Audio: Replace the added sound on the frame.
Remove Audio: Remove the existing music on the frame.
Add Video: Add a video from File Manager on the frame.
Replace Video: Replace the added video on the frame.
Remove Video: Remove the existing video on the frame.
Add Attachment: Add an accessory from File Manager on
the frame.
Replace Attachment: Replace the added accessory on the
frame.
Remove Attachment: Remove the existing accessory on the
frame.
Add Slide before: Add a new blank frame in front of the
frame.
Add Slide after: Add a new blank frame behind the frame.
Add Bookmark Text: Add the content of the bookmark on the
frame.
Preview: View the effect of the MMS.
Slide Time: Edit the time duration for the play of current MMS
message.
Previous Slide: Display the previous frame. (The option
exists when there is a frame in front.)
Next Slide: Display the next frame. (The option exists when
there is a frame behind.)
Delete the Slide: Delete the current frame. (The option exists
when there are more than 2 frames.)
Select Done and the following options are available:
Send: Send the MMS. (The option exists when there is at
least one receiver.)
47
•
•
•
•
Inbox
Save and Send: Save the MMS in Sent after the sending.
(The option exists when there is at least one receiver.)
Save as Draft: Save MMS in Drafts.
Send Options: Conduct relevant settings about the sending
of the MMS. (The option exists when there is at least one
receiver.)
Quit: Quit the edit interface of MMS.
In this menu you can choose to read SMS, MMS, MMS Push or WAP
Push messages that you have received.
Corresponding icons will be shown to remind you of new SMS, MMS,
MMS Push and WAP Push. If you have no space available for new
messages, the SMS Full or MMS Full icons will be displayed. In this
case you have to delete unnecessary SMS or MMS messages to make
sure that there is enough space to receive new SMS or MMS
messages.
The following operations can be chosen (depending on the type of
message that you have selected)
SMS
Select the SMS to be read from the SMS list and press Options for the
following operations:
•
•
•
•
•
•
•
•
•
•
48
View: View this SMS message.
Reply SMS: Reply with an SMS.
Reply MMC: Reply with an MMS.
Forward: Forward this SMS.
Edit: Edit the SMS.
Delete: Delete the current message.
Delete All: Delete all SMS messages in your Inbox.
Use Number: Extract the sender number of the current SMS
message, or to get the number in the message. The
numbers will be shown in a list. You may choose one from
the list for dialing or saving.
Use URL: Connect or save relevant websites.
Advanced: Set up the Superior Option.
Copy to Phone (SIM card): Copy the current SMS message
to your phone if it is saved in SIM card; or copy the current
SMS message to SIM card if it is saved in your phone.
Move to Phone (SIM card): Move the current SMS
message to your phone if it is saved in the SIM card; or
move the current SMS message to the SIM card if it is saved
in your phone.
Copy All Text Messages: Choose to copy from SIM card:
copy all of the SMS messages in your Inbox (SIM card) to
the phone; Choose to copy from Phone: copy all of the
received SMS messages in your phone to the SIM card.
Move All Text Messages: Choose to move from SIM card:
move all of the SMS messages in the Inbox (SIM card) to the
phone; Choose to move from Phone: move all of the
received SMS messages in your phone to the SIM card.
MMS
Select the MMS to be read from the MMS list and press Options for the
following operations:
•
•
•
•
•
•
•
•
•
•
•
View: Play the current MMS message.
SMS Reply: Reply with an SMS.
MMS Reply: Reply with an MMS.
Reply to All: Reply with an MMS to all relevant numbers of
this MMS.
Forward: Access the MMS Forwarding menu.
Edit: Edit the current MMS message.
Delete: Delete the current MMS message.
Delete All: Delete all messages in your Inbox.
Details: Check the details of the current MMS message.
Save Objects: Save relevant resources (pictures, music,
videos and accessories) in the phone. (The option exists
only when the MMS is being read.)
Use Number: Extract numbers in the text of current MMS
message, or to get the caller number. The numbers will be
shown in a list. If you choose one from the list, the dialing
interface will be displayed for you to conveniently dial or
save the number.
49
MMS Push
Select the MMS Push to be read from the MMS Push list and press
Options for the following operations:
•
•
•
•
•
View: View the current MMS Push.
Download: Download the MMS corresponding to the current
MMS Push.
Delete: Delete the current MMS Push.
Delete All: Delete all messages in your Inbox.
Use Number: Extract numbers in the text of current MMS
message, or to get the caller number. The numbers will be
shown in a list. If you choose one from the list, the dialing
interface will be displayed for you to conveniently dial or
save the number.
Wap Push
Select the Wap Push to be read from the Wap Push list and press
Options for the following operations:
z Read: Read the current WAP Push.
z Delete: Delete the current Wap Push.
z Delete All: Delete all of the messages in your Inbox.
Outbox
The message will be saved in the Outbox upon unsuccessful sending.
The following operations can be chosen (depending on the type of
message that you have selected)
SMS
Select the SMS to be read from the SMS list and press Options for the
following operations:
•
•
•
•
•
50
View: View this SMS message.
Send: Send this SMS message.
Edit: Edit the current message.
Delete: Delete the current message.
Delete All: Delete all messages in your Outbox.
•
•
•
Extract Number: Extract the sender number of the current
SMS message, or extract the number in the message. The
numbers will be shown in a list. If you choose one from the
list, the dialing interface will be displayed for you to
conveniently dial or save the number.
Use Website: Connect or save relevant websites.
Superior Option: Set up the Superior Option.
Copy to Phone (SIM card): Copy the current SMS message
to your phone if it is saved in SIM card;
Or copy the
current SMS message to SIM card if it is saved in your
phone.
Move to Phone (SIM card): Move the current SMS
message to your phone if it is saved in the SIM card;
Or
move the current SMS message to the SIM card if it is saved
in your phone.
Copy All: Choose to copy from SIM card: copy all of the
SMS messages in your Outbox in your SIM card to the
phone; Choose to copy from Phone: copy all of the SMS
messages in your Outbox in your phone to the SIM card.
Move All: Choose to move from SIM card: move all of the
SMS messages in your Outbox in your SIM card to the
phone; Choose to move from Phone: move all of the SMS
messages in your Outbox in your phone to the SIM card.
MMS
Select the MMS to be read from the MMS list and press Options for
the following operations:
•
•
•
•
•
•
•
View: View this MMS message.
Send: Send this MMS message.
Edit: Access the MMS edit interface.
Delete: Delete the current MMS message.
Delete All: Delete all MMS messages in your Outbox.
Details: Check the details of the current MMS message.
Use Number: Dial the relevant number or save it in the
Phonebook.
51
Sent
Successfully sent messages will be stored in the Sent if you selected
Save and Send for a sent message.
The following operations can be chosen (depending on the type of
message that you have selected)
SMS
Select the SMS to be read from the SMS list and press Options for the
following operations:
•
•
•
•
•
•
•
View: View this SMS message.
Forward: Forward this SMS message.
Edit: Edit the current message.
Delete: Delete the current message.
Delete All: Delete all the messages in your Sent.
Details: Check the details of the current SMS message.
Use Details: Extract the sender number of the current SMS
message, or to get the number in the message. The
numbers will be shown in a list. If you choose one from the
list, the dialing interface will be displayed for you to
conveniently dial or save the number.
MMS
Select the MMS to be read from the MMS list and press Options for
the following operations:
•
•
•
•
•
•
•
52
View: View this MMS message.
Forward: Forward this MMS message.
Edit: Access the MMS edit interface.
Delete: Delete the current MMS message.
Delete All: Delete all the messages in the Sent.
Details: Check the details of the current MMS message.
Use Number: Dial the relevant number or save it in the
Phonebook.
Drafts
Choose Save as Draft for the message to be sent, and your phone will
save this message to the Drafts.
Here you can check messages that have been saved but not yet sent.
The following operations can be chosen (depending on the type of
message that you have selected)
SMS
Select the SMS to be read from the SMS list and press Options for the
following operations:
•
•
•
•
•
•
•
View: View this SMS message.
Send: Send this SMS message.
Edit: Edit the current message.
Delete: Delete the current message.
Delete All: Delete all messages in your Drafts.
Properties: Check the details of the current SMS message.
Use Details: Dial the relevant number or save it in the
Phonebook.
MMS
Select the MMS to be read from the MMS list and press Options for
the following operations:
•
•
•
•
•
•
•
View: View this MMS message.
Send: Send this MMS message.
Edit: Edit this MMS message.
Delete: Delete the current MMS message.
Delete All: Delete all messages in your Drafts.
Properties: Check the details of the current MMS message.
Use Details: Dial the relevant number or save it in the
Phonebook.
Delete Folder
The Delete Folder is used to empty the Inbox, Outbox, Sent and Drafts
or to delete all the messages.
53
Template
Message templates offer 10 commonly used text phrases and 5 preset
MMS templates that can be used at your convenience.
SMS: Set the contents of preset messages that can be input directly
when messages are edited. You can edit or delete the templates.
MMS: Edit the content of preset MMS messages so that creating new
messages is easier. You can view them and check the details.
Message Settings
You can conduct sending and receiving settings about the SMS and
MMS in the messages.
SMS: Various settings related to SMS can be conducted.
•
Profile Settings:
Profile Name: Set the name of the profile.
SC Address: Set the number of the SMS Center. This
number can be obtained from your network service operator.
Valid Period: Set the validity period within which your SMS
message is kept in the SMS center. You can set the validity
period to be 1 hour, 6 hours, 12 hours, 1 day, 3 days, 1 week
or Maximum.
Message Type: Set the format of your SMS message,
Options available include Text, Fax, Pager and E-mail.
Note: Not all networks support all formats.
z
z
z
z
54
Common Settings: Turn on/off the Delivery Reports, It
enables you to know whether or not messages were delivered
successfully. This function requires network support.
Memory Status: You can check the use status and remaining
space of SMS in both the SIM card and Phone.
Preferred Storage: This menu allows you to choose
preferred storage location, namely, SIM Card or your Phone.
Pref. Bearer: Select the preferred sending mode of SMS,
including GPRS preferred, GSM preferred or GSM only.
MMS: You may conduct various MMS settings.
z
z
z
z
z
Compose: Set the reduction scale of the picture during the
edit of MMS, the use of automatic signature and its content.
Send: Set the relevant options during the sending of MMS.
Validity Period: Set the duration of time that your MMS
messages are stored at the network terminal. MMS messages
will be deleted by the network operator if they have still not
been sent to the target phone by the time that the period of
validity has elapsed.
Delivery Report: You can choose to activate or deactivate
the Delivery Report. With this feature activated, the network
will give you feedback when the receiver receives the MMS.
This function requires network support.
Read Report: You can choose to activate or deactivate the
Read Report. With this feature activated, the network will give
you feedback when the receiver begins to read the MMS. This
function requires network support.
Priority: Set the priority of the current MMS Message.
Slide Time: Set the default play time duration for each frame
of MMS message.
Delivery Time: Set the time mode of sending MMS (Real
Time, Within 1 Hour, Within 12 Hours and Within 14 Hours).
Retrieve: Set the relevant options during the receiving of
MMS.
Home Network: Set the retrieve mode of MMS (Prompt,
Reject and Delay) when the phone is in non-roaming network.
Roaming: Set the retrieve mode of MMS (Same as Primary
Network, Reject and Delay) when the phone is in roaming
network.
Read Report: Set the mode of sending Reading Report
(Inquiry, Send and Not Send) after the downloaded MMS is
read.
Delivery Report: Set whether or not to enable the Delivery
Report when an MMS is received.
Filter: Set whether or not to accept the MMS of "anonymous
sender" or "advertising information".
Server Profile: Edit the network settings used by MMS
messages. Settings Include:
55
z
Change Setting Title: You can change the titles of the
Settings.
Homepage: Set the address of MMS Center Server and the
default settings are http://mmsc.monternet.com.
Network Account: You can choose the network account from
GSM and GPRS.
Connection Form: You can choose the connection form from
WAP and HTTP.
User Name: Account Title.
Password: The password of the account.
Memory Status: Check the used and remaining space of the
memory.
4.4.2 E-mail
Press the Left soft key OK to access the E-mail menu and enable the
feature of receiving and sending E-mails.
Receiving and Sending E-mail
Send the E-mail edited in your phone to the Internet and receive the
mail from the Internet in your preset mailbox.
Edit E-mail
Edit a new E-mail. In the interface, you can set the receivers and
copies, insert accessory E-mail files, edit the themes and contents of
the E-mail and set the E-mail priority. You can select Save and Send,
Save in Drafts and Quit without Saving.
Inbox
Check the E-mails that have been received in the Inbox. Press Left
soft key to read them. When reading an E-mail, press Options to:
Reply, Reply Only, Reply All, Reply All Only, Forward and Delete.
Outbox
56
Check the E-mails that have not been sent in the Unsent. Select an
E-mail and press Options for the following available operations: Send,
Save and Send, Edit, Move to Drafts and Delete.
Sent
Check the E-mails that have been sent in the Sent. Please note that
you need to Save while sending an E-mail. Select an E-mail and you
will be able to Forward or Delete it.
Drafts
Check the currently saved E-mails in the Drafts menu and press the
Left soft key of Options to select Edit or Delete.
Delete Folder
Empty E-mails in the chosen mailbox.
E-mail Setup
Three options are available in E-mail Setup. Choose one and press the
left soft key Options to enable or edit the feature. If you are using this
feature for the first time, you are required to edit the selected Setup
Option according to the information provided by your E-mail service
operator. Options available for a configuration include: Transmission
Setup, Sending Server Setup, Retrieving Server Setup and
Electronic Signature. The operations are as follows:
Transmission Setup
Name of Configuration: To set the name of configured file that will be
displayed in the interface of E-mail Setup.
Transmission Account: Set the applied logging account. Two options
are available: GSM Data and GPRS.
Communication Protocol: The available communication agreements
are POP3 and IMAP4.
57
Auto Retrieve: You can choose to enable / disable the function of
Auto Retrieve. If this feature is enabled, E-mails will be automatically
retrieved according to the auto receiving time and frequency preset by
you.
Max. Retrieve Capacity: Set the maximum bytes of the E-mail
received by your phone.
Outgoing Setup
Outgoing Server: Set the server for sending mails.
Outgoing Server Port: Set the port number of the outgoing port.
Name Displayed: Set the name to be displayed.
E-mail Address: Set the E-mail address of the user.
User Name: Set the User Name to be used when logging on the
E-mail Server.
Password: Set the password to be used when logging on the E-mail
Server.
Incoming Setup
Incoming Server: Set the server for receiving E-mails.
Incoming Server Port: Set up the port No. for Incoming Connection.
User Name: Set the User Name to be used when logging on the
E-mail Server.
Password: Set the password to be used when logging on the E-mail
Server.
Reserve E-mail in Server: Set up whether or not to reserve the
private backup of e-mails in the server.
Electronic Signature
Set to turn on/off the use of signature when sending an E-mail. Select
the needed signature image from File Manager and edit the signature
text.
58
Example of E-mail Setting
Suppose the user has a mailbox of [email protected] on the website of
www.sohu.com with the username xxx and password 123456;
according to the configuration information provided by www.sohu.com
for E-mail users, the user may perform the following setups on the
mobile phone about the E-mail Setup “Profile1”.
Transmission Setup
Name of Configuration: Profile 1
Transmission Account: Edit this item and set the use account to be
the "E-mail Connection Setting" of the GPRS account.
Communication Protocol: Choose pop3.
Auto Retrieve: Close.
Max. Retrieve Capacity: Default Value of the mobile phone.
Outgoing Setup
Outgoing Server: smtp.sohu.com
Outgoing Server Port: Default Value of the mobile phone.
Name Displayed: See the Example.
E-mail Address: [email protected]
User Name: xxx
Password: 123456 (here is an input example. It will be displayed as”*”
on your phone.)
Incoming Setup
Incoming Server: pop3.sohu.com
Incoming Server Port: Default Value of the mobile phone.
User Name: xxx
59
Password: 123456 (here is an input example. It will be displayed as”*”
on your phone.)
Reserve E-mail in Server: Default Value of the mobile phone
Electronic Signature
No need to modify.
Upon the completion of the setting, you can choose to activate the
profile in the interface of E-mail profile list to enable the operations of
receiving and sending E-mails.
4.4.3 Chat
Choose Chat Room 1 or Chat Room 2 from the Chat menu to start
chatting. You can also make some settings on the chosen chat room.
4.4.4 Voice Mail Server
When it is inconvenient for you to answer an incoming call, your phone
can automatically transfer the incoming call to the Voice Mail number,
which will allow the caller to leave a voice mail for you. Firstly edit the
number for Voice Mail Server (the number is available from the Service
Operator.) Next, choose Connect to Voice Mail, and the phone will
dial the number of the mailbox that you have setup.
Hold down 1 key when the phone is idle to directly dial the preset voice
mailbox number.
Note: The voice mail feature requires network support. For more
information on voice mail, please contact your local network service
operator.
4.4.5 BROADCAST MESSAGE
BROADCAST MESSAGE messages are messages sent publicly by
your network service operator. With BROADCAST MESSAGE
messages, you can get information on various subjects, such as on
weather, taxis or hospitals. For more information on subjects available,
please contact your local network service operator.
60
Enter the CB message sub-menu and you will able to see 3 options:
Receive Mode: Turn on or turn off the receiving of broadcast
messages.
Read Message: Open the received broadcast message.
Language: You can choose whether to receive broadcast messages
in all languages.
Channel Setting:
z
z
z
z
Select: turn on/off the spare channel to filter out unnecessary
CB messages.
Add: Add a new broadcast channel and set up the channel
title as well as the channel ID.
Edit: Edit the selected channels.
Delete: Delete the selected CB spare channel.
Note: This feature is not available if it is not supported by your service
operator.
4.5 Call History
You may check recently missed, dialed and received calls.
Press OK Key when the phone is idle to access the main menu and
select Call History.
4.5.1 Missed Calls
List the recently missed calls. Access the Missed Calls list. Press OK
to check detailed information of the selected entry, including phone
number, corresponding contact name and call time and date. In
detailed information viewing screen, press Options to carry out the
following operations:
•
•
•
•
Delete: Delete the selected entries.
Save to Phone book: Save the selected phone number to
the Phonebook.
Dial: Dial the selected phone number.
Edit: Modify the incoming number for saving or dialing.
61
•
•
Send SMS: Send SMS to the selected phone number.
Send MMS: Send MMS to the selected phone number.
4.5.2 Dialed calls
List the recently dialed calls.
Rejected number list options are the same as those for missed calls.
4.5.3 Received Calls
List the most recent received calls.
Rejected number list options are the same as those for missed calls.
4.5.4 Delete Call Log
When your Call History is not empty, choose this option to delete all
call history, missed calls, received halls, dialed calls and rejected calls.
4.5.5 Call Time
You can view the total call time of the phone. There might be some
discrepancies between this figure and the actual call duration figure
that is provided by your service operator.
Last Call Time: Display the duration of your last call.
Total Dialed: Display the total duration of your dialed calls.
Total Received: Display the total duration of your received calls.
Reset All Time: Reset all calling duration.
4.5.6 SMS Counter
Check the total number of SMS messages sent and received.
4.5.7 GPRS Counter
This menu shows information about the traffic transmitted over the
GPRS network, including Last Sent, Last Received, All Sent and All
Received (in KB). You can also choose Reset Counter to reset these
counters. The information is only for reference and the actual GPRS
data traffic calculated by the operator shall be taken as final.
4.6 Settings
62
Your phone supports multiple phone setup options, by which you can
set up your phone according to your interests and needs. You can also
revert to default settings.
4.6.1 User Profiles
Different user profiles can be set for different scenarios and
environments.
General: For general conditions.
Meeting: For a meeting scenario. The default setting for ring is
"Vibration".
Outdoor: Suitable for outdoor activities. The ring volume is higher by
default.
Indoor: Suitable for indoor environments. The ring volume is lower by
default.
Earphone: Automatically activated when headsets are inserted.
Bluetooth: Automatically activated when bluetooth earphone is
available.
Activate Profile
1. Press Up Key and Down Key to select the profile.
2. Press Options and choose Activate.
Edit Profile
Select Customized Settings from the options of the corresponding
profile for the following operations:
Tone Setup: Choose different ring tones for different environments.
z
z
z
z
z
Incoming Call: There are 20 built-in ring tones and 5
customized tones for incoming ring tones.
Alarm: There are 20 built-in melodies and 5 customized tones
for alarms.
Power-On: There are 10 built-in melodies for Power-On, or
you can choose Mute to turn off the power-on tone.
Power-Off: There are 10 built-in melodies for Power-Off, or
you can choose Mute to turn off the power-off tone.
Message Tone: There are 10 built-in melodies for Power-Off,
or you can choose Mute to turn off Message Tones.
63
z
Keypad Tone: The keypad tone can be set to be Silent,
Tone or Click.
Volume: Adjust the volume of ring tones and keypad tones. Use the
Navigation keys (Up/Down) to adjust the volume in the volume
adjusting screen.
Alert Type: Set up the alert type for calls and messages. Options
available include Ring, Vibration, Vibra and Ring, and Vibra then
Ring.
Ring Type: Options available include Single, Repeat and Ascending.
Warning Tones: You may choose to turn on/off alert for warning,
error, network connection tone and call connection tone so as to
enable the tone prompt under corresponding circumstances.
Answer Mode: Set the answering mode.
z
Any Key: This key allows you to answer a call by pressing
any key except for the End key and Right Soft Key.
There is also a Vibration Mode available in addition to the 6 modes
that are mentioned above. Hold down # key in idle interface and enter
Vibration Mode. Hold down # again to quit the Vibration mode and
return to the previous user profile. The alert settings in vibration mode
cannot be set or modified by the user.
Note: The other modes will be disabled after the earphone mode is
enabled.
4.6.2 Phone Setup
Time and Date
Use this menu to set the time and date of your mobile phone.
Set Time / Date: Input the current time and date with number keys.
Set Format: 12-hour format or 24-hour format are available for Time
display format.
Set Home City: Set the time zone where the user is located.
64
Scheduled Power-on/off
Set up the time and status of scheduled power-on/off.
Preset Input Method:
Set the default language input method (for when text is edited)
Speed Dialing
In this submenu, open or close quick dialing function by activating or
deactivating status; In dialing list, set up "2-9" number keys, making it
possible complete dialing of set numbers by holding down
corresponding keys in idle interface.
Dedicated key
Modify the corresponding functions specified by Up, Down, Left and
Right keys when the phone is idle.
TV Out
Output On/ Off: You may activate / deactivate TV Out function.
Connect the phone and TV set with video cables and switch TV
channel to AV mode. Open the TV Out switch at the phone terminal.
Thus, you are capable of watching displayed contents of mobile phone
via TV set.
Output Format: Set to use a certain system to output videos. Options
available are PAL system or NTSC system.
Visual Adjust: Adjust image properties such as brightness and color.
BEX Sound Effects Enhancement: You may set up BEX sound
effects.
Note: BEX sound effects enhancement is unavailable for bluetooth
earphones
4.6.3 Display Characteristic
Set the screen display and backlight.
Wall Paper
Edit the background picture that is displayed when the phone is idle.
You can choose from 10 preset wallpapers in the phone (including
simulation clock and digital clock wallpapers) or you can choose to
65
download wallpapers from File Manager. The pictures can be in the
format of JPG, BMP or GIF.
Note: If the wallpaper is set as "Simulation Clock" or "Digital Clock",
information like the name of the song being played currently by the
Audio Player, the owner number, etc. will not be displayed in the idle
interface.
Themes
You can conduct operations of Activate, Update Frequency and Define
Order on the theme mode of the phone.
Power-On Display: Edit the screen display when the phone is
turned on. You may choose from the built-in 8 animations and
1 clip in the phone or select Download Customized from File
Manager. JPG, BMP or GIF formats are available for image
and 3GP or MP4 are available for videos.
Power-Off Display: Modify the Power Off screen display.
You may choose from the built-in 8 animations and 1 clip in
the phone or select Download Customized from File Manager.
JPG, BMP or GIF formats are available for image and 3GP or
MP4 are available for videos.
Main Menu Style: Modify the style of the main menu. Choose
from matrix or Page.
Menu Background: Set the display style of menu
background as Background Picture or Wall Paper.
Show Date and Time: Activate or deactivate time and date
display function in idle interface.
Show Owner Number: Activate or deactivate owner number
display function in idle interface.
Show Operator Name: Activate or deactivate operator
display function in idle interface.
LCD Backlight: Adjust the brightness of the backlight as well
as how long it stays fully lit.
4.6.4 Call Setup
66
Certain options require network support when calls are being made.
Please contact your service operator to check for these functions.
Caller ID (requiring network support).
You can choose whether or not your number is displayed on the
screen of the mobile that you are calling.
Set by Network: Use the default settings of the network.
Hide ID: Choosing this option enables your number not to display on
the screen of the mobile that you are calling.
Send ID: If the mobile that you are calling has activated the Caller
Display feature, your number will be displayed on their screen.
Call Waiting (requiring network support)
When this feature is enabled, you will be informed of a new incoming
call when you are answering a call.
z Activate: Activate this feature.
z Deactivate: Deactivate this feature.
z Query Status: View the status of this feature.
Call Divert (requiring network support)
With this service, incoming calls are diverted to a number that you
have designated. This can be set up in the following ways:
Divert All Voice Calls: Divert all incoming calls unconditionally.
Divert If Unreachable: Calls are diverted if your mobile phone is
unreachable by network.
Divert If No Answer: Calls are diverted if you do not answer.
Divert If Busy: Calls are diverted when the line is engaged.
Divert All Data Calls: Divert all incoming calls unconditionally.
Enter the menu of the divert type you want and you will have the
following options:
z
z
z
Activate: Activate the call divert feature and set the target
phone number
Deactivate: Deactivate the call divert feature.
Query Status: Check the current status of this feature.
All call diverts can be cancelled by selecting Cancel Diverts.
67
Call Barring (requiring network support)
This network feature allows you to prohibit all incoming and outgoing
calls. You are required to enter the barring password that has been
provided by your service operator before this function can be used.
The following options are available:
Outgoing Calls: You may carry out activate, deactivate and inquiry
operations on All Numbers, International Numbers and
International excluding Domestic Numbers.
Incoming Calls: You may carry out activate, deactivate and inquiry
operations on All Numbers and Roaming Numbers.
Cancel All: Deactivate all barring settings.
Change Barring PW: You may change the barring password provided
by your network service operator. You are required to enter the current
password before a new one can be set.
Call Time Reminder
Set whether or not a call time reminder will be given if calls exceed a
certain duration.
You may set up call time according to the following steps:
1.
2.
Press the Up and Down keys to select Single or Periodic.
Press OK soft key.
Enter numbers within the prompted range and press OK soft
key.
You may choose to deactivate this function.
Call Time Display
You may set to display call time during a call.
Auto Redial
When this function is enabled, the phone will automatically redial a
number after waiting for a certain period of time if the first call failed.
z
z
On: Activate this feature.
Off: Deactivate this feature.
Notes: The interval time between re-dialings always changes.
function depends of the network
68
This
Blacklist
With this function, you may add phone number you do not want to
answer into Blacklist and realize Reject / Answer function about this
number by Activating / Deactivating this function mode.
4.6.5 Network Setup
This function allows you to choose a network when you are roaming
(when you are not within the range of your own network)
Notes: Do not subscribe to a network that is not in accordance with
your SIM card. Otherwise, your mobile phone may not operate
normally. Contact your service operator for details.
Network Selection
Automatically/Manually Select Network
1.
2.
Select Network Selection option.
Select Manual Selection or Auto Selection via Search
Mode. If you have chosen Auto Selection, you will connect to
the home network. If you have chosen Manual Selection, the
phone will search for any applicable network. Please move on
to Step 3.
3. Press the Up and Down keys to select the required network.
Press OK soft Key.
Preferred Network
1. Select the preferred network.
2. Press Option soft key for the following operations:
Add From List: Choose a network service operator from the
predefined PLMN provider list in your phone and add it to your current
preferred network list.
Add: This option allows you to customize the name and priority of the
network operator.
Change Priority: Change the priority of the currently selected network
service operator.
Delete: Delete the currently selected network service operator.
GPRS Connection
1. Select GPRS connection.
2. Press the Switch soft key.
69
The GPRS Connection can be changed to the following two states:
•
•
Connect when Needed: You phone will connect to GPRS
when it is needed by the current feature and disconnect after
the feature is ended.
Always: The phone remains connected to the GPRS
network after it is turned on.
4.6.6 Security Setup
SIM Card Lock
This function allows you to protect your SIM card from unauthorized
use. When PIN Lock has been activated, you will need to enter the
PIN code every time that the phone is turned on.
You can lock/unlock the PIN in the following way:
1.
2.
Select PIN Lock and press Activate/Deactivate soft key.
Enter PIN code.
Notes: The SIM card will be locked permanently if the PIN is input
incorrectly 3 times in a row. If this is the case, use the PUK code to
unlock the SIM card. Your PIN code and PUK code may be provided to
you together with the SIM card. If you do not have your PIN or PUK
code, please contact your network operator.
Phone Lock
The phone lock feature is intended to prevent your mobile phone from
unauthorized use.
You can lock/unlock the phone in the following way:
1.
2.
Select Phone Lock and press Activate/Deactivate soft key.
Enter the phone lock password.
Note: The default phone lock password is 0000.
70
Automatic Keypad Lock
With this function enabled, the keypad will lock itself automatically if
the user does no operation on the phone within a set period of time
(when in idle mode).
You can set the Auto Key Lock function as follows:
1.
Press the Up and Down keys to select Auto Keypad Lock.
Press OK soft key.
2. Press the Up and Down keys to set the time. Press OK Soft
Key. If you want to cancel this feature, please select
Deactivate.
Change Password
The PIN, PIN2 and Phone Lock passwords can be changed.
Passwords can be changed in the following way:
1. Press Up or Down to choose the password to be changed, and then
press the OK soft key.
2. Enter the current password.
3. Enter the new password.
4. Re-enter the new password to confirm.
Notes: PIN lock must be enabled before the PIN can be changed.
Passwords must be between 4-8 digits.
4.6.7 Flight Mode
Activate or deactivate communication function of the phone.
Activate Communication: Your phone works normally.
Flight Mode: Network-related features of your phone will be restricted.
For example: Dialing and answering calls and receiving and sending
messages are unavailable, while multimedia features like MP3, videos
and camera are available.
Query When Power On: When the phone is powered on, there
appears a query interface about whether or not to deactivate the
communication feature.
71
4.6.8 Shortcuts
Modify the feature items in the shortcut menu triggered by the Left soft
key in idle interface
4.6.9 Restore Factory Settings
Restore certain settings to their original factory settings.
Notes: Your phone lock password is required to restore factory defaults.
Your phone will restart automatically after settings are restored.
4.7 Multimedia
In the main menu, press the Up Key and Down Key to scroll among the
Multimedia. Press Left Soft Key to access the following options:
Camera, Video Camera, Album, Audio Player, Video Player, Photo
Artist, Melody Composer, Sound Recorder, E-book Reader and FM
Radio.
4.7.1 Camera
Camera Setup
Access the preview interface and use number keys to carry out quick
adjustment on such camera parameters as Effect Setup, White
Balance, Size of Photo, Time Lapse, Continuous Shooting,
Profiles and Quality of Photo. You may adjust camera exposure
compensation value and zooming parameters with directional keys.
The existing and corresponding parameters will be shown on the
screen during adjustment. Press Options in preview interface to
access settings of relevant parameters of camera.
Quick setup may be carried out on the following parameters on
preview screen:
z
72
Exposure Compensation: The image brightness while
framing can be divided into 9 levels. The higher the level is,
the brighter the image will be.
z
z
z
z
z
z
z
z
Focus Adjustment: You may adjust the focus at low
resolutions. The zooming feature is unavailable when the
resolution is above 640X480.
Effect Setup: The color styles of the photos created by the
camera include normal, grayscale, retro, retro-green,
retro-blue, negative, grey negative, black board, white board,
copper plate engraving, blue engraving, emboss, contrast and
sketch. Key 1 is its shortcut setup key.
White Balance: Set up the status of white balance, including
Auto, Tungsten, Fluorescent, Cloudy, Incandescent and
Manual Adjustment. Key 2 is its shortcut setup key.
Size of Photo: Resolutions available include: 240*320,
320*240, 640*480, 800*600 and 1600*1200. Key 3 is its
shortcut setup key.
Time Lapse: Options available include OFF, 5 Seconds, 10
Seconds and 15 Seconds. Key 4 is its shortcut setup key.
Continuous Shooting: Options available include Off, Single
Continuous and Fast Continuous. Key 5 is its shortcut setup
key.
Profiles: Auto or Night Mode can be set. When this feature
is enabled, you can take a picture when the light is weak or
dim. Key 6 is its shortcut setup key.
Photo Quality: Options available include High, Medium and
Low. Key 7 is its shortcut setup key
Note: Press # key in preview interface to activate or deactivate display
of adjustment parameter icons.
Press Options in the preview interface for the following operations:
z
z
z
To Album: Switch to the album, which lists the picture files in
the current album.
Shutter sound, exposure compensation, avoid flickering,
delay shooting and continuous shooting setting in the
camera setting; size and quality of photo in the photo setting;
white balance, profiles and effect setting are all the same
as those in the quick adjustment.
Frame: Choose whether to add a frame (only available when
the image size is set to 240*320).
73
z
z
Storage Location: Set the storage location of the photo.
Restore Settings: Restore the camera parameters to default
settings.
Capture
Access the preview interface.
Focus the camera on the subject and adjust the image.
Press Capture or OK key to take pictures.
Select Save to save the current picture and return to the preview
interface. Select Clear to return to the preview interface without saving
the current picture. The picture will be saved in Album. You may view
the picture from "Photos" directory in File Manager.
4.7.2 Video Recorder
Your mobile phone supports digital video recording with sound.
Video Recorder Settings
Access the preview interface and press Up and Down keys to adjust
the exposure compensation. You can also zoom with the Left and
Right keys. Press the Left soft key in the preview interface to access
Video Recorder for the following operations:
z
z
z
z
z
z
74
View Video Files: Access the list of video files.
Video Recorder Setup: The white balance, exposure
compensation, camcorder mode and avoiding flicker etc. can
be set.
Video Setup: To set up Animation Size, Animation Quality,
File Size Limit, Recording Time, Effect, Compressed Format,
etc.
Effects Setup: Set the screen effects applied during
recording.
Storage Location: The video clip can be saved in the phone
or the memory card.
Restore Settings: Restore the parameters of the Video
Recorder to the defaults
Video Recording
Access the preview interface of record.
Press OK Key or Capture Key to start recording videos.
Press the Right Soft Key to stop recording and save the clip
automatically. You can view the saved clips from the Video Player or
from the directory "Video" in File Manager.
4.7.3 Album
Enter the list of photos taken by the camera.
Select the needed photos and press Options to View, Send, Rename,
Delete, Empty and Sort the photo. You can also view its Details and
set the Browse Mode and Storage Path.
•
•
•
•
•
•
•
•
•
View: View the selected photo.
Details: View the details of the photo.
Browse Mode: Matrix mode or List mode are available in
displaying the pictures.
Send: Options available include To Wallpaper, To Power
On Animation, To Power Off Animation, To Phonebook,
To MMS, To E-mail and To Bluetooth. The size of the
photo (as well as certain other factors) determines whether
or not this operation will be successful.
Rename: Modify the name of current photo.
Delete: Delete the current photo.
Empty: Delete all the photos in the current folder.
Sort: You can choose to sort the current pictures in the
folder according to name, type, time or size. You can also
choose None so as not to sort.
Storage Location: You can choose to display the photo list
stored in the phone or the memory card.
4.7.4 Audio Player
You can appreciate music with this feature. Access the Audio Player
interface and adjust the Play and Pause of the music by the OK key.
Press Left/Right to choose the previous/next audio file; Press the
Up/Down key to adjust the volume. Press * key for quick setting of the
play mode. Press the # key to choose the equalizer settings.
75
Press Options in the interface of Audio Player for the following
operations:
•
Sound Effects Setup: You may set up BEX Sound Effects
Enhancement and Equalizer.
Note: BEX sound effects enhancement is unavailable for bluetooth
earphones.
z
z
z
z
z
z
z
z
z
z
z
76
Play Setup: The mode, background play, play speed,
spectrum display style, backlight, lyric synchronization,
Bluetooth stereo output and Bluetooth stereo earphones can
be set.
Play/Pause: Start to play the music or have the currently
playing music paused. This option shall not appear when the
Current Play List is empty.
Hide: Return to the idle interface and start to play the
background music. This option shall not appear when the
Current Play List is empty.
Display Playlist: Display the current play list.
Load Default Memory Card List: Load the default playlist
containing the "My Music" folder in the memory card.
Load Default Phone List: Load the default playlist containing
the "My Music" folder in the memory card.
Load New Playlist: Load the music files with .lml suffix from
File Manager.
New Playlist: The user can choose the music randomly,
create music files (with .Iml suffix) of different styles and save
them in File Manager.
Set as Incoming Ring Tone: The present song can be set to
be the incoming ring tone. This option shall not appear when
the Current Play List is empty.
Send: The present song can be sent To Profile, To E-mail
and To Bluetooth. Songs of different styles have different
send options. This option shall not appear when the Current
Play List is empty.
Delete from Current Playlist: Delete the current song from
current playlist. This option shall not appear when the Current
Play List is empty.
z
z
Details: View the properties of the current song, such as
route, sound channel, pitch, size, duration, song name,
performer, album etc. (the information displayed depends on
the file). This option shall not appear when the Current Play
List is empty.
Skip To: You can jump to the specified play time to start the
music. This option will not be available when the current Play
List is empty or when the feature of Skip To is not supported
by the music format.
4.7.5 Video Player
Access the list of saved video clips. Select the needed video clips from
the list and press Options to Play, Send, Rename, Delete, Empty
and Sort the clip. You can also conduct the Bluetooth Setting and
settings about Storage Location and BEX Sound Effects
Enhancement.
•
•
•
•
•
•
•
Play: Play the selected video clip file. You can conduct the
operations according to the icon prompts in the interface and
press Volume key to adjust the volume. Adjust the play
speed by Left and Right key. Adjust the Fast Forward and
Fast Rewind by holding down the Up and Down key. Switch
to the full screen mode by the * key. Press Capture key to
save an image. When the video clip is not played in full
screen mode, you can press the Left soft key to access the
menu and set the Brightness, Contrast and Replay of the
clip.
Send: Options available include To Phonebook, To Power
On Animation, To Power Off Animation, To E-mail and To
Bluetooth.
Rename: Modify the name of current clip.
Delete: Delete the current clip.
Empty: Delete all the clips in the current folder.
Sort: You can choose to sort the current clips in the folder
according to name, type, time or size. You can also choose
None so as not to sort.
Bluetooth Setup: The Bluetooth stereo output and
Bluetooth stereo earphones can be set.
77
•
•
Storage Location: You can choose to display the clip list
stored in the phone or the memory card.
BEX Sound Effects Enhancement: You can choose the
type of BEX sound effects enhancement or choose to
deactivate the enhancement.
Note: BEX sound effects enhancement is unavailable for bluetooth
earphones.
4.7.6 Photo Artist
The photos stored in the memory card can be edited and composed
artistically.
In the option of photo edition, the photo can apply effects, apply photo
frame, be stamped, be added with words, be adjusted, be reversed,
expand canvas, be described etc.
4.7.7 Melody Composer
With this feature, you can compose your own ring tone and send it to
Profiles as your customized ring tone.
In the edit interface, there is a composing staff (5 staves). Follow the
instructions below to compose a ring tone.
Number key "0": To insert a pause.
Number key "1": To insert a musical note “Do”.
Number key "2": To insert a musical note “Re”.
Number key "3": To insert a musical note “Mi”.
Number key "4": To insert a musical note “Fa”.
Number key "5": To insert a musical note “So”.
Number key "6": To insert a musical note “La”.
Number key "7": To insert a musical note “Si”.
Number key "8": To activate the vibration effect and deactivate it with
Down key.
Number key "9": To enable LED. Press Down to close LED.
78
# Key: If the current symbol is a note, then have the current note
switch between halftone rise, normal and halftone fall.
* Key: If the current sign is a note or a pause, then modify the beat of
the current note.
Up key: If the current symbol is a note, then have the current note rise
for one tone, i.e., octave higher.
Down key: If the current symbol is a note, then have the current note
fall for one tone, i.e., octave lower.
Left key: Press this key to move the cursor to the previous note.
Right key: Press this key to move the cursor to the next note.
Press Options in the melody composition interface for the following:
•
•
•
•
Play: Play the edited ring tone.
Play Speed: Adjust the play speed of the edited ring tone:
Fast, Normal and Slow.
Select Instruments: There are 10 music instruments
available: Piano, Guitar, Violin, Saxophone, Drum, Flute,
Harmonica, Horn, Music box and Xylophone.
Save: Save the ring tone file after the file name is edited.
4.7.8 Voice Recorder
Access the list of video files. Choose the needed recording files and
press Options for the following operations:
•
•
•
•
•
Play: Play the currently selected recording file.
Sound Recording: Start a new sound record and press the
Left soft key or OK to pause/continue the record. Press the
Right soft key to stop the record and then choose whether
or not to save the record. The saved record files can be
found in the "Audio" subdirectory in File Manager.
Add: Add records to the current recording file and save all
the records in it finally. The feature is available only when the
recording file is in the format of amr or awb.
Rename: Modify the name of the current recording file.
Delete: Delete the current recording file.
79
•
•
•
Empty: Delete all the recording files under the current
directory.
Setup: The storage paths and formats (amr, wav or awb) of
the recording files can be set.
Send: The currently selected record file can be sent To
Profile, To MMS, To E-mail and To Bluetooth.
4.7.9 E-book Reader
The user can read E-books of TXT or LRC formats with this feature.
Access the E-book interface and press Options for the following
operations: Open, Refresh, Details, Delete, Delete All, Sort, Storage
Location and Help.
z
z
z
z
z
z
z
z
Open: You can open the E-books of TXT or LRC formats in
the E-books list.
Refresh: You can refresh the E-books under the E-book
directory corresponding to the current storage location.
Details: You can check the topic, size and format of the
current E-book.
Delete: Delete the selected E-book.
Delete All: Delete all the E-books in the E-book list.
Sort: The E-books in the current E-book list can be sorted
according to the name, type, time or size. You can also
choose None so as not to sort.
Storage Location: Options available are Phone and
Memory Card.
Help: The specifications of shortcuts in read interface are
offered.
Access the text viewing interface and press Options for the
following operations: Search, Jump to, Access Bookmark, Add
New Bookmark, Delete Bookmark, Details, Settings, Help and
OFF.
z
z
z
80
Search: You can choose whether or not to match in upper or
lower case in typing characters for searching.
Jump to: You can Jump to Beginning, Middle, End, or
according to the input percentage.
Access Bookmark: Access the bookmark list to see the 10
bookmarks added.
Add New Bookmark: Add new bookmarks to the bookmark
list.
z Delete Bookmark: Access the bookmark list and delete
bookmarks.
z Details: You can check the topic, size and format of the
current E-book.
z Settings: You can conduct settings about the Font, Scrolling
Mode, Auto Scrolling, Scrolling Speed, Full Screen Mode
and Encode Type of the E-book currently being read.
Font: Options available include Normal, Italics and Bold.
Scrolling Mode: The feature of auto scrolling line by line or page
by page can be set.
Auto Scrolling: The feature of auto scrolling line by line or page
by page can be activated according to the scrolling mode.
Scrolling Speed: Set the speed of auto scrolling.
Full Screen Mode: You can choose to activate or deactivate the
full screen mode.
z
Encode Type: You can choose the encode type of the file from:
English (Windows), UCS2 and UTF8.
•
•
Help: The specifications of shortcuts in read interface are
offered.
Off: Turn off the currently reading E-book and return to the
E-book list.
4.7.10 FM Radio
The FM Radio feature with the frequency band FM87.5-108 is only
available when you have inserted the earphones.
The specifications of the various keys in the radio interface are as
follows:
Up key: Turn on/off the searching switch.
Down key: Turn on/off the radio.
Left key and Right key: When the searching switch is turned off,
pressing Left/Right key once will decrease/increase the frequency
band by 0.1 MHz forward/backward. When the searching switch is
turned on, pressing Left/Right key once will help you find a normal
channel forward/backward.
Volume Key: Adjust the volume.
81
Number key "1": Briefly pressing this key will help you switch to the
corresponding channel when there is a first channel in Channel List,
while holding down this key will set the current channel as the first
channel in the Channel List.
Number keys "2-9": Similar to 1 key, the number keys only control
the channels whose numbers in Channel List correspond to the
number keys.
Press Options in the interface of Audio Player for the following
operations:
z
z
z
z
Channel List: Max. 9 channels with the frequency band
ranging from 87.5 to 108 can be edited.
Manual Input: Frequency ranging from 87.5 to 108 can be
input to search for the channels.
Auto Search and Setting: Save Max. 9 normal channels
searched automatically in the Channel List.
Settings: The radio can be set in the following way:
Background Play: With this setting activated, the phone is
able to play the background music while conducting other
operations (except the operations related to audio, camera
and games).
Loudspeaker: Activate or deactivate the loudspeaker feature
of the radio.
Sound Recording
broadcasting recording.
Format:
Set
the
format
of
the
Storage Location: Set the storage path of the sound
recording files of the phone.
•
•
•
82
Sound Recording: You can begin to record the current
FM Radio.
Continue Recording: Select the existing recording
files, add records to the current recording file and save
all the records in it finally.
List of Recording Files: Display the list of the all the
recording files.
4.8 Fun and Games
In the main menu, press the Up Key and Down Key to scroll
among the Fun and Games. Press Left soft key to access the following
options: Java and Games.
4.8.1 Java
There are two options available after accessing Java: Java setup and
Java application installed in the phone.
Java setting
Setup the music effects, vibration, network and backlight of Java
application.
z
z
z
z
z
Java Audio: Set up the volume of Java application or turn off
the music effects.
Java Vibration: Activate or deactivate the vibration effects of
Java application.
Java network: Select options of network connection setup
adopted when Java application connects to network. For
modification of these options, please refer to Services - WAPSetup- Edit Setup Option.
Heap Capacity: Display the capacity for running Java
application.
Backlight Control: Activate or deactivate the Backlight
Always On feature while Java application is running.
Java application
Java applications of the phone are saved in Java. Select the needed
Java application with Up and Down keys and press Options to access
the menu for the following operations:
z
z
z
Launch: Run the current Java application.
Refresh: Log onto the network, download and install the
latest version of the current Java applications. The option
exists only when the Java application is downloaded and
installed by OTA.
Information: Display the detailed information about the
current Java application, such as name and version, etc.
83
z
Delete: Delete the current Java application.
You can install Java application in the following way:
Store the JAD and JAR files of the Java program to be installed in the
same folder in the mobile phone or on the memory card, or store the
JAR file in File Manager only; then choose the JAD or JAR file from
File Manager and press Options to install. The storage location of
files should be selected in the process of installation. You can choose
whether or not to run the program after the installation.
Notes: Not all JAVA application can be installed and run in this phone.
If you conduct formatting or unauthorized actions with File Manager,
JAVA application that has been installed may be lost.
4.8.2 Games
The phone supports games of four formats: .nes, .smc, .gbc, and .gb.
You need to save the files in such formats in "My Game" directory of
File Manager. Scroll to desired games with Up and Down keys and
press Left Soft Key to access. Please see Help for details about how
to play the games.
Note: When the TV Out is activated, the images of the game can only
be output via the TV Out device and displayed in wide screen.
4.9 Tools
In the main menu, press Navigation key to choose Tools, and the
practical features provided by your phone will be available such as:
Alarm, Calendar, Calculator, To Do List, Stopwatch, Unit
Converter, Currency Converter, Bluetooth, World Time and Health
Management.
4.9.1 Alarm
Your mobile phone supports up to 5 alarm clocks, and the alarm clocks
can function when your phone is turned off. Choose an alarm clock
84
from the list. You can turn it on or off and set the time, frequency and
the delay time. The frequency includes: Daily, Customized (i.e. Alarm
on certain specified days of one week) and Once.
4.9.2 Calendar
Choose Calendar, and the calendar of the current month will be shown
on the display. The current day will be marked with a special color
background frame. The corresponding Chinese Zodiac animal will
display on the top of the Calendar, while the date in the lunar calendar
in underside. When you modify the date in Phone Setup, the calendar
will be updated accordingly. Press Options in the calendar interface
for the following operations:
Details
List relevant information on the current date, including Solar Calendar,
Lunar Calendar, Memo etc.
To Do List
List the memos for the date in question. If there is no record for the day
in question, you can select Add to make a new record; when there are
records, press Options for the following operations:
z
z
z
z
z
z
Browse: To browse the selected content of current memo.
Add: Add a new memo. You can set the date, time, remarks,
alarm reminder method and frequency.
Edit: Edit the selected memo.
Delete: Delete selected memos.
Delete All: Delete all the memos of the current date.
Send To Do List: The memo can be sent To SMS, To MMS
and To Bluetooth and can also be saved in files for
transmission.
Jump to Specified Date
Inputting dates will return the menu to calendar interface, with the
cursor stopping at the input date.
4.9.3 Calculator
Your mobile phone is equipped with a calculator capable of basic
mathematical functions
85
Once Calculator is chosen, the operation screen appears on the
display.
Enter numbers to be calculated with number keys 0-9 and enter the
decimal point with the * key. Enter minus (-) with the # key.
Enter operators +, –, x, and ÷ with the Up/Down/Left/Right keys
respectively.
Press the Right soft key of Clear to remove the latest input or result;
press the Return key to quit the Calculator and the OK key to get the
calculation result.
Press the Navigation keys and OK to select the corresponding storage
key. "MR": re-use the stored data; "MC": clear the memory, "M+": add
the displayed number and the number in the memory; "M-": the
displayed number minus the number in the memory; The stored data
will be displayed in the [ ] of the calculator interface.
4.9.4 To Do List
Display all memos. When there is any memo, options available in this
menu include View, New, Edit, Delete, Delete All, Send Memo, etc.
Select Delete All to delete all memos.
4.9.5 Stopwatch
Typical Stopwatch and nWay Stopwatch are available. In Typical
Stopwatch, you can choose between 2 timing modes: Split Timing
and Lap Timing. View Records can also be chosen.
With nWay Stopwatch, time on multiple ways can be recorded.
Tip: nWay Stopwatch can be reset by holding down the Left soft key
when the stopwatch is paused.
4.9.6 Unit Converter
Choose Unit Converter to convert units of weight, length, area,
volume and temperature. The input/output accuracy of conversions is
8 digits (including decimal points but excluding minus
signs).Temperature conversion supports inputs higher than or equal to
-273.15°C (-459.67°F). Other conversions do not support minus inputs;
Enter minus (-) with the * key and the decimal point with the # key.
86
Conversions are performed as follows:
1.
2.
3.
Choose a conversion unit and press OK to access.
In the menu of Unit Converter, press Up and Down keys to
choose the corresponding conversion units. Press Left and
Right keys to select the conversion unit and input numbers in
the selected unit bar.
Press the Left soft key to display the conversion result in the
other unit bar.
4.9.7 Currency Converter
Conversions are performed as follows:
1.
2.
3.
Input the exchange rate on the converter screen (add a
decimal point with the # key).
Press Left and Right key to select the rates of the home
currency and the foreign currency bar in the rate switch bar of
the converter interface. Enter the figures into the domestic
currency bar.
Press OK to display the result in the foreign currency bar.
4.9.8 Bluetooth
You can connect the phone with other Bluetooth devices for data
exchange with this Bluetooth feature and appreciate music with
Bluetooth earphones.
Bluetooth sends info via wireless waves. Therefore, you do not need to
keep the phone in line with other Bluetooth devices. You only need to
make sure that the maximum distance between two Bluetooth devices
is within 10m. However, despite this, the connection may receive
interference due to walls or other electrical devices in the vicinity.
Power
Activate or deactivate Bluetooth function of the phone. When the
feature is activated, the Bluetooth icon will be shown in the system icon
area in idle interface.
87
Inquiry New Device
Search for a Bluetooth device. After a Bluetooth device is found, select
a device and press Bond to pair it with the targeted Bluetooth device.
Bluetooth password may be necessary for a successful paring in the
process of pairing.
Notes: Some devices, especially the Bluetooth earphones, may have a
fixed password, e.g. 0000. The Bluetooth password is needed before
the phone pairs the device.
My Device
Check Bluetooth devices that you have locked onto in the past. Select
a device and press Options for the following operations:
z
z
z
z
z
z
Connect: Connect with the selected device by Bluetooth.
Select the services to connect and press OK to connect.
Disconnect: Disconnect the connected service. Select the
services to disconnect and press Disconnect to disconnect.
The option exists only when there is service connected with
the device.
Devices: Edit the name of selected device displayed in the
list.
Delete: Delete the device from the list of My Device.
Delete All: Empty the list of My Device.
Service List: Regain the Bluetooth service lists that the
selected device can offer.
Active Device
View Bluetooth devices and services that are currently connected.
Press Disconnect to disconnect from the selected device or service.
Setting
Set up the Bluetooth features of your phone. The following Options are
available:
z
88
Visibility: After you have activated your Bluetooth service,
you can choose whether your phone can be seen by other
Bluetooth device users.
z
z
z
z
z
Change Device Name: You can set the name of your phone
displayed on other Bluetooth devices.
Audio Path: You may choose whether or not to activate voice
communication via Bluetooth devices.
FTP Setting: Set the shared file directory and the disclosure
rights during FTP service by Bluetooth.
File Saving Path: Files pre-set to be received via Bluetooth is
kept in your phone.
Remote SIM Mode: Set whether or not other devices can
connect to the network via the SIM card in your phone.
About
View the relevant information about the Bluetooth service offered by
the phone.
You can send files by Bluetooth in the following way:
Select the files to send from File Manager and press Options to
choose Send To Bluetooth. If Bluetooth is not activated in the phone,
then it will be activated automatically and enter the searching history of
Bluetooth device.
Select the targeted Bluetooth and press OK. The targeted device must
be bonded first. Bluetooth passwords of the two parties should be
confirmed during the process of bonding.
You should activate the Bluetooth feature of the phone before
receiving or sending files by Bluetooth. When the Bluetooth device not
bonded sends files to your phone, then the files can only be sent and
received before the Bluetooth password is input correctly.
4.9.9 World Clock
When this option is chosen, the world time zone map appears on the
display. Move Up and Down to select the time zone and view the
corresponding city. Press Left/Right to move the cursor, and the time
of the city on which the cursor stays will be shown.
Press the Left soft key to display city phone codes, GMT time
difference and the date.
89
4.9.10 Health
Features of BMI and Menstrual are available in Health.
Body Mass Index
Choose your Gender, then enter your Height (Scope: 55~300cm) and
Weight (Scope: 1~300kg). Press OK and your Body Mass Index will be
displayed as Lean, Normal or Obese.
Menstrual
Input the last menstrual date and the averaged period with this feature
and the phone will thoughtfully mark the ovulation and menstrual
period henceforth in the Calendar with different colors. Select the date
in Calendar interface and press OK to check the pregnant rate of the
current day, so that you will arrange your life conveniently.
4.10 Services
In the main menu, use the navigation key to access the Services
submenu.
4.10.1 STK*
STK is a value-added service provided by your network service
provider. The name of the function that is displayed in the menu
depends on the SIM card you are using.
This menu can only be viewed if your SIM provides value-added
services such as news, weather, sports and entertainment. The
effective services provided may differ due to different plans of the
service operator.
4.10.2 WAP
If you have properly set up and activate the GPRS feature, you will be
able to press Login Key when the phone is idle to access WAP
homepage.
WAP-based services are supported by your phone. Many WAP
services such as news, weather reports and airlines are available.
90
Such services designed for your phone are provided by your WAP
service operator.
Since WAP services require network support, please turn to your
network service operator or the service provider providing you with
what you need for information.
Press Up and Down keys to select and access the browser in the WAP
menu with the following options available: Homepage, Bookmark,
History, Go to URL and Settings.
Homepage
Choose Homepage to browse your preset homepage.
Bookmark
Select the Bookmark to see all the bookmarks in the Bookmark list. We
have preset some bookmarks in your phone for your convenience.
Select the needed bookmark with the Up and Down keys and press
the Left soft key for the following available operations:
z
z
z
z
z
z
History
Go to URL: Link to the specified website of the bookmark.
Edit: Edit the name of the bookmark and its website address.
Send: Send the bookmark via SMS or MMS to those who you
want to send to.
Delete: Delete the bookmark.
Delete All: Delete all the bookmarks.
Add: Add new bookmarks.
Recent accessed page records are listed in the submenu for you to
select Link directly and access the web page that has been selected.
Go to URL
Enter the needed URL of WAP services in the submenu and press the
Left soft key of Options to confirm, and you'll be able to link the
needed WAP site. This is another flexible network accessing approach
besides bookmarks and History.
Settings
There are such submenus as follows in the Settings submenu for you
to set WAP services.
91
z
z
z
z
z
z
Edit Settings: You can surf the internet only when you have
made the correct settings according to local network,
including gateway setting and network account setting (GSM
account or GPRS account).
Browse Options: The time needed for the pictures to display
and the setting about whether or not to display are included.
Push Settings: Set to turn on/off the WAP PUSH receiving.
Clear Cache: Information or services that you have browsed
recently will be stored in the Cache of your phone. Select this
option to clear the temporary information stored in the Cache.
You should clear these temporary files recording your logging
information in time.
Clear Cookies: To clear cookies.
Trusted Certificate: Display the certificate for supporting
security connection.
Notes: If you have tried to access or have successfully accessed some
confidential information with your password (such as your bank
account), please clear the Cache and History every time after the
information is used.
In addition, as for the key operations during visit to WAP page, we
provide you with the following specifications as reference:
Online Help of WAP Logging
Online help
Press the Left soft key of Options for the following available
operations while browsing the WAP page:
z
z
z
z
z
z
z
z
92
Go to URL: Access the currently selected link.
Homepage: Access the current homepage that has been set.
Rearrangement: Re-open the current web page.
Bookmark: Check the Bookmark.
History: Access the recent accessed web pages.
Go To URL: Enter the address to go to a new website.
Set as Homepage: Set the currently accessed web page as
the homepage.
Save Picture: Download and save the currently selected
picture in your phone.
z
z
Setting: Set the WAP services.
End: Exit the WAP browser and terminate the link.
Note: Press End key during visit to WAP page to exit WAP browser
and terminate the link.
Specifications of phone keys during visit to a web page
-
Press Up and Down keys to scroll the page line by line.
-
Press the Left soft key to access the online function options.
-
Press number keys 0 - 9 to input letters and numbers.
Press the Right soft key to Cancel or Return, etc., according to
the prompt information of the soft key.
Notes: The key features of the phone may differ due to different WAP
services. Please conduct the operation according to the prompt on the
screen of the phone. Please turn to your WAP service operator for
more information.
4.10.3 Data Account
GSM Data
The list of GSM accounts are listed in the submenu. Choose an
account and the following editing options will be available:
z
z
z
z
z
z
z
Name: The name of the account.
Number: The number applied by account in dialing
connection.
User Name: The user identity of the dialing server (not the
WAP gateway). The default setting is WAP.
Password: The password required by the dialing server (not
the WAP gateway) to recognize your identity. The default
setting is WAP.
Line Type: Choose the line type of the data communication.
Options available include Analog and ISDN.
Speed: The speed of WAP data connection, including
4.8Kbps, 9.6Kbps and 14.4Kbps.
Domain: The WAP DNS server address.
93
GPRS
The list of GSM accounts are listed in the submenu. You can edit the
selected account in the following way:
z
z
z
z
z
Name: The name of the account.
GPRS Connection Point: APN connected.
User Name: The user identity of your APN server. The default
setting is blank.
Password: The password needed by your APN server to
recognize your identity. The default setting is blank.
Authenticate Type: The authenticate type applied during
WAP ID Authentication. You can choose from Normal and
Encrypted.
4.11 File Manager
This feature can help the user to check the status of the memory card,
as well as the pictures, videos, music, audio files, etc. The user can
also check or delete the files in the DRM rights list.
Access the File Manager. Three storage devices will be displayed:
Phone, DRM Rights List and Memory Card. Both the total and the
remaining capacity of the currently selected storage devices are shown
on the top of the interface.
DRM Rights List
You can access the view interface of the DRM rights list where DRM
rights files are stored. If you have received relevant DRM resource files,
then the corresponding DRM rights support is necessary before such
files can be used. Such files can be deleted by the user.
Note: If the DRM right file is deleted, then the corresponding files will
be unable to use.
Phone and Memory Card
Select a storage device and press Options for the following operations:
z
z
94
Open: Directories and files under the root directory are listed.
Create Folder: Create a new folder and edit the folder name.
z
z
Format: Format the storage device. All existing data will be
deleted.
Remove: Remove the memory card. This option will not be
available if you have selected the phone as storage device.
Press Options after selecting a folder in File Manager and the
following options will be available:
z
z
z
z
z
Open: To open the folder and list the sub-directories and files
in this folder.
New Folder: To create a new folder and edit the folder name.
Rename: To modify the name of the current folder.
Delete: To delete the current folder.
Sort: The files can be arranged according to the names, types,
time or sizes. You can also choose None so as not to sort.
Press Options after selecting a file in File Manager and the following
options will be available:
•
•
•
•
•
•
Play: If the file is a multimedia file or video file supported by
the mobile phone, this option will be displayed. Otherwise, it
will not appear.
Load to Player: If the suffix of the file is .lml, this option will
be displayed. Otherwise, it will not appear.
View: If the file is an image file supported by the mobile
phone, this option will be displayed. Otherwise, it will not
appear.
Open: If the file is a text file (.TXT) supported by the mobile
phone, this option will be displayed. Otherwise, it will not
appear.
Details: Display the related information about the selected
file. Detailed information may be different for files in different
format.
Edit: You may edit a picture file in JPG format with Photo
Artist.
95
•
Send: This option has different meaning for different types of
files. You may follow the instructions on the display to
perform corresponding operations.
Note: If the size of the image to be sent To MMS surpasses the limit of
MMS, the phone will compress the image according to the size of the
screen and send it To MMS if its size is within the limit after
compression.
•
•
•
•
•
•
Rename: Modify the name of the selected file.
Copy: Choose this option to copy the selected file to an existing
folder or a new folder.
Move: Choose this option to move the selected file to an existing
folder or a new folder.
Delete: Delete the selected files
Empty: Delete all the files under the current directory.
Sort: The files can be arranged according to the names, types,
time or sizes. You can also choose None so as not to sort.
Note: Whether or not some of the Options mentioned above are visible
in the Options Menu of a certain file depends on the file type and
whether the file is supported by the mobile phone.
96
Chapter V Input Method
5.1 General Description
This phone offers the following input methods: Smart English (both
upper and lower cases), English (both upper and lower cases) and
Number Input Method. Features accepted for input into the phone
include:
Input and edit an SMS message
Input and edit a phonebook entry
Edit the text in an MMS message
…
5.2 Description of Input Methods
The general definition of the keypad in input mode is as follows:
Keys
[* key]
[# key]
[Up Key]
[Down Key]
[Left Key]
[Right key]
[Left soft key]
[Right
soft
key]
[End key]
[OK key]
Corresponding
Character
or
Function
Press this key to insert a symbol
Switch between input methods
Page up
Description
Page Down
Move left
Move right
Enter the next selected character
Return or Clear
Return to idle interface
Enter the next selected character
5.2.1 Smart English Input
97
Smart English Input includes upper case and lower case letters, i.e.,
Smart ABC and Smart abc.
The Keypad of Smart English Input Method is specifically defined as
the following:(The ";" symbol in the following table divides Smart
English ABC and Smart English abc; if there is no symbol, then the
two correspond to the same character.):
Key
0 Key
1 Key
2 Key
3 Key
4 Key
5 Key
6 Key
7 Key
8 Key
9 Key
Corresponding Character or
Function
Space
.
ABC; abc
DEF; def
GHI; ghi
JKL; jkl
MNO; mno
PQRS; pqrs
TUV; tuv
WXYZ; wxyz
Description
Smart English Input Method:
Each key is used to input the corresponding character of that key, and
it may automatically change according to the character of previous key
to create phrases. Repeatedly tap the buttons until the characters that
you need appear. Press the Up and Down navigation keys and press
the Left Soft Key or OK to select the word or character.
5.2.2 English Input
The Keypad of English Input (which can be divided into upper and
lower case letters) is specifically defined as the following (The ";"
symbol in the following table divides English ABC Input and English
abc Input. If there is no symbol, then the two correspond to the same
character.):
98
Key
Corresponding Character or
Function
0 or Space
1 or symbol
ABC2; abc2
DEF3; def3
GHI4; ghi4
JKL5; jkl5
MNO6; mno6
PQRS7; pqrs7
TUV8; tuv8
WXYZ9; wxyz9
0 Key
1 Key
2 Key
3 Key
4 Key
5 Key
6 Key
7 Key
8 Key
9 Key
Description
English Input Method:
Each key is used to enter multiple characters. Repeatedly tap the
buttons until the characters that you need appear.
5.2.3 Number Input Method
Key definitions for number input are as follows:
Key
0 Key
1 Key
2 Key
3 Key
4 Key
5 Key
6 Key
7 Key
8 Key
9 Key
Corresponding Character
or Function
0
1
2
3
4
5
6
7
8
9
Number Input Method:
Press number keys 0-9 to input the corresponding numbers.
99
Chapter VI Troubleshooting
Please refer to the list below if you encounter any problems when
using your phone. If you tried but the problem has not been solved,
contact a qualified Meridian Mobile dealer or your local maintenance
center immediately.
■Your display prompts Enter PIN Code:
Enter the valid PIN code for your SIM card. If you do not know this
code, contact your network service operator immediately.
■Your display prompts Enter PUK Code:
If you enter the PIN code incorrectly three times in a row, your SIM
card will be locked. In this case, you have to enter the PUK code to
unlock your SIM card. Please contact your network service operator
immediately.
■Your phone prompts Insert SIM card
Make sure that your SIM card is correctly installed. Check whether
your SIM card works normally. This message may indicate that your
SIM card is defective or damaged. In this case, contact your network
service operator.
■Your phone prompts Out of Service Area or Network Failure:
Check your signal strength indicator. If the indicator shows no signal,
you may be in a basement or a building corner not covered by your
wireless network. Move to another location where the signal is strong
enough. There is another possibility: you may be in an area not
covered by your wireless network. You may ask your network service
operator to inform you of the network coverage.
■The sound is of poor quality, or there is echo or noise, making it
difficult to call:
Hang up the call, and dial again. Your network service operator may
provide you with a better link when you retry.
100
■Standby Time Drops:
If the signal is weak, your mobile phone has to search for the signal for
a longer time. This is a possible cause. When you do not want to
answer calls, you may power off your phone temporarily. Or, your
battery has been used for a long time and has worn out. In this case,
you have to buy a new battery.
■Your phone cannot be powered on:
Check your battery charge level. If necessary, recharge your battery.
You may try to power on your phone during the recharging. If your
mobile phone has been put aside for a long time, the battery may be
over discharged. In this case your phone cannot be powered on, even
if the battery has been recharged for a relatively long time. You have to
be patient, waiting for the recovery of your battery charge level.
■You cannot send a message:
Check the number setting related to your messaging service center.
You may forget to subscribe the SMS service. Or the recipient number
is not available. Another possible reason is that your local network
service operator does not support this service.
■The battery cannot be recharged
There are three possible reasons. One is that your charger is defective.
In this case, you have to contact your local Meridian Mobile dealer or
service center. The second possible reason is related to the charging
environment temperature. You can move to another environment.
Another possible reason is poor connection. Check your charger plug
connection.
■You cannot Add New Entry to your Phonebook
There is no free space available for adding a new phonebook entry.
Delete some outdated entries.
■You can not choose some feature
You have not subscribed corresponding service or your local network
service operator does not support this feature. Contact your local
Meridian Mobile dealer, qualified maintenance center or your network
service operator.
101
Chapter VII Definitions
■BROADCAST MESSAGE
Enable this feature to receive CB messages, such as messages about
weather or traffic.
■DTMF (Dual Tone Multiple Frequency)
DTMF is a signaling method useful for services such as phone banking
and automatic answering.
■International Indicator
When you enter a correct international phone number, add a '+' in the
front of the number.
■Network Service Operator
Your mobile phone is not usable until your have signed a service
protocol with your network service operator. And a SIM card is
required.
■PIN (Personal Identification Number)
This code authorizes use of your SIM card and its data. The PIN code
is provided by your network operator. This code consists of 4-8 digits,
and can be modified when necessary.
■PIN2 (Personal Identification Number 2)
This code authorizes using some special features of your SIM card. In
some countries, the PIN2 code may not be provided by your network
operator.
■PUK (Personal Unlocking Code)
Use this code to unlock a locked SIM card. This code is provided by
your network operator.
■Roaming
Roaming refers to using your mobile phone when you are not within
the area described in your service agreement.
102
■SIM (Subscriber Identity Module) Card
It includes security information and user information, e.g., Phonebook
and SMS.
■SMS (Short Message Service)
The sending and receiving of a SMS message is carried out via your
wireless network’s SMS center. This feature requires network support.
■WAP (Wireless Application Protocol)
This is the specification specially designed for mobile communication
devices. With WAP, your mobile device can access the Internet in a
simple, fast way.
103
Chapter VIII Technical Parameters
Standard
Product: GSM dual band digital mobile phone with GPRS features
Model: FLY MC100
System: GSM900/DCS1800 (supporting PCS 1900)
Operating Temperature
Highest: +55°C
Lowest: -10°C
Basic parameters
Size: 111.4mm (Length) * 50.2mm (Width) * 15.5mm (Depth)
Weight: About 112.8g (including the standard battery)
Call Time: 180-300 minutes*
Standby time: 300-400 hours*
Battery capacity: 1,050mAh
*May vary depending on local signal strength.
147-001648
V1.0
K
104


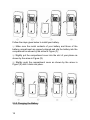
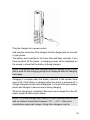


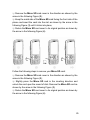


![hank yo_fo buyil_gaSamsung (}a_Te_a ]hs](http://vs1.manualzilla.com/store/data/005691502_1-2e8e29ffb67d0c8f7d0d701e3cb644b7-150x150.png)