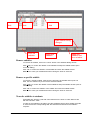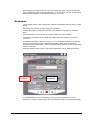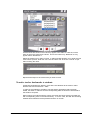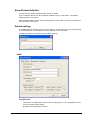
1
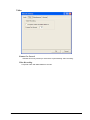
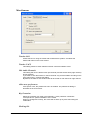
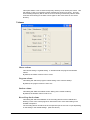
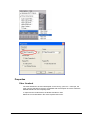
User manual
VACS – Virtual Recorder
AVIDAnet® MultiMedia Systems
User manual
Introduction • 1
Table of Content
Introduction.....................................................................................................................................5
Purpose and scope ......................................................................................................................5
Chapter organization.................................................................................................................5
Customer support ......................................................................................................................5
General: VACS................................................................................................................................7
General ........................................................................................................................................7
System requirements..................................................................................................................7
The software ...............................................................................................................................8
Installation of the software.......................................................................................................8
Installation of the hardware protection key..............................................................................8
Installation of INDEO codec....................................................................................................8
Start- up of the software............................................................................................................8
The menus .....................................................................................................................................10
General ......................................................................................................................................10
Menu: File .................................................................................................................................10
New ........................................................................................................................................11
Open.......................................................................................................................................13
Save as....................................................................................................................................17
Close.......................................................................................................................................19
Exit .........................................................................................................................................20
Menu: Edit................................................................................................................................21
Insert Blank ............................................................................................................................21
Subtitles..................................................................................................................................23
Display of subtitles.............................................................................................................23
Edit subtitles.......................................................................................................................24
Remove subtitles................................................................................................................26
Remove a specific subtitle .................................................................................................26
Transfer subtitles to students .............................................................................................26
Bookmarks .............................................................................................................................27
Add bookmarks..................................................................................................................28
Name bookmarks ...............................................................................................................28
Transfer teacher bookmarks to students.............................................................................29
User manual
Introduction • 2
Menu: Options ..........................................................................................................................30
Continuous repeat ..................................................................................................................30
Always on top ........................................................................................................................30
Show Teacher Subtitles..........................................................................................................30
Show Student Subtitles ..........................................................................................................31
Default settings ......................................................................................................................31
Audio..................................................................................................................................31
Amplification.................................................................................................................31
Input source....................................................................................................................32
Mixer Device..................................................................................................................32
MixerLine .......................................................................................................................32
Sample Rate ...................................................................................................................32
Bit Rate ..........................................................................................................................32
Sentence Detection.........................................................................................................32
Video ..................................................................................................................................33
Frames Per Second .........................................................................................................33
Video Recording ............................................................................................................33
Miscellaneous .....................................................................................................................34
Teacher Call ...................................................................................................................34
Teacher VACS ...............................................................................................................34
Mix Audio Channels ......................................................................................................34
Allow user preferences...................................................................................................34
Key Protection................................................................................................................34
Working Dir ...................................................................................................................34
Volumes .........................................................................................................................35
Master volume................................................................................................................35
Program volume .............................................................................................................35
Student volume ..............................................................................................................35
Record loop back volume ..............................................................................................35
Record volume ...............................................................................................................36
Preferences.............................................................................................................................36
Miscellaneous .....................................................................................................................36
Continuous repeat ..........................................................................................................36
Always on top ................................................................................................................36
Show Teacher Subtitles..................................................................................................36
Show Student Subtitles ..................................................................................................37
Position...........................................................................................................................37
Language ........................................................................................................................37
Menu: Video Capture ..............................................................................................................38
Input signal.............................................................................................................................38
Properties ...............................................................................................................................39
Video Standard...................................................................................................................39
Stream Format........................................................................................................................40
Frame Rate .........................................................................................................................41
Color Space / Compression................................................................................................41
Output Size.........................................................................................................................41
Menu: Help ...............................................................................................................................42
About......................................................................................................................................42
The toolbar ....................................................................................................................................43
User manual
Introduction • 3
The tool bar...............................................................................................................................43
Create new file .......................................................................................................................43
Create new video file .............................................................................................................43
Open file.................................................................................................................................43
Save as....................................................................................................................................44
The control of the VACS Virtual Recorder..................................................................................45
Student individual use .............................................................................................................45
Time and File indication........................................................................................................45
Elapsed time (1) .................................................................................................................45
Total time (2) .....................................................................................................................45
File name (3) ......................................................................................................................45
Volume control ......................................................................................................................46
Program volume (1) ...........................................................................................................46
Student volume (2).............................................................................................................46
Lock volumes (3) ...............................................................................................................46
Set volumes equal (4).........................................................................................................46
Control bar .............................................................................................................................47
Stop ....................................................................................................................................47
Play.....................................................................................................................................47
Pause ..................................................................................................................................47
Record ................................................................................................................................47
Bookmarks .............................................................................................................................48
Tape Index Set ...................................................................................................................48
Tape Index Reset................................................................................................................48
Tape Index go to ................................................................................................................48
Position on bookmark ........................................................................................................48
Repeat between bookmarks ...............................................................................................48
Teacher Call ...........................................................................................................................49
Sentence indication................................................................................................................49
Scroll left............................................................................................................................49
Scroll right ..........................................................................................................................50
Position on sentence...........................................................................................................50
User manual
Introduction • 4
Introduction
Purpose and scope
This manual describes the use of the virtual player/recorder VACS starting from version 3.01 on.
Chapter organization
The chapters are organized into the following sections:
Section 1 – INTRODUCTION details the installation procedure.
Section 2 – GENERAL: VACS gives a general view on the VACS software.
Section 3 – THE MENU'S details all menu's relevant to the use of the software.
Section 4 – THE TOOLBAR details all icons on the toolbar.
Section 5 – CONTROL OF THE VACS VIRTUAL RECORDER describes the student use of the
recorder.
Customer support
In this manual, the efforts were made to provide accurate and detailed information to ensure correct
use of the VACS. If however, by practical experience, additions were noticed as advi sable, the
company would welcome these suggestions.
The company has a Customer Support department, dedicated to solving the day -to-day problems
that may be experienced in the field. For personal service, contact the company.
Correspondence and equipment to be returned for repair should be addressed to:
Artec Electronics NV
Leo Bekaert-laan 1
B8870 – Izegem
Belgium
Telephone: +32-(0)51/ 33 60 99
Fax :
+32-(0)51/ 33 60 98
Customers from outside Belgium should address to the local distributor of their VACS system.
User manual
Introduction • 5
General: VACS
General
The VACS is a virtual recorder developed to fulfill all the different tasks of a standard language
laboratory recorder. It simultaneously records two tracks being the program track (sound sent by
the teacher) and the student track (sound from the students microphone).
System requirements
The software has to be installed on a PC with the following minimum standards:
•
Processor Pentium III or better;
•
256MB RAM memory;
•
1 GB hard disk for the audio files;
•
Sound Blaster compatible sound card (full duplex required);
•
Win2000, Win XP operating system;
•
Video capture card Hauppauge WinTV Go or similar if video capture is required.
User manual
General: VACS • 7
The software
Installation of the software
The software is distributed as a Microsoft Installer Package: “vacs_setup.msi”.
•
Right -click on the “vacs_setup.msi” file and select “Install”.
Following components will automatically be installed:
o
DirectX 9.0
o
Microsoft .NET framework
o
Ogg Vorbis DirectShow compression filter
Please refer to the VACS Quick Installation Guide for more details.
Installation of the hardware protection key
The hardware protection key software includes a setup program. Double-click on the file
“setup.exe” to launch the installer. It will install the driver for the hardware dongle and the service to
handle the requests from the VACS programs running on different computers.
Please refer to the VACS Quick Installation Guide for more details.
Installation of INDEO codec
On Windows XP systems, you will need to install the Indeo video codec in order to be able to view
all movie samples included in the VacsCatalogue directory in the VACS3 release. The video codec
is available on the VACS CD-ROM in the directory “codecs”.
Double-click on the executable “iv5setup.exe” to install.
Start-up of the software
The VACS Virtual Recorder is started
•
by a double click on the VACS icon
•
by selecting: à Start
or
à Programs
à Artec
à Vacs
User manual
General: VACS • 8
User manual
General: VACS • 9
The menus
General
A set of menus is visible on the menu bar. These menus are used to create new files, open files,
save files, change VACS settings, etc. A few of those menu items have been provided for future
functions but are not active yet.
Menu: File
User manual
The menus • 10
New
Creates a new sound file or video file if a hardware capture device is installed. By
default, the new sound file will be named: “newvacs.wav”, the new video file will be
named “newvacs.avi”.
Recording will not start immediately. The user still needs to click the “record” button,
which will now be activated (marked in red). Upon clicking the “record” button, the
recording will start till the user presses the “stop” button. During the recording, both the
“elapsed” and “total” time indications will progress.
The recording will be made to the student track only in the case of a student VACS.
The program track will be muted.
In case of a teacher VACS, the recording will be made on both the teacher and student
track.
RECORD
User manual
The menus • 11
The screenshot below shows a running recording.
No sentence indication will be available yet.
STOP
The new file can now be saved under a different name by selecting “Save as …”. (See
also below)
Before opening a new file, the VACS program will prompt the user to save a previously
recorded file.
User manual
The menus • 12
Open
Opens a windows browser menu to open an existing sound or video file.
By default, the extension selected will be WAV, MP3 or Ogg to open sound files in
wave, MP3 or Ogg format. To open a file of a different format, open the of “Files of
type” drop-down list. (see also screenshot below)
User manual
The menus • 13
If a compressed file is opened, the VACS will prompt you whether you want to be able
to record in this file or not. If Yes is clicked, a conversion to WAV format will be
performed. Comparative recording is not possible directly into a compressed audio file.
After the recording, a user can select to save the recorded file in the compressed MP3
or Ogg format.
During the decompress step, a progress indicator will be displayed.
While opening, a temporary file will be created. A dialog window will prompt you to wait
until this has been completed.
User manual
The menus • 14
If a Media file (video movie) is opened, the video window will automatically open as can
be seen in the screenshot below.
The video window and the main VACS window are 2 separate windows that can be
positioned on the screen independently. If the video window is moved close enough to
the VACS main window, it will automatically snap to the VACS window.
User manual
The menus • 15
If an audio file is opened, the sentence detection will start as a background process.
The file can already be played back during the sentence detection.
If the file is a lengthy sound file, the sentence detection may take a while to complete.
Remark that sentence detection is only performed on stereo files. As a consequence,
sentence detection will not be performed on student recordings.
Before opening a file, the VACS program will prompt the user to save a previously
recorded file that has not been saved yet.
User manual
The menus • 16
Save as
Opens a windows browser menu to save the current work file.
Sound files can be saved as Windows WAV files, MP3 or Ogg compressed files. By
default, the same name as the original will be used. Type in a new name if you want to
save under a different name.
Remove the original file extension if you want to save as a different compression
format.
The correct file type is preserved. In other words, it is impossible to save audio files as
video or vice versa.
The VACS can not be used to change the compression of a opened video file e.g.
MPEG files can only be saved as MPEG files and not as AVI.
The “Save as…” menu item is deactivated when no files is currently opened in the
VACS.
User manual
The menus • 17
A Progress indicator will appear during the save process.
User manual
The menus • 18
Close
Closes the currently loaded audio or video.
If modifications have been made that have not been saved yet, the following pop-up will
appear:
It is then up to the user to decide whether he/she wants to save the recording.
The “Close” menu item is deactivated when no files is currently opened in the VACS.
User manual
The menus • 19
Exit
This will close the VACS program.
If modifications have been made that have not been saved yet, the following pop-up will
appear:
User manual
The menus • 20
Menu: Edit
This menu will allow a user to perform some basic editing on audio or video files. Although the
VACS should not be considered an audio or video editing utility, the most common editing functions
used in language teaching have been provided.
Different possibilities will be offered to the user in a teacher VACS or student VACS.
Insert Blank
This function is available on the teacher VACS only.
Inserting blanks is only possible for audio files.
To insert a blank in a recording, position the VACS at the position where you want to
insert the blank. This can be done either by clicking the PAUSE button during playback
or by sliding the slider to the desired position in the file.
By experience, we have noted that using PAUSE during playback is the most
convenient way of working.
User manual
The menus • 21
PAUSE
When “Insert Blank” is clicked, a new dialog window will appear. This dialog will allow a
teacher to enter a duration expressed in seconds.
During the insertion of the blank, a progress indicator will appear. The blank is inserted
directly into the audio file.
When resuming playback, it will start at the inserted blank. Note that the correct
position of bookmarks and subtitling is preserved when inserting blanks.
User manual
The menus • 22
Subtitles
Display of subtitles
A teacher can insert teacher subtitles as well as student subtitles. A student will only
be able to insert student subtitles.
Teacher and student subtitles are displayed in separate windows. The windows can
be positioned anywhere on the screen. If moved close to the main VACS window, the
subtitle window will snap to the main VACS window.
The choice to display the teacher or student subtitle windows can be made in the
“Options” menu. (read more in the next section)
If inserted subtitles do not appear on your screen, check the “Options” menu to see
whether the window is active.
A student cannot deactivate the teacher subtitle window if a teacher has added subtitles
to the audio or video file.
Teacher subtitles will always be displayed using a red font color; student subtitles are
displayed using a black font color.
Teacher
subtitles
Student
subtitles
User manual
The menus • 23
Edit subtitles
On a teacher VACS:
•
To enter teacher subtitles, select “Edit – Subtitles”.
•
To enter student subtitles, select “Edit – Student Subtitles”.
On a student VACS:
•
User manual
To enter student subtitles, select “Edit – Subtitles”.
The menus • 24
A new dialog window will open. This is the dialog window where subtitles can be
entered.
To insert a subtitle in a recording, position the VACS at the position where you want to
insert the subtitle. This can be done either by clicking the PAUSE button during
playback or by sliding the slider to the desired position in the file.
By experience, we have noted that using PAUSE during playback is the most
convenient way of working.
When correctly positioned, position the mouse on the Start Time field in the subtitle
dialog window and double-click on the left mouse button. This action will copy the
current position in the audio or video fragment into the Start Time field. This time will
be used to start displaying the subtitle during playback.
Now go to the Subtitle field and type the subtitle you want to display.
Resume playback and pause the playback at the point where you want to remove the
subtitle from the screen.
When correctly positioned, position the mouse on the End Time field in the subtitle
dialog window and double-click on the left mouse button. This action will copy the
current position in the audio or video fragment into the End Time field. This time will be
used to stop displaying the subtitle during playback.
If you want the next subtitle to be displayed at the End Time of the previous subtitle,
double-click in the Start Time fi eld of the next subtitle. The will cause the subtitles to be
displayed consecutively in time without a gap between the subtitles.
Click “Apply” to apply the new subtitles but keep the subtitle window open for further
editing.
Click “OK” to apply the new subtitles and close the subtitle window.
User manual
The menus • 25
Start Time
field
End Time
field
Subtitle
field
Quit without saving
changes
Clear all
subtitles
Apply new
subtitles
Apply new
subtitles and
close window
Remove subtitles
To remove all subtitles, click on the “Clear” button in the Subtitles dialog window.
Click “Apply” to confirm the deletion of all subtitles but keep the subtitle window open
for further editing.
Click “OK” to confirm the deletion of all subtitles and close the subtitle window.
Make sure to save your modifications when closing the audio or video file.
Remove a specific subtitle
To remove a specific subtitle, make sure the entire line is selected and not just one
field. Use the “Delete” key to remove the selected subtitle.
Click “Apply” to confirm the deletion of the subtitle but keep the subtitle window open for
further editing.
Click “OK” to confirm the deletion of the subtitle and close the subtitle window.
Make sure to save your modifications when closing the audio or video file.
Transfer subtitles to students
All subtitles are stored in a file with name identical to the audio or video filename but
with the extension “.XML”.
In order for the students to be able to see the subtitles that have been added, the audio
or video file and the corresponding XML file should be transferred to the student’s
computer.
User manual
The menus • 26
When opening a media file with the VACS, the VACS will check if there is an XML file
with corresponding name in the same directory. If it is the case, the XML file containing
subtitles and bookmarks will be parsed and shown on screen.
Bookmarks
The possibility exists to place bookmarks, name the bookmarks and save them for later
usage.
Bookmarks are available for both teacher and students.
Teacher bookmarks will always be colored in red, student bookmarks are colored in
black.
When the teacher VACS is used, only teacher bookmarks can be added.
The teacher bookmarks can be saved and transferred for the students to be able to
view them.
If student bookmarks are present in the file, e.g. in a collected student file, the teacher
can view, rename and remove the student bookmarks. Make sure to remove the
student bookmarks individually. “Remove all bookmarks” will remove both student AND
teacher bookmarks.
When the student VACS is used, only student bookmarks can be added and named.
Teacher
bookmark
Student
bookmark
A bookmark name can be visualized by moving the mouse pointer on top of the
bookmark. A tooltip containing the name of the bookmark will be opened automatically.
User manual
The menus • 27
Bookmark
name
Add bookmarks
To add bookmarks, use the bookmark control bar. See also later in this manual.
Add bookmark
Name bookmarks
To name the bookmarks, click on “Edit – Bookmarks”.
User manual
The menus • 28
All bookmarks are shown in the order they appear in the audio or video file, not the
order in which they have been entered. This is the reason why “Bookmark 5” may
appear before “Bookmark 3”.
Select the bookmark you want to name. A dialog window allowing you to enter the new
name will be opened. Enter the new name and click “OK” to save or “Cancel” to quit
without saving the name.
Repeat these steps for each bookmark you want to name.
Transfer teacher bookmarks to students
All teacher bookmarks are stored in a file with name identical to the audio or video
filename but with the extension “.XML”.
In order for the students to be able to see the teacher bookmarks that have been
added, the audio or video file and the corresponding XML file should be transferred to
the student’s computer.
When opening a media file with the VACS, the VACS will check if there is an XML file
with corresponding name in the same directory. If it is the case, the XML file containing
subtitles and bookmarks will be parsed and shown on screen.
User manual
The menus • 29
Menu: Options
Continuous repeat
If this option is set, the currently opened file will continuously be played back until the user
clicks the stop button.
Remark that the repetition is at file level and not at sentence level.
Always on top
If set, the VACS window will always be on top of any other opened windows. It will not be
possible to hide the VACS window.
Show Teacher Subtitles
This option is available on the teacher VACS only. If unchecked, the teacher subtitle window
will not be visible.
In the screenshot above, the “Show Teacher Subtitles” option is checked. The teacher
subtitle window is opened.
When teacher subtitles are not shown during playback of the audio or video file, remember to
check the state of this option.
User manual
The menus • 30
Show Student Subtitles
If unchecked, the student subtitle window will not be visible.
In the screenshot above, the “Show Student Subtitles” option is unchecked. The student
subtitle window is not opened.
When student subtitles are not shown during playback of the audio or video file, remember to
check the state of this option.
Default settings
The default settings will affect how the VACS starts up. These settings can only be performed
by an Administrator. These settings cannot be adjusted on the user level.
A password needs to be entered to access these settings.
Audio
Amplification
This value is an amplification factor for the recording device. It is a multiplication factor
for the recording volume setting.
By default, the amplification is set to 1.
User manual
The menus • 31
Input source
This option allows a user to select the recording device. The recording device depends
on the installation.
If the microphone-headset is connected to the microphone input of the computer,
microphone should be selected.
If the microphone-headset is connected to the line-in input of the sound card, line in
should be selected as input source.
Remark that a microphone amplifier is required in order to connect the microphone
headset to the line in input of the sound card.
Mixer Device
This option allows a user to select the mixer device. The mixer device depends on the
type of sound card or on-board sound used. Only certified installers should modify this
option.
MixerLine
This option allows a user to select the mixer line. The mixer device depends on the
type of sound card or on-board sound used. Only certified installers should modify this
option.
Sample Rate
This option allows a user to select the sampling rate for digitizing the analog audio
signal. The higher the sampling frequency, the better the sound quality but the larger
the audio files will be. Only certified installers should modify this option.
Bit Rate
This option allows a user to select the sample width for digitizing the analog audio
signal. The higher the sampling frequency, the better the sound quality but the larger
the audio files will be. Only certified installers should modify this option.
Sentence Detection
Variables to fine-tune the sentence detection algorithm
User manual
The menus • 32
Video
Frames Per Second
Indicates how many frames per second are captured during video recording.
Video Recording
Compress video with IMEC MPEG-4 encoder.
User manual
The menus • 33
Miscellaneous
Teacher Call
Check this box for using the VACS with Avidanet Plato systems. It enables the
teachercall button on the main window.
Teacher VACS
This setting allows to switch between teacher VACS and student VACS.
Mix Audio Channels
This setting will mix the teacher track (left channel) and the student track (right channel)
during playback.
If you want to hear the teacher on the left channel only and the student recording on the
right channel only, uncheck this setting.
By default, the teacher and student track will be mixed on both the left an right channel.
Allow user preferences
If this option is set, the preferences menu is enabled. The preferences dialog is
described in the next section.
Key Protection
Select the protection key used in the laboratory. Each protection mechanism
corresponds to a specific installation of the VACS.
When not configured correctly, the VACS will not start up anymore after saving the
modification.
Working Dir
User manual
The menus • 34
This option allows a user to select a temporary directory to be used by the VACS. Use
this setting in case your originals (course material) are stored on a server. This will
avoid creating temporary files on the server thus causing unnecessary network traffic.
It will also avoid having to set write access rights for the VACS users on the server
directory.
Volumes
Master volume
This volume setting is a global setting. It will affect both the program and student
volume.
By default, the master volume is set to 100%.
Program volume
This setting will affect the program volume setting of the VACS at startup.
By default, the program volume is set to 5%.
Student volume
This setting will affect the student volume setting of the VACS at startup.
By default, the student volume is set to 5%.
Record loop back volume
This setting will affect the feedback of the recording device into the headset thus
allowing a user of the VACS program to hear his/her own voice when talking in the
headset microphone.
The recording device can either be the microphone input or the Line In input depending
on the setting in the default settings. (See also above)
User manual
The menus • 35
By default, the recording loop back volume is set to 0. This means that the VACS
program is not returning the microphone signal into the headset.
Record volume
This volume will affect the recording volume.
By default, the recording volume will be set to 50%. If a recording made sounds too
silent, the value should be increased.
Preferences
This dialog contains all the settings that can be changed on user level.
Miscellaneous
Continuous repeat
This setting determines whether the VACS program will be started with continuous
repeat enabled.
For more information on continuous repeat, see above.
By default, continuous repeat is disabled.
Always on top
This setting determines whether the VACS window will always be on top of any other
open windows.
For more information on always on top, see above.
By default, always on top will be disabled.
Show Teacher Subtitles
This option is available on the teacher VACS only. If unchecked, the teacher subtitle
window will not be visible.
User manual
The menus • 36
In the “User Settings” screenshot, the “Show Teacher Subtitles” option is checked. The
teacher subtitle window is opened.
When teacher subtitles are not shown during playback of the audio or video file,
remember to check the state of this option.
This is the default setting when the VACS is opened. The user can also modify this
setting when working with the VACS in the menu “Options”.
Show Student Subtitles
If unchecked, the student subtitle window will not be visible.
In the “User Settings” screenshot, the “Show Student Subtitles” option is unchecked. The
student subtitle window is not opened.
When student subtitles are not shown during playback of the audio or video file,
remember to check the state of this option.
This is the default setting when the VACS is opened. The user can also modify this
setting when working with the VACS in the menu “Options”.
Position
This setting will determine in which position of the screen the VACS will be opened.
Following positions are possible:
•
UPPERLEFT
•
UPPERMID
•
UPPERRIGHT
•
MIDLEFT
•
MIDMID
•
MIDRIGHT
•
BOTTOMLEFT
•
BOTTOMMID
•
BOTTOMRIGHT
By default, the VACS program will start up in the center of the screen. (MIDMID
position)
Language
This control gives you the possibility to switch the interface to one of the supported
languages.
Initial Directory
The initial directory contains the path where the user wants to start browsing for his
exercises.
The standard value is the users MyDocuments directory + \artec\student.
Remark: The modifications made in the Default settings dialog box / Preferences will only be
effective at the next start-up of the VACS program.
The Preferences menuitem can be disabled in the Default settings dialog box.
User manual
The menus • 37
Menu: Video Capture
Video capture can be used to digitize video material from an analogue medium such as a
videocassette.
Video capture is only possible when a video capture device has been installed in the computer.
We generally use video acquisition boards from Hauppauge or Pinnacle.
Video from a USB camera can also be digitized using the VACS program.
All menus shown here will largely depend on the video capture board driver used.
A number of parameters can be set for creating a new video file.
Input signal
The input signal to select will depend of your setup. In most cases, the input to be selected is
“Video Composite In”. The location of this setting will depend on the video acquisition board
driver installed. In the most recent versions, it can be found under “Video Input”.
The “Video Input” setting will be copied automatically into the “Video Crossbar..”.
User manual
The menus • 38
Properties
Video Standard
The video standard to be used will depend on the country you live in. In Europe, the
most common standard is the PAL_B standard with the exception of France where the
SECAM standard is also frequently used.
In Japan and the Unites Stares, the NTSC standard is used.
Select the correct standard in the Video Capture Filter menu.
User manual
The menus • 39
Stream Format
The stream format parameters can be found in the Video Capture Pin and Video
Preview pin settings.
The Video Preview Pin settings are used to preview the video before the capturing. A
video preview window will be opened as soon as a new video capture is selected even
before the “record” button is pressed.
The Video Capture Pin settings are used for the image stored in file during the
capturing. The selected settings will be used during playback of the stored video
fragment.
User manual
The menus • 40
Frame Rate
The frame rate used indicates how many frames per second will be digitized. The higher
this number, the more fluent the video sequence will be at playback but the larger the
generated video file will be. Values between 20 and 25 are commonly used.
Color Space / Compression
If the MPEG-4 compression is used, the color space should be set to YV12 or I420.
Output Size
The output size will determine the size of the captured video image. It is expressed in
number of horizontal pixels vs. number of vertical pixels.
The recommended image size is either 352 x 288 or 384 x 288.
User manual
The menus • 41
Menu: Help
About
Displays the following About box:
User manual
The menus • 42
The toolbar
The tool bar
The tool bar consists of an amount of tool buttons, used as shortcuts to activate certain
functionalities. Their function is equal to the ones on the menus.
During some functions of the VACS, some of the tool buttons will be grayed, which means
that they are deactivated. Only the colored buttons are active.
A short explanation about the selected button is given for approx. 1 second when the mouse
is positioned on it.
Create new file
Creates a new sound file. By default, the new sound file will be named:
“newvacs.wav”.
The recording will not start immediately. The user still needs to click the
“record” button, which will now be activated (marked in red).
The recording will be made to the student track only. The program track will be
muted.
Before opening a new file, the VACS program will prompt the user to save a
previously recorded file.
See also the “New” section in the file menu in the “The menus” paragraph
above.
Create new video file
Creates a new video file. By default, the new video file will be named :
“newvacs.avi”.
The recording is not started immediately. A preview screen is showed, and the
user can adjust various settings in the ‘Video Capture’ menu. (eg. TV Channel,
brightness level,...)
Once the user has put the appropriate options, pressing the record button can
start the actual recording.
Open file
Opens a windows browser menu to select a file.
User manual
The toolbar • 43
By default, the extension selected will be WAV to open sound files in wave
format. To open a file of a different format, open the of “Files of type” dropdown list.
Before opening a file, the VACS program will prompt the user to save a
previously recorded file.
See also the “Open” section in the file menu in the “The menus” paragraph
above.
Save as
Opens a windows browser menu to save the current work file.
Sound files will by default be saved as Windows WAV files.
See also the “Save as” section in the file menu in the “The menus” paragraph
above.
User manual
The toolbar • 44
The control of the VACS Virtual
Recorder
Student individual use
A set of recorder control buttons is used to control the recorder. Depending on the selected
function, some buttons may change.
This mode allows the student to perform the audio active comparative work.
Time and File indication
1
3
2
Elapsed time (1)
The time indication consists of 2 parts. There is an indication of the elapsed time so far in the
file.
Total time (2)
Furthermore, an indication of the total time of the loaded audio or video file is indicated.
File name (3)
In between the time indication, the file name of the currently loaded file in indicated.
User manual
The control of the VACS Virtual Recorder • 45
Volume control
Program volume (1)
Adjustable volume of the sound recorded or transmitted by the teacher.
One can change the volume by clicking on the slider and dragging the slider to the desired
position on the volume bar.
The slider will color light pink when the mouse is positioned on top of it. When clicked, the
slider will color red.
The program volume value at startup of the VACS program is determined in the default
options. (See above)
Student volume (2)
Adjustable volume of the sound recorded by the student.
One can change the volume by clicking on the slider and dragging the slider to the desired
position on the volume bar.
The slider will color light pink when the mouse is positioned on top of it. When clicked, the
slider will color red.
The student volume value at startup of the VACS program is determined in the default
options. (See above)
Lock volumes (3)
If pressed, this button will lock the program and student volume. This means that changing
one of both volumes will change the other accordingly.
The lock supersedes the “set volumes equal” button. (see below)
This button is a toggle button. It can either be in the up position or down position.
Set volumes equal (4)
When pressed, the program volume and student volume are set to equal levels.
In order to avoid ear damage, the lowest volume is selected as reference.
User manual
The control of the VACS Virtual Recorder • 46
This button will not affect the volume settings if the volumes are locked.
Control bar
Stop
The recorder stops playback or recording and jumps back to the
beginning of the file.
Play
Starts stereo playback.
In case a student made an audio-comparative recording, both the
program track as well as the student track will be played back.
When the playback has been activated, the play button changes into the
pause button.
Pause
Will pause the playback or recording at the current position in the audio
file.
When the VACS has been paused, the pause button changes into the
play button.
Record
Will start a recording on the student track only.
In case a stereo file is loaded, the record button will start a playback of
the program track and a recording on the student track.
This is the audio-comparat ive function. It will allow a student to repeat
what he/she hears without overwriting the original recording. The
original recording will still be available on the program track.
When the recording has been activated, the play button changes into the
pause button.
The record button is deactivated if a mono file is loaded.
User manual
The control of the VACS Virtual Recorder • 47
Bookmarks
Tape Index Set
Is used for the setting a new bookmark.
Bookmarks allow the student to move quickly through the audio file. The
bookmark
is displayed in the progress bar.
The track bar represents the total length of the loaded file.
Tape Index Reset
Is used to erase all bookmarks.
Tape Index go to
As soon as a bookmark has been positioned, these two buttons become
active allowing the student to browse through the audio file.
Go to the previous index
Go to the next index
Position on bookmark
A click on a bookmark indication below the progress bar will position the
slider on the progress bar at the bookmark position. The next playback
will start from that new position.
Clicking on a bookmark is another method of navigating between
bookmarks.
Repeat between bookmarks
Repeat the sample between 2 bookmarks. The start and end bookmark
are the previous and next bookmark of the current position of the slider
when pressing this button.
User manual
The control of the VACS Virtual Recorder • 48
Teacher Call
By clicking this button, the student can notify the teacher that he/she
needs assistance. (Only on Plato systems)
An indication of the student that clicked the teacher call button appears
on the teacher’s GUI.
Sentence indication
The VACS program automatically performs sentence detection when a stereo audio file is
loaded.
Upon completion of the sentence detection, number will appear on the sentence indication
bar.
All sentences are represented with an equal length. This length is not representative for the
length of the sentence itself.
The total length of the sentence bar is also not indicative for the total length of the loaded file.
A 10-sentence window is always visible.
Quite often, all sentences will not be displayed in one screen and a user will need to scroll to
visualize all sentences.
For this purpose, two scroll buttons have been provided for right and left scrolling.
The sentence bar will always be aligned with the current position in the file. During playback
or recording, the sentences will progress accordingly and scroll in the 10-sentence window as
needed.
Scroll left
Click here to scroll to the previous sentence.
When currently positioned at the beginning of the file, the VACS will
wrap around to the last sentence.
Remark that scrolling does not modify the current position in the audio
file. After 3 seconds, the VACS program will reposition the sentence bar
itself to the current position in the audio file.
User manual
The control of the VACS Virtual Recorder • 49
Scroll right
Click here to scroll to the next sentence.
When currently positioned on the end of the file, the VACS will wrap
around to the first sentence.
Remark that scrolling does not modify the current position in the audio
file. After 3 seconds, the VACS program will reposition the sentence bar
itself to the current position in the audio file.
Position on sentence
Click on a sentence to position the audio file on this sentence. The next
playback or recording will then start at this new position.
The sentence at which the VACS is currently positioned will be marked
by placing the sentence button in the down position and changing the
color of the sentence button.
Remarks
User manual
•
Sentence detection is NOT performed on mono files.
•
The VACS program will automatically align left to the sentence at the current position
in the file after 3 seconds unless a sentence button is clicked.
The control of the VACS Virtual Recorder • 50