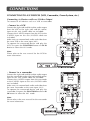
1
15” LCD Television
ASTV1615HDS
Owner’s Manual
SAFETY PRECAUTIONS
The lightning flash with an arrowhead within
a triangle alerts you to uninsulated
dangerous voltage within the product's
enclosure that could cause an electric shock.
CAUTION
RISK OF ELECTRIC SHOCK
DO NOT OPEN
The exclamation point within a triangle alerts
you to the presence of important operating,
maintenance and servicing instructions in
this user’s manual.
WARNING: TO REDUCE THE RISK OF ELECTRIC
SHOCK, DO NOT REMOVE COVER (OR BACK).
NO USER-SERVICEABLE PARTS INSIDE. REFER
SERVICING TO QUALIFIED PERSONNEL.
WARNING: TO PREVENT FIRE OR SHOCK HAZARD, DO NOT EXPOSE THIS UNIT TO RAIN OR MOISTURE. DO
NOT PLACE OBJECTS FILLED WITH LIQUIDS ON OR NEAR THIS UNIT.
CAUTION: DANGER OF EXPLOSION IF BATTERY IS INCORRECTLY REPLACED. REPLACE ONLY WITH THE SAME
OR EQUIVALENT TYPE.
The symbol for Class II (Double lnsulation)
CAUTION
INVISIBLE LASER RADIATION WHEN OPEN
AND INTERLOCKS DEFEATED.
AVOID EXPOSURE TO BEAM
This symbol means that the unit complies with
European safely and electrical interference
directives.
PLACEMENT INFORMATION
• Do not use this unit in places which are extremely hot, cold, dusty, or humid.
• Place the unit on a flat and even surface.
• Do not restrict the air flow of this unit by placing it somewhere with poor air flow, by covering
it with a cloth, or by placing it on bedding or carpeting.
SAFETY INFORMATION
• When connecting or disconnecting the cord, grip the plug and not the AC cord itself. Pulling
the cord may damage it and create a hazard.
• When you are not going to use the unit for a long period of time, disconnect the AC cord.
• The mains plug is used as the disconnecting device. It should remain readily operable and
should not be obstructed during intended use. To be completely disconnected from the supply
mains, the mains plug of the apparatus should be disconnected from the mains socket outlet
completely.
• When the signal lamp LED is off, it indicates that the apparatus is completely disconnected
from the mains.
• The apparatus should not be exposed to dripping or splashing and that no objects filled with
liquids, such as vases, should be placed on apparatus.
• Leave a minimum distance 100mm around the apparatus for sufficient ventilation;
• The ventilation openings should not be impeded by covering with items such as newspaper,
table-cloths, curtains etc.
• No naked flame sources such as lighted candles should be placed on the apparatus;
• Attention should be drawn to the environmental aspects of battery disposal;
• The use of apparatus in moderate climates.
CONDENSATION INFORMATION
• When left in a heated room where it is warm and damp, water droplets or condensation may
form inside the unit. When there is condensation inside the unit, the unit may not function
normally. Let the unit stand for 1-2 hours before turning the power on, or gradually heat the
room and let the unit dry before use.
RATING PLATE LOCATION
• The rating plate is on the back of product.
WARNING:
Should any problems occur, disconnect the AC cord and refer servicing to a qualified technician.
2
IMPORTANT SAFETY INSTRUCTIONS
MAINS PLUG
UNITS SUPPLIED WITH MOULDED MAINS PLUG
1. If the mains plug fitted to the AC cord supplied is not suitable for your mains outlet it may be necessary to cut it off.
Carefully dispose of the severed plug. Under no circumstances must it be
inserted into a mains socket, otherwise a dangerous electric shock could result.
2. If the fuse in the fitted mains plug should fail, replace it with a BS1362 approved
fuse rated at 3A Never use the plug without the fuse cover fitted.
WIRING A MAINS PLUG
As the wires in the mains lead may not correspond with the coloured markings
identifying the terminals in your plug proceed as follows:
• The wire which is coloured blue must be connected to the terminal which is
marked with the letter N or coloured black.
• The wire which is coloured brown must be connected to the terminal which is
marked with the letter L or coloured red.
• No connection is to be made to the earth terminal of the plug which is marked
with the letter E or coloured green or green and
yellow or marked by the safety earth symbol.
The wires in this mains lead are
coloured in accordance with the
following code.
BLUE-NEUTRAL
BROWN-LIVE
The standard (BS1363) mains plug must be fitted with a 3 Amp fuse
approved to BS1362. If any other plug or connection is used a 3 Amp
fuse must be fitted in the plug or adaptor or in the distribution board.
Caution: Moisture Condensation
If the equipment is moved from a cold place to a warm one, water in the air will condense on some parts and may cause
damage or malfunction if the equipment is operated.
Allow at least two hours for the equipment to acclimatise before switching it on.
This unit is designed to operate from a 230V-240V AC ~ 50Hz mains supply.
Please note that when the STANDBY/ON switch is in the standby position this does not completely disconnect the unit from
the mains supply. If the equipment is not to be used for a day or more, disconnect it at the wall outlet.
This symbol means that the unit is double insulated.No connection to earth is necessary.
SAFE USE OF YOUR EQUIPMENT
This equipment has been designed and manufactured to meet UK safety standards but like any electrical equipment care
must be taken to obtain the best results from the equipment and assure your own safety. Here are a few tips to help you
do this:
READ this instruction manual before you attempt to use the equipment.
NEVER fit makeshift stands or legs with woodscrews. Use only approved supports and fasteners specially designed for
the equipment.
NEVER let anyone, especially children, push objects into holes, ventilation slots or any other opening; this could result in
fatal electric shock!
ALWAYS disconnect the AC power cord when you are not going to use the unit for a long period of time.
ENSURE adequate ventilation of the equipment is not obstructed, for example by curtains above or soft furnishings
underneath it.
ENSURE that all electrical connections (including the mains plug, extension leads and interconnections between pieces
of equipment) are properly made in accordance with the instructions given. Switch off the main supply when making or
changing connections.
CONSULT your dealer if you are ever in doubt about the installation, operation or safety of your equipment.
DON'T continue to operate the equipment if it is damaged in any way or if it does not function normally.
Withdraw the mains plug and consult your dealer.
DON'T leave equipment switched on when it is unattended unless it is part of it's normal function to operate in your
absence, for example a video cassette recorder with timed recording facility.
LISTEN to headphones at moderate volume levels; high volume levels can permanently damage your hearing.
3
TABLE OF CONTENTS
SAFETY PRECAUTIONS .......................................................................................... 2
IMPORTANT SAFETY INSTRUCTIONS .................................................................. 3
INSTALLATION ........................................................................................................ 5
Removing the base stand ................................................................................... 5
Mounting on the wall ......................................................................................... 5
REMOTE CONTROL ................................................................................................ 6
REMOTE CONTROL REFERENCE GUIDE .............................................................. 7
UNIT REFERENCE GUIDE ..................................................................................... 8
CONNECTING A TV ANTENNA .............................................................................. 9
CONNECTING A POWER CORD ............................................................................ 9
DISPLAY ................................................................................................................... 9
TV SETUP ........................................................................................................ 10 – 13
Setup menu ........................................................................................................ 10
Tuning menu ...................................................................................................... 11
Program menu ................................................................................................... 11
Picture menu ...................................................................................................... 12
Sound menu ....................................................................................................... 13
TELETEXT ......................................................................................................... 14 - 15
CONNECTIONS .............................................................................................. 16 – 20
Connecting to A/V devices (VCR, Camcorder, Game System, etc.) ............ 16 - 17
Connecting to sources with component video output (DVD - only 480i, 480p,
720p & 1080i are supported) ............................................................................ 18
Connecting to sources with scart .....................................................................18
Connecting an audio amplifier ......................................................................... 19
Connecting a PC ................................................................................................ 19
Connecting to sources with DVI output (DVD - only 576i, 576p, 720p & 1080i are
supported) ........................................................................................................... 20
USING HEADPHONES ........................................................................................... 20
TROUBLESHOOTING GUIDE ............................................................................... 21
4
INSTALLATION
REMOVING THE BASE STAND
WARNING: The LCD Display is very fragile, and must be protected at all times when removing
the base stand. Be sure that no hard or sharp, or anything that could scratch or damage the LCD
display, come in contact with it. Do NOT place pressure on the front of the unit at any time
because the screen could crack.
1. Disconnect any cables or cords connected to the unit.
2. Lay the unit down on a flat surface, so the back side is facing up, making sure to place a
soft cushioned material (such as a pillow or thick piece of foam) beneath the screen.
3. Remove the four screws and then remove the BASE STAND from the TV.
MOUNTING ON THE WALL
This unit is VESA-compliant, and is designed to be wall-mounted with a VESA-compliant 75mm
x 75mm mounting kit designed for flat-panel TVs (sold separately). Mount this unit according
to the directions included with the mounting kit.
5
REMOTE CONTROL
USING THE REMOTE CONTROL
•
•
•
Point the remote control at the REMOTE SENSOR located on the unit.
When using this unit in a very brightly lit area, the infrared REMOTE CONTROL SENSOR may
not work properly.
The recommended effective distance for using the remote control is about 16 feet (5 metres).
TO CHANGE THE REMOTE CONTROL BATTERY
1. Open the battery door.
2. Insert two “AAA” batteries.
BATTERY REPLACEMENT
When the batteries become weak, the operating distance of the remote control will be greatly
reduced and you will need to replace the batteries.
Note:
• If the Remote Control is not going to be used for a long time, remove the batteries to avoid
damage caused by battery leakage corrosion.
• Do not mix old and new batteries. Do not mix ALKALINE, standard (CARBON-ZINC) or
rechargeable (NICKEL-CADMIUM) batteries.
WARNING:
Do not dispose of batteries in a fire or they may leak and/or explode.
Waste electrical and electronic products must not be disposed of with
household waste. Please refer to the retailer from whom you purchased
this item for disposal instructions.
MK9 2NW
6
REMOTE CONTROL REFERENCE GUIDE
6)
10
1
11
2
7)
12
3
13
14
8)
4
5
15
6
7
8
16
17
18
19
9
9)
10)
11)
12)
13)
14)
1)
2)
3)
4)
5)
FUNCTION button
Toggle between AV1/AV2/YUV/PC/DVI/
TV.
Number (0 – 9) buttons
Use to change the TV channels.
CANCEL button
Press to cancel the Teletext menu.
EXIT button
Press to exit the menu and return directly
to normal viewing.
Cursor ( , , , ) buttons
Press to highlight selections on a menu
screen and make adjust certain settings.
CH + & CH – button
Move up or down through the TV channels
and forward or backward the page of
Teletext screen.
MENU button
Press to display the on-screen menu.
+ VOLUME – button
Press to adjust the volume level.
DISPLAY button
Press to show which input you are watching
(TV Channel/AV1/AV2/YUV/PC/DVI).
INDEX button
Press to select the page number of the
index from Teletext.
15)
16)
17)
18)
19)
7
SLEEP button
Sets the SLEEP timer. The unit will remain
ON for the time that is set, and will
automatically shut off afterwards.
HOLD button
Press to stop the automatic page change
from Teletext.
SUBTITLE button
Press to display the selected Teletext
page.
button
Directly select Mono/Stereo - Dual I/II.
RED/GREEN/YELLOW/BLUE button
Press to select the relevant page quickly
from Teletext.
TV /TEXT button
Directly selects TV mode & Teletext mode.
STANDBY/ON button
Press to turn ON the unit or put it in
STANDBY (OFF) mode.
YUV IN button
Directly selects YUV mode.
AV IN button
Directly selects AV1/AV2 mode.
LAST CH button
Press to switch repeatedly between the
last two channels displayed.
REVEAL button
Press to reveal answers on a quiz or game
pages from Teletext.
MUTE button
Press to turn off the sound.
PICTURE button
Select from preset screen display settings
to match the type of show you are watching
(Standard, Personal, Movie, Dynamic, &
Soft).
TIME button
Press to display the current time
information from Teletext.
MIX button
Press to select Teletext with a TV
programme.
SOUND button
Select from preset sound settings (Personal,
Voice, Music, Theatre) to match the type
of show you are watching.
FORMAT button
Press to set the display on wide screen or
normal screen for AV1/AV2/YUV ONLY.
SIZE button
Press to set the letters size of teletext on
the screen.
UNIT REFERENCE GUIDE
1) TV Antenna Cable terminal - Coaxial TV
antenna input
2) Colour LCD Screen
3) STANDBY indicator
Indicates whether the unit is ON or in
STANDBY (OFF) mode.
Light On: The unit is in STANDBY.
Light Off: The unit is turned ON.
4) Removeable Stand
5) Remote Control Sensor
Do not block this sensor or the remote
control will not work.
6) STANDBY/ON button
Turns the unit on and off.
MENU button
Enter the Setup menu.
FUNCTION button
Select TV, AV1, AV2, YUV, PC & DVI.
/
buttons
Select a TV channel and highlight selections
(Up & Down) on the menu screen.
– VOL + controls
Adjusts the volume level and highlights
selections (Left & Right) on the menu screen.
7) Headphone Jack
8) PC IN Audio Jack
9) PC IN MONITOR/VGA jack
10) DVI Input
11) Scart (AV IN 2)
12) AV IN 1 S-Video Input
13) AV IN 1 Video Input Jack / Audio Input
Jacks (Left / Right)
14) Audio Output Jacks (Left/Right)
15) Power Cord
16) YUV IN Component Video Inputs
(Y/PB/PR) / Audio Input Jacks (Left/Right)
8
CONNECTING A TV ANTENNA
CONNECTING A TV ANTENNA/CABLE/SATELLITE
To view television channels correctly, a signal must be received from one of the following
sources:
- An indoor or outdoor aerial antenna
- A cable system
- A satellite system
Note:
For receiving over-the-air TV
broadcasts, we recommend that you
use an external fixed antenna. Should
you require the use of a temporary
antenna, please ensure that you
purchase an antenna with sufficient
ability to receive in weak signal areas.
Only when you are in close proximity
to a transmitter will a temporary
antenna reproduce a signal as strongly
as a fixed antenna.
To allow the TV antenna
cable to be fixed neatly into
your set, an L-shaped
adaptor is provided.
Satellite, Cable, or TV antenna
cable to TV ANTENNA CABLE
Terminal (cable not included)
CONNECTING A POWER CORD
CONNECT THE POWER CORD
• Connect the AC power cord into a wall outlet.
• Press the STANDBY/ON button on the unit or
remote control to turn on the unit.
Note:
• Be sure the AC power cord is disconnected and
all functions are off before making connections.
• Make sure that all the components are connected
correctly.
• When you are not going to use the unit for a long
period of time, disconnect the power cord.
To AC outlet
DISPLAY
DISPLAY INFORMATION
Symbol
The display information shown below
on the TV screen depending on the
operation status.
TV Display Symbol
TV Display
Nicam mode
PICTURE menu
Stereo mode
SOUND menu
Mono mode
SETUP menu
Mute mode
TUNING menu
PROGRAM menu
9
TV SETUP
SETUP MENU
1. Press the MENU button.
or
button to select the Setup menu, then press
button to enter the setting.
2. Use
or
button to select the options (OSD Size, Language, Country, Timers, Teletext
3. Use
or
buttons.
lang., Teletext E/W, Auto adjust, Restore setting) and adjust them using the
4. Repeat step 3 to adjust other settings.
5. To exit the MAIN MENU and return to the normal screen, press the EXIT button on remote
control.
In TV mode
•
•
•
•
•
•
•
•
OSD Size
Background
: Select the menu size you prefer.
: Select the menu from translucent /
opaque on the screen.
Language
: Select the language your prefer.
Country
: Select the country your prefer.
Timers
: Select the Sleep timer / Reminder timer
mode.
Sleep timer / Reminder timer : Off -> 5
- - - - -> 115 -> 120.
Teletext lang. : Select the teletext language from Pan
European / Cyrillic / Greek.
Teletext E/W
: Select the teletext from West / East.
Restore setting : Reset the TV mode to the factory
settings.
In PC mode
•
•
•
•
•
•
OSD Size
Background
: Select the menu size you prefer.
: Select the menu from translucent /
opaque on the screen.
Language
: Select the language you prefer.
Timers
: Select the Sleep timer / Reminder timer
mode.
Sleep timer / Reminder timer : Off -> 5
- - - - -> 115 -> 120.
Auto Adjust
: Adjusts when characters have low
contrast or when the image flickers
automatically.
Restore setting : Reset the PC mode to the factory
settings.
In AV / YUV / DVI mode
•
•
•
•
•
OSD Size
Background
: Select the menu size you prefer.
: Select the menu from translucent /
opaque on the screen.
Language
: Select the language you prefer.
Timers
: Select the Sleep timer / Reminder timer
mode.
Sleep timer / Reminder timer : Off -> 5
- - - - -> 115 -> 120.
Restore setting : Reset the AV / YUV / DVI mode to the
factory settings.
10
TV MODE
PC MODE
AV / YUV / DVI MODE
TV SETUP
TUNING MENU
1. Press the MENU button.
or
button to select the Tuning menu, then press
button to enter the setting.
2. Use
3. Use
or
button to select the options (Program no., Program name, Colour, Sound, Auto
or
buttons.
tune, Manual tune, AFC, Skip) and adjust them using the
4. Repeat step 3 to adjust other settings.
5. To exit the MAIN MENU and return to the normal screen, press the EXIT button on remote
control.
Note : This option is available in TV mode only.
Porgram no.
: To store 1-99 TV channel.
Programe name : To set the name of TV channel.
Use or cursor to select the characters
to represent the station name. Use
or
to next position of character.
Colour System : Select from Auto/PAL.
Sound System : Select from Auto, BG, I, DK, BG NICAM,
I NICAM, DK NICAM.
Auto tune
: Searches for usable stations and stores
them in memory.
Manual tune
: If the reception is not satisfactory, adjust
using
or
keys.
AFC
: Auto frequency control.
Skip
: ON - Skip weak channels.
OFF - No channel skip.
TV MODE
PROGRAM MENU
1. Press the MENU button.
2. Use
or
button to select the Program menu, then
button to enter the setting.
press
3. To exit the MAIN MENU and return to the normal screen,
press the EXIT button on remote control.
Note : This option is available in TV mode only.
Remarks:
Move
Delete
: Use
, ,
or
cursor to select the
Channel no. and press GREEN button, then
select the Channel no. you want to swap
it with, press GREEN button to swap.
, ,
or
cursor to select the
: Use
channel no. you want to delete, press
RED button twice to delete.
11
TV MODE
TV SETUP
PICTURE MENU
1. Press the MENU button.
2. Press
button to enter the setting.
or
button to select the options (Brightness, Contrast, Colour, Sharpness, Tint,
3. Use
or
buttons. (The screen will change to
Colour Temp, Preset) and adjust them using the
your desired setting).
4. Repeat step 3 to adjust other options.
5. To exit the MAIN MENU and return to the normal
screen, press the EXIT button on remote control.
In TV / AV / YUV* / DVI* mode (* part menu only)
•
Brightness
•
Contrast
: Adjust to brighten the darkest parts of the
picture.
: Adjust to sharpen the picture quality. The
black portions of the picture become
richer in darkness and the white become
brighter.
• Colour
: Adjust the colour of the picture.
• Sharpness
: Adjust the sharpness level to improve
detail in the picture.
• Tint
: Adjust the tint of the picture. (Toward
purple / Toward green)
• Colour Temp : Adjust the three colour temperature of
the picture. Select Normal (balanced) /
Cold (blue white) / Warm (red white) mode.
• Preset
: Select from preset screen display settings
to match the type of show you are
watching (Standard, Personal, Movie,
Dynamic, & Soft).
Note :
You can also select simply by pressing the PICTURE button.
TV / AV MODE
YUV / DVI MODE
In PC mode
Use
or
button to select the options (Brightness,
Contrast, Frequency, Phase, H offset, V offset, Colour Temp,
Preset) and adjust them using the or buttons. (The screen
will change to your desired setting).
- Resolution
: 1366 x 768 max
- Refresh Frequency : 60Hz max.
• Brightness
: Adjust to brighten the darkest parts of the
picture.
• Contrast
: Adjust to sharpen the picture quality. The
black portions of the picture become richer
in darkness and the white become brighter.
• Frequency : Adjust the frequency of the picture.
• Phase
: Adjust when characters have low contrast
or when the image flickers.
• H offset
: Centre the image by moving it left or right.
• V offset
: Centre the image by moving it up or down.
• Colour Temp : Adjust the three colour temperature of the
picture. Select Normal (balanced) / Cold
(blue white) / Warm (red white) mode.
• Preset
: Select from preset screen display settings
to match the type of show you are watching
(Standard, Personal, Movie, Dynamic, &
Soft).
12
PC MODE
TV SETUP
SOUND MENU
1. Press the MENU button.
or
button to select the Sound menu, then press
button to enter the setting.
2. Use
or
button to select the options (Balance, Bass, Treble, Preset) and adjust them
3. Use
using the
or
buttons.
4. Repeat step 3 to adjust other settings.
5. To exit the MAIN MENU and return to the normal screen, press the EXIT button on remote
control.
TV MODE
Experiment with different sound settings until you find the
settings you prefer.
• Bass
: Adjust the bass range.
• Treble : Adjust the treble range.
• Balance : Adjust the balance level toward the left or
right speakers.
• Preset : Select from preset sound settings (Personal,
Voice, Music, Theatre) to match the type of
show you are watching.
Note :
You can also select simply by pressing the SOUND button.
13
PC / AV / YUV / DVI MODE
TELETEXT
Teletext is an information system that displays text on your TV screen. Using the Teletext control
buttons you can view pages of inforamtion that are listed in the teletext index.
Please Note
No on screen display is available in text mode. The contrast, brightness and colour cannot be
changed but the volume control is still available.
TO ENTER TEXT MODE
Please Note
Make sure the TV channel you are watching transmits teletext. If not NO TEXT sign will be shown
on the screen.
Press the TV/TEXT button. The text page will appear, normally the index page.
TO EXIT TEXT MODE
Press the TV/TEXT button, The TV will return to the channel you were watching.
TO SELECT A PAGE OF TEXT
Find the number of the page in the index and enter it using the Numeric buttons. The number of
the page will appear in the top left hand corner of the screen.
The page counter will search for your page. When it finds it, the page will be displayed.
To move to the next page of text, press the CH + button.
To move to the previous page, press the CH - button.
To return to the index page, enter the “100” by using the Numeric buttons.
TIME/MIX
To view a page of the text whilst watching a TV programme press the MIX button. The text will be
superimposed over the TV programme.
Press the MIX button again to return to the text page.
PAGE SEARCH WHILST WATCHING TV
In Text mode press the CANCEL button. The TV will return to TV mode with “ CAN ” in the top left
hand corner of the screen.
Enter the page number you want using the Numeric buttons.
The top line of the text page will appear whilst the text searches for your page. When the page
is found the number will remain in the top left hand corner of the screen.
Press the CANCEL button to view your selected page of text.
14
TELETEXT
DOUBLE HEIGHT TEXT
If you have difficulty reading the text on the TV you can double the height of the text.
Press the SIZE button. The top half of the page will be displayed in double height text.
Press the SIZE button again. The bottom half of the page will be displayed in double height text.
Press the SIZE button again to return to the full page.
PAGE STOP
If the page of text you have selected contains sub pages, these sub pages will automatically be
displayed in order with a delay to allow you to read the page.
To stop the move to the next sub page, press the HOLD button. “HOLD” will appear in the top left
hand corner.
To continue moving through the sub pages, press the HOLD button again.
TO SELECT A SUB PAGE
To select a sub page press the SUBTITLE button. The screen will show “ S _ _ _ _ “, then press the
page by using the Numeric buttons.
TO REVEAL INFORMATION
Press the REVEAL button to reveal concealed information (quiz answers etc.).
Press the REVEAL button again to conceal the information again.
FASTEXT
At the bottom of the teletext screen is a row of subject headings in red, green, yellow and blue.
The remote control has a row of colour buttons corresponding to the row of coloured subjects on
the screen.
Pressing one of the colour buttons will take you directly to the page corresponding to the subject
heading.
15
CONNECTIONS
CONNECTING TO A/V DEVICES (VCR, Camcorder, Game System, etc.)
Connecting to Devices with an S-Video Output
To connect to A/V devices such as a VCR or camcorder:
- Connect to a VCR
Connect the right (red) and left (white) audio output
from the VCR to the right (red) and left (white)
input on this unit (Audio cable not included).
Connect the S-VIDEO output from the VCR to the
S-VIDEO input on this unit (S-VIDEO cable not
included).
Make sure you connect both audio and video from
the same VCR to the same input (AV1).
To operate the connected device and play the
VCR, first press the FUNCTION button or AV IN
button to select the AV1 mode.
Note:
Please refer to the user manual for the VCR for
more information.
- Connect to a camcorder
Connect the right (red) and left (white) audio output
from the camcorder to the right (red) and left (white)
input on this unit (Audio cable not included).
Connect the S-VIDEO output from the camcorder
to the S-VIDEO input on this unit (S-VIDEO cable
not included).
Make sure you connect both audio and video from
the same camcorder to the same input (AV1).
To operate the connected device and play the
camcorder, first press the FUNCTION button or AV
IN button to select the AV1 mode.
Note:
Please refer to the user manual for the camcorder
for more information.
16
CONNECTIONS
Connecting to Devices with a Composite (yellow RCA-type) Video Output
To connect to A/V devices such as a VCR or camcorder:
- Connect to a VCR
Connect the right (red) and left (white) audio output
from the VCR to the right (red) and left (white)
input on this unit (Audio cable not included).
Connect the video (yellow) output from the VCR to
the video input on this unit (Video cable not
included).
Make sure you connect both audio and video from
the same VCR to the same input (AV1).
To operate the connected device and play the
VCR, first press the FUNCTION button or AV IN
button to select the AV1 mode.
Note:
Please refer to the user manual for the VCR for
more information.
- Connect to a camcorder
Connect the right (red) and left (white) audio output
from the camcorder to the right (red) and left (white)
input on this unit (Audio cable not included).
Connect the video (yellow) output from the
camcorder to the video input on this unit (Video
cable not included).
Make sure you connect both audio and video from
the same camcorder to the same input (AV1).
To operate the connected device and play the
camcorder, first press the FUNCTION button or AV
IN button to select the AV1 mode.
Note:
Please refer to the user manual for the camcorder
for more information.
17
CONNECTIONS
CONNECTING TO SOURCES WITH COMPONENT VIDEO OUTPUT (DVD only 480i, 480p, 720p & 1080i are supported)
Devices with component video output must be
connected to the YUV input:
Connect the three video outputs (Y, Pb, Pr) from
the source to the corresponding video inputs on
this unit (Component video cable not included).
Connect the right (red) and left (white) audio output
from the source to the right (red) and left (white)
input on this unit (Audio cable not included).
Make sure you connect both audio and video from
the same source to YUV mode.
To operate the connected device and play the
source, first press the FUNCTION button or YUV
IN button to select the YUV mode.
Note:
Please refer to the user manual for your component
video source for more information and connection
details.
CONNECTING TO SOURCES WITH
SCART
Devices with RGB output must be connected
to the SCART input:
Connect the SCART from the source to the
corresponding SCART on this unit (SCART cable
not included).
Make sure you connect both SCART to SCART.
To operate the connected device and play the
source, first press the FUNCTION button or
AV IN button to select the AV2 mode.
If your VCR permits, then connect
your TV antennna to your VCR
and VCR RF out to the unit.
18
CONNECTIONS
CONNECTING AN AUDIO AMPLIFIER
This connection allows you to use an audio
amplifier and external speakers.
Connect the right (red) and left (white) audio
OUTPUT from this unit to the right (red) and left
(white) audio INPUT on your amplifier. Refer to
your amplifier’s user manual for more information.
Note :
To control the audio, both the TV and the amplifier
must be turned on, and the volume of the amplifier
must be set above 0, or you will not hear any
sound.
If you want to hear the volume of the amplifier
only. Press the volume – button of the TV to decrease
the volume or press the MUTE button of remote
control to turn off the sound.
CONNECTING A PC
Connect the 15-pin D-SUB PC/VGA connector from
your computer to the 15-pin D-SUB PC/VGA input
on this unit using a monitor cable (not included).
Connect a stereo audio cable (not included) to
the PC AUDIO IN jack on the bottom of this unit,
and the other end to the AUDIO OUT jack on your
computer’s sound card.
To operate the connected device, first press the
FUNCTION button to select the PC mode.
Note :
• If the TV is cold, there may be a small “flicker”
when the set is switched on. This is normal,
there is nothing wrong with your TV.
• If possible, use the VESA 1,024 x 768@60 Hz
video mode to obtain the best image quality for
your LCD monitor. If used under the other
resolutions, some scaled or processed picturers
may appear on the screen. The TV has been preadjusted to the mode VESA 1,024 x 768@60Hz.
19
CONNECTIONS
CONNECTING TO SOURCES WITH DVI OUTPUT (DVD - only 576i, 576p,
720p & 1080i are supported)
Connect the montior output (DVI) from your
computer/HD source to the DVI input on this unit.
Connect a stereo audio cable (not included) to
the PC AUDIO IN jack on the bottom of this unit,
and the other end to the AUDIO OUT jack on your
computer/HD source.
To operate the connected device, first press the
FUNCTION button to select the DVI IN mode.
Using in HD (High Definition) Mode
The HD (High Definition) mode allows you to
enjoy clearer and sharper pictures through the
DVI inputs if you are using a HD source.
HD
USING HEADPHONES
• Turn down the volume before connecting headphones to the unit, then adjust the volume to
your desired level.
• When headphones are connected, no sound will come from the front speakers.
Note:
• Avoid listening to sound at high levels for prolonged periods of time. This may be harmful to
you and may cause hearing loss.
20
TROUBLE SHOOTING GUIDE
SYMPTOM
CAUSE (AND REMEDY)
No power.
• Check that the AC power cord is connected.
• Turn on the unit.
The remote does not
function.
•
•
•
•
Bad Picture (snow,
multiple
images,
distortion, blurry)
• Check the location of the antenna and adjust it if neccessary.
• Make sure the antenna cable is firmly connected.
• Make sure all input cables are firmly connected.
No sound.
• Increase the volume.
• Check whether the mute function has been activated on the
Remote Control.
Black and
picture.
white
Remove any obstacles between the remote and the unit.
Use the remote near the unit.
Point the remote at the remote sensor on the unit.
Replace the battery in the remote with a new one.
• Check the Picture setting within the Setup menu.
• Check to make sure the program you are watching is broadcast
in Colour and not Black & White.
No picture or sound.
•
•
•
•
•
•
Make sure the unit is plugged in and turned on.
Make sure that the TV mode is selected.
Try a new channel to check for possible station trouble.
Make sure the antenna is connected properly.
Increase the volume.
Make sure the antenna or audio/video source device is working
properly.
• Make sure all cables are firmly connected.
• Check for local interference.
Coloured patches of
picture.
• Make sure there are no unshielded electrical devices nearby
that are causing interference.
• Turn the TV off for 30 minutes, then try it again.
Panel function key
does not respond
correctly.
• Under the influence of electrostatic phenomenon, the product
may malfunction and require user to power reset.
• Unplug and re-plug the AC power cord.
21
TECHNICAL HELP ON THE OPERATION OF
THIS PRODUCT IS AVAILABLE
MONDAY TO FIRDAY 1PM TO 9 PM
PLEASE CALL 0845 307 5537
IF YOU REQUIRE ANY OTHER ACCESSORIES
FOR THIS PRODUCT
PLEASE CALL 01302 872207
MONDAY TO FRIDAY 9 AM TO 5 PM
22