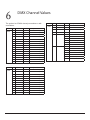
1
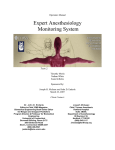
LED Performer Mini Bar
User Manual
Ilumenite™
15308 El Prado Rd. Chino, CA 91710
v (909) 606-6818 – f (909 606-6919
www.ilumenite.com
Table of Contents
Table of Contents
1
Read First!
3
Manual Color Mix. . . . . . . . . . . . . . . . . 10
Unpacking Instructions. . . . . . . . . . . . . . . . . 3
White Strobe. . . . . . . . . . . . . . . . . . . 10
Enclosures. . . . . . . . . . . . . . . . . . . . . 3
Color Cross-Fade Program . . . . . . . . . . . . . 10
AC Power. . . . . . . . . . . . . . . . . . . . . . . 3
Color Change Program. . . . . . . . . . . . . . . 10
Safety Instructions. . . . . . . . . . . . . . . . . . . 3
Color Chase Program. . . . . . . . . . . . . . . 10
Contacting ILUMENITE. . . . . . . . . . . . . . . . . 4
Global Headquarters. . . . . . . . . . . . . . . . 4
4
Fixture Operation
11
Menu System. . . . . . . . . . . . . . . . . . . . . 11
America Sales & Support. . . . . . . . . . . . . . 4
The LED Display Panel. . . . . . . . . . . . . . . 11
UK Sales & Support. . . . . . . . . . . . . . . . . 4
Menu Map . . . . . . . . . . . . . . . . . . . . 11
Symbols & Icons . . . . . . . . . . . . . . . . . . . . 4
Setting the DMX start channel (Addr) . . . . . . . 11
Safety Symbols. . . . . . . . . . . . . . . . . . . 4
Setting the DMX channel mode (Addr). . . . . . . 11
Document Icons . . . . . . . . . . . . . . . . . . 4
Manually color mix (rL--, gL-- & bL--) . . . . . . 11
Warranty Information. . . . . . . . . . . . . . . . . 4
Manual white strobing (FLAS). . . . . . . . . . . 12
Service and Repairs. . . . . . . . . . . . . . . . . . . 5
Color Cross-Fade Program (FAde). . . . . . . . . . 12
2
3
Product Overview
6
Color Change Program (ASc-). . . . . . . . . . . 12
Product Features. . . . . . . . . . . . . . . . . . . . 6
Color Chase Program (cE--), Speed (cS--) . . . . . 12
DMX Channel Summary. . . . . . . . . . . . . . . . . 6
Sound Activated Chase Program (SouA). . . . . . . 13
Technical Specifications. . . . . . . . . . . . . . . . . 6
Sound Activated Flash Program (SouF) . . . . . . . 13
Installation
Sound Activated Program (SEnS). . . . . . . . . . 13
8
AC Power. . . . . . . . . . . . . . . . . . . . . . . 8
6
DMX Channel Values 14
7
Maintenance & Troubleshooting
15
Mounting. . . . . . . . . . . . . . . . . . . . . . . 8
Orientation. . . . . . . . . . . . . . . . . . . . 8
Safety Cable . . . . . . . . . . . . . . . . . . . . 8
Cleaning. . . . . . . . . . . . . . . . . . . . . . . 15
Rigging. . . . . . . . . . . . . . . . . . . . . . 8
Fixture Linking. . . . . . . . . . . . . . . . . . . . . 9
DMX Primer. . . . . . . . . . . . . . . . . . . . 9
Build a DMX Daisy Chain. . . . . . . . . . . . . . . 9
DMX start address . . . . . . . . . . . . . . . . . 9
Setting the DMX start address . . . . . . . . . . . 10
Quick Operation. . . . . . . . . . . . . . . . . . . 10
Stand Alone Operation. . . . . . . . . . . . . . . 10
LED Performer Mini Bar
2
1
Read First!
Unpacking Instructions
Safety Instructions
Immediately upon receiving a product, carefully unpack
the carton, check the contents to ensure that all parts
are present, and have been received in good condition.
Notify the shipper immediately and retain packing material for inspection if any parts appear damaged from shipping or the carton itself shows signs of mishandling. Save
the carton and all packing materials. In the event that a
fixture must be returned to the factory, it is important
that the fixture be returned in the original factory box
and packing.
♦♦
Please keep this User Guide for future consultation. If
you sell the unit to another user, be sure that they also
receive this instruction booklet.
♦♦
Always make sure that you are connecting to the proper voltage and that the line voltage you are connecting
to is not higher than that stated on decal or rear panel
of the fixture.
♦♦
This product is intended for both indoor and outdoor
use.
♦♦
Make sure there are no flammable materials close to
the unit while operating.
♦♦
The unit must be installed in a location with adequate
ventilation, at least 50cm from adjacent surfaces. Be
sure that no ventilation slots are blocked.
♦♦
Always disconnect from power source before servicing
or replacing lamp or fuse and be sure to replace with
same lamp source.
♦♦
Secure fixture to fastening device using a safety chain.
Never carry the fixture solely by its head. Use its carrying handles.
♦♦
Maximum ambient temperature is Ta: 40°. Do not operate fixture at temperatures higher than this.
♦♦
In the event of serious operating problem, stop using the unit immediately. Never try to repair the unit
by yourself. Repairs carried out by unskilled people
can lead to damage or malfunction. Please contact the
nearest authorized technical assistance center. Always
use the same type spare parts.
♦♦
Don’t connect the device to a dimmer pack.
♦♦
Make sure power cord is never crimped or damaged.
♦♦
Never disconnect power cord by pulling or tugging on
the cord.
♦♦
Avoid direct eye exposure to lamp while it is on.
Enclosures
Your box includes the following items.
♦♦
(1) LED Performer Mini Bar
♦♦
(1) XLR 3-Pin Data Cable
♦♦
(1) IEC Power Cable
♦♦
(1) IEC Power Cable Link
♦♦
Warranty Card
♦♦
Users Manual
AC Power
To determine the power requirements for a particular
product, see the label affixed to the back plate of the
product or refer to the product’s specifications chart. A
product’s listed current rating is its average current draw
under normal conditions. All fixtures must be powered
directly off a switched circuit and cannot be run off a
rheostat (variable resistor) or dimmer circuit, even if
the rheostat or dimmer channel is used solely for a 0%
to 100% switch. Before applying power, check that the
source voltage matches the product’s requirement. Check
the product or device carefully to make sure that if a
voltage selection switch exists that it is set to the correct
line voltage you will use.
LED Performer Mini Bar
3
Read First!
Contacting ILUMENITE
Document Icons
Global Headquarters
The following icons may be used through-out this document to aid the reader in finding relevant and most
sought out information.
Gonghe Town, He Shan City Guangdong,P.R. China
529728
Phone: +86 750-8300-941
Fax: +86 750-8300-940
Email: [email protected] (America)
[email protected] (Europe & Asia)
America Sales & Support
15308 El Prado Rd, Chino CA 91710 USA
Phone: (909) 606-6818
Fax: (909) 606-6919
URL: www.ilumenite.com
Email: [email protected]
Support: [email protected]
Technical Contacts:
Irradiant/Ilumenite: [email protected]
Energy Efficient Ent.: [email protected]
UK Sales & Support
Phone: +44(0) 1908 217799
Symbols & Icons
The following symbols and icons may appear throughout
this manual to highlight and emphasize safety information
or draw additional attention to topic notes and tips.
Safety Symbols
Safety Warning!
Risk of severe personal injury or damage
to your equipment.
Safety Hazard!
Risk of lethal or severe electric shock.
Safety Hazard!
Risk of fire.
Hot Surface!
Risk of personal injury.
LED Performer Mini Bar
Alert!
Announcement
Contact information
Notes provided
Help
Stop
Tips
Tools
Tutorial
Take notes!
Warranty Information
Thank you for purchasing a Energy Efficient Enterprises
Inc.® Irradiant® Ilumenite® product from an authorized
EEE/Irradiant/Ilumenite dealer. We take great pride in the
quality, value, and performance of our products and being your factory direct source for illumination products.
Please follow the proper operation and maintenance procedures outlined in the products technical documentation. Should you need further technical assistance, e-mail
[email protected] (Irradiant/Ilumenite Products)
[email protected] Energy Efficient Enterprises General
and Commercial Lighting Products.
LIMITED WARRANTY USA (48 contiguous States of the
USA and DC)
A.Our
warranty is limited to manufacturing defects in
material and workmanship in products purchased
within the 48 contiguous States of the USA and DC.
The warranty is valid from the date of purchase by the
original purchaser and for a period of:
a. 24 months for DMX-controllable lighting fixtures
and DMX-512 controllers;
b. 12 months for non-DMX effect fixtures and nonprogrammable controllers;
4
c.
d.
6 months for laser diodes.
12 months for all fog and haze machines
B.PLEASE
NOTE that defective products reach the
address set out below by the last day of the relevant
warranty period at the latest. Late claims will not be
processed or considered.
C.Exclusions
a. parts prone to normal wear and tear including
lamps, fuses, brushes, contact rings, lamp sockets and
belts; and
b. damage or failure caused by abuse, misuse, faulty
installation and operation, improper or inadequate
maintenance, and any repair or guarantee on repairs
not carried out by Energy Efficient Enterprises, Inc®
are excluded from this warranty.
D.For
products purchased outside the 48 contiguous
States of the USA and DC: Please consult your local
Energy Efficient Enterprises, Inc® distributor as warranty policies vary from country to country.
E.It
is the original purchaser’s responsibility to provide a
dated proof of purchase. The warranty is not transferable.
F.During
the relevant warranty period Energy Efficient
Enterprises, Inc® will at its sole discretion repair or
exchange a defective product under warranty free of
charge provided that:
a. the product serial number has not been altered
or removed; and
b. damage or failure caused by abuse, misuse, faulty
installation and operation, improper or inadequate
maintenance, and any repair or guarantee on repairs
not carried out by Energy Efficient Enterprises, Inc®
are excluded from this warranty.
Service and Repairs
To secure the best service, please follow these simple
steps:
Register your product (fill out and return the warranty
card) as soon as possible after purchase. A copy of the
Warranty Registration form can be found in this manual.
E-mail [email protected] or call 909-606-6818 to
request a return authorization number (RMA#). Do not
send a product without first securing an RMA#. Do not
write the RMA# directly on the box.You must write it
on a removable sticker, i.e., a shipping label.
Units must be in the original packaging with all original accessories. Do not write anything on or alter in
any way the original box. Any damage from inadequate
packing or carrier mishandling is the sole responsibility
of the sender. Double-box all returns. Place the original
box in a larger box and surround it with suitable packing
materials, such as styrofoam peanuts or foam.
All shipping charges must be prepaid by the sender. Energy Efficient Enterprises, Inc.® will, at its own expense,
return the repaired product to the sender provided that
the return address is within the 48 contiguous States
of the USA and DC and that the product is still under
warranty (proof of purchase required. Please see warranty details on back page). We will ship best way at our
discretion.
PRODUCTS NOT UNDER WARRANTY: Please notify
your Energy Efficient Enterprises, Inc® service advisor
that your product is no longer under warranty when
you request your authorization number. Once the unit
has been received, you will be contacted and advised of
the cost of carrying out any repair.
G.This
Warranty on repairs: All repairs have a 60-day warranty
on replaced parts and repair labor valid from the date
the repaired unit is delivered to the shipping agent for
return to the customer.
H.All
Energy Efficient Enterprises, Inc® is not responsible for
any loss or damage to additional items or accessories
that are sent with returned products. We cannot be held
responsible for delays in shipping.
warranty does not confer any rights other than
those expressly set out in this warranty and in particular no credit notes will be issued. This warranty does
not cover any claims for consequential loss or damage.
shipping charges must be pre-paid by the sender.
Energy Efficient Enterprises, Inc® will, at its own
expense, ship back the repaired product to the sender
anywhere within the 48 contiguous States of the USA
and DC. We will ship best way at our discretion.
I.To
secure your warranty coverage, fill out the registration card and send or fax it back to Energy Efficient Enterprises, Inc® with a copy of dated proof of
purchase. Products under warranty receive priority
for repairs.
LED Performer Mini Bar
PLEASE NOTE that it is essential that defective products
reach the address set out by the last day of the relevant
warranty period at the latest. Late claims will not be
processed or considered.
This warranty does not confer any rights other than
those expressly set out in this warranty and in particular
no credit notes will be issued. This warranty does not
cover any claims for consequential loss or damage.
5
2
Product Overview
Product Features
Mode
DMX
Channel
Function
P001
1
Red (0-100%)
2
Green (0-100%)
♦♦
Pixel level control
♦♦
Autoranging Power Supply 90-220V
♦♦
Daisy chain power to minimize power distribution
3
Blue (0-0100%)
♦♦
RGB color mixing using 16 x 3W leds (3-in-1), yields
“no” RGB color shadowing
4
Red (0-100%)
5
Green (0-100%)
6
Blue (0-0100%)
7
Red (0-100%)
8
Green (0-100%)
DMX512 universal control protocol via 3-pin XLR
9
Blue (0-0100%)
Available in either Gray, Black or White housing
10
Red (0-100%)
11
Green (0-100%)
12
Blue (0-0100%)
Mode
DMX
Channel
Function
F001
1
Dimmer (0-100%)
2
Red (0-100%)
3
Green (0-100%)
4
Blue (0-0100%)
5
Strobe
6
Macro
♦♦
♦♦
♦♦
Built in color change programs and the ability to
manually set color without a controller
DMX Channel Summary
This product has 3 DMX channel personalities as referenced below.
Mode
DMX
Channel
Function
A001
1
Red (0-100%)
2
Green (0-100%)
3
Blue (0-0100%)
4
Dimmer (0-0100%)
5
Red (0-100%)
6
Green (0-100%)
7
Blue (0-0100%)
8
Dimmer (0-0100%)
Physical
9
Red (0-100%)
♦♦
10
Green (0-100%)
Width: 370mm (14.6in)
11
Blue (0-0100%)
♦♦
Length: 245mm (9.65in)
12
Dimmer (0-0100%)
♦♦
Height: 150mm (5.9in)
13
Red (0-100%)
♦♦
14
Green (0-100%)
Weight: 4.4Kg (9.5lbs)
15
Blue (0-0100%)
16
Dimmer (0-0100%)
Technical Specifications
Electrical
♦♦
♦♦
Input voltage: Autoranging 100V-240V AC, 50-60Hz
Power consumption: 52W
Construction
♦♦
♦♦
♦♦
LED Performer Mini Bar
Housing: Powder coated steel
Color: Black, Gray or White
Ingress Protection (IP): IP30
6
Product Overview
Connections
♦♦
♦♦
♦♦
♦♦
Power cable entry: IEC320 C13 (included)
Power Linking: IEC320 C13 to C14 (included)
Data cable entry: XLR 3-pin
Data connection: Male to Female XLR 3-pin, 16ft
Electronics
♦♦
♦♦
♦♦
♦♦
♦♦
Control panelL 4-digit LED Display with 4 control buttons
Control: USITT DMX-512
DMX Personalities: (16,12, & 6 control channels)
Operational modes: DMX, Stand-Alone, Master/Slave
Manually set Red, Green and Blue levels on board
Temperatures
♦♦
♦♦
♦♦
Fan cooled
Maximum ambient temp: 40°C (104°F)
Maximum housing temp: 80°C (176°F)
LED Array
♦♦
Configuration: 16 x 3W (3-in-1)
Optical
♦♦
♦♦
Available in 25° Standard Beam Angle
Beam Shaping Films available in 30°, 40° & 60°x1°
Ordering Information
Voltage
Angle Color
Order Code
90-220V
25°
Black
ILDIP-4016526-01E-11
Gray
ILDIP-4016526-01E-21
White
ILDIP-4016526-01E-31
Beam Shaping Films Order Code
Angle
Size
Order Code
30°
3” x 12.5”
IRIL-BSF30-MB1
40°
3” x 12.5”
IRIL-BSF40-MB1
60°x1°
3” x 12.5”
IRIL-BSF60x1-MB1
Using a 60° x 1° film with a 25° primary lens will yield
a 60°x25° beam angle. The beam shaping film is precut to
fit into the front face of the product.You can affix the film
using stage tape or double sided tape.
Warranty Information
♦♦
2-year limited warranty
LED Performer Mini Bar
7
3
Installation
AC Power
Do not install in a location where flooding may occur!
This fixture is not equipped with a power
switch. To power on the fixture simply connect
it to an appropriately rated power source. It
cannot be remotely turned off using a control channel.
If you require the fixture to be completely turned off,
please do so at the branch circuit or via an interrupt.
♦♦
To determine the power requirements for a particular
fixture, see the label affixed to the back plate of the
fixture or refer to the fixture’s specifications chart.
♦♦
A fixture’s listed current rating is its average current
draw under normal conditions.
♦♦
All fixtures must be powered directly off a switched
circuit and cannot be run off a rheostat (variable resistor) or dimmer circuit, even if the rheostat or dimmer
channel is used solely for a 0% to 100% switch.
♦♦
Before applying power to a fixture, check that the
source voltage matches the fixture’s requirement.
♦♦
All fixtures must be connected to circuits with a suitable Earth Ground.
Cable
Pin
International
Brown
Live
L
Blue
Neutral
N
Yellow/Green
Earth
EG (Ground)
Mounting
The aluminum housing may reach temperatures up
to 90°C (194°F). Please restrict public access to
the fixture whenever possible,.
Location
This fixture can mounted on a truss using its yoke assembly. The yoke assembly also serves to floor-stand the
fixture on a flat surface.
Orientation
This fixture can be rigged in any orientation on a truss
without altering its normal operation. The yoke assembly allows the adjustment of both pan and tilt on a truss
once mounted using a single C clamp through the centermounting hole on the bottom yoke bracket.
Safety Cable
It is recommended that you use a safety cable when
mounting any fixture. Verify that the cable is capabale of
supporting the weight of the fixture.
Rigging
The fixture includes a mounting yoke to which 1 rigging
C style pipe clamp can be bolted.
Overhead rigging requires careful planning and
experience. It includes the calculation of working load limits, installation materials and periodic safety
inspection. If you lack these qualifications, do not attempt
the install yourself. Improper installation can result in
personal injury or damage of property.
1. Align the clamp screw with the center hole on the
yoke and tighten.
It is very important that you allow at least 4 inches of
free space and unrestriscted airflow around the fixture.
4. Make sure your outlet has power.
An IP65 rated fixture can be installed outdoors and is
built to withstand rain and other low-pressure water
projections. Please avoid the following;
Do not expose to high-pressure water jets from any
direction!
2. Verify the structure can hold 10 times the weight of
all to-be installed fixtures.
3. Adjust the angle on the yoke arm as necessary.
5. Focus or point the light or fixture in the direction you
wish to aim.
6. Follow the operating instructions.
7. Call your authorized Dealer if you need friendly advice and technical assistance.
Do not immerse in water or any other fluid!
LED Performer Mini Bar
8
Installation
Fixture Linking
Build a DMX Daisy Chain
This fixture can operate on a standard DMX 512 link
controlled by a DMX controller.
1. Connect the DMX output of the controller directly
with the DMX input of the first fixture in the chain.
DMX Primer
2. Connect the DMX output of the first fixture in the
chain with the DMX input of the next fixture.
There are 512 channels in a DMX-512 connection. Channels may be assigned in any manner. A fixture capable of
receiving DMX-512 will require one or a number of sequential channels. The user must assign a starting address
on the fixture that indicates the first channel reserved
in the controller. There are many different types of DMX
controllable fixtures and they all may vary in the total
number of channels required. Choosing a start address
should be planned in advance. Channels should never
overlap. If they do, this will result in erratic operation of
the fixtures whose starting address is set incorrectly.You
can however, control multiple fixtures of the same type
using the same starting address as long as the intended
result is that of unison movement or operation. In other
words, the fixtures will be slaved together and all respond
exactly the same.
inpu
ut
utp
DMX fixtures are designed to receive data through a serial Daisy Chain. A Daisy Chain connection is where the
DATA OUT of one fixture connects to the DATA IN of
the next fixture. The order in which the fixtures are connected is not important and has no effect on how a controller communicates to each fixture. Use an order that
provides for the easiest and most direct cabling. Connect
fixtures using shielded two conductor twisted pair cable
with three pin XLR male
common
o
t
to female connectors.
1
1
dmx +
The shield connection is
3
3
pin 1, while pin 2 is Data
2
2
dmx Negative (S-) and pin 3 is
DMX connector configuration
Data positive (S+).
Termination reduces signal errors and to
avoid signal transmission problems and
interference, it is always advisable to
connect a DMX signal terminator.
1
3
2
Resistance 120 ohm 1/4w
between pin 2(dmx -) and
pin 3(dmx +) of the last
fixture
Do not connect anything to the ground lug on the XLR connector. Do not connect or allow contact between the common
(cable shield) and the fixture’s chassis ground. Grounding the
common may cause a ground loop or erratic behaviour of your
fixture.
LED Performer Mini Bar
3. Continue linking the remaining fixtures coming out
from the DMX output and into the DMX input as
referenced above.
#2
#1
#32
Fixture
Fixture
Fixture
in out
in out
in out
DMX Controller
Terminator (120 Ohm)
It is recommended that you do not exceed a maximum of 32
linked fixtures or 500 meters (1,640 feet) on your DMX chain.
Instead use an opto-splitter (DMX splitter) to accomodate
more than 32 fixtures.
DMX start address
The DMX mode enables the use of a universal DMX
controller device. Each fixture requires a “start address”
from 1 to 511. A fixture requiring one or more channels for control begins to read the data on the channel
indicated by the start address. For example, a fixture that
occupies or uses 7 channels of DMX and was addressed
to start on DMX channel 100, would read data from
channels: 100, 101, 102, 103, 104, 105 and 106.
Choose start addresses so that the channels
used do not overlap and notate the start
address selected for future reference.
If this is your first time addressing a fixture using the
DMX-512 control protocol please read the “DMX
Primer” in this chapter. It contains very useful information that will help you understand its use.
9
Installation
Setting the DMX start address
P001
Menu Down
Up
Enter
Display Menu
1. Access the fixture’s display menu using the 4 buttons
located directly under the LED display.
2. Press the [ Menu ] button to return to the top menu
level.
3. Press the [ Up or Down ] button until the LED display shows (Addr).
4. Press the [ Enter ] button continuously to toggle between (A001), (P001) & (F001). Where (F001) represents
the simplest 6 channel DMX mode.
5. Use the [ Up or Down ] buttons to select a new
DMX start channel.
6. Press [ Menu ] to complete this task.
The physical location of the fixture on the DMX daisy chain
does not have to correspond with the order of channel assignments. However, the fixture’s channel range must not overlap
any other DMX enabled device on the daisy chain. If you
overlap channels you could end up with unintended results.
The exception would be identical fixtures under the same
start channel as a means of unified control of like fixtures.
White Strobe
Permanently set a white strobe by using the (FLAS) function.
Color Cross-Fade Program
Execute a color cross-fade program and choose from 15
speeds by using the (FAdE) function.
Color Change Program
Executes a 7 color change program and choose from 15
speeds by using the (ASC-) function.
Color Chase Program
Choose any one of 5 chase programs by using the (CE--)
and set the speed from slow to fast by using the (CS--)
function.
Sound Activated Program
Execute programs using its built in microphone by using
(SouA),(SouF) and (SEnS).
Master/Slave Operation
A master/slave operation can quickly be established by
setting the first unit in the link to any one of the pre-programmed functions and then setting all subsequent linked
fixtures to (A001).
Do not connect fixtures to a lighting controller
when in Master/Slave operation.
Quick Operation
Stand Alone Operation
This fixture has some basic built in programs and provides the user the ability to create an individual color mix
using the Red, Green and Blue intensity levels.
To engage the Stand Alone operation of this fixture
simply continue to read about the following functions, for
a detailed description and instructions skip to the next
chapter.
Manual Color Mix
Manually select a color on your fixture by using (rL--),
(gL--) & (bL--) and adjusting their values.
LED Performer Mini Bar
10
4
Fixture Operation
Menu System
ASc-
00-15
The onboard control interface provides fixture configuration options, stand-alone options and programmable
functions.
Executes a color change program and
sets the speed of the program in 15
step increments from slow to fast.
cE-cS--
00-15
00-15
Select from 15 chase programs.
The LED Display Panel
SouA
00-15
Chase programs activated by sound
using the internal microphone. Uses the
same chase programs as in (cS--)
SouF
00-15
Sound triggered flash. Uses the same
chase programs as in (cS--)
SEnS
00-15
Sound triggered programs.
The LED display panel automatically turns off after 45
seconds of inactivity. Press any button to turn on the
display.
P001
Menu Down
Up
Enter
Display Menu
Display Panel Buttons
The following table describes Button functions.
Menu
Backs out of any current fucntion and returns to
top level menu
Down
Toggles downward through functions options
Up
Toggles upward through function options
Enter
Confirms selection or set values
Menu Map
Sets the chase speed for CE-- selected
chase program in 15 step increments
from slow to fast.
Setting the DMX start channel (Addr)
1. Access the fixture’s display menu using the 4 buttons
located directly under the LED display.
2. Press the [ Menu ] button to return to the top menu
level.
3. Press the [ Up or Down ] button until the LED display shows (Addr).
4. Press the [ Enter ] button continuously to toggle
between (A001), (P001) & (F001) channel modes. Stay
on any one of the selected modes.
(A001) is a 16 Ch mode
(P001) is a 12 Ch mode
(F001) is a 6 Ch mode
Level 1
Level 2
Option/Setting
Description
5. Use the [ Up or Down ] buttons to select a new
DMX start channel in the selected mode.
Addr
A001
p001
f001
Starting DMX channel, (16Ch Mode)
6. Press [ Menu ] to complete this task.
rL--
001-511
001-511
001-511
00-15
gL--
00-15
Sets manual intensity levels of the green
leds. 15 step increments to 100%
bL--
00-15
Sets manual intensity levels of the blue
leds. 15 step increments to 100%
FLAS
00-15
Sets a white strobe rate from slow to
fast in 15 step increments
FAdE
00-15
Executes a color cross-fade program
and sets the speed of the program in
15 step increments from slow to fast.
LED Performer Mini Bar
Starting DMX channel, (12Ch Mode)
Starting DMX channel, (6Ch Mode)
Sets manual intensity levels of the red
leds. 15 step increments to 100%
Setting the DMX channel mode (Addr)
Please see the previous topic which contains both address and channel mode selection.
Manually color mix (rL--, gL-- & bL--)
Setting the individual intensity of the Red, Green and Blue
leds on your fixture will yield a different color. This is
called additive color mixing.
11
1. Access the fixture’s display menu using the 4 buttons
located directly under the LED display.
play shows (FAdE)
2. Press the [ Menu ] button to return to the top menu
level.
4. Press the [ Enter ] button and the display will switch
to (Fd00). Where “00” represents a value between
00-15.
3. Press the [ Up or Down ] button until the LED display shows (rL--) for Red, (gL--) for Green or (bL--)
for Blue.
5. Use the [ Up or Down ] buttons to select a new
value. Each value represents a cross-fade rate from
slow to fast in 15 step increments.
4. Press the [ Enter ] button and the display will switch
to (rL00) for Red, (gL00) for Green or (bL00) for Blue
respectively. Where “00” represents a value between
00-15.
6. Press [ Menu ] to complete this task.
5. Use the [ Up or Down ] buttons to select a new
value. Each value represents an intensity level starting
with 0% and reaching a maximum of 100%. in 15 step
increments.
6. Press [ Menu ] to complete this task.
Manual white strobing (FLAS)
You can set the fixture to permanently strobe/flash in 15
different speeds. The flash will occur on all colored leds at
full intensity and therefore flash the color white.
1. Access the fixture’s display menu using the 4 buttons
located directly under the LED display.
2. Press the [ Menu ] button to return to the top menu
level.
3. Press the [ Up or Down ] button until the LED display shows (FLAS)
4. Press the [ Enter ] button and the display will switch
to (FL00). Where “00” represents a value between 0015.
5. Use the [ Up or Down ] buttons to select a new
value. Each value represents a strobe rate from slow
to fast.
6. Press [ Menu ] to complete this task.
Color Cross-Fade Program (FAde)
The color cross-fade program performs a color change
in a cross-fade effect. This is where the intensity in one
color step/color begins to decrease while the intensity
in the following step/color begins to increase. The color
change will be very subtle and almost unnoticeable.
1. Access the fixture’s display menu using the 4 buttons
located directly under the LED display.
Color Change Program (ASc-)
The color change program works in a similar fashion to
the cross-fade program, except with no cross-fade effect.
Seven colors will simply change one after the other in the
selected speed.
Please follow the instructions in the previous topic (FAdE)
and replace the menu function with (ASC-).
Color Chase Program (cE--), Speed (cS--)
1. Access the fixture’s display menu using the 4 buttons
located directly under the LED display.
2. Press the [ Menu ] button to return to the top menu
level.
3. Press the [ Up or Down ] button until the LED display shows (CE--)
4. Press the [ Enter ] button and the display will switch
to (CE00). Where “00” represents a value between 0004.
5. Use the [ Up or Down ] buttons to select a new
value. Each value represents a different color chase
program.
6. Press [ Menu ] to complete this task and return to
the top menu.
7. Press the [ Up or Down ] button until the LED display shows (CS--)
8. Press the [ Enter ] button and the display will switch
to (CS00). Where “00” represents a value between 0015.
9. Use the [ Up or Down ] buttons to select a new
value. Each value represents a program chase rate
from slow to fast.
10. Press [ Menu ] to complete this task.
2. Press the [ Menu ] button to return to the top menu
level.
3. Press the [ Up or Down ] button until the LED disLED Performer Mini Bar
12
Sound Activated Chase Program (SouA)
Access the fixture’s display menu using the 4 buttons
located directly under the LED display.
1. Press the [ Menu ] button to return to the top menu
level.
2. Press the [ Up or Down ] button until the LED display shows (SouA)
3. Press the [ Enter ] button and the display will switch
to (SA00). Where “00” represents a value between
00-15.
4. Use the [ Up or Down ] buttons to select a new
value. Each value represents a different sound chase
program.
5. Press [ Menu ] to complete this task.
Sound Activated Flash Program (SouF)
Access the fixture’s display menu using the 4 buttons
located directly under the LED display.
1. Press the [ Menu ] button to return to the top menu
level.
2. Press the [ Up or Down ] button until the LED display shows (SouF)
3. Press the [ Enter ] button and the display will switch
to (SF00). Where “00” represents a value between
00-15.
4. Use the [ Up or Down ] buttons to select a new
value. Each value represents a different color change
program with flash/strobe.
5. Press [ Menu ] to complete this task.
Sound Activated Program (SEnS)
Access the fixture’s display menu using the 4 buttons
located directly under the LED display.
1. Press the [ Menu ] button to return to the top menu
level.
2. Press the [ Up or Down ] button until the LED display shows (SEnS)
3. Press the [ Enter ] button and the display will switch
to (Sn00). Where “00” represents a value between
00-15.
4. Use the [ Up or Down ] buttons to select a new
value. Each value represents {This is a little difficult to
see what is the difference from the other programs}
5. Press [ Menu ] to complete this task.
LED Performer Mini Bar
13
6
DMX Channel Values
This product has 3 DMX channel personalities as referenced below.
Mode
Ch. Func.
Value
Description
F001
1
Dimmer
0-255
0-100% Global Dimmer
2
Red
0-255
0-100% Color Intensity
Mode
Ch. Func.
Value
Description
A001
1
Red
0-255
0-100% Color Intensity
3
Green
0-255
0-100% Color Intensity
2
Green
0-255
0-100% Color Intensity
4
Blue
0-255
0-100% Color Intensity
0-100% Color Intensity
5
Strobe
000-009
No Function
Strobe, Slow to Fast
3
Blue
0-255
4
Dimmer
0-255
0-100% Global Dimmer
010-057
5
Red
0-255
0-100% Color Intensity
058-059
No Function
0-100% Color Intensity
060-108
Strobe at slow speed
160-161
No Function
162-255
Random Strobe
000-009
No Macron
6
Green
0-255
7
Blue
0-255
0-100% Color Intensity
8
Dimmer
0-255
0-100% Global Dimmer
6
Macro
9
Red
0-255
0-100% Color Intensity
10
Green
0-255
0-100% Color Intensity
010-050
Color Fade
0-100% Color Intensity
051-091
Color Fade, RGB only
Color Fade
11
Blue
0-255
12
Dimmer
0-255
0-100% Global Dimmer
092-132
13
Red
0-255
0-100% Color Intensity
133-173
Color Fade
0-100% Color Intensity
174-214
Color Fade snaps
215-255
Random All macros
14
Green
0-255
15
Blue
0-255
0-100% Color Intensity
16
Dimmer
0-255
0-100% Global Dimmer
Mode
Ch. Func.
Value
Description
P001
1
Red
0-255
0-100% Color Intensity
2
Green
0-255
0-100% Color Intensity
3
Blue
0-255
0-100% Color Intensity
4
Red
0-255
0-100% Color Intensity
5
Green
0-255
0-100% Color Intensity
6
Blue
0-255
0-100% Color Intensity
7
Red
0-255
0-100% Color Intensity
8
Green
0-255
0-100% Color Intensity
9
Blue
0-255
0-100% Color Intensity
10
Red
0-255
0-100% Color Intensity
11
Green
0-255
0-100% Color Intensity
12
Blue
0-255
0-100% Color Intensity
LED Performer Mini Bar
14
7
Maintenance & Troubleshooting
Please Read the “Safety Information” section of this
manual before carrying out any service or maintenance
work on any lighting fixture.
This fixture’s housing and front glass can be cleaned with
mild detergents such as those for washing cars. To clean
the housing and front glass;
Ensure that mains power to the fixture is terminated
before handling equipment in any way.
1. Isolate the fixture from AC power and allow the fixture to cool for 20 minutes.
Excessive dirt and particle buildup can affect light performance, can cause overheating which can ultimately
lead to damage of the fixture.
2. Where a silicone seal exists, inspect and make sure it
is in good condition. If any seal shows signs of damage
or loss of water resistance, stop cleaning the fixture
and contact an Ilumenite/Irradiant authorized service
technician for seal replacement.
Take precautions to avoid ESD (Electro static discharge)
damage during service.
The service and maintenance procedures described in
this section must be carried out by qualified professionals
only. Any service procedures not described in this section
must be carried out by Irradiant/Ilumenite Service organization or its authorized agents.
Optical components in all lighting fixtures are subject to
wear over the life of the fixture. It can result in gradual
changes in color rendition as well as overall intensity of
the light. The extent of wear depends heavily on operating conditions, maintenance and climatic environment. For
this reason, it is impossible to specify precise lifetimes for
optical components.You will eventually need to replace
LEDs if their characteristics are affected by wear after
an extended period of use and if you require fixtures to
perform within very precise optical and color parameters.
3. If seals are in good condition, rinse off loose dirt with
a low-pressure water spray.
4. Wash the aluminum housing and front glass using
warm water with a little mild detergent and a softbrush or sponge. Do not use abrasive cleaners.
5. Rinse with clean water and wipe dry.
Cleaning
Regular cleaning is essential for fixture life and performance. Buildup of dust and dirt degrades the fixture’s light
output and cooling ability.
Cleaning schedules will vary greatly depending on the
operating environment. Inspect fixtures within their first
few weeks of operation to estimate the frequency of the
cleaning and maintenance.
Do not use products that contain solvents, abrasives or
caustic agents for cleaning, as they can cause surface damage to the fixture.
Warning! Never use a high-pressure water jet for
cleaning. Take care not to damage seals and
wiring during cleaning.
LED Performer Mini Bar
15