1
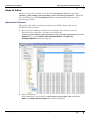
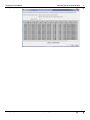
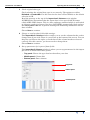
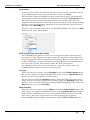
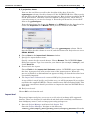
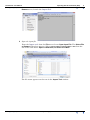
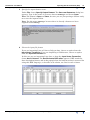
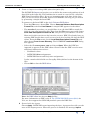
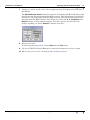
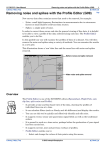
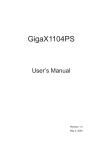
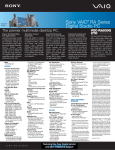
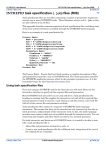
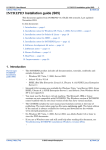
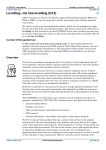
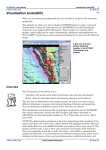
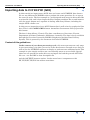
INTREPID User Manual
Library | Help | Top
Importing data to INTREPID (G03)
1
| Back |
Importing data to INTREPID (G03)
Top
In this tutorial we import some ASCII data and create an INTREPID Line dataset.
We use two different INTREPID tools to perform the same operation. So, we repeat
the same job twice. The first example is a tool designed much more for those that like
to point and click, and is based upon the Excel import paradigm.The second instance
uses the genric Import tool, capabale of dealing with many formats, including the
simple ASCII column case.
In this tour we import data in an ASCII format that is well suited to geophysical line
data. This is called ASEG-GDF2 format. Australian Government Surveys prescribe
this format.
The data is from Albury, Victoria. The data custodians are Geoscience Victoria,
Department of Primary Industries, Melbourne, Australia. The data is freely available
through the Geoscience Australia GADDS (Geophysical Archive Data Delivery
System). This is powered by the Jetstream tool from INTREPID.
Context of this guided tour
In the context of your data processing cycle, this tour represents an early stage
in your processing cycle when you receive some data from an external source and you
wish to use the INTREPID software to display or perform some additional work. This
example is quite simple and does not cover forming tensor or vector fields. Special
short cuts are provided to make this easy on import for both the general ASCII flat
file case - use the DDF or data description file
and the ASCIIXYZ importer option - header must have 6 componenets with
XX,YY,ZZ,XY,YZ,ZX in the names somewhere.
Library | Help | Top
© 2012 Intrepid Geophysics
| Back |
INTREPID User Manual
Library | Help | Top
Importing data to INTREPID (G03)
2
| Back |
Overview
Using INTREPID you can directly open, read from and write to datasets in the
following data storage formats:
•
INTREPID database (..DIR)
•
Geosoft database (*.gdb)
•
ESRI shapes and MapInfo TAB files
•
Oracle database
•
PostgreSQL database
•
ERMapper and INTREPID grid (*.ers) , also *.gxf, *.cdf, *.zmap
For all other formats, you need to import the data and create a new INTREPID
dataset.
INTREPID has two tools for importing data.
•
Import tool—this versatile tool has many import options and can import data
stored in a wide variety of formats.
•
Ascii Import Wizard—this is specially designed for easy import of ASCII data,
and is similar in look and feel to the text file import feature of Microsoft Excel. It
has fewer options than the Import tool.
Location of sample data for Guided Tours
We provide two complete sets of sample datasets, one in INTREPID format and one
in Geosoft format. INTREPID works equally well with both formats. When you want
to open a dataset, navigate to the directory containing the required data format.
Where install_path is the path of your INTREPID installation, the project
directories for the Guided Tours sample data are
install_path\sample_data\guided_tours\intrepid_datasets and
install_path\sample_data\guided_tours\geosoft_datasets.
For example, if INTREPID is installed in
C:\Program Files\Intrepid\Intrepid4.5.nnn,
then you can find the INTREPID format sample data at
C:\Program Files\Intrepid\Intrepid4.5.nnn\sample_data\
guided_tours\intrepid_datasets
This is the default location for the sample data. If you have installed INTREPID
normally, the data resides there. If you have installed INTREPID elsewhere, the
exercises will work just as well. Just use the appropriate pathnames.
For more information about installing the sample data, see "Sample datasets—
installing, locating, naming" in INTREPID Guided Tours Introduction (G01)
For a more detailed description of INTREPID datasets, see Introduction to the
INTREPID database (G20). For even more detail, see INTREPID database, file and
data structures (R05).
Location of sample data for CookBooks
Right next to the Guided tours data, is a rich set of more exotic geophysics datasets
and grids, already prepared for the cookbook training sessions. A casual user might
Library | Help | Top
© 2012 Intrepid Geophysics
| Back |
INTREPID User Manual
Library | Help | Top
Importing data to INTREPID (G03)
3
| Back |
also gain some trial and error insights into the capbilities of the software, just by
testing the Project Manger’s ability to preview and describe the attributes of each of
the cookbook datasets.
Library | Help | Top
© 2012 Intrepid Geophysics
| Back |
INTREPID User Manual
Library | Help | Top
Importing data to INTREPID (G03)
4
| Back |
Steps to follow
Before you begin the tutorial, locate the file alburydata.zip in the directory
install_path\sample_data\guided_tours\intrepid_datasets. Unzip the
file into a directory called alburydata (Some unzip programs will create this
directory by default).
Import Ascii Columns
This is the most direct and simple method to get ASCII column data into an
INTREPID binary format.
1
Start the Project Manager and launch the Import Ascii Columns wizard.
Start the Project Manager. Navigate to the directory
install_path\sample_data\guided_tours\intrepid_datasets. From the
Dataset menu, choose Import Ascii Columns Wizard. The Open for
AsciiimportWizard dialog box appears.
2
Open the input file.
In the dialog box, select the file alburydata\alburydata.dat and choose
Open. The Import Ascii Columns main window appears.
Library | Help | Top
© 2012 Intrepid Geophysics
| Back |
INTREPID User Manual
Library | Help | Top
Library | Help | Top
Importing data to INTREPID (G03)
5
| Back |
© 2012 Intrepid Geophysics
| Back |
INTREPID User Manual
Library | Help | Top
3
Importing data to INTREPID (G03)
6
| Back |
Check original data type.
Check whether the original data type is set correctly. The options are either
Delimited or Fixed width. For this exercise the data is Fixed Width, so the default
selection is OK.
Read the message at the top of the Import Ascii Columns main window.
INTREPID has determined that the input data is in a special ASCII format,
called ASEG-GDF2 format. This is a data exchange standard which is well suited
to airborne geophysical survey line data. INTREPID automatically finds and use
the alburydata.dfn file to provide naming and formatting information for the
data columns.
Choose Next to continue.
4
Change or confirm data field width settings.
This Import Ascii Columns window enables you to see the columns breaks, and to
change them if you wish. There is a scroll bar at the bottom of the screen. You can
drag the scroll bar to the right, to check that all the column breaks are located
correctly. For this exercise, you do not need to change them.
Choose Next to continue.
5
Set up parameters for import of data fields.
This Import Ascii Columns window is where you set up parameters for the import
process. It is divided into three panels.
•
Top panel: Choose the type that best describes your data
•
Middle panel: Column Info
•
Bottom panel: Data columns
top panel
middle panel
bottom panel
Library | Help | Top
© 2012 Intrepid Geophysics
| Back |
INTREPID User Manual
Library | Help | Top
Importing data to INTREPID (G03)
7
| Back |
Line number
In the top panel choose the data type that best suits your data. For this exercise
we are importing Line data, so leave the default choice as Lines.
The first data column is highlighed in blue in the bottom panel. The properties
and settings for this data column are displayed in the middle Column Info panel.
The Name, Datatype and Missing properties for the columns have all been
supplied from the input files. However we want to make the Line column a Group
By field, since it is the primary identifier for the Line dataset. Check the box to
the right of the Group By text.
Next we want to set this column to be the INTREPID Line alias. From the Alias
dropdown list, select LineNumber.
Quick review of the Group by concept:
An INTREPID Line dataset is made up of groups. Each group represents one
survey line of data. Therefore the Line number is imported as a Group By field,
and it becomes the primary identifier for each group. However other fields, such
as Date and Flight, can also be imported as Group By fields, provided they have
only one value per line. This helps to reduce the size of the dataset.
If a collection of data has no line structure we refer to it as point data. An
INTREPID Point dataset consists of a single group.
Line type
Now select the next column. Select Linetype in the bottom Data Columns panel.
The second column now appears highlighted in blue, and the Column Info panel
updates to show the properties for this column.
We also want to make the Linetype column a Group By field, since it has only a
single value for each line (group) in the dataset. Check the Group By check box.
Next we want to set this column to be the INTREPID LineType alias. From the
Alias dropdown list, select LineType.
Flight, Fiducial
Now select the next column. Select Flight in the bottom Data Columns panel. The
next column now appears highlighted in blue, and the Column Info panel updates
to this column’s information. You can also make the Flight column a Group By
field, since it has only a single value for each line (group) in the dataset.
Select the Fid column. Set this column to have the INTREPID Fiducial alias.
Library | Help | Top
© 2012 Intrepid Geophysics
| Back |
INTREPID User Manual
Library | Help | Top
Importing data to INTREPID (G03)
8
| Back |
X, Y, projection, datum
Now use the scroll bar to scroll to the far right of the data. Select the
xgda94mga55 column. Set this column to be the INTREPID X alias. When you do
this the Projection & Datum selection box appears. Here is where you define the X
and Y Alias names, and their associated Datum and Projection. The Y Alias is
currently wrong so you need to change it. From the pull-down list, choose the Y
Alias to be ygda94mga55.
From the drop down list choose the Datum to be GDA94. From the drop down list
choose the Projection to be MGA55. When you have finished choose OK.
In the Import Ascii Columns window, select the ygda94mga55 column. Check
that the Alias for this column is set to Y, and the Datum and Projection are set to
GDA94, MGA55.
6
Choose Next in the Import Ascii Columns window.
7
Specify the output dataset name.
Specify a name for the created dataset. Choose Browse. The INTREPID Open
dialog box appears. Type in a name for your dataset (for example, albury2), and
choose Save As.
8
Proceed with the import.
Choose Finish in the Import Ascii Columns window. INTREPID starts importing
the data. A progress bar tells you the state of the import process. When the
process is finished, an Information box appears telling you that the data has been
successfully imported.
9
The Import Ascii Columns tool creates a DDF of the format used in the import.
A copy of this is saved locally, and, in this case, you will be prompted if you wish to
overwrite the supplied DDF file. Choose another name like alburydata2.ddf. This
is for your convenience should you wish to re-import the data into INTREPID at a
later date.
10 Exit from the tool.
Choose OK to exit from the tool.
Import tool
The generic import tool gives you access to a rich vein of exchange API supported
formats. These are designed to switch back and forth with commonly used formats
from thridparty sources, such as image processing packages etc.
1
Start the Project Manager and launch the Import Tool.
Start the Project Manager. Navigate to the directory
install_path\sample_data\guided_tours\intrepid_datasets. From the
Library | Help | Top
© 2012 Intrepid Geophysics
| Back |
INTREPID User Manual
Library | Help | Top
Importing data to INTREPID (G03)
9
| Back |
Dataset menu, launch the Import Tool.
2
Open the input file.
From the Import tool, from the File menu choose Open Input File. The Select File
or Dataset dialog box appears. Select alburydata\alburydata.dat from the
list of files and choose Open on Windows, or Select on LINUX.
The file name appears on the text in the Import Tool window.
Library | Help | Top
© 2012 Intrepid Geophysics
| Back |
INTREPID User Manual
Library | Help | Top
3
Importing data to INTREPID (G03)
10
| Back |
Specify the output dataset name.
Under File, choose Specify Output Dataset. The Save new Dataset as dialog box
appears. Type in the name of your new dataset albury1 and choose Open.
Note: The button is Open, not Save, because you are just opening a dataset ready
to receive the imported data.
Note: Use the name albury1 because there is already a dataset we have
supplied called albury.
4
Choose the input file format.
If you are importing Line or Point or Polygon data, choose an option from the
Input Vector Format list. If you are importing a Grid dataset, choose an option
from the Input Grid Format list.
In this case we are importing Line data, so from the Input Vector Format list,
choose Ascii Columns. The AsciiColumns DDF editor appears. DDF stands for
data description format, and in the popup below, the bottom section is reserved for
using this DDF language, to describe each column, one line for each column.
Library | Help | Top
© 2012 Intrepid Geophysics
| Back |
INTREPID User Manual
Library | Help | Top
5
Importing data to INTREPID (G03)
11
| Back |
Create or import an existing DDF (data description file).
The INTREPID Import tool requires you to define the names and positions of each
data field in the input file. This information is stored in a special file, called the
DDF (Data Description File). If you are importing some new data for the first
time you need to create this DDF. However INTREPID can help you get started
by generating a simple skeleton DDF.
To generate a skeleton DDF in the Ascii Columns DDF editor:
•
From the File menu, choose File. Choose Generate Skeleton Data Description
Format File, and then Line Dataset. A simple DDF appears in the editor.
•
The standard procedure you would follow is to edit this DDF to match the
fields in your own input data file. Then from the File menu, you would choose
Save Data Description Format File As, and you save your DDF as a new file.
However for this exercise we don’t need to create a DDF. We already have an
existing DDF for this data, so all you need to do it to load the file into the DDF
editor. From the File menu, choose Load Data Description Format File, and
then choose From Current Directory. The INTREPID Load Local DDF dialog
box appears.
•
Select the file alburydata.ddf and choose Open. When the DDF has
imported it appears in the DDF editor. Observe that the DDF can also store
additional information such as:
•
Undefined values
•
INTREPID Alias assignments
•
INTREPID Datum and Projection assignments
It also controls which fields are Group By fields (defined at the bottom of the
file).
•
Choose OK to close the DDF editor.
Note: the DDF editor has its own Help facility.
For more information on DDF, refer to The INTREPID DDF format (R08). At
V5.0, we also support the GOOGLE protobuf syntax for DDF files.
6
Proceed with the import.
Choose Apply. INTREPID starts importing the data. A progress bar tells you the
state of the import process. When the process is finished, the message Import
Library | Help | Top
© 2012 Intrepid Geophysics
| Back |
INTREPID User Manual
Library | Help | Top
Importing data to INTREPID (G03)
12
| Back |
processing completed appears. Choose OK.
Library | Help | Top
© 2012 Intrepid Geophysics
| Back |
INTREPID User Manual
Library | Help | Top
7
Importing data to INTREPID (G03)
13
| Back |
Change or confirm the X and Y alias assigments and the Datum and Projection of
the dataset.
The GeoReference Vector dialog box appears. Check that the X and Y aliases and
the Datum and Projection information are correct. This information can either be
set here or can be provided from the DDF. For this exercise the information was
provided from the DDF. Observe that when you choose the X, Y, Projection and
Datum buttons, a list of options appears. For this exercise you don’t need to
change anything, so choose Cancel to dismiss each list.
8
Exit from the tool.
To exit from the Import tool, choose Quit from the File menu.
9
Use the INTREPID Project Manager to examine the dataset you have created.
10 Move to the next exercise, the Import Ascii Columns wizard.
Library | Help | Top
© 2012 Intrepid Geophysics
| Back |
INTREPID User Manual
Library | Help | Top
Importing data to INTREPID (G03)
14
| Back |
Further things to consider
During the import process you defined certain fields to be INTREPID Alias fields.
This tells INTREPID which fields are to be recognised as Fiducial, Line, X, Y,
and so on. If these fields are not defined as Alias fields during import, you can
define them as Alias fields after import. This is easily done using the Project
Manager. Simply highlight the dataset name under the Project Manager
Filename panel, and select the Fields tab. Current Aliases are displayed in the
Alias column. Select this column if you want to define a field as an Alias value.
INTREPID expects to see Aliases set for at least Linenumber, X and Y.
Key points for this guided tour
In this guided tour you have:
•
Used the Import tool to import some ASCII data and create an INTREPID Line
dataset
•
Used the Import Ascii Columns tool to import the same ASCII data and create an
identical INTREPID Line dataset
•
Gained some insight into how Alias and Group By concepts work in INTREPID.
Frequently Asked Questions
Q : I have a lot of files to import. They all have a similar format. Is there an
easier way to do this?
A : Yes. The Import tool has batch options which make multiple-file imports easy.
Q : I have some data to import with a unusual column delimiter. Can I import
it?
A : Yes. The Import tool can handle a variety of non-standard column delimiters.
Q : I have forgotten the DDF syntax. Are there some examples I can refer to?
A : There are lots of examples of DDF files in the INTREPID installation/examples
area.
Q : I find the DDF editor in the Import tool difficult to use. Are there any
other options?
A : You may find it easier to create your DDF using a standard text editor and then
import it into the DDF editor.
Library | Help | Top
© 2012 Intrepid Geophysics
| Back |