1
2010-02-22
Richmond Sound Design - Show Contr…
ABEdit
AudioBox™ AB64 EDITING & CONTROL SOFTWARE
USER MANUAL to be used with the Model AB64 ONLY
ABEdit Version: 7 .3 .9
Coded By : Shelly Kantrow
Manual By : Susanne Clam pett & Ch arlie Richm ond
All Rights Reserv ed, Copy right ©2 01 0
Dev eloped and Distributed by :
Richm ond Sound Design Ltd.
Vancouv er, Canada
Phone + 1 -604 /7 1 5-94 4 1
http://ww w.RichmondSoundDesign.com
CONTENTS:
1. INTRODUCTION
1.1. SOFTW ARE VERSIONS
2. SYSTEM HARDW ARE
2.1. COMPUTING EQUIPMENT
2.2. INTERFACING
2.2.1. COMPUTING EQUIPMENT
2.2.2. MIDI CONNECTIONS
2.2.3. ETHERNET CONFIGURATION
2.3. OPERATING PRECAUTIONS
2.3.1. DISK HANDLING
2.3.2. DATA/SHOW S DISK BACKUP
2.3.3. OBTAINING THE SOFTWARE
2.3.4. HARD DISK INSTALLATION
3. USING THE PROGRAM
3.1. SETTING UP
3.1.1. PREFERENCES
3.1.2. CREATING PROJECT FOLDERS
3.1.3. STARTING THE PROGRAM
3.2. ABSHOW W INDOW
3.2.1. ABSHOW MENUS
3.2.2. MAKING SHOW S AND CUES
3.2.2.1. NEW MESSAGES
3.2.2.1.1. SET INPUT/OUTPUT LEVEL
3.2.2.1.2. SET SUBMASTER LEVEL
3.2.2.1.3. SET CROSSPOINT LEVEL
3.2.2.1.4. SET CROSSPOINT PHASE
3.2.2.1.5. SET DELAY
3.2.2.1.6. ENABLE/DISABLE DELAY
3.2.2.1.7. MUTE/UNMUTE CHANNEL
3.2.2.1.8. SOLO/UNSOLO CHANNEL
3.2.2.1.9. SET EQ
3.2.2.1.10. PLAYBACK (GO, STOP, LOAD, RESUME)
3.2.2.1.11. PLAYBACK (GO CHANNEL SET)
3.2.2.1.12. MIDI SHOW CONTROL EVENT
3.2.2.1.13. SET MATRIX
3.2.2.1.14. SET INPUT CHANNEL MODE
3.2.2.1.15. SET MIDI ECHO
3.2.2.1.16. MTC GENERATOR
3.2.2.1.17. HEX EDITOR
3.2.2.2. TRACKSHEET
3.3. SHOW PROPERTIES AND AUDIOBOX SETUP WINDOW
3.3.1. SUBMASTERS
3.3.2. CONTROLLER ASSIGNS
3.3.3. ALL_OFF ACTIONS
3.3.4. GPI - GENERAL PURPOSE INPUT PARAMETERS
3.3.5. COBRANET SETTINGS
3.4. AB CONTENTS W INDOW
3.5. AudioBox AB64 SHOW CONTROL W INDOW
3.6. VU METER W INDOW
3.7. AudioBox AB64 STATUS WINDOW
3.8. IMPORT SHOW WINDOW
3.9. PLAYBACK W INDOW
3.10. SUBMASTERS WINDOW
3.11. INPUTS WINDOW
3.12. OUTPUTS WINDOW
3.13. CROSSPOINTS WINDOW
4. TUTORIAL
4.1. LIVE AUDIO PLAYBACK
richmondsounddesign.com/…/ab64-a…
1/38
2010-02-22
Richmond Sound Design - Show Contr…
4.1.1. MAKING CUE #10
4.2. EIGHT CHANNEL PLAYBACK
4.2.1. SETTING INPUT & OUTPUT LEVELS
4.2.2. SETTING CROSSPOINT LEVELS
4.2.3. LOADING SELECTIONS
4.2.4. STOPPING SELECTIONS
4.2.5. FINISHING CUE #20
4.3. TUTORIAL SHOW 2
5. TROUBLESHOOTING
5.1. MIDI HARDW ARE
5.2. SOFTW ARE/COMPUTER
5.3. SOFTW ARE SUPPORT
6. REFERENCE SECTION
6.1.
6.2.
6.3.
6.4.
KEYBOARD COMMANDS
KEYBOARD LABELS
AudioBox AB64 MIDI IMPLEMENTATION
AudioBox AB64 MSC RESPONSES
7. GLOSSARY
8. INDEX
TOP INDEX
1. INTRODUCTION
This m anual is for use with ABEdit Version 7 .3 .8. and the AudioBox Model AB64 only ! Please read and study this gu ide thoroughly - it is the key to satisfaction in
the use of y our AudioBox AB64 with ABEdit. We high ly recom m end that the Windows Reference Guide, supplied with the operating sy stem , be read and studied
thoroughly as w ell. Although this guide prov ides com plete inform ation about the use of ABEdit software, it is not a substitute for the inform ation prov ided by
other m anuals supplied w ith the sy stem .
For first tim e use of ABEdit or upon changing any sy stem hardware, follow this guide carefully beginning with section 2.
For first tim e editing or program m ing with ABEdit, follow this guide carefully beginning with section 3.
Allow adequ ate tim e to work with the software without interruption. Please becom e com pletely fam iliar with ABEdit before program m ing y our show.
Ev en highly knowledgeable designers, program m ers and operators will sav e tim e and confusion if they follow Section 4. com pletely to learn the m ost efficient
way to program and operate the ABEdit sy stem .
Through out this guide, we attem pt to consistently use words w ith specific m eanings as defined in the glossary . Please consu lt the glossary to clarify the m eaning
of any word.
TOP INDEX
1.1. SOFTWARE VERSIONS
The latest v ersion of ABEdit is alway s av ailable for downloading at RSD's w eb site:
RSD Dow nload Page
TOP INDEX
2. SYSTEM HARDWARE
Requ ired ABEdit com puter sy stem hardware:
Com pu ter and colour m onitor (1 2 80 x 1 02 4 or better)
4 8K sam ple rate sound card/MIDI Interface or equal
1 00Mb/S Ethernet port
Sound card to MIDI Cable Adapter (av ailable from RSD)
Interface all com ponents correctly for total sy stem control. If desired, y ou m ay run ABEdit to program sh ow s without restriction on the com puter without being
connected to the AudioBox AB64 , but of course nothing can be changed on the AudioBox AB64 until it is connected. At that tim e, y ou will be autom atically
prom pted by ABEdit to update and refresh the Au dioBox AB64 .
Recom m ended sy stem hardware for ABEdit is alway s up to date at:
RSD Frequently Asked Questions Page
TOP INDEX
2.1. COMPUTING EQUIPMENT
Recom m ended com puting equ ipm ent, properly connected and installed, for ABEdit and the Firm wareInstaller Windows firm ware loader utility , as periodically
upgraded and av ailable free on our w eb site is alway s kept up to date at:
RSD Frequently Asked Questions Page
Am ount of RAM requ ired depends on the size and num ber of .wav files being m anipulated by associated sound editing software not prov ided by RSD. The
m inim um am ount of RAM is enough to run m ost basic Digital Audio Workstation software. Please refer to y our DAW software's docum entation for specific adv ice.
AudioBox AB64 hard disks can contain m any hours of audio, so there should be enough com pu ter hard disk space to store these as original .wav files. Th e
com puter m ust hav e enou gh storage dev ice space to store all original .wav files. A com puter network w ith a large serv er is an ideal solution for m ost production
requirem ents.
TOP INDEX
2.2. INTERFACING
TOP INDEX
2.2.1. COMPUTING EQUIPMENT
richmondsounddesign.com/…/ab64-a…
2/38
2010-02-22
Richmond Sound Design - Show Contr…
WARNING:
DO NOT CONNECT OR DISCONNECT ANYTHING WHILE POWER IS APPLIED!
Please consult the Com puter and Windows Reference Manuals for all m ouse, key board, printer and m onitor interconnection and power-up procedures.
Attach the MIDI interface Adapter Cable (DB1 5) to the Gam e port of the Sound Card. Th e MIDI OUT and IN (DIN-5) connectors to all equ ipm ent being controlled
(see Section 2.2.2. ).
Connect the com pu ters running ABEdit and all AB64 s to y our Local Area Network (LAN). Make sure there is no router or firewall BETWEEN com puters and
AB64 s. Also, m ake sure there is no firewall softw are running on y our com puter, including any Window s XP firewalls. The AB64 s should norm ally be set to
autom atically obtain IP addresses v ia DHCP if there is a router or other dev ice in the netw ork that assigns IP num bers v ia DHCP. Otherwise, IP addresses m ust be
m anually assigned and hav e no conflicts. (see Section 2.2.3. ).
TOP INDEX
2.2.2. MIDI CONNECTIONS
Use the following third party dev ices (av ailable from RSD) to interface m ore than one Au dioBox AB64 w ith the ABEdit com puter:
QTY
ITEM
1
"MIDI Merge Box" or "MIDI Merger" with sufficient num ber of MIDI IN ports.
1
"MIDI Splitter" with sufficient num ber of MIDI OUT ports.
Connect each MIDI OUT port of ev ery AudioBox AB64 to a MIDI IN port on a standard MIDI Merge Box. Connect each MIDI OUT port uniqu ely v ia a standard MIDI
cable to each m erge box MIDI IN port.
If interfacing only one AudioBox AB64 , connect its MIDI OUT directly to the MIDI IN port of the MIDI interface Adapter cable. The MIDI Merge Box is not
necessary .
Connect the MIDI OUT port of th e MIDI interface Adapter cable to th e MIDI IN port of the nearest AudioBox AB64 . Connect the MIDI THRU port of that AudioBox
AB64 to the MIDI IN port of the next AudioBox AB64 .
Connect MIDI THRU ports to MIDI IN ports in a "daisy chain" fashion prov ided all dev ices receiv e MIDI m essages reliably . We do not recom m end this m ethod of
MIDI signal distribution because it m ay resu lt in erroneous data transm ission.
The recom m ended and superior m ethod of sending a single MIDI OUT signal to m ultiple MIDI IN ports is as follow s:
Connect the MIDI OUT of the MIDI interface Adapter cable to the MIDI IN of the MIDI Splitter.
Connect each MIDI OUT of the MIDI Splitter one-to-one to each MIDI IN of each MIDI unit in the sy stem .
If there are m ore controlled units than OUTS on the Splitter, connect one of the Splitter's MIDI OUT ports to the MIDI IN of another Splitter.
Connect the MIDI IN of each additional dev ice to a MIDI OUT of the splitter.
Connect each MIDI IN uniqu ely v ia a standard MIDI cable to a single MIDI OUT.
Do not m erge MIDI OUT from the ABEdit com puter with other MIDI OUTs and return it to the MIDI IN of the interface. This can cause a condition in which MIDI
m essages pass continuously around in a closed loop and w ill v ery quickly cause the sy stem to freeze.
TOP INDEX
2.2.3. ETHERNET CONFIGURATION
The AudioBox AB64 works with 1 0Mb/S or 1 00Mb/S Ethernet but the latter is preferred. Connect the control network to th e AB64 's Ethernet Network RJ4 5
connector. It is recom m ended that y our netw ork use a router that assigns IP addresses v ia DHCP and that each AB64 on the network be set to obtain IP addresses
v ia DHCP. Each AB64 com m unicates with m ultiple dev ices on the network (inclu ding m ultiple com puters running ABEdit) autom atically by opening as m any
ports as necessary .
If y ou m ust set a static IP address on the AB64 (if th ere is no DHCP serv er av ailable, for exam ple) y ou m u st m ake sure the AB6 4 's IP address is different from all
other dev ices on the network and the IP address is within the subm ask range of y our com puter's IP configuration. You can see the IP configuration by opening a
com m and prom pt window , and ty ping ipconfig then pressing return. It will show som eth ing like this:
Ethernet adapter Local Area Connection 5:
Connection-specific DNS Suffix . : v c.shaw cable.net
IP Address. . . . . . . . . . . . : 1 92 .1 68.0.3
Subnet Mask . . . . . . . . . . . : 2 55.2 55.2 55.0
Default Gatew ay . . . . . . . . . : 1 92 .1 68.0.1
The subnet m ask is usually 2 55.2 55.2 55.0 wh ich m eans in this case that the IP address of the AB has to m atch the first 3 fields of the IP address shown. In this
case (for exam ple) that m eans that the AB64 's IP address m ust start with 1 92 .1 68.0.som ething. If settings are not correct, ABEdit will generate an error m essage
if the IP address of the box is not in the proper range that w ill work on the local netw ork. This m essage specifies the IP address, the AB64 S/N and that it can't
work on the netw ork.
For m ore details, please refer to the instructions inclu ded with y our AudioBox AB64 . Current inform ation is alway s av ailable on our web site in the Frequently
Asked Questions section. The URL for this page is RSD Frequently Asked Questions Page
TOP INDEX
2.3. OPERATING PRECAUTIONS
TOP INDEX
2.3.1. DISK HANDLING
IMPORTANT: NEVER REMOVE PORTABLE MEDIA UNTIL TWO SECONDS AFTER THE DISK DRIVE LIGHT GOES OUT!
TOP INDEX
2.3.2. DATA/SHOWS DISK BACKUP
The AudioBox AB64 and ABEdit w ork together as backups for each other. Ev ery thing that is on th e AudioBox AB64 is presum ably already on the com puter. The
only way th is is not so is if the user deletes the files on the com puter. Also, w hen rev iewing the contents on the AudioBox AB64 , the program will autom atically
check to m ake sure there is a copy of each selection and show on the com puter using the preferred path. If there is no backup of the designated file, a m essage will
indicate that those files cannot be found. But before copy ing from the AudioBox AB64 back on to the com puter's hard driv e, m ake sure the project paths are
richmondsounddesign.com/…/ab64-a…
3/38
2010-02-22
Richmond Sound Design - Show Contr…
correct.
How ev er, in order to safeguard against power failure, equipm ent failure or operator errors, periodically m ake at least tw o backu p copies of y ou r project using
'Back Up Current Project' in the File m enu.
TOP INDEX
2.3.3. OBTAINING THE SOFTWARE
RSD su pplies the ABEdit program by Internet only .
Browse to RSD's softw are w eb page RSD Download Page and sav e the current v ersion of ABEdit (abedVxxx.EXE) to a tem porary folder on y our h ard disk.
The current v ersion of this User Manual can be obtained from our Manuals page: RSD Manuals Page
TOP INDEX
2.3.4. HARD DISK INSTALLATION
1.
2.
3.
4.
5.
6.
7.
8.
Open the tem porary folder containing abedVxxx.EXE.
Double click on abedVxxx.EXE to install ABEdit in an 'RSD' folder in the Start m enu's 'Program s' folder.
Other files w ill be placed where they need to be.
If a m essage appears say ing a file is in use and cannot be replaced, click 'Ignore' and the installation will continue.
ABEdit m ay be installed in alternate folders but we recom m end using the installation defaults.
If an update is being installed, place the updated v ersion in the sam e folder - no data will be affected.
It is alway s a good idea to restart the com puter after installing or updating a program .
To run the program , open the Start m enu, go to Program s/RSD/ABEdit/ABEdit or sim ply double-click the ABEdit icon on the desktop.
Installation should proceed w ith out incident. In case of difficulty , please copy all errors reported and adv ise us im m ediately so th at we m ay assist.
TOP INDEX
3. USING THE PROGRAM
IT IS HIGHLY ADVISABLE TO FREQUENTLY MAKE AT LEAST TWO BACKUP COPIES OF EVERY PROJECT
TOP INDEX
3.1. SETTING UP
This guide assum es ABEdit is installed on the com puter's internal hard disk driv e.
If not, follow the instructions in Section 2.3.4., abov e.
After connecting all equipm ent according to Section 2., connect the com puter to the AC m ains supply and switch on the pow er.
The standard Desktop soon appears.
TOP INDEX
3.1.1. PREFERENCES
To put ABEdit on the desktop:
1.
2.
3.
4.
Find the folder that ABEdit is in
Right click the ABEdit.exe icon
Drag it to th e desired location on the desktop
Release the m ou se button and select 'Create Shor tcu t(s) Here'
Run ABEdit only once on a single com puter unless y ou want to run different projects sim ultaneously .
All com puters running ABEdit projects netw orked with each AudioBox AB64 w ill autom atically detect changes m ade to shows and selections in it and will
prom pt the user to update ev ery thing appropriately . For inform ation on further installation custom izing, please contact RSD.
TOP INDEX
3.1.2. CREATING PROJECT FOLDERS
There is no need to m anually create project and show folders since ABEdit perform s this task autom atically during setup.
To copy projects, selections and shows betw een com puters, select 'Back Up Current Project' in the File m enu and select the desired folder in the destination
com puter on the sam e netw ork.
TOP INDEX
3.1.3. STARTING THE PROGRAM
1 . Start ABEdit by double-clicking the ABEdit icon on th e Desktop
If no AudioBox AB64 is connected, an inform ation w indow appears stating 'No AudioBoxes Found.'
2 . The title window appears, containing v ersion inform ation.
If v alid projects exist, the m ain program w indow appears.
If this is the first tim e the program is run and the com puter is NOT connected to an AudioBox AB64 :
1 . An inform ation window appears stating 'ABEdit has fou nd no default project. Please select an existing project or create a new one.' Click New, then click
OK.
2 . The 'New Project' window appears requesting a project nam e. Ty pe a project nam e and click OK.
Each AudioBox AB64 w ill only run one project at a tim e. In other words, if AudioBox AB6 4 #3 is to be used in Ham let, the project to edit this com bination
can be called Ham let-AB3
3 . The 'Num ber of play back channels' window appears requesting the ty pe of AudioBox. Select AB64 (Select Matrix Size) then select the m atrix size of y our
richmondsounddesign.com/…/ab64-a…
4/38
2010-02-22
4.
5.
6.
7.
8.
Richmond Sound Design - Show Contr…
AB64
The ABEDIT w indow appears stating 'This project has no Defau lt Show . The default show w ill be autom atically loaded by the AudioBox on start-u p. Please
select a Default Show now.' Click OK
The next window states 'If y ou change the default Show in this Project, th e dev ice ID as set in that Show w ill au tom atically be read and set by the
AudioBox.' Click 'Create a new Show '.
The next window prov ides inform ation about the Dev ice ID num ber. Click OK.
This w indow basically adv ises y ou to choose Dev ice ID 0 unless y ou hav e m ultiple boxes y ou are dealing with. Click 'ID 0'.
The 'Show Properties and Au dioBox Setup' window appears. See Section 3.3. for further details. Enter a Show Nam e and Click Sav e then click OK in the
'Send Show to AudioBox' window .
If this is the first tim e the program is run and the com puter IS connected to an AudioBox AB64 :
1 . An inform ation window appears stating 'ABEdit has fou nd no default project. Please select an existing project or create a new one.' Click New, then click
OK.
2 . The 'New Project' window appears requesting a project nam e. Ty pe a project nam e and click OK.
Each AudioBox AB64 w ill only run one project at a tim e. In other words, if AudioBox AB6 4 #3 is to be used in Ham let, the project to edit this com bination
can be called Ham let-AB3
3 . The ABEDIT w indow appears stating 'This project has no Defau lt Show . The default show w ill be autom atically loaded by the AudioBox on start-u p. Please
select a Default Show now.' Click OK
4 . The next window states 'If y ou change the default Show in this Project, th e dev ice ID as set in that Show w ill au tom atically be read and set by the
AudioBox.' Click 'Create a new Show '.
5. The next window prov ides inform ation about the Dev ice ID num ber. Click OK.
6 . This w indow basically adv ises y ou to choose Dev ice ID 0 unless y ou hav e m ultiple boxes y ou are dealing with. Click 'ID 0'.
7 . The 'Show Properties and Au dioBox Setup' window appears. See Section 3.3. for further details. Enter a Show Nam e and Click Sav e then click OK in the
'Send Show to AudioBox' window .
ABEdit is a m ulti docum ent interface, in w hich all windows open and close w ithin the confines of the m ain AudioBox AB64 Editor window unless y ou ch oose to
m ake a window float. Windows capable of floating h av e an 'F' button in the lower right hand corner.
The top line of the m ain ABEdit window display s v arious Project v alues: the AudioBox AB64 's Serial Nu m ber, firm ware v ersion, Dev ice ID, Default Show file
nam e and current operating status.
Running additional program s w ith ABEdit requires m ore m em ory . Determ ine the exact am ount of m em ory required in adv ance of critical show program m ing
and with adequate tim e for thorough testing.
TOP INDEX
3.2. ABSHOW WINDOW
To open the ABShow w indow , select Show Editor in th e View m enu. If the ABShow window is already open, it can be brough t to the foregrou nd by selecting
ABShow in the Window m enu or clicking on the ABShow button in the Toolbar. The toolbar is display ed if it is selected in the View m enu.
ABShow autom atically creates a sh ow folder for each show inside th e Shows folder of the C:\Program Files\RSD\ABEdit folder and the user can quickly load all
show s into the AudioBox AB64 . Within each show folder, it creates an indiv idual list
cue path(s)
folder for each of the up to 1 2 8 cue lists per show. ABShow also creates
within each list. Each cue path prov ides up to 3 2 KB of cue storage space, norm ally enou gh for about 1 000 cues
of av erage size.
The third line of the ABShow w indow in th e left 'tree' colum n display s the currently selected lev el (show, list, path or cue) within the Show:
'Show Tracksheet' is a way to v iew all m essages within a show in different orders. This w ill be discussed in detail in Section 3 .2 .2 .2 .
The m enus av ailable in th e AudioBox AB64 Editor window change depending upon the selected lev el of the Show .
The left side of the ABShow w indow display s the v arious lev els of a show: Lists, Paths and Cue. Right-clicking on any item prov ides a m enu of options.
For Show s:
Edit Show Defaults
Rem ov e Show from Editor
Delete Show
New List
Sav e Show as Show File
Refresh Show
Change Dev ice IDs
The sam e choices are av ailable in the Show m enu of the AudioBox AB64 Editor window .
For Lists:
Edit List Defaults
Delete List
New Path
Change Dev ice IDs
The sam e choices are av ailable in the List m enu of the AudioBox AB64 Editor window.
For Paths:
Edit Path Defaults
Delete Path
Make New Cue
Change Dev ice IDs
The sam e choices are av ailable in the Path m enu of the AudioBox AB64 Editor w indow.
For Cues:
Edit Cue Defaults
Delete Cue
Change Dev ice IDs
richmondsounddesign.com/…/ab64-a…
5/38
2010-02-22
Richmond Sound Design - Show Contr…
The sam e choices are av ailable in the Cue m enu of the AudioBox AB64 Editor w indow.
The right side of the ABShow w indow display s the properties of the lev el below the one on the left: Lists, Paths, Cues and Messages. Messages can be created,
m anipulated and edited using the toolbar that appears when m essages are display ed.
Also please see the quick reference section.
TOP INDEX
3.2.1. ABSHOW MENUS
The follow ing m enus and m enu item s are only av ailable in the AudioBox AB64 Editor window w hen the ABShow window is highlighted:
File
View
Project
ABContents
Window
Show Control
Show
List
Path
Cue
The last four m enus are only display ed wh en the appropriate show lev el is selected.
The File Menu contains:
New Project - opens the New Project w indow to create a new project folder into which show s and data from the cu rrent project can be copied if desired.
Open Project - opens the Open Project window which lists all av ailable projects.
Sav e as New Project - opens the New Project window to create a new project folder into which shows and data from the current project can be copied if
desired.
Back up Current Project - opens the Select a Path window to choose the destination of a copy of the cu rrent project.
Im port Project From AudioBox AB64 - Opens the Im port Data from AudioBox AB64 window to im port shows or selections onto the com puter from the
current AudioBox AB64 . This window also show s how m uch free space is on the com puter's hard driv es and how m uch space is needed to im port the
selected selections and/or shows.
Renam e Project - opens the Renam e Project window
Delete Project - opens the Delete Project window which lists all projects.
New Show - opens the Show Properties w indow to create a new show folder into which lists, paths, cues and m essages from other show s in the w indow can
be dragged and dropped and new elem ents created and edited.
Load Show - brings an existing show into the ABShow window so it can be furth er edited or used to assem ble new shows by dragging and dropping elem ents
between shows in the window.
Im port Show - retriev es an existing show from the AudioBox AB64 or from an exported show file. See Section 3.8.
The View m enu contains:
Show Editor - opens the ABShow window in which all AudioBox AB6 4 shows are created and edited. See Section 3.2.2.
VU Meters - opens the AudioBox AB64 VU window in which the lev els of all audio signals in input and output channels are v isible. See Section 3.6.
Play back - opens/closes the Play back w indow which prov ides interactiv e audio selection play back controls and display s. See Section 3.9.
AudioBox AB64 Show Control - opens/closes the window which display s the status of the show currently r unning on the AudioBox AB64 . Fu lly interactiv e
show control buttons and icons are prov ided with which to control the show liv e and in real tim e. See Section 3.5.
LIVE/Subm asters - opens/closes the Subm asters window. See Section 3.10.
LIVE/Inputs - opens/closes the Inputs window. See Section 3.11.
LIVE/Outpu ts - opens/closes the Outputs w indow . See Section 3.12.
LIVE/Crosspoints - opens/closes the Crosspoints window . See Section 3.13.
Taskbar - opens the taskbar which display s wh ich windows are currently open. Ju st like in Windows, it also allows y ou to quickly bring windows to the
foreground.
Com m and History - opens the Message History w indow which shows recent MIDI m essages sent to the AudioBox AB64 .
AudioBox AB64 Status - opens/closes th e status w indow which display s total num ber of m essages and com m ands receiv ed and acted upon plus operating
statu s of the AudioBox AB64 . See Section 3.7.
The Project m enu contains:
Preferences - opens the Preferences window in which the default path for th e Selections directory is specified. This allows defining a network location for all
.wav files, for exam ple.
Project Viewer - Opens th e Project Viewer w hich show s selections and show s by project.
The AB Contents m enu contains:
Audio Selections - opens the AudioBox AB64 contents w indow with the Audio Selections tab preselected. See Section 3.4.
Shows - opens the AudioBox AB6 4 contents w indow with the Show s tab preselected. See Section 3.4.
Em pty All Directories - Rem ov es all shows and selections from the AudioBox AB64 hard driv e. Does not alter Project contents. Use this when the hard disk
directory inform ation has been corrupted. You will be prom pted to reload selections and shows.
The Window s m enu contains the nam es of all currently open window s - select th e one y ou want to bring to the front.
The Sh ow Control m enu contains all function key options which control AudioBox AB64 Sh ow Control operations. See Section 3.5.
The Sh ow m enu contains:
Edit Show Defaults - opens the Show Properties w indow with the selected sh ow 's properties display ed
Rem ov e Show from Editor - does not perm anently delete th e sh ow
Delete Show - rem ov es th e show perm anently from the sy stem
New List - opens the Set List Num ber w indow followed by the List Properties window to create a new List in the selected show (m axim um 1 2 7 lists per
show)
Sav e Show as Show File - sav es as a single .sho file for exporting to another sy stem .
Refresh Show - downloads the cu rrent show to th e AudioBox AB64 if it is in the current Project
Change Dev ice IDs - will change the dev ice ID num ber of all m essages in current show.
The List m enu contains:
Edit List Defaults - opens the List Properties window w ith the selected list's properties display ed
Delete List - perm anently rem ov es the selected list from the show
New Path - opens the Set Path Num ber window followed by the Path Properties window to create a new Path in the selected list (m axim um 2 04 7 paths per
show)
richmondsounddesign.com/…/ab64-a…
6/38
2010-02-22
Richmond Sound Design - Show Contr…
Change Dev ice IDs - will change the dev ice ID num ber of all m essages in the current list
The Path m enu contains:
Edit Path Defaults - opens the Path Properties w indow with the selected path's properties display ed
Delete Path - perm anently rem ov es the selected path from the list
Make New Cue - opens the Make New Cue window to create a new Cue in the selected path (m axim um 3 2 7 68 cue By tes per path)
Change Dev ice IDs - will change the dev ice ID num ber of all m essages in the current path .
The Cue m enu contains:
Edit Cue Defaults - opens the Cue Properties window w ith the selected cue's properties display ed
Delete Cue - perm anently rem ov es th e selected cue from the path
Change Dev ice IDs - will change the dev ice ID num ber of all m essages in the current cue.
TOP INDEX
3.2.2. MAKING SHOWS AND CUES
If the ABShow w indow is not v isible, select Show Editor in the View m enu.
To illustrate the show m aking process, w e w ill m ake a show that will be used in one of the tutorials. See Section 4. Choose New Sh ow in the File m enu. A dialog box
appears stating 'When creating a new show, it is necessary to select an AudioBox AB64 Dev ice ID for the show.' Click OK.
Another dialog box appears: 'You are about to set the Dev ice ID for this show. If it is changed, the dev ice ID in ev ery Au dioBox AB64 m essage in the Show will need
to be changed. Please consider this choice carefully . Wh en copy ing m essages, cues, paths, or lists into the Show from Show s with a different dev ice ID, y ou will
hav e to change the dev ice ID in ev ery m essage copied. For this reason, it is adv isable to use the sam e dev ice ID whenev er possible. It is recom m ended to use Dev ice
ID # 0.' Click 'ID 0'. The Show Properties window then com es to the foreground.
Click the Show Nam e field and ty pe 'Tu torial Show 1 '. Th ree fields which set global settings appear in the Show Properties window .
The MIDI Echo box defines w hether the MIDI m essages receiv ed by the MIDI IN of the AudioBox AB64 will be m erged with any MIDI data generated by the
AudioBox AB64 Show and passed throu gh to the Au dioBox AB64 MIDI OUT port. If this box is not ticked, only the internal AudioBox AB64 processes will receiv e
the m essages from th e MIDI IN port. Make sure this box is ticked.
The MIDI LoopBack box defines whether the show's cue data w ill be internally sent to the AudioBox AB64 . This allows shows to self-m odify or control them selv es
as well as control the AudioBox AB64 sound play back and m atrix controls. If this box is not ticked, the show data w ill not affect any internal AudioBox AB64
processes. Make sure this box is ticked.
The Enet-Echo box defines w hether the MIDI m essages receiv ed by the Ethernet port of the AudioBox AB6 4 will be m erged w ith any MIDI data generated by the
AudioBox AB64 Show and passed throu gh to the Au dioBox AB64 MIDI OUT port. If this box is not ticked, only the internal AudioBox AB64 processes will receiv e
the m essages from th e Ethernet port. Make sure this box is NOT ticked.
The Auto Clock Start m enu prov ides the following choices: Off, On, MSC GO, and Zero Clock. This determ ines when a stopped list clock w ill au tom atically start
again by itself:
Off: will not start until specifically giv en a Start Clock m essage
On: will start w hen any cue GOes
MSC GO: will start w hen any MSC GO cue (not a tim ed cue) 'GO's.
Zero Clock: w ill start when any cue that Zeros the clock 'GO's.
The safest setting for this is 'On' since that w ill autom atically start the Clock when any Cue GOes. This causes auto follows and internally tim ed m essages to
execute ev en if the Clock has been tem porarily turned off.
Click the 'Sav e' button and a dialog box appears stating 'Show "Tutorial Show 1 " is not in the current project. Use "ABContents->Shows - Add New " or "ABContents> Show s - Add to Project" to add th e sh ow to the project.' For the m om ent click OK but do not follow th e dialog box instructions. Tutorial Show 1 appears in the left
colum n of the ABShow window. The Tu torial_Show _1 folder will autom atically be created in the Sh ow s folder. How ev er, it will not autom atically be added to the
current project as the dialog box indicated. We will do this later as the show needs to hav e at least one cue in it before it can be successfully added to the project.
Left-click the show's nam e and click the Sh ow m enu or right-click the show 's nam e. Click the New List m enu item . The Set List Num ber window appears. Select
the num ber 1 and click OK. The List Properties window opens. Eight param eters appear and the defaults are ty pical for m any shows:
richmondsounddesign.com/…/ab64-a…
7/38
2010-02-22
Richmond Sound Design - Show Contr…
Ty pe 'Tutorial List' in the List Nam e field.
The List ID defaults to the lowest nu m ber av ailable.
The Ch annel Mask box defines on which MIDI channels the AudioBox AB64 show sends the 'All-Notes-Off' m essage w henev er sequ ences stop. The default is
to send this m essage on no channels.
MTC Sequence Tim ing defaults to Follow List Clock so that the sequences and list clock are sy nchronized.
Clock Ty pe defaults to Stopw atch.
Auto Cue Path Sequencing defaults to No. 'Yes' here m akes th e next cu e path autom atically open when the last cue in the current path finishes.
Clock Running w hen list opened defaults to No - change this to Yes
Open List when Show opens defaults to No - change this to Yes
Click OK and a + appears to th e left of the Tu torial Show 1 in the left colum n of the ABShow w indow. Click the + (m aking it a -) and Tutorial List appears below
the new show . Left-click the list's nam e and click the List m enu or right-click the new list's nam e. Click th e New Path m enu item . The Set Path Num ber window
appears. Select num ber 1 and click OK. The Path window opens. Two param eters appear:
Ty pe 'Tutorial Path ' in th e Path Nam e field.
The Path ID defaults to the lowest num ber av ailable.
Click OK and a + appears to th e left of the new list in the left colum n of th e ABShow window. Click the + (m aking it a -) and Tutorial Path appears below the new
list. Left-click the path's nam e and click the Path m enu or righ t-click the path's nam e. Click th e Make New Cue m enu item . The Cue Properties window appears.
Four param eters appear:
Ty pe 1 in the Cue Num ber field. Whole cue num bers can be from 1 to 6553 5 with up to four subsections from 1 to 2 55 separated by decim al points (eg a
m axim um of 6553 5.2 55.2 55.2 55.2 55)
Zero Clock defaults to On, which m eans that the cue will zero the list's clock w hen it GOes.
The Cu e Tim e defaults to all zeros, which m eans it will only GO when an appropriate MSC GO m essage is receiv ed.
Ty pe 'First Tutorial Cue' in the Description field.
Click OK and a + appears to th e left of the Tu torial Path in th e left colum n of the ABShow window. We can now add this sh ow to the current project. Go to
ABContents and select Shows. Click OK to all m essages (if they appear) until the ABContents w indow is in the foreground. Click 'Add New'. Select 'Tutorial Show 1 '
and when the w indow appears with the show num ber inform ation, click OK. The show has now been sent to the AudioBox AB64 and is in the current project.
Click 'Exit'.
Click the + (m aking it a -) and cue 1 appears below th e new path. Left-click the new cue's num ber and a toolbar appears in the right side of the ABShow window.
The tools in the toolbar are (L to R):
Back to Parent
Delete and Copy to Clipboard (Cut)
Copy
Paste
Ev ent Manager
Send Selected Message(s) to Output selected abov e
Play Cue (with tim e)
Capture Incom ing MIDI v ia selected MIDI input dev ice
Begin Recording Cue (Records Actions in ABEdit)
Add Snapshot Ev ents
Mov e Message Up
richmondsounddesign.com/…/ab64-a…
8/38
2010-02-22
Richmond Sound Design - Show Contr…
Mov e Message Dow n
New Message
Edit Message
Delete Message(s)
Insert New Message
Change Dev ice ID
Som e of these options are grey ed because there is no m essage within the cue y et.
TOP INDEX
3.2.2.1. NEW MESSAGES
Click the New Message icon and the Choose Message Ty pe window appears. There are 1 7 choices:
Fiv e param eters appear on all m essage editors in th e top of the window:
Message Tim e Defaults to all zeroes, which defines how soon after the start of th e prev ious m essage the current one w ill go.
The Dev ice ID defaults to 0 or the default ID set for the show.
The Description is specifically what the m essage will do wh en executed during the show, which is not necessarily exactly the sam e that happens w hen
sim ilar com m ands are executed liv e by the operator - see the specific sections below w hich describe the liv e actions generated by Liv e action window s for
m ore inform ation on liv e com m ands.
The top righ t is the hex data. Any v alid MIDI hex m essage can be ty ped directly in the field or pasted from another cue.
Click the Parse button at any tim e to autom atically parse the hex data.
Many specific AudioBox AB64 com m ands cannot easily be created as 'New Messages' in the show editor since m any of these m ore com plex com m ands would be
extrem ely difficult (if not im possible) to generate and 'New Messages' editing only deals with the lar ge category of general com m ands m ore easily chosen from
scratch. In m any cases, such as Set Stop Notification, it is alm ost im possible to get to the custom editor that com es up in the ABShow window when one sim ply
double clicks on such com m ands after they hav e been initially created in the liv e action windows.
Four buttons appear in the right portion of all Edit Message windows:
Copy to Clipboard - This w ill send the m essage to the Window s clipboard.
Send - This button will im m ediately send the m essage to the AudioBox AB6 4 .
Cancel
OK
TOP INDEX
3.2.2.1.1. SET INPUT/OUTPUT LEVEL
This window allows y ou to create a m essage th at sets the param eters of one input or output channel. Start by selecting 'Input' or 'Output'. Then select a channel
num ber from the drop-down m enu. Drag the fader to the desired lev el. Enter a ram p tim e and ty pe if this is to be a tim ed fade. Clicking 'OK' w ill autom atically
paste this m essage into the currently opened cue.
TOP INDEX
3.2.2.1.2. SET SUBMASTER LEVEL
richmondsounddesign.com/…/ab64-a…
9/38
2010-02-22
Richmond Sound Design - Show Contr…
This window allows y ou to create a m essage th at sets a subm aster lev el. Select a subm aster num ber from the drop-dow n m enu. Drag the fader to the desired
lev el. Clicking 'OK' will autom atically paste th is m essage into the currently opened cue.
TOP INDEX
3.2.2.1.3. SET CROSSPOINT LEVEL
This window allows y ou to create a m essage th at will set the param eters for a crosspoint. Select an input channel num ber and an output channel num ber from
the drop-dow n m enus. Drag the fader to the desired lev el. Enter a ram p tim e and ty pe if this is to be a tim ed fade. Clicking 'OK' w ill au tom atically paste this
m essage into the currently opened cue.
TOP INDEX
3.2.2.1.4. SET CROSSPOINT PHASE
This window allows y ou to create a m essage th at will set the polarity of a crosspoint. Select an input channel num ber and an output channel num ber from the
drop-dow n m enus. Select 0 degrees or 1 80 degrees. Clicking 'OK' will autom atically paste this m essage into the currently opened cue.
TOP INDEX
3.2.2.1.5. SET DELAY
This window allows y ou to create a m essage th at will set the delay tim e of an input or output channel. Start by selecting 'input' or 'output'. Then select a channel
num ber from the drop-down m enu. Drag the fader to the desired num ber of m illiseconds for the delay tim e. Clicking 'OK' w ill autom atically paste this m essage
into the currently opened cue.
TOP INDEX
3.2.2.1.6. ENABLE/DISABLE DELAY
This window allows y ou to create a m essage th at enables or disables the delay on an input or output channel. Start by selecting 'input' or 'output'. Then select a
channel num ber from the drop-dow n m enu. Click on the big red button to enable or disable the delay for the specified channel. Clicking 'OK' w ill autom atically
richmondsounddesign.com/…/ab64-a…
10/38
2010-02-22
Richmond Sound Design - Show Contr…
paste this m essage into the currently opened cue.
TOP INDEX
3.2.2.1.7. MUTE/UNMUTE CHANNEL
This window allows y ou to create a m essage th at m utes or unm utes an input or output channel. Start by selecting 'input' or 'output'. Then select a channel
num ber from the drop-down m enu. Click on the big red button to m ute or unm ute the specified ch annel. Clicking 'OK' w ill autom atically paste this m essage into
the currently opened cue.
TOP INDEX
3.2.2.1.8. SOLO/UNSOLO CHANNEL
This window allows y ou to create a m essage th at solos or unsolos an input or output channel. Start by selecting 'input' or 'output'. Then select a channel num ber
from the drop-down m enu. Click on the big red button to solos or unsolos the specified channel. Clicking 'OK' w ill autom atically paste this m essage into the
currently opened cue.
TOP INDEX
3.2.2.1.9. SET EQ
This window allows y ou to create a m essage th at sets the equ alization for an input or output channel. Start by selecting 'input' or 'output'. Then select a channel
num ber from the drop-down m enu. Select the num ber of bands to be used. Then choose the ty pe of equalization to be used (bandpass, high pass, lowpass.) Then
choose from left to right the center frequency , bandwidth, and the decibel boost or cut. Clicking 'OK' will autom atically paste this m essage into the currently
opened cue.
TOP INDEX
3.2.2.1.10. PLAYBACK (GO, STOP, LOAD, RESUME)
This window allows y ou to create a play back m essage. Select whether y ou want a selection to GO, STOP, LOAD, or RESUME. Select either 'specific location' or
'current location.' If 'specific location' is selected, a window pops up that allows y ou to choose a selection to be play ed. Select an input channel from the drop-down
m enu. Clicking 'OK' will autom atically paste this m essage into the currently opened cue.
TOP INDEX
3.2.2.1.11. PLAYBACK (GO CHANNEL SET)
This window allows y ou to create a m essage th at will assign a group of loaded play back channels to GO sim ultaneously . Select which play back channels y ou want
richmondsounddesign.com/…/ab64-a…
11/38
2010-02-22
Richmond Sound Design - Show Contr…
to GO. Clicking 'OK' w ill autom atically paste this m essage into the currently opened cue.
TOP INDEX
3.2.2.1.12. MIDI SHOW CONTROL EVENT
This window allows y ou to create a m essage for a MIDI Show Control ev ent. It is used when the AudioBox AB64 is controlling other MSC dev ices. Clicking 'OK' will
autom atically paste this m essage into the currently opened cu e.
TOP INDEX
3.2.2.1.13. SET MATRIX
This window allows y ou to create a m essage th at sets the entire m ixer to one of the fiv e com m on m atrix settings. Clicking 'OK' will autom atically paste this
m essage into the currently opened cue.
TOP INDEX
3.2.2.1.14. SET INPUT CHANNEL MODE
This window allows y ou to create a m essage th at sets the input m ode of a channel. Select an input channel num ber from the drop-dow n m enu. Select what m ode
that input channel is to be in. Clicking 'OK' will autom atically paste this m essage into the currently opened cue.
TOP INDEX
3.2.2.1.15. SET MIDI ECHO
This window allows y ou to create a m essage th at sets the MIDI ech o status. These settings are discussed in detail in Section 3.2.2. Clicking 'OK' w ill autom atically
paste this m essage into the currently opened cue.
TOP INDEX
3.2.2.1.16. MTC GENERATOR
richmondsounddesign.com/…/ab64-a…
12/38
2010-02-22
Richmond Sound Design - Show Contr…
This window allows y ou to create a m essage th at sets the com m ands for the MIDI Tim e Code generator. In the left colum n choose a com m and and in th e box on the
right, ch oose a fram e rate. Clicking 'OK' will autom atically paste this m essage into the cu rrently opened cue.
TOP INDEX
3.2.2.1.17. HEX EDITOR
The Hex Editor is for MSC or MIDI m essages other than w hat is prov ided in ABEdit.
Any v alid MIDI hex m essage can be entered in the bottom field:
It m ay be ty ped directly in the field.
It can be cut and pasted from any other Windows program using the righ t-click cut and paste process.
The MSCEdit bu tton opens the MSC Editor and a MIDI Show Control Message can be created, edited analy zed and parsed autom atically .
Actions perform ed in the AudioBox AB64 Show Control, Play back or any Liv e w indow will also be captured autom atically .
Additional m essage editors are av ailable upon request at extra cost
Click OK and the m essage appears in the right side of the ABShow window if hex data has been entered.
Click Cancel to proceed w ithout adding a m essage.
TOP INDEX
3.2.2.2. TRACKSHEETS
Tracksheets are conv enient way of v iew ing all m essages in a particular show . Within each show , the m essages can be v iew ed by groups and subgrou ps in the left
colum n. Each Dev ice ID num ber is m aster group. The m ain su b-groups are Liv e m essages (inputs, outputs, crosspoints, and subm asters), Play back m essages, and
Show Control m essages.
Under each m ain sub-group, y ou can either v iew ALL Liv e m essages or Play back m essages or Show Control m essages at once or y ou can go deeper into the subgroups by clicking on the '+ ' sign in the tree. For exam ple, for the Liv e group y ou can v iew just the m essages that inv olv e lev el changes for input 1 0. For the
Play back group y ou can v iew ju st the m essages that are LOAD com m ands input 9 . For the Show Control group y ou can v iew just the m essages that say OPEN
CUE LIST.
richmondsounddesign.com/…/ab64-a…
13/38
2010-02-22
Richmond Sound Design - Show Contr…
With in all of these windows on the right-hand side, m essages are sorted by List num ber, then Path num ber, then Cue num ber, then ID num ber. These m essages
can also be sorted by Cue num ber w hich is really useful when y ou are using m ultiple lists and the Cues are jum ping from one list to the other.
TOP INDEX
3.3. SHOW PROPERTIES AND AUDIOBOX SETUP WINDOW
By right-clicking on the show icon and selecting Edit Show Defaults, the Show Properties and Au dioBox Setup w indow appears.
Click the specific Com m and y ou wish to program and edit. Each Com m and opens a window w hich prov ides its unique editing tools.
TOP INDEX
3.3.1. SUBMASTERS
SET SUBMASTER ZERO
The v alue chosen represents the subm aster am plitude step v alue at which each subm aster neither adds nor subtracts from the gain of the ch annel(s) it is
assigned to. Default is 64 .
SET SUBMASTER GAIN
Four choices are av ailable:
0.7 5dB change ev ery
0.7 5dB change ev ery
0.7 5dB change ev ery
1 .50dB change ev ery
fou r subm aster am plitude steps
tw o su bm aster am plitude steps
subm aster am plitude step
subm aster am plitude step
Each subm aster has 1 2 8 am plitude steps, controlled by the continuous MIDI controller assigned to it. This prov ides a theoretical total control range of 2 4 dB
(default), 4 8dB, 96dB and 1 92 dB, respectiv ely . The gain structure of the Au dioBox AB64 lim its the m axim um ov erall gain to 0dB (unity gain), howev er, so
sending com m ands to rise abov e this lev el will be ignored.
SUBMASTER ASSIGNS
richmondsounddesign.com/…/ab64-a…
14/38
2010-02-22
Richmond Sound Design - Show Contr…
Click View by Subm aster to see which Input and Output channels are currently assigned to that Subm aster. Click Input and/or Output channel boxes to change
assignm ents.
Click View by Channel to see which Subm asters are currently assigned to that channel. Click Subm aster boxes to change assignm ents.
Any com bination of Subm asters m ay be assigned to AudioBox AB64 Input and Output ch annels. As each subm aster lev el is changed liv e v ia MIDI controller
m essages (as assigned in the Assign Controller window , below), the v olum e of the ch annels they are assigned to change appropriately .
TOP INDEX
3.3.2. CONTROLLER ASSIGNS
Each MIDI Continuous Controller can control one subm aster. Each subm aster can be controlled by one Controller.
Click the Controller-> Subm aster num ber to select a MIDI Continuous Controller. Select the MIDI channel of th e Controller at the top. Click the Subm aster box
below to choose w hich one is controlled by th at Controller. Any prev iously stored assignm ents are display ed in the Controller field. Click any Subm aster box to
change the assignm ent.
TOP INDEX
3.3.3. ALL_OFF ACTIONS
This opens the SET ALL_OFF ACTIONS window. This w indow indicates what functions will be affected wh en an ALL_OFF com m and is sent to the AudioBox AB64 .
TOP INDEX
3.3.4. GPI - GENERAL PURPOSE INPUT PARAMETERS
richmondsounddesign.com/…/ab64-a…
15/38
2010-02-22
Richmond Sound Design - Show Contr…
This opens the General Purpose Input Param eters w indow . This allow s the setting of fou r m odes for the action of the Play back Trigger GPI port:
Norm al (play back started + cue triggered with cue num ber offset)
No Play back (play back not started, cue triggered with cue num ber offset)
Play back with no offset (play back started, cue triggered with no cue num ber offset)
Second cue trigger (play back not started, cue triggered with no cue num ber offset)
The left side of the window display s a slider which sets the Cue and Play back Trigger Lockout tim es (prev enting double triggering of both GPI triggers within a
specified period of tim e) in m illiseconds from 0 to 1 63 83
These are all adv anced functions which are only used w hen interfacing the Au dioBox AB64 w ith a controller using the GPI port. Please refer to the detailed
com m and set docum ent for full details on the m eanings of th ese settings.
TOP INDEX
3.3.5. COBRANET SETTINGS
This opens the Bundle Assignm ents window w hich sets the relationship between AB64 Inputs and Outputs and CobraNet bundles. Enter the CobraNet bundle
num bers that should be assigned to the appropriate transm it and receiv e channels.
Module 1 Receiv er signals appear at inputs 1 -3 2 of the AB6 4 Source Mixer on the 'Digital' fader.
Module 2 Receiv er signal appear at inputs 3 3 -64 of the AB64 Source Mixer on the 'Digital' fader.
Module 1 Transm itter signals are deriv ed from AB6 4 Outputs 1 -3 2 .
Module 2 Transm itter signals are deriv ed from AB64 Outputs 3 3 -64 .
TOP INDEX
3.4. AB CONTENTS WINDOW
richmondsounddesign.com/…/ab64-a…
16/38
2010-02-22
Richmond Sound Design - Show Contr…
Select either m enu item in the AB Contents m enu of the AudioBox AB64 Editor window and the AB Contents window appears with alternate tabs preselected.
The AB Contents window com pletely m anages the contents of the AudioBox AB6 4 in conjunction with the needs of all Projects. All coordination between Project
editing and operation and the AudioBox AB64 , whether connected to the com puter or not, is m anaged autom atically and the user is prom pted to refresh th e
AudioBox AB64 contents whenev er necessary and possible.
The AB Contents window com m unicates w ith the AudioBox AB64 v ia Ethernet only . It dow nloads 4 8K sam ple rate audio (.WAV) files created by audio editing
software (not prov ided by RSD) and shows created in th e ABSh ow window to the AudioBox AB64 .
The Audio Selections section display s:
A list of audio selections used in the current Project and their play back length
A list of audio selections in the current Project's AudioBox AB64 and their play back length
Buttons:
Project Details - fu ll inform ation on any or all selections in th e current Project and which other projects use them
Rem ov e - disassociates a selection from the current Project
Refresh - updates the contents of the AudioBox AB64
Print/Sav e - will print shows and selections in th e project or AudioBox AB64 or will sav e show s and selections as backups onto the sy stem hard
driv e.
Im port - im ports selected item s from the AudioBox AB64 to the Project
Change Path - changes default path for shows and selections
Add New - dow nloads any .w av file (or shortcut) to the AudioBox AB64 and creates a list of th e source files
AudioBox AB6 4 Details - full inform ation on any or all selections in the selected AudioBox AB64 and which projects use them
Add to Project - associates a selection w ith the current Project
Delete - rem ov es a selection from the AudioBox AB64 if it is not used by a project
Defrag - perform s a process wh ich increases the am ount of av ailable space on the AudioBox AB64 driv e by recov ering isolated disk blocks and needs
to be done only w hen the disk is alm ost full and m axim um disk space is required. Warning: This process m ay take a long tim e!
Exit - closes the window
Total disk capacity in audio play back tim e
Disk space currently used
Disk space currently free
Disk space potentially av ailable after defragm enting
The Sh ow s section display s:
A list of shows used in the current Project and their size in blocks
A list of shows in the cu rrent Project's AudioBox AB64 and th eir size in blocks
Buttons:
Project Details - fu ll inform ation on any or all shows in the current Project and which other projects use them
Rem ov e - disassociates a Show from the current Project
Refresh - updates the contents of the AudioBox AB64
Print/Sav e Change Path - changes default path for shows and selections
Add New - dow nloads any Show in the ABShow Show list to the Au dioBox AB64
AudioBox AB6 4 Details - full inform ation on any or all show s in th e selected Au dioBox AB64 and w hich projects use them
Add to Project - associates a Show w ith the current Project
Delete - rem ov es a Show from the AudioBox AB64 if it is not used by a project
Defrag - perform s a process wh ich increases the am ount of av ailable space on the AudioBox AB64 driv e by recov ering isolated disk blocks and needs
to be done only w hen the disk is alm ost full and m axim um disk space is required. Warning: This process m ay take a long tim e!
Exit - closes the window
Total disk capacity in blocks
Disk space currently used
Disk space currently free
Disk space potentially av ailable after defragm enting
Also please see the quick reference section.
TOP INDEX
3.5. AudioBox AB64 SHOW CONTROL WINDOW
richmondsounddesign.com/…/ab64-a…
17/38
2010-02-22
Richmond Sound Design - Show Contr…
Select m enu item AudioBox AB64 Show Control in the View m enu of the AudioBox AB64 Editor w indow and the AudioBox AB64 Show Control window appears
with all currently operating show lists and cues display ed along w ith an interactiv e Sh ow tree.
The AudioBox AB64 Show Control w indow com pletely m onitors and can interactiv ely m anage the liv e show operation of the AudioBox AB64 . All liv e cue actions
within the Au dioBox AB64 are display ed and can be m odified by the user as required. The AudioBox AB64 w ill sim u ltaneously respond to operator com m ands
executed from this window as well as MSC com m ands receiv ed by the MIDI IN port of the AudioBox AB6 4 .
All com m ands generated in the AudioBox AB6 4 Show Control, Play back or any Liv e window can be recorded w ith the ABShow Begin Recording Cu e tool and
indiv idual com m ands can be captured into the Message Edit w indow and the Set Stop Notification w indow .
The AudioBox AB64 Show Control w indow com m unicates with the AudioBox AB64 v ia Eth ernet only .
The top left area of the window display s:
Show nam e
Show num ber
Num ber of lists in the Show
Num ber of paths in the Show
MIDI Loopback status
AB Operating statu s
The top right area of the window display s:
MIDI-MIDI Echo Status
Enet-MIDI Echo Status
Refresh Current Show - downloads the current show from ABShow to the AudioBox AB64
MTC generator - MIDI Tim e Code generator
The low er left portion of the window display s the status of an open list. The top part display s th e List and Path nu m ber being display ed and the num ber of cue
sequences currently running in that list. Below that is display ed:
The nu m ber and nam e of the last cue to Go
The nu m ber and nam e of the Standby Cue
The current tim e v alue of the List Clock
The current tim e v alue of the Sequence Clock
An interactiv e Show tree, display ing all Lists, Paths and Cues in the Show - autom atically opening and closing the tree as cues Go plus prov iding the u ser
with an interactiv e operating env ironm ent
Buttons:
Close Current List
Stop List Clock
Start List Clock
Zero List Clock
Load Prev ious Standby Cue
Go Standby Cue
Load Next Standby Cue
Tree v iews of additional lists can be v iew ed by clicking on the '+ ' sign abov e the original tree.
Also please see the quick reference section.
TOP INDEX
3.6. VU METER WINDOW
richmondsounddesign.com/…/ab64-a…
18/38
2010-02-22
Richmond Sound Design - Show Contr…
Select m enu item VU Meters in the View m enu of the AudioBox AB64 Editor window and the VU Meter window appears. All 1 6 Audio Input and Output lev els are
display ed separately in this window. This window will not display u nless an AudioBox AB64 is connected v ia Ethernet.
Input VU Meters 1 -1 6 display th e actual audio lev els of the internal Hard Disk play back sy stem . If inputs 1 through 8 are set to LIVE, then input VU 1 -8 w ill
display the actual au dio lev els at XLR input connectors 1 -8. Output VU m eters display th e actual audio lev els at the XLR output connectors.
Also please see the quick reference section.
TOP INDEX
3.7. AudioBox AB64 STATUS WINDOW
Select m enu item AudioBox AB64 Status in the View m enu of the AudioBox AB64 Editor window and the AudioBox AB64 Status window appears at the bottom of
the AudioBox AB64 Editor w indow. The following key operational statistics are display ed continuously in this w indow:
Buffers Free - incom ing com m and buffer queue tally
Low Water Mark - lowest buffer tally lev el
Ethernet Messages - tally of total AudioBox AB64 com m ands receiv ed v ia Ethernet
MIDI Messages - tally of total AudioBox AB64 com m ands receiv ed v ia MIDI IN or loopback
[Ethernet Messages] OK - tally of AudioBox AB64 com m ands successfully com pleted
[MIDI Messages] OK - tally of AudioBox AB64 com m ands successfu lly com pleted
[Ethernet Messages] Bad - tally of unsuccessful AudioBox AB64 com m ands
[MIDI Messages] Bad - tally of unsuccessful AudioBox AB64 com m ands
Status - flashing 'LED' indicates OK
Status field - current status sum m ary
Buffer and m essage tallies are accum ulated by the AudioBox AB64 so they w ill not be reset until the AudioBox AB64 is reset.
Also please see the quick reference section.
TOP INDEX
3.8. IMPORT SHOW WINDOW
Select m enu item Im port Show File/File in the File m enu of the AudioBox AB64 Editor window w hile the ABShow window is highlighted and a file browser
appears. Select any ABShow .sho ty pe file obtained from any ABEdit installation and click OK. The Im port Sh ow window appears.
Select m enu item Im port Show File/From AudioBox AB6 4 in the File m enu of the AudioBox AB64 Editor window w hile the ABShow window is highlighted and a
window appears in which all av ailable AudioBox AB6 4 es can be selected by serial num ber. Select the AudioBox AB64 and the Sh ow desired and click OK. The
Im port Show window appears.
richmondsounddesign.com/…/ab64-a…
19/38
2010-02-22
Richmond Sound Design - Show Contr…
Click:
View Show - to v iew all show data
Im port Show - to put th e show into the ABShow w indow so it can be edited
Print - to print all show data to a correctly configured and connected printer
TOP INDEX
3.9. PLAYBACK WINDOW
Select m enu item Play back in the View m enu of the AudioBox AB64 Editor w indow and the Play back w indow appears. The Play back window operates in two
m odes: Liv e or Setup, which is selected by clicking those w ords in th e right end of each track. Tooltips are prov ided for ev ery icon, button and display function in
the Play back window.
All buttons in the Liv e m ode instantly control the AudioBox AB64 audio selection play back functions and the MIDI com m ands generated can be captured in the
ABShow m essage editor so they can be put into a show as desired.
The top section ('ALL Channels') contains a Rev iew, Stop, Go and Cue button.
These buttons act on all enabled channels as indicated. To enable
any ch annel in the Liv e m ode, click LOAD then 'Click for Selection' in the corresponding Setup area's display . Make a selection in the window that appears then
click the 'load' icon at the lower left of that channel's setup area.
The v ery top of the left colum n has buttons entitled Sy nchronous LOAD, LOAD and GO, and GO.
indicated.
These buttons act on all enabled channels as
Each channel in the Liv e m ode can be controlled independently w ith its transport buttons once it is enabled as described abov e. Th e MIDI com m ands generated
can be captured in ABShow. Each channel display s the current selection num ber, nam e play back status and tim e.
The top section in the Setu p m ode prov ides a conv enient way to instantly m ake a chosen selection play and stop at a chosen selection on all play back channels
sim u ltaneously . To start or stop play ing at a tim e oth er than 00:00:00.00, click in the tim e display area and enter the desired num ber or m ov e the m ouse up
and dow n.
Each channel in the Setup side prov ides for indiv idual selections and tim es for GO, STOP, LOAD & RESUME. GO starts the selection w hereev er it is currently
unless a specific tim e is inserted. Likewise, STOP m akes the selection stop w hereev er it is cu rrently unless a specific tim e is inserted. To m ake a selection sim ply
start and stop use GO and STOP. Select the function desired before choosing the selection and setting the tim e. Clicking the 'Right Arrow' at the left of each display
inserts the current liv e selection and tim e into the current setup display .
RESUME specifies the exact point in any selection from which play back continues withou t pau se w hen the current selection stops for any reason (including
ending norm ally , receiv ing a liv e stop com m and or an appropriate play back STOP com m and with a specific location in a cue wh ich gets executed while the
selection is play ing). RESUME is the com m and to use when wanting to m ake selections loop seam lessly : insert a RESUME m essage that specifies the start point of
the loop repeat into the cue after the play back GO (and STOP) m essage(s). RESUME stay s resident until it is cancelled w ith a RESUME CLEAR com m and. For m ore
inform ation on RESUME see the com m and set docum ent: RESUME Command
The bars on the right h and side link two adjacent channels so w hen play ing back one channel of a linked stereo file, the other channel w ill play as well.
The 'attention' icon brings up the SET STOP NOTIFICATION (SSN) window . This allow s y ou to hav e the AudioBox AB64 send v irtually any m essage y ou w ant
wh enev er the selection stops. While the SSN window is open, sim ply generate th e m essage y ou wish by perform ing the desired action in ABEdit and that m essage
will be encapsulated in the SSN m essage w hich can then be sav ed in a cue. SET STOP NOTIFICATION stay s resident until it is cancelled with a SET STOP
richmondsounddesign.com/…/ab64-a…
20/38
2010-02-22
Richmond Sound Design - Show Contr…
NOTIFICATION CLEAR com m and. For m ore inform ation on SET STOP NOTIFICATION see the com m and set docum ent: Set Stop Notification Command
Also please see the quick reference section.
TOP INDEX
3.10. SUBMASTERS WINDOW
Select m enu item LIVE/Subm asters in the View m enu of the AudioBox AB64 Editor window and the Subm asters window appears. All 3 2 subm asters are
display ed and can be m ov ed with the m ouse. The current v olu m e lev el of each subm aster is alway s display ed correctly . Each subm aster can be controlled by a
MIDI controller as chosen in ABSetup.
The subm aster last clicked is display ed in red and the Input and Output lev el controls wh ich are assigned in ABSetup to that subm aster hav e their 'Assigned to
Current Subm aster' indicator illum inated, if the Inputs and/or Outputs window s are v isible.
TOP INDEX
3.11. INPUTS WINDOW
Select m enu item LIVE/Inputs in the View m enu of the AudioBox AB64 Editor window and the Inputs w indow appears. Liv e control functions for all input
channels are accessible in the Inputs w indow . These include: Volum e lev el, Auto-Pan rate and ram p, Mute, Solo, Delay & Link controls. There is also an indicator
wh ich display s cu rrent subm aster assignm ents.
Once Auto-Pan fade rates hav e been set, an autom atic fade can be initiated by double-clicking at the desired v olum e lev el point. Also please see the quick reference
section.
Also please see the Input , EQ/Delay and Snapshot quick reference section.
TOP INDEX
3.12. OUTPUTS WINDOW
richmondsounddesign.com/…/ab64-a…
21/38
2010-02-22
Richmond Sound Design - Show Contr…
Select m enu item LIVE/Outputs in the View m enu of the AudioBox AB64 Editor w indow and the Outputs w indow appears. Liv e control functions for all output
channels are accessible in the Outputs window. These include: Volum e lev el, Au to-Pan rate and ram p, Mute, Solo, Delay , EQ & Link controls. There is also an
indicator which display s current subm aster assignm ents.
Once Auto-Pan fade rates hav e been set, an autom atic fade can be initiated by double-clicking at the desired v olum e lev el point.
Also please see the Input , EQ/Delay and Snapshot quick reference section.
TOP INDEX
3.13. CROSSPOINTS WINDOW
Select m enu item LIVE/Crosspoints in the View m enu of th e AudioBox AB64 Editor window and the Crosspoints window appears. Liv e control functions for all
crosspoints are accessible in the Crosspoints window by double clicking on the knobs. These include: Volum e lev el, Auto-Pan rate and ram p.
Once Auto-Pan fade rates hav e been set, an autom atic fade can be initiated by double-clicking at the desired v olum e lev el point.
Also please see the Crosspoint and Snapshot quick reference section.
TOP INDEX
4. TUTORIAL
This section describes som e ty pical ABEdit program m ing procedures but is not intended to prov ide exam ples of ev ery show situation. RSD can prov ide suggestions
on how to do m ore com plex program m ing or we can prov ide a consultant program m er at extra cost. Please be aware, howev er, that we cannot solv e ev ery show
program m ing puzzle ov er the phone or by em ail.
Since each indiv idual show setup is different, it will be difficult to describe precisely how to program y our particular sy stem but we will prov ide som e ty pical
exam ples.
We'll begin with sim ple procedures and work our way to m ore adv anced exercises in show control. We w ill be w orking with the Default show 'Tutorial Show 1 '.
Since, upon startup of the program a default show was created autom atically , we will now change som e of the defaults to suit our need. Right Click on the icon in
the left colum n
and select 'Edit List Defaults.' The three options (Auto CuePath Sequencing, Clock Running when list opened, and Open List w hen Show opens)
richmondsounddesign.com/…/ab64-a…
22/38
2010-02-22
Richmond Sound Design - Show Contr…
on the right all need to be selected. Refer to section 3.2.2. for details.
To prepare for this tu torial, w e w ill hav e to put som e audio selections on the AudioBox AB64 . Using y our CoolEdit (or equiv alent) softw are, record at least nine
4 8K sam ple rate audio selections and sav e them as PCM form at .wav files in the C:\Program Files\RSD\ABEdit\Selections folder.
In the AudioBox AB64 Editor window , select the AB Contents/Audio Selections m enu item . In the Audio Selections window, click Add New and select the first
.wav file then click OK. If the file is stereo, ABEdit will autom atically split it into tw o m ono files and download them to the AudioBox AB64 . Repeat this process for
all nine .wav files. ABEdit w ill also autom atically add the selections to th e current project.
TOP INDEX
4.1. LIVE AUDIO PLAYBACK
First w e'll sim ply play the first selection on the AudioBox AB64 hard driv e. We w ill route the audio to output one of the AudioBox AB64 . Before beginning, we will
m ake sure all of the liv e m ixer windows are norm alized (set to zero.) Select LIVE/Inputs under the View m enu. Click on 'Set Matrix.' Click on 'Send' on th e first
option (all input, output, and crosspoint lev els full off.) Then click 'Done.'
We'll set things up to record our actions at the sam e tim e so that in the next section of the tutorial w e can m ake a cue that does autom atically what we first do
m anually :
1 . Select Sh ow Editor in the View m enu of the Au dioBox AB64 Editor window
2 . Open the Tu torial Show 1 tree by clicking on all + sy m bols until Cue 1 is v isible in the tree - see 3.2.2. if the Tutorial Show 1 has not y et been created
3 . Select Cue 1 in the tree on the left side of the ABShow w indow
4 . On the right side of the ABShow window, click the Begin Recording Cue tool
open during the following procedures
- the Capture ABEdit Actions w indow should open which should be left
Until y ou click Sav e in the Capture ABEdit Actions window all y our actions w ill be recorded so m ake sure ev ery thing y ou do is w hat y ou want to into th e cue. If
y ou m ake a m istake, y ou can either click 'Clear' or rem ov e unwanted m essages after th ey hav e been sav ed into the cue.
Now let's set som e v olum e lev els:
1 . Select Inputs in the Window m enu of th e AudioBox AB64 Editor window
2 . In the Inputs w indow, On input 9, place m ouse at a nom inal lev el in the m iddle of the fader so it reads som ewhere around '7 5'. Now, double click. The fader
will autom atically go to that lev el and that m essage w ill get recorded into the captu re window .If y ou sim ply drag the fader up to the desired lev el in
capture m ode, y ou will end up w ith dozens of m essages that w ill hav e captured ev ery m ov e at a giv en interv al.
3 . Select LIVE/Crosspoints in the View m enu of the AudioBox AB64 Editor w indow
4 . In the Crosspoints window , select th e knob at the intersection of Input 9 (v ertical colum n 9) and Output 1 (horizontal row 1 )
5. Set the Gain fader w hich appears to its m axim um lev el by double clicking at the top of the fader and click OK.
6 . Select LIVE/Outputs in the View m enu
7 . In the Outputs window, set the output fader one to a nom inal lev el by double-clicking at the desired lev el
Finally , w e'll specify selection one to play and specify it to stop at the beginning of selection tw o.
1.
2.
3.
4.
5.
Select Play back in the View m enu of the AudioBox AB64 Editor w indow
In the Play back window, click GO in Ch annel 9 under Setup
In the sam e area, click the m essage 'Click for Selection'
In the window that appears, choose the first selection and click OK
In the Channel 9 Setup area of the Play back window, click the green arrow 'go' icon in the low er left corner
The Ethernet indicator on the AB64 should show activ ity and selection one will be au dible on au dio output one.
INDEX
4.1.1. MAKING CUE #1
Now we'll m ake that cue that autom atically does what we ju st did m anually .
1 . The Capture ABEdit Actions w indow should still be v isible - if not, click Capture ABEdit under th e w indow m enu to bring it to the foreground.
2 . In the Capture ABEdit Actions window, click Sav e - all actions recorded abov e should now be in Cue 1 in the ABShow window
Now we can test the whole cue:
1 . Make sure the output dev ice is set to Ethernet in the top left corner of the ABSh ow window.
2 . Click the 'Play Cue' button
The AudioBox AB64 should do ev ery thing that cue 1 is supposed to m ake it do. If som ething does not perform correctly , recheck the m essages to m ake sure they
are all correct.
High light Cue 1 and select Edit Cue Defaults in th e Cue m enu. Ty pe 'Play Selection 1 routed to Output 1 ' in Cue Description. Edit the Cue Tim e in the Cu e
Properties window so it now reads 00 hours, 00 m inutes, 3 0 seconds, 00 fram es and 00 fractional fram es. This w ill m ake the cue au tom atically GO 3 0 seconds
after the Au dioBox AB64 list clock starts.
The list clock is set to start autom atically w hen the list opens and the list is set to open autom atically w hen the show opens. The AudioBox AB64 au tom atically
opens the default show when it powers up.
To m ake 'Tu torial Show 1 ' the default show, click on the top right button th at has a show nam e already on it. Click on 'Select a show from the current project.'
Click on Tutorial Show and click OK. This m eans that Cue 1 will go au tom atically after the AudioBox AB64 powers up - but first we hav e to refresh the show.
To update Tutorial Show 1 on th e AudioBox AB64 at any tim e, high light Tutorial Show 1 in the ABShow w indow , right click and select Refresh Show in the Show
m enu OR open up the AudioBox AB64 Show Control window . Make sure the Tu torial 1 show appears, th en click 'Refresh'
Pow er down the Au dioBox AB64 and observ e the au dio play back autom atically GO approxim ately 4 2 seconds after it is pow ered back on. The list clock w ill begin
once the statu s light on the AudioBox AB64 starts flashing approxim ately once ev ery second. Cue 1 can also be triggered at any tim e with a show controller or
any MIDI sy stem or v ia the liv e controls in the AudioBox AB64 Show Control w indow.
TOP INDEX
4.2. EIGHT CHANNEL PLAYBACK
Now we'll simultaneously play all eight audio selections on the AudioBox AB6 4 hard driv e. We w ill route each selection one through eight to outputs one through
eight of the AudioBox AB64 , respectiv ely . We w ill do this by assigning selections 1 -8 to inputs 9-1 6 respectiv ely .
We'll call this Cue 2 :
1 . Select ABShow in the AudioBox AB64 Editor Window m enu if not v isible or click on the ABShow taskbar.
richmondsounddesign.com/…/ab64-a…
23/38
2010-02-22
2.
3.
4.
5.
6.
Richmond Sound Design - Show Contr…
If Tutorial Show 1 is not loaded, use the File m enu item Load Show to load it
Select Tutorial Path of the Tutorial Show 1
Select New Cu e in the Path m enu and m ake cue 2
Nam e the cue 'Multitrack play back.'
Click OK
TOP INDEX
4.2.1. SETTING INPUT & OUTPUT LEVELS
Now we'll set and 'snapshot' the input v olum es:
1 . Make sure all lev els are at 0 and select Inputs in the Window m enu of the AudioBox AB64 Editor w indow
2 . Click the Link/Unlink Ch annel button
at the bottom of input channels 9 through 1 6 to link those channels.
3 . Drag one of the linked faders u p to a nom inal lev el. You will notice inputs 9 through 1 6 are all at the new lev el.
4 . At th e bottom of the inpu ts window, click on the cam era icon
1.
2.
3.
4.
5.
and select 'Edit Snapshot Tem plates.' This w indow appears:
At th e top of the window, click on inputs 9 through 1 6, then click on the A to the left of the second row , which is the fader lev el row.
Click 'Sav e Snapshot.'
Nam ing the snapshot is not necessary and will be discussed in a different section so click OK.
A dialogue window appears say ing 'A Snapshot has been created. Would y ou like Add/Replace/Append a Cue now?' Click Yes.
From the top pull down m enu in this next window, select the Tutorial Show 1 . In the tree below, click on the + signs until the cue list appears and click on
Cue 2 . Then Click 'Append to Cue.'
Those input lev els are now in Cue 2 .
For the outputs, w e w ill follow the sam e procedure:
1 . Make sure all lev els are at 0 and select Outputs in the Window m enu of the AudioBox AB64 Editor window
2 . Click the Link/Unlink Ch annel button at the bottom of output channels 1 through 8 to link those channels
3 . Drag one of the linked faders u p to a nom inal lev el. You will notice outputs 1 th rough 8 are all at the new lev el.
4 . At th e bottom of the outputs w indow , click on the cam era icon
1.
2.
3.
4.
5.
and select 'Edit Snapshot Tem plates.' This window appears:
At th e top of the window, click on outputs 1 through 8, then click on the A to the left of the second row, w hich is the fader lev el row.
Click 'Sav e Snapshot.'
Nam ing the snapshot is not necessary and will be discussed in a different section so click OK.
A dialogue window appears say ing 'A Snapshot has been created. Would y ou like Add/Replace/Append a Cue now?' Click Yes.
From the top pull down m enu in this next window, select the Tutorial Show . In the tree below, click on the + signs until the cue list appears and click on
Cue 2 . Then Click 'Append to Cue.'
Those input lev els are now in Cue 2 .
TOP INDEX
4.2.2. SETTING CROSSPOINT LEVELS
We w ill now set the crosspoint v olum es:
1 . Select Crosspoints in the Window m enu of the AudioBox AB64 Editor w indow
2 . The v olum e of the crosspoint at input 9, output 1 sh ould already be at m axim um - if it is not, just select that knob and double click at the top of the slot in
the w indow that appears
3 . Select the knob at input 1 0, output 2 and double click at th e top of the slot in the window th at appears
richmondsounddesign.com/…/ab64-a…
24/38
2010-02-22
Richmond Sound Design - Show Contr…
4 . Set the v olum es to full in the sam e m anner for the following crosspoints:
Input 1 1 , output 3
Input 1 2 , output 4
Input 1 3 , output 5
Input 1 4 , output 6
Input 1 5, output 7
Input 1 6, output 8
At the bottom of the crosspoints window, click on the cam era icon
1.
2.
3.
4.
5.
and select 'Edit Snapshot Tem plates.'
Select the crosspoints that y ou w ant put into Cue 2 w hich is 9-1 ,1 0-2 , etc.
Click 'Sav e Snapshot.'
Nam ing the snapshot is not necessary and will be discussed in a different section so click OK.
A dialogue window appears say ing 'A Snapshot has been created. Would y ou like Add/Replace/Append a Cue now?' Click Yes.
From the top pull down m enu in this next window, select the Tutorial Show . In the tree below, click on the + signs until the cue list appears and click on
Cue 2 . Then Click 'Append to Cue.'
Those input lev els are now in Cue 2 .
TOP INDEX
4.2.3. LOADING SELECTIONS
Now we'll load the Audio Play back selections: Open th e Capture ABEdit Actions window .
window until y ou click Sav e in that window
Ev ery m ov e y ou m ake will be recorded into the Capture ABEdit
1 . Select Play back in the Window m enu of the AudioBox AB64 Editor window
2.
3.
4.
5.
6.
7.
8.
9.
1 0.
11.
12.
13.
14.
1 5.
16.
17.
1 8.
19.
2 0.
21 .
22.
23.
24.
2 5.
26.
27 .
2 8.
29.
3 0.
31 .
32.
33.
In the Play back window, in the channel 9 Setup area, click LOAD
Also in channel 9, click the m essage 'Click for Selection'
In the window that appears, choose the first selection and click OK
In channel 9, click th e 'load' icon in the lower left corner of the setup area - th is tells th e track to prepare to play at the beginning of selection one
In channel 1 0, click LOAD
In channel 1 0, click the m essage 'Click for Selection'
Choose the second selection and click OK
In channel 1 0, click the 'load' icon in the low er left corner
In channel 1 1 , click LOAD
In channel 1 1 , click the m essage 'Click for Selection'
Choose the third selection and click OK
In channel 1 1 , click the 'load' icon in the lower left corner
In channel 1 2 , click LOAD
In channel 1 2 , click the m essage 'Click for Selection'
Choose the fou rth selection and click OK
In channel 1 2 , click the 'load' icon in the low er left corner
In channel 1 3 , click LOAD
In channel 1 3 , click the m essage 'Click for Selection'
Choose the fifth selection and click OK
In channel 1 3 , click the 'load' icon in the low er left corner
In channel 1 4 , click LOAD
In channel 1 4 , click the m essage 'Click for Selection'
Choose the sixth selection and click OK
In channel 1 4 , click the 'load' icon in the low er left corner
In channel 1 5, click LOAD
In channel 1 5, click the m essage 'Click for Selection'
Choose the sev enth selection and click OK
In channel 1 5, click the 'load' icon in the lower left corner
In channel 1 6, click LOAD
In channel 1 6, click the m essage 'Click for Selection'
Choose the eighth selection and click OK
In channel 1 6, click the 'load' icon in the low er left corner
TOP INDEX
4.2.4. STOPPING SELECTIONS
Each selection norm ally play s out, but if y ou w ant it to stop before the end, set stop points like this:
1.
2.
3.
4.
5.
6.
Select Play back in the Window m enu of the AudioBox AB64 Editor window
In the Play back window, in the channel 9 Setup area, click STOP
Also in channel 9, click the m essage 'Click for Selection'
In the window that appears, choose the first selection and click OK
Click in the tim e display below the selection nam e
Enter the tim e at which the selection should stop
7 . In channel 9, click th e square red 'stop' icon in the lower left corner of the setup area
- this tells the track to stop play ing at the tim e entered
TOP INDEX
4.2.5. FINISHING CUE #2
Finally we can execute the GO:
In the top left of the Play back window ('Current Selection ALL Channels') click the Go button (green arrow )
The Ethernet indicator on the AB64 will indicate activ ity and sim u ltaneously selections one through eight will be audible on audio outpu ts one through eight,
respectiv ely .
Now we'll m ake a cue that autom atically does what w e just did m anually .
1 . The Capture ABEdit Actions w indow should still be v isible - click Capture ABEdit under the Window m enu to bring it to the foregrou nd.
2 . In the Capture ABEdit Actions window, click Sav e - all actions recorded abov e should now be in Cue 2 in the ABShow window
Now we can test the whole cue:
richmondsounddesign.com/…/ab64-a…
25/38
2010-02-22
Richmond Sound Design - Show Contr…
1 . Click the first m essage in cue 2 to highlight it
2 . Scroll to the end of the m essage list
3 . Hold the Shift key down and click the last m essage to highlight all m essages in cue 2
4 . Click the Send Selected Message(s) Tool
default)
to send all highlighted m essages to the AudioBox AB64 v ia the output selected in the toolbar (Ethernet is
5. You can also sim ply click on the 'Play Cue' icon
to run the entire cue in real tim e
The AudioBox AB64 should do ev ery thing that cue 2 is supposed to m ake it do. If som ething does not perform correctly , recheck the m essages to m ake sure they
are all correct. If som ething does not perform correctly , recheck the m essages to m ake sure they all hav e the desired com m ands in them . Highlight each m essage
one at a tim e and send it to confirm its actions by clicking on the 'Send Selected Messages' icon.
High light Cue 2 and select Edit Cue Defaults in the Cue m enu. Edit the Cue Tim e in the Cue Properties window so it now reads 00 hours, 00 m inutes, 3 0 seconds,
00 fram es and 00 fractional fram es. This will m ake the cue autom atically GO 3 0 seconds after cue 1 goes.
Select AudioBox AB64 Show Control in the Tutorial Show 1 will soon appear in the Show Control window w hich appears. 'Show Requires Refresh' will flash if a
change has been m ade to the show . Click 'Refresh'
Pow er down the Au dioBox AB64 and in the Show Control w indow observ e cue 1 autom atically GO approxim ately 4 2 seconds after it is pow ered back on th en 3 0
seconds later cue 2 will go, starting all 8 selections as program m ed. Cues 1 and 2 can also be triggered at any tim e with a show controller, any MIDI sy stem or
with the Show Control buttons in the Show Control window.
TOP INDEX
4.3. TUTORIAL SHOW 2
Make sure the inpu t, crosspoint, and output windows are all open (View Menu- Liv e, m ake su re they are each checked). Plug y our sound generating or play back
dev ice (Mixer output, CD, cassette, etc.) into the balanced XLR inpu ts 1 and 2 on the back of the AudioBox AB6 4 .
Norm alize the m ixers. This can be done quickly by going to the input, output, OR crosspoint window, clicking on 'Set Matrix' and clicking on 'all input, output,
and crosspoint lev els full off "Send."' If y ou just finished stepping through Tutorial Show 1 , y ou w ill also need to unlink all the input and output channels.
Test th e routing
In the crosspoint w indow, set input 1 to outputs 1 , 3 , 5, etc. and set input 2 to outputs 2 , 4 , 6, etc. up to 1 6. For m ost applications, it is probably safest to set the
crosspoint lev els to full so y ou hav e one less lev el v ariable to think about. Set y our inpu ts 1 & 2 to a nom inal lev el (approxim ately 1 00). Once m usic is play ing,
m ake sure y ou, in fact, hav e signal on y ou r input faders. Now bring up y our output faders up one at a tim e to confirm signal and speaker assignm ents.
Please take not as to w hat output lev els are nom inal lev els for the room . This will com e in handy wh en w e begin program m ing output lev els into Tu torial Show
2.
Note: You can alway s bring a w indow to the foreground from the Window m enu.
Testing features
While audio is being play ing, it is a good idea at this point to experim ent w ith th e features on the faders. AutoPan function, m ute, solo, EQ (Output only ), and
delay . With the AutoPan function, w hen y ou hav e ch anged the fade tim e and clicked OK, just double click at a different point on the fader and y ou will see th e
fader slide to y our new lev el ov er tim e. Note that the breakdown is hh:m m :ss.ff. FYI the table ram p is generally a sm oother sounding fade. The exponential ram p
is better for crossfades of sim ilar m aterial (w ind, crickets, other subtle am biences).
FYI, the stock table ram p is sim ply a linear fade and exponential is logarithm ic.
Internal Input Audio Play back To prepare for this section of the tutorial, w e w ill need to m ake sure there are selections on the AudioBox AB64 . Using y our DAW
software, record at least a few 4 8K sam ple rate audio selections of v ary ing lengths as PCM .wav form at files in the C:\Program Files\RSD\ABEdit\Selections
folder.
In the AudioBox AB64 Editor window , select the ABContents/ Audio Selections m enu item . In the Audio Selections window, click Add New and select the first
.wav file then click OK. If the file is stereo, ABEdit will autom atically split it into tw o m ono files and download them to the AudioBox AB64 . For the tutorials, it
would be m ore useful if these first eight selections are longer than one m inute (preferably am bience ty pe stuff like birds, street sounds, etc.) Repeat this process
for eight .wav files. ABEdit w ill also autom atically add the selections to the current project.
In the crosspoint w indow, assign input 9 to output 1 & 2 . Bring outputs 1 & 2 to full. Open up the play back window (View Menu). In channel 9 set-up colum n on
the right, click on Go. Click for selection. Choose the s longer wav file and click OK. Click on the Play icon.
You should be seeing lev el on the input m ixer.
Bring up the lev el on input 9 and y ou should be hearing the audio in outputs 1 & 2 . In the play back window in the left colum n y ou can shuttle through the sound
file. Keep in m ind for future reference that this is the only w indow from w hich y ou can shu ttle through an indiv idual or group of sound files. In other w ords, if
y ou need to stop in the m iddle of a sound file and pick up from that spot or start from any w here else in the m iddle of the sound file, y ou m ust do it from the
play back window.
Making Cues
We w ill be w orking with Tutorial Show 2 . Refer to section 3.2.2. SETTING UP to m ake a 'Tutorial Show 2 ' prior to beginning and m ake sure the show created in
that section is loaded into the ABShow window. The Au dioBox AB64 m ust be connected and configured properly and the MIDI and Ethernet connections
establish ed. Make sure the Tutorial Show 2 is the default show by clicking on the show button in the top right portion of the Show Editor and selecting on 'Select a
show from the current project.'
We are going to m ake a sequ ence of cues. There are sev eral w ay s to m ake the sam e ty pes of cues which will be dem onstrated. After m aking the cues, w e will go
back to edit them as one would do under norm al theatre tech circum stances.
To begin, we will m ake a cue that norm alizes the m ixers. In section 3 .2 .2 . a new list, path and cue w ere created for Tutorial Show 2 .
Right-click on Cue 1 and select 'Edit Cue Defaults'. Under description, ty pe 'Norm alize m ixer.'
Now , we are ready to do som e program m ing:
Click on 'Cue 1 '
1.
2.
3.
4.
5.
6.
Open the ABEdit Captu re Window
Bring any of the LIVE m ixer windows to th e foreground (input, ou tput, crosspoint)
Click on the 'Set Matrix' button at the bottom
Click Send on th e top selection
Click Done
In the Capture Window , Click Sav e
This cue will set all inputs, outputs and crosspoints to 0
richmondsounddesign.com/…/ab64-a…
26/38
2010-02-22
Richmond Sound Design - Show Contr…
The follow ing cues w ill include play back of audio selections and auto-panning. Each cue w ill dem onstrate a different m ethod of m aking cues.
1 . In the Sh ow Editor w indow, right click on 'Path 1 '
Make New Cue
Num ber it '5' (MSC Go)
Under Description ty pe 'First Play back Inputs 9/1 0'
Click OK
2 . Click on Cue 5
3.
4.
5.
6.
7.
8.
9.
1 0.
11.
12.
13.
14.
1 5.
16.
17.
1 8.
19.
2 0.
Click on the New Message icon.
Select 'Set Input/Output lev els' and click OK
Select Input 9 and set the fader to 1 00 and click OK
Follow the sam e procedure (2 -4 ) for Input 1 0
Follow the sam e procedure (2 -4 ) for Output 1
Follow the sam e procedure (2 -4 )for Output 2
For Crosspoints, click on the New Message icon
Select Crosspoint lev els and click OK
Select Input 9 and Outpu t 1 , bring the fader to full (1 2 7 ) and click OK
Follow the sam e procedure (8-1 0) for Input 1 0 going to Output 2
For Play back, click on the New Message icon
Select 'Play back (GO, LOAD, STOP, RESUME)' and click OK
Click on LOAD and select the first selection and click OK
Select channel 9 from the drop m enu that say s 'All' and click OK
Follow the sam e procedure (1 2 -1 5) for selection 2 in input 1 0
To create a GO com m and click on the New Message icon
Select 'Play back (GO CHANNEL SET)' and click OK
At th e bottom of this w indow , click on 9 and 1 0, then click OK
Cue 5 is now com plete and should look som ething like this:
Make a new Cue 1 0. This cue w ill use the ABEdit Capture Window .
1 . Under description, ty pe 'Second Play back 1 1 /1 2 /1 3 /1 4 '
In the tim e slot in the top left of the window, m ake it 1 0 seconds, This m eans that Cu e 1 0 will autom atically Go 1 0 seconds after Cue 5 has begun.
Click OK
2 . Click on Cue 1 0
3.
4.
5.
6.
7.
8.
9.
1 0.
Open the ABEdit Captu re window .
Ev ery m ov e that is m ade will now be recorded into the ABEdit Capture w indow.
In the input w indow , link input 1 1 with input 1 2 by clicking on the arrow at the top of the two faders. It will turn red when linked.
Follow this sam e procedure (3 ) for inputs 1 3 and 1 4
Double click som ew here on fader 1 1 or 1 2 at around the lev el 60. Both faders will jum p to that lev el and there will be two new m essages in the ABEdit
Capture w indow . If, for som e reason, m ore than tw o m essages get recorded, it won't m ake any difference but y ou can alway s delete them afterwards if y ou
want to keep y our cues tidy .
Double click som ew here on fader 1 3 or 1 4 at around lev el 90
In the crosspoint window, assign inpu ts 1 1 and 1 3 to Ou tput 1 by clicking the crosspoint and double clicking at the top of the fader.
Follow this sam e procedure (7 ) for assigning inputs 1 2 and 1 4 to Output 2
In the Play back window in inputs 1 1 throu gh 1 4 , click LOAD and th en Click for Selection. For 1 1 through 1 4 , choose selections 3 th rough 6 respectiv ely .
For each input, click on the LOAD icon in the right colum n.
In the top left of the Play back w indow, click on the Sy nchronous Go button
1 1 . In the ABEdit Capture window, click Sav e
1 2 . Make sure that the last m essage is only com m anding inputs 1 1 through 1 4 to GO. If it is different, double click on that m essage and edit it accordingly .
Cue 1 0 shou ld look som eth ing like this:
Cue 1 5 will utilize the Snapshot function when possible as w ell as the New Message window .
1 . Make a m anual Cue 1 5 (MSC Go) and nam e it 'Third Play back 1 5/1 6'
2 . Click OK and then click on Cue 1 5.
richmondsounddesign.com/…/ab64-a…
27/38
2010-02-22
Richmond Sound Design - Show Contr…
3 . In the input w indow , link inputs 1 5 and 1 6 by clicking on the green 'LED' at the bottom of the faders. It will light up when activ ated. This links all faders
that hav e the green 'LED' on...not just a pair.
4 . Bring the faders up to 50
and select 'Edit Snapshot Tem plate'
5. Click on the Snapshot icon
At the top of the w indow , select inputs 1 5 and 1 6 as w ell the fader button for each.
Click Sav e Snapsh ot, click OK, then click Yes
From the top, open th e sh ow 'Tutorial Show 2 ' and the corresponding list, path and Cue 1 5
Click 'Append to Cue'
6 . In the crosspoint window, send inputs 1 5 and 1 6 to outputs 1 and 2 respectiv ely at full (1 2 7 )
7 . Click on the snapshot icon
and select 'Edit Snapshot Tem plate'
Click on the two points th at y ou just brought u p to full
Click Sav e Snapsh ot, Click OK, then click Yes
From the top, open th e sh ow 'Tutorial Show 2 ' and the corresponding list, path and Cue 1 5
Click 'Append to Cue'
8. Click on the New Message icon,
select Play back (Go, Load, Stop, Resum e), and click OK
Click on Load
Choose selection num ber 7 and click OK
Under Channel, select input 1 5 and click OK
9 . In the ABShow w indow, click once on the new Play back m essage. Copy and paste this m essage by clicking on the copy icon
followed by the paste icon
1 0. Double click on the new m essage
Change the selection num ber by clicking on th e num ber of the selection
Choose selection num ber 8 and click OK
Now change the input channel to 1 6
Click OK
1 1 . Click New Message, select Play back (Go Channel Set) and click OK
Click on input channels 1 5 and 1 6, then click OK
Cue 1 5 should look som ething like this:
The next cue will be a fade u p or down of inputs 9 through 1 6
1 . Make a Cue 2 0 nam ed 'Shift in perspectiv e' with a Cue Tim e of 2 sec.
2 . Click the New Message icon,
select 'Select Input/Output Lev el' and click OK
Select Inpu t 9 and bring the fader u p to 50
In the green tim e w indow , click on 1 0 seconds
Click OK
3 . Copy and Paste this m essage
Edit the new m essage by double-clicking on the m essage
Change the input from 9 to 1 0 and click OK
4 . Copy and paste both these m essages
Double click on the first pasted m essage
Change the input from 9 to 1 1
Change the lev el from 50 to 1 00, and click OK
Double click on the other pasted m essage
Change the input from 1 0 to 1 2
Change the lev el from 50 to 1 00, and click OK
5. Click the New Message icon,
select 'Select Input/Output Lev el' and click OK
Select Inpu t 1 3 (leav e the fader at 0)
In the green tim e w indow , click on 7 seconds
Click OK
6 . Copy and Paste this m essage
Edit the new m essage by double-clicking on the m essage
Change the input from 1 3 to 1 4 and click OK
7 . Copy and paste both these m essages
Double click on the first pasted m essage
Change the input from 1 3 to 1 5
Change the fade tim e to 5 sec.
Bring the lev el up to 90, and click OK
Double click on the other pasted m essage
Change the input from 1 4 to 1 6
Change the fade tim e to 5 sec.
Bring the lev el up to 90, and click OK
Cue 2 0 should look like this:
richmondsounddesign.com/…/ab64-a…
28/38
2010-02-22
Richmond Sound Design - Show Contr…
*Note: As stated before, there are sev eral way s to create cu es and th eir corresponding m essages. It is obv iou sly up to the indiv idual operator on how he/she
prefers to w ork.
You are now ready to send these cues as a show to the AudioBox AB64 .
1 . In the Sh ow Editor, m ake sure that the output is switched to Ethernet
2 . Change the default show to Tu torial Show 2 by clicking on the button in the top right area of the Show Editor, click on 'Select show from current project'
and select Tutorial Show 2 .
3 . Open the AudioBox AB64 Sh ow Control window from the View m enu
4 . Send the show to th e AudioBox AB64 by clicking on the Refresh button.
5. In the left colum n, open the list and path of cues and Cu e 1 will be standing by (Superm an 'S').
6 . The F1 2 key is the "Go' com m and
7 . Press F1 2 and y ou shou ld see the faders in y our input m ixer windows all go to '0'
8. Press F1 2 and 'Cue 5' w ill go
9 . 'Cue 1 0 will autom atically Go after 1 0 seconds
1 0. Press F1 2 to fire 'Cu e 1 5'
1 1 . 'Cue 2 0' will autom atically go after 2 seconds
*Note: When changes are m ade to the show, a m essage w ill flash 'Sh ow Requires Refresh' in the MSC window.
*Note: You can alway s send indiv idual or groups of m essages to th e AudioBox AB64 by selecting one or m ore m essages and clicking on the MIDI connection icon.
This sends those m essages im m ediately to th e AudioBox AB64 . If y ou w ant to hear the entire cue including any tim ings related to it (fade tim es, start tim es
within the cue), y ou can click on the icon that has m usical notes
and click Play .
INDEX
5. TROUBLESHOOTING
There are four basic equipm ent categories into which troubleshooting can be placed: Ethernet Hardware, MIDI Hardware, the Com puter and the AudioBox AB64 .
Ethernet Hardware problem s are constantly m onitored by RSD and w e recom m end y ou check our w eb site FAQ page for the latest inform ation we hav e on know n
problem s and solutions.
INDEX
5.1. MIDI HARDWARE
If the ABEdit com puter or the AudioBox AB6 4 does not respond to com m ands or responds unreliably , the problem will alm ost certainly be solv ed by the following
procedures.
The m ost effectiv e way to proceed with troubleshooting is to perform the following tasks one at a tim e, each tim e powering dow n the sy stem before hand, then
reassem bling all functioning elem ents, powering up and testing:
1 . Carefully reread Section 2. of this guide and follow all instructions carefu lly . Do not proceed further until there is no doubt that all aspects of the sy stem in
question fully conform to this section.
2 . Carefully reread th e appropriate sections of the user guides for all other equipm ent, especially the troubleshooting sections.
3 . If y ou hav e any questions, it w ould be adv isable to consult with an authority on the particular equipm ent rather than m ake any assum ptions
whatsoev er.
4 . Try using new or different MIDI or Ethernet cables or a different interconnection procedure. Experience w ith electronic difficulties teaches th at alm ost all
problem s are related to connections, connectors and interfaces between equipm ent. Try a different sound card MIDI interface Adapter cable.
5. Ensure that MIDI Show Control Dev ice #'s are correctly set for all pieces of equipm ent and in all MSC cues.
6 . Ensure that IP #'s are correctly set.
7 . Ensure that MIDI Channel #'s are set on all m usical MIDI dev ices.
8. Check ou r w eb site FAQ page for the latest inform ation we hav e on known problem s and solutions.
9 . If all abov e procedu res do not produce results, contact RSD; w e will be pleased to assist if possible.
TOP INDEX
5.2. SOFTWARE/COMPUTER
SOFTWARE PROBLEMS
If the ABEdit window s seem to be too big to display properly , the display m ay be set incorrectly . We recom m end 1 2 80x1 02 4 . There is no particular adv antage to
using a higher resolu tion unless y ou want to display other program s sim ultaneously .
If y ou experience difficulty w ith the software itself - if it fails to load or fails during operation - a v ariety of sy stem m essage window s m ay appear when the
problem occurs. If this happens, please m ake a detailed note of the contents of any m essages wh ich appear and report this to u s im m ediately , along with a
description of what was happening and/or w hat y ou were doing at the tim e.
Apparent software problem s m ay be a result of defectiv e or inadequate hardware. Check with y our local authorized com puter repair facility to determ ine if the
com puter should be repaired or upgraded.
UPGRADING DIFFICULTIES
If y ou upgrade or add any equipm ent to y our com puter, this m ay be the cause of problem s which did not prev iously occur.
TOP INDEX
5.3. SOFTWARE SUPPORT
richmondsounddesign.com/…/ab64-a…
29/38
2010-02-22
Richmond Sound Design - Show Contr…
If y ou hav e done ev ery thing in this tutorial, y ou w ill hav e a v ery good feel for ABEdit's basic capabilities.
We h av e tried to present a ty pical but not exhaustiv e tutorial.
We h ope y ou w ill hav e a chance to try all the features of this softw are.
Our goal is to m ake all our u sers proficient in the use of ABEdit in the shortest tim e possible.
If y ou feel we hav e m issed som e essential point or that som ething could be explained or exem plified in a better m anner, or that certain areas need to be m ore
thoroughly cov ered, please let u s know.
As responsible prov iders w e are alw ay s pleased to assist. We prefer to com m unicate v ia em ail for a v ariety of reasons bu t are aware of the som etim es urgent
nature of show produ ction so we will assist by telephone if necessary .
Em ail for technical support is: Ch arlieR 'at' Richm ondSoundDesign 'dot' com
Our telephone support hours are 2 4 hours per day , 7 day s per week. Call + 1 -604 /7 1 5-94 4 1 .
TOP INDEX
6. REFERENCE SECTION
This section includes:
Sum m ary of Com m ands
Key board Labels
MIDI Im plem entation
Detailed MSC Responses
TOP INDEX
6.1. KEYBOARD COMMANDS
NOTE:COMMAND NORMALLY APPLIES TO WINDOW SELECTED OR TO ALL OPEN CUE LISTS IF Au dioBox AB64 SHOW CONTROL WINDOW IS SELECTED
CLOCK CONTROL
START CLOCK
Press 'F1 ' key
RESTORE
Press 'Shift' plus 'F1 ' key s
PLAYBACK RESTORE
Press 'Ctrl' plus 'F1 ' key s
STOP CLOCK
Press 'F2 ' key
PLAYBACK STOP
Press 'F6' key
ZERO CLOCK
Press 'F3 ' key
ALL OFF
Press 'F4 ' key
RESET
Press 'Shift' plus 'F4 ' key s
PLAYBACK ALL OFF
Press 'Ctrl' plus 'F4 ' key s
MUTE ALL OUTPUTS
Press 'F5' key
UNMUTE ALL OUTPUTS
Press 'Shift' plus 'F5' key
GLOBAL MTC LOCK
Press 'Alt' plus 'L' key s
GLOBAL MTC UNLOCK
Press 'Ctrl' plus 'L' key s
STANDBY COMMANDS
LOAD PREVIOUS STANDBY CUE
Press 'F9' key (or Joy stick 'stick left')
LOAD NEXT STANDBY CUE
Press 'F1 0' key (or Joy stick 'stick right')
GO COMMANDS
GO TIMED CUE & SET CLOCK TO CUE TIME
Press 'F8' key ("Go Cue/Jam Clock")
GO CUE
Press 'F1 2 ' key (or Joy stick 'fire button')
TOP INDEX
6.2. KEYBOARD LABELS
Use the following form at to create a key board label strip:
+KEY
F1
F2
F3
F4
F5
F6
F8
ALT
F9
F10
F12
TOP OF SHOW
CTRL
PLAY BACK
RESTORE
PLAY BACK
ALL OFF
SHIFT
RESTORE
RESET
UNMUTE ALL
OUTPUTS
NONE
START CLOCK
ALL OFF
MUTE ALL
OUTPUTS
STOP
CLOCK
ZERO
CLOCK
richmondsounddesign.com/…/ab64-a…
PLAY BACK
STOP
GO/JAM
CLOCK
BEGIN LOOP
END LOOP
PREVIOUS
SEQUENCE
NEXT
SEQUENCE
PREVIOUS CUE
NEXT CUE
GO
CUE
30/38
2010-02-22
Richmond Sound Design - Show Contr…
TOP INDEX
6.3. AudioBox AB64 MIDI IMPLEMENTATION
The AudioBox AB64 Show Control engine responds to MIDI Show Control (MSC) Sound and All Ty pes Com m and_Form at m essages for th e Dev ice Num ber as set in
the Dev ice ID Num ber field of the AudioBox AB64 Editor w indow .
The AudioBox AB64 Audio Play back engine responds to MIDI Show Control (MSC) EPROM Play back and All Ty pes Com m and_Form at m essages for the Dev ice
Nu m ber as set in the Dev ice ID Num ber field of the AudioBox AB64 Editor w indow .
Please refer to the MSC 1 .0 specification as published by the International MIDI Association for m ore detailed inform ation on th is standard. A copy of this
specification is av ailable on our web site.
AudioBox AB64 MSC im plem entation is su bject to change without notice. Th e current im plem entation is av ailable v ia the RSD web site under 'Technical
Inform ation' in the index.
Key :
AudioBox AB64 RESPONSE
com m and/m essage receiv ed in hex (NAME OF COMMAND)
GO CUE
com m and 01 (GO)
See Section 6.4.
LOAD TO STANDBY
com m and 05 (LOAD)
See Section 6.4.
STOP/ZERO CLOCK/MTC CHASE OFF
com m and 08 (ALL_OFF)
RESTART CLOCK/MTC CHASE RESTORE
com m and 09 (RESTORE)
RESET
com m and 0A (RESET)
GO CUE - JAM CLOCK
com m and 1 0 (GO/JAM CLOCK)
STANDBY + 1
com m and 1 1 (STANDBY_+ )
STANDBY -1
com m and 1 2 (STANDBY_-)
NEXT SEQUENCE
com m and 1 3 (SEQUENCE_+)
PREVIOUS SEQUENCE
com m and 1 4 (SEQUENCE_-)
START CLOCK
com m and 1 5 (START_CLOCK)
STOP CLOCK
com m and 1 6 (STOP_CLOCK)
ZERO CLOCK
com m and 1 7 (ZERO_CLOCK)
SET CLOCK TO A SPECIFIC TIME
com m and 1 8 (SET_CLOCK)
MIDI TIME CODE ON
com m and 1 9 (MTC CHASE ON)
MIDI TIME CODE OFF
com m and 1 A (MTC CHASE OFF)
OPEN CUE LIST
com m and 1 B (OPEN_CUE_LIST)
See Section 6.4.
CLOSE CUE LIST
com m and 1 C (CLOSE_CUE_LIST)
CHOOSE CUE PATH
com m and 1 D (OPEN_CUE_PATH)
See Section 6.4.
TOP INDEX
6.4. AudioBox AB64 MSC RESPONSES
AudioBox AB64 MSC im plem entation is su bject to change without notice. Th e current im plem entation is av ailable v ia the RSD web site under 'Technical
Inform ation' in the index.
In the following table, 'GO cue' indicates th at there is no cue num ber specified. 'GO cue 0' m eans th at Cue num ber '0' is specified. 'GO cue A' indicates that a
num ber besides '0' is specified.
MSC 'SOUND'
MESSAGE
LIST
SPECIFIED
PATH
SPECIFIED
AudioBox AB64
PRECONDITION
RESULTING ACTION
GO cue
none
none
no lists open
nothing
GO cue
none
none
lists open
standby cue goes, all open lists
GO cue 0
none
none
no lists open
nothing
GO cue 0
none
none
lists open
standby cue goes, all open lists
GO cue A
none
none
no lists open
nothing
GO cue A
none
none
lists open
all cues A go, all open lists
GO cue 0
B
none
list B closed
nothing
GO cue 0
B
none
list B open
next cue goes in list B
GO cue A
B
none
list B closed
nothing
GO cue A
B
none
list B open
cue A goes in list B
GO cue 0
B
C
list B closed
nothing
richmondsounddesign.com/…/ab64-a…
31/38
2010-02-22
Richmond Sound Design - Show Contr…
GO cue 0
B
C
list B path C open
next cue goes in list B
GO cue 0
B
C
list B path D open
nothing
GO cue A
B
C
list B closed
nothing
GO cue
B
C
list B path C open
cue A goes in list B
GO cue A
B
C
list B path D open
go cu e A path C
LOAD cue 0
none
none
no lists open
nothing
LOAD cue 0
none
none
lists open
reset lists to top of show
LOAD cue A
none
none
no lists open
nothing
LOAD cue A
none
none
lists open
load all cues A, all open lists
LOAD cue 0
B
none
list B closed
nothing
LOAD cue 0
B
none
list B open
load first cue, current path
LOAD cue A
B
none
list B closed
nothing
LOAD cue A
B
none
list B open
load cue A in list B
LOAD cue 0
B
C
list B path C open
nothing
LOAD cue 0
B
C
list B path D open
open path C, load first cue
LOAD cue A
B
C
list B closed
nothing
LOAD cue A
B
C
list B path C open
load cue A in list B
LOAD cue A
B
C
list B path D open
open path C, load cue A
OPEN
B
none
list B open
set 'last list opened' to 'B'
OPEN
B
none
list B closed
open list B, form er path & cue; set 'last list opened'
to 'B'
OPEN OPEN
B
C
list B closed
open list B path C
OPEN OPEN
B
C
list B open
open path C list B
OPEN
C.B
none
list B closed
open list B path C
OPEN
none
C.B
list B open
open path C list B
In the following table, 'GO' indicates that there is no selection num ber specified. 'GO selection 0' m eans that selection num ber '0' is specified. 'GO selection A'
indicates that a selection num ber besides '0' is specified.
MSC 'EPROM PLAY BACK' MESSAGE
(CUE=SELECTION)
LIST SPECIFIED
(LIST=CHANNEL)
AudioBox AB64
PRECONDITION
RESULTING ACTION
GO
none
no channels open
nothing
GO
none
channels open
next selections play in all open channels
GO selection 0
none
no channels open
nothing
GO selection 0
none
channels open
next selections play in all open channels
GO selection A
none
no channels open
nothing
GO selection A (< 51 2 )
none
channels open
selection A play s in all open channels
GO selection A (> 51 2 )
none
channels open
stops play back and sets no selection to play next
in all open channels
GO selection 0
B
channel B closed
nothing
GO selection 0
B
channel B open
next selection play s in channel B
GO selection A
B
channel B closed
nothing
GO selection A (< 51 2 )
B
channel B open
selection A play s in channel B
GO selection A (> 51 2 )
B
channel B open
stops play back and sets no selection to play next
in channel B
LOAD selection 0
none
no channels open
nothing
LOAD selection 0
none
channels open
sets next selections to play next in all open
channels
LOAD selection A
none
no channels open
nothing
LOAD selection A (< 51 2 )
none
channels open
sets selection A to play next in all open channels
LOAD selection A (> 51 2 )
none
channels open
sets no selection to play next in all open channels
LOAD selection 0
B
channel B closed
nothing
LOAD selection 0
B
channel B open
sets next selection to play next in channel B
LOAD selection A
B
channel B closed
nothing
LOAD selection A (< 51 2 )
B
channel B open
sets selection A to play next in channel B
LOAD selection A (> 51 2 )
B
channel B open
sets no selection to play next in channel B
OPEN
B
channel B open
set 'last channel opened' to 'B'
OPEN
B
channel B closed
open channel B, form er selection; set 'last channel
opened' to 'B'
TOP INDEX
richmondsounddesign.com/…/ab64-a…
32/38
2010-02-22
7. GLOSSARY
Richmond Sound Design - Show Contr…
auto clock start
When this is selected, the list clock w ill autom atically start w hen the list is opened
auto cue-path sequencing
When this is selected, paths will autom atically open w hen the last cue from the preceding path has gone.
auto-pan
This function allows the user to set a tim e and a ram p shape to all input, ou tput, and crosspoints.
autom atic
Generally : Process which is m anaged by the com puter. Specifically : Wh en a cu e goes because its 'Tim e' is equal to (or less than if clock is in Internal
m ode) the clock's.
backup
The process of m aking an accurate copy of a folder or file for use in case of difficulty w ith the original or to create m irrored installations in other
locations.
blank field
To erase prev ious inform ation from the selected field.
blind edit
Process of altering data in cu es w ith out affecting current show operation. Also called 'Deaf Edit.'
box
A window requiring a response.
buffer
A block of v irtual m em ory containing data (i.e. edit cue, current cue, standby cue, etc.) m irroring stored or receiv ed data.
choose
The process of selecting a m enu, then m ov ing the cursor until the desired m enu item is highlighted and then clicking the left m ouse button on it.
clock
The list stopwatch w hose tim e is v isible in the AudioBox AB64 Show Control window . Display s Internal, MIDI Tim e Code or Real Tim e v alue in the
appropriate m odes.
configuration
The aggregate of all choices and selections which can be m ade in m enus and window s. These can be sav ed and loaded as desired and ABEdit
autom atically defaults to these w henev er it is loaded.
cue
Num bered and described data, contained in a cue path folder, capable of containing m ultiple v alid MIDI m essages defined as a sequ ence which will
be run by the list clock.
cue disk
7 2 0KB or 1 .4 4 MB, 3 .5" m icro floppy disk used to perm anently store backups of Projects including show lists, paths, data and configurations by
dragging folders into the disk w indow in the Desktop.
current cue
The m ost recent cue to hav e gone. This cue is display ed just abov e the standby cue in the AudioBox AB6 4 Show Control w indow except wh en cues
are being loaded to standby in random order and is also known as the Last Cue Gone.
data
The num erical inform ation sav ed on th e hard disk and used by the com puter to create all aspects of a Project.
default
A v ariable functional sy stem characteristic which m ay be selected and sav ed when desired for sem i-perm anent storage and au tom atic retriev al by
the sy stem when loading any show at any tim e.
dialog box
A window containing questions which m ust be answ ered by the operator before continuing.
disk m anagem ent
The sy stem , as transparent to the operator as possible, by wh ich m u ltiple cue paths m ay be u sed for gr eatest operating flexibility with m inim al
chance of error.
folder
In the Windows 95/98/2 000 Desktop env ironm ent, the graphic representation of a directory in which additional folders (sub-directories) and other
files such as cues and sy stem files are stored. When a folder is dragged with the m ouse to another window (such as du ring th e sh ow backup
procedure) the entire contents of the folder are copied to the w indow.
edit
To use the MIDI Message Editor to v iew, alter and sav e cue m essage data independently from the Show in the AudioBox AB64 .
EQ
Equalization, av ailable on all inputs and outputs
fader
The m ov able slider for each input, output, and crosspoint.
F key
One of the 1 2 'function' key s at the top of the key board, labeled F1 th rough F1 2 .
field
An area of the w indow in wh ich alphanum eric text or prescribed v alu es m ay be user inserted for a w ide range of purposes.
file
A com plete set of data sav ed in a folder and organized in a prescribed m anner.
form at
Process of preparing a new floppy disk to be u sed as a backup floppy Project, Data, Sh ow or cue disk.
function
The sy stem 's specific reaction to pressing one of the 'function key s' (F1 -F1 2 ) or choosing one of the sy stem process item s from the Clock or Standby
m enu or m enu bar. Most functions interact w ith the sy stem v ery com prehensiv ely and m ust be chosen carefully .
gadget
Any object in the window which generates a sy stem response w hen pointed at and clicked w ith the m ouse.
GO
The process of replacing the cu rrent cue with the one w aiting in standby and therew ith sending the standby cue's MIDI m essage data out the MIDI
OUT port (and back to the originating sy stem when Loopback is on).
hardw are
All phy sical sy stem entities (not the program or data contained on disks) including the com puter, the AudioBox AB6 4 and all sy stem m odules,
fram es, cables, etc.
highlight
Altering the background/foreground/border colours of (a) specific area(s) of the w indow from norm al in order to draw attention to (it) them usually accom plished by clicking the left m ouse button on th e desired object.
inform ation
The alphanum eric data display ed in fields and windows.
interface
A m odule connected to or installed in the com puter or AudioBox AB64 w hich allow s the sy stem to com m u nicate w ith other dev ices or sy stem s.
list
The folder that holds m ultiple cue paths which can be loaded exclusiv ely .
load
Process of fetching cue or audio play back data from a perm anent storage dev ice and putting it into v irtual m em ory for instantaneous use.
loop
Process of m ultiple repeating cue sequences according to cu e num ber decim al point hierarchies.
m enu
A series of choices listed u nder a specific h eading, seen and av ailable w hen the m enu bar is pointed at and the left m ouse button clicked.
richmondsounddesign.com/…/ab64-a…
33/38
2010-02-22
Richmond Sound Design - Show Contr…
m enu bar
The second line of a w indow , containing m enus
m erge
Process of com bining data com ing from two or m ore MIDI dev ices into a single stream of MIDI data.
MIDI
Musical Instrum ent Digital Interface
MTC sequence
MIDI m essages captured while MTC is being receiv ed while in the MTC Capture w indow and sav ed as cues according to the MTC tim e stam p as
display ed in the MIDI Capture window.
MTC Show
A show in w hich all cues w ill probably be tim ed cues, intended to be executed by MIDI tim e code alone. Th is is the norm al choice for 'canned' or
stand-alone sh ow s.
non-activ e
Area of window w hich does not contain gadgets that perform specific responses to m ouse clicks.
operate
Process of running the show using the AudioBox AB64 Show Control window, display ing the clock, loops rem aining, current cue inform ation, and
standby plus upcom ing cues' inform ation.
path
The folder that holds all cues w hich are sim u ltaneously executable.
point
Process of m ov ing m ouse on flat surface to m ake the window pointer/cursor coincide with desired gadget, m enu or list item .
power-up/down
Process of sw itching on sy stem power/shutting down the com puter then switch ing off sy stem pow er.
priority
Ordering of im portance of m ultitasking sy stem tasks, w ith operation of show cues being m ost im portant.
reset
Process of autom atically stopping and zeroing the clock (if in Internal m ode) while loading the first cues of all open cue lists to standby .
run
The process of loading the first cue of a specific show to standby and then proceeding to m ake all cues go in a norm al m anner at the appropriate
tim es until the cue sequence is finished.
sav e
Process of assigning a cue num ber and adding inform ation to a specific set of cue m essage data and per m anently writing all data to a cue file in a
cue folder for future retriev al.
scroll
Mov ing of the contents of a w indow or field up/down or right/left in response to m ouse control of th e scroll bars.
scroll bar
Gadget with arrows wh ich allow s m ov ing of th e contents of a window or field up/down or left/right.
select
Process of pointing the cursor/pointer with the m ouse then pressing and clicking the left m ouse button.
selected
Condition attributable to any window currently display ed on the v ideo m onitor which has a highlighted appearance. This indicates that all
fu nctions executed w ill apply to the selected w indow .
set m atrix
In the LIVE window s, this bu tton allows the user to qu ickly reset the m ixers to sev eral different com m only used settings.
show
The actual file that is stored on the AudioBox AB64 and dictates what the AudioBox AB64 will actually do.
standby
The cue that is highlighted in th e AudioBox AB64 Show Control window, waiting to becom e the current cue and hav e its m essage data sent when a
go is giv en.
sy stem
The sum total of the ABEdit com puter and AudioBox AB64 and other hardware in the installation; including all sh ow control and audio dev ices and
hardware and software working together.
Sy stem Disk
The CD-ROM containing the licensed softw are.
tim e
The v alue giv en to all sav ed cues indicating at which clock tim e the cue w ill autom atically go if it is in standby .
tim ed cue
The ty pe of cue which is giv en a tim e of other than 0:0:0:0.00 (which m akes a cue go on a PRESS F1 2 or MSC GO com m and only )
title page
A window prov iding copy right, date, licensing and authorship inform ation; presented during program loading or About m enu click.
unselected
Condition attributable to any window or field currently display ed on the v ideo m onitor w hich has an unhighlighted appearance. This indicates
that the user executed functions do not necessarily apply to the unselected w indow (s), but the display ed program is still fully operational since the
Window s 95/98 is m ultitasking.
window
A graphic display of a size as large as necessary presented as an ov erlay on th e Desktop, prov iding im portant inform ation and containing operator
control and editing interfaces.
write protect
The sm all sliding tab on the floppy disk which prev ents accidental erasure of disk data w hen open.
zero clock
The com m and in ABEdit Show Control Window that sets th e list clock back to zero.
TOP
8. INDEX
PRIMARY REFERENCE
SECONDARY REFERENCES
SECTION
ABShow
add snapshot events
3.2.2.
ABShow
back to parent
3.2.2.
ABShow
capture incoming MIDI
3.2.2.
ABShow
event manager
3.2.2.
ABShow
play cue
3.2.2.
ABShow
record actions
3.2.2.
ABShow
send selected messages
3.2.2.
All_Off Actions
set
3.3.1.
ASPI
requirements
2.1.
AudioBox AB64
status
3.7.
richmondsounddesign.com/…/ab64-a…
34/38
2010-02-22
Richmond Sound Design - Show Contr…
Auto
clock start
3.2.2.
Auto
cue path sequencing
3.2.2.
Auto
pan
3.11.
Backup
floppy disk/folder
2.3.2.
Backup
project
2.3.2.
Backup
selections
2.3.2.
Backup
shows
2.3.2.
Backup
system disk
2.3.2.
Clock
auto start
3.2.2.
Clock
menu/F key control
6.1.
Clock
running/stopped
3.5.
Clock
stopwatch
3.2.2.
Clock
time code
3.2.2.
Clock
type
3.2.2.
Clock
zeroed by cue
3.5.
Clock
zero, setting in editor
3.2.2.
Connections
Ethernet
2.2.3.
Controller
assign
3.3.1.
Crosspoint
auto-pan
3.13.
Crosspoint
phase
3.13.
Cue
current
3.2.1.
Cue
defaults
3.2.2.
Cue
delete
3.2.2.
Cue
edit
3.2.2.
Cue
last
3.5.
Cue
list
3.2.2.
Cue
operation
3.5.
Cue
parent
3.2.2.
Cue
path
3.2.2.
Cue
path auto sequencing
3.2.2.
Cue
path list
3.2.2.
Cue
properties
3.2.2.
Cue
sequence
3.2.2.
Cue
standby
3.5.
Cue
time
3.2.2.
Cue
time, entering value
3.2.2.
Cue
update
3.2.2.
Cue list
current
3.5.
Cue list
changing
3.5.
Cue list
close
3.5.
Cue list
display
3.5.
Cue list
name
3.2.2.
Cue list
open
3.5.
Default
show
3.2.1.
Defaults
loading/saving system
2.3.2.
Defaults
loading/saving show
2.3.2.
Defaults
loading/saving list
2.3.2.
Delay
inputs
3.11.
Delay
outputs
3.12.
Device ID
MIDI
3.1.3.
IP Address
Ethernet
2.2.1.
Disk
backup
2.3.2.
Disk
defragment
3.4.
Disk
format
2.3.2.
Disk
handling precautions
2.3.1.
Echo
MIDI-MIDI
3.2.2.
richmondsounddesign.com/…/ab64-a…
35/38
2010-02-22
Richmond Sound Design - Show Contr…
Echo
Enet-MIDI
3.2.2.
Edit
crosspoint message
4.3.
Edit
EQ
4.3.
Edit
hex
3.2.2.
Edit
input message
4.3.
Edit
MIDI Cue Editor
3.2.2.
Edit
MIDI Message Editor
3.2.2.
Edit
output message
4.3.
Edit
playback message
4.3.
Edit
save cue
4.3.
EQ
inputs
3.3.1.
EQ
outputs
3.3.1.
EQ
set gain table
3.3.1.
ETHERNET
configuration
2.2.3.
F Keys-Clock
functions/menus
6.1.
F Keys-Standby
functions/menus
6.1.
Fader
linking
3.11.
Functions
clock menu
6.1.
Functions
standby menu
6.1.
Hard Disk
installation
2.3.4.
Hardware
interconnection
2.2.
Hardware
requirements
2.1.
Import
show
3.8.
Inputs
auto-pan
3.11.
Inputs
delay
3.11.
Inputs
EQ
3.11.
Inputs
fader linking
3.11.
Inputs
GPI - general purpose
3.3.4.
Inputs
set matrix
3.11.
Installation
hardware
2.2.
Installation
software
2.3.4.
List
channel mask
3.2.2.
List
defaults
3.2.2.
List
delete
3.2.2.
List
edit
3.2.2.
List
ID
3.2.2.
List
new
3.2.2.
List
properties
3.2.2.
List clock
start
3.5.
List clock
stop
3.5.
List clock
zero
3.5.
Live
crosspoints
3.13.
Live
disable
3.9.
Live
enable
3.9.
Live
input channel mode
3.9.
Live
inputs
3.11.
Live
outputs
3.12.
Live
playback
3.9.
Live
submasters
3.10.
Load
audio
4.2.3.
Loopback
status
3.5.
Memory
requirements
2.1.
Merge
Box
2.2.2.
Merge
description
2.2.2.
Message
delete
3.2.2.
Message
insert
3.2.2.
richmondsounddesign.com/…/ab64-a…
36/38
2010-02-22
Richmond Sound Design - Show Contr…
Message
MIDI
3.2.2.
Message
move
3.2.2.
Message
new
3.2.2.
Message
Ethernet
3.2.2.
Message
timed
3.2.2.
MIDI
cue
3.2.2.
MIDI
device ID
3.1.3.
MIDI
edit cue
3.2.2.
MIDI
implementation
6.3.
MIDI
interface
2.2.1.
MIDI
loopback
3.2.2.
MIDI
make cue
3.2.2.
MIDI
MIDI echo
3.2.2.
MIDI
passthru
3.2.2.
MIDI
Time Code (MTC)
3.2.2.
MIDI channel
set
3.2.2.
New
message
3.2.2.
Outputs
auto-pan
3.12.
Outputs
delay
3.12.
Outputs
EQ
3.12.
Outputs
fader linking
3.12.
Outputs
set matrix
3.12.
Parse
messages
3.2.2.
Path
defaults
3.2.2.
Path
delete
3.2.2.
Path
edit
3.2.2.
Path
ID
3.2.2.
Path
new
3.2.2.
Path
properties
3.2.2.
Playback
go
3.9.
Playback
load
3.9.
Playback
loop
3.9.
Playback
resume
3.9.
Playback
resume clear
3.9.
Playback
set stop notification
3.9.
Playback
stop
3.9.
Preferences
requirements
3.1.1.
Project
backup
2.3.2.
Project
new
3.1.2.
Project
open
3.1.3.
Project
preferences
3.1.3.
Project
rename
3.1.3.
Program
shows
4
Properties
cue
3.2.2.
Properties
list
3.2.2.
Properties
path
3.2.2.
Properties
show
3.2.2.
Requirements
hardware
2
Requirements
RAM
2.1.
Requirements
system
2
Ethernet
connections
2.2.3.
Ethernet
IP address
2.2.1.
Ethernet
MIDI echo
3.2.2.
Set matrix
inputs
3.11.
Set matrix
outputs
3.12.
Setup
clear/restore
3.3.
richmondsounddesign.com/…/ab64-a…
37/38
2010-02-22
Richmond Sound Design - Show Contr…
Setup
go
3.9.
Setup
load
3.9.
Setup
resume
3.9.
Setup
stop
3.9.
Setup
update
3.3.
Show
default
3.2.1.
Show
delete
3.2.2.
Show
edit
3.2.2.
Show
editor
3.2.2.
Show
file
3.2.2.
Show
import
3.8.
Show
refresh
3.5.
Show
remove
3.2.2.
Snapshots
crosspoints
3.13.
Snapshots
inputs
3.11.
Snapshots
outputs
3.12.
Software Versions
demonstration
1.1.
Software Versions
production
1.1.
Submaster
assign
3.3.1.
Submaster
set gain
3.3.1.
Submaster
set zero
3.3.1.
USB
connections
2.2.4.
Warnings
making backups
2.3.2.
Warnings
removing disks
2.3.1.
Contact | TOP | Home
© Copyright 2010
Richmond Sound Design Ltd | Show Control | Virtual Sound System | Theatre Sound Design | Themed Entertainment | Paging
Interactive Exhibits | Soundscapes | Immersive Environments | Sonic Art | Aural Pathw ays | Noise masking | Digital Signage
richmondsounddesign.com/…/ab64-a…
2010-02-22
38/38
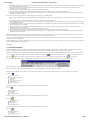

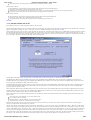
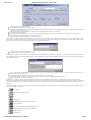
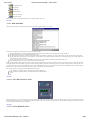
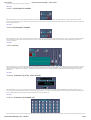
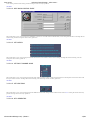

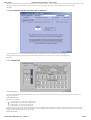
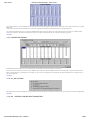
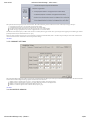
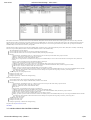
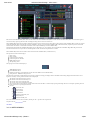
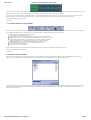
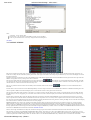
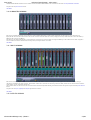
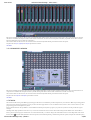
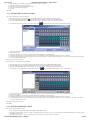
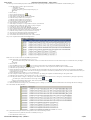
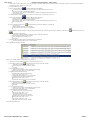

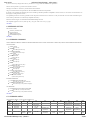


![ShowMan User Manual [PDF Format]](http://vs1.manualzilla.com/store/data/005637930_1-31cd6ced5af6c2a7a337ddd38fc92d65-150x150.png)