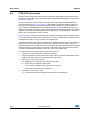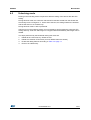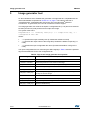
1
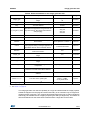
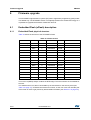
UM1953 User manual STCOMET boot and FW upgrade Introduction The purpose of this document is to give to customers the information related to the boot and the upgrade mechanisms that can be used and implemented in the STCOMETxx and STCOMxx devices. The goal of this UM is to inform the reader about all the possible solution he can adopt to fit its application requirements. This user manual is applicable to all the STCOMETxx and STCOMxx part numbers referred as the STCOMET. This user manual does not contain information related to the STCOMETxx and STCOMxx devices except the ones required to better explain the boot and upgrade possibilities. Information on the STCOMETxx and STCOMxx devices can be found on the ST website. October 2015 DocID028398 Rev 1 1/37 www.st.com 37 Contents UM1953 Contents 1 Document conventions . . . . . . . . . . . . . . . . . . . . . . . . . . . . . . . . . . . . . . . 6 List of abbreviations . . . . . . . . . . . . . . . . . . . . . . . . . . . . . . . . . . . . . . . . . . . . . . . . 6 2 The STCOMET bootloader . . . . . . . . . . . . . . . . . . . . . . . . . . . . . . . . . . . . 7 2.1 3 4 5 2/37 Image format description . . . . . . . . . . . . . . . . . . . . . . . . . . . . . . . . . . . . . . 8 2.1.1 PE and RTE images format . . . . . . . . . . . . . . . . . . . . . . . . . . . . . . . . . . . 9 2.1.2 OTP image format . . . . . . . . . . . . . . . . . . . . . . . . . . . . . . . . . . . . . . . . . 11 2.2 Boot traces . . . . . . . . . . . . . . . . . . . . . . . . . . . . . . . . . . . . . . . . . . . . . . . . 13 2.3 SPI Flash mandatory requirements . . . . . . . . . . . . . . . . . . . . . . . . . . . . . 14 Security level description . . . . . . . . . . . . . . . . . . . . . . . . . . . . . . . . . . . . 15 3.1 Security level 1: unsecure . . . . . . . . . . . . . . . . . . . . . . . . . . . . . . . . . . . . 15 3.2 Security level 2: secure . . . . . . . . . . . . . . . . . . . . . . . . . . . . . . . . . . . . . . 15 3.3 Security level 3: secure and locked . . . . . . . . . . . . . . . . . . . . . . . . . . . . . 16 3.4 Security level 4: secure for customer loader . . . . . . . . . . . . . . . . . . . . . . 16 3.5 Security level 1*: secure erase and unlocking . . . . . . . . . . . . . . . . . . . . . 16 3.6 Security level global summary . . . . . . . . . . . . . . . . . . . . . . . . . . . . . . . . . 17 Boot modes . . . . . . . . . . . . . . . . . . . . . . . . . . . . . . . . . . . . . . . . . . . . . . . 18 4.1 Boot pins and boot modes execution . . . . . . . . . . . . . . . . . . . . . . . . . . . . 18 4.2 Normal boot mode . . . . . . . . . . . . . . . . . . . . . . . . . . . . . . . . . . . . . . . . . . 19 4.2.1 Normal boot mode in security level 1 and 1* . . . . . . . . . . . . . . . . . . . . . 19 4.2.2 Normal boot mode in security level 2 and 3 . . . . . . . . . . . . . . . . . . . . . . 20 4.2.3 Normal boot mode in security level 4 . . . . . . . . . . . . . . . . . . . . . . . . . . . 20 4.3 Low power boot mode . . . . . . . . . . . . . . . . . . . . . . . . . . . . . . . . . . . . . . . 21 4.4 CTM OTP write mode . . . . . . . . . . . . . . . . . . . . . . . . . . . . . . . . . . . . . . . . 22 4.5 Unlocking mode . . . . . . . . . . . . . . . . . . . . . . . . . . . . . . . . . . . . . . . . . . . . 23 Image generator tool . . . . . . . . . . . . . . . . . . . . . . . . . . . . . . . . . . . . . . . . 24 5.1 PE (Cortex-M4) image generation . . . . . . . . . . . . . . . . . . . . . . . . . . . . . . 26 5.2 RTE images . . . . . . . . . . . . . . . . . . . . . . . . . . . . . . . . . . . . . . . . . . . . . . . 26 5.3 Composing images . . . . . . . . . . . . . . . . . . . . . . . . . . . . . . . . . . . . . . . . . . 27 DocID028398 Rev 1 UM1953 6 Contents Firmware upgrade . . . . . . . . . . . . . . . . . . . . . . . . . . . . . . . . . . . . . . . . . . 28 6.1 6.2 6.3 7 8 Embedded Flash (eFlash) description . . . . . . . . . . . . . . . . . . . . . . . . . . . 28 6.1.1 Embedded Flash physical structure . . . . . . . . . . . . . . . . . . . . . . . . . . . . 28 6.1.2 Sector lock management . . . . . . . . . . . . . . . . . . . . . . . . . . . . . . . . . . . . 29 FW upgrade ISP and IAP . . . . . . . . . . . . . . . . . . . . . . . . . . . . . . . . . . . . . 29 6.2.1 In-system reprogrammability . . . . . . . . . . . . . . . . . . . . . . . . . . . . . . . . . 30 6.2.2 In-application reprogrammability . . . . . . . . . . . . . . . . . . . . . . . . . . . . . . 30 Firmware download for production . . . . . . . . . . . . . . . . . . . . . . . . . . . . . . 30 6.3.1 Programming steps to target security level 1 . . . . . . . . . . . . . . . . . . . . . 31 6.3.2 Programming steps to target security level 2 and 3 . . . . . . . . . . . . . . . . 31 6.3.3 Programming steps to target security level 4 . . . . . . . . . . . . . . . . . . . . . 32 6.3.4 Programming steps using JTAG to target security level 4 . . . . . . . . . . . 33 6.3.5 Programming application example . . . . . . . . . . . . . . . . . . . . . . . . . . . . 33 OTP area information and OTP public key . . . . . . . . . . . . . . . . . . . . . . 35 7.1 OTP data access . . . . . . . . . . . . . . . . . . . . . . . . . . . . . . . . . . . . . . . . . . . 35 7.2 OTP public key . . . . . . . . . . . . . . . . . . . . . . . . . . . . . . . . . . . . . . . . . . . . . 35 References . . . . . . . . . . . . . . . . . . . . . . . . . . . . . . . . . . . . . . . . . . . . . . . . 35 Appendix A Authentication details for “clear text” PE images . . . . . . . . . . . . . 36 Revision history . . . . . . . . . . . . . . . . . . . . . . . . . . . . . . . . . . . . . . . . . . . . . . . . . . . . 36 DocID028398 Rev 1 3/37 37 List of tables UM1953 List of tables Table 1. Table 2. Table 3. Table 4. Table 5. Table 6. Table 7. Table 8. Table 9. Table 10. Table 11. Table 12. Table 13. 4/37 PE and RTE images format . . . . . . . . . . . . . . . . . . . . . . . . . . . . . . . . . . . . . . . . . . . . . . . . . 9 OTP image format . . . . . . . . . . . . . . . . . . . . . . . . . . . . . . . . . . . . . . . . . . . . . . . . . . . . . . . 11 Bootloader traces message . . . . . . . . . . . . . . . . . . . . . . . . . . . . . . . . . . . . . . . . . . . . . . . . 13 Security level features summary. . . . . . . . . . . . . . . . . . . . . . . . . . . . . . . . . . . . . . . . . . . . . 17 Boot modes and BOOT0/1 pin values . . . . . . . . . . . . . . . . . . . . . . . . . . . . . . . . . . . . . . . . 18 Boot modes execution based on security level. . . . . . . . . . . . . . . . . . . . . . . . . . . . . . . . . . 18 Boot modes execution typical times . . . . . . . . . . . . . . . . . . . . . . . . . . . . . . . . . . . . . . . . . . 18 Tags for the image generator tool input file . . . . . . . . . . . . . . . . . . . . . . . . . . . . . . . . . . . . 24 Element attributes for the image generator tool . . . . . . . . . . . . . . . . . . . . . . . . . . . . . . . . . 25 eFlash sectors . . . . . . . . . . . . . . . . . . . . . . . . . . . . . . . . . . . . . . . . . . . . . . . . . . . . . . . . . . 28 OTP data mapping on shadow sector . . . . . . . . . . . . . . . . . . . . . . . . . . . . . . . . . . . . . . . . 35 Default key for “clear text” PE images . . . . . . . . . . . . . . . . . . . . . . . . . . . . . . . . . . . . . . . . 36 Document revision history . . . . . . . . . . . . . . . . . . . . . . . . . . . . . . . . . . . . . . . . . . . . . . . . . 36 DocID028398 Rev 1 UM1953 List of figures List of figures Figure 1. Figure 2. Figure 3. Figure 4. Figure 5. PE image example . . . . . . . . . . . . . . . . . . . . . . . . . . . . . . . . . . . . . . . . . . . . . . . . . . . . . . . 10 Typical current consumption during low power boot mode. . . . . . . . . . . . . . . . . . . . . . . . . 21 IAP/ISP modes and security levels . . . . . . . . . . . . . . . . . . . . . . . . . . . . . . . . . . . . . . . . . . . 29 Security level transition diagram for firmware programming during production . . . . . . . . . 31 Programming application example . . . . . . . . . . . . . . . . . . . . . . . . . . . . . . . . . . . . . . . . . . . 34 DocID028398 Rev 1 5/37 37 Document conventions 1 UM1953 Document conventions List of abbreviations 6/37 AES - advanced encryption system ECC - elliptic curves cryptography ECIES - elliptic curve integrated encryption scheme eFlash - embedded Flash memory GCM - Galois counter mode IAP - in-application programming ISP - in-system programming JTAG - Joint Test Action Group MAC - medium access control (also EUI48) MISC - miscellaneous block registers OTP - one-time programmable PE - protocol engine POR - power-on reset QFS - quadruple frequency synthesizer RTE - real-time engine SL - security level SPI - serial peripheral interface DocID028398 Rev 1 UM1953 2 The STCOMET bootloader The STCOMET bootloader The STCOMET embeds a flexible bootloader which in short: Implements security policies according to security levels by enabling/disabling the insystem programming (ISP) through the JTAG and the in-application programming (IAP) through the eFlash write access It implements a secure in-application programming (IAP) mechanism for both the realtime engine (RTE) firmware and the protocol engine Cortex®-M4 (PE) firmware. The RTE firmware is always encrypted and authenticated by STMicroelectronics® using the AES GCM security algorithm. The PE firmware can be encrypted using the AES-GCM security algorithm. The PE firmware is always authenticated (see Section 7 on page 35) It allows the development of the full custom PE FW IAP, with a dedicated secure level It offers a low power boot mode It provides a secure way to write one-time programmable (OTP) data. The STCOMET bootloader behavior depends on the values of the two dedicated BOOT0 and BOOT1 pins and on the current security level of the device after a device reset. The possible reset causes are: Power-on reset (POR) Trigger by RESETn pin Watchdog reset ScSysStat field of SYSCTRL register assertion The bootloader code cannot be updated by the customer. This document refers to bootloader version 2.2. DocID028398 Rev 1 7/37 37 The STCOMET bootloader 2.1 UM1953 Image format description The in-application programming (IAP) through the bootloader and the customer OTP write procedure makes the use of binary files called images. These image files contain the firmware to be upgraded preceded by one header that controls the programming process or the OTP data to be written. These images are stored in one external SPI Flash connected to the SPI0 port of the STCOMET (see 1. in Section 8: References on page 35 for peripheral details). Any external entity able to emulate the behavior of the SPI Flash can be used to perform IAP. In this document we refer to the SPI Flash as a real device or as entities able to emulate this kind of device. If the SPI Flash is not detected, the bootloader ends with error. The behavior of the device after this error depends on the boot mode (see Section 4 on page 18). If the SPI Flash is detected busy after the reset, the bootloader ends with error as in the above case. This can happen if the user code triggers a long operation on the SPI Flash (i.e.: sector erase) and it does not wait for the operation completion before performing a reset. In this case the user code must ensure the proper timing before triggering the reset. Three image formats are defined: PE image, RTE image and OTP image. The next sections show the formats and the possible values for each image's field (values are in little endian). The user must save images in the external SPI Flash with alignment to the page (256 bytes alignment). If the user saves more than one image, and the size of the images does not fit the 256 bytes boundary, padding bytes can be inserted. Padding bytes are ignored by the bootloader. The first PE or RTE image must be saved at the address 0x00000000 of the SPI Flash. 8/37 DocID028398 Rev 1 UM1953 2.1.1 The STCOMET bootloader PE and RTE images format The PE and RTE images format is similar and contains the firmware related to the PE or the RTE based on the initial 4-byte type value. The firmware can be split in different sections (up to 255 sections). Each section must be aligned to 128-bit boundary (16 bytes). To reach the alignment, padding bytes can be added and they will be ignored by the bootloader. Sections are identified by the section headers. All the section headers must be placed before the entire firmware payload. The sequence of the section headers must respect the sequence of the section payloads. Table 1. PE and RTE images format Name Image header (clear text) Values/meaning Size (Bytes) Image type PE image = 0x00000001 RTE image= 0x00000003 0 4 Encryption status of the whole firmware The encryption algorithm used for firmware image encryption and/or authentication: AES GCM with 128-bit key = 0 AES GCM with 192-bit key = 1 AES GCM with 256-bit key = 2 No encryption = 3 4 4 Image version Image version. The version has to be always greater than zero. 8 4 Firmware entry address Firmware image address. Should be 0x00000000 for the PE image. 12 4 Firmware size The size of the firmware payload (in bytes) 16 4 AES IV The AES initialization vector 20 16 Authentication tag The authentication tag, generated during AES authentication. 36 16 Number of sections The number of sections (N) of the firmware image. The number of sections has to be greater than zero. 52 4 n-th section size The size of the n-th section in firmware payload 56 + 12 * (n - 1) 4 The destination eFlash address in which the section payload 60 + 12 * (n - 1) 4 64 + 12 * (n - 1) 4 56 + 12 * N Var. length n-th section header (n from 1 to N) n-th section destination address n-th section unlocking flag 0 = locked 1 = unlocked Firmware payload Offset (Bytes) Variable length firmware payload (one or more sections, each section is 16byte aligned). DocID028398 Rev 1 9/37 37 The STCOMET bootloader UM1953 Figure 1 shows an example of one PE image (in yellow the section header). This image has a version number equals to 0x2F9, it contains only one section (not locked) of 267344 bytes. It is encrypted using AES-GCM 128 with a 128-bit key and initialization vectors of 0x04030201, 0x08070605, 0x09090909, and 0x22220000 Figure 1. PE image example The RTE image is considered valid if the following conditions are met: 10/37 Image type equals to 0x00000003 Encryption status should be different from “no encryption” Image version greater than 0 Firmware size smaller than 128 kB Number of section smaller or equal to 255 Section sizes sum should be less or equal to the specified firmware size Section addresses should be in the address space of RTE Section addresses combined with section sizes should be in the address space of RTE Authentication tag on the payload and header initialization vector should be equal to the one specified in the image header. DocID028398 Rev 1 UM1953 The STCOMET bootloader The PE image is considered valid if the following conditions are met: Image type equals to 0x00000001 Encryption status should be different from “no encryption” if the security level is greater than 1 Image version greater than 0 Firmware entry address equals to 0 Firmware size smaller than the embedded Flash size minus 128 kB Number of section smaller or equal to 255 Section sizes sum should be less or equal to the specified firmware size Section addresses should be in the address space of eFlash user sectors (except sector 13) Section addresses combined with section sizes should be in the address space of eFlash user sectors (except sector 13) Authentication tag on the payload and header initialization vector should be equal to the one specified in the image header. The PE image encryption and authentication is applied on the entire payload. 2.1.2 OTP image format The OTP image format shares the meaning of first 4 bytes with the PE and RTE images format. The bootloader uses this 4-byte type value to distinguish between the PE, RTE or OTP data image. Table 2. OTP image format Name Image header (clear text) Encrypted payload Values/meaning Offset Size (Bytes) (Bytes) Image type OTP image = 0x00000005 0 4 MAC flag User MAC address not included in the image = 0x00 User MAC address included in the image = 0x01 4 1 ECC input point ECC point created during ECIES encryption 5 64 A-MAC Authentication code generated during ECIES encryption 69 32 User key AES key for PE firmware encryption: AES-128 key: 16-byte key data + 16 unused bytes AES-192 key: 24-byte key data + 8 unused bytes AES-256 key: 32-byte key data 101 32 Additional key Additional customer key not relevant for boot 133 8 User MAC address Customer MAC if MAC flag = 0x01 Unused bytes if MAC flag = 0x00 141 6 147 2 SL4 transition spare Trigger transition to SL4 = 0xBBAA bytes Trigger transition to SL2/3 = other values DocID028398 Rev 1 11/37 37 The STCOMET bootloader UM1953 The OTP image is considered valid if the following conditions are met: The Image type must be equal to 0x00000005 The image must be located at the address 0x00000000 of the external SPI Flash The security level is equal to 1 A-MAC evaluated from the ECC input point and payload should be equal to the one specified in the header. If a valid OTP image is found and the boot mode is not the CTM OTP write, the bootloader does not perform any further scan of the SPI Flash. 12/37 DocID028398 Rev 1 UM1953 2.2 The STCOMET bootloader Boot traces During bootloader execution some trace information can be read on the USART0 interface using the following settings: Baud rate 115200 Data 8 bit Parity none Stop 1 bit Flow control none The traces messages are explained in Table 3. Table 3. Bootloader traces message Message Code Description STATUS: BOOT START V2.2 00 00 00 00 The version of the bootloader code 00 00 00 01 STCOMET is in security level 1 or 1* 00 00 00 02 STCOMET is in security level 2 or 3 00 00 00 04 STCOMET is in security level 4 STATUS: BOOT MODE 00 00 00 0X BOOT pins values STATUS: RTE IMG STARTED XX XX XX XX The RTE image version CPU IMG XX XX XX XX The PE image version STATUS: BOOT NORMAL_END 00 00 00 00 Boot ends without errors 00 00 00 01 Error for shadow sector integrity 00 00 00 02 Error, no valid PE image found 00 00 00 04 Error, no valid RTE image found 00 00 00 08 Error, maximum number of attempts reach for OTP write 00 00 00 10 Error, OTP image authentication fail 00 00 00 20 Error, OTP image check fail 00 00 00 40 Error, no valid OTP image found 00 00 00 80 Error on eFlash access 00 00 01 00 Error, security level not OK 00 00 02 00 Error, wrong image size 00 00 04 00 Error on eFlash erase 00 00 08 00 Error, wrong image start address 00 00 10 00 Error on SPI Flash access 00 00 20 00 Error on the start of RTE image STATUS: BOOT LC STATUS: BOOT ERROR The boot error messages are treated as bitfield, so the error “00 00 00 06" is the sum of the two errors “00 00 00 02" (no valid PE image found) and “00 00 00 04" (no valid RTE image found). DocID028398 Rev 1 13/37 37 The STCOMET bootloader 2.3 UM1953 SPI Flash mandatory requirements The bootloader makes the use of one external SPI Flash in order to store images. The user can select the memory that best fits its constraints without any constraints on the model, version and supplier. The device must fulfill the following requirements: 14/37 SPI interface at 24 MHz with mode 0 SPI command “CONTINUOS READ” = 0x3 Bytes address (maximum supported size is 16 MB) DocID028398 Rev 1 UM1953 3 Security level description Security level description The STCOMET device implements a set of security levels that are associated with different security policies. Each security level affects the way the user can upgrade the firmware (both PE and RTE) and the available functionalities. The security level transitions depend on the values of the BOOT0 and BOOT1 pins and on the OTP information the user writes in the device. In order to implement those security levels, the JTAG peripheral is disabled during power-on or reset and during bootloader execution. 3.1 Security level 1: unsecure This is the list of features available when the device is in the security level 1 and booted in the normal boot mode: 3.2 PE debug through the JTAG is available. The PE and RTE firmware download in the eFlash through the JTAG is available (ISP). The PE and RTE firmware update mechanism (IAP) from the external SPI Flash available (for PE authentication is always evaluated on the default key, encrypted and unencrypted images are supported). Download OTP data available. The user code can read and write the “main memory” sectors of the eFlash. The user code cannot access to the shadow sector (neither with JTAG nor with direct eFlash reading). Security level 2: secure This is the list of features available when the device is in the security level 2 and booted in the normal boot mode: PE debug through the JTAG is disabled. The PE and RTE firmware download in the eFlash through the JTAG is not available. The PE and RTE firmware update mechanism from the external SPI Flash available only through the bootloader. Only encrypted and authenticated PE firmware is loaded. Only an encrypted firmware image can be loaded (customer key provided through OTP write). The user code cannot write the “main memory” sectors of the eFlash (only the bootloader). The user code can read to the shadow sector. DocID028398 Rev 1 15/37 37 Security level description 3.3 UM1953 Security level 3: secure and locked This is the list of features available when the device is in the security level 3 and booted in the normal boot mode: 3.4 PE debug through the JTAG is disabled. The PE and RTE firmware download in the eFlash through the JTAG is not available. The PE and RTE firmware update mechanism from the external SPI Flash available only through the bootloader. Only encrypted and authenticated PE firmware is loaded. Only unlocked sectors can be upgraded. Only an encrypted firmware image can be loaded (customer key provided through OTP write). The user code cannot write the “main memory” sectors of the eFlash (only the bootloader). The user code can read the shadow sector. Security level 4: secure for customer loader This is the list of features available when the device is in the security level 4 and booted in the normal boot mode: 3.5 PE debug through the JTAG is disabled. The PE and RTE firmware download in the eFlash through the JTAG is not available. The PE and RTE firmware update mechanism available only through the user code (bootloader is bypassed). The user code can read and write the “main memory” sectors of the eFlash. The user code cannot access to the shadow sector (neither with JTAG nor with direct eFlash reading). Security level 1*: secure erase and unlocking This is the list of features available when the device is in the security level 1* and booted in the normal boot mode: 16/37 PE debug through the JTAG is available. The PE firmware download in the eFlash through the JTAG is available. The PE and RTE firmware update mechanism (IAP) from the external SPI Flash available (for PE authentication is always evaluated on the default key, encrypted and unencrypted images are supported). The download OTP data is not available. The user code can read and write the “main memory” sectors of the eFlash. The user code cannot access to the shadow sector (neither with JTAG nor with direct eFlash reading). DocID028398 Rev 1 UM1953 3.6 Security level description Security level global summary Table 4 summarizes the features available in each security level for the normal boot mode. Table 4. Security level features summary SL1 SL2 SL3 SL4 SL1* PE JTAG debug Yes No No No Yes PE and RTE JTAG FW download (ISP) Yes No No No Yes PE IAP programming by bootloader Yes No Yes [see(3)] RTE IAP programming by bootloader Yes Yes Yes No Yes Download OTP data Yes No No No No Read “main memory” sectors Yes Yes Yes Yes Yes Write “main memory” sectors Yes No No Yes Yes Read shadow sector No Yes Yes No No Yes [see(1)] Yes [see(2)] 1. Only encrypted images. 2. Only encrypted images and only for not locked sectors. 3. Only not encrypted images. DocID028398 Rev 1 17/37 37 Boot modes UM1953 4 Boot modes 4.1 Boot pins and boot modes execution STCOMET bootloader behavior depends on the selected boot mode after the reset. Boot modes are selectable by two boot pins, the BOOT0 and BOOT1 (see section 1.13 of 1. in Section 8: References on page 35). The user code can check the value of configuration in the SOC_CFG register of the MISC block. Table 5. Boot modes and BOOT0/1 pin values Boot mode Boot mode value BOOT1 BOOT0 Normal boot 0x2 1 0 Customer OTP write 0x0 0 0 Unlocking 0x1 0 1 Low power 0x3 1 1 The possibility to execute the bootloader starting in one of the supported boot modes depends on the security level as described in Table 6. If an unsupported boot mode is selected in a specific security level, the bootloader ends with error and enters in an endless loop enabling the security feature according to Table 4. Table 6. Boot modes execution based on security level SL1 SL2/3 SL4 SL1* Normal boot Yes Yes Yes Yes Customer OTP write Yes No No No Unlocking Yes Yes Yes Yes Low power Yes Yes Yes Yes Table 7. Boot modes execution typical times No image upgrade PE and RTE upgrade OTP image download Normal boot 3 sec [see (1)] 17 sec n/a Customer OTP write n/a n/a 1 sec Unlocking 5 sec n/a n/a Low power 8 ms n/a n/a 1. The time is 1 sec if no valid image is present at the address 0x0 of the SPI Flash. The next sections detail the boot procedures in each security level. 18/37 DocID028398 Rev 1 UM1953 4.2 Boot modes Normal boot mode The normal boot mode is the standard way to boot the device. The behavior of this mode changes based on the security level. As already introduced in Section 2.1 on page 8, the first PE or RTE image must be present at the address 0x00000000 of the external SPI Flash. 4.2.1 Normal boot mode in security level 1 and 1* The steps performed by the bootloader during this mode are: 1. Verify if PE and RTE images were already loaded in the eFlash 2. Verify the presence of PE and RTE images in the external SPI Flash 3. If no valid PE or RTE images are found in both external and internal Flashes 4. a) Enable the debug/security features according to Table 4 b) Perform an endless loop If valid images are found a) Check the images versions b) If new images are present in the external SPI Flash (higher version or the first download) i.Copy the PE image payload from the SPI Flash to the eFlash destination sectors ii.Copy the RTE image from the SPI Flash to the eFlash target sector (sector 13) c) Decrypt and download RTE firmware in the RTE internal memory d) Enable the RTE and wait for RTE ready notification e) Copy the MAC address to the MISC general purpose registers f) Enable the debug/security features according to Table 4 g) Jump to the application firmware start address (reset address 0x0). DocID028398 Rev 1 19/37 37 Boot modes 4.2.2 UM1953 Normal boot mode in security level 2 and 3 The steps performed by the bootloader during this mode are: 1. Verify if PE and RTE images were already loaded in the eFlash (PE image authenticated with customer key) 2. Verify the presence of PE and RTE images in the external SPI Flash 3. If no valid PE or RTE images are found in both external and internal Flashes (i.e.: PE image loaded in security level 1) 4. a) Enable the debug/security features feature according to Table 4 b) Perform an endless loop If valid images are found a) Check the images versions b) If new images are present in the external SPI Flash (higher version number or first download, PE image correctly authenticated) i.Copy the PE image payload from the SPI Flash to the eFlash destination sectors if not locked (the decryption and the authentication are done using the customer key written in the OTP area) ii.Lock the eFlash sectors that are target destination for locked sections iii.Copy the RTE image from the SPI Flash to the eFlash target sector (sector 13) 4.2.3 c) Decrypt and download RTE firmware in the RTE internal memory d) Enable the RTE and wait for RTE ready notification e) Copy the MAC address to the MISC general purpose registers f) Enable the debug/security features according to Table 4 g) Jump to the application firmware start address (reset address 0x0). Normal boot mode in security level 4 The steps performed by the bootloader during this mode are: 1. Verify if PE and RTE images were already loaded in the eFlash 2. If no valid firmware images are found in the internal eFlash 3. a) Enable the debug/security features feature according to Table 4 b) Perform an endless loop If valid images are found a) If the RTE image is present i.Decrypt and download RTE firmware in the RTE internal memory ii.Enable the RTE and wait for RTE ready notification 20/37 b) Copy the MAC address to the MISC general purpose registers c) Enable the debug/security features according to Table 4 d) Jump to the application firmware start address (reset address 0x0). DocID028398 Rev 1 UM1953 4.3 Boot modes Low power boot mode The low power boot mode is used to start the user code with a slow PE frequency to target low power mode application (i.e.: running from battery). The PE frequency is directly 24 MHz from the external crystal source (see1. of Section 8: References on page 35 for details on the STCOMET clock structure). This boot mode does not enable the RTE and does not perform IAP and upgrade from the external SPI Flash. To target low power consumption the user must detect as soon as possible the boot in the low power mode by checking the SOC_CFG register of the MISC block. This implies that the eFlash should already contain a previously loaded application code. In case the eFlash does not contain a valid code, a fault is generated (the bootloader does not perform any check and always jumps to the application firmware start address). The low power boot mode can run in every security levels. The enabled features in this boot mode depend on the STCOMET security level as specified in Section 3.6 on page 17. The typical boot time during this low power mode is 8 ms (not including the application code startup that depends on the user choice) and the average current consumption is less than 20 mA during this period. Figure 2 shows the typical current consumption (Y axe in mA) during the time (X axe in sec'ms) after the POR in the low power mode. The total time is around 30 ms and includes the 8 ms of the low power mode boot and the application startup when entering in the main() function to configure and shut-down the QFS. Figure 2. Typical current consumption during low power boot mode The steps performed by the bootloader during this mode are: 1. Enable the debug features according to the current security level and block the access to the shadow sector of the eFlash 2. Jump to the application firmware start address (reset address 0x0). DocID028398 Rev 1 21/37 37 Boot modes 4.4 UM1953 CTM OTP write mode Booting in the customer OTP write mode is required to allow writing of the customer OTP data and to change the security level of the device. OTP information details can be found in Section 7 on page 35. The OTP information must be stored in the SPI Flash at the address 0x00000000 as an OTP image (see Section 2.1.2 on page 11). OTP images stored at a different location are ignored. OTP images must have an encrypted payload. The user encrypts the payload using a public key provided by ST as reported in Section 7. The bootloader decrypts this image using a secret private key, ensuring that thirty parties cannot decrypt the OTM image payload. In particular, the ECIES public scheme approach is selected with the use of ECC elliptic curve cryptography to share a secret. Table 6 on page 18 shows the security levels that allow running the CTM OTP write mode. In case the CTM OTP write mode is selected in a security level that does not support it, the bootloader ends with an error and enter in an endless loop. The CTM OTP write mode can be selected only for a limited number of time (16) to attempt writing the OTP area. One attempt could fail due to failure in the decryption of the OTP image payload, due to the absence of the OTP image at the address 0x00000000 of the SPI Flash or because the OTP image is corrupted. If this boot mode is selected for more than 16 times, the bootloader ends with an error and enter in an endless loop. The steps performed by the bootloader during this mode are: 1. Check the security level and the number of attempts 2. Check the presence and the correctness of the image in the external SPI Flash at the address 0x0 (if the SPI Flash is not present the check fails) 3. If the step 1. and 2. ends correctly: a) Update the OTP area with the customer OTP data b) Check the “SL4 transition spare bytes” i.If it is equal to 0xBBAA change the security level to 4 ii.Otherwise change the security level to 2 4. If the step 1. and/or step 2. fails: a) 22/37 Increment the number of attempts and enter in an endless loop. DocID028398 Rev 1 UM1953 4.5 Boot modes Unlocking mode Booting in the unlocking mode is required to allow the debug of the device after the OTP writing. During this boot mode, the customer code and OTP data are erased from the eFlash and the security level is changed to 1*. At the end of the boot, the debug features are enabled and the PE enters in an endless loop. During this boot mode no IAP is performed. After the boot in the unlocking mode, it is not possible to perform again the customer OTP writing and only “clear text” PE images or encrypted with the default key PE images can be loaded. The steps performed by the bootloader during this mode are: 1. Delete all the “main memory” eFlash sectors 2. Delete the customer OTP section (a set of default values are written) 3. Enable the debug features according to Table 4 on page 17 4. Enter in an endless loop. DocID028398 Rev 1 23/37 37 Image generator tool 5 UM1953 Image generator tool ST also releases a tool to facilitate the generation of images that are compatible with the internal bootloader as specified in Section 2.1 on page 8. The name of this tool is “ImageGenerator” (ImageGenerator.exe) and it runs in the Microsoft® Windows environment. To get this tool, the user can contact his local ST support. The image generator tool receives as inputs a configuration file (*.xml) and some sections binaries (at least one) and produces as an output one image. The syntax of the tool is: ImageGenerator -v = <verbosity level[0-3]> -o = <output file>.img, -c = <configuration file>.xml Where: “-v” specifies the output verbosity level (if omitted the default 0 is used) “-o” specifies the output name of the image file (if omitted the default “output.img” is used) “-c” specifies the input configuration file name (if omitted the default “config.xml” is used) The input configuration file is a code using the XML language. Table 8 shows the possible tags and the attributes for the xml configuration file. Table 8. Tags for the image generator tool input file Tag Description <header> </header> Declare the output image header <section> </section> Declare the presence of one section in the image <compose> </compose> Allow the concatenation of multiple images in a single file <OTP> </OTP> <aes_iv> </aes_iv> <aes_key> </aes_key> <mac48> </mac48> <spare> </spare> Declare the output image for the OTP Declare the initialization vector for the AES GCM authentication Define the key to encrypt the payload for the PE/RTE output image or the user key for the OTP image Define the user MAC address Define the value for the SL4 transition spare bytes <pub_key> </pub_key> The public key used to encrypt the OTP image payload <add_key> </add_key> Define the additional key 24/37 DocID028398 Rev 1 UM1953 Image generator tool Table 9. Element attributes for the image generator tool Element attribute Description Possible values Tag image_type Specifies if the output image is a PE or RTE image. cpu rte <header> version The version to be assigned to the image. Uint32 (>0) <header> entry The start address 0x0000 <header> fw_encryption_status Specifies if the payload is encrypted and the key size used for AES GCM (authentication always apply). cleartext aes_128 aes_192 aes-256 <header> valuei, 0 i 3 AES-GCM initial vector's i-th word Uint32 <aes_iv> valuei , 0 i 7 AES-GCM key's i-th word Uint32 <aes_key> address The memory address when the section payload will be written. Uint32 [address in eFlash(1)] <section> unlock Specifies if the sector(s) will be locked after the section payload writing. Locking is applied to all the eFlash sectors used to load this section. 0: section locked 1: section not locked <section> filename The name of the file that contains the binary code for the section. text <section> image_cpu The name of the file that contains the PE image. text <compose> version_cpu The version of the PE image after composition “no_change” or Uint32 (> 0) <compose> image_rte The name of the file that contains the RTE image. text <compose> version_rte The version of the RTE image after composition “no_change” or Uint32 (> 0) <compose> mac48_status If included with the correct value indicates the presence of a valid custom MAC address. “custom“ <OTP> valuei, 0 i 5 The value of the i-th byte of the custom MAC address UInt8 <mac48> valuei, 0 i 5 The value of the spare bytes Value0 = ”0xAA” Value1 = ”0xBB” or any other UInt8 <spare> key_string Public key(2) 32-byte string <pub_key> 1. Must be 64-bit aligned. 2. See Section 7 on page 35. The image generator tool has the capability to encrypt and authenticate the image payload, handle the alignment to the page and section boundary in an automatic way for single and multiple images (compose). The compose functionality allows the user to create a single file that simply concatenate the two images (respecting the 256-byte alignment). This allows an efficient download into the external SPI Flash because a single file can be written. DocID028398 Rev 1 25/37 37 Image generator tool 5.1 UM1953 PE (Cortex-M4) image generation This is an example of the input *.xml file for the PE image generation: <?xml version="1.0" encoding="UTF-8"?> <header image_type="cpu" version="1024" entry="0x0000" fw_encryption_status="aes_128"> <aes_iv value0="0x00" value1="0x01" value2="0x02" value3="0x03"> </aes_iv> <aes_key value0="0xFFFFFFFF" value1="0xFFFFFFFF" value2="0xFFFFFFFF" value3="0xFFFFFFFF" value4="0xFFFFFFFF" value5="0xFFFFFFFF" value6="0xFFFFFFFF" value7="0xFFFFFFFF"> </aes_key> </header> <section address="0x00000000" unlock="1" filename="first_image.bin"> </section> <section address="0x00008000" unlock="0" filename="second_image.bin"> </section> The generated output image will have the version 1024, it will be encrypted with the AES GCM and a 128-bit wide key and the default key is used (STCOMET in security level 1). The image is composed by two sections, the first loaded at the address 0x00000000 of the eFlash and the second loaded at the address 0x00008000 of the eFlash. The first section contains the “first_image.bin” file and the related sectors of the eFlash will be unlocked. The second section contains the “second_image.bin” file and the related sectors of the eFlash will be locked (the user cannot upgrade this part using the bootloader because this example refers to the security level 1 and it can be used to test the locking feature). 5.2 RTE images The RTE image generation is reserved for the internal ST use and the images are provided to users. Since the header version is not considered for checking the validity of the image (the bootloader only checks that the value is greater than 0) the user can change this value to make experiments with multiple image types having the opportunity to always load the mostly stable one. 26/37 DocID028398 Rev 1 UM1953 5.3 Image generator tool Composing images This is an example of the input *.xml file for the composite image generation: <?xml version="1.0" encoding="UTF-8"?> <compose image_cpu="pe.img" version_cpu="577" image_rte="rte.img" version_rte="no_change"> </compose> The "pe.img" image file and the "rte.img" image file are concatenated by respecting the 256 byte alignment for the image position in the external SPI Flash (padding is added if needed). The result output file is the binary concatenation of the two previous file. In the final concatenated file, the Image generator also change the version number of the PE image from its original value to 577. The RTE version does not change. 5.4OTP Image Generation This is an example of the input xml file for the OTP image generation: <?xml version="1.0" encoding="UTF-8"?> <OTP mac48_status="custom"> <aes_key value0="0x5869D8D0" value1="0xFF93617C" value2="0xC2FFA58D" value3="0xE8F1B66D" value4="0x8D481207" value5="0x5E52AFFD" value6="0x5AC87F54" value7="0xEBA8D673"> </aes_key> <add_key value0="0xE6" value1="0x1F" value2="0x16" value3="0x95" value4="0x92" value5="0xC1" value6="0xA2" value7="0x99"> </add_key> <mac48 value0="0x0D" value1="0x61" value2="0x51" value3="0x54" value4="0x7B" value5="0x9B"> </mac48> <spare value0="0x11" value1="0x22"> </spare> <pub_key key_string="04f667750fe1c03930f841853347efc8089e863e879c76269d50ebba9ad18a a74cd37145c339df84b3ecb4c6282f14b9c23a34880625e393ab0e539d637356ad75"> </pub_key> </OTP> The generated OTP image will have two keys, one for decrypting the PE images during the normal boot modes, and one additional key available for the user. The user also specifies a different MAC address that will be used instead of the one preloaded by ST. Since the SL4 transition spare bytes are not equal to 0xBBAA the final security level will be the security level 2. In order to have the transition to the security level 4 the spare tag must be: <spare value0="0xAA" value1="0xBB">? DocID028398 Rev 1 27/37 37 Firmware upgrade 6 UM1953 Firmware upgrade The STCOMET supports both in-system (ISP) and in-application programming (IAP) modes in a flexible way. The STCOMET device is completely based on the eFlash technology so it is possible to upgrade the firmware of both RTE and PE. 6.1 Embedded Flash (eFlash) description 6.1.1 Embedded Flash physical structure Table 10 shows the structure of the STCOMET eFlash. Table 10. eFlash sectors Block Name Number Base address Size Main memory B0F0 0 0x00000000 16 KB B0F1 1 0x00004000 16 KB B0F2 2 0x00008000 32 KB B0F3 3 0x00010000 32 KB B0F4 4 0x00018000 16 KB B0F5 5 0x0001C000 16 KB B0F6 6 0x00020000 64 KB B0F7 7 0x00030000 64 KB B0F8 8 0x00040000 128 KB B0F9 9 0x00060000 128 KB B0FA 10 0x00080000 128 KB Not available in 05 p/n B0FB 11 0x000A0000 128 KB Not available in 05 p/n B0FC 12 0x000C0000 128 KB Not available in 05 p/n B0FD 13 0x000E0000 128 KB B0SH 14 0x00100000 16 KB Shadow sector Note The sector 13 (B0FD) always contains the RTE image. The other sectors are accessible for the user. The shadow sector can also be accessible by the user based on the security level (see Table 4 on page 17). OTP data are stored in this sector, so the user code can read this part of the Flash in order to get previously downloaded information (see Section 7 on page 35). 28/37 DocID028398 Rev 1 UM1953 6.1.2 Firmware upgrade Sector lock management It is possible to lock some sectors of the eFlash in order to avoid anyone to load another firmware section overwriting the original code. The “section unlocking flag” (see Section 2.1.1 on page 9) is provided in the section header of the PE image. Configuring this flag to the value of “0” indicates the bootloader to lock all the eFlash sectors that contain the binary sections after the eFlash writing. For all future images corresponding to this section, it will not be possible to update those sectors with the IAP mode (it is possible to use the ISP but only in the security level 1/1* because the JTAG interface is available). 6.2 FW upgrade ISP and IAP The device supports both in-system (ISP) and in-application programming (IAP) modes using the eFlash and external SPI Flash. Figure 3 shows the relationship between the security level and the ISP/IAP modes. Figure 3. IAP/ISP modes and security levels DocID028398 Rev 1 29/37 37 Firmware upgrade 6.2.1 UM1953 In-system reprogrammability The ISP mechanism allows the user to erase and program the embedded Flash through the JTAG port. This mechanism is available in the security level 1/1* and normal mode boot as detailed in Section 3 on page 15 and Section 4 on page 18, otherwise it is disabled. Thanks to the availability of the JTAG port, the user can download its application code directly into the eFlash as well as the full RTE image in the sector #13. If this way of downloading is selected, the bootloader can end with an error, typically the error “00 00 00 02". This indicates that the bootloader is not able to detect the PE image because, in fact, the user never downloads an image through the SPI Flash into the device but directly the code using the JTAG. The bootloader does not enter in an endless loop (see Section 4.2.1 on page 19) but jumps to the user code start address of the eFlash (0x00000000). 6.2.2 In-application reprogrammability There are two main ways to perform IAP. The first one makes the use of the STCOMET bootloader and the external SPI Flash. The second one makes the use of a user bootloader. The first IAP mode allows storing in an external SPI Flash the code to be downloaded into the device on the next power-on with the normal boot mode. The IAP mode can be used for the RTE only, PE only or both RTE and PE. Firmware upgrade depends on the user needs. The external SPI Flash can also contain multiple versions for each code (RTE and PE), but at least one valid PE or RTE image must be present at the address 0x00000000 of the SPI Flash. The presence of multiple images is required for instance to support the rollback to old firmware versions in case the new image has problems. This can be achieved by changing the version numbers of the old image with a number greater that the new one. In any case the change of the firmware requires a complete reset of the device to start the bootloader. The second IAP mode allows the user to write its own second level bootloader. It makes the use of the security level 4. After the STCOMET bootloader starts the RTE with the already stored RTE image, the bootloader leaves the control to the user code. The user code must contain a customer bootloader with the capability to upgrade the eFlash sectors. 6.3 Firmware download for production The STCOMET can be embedded in a wide range of applications. The following sections provide all the relevant information to program the STCOMET firmware during final application production (manufacturing) using IAP. This document does not provide information on how to design a tool for the firmware programming but the procedure to be followed and the actions to be taken in each step (for example the configuration of the STCOMET Boot and Reset pins). The STCOMET firmware programming procedures depend on the target security level chosen by the user for the programmed device (see Figure 4). It always involves the OTP image and/or PE and RTE images programming. Since the first PE or RTE image and the OTP image must be loaded at the address 0x00000000 of the external SPI Flash, it is not possible to write them in a single step on the external Flash and use boot modes to target a final security level with the STCOMET programmed. 30/37 DocID028398 Rev 1 UM1953 Firmware upgrade The user can refer to Table 7 on page 18 for the time required to complete each boot operation. Figure 4. Security level transition diagram for firmware programming during production 6.3.1 Programming steps to target security level 1 This procedure is not recommended due to a lack of security for product field deployment. A user that wants to leave the programmed device in the security level 1 cannot write the OTP but only the RTE and PE images/firmware with the following implication (details can be found in Section 3 on page 15). The JTAG remains opened The bootloader cannot load protected PE images The OTP area is not accessible by the OEM FW or by JTAG The steps to be followed are: 6.3.2 1. The PE and RTE images must be written on the SPI Flash (starting from address 0x0) 2. The boot pins must be configured in the normal boot mode 3. A reset must be triggered to load the PE and RTE images Programming steps to target security level 2 and 3 The firmware download for this case involves three image files: Encrypted (with ST public key) OTP image file which stores user sensible data (EUI48, encryption key), and the “SL4 transition spare bytes” different from 0xAABB Encrypted RTE image file provided by ST (version number > 0) Encrypted PE image file with a user key (version number > 0). This image can contains “locked” sectors to activate the security level 3. DocID028398 Rev 1 31/37 37 Firmware upgrade UM1953 The steps to be followed are: 6.3.3 1. The OTP image must be written on the SPI Flash at the address 0 2. The boot pins must be configured in the CTM OTP write mode 3. A reset must be triggered in order to load the OTP data (transition to security level 2) 4. The PE and RTE images must be written on the SPI Flash (starting from address 0) 5. The boot pins must be configured in the normal boot mode 6. A reset must be triggered to load the PE and RTE images (transition to security level 3 if there are some locked sections). Programming steps to target security level 4 The user that intends to target the security level 4 can select between two possible cases. The first case uses three image files: Encrypted (with ST public key) OTP image file which stores OEM sensible data (EUI48) and the “SL4 transition spare bytes” equal to 0xAABB Encrypted RTE image file provided by ST (version number > 0) Cleartext PE image file (version number > 0) The steps to be followed are: 1. The PE and RTE images must be written on the SPI Flash (starting from address 0) 2. The boot pins must be configured in the normal boot mode 3. A reset must be triggered to load the PE and RTE images 4. The OTP image must be written on the SPI Flash at the address 0 5. The boot pins must be configured in the CTM OTP write mode 6. A reset must be triggered in order to load the OTP data (transition to security level 4) The second case uses four image files: Cleartext PE image file (version number >0) containing only the user bootloader (bootloader image) Encrypted (with ST public key) OTP image file which stores OEM sensible data (EUI48) and the “SL4 transition spare bytes” equal to 0xAABB Encrypted RTE image file provided by ST (version number > 0) Encrypted PE image that the user bootloader can load The steps to be followed are: 32/37 1. The bootloader image and the RTE image must be written on the SPI Flash (starting from address 0) 2. The boot pins must be configured in the normal boot mode 3. A reset must be triggered to load the bootloader and RTE images 4. The OTP image must be written on the SPI Flash at the address 0 5. The boot pins must be configured in the CTM OTP write mode 6. A reset must be triggered in order to load the OTP data (transition to security level 4) 7. The PE image must be written on the SPI Flash (starting from address 0) 8. The boot pins must be configured in the normal boot mode 9. A reset must be triggered so the custom bootloader can load the PE image. DocID028398 Rev 1 UM1953 6.3.4 Firmware upgrade Programming steps using JTAG to target security level 4 Even if not recommended, it is possible to use the JTAG for firmware production. Even if the JTAG is selected, the user must use the OTP image and external SPI Flash (or an emulator) to target security levels 4. The programming strategies that use the JTAG to download firmware inside the eFlash make the use of the Flashloader specific for each production tool. ST does not provide such a kind of the tool that must be developed by the user itself. This strategy uses: Encrypted (with ST public key) OTP image file which stores OEM sensible data (EUI48, encryption key) and the “SL4 transition spare bytes” equals to 0xAABB for targeting the security level 4 RTE image file provided by ST (version number > 0) Cleartext PE code binary file The steps to be followed are: 6.3.5 1. The RTE image and PE code binary file must be loaded into the eFlash trough the JTAG connection and user specific Flashloader tool 2. The OTP image must be written on the SPI Flash at the address 0 3. The boot pins must be configured in the CTM OTP write mode 4. A reset must be triggered in order to load the OTP data (transition to security level 4). Programming application example A typical example of programming environment for production is the tool shown in Figure 5 that makes the use of two external SPI Flashes containing the OTP (at the address 0x00000000) image and PE/RTE images (starting from the address 0x00000000). Information related to the hardware interconnection with the STCOMET can be found in 2. of Section 8 on page 35. DocID028398 Rev 1 33/37 37 Firmware upgrade UM1953 Figure 5. Programming application example The typical programming tool also monitors the USART0 boot traces as described in Section 2.2 on page 13. If the word “ERR” is not found on the traces and the word “END” is caught, the boot procedure correctly ends. 34/37 DocID028398 Rev 1 UM1953 OTP area information and OTP public key 7 OTP area information and OTP public key 7.1 OTP data access After the CTM OTP write mode, the OTP data are stored in the shadow sector of the eFlash following the mapping in Table 11. Table 11. OTP data mapping on shadow sector Shadow sector Data Bytes addresses size Data type Values/meaning OEM key AES key for PE/RTE firmware encryption. AES-128 key: 16-byte key data + 16 unused bytes AES-256 key: 32-byte key data 0x00100028 32 Additional key Additional customer key (not relevant for boot) 0x00100048 8 EUI-48 MAC ADDRESS Customer MAC/Production MAC 0x00100050 6 SL4 transition spare bytes SL4 transition spare bytes 0x00100058 2 The EUI-48 MAC address is available in all security levels and after a normal boot on the MISC registers GP_CTR00 and GP_CTR01. For the SL1/SL1* the MAC reported in the registers is the ST preloaded one. For the SL2/SL3/SL4 the user can specify its own EUI-48 MAC. If the OTP image carries the MAC flag set to 1, the bootloader copies this user address in the shadow sector and reports it in the MISC registers. If the MAC flag is set to 0, the bootloader reports in the MISC register the ST preloaded EUI-48 MAC address. 7.2 OTP public key The public key to be used to encrypt the OTP image is: 04f667750fe1c03930f841853347efc8089e863e879c76269d50ebba9ad18aa74cd37145c3 39df84b3ecb4c6282f14b9c23a34880625e393ab0e539d637356ad75 8 References 1. STCOMET - Smart meter and powerline communication system-on-chip datasheet 2. STCOMET smart meter and power line communication system-on-chip development kit - AN4732 application note. DocID028398 Rev 1 35/37 37 Authentication details for “clear text” PE images Appendix A UM1953 Authentication details for “clear text” PE images The STCOMET bootloader can load unencrypted PE images only in the SL1. These images are only authenticated to check the validity of the payload content. The bootloader uses the AES-GCM mode with a 256-bit key in order to perform authentication on unencrypted PE images. The key value used to check the authentication tag is: Table 12. Default key for “clear text” PE images Byte 0 (LSB) Byte 1 Byte 2 Byte 3 Byte 4 Byte 5 Byte 6 Byte 7 (MSB) 0xFFFFFFFF 0xFFFFFFFF 0xFFFFFFFF 0xFFFFFFFF 0xFFFFFFFF 0xFFFFFFFF 0xFFFFFFFF 0xFFFFFFFF Revision history Table 13. Document revision history 36/37 Date Revision 20-Oct-2015 1 Changes Initial release. DocID028398 Rev 1 UM1953 IMPORTANT NOTICE – PLEASE READ CAREFULLY STMicroelectronics NV and its subsidiaries (“ST”) reserve the right to make changes, corrections, enhancements, modifications, and improvements to ST products and/or to this document at any time without notice. Purchasers should obtain the latest relevant information on ST products before placing orders. ST products are sold pursuant to ST’s terms and conditions of sale in place at the time of order acknowledgement. Purchasers are solely responsible for the choice, selection, and use of ST products and ST assumes no liability for application assistance or the design of Purchasers’ products. No license, express or implied, to any intellectual property right is granted by ST herein. Resale of ST products with provisions different from the information set forth herein shall void any warranty granted by ST for such product. ST and the ST logo are trademarks of ST. All other product or service names are the property of their respective owners. Information in this document supersedes and replaces information previously supplied in any prior versions of this document. © 2015 STMicroelectronics – All rights reserved DocID028398 Rev 1 37/37 37