1
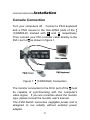
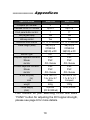
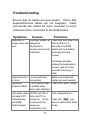
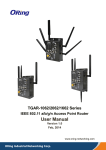
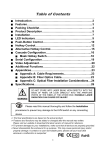
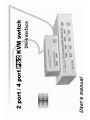
▓ The complete DNV-102 contains: 2-Port KVM Switch (DNV-102) x 1 User’s manual x1 Rubber foot pad x 1 set ▓ The complete DNV-104 contains: 4-Port KVM Switch (DNV-104) x 1 User’s manual x1 Rubber foot pad x 1 set PP5-P1300-301-IG Printed in Taiwan Table of Content ■ Introduction Overview ...................................................... 1 Features ....................................................... 2 ■ Installations Console Connection .................................... 3 Computers Connection ................................ 4 Initial Power-up ............................................ 5 ■ Operations Front Panel operation .................................. 6 Hot-key commands ...................................... 7 ■ Appendices Specifications ............................................. 10 Troubleshooting .........................................11 Please read this manual thoroughly and follow the Installation procedures to prevent any damage to the KVM Switch or any connecting device. ----------------- Introduction Overview The KVM Switch DNV-102/DNV-104 is a computer switch that allows access to two/four IBM compatible computers from one keyboard, mouse and monitor. Switching between computers is as easy as pressing the push button or entering hot-key commands from your keyboard without installing any interface card and software. The powerful KVM Switch is independent of the computer operating system, allowing the attached computers to run different applications. The space-saving design enables you to connect all the cables to the back of the DNV-102/DNV-104 taking the least amount of space on your desk. It is a valuable tool for your computer management. Yet, for DNV-104, the user can press “FUNC” button combining with the other pushbuttons to adjust the optimal video signal strength corresponding to the length or quality of DVI cable. Automatic Mouse Conversion This technology enables you to connect computers with PS/2 mouse ports to the KVM Switch, and control both computers from one PS/2 mouse. The KVM Switch automatically identifies the mouse and switches to proper mouse protocol. 1 Features Cascade configuration expands system capability Auto scan automatically selects computers sequentially Supports Microsoft IntelliMouse (Pro), IntelliTrackball Hot-key functions allow easy computer access Front panel “FUNC” button for easily adjusting the video signal strength. (for DNV-104 only) Built-in buzzer for hot-key command confirmation Keyboard states automatically saved and restored when switching computers Operating system independent, transparent to all applications True plug and play system configuration Keyboard and mouse can be hot plugged at any time DVI interface DDC2B compatible Power-free operation 2 -----------------Installation Console Connection Turn your computers off. Connect a PS/2 keyboard and a PS/2 mouse to the mini-DIN-6 ports of the C (CONSOLE) marked with K and M respectively. Then connect your DVI-I monitor cable directly to the DVI-I port of C as shown in figure 1. Figure 1: C (CONSOLE) Connection The monitor connected to the DVI-I port of the C must be capable of synchronizing with the computer's video signal. If you are uncertain about the monitor type, please consult the monitor user's manual. The KVM Switch consumes negligible power and is designed to run reliably without external power adapter. 3 Computers Connection Now you have two computers to connect to the KVM Switch. Use a male-to-male Mini-DIN-6 cable to connect from the first PC’s keyboard port to the corresponding K1 port; and, use another male-to-male Mini-DIN-6 cable from the PC’s mouse port to the M1 port. Connect your computer’s DVI-I port to the DVI-I port of the KVM Switch as shown in figure 2. Follow the same procedures for the second computer using K2 and M2 port. Figure 2: COMPUTER Connection 4 Initial Power-up Make sure all computers and KVM Switch are powered down during installation. After connection, you just power up the computers; the KVM Switch will get enough power to operate from the computers. This procedure ensures the KVM Switch receive computer settings correctly when computer boots. Therefore, the KVM Switch generates correct responses and allows both computers to boot successfully without user intervention. 5 ----------------- Operations Front Panel operation You may switch to a different computer by pressing the front panel push-button directly or by issuing hot-key commands. The front-panel red indicator changes to reflect the computer port selected. The indicator flashes while in either Auto Scan or Manual Scan mode. “FUNC” Button (for DNV-104 only) To adjust the optimal video signal strength corresponding to the length or quality of DVI cable, the user can press “FUNC” button combining with the other pushbuttons. Step 1. Press “FUNC” button three times, the LED of “FUNC” will flash one time per second. Step 2. Press pushbutton “1” one or two times for adjusting the equalization of selected port input video strength with one beep (normal) or two beeps (enhance) respectively. or Press pushbutton “3” one or two times for adjusting the output current of selected port with one beep (normal) or two beeps (enhance) respectively. or 6 Press pushbutton “4” one, two, three, or four times for adjusting the output emphasis of selected port with one beep (no pre-emphasis), two beeps (low pre-emphasis), three beeps (medium pre-emphasis), or four beeps (high pre-emphasis). Step 3. Once the setting is finished, press “FUNC” button one time to exit the setting. Hot-key commands The Hot-key command is a short keyboard sequence to select a computer, to activate computer scan, etc. KVM Switch interprets keystrokes for hot-keys all the time. A hot-key sequence starts with two left Ctrl keystrokes followed by one or two more keystrokes. A built-in buzzer generates a high-pitch beep for correct hot-key command; otherwise, one low-pitch beep for error and the bad key sequence will not be forwarded to the selected computer. To select a computer: left Ctrl + left Ctrl + 1 Selects the computer at port 1. left Ctrl + left Ctrl + 2 Selects the computer at port 2 Do not use the keypad at the right of the keyboard. 7 To start Auto Scan, automatically scan power- on computers one by one at a fixed interval: left Ctrl + left Ctrl + F1 To abort the Auto Scan mode, press the left Ctrl key twice. When Auto Scan detects any keyboard or mouse activity, it suspends the scanning till the activity stops; it then resumes with the next computer in sequence. The length of the Auto Scan interval (Scan Rate) is adjustable, see below. Manual Scan enables you to manually switch back and forth between power-on computers. left Ctrl + left Ctrl + F2 Press or to select the previous or the next computer in sequence. And, press any other key to abort the Manual Scan. To adjust Scan Rate, this sets the duration before switching to the next computer in Auto Scan: left Ctrl + left Ctrl + F3 The KVM Switch generates 1 to 4 beeps indicating scan interval of 3, 8, 15 and 30 seconds respectively. 8 To adjust keyboard typematic rate (characters/sec), this setting over-rides that of BIOS and any operating system: left Ctrl + left Ctrl + F4 The KVM Switch generates 1 to 4 beeps corresponding to 10, 15, 20 and 30 characters/sec respectively. 9 ----------------- Appendices Specifications DNV-102 DNV-104 Computer port number 2 4 Cascade control PC number Up to 4 Up to 16 Front panel button control 1 5* Hot plug-and-play Yes Yes Hot-key control Yes Yes Automatic scan interval 3, 8, 15, 30 seconds 3, 8, 15, 30 seconds 3M(10ft) at 3M(10ft) at Cable Length (Max) CONSOLE CONSOLE 3M(10ft) at PC 3M(10ft) at PC Monitor Type DVI DVI Computer keyboard connector PS/2 PS/2 Mouse PS/2 PS/2 monitor DVI-I female DVI-I female Console keyboard connector PS/2 PS/2 Mouse PS/2 PS/2 monitor DVI-I female DVI-I female H x W x D (mm) 40 x 124 x 70 44 x 220 x 130 (in.) 1.6 x 4.9 x 2.7 1.7 x 8.7 x 5.1 size Micro Compact weight 440g 1030g Power supply Optional 9VDC,500mA (min.) (DC 9V,500mA) * Four buttons for port switching PLUS one extra “FUNC” button for adjusting the DVI signal strength, please see page 6 for more details. 10 Troubleshooting Ensure that all cables are well seated. Check that keyboard/mouse cables are not swapped. Label and bundle the cables for each computer to avoid confusion when connected to the KVM Switch. Symptom Causes Solutions Keyboard or Improper power-up mouse does not sequence. work Keyboard or mouse not properly initialized. Press and hold down the push button for 3 seconds, the KVM Switch will re-initialize the keyboard and mouse. If problem persists, unplug the keyboard or mouse, wait for a few seconds then plug it back. Keyboard error Loose keyboard Make sure keyboard on boot connection. cables are well seated. Keyboard The computer was Press both SHIFT keys. strokes shifted in shifted state when last switched Auto Scan does All PCs are off or Turn computers on. not switch PC only one PC is automatically turned on. Scan Press left Ctrl key and KVM mode works for twice to abort Auto Scan Switch beeps power-on mode. computers only. 11 The and keys do not work in Manual Scan All PCs are off or only one PC is turned on. Scan mode works for power-on computers only. Computers do not supply enough power. The KVM Switch fails to function occasionally. Not functional in In master/slave cascade configuration, the configuration. master unit must have equal or more PC ports than that of slaves. If DNV-102 is a slave, its master can only be DNV-102. 12 Turn computers on. Press any other key to abort Manual Scan mode. Add a power adapter with minimum of DC 9V 500mA output rating to the SPARE power jack. DNV-102 can be a slave of DNV-102, DNV-104. If DNV-102 is a master, then DNV-104 can’t be its slave. Limited Warranty IN NO EVENT SHALL THE DIRECT VENDOR'S LIABILITY FOR DIRECT OR INDIRECT, SPECIAL, INCIDENTIAL OR CONSEQUENTIAL DAMAGES, LOSS OF PROFIT, LOSS OF BUSINESS, OR FINANCIAL LOSS WHICH MAY BE CAUSED BY THE USE OF THE PRODUCT EXCEEDS THE PRICE PAID FOR THE PRODUCT. The direct vendor makes no warranty or representation, expressed or implied with respect to the contents or use of this documentation, and especially disclaims its quality, performance, merchantability, or fitness for any particular purpose. The direct vendor also reserves the right to revise or update the product or documentation without obligation to notify any user of such revisions or updates. For further information, please contact your direct vendor. All the brand names and registered trademarks are the property of their respective owners.