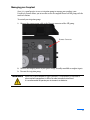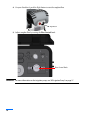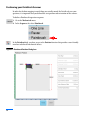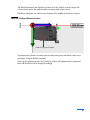
1
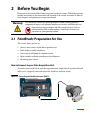
PaintBrush Scanner TM User Manual www.zetec.com This manual and the product and programs it describes are protected by copyright laws and therefore may not be reproduced, in whole or in part, whether for sale or not, without the prior written consent from ZETEC, Inc. Under copyright law, copying includes translation into another language or format. ©ZETEC, Inc., 2015 This document was prepared with particular attention to usage to ensure the accuracy of the information contained therein. It corresponds to the version of the product manufactured prior to the date appearing on this page. There may, however, be some differences between the manual and the product if the products has been modified thereafter. The information contained in this document is subject to change without notice. Manual revision R01 Part number: 10051852 First edition, May 2015 Printed in Canada Safety Precautions and Symbols This section gives you the most important precautions to follow, identifies and explains the various safety symbols found on the instrument and various accessories. Before turning on the instrument and the various accessories, make sure that the proper safety precautions are taken, as described below. General Precautions Before turning on your equipment, carefully read the instructions in this user manual and those found in the TOPAZ™ user manual. Never touch connector pins, when the instrument is turned on, as high voltage may be present. Keep this user manual in a safe place for future reference. Follow the installation and operation procedures carefully. Heed the safety warnings found on the PaintBrush scanner and in this manual. The PaintBrush scanner has been designed for Non-destructive evaluations of industrial and commercial materials. Do not use the TOPAZ, the PaintBrush scanner and the various accessories for any other purpose other than the intended use stated above. The mains plug of AC/DC adapter, of your ZETEC data acquisition unit, shall only be inserted in a socket outlet provided with a protective earth contact. You must not negate the protective action by using an extension cord (power cable) without a protective conductor (grounding). Grounding one conductor of a two-conductor outlet is not sufficient protection. Only use cables and accessories approved by ZETEC for your PaintBrush scanner. Whenever it is likely that the ground connection is ineffective, turn off the instrument and the various PaintBrush scanner accessories and secure it against any unintended operation. If the equipment is used in a manner not specified by ZETEC, Inc., the protection provided on the equipment may be impaired. Do not install substitute parts or perform unauthorized modifications to the PaintBrush scanner or to your ZETEC instrument. The PaintBrush scanner must be serviced by manufacturer only. For any problem or question regarding this your equipment, contact ZETEC, Inc., or an authorized ZETEC, Inc. representative. ZETEC service personnel shall apply best practices for maintenance of the PaintBrush scanner. i Electrostatic Discharge Precautions Should you ever have to disassemble any of PaintBrush scanner or touch any of its internal components (under ZETEC-authorized supervision), make sure that you take all the necessary precautions against electrostatic discharges (ESDs). ESDs can permanently damage electronic components in your system. Electrostatic damage to components can take the form of disruptions or even catastrophic system failures. Moreover, omitting to take appropriate precautions could void your warranty. The basic rules of ESD control are: Handle ESD-sensitive components only in protected work areas. Always ground yourself when handling ESD-sensitive components or assemblies. Be sure to use the proper maintenance and work procedures in conjunction with the type of material. Always use a conductive or shielding container during storage or transportation of ESDsensitive components or assemblies (for example, printed circuit boards). The materials used must create a Faraday cage, which will isolate the contents from electrostatic charges. Open ESD-safe containers only at a static-safe workstation. Such a workstation will include equipment to perform three critical functions: grounding, isolation, and neutralization. At the static-safe workstation, follow this procedure before beginning any work: 1. Test your grounding devices to ensure that they are functioning properly. 2. Put on your wrist strap or foot grounding devices. 3. Check all grounding cords to make sure they are properly connected to ground, ensuring the effective dissipation of electrostatic charges. 4. Turn on an ion generator, if available. This will help dissipate static charges from any nonconducting materials. 5. Make sure that your work surface is clean and clear of unnecessary materials, particularly common plastics. 6. When handling electronic devices, hold the components by their plastic edges. Avoid touching the metal leads. 7. Avoid bringing components in contact with your clothing, hair, or other nonconducting materials. The above procedure is only a summary of the measures to be taken against electrostatic discharges. Please consult the literature dedicated to that topic for more details. ii Instrument Markings and Safety Symbols The following symbols may be found on your PaintBrush scanner, and pertain to safety regulations that should be followed carefully. The crossed pace maker symbol is used to indicate a potential hazard to the bearer of those devices and other sensitive devices (such as neurostimulators and metallic implants). The PaintBrush scanner are using powerful magnets to hold them firmly against the components they inspect; such powerful magnets can interfere with bionic devices. Refer to the user manual to ensure proper protection and safe practice. The lightning flash with arrowhead label is used as a “high voltage sign.” It indicates the presence of “hazardous voltages” (within the product enclosure or accessible externally) that may be of sufficient magnitude to constitute a risk of electric shock to persons. Refer to the user manual to ensure proper protection and safe practice. The “RoHS compliant” symbol signifies that this product is compliant with RoHS directive 2002/95/EC. This directive prohibits the use of lead, mercury, cadmium, hexavalent chrome, poly-bromated biphenyl (PBB) or poly-bromated diphenylether (PBDE) in certain classes of electrical or electronic units as of July 2011. The “Crossed-Out Wheeled Bin” label is a reminder to dispose of this product in accordance with local WEEE regulations. This electronic instrument was manufactured according to high quality standards to ensure safe and reliable operation when used as stated in this manual. Due to its nature, this instrument may contain small quantities of substances known to be hazardous to the environment or to human health if released in the environment. For this reason, Waste Electrical and Electronic Equipment (commonly known as WEEE) should never be disposed of in the public waste stream. The “CE” marking approves conformity with all applicable directives and standards of the European community. iii EMC Directive Compliance The PaintBrush scanner accessories may generate frequency energy causing interference if not installed and used in strict accordance with ZETEC instructions. The different equipments have been tested and found to comply with the limits for an industrial device in accordance with the specifications of EMC standard EN 61326-1 (2012). It is required to mention that emissions in excess of the levels of this standard may be generated by the instrument and/or the cabling if it is connected to test probes that are not properly manufactured or not properly connected to the instrument’s connectors. Security Standards The PaintBrush scanner is a Class 1 instrument of installation category II. It complies with standard EN-61010-1 (2010). iv Conventions of this Manual This user manual is designed to be easy to understand and user-friendly, but to take full advantage of the information given, it is good to know the conventions used. In the following pages, you will find the definitions of the safety indications as well as the typographical choices made. Safety Indications The purpose of the various safety indications is to ensure operator safety and instrument integrity. Warning! The Warning sign denotes a hazard. It calls attention to a procedure, practice, or the like, which, if not correctly performed or adhered to, could result in severe personal injury or death. Do not proceed beyond a Warning sign until the indicated conditions are fully understood and met. Caution The Caution sign denotes a hazard. It calls attention to a procedure, practice, or the like, which, if not correctly performed or adhered to, could result in material damage or loss of data. Do not proceed beyond a Caution sign until the indicated conditions are fully understood and met. IMPORTANT: The IMPORTANT sign calls attention to a note that provides important information, or information essential to the completion of a task. NOTE: The NOTE sign calls attention to an operating procedure, practice, or the like, that requires special attention. A NOTE also denotes related, parenthetical information that is useful but not imperative. v Typographical Conventions The various typographical conventions explained below were defined to standardize and simplify the look and feel of this documentation. Italic An italic typeface is used to indicate emphasis on a specific word or phrase (for example: This options should never be checked.) Bold A bold typeface is used to indicate the name of a menu item or a named user interface element (for example: the File menu, the Options… button, etc.) Generally, items in bold are capitalized to reflect the capitalization used on screen. SMALL CAPITALS Small capitals are generally used when reference is made to inscriptions found “as is” on an instrument (buttons, connectors, indicator lights, etc.) vi Table of Contents Table of Contents ............................................................................ vii Introducing the PaintBrush™ Scanner ............................................. 1 1 PaintBrush Scanner Features ..................................................... 3 Overview of the PaintBrush Scanner .............................................................................................. 4 2 Before You Begin ........................................................................ 7 PaintBrush: Preparation for Use ..................................................................................................... 7 3 Creating an Inspection Configuration .................................... 19 4 Maintenance ............................................................................. 25 Cleaning the PaintBrush ................................................................................................................. 25 Changing Scanner Wheels ............................................................................................................. 26 5 Specifications ............................................................................ 29 General .............................................................................................................................................. 29 PaintBrush Interface Connector ................................................................................................... 31 Appendix A – Accessories ............................................................... 33 AIP Irrigation Pump ....................................................................................................................... 33 Connection Adapters and Splitters ............................................................................................... 34 Ethernet Cable ................................................................................................................................. 35 PaintBrush User Manual ................................................................................................................ 35 Appendix B – AIP Irrigation Pump .................................................. 37 Overview ........................................................................................................................................... 37 Maintenance ..................................................................................................................................... 41 Troubleshooting .............................................................................................................................. 42 Specifications .................................................................................................................................... 43 Connector References ..................................................................................................................... 45 vii viii Introducing the PaintBrush™ Scanner ZETEC provides you with a complete and integrated solution in order to get the full benefit out of your inspection system. You can enhance your examination of large surface with the ZETEC’s PaintBrush™ scanner. The PaintBrush™ is a hand held scanner with built-in encoders and magnetic wheels (for carbon steel) or non-magnetic wheels (for composites materials). Its dual encoder design translates the PaintBrush™ free motion to a scan-index inspection canvas. Its motion, not bounded by single axis motion, allows you to freely paint over the surface to examine. It This makes the PaintBrush™ an ideal tool to perform phased array UT thickness measurements over large areas that would require multiple scan lines. The PaintBrush™ scanner easily integrates to your TOPAZ™ with the detection feature that automatically set parameters such as encoder resolution and scanner configuration. In addition, you can also take advantage of embedded control buttons to pause your data acquisition, reset encoders or turn ON or OFF your AIP™ irrigation pump. 1 2 1 PaintBrush Scanner Features This chapter presents a brief description of the features and software functions dedicated to the PaintBrush scanner for your TOPAZ UltraVision interface. Free motion scan patterns; Pause and restart data acquisition; Reset encoders; Turn ON or OFF your irrigation pump (AIP™); PaintBrush positioning function with graphical feedback for straightforward sequence settings definition. These controls are at your fingertips. The PaintBrush is available in two different models according to the wheel type mounted on the scanner: magnetic or rubber composite. You will find information about the available accessories in order to optimize your inspection in “Accessories” on page 33. Warning If the equipment is used in a manner not specified by ZETEC, the protection provided by the equipment may be impaired. Always refer to your user manual for best practices. The PaintBrush is meant to be used by trained personnel only. Always follow local safety regulations in order to avoid hazardous situations during use. For more information on the standard operation of your TOPAZ system, please refer to your TOPAZ user manual. 3 1.1 Overview of the PaintBrush Scanner The design of the PaintBrush scanner allows you to adapt it to examine large surface components of different diameters (from 4 inches to flat) and thicknesses. Figure 1-1 PaintBrush Scanner 4 Your PaintBrush scanner allows you to: Perform Free Motion Scan Patterns The main feature of the PaintBrush scanner allows you to move the scanner freely over the surface to examine. When both wheels are in contact with the surface, you can move in any direction, turn right or left, and your data acquisition will follow. Pause and Restart your Data Acquisition By clicking the Left button on your PaintBrush scanner, the data acquisition is paused, allowing you to move the scanner without acquired signals by keeping the encoded position feedback information. Clicking it once more restarts the data acquisition. Left Button Reset your Encoder Positions By clicking and holding the Left button on your PaintBrush scanner for three (3) seconds, the encoder positions on your scan and index axes are reset to zero (0). Activate or Stop Couplant Flow By clicking the Right button on your PaintBrush scanner, the couplant flow from your AIP pump is started. Clicking it once more stops the pump. Right Button NOTE: Proper cable needs to be connected to your AIP pump remote control connector. for more information, see “Accessories” on page 33. 5 Positioning Graphical Feedback Your TOPAZ user interface offers a position settings graphical display that allows for easy sequence definition (for more information, see “Positioning your PaintBrush Scanner” on page 12). 6 2 Before You Begin Please review the sections below before using your PaintBrush scanner. This chapter presents detailed instructions on the connections and assembly of the various accessories in order to better integrate and optimize your inspection solution. Warning! The PaintBrush scanner uses powerful magnets to hold it firmly against the component to inspect; such powerful magnets can interfere with bionic devices. Operators bearing pace makers and other sensitive devices (such as neurostimulators and metallic implants) should take the necessary precaution to avoid potential hazards. 2.1 PaintBrush: Preparation for Use This section shows you how to: Connect your scanner to your data acquisition unit; Probe/wedge assembly attachment; Connection to AIP pump for couplant control. Adjust encoder resolution according to wheel diameters. Positioning your Scanner. How to Connect to your Data Acquisition Unit To connect your PaintBrush to your data acquisition unit, simply take the encoder cable and make sure it is properly connected to both the PaintBrush and your system. Figure 2-1 Connecting the PaintBrush to your TOPAZ 7 IMPORTANT: Your PaintBrush scanner comes with an auto-detection capability, similar to the autodetection of phased array UT probes, that provides essential parameters information to your system (e.g. scanner identification and nominal encoder resolution). Auto-detection signal is provided through the encoder cable. Before connecting the Paintbrush to the TOPAZ, make sure you are using Version 3.7R1 or later. Make sure your TOPAZ is turned ON for the feature to work properly. Probe/Wedge Assembly Attachment To attach or remove a probe/wedge assembly on the probe holder (i.e. “forks”): 1. Using the provided Allen key, loosen the screw of one of the two (2) holder arms until you can remove it. This allows you to remove a probe/wedge assembly currently in place. 2. To attach a probe: 2 a. Position the probe/wedge assembly between the two (2) holder arms. 2 b. Move the loosen arm in order to secure the probe/wedge assembly in the holder. 2 c. Using the provided Allen key, tighten the screw in place. Depending on the selected probe/wedge assembly, you may require different sets of harm holders. 8 Managing your Couplant Since it is a good practice to use an irrigation pump to manage your couplant, your PaintBrush scanner allows you to turn ON or OFF the couplant flow of an AIP pump with the touch of a button. To control your irrigation pump: 1. Connect the scanner pump cable to the Remote connector of the AIP pump. Remote Connector 2. Connect the coupling outlet to your probe/wedge assembly manifold or couplant inputs. 3. Turn ON the irrigation pump. WARNING Do not use AC power adapters of your instruments (TOPAZ and AIP) in wet areas or when couplant management is difficult in order to avoid electrical shock. It is recommended to operate your instruments on batteries. 9 4. On your PaintBrush, push the Right button to start the couplant flow. Right Button 5. Adjust couplant flow by turning the Flow Control knob. Flow Control Knob IMPORTANT: For more information on the irrigation pump, see “AIP Irrigation Pump” on page 37 10 Adjusting Encoder Resolution for New Wheel Diameters The software process that allows the coverage calculations to follow the PaintBrush motion over your specimen requires precise wheel diameter input (with an accuracy of 0.1mm). To adjust your PaintBrush wheel diameters: 1. Go to the Mechanical menu. 2. Select the Paintbrush tab. 3. Tap Calibrate. The Calibrate Wheels dialog box appears. 4. Enter the Left and Right wheel diameters. 5. New Encoder Resolution shows the computed resolution for the new wheel (for Left and Right). 6. Tap Accept. The new encoder resolutions are burned in the memory chip of your PaintBrush scanner. IMPORTANT: It is important to validate your encoder resolution base on the applicable code for your examination. 11 Positioning your PaintBrush Scanner In order for the data mapping to match how you actually moved the PaintBrush over your specimen, it is important that you defined the start position and orientation of the scanner. To define a Paintbrush inspection sequence: 1. Go to the Mechanical menu. 2. In the Sequence tab, select Paintbrush. In the Paintbrush tab, you have access to the Position function that provides a user-friendly interface to define all mechanical offsets. Figure 2-2 Paintbrush Position Dialog box 12 The default location of your PaintBrush scanner is in-line with the scan axis origin (left scanner wheel) and in-line with the index axis origin (back of the scanner). For offsets calculation, the software uses the point in the middle of wheels as a reference. Figure 2-3 Paintbrush Reference Position Scanner Reference Position To position your PaintBrush scanner, you can either enter preset and offsets values or use your finger to tap on different locations. If you tap the specimen corners, the PaintBrush scanner will automatically be positioned there and the offsets will be changed accordingly. 13 Figure 2-4 Quick Positioning Example If you click on the scanner itself, it will rotate clockwise by 90°. Each additional tap, rotates the scanner 90° and the preset and offsets values are adjusted automatically. Figure 2-5 Scanner Rotation Example You can also invert the scan/index representation by modifying the Inverted Representation parameter. 14 Figure 2-6 Inverted Representation Example As previously mentioned, you can manually change the different parameters to position your scanner/probe/wedge assembly on your specimen. 15 Figure 2-7 Paintbrush Position Example: Orientation Preset, Scan Preset and Index Preset Index Preset Scan Preset Orientation Preset 16 Figure 2-8 Paintbrush Position Example: Fork Offset, Scan Reference Offset and Index Reference Offset Index Reference Offset Fork Offset Scan Reference Offset 17 18 3 Creating an Inspection Configuration The TOPAZ with its UltraVision Touch interface is a powerful tool that is ready to tackle a number of inspection challenges. With the PaintBrush scanner, you get an enhanced experience for large surface specimen examination. The following chapter provides a guide in order to prepare PaintBrush inspection configurations. This guide focuses on the features of the PaintBrush scanner. For more in-depth look at the standard TOPAZ software functions, refer to the TOPAZ user manual. Paintbrush can accommodate a wide variety of probes. The following example presents a generic procedure to implement thickness measurement using PaintBrush. Situation Thickness inspection of a carbon steel plate with a nominal thickness of 12.7mm (0.5in.) using one (1) LM-5MHz probe and LM-0LW wedges. Scanning Method Encoded Paintbrush scan Scanning mechanism: PaintBrush Scanner Recording Storing C-scan amplitude and position signals To implement a thickness measurement configuration: 1. Connect your PaintBrush scanner to your TOPAZ. The auto-detection window will appear and display the newly connected scanner. 2. Tap Accept. Encoder resolution and wheel diameters hard-coded in the PaintBrush scanner are implemented in the TOPAZ interface. 3. Define your Specimen. 19 3 a. 3 b. 3 c. 3 d. Set the Shape Type to Plate. Specify the dimensions of the plate (Length and Width). Specify your specimen Thickness: 12.7mm (or 0.5in.). Tap Accept. Your specimen shape is now defined. 3 e. Set your Material to Steel. This also defines the sound velocities that will be used for the focal law calculations. 4. Define your first Channel settings. 4 a. Set your Channel name. It is your choice to either rename the channel or leave the default name. However, for multiple channel configuration, it is good practice to provide a meaningful name using channel characteristics. 4 b. Set your channel Configuration to Phased Array Pulse Echo. 4 c. Connect your phased array UT probe for auto-detection (with a 0° wedge) or select a Probe from the database (LM-5MHz) and select a Wedge from the database (LM0LW). 20 4 d. Define your Calculator parameters. 4 e. 4 f. 4 g. 4 h. 4 i. 4 j. 4 k. 4 l. 4 m. 4 n. 4 o. 4 p. 4 q. 4 r. Set your Skew Angle to 90°. Define your Scan Reference Set Index Reference to 0mm. Set Wave Type to Longitudinal. Selecting the wave type defines the sound velocity used for the calculations which comes from the material selection. Set Sweep to Linear. Set the refracted Angle to 0° Set the Aperture size to 16. Set the First Element to 1. First element used by the first active aperture. Set the Last Element to 64. Last element used by the last active aperture. Set your Focal Point to Half Path. Set Position to 10.0mm (0.393in). Set Timebase Type to Half Path or True Depth. Define Timebase Start and Timebase Range. Tap Accept. 21 This configuration creates 49 different beams by literally moving the active aperture (16 elements) along the array. This also called electronic scanning. 5. Adjust your ultrasound settings (UT Settings menu). 5 a. Set your General parameters (Gain, time base...). 5 b. Set your Pulser & Receiver parameters (Voltage, Pulse Width, Rectification, Filter and Smoothing). 6. To create C-scan data, define your Gates parameters. 6 a. Tap Gate and select Gate 1. 6 b. Set State to On. 6 c. Define the gate Start, Range and Threshold. Adjust these parameters in order to monitor the inside of the plate (without the nominal back-wall location). 6 d. Set the detection mode of the gate (Trigger): Crossing or Maximum. back-wall echo location. 7. In the UT Settings menu, go to the Digitizer sub-menu. 8. Set Produce A-Scan to No. Your configuration will now only record C-scan data information. 9. To define your PaintBrush inspection sequence, go to the Mechanical menu. 10. In the Sequence tab, select Paintbrush. 11. In the Sequence tab, you can now define the Scan Start, Stop and Resolution. 12. In the Sequence tab, you can now define the Index Start, Stop and Resolution. 13. To position your PaintBrush scanner to its start location on your specimen: 22 13 a. Go to the Paintbrush tab. 13 b. Tap Position. The Paintbrush Position window appears. 13 c. Define Fork Offset. The Fork Offset value depends on the probe/wedge holder design. It is the distance between the front of the scanner and the probe/wedge reference point. 13 d. Define the Orientation Preset. Orientation of the scanner according to the scan and index axes (see Figure 3-1). 13 e. Define the Scan Preset. Distance between the scanner reference point and the origin of scan/index coordinate system along the scan axis (see Figure 3-1). 13 f. Define the Index Preset. Distance between the scanner reference point and the origin of scan/index coordinate system along the index axis (see Figure 3-1). IMPORTANT: It is important that your defined positioning is exactly where you will start your inspection for your data to be properly mapped on your specimen. Scan Reference Offset and Index Reference Offset are automatically defined from the values above. These values are defined per the probe/wedge assembly reference point (green dot on the front of the scanner). 23 Figure 3-1 Paintbrush Position Example Index Preset Scan Preset Orientation Preset 13 g. Tap Accept once your start location and orientation are correctly defined. NOTE: 24 See the glossary for additional information on the different parameters. See “Glossary” on page 49. 4 Maintenance You will find in the following pages the basic maintenance that you can perform on the PaintBrush to keep it in good working conditions. Keep in mind that, by design, the PaintBrush requires only minimal maintenance. 4.1 Cleaning the PaintBrush The PaintBrush external surfaces (housing and front panel) can be cleaned when needed. To clean the PaintBrush: 1. Make sure the PaintBrush is disconnected from the TOPAZ. 2. To bring the instrument back to its original finish, clean the housing and the front panel with a soft cloth. Caution Do not clean the instrument with a water jet, spray can, or spray bottle. The connector contacts could stay wet and produce a short circuit when plugging cables. 3. To get rid of persistent stains, use a slightly damp cloth with mild soap. Do not use abrasive products or powerful solvents that might damage the finish. 4. To remove dirt from the PaintBrush scanner wheels, you can use a soft cloth or the sticky side of a tape. 25 4.2 Changing Scanner Wheels The PaintBrush scanner is offered with either magnetic wheels or with composite rubber wheels. If required for cleaning or replacement, you can remove PaintBrush scanner wheels. Warning! The PaintBrush scanner uses powerful magnets to hold it firmly against the component to inspect; such powerful magnets can interfere with bionic devices. Operators bearing pace makers and other sensitive devices (such as neurostimulators and metallic implants) should take the necessary precaution to avoid potential hazards. Figure 4-1 PaintBrush Scanner wheels: (A) Magnetic and (B) Rubber Composite (A) (B) To remove the wheels from your scanner: 1. Gather the spanner wrench and Allen key provided in your PaintBrush scanner kit. 26 Figure 4-2 PaintBrush Scanner Tools: (A) Spanner Wrench and (B) Allen Key (A) (B) 2. Align the pegs of the spanner wrench with the peg holes of the scanner. 3. Using the Allen key, remove the wheel screw 27 Figure 4-3 Wheel Removal 4. The wheel can now be easily remove from the scanner axle. 5. Either clean the wheels or gather new one. 6. Place the cleaned or new wheel on the scanner axle. 7. Position the spanner wrench on the new wheel (wrench pegs inserted in the wheel peg holes). 8. With the Allen key, replace the screw. The new wheel is now in place, repeat steps 2 to 7 for the second wheel. 28 5 Specifications You will find in the following pages the specifications of the PaintBrush. 5.1 General This section contains the general physical specifications for the PaintBrush. Housing Size (W x H x D) 84.25 mm x 93.53 mm x 136.40 mm (3.32 in. x 3.68 in. x 5.37 in.) Net weight 1030g (2.27 lb) without cable 1400g (3.09 lb) with 5 m cable Cable Length 5 m (196.85 in.) Figure 5-1 PaintBrush Size 29 Inspection Diameters and Positioning Pipe minimum diameter Horizontal and vertical 101.6 mm (4.0 in) Pipe maximum diameter 48'' (1219.2mm) or Flat Maximum position deviation ±1.4mm/1000.0mm typ. Environment Examination surface operating -20°C to 150°C (-4°F to 302°F) temperature Note: Intermittent operation, maximum duration of 25 min. at 150°C (302°F) with ambient temperature at 22°C (72°F). Operating temperature -20°C to 75°C (-4°F to 167°F) Storage temperature -40°C to 75°C (-40°F to 167°F) Ingress Protection Designed for IP66 European Conformity CE compliant Buttons Left button Pause and restart acquisition or If held for 3 seconds, resets encoder positions to zero (0) Right button Start or Stop couplant flow (with AIP irrigation pump) Power supply requirement +5V ± 10% @ 200mA Power 30 5.2 PaintBrush Interface Connector Description HD-15, female connector Suggested cable connector ZETEC, Inc., 21AE0052 Figure 5-2 I/O Interface Connector Table 1 Pin-out for the I/O interface connector Pin I/O Signal 1 In - 2 In - 3 In +5V 4 - - 5 In/Out - 6 - - 7 - - 8 In/Out - 9 In 10 Name Current Type Left button switch (NO, switched to +5V when pressed) - - Right button switch (NO, switched to +5V when pressed) - - input power 200 mA - - - - TTL - - - - - - - TTL PhA axis 1 Right Wheel Encoder Phase A - TTL In PhB axis 1 Right Wheel Encoder Phase B - TTL 11 In PhA axis 2 Left Wheel Encoder Phase A - TTL 12 In PhB axis 2 Left Wheel Encoder Phase B - TTL PaintBrush identifier PaintBrush identifier 31 Table 1 Pin-out for the I/O interface connector 32 Pin I/O Signal 13 - - 14 - - 15 - Gnd Name Current Type - - - - KEY (Pin disabled) Ground Appendix A – Accessories A variety of accessories are available for your PaintBrush scanner. You will find an alphabetical list of available accessories in the following pages. A.1 AIP Irrigation Pump ZETEC offers an irrigation pump for couplant delivery, the AIP. You can get a couplant pump by simply ordering ZETEC item # .10050408 33 A.2 Connection Adapters and Splitters ZETEC offers a series of connection adapters which allows operation of its standard PA probes on different hardware platforms or of other PA probes on ZETEC’s equipment. In order to allow simultaneous operation of multiple PA probes, we also offer a series of splitter cables and boxes. Should you need special connection solutions, don’t hesitate to contact us for any custom design. Table 2 Adapters and Splitters Adapter/Splitter Part number # 10037252 Description Adapter Box - Connect one DYNARAY compatible PA probe connector (Hypertronics) to the ZIRCON or TOPAZ (ZPAC male connector to DYNARAY female connector, 128 connections) 34 # 10037251 Adapter Box - Connect one Omni-type PA probe connector to the ZIRCON or TOPAZ (ZPAC male connector to Omni-type female connector, 128 connections) # 10037253 Splitter Cable - Connect simultaneously 2 DYNARAY compatible PA probes (Hypertronics) to the ZIRCON or TOPAZ (ZPAC male connector to 2 DYNARAY female connectors, 1-64 and 65-128) # 10048834 Splitter Box - Connect simultaneously 2 ZIRCON or TOPAZ compatible PA probes to the ZIRCON or TOPAZ (ZPAC male connector to 2 ZPAC female connectors, 1-64 and 65-128). It also provides 4 LEMO 00 connectors for 2 additional TOFD channels. Adapter can be mounted on the back of your TOPAZ unit. A.3 Ethernet Cable ZETEC can provide you with an additional 2-meter Ethernet cables. These are Category 6 shielded Ethernet cables. Simply order ZETEC item #10039986. One Ethernet cable is provided standard with every TOPAZ. A.4 PaintBrush User Manual Your PaintBrush comes with a printed copy of its user manual. You can get an additional printed copy of this manual by simply ordering ZETEC item # 10051852. 35 36 Appendix B – AIP Irrigation Pump ZETEC’s irrigation pump unit, the AIP, is a is gear pump designed for efficient delivery of low viscosity ultrasonic couplant (e.g. water). A battery-operated compact and robust casing designed to allow the irrigation pump to be deployed anywhere, even in contaminated areas thanks to its hermetically-sealed casing and easy to clean inner tank. Caution ANTI-FREEZE COUPLANT: Although your AIP pump can operate at low temperature, you must use a couplant that will not freeze; otherwise the piping inside the pump will be damaged. Caution AIP PUMP STORAGE: When storing your AIP pump at temperature near or below 0°C, ensure that no couplant that may freeze is left in the unit piping. To prevent damage to your AIP pump, remove all couplant from the unit piping system, circulate anti-freeze liquid (e.g. sub-zero windshield washer) and then remove all excess liquids. B.1 Overview This section presents a description of the AIP pump front panel. Front Panel Description The front panel enables the user to perform the following: Power up and down the AIP pump; Adjust the couplant flow; Disable and enable pump from remote control. 37 Figure B-1 Front panel of the AIP Pump The front panel features the following components: 38 DC-IN 15V - 6.7A DC power input. This input connector is used to power up and/or recharge the batteries for the mains line. The ratings for this input are 15V - 6.7A POWER ON/OFF The power switch is used to turn ON/OFF the instrument. BATTERY TRANSPORT COMPARTMENT Compartment to be used only for the transportation of the batteries. FLOW CONTROL This control knob allows you do increase or decrease the flow of the pump. INLET Couplant entry in the pump mechanism. OULET Couplant output REMOTE CONTROL Remote control connection that allows to enable or disable the pump. When left opened, the pump is always enabled. FILTER COMPARTMENT This compartment is used to store couplant filter during transportation. Make sure that the cover is properly latched during transportation. LOW BATTERY There are 2 LED status indicators providing information on battery charge status. LED flashing indicates low battery level. Handle One handles is located on the pump top cover that can be used to carry the unit. The top panel enables the user to insert or remove the batteries. The battery compartment can hold up two batteries. However, the unit can operate with only one battery installed. Warning Your unit uses Li-Ion batteries (Voltage 10.8V, Capacity 7800mAh). Only approved battery must be used. Batteries must not be exposed to wet conditions. To insert a battery: 1. Open the battery compartment door. 2. To insert a battery, align the groove on the battery with the small edge inside the battery compartment. 3. Close the battery compartment door. When the AC/DC power adapter is properly connected, the batteries will recharge inside the AIP pump. The recharging process start automatically when the adapter is connected if the battery temperature is below 45°C. You can also recharge your batteries using an external battery charger. To remove a battery: 1. Open the battery compartment door. 2. Pull the battery out by using the tab. NOTE: The AIP pump will charge batteries even if turned OFF, given the AC/DC adapter is properly connected and the battery temperature is below 45°C. 39 Figure B-2 Side panel of the AIP Pump 40 B.2 Maintenance This chapter covers the basic maintenance an operator can perform on the AIP pump. The maintenance operations explained below allow you to keep the unit in good working order. By design, the AIP pump requires only minimum maintenance Preventive Maintenance The AIP pump does not contain any external mobile parts and does not require any particular type of maintenance. We only recommend a regular visual inspection of the unit to ensure that it is working properly. IMPORTANT: Couplant filter must be changed regularly to avoid overpressure conditions. Cleaning the Unit The external surfaces of the AIP pump, its case and the front panel, can be cleaned if needed. This section provides the steps to clean the unit. IMPORTANT: Make that the excess couplant is properly recovered according to local laws and regulations. To clean the unit: 1. Make sure that the unit is not powered on, that the AC/DC adapter is unplugged and batteries are removed. 2. To revert the unit to its original finish, clean the case and front panel with a soft cloth. WARNING Do not clean the unit with a water jet, spray can or any other type of sprayer. Liquid could seep into the unit and damage it, or the contact on the connectors could be wet and cause a short circuit when connecting the cable. 3. To remove stubborn stains, use a cloth dampened with a soft soap solution. Do not use abrasive products or powerful solvents, which could damage the finish. 4. Wait until the unit is completely dry before inserting the batteries or plugging the AC/DC adapter. 41 B.3 Troubleshooting This section provides troubleshooting instructions related to the unit operation. Table 3 Troubleshooting guide for the ZMC4 Problem Cause Solution My unit will not power on. Power cord is not connected and without batteries. Check the power cord. No charged batteries without power cord. Insert properly charged batteries. Couplant is not flowing Flow adjustment is closed Check couplant; or pipes are clogged. Verify that flow adjustment is properly adjusted; Verify that couplant is clean and free from large dirt particles that could clog the piping and filter. It is good practice to regularly flush the piping with clean couplant to remove clogging particles. Battery does not charge Battery is in an end-of-life Replace battery with a new one. cycle Temperature exceeds 45°C AIP pump turns off by itself 42 Batteries will not charge for security reasons. When unit cools down, the charging process will restart. AIP pump temperature is Let the irrigation pump cool down outside of operating and return to normal operating range. temperature. Filter is clogged. Change filter. Couplant flow is too restricted. Ease couplant flow. B.4 Specifications This section presents general specifications of the instrument (size, operating temperature, etc.). Housing (without handle) Dimensions (W x H x D) 41.6 x 22.1 x 33.4 cm (16.4 x 8.7 x 13.1 in) Weight 6.1 kg (13.4 lbs) without batteries and without couplant 7.1 kg (15.7 lbs) with batteries and without couplant Environment Operating temperature Storage temperature ab 5°C to 45°C (41°F to 113°F) -20°C to 60°C (-4°F to 140°F) Maximum operating relative humidity 80% up to 31°C (88°F), decreasing linearly to 50% relative humidity at 40°C (104°F) Altitude Up to 2000 m Ingress Protection Designed for IP66 Pollution Degree Degree 2: When used indoors Degree 3: when used outdoors without exposing to direct sunshine/wet locations, in battery powered mode. a. b. Pipe and pump must be flushed from any couplant. Proper couplant must be used to ensure that the unit is not damaged by freezing of the couplant. Some couplant are toxic and regulated by local laws. It is the user responsibility to follow local regulations regarding hazardous materials. 43 Electrical Specifications and Flow Information This section presents power supply specifications and flow information. AC/DC Converter Input Voltage 100-120 VAC / 220-240 VAC Main supply voltage fluctuations up to ±10% of the nominal voltage Transient over-voltage II Frequency 50 Hz or 60 Hz AC/DC Converter Output DC OUT 15V/6.7A Maximum power 100 VA Battery type Li-ion battery (Rechargeable pack) Voltage 10.8V Capacity 7800mAh Only approved battery must be used. Number of batteries up to 2 (battery chamber can hold 2 hot-swappable batteries) Battery life Up to 8 hours with two batteries (depending on water flow and pressure) Flow information Flow rate range Adjustable from 0 to 2 l/min Maximum couplant column 2.5 meters Maximum generated pressure 174 psi or 1200 kPa Typical operating pressure WARNING 44 0-40 psi or 0 to 276 kPa Piping must be size 1.5 time the maximum operating pressure. B.5 Connector References This section presents the technical description of the AIP front panel connectors. For each connector, you will find: a brief description, the manufacturer number, the number of the corresponding cable connector, an illustration, and a table giving the specifications or the signal pin-out for the connector. 45 REMOTE Connector Description 4-pin, female Manufacturer and number Fisher Connectors, DEE.102.A053-130 Suggested cable connector Fisher Connectors, S.102.A053-132+, E31.102.2\4.3+B (sealing nut) Figure B-3 The REMOTE connector Table 4 Pin-out for the REMOTE connector 46 Pin Signal Description 1 Remote input This line must be shorted to ground to disable the pump. 2 GND Ground return used with the remote input. Zetec, Inc. 875 Bl. Charest Ouest, Suite 100 Québec, Qc G1N 2C9 CANADA P/N 10051852 -R01