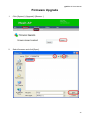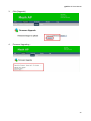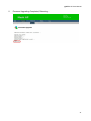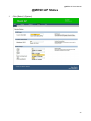
1
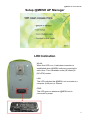
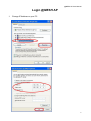
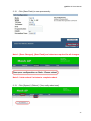
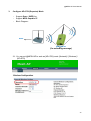
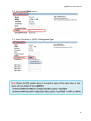
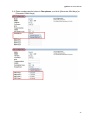
@MESH AP User Manual
@MESH AP
WiFi Mesh Access Point
User Manual
September 2008
1
@MESH AP User Manual
Contents
• Introduction .………………………………….…………...……...…….…….…………….3
• Features .………………………………………….….…….……….………………………3
•
•
•
•
•
@Mesh AP Manager ......……………………….…..….………….………….…………..3
Setup @MESH AP Manager………………….…..….………….………….……………4
LED Indication………………………………………………………………………………4
Login @MESH AP………………………………………………………………………….5
@MESH AP Manager Settings…………………………………………………………..9
•
•
•
•
•
@MESH AP Quick Guide………………………………………………………………..15
Set @MESH AP IP …........................................……………………………...…….…33
Set Login Password …....……………………….….……….……………….….….……34
Backup & Restore…………………………………………………………………………36
Back to Factory Default …..……………………..….…………..………………….……38
•
•
•
•
•
Firmware Upgrade…….…….…………………..…….…………….……………..….….39
Change @MESH AP name………………………………………………………………42
@MESH AP Status………………………………………………………………………..43
Troubleshooting ………………………………….…….……………….…….…….…....52
Technical Specifications ……………………………….……….….………...………..…53
2
@MESH AP User Manual
Introduction
@MESH AP can extend your existing network without any extra configuration and wiring.
@MESH AP supports [AP+Mesh], [AP+STA (Repeater)] and [AP] mode.
Features
• Cost-Effective
• High Performance
• Easy for installation
• Auto connection for better signal route
• Easy to Configure by @MESH AP Manager
@MESH AP Manager
•
•
•
•
MESH AP Manager Version 1.0.7
Search all @MESH AP automatically
Configure one or all @MESH AP
Display neighbor @MESH AP signal
• Auto-Refresh signal of @MESH AP
• Display @MESH AP network map
3
@MESH AP User Manual
Setup @MESH AP Manager
LED Indication
WLAN:
When this LED is on, it indicates connection is
established when @MESH units are connected to
each other. This is available under [AP+Mesh] &
[AP+STA] modes.
LAN:
This LED indicates this @MESH unit connects to a
computer (LAN port) or Internet.
PWR:
This LED goes on whenever @MESH unit is
connected to power.
4
@MESH AP User Manual
Login @MESH AP
1.
Change IP Address on your PC
5
@MESH AP User Manual
2.
Run [@MESH AP Manager] or enter the default IP (192.168.1.100) in web browser.
6
@MESH AP User Manual
@MESH AP Manager
1.
When start [@MESH AP Manager], it will search all the @MESH APs in the network
automatically.
2.
Click [Discover] to search all the @MESH APs in the network.
7
@MESH AP User Manual
3.
Double-click the selected @MESH AP to setup @MESH AP via web browser.
4.
Enter [User name] & [Password] to login the @MESH AP.
User name: admin or root
Password: admin
8
@MESH AP User Manual
@MESH AP Manager Settings
Mesh ID: Mesh network ID, 0-32 Bytes
STA ESSID: ESSID for [AP+STA] Mode only
Mesh Key: Encryption key between @MESH AP, 0-40 Bytes
AP ESSID: WiFi AP ESSID, 0-32 Bytes
RF Channel: [FCC] 1 – 11 Channel, [ETSI] 1 – 13 Channel
Operation: [AP+Mesh], [AP+STA] or [AP] Mode
1. Click [Operation] to select different mode. [AP+Mesh], [AP+STA] or [AP] Mode.
9
@MESH AP User Manual
2. Click [Change] to update [Channel], [Mesh ID], [Mesh Key], [ESSID] and [Operation] for
selected @MESH AP. @MESH AP will reboot automatically.
3. Click [Change All] to update [Channel], [Mesh ID] and [ESSID] for ALL the @MESH
APs in the network, all @MESH APs will reboot automatically.
10
@MESH AP User Manual
4. Select different @MESH AP in the list, it will display [Neighbor MESH AP Signal] for
each @MESH AP.
5. Click [Auto-Refresh] to refresh the selected @MESH AP information every 5 seconds.
11
@MESH AP User Manual
6. Click [Stop-Refresh] to stop.
7. Click [Map] to show the network map.
12
@MESH AP User Manual
8. Move the cursor on the MAC address and it will display the @MESH AP settings. Click
[Back] to close the map
9. Click [Exit] and [Yes] to quit [@MESH AP Manager].
13
@MESH AP User Manual
10. Click [Version] to see the software version of @MESH AP Manager.
14
@MESH AP User Manual
@MESH AP Quick Guide
• @MESH AP supports 3 modes: [AP+Mesh], [AP+STA] (Repeater) and [AP Mode].
1. Login @MESH AP
1-1.
Change IP Address on your PC.
1-2.
Run [@MESH AP Manager] or enter the default IP (192.168.1.100) in web
browser.
15
@MESH AP User Manual
1-3.
Enter [User Name] & [Password].
User name: admin or root
Password: admin
1-4.
@MESH AP configuration screen
16
@MESH AP User Manual
2.
Configure AP+ Mesh Mode
• Default Mode
: AP+Mesh
• Default Mesh ID : Mesh
• Default Channel Domain : FCC (Ch#1 – Ch#11)
• Default Channel : 11
2-1.
Click [Network].
2-2.
Click [Wireless].
17
@MESH AP User Manual
2-3.
Click [AP+Mesh] in Operation.
2-4.
Select desired setting for Channel Domain & Channel.
18
@MESH AP User Manual
2-5.
Enter the distance (in meters) of your application in Wireless Distance.
2-6.
The default MESH ID is [MESH]. MESH ID is the same as ESSID.
2-7.
Select [Disabled] or [AES] in Encryption Type.
• AES Passphrase: Create a encryption between @MESH APs.
19
@MESH AP User Manual
2-8.
Select [Static IP] in Connection Type. You can also change the settings of [IP
Address], [Netmask] and [Default Gateway].
2-9.
Select [DHCP] in Connection Type.
20
@MESH AP User Manual
2-10.
Click [Save Changes].
2-11.
Changes are saved in temporary memory.
21
@MESH AP User Manual
2-12.
Click [Save Flash] to save permanently.
Note 1: [Save Changes], [Save Flash] and reboot are required for all changes.
Note 2: It takes about 2 minutes to complete reboot.
2-13.
Click [System] \ [Reboot] \ [Yes, really reboot now].
22
@MESH AP User Manual
3.
Configure AP+STA (Repeater) Mode
• Support Open / WEP Key
• Support WDS-Capable AP
• Block Diagram :
ADSL
@MESH AP
(For extending coverage)
3-1. You can set @MESH AP to work as [AP+STA] mode. [Network] \ [Wireless] \
[AP+STA]
23
@MESH AP User Manual
3-2. The Default ESSID is [any]
3-3. Select [Disabled] or [WEP] in Encryption Type.
24
@MESH AP User Manual
3-4. Enter numbers and/or letters in Passphrase, and click [Generate 40bit Keys] or
[Generate 128bit Keys].
25
@MESH AP User Manual
3-5. Click [Save Changes].
3-6. Click [Save Flash].
26
@MESH AP User Manual
3-7. Reboot @MESH AP. Click [System] \ [Reboot] \ [Yes, really reboot now].
4.
Configure AP Mode
• Support Open / WEP 64/128 Bit Key
•
•
•
•
•
Support WPA-PSK, WPA2-PSK
Cipher Type: TKIP, AES
Support WPA-EAP, WPA2-EAP
Support TLS/TTLS/PEAP
Support QoS: WMM
• Block Diagram :
ADSL
RJ45
AQ500h
@MESH AP
(For extending coverage)
27
@MESH AP User Manual
4-1. @MESH AP can work as [AP] mode. [Network] \ [Wireless] \ [Operation]
4-2. The default ESSID is [Mesh]
28
@MESH AP User Manual
4-3. There are different selections in Encryption Type. Click WEP in Encryption
Type.
4-3-1. Encryption Type: WEP
29
@MESH AP User Manual
4-3-2. Encryption Type: WPA (PSK) or WPA2 (PSK)
WPA PSK: 8-63 characters
4-3-3. Encryption Type: WPA (RADIUS) or WPA2 (RADIUS)
RADIUS IP Address: RADIUS Server IP
RADIUS Port: 1812
RADIUS Server key: 1-32 characters
30
@MESH AP User Manual
4-3-4. QoS: Select [On] or [Off].
The WMM (Wi-Fi Multimedia) for Quality of Service and configurable
dedicated SSID for Voice/Video enables you to take advantage of low cost
call via Voice-over-IP. Flexibility Setting.
4-4. Click [Save Changes].
31
@MESH AP User Manual
4-5. Click [Save Flash].
4-6. Reboot @MESH AP. Click [System] \ [Reboot] \ [Yes, really reboot now].
32
@MESH AP User Manual
Set @MESH AP IP
1.
Static IP Mode: Change AP IP Address
2. DHCP Mode
33
@MESH AP User Manual
Set Login Password
1. Change login password: [System] \ [Password]
34
@MESH AP User Manual
Backup & Restore
1. Backup: [System] \ [Backup & Restore] \ [Backup]
35
@MESH AP User Manual
36
@MESH AP User Manual
2. Restore: [System] \ [Backup & Restore] \ [Restore]
37
@MESH AP User Manual
Back to Factory Default
•
Step 1: Power up @MESH AP and wait for 2 minutes.
•
•
•
Step 2: Click [System] \ [Backup & Restore] \ [Default].
Step 3: Click [Save Flash] and reboot.
Step 4: Wait for @MESH AP to reboot.
38
@MESH AP User Manual
Firmware Upgrade
1.
Click [System] \ [Upgrade] \ [Browse…]
2.
Select firmware and click [Open].
39
@MESH AP User Manual
3.
Click [Upgrade].
4.
Firmware Upgrading…
40
@MESH AP User Manual
5.
Firmware Upgrading Completed, Rebooting…
41
@MESH AP User Manual
Change @MESH AP Name
1.
Change @MESH AP name: [System] \ [Setting], enter a desired Host Name.
42
@MESH AP User Manual
@MESH AP Status
1.
Click [Status] \ [System].
43
@MESH AP User Manual
2.
Click [Status] \ [Interfaces].
44
@MESH AP User Manual
3.
Click [Status] \ [ARP Cache].
4.
Click [Status] \ [Netstat].
45
@MESH AP User Manual
5.
Click [Status] \ [Diagnostics].
6.
Click [Status] \ [Mesh].
46
@MESH AP User Manual
7.
Click [Status] \ [AP].
8.
Click [Status] \ [STA].
47
@MESH AP User Manual
9.
Click [Status] \ [Site Survey].
Only available under [AP+STA] mode.
48
@MESH AP User Manual
10. Click [Log] \ [Log Settings].
49
@MESH AP User Manual
11. Click [Log] \ [Syslog].
50
@MESH AP User Manual
12. Click [Log] \ [Kernel].
51
@MESH AP User Manual
Troubleshooting
Double-click the selected @MESH AP to setup @MESH AP via web browser
• Q : Why can’t I connect @MESH AP under [AP+STA] mode?
• A : Add a WDS setting in remote AP.
• Q : Configuration is not effective?
• A : Please reboot @MESH AP.
• Q : Configuration is not saved after reboot?
• A : Click [Save Flash] before reboot. Please refer to page 42.
52
@MESH AP User Manual
Technical Specifications
Interface
Security Features
• 1 x RJ-45 10/100Mbps port
• 1 x 802.11b/g wireless interface
QoS
Wireless Multimedia Extensions ; WMM
(802.11e)
• WEP 64/128-bit
• WPA-PSK (TKIP/AES), WPA-EAP
• WPA2- PSK (TKIP/AES), WPA2-EAP
Wireless Features
• Interoperable with 802.11b/g compliant
equipments
• Auto data rate switch with 54, 48, 36, 24,
Management Features
• Web Based Management
• @MESH AP Manager
• TFTP/HTTP download
18, 12, 11, 9, 6, 5.5, 2, 1 Mbps for 11 b/g
• SNTP
• External Antenna
• System Throughput 16 Mbps
• Frequency Domain : FCC, ETSI
• Event log
• System Information
• Change Administrator Password
• System reboot
Output Power & Range
1) @MESH 500: 500mW; Rang: 500m
2) @MESH 100: 100mW; Rang: 100m
Throughput
1) One Hop : 13 Mbps
2) Two Hops : 5.4 Mbps
3) Three Hops : 4.2 Mbps
4) Four Hops : 3 Mbps
*Depend on the wireless adapter
53