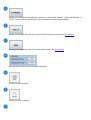
1
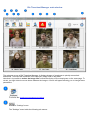
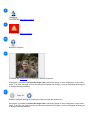
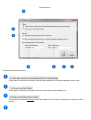
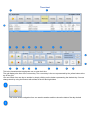
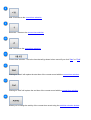
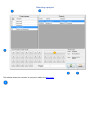
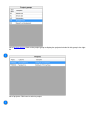
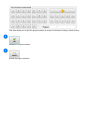
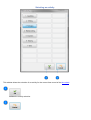
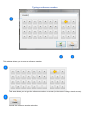
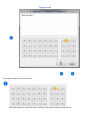
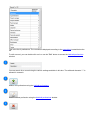
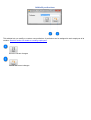
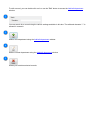
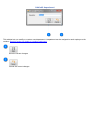
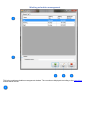
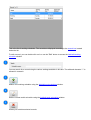
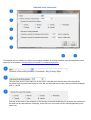
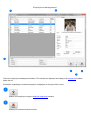
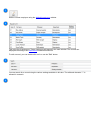
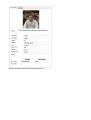
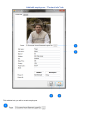
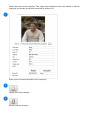
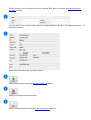
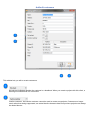
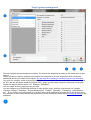
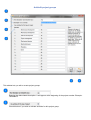
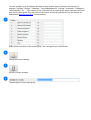
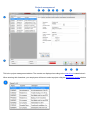
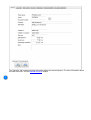
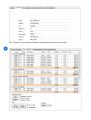
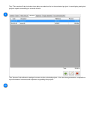
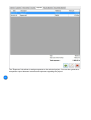
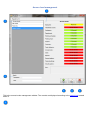
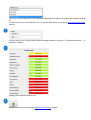
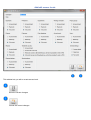
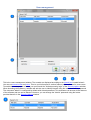
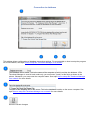
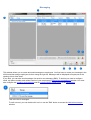
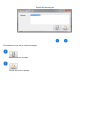
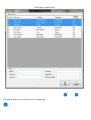
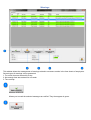
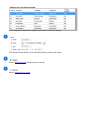
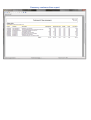
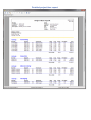
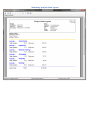
Biz Timesheet Manager
User's manual
Table of Contents
Biz Timesheet Manager............................................................................................................................. 3
Biz Timesheet Manager main window.................................................................................................... 4
Parameters...............................................................................................................................................7
Timesheet.................................................................................................................................................9
Selecting a project...............................................................................................................................14
Selecting an activity............................................................................................................................ 17
Typing a reference number................................................................................................................. 19
Typing a note.......................................................................................................................................21
Professions management...................................................................................................................... 23
Add/edit professions............................................................................................................................ 26
Departments management.................................................................................................................... 27
Add/edit department............................................................................................................................ 29
Working schedules management.......................................................................................................... 30
Add/edit work schedules..................................................................................................................... 33
Employees management....................................................................................................................... 35
Add/edit employees - "Contact info" tab............................................................................................. 38
Add/edit employees - "General info" tab.............................................................................................40
Customers management....................................................................................................................... 43
Add/edit customers..............................................................................................................................45
Project groups management................................................................................................................. 47
Add/edit project groups....................................................................................................................... 50
Project management..............................................................................................................................52
Add/edit projects..................................................................................................................................60
Access level management.................................................................................................................... 62
Add/edit access levels.........................................................................................................................65
User management................................................................................................................................. 66
Add/edit users......................................................................................................................................68
Security options..................................................................................................................................... 69
Connection to database........................................................................................................................ 71
Messaging.............................................................................................................................................. 73
Add/edit messages.............................................................................................................................. 76
Selecting employee(s)......................................................................................................................... 77
Warnings................................................................................................................................................ 79
Reports...................................................................................................................................................81
Detailed employee time report............................................................................................................ 83
Summary employee time report..........................................................................................................84
Detailed customer time report.............................................................................................................85
Summary customer time report...........................................................................................................86
Detailed project time report.................................................................................................................87
Summary project time report...............................................................................................................88
How to setup Biz Timesheet Manager on a network............................................................................89
Biz Timesheet Manager
Biz Timesheet Manager is a time tracking software for enterprises. It allows employees to enter their time by
themselves, easily and efficiently, no matter what their level of knowledge with computer is.
Biz Timesheet Manager will allow you to sea in real-time the time performed by your employees on all your
projects, assignements, contracts, service calls, etc.
This software is provided for manufacturing companies, machine shops, production lines, as well as
service companies such offices of lawyers, architects, accountants, etc.
All editions of Biz Timesheet Manager can be shared over a local network. This allows your employees to enter
their time directly from their desktop.
Biz Timesheet Manager main window
The welcome screen of Biz Timesheet Manager. It displays images of employees to quickly access their
timesheets. To access the timesheet of an employee, simply click on his photo.
Note that it is possible to reduce the image size to allow the display of more employees on the same page. To
do this, just right click the mouse button between the images. A menu will appear allowing you to change these
parameters.
To access the employees management window.
Access to "Settings" menu
The "Settings" menu holds the following sub menus:
1. Employees - This menu allows access to the employees management window
2. Customers - This menu allows access to the customers management window
3. Professions - This menu allows access to the professions management window
4. Departments - This menu allows access to the departments management window
5. Working schedules - This menu allows access to the working schedules management window
6. Project groups - This menu allows access to the project groups management window
7. Projects - This menu allows access to the projects management window
To access the customers management window
Access to "Security" menu
The "Security" menu holds the following sub menus:
1. Security Options - This menu allows configuration of security options such as the administrator
password and enabling or disabling the user management
2. Access Levels - This menu allows access to the access levels management window
3. Users - This menu allows access to the users management window
4. Lock - Allows you to lock the software and thus force the next user to identify
Access to the "Options" menu
The "Options" menu contains the following elements:
1. Language - Allows you to change the language of the software.
2. Parameters - Allows access to the parameters window
3. Database connection settings - Allows you to specify the server host name and the location of the
database on it.
4. Messaging - Allows access to the messaging features
5. Warnings - Allows access to the warnings
6. Backup Database - To make a backup of the database
7. Restoring database - Shows how to restore a database file
To access the projects management window
To access the reporting window
To access the messaging window
To access the warnings window
Access to help files
To access the timesheet of an employee, click on his picture
Note that it is possible to reduce the image size to allow the display of more employees on the same
page. To do this, just right click the mouse button between the images. A menu will appear allowing you
to change these parameters.
Allows to navigate among the employees pages to show the desired one
Note that it is possible to reduce the image size to allow the display of more employees on the same
page. To do this, just right click the mouse button between the images. A menu will appear allowing you
to change these parameters.
Parameters
Setting of software parameters
If this option is selected, the project numbers generated by Biz Timesheet Manager will be used.
If this option is selected, the project numbers will be will be determined by you.
If this option is selected, warnings will be generated if time records are incoherent in employee's time
sheets.
Sender's email address
This allows the sending of messages using email and SMS. View the message window for more details.
Outgoing Mail Server
It allows sending messages using SMS and email. View the message window for more details.
Save the current changes
Cancel the current changes
Timesheet
This is the timesheet that employees use to enter their time.
The grid displays the time of the current day. The current day is the one represented by the yellow button at the
top of the grid.
You can switch from one day to another by simply clicking on the button representing the desired day. You can
change week by using the buttons with arrows at the left and right sides.
This button allows navigation from one week to another and thus show the data of the day desired
The week days buttons allow you to select the day to display in the grid. The yellow button is the current
day. To move from one week to another, use the navigation buttons at the left and right
Button "Up". This button skips to the upper record in the grid. You can also manually click on the grid to
change the selection.
Button "Up". This button skips to the lower record in the grid. You can also manually click on the grid to
change the selection.
Adds a time record in the grid using the project selection window.
Allows to delete the selected time record.
Removes 15 minutes to the current time selection
Add 15 minutes to the current time selection
Removes 1 minute to the current time selection
Add 1 minutes to the current time selection
Current time selection. This is the time that will go down in time record if you click "Start" or "End".
Clicking on "Start" will replace the start time of the current record with the current time selection.
Clicking on "End" will replace the end time of the current record with the current time selection.
Allows you to change the activity of the current time record using the activities selection window.
Allows you to change the multiplier for overtime. You can include "Simple", "And a half" "Double" or
"Triple". The time for the record will then be calculated according to this multiplier.
Allows you to change the reference number of the current time record using this window.
Allows you to change the note of the current time record using this window.
Displays the total time of the current day and week.
Save the current changes
Cancel the current changes
The list of time of the selected day. To change the day, use the week days buttons.
To close the timesheet
Selecting a project
This window allows the selection of a project to add to the time sheet.
List of project groups. Click on the project group to display the projects included in this group in the right
list.
List of projects. Click here to select a project.
This area allows you to type the project number on screen (in the case of using a touch screen).
Validate the project selection
Cancel the project selection
Selecting an activity
This window allows the selection of an activity for the current time record of the time sheet.
Validate the activity selection
Cancel the activity selection
Typing a reference number
This window allows you to enter a reference number.
This area allows you to type the reference number on screen (in the case of using a touch screen).
Cancel the reference number selection
Validate the reference number selection
Typing a note
This window allows you to enter a note
This area allows you to type the note on screen (in the case of using a touch screen).
Validate the note selection
Cancel the note selection
Professions management
This is the professions management window. The records are displayed according to the search box located
below the list.
This is the list of professions. The records are displayed according to the search box located below the
list.
To edit a record, you can double-click on it or use the "Edit" button to access the Add/edit professions
window.
You can search for a record using the various settings available in this box. The wildcard character "*" is
allowed in research.
Adds a new profession using the Add/edit professions
Edit the current profession using the Add/edit professions window
Allows you to delete selected records
Add/edit professions
This window lets you modify or create a new profession. A profession can be assigned to each employee at its
creation. See this section for details on creating employees.
Save the current changes
Cancel the current changes
Departments management
This is the departments management window. The records are displayed according to the search box located
below the list.
This is the list of departments. The records are displayed according to the search box located below the
list.
To edit a record, you can double-click on it or use the "Edit" button to access the Add/edit department
window.
You can search for a record using the various settings available in this box. The wildcard character "*" is
allowed in research.
Adds a new department using the Add/edit department window.
Edit the current department using the Add/edit department window
Allows you to delete selected records
Add/edit department
This window lets you modify or create a new department. A department can be assigned to each employee at its
creation. See this section for details on creating employees.
Save the current changes
Cancel the current changes
Working schedules management
This is the working schedules management window. The records are displayed according to the search box
located below the list.
This is the list of working schedules. The records are displayed according to the search box located
below the list.
To edit a record, you can double-click on it or use the "Edit" button to access the Add/edit working
schedule window.
You can search for a record using the various settings available in this box. The wildcard character "*" is
allowed in research.
Adds a new working schedule using the Add/edit work schedules window.
Edit the current workin schedule using the Add/edit work schedules window
Allows you to delete selected records
Add/edit work schedules
This window lets you modify or create a new working schedule. A working schedule must be assigned to each
employee at its creation. See this section for details on creating employees.
The name of the working schedule. For example : Day, Evening, Night...
The start time of shift. If the start time of the shift is 3:00 AM, then the total time of the day will be
calculated from recorded times between 3:00 AM and 2:59 AM the next day, and not between midnight
and 11 : 59 PM.
First day of the week of this schedule. If the first day of the shift is Monday, for example, the total time of
the week will be calculated as of Monday, at the first hour of the shift until the following Monday at the
same time.
Generate a warning if an employee enter more than a certain number of hours in a day.
Generate a warning if an employee enter less than a certain number of hours in a week.
Save the current changes
Cancel the current changes
Employees management
This is the employees management window. The records are displayed according to the search box located
below the list.
Information regarding the selected employee is displayed to the right of the screen.
Adds a new employee using the Add/edit employees window.
Allows you to delete selected records
Edit the current employee using the Add/edit employees window
This is the list of employees. Those employees will appear in the main window. The records are
displayed according to the search box located below the list.
To edit a record, you can double-click on it or use the "Edit" button.
You can search for a record using the various settings available in this box. The wildcard character "*" is
allowed in research.
Show information about the selected employee.
Add/edit employees - "Contact info" tab
This window lets you edit or create employees.
Selects the picture of the employee. This image will be displayed in the main window so that the
employee can quickly access their timesheet by clicking on it.
Enter here the contact information of the employee.
Cancel the current changes
Save the current changes
Add/edit employees - "General info" tab
This window lets you edit or create employees.
Select the profession.
Select the department.
Select the working schedule.
PIN (personal identification number) of the employee. This PIN allows secure access to the timesheet of
the employee. The employee must enter their PIN to gain access to it. If the PIN field is left blank when
creating an employee, the PIN will not be required to access the timesheet.
Billing rate of employee
Hourly cost of employee. Used to calculate cost of projects.
Settings for text messaging (SMS)
Enter the 10 digits phone number of the employee
For text messaging to work, you must also configure the email address and the outgoing mail server. See
the Parameters window for details.
Settings for text messaging (SMS)
Enter the cellular carrier of the employee
For text messaging to work, you must also configure the email address and the outgoing mail server. See
the Parameters window for details.
Save the current changes
Cancel the current changes
Customers management
This is the customers management window. The records are displayed according to the search box located below
the list.
Information regarding the selected customer is displayed to the right of the screen.
You must assign a client to each project you create. For non billable projects or administrative tasks, you can
create your own company as a customer and use it to create such projects.
This is the list of customers. The records are displayed according to the search box located below the
list.
To edit a record, you can double-click on it or use the "Edit" button to access the Add/edit working
schedule window.
You can search for a record using the various settings available in this box. The wildcard character "*" is
allowed in research.
Show information about the selected customer.
Adds a new customer using the Add/edit customers window.
Allows you to delete selected records
Edit the current customer using the Add/edit customers window
Add/edit customers
This window lets you edit or create customers.
Not solvent. Indicates whether the customer is a deadbeat. When you create a project with this client, a
warning will indicate that it is not solvent.
Inactive customer. An inactive customer cannot be used to create new projects. Customers no longer
used, rather than being suppressed, are setted inactive because data from previous projects can always
be related thereto.
Cancel the current changes
Save the current changes
Project groups management
This is the project groups management window. The records are displayed according to the search box located
below it.
Project groups are used for classifying the projects into categories to let your employees easily create their
timesheets and for you to have clear reports. See this section for details on entering projects in the timesheet.
You could, for example, create a project group "SC" for "Service Calls". The short description in this case would
be "SC" and the description would be "Service Calls". When you will create a project in this group, the project
number will begins with the letters "SC". Example: "SC000001".
You can create as many project groups you want.
You can configure up to 30 different activities for each project group. Activities could include, for example,
"Carriage" "Design", "Drawings," "Project Management", "Collage," "Assembly", "Packaging", "Administration",
etc. ... If you choose to set up activities for a project group, when employees will enter time in this project group,
they will have to select which activity they performed. See this window for details about selecting an activity in the
timesheet.
This is the list of project groups. The records are displayed according to the search box located below the
list.
To edit a record, you can double-click on it or use the "Edit" button to access the Add/edit working
schedule window.
You can search for a record using the various settings available in this box. The wildcard character "*" is
allowed in research.
Adds a new customer using the Add/edit project groups window.
Edit the current project group using the Add/edit project groups window
Allows you to delete selected records
Add/edit project groups
This window lets you edit or create project groups.
Entering the abbreviated description. It will appear at the beginning of the project number. Example:
"RD000001"
Check this box if you wish to activate activities for this project group.
You can configure up to 30 different activities for each project group. Activities could include, for
example, "Carriage" "Design", "Drawings," "Project Management", "Collage," "Assembly", "Packaging",
"Administration", etc. ... If you choose to set up activities for a project group, when employees will enter
time in this project group, they will have to select which activity they performed. See this window for
details about selecting an activity in the timesheet.
Enter here the activities of this project group. You can register up to 30 activities.
Cancel the current changes
Save the current changes
The description of the project group
Project management
This is the project management window. The records are displayed according to the search box located below it.
When entering their timesheet, your employees will have to select a project using the Selecting a project window.
This is the list of projects. The records are displayed according to the search box located below the list.
To edit a record, you can double-click on it or use the "Edit" button to access the Add/edit projects
window.
You can search for a record using the various settings available in this box. The wildcard character "*" is
allowed in research.
Adds a new project using the Add/edit project groups window.
Edit the current project using the Add/edit projects window
Allows you to delete selected records
The "General" tab contains general information about the selected project. For more information about
the data of this tab, see the Add/edit projects window.
The "Customer" tab contains information regarding the customer of the project.
The "Time worked" tab includes time data recorded so far in the selected project. It can display and print
project reports according to several criteria.
The "income" tab allows to assign incomes to the selected project. You can then generate a comparison
report between incomes and expenses regarding the project.
The "Expenses" tab allows to assign expenses to the selected project. You can then generate a
comparison report between incomes and expenses regarding the project.
The "Images" tab allows you to assign images to the selected project.
The "Documents" tab allows you to assign documents to the selected project.
Add/edit projects
This window lets you edit or create projects.
To select the project group.
To select the customer
The " ... " button allows to select the customer from a list.
You can create a new customer using the " + " button.
The project's description
The deadline of the project
The estimated time of project
Save the current changes
Cancel the current changes
Access level management
This is the access levels management window. The records are displayed according to the search box located
below it.
This is the list of access levels. The records are displayed according to the search box located below the
list.
To edit a record, you can double-click on it or use the "Edit" button to access the Add/edit access levels
window.
You can search for a record using the various settings available in this box. The wildcard character "*" is
allowed in research.
Settings of the selected access level.
Adds a new access level using the Add/edit access levels window.
Edit the current access level using the Add/edit access levels window
Allows you to delete selected records
Add/edit access levels
This window lets you edit or create access level.
Save the current changes
Cancel the current changes
User management
This is the users management window. The records are displayed according to the search box located below it.
You can set access levels and users. This let you limit access to various features of the software for some users.
To enable the management of users, you must check the "Activate security login" of the Security options window.
When launching the software, a window will ask the user to identify himself using his username and its password.
The username "admin" is configured by default with a blank password. This username can access all the features
of the software and can not be deleted. However, you can change the "admin" password using the button
provided therefor in the Security Options window.
This is the list of users. The records are displayed according to the search box located below the list.
To edit a record, you can double-click on it or use the "Edit" button to access the Add/edit users window.
You can search for a record using the various settings available in this box. The wildcard character "*" is
allowed in research.
Adds a new user using the Add/edit users window.
Edit the current user using the Add/edit users window
Allows you to delete selected records
Add/edit users
This window lets you edit or create users.
The username. It will be asked when the software is launched (if security logins are enabled). See the
Security Options window for details.
The password. It will be asked when the software is launched (if security logins are enabled). See the
Security Options window for details.
Let you select the access level of the user.
Save the current changes
Cancel the current changes
Security options
This window allows the management of security options related to user logins used to access the software.
You can set access levels and users. This let you limit access to various features of the software for some users.
To enable the management of users, you must check the "Activate security login" of the Security options window.
When launching the software, a window will ask the user to identify himself using his username and its password.
The username "admin" is configured by default with a blank password. This username can access all the features
of the software and can not be deleted. However, you can change the "admin" password using the button
provided therefor in the Security Options window.
To enable the users management functionalities. When opening the software, a window will ask the user
to identify himself with his username and its password.
Sets the locking parameters. You can choose to lock the program after a certain time or you can choose
to never lock. Once the software is locked, a user must enter their username and password in order to
unlock.
The username "admin" is configured by default with a blank password. This username can access all the
features of the software and can not be deleted. However, you can change the "admin" password using
this button.
Save the current changes
Cancel the current changes
Connection to database
This window allows configuration of database connection settings. For more details on how to setup the program
on a local network, see topic How to setup Biz Timesheet Manager on a network
The Database server name. This is the name of the computer on which resides the database. If Biz
Timesheet Manager is used in local mode only, you must enter "(local)" in this field, as shown in the
picture. Otherwise, you must enter the computer name. See topic How to setup Biz Timesheet Manager
on a network for more details.
The path of the database file on the server. This is the database location on the server computer. See
topic How to setup Biz Timesheet Manager on a network for more details.
Save the current changes
Cancel the current changes
Messaging
This window allows you to create and send messages to employees. You first have to create your message in the
left list and then assign employees to them using the right list. Messages will be displayed to employees at the
opening of their time sheet.
If you wish, you can also send messages via email or text message (SMS). To do this you need to configure
email, cell phone number and cellular carrier of your employees in Employees management window. You must
also configure the sender's email address and the outgoing SMTP email server in the Parameters.
This is the list of messages.
To edit a record, you can double-click on it or use the "Edit" button to access the Add/edit messages
window.
This is the list of employees who are assigned to the selected message in the left list.
Adds a new message using the Add/edit messages window.
Edit the current message using the Add/edit messages window
Allows you to delete selected records
Exit this window
Allows you to assign employees to the selected message using the Selecting employee(s) window.
Allows you to remove the selected employees from the list.
This button allows you to send the selected message to selected employees as an email.
To use this feature you need to configure email of your employees in Employees management window.
You must also configure the sender's email address and the outgoing SMTP email server in the
Parameters.
This button allows you to send the selected message to selected employees as an SMS (text message).
To use this feature you need to configure cell phone number and cellular carrier of your employees in
Employees management window. You must also configure the sender's email address and the outgoing
SMTP email server in the Parameters.
Add/edit messages
This window lets you edit or create messages.
Save the current changes
Cancel the current changes
Selecting employee(s)
This window allows you to select one or more employees
Validate the selection
Cancel the selection
Warnings
This window allows the management of warnings related to erroneous entries in the time sheets of employees.
Several types of warnings can be generated:
1. Too much time was entered for a day
2. Not enough time was entered for one week
3. Time overlap
Mark as VERIFIED
Allows you to mark the selected messages as verified. They then appear in green.
Delete the selected warnings
Exit this window
Mark as NOT VERIFIED
If one or more messages are marked as VERIFIED, this button allows to mark the selected messages as
NOT VERIFIED. They then appear in white.
Send a reminder to employees
This button will send a reminder to employees of selected warnings. This message will appear to them at
the next opening of their timesheet.
Reports
This window allows you to generate reports regarding employees and customers. For project reports, please
consult the "Time worked" tab of the Project management window.
List of work schedules. You must first select a work schedule before you can select one or more
employees for printing.
List of employees. Select the employees you want to include in reports.
The "Period" frame allows you to select the period to show in the report.
Show a detailed report including all time records.
Show a summary time report.
Detailed employee time report
Summary employee time report
Detailed customer time report
Summary customer time report
Detailed project time report
Summary project time report
How to setup Biz Timesheet Manager on a network
How can I set up Biz Timesheet Manager on my local network?
1. Install the Biz Timesheet Manager programme (www.biztimesheetmanager.com/download/
BizTimesheetSetup30.exe) on your data server. The data server can be any computer on your local
network.
2. Install the Firebird component on your database server (www.biztimesheetmanager.com/
download/fbnetwork.exe). IMPORTANT!: the installer programme will ask you where you want to
install the Firebird programme and will then ask you where you want to install the database. The
Firebird programme needs to be installed on the same drive as the database itself.
3. Activate your server. To do this send us your server identification code and we will send you the
corresponding activation code. To obtain your identification code you need to click on "Activate now"
in the Biz Timesheet Manager (trial version) start up window.
4. Make sure that the TS_DBase.FDB database file is in your server’s "C:\Program Files\Biz Timesheet
Manager Data" folder (or the folder specified during database installation). If the "Program Files"
folder on your server is not on the C drive then search for it on the appropriate drive (for example:
"M:\Program Files\Biz Timesheet Manager Data"). This path will be the one that you will need to set
up on your client workstation at the next stage.
5. Open Biz Timesheet Manager on your server and go to menu "Options - Personnalize". Replace the
name of the database server for the server name. If you do not know the name of the database server
then, right-click on “Workstation”, choose "Properties" and select the “Computer name” tab.
6. Go to a client workstation. Install Biz Timesheet Manager (www.biztimesheetmanager.com/
download/BizTimesheetSetup30.exe), launch the application and click on the "Options - Database
connection information” menu and enter your server name in the appropriate box. If you do not
know the name of the database server then go to your server, right-click on “Workstation”, choose
"Properties" and select the “Computer name” tab.
7. On the workstation enter the server database path at the appropriate place (for example: "C:
\Program Files\Vehicle Fleet Manager Data").
8. Close the Biz Timesheet Manager application on your client workstation and restart it. The
programme should automatically connect to the database. If it doesn’t work it is probably because
the database path is incorrect. If these parameters are correct your server probably has a firewall.
Most computers have a firewall. If so, you need to deactivate it or set up a firewall exception. You
need to set up a firewall exception for the following programme file: "C:\Program Files\Firebird
\Firebird_2_0\fbserver.exe". To add a firewall exception (with Windows XP), go to "Start - Control
Panel - Firewall". Click on add programme in the "Exceptions" tab, click on browse and choose the
following file: "C:\Program Files\Firebird\Firebird_2_0\Bin\fbserver.exe"