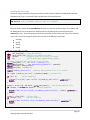
1
Dynamic Web Pages
With
The Embedded Web Server
The Digi-Geek’s AJAX Workbook
(NET+OS, XML, & JavaScript)
Version 1.0
5/4/2011
Page 1
Copyright Digi International, 2011
Table of Contents
Chapter 1 - How to Use this Guide ............................................................................................................... 5
Prerequisites – If You Can Ping, You Can Use This Thing! ..................................................................... 5
Getting Help with TCP/IP and Wi-Fi Setup ............................................................................................ 5
The Study Guide or the Short Cut? ....................................................................................................... 5
C Code ................................................................................................................................................... 6
HTML Code ............................................................................................................................................ 6
XML File ................................................................................................................................................. 6
Provide us with Your Feedback ............................................................................................................. 6
Chapter 2 - The Server-Client Relationship ................................................................................................... 7
Example – An Analogy for a Normal HTML page .................................................................................. 8
TIP: Auto-refreshing the Page is an Option.......................................................................................... 8
Chapter 3 - Embedded Devices have a limited CPU budget ......................................................................... 9
Question – How Much Can this Little Guy Handle? .............................................................................. 9
Answer – Quite a Bit! ............................................................................................................................ 9
Chapter 4 - Serving a Basic Web Page ........................................................................................................ 10
Prep Work – Building a Project, Tweaking Files, and PBuilder ........................................................... 10
Now What? ......................................................................................................................................... 25
TIP – Do Not Choke Your Embedded Web Server............................................................................... 27
Chapter 5 – Sneaky but Useful Comment Tags........................................................................................... 28
Get information from the embedded device to display in the browser............................................. 28
Set information from the browser on the embedded device ............................................................. 29
Chapter 6 - Introducing Stub Functions ...................................................................................................... 30
Chapter 7 - Using Comment RpGet Tags with a Basic Web Page ............................................................... 31
The HTML Code ................................................................................................................................... 31
The root.c Code ................................................................................................................................... 32
Chapter 8 - Our First Dynamic Web Page ................................................................................................... 34
Chapter 9 - Interactive Web Pages Made Easy ........................................................................................... 36
Adding an HTML Form and a Submit Button ...................................................................................... 36
PBuilder Created Files ......................................................................................................................... 38
Updating the root.c code ................................................................................................................... 39
The Final Result? A Web Form Interacting with our Controller! ....................................................... 39
Page 2
Copyright Digi International, 2011
Chapter 10 - Detecting User Input from the Web Page.............................................................................. 40
Other Possibilities? ............................................................................................................................. 42
Chapter 11 - Adding JavaScript with comment tags to your HTML Pages .................................................. 43
Initializing JavaScript Variables with comment tags ........................................................................... 43
How to Create the Most Annoying Pop-up Box in History ................................................................. 44
The Annoying Pop-up Box ................................................................................................................... 45
Saving the Annoying Pop-Up Box........................................................................................................ 45
Chapter 12 - Basic XML with the Digi Embedded Web Server.................................................................... 47
Putting together JavaScript Code to Read your XML data .................................................................. 51
Scary Looking JavaScript Code ............................................................................................................ 51
The Magic “Go Get My XML File” Function ........................................................................................ 51
The Primary JavaScript Function ......................................................................................................... 54
Breaking down the Scary Looking JavaScript – HTML DOM ............................................................... 54
Adding an ID to the HTML Attributes.................................................................................................. 55
The HTML body that works with the JavaScript Program ................................................................... 56
Updating the root.c Code.................................................................................................................... 56
Let’s See the Dog Tags Work! ............................................................................................................. 57
Where is the Magic? - AJAX ................................................................................................................ 57
Chapter 13 – Embedded devices and XML – The Holy Grail of Embedded Web Developers .................... 58
The Teeny-Tiny and yet Magical my_data.xml file ............................................................................. 58
Updating the root.c code ................................................................................................................... 59
The Magic HTML file with Special Kung Fu JavaScript ........................................................................ 60
The Magic Page in Action! .................................................................................................................. 61
Is this Really Magic? ............................................................................................................................ 62
Chapter 14 - Loopy JavaScript ..................................................................................................................... 63
The Joy of the setTimeout() Function ................................................................................................. 63
Easy setTimeout() Function Example .................................................................................................. 63
Using the setTimeout() Function to create an Infinite Loop............................................................... 64
Exiting the Loop .................................................................................................................................. 64
Looking at the Page ............................................................................................................................. 65
Using a JavaScript Loop to Pass Dynamic XML Data in Real-Time ...................................................... 66
C Code ................................................................................................................................................. 66
Page 3
Copyright Digi International, 2011
The Amazing JavaScript Program ........................................................................................................ 69
The HTML Body ................................................................................................................................... 70
Watching it All Work ........................................................................................................................... 70
Want more? ........................................................................................................................................ 72
Chapter 15 - Dynamic Web Interface to Hardware in Real-Time ............................................................... 73
A Simple XML file for Our Little Switch ............................................................................................... 73
Editing the CreateXMLFile() Function ................................................................................................. 74
The JavaScript Code ............................................................................................................................ 76
The HTML Body ................................................................................................................................... 76
How Does it Look? .............................................................................................................................. 77
Page 4
Copyright Digi International, 2011
Chapter 1 - How to Use this Guide
This Guide is not a user’s manual in the traditional sense. Instead, it is an informal workbook for a
variety of different embedded web server projects.
Sample Code for this Guide can be found here
Prerequisites – If You Can Ping, You Can Use This Thing!
This guide is not intended to teach a user basic Internet and TCP/IP networking skills. In order to use the
information in this guide, you should be able to configure your Digi device for your network so that you
can ping it with a PC connected to the same network.
Getting Help with TCP/IP and Wi-Fi Setup
You have plenty of options if you need to get help with basic TCP/IP and Wi-Fi.
1. An online TCP/IP Tutorial:
http://www.w3schools.com/tcpip/default.asp
2. Digi has a guide for Wi-Fi available here:
http://ftp1.digi.com/support/documentation/digi_wireless_troubleshooting_guide.pdf
3. In addition, your device’s user manual should have a chapter dedicated to TCP/IP and
networking.
The Study Guide or the Short Cut?
The chapters build on each other and one good approach would be to work from the beginning of the
workbook to the end as a learning experience. Another equally valid approach would be to scan the
chapter headings to find something similar to your project and use the example there as a starting point.
Page 5
Copyright Digi International, 2011
C Code
A text box containing code written in C will have a gray background.
void some_function()
{
printf("I am C code\n");
}
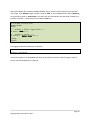
HTML Code
A text box containing HTML code will have a light green background.
<html>
<title>some title</title>
<head></head>
<body>I am HTML Code</body>
</html>
XML File
A text box containing XML will have a blue background.
<!-- My XML file -->
<Stuff>
<My_File>I am an XML File</My_File>
</Stuff>
Provide us with Your Feedback
If there is something that:
Does not work
Could be explained better
You think is missing
You like
Please, let us know by contacting our team at the following URL:
Digi Support: http://www.digi.com/support/
Page 6
Copyright Digi International, 2011
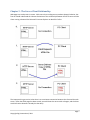
Chapter 2 - The Server-Client Relationship
Web pages are not dynamic in nature. With some clever coding we can produce dynamic behavior, but
first we should understand the inherent limitations of the relationship between the HTTP server and the
client running a browser like Microsoft’s Internet Explorer or Mozilla’s Firefox.
The important thing to notice is that there is no continuous connection between the client and the web
server. (After the HTML page has been served, we could shoot the server with a shotgun, and the client
would not notice because it already has the data.)
Page 7
Copyright Digi International, 2011
Example – An Analogy for a Normal HTML page
If we pretend that I am the server and you are the client we can recreate this relationship.
0. You are in your car and I am home watching my TV.
(No connection between client and server.)
1. If you want directions to the pizza parlor, you call me.
(Client requests data.)
2. I tell you how to get there.
(Server supplies data.)
3. We hang up.
(No connection between client and server.)
4. You get there but now you cannot find the parking so you call me back.
(Client makes new request for data.)
5. I tell you where to park.
(Server supplies data.)
6. We hang up.
(No connection between client and server.)
The key concept here is that there will be no fresh data without a new request to the server. This is
how a web server typically works. An easy way to demonstrate this is to load a web page and then
unplug your PC’s Ethernet cable. The web page will not notice that it does not have access to the web
server anymore because it has already been loaded. (Later we will see that web pages can execute
programs that change this behavior.)
TIP: Auto-refreshing the Page is an Option
With a bit of HTML code in the head element, you can have the page automatically refresh itself in a
given time interval.
<head><meta http-equiv="refresh" content="300" ></head>
The value in quotes after the content attribute is the number of seconds until the page automatically
refreshes itself. If you want a different time interval, we could change the value of content in our
refreshing meta tag. This example would refresh the page every 5 minutes (300 seconds). In an autorefreshing example, you would call my phone every 5 minutes for new instructions to the pizza parlor.
Page 8
Copyright Digi International, 2011
Chapter 3 - Embedded Devices have a limited CPU budget
The PC viewing the web page typically has more resources than the embedded web server. You can use
that to your advantage by pushing the heavy lifting out to the browser. By calling on the PC’s memory
and CPU, we can have very complicated script, code, or animation and still be very responsive as a web
server without overly taxing our embedded device.
You can create very complicated code in the browser using:
HTML
Java Applets
JavaScript and AJAX
Flash
AJAX
Yahoo User Interface
Canvas
Plenty more to boot…
The Digi Advanced Web Server (AWS) does not support server-side scripting. While these might work
just fine on a more powerful web server, the embedded computer will not be able to run them. Even if
it could, the processing power required to handle them might make it a bad choice. A good rule of
thumb to remember is that anything that runs on the server side will not work because it would require
a special command interpreter from the web server.
You cannot use the following server-side scripting languages or programs:
Java Servlets
PHP
SQL
Apache
MediaWiki
WordPress
Etc…
Question – How Much Can this Little Guy Handle?
Can the Digi embedded computer serve interactive web pages with an ARM processor?
Answer – Quite a Bit!
Just looking at the example web pages served by the Digi devices will show you a collection of cascading
style sheets, JavaScript files, and more. You will probably be surprised by how much performance you
can get out of an embedded web server.
Page 9
Copyright Digi International, 2011
Chapter 4 - Serving a Basic Web Page
Serving a web page with Digi Embedded devices is very easy.
Here is an example of a simple web page:
<html>
<title>some title</title>
<head></head>
<body>
Hello World!
</body>
</html>
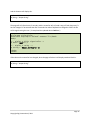
The page should generate the following in the browser:
Hello World!
How can we serve this page with a Digi Embedded device running NET+OS?
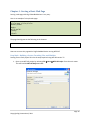
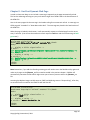
Prep Work – Building a Project, Tweaking Files, and PBuilder
Starting from a fresh project here are the steps required using NET+OS version 7.5.
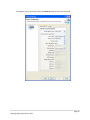
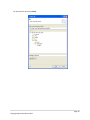
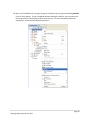
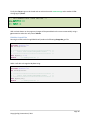
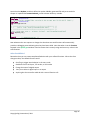
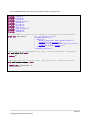
1. Open a new NET+OS project by selecting File New NET+OS Project from the main menu.
This will load the NET+OS Project window:
Page 10
Copyright Digi International, 2011
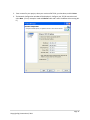
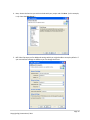
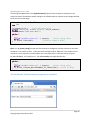
2. Enter a name for your project, select your version of NET+OS, your hardware, and click Next.
3. The Network Configuration window will be displayed. Configure your TCP/IP connection and
select Next. (For my examples I used an Ethernet cable and a static IP address without using WiFi.)
Page 11
Copyright Digi International, 2011
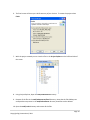
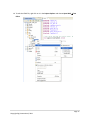
To configure a Wi-Fi connection, select the Wireless option on the menu to the left:
Page 12
Copyright Digi International, 2011
4. Next, choose the Services you wish to include with your project and click Next. (In this example,
I only chose the Web Server.)
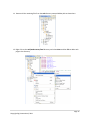
5. NET+OS will prompt you for additional settings which you might be able to accept by default. If
your environment settings are different you can change them here.
Page 13
Copyright Digi International, 2011
6. The final screen will show you a brief summary of your choices. To create the project select
Finish.
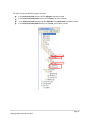
7. With the project created you can view the files in the Project Explorer on the left hand side of
the screen.
8. Using Project Explorer, Open the web/webcontents directory.
9. Remove all the files in the web/webcontents/html directory. Note that the files PbSetup.txt
and RpUsrDct.txt present in the web/webcontents directory should be not be deleted.
10. Open the web/result directory and remove all the files.
Page 14
Copyright Digi International, 2011
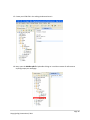
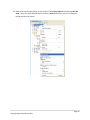
11. Remove all the remaining files from the web directory except PBuilder.pbb as shown here:
12. Right click on the web/webcontents/html directory and select New and then File to add a web
page to the directory:
Page 15
Copyright Digi International, 2011
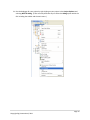
13. Name the file and select Finish.
Page 16
Copyright Digi International, 2011
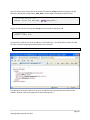
14. To edit the HTML file, right click on it in the Project Explorer and choose Open With Text
Editor.
Page 17
Copyright Digi International, 2011
15. Create your HTML file in the editing window and save it.
16. Next, open the PBuilder.pbb file by double clicking on it and then remove all references to
anything except your web page.
Page 18
Copyright Digi International, 2011
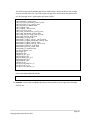
The initial contents of the PBuilder.pbb file are shown below. Note that there is one carriage
return at the end of the file. You need a single carriage return at the end of the .pbb file and
only one carriage return. Anything else will cause trouble.
html/index.htm
html/network_config.htm
html/wireless_network_config.htm
html/wireless_ip_config.htm
html/upload_firmware.htm
html/reboot.htm
html/reboot_status.htm
html/filelist.htm
html/cwm_connections_config.htm
html/cwm_advanced_config.htm
html/cwm_certificate_config.htm
help/cwm_config_help.htm
mesh/mesh_config.htm
mesh/mesh_legacy_serial_config.htm
mesh/mesh_zigbee_advanced_config.htm
mesh/mesh_zigbee_config.htm
mesh/mesh_zigbee_config_table.htm
mesh/mesh_network_view.htm
mesh/mesh_device_state.htm
mesh/mesh_fw_update.htm
css/stylesheet.css
img/logo.gif
img/back.gif
img/back_off.gif
img/forward.gif
img/forward_off.gif
img/tabclose.gif
img/tabopen.gif
img/help.gif
scripts/errhandler.js
scripts/utils.js
scripts/validation.js
Here is the updated PBuilder.pbb file.
html/hello.html
17. Reminder - Ensure that the PBuilder.pbb file has one (and only one) carriage return following
the final line.
Page 19
Copyright Digi International, 2011
18. Next, run the PBuilder utility by right clicking on the name of your project and selecting PBuilder
from the list of options. (If you run PBuilder without deleting the old files, you can make use of
the merge utility to combine the old file and the new one. For more information about the
merge utility, consult the NET+OS documentation.)
Page 20
Copyright Digi International, 2011
19. After running the PBuilder program note that:
In the web/result/fixed directory the file RpPages.c has been created.
In the web/result/fixed/html directory the file hello.c has been created.
In the web/result/stubs directory the files RpUsrDct.c and RpUsrDct.h have been created.
In the web/result/stubs/html directory the file hello_v.c has been created.
Page 21
Copyright Digi International, 2011
20. Build the project by right clicking on your project in the Project Explorer and selecting NET+OS
Build. (There are many different ways to select the Build option within the GUI including the
toolbar and the main menu.)
Page 22
Copyright Digi International, 2011
21. Run the debugger for your project by right clicking on your project in the Project Explorer and
selecting NET+OS Debug. (There are many different ways to select the Debug option within the
GUI including the toolbar and the main menu.)
Page 23
Copyright Digi International, 2011
22. When the debugger starts, it will switch the GUI to the debugger view. On the upper left side
you will see the program’s threads display as well as a series of buttons that resemble the
controls on a DVD player. The debugger will automatically insert two break points into your
code and will pause at each one to wait for you to press the green play button. In the image
below, the debugger is waiting for the user to press the green play button shown in the Debug
tab.
When the button is pressed once, you will see information scrolling through the bottom window
in the STDIO Serial Console tab. There will be a planned pause for 5 seconds as the program
waits to see if you want to change any settings. After the pause, execution will continue until
you hit the second break point. Press the green play button again and your program will
execute and continue running freely.
Page 24
Copyright Digi International, 2011
23. In order to switch between the debugging perspective and the NET+OS perspective you can click
on the three icons in the tab located in the upper right corner. From left to right, the first Icon is
the Open Perspective (which you will not use), the Debugger Perspective (shown above), and
the NET+OS Perspective which is where you will do the majority of your editing.
Now What?
With the program running on your embedded device you should now be able to point a browser to the
IP address of your controller to view the web page. Assuming you have configured your TCP/IP settings
correctly in step 3 above you can now serve the basic web page with a Digi device.
Next we can take a look at the automatic code generated in the root.c file. The code below may look
intimidating but we can trim that down a bit to make it easier to work with.
#include <stdio.h>
#include <stdlib.h>
#include <tx_api.h>
#include <appservices.h>
#include <wxroot.h>
#include "bsp_api.h"
#include "bsp_sys.h"
#include "bsp_services.h"
#include "appconf.h"
#if (BSP_IDIGI_ENABLED == TRUE)
#include "netosIo.h"
#include "stringUtil.h"
#include "idigi_api.h"
#include "ssl_cert.h"
#endif
#if (BSP_IDIGI_ENABLED == TRUE)
/* This function gets SSL certificates from the file system.
* If this function is able to read all SSL certificates are in the file system,
* it will add all certificates in SSL Cert database and initialize
* cert for iDigi Device Protocol.
*/
int ssl_cert_init(void)
{
#if (FLASH_FILESYSTEM_ENABLED == TRUE)
NaStatus ccode;
if (NABspFilesystemForCLib == 0)
{
printf("Please enable BSP_INCLUDE_FILESYSTEM_FOR_CLIBRARY to include SSL
certificate for iDigi\n");
}
else
{
ccode = sslCertificate_Init();
if (ccode == NASTATUS_SUCCESS)
{
iDigiRegisterSslCert();
}
else
{
printf("sslCertificate_Init fails error = 0x%X\n", (unsigned)ccode);
}
Page 25
Copyright Digi International, 2011
}
#else
printf("Please enable FLASH_FILESYSTEM_ENABLED and
BSP_INCLUDE_FILESYSTEM_FOR_CLIBRARY to include SSL certificate for iDigi\n");
#endif
return 0;
}
#endif
/* this function is defined for APP_IDIGI_INIT in appconf.h and
* is called by BSP to initialize the command callback function.
*/
int app_idigi_init(void)
{
#if (BSP_IDIGI_ENABLED == TRUE)
ssl_cert_init();
#endif
return 0;
}
/*
* Function: void applicationTcpDown (void)
*
* Description:
*
*
This routine will be called by the NET+OS root thread once every
*
clock tick while it is waiting for the TCP/IP stack to come up.
*
This function can increment a counter everytime it's called to
*
keep track of how long we've been waiting for the stack to start.
*
If we've been waiting too long, then this function can do something
*
to handle the error.
*
*
This function will not be called once the stack has started.
* Parameters:
*
none
* Return Values:
*
none
*/
void applicationTcpDown (void)
{
static int ticksPassed = 0;
ticksPassed++;
/*
* Code to handle error condition if the stack doesn't come up goes here.
*/
}
/*
*
*
*
*
*
*
*
*
*
*
*
*
*
*/
Function: void applicationStart (void)
Description:
This routine is responsible for starting the user application. It should
create any threads or other resources the application needs.
ThreadX, the NET+OS device drivers, and the TCP/IP stack will be running
when this function is called.
Parameters:
none
Return Values:
none
Page 26
Copyright Digi International, 2011
void applicationStart (void)
{
/* Initialize the system services for the application. */
initAppServices();
/*
* Code to start the user application goes here.
*/
printf ("Hello World. %s Ready\n", APP_DIALOG_APP_NAME);
}
Here is a much reduced version of the root.c file that is just big enough to meet our needs.
#include
#include
#include
#include
#include
#include
#include
#include
#include
<stdio.h>
<stdlib.h>
<tx_api.h>
<appservices.h>
<wxroot.h>
"bsp_api.h"
"bsp_sys.h"
"bsp_services.h"
"appconf.h"
//Dummy function as a placeholder for iDigi. (See APP_IDIGI_INIT in appconf.h)
int app_idigi_init(void)
{
return 0;
}
//Call while waiting for TCP/IP stack. (Not called after stack has started.)
void applicationTcpDown (void)
{
static int ticksPassed = 0;
ticksPassed++;
}
//Display message in STDIO indicating web page is ready.
void applicationStart (void)
{
initAppServices();
//Init web server & go
printf ("Web page is active!! Point your browser to %s\n", APP_IP_ADDRESS);
}
This shorter version of root.c also works and will serve your web page without any issue.
TIP – Do Not Choke Your Embedded Web Server
Make note here that the threaded OS automatically services the web server without you having to do
anything but start it up in the root.c file. If your web server is not responsive, it may be because you are
calling a blocking function (or an interrupt) that prevents the CPU from servicing requests for the web
server.
Page 27
Copyright Digi International, 2011
Chapter 5 – Sneaky but Useful Comment Tags
Digi has created HTML tags you can use within the comments of your web page that allow easy
integration with the embedded device. Because the special tags are tucked into comments, the
browser will never see them and they will not interfere with your standard HTML code if you preview it
a browser. After you run the HTML code through PBuilder, the tags will be “compiled” and won’t show
up in the final web page served by the Digi controller.
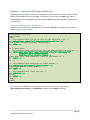
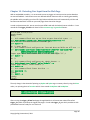
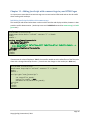
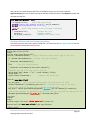
Get information from the embedded device to display in the browser
Assuming I have a variable named MyData defined on my embedded device, I can access and display it
with matched pairs of RpGet tags as shown here:
<html>
<title>some title</title>
<head></head>
<body>
<!-- Display a 16-bit signed value -->
<!-- RpDisplayText RpTextType=Signed16 RpGetType=Direct RpGetPtr=MyData -->
<!-- RpEnd -->
</body>
</html>
o
o
o
o
o
RpDisplayText will display the value stored on the controller and also functions as an
opening tag to be paired with the closing tag RpEnd.
RpTextType defines what type of value is displayed. In this case it is a 16-bit signed
integer.
RPGetType specified as Direct indicates that we are directly referencing the memory
location of the data by the variable name indicated by the next tag, RpGetPtr.
RpGetPtr is the name of the variable on the controller and works like a pointer to the
data.
RpEnd is a closing comment tag paired with the opening tag RpDisplayText.
Remember that the RpGet tags will retrieve information from the embedded controller to display in the
browser. For more information on how to use the RpDisplayText comment tag, consult the Advanced
Web ServerToolkit manual located by default in the C:\netos75\Documentation directory.
Page 28
Copyright Digi International, 2011
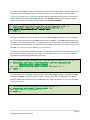
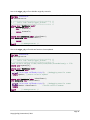
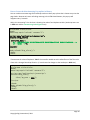
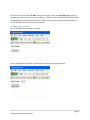
Set information from the browser on the embedded device
Assuming I have a variable named MyData defined on my embedded device, I can both change and
display it with comment matched pairs tags as shown here:
<html>
<title>some title</title>
<head></head>
<body>
<!-- …more stuff up here having to do with forms -->
<!-- This comment block configures our form and the variables we will use -->
<!-- RpFormInput type="text" name="NameField" size="32" maxlength="32"
RpGetType=Direct RpGetPtr=MyData
RpSetType=Direct RpSetPtr=MyData -->
<input type="text" name="NameField" size="32" maxlength="32" />
<!-- RpEnd -->
<!-- …more stuff down here having to do with forms -->
</body>
</html>
All of this needs to be combined with other tags to build an HTML form but to start with you can see
that the various RpGet tags are matched by RpSet tags which send data back to the controller.
o
o
o
o
RpFormInput will provide PBuilder with the information it needs to prepare the C code
that supports the HTML <INPUT> tags. It also functions as an opening tag to be paired
with the closing tag RpEnd.
RpSetType specified as Direct indicates that we are directly referencing the memory
location of the data by the variable name indicated by the next tag, RpSetPtr.
RpSetPtr is a pointer to the name of the variable on the controller and works like a
pointer to the data.
RpEnd is a closing comment tag paired with the opening tag, RpFormInput.
As the comments in the snippet indicate, there is more that must be done before this is working code,
but for now, it provides us an understanding of how to pass information back and forth between the
browser and the server.
Remember that the RpSet comment tags will send information from the browser to the embedded
controller. For more information on how to use the RpDisplayText comment tag, consult the Advanced
Web Server Toolkit manual located by default in the C:\netos75\Documentation directory.
Page 29
Copyright Digi International, 2011
Chapter 6 - Introducing Stub Functions
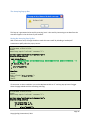
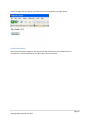
Beyond reading or changing values on the controller you can also reference callback functions called
“Stub Functions” to handle tasks related to your web page. Instead of using the Direct keyword with the
RPGetType and RpSetType comment tags to reference memory locations directly, you will use the
Function keyword to reference a stub function:
<html>
<title>some title</title>
<head></head>
<body>
<!-- …more stuff up here having to do with forms -->
<!-- This comment block configures our form and what variables we will use -->
<!-- RpFormInput type="text" name="NameField" size="32" maxlength="32"
RpGetType=Function RpGetPtr=GetMyData
RpSetType=Function RpSetPtr=SetMyData
-->
<input type="text" name="NameField" size="32" maxlength="32" />
<!-- RpEnd -->
<!-- …more stuff down here having to do with forms -->
</body>
</html>
After running the web page through the Pbuilder utility, empty placeholder functions will be created for
your project in the web result stubs html folder. In this example I have added some minor
functionality to each of the functions. We will create a working sample with a stub function later after
we try working with more basic examples.
/* Created with PageBuilder version 4.04 on Mon Dec 20 11:10:27 2010 */
#include "AsExtern.h"
#if RomPagerServer
/* ******************************************* */
/* *
Built from "html\trigger_cb.html"
* */
/* ******************************************* */
extern char MyData[50]; //Defined in web/result/stubs/html/formsubmitted_v.c
extern char *GetMyData(void);
char *GetMyData(void)
{
return MyData;
}
extern void SetMyData(char *theValuePtr);
void SetMyData(char *theValuePtr)
{
strcpy(MyData, theValuePtr);
return;
}
#endif
/* RomPagerServer */
Page 30
Copyright Digi International, 2011
Chapter 7 - Using Comment RpGet Tags with a Basic Web Page
Create a new project using the steps described in Chapter 4 or edit the existing project.
The HTML Code
Here is a simple web page called showdata.html with comment RpGet tags included that point back
directly to the C variables. (I have placed the comment tags in bold green text.)
<html>
<title>some title</title>
<head></head>
<body>
<!-- Display a 16-bit signed value -->
My Data =
<!-- RpDisplayText RpTextType=Signed16 RpGetType=Direct RpGetPtr=MyData -->
<!-- RpEnd --><br />
<!-- Display a string -->
My String = "
<!-- RpDisplayText RpTextType=ASCII RpGetType=Direct RpGetPtr=MyString -->
<!-- RpEnd -->"<br />
</body>
</html>
This HTML code will need to be run through the Pbuilder utility in order to link it logically to the C code
running on the controller. Once Pbuilder has been run successfully, we can pass variable information
from the controller to the browser directly.
Running the showdata.html web page through Pbuilder will produce a showdata.c file in the web
result fixed html folder which represents a C language version of the web page. This file might be
intellectually interesting because it shows how NET+OS represents HTML as C code, but for our purposes
we can ignore it for the moment.
Pbuilder will also produce another c file which we are interested in called the showdata_v.c. You will
find this file in the file in the web result stubs html folder. The showdata_v.c file created by
PBuilder will initially look like this:
/* Created with PageBuilder version 4.04 on Thu Jan 20 13:25:14 2011 */
#include "AsExtern.h"
#if RomPagerServer
/* ***************************************** */
/* *
Built from "html\showdata.html"
* */
/* ***************************************** */
Signed16 MyData = 0;
char MyString[] = "";
#endif
/* RomPagerServer */
I have edited the showdata_v.c file to define my variables as an integer and an array of characters with
fifty elements.
Page 31
Copyright Digi International, 2011
/* Created with PageBuilder version 4.04 on Wed Dec 15 13:30:26 2010 */
#include "AsExtern.h"
#if RomPagerServer
/* ***************************************** */
/* *
Built from "html\showdata.html"
* */
/* ***************************************** */
//See root.c and showdata.html for usage
int MyData = 0;
//Edited to change "Unsigned16" type to "int"
char MyString[50];
//Edited to set size
#endif
/* RomPagerServer */
The root.c Code
The code in root.c below demonstrates how to set the variables. (This is a stripped down version of
root.c created just as we did in Chapter 4.)
#include
#include
#include
#include
#include
#include
#include
#include
#include
<stdio.h>
<stdlib.h>
<tx_api.h>
<appservices.h>
<wxroot.h>
"bsp_api.h"
"bsp_sys.h"
"bsp_services.h"
"appconf.h"
//Web variables defined in web/result/stubs/html/showdata_v.c file
extern int MyData;
extern char MyString[50];
//Dummy function as a placeholder for iDigi. (See APP_IDIGI_INIT in appconf.h)
int app_idigi_init(void)
{
return 0;
}
//Call while waiting for TCP/IP stack. (Not called after stack has started.)
void applicationTcpDown (void)
{
static int ticksPassed = 0;
ticksPassed++;
}
//Display message in STDIO indicating web page is ready.
void applicationStart (void)
{
initAppServices();
//Init web server & go
printf ("Point your browser to %s\n", APP_IP_ADDRESS);
strcpy(MyString, "Output Data"); //Set MyString variable
while(1)
{
MyData++;
//Tweak the value of the MyData variable
}
}
Page 32
Copyright Digi International, 2011
With these Pbuilder files created and root.c tweaked, we can now serve fresh data from the controller
to the page. If the MyData integer variable is equal to ‘2009’ on the embedded device and the MyString
string variable is equal to “Output Data”, the web server will automatically edit the HTML file before it is
served to a browser. (I have shown the new data in bold text.)
<html>
<title>some title</title>
<head></head>
<body>
<!-- Display a 16-bit signed value -->
My Data = 2009<br />
<!-- Display a string -->
My String = "Output Data”<br />
</body>
</html>
The page generates the following in the browser:
My Data = 2009
My String = “Some String”
If the data changes on the embedded controller you will need to manually reload the page in order to
see the new data displayed in the browser.
Page 33
Copyright Digi International, 2011
Chapter 8 - Our First Dynamic Web Page
In order to show new data, we can include a meta tag to request that the page automatically reload.
This has the advantage of being very easy to do with a single line of HTML code in the head element of
the HTML file.
Here is the same page with the meta tag in the header asking for an automatic refresh. A meta tag is an
HTML tag with “metadata” or “data about other data”. The meta tags are placed in the head section of
the HTML file.
When the page is loaded in the browser, it will automatically request a refreshed page from the server
every 5 seconds. (You will see the automatic refresh request in bold text and the comment tags in bold
green text.)
<html>
<title>some title</title>
<head><meta http-equiv="refresh" content="5"></head>
<body>
<!-- Display a 16-bit signed value -->
My Data =
<!-- RpDisplayText RpTextType=Signed16 RpGetType=Direct RpGetPtr=MyData -->
<!-- RpEnd --><br />
<!-- Display a string -->
My String = "
<!-- RpDisplayText RpTextType=ASCII RpGetType=Direct RpGetPtr=MyString -->
<!-- RpEnd -->"<br />
</body>
</html>
Note: Remember, if you add the refreshing metatag you will need to rerun the Pbuilder utility again and
make any changes to the filename_v.c file created as we did in the previous chapter. PBuilder will
automatically overwrite the files which might cause you to lose any custom code in the filename_v.c
file.
Assuming the MyData integer variable starts at ‘2009’ and MyString starts at “Output String”, after they
are served from the controller the HTML file will look like this:
<html>
<title>some title</title>
<head><meta http-equiv="refresh" content="5"></head>
<body>
<!-- Display a 16-bit signed value -->
My Data = 2009<br />
<!-- Display a string -->
My String = "Output String"<br />
</body>
</html>
Page 34
Copyright Digi International, 2011
And the browser will display this:
My Data = 2009
My String = “Output String”
The page will still refresh every 5 seconds, and the controller will still send a copy of fresh data even if it
has not changed. If we assume that after 5 seconds the value of MyData has changed to ‘1967’ the file
will change showing the new. (I have placed the updated data in bold text.)
<html>
<title>some title</title>
<head><meta http-equiv="refresh" content="5"></head>
<body>
<!-- Display a 16-bit signed value -->
My Data = 1967<br />
<!-- Display a string -->
My String = "Output String"<br />
</body>
</html>
If the value on the controller has changed, when the page refreshes it will display new data like this:
My Data = 1967
My String = “Output String”
Page 35
Copyright Digi International, 2011
Chapter 9 - Interactive Web Pages Made Easy
Displaying data is great but in order to use a web page as a user interface, we need the ability to both
display and change data from the web page. Fortunately, we can do this with RpSet tags. Here is a
simple web page called changedata.html with comment RpSet tags included that point back directly to
the C variables.
Adding an HTML Form and a Submit Button
We will create a variation of our web page with a form and a Submit button added. (You will see the
comment tags in bold green text.)
<html>
<title>some title</title>
<head></head>
<body>
<!-- This comment block sets up our form to pass data with a get -->
<!-- RpFormHeader method="get" RpNextPage=Pgformsubmitted -->
<form action="formsubmitted.html" method="get">
<!-- RpEnd -->
<br /> Enter Data:
<!-- This comment block configures our form and what variables we will use -->
<!-- RpFormInput type="text" name="NameField" size="32" maxlength="32"
RpGetType=Direct RpGetPtr=MyData
RpSetType=Direct RpSetPtr=MyData -->
<input type="text" name="NameField" size="32" maxlength="32" />
<!-- RpEnd -->
<br />
<!-- This comment block configures our submit button -->
<!-- RpFormInput type="submit" value="Submit" -->
<input type="submit" value="Submit" />
<!-- RpEnd -->
<!-- This comment block closes the form -->
<!-- RpEndForm -->
</form>
<!-- RpEnd -->
</body>
</html>
First notice that our NET+OS comment tags are broken up into pairs with an opening tag
(RpFormHeader, RpForm Input, and RpEndForm ) paired with an RpEnd closing tag .
Page 36
Copyright Digi International, 2011
By using an HTML <form> element we allow the user to enter information and we send this back to the
web server as an HTTP post transaction. All the normal parts of an HTML form are combined with
comment tags shown in green bolded text which enable the data passing for the server. Here we see
that we will be passing data using a “get” defined in the method attribute and that when the submit
button is pressed we will transition to a new page called formsubmitted.html.
<!-- This comment block sets up our form to pass data with a get -->
<!-- RpFormHeader method="get" RpNextPage=Pgformsubmitted -->
<form action="formsubmitted.html" method="get">
<!-- RpEnd -->
To create a box where we can enter data we can use the HTML <input> tag which is part of a standard
form. This input tag is defined by the type attribute to be our text box. The name attribute allows you
to assign a name to the input element . The size attribute tells us the width of the input field (32) while
the maxlength attribute provides us with the maximum number of characters we can type into the input
field (32). The comment tags are shown in green bolded text.
In addition you will see that the MyData variable is included for sending and receiving data directly from
the controller with RpGet and RpSet tags. Again, you can see that our comment tags are provided in
pairs with each opening tag paired with an RpEnd tag.
<!-- This comment block configures our form and what variables we will use -->
<!-- RpFormInput type="text" name="NameField" size="32" maxlength="32"
RpGetType=Direct RpGetPtr=MyData
RpSetType=Direct RpSetPtr=MyData -->
<input type="text" name="NameField" size="32" maxlength="32" />
<!-- RpEnd -->
To create a button for submitting the data we will use the HTML <input> tag again and define the type
attribute to “submit” to create the submit button. You can change the text displayed on the submit
button by editing the quoted text after the value attribute. Again, the paired comment tags are shown
in green bolded text.
<!-- This comment block configures our submit button -->
<!-- RpFormInput type="submit" value="Submit" -->
<input type="submit" value="Submit" />
<!-- RpEnd -->
Page 37
Copyright Digi International, 2011
Finally the <form> tag must be closed and we achieve that with comment tags and a standard HTML
closing tag of </form>.
<!-- This comment block closes the form -->
<!-- RpEndForm -->
</form>
<!-- RpEnd -->
With a submit button on the page any changes will be passed back to the server automatically using a
get transaction when the user presses Submit.
PBuilder Created Files
Running the HTML code through PBuilder will produce the following changedata_v.c file:
/* Created with PageBuilder version 4.04 on Thu Jan 20 13:45:58 2011 */
#include "AsExtern.h"
#if RomPagerServer
/* ******************************************* */
/* *
Built from "html\changedata.html"
* */
/* ******************************************* */
char MyData[] = "";
#endif
/* RomPagerServer */
Which I will edit to change the MyData string:
/* Created with PageBuilder version 4.04 on Thu Jan 20 13:45:58 2011 */
#include "AsExtern.h"
#if RomPagerServer
/* ******************************************* */
/* *
Built from "html\changedata.html"
* */
/* ******************************************* */
char MyData[50];
#endif
/* RomPagerServer */
Page 38
Copyright Digi International, 2011
Updating the root.c code
If we change the root.c code in the applicationStart() function from the previous example, we can
watch the value of the MyData variable change in the STDIO window in response to the changes entered
by the user on the web page.
void applicationStart (void)
{
int i=0;
initAppServices();
//Init web server & go
printf ("Point your browser to %s\n", APP_IP_ADDRESS);
strcpy(MyData,"Send some data");
while(1)
{
i++;
printf("\n\n#%d +++%s+++\n", i, MyData);
//Print string value
tx_thread_sleep(1000);
//Yield to create a delay
}
}
Note – the tx_thread_sleep() function tells the function to intelligently yield the processor to the other
threads for a set number of ticks. In this case the thread will sleep for 1000 ticks. The number of ticks
used here is not measured in milliseconds but you could adjust this to a discrete time by using the
NS_MILLISECONDS_TO_TICKS() macro. The updated while loop might look like this:
while(1)
{
i++;
printf("\n\n#%d +++%s+++\n", i, MyData);
//Print string value
tx_thread_sleep(NS_MILLISECONDS_TO_TICKS(1000)); //Yield to delay
}
The Final Result? A Web Form Interacting with our Controller!
Page 39
Copyright Digi International, 2011
Chapter 10 - Detecting User Input from the Web Page
With an embedded controller, it is not unusual to want to trigger an interrupt service routine based on
an external feedback. Stub functions are user defined callback functions that are initially generated by
the pbuilder utility compiling your html file. Digi’s Advanced Web Server will automatically call the stub
function associated with a value on your web page, when that value changes.
In order to demonstrate this, we can use the same HTML code with the Submit button as before. I have
named this file trigger_cb.html and I have left the comment tags in green bold letters.
<html>
<title>some title</title>
<head></head>
<body>
<!-- This comment block sets up our form to pass data with a post -->
<!-- RpFormHeader method="get" RpNextPage=Pgformsubmitted -->
<form action="formsubmitted.html" method="get">
<!-- RpEnd -->
<br /> Enter Data:
<!-- This comment block configures our form and what variables we will use -->
<!-- RpFormInput type="text" name="NameField" size="32" maxlength="32"
RpGetType=Function RpGetPtr=GetMyData
RpSetType=Function RpSetPtr=SetMyData -->
<input type="text" name="NameField" size="32" maxlength="32" />
<!-- RpEnd -->
<br />
<!-- This comment block configures our submit button -->
<!-- RpFormInput type="submit" value="Submit" -->
<input type="submit" value="Submit" />
<!-- RpEnd -->
<!-- This comment block closes the form -->
<!-- RpEndForm -->
</form>
<!-- RpEnd -->
</body>
</html>
The only change is that instead of pointing my RpGet and RpSet tags to memory directly using the direct
value, I am pointing them to functions which I have named GetMyData and SetMyData.
RpGetType=Function RpGetPtr=GetMyData
RpSetType=Function RpSetPtr=SetMyData
After running the trigger_cb.html web page through Pbuilder it will create two related files called
trigger_cb.c which represents the logical web page in C code and trigger_cb_v.c which provides us with
placeholder functions ready for us to flesh out.
Page 40
Copyright Digi International, 2011
Here is the trigger_cb_v.c file as PBuilder originally created it:
/* Created with PageBuilder version 4.04 on Fri Jan 21 10:16:38 2011 */
#include "AsExtern.h"
#if RomPagerServer
/* ******************************************* */
/* *
Built from "html\trigger_cb.html"
* */
/* ******************************************* */
extern char *GetMyData(void);
char *GetMyData(void) {
char * theResult;
return theResult;
}
extern void SetMyData(char *theValuePtr);
void SetMyData(char *theValuePtr) {
return;
}
#endif
/* RomPagerServer */
Here is the trigger_cb_v.c file with two functions I have updated:
/* Created with PageBuilder version 4.04 on Mon Dec 20 11:10:27 2010 */
#include "AsExtern.h"
#if RomPagerServer
/* ******************************************* */
/* *
Built from "html\trigger_cb.html"
* */
/* ******************************************* */
//Web variable defined in web/result/stubs/html/formsubmitted_v.c file
extern char MyData[50];
extern char *GetMyData(void);
char *GetMyData(void)
{
printf("\n\n+++get callback+++\n\n");
//Debugging note for STDIO
return MyData; //Return value of MyData
}
extern void SetMyData(char *theValuePtr);
void SetMyData(char *theValuePtr)
{
printf("\n\n+++set callback+++\n\n");
//Debugging note for STDIO
strcpy(MyData, theValuePtr);
//Assign value to MyData
return;
}
#endif
/* RomPagerServer */
Page 41
Copyright Digi International, 2011
Notice that the MyData variable is defined in another PBuilder generated file and just as we did in
Chapter 4 I updated the formatsubmitted_v.c file to better define my variable.
/* Created with PageBuilder version 4.04 on Mon Dec 20 11:10:27 2010 */
#include "AsExtern.h"
/* Created with PageBuilder version 4.04 on Mon Dec 20 11:10:27 2010 */
#include "AsExtern.h"
#if RomPagerServer
/* ********************************************** */
/* *
Built from "html\formsubmitted.html"
* */
/* ********************************************** */
//For usage see root.c, trigger_cb.html, and formsubmitted.html
char MyData[50];
#endif
/* RomPagerServer */
Now whenever the user requests or changes the data these two stub functions will automatically
provide us debugging notes indicating that they have been called. Note that when I use the Function
keyword in the RpSetType attribute I need to ensure that I correctly assign and return my values in the
stub functions.
Other Possibilities?
Remember that you can create complicated behavior with your callback functions. When the client
changes a value, the callback function could:
Set a flag to trigger some behavior in the root.c code
Send data from a serial port, TCP socket, or UPD socket
Change the state of a digital output
Set a pin as either a digital input or an output
Anything else the controller could do with a normal function call…
Page 42
Copyright Digi International, 2011
Chapter 11 - Adding JavaScript with comment tags to your HTML Pages
It is important to remember that comment tags are not restricted to HTML code and can also be useful
when working with JavaScript.
Initializing JavaScript Variables with comment tags
This JavaScript code shown below does not do much but initialize and display variables; however it does
provide a useful demonstration. (JavaScript items are in bold black text and the comment tag is in bold
green text.)
<html>
<title>some title</title>
<head><meta http-equiv="refresh" content="5" ></head>
<body>
MyData =
<script type="text/javascript">
var Controller_Data1;
Controller_Data1 =
<!-- RpDisplayText RpTextType=ASCII RpGetType=Direct RpGetPtr=MyData -->
<!-- RpEnd -->;
document.write(Controller_Data1);
</script>
<br />
</body>
</html>
If we assume the value of MyData is “2011” the controller would serve this edited form of the file to the
client with a changed JavaScript function. (I have shown the changes to the JavaScript in bold text.)
<html>
<title>some title</title>
<head><meta http-equiv="refresh" content="5" ></head>
<body>
MyData =
<script type="text/javascript">
var Controller_Data1;
Controller_Data1 = 2011;
document.write(Controller_Data1);
</script>
<br />
</body>
</html>
Page 43
Copyright Digi International, 2011
How to Create the Most Annoying Pop-up Box in History
You can combine comment tags with JavaScript code to make a pop-up box that is shown every time the
page loads. Because we have a refreshing meta tag in the HTML head element, this pop-up will
reappear every 5 seconds.
Why is this interesting? Our alert box is showing the value of our MyData variable. (JavaScript items are
in bold text and the comment tags in bold green text.)
<html>
<title>some title</title>
<head>
<meta http-equiv="refresh" content="5">
<script type="application/x-javascript">
function disp_alert()
{
alert("My_Data =
<!-- RpDisplayText RpTextType=ASCII RpGetType=Direct RpGetPtr=MyData -->
<!-- RpEnd -->");
}
</script>
</head>
<body onload="disp_alert();">
</body>
</html>
If we assume the value of MyData is “2011” the controller would serve this edited form of the file to the
client with a changed JavaScript function. (I have shown the changes to the JavaScript in bold text.)
<html>
<title>some title</title>
<head>
<meta http-equiv="refresh" content="5">
<script type="application/x-javascript">
function disp_alert()
{
alert("My_Data = 2011");
}
</script>
</head>
<body onload="disp_alert();">
</body>
</html>
Page 44
Copyright Digi International, 2011
The Annoying Pop-up Box
This Pop-up is guaranteed to be terribly annoying, but it is also terribly interesting to see data from the
controller appear in the alert box of your browser.
Saving the Annoying Pop-Up Box
With a little more work, we might be able to make this more useful by including a JavaScript if
statement to qualify when the pop-up occurs.
<html>
<title>some title</title>
<head>
<meta http-equiv="refresh" content="5">
<script type="application/x-javascript">
function disp_alert()
{
var alarm_flag =
<!-- RpDisplayText RpTextType=ASCII RpGetType=Direct RpGetPtr=MyData -->
<!-- RpEnd -->;
if (alarm_flag == 1)
{
alert("ALARM!");
}
}
</script>
</head>
<body onload="disp_alert();">
</body>
</html>
If I encounter an alarm condition I can set the MyData variable to “1” and my pop-up box will trigger
when the page reloads with the refreshing meta tag.
<html>
<title>some title</title>
<head>
<meta http-equiv="refresh" content="5">
<script type="application/x-javascript">
function disp_alert()
{
var alarm_flag = 1;
if (alarm_flag == 1)
{
alert("ALARM!");
Page 45
Copyright Digi International, 2011
}
}
</script>
</head>
<body onload="disp_alert();">
</body>
</html>
With just a bit of imagination, you can do almost anything.
Page 46
Copyright Digi International, 2011
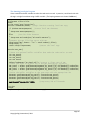
Chapter 12 - Basic XML with the Digi Embedded Web Server
XML is a method of transmitting and presenting data in an organized way. It uses XML tags the same
way you or I might use the handles on a suitcase to grab onto it. If you know the XML tag, you can get to
the data very easily and the best thing is you will create your own tags for your file. (I have put the data
in bold text.)
For example:
<!-- My XML file -->
<Famous_Animals>
<Dogs>
<Scoobie_Doo>Great Dane</Scoobie_Doo>
<Lassie>Collie</Lassie>
<Rin_Tin_Tin>German Shepherd</Rin_Tin_Tin>
<Stimpy>Chihuahua</Stimpy>
</Dogs>
</Famous_Animals>
Each defined tag must have a closing tag with a “/” like this:
<my_nifty_xml_tag >some nifty data</my_nifty_xml_tag>
With this understanding, we can add an XML data file into our embedded web server by creating it in
the embedded device’s RAM file system.
Page 47
Copyright Digi International, 2011
Here in root.c we define the contents of our XML file with a string constant.
#include
#include
#include
#include
#include
#include
#include
#include
#include
#include
#include
<stdio.h>
<stdlib.h>
<tx_api.h>
<appservices.h>
<wxroot.h>
<fs_api.h>
"bsp_api.h"
"bsp_sys.h"
"bsp_services.h"
"appconf.h"
"netosIo.h"
//String constant to place in file created in CreateXMLFile() function below
const char XML_Data[]=
"<!-- My XML file -->\n"\
"<Famous_Animals>\n"\
" <Dogs>\n"\
"
<Scoobie_Doo>Great Dane</Scoobie_Doo>\n"\
"
<Lassie>Collie</Lassie>\n"\
"
<Rin_Tin_Tin>German Shepherd</Rin_Tin_Tin>\n"\
"
<Stimpy>Chihuahua</Stimpy>\n"\
" </Dogs>\n"
"</Famous_Animals>\n";
//Dummy function as a placeholder for iDigi. (See APP_IDIGI_INIT in appconf.h)
int app_idigi_init(void)
{
return 0;
}
//Call while waiting for TCP/IP stack. (Not called after stack has started.)
void applicationTcpDown (void)
{
static int ticksPassed = 0;
ticksPassed++;
}
Page 48
Copyright Digi International, 2011
Then we will add a function to root.c named CreateXMLFile() to create a “dogs.xml” file in the RAM file
system using standard C functions used to manipulate files. That process will follow three basic steps
which are open() (which creates the file), write(), and close() .
//Create an XML file to store in /FS/RAM0
void CreateXMLFile (void)
{
int status,
//Return value buffer for write() and close() functions
fd;
//File descriptor populated by open() function
printf("\nCreating XML File in /FS/RAM0 filesystem.\n");
//Open (or create) file for reads or writes
fd = open ("RAM0/dogs.xml", O_CREAT|O_RDWR);
if (fd < 0) //Error handling
{
printf ("APP: Failed to open /FS/RAM0/dogs.xml[%d]\n", getErrno());
return;
}
//Write XML data to file
status = write (fd, XML_Data, strlen(XML_Data));
if (status != strlen(XML_Data)) //Error handling
{
printf ("APP: Failed[%d] writing /FS/RAM0/dogs.xml[%d]\n", status, getErrno());
return;
}
//Close file
status = close (fd);
if (status != 0) //Error handling
{
printf ("APP: Failed to close /FS/RAM0/dogs.xml[%d]\n", getErrno());
return;
}
printf("\n\n+++FILE CREATED+++\n\n%s\n\n",XML_Data);
}
First we will create the file with read and write permissions using the open() function and then we will
place the file in FS/RAM0/dogs.xml directory by using “RAM0/dogs.xml” as the filename. (Here we can
omit the “FS” which is the root directory and stands for “file system”.
The open() function returns a file descriptor that I am storing in the fd variable which we can use to
write to the file later.
//Open (or create) file for reads or writes
fd = open ("RAM0/dogs.xml", O_CREAT|O_RDWR);
Page 49
Copyright Digi International, 2011
Next, we will write our string constant to the data file with the write() function by passing in the file
descriptor, fd, and the string constant, XML_Data, and the length of the data we want to write.
//Write XML data to file
status = write (fd, XML_Data, strlen(XML_Data));
Finally, we will close the file using the close() function and the file descriptor, fd.
//Close file
status = close (fd);
If we assume my web server has an IP address of “192.168.1.197”, I should be able to access the XML
file from a browser by typing the following URL into my browser:
http://192.168.1.197/ FS/RAM0/dogs.xml
This demonstrates that the device can serve up an XML file in a way that makes some sense to the
browser. Now we need a web page that can do something with it.
Page 50
Copyright Digi International, 2011
Putting together JavaScript Code to Read your XML data
Different browsers will handle an XML file in different ways, but the process will break down into five
basic steps:
1.
2.
3.
4.
5.
Create a local XML document.
Do you want your read to be synchronous or asynchronous?
Get the XML file from the server and store the contents in your local version.
Grab a specific piece of data from the file.
Do something with that data like show it in your web page.
Scary Looking JavaScript Code
I have put together a small HTML file with JavaScript code to access the dogs.xml file. This may look
intimidating so we are going to break it down piece by piece. (You will notice the XML tag in bold blue
text and the ID attribute referenced in bold red text.)
The Magic “Go Get My XML File” Function
Inside the head section of the HTML file we are going to write two functions.
The first function will be a generic (and reusable) function to create a local XML document and
then populate it with data it gets from the server.
The second function will walk through our local copy of the XML file to get some data and then
place it into the body of the HTML page.
<html>
<title>some title</title>
<head>
<script type="text/javascript">
//The magic function to request an XML file and return a local copy
function loadXMLDoc(dname)
{
if (window.XMLHttpRequest) //Create local XML document
{
xhttp=new XMLHttpRequest();
}
else
//Use for older browsers
{
xhttp=new ActiveXObject("Microsoft.XMLHTTP");
}
//Request the XML file from server with GET
xhttp.open("GET",dname + "?t=" + Math.random(),false);
//Request the XML file from server with POST
//xhttp.open("POST", dname + "?t=" + Math.random(),false);
xhttp.send("");
return xhttp.responseXML;
//Return the local copy
}
Page 51
Copyright Digi International, 2011
In this document, I am going to treat the complicated topic of the HTML Document Object Model (DOM)
as we would a hammer. I am going to show you a basic method of using these tools but I am not going
to get into extensive detail about what makes them work. If we use the hammer analogy, we are
interested in hitting our nails into a board, but we do not need to know equations for kinetic energy or
how Newtonian physics explains a lever.
If you want more information on HTML DOM, you can find a tutorial here:
http://www.w3schools.com/htmldom/default.asp
You should notice that we are passing in the name of the XML file in the beginning of the function like
this:
function loadXMLDoc(dname)
{
…
}
That allows us to use the same function to request any XML file from the server by calling my
loadXMLDoc() function with different files and stashing the result in a local variable.
myXMLData = loadXMLDoc(“/FS/RAM0/dogs.xml”);
SomeXMLStuff = loadXMLDoc(“/FS/RAM0/my_data.xml”);
LocalXML = loadXMLDoc(“/FS/RAM0/my_xml.xml”);
Next, we need to have a plan for handling different web browsers. If we are using a newer browser, our
local XML buffer called xhttp will be created by this code. If we are running an older browser this if
statement will fail and return a false value, moving us onto the next option.
if (window.XMLHttpRequest)
//Create local XML document
{
xhttp=new XMLHttpRequest();
}
The older browsers will be handled by our else statement. Here we try creating the local version again
using an older method for Microsoft’s Internet Explorer versions 5 and 6.
else //Use for older browsers
{
xhttp=new ActiveXObject("Microsoft.XMLHTTP");
}
Page 52
Copyright Digi International, 2011
To actually retrieve the XML data we will use the open function. The open function requires you to list
your method (GET or POST shown here), the URL, and then choose false or true.
I have added a small trick that ensures that each GET request has a unique URL by adding a random
number at the end. That tricks the cache and we get the current version of the XML file rather than
using one stored locally. When you are using an XML file that changes dynamically, this is important to
ensure that your browser gets the fresh data.
//Request the XML file from server with GET
xhttp.open("GET",dname + "?t=" + Math.random(),false);
//Request the XML file from server with POST
//xhttp.open("POST", dname + "?t=" + Math.random(),false);
Note: Some web browsers will not need the random number trick and automatically request the file
from the server. If your application never uses one of these browsers, you could call the same function
without the random number trick like this:
//Request the XML file from server with GET
xhttp.open("GET", dname, false);
//Request the XML file from server with POST
//xhttp.open("POST", dname, false);
If your XML file is very large, you may want the JavaScript code to wait until the XML file is completely
loaded. You can make the JavaScript program wait for the file to load by specifying that you do not
want an asynchronous load. By passing in the false parameter you can load the XML file into your xhttp
object and the program will wait for you to finish before it continues execution.
The send function sends the request to the server and the empty quotes (“”) tell us we do not want to
send any data with the request. Finally, we pass our XML data back out of the function.
xhttp.send("");
return xhttp.responseXML;
//Send request without extra data
//Return the local copy
Page 53
Copyright Digi International, 2011
The Primary JavaScript Function
function Get_Dog_Tags() //Function to get XML place it in the HTML page
{
var Breed; //This optional buffer makes the code easier to read
xmlDoc=loadXMLDoc("/FS/RAM0/dogs.xml"); //Creates a local copy of XML
//Get the XML data from Scoobie_Doo tag and stash it in Breed
Breed = xmlDoc.getElementsByTagName("Scoobie_Doo")[0].childNodes[0].nodeValue;
//Write the contents of Breed at the span tag with the id="Dog_Breed"
document.getElementById("Dog_Breed").innerHTML=Breed;
}
Breaking down the Scary Looking JavaScript – HTML DOM
First, we are going to store the breed of the dog in a JavaScript variable. If we wanted to manipulate the
data with our JavaScript code, this is useful. If we just want to output the data, we might not need this
variable.
var Breed;
//This optional buffer makes the code easier to read
Next, I will call my magic function to go get my XML data and store it into my xmlDoc buffer. (We
already described how this function works earlier.)
xmlDoc=loadXMLDoc("/FS/RAM0/dogs.xml"); //Creates a local copy of XML
With the XML file loaded, we can use the XML tag to latch onto a key piece of data by specifying the tag
name. (I have placed the unique XML tag in bold blue text to make it easy to spot.)
//Get the XML data from Scoobie_Doo tag and stash it in Breed
Breed = xmlDoc.getElementsByTagName("Scoobie_Doo")[0].childNodes[0].nodeValue;
Now that we have the data in the program we need a method for writing it to the web page. The
document.getElementById function lets you tuck variable information into a
place on your web page that has the correct attribute ID. (I have placed the
attribute ID in bold red text to make it easy to spot.)
//Write the contents of Breed at the span tag with the id="Dog_Breed"
document.getElementById("Dog_Breed").innerHTML=Breed;
Page 54
Copyright Digi International, 2011
Adding an ID to the HTML Attributes
An HTML element can have attributes. An attribute is made up of a name and a value. The value is in
quotes. Here you can see an HTML paragraph indicated by the <p> tag with a unique ID attribute. You
can add an ID attribute to any HTML element. (I have placed the ID attribute in bold red text to make it
easy to see.)
<p id=”my_unique_paragraph_id”>Some Stuff</p>
Attributes allow us to provide additional information about the element and we can use these as
handles for plugging things into our page with XML. In the HTML code for handling our XML file, I have
included an ID using a <span> tag. The <span> tag does not do anything to modify the appearance of
the web page by itself. Instead, it provides us a convenient hook we can use to drop our data into the
page using the ID attribute. Here is a span tag with the ID attribute in bold red text to make it easy to
see.
<span id="Dog_Breed"></span>
If I wanted to directly set the value between my two span tags to “Some Dog”, I could use the following
JavaScript statement:
document.getElementById("Dog_Breed").innerHTML="Some Dog";
By using our Breed JavaScript variable, we can set this value with data from the XML file.
//Write the contents of Breed at the span tag with the id="Dog_Breed"
document.getElementById("Dog_Breed").innerHTML=Breed;
We could skip the Breed variable completely and use a single line of code to assign the XML data to the
ID attribute just as easily if we wished. This line of code assigns the value directly without any buffer
variable:
document.getElementById("Dog_Breed").innerHTML =
xmlDoc.getElementsByTagName("Scoobie_Doo")[0].childNodes[0].nodeValue;
I chose to break this single line up, because it is easier to read and explain if we take it in smaller steps.
Page 55
Copyright Digi International, 2011
The HTML body that works with the JavaScript Program
<body>
<b>What Kind of Dog is Scoobie Doo?</b>
<p>Scoobie Doo is a <span id="Dog_Breed"></span></p>
<p><button onclick="Get_XML_Dog();">Snag an XML Dog Tag!</button></p>
</body>
In the body of the HTML there are two lines that are important. The first is our <span> tag with its ID
attribute.
<p>Scoobie Doo is a <span id="Dog_Breed"></span></p>
The last key piece is HTML code to add a button. When the button is clicked, our JavaScript function
Get_XML_Dog() will execute.
<p><button onclick="Get_XML_Dog();">Snag an XML Dog Tag!</button></p>
Updating the root.c Code
After running the web page through the Pbuilder you still need to edit the root.c file again to call your
CreateXMLFile() function in the applicationStart() function.
//Display message in STDIO indicating web page is ready.
void applicationStart (void)
{
initAppServices();
//Init web server & go
CreateXMLFile();
//Create XML file in RAM0
printf ("Point your browser to %s\n", APP_IP_ADDRESS);
}
Page 56
Copyright Digi International, 2011
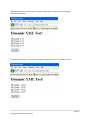
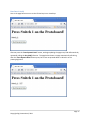
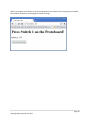
Let’s See the Dog Tags Work!
When the page is loaded initially the browser will display this text:
When the user clicks the button the Get_XML_Dog() JavaScript function will execute and our magic XML
code will produce this:
Where is the Magic? - AJAX
The important thing to notice is that all this occurred without a page refresh! This is a method of web
programming known as Asynchronous JavaScript and XML or AJAX.
Page 57
Copyright Digi International, 2011
Chapter 13 – Embedded devices and XML – The Holy Grail of Embedded
Web Developers
With XML and our Digi embedded web server we can create a powerful combination.
As an example, our embedded web server might have the following web resources that it needs to serve
to a browser:
HTML file
3 jpegs
JavaScript file
Style sheet
XML file
- 500k
- 250k each
- 100k
- 50k
- 1k
We want a dynamic page and we could use this HTML code in the <head> to force the entire page to
refresh every 5 seconds.
<meta http-equiv="refresh" content="5" >
Unfortunately, in this case a single page refresh requires 1401k of data!
That is not efficient at all!
If we use the previous option of manually refreshing the entire page every 5 seconds with a meta tag we
place a serious burden on the web server. If we can refresh only the XML file, we create the ability to
update only the data in the web page without refreshing the entire page.
The Teeny-Tiny and yet Magical my_data.xml file
Consider this simple XML where '2011' is the current value of MyData1.
<!-- XML File -->
<Digi>
<My_Data1>2011</My_Data1>
</Digi>
This file is very small and our embedded web server can serve this up much more quickly than the entire
page with all the supporting files. Best of all, the HTML pages do not completely reload and the data will
change before our eyes like magic!
Page 58
Copyright Digi International, 2011
Updating the root.c code
Instead of using a predefined string constant we can now create our XML file in RAM dynamically with
fresh data every time. First we will need a variable with the interesting data.
int MyData1 = 0;
//Dynamic data for XML file (global)
Then we need to update our CreateXMLFile() function to create files with fresh data. This time we add
an additional step to the sequence for working with files by deleting any previous files with the
remove() function. By removing any previous copy of the file, we ensure that our file is fresh and clean
every time. Here is the sequence we will use to create a new XML file in each loop:
remove()
open()
write()
close()
void CreateXMLFile (void)
{
char XML_Data[200]; //XML data buffer
char Data_Buffer[50];//Buffer for MyData variable
int
status;
//Return value for write() & close()
int
fd;
//File descriptor populated by open()
//Create formatted XML string to write to file
strcpy(XML_Data, "<!-- XML File -->\n<Digi>\n");
sprintf(Data_Buffer, " <My_Data1>%d</My_Data1>\n", MyData1);
strcat(XML_Data, Data_Buffer);
strcat(XML_Data, "</Digi>");
remove("RAM0/my_data.xml");
//Delete the previous file if it exists
fd = open ("RAM0/my_data.xml", O_CREAT|O_RDWR); //Create file
if (fd < 0)
//Error handling
{
printf ("Error[%d]: Open failure /FS/RAM0/my_data.xml\n", getErrno());
return;
}
status = write (fd, XML_Data, strlen(XML_Data)); //Write XML data to file
if (status != strlen(XML_Data))
//Error handling
{
printf ("APP: Write Fail[%d] /FS/RAM0/my_data.xml[%d]\n", status, getErrno());
return;
}
status = close (fd); //Close file
if (status != 0)
//Error handling
{
printf ("APP: Failed to close /FS/RAM0/my_data.xml[%d]\n", getErrno());
return;
}
}
Page 59
Copyright Digi International, 2011
Now that we can create dynamic XML files in the RAM file system, we only need to edit the
ApplicationStart() function to add a loop that periodically tweaks the value of the MyData1 variable and
recreates the XML file.
void applicationStart (void)
{
initAppServices();
//Init web server & go
printf ("Point your browser to %s\n", APP_IP_ADDRESS);
printf("Serving Dynamic XML file.\n");
while(1) //Each loop creates a new file with fresh data
{
CreateXMLFile();
//Create XML file
MyData1++;
//Update MyData1
tx_thread_sleep(50);
//Rewrite file every 50 ms
}
}
The Magic HTML file with Special Kung Fu JavaScript
This looks almost the same as the previous HTML file. (You will notice the XML tag in bold blue text and
the ID attribute referenced in bold red text.)
<html>
<title>some title</title>
<head>
<script type="text/javascript">
function loadXMLDoc(dname)
//Magic function creates local copy of XML file
{
if (window.XMLHttpRequest) //Create local XML document
{
xhttp=new XMLHttpRequest();
}
else
//Use for older browsers
{
xhttp=new ActiveXObject("Microsoft.XMLHTTP");
}
//Request the XML file from server with GET
xhttp.open("GET",dname + "?t=" + Math.random(),false);
xhttp.send("");
return xhttp.responseXML;
//Return the local copy
}
function Read_XML_File()
{
var XML_Data;
//This optional buffer makes the code easier to read
xmlDoc=loadXMLDoc("/FS/RAM0/my_data.xml"); //Create local copy of XML data
//Store the value of My_Data tag in the XML_Data variable
XML_Data = xmlDoc.getElementsByTagName("My_Data")[0].childNodes[0].nodeValue;
//Write the contents of the buffer variable at the span tag with the appropriate id
document.getElementById("My_Data_ID").innerHTML=XML_Data;
}
</script>
</head>
<body>
<p><b>My_Data1:</b><span id="My_Data_ID;"></span></p>
<button onclick="Read_XML_File();">Get XML</button>
</body></html>
Page 60
Copyright Digi International, 2011
Each time the user clicks the “Get XML” button it will trigger a call to the Read_XML_File() JavaScript
function which requests a fresh copy of the XML file. Unlike our previous example, the XML file is being
refreshed with new data every 50 milliseconds. When the value of the My_Data variable changes, so
will the XML file and we can see that in the browser.
The Magic Page in Action!
Here is the page before the button is pressed:
Here is the page after the button is pressed the first time without any page refresh:
Page 61
Copyright Digi International, 2011
Here is the page after the button is pressed the second time without any page refresh:
Is this Really Magic?
Each click of the button requests a new copy of the XML file which we have created every 50
milliseconds. It is fast and effective! Can we make it more interesting?
Page 62
Copyright Digi International, 2011
Chapter 14 - Loopy JavaScript
Updating the data on a button press is interesting, but it would be more impressive to continually
refresh the data behind the scenes with an infinite loop. JavaScript has a mechanism for this called a
timing event.
The Joy of the setTimeout() Function
The setTimeout() function can be used to execute a JavaScript function after an interval has expired. It
accepts two parameters:
1. A JavaScript statement
2. A time interval in milliseconds
The function returns a unique ID number that will allow you to shut down the timed process. You can
think of this as a way of putting a C-code style break into your infinite loop as an escape hatch.
A call to the setTimeout() might look like this:
var t =setTimeout(“c=c+1;”,5000);
//increment c in 5 seconds
Easy setTimeout() Function Example
Here is a short HTML file that uses the setTimeout() Function to display an alert box 5 seconds after the
user presses a button on the web page.
<html>
<title>some title</title>
<head>
<script type="text/javascript">
function Delayed_Pop_Up()
{
var timer_id = setTimeout("alert('TaDa!')",5000);
}
</script>
</head>
<body>
<button onclick="Delayed_Pop_Up();">Trigger Delayed Pop Up</button>
</body>
</html>
Page 63
Copyright Digi International, 2011
Using the setTimeout() Function to create an Infinite Loop
A more interesting construction would be to use setTimeout() to call another function in an infinite loop.
Here we are using the same ID attribute from the previous examples as a mechanism for creating an
infinite loop that continues to update the value of the c variable as displayed on the web page twice per
second.
<html>
<title>some title</title>
<head>
<script type="text/javascript">
var c = 0;
var timer_id;
//Simple counter
//Global timeout ID so we can exit later if we wish
function Inc_C()
{
c = c +1;
document.getElementById(“c_variable”).innerHTML=c;
timer_id = setTimeout(“Inc_C()”,500); //Calling function again to loop!
}
</script>
</head>
<body>
<p>c = <span id="c_variable"></span></p>
<p><button onclick="Inc_C();">Start C up!</button></p>
</body>
</html>
Exiting the Loop
If we wanted to exit the infinite loop, we could use the clearTimeout() function like this:
clearTimeout(timer_id);
Page 64
Copyright Digi International, 2011
For example, we could create another button that exits the loop. (I have placed the code used to exit
the loop in bold text below.)
<html>
<title>some title</title>
<head>
<script type="text/javascript">
var c = 0;
//Simple counter
var timer_id;
//Global timeout ID so we can exit later if we wish
function Inc_C()
{
document.getElementById("c_variable").innerHTML=c;
c = c +1;
timer_id = setTimeout("Inc_C()",500); //Calling function again to loop!
}
function Done()
{
clearTimeout(timer_id);
}
</script>
</head>
<body>
<p>c = <span id="c_variable"></span></p>
<p><button onclick="Inc_C();">Start C up!</button></p>
<p><button onclick="Done();">Stop C!</button></p>
</body>
</html>
Looking at the Page
Here is a screenshot of how the page will look:
Page 65
Copyright Digi International, 2011
Using a JavaScript Loop to Pass Dynamic XML Data in Real-Time
Now that we understand how to start and stop loops in JavaScript, we can apply this to our dynamic
XML files.
Here is a more interesting XML file where I have populated the XML tags with the current values of
variables.
<!-- XML File -->
<Digi>
<My_Data1>2011</My_Data1>
<My_Data2>1792</My_Data2>
<My_Data3>1066</My_Data3>
<My_Data4>95</My_Data4>
</Digi>
C Code
Again we will need some global variables to write into our XML file.
//Dynamic data for XML file (global)
int MyData[4];
Next we need to update our CreateXMLFile() function to create files with fresh data from multiple
variables. We will use the same sequence for working with files:
remove()
open()
write()
close()
Page 66
Copyright Digi International, 2011
But now we add a small for loop to create a line of XML for each variable.
void CreateXMLFile (void)
{
char XML_Data[200]; //XML data buffer
char Data_Buffer[50];//Buffer for MyData variable
int
status;
//Return value for write() & close()
int
fd;
//File descriptor populated by open()
//Create formatted XML string to write to file
strcpy(XML_Data, "<!-- XML File -->\n<Digi>\n");
//Begin file
//Create 4 new lines to the file for MyData1 - MyData4
for (i=1;i<5;i++)
{
sprintf(Data_Buffer, " <My_Data%d>%d</My_Data%d>\n",i, MyData[i-1], i);
strcat(XML_Data, Data_Buffer);
}
strcat(XML_Data, "</Digi>"); //Be careful not to exceed buffer size (200 char)
//Delete the previous file if it exists
remove("RAM0/my_data.xml");
//Open (or create) file for reads or writes
fd = open ("RAM0/my_data.xml", O_CREAT|O_RDWR);
if (fd < 0)
//Error handling
{
printf ("Error[%d]: Open failure /FS/RAM0/my_data.xml\n", getErrno());
return;
}
//Write XML data to file from string constant
status = write (fd, XML_Data, strlen(XML_Data));
if (status != strlen(XML_Data))
//Error handling
{
printf ("APP: Write Fail[%d] /FS/RAM0/my_data.xml[%d]\n", status, getErrno());
return;
}
//Close file
status = close (fd);
if (status != 0)
//Error handling
{
printf ("APP: Failed to close /FS/RAM0/my_data.xml[%d]\n", getErrno());
return;
}
}
Page 67
Copyright Digi International, 2011
And the ApplicationStart() code:
void applicationStart (void)
{
MyData[0] = 1;
MyData[1] = 10;
MyData[2] = 100;
MyData[3] = 1000;
initAppServices();
//Init web server & go
printf ("Point your browser to %s\n", APP_IP_ADDRESS);
printf("Serving Dynamic XML file.\n");
//Every loop creates a new file with fresh data
while(1)
{
CreateXMLFile();
MyData[0]++;
MyData[1]++;
MyData[2]++;
MyData[3]++;
tx_thread_sleep(475);
//Rewrite file every 475 ms
}
}
This code does not do much that is different from our previous examples with the exception that it has
four variables and we are only updating the My_Data variables every 475 ms.
Our goal is to request a refreshed version of this file from the embedded web server in an infinite loop.
We can use the setTimeout() function to achieve this goal by combining it with the XML code we have
already used.
Page 68
Copyright Digi International, 2011
The Amazing JavaScript Program
I have created four buffer variables to make the code easier to read. In practice, I would set the id with
the tag in a single line without using a buffer variable. (The looping statement is shown in bold text.)
<html>
<title>some title</title>
<head>
<script type="text/javascript">
function loadXMLDoc(dname) //Magic function creating local XML copy
{
if (window.XMLHttpRequest) //Create local XML document
{
xhttp=new XMLHttpRequest();
}
else
//Use for older browsers
{
xhttp=new ActiveXObject("Microsoft.XMLHTTP");
}
//Request the XML file from server with GET
xhttp.open("GET",dname + "?t=" + Math.random(),false);
xhttp.send("");
return xhttp.responseXML;
//Return the local copy
}
function Get_XML()
{
//These are optional buffer variables that make the code easier to read
var XML_Data1;
var XML_Data2;
var XML_Data3;
var XML_Data4;
xmlDoc=loadXMLDoc("my_data2.xml");//Creates a client copy of XML
//Store the value of My_Data tag in the XML_Data buffer variables
XML_Data1 = xmlDoc.getElementsByTagName("My_Data1")[0].childNodes[0].nodeValue;
XML_Data2 = xmlDoc.getElementsByTagName("My_Data2")[0].childNodes[0].nodeValue;
XML_Data3 = xmlDoc.getElementsByTagName("My_Data3")[0].childNodes[0].nodeValue;
XML_Data4 = xmlDoc.getElementsByTagName("My_Data4")[0].childNodes[0].nodeValue;
//Write the buffer variables at the span tags with the appropriate ids
document.getElementById("My_Data1").innerHTML=XML_Data1;
document.getElementById("My_Data2").innerHTML=XML_Data2;
document.getElementById("My_Data3").innerHTML=XML_Data3;
document.getElementById("My_Data4").innerHTML=XML_Data4;
setTimeout("Get_XML();",500);
//Loop every 500 milliseconds
}
</script>
</head>
(The second part of the HTML file is on the next page.)
Page 69
Copyright Digi International, 2011
The HTML Body
This is very similar to the previous example with the exception that we are accessing four variables.
<body>
<h1>Dynamic XML Test!</h1>
<p>
<b>My_Data1:</b>
<b>My_Data2:</b>
<b>My_Data3:</b>
<b>My_Data4:</b>
</p>
<span
<span
<span
<span
id="My_Data1"></span><br
id="My_Data2"></span><br
id="My_Data3"></span><br
id="My_Data4"></span><br
/>
/>
/>
/>
<p><button onclick="Get_XML()">Get XML</button></p>
</body>
</html>
Watching it All Work
Here is the page before the button is pressed:
Page 70
Copyright Digi International, 2011
When the button is pressed, the client requests the XML file from the server and the page is
automatically updated:
Every 500 milliseconds, it will continue to update automatically without any button presses.
Page 71
Copyright Digi International, 2011
And again:
Want more?
With the ability to swap data in real-time with your embedded controller you have the potential to
create dynamic charts, graphs, and other animations with Flash or extensions to the JavaScript language
like the Yahoo User Interface and Canvas.
Page 72
Copyright Digi International, 2011
Chapter 15 - Dynamic Web Interface to Hardware in Real-Time
The next natural step is to move from an abstract variable like My_Data to a value defined by the
hardware itself. Digi devices usually have access to a push button switch on the prototyping board.
To configure a Digital input two steps are required:
Configure the pin as an input
Read the pin
If we assume I have access to a switch on pin 81, we can configure the pin with this statement:
NAconfigureGPIOpin(81, NA_GPIO_INPUT_STATE, 0);
The first parameter is the pin number, the second is a macro for setting it up as an input, and final
parameter is the desired initial state.
If we assume I have created an integer named Switch_1, we can read the value of the switch with this
statement:
NAgetGPIOpin(81, &Switch_1);
The first parameter is the pin number, the second is the variable where I want to store the result.
We can then use the same method as before to create a dynamic web page to display the status of the
hardware.
A Simple XML file for Our Little Switch
Here is our dynamic XML file where I have placed a zero to represent the current value of the switch.
<!-- XML File -->
<Digi>
<Switch1>0</Switch1>
</Digi>
Page 73
Copyright Digi International, 2011
Editing the CreateXMLFile() Function
First I will create a macro for my input pin and a global variable for the current switch data.
#define APP_INPUT_PIN
81
unsigned int Switch_1 = 0;
//This is switch S6 on my development board
//Dynamic data for XML file (global)
Next, I will update the CreateXMLFile() function to create an XML file for my switch. The only real
change is that I am using an if statement to write text to the XML file instead of an integer.
void CreateXMLFile (void)
{
Char XML_Data[500];
char Data_Buffer[100];
int
status;
int
fd;
//XML data buffer
//Buffer for MyData variable
//Return value for write() & close()
//File descriptor populated by open()
//Create formatted XML string to write to file
strcpy(XML_Data, "<!-- XML File -->\n<Digi>\n");
//Begin file
//Create line for Switch_1
if (Switch_1 == 1)
{
sprintf(Data_Buffer, " <Switch_1>OFF</Switch_1>\n");
}
else
{
sprintf(Data_Buffer, " <Switch_1>ON</Switch_1>\n");
}
strcat(XML_Data, Data_Buffer);
strcat(XML_Data, "</Digi>");
//Delete the previous file if it exists
remove("RAM0/my_data.xml");
//Create the file for reads or writes
fd = open ("RAM0/my_data.xml", O_CREAT|O_RDWR);
if (fd < 0)
//Error handling
{
printf ("Error[%d]: Open failure /FS/RAM0/my_data.xml.\n", getErrno());
return;
}
//Write XML data to file from string constant
status = write (fd, XML_Data, strlen(XML_Data));
if (status != strlen(XML_Data))
//Error handling
{
printf ("APP: Write Faile[%d] /FS/RAM0/my_data.xml[%d]\n", status, getErrno());
return;
}
//Close file
status = close (fd);
if (status != 0)
//Error handling
{
printf ("APP: Failed to close /FS/RAM0/my_data.xml[%d]\n", getErrno());
return;
}
}
Page 74
Copyright Digi International, 2011
In the applicationStart() code, we configure the switch and then poll the value and write the XML file in
a loop.
void applicationStart (void)
{
int result = 0; //Store return value from GPIO configuration
initAppServices();
//Init web server & go
printf("Point your browser to %s\n", APP_IP_ADDRESS);
printf("Serving Dynamic XML file.\n");
//Configure the IO Pin as input
result = NAconfigureGPIOpin(APP_INPUT_PIN, NA_GPIO_INPUT_STATE, 0);
if (result != 0)
{
printf ("NAconfigureGPIOpin failure[%d]\n", result);
}
//Every loop read switch and create a new file with fresh data
while(1)
{
NAgetGPIOpin(APP_INPUT_PIN, &Switch_1); //Read input & store value in Switch_1
CreateXMLFile();
//Write an XML file
tx_thread_sleep(475);
//Rewrite file every 475 ms
}
}
Page 75
Copyright Digi International, 2011
The JavaScript Code
Our JavaScript program should merely be a variation on what we have already done. In this case, I am
skipping the buffer variable in order to assign the ID attribute to the value from the XML tag in a single
statement. (I have placed the single line of code that assigns the value in bold text.)
<script type="text/javascript">
function loadXMLDoc(dname) //Magic function creates a local copy of XML
{
if (window.XMLHttpRequest) //Create local XML document
{
xhttp=new XMLHttpRequest();
}
else
//Use for older browsers
{
xhttp=new ActiveXObject("Microsoft.XMLHTTP");
}
//Request the XML file from server with GET
xhttp.open("GET",dname + "?t=" + Math.random(),false);
xhttp.send("");
return xhttp.responseXML;
//Return the local copy
}
function Get_XML()
{
xmlDoc=loadXMLDoc("/FS/RAM0/my_data.xml");
//Creates a local copy of XML
//This can all be done without a buffer variable in a single pass like this
document.getElementById("Switch_1").innerHTML=
xmlDoc.getElementsByTagName("Switch_1")[0].childNodes[0].nodeValue;
setTimeout("Get_XML();",500); //Loop every 500 milliseconds
}
</script>
The HTML Body
The HTML body is again merely a variation on the same theme.
<body>
<h1>Press Switch 1 on the Protoboard!</h1>
<p><b>Switch_1:</b> <span id="Switch_1"></span><br /></p>
<p><button onclick="Get_XML ()">Start Dynamic Data</button></p>
</body>
</html>
Page 76
Copyright Digi International, 2011
How Does it Look?
Here is the page before we turn on the infinite loop in our JavaScript.
After we press the “Start Dynamic Data” button, we begin updating the page every 500 milliseconds by
repeatedly calling the Get_XML() function. The page below shows our page automatically refreshing
after the “Start Dynamic Data” button press, but I have not pressed down on Switch 1 on the
prototyping board.
Page 77
Copyright Digi International, 2011
When I press down on the switch on the prototyping board, the continuously refreshing stream of XML
data updates the data on the web page to show the change.
Page 78
Copyright Digi International, 2011