1
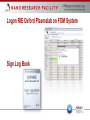
ICP-RIE (Oxford Plasmalab 100) Basic User Manual 3rd Edition September 2012, NR 1) ICP-RIE System Overview Gas Sensors ICP-RIE Loadlock Temperature Control Box Gas Leak Alarm Logon RIE Oxford Plasmalab on FOM System Sign Log Book 2) Vent Loadlock • Under “Cycling Loadlock Pumping” click Stop then Vent • Wait until “Vent Time Left” is 0 secs (150 sec total vent time) • Open the Loadlock chamber door 3) Insert Wafer • Add wafer to Loadlock with the flat edge between the pins and close lid • Click Stop Evacuate in the Loadlock panel • Enter a Wafer Name in the “Load Wafer or pump loadlock” pop-up window click OK Pins 4) Recipe • Input your recipe temperature in the temperature control box • Push the T button use the arrow keys to select a “Temperature Setpoint” input a new temperature using the number keypad if needed push OK • In the PC2000 software go to “Process Recipes” Recipe cont. • Click Load and choose a recipe from the list • When the temperature control box reaches the desired temperature start the etch process by clicking Run (recipes should include a pump step before (PTP) and after the etching step (PTB) to automatically pump down the Loadlock, move the wafer into the process chamber, pump down the process chamber after etching, and move the wafer back to the Loadlock) Recipe cont. • You may edit a recipe that has been loaded by clicking on a step in the list on the left and choosing “Edit Step” • Make a new recipe by clicking New in pop-up window “Clear current recipe?” click OK then click in the recipe step box on the left and choose “Insert Step” or click and drag a preprogrammed step from the “Step Library” list on the right into the recipe box and choose “Edit Step” Recipe cont. • In the “Process Step Editor” input Step Name, Step Time, Process Gas flows, Chamber Pressure, Helium Backing Pressure, RF Generator Forward Power, and ICP Generator Forward Power • Click OK when done or if button is grayed out press Enter on the keyboard (press Esc to cancel) • In the “Recipe” screen give the recipe a new name and click Save 5) Etch Process • During the etch process the chamber screen will display the recipe progress and all input gas, power, and pressure settings • When the etch process is complete a “Yellow Alert” window will pop up to notify you of the process completion click Continue (It is normal for this alert to remain active in the right hand corner of the screen) Etch Process cont. • In the pop-up window “Wafer has finished processing. Ready to be removed.” click OK • Click Stop Vent in the Loadlock panel and wait for the vent cycle to finish • Remove your wafer and insert another repeat steps starting on page 11 6) Shut down • When done using the instrument remove your sample, close the Loadlock door, and click Stop Evacuate in the Loadlock panel