1
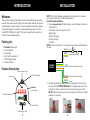
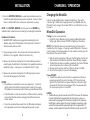
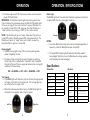
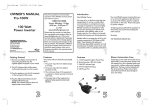
Motorcycle Helmet
Safety Light
OWNER’S MANUAL
•WHL-40 (Half Helmet)
•WHL-80 (Full or 3/4 Helmet)
INTRODUCTION
INSTALLATION
Welcome
Thank you for choosing a Whistler product. We are dedicated to providing
products that represent both quality and value. Please read the user manual
carefully before using this product. If you have additional questions, please
visit the FAQ page on our website at www.whistlergroup.com or call toll
free 800-531-0004, 8am to 5pm CT, Monday through Friday to speak to a
Customer Service Representative.
Packing List
•
•
•
•
•
•
MotoGlo Helmet Light
Control Module
Pairing Key
Wire Tap Connectors x 5
USB Charging Cable
Owner’s Manual
NOTE: The Control Module is designed for connection with multi wire
loom systems and not for CAN bus applications.
Control Module Installation
1. Using a computer safe test light probe or volt/ohm meter, locate each
of the wires for:
•12V when motorcycle ignition is ON
•Brake Light
•Right Turn Signal
•Left Turn Signal
•Ground
NOTE: On most motorcycles, the wiring harness can be located beneath
the seat.
BLACK
GREEN
YELLOW
CONTROL
MODULE
Feature Description
OUTPUT
INPUT +
Ignition Switch
-
12V
Positive cable for brake
BLUE Positive cable for right turn light
Center Indicator Light
Mini USB Interface
Pairing Key
ORANGE Positive cable for left turn light
GREEN Ground
MotoGlo
Helmet Light
Wire Tap Connectors
2. Using the provided wire taps and the wiring diagram above, attach
the wires of the CONTROL MODULE to the appropriate wires of the
motorcycle, making sure that wire connections have good contact.
NOTE: Electrical tape may be used to wrap the connections for better
resistance to moisture.
STEP 1:
STEP 2:
STEP 3:
Control Module
USB Charging Cable
2
3
INSTALLATION
3. Place the CONTROL MODULE in a weather protected area (such as
beneath the seat) and secure to prevent movement. Locate so that it
does not interfere with other motorcycle components or wiring.
NOTE: The CONTROL MODULE must be wired in line BEFORE any
additional after market items such as taillight or brake light modulators.
Installation On Helmet
1. HELMETS VARY. Before removing protective backing from the
adhesive pads, test fit the MotoGlo on the back base of helmet to
determine best position and fit.
2. Using isopropyl alcohol, clean the area of the helmet where the
MotoGlo is to be applied. Allow the alcohol to dry.
3. Remove the protective backing from the center adhesive pad and
carefully apply the MotoGlo to the helmet in the predetermined area
identified in step 1, making sure it is centered from left to right.
4. Remove the protective backing from the LED extensions (one at a
time) and carefully apply to the helmet.
NOTES:
• The adhesive is intended for a one time application. It is best to
lightly position the MotoGlo insuring proper location, then apply
firm pressure for several seconds to insure a good adhesive bond.
• If the MotoGlo is to later be reused on a different helmet, carefully
remove the MotoGlo without damaging the LED extensions or
center module.
• Clean the residual adhesive pads from the MotoGlo and replace
with appropriate automotive molding adhesive pads or tape.
4
CHARGING / OPERATION
Charging the MotoGlo
Use the included USB cable to charge the MotoGlo. The center
indicator light is RED while charging and will turn GREEN when the
MotoGlo is fully charged. (A standard USB to mini USB cable can also
be used.)
MotoGlo Operation
Pairing (only for initial operation)
• Install the Control Module and fully charge the MotoGlo Helmet
Safety Light. Refer to Power ON/OFF for additional information.
NOTE: If the MotoGlo does not automatically pair with the control
module after initial charge, or if pairing a second MotoGlo to the same
control module, the following steps are to be used to manually pair the
MotoGlo with the control module.
1. With the motorcycle ignition ON, insert the Pairing Key into the mini
USB interface on the MotoGlo. (MotoGlo should be fully charged.)
2. The MotoGlo has been successfully paired with the Control Module
and activated when the Indicator Light turns BLUE.
3. Remove the Pairing Key and the Indicator Light will turn RED.
4. Store the Pairing Key in a place of safe keeping.
Power ON/OFF
• The MotoGlo default is automatically in operational mode once
properly paired with the control module. With the motorcycle
ignition ON, the MotoGlo will power ON when it detects a slight
movement of the helmet and will power OFF a few seconds after
the motorcycle ignition is turned OFF.
NOTES:
1. The MotoGlo may also be manually turned OFF in the event the rider does
not want the MotoGlo to operate while the motorcycle is in use, as in
situations with a passenger. With the motorcycle ignition ON, make sure
the MotoGlo is within range of the control module and operating. Apply
and hold the brake and then operate left-right-left turn signals within 3
seconds, and then release the brake. The MotoGlo should now turn OFF.
5
OPERATION
OPERATION / SPECIFICATIONS
2. Once manually turned OFF, the same procedure must be used to
power ON the MotoGlo.
IMPORTANT: If 2 MotoGlo Helmet Lights have been paired to the
control module, the procedures above will affect BOTH helmet lights
if they are in range of the control module. If only one MotoGlo is to
be manually turned OFF or ON, make sure the other MotoGlo is in
“sleep” status or out of range (>100FT) of the control module.
NOTE: The MotoGlo will go into “sleep” status when the ignition is
turned OFF and the MotoGlo powers OFF a few seconds later. The
MotoGlo will remain in “sleep” status until a slight movement is
detected after the ignition is turned ON.
Running Lights
• The RED running lights remain ON in normal operating mode
unless changed by the user.
• The status of the running lights may be changed by operating
the left-right-left turn signals within 3 seconds. Each completed
left-right-left cycle of the turn signals will advance the running light
condition to the next status.
ON --> FLASHING --> OFF -->ON --> FLASHING --> OFF
Turn Signals
• The AMBER lights will flash either right or left when the appropriate
turn signal is activated on the motorcycle. The running lights will
go out while the turn signal is ON.
• When the brake is applied while turning, the RED brake light will
illuminate on the opposite side of the turn signal.
Brake Light
The BRAKE lights will illuminate when the brake is applied, and will be
a brighter RED than the running light condition.
Brake
Running
NOTES:
• The center RED indicator light will remain illuminated regardless of
operation, unless the MotoGlo has been turned OFF.
• The center RED indicator light will flash when the battery needs to
be recharged. When this occurs, the MotoGlo will no longer operate
until the battery has been recharged.
Specifications
Transmitter
Receiver
TX Frequency
433MHZ
Charging Volt
5V
Weight (oz/g)
1.4oz / 39g
Battery Capacity
1100±50mAh
Size (in/mm)
1.8 x 1.7 x 0.7 / 47 x 44 x 16.5
Peak Current
63mA
TX Range
50’ ± 10’ / 15m ± 3m
Stand by Current
Working Volt(Input)
12V
Weight (oz/g)
WHL-80
WHL-40
Peak Current
39mA
Waterproof
IP63
Size (in/mm)
WHL-80 15 x 0.8 x 0.9 / 380 x 45.5 x 23
WHL-40 14.8 x 0.8 x 0.9 / 375 x 45.5 x 25
6
2.8oz. / 78.5g
2.7oz. / 75g
Waterproof
IP63
Charging Current
1A
Right Turn
Left Turn
0.19mA
7
WARRANTY INFORMATION
Consumer Warranty
This Whistler product is warranted to the original purchaser for a period of
one (1) year from the date of original purchase against all defects in materials
and workmanship, when purchased from an authorized Whistler retailer. This
limited warranty is void if the unit is abused, misused, modified, installed
improperly, or if the housing and/or serial numbers have been removed.
There are no express warranties covering this product other than those set
forth in this warranty. All express or implied warranties for this product are
limited to one (1) year. Whistler is not liable for damages arising from the use,
misuse, or operation of this product including but not limited to loss of time,
inconvenience, loss of use of your product or property damage caused by
your product or its failure to work, or any other incidental or consequential
damages including personal injury.
DO NOT RETURN ITEM TO STORE WHERE PURCHASED.
FOR WARRANTY INFORMATION, CONTACT WHISTLER CUSTOMER
SERVICE AT 1-800-531-0004.
Representatives are available to answer your questions Monday – Friday
from 8:00 a.m. to 5:00 p.m. CT
Service Under Warranty
During the warranty period, defective units will be repaired or replaced
(with the same or a comparable model), at Whistler’s option, without charge
to the purchaser when returned prepaid, with dated proof of purchase to
the address below. Units returned without dated proof of purchase will be
considered out of warranty and therefore are not covered by the described
Limited Warranty. (Refer to Service Out of Warranty section.)
Due to the specialized equipment necessary for testing Whistler products,
there are no authorized service centers other than Whistler. When returning a
unit for service under warranty, please follow these instructions:
1. Ship the unit in the original carton or in a suitable sturdy equivalent,
fully insured, with return receipt requested to:
Whistler Repair Dept.
1412 South 1st St.
Rogers, AR. 72756
Please allow 3 weeks turnaround time.
8
WARRANTY INFORMATION
IMPORTANT: Whistler will not assume responsibility for loss or damage
incurred in shipping. Therefore, please ship your unit insured with return
receipt requested. CODs will not be accepted!
2. Include with your unit the following information, clearly printed:
• Your name and physical street address for shipping (no PO Boxes),
a daytime telephone number, and an email address (if applicable).
• A detailed description of the problem (e.g.,“device will not power ON”).
• A copy of your dated proof of purchase or bill of sale.
3. Be certain your unit is returned with its serial number. Units without
serial numbers are not covered under warranty.
IMPORTANT: To validate that your unit is within the warranty period,
make sure you keep a copy of your dated proof of purchase. For
warranty verification purposes, a copy of your dated store receipt must
accompany any Whistler product sent in for warranty work.
Service Out Of Warranty
Units will be repaired at “out of warranty” service rates when:
• The unit’s original warranty has expired.
• A dated proof of purchase is not supplied.
• The unit has been returned without its serial number.
• The unit has been misused, abused, modified, installed improperly,
or had its housing removed.
The minimum out of warranty service fee for your Whistler Helmet Safety
Light is $35.00 (U.S.). If you require out of warranty service, please return
your unit as outlined in the section “Service Under Warranty” along with
a cashier’s check or money order in the amount of $35.00. Payment may
also be made by MasterCard, VISA or American Express.
Personal checks are not accepted.
9
WARRANTY INFORMATION
In the event repairs cannot be covered by the minimum service fee,
you will be contacted by a Whistler technical service specialist who will
outline options available to you.
IMPORTANT: When returning your unit for service, be certain to include
a daytime telephone number and an email address (if applicable).
Customer Service
If you have questions concerning the operation of your Whistler product,
or require service during or after the warranty period, please call
Customer Service at 1-800-531-0004.
Representatives are available to answer your questions Monday - Friday
from 8:00 a.m. to 5:00 p.m. (CT) or visit the F.A.Q.’s at
www.whistlergroup.com.
CORPORATE HEADQUARTERS
1716 SW Commerce Dr. Ste. 8
Bentonville, AR 72712
Toll Free (800) 531-0004
TEL (479) 273-6012
FX (479) 273-2927
www.whistlergroup.com
CUSTOMER RETURN CENTER
1412 South 1st St.
Rogers, AR 72756
Customer Service Tel (800) 531-0004
Email: [email protected]
10
P/N 404003
02N15 ©2015 The Whistler Group, Inc.