1
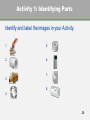
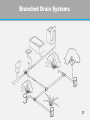
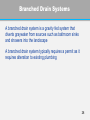
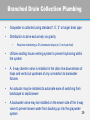
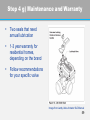
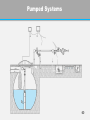
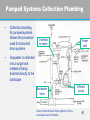
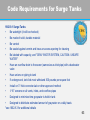
GRAYWATER CURRICULUM
Graywater Collection Plumbing
1
Class 4 Objectives
1. Different roles of installers
•
Plumbers
•
Landscapers
2. General principles of graywater plumbing
•
Separate or combined flows
•
Graywater diversion, accessibility and future flexibility
3. Laundry to landscape systems
4. Branched drain systems
5. Pumped systems
2
Landscapers & Plumbers:
A Partnership for Graywater
Plumbers:
Landscapers:
•
Install in-house graywater
collection plumbing
•
Ensure water gets used as
efficiently as possible
•
Plumb as high as possible,
conserving fall along length of
pipes
•
Install outdoor distribution
plumbing
•
Design and implement irrigation
fields, water budgets and
appropriate plants
•
Plumb diversions downstream of
traps and vents
•
New construction: plumb
graywater lines separately until
outside house
•
Adjust landscape elevations, and
coordinate with site runoff and
rainwater
•
Install diverter valve(s), overflow
to septic/sewer
•
Amend soil, add mulch
•
Define seasonal maintenance
tasks
•
Pull permit for Graywater irrigation
fields, if needed
3
•
Pull permit for plumbing change
work, if needed
Tools Required for
Collection Plumbing
Below are some tools that may be helpful:
• Measuring tape
• Caulking gun
• Stud finder
• Digging tools: shovel, pick
axe, posthole digger
• PVC cutting tools: ratcheting
cutters, saw, tubing cutters
• Wheel barrow
• 2 pairs of channel locks
• Permanent marker
• Drill
• Gloves and rags
• Drill bits: 2 1/8” hole saw, 1.5"
hole saw, 1/4" pilot bit
• Levelling tools: 4’ level,
torpedo level, laser level
(optional)
• Screwdriver
• Hammer
• Tin snips
• ABS cutting tools: ABS saw,
reciprocating saw or sawzall
with appropriate blades
4
General Principles of
Wastewater Plumbing
This course does not provide comprehensive training in
plumbing. Using a professional plumber to plan and execute
collection plumbing is highly recommended.
• Achieve a slope of 1/4” in. per foot or more
• Use long-sweep 90’s, 45’s (aka sanitary fittings) as opposed to short
sweep and tight turns that obstruct flow
• Provide clean outs after every 135 degrees of cumulative turns and
after every 100’ of run
• Strap/support pipes at least every 4’.
• Size pipes according to the number of DFU’s (drainage fixture units)
they drain
• Do not drill a hole through a stud larger than 1/3 of a studs width 5
General Principles of
Wastewater Plumbing
• Conserve fall as much as possible, destination for graywater is
higher than sewer pipes
• Divert graywater downstream from traps and vents so that their
function is preserved
• Divert graywater upstream from connection to backwater sources
• Build for future flexibility, install expensive components with
removable couplings, leave sufficient pipe between fittings to be
able to reconfigure
• Provide clean outs and inspection access
6
Laundry to Landscape Systems
7
Laundry to Landscape Systems
A laundry-to-landscape graywater system captures
graywater from the discharge hose of your washing
machine, enabling you to reuse the water without altering
the existing plumbing in your home
Graywater is distributed through an irrigation line with
outlets directing water to mulch basins close to specific
plants
8
Laundry to Landscape
Collection Plumbing
• Captures graywater from the discharge hose of your washing
machine
• Diversion upstream of drainpipe
• No alteration to existing plumbing
• Washing machine pump used to distribute graywater
• Water is slightly pressurized so the system is less demanding of
strict grade (fall) than a gravity-only system
• 3-way diverter valve diverts water either to the landscape or the
septic/sewer
• Vacuum breaker or anti-siphon component on the landscape side of
the 3-way valve
9
Laundry to Landscape
System Overview
Indoor
A.
Brass 1" 3-way valve
B.
PVC 1" Male Adapter (S x MPT)
C.
Barbed 1" Male Adapter (MPT)
D.
PVC 1" 90 Elbow
E.
PVC 1" Tee
F.
PVC 1.5" x 1" Reducing Bushing (SxS)
G.
PVC 1.5" Female Adapter (FPT x Slip)
H.
Auto-vent or Air Admittance Valve 1.5”
Outdoor
J.
Barbed 1" Adapter (BxS)
K.
Barbed 1" Tee
L.
Barbed 1" x 1/2" Reducing Tee
M.
Poly 1/2" Tubing
N.
8 - 7" round valve box
O.
Green Back Valve Barbed 1/2"
P.
Barbed 1" Coupling
http://www.cleanwatercomponents.com
10
Laundry to Landscape
Collection Plumbing
3-way diverter valve; Auto vent; 1" pipe (PVC); Swing
check Backflow preventer (if water is going uphill)
11
Photo: Greywater Gardens
Laundry to Landscape - Step by Step
Laundry to Landscape collection plumbing:
Step 1: Connecting the 3-way diverter valve
Step 2: Anti-siphon component
Step 3: Drilling hole for pipe to exit
Step 4: Plumb to hole
Step 5: Plumb to sewer connection
Step 6: Strap pipe/diverter valve
Step 7: Label pipe and 3-way diverter valve
12
Step 1: Connecting the 3-way diverter
Valve
1” PVC
male adapter
1”-brass 3-way
diverter valve
1”schedule
40 PVC pipe
1”PVC barbed
male adapter
Hose clamp
Washer hose
(from machine)
13
Step 1: 3-Way diverter valve
Configurations
a. Diverter valve must be above “flood
rim” of machine
b. Washer hose must connect to middle
port
c. Use teflon tape (on threads) and glue
(on slip connections) to make watertight connections
d. Secure with pipe clamps
14
Step 1: Teflon Tape Threaded Fittings
Teflon tape helps prevent leaks
• Wrap tape CLOCKWISE several times
over
• Don't “cross-thread” when screwing
fitting into 3-way diverter valve
• Tighten with channel locks
15
Step 1: Troubleshooting tips for
Connecting Washer Hose
Washer hose doesn't fit onto 1” barbed adapter
• If hose is too large or
small use threaded
bushing with proper sized
barbed adapter
¾ x 1” threaded
bushing
¾” barbed male
adapter
• If hose is slightly too small
heat hose with hair dryer
or hot water, then
forcefully push on
16
Step 1: Troubleshooting tips for
Connecting Washer Hose
Washer hose connection leaks (rigid hose)
•
Tighten hose clamps, add 2nd hose clamp
•
Connect with piece of vinyl tubing
17
Step 2: Anti-siphon Component
Used to prevent a
potential siphon from
forming and draining the
machine as it tries to refill
• Options
• Autovent, AAV, in-line vent
• “breather tube” any vent
tall enough not to emit
water
• Must be at high point of
system
• Must be accessible in
case of leaks and for
replacement
18
Step 2: Anti-siphon Assembly
Autovent 1 ½” threads
1 ½” FPT (female pipe
threads) by slip coupling
Reducing bushing
1 ½” x 1” slip
19
Step 2: Placement of Anti-Siphon
• High point
• Accessible/visible (not behind a
wall)
20
Step 3: Drilling Hole for Pipe to Exit
a. Look for potential issues
•
electrical lines, insulation type, gas pipes, etc
b. Drill a ¼” pilot hole
c. If no obstructions, drill hole for 1” PVC with
d. 1½” holesaw
•
drill from outside in, and inside out for a clean looking hole
e. Use proper bit for your wall/floor
•
wood bit, stucco bit, etc
21
Step 4: Plumb to Hole
Cutting PVC pipe
• Use PVC cutters or handsaw
• Remember to calculate the length of pipe that
will “slip” into the fitting when figuring your
measurements
• Use as few fittings as possible to minimize
friction
22
Step 5: Plumb to Sewer Connection
Gluing PVC
Use Gorilla PVC glue if possible (it's much less
toxic than regular PVC primer and glue)
1. Clean and dry pipe
2. Apply glue to the inside of the fitting “hub” first
3. Apply glue to the outside of the pipe
4. Push together quickly, inserting all the way, rotate
slightly to spread glue evenly, and hold a second as
it will try to push out
23
Step 6: Strap Pipe/Diverter Valve
• Use 2-hole straps or plumbers tape
• Add wood blocking as necessary
• Strap so diverter valve is secure
24
Step 7: Label Pipe and 3-way Diverter
Valve
• Label pipe: “Caution: Non-potable water, do not
drink”
• Label diverter valve showing direction of
graywater
25
Activity 1: Identifying Parts
Identify and label the images in your Activity.
1.
5.
2.
6.
7.
3.
8.
4.
26
Branched Drain Systems
27
Branched Drain Systems
A branched drain system is a gravity fed system that
diverts graywater from sources such as bathroom sinks
and showers into the landscape
A branched drain system typically requires a permit as it
requires alteration to existing plumbing
28
Branched Drain Collection Plumbing
•
Graywater is collected using standard 1.5”, 2” or larger drain pipe
•
Distribution is done exclusively via gravity
•
Requires maintaining a 2% downward slope (or ¼ inch per foot)
•
Utilizes existing house venting system to prevent siphoning within
the system
•
A 3-way diverter valve is installed in the drain line downstream of
traps and vents but upstream of any connection to backwater
fixtures
•
An actuator may be installed to automate ease of switching from
landscape to septic/sewer
•
A backwater valve may be installed on the sewer side of the 3-way
valve to prevent sewer water from backing up into the graywater
29
system
Branched Drain
System Overview
Indoor
1.
3-way diverter valve
5.
3-way valve actuator (optional)
Outdoor
2.
7” round valve box
3.
ABS 1.5” or 2” double ell (twin 90)
4.
ABS 1.5” or 2” double ell (twin 90)
w/inspection/cleanout port
30
http://www.cleanwatercomponents.com
Branched drain - Step by Step
Branched drain collection plumbing:
Step 1: Pipe identification
Step 2: Re-plumb drain lines to combine into one before diversion point
or run separately through independent systems
Permit required
Step 3: Install a 3-way valve or diversion point
Step 4: Optional: installing an actuator
31
Step 1: Pipe Identification
Waste water pipes are sized by the amount of water that travels through them
The size refers to the “ID” or “Inner Diameter”
• Toilets 3” to 4”
• Lavatories (bathroom sink)
1 ¼” or 1 ½”
• Kitchen sinks 1 ½” to 2”
• Showers and tubs 2”
(but you may see 1½
or smaller)
P-Traps prevent sewer gases
from entering the building.
32
Step 1: Pipe Identification
1. Check pipe size
• Larger pipes may include the toilet water
2. Check for a p-trap
• Visible p-trap is from a shower/bath or laundry
• Kitchen sinks, bathroom sinks, toilets, washer standpipes and
laundry sinks have p-traps in the house
3. Run HOT water in the drain line
• If you feel the pipe heat up, then you know what's going into it. If
there is any question about the toilet being connected, flush the
toilet, feel and listen for water. Second story bathrooms almost
always connect the toilet and shower drains in the floor.
Need help? Partner with a plumber for indoor modifications!
33
Step 1: Plumbing Examples
Tub/shower
• Trap under floor
• 1 ½"-2" drain
Sinks
• Trap below sink
• 1 ¼"- 2" drain
• Vents can be confused
for sink drains
House main sewer lines: oldest to newest
• Clay, Cast Iron, Steel, Plastic (PVC, ABS)
Plumbers can help identify pipes!
Most commonly
used material
34
Step 1: Plumbing Examples
Lavy (sink) drain
Toilet vent
If the graywater drain
connects to the toilet the
water is unusable and against
code
Shower drain/p-trap
Toilet drain
Shower vent
Laundry p-trap inside
wall, no trap visible
under floor
35
35
35
http://www.vanderbrew.com/house/
Step 1: Second Story Plumbing
Graywater is typically joined with the blackwater on the second
story and is not usable
http://www.plumbingrepiping.com
36
Activity 2: Identifying Plumbing
Images
Identify the fitting, source of water, and material for the
picture on your activity.
2
1
6
3
5
4
37
Step 2: Re-plumb Drain Lines
Combined Flows
Separate Flow
•
Drain lines from separate
fixtures combine into one
before diversion point
•
Drain lines from each fixture
run separately through
independent systems
•
Variations in flow from
different fixtures average out
•
Simpler plumbing, less fall
required
•
Eliminates the need for
multiples of valves, pumps or
filters
•
Take advantage of unique
flow characteristics of fixtures
•
Plumbing is more
complicated, requires more
fall
•
Upstairs bathroom could
irrigate higher elevation
•
Laundry machine could
irrigate further away
38
Step 2: Slope
• All parts of system need proper slope
• Conserve fall as much as possible
• Plumbing may be able to exit house
above foundation wall
• 2% slope = 2’ drop per 100’ of run
• If level put 1” block on 4' level to get 2%
slope
39
Step 2: Venting
A universal plumbing requirement
•
Venting prevents a vacuum from being formed as water runs through a line
•
Venting for graywater pipes can be separate from toilet vent or can tie into
the toilet vent 12” above spill point of highest fixture served by vent
40
Source: Art Ludwig ‘Builder’s Greywater Guide’
Step 2: Traps and Vents
Critical distance
•
P-traps must be vented
just downstream
•
Maximum allowed
distance from the trap to
the vent is know as the
“critical distance”
•
3.5’ for 1 ½” pipe
•
5’ for 2” pipe
•
6’ for 3” pipe
41
Step 2: Sizing Drain Line Pipes
Drain line pipes sized according to drainage fixture units
• CPC Chapter 7 Sanitary Drainage
Abstract from Table 702.1 (private residence)
Table 702.2 (a)
Fixture
Size of Trap and
Trap Arm
(inches)
Minimum
Trap Size
(inches)
Drainage
Fixture
Unit
Values
1½
2
1¼
1
2
2
1½
3
Bathroom sink
1¼
1
2
4
Clothes washer
2
3
3
6
1½
2
4
8
Toilet, 1.6 gpf
3
3
Toilet, >1.6 gpf
3
4
Bath
Shower
Kitchen sink
Maximum
Drainage
Fixture
Unit Values
42
Step 3: Install a 3-way Diverter Valve
• Install a 3-way diverter valve in the drainpipe of
the fixture you will be collecting graywater from
• The valve must be installed after the p-trap and
vent but before the connection to a toilet or
kitchen sink drain
• If you must install the valve in an inaccessible
area because of space considerations you can
add a motor called an actuator to operate the
valve remotely
43
Step 3: Install a 3-way Diverter Valve
1 ½" ABS glued into 3-way valve
All sides 2" ABS
44
Step 3: Install a 3-way Diverter Valve
Note: Valve should be clearly marked and easily accessible (or install an actuator)
P-Trap from
shower visible
CPC states that a cleanout is required
following every cumulative 135 degrees
of turns and/or after 100’ of run
45
Step 3: Backwater Valve
•
Sometimes installed on the sewer side of the 3-way valve to
prevent sewer water from backing up into the greywater system
•
Not required by all jurisdictions. Clogging and longevity issues
have been reported
•
Since the 3-way valve itself shuts off the sewer connection, the
backwater valve functions only if the 3-way valve is left partially
open
46
Step 4: Installing an Actuator
If the 3-way valve is difficult to access you will need to
install an actuator to operate the 3-way valve remotely
An actuator is an electrically
powered motor that turns the
3-way valve
Used when
• 3-way valve is not easily
accessible (e.g. tiny crawl
space)
• Frequent turning of the valve
is necessary
47
Activity 3: Wiring an Actuator
As you go through the following slides watch your
instructor demonstrate how an actuator is wired.
Follow along on your diagram.
48
Step 4: Installing an Actuator;
Common Brands
Kits are available containing a transformer,
fuse, switch, and plastic box
• Jandy Valve Actuator ($120-$200)
• Goldline Valve Actuator ($90-$120)
• Pentair Valve Actuator($120-$160)
• Intermatic Valve Actuator ($60- $120)
49
Step 4: Installing an Actuator;
Parts of an Actuator
Actuator
Electrical switch box
and toggle switch
Fuse holder
(with fuse inside)
Use 18 gauge wire if
you need more wire
Transformer
50
Step 4: Installing an Actuator
a) Check cam settings for proper orientation of the actuator
on the three way valve
b) Mount actuator on 3-way valve
c) Install transformer and wire to electrical switch box
d) Mount electrical switch box
e) Tuck in wires, close box, plug in transformer
f)
Test the actuator
g) Troubleshooting: Follow manufacturer instructions to
calibrate the actuator (if necessary)
51
Step 4 a) Cam Settings for Valve
Orientation
• Most Actuators can be mounted to
the valve in four different positions.
• The cam setting determines which
port the water will be entering from
and which port it will leave from.
• Refer to your user manual to
determine the appropriate cam
setting for your needs.
Goldline Installation Manual; Model GVA-24
52
Step 4 b) Mounting the Actuator
a.
b.
a.
Remove handle and the 4 screws
on the 3-way valve
b.
Attach actuator by replacing the
short screws with the longer screws
provided by the manufacturer
c.
Replace handle (manual operation)
c.
53
53
Step 4 c) Wire Actuator to Electrical
Switch Box
a. Determine best location
for switch (near an outlet)
i.
Actuator switches can be
located inside a sink
cabinet, or attached to
any wall
b. Run the wire from the actuator
to the location of the switch
box
c. Wire according to the
manufacturers instructions for
your actuator
d. Drill holes only if necessary
54
Step 4 d) Mount Electrical Switch Box
In the location selected mount the switchbox
using the screws provided with the actuator kit
55
Step 4 e) Tuck in Wires, Close Box,
Plug in Transformer
56
Step 4 f) Test the Actuator
Verify actuator operates the 3-way valve properly
• Turn toggle switch "up". Observe what happens with the
actuator.
• Turn toggle switch "down". Observe what happens with the
actuator.
Once it's working label the toggle switch (eg."up" =
sewer")
57
Step 4 g) Troubleshooting
If it doesn't you'll need to open it and adjust the
pins using the manufacturers’ guide.
Example troubleshooting:
If the 3-way valve's inlet port was changed, you'll need to
calibrate the actuator
• Test to see how the actuator is rotating, open actuator and
observe inside
• Adjust actuator's rotation using manufacturers guide
58
Step 4 g) Maintenance and Warranty
•
Two seals that need
annual lubrication
•
1-3 year warranty for
residential homes,
depending on the brand
•
Follow recommendations
for your specific valve
Image from Jandy Valve Actuator I&O Manual
59
Pumped Systems
60
Pumped Systems Collection Plumbing
•
•
Collection plumbing
for pumped systems
follows the procedure
used for branched
drain systems
Overflow
to sewer
Power
cord
Graywater is collected
into a surge tank
instead of being
diverted directly to the
landscape
Backwater
valve
Source: Robert Kourik ‘Drip Irrigation for Every
Landscape and all Climates’
Effluent
pump
61
Pumped Systems Collection Plumbing
•
Minimize depth of the graywater stub out
•
Maximize height of the graywater stub out
above sewer pipe level
•
Manual diversion valve upstream of the
pumping basin
•
Collection container must have at least 1 inlet
and 1 overflow to sewer or septic
•
Overflow pipe must be at least the same size
as the inlet pipe
•
Backwater valve or P-trap sometimes
installed on the sewer side
•
Some buried tanks can't have a bottom drain
to empty tank. If a regulatory agency requires
this you won't be able to permit this type of
system
62
Code Requirements for Surge Tanks
1602.9.1 Surge Tanks
•
Be watertight (it will be checked)
•
Be made of solid, durable material
•
Be vented
•
Be sealed against vermin and have an access opening for cleaning
•
Be labeled with capacity, and "GRAY WATER SYSTEM, CAUTION- UNSAFE
WATER"
•
Have an overflow drain to the sewer (same size as inlet pipe) with a backwater
valve
•
Have unions on piping to tank
•
If underground, tank lids must withstand 300 pounds per square foot
•
Install on 3” thick concrete slab or other approved method
•
1/16” screens on all vents, inlets, and overflow pipes
•
Designed to minimize time graywater is held in tank
•
Designed to distribute estimated amount of graywater on a daily basis
*see 1602.8.3 for additional details
63
Pumped Systems Collection Plumbing
Example: IrriGray
•
Filtered pumped system
designed to work with
IrriGray Smart Controller
•
Single entry serves as inlet,
manual bypass and overflow
•
Gatevalve can be closed to
prevent graywater from
entering the basin
•
When gatevalve closed
graywater backs up to
bypass tee and flows to
sewer/septic
Source: IrriGray
64
Pumped Systems Collection Plumbing
Example: IrriGray
•
Pump disabled for
filter backwash
•
No residue buildup
in basin
•
Brass swing check
valve ensures
alternate water
cannot flow back
into pumping basin
•
Two 12V DC valves
are used to control
pumped water flow
Optional Coarse hair catch filter bag installed on inlet pipe
Source: IrriGray
65


![User`s Manual MV2000[SU:M] Ventilator System 0470](http://vs1.manualzilla.com/store/data/005841388_1-c867b5a0773523e6306e353a41d4c56d-150x150.png)