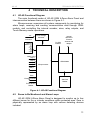
1
UO-4S
GSM 4-Zone Alarm Panel
revision 02
Installer’s and User’s Manual
UO-4S GSM 4-ZONE ALARM PANEL
Table of Contents
1 GENERAL..................................................................................................6
2 SPECIFICATIONS .....................................................................................7
2.1
2.2
2.3
Alarm Loops .............................................................................................. 7
Relay Outputs............................................................................................ 7
Touch Memory Reader Input ................................................................... 7
3 UO-4S DESIGN..........................................................................................8
3.1
3.2
Panel Light Indicators .............................................................................. 8
Panel PCB and Terminal Blocks.............................................................. 8
4 TECHNICAL DESCRIPTION ...................................................................11
4.1 UO-4S Functional Diagram .................................................................... 11
4.2 Zones to Be Monitored and Alarm Loops ............................................ 11
4.2.1 Loop Type ........................................................................................ 12
4.2.2 Physical Condition............................................................................ 12
4.2.3 Loop Logic Status Control................................................................ 13
4.2.4 Loop Autoarming .............................................................................. 13
4.2.5 Local Arming and Disarming by TM Keys ........................................ 13
4.3 Relay Outputs.......................................................................................... 14
4.3.1 Siren Relay....................................................................................... 14
4.3.2 Lock Control Relay Program ............................................................ 14
4.3.3 Confirmation Relay Program............................................................ 14
4.3.4 Lamp Relay Program ....................................................................... 15
4.3.5 Remote Control Relay Program ....................................................... 15
4.3.6 Switch Off After Loop Disarming Relay Program ............................. 15
4.4 Patrol Check Circuit................................................................................ 15
4.5 Power Control ......................................................................................... 16
4.6 Panel Operating Modes .......................................................................... 16
4.6.1 Operating Mode................................................................................ 16
4.6.2 Fire / Alarm Mode............................................................................. 16
4.6.3 Lock Control Mode ........................................................................... 16
4.6.4 Key Programming Modes................................................................. 17
4.7 Remote Notification ................................................................................ 17
4.7.1 Notification by SMS-messages ........................................................ 17
4.7.2 Notification by Voice Messages ....................................................... 19
4.7.3 Notification by Contact ID Messages ............................................... 20
4.7.4 Notification by Phone Calls .............................................................. 21
4.8 Remote Control ....................................................................................... 21
5 DELIVERY SET, MARKING AND PACKING ..........................................22
5.1
5.2
5.3
Delivery Set ............................................................................................. 22
Marking .................................................................................................... 22
Packing .................................................................................................... 22
6 GETTING STARTED ...............................................................................23
6.1
6.2
6.3
2
Panel Mounting ....................................................................................... 23
TM Reader Connecting........................................................................... 23
Alarm Loops Connecting ....................................................................... 23
UO-4S
GENERAL
6.4
6.5
6.6
6.7
Executive Devices Connecting.............................................................. 24
Patrol Check Circuit Connecting ........................................................... 24
Power Supply Connecting...................................................................... 24
SIM-Card Installing.................................................................................. 24
7 UO-4S CONFIGURING ........................................................................... 25
7.1
UO-4S Configuring by Means of PC ...................................................... 25
7.1.1.1
7.1.1.2
7.1.1.3
7.1.1.4
UO-4S Parameters Adjusting .......................................................... 26
GSM-Supervisor Parameters Adjusting ........................................... 27
Notification Filter Adjusting .............................................................. 29
TM Key Parameter Adjusting ........................................................... 29
7.2 UO-4S Configuring by Means of a Cellular Phone............................... 30
7.2.1 UO-4S Parameters Adjusting ........................................................... 31
7.2.2 Remote Control Password Adjusting................................................ 32
7.2.3 Supervisors Descriptors Adjusting ................................................... 32
7.2.4 Loop Assignment Adjusting.............................................................. 34
7.2.5 Autoarming Adjusting ....................................................................... 34
7.2.6 Siren Operating Time Adjusting ....................................................... 35
7.2.7 Inner Sounder Operating Time Adjusting ......................................... 35
7.2.8 Configuration Overwriting................................................................. 35
7.3 Panel Current Time Setting .................................................................... 36
7.4 TM Key Hard Programming.................................................................... 36
7.4.1 TM Master Key Hard Programming.................................................. 36
7.4.2 TM Key Hard Programming.............................................................. 36
7.4.3 TM Key Hard Deleting ...................................................................... 37
8 OPERATING ........................................................................................... 38
8.1 Panel Indication....................................................................................... 38
8.2 Local Arming and Disarming ................................................................. 41
8.2.1 Zone Local Arming by means of ТМ key.......................................... 41
8.2.2 Zone Local Disarming by means of ТМ key ..................................... 41
8.3 Electromagnetic Lock Control ............................................................... 42
8.4 Voice Notification.................................................................................... 42
8.5 Phone Call Notification........................................................................... 42
8.6 Remote UO-4S Panel Control................................................................. 42
8.6.1 Request for current loop logic statuses ............................................ 42
8.6.2 Remote Alarm Loop Arming ............................................................. 43
8.6.3 Remote Alarm Loop Disarming ........................................................ 43
8.6.4 Remote Relay Control ...................................................................... 43
8.6.4.1
8.6.4.2
8.6.5
8.6.6
To Switch the Relay On ................................................................... 44
To Switch the Relay Off ................................................................... 44
Confirmation Sending ....................................................................... 44
Remote UO-4S Time Setting............................................................ 44
9 TROUBLESHOOTING............................................................................ 45
10 MAINTENANCE...................................................................................... 46
10.1 UO-4S Technical Testing Algorithm...................................................... 46
11 MANUFACTURER DATA ....................................................................... 49
Warranty ..................................................................................................... 50
3
UO-4S
GENERAL
This Installer’s and User’s Manual is intended to help for studying of
operability principles and maintenance of UO-4S GSM 4-Zone Alarm
Panel revision 02 version 2.14. The UO-4S version number is represented
on the label on the device bottom or on the device PCB.
Please read these instructions completely before connecting,
operating, adjusting, or maintaining this product.
5
UO-4S GSM 4-ZONE ALARM PANEL
1
GENERAL
UO-4S GSM 4-Zone Alarm Panel revision 02 (hereinafter referred to
as panel) is a control and indicating equipment designed to be the basic
element of a fire&burglary system suitable for security providing of various
assets such as houses, shops, offices, enterprises and so on.
The UO-4S panel main functions are:
1. User programmable monitoring of up to four different zones in order
to detect fires, intrusions, breaking, and opening or closing of doors,
windows, safes and so on.
2. Internal and external sound and light alarm in case of connected
detectors having actuated.
3. Two executive device automated control in accordance with one of
the five available programs (external indication, confirmation sending,
lock control, and remote control).
4. Remote alarm and service notification and remote relay control by up
to five authorized supervisors through GSM 900/1800 cellular
communication channel. The way of notification is user
programmable and can be one of SMS messages, voice messages,
Contact ID DTMF-signals (via corresponding modem), or phone call
without reply (if user cell phone is equipped with Caller ID option).
The UO-4S panel is also designed to be used within centralized
security system monitoring a group of assets from Central Guard Station. In
such a case the UO-4S panel is suitable to transmit alarm and service
messages from assets to the Central Station, to verify centralized arming,
and to be used for scheduled patrol inspecting.
In order to monitor fire and intrusion conditions any detectors with dry
contact outputs can be connected to the panel, among them magnetic
contacts, photoelectric, ultrasonic, RF, acoustic detectors with selfcontained power supply, fire heat detectors, and output circuits of other
control and indicating equipment.
System arming and disarming can be carried out by several ways.
For local authorized arming/disarming by means of Dallas Touch Memory
keys an external TM reader should be connected to the UO-4S panel.
The UO-4S panel can be used to implement some home automation
function such as remote switching on of home electric equipment (light
fixtures, locks, air conditioners, kettles, washing machines and so on).
UO-4S is to be powered by 12 VDC supply. If RIP-12 uninterrupted
power supply manufactured by Bolid Company is in use, UO-4S panel is
capable to detect AC line failures following by transmitting trouble
notifications to authorized cell phone.
UO-4S panel is round-the-clock indoor operable.
6
UO-4S
SPECIFICATIONS
2
SPECIFICATIONS
UO-4S panel rev.02 is designed to be powered by 12 VDC supply,
the panel voltage consumption being from 10.2 to 15 V.
The operating temperature range is from −30 to +50°С.
The current rating doesn’t exceed 80 mA. When transmitting
messages and while registration in GSM-network current consumption can
short-time increase up to 500 mA.
2.1
Alarm Loops
The maximum number of alarm loops with monitored detectors to be
connected to the panel is four.
The input alarm loop voltage ranges from 6 to 12 V.
When short circuit failure has happened in any alarm loop other loops
are kept being supplied as described above.
UO-4S restricts the electric current flowing through an alarm loop not
to exceed 12 mA.
If intruder detectors are included in an alarm loop then wire
resistance (without regard to termination resistor) must not exceed 1 kΩ,
while leakage resistance between loop wires or between each wire and the
earth must be at least 20 kΩ.
If fire heat detectors are included in alarm loop then wire resistance
(without regard to termination resistor) must not exceed 100 Ω, while
leakage resistance between loop wires or between each wire and the earth
must be at least 50 kΩ.
2.2
Relay Outputs
The device is equipped with three executive relays, one relay being
strictly designed to connect a siren.
The maximum relay direct switching current is 1 A, while the
maximum alternating one is 0.5 А.
The maximum relay switching voltage is 24 V for direct current and
100 V for alternating current.
The maximum relay switching power doesn’t exceed 10 W.
2.3
Touch Memory Reader Input
UO-4S panel is equipped with input contacts to connect an identifier
reader circuit.
No more than four Touch Memory contact devices can be brought in
parallel across identifier reader circuit contacts.
There is only one contact terminal to connect external reader LED.
The overall length of reader connecting wires must not exceed 100 m
provided wire diameter is no less than 0.5 mm.
The UO-4S storage memory capacity is 16 TM identifiers.
7
UO-4S GSM 4-ZONE ALARM PANEL
3
UO-4S DESIGN
UO-4S GSM 4-Zone Alarm Panel is implemented in plastic case
whose view along with overall and mounting dimensions are demonstrated
in Figure 3-1.
80
GSM
READY
∅7
2
3,5
3
70
103
1
4
Two holes ∅3
135
35
150
Figure 3-1: UO-4S Overall and Mounting Dimensions
3.1
Panel Light Indicators
There are six LED indicators on the panel top cover, the upper LED
indicating GSM-connection status, next READY LED indicating the panel
itself conditions, and rest four LEDs indicating statuses of four connected
alarm loops respectively.
3.2
Panel PCB and Terminal Blocks
Within panel case the device PCB is housed, with board layout being
showed in Figure 3-2.
The main components shown are:
− the GSM-module with the built-in internal antenna and SIM-card
reader,
− the internal sounder,
− the port for UO-4S to PC connecting,
− the tamper switch for unauthorized tampering detecting, and
− the group of screw clamp terminals for input and output circuit
connecting as follows.
8
UO-4S
UO-4S DESIGN
To PC COM port for configuring
GSM
Module
External Touch
Memory Reader
SIM-Card
Reader
4
Internal Antenna
1
2
3
GSM
READY
The Jumper should be set on while PC
configuring and operating
To External Antenna
SIM-Card
LED
0B
25
24
TM
23
K3
22
K3
K2
K2
K1
21
20
19
18
К1
17
ШС4ШС4+
16
15
8.2 kOhm
ШС3-
14
8.2 kOhm
ШС3+
ШС2ШС2ШС2+
13
12
ШС1ШС1+
10
9
8
0B
КЦН
0B
Кпит.
B
A
Tamper Switch
r
To Siren
To executive
Devices
10 kOhm
Intruder Loop
Auxiliary Loop
11
0B
7
6
5
4
3
2
12B
1
The example
of fire heat
detector
connection
8.2 kOhm
Intruder Loop
To Patrol Check Circuit
To +OC RIP Output
To 12V Power Supply
Figure 3-2: UO-4S Panel PCB Layout
9
UO-4S GSM 4-ZONE ALARM PANEL
PCB
Designator
LED
0В
ТМ
К3
К3
К2
К2
К1
К1
ШС4ШС4+
ШС3ШС3+
ШС2ШС2+
ШС1ШС1+
0В
КЦН
0В
Кпит
В
А
0В
12В
10
25
24
23
22
21
20
19
18
17
16
15
14
13
12
11
10
9
8
7
6
5
4
3
2
1
Assignment
To connect a TM reader circuit as shown in Figure 3-2
To connect a siren
To connect an executive device #2
To connect an executive device #1
Negative and positive contacts to connect an alarm loop #4
Negative and positive contacts to connect an alarm loop #3
Negative and positive contacts to connect an alarm loop #2
Negative and positive contacts to connect an alarm loop #1
To connect a Patrol Check circuit
To connect “Кпит” and “0В” UO-4S contacts
to “+OC” and “0 V” RIP-12 output contacts respectively
Reserved
0 V and 12 V contacts to connect power supply
UO-4S
TECHNICAL DESCRIPTION
4
4.1
TECHNICAL DESCRIPTION
UO-4S Functional Diagram
The main functional nodes of UO-4S GSM 4-Zone Alarm Panel and
interconnection between them are shown in Figure 4-1.
Microprocessor supervises all system components by monitoring for
alarm loops, receiving and sending communication data through GSMmodule, and controlling the internal sounder, siren, relay outputs, and
Touch Memory reader operations.
12V
Power Voltage
Converter
Indicators
3.6 V
GSM
READY
1
2
3
4
To GSM
Indicator
Internal
Antenna or
External
Antenna with
Adaptor
Alarm Loops
Loop 1
Loop 2
GSM-Module
Loop3
Loop 4
Microprocessor
Relay 1
Relay 2
Siren
External Indicator
Touch Memory
Reader
SIM-Card
Reader
Figure 4-1: UO-4S Functional Diagram
4.2
Zones to Be Monitored and Alarm Loops
UO-4S GSM 4-Zone Alarm Panel is designed to monitor up to four
different zones for fire or intruder conditions within protected area. Zone is
physically represented by an alarm loop with various detecting devices
included.
11
UO-4S GSM 4-ZONE ALARM PANEL
UO-4S panel allows programming of various zone monitoring methods
by means of corresponding alarm loop’s Loop Type parameter configuring
and all possible logic status (arming or disarming) controls defining.
4.2.1
Loop Types
Depending on detecting devices included and users’ functional needs
Loop Type parameter should be defined as one of the following values:
Fire (De Incendio): Such a loop is armed without delay and never
disarmed. Only heat fire detectors can be brought in such a loop.
Entry (Entrada): Such a loop is armed and disarmed after a time
delay having expired (that is, entry delay and exit delay can be given for
this type of alarm loop).
Intruder (De Guardia): Such a loop is armed or disarmed instantly
without any time delay.
Alarm (Alarmada): Such a loop is armed without delay but never
disarmed.
Entry, Intruder, and Alarm typed loops can comprise any loopunpowered dry contact output devices such as magnetic contacts, intruder
detectors or even control and indication equipment outputs (for example,
for smoke detector monitoring if necessary).
Auxiliary (Tecnológica): Such a loop is used to enable other loops
manual local arming control by any included switch opening (for arming)
and closing (for disarming). If only authorized control is assumed then a
crypto device can be used for such switching, otherwise a holding key or
lock button can be included into alarm loop.
4.2.2
Physical Condition
Detecting device monitoring results in loop physical condition defining
and report message generating.
Fire alarm loop physical conditions are defined depending on its
resistance measured as follows:
0.2
Short
Failure
0.5
1.6
Breaking
2 kΩ
14kΩ
Norm
17kΩ
50kΩ
Breaking
Open
Failure
When a fire alarm loop has been broken (fire heat detector has
actuated) FIRE (INCENDIO) message is generated. If short or open failure
has occurred in a fire loop then TROUBLE message (ROTURA DE LA
LÌNEA DE INCENDO) is formed. After fire loop having been restored
ARMED (ARMADO) message is generated.
Entry, Alarm, and Intruder alarm loop physical conditions are defined
depending on its resistance measured as follows:
12
UO-4S
TECHNICAL DESCRIPTION
Norm
– Loop resistance is within 2 to 14 kΩ range and resistance
deviations don’t exceed 10% within a hour
Breaking – Loop resistance is less than 1.6 kΩ, or more than 17 kΩ, or
loop resistance value has jumped (more than 10% of
deviation)
When an Intruder or Alarm loop has been broken ALARM (ALARMA)
message is formed.
When an Entry alarm loop has been broken after entry or exit delay
expiring ENTRY ALARM (ALARMA DE LA ZONA ENTRANTE) message is
generated.
Auxiliary alarm loop physical conditions are not defined, with loop
opening leading to arming and loop closing leading to disarming of
assigned alarm loop.
4.2.3
Loop Logic Status Control
An alarm loop can get one of the three logical statuses, which are
Armed, Disarmed, and Arming Failed. The panel switches an alarm loop
between Armed and Disarmed statuses by four possible configurable ways:
– By autoarming with programmable time delay (see clause 4.2.4)
– By auxiliary loop closing or opening (see clause 4.2.1)
– Local control by means of TM key to reader touching (see clause
4.2.5)
– Password protected remote SMS-control (see section 8.2)
If physical condition of a loop is Norm during arming, that is its
resistance is within normal range, this loop enters Armed logic status.
Otherwise, this one enters Arming Failed status. Loop disarming always
results in Disarmed status entering.
Entry alarm loop enters Armed status after given time (that is exit
delay) since TM key to reader touching if its resistance is within normal
range.
4.2.4
Loop Autoarming
All alarm loops except Fire one can be automatically armed since
specified time interval after breaking and recovering if this loop has not been
disarmed all this time. For Entry loop the autoarming interval must exceed
exit and entry delays.
4.2.5
Local Arming and Disarming by TM Keys
The panel provides the connection of the reader of electronic
identifiers formatted as Dallas Touch Memory. The user identification is
performed by key code reading.
13
UO-4S GSM 4-ZONE ALARM PANEL
The reading and writing of a code is realized by means of touching
the reader with the electronic identifier.
The panel is supplied by single input for reader connection.
The distance between the panel and the reader cannot exceed 100 m
provided the wire cross-section area is not less than 0,1 square mm.
The codes memory capacity is 16 including Master Key identifier.
UO-4S alarm loops either by one or by a group can be armed and
disarmed by means of TM key to reader touching. The corresponding
authorities are established during key programming as discussed in
chapter 7. The specific procedures are described in section 8.2.
4.3
Relay Outputs
UO-4S panel is equipped with three relay outputs, with relay “K3”
being designed as siren and two other ones being user programmable in
according with five available programs described below.
The relay outputs in question are low-powered (see specification in
2.2 section), so it can be required to include devices with higher commuting
parameters in relay circuit.
4.3.1
Siren Relay
Relay output #3 (“K3”) is designed to connect a siren.
This relay is to be switched on for a given time when an assigned
alarm loop has been broken.
The operating period and loop coupling are specified during UO-4S
configuring. The period can be given so as the siren will not be switched off
until assigned alarm loop is disarmed.
4.3.2
Lock Control Relay Program
Lock Control program allows assigning a relay only with one panel
alarm loop.
When the assigned alarm loop has been disarmed or short failed in
disarmed condition the relay is switched on for 4 seconds enabling the
electromagnet lock opening.
Then the relay switches off and the lock is closed.
An exit button can be brought in such a relay circuit.
4.3.3
Confirmation Relay Program
This type of relay control is suitable for centralized security system.
Such a relay is switched when a user is arming assigned alarm loops by
means of TM key. Being turned on, the relay switches in interrupted mode
14
UO-4S
TECHNICAL DESCRIPTION
once per a second. The external light can be included in the relay circuit to
indicate the relay switching.
The relay is switched off after remote confirmation from Security
Station having been received, or when all assigned loops are disarmed, or
at least one assigned loop has entered in Fire / Alarm condition.
4.3.4
Lamp Relay Program
Such a relay is designed for external indicating.
The relay is switched on when at least one assigned alarm loop is
armed and there are no assigned loops in Arming Failed status or Breaking
condition.
If all assigned alarm loops are disarmed the relay is switched off.
If at least one assigned loop is in Arming Failed status or Breaking
physical condition the relay switches in interrupted mode once per a
second.
4.3.5
Remote Control Relay Program
This type of relay control is design to enable remote control of various
devices connected to this relay circuit, such as electromagnetic lock,
electric kettle, conditioner, radiator, washing machine, video camera and so
on, provided they are connected through more powerful commuting
devices.
4.3.6
Switch Off After Loop Disarming Relay Program
This type of relay program is also designed for external indicating.
Such a relay can be assigned only with single alarm loop.
The relay is switched on when assigned alarm loop is armed. When
the alarm loop has been disarmed the relay is switched off.
4.4
Patrol Check Circuit
If UO-4S alarm panel is used for centralized safeguard the Control
Check facility can be used in order to implement scheduled inspection of
assets being protecting.
A Patrol Check circuit with sealed contact shunted by 1 kΩ resistor
and external LED indicator in series included is connected to the
corresponding panel contact terminals (see section 6.5).
When a patrol has inspected an asset being protected the magnet is
touched to sealed contact, with corresponding signal being transmitted to
the Central Guard Station. This signal can designate the inspection having
been successful, or can be used to verify the inspection implementation.
15
UO-4S GSM 4-ZONE ALARM PANEL
4.5
Power Control
If the UO-4S panel is powered by RIP-12 uninterrupted power supply
manufactured by Bolid Company it can monitor the AC line functionality
and indicate failing or recovering of mains power line locally and remotely.
To enable this option connect “Кпит” and “0 В” panel PCB contact
terminals (see Figure 3-2) to “+OC” and “0 V” RIP-12 output contacts
respectively. When mains power has dropped such a power control circuit
is closed providing power trouble detecting. Similarly, when AC line has
restored the power control circuit is recovered too.
Moreover, the panel itself detects failures of a 12 V power supply and
enables internal indicating and remote notification of supply voltage being
out of range.
4.6
Panel Operating Modes
UO-4S GSM 4-Zone Alarm Panel operates in one of the following
modes:
− Operating
− Fire / Alarm
− Lock Control
− Key Programming
4.6.1
Operating Mode
The panel mode is considered to be Operating if all armed loop
physical conditions are Norm (see section 4.2.2), or if any alarm loop has
been open or closed for no more than 250 ms.
4.6.2
Fire / Alarm Mode
The panel enters Fire / Alarm mode while any armed loop (except
auxiliary) has been broken for more than 300 ms meaning an included
detector having actuated.
Entry alarm loop enters Alarm condition since entry delay time having
elapsed if it was not disarmed during this time.
If an actuated loop was assigned with the panel relay “K3”, and an
external siren is connected to the relay output in question then such the
siren shall be turned on in Fire / Alarm mode.
If a relay output is configured as Confirmation (see section 4.3.3) it is
switches off in Fire / Alarm mode until broken loop rearming.
4.6.3
Lock Control Mode
UO-4S panel provides control of an electromagnet lock connected to
a Lock Control programmed relay output. While disarming the loop
assigned with this relay, or while pressing on Exit button included in this
16
UO-4S
TECHNICAL DESCRIPTION
loop being disarmed, the relay turns on for 4 seconds allowing the lock to
be released.
4.6.4
Key Programming Modes
The panel can be switched in two special modes those are:
− TM Master Key Programming mode designed to program special
Master TM Key used to enter and exit Key Programming mode by
touching TM reader, and
− TM Key Programming mode designed to program by hardware a
number of TM keys used to arm and disarm a system
The panel is switched to these modes as described in section 7.4.
4.7
Remote Notification
The UO-4S panel provides alarm and trouble remote GSMnotifications by means of four different ways which are SMS, voice
messages, Contact ID DTMF-signals (via special modem), and phone calls
without replying (if user cell phone is equipped with Caller ID option).
Up to 5 system owners (or supervisors) can be notified by a panel.
A panel can be configured to send automatically periodical reports
about loops armed currently to one of two pointed supervisors.
The types of notifications being sent to panel supervisors can be
flexible selected from a group of available ones for each alarm loop and
each supervisor separately.
4.7.1
Notification by SMS-messages
In Table 1 following is the list of all available alarm and system
notifications that can be transmitted (if configured) from UO-4S to an
authorized cell phone as SMS-messages.
Table 1: SMS messages transmitted by UO-4S
Text of
SMS-message Received
DESARMADO
S1 nombre1, S2 nombre2…
- USUARIO NN nombre
ARMADO
S1 nombre1, S2 nombre2…
- USUARIO NN nombre
FALLO
S1 nombre1, S2 nombre2…
ROTURA
S1 nombre1, S2 nombre2…
INCENDIO
S1 nombre1, S2 nombre2…
Notification
Loops with numbers S1, S2, …and with names
specified by “nombres” have been disarmed by
authorized user (see notes 1-3 below)
Loops with numbers S1, S2, …and with names
specified by “nombres” have been armed by
authorized user (see note 1-3 below)
The prompt to arm specified loops has failed
Short or open failure of specified loops
FIRE at Fire alarm loops with specified numbers
and names
17
UO-4S GSM 4-ZONE ALARM PANEL
ALARMA
S1 nombre1, S2 nombre2…
PANICO
S1 nombre1, S2 nombre2…
DENEGADO
PROG
PRUEBA
ESTADO ARMADO S1, S2…
ESTADO:
ARMADO S1, S2…, or
DESARMADO
CONFIRMADO…
DC BAJA
DC ALTA
DC RECUPERADA
AC BAJA
AC RECUPERADA
ALARMA de ENTRADA
S1 nombre1, S2 nombre2…
APERTURA
CERRADO
REINICIO
1
2
3
4
18
Breaking of Intruder alarm loops with specified
numbers and names
Breaking of Alarm loops with specified numbers
and names
The unregistered TM key has been presented
The panel has entered Key Programming mode
TEST message, that is periodical automatic
report about current loop logic statuses
The reply after remote loop status request (see
8.6.1). Can be the list of armed loop numbers (if
any), or message about all loops being disarmed
Patrol Check circuit is activated
DC voltage is below 11 V
DC voltage is above 16 V
DC voltage has been within normal range
AC voltage has been out of range more than 20s
AC voltage has been OK more than 20s
Breaking of armed Entry alarm loop
The panel enclosure has been opened
The panel enclosure has been closed
The panel has just been restarted
Notes:
If NN = 1 ÷ 15 then a loop was disarmed/armed by means of TM key
with NN number;
if NN = 20 then a loop was disarmed/armed by means of auxiliary
loop closing/opening;
if NN = 21 ÷ 25 then a loop was disarmed/armed remotely by means
of supervisor described with (NN − 20) number in panel configuration
(see section 7.1.1.2).
If NN = 1 ÷ 15 then a loop was disarmed/armed by means of TM key
with a configured key name;
if NN = 20 then a name field will be empty;
if NN = 21 ÷ 25 then name field will contain the name of a supervisor
as it was assigned while being configured (see section 7.1.1.2).
When Fire loop has been recovering the “USARIO” part is not
transmitted.
Each notification is preceded by current time formatted as HH:MM
(hours and minutes). This timestamp to be displayed correctly set the
panel current time remotely as described in section 7.3.
UO-4S
TECHNICAL DESCRIPTION
5 Each SMS message is preceded by panel name as it was typed while
being configured (see section 7.1.1.1).
6 If there are some notification collected in the panel nonvolatile
memory they are transmitted by group all together. Up to 16 SMS
notifications can be storied in panel memory.
4.7.2
Notification by Voice Messages
Following is the list of synthesized voice messages that can be
transmitted by UO-4S panel to an authorized cell phone.
All voice messages listed below begin with “Atención, es el mensaje
del dispositivo número NNNN”, where NNNN is four-digital number of
UO-4S in question entered upon configuring (see 7.1.1.1 section).
A voice message is considered to have been delivered if it was
listened entirely including the number of repetitions given in panel
configuration. If the message was not fully listened the panel will attempt to
connect with the cell phone to send message for given time of transmission
attempts (see 7.1.1.2 section of this manual).
Table 2: Synthesized Voice Messages Transmitted by UO-4S
Voice Message Received
Notification
Está desarmada la zona número The zone (alarm loop) with specified
<Nº de la zona> por el usuario number has been disarmed by user
with specified number
<Nº de usuario>
Está armada la zona número The zone (alarm loop) with specified
<Nº de la zona> por el usuario <Nº number has been armed by user with
specified number
de usuario>
Rotura del lazo <Nº del lazo>
The specified loop resistance was out
of range during arming, or short/open
failure has occurred in this loop
Incendio en la zona <Nº del lazo>
Fire in this zone or Fire loop breaking
Alarma en la zona<Nº del lazo>
Intruder Alarm in specified zone
Atraco en la zona <Nº del lazo>
Panic button has been pressed in zone
specified, or breaking of Alarm loop
La llave no autorizada
Unknown TM key has been touched to
UO-4S panel reader
Programación
The panel has just entered TM KEY
Programming mode
Confirmación de la guardia
The Patrol Check circuit has been
activated
Fallo de alimentación de reserva
12 VDC voltage is out of range
between 11 V and 16 V
19
UO-4S GSM 4-ZONE ALARM PANEL
Voice Message Received
Notification
Recuperación de alimentación de
12 VDC voltage has been restored
reserva
Fallo de alimentación
Mains power has failed more than 20 s
Recuperación de alimentación
Mains power has been restored
Alarma de la entrada
Breaking of armed Entry alarm loop
Alarma de sabotaje
The panel enclosure has been opened
El sabotaje se ha recuperado
The panel enclosure has been closed
Reinicio
Panel restart
4.7.3
Notification by Contact ID Messages
If Contact ID protocol is selected in order to be transmitted through
GSM-channel the panel ID must contain only non-zero digits. The receiving
GSM signal level should exceed a half of cell phone scale.
Table 3: Contact ID Messages Transmitted by UO-4S
Contact ID Codes
Fourdigital
panel
number
Identifier
Qualifier
Event
Code
Loop
Number
User
Number
CS
Disarmed
XXXX
18
1
401
X
XX
X
Armed
XXXX
18
3
401
X
XX
X
Arming Failed
XXXX
18
1
454
X
Fire Loop Trouble
XXXX
18
1
373
X
0
X
Fire
XXXX
18
1
110
X
0
X
Intruder Alarm
XXXX
18
1
132
X
0
X
Panic Alarm
XXXX
18
1
122
X
0
X
Unknown TM Key
XXXX
18
1
406
0
0
X
TM-Programming
XXXX
18
1
627
0
0
X
TEST
XXXX
18
1
602
0
0
X
Patrol Check
XXXX
18
1
999
0
0
X
Low 12 V Voltage
XXXX
18
1
302
0
0
X
High 12 V Voltage
XXXX
309
0
0
X
12 V Recovered
XXXX
18
3
302
0
0
X
AC Failed
XXXX
18
1
301
0
0
X
Notification
20
X
UO-4S
TECHNICAL DESCRIPTION
Contact ID Codes
Fourdigital
panel
number
Identifier
Qualifier
Event
Code
Loop
Number
User
Number
CS
AC Restored
XXXX
18
3
301
0
0
X
Entry Alarm
XXXX
18
1
134
0
0
X
Panel Tampering
XXXX
18
1
383
0
0
X
Panel Case Closed
XXXX
18
3
383
0
0
X
Panel Restart
XXXX
18
1
305
0
0
X
Notification
4.7.4
Notification by Phone Calls
The notifying by phone calls without replying is the least-cost and
least-informative way. It can be configured to mean only one event or event
complex. Such a way of notifying is available only if user cell phone is
equipped with Caller ID option.
The panel is configured to transmit specified reports by Phone Call to
pointed supervisor as described in chapter 7. The supervisor enrolls the
panel phone number with a text comment as a name into his or her cell
phone contact list.
When the event programmed has happened the UO-4S panel shall
call supervisor phone, with the event description being displayed on the cell
phone screen. The user receives the call, the panel discarding the
communication immediately resulting in the call to be no paid for.
4.8
Remote Control
UO-4S remote control is implemented by means of sending SMSmessage containing a password protected command to UO-4S destination
phone number.
The command can be fulfilled if only source phone number and the
password presented are programmed in UO-4S configuration (see 7.1.1.1
section).The list of remote control operations available for such a phone
owner is as follows (see 8.6 section for more details):
− Request for current logic statuses of alarm loops (armed or
disarmed)
− Specified alarm loop arming
− Specifies alarm loop disarming
− Specified relay switching for given time period
− Report Confirmation sending
− Time setting
21
UO-4S GSM 4-ZONE ALARM PANEL
5
5.1
DELIVERY SET, MARKING AND PACKING
Delivery Set
Following is the list of the UO-4S GSM 4-Zone Alarm Panel
components being delivered from manufacturer:
9 UO-4S GSM 4-Zone Alarm Panel
9 This Installer’s and User’s Manual
9 3 self-tapping screws 3×25.016 with 6х30 dowels
9 4 loop termination resistors MF 1/2W-8K2-5%
9 UO-4S to PC connecting cable
9 TM-key DS1990R-F5
UO-4S can be supplied with external 900/1800 GSM antenna and
GSM to FME adapting cable.
5.2
Marking
Each panel is supplied with marking as follows:
9
Manufacturer logotype
9
Symbolic notation
9
The year and the quarter of the manufacturing
9
Accordance mark
9
Factory serial number
The external panel terminal marking corresponds to the PCB layout
(see 3.2 clause).
5.3
Packing
The panel along with component parts and maintenance
documentation is packed into the carton box. It is assumed to pack the
panel into the proper container.
The boxes or containers are placed along with accompanying
documents into the transportation packing.
Each transportation packing should be furnished by packing list
contained information as follows:
1) Manufacturer logotype;
2) The identification, designation and the number of products inside;
3) The designation and the number of replacement components;
4) Packager sign or stamp;
5) The packaging date.
22
UO-4S
GETTING STARTED
6
6.1
GETTING STARTED
Panel Mounting
Do FOLLOW the electrical installation operational and electrical
safety code rules during the installation, operation, or maintenance of
S2000-ASPT panel and communication lines and associated equipment.
Do SHUT OFF mains and backup power before installing the panel or
repairing any failure.
Prevent the electric wire isolation from being broken at sharp edge
rounding places.
While removing the panel from its package on receipt inspect the
panel PCB to be free from detached components and pinout defects.
Test the panel operability in accordance with technical algorithm
discussed in section 10.1.
The panel is to be mounted on walls or other suitable surfaces
protected against atmospheric layouts, mechanical damages and
unauthorized access.
6.2
TM Reader Connecting
If the panel is to be controlled locally by means of TM keys an
external TM reader must be connected as shown in Figure 3-2 and
discussed in section 2.3.
6.3
Alarm Loops Connecting
Connect all necessary alarm loop circuits to the PCB terminal blocks
marked as "ШС" (from #9 to #16).
All detectors have to be wired into alarm loop in series with 8.2 kΩ
resistances provided as shown in Figure 3-2. Fire heat detectors
additionally have to be brought in circuit with 10 kΩ resistance in parallel
across it.
The possible number of devices to be included into each alarm loop
is defined by user needs and technical restrictions for loop and wires
resistance (common loop resistance shall be within 2 to 15 kΩ range and
common wire resistance shall not exceed 100 Ω for fire loop and 1 kΩ for
rest ones).
If Exit button is to be brought in a loop circuit it is included as shown
in Figure 6-1.
23
UO-4S GSM 4-ZONE ALARM PANEL
Figure 6-1: Exit Button Wiring
6.4
Executive Devices Connecting
Connect if necessary an external siren to panel К3 contacts (#21 and
#22). Connect the required executive devices to the contacts K1 and K2
(#17-#20) in accordance with the connecting diagram shown in Figure 3-2.
If the executive devices require more powerful switching equipment
include such devices into the relay output executive circuit.
6.5
Patrol Check Circuit Connecting
Connect if necessary Patrol Check circuit as shown in Figure 6-2.
Figure 6-2: Patrol Check Circuit Wiring
6.6
Power Supply Connecting
Connect power supply leads to “12 B” and “0 V” (#1 and #2
respectively) panel PCB contacts (see Figure 3-2).
If RIP-12 uninterrupted power supply is to be used connect its +OC
contact to the “Кпит” (#5) panel terminal and couple RIP-12 0 V terminal
with panel “0 B” contact #6 in order to provide mains power control (see
section 4.5).
6.7
SIM-Card Installing
In order to communicate with UO-4S panel by means of a GSM
channel a cell phone SIM-card must be located into the panel GSM-module
(see Figure 3-2).
Before installing inside the panel disable PIN-CODE PROMPT SIMcard setting by means of any available cell phone. Verify the sufficiency of
GSM-network signal level at the place of panel location. If two-tone Contact
ID protocol is assumed to be used in order to transmit notifications the
GSM signal level must reach at least a half of the cell phone scale.
24
UO-4S
UO-4S CONFIGURING
7
UO-4S CONFIGURING
In order to adjust UO-4S panel for particular application it is
necessary to describe all its configuration parameters, those fall into three
groups, which are:
− UO-4S own parameters such as identification name/number (ID),
remote control password, loop parameters, entry and exit delays,
sounders and relay parameters
− System’s owners or supervisors parameters such as phone
numbers, ways of notification transmission and their parameters,
and types of reports to be transmitted
− TM Key parameters
The adjusted values of configuration parameters are storied in the
panel non-volatile memory.
The panel can be configured by several ways.
The best way to program the UO-4S panel is to connect it to a
computer by means of cable provided and to apply the program
UPROG.EXE of version 4.0.0.906 or above. The first and second groups of
panel parameters can also be configured through panel’s SIM-card inserted
in any available cell phone. TM key parameters can be adjusted by
hardware.
The panel being configured in any way, the panel top cover is
opened. Due to the panel is equipped with a tamper switch; a fact of panel
configuring can always be monitored by corresponding notification
adjusting.
When configuring has been completed take care to close the panel
top cover.
In order the event time within SMS notifications to be displayed
correctly set the proper panel current time by remote SMS-command as
explained in section 7.3.
7.1
UO-4S Configuring by Means of PC
Adjust UO-4S panel by means of a computer by doing the following.
Power on the computer with UPROG.EXE installed. Verify the version
of configuration program is 4.0.0.906 or above.
Connect UO-4S to a COM port of computer by connecting cable
provided. Ensure the panel PCB jumper is set on.
Power the UO-4S on and run UPROG.EXE.
Click
button from the tool bar or select Dispositivo → Leer
configuración de dipositivo commands.
25
UO-4S GSM 4-ZONE ALARM PANEL
When Búscueda de dispositivos window has been opened, enter
(or select) the PC COM port the panel is connected to into Puerto serie
field and select Búscueda command.
When the list of the devices found at pointed COM port has been
displayed, select the UO-4S being configured and click Eligir button.
The configuration having been read, the main UPROG window is
opened.
Once the panel configuring has been completed save all settings by
writing new configuration to UO-4S by means of Guardar la configuración
en el dispositivo command from the Dispositivo menu or from toolbar.
The sound signal will acknowledge the change saving.
The configuration having been set can be changed in future if
necessary.
7.1.1.1 UO-4S Parameters Adjusting
In order to configure UO-4S parameters select Dispositivo tab.
First, describe the object setting UO-4S parameters.
Enter the unique UO-4S identifier into the ID de instalación field. It
can contain from one to seven digits or letters and must not begin with 0. If
Contact ID protocol or Vice messages are assumed to be used for
notifications transmitting through GSM-channel the panel identifier must be
presented by four nonzero digits.
Next, type the five-digital password for remote UO-4S control ability
into the Contraseca field.
If necessary select entry and exit delays from 1 to 255 seconds in
Tiempo para entrar and Tiempo para solir fields. By default these values
are set to 0, that means no delaying.
Then, define each alarm loop settings.
For each loop select the suitable loop types (see 4.2.1 clause) from
Tipo de Z1-Tipo de Z4 dropdown menus.
Set Autoarmar switches on if necessary (see 4.2.4 section). Select
the autoarming delay if necessary in Retraso al almar field keeping in
mind that autoarming delay for Entry alarm loop should exceed both entry
and exit delays set above. The value can range from 0 to 255 seconds.
Enter the text names consisting from 1 to 8 symbols for each loop
into Nombres de la zonas fields. These names will identify the
corresponding alarm loops in SMS messages transmitted by panel while
notification.
If some of the panel alarm loops are configured as auxiliary (see
4.2.1 clause) mark the alarm loops which must be armed and disarmed
after auxiliary loop opening and closing respectively in Armar and
Desarmar windows of Tecnológica.
26
UO-4S
UO-4S CONFIGURING
Next, give the relay parameters in Relé 1-2 sections. Select the
required relay types in Tipo and assign each relay with loops (zones)
whose breaking has to lead to the relay switching in Zonas. The available
relay programs are (see 4.3 clause):
Gestión de cerradura - Lock Control
Confirmación
- Confirmation
Làmpara
- Lamp
Gestión de exterior
- Remote Control
Apagar al desarmar
- Switch Off After Loop Disarming
Finally, in Sirena y la biper interior section define the settings of the
panel sound alarms if necessary. Enter the siren sounding time from 1 to
255 seconds in Duración de alarma field and assign the siren with alarm
loops whose breaking has to be accompanied with external siren signaling
in Zonas asociadas con sirena windows. Similarly, enter the internal
sound alarm operating time in Tiempo func. de biper field and couple the
internal sounder with alarm loops whose breaking has to cause the internal
sound signaling in Zonas asociadas con biper windows.
Zero set in Duración and Tiempo fields designates not sounding,
while value of 255 designates that sounding will not be terminated until the
alarm loop will be disarmed.
7.1.1.2 GSM-Supervisor Parameters Adjusting
In order to configure supervisor parameters select Teléfonos tab.
At the top part of the window having been opened there is a group of
transmission parameters set by default. The default values are defined for
typical applications in order to keep optimal ratio between delivery reliability
and communication expenses. If messages to be transmitted are of great
importance for the system owner and must not be lost it is advisable to
increase the values of parameters in questions.
If Voice messages are selected to be transmitted set the number of
transmission attempts in Numero maximo de mensajes en transmission
por canal de voz field. By default this value is set to zero, so Voice
messages cannot be transmitted. Voice messages are not repeated in one
communication session by default, so set the required number of
repetitions in Repeticiones de mensajes de voz field if necessary. The
field Tiempo de escuche maximo en minutos is reserved.
It can be no more than five GSM-supervisors for each UO-4S panel.
The GSM-supervisor is considered to be a panel owner with particular cell
phone number communicated with panel only by a single way, i.e. by SMSmessages, or by Voice messages, or by Contact ID protocol, or by Phone
Call. If a phone owner wishes to receive information from panel by several
27
UO-4S GSM 4-ZONE ALARM PANEL
ways he has to be registered in panel configuration several times with the
same phone numbers and different notification methods.
Define each supervisor descriptor in Teléfono 1 – Teléfono 5
sections.
Enter the full cell phone number with international code included in
Numero de teléfono field.
Then, describe the parameters of TEST notifications. Select the
required type in Tipo de aviso TEST dropdown menu. You can choose not
being notified, or SMS-notification every several hours, or phone calls
every several hours or minutes. Select the proper numerical time value in
the window Periodo de transmisión below.
Next, choose the communication way in order to transmit alarm and
service notifications from UO-4S panel to system owner in question in
Protocolo de transmisión de mensajes field. It will be one way from
Mensaje SMS, Llamada de voz, Contact ID (ADEMCO) and Llamada
telefónica.
Notes: Please, keep in mind that
1. Selected types of TEST notification must be in agreement with
type of other notifications. If SMS-channel is selected to be
transmission way then TEST notification has to be transmitted as
SMS too. If all event messages are transmitted via any other
channel, TEST notifications are to be typed as phone call.
2. TEST notifications are transmitted ONLY to phone numbers
defined in Teléfono 1 OR Teléfono 2 descriptor.
3. TEST notifications are NOT transmitted when all alarm loops are
disarmed.
4. Each TEST notification is transmitted when time period designed
in Periodo de transmisión field has been expired since any last
transmission that is alarm notification, or service notification, or
preceding TEST one. If the time pointed is zero then notifications
will not be transmitted.
5. Remember that GSM-signal receiving level should be at least a
half of telephone scale if Contact ID (ADEMCO) is used.
Then, select for each alarm loop in Parametros de transmisión
section the way for transmission of notifications specified below in 7.1.1.3
clause. The notifications about each alarm loop conditions can be not
transmitted to this supervisor at all, or can be transmitted all, or only alarm
messages can be transmitted, or all notifications except DESARMADO or
ALARMA.
Finally, in Nombre window type the system owner’s name which will
be displayed in SMS messages being sent to other supervisors in case of
remote arming and disarming.
28
UO-4S
UO-4S CONFIGURING
The switch Permitir descolgar el teléfono is reserved.
7.1.1.3 Notification Filter Adjusting
Adjust the types of messages to be transmitted by UO-4S panel to its
supervisors.
Select the Filtros de mensajes tab. The table with message list
down and supervisor list across will appear. All types of available
notifications are described in section 4.7 of this manual.
By default each cell in table is marked meaning that all types of
notifications are available to transmit to all supervisors.
Double click left mouse key on those cells that are located at points of
intersection of message that MUST NOT be transmitted and supervisor that
MUST NOT be notified by corresponding message. Such the cells will be
empty.
7.1.1.4 TM Key Parameter Adjusting
Select Llaves tab in order to add or delete TM keys, or to assign
them with specified authorities.
The tools available at the toolbar will be as follows:
- To read keys from a file
Leer fichero de los cуdigos de llaves
- To write the keys into a file
Guardar el fichero de los cуdigos de llaves
- To read keys from a device
Leer las llaves de dispositivo
- To write the keys into the device
Guarda las llaves en dispositivo
- To add a key
Aсadir un llave nueva a dispositivo
- To delete the selected key
Borrar llave
To begin with, it is necessary to read keys from the panel if
presented.
If there is no key programmed before it is possible to read keys from
floppy disk (by means of first tool if such a disk is available) or to program a
number of keys manually.
TM Master Key can not be created by software. To program it follow
the instructions of section 7.4.1. When Master Key has been programmed
29
UO-4S GSM 4-ZONE ALARM PANEL
its descriptor is located within Key Table string with zero number on the
computer screen.
ATTENTION: When TM Master Key has been programmed all TM
keys configured before are lost.
To add new TM key with arming/disarming authorities:
Select Acadir la llave button from the toolbar
Select Leer la llave button at right part of the screen and touch
a TM key to the reader following in system prompt
When the programmed TM key descriptor has appeared within the
table select its specified loop arming and disarming authorities by double
clicking on table cell located at the intersection of desired operation and
specified alarm loop.
Type a text name for TM key if necessary.
You cannot assign any authority to the Master Key because it is
designed to switch the panel into programming mode.
When the list of TM keys has been created you can change key
authorities as described above or delete any key by means of Borrar llave
tool button.
You can write all programmed keys into a file of special format to a
floppy disk by means of Guardar el fichero de los cуdigos de llaves tool.
Such a disk can be used to load all programmed keys into any other UO-4S
panel to be controlled by the same TM keys.
In order to store key adjustment into panel non-volatile memory select
Guarda las llaves en dispositivo tool button.
7.2
UO-4S Configuring by Means of a Cellular Phone
Configuring the panel via its SIM-card makes not so much
opportunities as programming by means of a PC.
The message filters can not be adjusted by means of a cell phone, all
available messages being transmitted to all registered supervisors.
The TM key codes are not programmable through a SIM-card. In
such a case they are to be registered by hardware as shown in section 7.4.
Moreover, there is no any feedback when configuring by means of
cell phone settings. A mistake within entered command can cause a
malfunction of panel operability. So be careful when programming the
UO-4S SIM-card manually.
30
UO-4S
UO-4S CONFIGURING
In order to program UO-4S panel through SIM-card insert the panel’s
SIM-card into any available cell phone and select SIM-CARD MEMORY
option in phone settings.
7.2.1
UO-4S Parameters Adjusting
In order to define the name/number of UO-4S panel itself, the alarm
loop types, relay executive programs, entry and exit delays, and the
number of attempts of Contact ID message transmission add the following
entry to the phone contact list:
Name
ParNAME
Phone Number
XXXXYY*Z*T*W
where:
NAME is a name or number to identify this panel while notification is
sent. It can consist from digits and letters, the first symbol
being no zero. Its length can range from 1 to 7 symbols. If
Contact ID or Voice notification channels are in use the panel
name has to contain only digits from 1 to 9 zero excluding.
XXXX are types (in accordance with Table 4) of alarm loops from
the first to the fourth as they are marked on panel PCB
YY
are types (in accordance with Table 5) of the first and the
second relays
Z
is an exit time (arming delay) in seconds from 0 to 255, zero
meaning arming without delay. By it is set to zero.
T
is an entry time (disarming delay) in seconds from 0 to 255,
zero meaning disarming without delay. By default this one is
set to zero.
W
is a number of attempts of Contact ID message transmissions
from 1 to 10
Table 4: Designators of Alarm Loop Types
X
Loop Type
Designation
0
Reserved
1
Entry
Zone with arming and disarming delay capabilities
2
Intruder
Armed and disarmed without any delay
3
Reserved
4
Alarm
Never disarmed
5
Fire
Never disarmed
6
Auxiliary
For assigned alarm loops arming when opened and
disarming when closed without delay
31
UO-4S GSM 4-ZONE ALARM PANEL
Table 5: Designators of Relay Types
Y
Type of Executive Relay Program
0
Lock Control (can be assigned only with single loop)
1
Confirmation
2
Lamp
3
Remote Control
4
Switch Off After Loop Disarming (can be assigned only with single loop)
Example: contact entry with Par1111 in Name field and 122223*60*30*3 in
Phone number field will be considered as following UO-4S configuration:
– This UO-4S panel is identified as 1111
– The first alarm loop is configured to be Entry
– The rest alarm loops are configured to be Intruder
– The first relay has Lamp type
– The second relay can be controlled remotely
– The exit time will be 60 sec
– The entry time will be 30 sec
– The Contact ID messages transmission attempts number is 3.
7.2.2
Remote Control Password Adjusting
Set the UO-4S remote control password by adding the following
contact entry:
Name
Pas or Password
Phone Number
XXXXX
where XXXXX is five-digital password. Strictly five digits must be
typed as a password, otherwise remote control is disabled.
7.2.3
Supervisors Descriptors Adjusting
In order to describe supervisors to control the system remotely, add
the following contact entry for each supervisor descriptor (five maximum):
Name
Phone Number
ANXXXXYTZZ
PHONE NUMBER
where:
A
is the special initial symbol
N
is the sequence number of descriptor which can be from 1 to
5. This number must not be repeated from entry to entry
XXXX is the sequence of message transmission parameters (see
Table 6) for loops from the first to the fourth
Y
points the way of notification transmission (see Table 7)
32
UO-4S
UO-4S CONFIGURING
T
ZZ
points the way of TEST message transmission (see Table 8)
defines the time period in corresponding units for TEST
message transmission period
PHONE NUMBER is supervisor’s cell phone number preceded by
international code which notifications will be sent to.
Table 6: Message Transmission Parameters
Symbol
Meaning
0
Don’t transmit notifications concerning this alarm loop
1
Transmit only alarm messages concerning this alarm loop
2
Don’t transmit DESARMADO and ALARMA DE ENTRADA
3
Transmit all messages
4
Transmit all messages except ALARMA DE ENTRADA
Table 7: Notification Transmission Ways
Symbol
Meaning
s
Notification by SMS messages
d
Notification by DTMF
t
Notification by Phone Call
g
Notification by Voice messages
Table 8: TEST Message Transmission Parameters
Symbols
Meaning
s
TEST notification is transmitted by SMS every several hours (from 1
to 250 hours)
h
TEST notification is transmitted by Phone Call every several hours
(from 1 to 250 hours)
m
TEST notification is transmitted by Phone Call every several minutes
(from 1 to 250 minutes)
000
Don’t transmit TEST notification
Notes:
1. Phone Call and SMS message TEST can be sent only to A1 and
A2 supervisors.
2. TEST messages are not transmitted when all alarm loops are
disarmed.
3. TEST message sending period is counted from any last
transmission to this supervisor.
33
UO-4S GSM 4-ZONE ALARM PANEL
4. There must not be the same Name field in two or more entries.
5. If you desire to receive different kinds of notification at a single cell
phone you should record the corresponding number of entries with
the same Phone Number field and different Name fields.
Example 1: Name A14444ss02 means that the first supervisor will receive
SMS messages TEST every 2 hours.
Example 2: Name A11234gm10 means that the first supervisor will
receive:
– Voice alarm messages dealing with the first alarm loop
– All Voice messages dealing with the second loop except DESARMADO
and ALARMA DE ENTRADA
– All Voice messages dealing with the third loop
– All Voice messages dealing with the fourth loop except ALARMA DE
ENTRADA
– TEST messages are transmitted by Phone Call every 10 minutes
7.2.4
Loop Assignment Adjusting
In order to assign alarm loop breaking with other panel executive and
auxiliary equipment add the following contact entry:
Name
ShlXXXX
Phone Number
YYYY0ZZZZ8SSSS9DDDD7BBBB6
where:
XXXX are the numbers of alarm loops assigned with relay K1
YYYY are the numbers of alarm loops assigned with relay K2
ZZZZ are the numbers of alarm loops assigned with external siren
SSSS are the numbers of alarm loops designed to be armed by
auxiliary loop opening
DDDD are the numbers of alarm loops designed to be disarmed by
auxiliary loop closing
BBBB are the numbers of alarm loops assigned with the internal
panel sounder
The separating characters 0, 8,9,7,6 are mandatory.
7.2.5
Autoarming Adjusting
In order to point alarm loops to be automatically armed since several
time interval after breaking, add the following entry to the contact list:
Name
AutoXXXX
34
Phone Number
YYY
UO-4S
UO-4S CONFIGURING
where:
XXXX is the list of alarm loop numbers to be autoarmed after
breaking
YYY is the time period ranged from 0 to 255 seconds for arming to
be delayed after breaking
7.2.6
Siren Operating Time Adjusting
In order to give external siren operating time while associated loops
are broken, add the following entry to the contact list:
Name
Sir
Phone Number
YYY
where:
YYY is the number of seconds you want the connected siren to be
switched on in case of assigned loop breaking. The time value
can range from 0 to 255 seconds, with 0 meaning not
sounding and 255 meaning the siren will sound continually
until alarm will be reset. By default the siren operating time is
set to zero (not sounding).
7.2.7
Inner Sounder Operating Time Adjusting
In order to give panel internal sounder operating time while
associated loops are broken add the following entry to the contact list:
Name
Sound
Phone Number
YYY
where:
YYY is the number of seconds you want the sounder to be switched
on in case of assigned loop breaking. The time value can
range from 0 to 255 seconds, with 0 meaning not sounding
and 255 meaning the sounder will be switched on continually
until alarm will be reset. By default the sounder operating time
is set to zero (not sounding).
7.2.8
Configuration Overwriting
The configured parameters must be relocated from the SIM-card to
the UO-4S non-volatile memory. To do this:
1) Power off the UO-4S panel and open the panel cover
2) Move the SIM-card from the cell phone to the panel SIM-card
reader
3) Power up the panel and wait for 10 seconds until READY LED has
terminated flashing
35
UO-4S GSM 4-ZONE ALARM PANEL
4) Enter TM Key Programming mode by touching the TM reader with
Master Key. The panel internal sounder shall doubly beep three
times meaning Programming mode entering
5) Press and hold panel tamper switch for 10 ÷ 15 seconds
6) Wait until UO-4S terminates beeping (less than 1 minute)
7) Replace the panel cover.
Note: Write the configuration from SIM-card into the panel memory
only if the communication within GSM-network is stable.
7.3
Panel Current Time Setting
Set the UO-4S panel current time as described in section 8.6.6.
7.4
TM Key Hard Programming
In order to program TM keys by hardware it is necessary to open the
panel top cover. After programming completing put the panel cover on.
7.4.1
TM Master Key Hard Programming
In order to program TM Master Key by hardware, power the UO-4S
panel off and couple TM reader contact terminals. Then, switch on the
panel again. Panel to TM Master Key Programming mode entering shall be
confirmed by two double short and one long signal of panel internal
sounder.
Disconnect TM reader contacts and touch the reader by a TM key
within 10 seconds after disconnecting. Two short beeps will confirm the
new Master Key recording into the panel memory, all information about TM
keys programmed before being erased.
To exit the TM Master Key Programming mode do one of the
following: couple TM reader contacts for 4 seconds, or wait for 30 seconds,
or shut off the panel power.
7.4.2
TM Key Hard Programming
In order to program TM keys suitable for zone arming/disarming (the
maximum number of such the keys is 15) ensure all Intruder and Entry
alarms are disarmed. Otherwise the TM Key Programming mode is
unavailable.
Switch the panel power on and wait for 10 seconds.
Touch the Master key to the TM reader. The panel internal sounder
will emit three double beeps confirming TM Key programming mode
entering.
Touch the TM reader by TM key to be programmed. Its code will be
recorded into the panel memory, the sounder emitting two beeps. The
36
UO-4S
UO-4S CONFIGURING
LEDs from 1 to 4 will indicate the number of TM key being programmed for
2 ÷ 3 seconds, then they will begin to display the statuses of assigned
alarm loops.
Notes: If the TM key presented has already been programmed for
this panel then UO-4S acknowledges it by once beep. If the panel key
memory is full meaning that 16 key with Master Key included have already
been programmed then the panel sounder emits long error signal.
If the TM key has been successfully registered by the panel, couple it
with alarm loops to be armed and disarmed by this key. Close in turns the
corresponding loop contacts for short time. If corresponding LED is lighting
it means that this loop is assigned with the key being programmed.
In order to confirm programming touch the TM reader by this key
once more.
Repeat programming for another TM key if necessary or exit TM Key
programming mode by closing reader contacts for 4 seconds, or by waiting
30 seconds after any programming operation, or by shutting panel power
off. The exit from programming mode will be confirmed by sounder beep.
Note: If any alarm loop is closed the panel can’t leave the
programming mode.
7.4.3
TM Key Hard Deleting
In order to delete the code of a TM key with arming and disarming
authorities from the panel memory do the following.
Disarm Intruder and Entry alarm loops and enter TM Key
Programming mode as described in previous section.
Touching the TM reader by TM Master Key, press the panel tamper
switch for short time and remove the last one.
Press tamper switch such many times as a number of TM Key to be
deleted. The LEDs from 1 to 4 will indicate the binary form of TM Key
number.
Press and hold tamper switch for 5 ÷ 8 seconds. When the key has
been deleted the panel will sound.
Then delete other key or exit programming mode by TM Master Key
to reader touching, or by reader contacts coupling for 3 seconds, or by
waiting 30 seconds since the last programming operation.
Note: If an attempt of TM Master Key deleting is implemented the
panel records parameters into SIM-card and DOES NOT DELETE key with
zero number (that is, Master Key).
37
UO-4S GSM 4-ZONE ALARM PANEL
8
OPERATING
In this chapter it is shown how to monitor your system statuses and
events depending on light and sound indication observed, how to arm and
disarm your system, how to receive notifications, and how to implement
system remote control.
You can change system settings if necessary as shown in chapter 7,
or to add/delete TM keys as described in section 7.4.
8.1
Panel Indication
The Tables below demonstrate the behavior of panel light and sound
indicators depending on conditions or events having occurred.
Table 9: GSM LED Indication
Condition
Indicator Behavior
232-line communication
Lit by green or yellow
232-line communication has
been lost
Switched off or flashes by red
The level of GSM signal
received is too low or
communication has been lost
Flashes by red or yellow eight times per a
second
Too much GSM errors
Flashes by red or yellow four times per a second
Table 10: READY LED Indication
Event, or Condition
Indicator Behavior
TM key to reader first
Three flashes
touching in Operating mode
LED flashes four times per 2 seconds, 1 ÷ 4
LEDs displaying key number in binary code.
TM key to reader touching in
Then READY LED flashes once per a second,
Key Programming mode
1 ÷ 4 LEDs indicating loops being assigned with
this key
Key deleting
Flashes twice for 2 seconds, 1 ÷ 4 LEDs
displaying the number of key being deleted
Norm
Lit steady
GSM-module with panel Sets of four-times flashing twice per a second at
communication has been lost 2 second intervals
GSM signal has dropped Sets of two-times flashing twice per a second at
below normal value
2 second intervals
Supply voltage is out of Flashes once per a second; of switches off if
11 V – 15 V range
GSM-coupling with panel has been lost too
38
UO-4S
OPERATING
Table 11: Panel 1-4 LED Indication
Condition of a Loop
Corresponding Indicator Behavior
Loop is disarmed
Associated LED is lighted off
Loop is armed
Associated LED is lighted on
Loop is broken,
or its arming failed
Associated LED flashes twice per a second*
The arming command has Flashes twice per a second if loop resistance is
been received, but the arming out of normal range; or flashes once per 2
delay has not been expired
seconds if not
*Note: Such indication is kept within 2 minutes since a broken loop
has been disarmed
Table 12: External LEDs (TM Reader and Patrol Check Circuit) Indication
Event, or Condition
Indicator Behavior
All loops apart from Alarm
Switched off
and Fire ones are disarmed
At least one loop apart from Switched on if power supply is within normal
Alarm and Fire ones are range, or flashes once per two seconds
armed
otherwise
At least one alarm loop has
been broken or its arming Flashes twice per second
has failed
Entry alarm loop is arming, Flashes twice per a second if loop resistance is
arming delay having not out of range, or flashes once per two seconds
been“ expired
otherwise
TM Reader Indicator (only) after triple flashings
First TM key to reader
displays current conditions of loops assigned
touching in Operating mode*
with this key
Disarming
Is switching off
Arming
Is switching on
Patrol Check
Patrol Check Indicator (only) flashes two times
Key Programming mode
Switched off
Unknown Key
TM Reader Indicator (only) switches on for 0.5 s
*Note: After single TM key to reader touching the external reader
displays the conditions of loops assigned with this key for 30 seconds. To
arm or to disarm the assigned zones touch the same key to reader once
more within this 30 second period.
39
UO-4S GSM 4-ZONE ALARM PANEL
Table 13: Internal Sounder Indication
Event, or Condition
Sounder Behavior
Operating mode
Switched off
Breaking of an associated
loop, or associated loop fire
trouble
Sounds in interrupted mode
Arming of an associated loop
Two short beeps
Disarming of an associated
loop
If the sounder was on it is switched off, or emits
a beep otherwise
Delaying of arming
Short beeps once per two seconds. Within 15
sec before arming delay having been expired
the beep frequency increase up to twice per a
second
Illegal TM key to reader
touching
Long sound
Arming of a loop has failed
Sounder is off
TM Key Programming mode
entering
Three short double sounds
If the key code has already been recorded into
UO-4S memory then the sounder emits a beep.
TM key to reader touching in
Key Programming mode
If the TM key been touched is unknown the
sounder acknowledges the new key code
recording into the UO-4S memory by two
beeps.
If UO-4S key memory is full and all 16 key
codes have already been recorded then the
sounder emits long sound signal. It is
necessary to delete an existing key in order to
program new key
Master Key Programming
Two short twice beeps and then one long sound
mode entering
TM key to reader touching in
Master Key Programming Two beeps
mode
TM key deleting
40
One long and two short sounds
UO-4S
8.2
OPERATING
Local Arming and Disarming
Local zone arming and disarming are implemented by three different
ways as was discussed in section 4.2, namely by autoarming after
breaking, by auxiliary alarm loop assigned with this zone opening and
closing respectively, and by TM key to reader touching.
This section explains in details how to arm and disarm system zones
by means of TM key to reader touching. Operations described below are
enabled only if the key presented has been registered by UO-4S panel with
authorities to arm and disarm specified alarm loop (see section 7.1.1.4).
The double touching method is implemented in order to arm and
disarm system by means of TM key. Since 30 seconds after first touching
the loop statuses are being displayed by reader light indicator. The second
touching within this 30 second period leads to arming or disarming of loops
assigned with this TM key.
8.2.1
Zone Local Arming by means of ТМ key
Inspect the condition of loops assigned with this key by once key to
reader touching. The reader LED shall indicate loop statuses as shown in
Table 12.
Within 30 seconds after first touching touch the same TM key to
reader once more. If all assigned loops was not armed (disarmed or its
arming was failed) they will be armed. If at least one loop was armed the
disarming process begins.
If at least one alarm loop is of Entry type then sounder begins to
beep.
Ensure all assigned loops have been armed by visual inspecting of its
LED indication (see Table 11).
If a relay is configured as Confirmation then:
1) After arming of loop assigned with this relay indicators flashes
once per second,
2) After message transmission indicators flashes once per second,
3) After confirmation receiving the indicator is lit steady.
8.2.2
Zone Local Disarming by means of ТМ key
Inspect the condition of loops assigned with this key by once key to
reader touching. The reader LED shall indicate loop statuses as shown in
Table 12.
Within 30 seconds after first touching touch the same TM key to
reader once more in order to disarm assigned loops if at least one was
armed or broken. If all assigned loops was not armed (disarmed or in
arming failed status) then the second touching will lead to all assigned
loops arming.
41
UO-4S GSM 4-ZONE ALARM PANEL
If loop of Entry type is broken it enters actuated status. If not
disarmed within 30 seconds then an alarm is initiated.
8.3
Electromagnetic Lock Control
Electromagnetic Lock Control is enabled if only the corresponding
relay is configured with Lock Control type.
Such a relay is switches on releasing a door for 4 seconds when the
associated alarm loop either has been disarmed or has been closed after
being disarmed.
8.4
Voice Notification
If synthesized voice notifications are transmitted to you authorized
cell phone listen a message received fully. If the phone call is discarded
before the voice message is played completely then UO-4S will repeat the
attempts to transmit the message (if the number of attempts are set in a
value more than 1 – see section 7.1.1.2).
8.5
Phone Call Notification
If phone call notifications are transmitted to you authorized cell phone
then accept call receiving, and UO-4S will discard this call within 2
seconds. If you discard or ignore such a call then UO-4S will repeat the
attempts to transmit the message until the configured number of attempts
has expired (see section 7.1.1.2).
8.6
Remote UO-4S Panel Control
UO-4S remote control is implemented by means of sending SMS
containing a password protected command from authorized cell phone to
UO-4S phone number.
A command can be fulfilled if only source phone number and the
password presented are programmed in UO-4S configuration. The owner
of such a phone can request the current status of alarm loops (that is, are
the alarm loops armed or disarmed), send arming or disarming command,
send executive relay command, send arming report confirmation or change
current time.
All available commands along with corresponding strings of symbols
being entered from phone keypad are presented below.
8.6.1
Request for current loop logic statuses
In order to request current alarm loop logic statuses and to inspect
are they armed or disarmed now, send such a string from your cell phone:
42
UO-4S
OPERATING
PXXXXXQ, where XXXXX should be replaced by legal password.
If there are no loops armed, the reply will be DISARMED
(DESARMADO), otherwise the reply will be ARMED S,S… (ARMADO),
where S,S… is the numbers of armed loops.
8.6.2
Remote Alarm Loop Arming
In order to arm the specified alarm loops remotely, send such a string
from your cell phone to UO-4S cell phone number:
PXXXXXaSS…, where XXXXX should be replaced by legal password
and SS… should be replaced by the sequence of numbers of the loops to
be armed.
Example: the command P45235a24 means the authorized instruction for
UO-4S to arm alarm loops with numbers 2 and 4, the password presented being
45235.
After remote arming the corresponding notification will be transmitted
to authorized supervisors. It looks like ARMED S,S… USER NN (ARMADO
S,S… USARIO NN), where S,S… are the numbers of loops having been
remotely armed and the NN is 20 plus the number of descriptor in panel
configuration (see section 7.1.1.2) of supervisor that has armed the loops.
8.6.3
Remote Alarm Loop Disarming
In order to disarm the specified alarm loops remotely, send such a
string from your cell phone to UO-4S cell phone number:
PXXXXXdSS…, where XXXXX should be replaced by legal password
and SS… should be replaced by the sequence of numbers of the loops to
be disarmed.
Example: the command P45235d23 means the authorized instruction for
UO-4S to disarm alarm loops with numbers 2 and 3, the password presented
being 45235.
After remote disarming the corresponding notification will be
transmitted to authorized supervisors. It looks like DISARMED S,S… USER
NN (DESARMADO S,S… USARIO NN), where S,S… are the numbers of
loops having been remotely disarmed and the NN is 20 plus the number of
descriptor in panel configuration (see section 7.1.1.2) of supervisor that has
disarmed the loops.
8.6.4
Remote Relay Control
Remote Relay Control is enabled only if the corresponding relay is
configured with External Control type.
43
UO-4S GSM 4-ZONE ALARM PANEL
8.6.4.1 To Switch the Relay On
In order to switch the relay on, send a PXXXXXrNYtZ SMSmessage from your cell phone to UO-4S phone number, where
XXXXX is your remote control password,
N is the relay number (1 or 2),
Y is one for relay switching on and zero for relay switching off,
Z is the relay operating period in seconds, the maximum value being
255. If Z is missed or equal to zero then the operating period is
unlimited and the relay will be switched on until switching off
command having been received.
Example: the SMS-message P12345r21t4 will be considered as the
command to switch the second relay on for 4 seconds.
8.6.4.2 To Switch the Relay Off
In order to switch the relay off, send a PXXXXXrN0 SMS-message
from your cell phone to UO-4S phone number, where
XXXXX is your remote control password,
N is the relay number (1 or 2),
Example: the SMS-message P12345r10 will be considered as the
command to switch the first relay off.
8.6.5
Confirmation Sending
In order to send a confirmation of arming report receiving, send such
a string from your cell phone to UO-4S phone number:
PXXXXXk, where XXXXX should be replaced by legal password.
8.6.6
Remote UO-4S Time Setting
Send UO-4S a PXXXXXtHHMM SMS-message (where XXXXX is
your remote control password and HHMM is the required time value) from
your cell phone.
Example: the command P45235t1200 means the authorized instruction for
UO-4S to set current time in 12 hours 00 minutes, the password presented being
45235.
44
UO-4S
TROUBLESHOOTING
9
TROUBLESHOOTING
Use the Table 14 to resolve some problems during UO-4S operating.
Table 14: Problem resolving
Problem
READY indicator isn’t lit
after UO-4S powering up
Possible Cause
No utility voltage
SIM-card is not installed
within UO-4S.
PIN-Code Prompt
is enabled
GSM indicator flashes by
red or yellow eight times
per a second
Solution
Check the UO-4S power
supply connection
Make sure a SIM-card is
inserted within UO-4S
GSM-module
Disable PIN-Code
Prompt by means of a
cell phone
Check the antenna or
attach an external
antenna to UO-4S.
Communication with cell
phone operator is lost, or
level of signal received is Ensure signal level at
below the normal value UO-4S location is within
normal range by means
of a cell phone.
Check the antenna or
GSM communication lost attach an external
antenna to UO-4S.
SMS-messages fails to
transmit, with READY
indicator flashing
Incorrect SMS-centre
phone number
Enter the correct phone
number of SMS-centre in
accordance with cell
phone instructions
Deficit of personal
account balance
Liquidate a debt
45
UO-4S GSM 4-ZONE ALARM PANEL
10 MAINTENANCE
Be sure your UO-4S panel is fully operational by annually inspecting
and testing it as described below.
Do always take care of safety precautions discussed in section 6.1.
Study closely panel operating principles and rules presented in this manual
before testing.
In order to discover any defect and estimate panel technical condition
do the following:
1. Make the visual inspection of the panel. Ensure it has no
mechanical damages. Remove any dirt or dust if presented.
2. Inspect the conditions of electric wires, connection contacts and
panel attachment security.
3. Test the panel operability in according with technical algorithm
from section 10.1.
The inspection and testing have to be carried out at ambient conditions
as follows:
− Ambient temperature from 15 to 35ОС
− Relative humidity from 45 to 80% non-condensing
− Atmospheric pressure from 84 to 106.7 kPa
10.1 UO-4S Technical Testing Algorithm
WARNING! SHUT OFF UO-4S power supply before wires connecting
or disconnecting.
In order to test the panel, establish the test set up as shown in Figure
10-1.
The overall testing time doesn’t exceed 20 minutes.
Test UO-4S by doing the following:
1. Connect 8.2 kΩ resistors to the alarm loops.
2. Connect power supply to UO-4S and measure input current
rating by means of AV amperevoltmeter. Ensure the measured
value doesn’t exceed 80 mA.
3. Ensure READY indicator has lit within 1 minute after UO-4S
powering up (the external power voltage being out of 11 V – 15 V
range, READY indicator shall flash once every 2 seconds).
4. Program Master-Key (if not presented) and a TM key for all
alarm loop control as described in section 7.4.
46
MAINTENANCE
Touch Memory
Reader
GSM-module
LED
SIM-Card
Reader
SIM-Card
0B
TM
4
Internal Antenna
1
2
3
Tamper Switch
a
25
24
r
23
K3
22
K3
21
20
19
K2
K2
K1
GSM
READY
To External Antenna
UO-4S to PC Connecting Cable
UO-4S
To Siren
To Executive
Devices
К1
ШС4-
18
17
16
8.2 kOhm
ШС4+
ШС3-
15
14
8.2 kOhm
ШС3+
ШС2ШС2ШС2+
13
12
8.2 kOhm
ШС1ШС1+
0B
КЦН
0B
Кпит.
B
A
0B
12B
11
10
9
8
7
6
5
4
3
2
1
8.2 kOhm
1 kOhm
To +OC RIP-12
Output
RIP-12
PA1
0B
+12 B
Bank of
Resistance
Figure 10-1: UO-4S Testing Wiring Diagram
47
UO-4S GSM 4-ZONE ALARM PANEL
5.
6.
7.
8.
9.
10.
11.
12.
13.
14.
15.
16.
17.
18.
19.
20.
21.
22.
23.
24.
48
Configure all alarm loops as Intruder as described in chapter 7.
Connect a resistor bank into the first alarm loop and set 1.8 kΩ
resistance value.
Arm alarm loops. Ensure alarm loop #1 has entered in ARMING
FAILED status by observing indicator’s behavior.
Configure UO-4S relay types as Remote Control for relay #1 and
Lamp for relay #2, as described in chapter 7.
Disarm all alarm loops. Ensure all loops having entered
DISARMED status.
Set alarm loop #1 resistance to 2 kΩ.
Arm alarm loops and ensure their having entered ARMED status.
Inspect K2 contacts. They must be closed.
Disarm all alarm loops and set alarm loop #1 resistance to the
8.2 kΩ value.
Arm alarm loops. They must enter ARMED status.
Set alarm loop #1 resistance to the 17 kΩ value. Ensure the loop
having entered ALARM status.
Inspect K3 contacts. They must be closed.
Disarm loops. Set alarm loop #1 resistance to the 15 kΩ value.
Arm loops. They shall enter ARMED status.
Disarm loops. Set alarm loop #1 resistance to the 17 kΩ value.
Arm loops. Loop #1 shall enter ARMING FAILED status.
Disarm loops.
Repeat steps from 6 to 21 for loop#2, loop#3, and loop #4.
Switch relay #1 remotely by SMS sending (see section 8.6.4.1).
Ensure K1 contacts are closed.
UO-4S
MANUFACTURER DATA
11 MANUFACTURER DATA
ZAO NVP BOLID
#4, Pionerskaya street, Korolyov, Moscow Region, Russia, 141070
Tel/fax: +7 495 777 40 20, +7 495 516 93 72
E-mail: [email protected]
Web-site: http://www.bolid.com
49
UO-4S GSM 4-ZONE ALARM PANEL
Warranty
Manufacturer warrants its product to be in conformance with
specification under normal transportation, storage, mounting and
maintenance.
Manufacturer warrants UO-4S product to be free from defects in
materials and workmanship under normal use and service for 18 months
since putting it into operation, but no more than 24 months since acceptance
date below.
The reconservation period must not exceed 12 months.
In the event of in-warranty failure the failed UO-4S should be brought
back to the manufacturer supplied with its damage certificate describing the
defect and acceptance certificate below to validate the warranty status.
UO-4S GSM 4-Zone Alarm Panel
______________________________________________________________________________________________________________________
Product Designation
Serial Number
Produced, tested by quality control department in compliance with state
standards and specifications, and packed by NVP BOLID Company.
Q.C.
STAMP ____________________________ ____________________
Name
Date
50