1
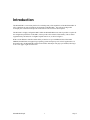
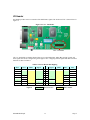
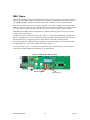
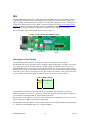
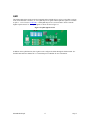
M5208EVB-RevB
32-bit Microcontroller
User Manual
Version 1.0
Intec Automation Inc.
2751 Arbutus Road
Victoria, BC V8N5X7
Canada
www.steroidmicros.com
Warranty
Intec Automation Inc. warrants the hardware components of this product to be free from defects in material
and workmanship. This warranty extends for a period of 90 days from the date of purchase. Any
component under warranty will be repaired or replaced at the sole discretion of Intec Automation Inc.,
without charge to the purchaser, providing that the return of the component or board is preauthorized by
Intec, that shipping is prepaid by the purchaser, and that Intec determines the defect is not a result of
misuse.
The components of this product are provided "as is" without warranty. The entire risk for the results and
performance of these components is assumed by the purchaser. Intec Automation Inc. does not warrant,
guarantee or make any representation regarding the use of this product.
No other warranties are made, expressly or implied, including, but not limited to, the implied warranties of
merchantability and suitability of products for a particular purpose. In no event will Intec Automation Inc.
be held liable for additional damages, including lost profits, lost savings or other incidental or
consequential damages arising from the use or inability to use Intec's products or the products resold by
Intec.
Disclaimers
Intec Automation Inc. reserves the right to make changes without notice, to any product, to improve
reliability, performance, capabilities, design or ease of use, or to reduce size or cost.
Intec Automation Inc. products may not be used as components in life support devices of any description.
M5208EVBUM.pdf
i
7-Sep-5
Safety Information
FCC Certification
This device complies with Part 15 of the FCC Rules. Operation is
subject to the following two conditions:
1) This device may not cause harmful interference, and
2) This device must accept any interference that may cause any undesired operation
This equipment has been tested and found to comply with the requirements of ETSI EN301 489-1 V1.4.1.
It bears the CE marking for sale and operation within Europe.
NOTE: This equipment has been tested and found to comply with the limits for a Class B digital device,
pursuant to part 15 of the FCC Rules. These limits are designed to provide reasonable protection against
harmful interference when the equipment is operated in a commercial environment. This equipment
generates, uses, and can radiate radio frequency energy and, if not installed and used in accordance with the
instruction manual, may cause harmful interference to radio communications. Operation of this equipment
in a residential area is likely to cause harmful interference in which case the user will be required to correct
the interference at his/her own expense.
IC Certification
Operation is subject to the following two conditions:
1) this device may not cause interference, and
2) this device must accept any interference, including interference that may cause undesired
operation of the device.
L'utilisation de ce dispositif est autorisée seulement aux conditions suivantes :
1) il ne doit pas produire de brouillage et
2) 2) l'utilisateur du dispositif doit être prêt à accepter tout brouillage radioélectrique reçu, même si
ce brouillage est susceptible de compromettre le fonctionnement du dispositif.
NOTE: The abbreviation, IC, before the registration number signifies that registration was performed
based on a Declaration of Conformity indicating that Industry Canada technical specifications were met. It
does not imply that Industry Canada approved the equipment.
Caution
CAUTION: This device is susceptible to electrostatic discharge (ESD) and surge phenomenon. Always use
ESD precautions when handling this device.
CAUTION: Changes or modifications to this equipment, not expressly approved by the manufacturer
could void the user's authority to operate the equipment.
M5208EVBUM.pdf
ii
7-Sep-5
Table of Contents
Warranty ............................................................................................................................ i
Disclaimers.......................................................................................................................... i
Safety Information ............................................................................................................ ii
FCC Certification............................................................................................................ ii
IC Certification ............................................................................................................... ii
Caution............................................................................................................................ ii
Table of Contents ............................................................................................................. iii
Glossary ............................................................................................................................. v
Nomenclature ................................................................................................................... vi
Introduction....................................................................................................................... 1
M5208EVB Modules......................................................................................................... 3
Power System.................................................................................................................. 4
Power Jumpers............................................................................................................ 5
Low Voltage Detection................................................................................................ 5
Reset................................................................................................................................ 6
Startup Configuration ................................................................................................. 6
Boot Select .................................................................................................................. 8
Clock Input...................................................................................................................... 9
Serial Ports .................................................................................................................... 10
Serial Debugging ...................................................................................................... 10
BDM/JTAG Port........................................................................................................... 11
JTAG_EN .................................................................................................................. 11
I/O Header..................................................................................................................... 13
DMA Timers................................................................................................................. 14
IRQ................................................................................................................................ 15
Interrupt Level and Priority...................................................................................... 15
Abort Button.............................................................................................................. 16
QSPI.............................................................................................................................. 17
I2C ................................................................................................................................. 18
M5208EVBUM.pdf
iii
7-Sep-5
Memory and Storage..................................................................................................... 19
Internal SRAM .......................................................................................................... 19
External SRAM.......................................................................................................... 19
External DDR SDRAM ............................................................................................. 19
External Flash........................................................................................................... 19
Programming Flash............................................................................................... 20
Running from Flash .............................................................................................. 20
Memory Mapping...................................................................................................... 21
Watchdog Timer ........................................................................................................... 23
Ethernet ......................................................................................................................... 24
Advanced Users ........................................................................................................ 24
ZigBee Capable Transceiver......................................................................................... 25
FCC Certification.......................................................................................................... 26
IC Certification ............................................................................................................. 26
Caution.......................................................................................................................... 26
Appendix A
Jumpers, Switches, Pinouts & Specifications ....................................... A
Appendix B M5208EVB Schematics & BoM ..............................................................B
Appendix C
dBUG Monitor......................................................................................... C
Appendix D
uClinux Commands................................................................................. D
Appendix E
uClinux Drivers.........................................................................................E
M5208EVBUM.pdf
iv
7-Sep-5
Glossary
BDM
Background Debug Mode. Mode. A non-intrusive method of taking control of the
MCF5208 through a debug program running on a host PC.
DCE
Data Communication Equipment.
DDR
Data Direction Register. A register whose bits correspond to the function of a set of
digital I/O pins. The convention on the M5208EVB is to use 0 for input, 1 for output.
DMA
Direct Memory Access. Ability to copy a block of data from one device to another
without the intervention of the CPU.
DTE
Data Terminal Equipment.
Duty Cycle
The fraction of high time of a PWM signal versus the period of the signal.
Eclipse
A multi-purpose, extensible integrated development environment.
GCC
GNU Compiler Collection. A public license GNU compiler.
GDB
GNU Debugger. A public license GNU debugger.
GPIO
General Purpose Input/Output. These are 3.3V level signals on the M5208EVB.
GPL
GNU General Public License.
Header
Single or double row of pins on a circuit board to which connectors may be attached.
IDE
Integrated Development Environment. An set of software tools that share a single
interface used for writing, compiling and debugging programs.
IRQ
Interrupt Request. The ability of a module or external pin to request servicing of the
interrupt controller. An IRQ stops the current execution of a program and jumps to a
piece of code found in the interrupt vector table.
LSB
Least Significant Byte.
MSB
Most Significant Byte.
PIT
Periodic Interrupt Timer. A timer that can generate interrupts at regular intervals.
PWM
Pulse Width Modulation. A pseudo-analog signal that is toggled at a high frequency. The
analog value between 0 and 3.3V is determined by the signal’s duty cycle.
WDT
Watchdog Timer. A timer that resets the MCF5208 if the running program gets caught in
an infinite loop or branches incorrectly.
M5208EVBUM.pdf
v
7-Sep-5
Nomenclature
Periodically, reference is made to entities in a generic manner using the italicized letter n to indicate that
there are many numbered entities with the same name. For example, DATn applies to all bits in the DAT
register.
The naming conventions used for signals are shown in Table 1.
Table 1: Signal Nomenclature
M5208EVBUM.pdf
Name
Type
Logic Value
Term
SIGNAL
Active High
0
1
Asserted
Negated
*SIGNAL
Active Low
0
Negated
1
Asserted
vi
7-Sep-5
Introduction
The M5208EVB is a convenient platform for evaluating many of the capabilities of the MCF5208 MPU. It
offers a head start in terms of hardware development around this MPU. The software packages that
accompany this evaluation board provide a head start in terms of software development.
The MC5208 is a highly configurable MPU. While the M5208EVB does not make it possible to explore all
the configuration possibilities of this MPU, it does provide a fair amount of functionality. This is further
supplemented by the inclusion of a ZigBee capable transceiver, as shown in Figure 1.
With a 10/100 Ethernet controller and the ability to interface to up to 256MB (not Mb) of fast DDR
SDRAM, the MCF5208 can support large operating systems and open up new software opportunities. To
demonstrate this, the M5208EVB is shipped with uClinux and sample web pages pre-installed, allowing it
to serve web pages “right out of the box”.
M5208EVBUM.pdf
1
1-Sep-5
Figure 1 – M5208EVB Capabilities
M5208EVBUM.pdf
2
1-Sep-5
M5208EVB Modules
The M5208EVB is made up of modules. Some modules correspond to on-chip ColdFire peripherals. Other
modules correspond to on-board peripherals and added features. These modules are:
•
Power System – +7-14VDC input, regulated on board to provide necessary processor and
peripheral voltages
•
Reset Control circuitry and reset configuration switches
•
Clock selection circuitry for on-board crystal, on-board oscillator or external oscillator
•
Serial module – 2 level translated serial ports
•
Background Debug Mode (BDM) port
•
I/O Header providing access to several MCF5208 signals for off board use
•
DMA Timer module
•
Interrupt Request Subsystem (IRQ)
•
QSPI module
•
I2C module
•
Memory – 2MB external flash, 32 MB external DDR SDRAM and a foot print for a 128KB
external SRAM
•
WatchDog Timer (WDT) module
•
Ethernet, PHY and RJ45 connector
•
ZigBee capable transceiver
•
Resident firmware (dBUG monitor)
•
Operating System (uClinux)
Some of these features are associated with connectors as shown Figure 1. This adds up to a rich assortment
of features.
M5208EVBUM.pdf
3
1-Sep-5
Power System
The center positive 5.5/2.1mm power jack for the M5208EVB accepts inputs ranging from +7V to +14V
DC, capable of at least 3 watts. A slider switch connects the power to the board. When this switch is in the
ON position power is connected to the board; otherwise all circuits on the board are isolated from the input
power. A resettable Polyswitch fuse protects the power supply against a short on the board. Two green
LEDs between the power connector and power switch indicate when the board is powered. The location of
these indicators is shown in Figure 2.
Figure 2: M5208EVB Power
Power
Indicators
Power
Connector
Power Switch
Table 2: M5208EVB Voltage Levels
Voltage Max Current Signal Name
3.3V
1A
EVDD
2.5V
500mA
SDVDD
1.5V
200mA
PLLVDD, IVDD
1.25V
VREF
Description
External I/O supply voltage.
External Bus supply voltage. Used by DDR SDRAM, flash and SRAM.
PLL and Internal Core supply voltage.
DDR reference voltage.
Figure 3: Power Test Points
GND test loop
GND test point
Power test points
M5208EVBUM.pdf
GND test loop
4
1-Sep-5
Each supply voltage can be measured at a labeled test point on the M5208EVBand Ground can be accessed
at 2 test clips and one test point as shown in Figure 3.
Power Jumpers
Several jumpers make it possible to measure the current draw to the various MCF5208 processor power
inputs or to isolate them from the power supplies. These jumpers are listed in Table 3.
Figure 4: Power Jumpers
Power Jumpers
Table 3: Power Jumper Descriptions
JP7
ON
Connect Core, PLL filter to 1.5V
JP8
OFF
ON
OFF
Disconnect Core, PLL filter from 1.5V
Connect Core to 1.5V (w/ JP7 ON)
Disconnect Core from 1.5V
JP9
ON
Connect MPU I/O rail to 3.3V
JP10
OFF
ON
OFF
Disconnect MPU I/O rail from 3.3V
Connect External Bus to 2.5V
Disconnect External Bus from 2.5V
All the power jumpers are described in Appendix A and on Sheet 12 of the M5208EVB schematic.
Low Voltage Detection
The ColdFire5208 processor does not have internal low-voltage detection circuitry to detect intermittent
power levels. The voltage supervisor on the reset debounce circuit (Sheet 11 of the schematic) serves as a
voltage supervisor that resets the processor if the external voltage (3.3V) drops below 3.15V.
WARNING:
To avoid damage to the M5208EVB, only attach a coaxial center positive (2.1 mm) plug.
Draw from any power pin on a header to an external circuit, in excess of 100ma, may damage the board.
M5208EVBUM.pdf
5
1-Sep-5
Reset
There are 3 ways to reset the M5208EVB:
Power-on reset – accomplished by power cycling the board: switch the power switch to the OFF
position then back to the ON position or remove and reconnect the power cable. The contents of all
volatile memory (iRAM and SDRAM) will be lost.
External reset – asserted by pressing the Reset button or by issuing a reset command through the
BDM pod using software on the PC. The contents of volatile memory are preserved.
Software reset – invoked with the ‘reset’ command to dBUG monitor, the ‘reboot’ command in
uClinux, or by setting bit 7 in the RCR register (see MCF5208 Reference Manual, “Chapter 10 Reset
Controller Module”). The contents of volatile memory are preserved.
In all 3 cases, when the board is reset, all registers are reset to their default state.
Figure 5: Reset Signal and Switch Locations
*RSTI
test point
*RCON
Jumper
(JP5)
*RSTOUT
test point
Reset LED
Power switch
Reset button
*RCON Switch
(SW1)
Startup Configuration
The MCF5208 configuration depends on 9 signals: *RCON, D9 and D[7:1] which are sampled when the
MPU comes out of reset. When *RCON is asserted (the shunt on JP5 is on), the MCF5208 reads its
configuration options from the data signals which are driven high or low by the 8 rocker switches on SW1.
Configuration options are shown in Table 4. If *RCON is negated (JP5 OFF), the MCF5208 takes the
default reset configuration values shown in Table 5.
M5208EVBUM.pdf
6
1-Sep-5
Table 4: RCON Mode Configuration Selection (*RCON = 0 Å JP5 ON)
Selection
Configuration
SW1-1
PLL Mode
OFF
166.67MHz Core bus, 83.33MHz External Bus operation
ON
88MHz Core bus, 44MHz External Bus operation (Note 1)
SW1-2
Oscillator Mode
OFF
Crystal oscillator mode
ON
SW1-3
Oscillator bypass mode
SW1-4 Boot Port Size
OFF
OFF
ON
ON
OFF
ON
OFF
ON
16-bit port
32-bit port
32-bit port
8-bit port
SW1-5
Output Pad Drive Strength
OFF
High drive strength
ON
SW1-6
Low drive strength
LIMP Mode
OFF
Normal operation; PLL drives internal clocks.
ON
LIMP mode; low-power clock divider drives internal clocks.
SW1-7
Oscillator Frequency Select
OFF
16MHz is used as input to processor
ON
SW1-8
16.67MHz is used as input to processor
Chip Select Configuration
OFF
A[23:22] = A[23:22]
ON
A[23:22] = *FB_CS[5:4]
NOTE: Default setting for each switch is OFF
Table 5: Default RCON Values (*RCON = 1; Å JP5 OFF)
Selection
Default Mode
PLL Mode
Oscillator Mode
Boot Port Size
Output Pad Drive Strength
LIMP Mode
Oscillator Frequency Select
Chip Select Configuration
88MHz Core bus, 44MHz External Bus operation (Note 1)
Crystal oscillator mode
32-bit port
Low drive strength
Normal operation; PLL drives internal clocks.
16MHz is used as input to processor
A[23:22] = A[23:22]
Note 1: Caution! Loss of Functionality.
Running the PLL at 88/44MHz will run the DDR out of spec. The DDR will be inaccessible under this
configuration.
M5208EVBUM.pdf
7
1-Sep-5
Boot Select
This jumper determines whether the dBUG monitor executes a program in flash, or, whether dBUG
remains as the only active program.
When the M5208EVB powers on, dBUG monitor immediately initializes the board. Then it looks to the
BOOTSEL signal to determine its behavior. BOOTSEL is tied to JP3. If BOOTSEL is asserted (JP3 is ON)
and the board’s Autorun parameter is set, then dBUG monitor will run the program it has saved in flash. By
default this program is uClinux, but can be replaced with any user program. If BOOTSEL is negated (JP3 is
OFF), then dBUG monitor will present the dBUG prompt at the console and await user input.
Figure 6 - Boot Select Jumper
BOOTSEL
(JP3)
M5208EVBUM.pdf
8
1-Sep-5
Clock Input
There are 3 options for providing the clock input to the MCF5208. Table 6 shows valid combinations of
settings for SW1-2, JP5, JP11 and JP12 to select the clock input (Figure 7), as shown in Table 6.
Figure 7: Clocking Selection
Clock Select
Jumpers
PLL
Disable
Table 6: Clock Source Selection
SW1-2
JP5
JP11
OFF
ON
ON
OFF
ON
ON
ON
1-2
1-2
JP12 Clock Selection
1-2
1-2
2-3
2-3
16MHz Crystal
16MHz Crystal
16MHz Oscillator
External Oscillator
Warning! Using any combination of settings not included in this table can damage the PLL circuit on the
MCF5208. Ensure that only these combinations are used when power is applied to the board.
M5208EVBUM.pdf
9
1-Sep-5
Serial Ports
The M5208EVB has two COM ports with RS232 level signals. They normally connect to a host PC.
Figure 8: M5208EVB Serial Ports
COM1
COM2
COM1 is specifically used for serial debugging a user program with the dBUG monitor or, for uClinux
terminal.
COM2 is available for user I/O and for redirecting console I/O during a serial debugging session. The
female DB9 serial connectors have standard DCE pinouts and connect directly to a DTE device such as a
PC. There are no hardware handshaking signals on COM1 or COM2.
COM3 (UART2) signals are available on CN1. The Tx and Rx signals are multiplexed with TIN0 and
TOUT2, respectively. See I/O Header and “Chapter 24: UART Module” of the MCF5208 Reference
Manual for more details.
Serial Debugging
Serial debugging requires the use of 2 COM ports if the user program contains any console I/O (i.e. printf
or getc). This is because the serial dBUG monitor ties up COM1and console I/O is typically redirected to
COM2.
M5208EVBUM.pdf
10
1-Sep-5
BDM/JTAG Port
While serial debugging using the on-board dBUG monitor is adequate for many applications, Background
Debug Mode (BDM) debugging makes it possible for a BDM debugger to have total control of the
processor, even after a program has crashed. BDM debugging is able to monitor the processor status at any
time, without interfering with the processor execution. If JTAG is enabled, the JTAG signals from the
MCF5208 come out to the BDM header.
Figure 9: CN2 – BDM Port
Table 7: CN2 – BDM Port Signals
Direction Signal
GND
GND
IN
*RSTI
3V3
GND
OUT
PST2
OUT
PST0
OUT
DDATA2
OUT
DDATA0
GND
1V5
Pins
1 2
3 4
5 6
7 8
9 10
11 12
13 14
15 16
17 18
19 20
21 22
23 24
25 26
Signal Direction
*BKPT
IN
DSCLK
IN
TCLK
IN
DSI
IN
DSO
OUT
PST3
OUT
PST1
OUT
DDATA3
OUT
DDATA1
OUT
GND
PSTCLK
OUT
*TA
IN
Pin 25 on the BDM header is connected to 1V5 through JP2, which is fitted by default. This jumper is
required for some of the legacy BDM pods that connect pins 9 & 25 of the BDM interface internally. More
recent debug pods support both core & I/O voltages. The BDM pod supplied with the M5208EVB supports
both voltages and requires JP2 to be fitted.
JTAG_EN
J1 is a 2-position shorting pad for a 0 ohm 0603 resistor (Figure 10). By default pads 1-2 are shorted,
enabling BDM mode on the processor. This configures all the signals on the BDM header, CN2, with their
BDM functions as described in “Chapter 26 Debug Module” of the MCF5208 Reference Manual. In BDM
M5208EVBUM.pdf
11
1-Sep-5
mode, JP1 should be fitted across pins 1-2 to connect TCLK/PSTCLK, configured as PSTCLK, to pin 24 of
CN2.
Figure 10: BDM – JTAG Set Up for BDM
PSTCLK
To CN2.24
Select
BDM
The BDM header also serves as a port for JTAG signals if the 0 ohm resistor on J1 is soldered across pads
2-3. “Chapter 27 IEEE 1149.1 Test Access Port (JTAG)” of the MCF5208 Reference Manual describes the
functions of the JTAG signals. In JTAG mode, JP1 should be fitted across pins 2-3 to connect
TCLK/PSTCLK, configured as TCLK to pin 6 of CN2.
Figure 11: BDM – JTAG Set Up for JTAG
TCLK
To CN2.24
Select
JTAG
M5208EVBUM.pdf
12
1-Sep-5
I/O Header
One header provides access to a number of the MCF5208’s signals. The location of CN1 is shown below in
Figure 12.
Figure 12: CN1 – I/O Header
CN1 – I/O Header
CN1 is a 2x8 double row header that provides access to the DMA timer, QSPI, IRQ, and I2C signals. All
these signals can also be configured as general purpose I/O. A mapping of these signals and their associated
functions is shown in Table 8.
Table 8: CN1 I/O Header Pin Mapping
Alt 2
Alt 1
GPIO
-
-
U2TXD
*U2RTS
QSPI_CS0
-
DT0OUT
DT2OUT
*DREQ0
I2C_SDA
DT0IN
U2RXD
-
-
Signal
GPIO
1 2
3V3
GND
3 4
PTIMER0
DT0IN
DT1IN
PTIMER1
5 6
PTIMER2
DT2IN
DT3IN
PTIMER3
7 8 QSPI_CLK PQSPI0
PIRQ4
*IRQ4
PQSPI1 QSPI_DOUT 9 10 QSPI_DIN PQSPI2
11 12
PUARTL3
U0CTS
U1CTS
PUARTL7
PFECI2C0 I2C_SDA 13 14 I2C_SCL PFECI2C1
-
Legend:
M5208EVBUM.pdf
Signal
3V3
15 16
GND
Special Function
13
-
Alt 1
Alt 2
-
-
DT1OUT
U2RXD
DT3OUT *U2CTS
I2C_SCL
*DREQ0 *U2CTS
DT1IN QSPI_CS1
U2TXD
-
-
GPIO SIGNAL
1-Sep-5
DMA Timers
There are 4 32-bit DMA Timers on the MCF5208. Each timer is associated with a single input capture (IC)
signal and a single output compare (OC) signal. The two signals are multiplexed onto a single pin on the
196 MAPBGA package, so only one function, either DTnIN or DTnOUT, can be enabled at a time.
The tic rate for each timer can be set, through its prescalar, to a frequency ranging from 20.26 KHz to 83
MHz. The timers can operate in a free-run mode where the timer counts up to 0xFF FF FF FF then wraps to
0, or they can run in restart mode where the timer will reset to 0 once the compare value is reached.
Each DMA Timer module can be configured to fire an interrupt when an input event (IC) or a reference
compare match is detected (OC).
The DMA Timer pins are shown in blue on CN1 in Figure 13. They can be independently configured as
GPI/O. Configuring a pin for I/O will disable any timer functionality associated with the pin, but will not
affect the timer itself. Configuring a pin for its timer function will disable its GPI/O function.
When timer signals are configured as digital outputs or as timer outputs, they can be connected to LEDs
through jumpers JP13 – JP16. These jumpers are shown in Figure 13.
As shown in Table 8, pins 3 – 6 on CN1 are the DMA Timer pins. A full description of the functions of
these signals is in MCF5208 Reference Manual Ch. 22: DMA Timers.
Figure 13: DMA Timer LED Locations
GPIO/Timer LEDs
M5208EVBUM.pdf
14
Timer Jumpers
1-Sep-5
IRQ
The MCF5208 EPORT module has 3 signals (IRQ1, IRQ4 and IRQ7) that can be individually configured
as digital inputs or outputs or they can be configured to be edge or level sensitive interrupt signals. If a
signal is configured for edge detection, it can detect on a rising edge, falling edge or both. All IRQ pins are
configured as digital input out of reset. *IRQ1 is used as in interrupt from the MC13192 ZigBee Capable
Transceiver. IRQ7 is connected to the Abort button on the M5208EVB. When the board first starts up, the
dBUG monitor configures *IRQ7 as a falling edge interrupt. This leaves *IRQ4 for user control.
The location of the Abort switch and *IRQ4 pin is shown in Figure 14.
Figure 14: Abort Switch and *IRQ4 Locations
Abort Button
*IRQ4
Interrupt Level and Priority
An understanding of the interrupt level and priority scheme on the MCF5208 can be helpful.
The MCF5208 has sources of interrupts. Each is assigned a number ranging from 1 for IRQ1 to 62 for buss
error. These are hard wired. With the exception of the IRQ signals, each interrupt source (eg. source 4,
PIT0/PCSR0[PIF] PIT interrupt flag) can be assigned an interrupt level, 1 being the lowest level, 7 being
the highest (serviced first). Any number of interrupts can be set to the same level. When multiple interrupts
at the same level fire, they are processed in reverse order of their source number. That is, the lowest source
gets serviced last. And, the IRQ signals correspond to the lowest sources, as shown in Table 9.
Table 9: IRQ Pin Priority
Signal Source/Priority
*IRQ1
1
*IRQ4
2
*IRQ7
3
This interrupt scheme can have interesting side effects. For instance, in the [absurd] case where the
Ethernet interrupts were set to level 7, the level 7 interrupt fired by pressing the Abort button would not be
serviced until the CPU had finished servicing the Ethernet interrupts.
dBUG monitor sets the *IRQ7 level to level 7. Internal interrupt sources should not be set to level 7 or the
Abort functionality of dBUG monitor will be compromised.
The MCF5208’s interrupt scheme is covered in great detail in Freescale’s MCF5208 Reference Manual Ch.
14 – Interrupt Controller Module and Ch. 15 – Edge Port Module.
M5208EVBUM.pdf
15
1-Sep-5
Abort Button
When this tactile switch is pressed, the *IRQ7 signal is asserted. When the M5208EVB is running under
control of the dBUG monitor, a level 7 interrupt will be triggered. The dBug monitor will terminate the
user program and the CPU context will be displayed on the host PC, followed by the dBug prompt. This
assumes that the M5208EVB is connected serially to a host PC running a serial terminal program such as
HyperTerminal.
uClinux does not implement the abort functionality. However this button can be used as a general purpose
input for user interaction with an application.
This signal is debounced and is held low for up to 700ms after the button is released.
M5208EVBUM.pdf
16
1-Sep-5
QSPI
The QSPI module allows high-speed serial communication with SPI devices such as a serial flash, real time
clock, AtoD and DtoA converters, etc. Two QSPI chip select signals and the QSPI bus signals are available
on pins 8 – 12 on CN1 (See I/O Header). A third QSPI chip select is used on-board to interact with the
ZigBee capable transceiver. The QSPI signals are shown in blue in Figure 15.
Figure 15: QSPI Signals on CN1
In addition to the QSPI function, these signals can be configured as GPIO through the GPIO module. See
the MCF5208 Reference Manual Ch 13: General Purpose I/O Module for more information.
M5208EVBUM.pdf
17
1-Sep-5
I2C
The I2C module is 2-wire serial bus used for communication with I2C devices serial flash, real time clock,
etc. The I2C signals, SDA and SCL are brought out to pins 13 and 14 on CN1. These signals are configured
through the I2C module on the MCF5208. These signals are shown in blue in Figure 16.
Figure 16: I2C Signals on CN1
M5208EVBUM.pdf
18
1-Sep-5
Memory and Storage
The M5208EVB has 4 types of memory available to the user:
•
16KB Internal (on-chip) SRAM
•
128KB External SRAM (optional)
•
32MB External DDR SDRAM
•
2MB External Flash
Figure 19 shows the memory mapping of these memory blocks. All the external memory devices run and
interface at 2.5V. This allows a single bus to interface all devices without the need for buffers.
Internal SRAM
The MCF5208’s 16KB on-chip SRAM is fast single-cycle memory making it ideal for the user program
stack. dBUG monitor initially maps the internal SRAM to 0x80 00 00 00.
External SRAM
Pads for a 2.5V 64K x 16-bit SRAM (IDT IDT71T016SA12PH) are located beneath the M5208EVB. This
part can be attached for benchmarking purposes. It is driven by *FB_CS1.
External DDR SDRAM
The M5208EVB has a fast 16M x 16-bit DDR SDRAM for both data storage and program execution.
Typically the user program is loaded from flash into SDRAM and run from SDRAM. The program can also
be loaded through a serial port or Ethernet.
External Flash
External flash consists of a 2MB Am29BDD160G. It is selected by *FB_CS0. This 2.5V flash is organized
as 512K x 16-bits. It is made up of 8 x 8KB sectors, 30 x 64KB sectors and 8 x 8KB sectors. A sector is the
smallest block of memory that can be erased.
The M5208EVB’s external flash is shipped pre-loaded with the dBug monitor, the uClinux kernel and
uClinux services. On start up, the dBUG monitor is set up to check if there is an executable in flash. If so, it
starts execution of this program, which, as shipped, would be uClinux. As shipped, the flash memory map
looks like Figure 17.
uClinux is the default user program shipped with the M5208EVB. A different user program may be saved
into external flash using dBUG monitor at the expense of overwriting uClinux. However uClinux may be
restored painlessly into external flash at anytime by reprogramming the m5208evb.s19 flash image with
CFflasher. Getting a program to run under uClinux is done through the RC file, which is analogous to a
DOS Autoexec.bat file.
M5208EVBUM.pdf
19
1-Sep-5
Programming Flash
A user program can be programmed into flash using several techniques. The dBUG monitor supports
saving a program compiled to run from flash with the ‘dl’ command. See Appendix C - dBUG Monitor for
a description of this and other useful dBUG commands.
Figure 17: 2MB Flash with uClinux (as Shipped)
0x00000000
dBUG monitor
:
0x0003FFFF
0x00040000
uClinux JFFS2 File System
:
(on EVB as shipped)
0x000DFFFF
Compressed uClinux kernel & services 0x000E0000
:
(linked for DDR SDRAM)
0x001FFFFF
dBUG monitor’s ‘dfl’ command allows the user to save an executable file to flash. In order to execute this
file, dBUG first copies it to DRAM and then runs it from there. Consequently, the program must be linked
to run out of DRAM. With this command, a flash program is stored at the top of flash, just below a 32-byte
program information block which allows dBUG to find the code, come time to execute it. The mapping of
a user program in flash is shown in Figure 18.
The total space consumed by any program is the size of the program + 32 bytes rounded-up to the nearest
64K sector boundary.
Figure 18: 2MB Flash with User Program
dBUG monitor
0x00000000
:
0x0003FFFF
Data storage
0x00040000
:
0x000(X-1)FFFF
User Program
0x000X0000
:
(linked for DDR SDRAM)
0x001FFFDF
Program Info Block
0x001FFFE0
(32 bytes)
0x001FFFFF
Running from Flash
The ‘gfl’ command will execute a program saved in external flash using the ‘dfl’ command. The program
can also be run automatically when the board resets by setting the Autorun parameter to ON in dBUG. If
Autorun is set and JP1 is on, dBUG monitor will attempt to run a program in flash as directed by the
program information block at the top of flash.
M5208EVBUM.pdf
20
1-Sep-5
If Autorun has been set and the user wishes not to have the program run automatically, remove the jumper
from JP1. Under this configuration, dBUG will always boot to the dBUG prompt. Table 10 shows the
possible settings and their actions out of reset.
Because the program is copied to DRAM and executed from there, it must be linked for execution from
DRAM.
Table 10: dBUG Boot Configuration
Action
Boot to dBUG>
Boot to dBUG>
Autorun user program
(typically uClinux)
JP3
OFF
ON
Autorun
OFF
ON
ON
As shipped, the user program on the M5208EVB is uClinux. When JP1 is fitted, dBUG monitor will load
uClinux into DDR SRAM and run it. uClinux can be configured to load a user program saved in the flash
file system. “/etc/rc” is a script that is executed upon booting uClinux. This script should contain the path
and name of the program to be run automatically. Initially, “/etc/rc” contains “/usr/interactive_demo”
which serves a number of web pages including an interactive page that allows the user to interact with the 4
timer LEDs on the M5208EVB.
Memory Mapping
The M5208EVB memory map is shown below in Figure 19. Any memory access to a location not
specified in Figure 19 is an undefined operation and may result in a bus access error and should be avoided.
This memory mapping is dependent on a user program being linked with the Intec memory mapping and
using the dBUG monitor.
M5208EVBUM.pdf
21
1-Sep-5
Figure 19: dBUG M5208EVB Memory Map
External Flash (2MB)
Vector Table
0x00000000
*FB_CS0
:
0x00003FFF
Parameters
0x00004000
:
0x00005FFF
0x00006000
dBUG Code + Data
:
0x0003FFFF
Flash File System
0x00040000
and uClinux
:
0x001FFFFF
0x00200000
:
0x0FFFFFFF
Optional
0x10000000
External SRAM (128KB)
:
*FB_CS1
0x1001FFFF
0x10020000
:
0x3FFFFFFF
DDR SDRAM (32MB)
Vector Table + dBUG Data (Copied at boot)
SD_CS
64K dBUG heap
0x40000000
:
:
:
3K dBUG Stack (HEAP_END + 3K)
:
Unused
0x4001FFFF
User Code
0x40020000
User Data
:
Unused
0x41FFFFFF
0x42000000
:
0x7FFFFFFF
Fast
0x80000000
Internal SRAM (16K)
:
User Stack (Typical)
0x80003FFF
0x80004000
:
0xFBFFFFFF
Peripheral Registers
See Freescale MCF5208 Reference
Manual for more information.
0xFC000000
:
0xFFFFFFFF
M5208EVBUM.pdf
22
1-Sep-5
Watchdog Timer
The MCF5208 has a Watchdog Timer (WDT) which can be used to reset the board in the event a program
has entered an unexpected state. When the watchdog timer is enabled, it must be serviced periodically to
ensure that it does not time out and reset the MPU. Servicing consists of writing a 0x5555 and 0xAAAA
sequence to the Watchdog Service Register. Once enabled, the watchdog timer cannot be disabled without
resetting the MPU.
M5208EVBUM.pdf
23
1-Sep-5
Ethernet
The M5208EVB supports 10/100 Ethernet through a brand new, soon to be released PHY chip from
National Semiconductor, the DP83848. It can auto-negotiate connection speed and can switch its Tx and
Rx lines to suit the polarity of the connection (Auto-MDIX feature). Crossover Ethernet cables are never
required. The RJ45 connector has 2 LEDs which convey information, as summarized in Table 11.
Table 11: Ethernet Indicator LEDs
LED
Speed
Link/Traffic
State
On
Off
On
Blink
Off
Significance
100Mbps
10Mbps
Good link
Traffic
No link
Figure 20: Ethernet Connector
Speed LED
National Semi
DP83848 PHY
Link/Traffic LED
Advanced Users
The Ethernet PHY chip on board is configured to support Auto-negotiation of 10 and 100 base-T speeds,
full-duplex and half-duplex connections. The MII interface to the PHY chip is connected to the MCF5208
MII serial management allowing the MPU complete control over the PHY. The PHY has an address of
0x01. For further information about the PHY and its internal registers, see the National Semiconductor
DP83848 PHY Data Sheet. The physical Ethernet interface (PHY) can be accessed under uClinux using a
command line tool called “mii-tool”.
M5208EVBUM.pdf
24
1-Sep-5
ZigBee Capable Transceiver
A MC13192 ZigBee Capable Transceiver chip and printed circuit board antenna have been integrated on
the M5208EVB to demonstrate the ease of integration of this ZigBee capable transceiver with the
MCF5208.
Figure 21: ZigBee Capable Transceiver Location
The MC13192 interfaces to the MCF5208 via the QSPI lines and some GPIO signals. The additional GPIO
are required to realize the full functionality of the MC13192 chip. The signal connections are shown below.
Table 12: MC13192 Connections
M5208EVBUM.pdf
MCF5208 Signal
MC13192 Signal
QSPI_CLK
SPICLK
QSPI_DIN
MISO
QSPI_DOUT
MOSI
U0RTS/QSPI_CS0
RTXEN
U1RTS/QSPI_CS1
*ATTN
QSPI_CS2
*CE
*RSTOUT
*RST
*IRQ1
*IRQ
*TS
GPIO1/OUT_OF_IDLE
*FB_CS3
GPIO2/CRC_VALID
25
1-Sep-5
For information on communicating with the MC13192, refer to the MC13192 Data Sheet and MC13192
Reference Manual. The SMAC source code shows using the MC13192 transceiver in a simple application.
FCC Certification
This device complies with Part 15 of the FCC Rules. Operation is
subject to the following two conditions:
3) This device may not cause harmful interference, and
4) This device must accept any interference that may cause any undesired operation
This equipment has been tested and found to comply with the requirements of ETSI EN301 489-1 V1.4.1.
It bears the CE marking for sale and operation within Europe.
NOTE: This equipment has been tested and found to comply with the limits for a Class B digital device,
pursuant to part 15 of the FCC Rules. These limits are designed to provide reasonable protection against
harmful interference when the equipment is operated in a commercial environment. This equipment
generates, uses, and can radiate radio frequency energy and, if not installed and used in accordance with the
instruction manual, may cause harmful interference to radio communications. Operation of this equipment
in a residential area is likely to cause harmful interference in which case the user will be required to correct
the interference at his/her own expense.
IC Certification
Operation is subject to the following two conditions:
3) this device may not cause interference, and
4) this device must accept any interference, including interference that may cause undesired
operation of the device.
L'utilisation de ce dispositif est autorisée seulement aux conditions suivantes :
3) il ne doit pas produire de brouillage et
4) 2) l'utilisateur du dispositif doit être prêt à accepter tout brouillage radioélectrique reçu, même si
ce brouillage est susceptible de compromettre le fonctionnement du dispositif.
NOTE: The abbreviation, IC, before the registration number signifies that registration was performed
based on a Declaration of Conformity indicating that Industry Canada technical specifications were met. It
does not imply that Industry Canada approved the equipment.
Caution
CAUTION: This device is susceptible to electrostatic discharge (ESD) and surge phenomenon. Always use
ESD precautions when handling this device.
CAUTION: Changes or modifications to this equipment, not expressly approved by the manufacturer
could void the user's authority to operate the equipment.
M5208EVBUM.pdf
26
1-Sep-5
If this equipment does cause harmful interference to radio or television reception, which can be determined
by turning the equipment off and on, the user is encouraged to try to correct the interference by one or more
of the following measures:
•
Relocate the M5208EVB and reorient serial or Ethernet cables attached to it.
•
Reorient or relocate the receiving antenna.
•
Increase the separation between the M5208EVB and receiver.
•
Power the M5208EVB from an outlet that is on a different circuit than the receiver.
M5208EVBUM.pdf
27
1-Sep-5
Appendix A
Jumpers, Switches,
Pinouts &
Specifications
M5208EVBUM.pdf
A
1-Sep-5
Jumpers
Table A-1 lists each jumper and its function on the M5208EVB. The default position of the jumper is
shown in bold. A quick reference of the jumper functions is silk screened onto the bottom side of the board.
Table A-1: Jumper Settings and Function
Jumper
JP1
JP2
JP3
JP4
JP5
JP6
JP7
JP8
JP9
JP10
JP11
JP12
JP13
JP14
JP15
JP16
Settings
1-2
2-3
ON
OFF
ON
OFF
ON
OFF
ON
OFF
ON
OFF
ON
OFF
ON
OFF
ON
OFF
ON
OFF
1-2
2-3
1-2
2-3
ON
OFF
ON
OFF
ON
OFF
ON
OFF
Function
Connect TCLK/PSTCLK to pin 24 of BDM CN2
Connect TCLK/PSTCLK to pin 6 of BDM CN2
Connect 1.5V to pin 25 of BDM CN2
Disconnect 1.5V from pin 25 of BDM CN2
Boot uClinux (or user program)
Boot dBUG
Disable TEST mode
Enable TEST mode
Enable reset configuration
Disable reset configuration
DDR mode
SDR mode
Connect Core, PLL filter to 1.5V
Disconnect Core, PLL filter from 1.5V
Connect Core to 1.5V (w/ JP7 ON)
Disconnect Core from 1.5V
Connect MPU I/O rail to 3.3V
Disconnect MPU I/O rail from 3.3V
Connect MPU External Bus to 2.5V
Disconnect MPU External Bus from 2.5V
Clock source select: Oscillator
Clock source select: External oscillator (CN7)
Clock source select: Crystal
Clock source select: Oscillator
Enable/Disable TOUT3 LED
Disable TOUT3 LED
Enable/Disable TOUT2 LED
Disable TOUT2 LED
Enable/Disable TOUT1 LED
Disable TOUT1 LED
Enable/Disable TOUT0 LED
Disable TOUT0 LED
JP1 – Selects either pin 6 or pin 24 of the CN2 to be connected to the TCLK/PSTCLK signal from the
M5208EVB. TCLK is used when JTAG mode is enabled; PSTCLK is used when BDM mode is enabled.
(see JTAG_EN).
JP2 – This jumper is required for some of the legacy BDM cables that connect pins 9 & 25 of the BDM
interface internally. More recent cables support both core & I/O voltages. Please check with your BDM
cable supplier. The BDM cable supplied with the M5208EVB supports both core and I/O voltages and
requires JP5 to be fitted.
M5208EVBUM.pdf
A-2
1-Sep-05
JP3 – When fitted this jumper causes dBUG monitor to automatically load a program and run it. Typically
this program is uClinux (as shipped). See Appendix C and the SBCTools Programmer Reference for more
information on the Autorun feature of dBUG monitor. When this jumper is open, dBUG monitor will not
run any user program and instead display the dBUG prompt on the terminal and wait for input.
JP4 – When fitted this jumper disables the factory test mode of the MCF5208. This jumper is normally
always fitted.
JP5 – When fitted this jumper asserts the *RCON signal and causes the MCF5208 to load the CCR register
based on the signals D9, D[7:1]. These signals are conditioned out of reset by the DIP switch. See the
MCF5208 Reference Manual, (Ch 9 Chip Configuration Register) for more information on the reset
configuration.
JP6 – This jumper selects between DDR and SDR mode for the SDRAM module. Should always be fitted
to support DDR mode.
JP7 – When fitted connects 1.5V to the PLL filter and to JP8.
JP8 – When fitted connects the processor core voltage to 1.5V. JP7 must also be fitted.
JP9 – When fitted connects the processor I/O voltage to 3.3V. Also connects JP11 to 3.3V.
JP10 – When fitted connects the processor external bus voltage to 2.5V.
JP11 – This jumper selects between an external oscillator and an off-board frequency source. This jumper
is only relevant is JP15 is in position 1-2. By default it is set to position 2-3 to
JP12 – This jumper selects between the on board crystal or an external oscillator. It is in position 1-2 by
default to select the on-board crystal.
JP13 – This jumper connects TOUT3 to its LED. It is normally fitted.
JP14 – This jumper connects TOUT2 to its LED. It is normally fitted.
JP15 – This jumper connects TOUT1 to its LED. It is normally fitted.
JP16 – This jumper connects TOUT0 to its LED. It is normally fitted.
M5208EVBUM.pdf
A-3
1-Sep-05
Switches
Several switches on the M5208EVB are used to control the board’s configuration and operation. The
switches are listed in Table A-2.
Table A-2: Switch Functions
Switches
Power Switch
Function
Isolates M5208EVB from power supply.
Asserts the *RSTI signal forcing the MCF5208 and peripheral systems
Reset Button
to reset.
Asserts the *IRQ7 signal causing an interrupt in the MCF5208. This
Abort Button
interrupt is handled by dBUG monitor.
Configuration Switch Determines the out of reset configuration of the MCF5208.
Reset Configuration Switches
The DIP switch on the M5208EVB determines the MCF5208’s personality out of reset when the *RCON
signal is held low (JP5 is fitted).
Table A-3: Reset Configuration Switch Functions
SW1-1
PLL Mode
OFF
166.67MHz Core bus, 83.33MHz External Bus operation
ON
88MHz Core bus, 44MHz External Bus operation (Note 1)
SW1-2
Oscillator Mode
OFF
Crystal oscillator mode
ON
Oscillator bypass mode
SW1-3 SW1-4 Boot Port Size
OFF
OFF
ON
ON
OFF
ON
OFF
ON
16-bit port
32-bit port
32-bit port
8-bit port
SW1-5
Output Pad Drive Strength
OFF
High drive strength
ON
Low drive strength
SW1-6
LIMP Mode
OFF
Normal operation; PLL drives internal clocks.
ON
LIMP mode; low-power clock divider drives internal clocks.
SW1-7
Oscillator Frequency Select
OFF
16MHz is used as input to processor
ON
16.67MHz is used as input to processor
SW1-8
Chip Select Configuration
OFF
A[23:22] = A[23:22]
ONN
A[23:22] = *FB_CS[5:4]
M5208EVBUM.pdf
A-4
1-Sep-05
LEDs
The LEDs on the M5208EVB indicate the status of the board and can be used by user programs as
indicators. The LEDs’ colours and their functions are listed below.
Table A-4: LED Functions
Signal
2.5V
3.3V
LED Colour
Green
Green
Description
External Bus power indicator
I/O power indicator
*RSTOUT
Red
Reset indicator: LED will light when the board is resetting.
*IRQ7 (Abort Button)
TOUT3
TOUT2
TOUT1
TOUT0
Red
Amber
Amber
Amber
Amber
Abort indicator: LED will light when *IRQ7 is asserted.
Timer/GPIO LED: LED off = low, LED on = high
Timer/GPIO LED: LED off = low, LED on = high
Timer/GPIO LED: LED off = low, LED on = high
Timer/GPIO LED: LED off = low, LED on = high
Electrical Specifications
The maximum source/sink current on I/O varies depending on the pin it is attached to. Table A-5 shows
the maximum source/sink current on the I/O header by pin.
Table A-5: CN1 Drive Strength by Pin
Drive
Strength
M5208EVBUM.pdf
Pin
Drive
Strength
-
1
2
-
8/16mA
3
4
8/16mA
8/16mA
5
6
8/16mA
4mA
7
8
8/16mA
8/16mA
9 10
8/16mA
4mA
11 12
4mA
8/16mA
13 14
8/16mA
-
15 16
-
A-5
1-Sep-05
Header Pinouts
CN1 – I/O Header
Def Alt RTL
Alt RTL
Func
Pin
Function
3V3
-
-
GPIO DT0IN DMA Timer
GPIO DT2IN DMA Timer
GPIO
IRQ
GPIO
GPIO
GPIO
3V3
-
RTL
RTL GPIO
RTL GPIO
Pin Port (Note 1)
-
-
1
2
-
PIN0
PIN2
PIN4
PIN1
PIN3
PIN0
_TIMER
_TIMER
_IRQ
_QSPI
_UART
_I2C
3
5
7
9
11
13
4
6
8
10
12
14
_TIMER
_TIMER
_QSPI
_QSPI
_UART
_I2C
-
-
-
RTL
Port (Note 1) Pin
15 16
Alt RTL
Alt RTL Def
Function
-
Pin
-
PIN1 DMA Timer
PIN3 DMA Timer
PIN0
PIN2
PIN7
PIN1
-
-
-
Func
-
GND
PIN1
PIN3
-
GPIO
GPIO
GPIO
GPIO
GPIO
GPIO
-
GND
-
NOTE 1: To create the port name, prepend “EVB_DIO_PORT” i.e. EVB_DIO_PORT_TIMER is the
constant used to access any of the DMA Timer pins as GPIO.
CN2 – BDM Header
Def
Alt Func Func
MCF
RTL
Signal
RTL Port
Pin
RTL
MCF
RTL Port
Pin
Signal
Def
Func Alt Func
-
-
-
-
-
1
2
-
-
*BKPT
-
-
-
GND
-
-
-
3
4
-
-
DSCLK
-
-
-
GND
-
-
-
5
6
-
-
TCLK
-
-
-
-
*RSTI
-
-
7
8
-
-
DSI
-
-
-
-
3V3
-
-
9
10
-
-
DSO
-
-
-
GND
-
-
-
11 12
-
-
PST3
-
-
-
-
PST2
-
-
13 14
-
-
PST1
-
-
-
-
PST0
-
-
15 16
-
-
DDATA3
-
-
-
-
DDATA2
-
-
17 18
-
-
DDATA1
-
-
-
-
DDATA0
-
-
19 20
-
-
-
GND
-
-
-
-
-
-
21 22
-
-
-
-
-
-
GND
-
-
-
23 24
-
-
CLKOUT
-
-
-
-
3V3
-
-
25 26
-
-
*TA
-
-
M5208EVBUM.pdf
A-6
1-Sep-05
Coordinates
M5208EVBUM.pdf
A-7
1-Sep-05
Appendix B
M5208EVB Schematics
&
BoM
M5208EVBUM.pdf
B
1-Sep-5
M5208EVB-RevB Bill of Materials (BoM)
30-Aug-05
Qty Value
Device
Manufacturer
Part Number
Ref ID
1
1
1
1
1
1
1
1
1
1
1
2
1
1
1
1
4
2
2
5
1
1
1
1
1
2
2
2
2
11
MC13192
MCF5208
DP83848
LM2675
MT46V16M16
IDT71T016SA12PH
IDT71T016SA12PH
SP3249EY
SPX1117M3
LD29080
74XX573T
MCP130
FUSE-PTC
L-SMT-0603
L-SMT-0805
IND_DN8155
LED-0805
LED-0805
LED-0805
DIODE-CRS05
MA-406
TSX-4025
MA-406
CSX-750F
CAP-0402
CAP-0402
CAP-0402
CAP-0603
CAP-0603
CAP-0402
Freescale
Freescale
National Semi
National Semi
Micron
AMD
IDT
Sipex
Sipex
STElectronics
Fairchild Semi
MicroChip
Raychem
Murata
Murata
Coev
Lite-On
Lite-On
Lite-On
MCC
Citizen
Toyocom
Fox
Fox
Rohm
CalChip
Murata
AVX
TDK
Rohm
MC13192FC
MCF5208CVM66
DP83848VV
LM2675M-3.3
MT46V16M16
AM29BDD160GT64DKI
IDT71T016SA12PH
SP3249EY
SPX1117M3-1.5
LD29080DT25
74LVX573MTC
MCP130T-315I/TT
miniSMDC050
BLM18AG102SN1D
BLM21P221SGPT
DN8155-470K
LTST-C170KFKT
LTST-C170KGKT
LTST-C170KRKT
MBRX130
CM309S-16.000MABJTR
TSX-4025
FPX-250F-20
F4100-160 oscillator
MCH155A1R5CK
GMC04CG100K25NT
GRM1555C1H180JZ01D
06035A220JAT2A
C1608COG1H390J
MCH155A221JK
U7
U1
U4
U12
U6
U13
U2
U8
U9
U3
U11
U10, U14
U15
L6
L4
L2
D9, D10, D11, D12
D2, D4
D8, D15
D1, D3, D5, D6, D13
Y3
Y2
Y1
U5
C19
C29, C30
C20, C24
C4, C5
C12, C13
6 1nF COG 10%
CAP-0603
AVX
06035A102JAT2A
C28, C42, C44, C58,
C62, C65
35 0.1uF X7R
CAP-0603
Rohm
MCH182CN104KK
MC13192
MCF5208
DP83848
LM2675
MT46V16M16
AM29BDD160G
IDT71T016SA12PH
SP3249EY
SPX1117M3
LD29080DT25
LVX573
MCP130
FUSE-PTC
FB1K0/100ma
0805FB200z/1a
47uH/1A/0R2
Amber
Green
Red
0.4V/1a/30Vmax
16.000MHz
16.000MHz
25.000MHz
16MHz
1.5pF GOG +/-0.25pF
10pF COG 5%
18pF COG 5%
22pF COG 5%
39pF COG 5%
220pF COG 10%
1 0.1uF X7R
1 4.7uF/50V/0R36
6 10uF/6.3v/0.5R
4XCAP603
CAP_TANT_D
CAP_TANT_Y
NIC
Vishay
Kemet
NCA1206X7R104K16TR
293D475X9050D2T
T491A106K006AS
1 100uF/10V/0.15R
CAP_TANT_D
Vishay
593D107X9010D2T
Intec Automation Inc.
1
C15, C18, C26, C40,
C43, C45, C59, C63,
C66, C72, C73
C1, C2, C3, C7, C9,
C10, C11, C14, C16,
C17, C21, C27, C33,
C34, C35, C36, C37,
C38, C46, C47, C48,
C49, C50, C51, C52,
C53, C54, C55, C56,
C57, C60, C64, C70,
C71
C6
C41
C8, C22, C23, C25, C31,
C32
C39
www.steroidmicros.com
M5208EVB-RevB Bill of Materials (BoM)
Qty Value
30-Aug-05
Device
Manufacturer
Part Number
Ref ID
1 0R0
9 22R0
RES-0603
4XRES603
Rohm
CalChip
MCR03EZPJ000
CN34J220CT
J1
6 22R0
RES-0603
Vishay
CRCW0603-22R0FRT1
1
2
2
4
1
1
1
2
7
49.9, 1%
100
150
150
1K5
4K87, 1%
10K
10K, 1%
10K
4XRES603
RES-0603
RES-0603
4XRES603
RES-0603
RES-0603
RES-0603
RES-0603
4XRES603
CTS
Rohm
Rohm
CalChip
CalChip
CalChip
Vishay
Vishay
CalChip
742C083510JTR
MCR03EZHJ101
MCR03EZHJ151
CN34J151CT
RM06F1501CT
RM06F4871CT
CRCW0603-1002FRT1
CRCW0603-1002FRT1
CN34J103CT
R26, R27, R28,
R38, R39, R47
R13
R2, R4
R8, R16
R5, R7, R10, R11
R51
R1
R6
R40, R41
1
2
1
13
DIPSW
PBSW05
1101M2SXA
1X2
DIPSW
PBSW05
1101M2SXA
Header
Amp Alco
ITT Cannon
ITC
Mode
435640-5
KSC421G
1101M2S3AQE2
36-280G-0 2x40 straight double row
3
1
1
2
1
1
1
2
14
1X3
2X8
2X13
DB9F/90
HFJ11-2450E
PWR_J
SMA
TEST_LOOP
Header
Mode
Header
Mode
Header
Mode
DB9F/90
Mode
RJ45MAG
Tyco
PWR_J
Mode
SMA
Amphenol
TEST_LOOP
Keystone
40X30_VIA_UNMASKED
2 ANT_DIPOLE
Intec Automation Inc.
ANT_DIPOLE
2
R22, R24, R30,
R34, R35, R36,
R37, R46, R48
R3, R9, R14, R20,
R21, R32, R33
SW1
SW2, SW3
SW5
JP2, JP3, JP4, JP5,
JP6, JP7, JP8, JP9,
JP10, JP13, JP14,
JP15, JP16
36-140G-0 1x40 single strip
JP1, JP11, JP12
36-280G-0 2x40 straight double row CN1
36-280G-0 2x40 straight double row CN2
30-420-0
CN3, CN4
5-1605473-7
CN6
31-155-0 2.1mm power jack
CN5
901-9894-RFX
CN7
5015
TP5, TP6
Unmasked vias
TP1, TP2, TP3,
TP4, TP7, TP8,
TP9, TP10, TP11,
TP12, TP13, TP14,
TP15, TP16
Etched antennas
ANT1, ANT2
www.steroidmicros.com
Appendix C
dBUG Monitor
M5208EVBUM.pdf
C
1-Sep-5
dBUG Monitor
dBUG is a program that runs on the target SBC, that interacts serially with a console or debugger program
on the PC. It also interacts with the user program that runs on the SBC. dBUG provides a mechanism for
downloading, running and debugging programs without a BDM pod. It also stores board parameters (such
as the IP address); handles user program boot-up; can handle user program interrupts, and can act as an
interface for the user program’s console I/O.
Basic concepts
The dBUG Monitor is a versatile program that carries out a number of services and can be used in different
ways.
dBUG and Serial Console Program
A developer can interact directly with dBUG through any serial console program such as HyperTerminal,
using dBUG’s command line interface. That is, a developer can load, debug and run his program without
the need of a specialized debug program. dBUG offers a rich assortment of commands, and, in fact, some
commands can only be accessed through a console program. The full list of dBUG commands can be
viewed by typing “Help” after the “dBUG>” prompt, when accessing the SBC through a serial console
program.
dBUGmonitor.pdf
C-1
5-Sep-05
dBUG and Autorun
On startup, dBUG checks if JP3 is installed and if it is, then dBUG attempts to boot a program stored in
external flash. A program can be stored into external flash by using the “dfl” or “dnfl” commands detailed
below and in the dBUG user manual.
The World as Seen by dBUG
dBUG resides in the bottom 256K of the M5208EVB external flash. On startup, dBUG maps the 16MB
SDRAM and accesses it as follows:
•
It sets up (DDR) SDRAM from 0x40000000 to 0x41FFFFFF.
•
It uses the lower 128K of SDRAM, that is, 0x40000000 to 0x4001FFFF for its vector table, data
and stack. Consequently this memory space is out of bounds to the user program.
•
It expects the user program to always start at 0x40020000 in SDRAM.
•
A user program can use the MCF5208’s on-chip SRAM for stack space, since it is very fast and
dBUG does not use this memory.
Using dBUG
Setting dBug Parameters
dBUG stores several parameters on the SBC that determine dBUG’s behaviour. Resetting or repowering
the board will not affect the values of these parameters:
•
Base -The numeral base used by dBUG for entry and display of all numbers [16].
•
Baud - The baud rate shared by the SBC’s Primary and Secondary serial connection [115200].
Setting Board Parameters
dBUG stores several parameters on the SBC that determine the SBC’s behavior. Resetting or repowering
the board will not affect the values of these parameters. Some of these parameters are:
•
Watchdog - When On, the watchdog timer is left enabled on the MCF5208 and must be fed by the
user program or the watchdog will reset the board after ~5 seconds.
•
Server - The IP address of a PC running a TFTP server. This setting is used for network
downloads.
•
Client - The IP address of the board.
•
Gateway - The IP address of the gateway for the LAN that the board is connected to.
•
Netmask - The netmask of the LAN that the board is connected to.
•
DNS - The IP address of a DNS server, used for resolving a URL to IP address.
•
Ethaddr -The MAC address.
dBUGmonitor.pdf
C-2
5-Sep-05
The values of these parameters can be displayed on the console screen with the “show” command. Each
value can be individually set using the “set” command. The “set” command takes two parameters: the
name of the parameter and the new value of the parameter.
Downloading Programs
User programs can be downloaded to the M5208EVB via the serial connection or a network connection.
A serial download is done using the “dl” command. The “dl” command puts the dBUG monitor into a state
where it waits for an s-record download of the user program. Using HyperTerminal, click on Transfer Æ
Send Text File… and select the s-record to download. dBUG stores the program starting at 0x40020000.
A network download is done using the “dn” command. Before the “dn” command can be issued the dBUG
parameters must be set correctly. The necessary parameters are Server, Client, Gateway, Netmask,
Filename, Filetype and Ethaddr. Once these are set, issuing the “dn” command will download the specified
file from the specified server IP address.
Programming Flash
The “dfl” command is used to program the permanent storage on the M5208EVB. This command behaves
exactly like the “dl” command but adds the feature of saving the downloaded program to external flash.
For example, to save a program to the external flash, a user types “dfl” presses return, then transfer the srecord as with the “dl” command.
Running Programs
A program is run using the “go” command with a start address (0x40020000) or the “gfl” command.
Programs compiled for dBUG should always start at address 0x40020000. The “gfl” command will
determine if a program is present in external flash, and then it will copy it to 0x40020000 in SDRAM and
run it.
Killing Programs
The “kfl” command will destroy a program stored in external flash. If a valid program exists in the
specified location, then it is marked as dead, and will not be run by either the Autorun feature or the gfl
command.
dBUG Help
More information can be found on dBUG by typing “help” at the command prompt. The “help” command
lists all the dBUG commands and a description of the syntax of the command.
dBUG Updates
To update dBUG use either the dldbug command or the P&E background debug module (BDM) with the
CFFlasher program. The M5208EVB is shipped with a combined dBUG and uClinux image. The factory
image can be found on this CD under “Software\Firmware” directory m5208evb.s19.
dBUGmonitor.pdf
C-3
5-Sep-05
Appendix D
uClinux Commands
M5208EVBUM.pdf
D
1-Sep-5
Useful uClinux Commands
The following commands are widely used on all Linux based systems including uClinux.
These are just a summary of useful commands; more documentation can be found for
each of these commands at http://man.linuxquestions.org. Also typing “help” at the
uClinux prompt “/>” will provide a complete listing of the command available.
File System Manipulation
•
•
•
•
•
•
•
•
•
•
•
ls – list directory contents
cd – change directory
mkdir – make directory
rm – remove file
rmdir – remove directory
cp – copy a file
mv – move a file
cat - view a file on standard output
mount – mount a file system on top of a device
o e.g.: />mount –t jffs2 /dev/mtdblock1 /mnt/flash
smbmount – mount a remote file share
o e.g.: />smbmount //192.168.2.98/wokspace /mnt/workspace –o
username=Mike,password=mike
sync – synchronize cached files in RAM to disk
Network
ifconfig
The ifconfig command is used to view and edit network information such as IP address
and subnet mask
•
•
•
ifconfig eth0 – display IP address and other network parameters
ifconfig eth0 [ip] netmask [netmask] – Set IP address to [ip] and netmask to
[netmask]
ifconfig –h – display help on the ifconfig command
uClinuxCommands.pdf
C-1
5-Sep-05
route
The route command is used to view or edit network routing information.
•
•
•
route – display network routing table
route add default gw [gateway] – Add the default gateway to the routing table
route -h – diplay help for the route command
mii-tool
The mii-tool command is used to get and set low-level physical information from the
network interface, such as speed and duplex.
•
•
•
•
•
mii-tool – display the physical Ethernet properties
mii-tool –v – display more information (verbose)
mii-tool –v –v – most verbose setting (includes raw dump of PHY chip registers in
Hex)
mii-tool –restart – reset the physical Ethernet interface chip
mii-tool –h – help for the mii-tool command
Date/Time
date
The date command will show or set the system date as kept by the kernel while running.
This date will reset every time the board is rebooted. If you would like to keep the time
accurate, you must use a battery backed RTC with the “hwclock” utility.
•
•
date – view the current system date
date [MMDDhhmm[YYYY]] – set the system date time
System
proc file system
The proc file system provides diagnostics for the entire system. To view the diagnostics
use the cat command in the /proc directory.
•
•
•
cat /proc/cpuinfo – displays stats about the CPU brand and speed
cat /proc/interrupts – statistics on interrupts
cat /proc/mounts – information on mounted filesystems
uClinuxCommands.pdf
C-2
5-Sep-05
•
more…browse through the /proc directory and subdirectories to see more
diagnostics.
ps
The ps command shows information about the current running processes in the system.
•
ps – display information including the process id of each process in the system.
shutdown
The shutdown command is the only way to correctly shutdown uClinux without causing
potential file system damage. The shutdown command will attempt to gracefully close
all processes and eventually kill them, synchronize the cached file system information to
disk and terminate operation.
•
•
•
shutdown –h now – Shutdown the system and hang in an endless loop (requires
hard reset to boot up again)
shutdown –r now – Shutdown the system and perform a software reset, if Autorun
is on uClinux will boot up again.
shutdown – display usage information for the shutdown command
uClinuxCommands.pdf
C-3
5-Sep-05
Appendix E
uClinux Drivers
M5208EVBUM.pdf
E
1-Sep-5
uClinux Device Drivers
The following sections describe the various device drivers in uClinux that are importance
to user application development. There are other drivers available in the /dev directory
that are not included in this list because they are exclusively used by the kernel.
ips (IPS)
The “ips” driver has been developed by Intec to support the run time library under
uClinux. The internal peripheral system (ips) driver provides user applications with
access to the hardware registers. User applications should never use the ips driver
directly, but instead simply call functions from the run time library provided.
mtd[x]/mtdblock[x] (External Flash)
The memory technology device (mtd) driver is for accessing the external flash device.
On the Wildfire board this device provides access to the on board serial flash. To make
use of the mtd driver a file system should be mounted on top of it. The Journaling Flash
File System (JFFS2) is designed for these type of flash devices which require sector
erases before writes. To use the mtd driver issue the following command at either the
command line or from the rc file (done by default with the M5208EVB as shipped in the
etc/rc file).
1. Create a directory if not already created (/>mkdir /mnt/flash)
2. Mount the file system (/>mount –t jffs2 /dev/mtdblock1 /mnt/flash)
3. To erase a device use the raw char driver (/>eraseall /dev/mtd1). This will
erase all data on the device and is in fact like formatting the device.
For the M5208EVB the partitions are as follows:
1. mtd0, mtdblock0 – 256K dBUG partition
2. mtd1, mtdblock1 – 640K JFFS2 partition
3. mtd2, mtdblock2 – 1152K compressed Kernel image
Only the mtd1 partition should be used in most cases. Altering the other partitions could
cause problems booting the board and will require the board to be re-flashed with the
BDM pod.
Once mounted the directory can be used like any other and will retain its data between
power cycles.
uClinuxDeviceDrivers.pdf
D-1
27-Jun-05
ram (RAM)
The ram driver allows a file system to be mounted in RAM. A special RAM disk is
created by default on startup from the rc script when uClinux boots. The /var directory
will boast fast access, but will not retain its contents between system reboots. It is not
likely that a user application will need to use this driver directly, but instead simply use
the /var directory for fast file access.
ttyS (COM Ports)
The ttyS drivers provide access to the serial ports under uClinux. The ttyS driver can be
configured in many ways to allow ASSCII and binary communications. The number
after the ttyS represents which port to use.
•
•
•
ttyS0 – uart0 – COM1 (used as console)
ttyS1 – uart1 – COM2
ttyS2 – uart2 – COM3
See the uDemoSerial for a comprehensive example on using the serial device driver
under uClinux.
uClinuxDeviceDrivers.pdf
D-2
27-Jun-05