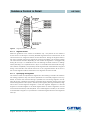
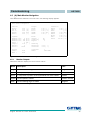
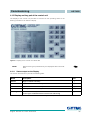
1
Basics + Software HG 73650 Track Guidance Controller Basics, Commissioning and Software HG 73650 English, Revision 01 Dev. by: M.L. Date: 20.09.2012 Author(s).: RAD / A.F. Götting KG, Celler Str. 5, D-31275 Lehrte - Röddensen (Germany), Tel.: +49 (0) 51 36 / 80 96 -0, Fax: +49 (0) 51 36 / 80 96 -80, eMail: [email protected], Internet: www.goetting.de Contents HG 73650 Contents 1 Introduction .......................................................................4 1.1 1.2 1.3 1.4 2 Virtual tracks .......................................................................... 4 Suitable and unsuitable vehicle types ...................................... 5 How it works ........................................................................... 6 1.3.1 System Structure ........................................................................... 6 1.3.2 Steering Controller ........................................................................ 6 1.3.3 Sensor Fusion ............................................................................... 7 1.3.4 Track Controller ............................................................................. 7 1.3.5 Parameterization ........................................................................... 8 Preconditions / Options ........................................................... 9 Guidance Control in Detail ............................................... 10 2.1 Steering controller ................................................................ 10 2.1.1 Segments .................................................................................... 10 2.1.1.1 2.1.1.2 2.1.1.3 2.1.1.4 2.1.2 Attributes..................................................................................... 15 2.1.3 Offset driving ............................................................................... 15 2.1.4 Calculation of the Steering Angle ................................................. 16 2.1.4.1 2.1.4.2 Velocity Calculation ..................................................................... 18 2.1.6 Driving Modes ............................................................................. 18 2.1.7 Vehicle Options: Fork Lift Vehicle ................................................ 19 Odometric System ....................................................................... 20 Sensors for navigation .......................................................... 21 2.3.1 The Transponder Antenna ........................................................... 21 2.3.1.1 2.3.1.2 2.3.1.3 2.3.2 2.4 3 Idle Mode ............................................................................... 18 Modus Parameter Test ............................................................ 19 Automatic Mode ...................................................................... 19 The Internal Sensor Fusion ................................................... 19 2.2.1 2.3 Feed Forward Control ............................................................. 17 Feed Back Control .................................................................. 17 2.1.5 2.1.6.1 2.1.6.2 2.1.6.3 2.2 The segment file ..................................................................... 11 Segment search ...................................................................... 13 Specifiying the segments ........................................................ 13 Transmission of the segments ................................................. 15 Transponder System for Positioning Calculation ...................... 21 Initialization of the Transponder Sensor Fusion ....................... 22 Transponder List ..................................................................... 22 Sky-Trax ..................................................................................... 23 Vehicle Control Unit .............................................................. 23 Interfaces ........................................................................ 25 3.1 CAN Bus .............................................................................. 25 English, Revision 01, Date: 20.09.2012 1 Contents 3.2 3.3 3.4 3.5 3.6 4 HG 73650 3.1.1 CAN 1 ......................................................................................... 25 3.1.2 CAN 2 ......................................................................................... 25 Profibus ................................................................................ 26 Ethernet ............................................................................... 26 Serial Interfaces ................................................................... 26 3.4.1 SIO 1 .......................................................................................... 26 3.4.2 SIO 2 .......................................................................................... 26 3.4.3 SIO 3 .......................................................................................... 26 3.4.4 SIO 4 .......................................................................................... 27 Terminal ............................................................................... 27 IO 1 to 4 ............................................................................... 27 Commissioning................................................................ 28 4.1 4.2 4.3 4.4 4.5 4.6 4.7 4.8 4.9 Commissioning of Communication ......................................... 28 Commissioning Terminal Program ......................................... 29 4.2.1 Finding Hyper Terminal / Adding Hyper Terminal to the system .... 29 4.2.2 Parameter Settings ...................................................................... 30 Using the Terminal Program.................................................. 30 Main Menu ........................................................................... 31 (A) Main Monitor Navigation .................................................. 32 4.5.1 Monitor Outputs ........................................................................... 32 4.5.2 Input Options ............................................................................... 35 (B) Main Monitor Sensorfusion .............................................. 35 (C) Vehicle Monitor ............................................................... 39 (D) Datalogging .................................................................... 39 (E) Test Monitor .................................................................... 40 4.9.1 Display outputs ............................................................................ 40 4.9.2 Input Options ............................................................................... 41 4.10 (F) Error Logger.................................................................... 42 4.11 (G) Parameters Navigation.................................................... 49 4.11.1 (A) Main ...................................................................................... 50 4.11.2 (B) Geometric .............................................................................. 52 4.11.3 (C) Accuracy ............................................................................... 54 4.11.4 (D) Steering................................................................................. 55 4.11.4.1 Parameters ............................................................................. 55 4.11.4.2 Steering correction.................................................................. 56 4.11.5 (E) Stering Controller ................................................................... 57 4.11.6 (F) Speed Controller .................................................................... 60 4.11.7 (G) Sensor Fusion ...................................................................... 61 4.11.8 (H) Vehicle Specials .................................................................... 63 English, Revision 01, Date: 20.09.2012 2 Contents HG 73650 4.11.9 (I) Datalogging (Parameterization of the output) ........................... 63 4.12 Display and key pad of the control unit .................................. 65 4.12.1 Status output on the Display ........................................................ 65 4.12.2 Direct input options at the control unit .......................................... 67 5 Trouble Shooting ............................................................. 69 6 List of Images ................................................................. 71 7 List of Tables .................................................................. 72 8 Essential Information for Reading this Manual.................. 74 9 Copyright and Terms of Liability ...................................... 75 9.1 9.2 9.3 Copyright.............................................................................. 75 Exclusion of Liability ............................................................. 75 Trade Marks and Company Names........................................ 75 English, Revision 01, Date: 20.09.2012 3 Introduction 1 HG 73650 Introduction The subject of this manual is the track guidance controller for AGV (Automated Guided Vehicles) used for following virtual tracks (see below). This manual describes the following components of the track guidance controller: 1. Track control with steering controller, sensor fusion and vehicle control (see chapter 2 on page 10) 2. Overview of interfaces (see chapter 3 on page 25) 3. Commissioning (see chapter 4 on page 28) 4. The description of the hardware and the telegram listing of the interfaces can be found in two separate documents The following sections of the introduction will provide an overview of these areas. 1.1 Virtual tracks A virtual track describes a route that does not have physical tracks or marks (e.g. optical lines or inductive guide wires). It is usually defined in a CAD program (below we will refer to Malz++Kassner CAD 6 for which Götting KG provides a plug-in for the track guidance controller) where the required track is directly drawn into a layout. The vehicle will follow this virtual track like on a real track or rails. The CAD software has to reflect the features of the vehicle used (see below) in order to make tracking as accurate as possible. Figure 1 Example: Virtual track with support points The virtual track consists of several segments that define the sections between branches and end points. Each of the segments must consist of at least four support points which are positioned at equal distance over the whole route. These support points are not actual points on the route (for example transponders in the ground). The distance between them depends on the type of the route and the vehicle used. The closer the support points lie next to one another the more precisely the tracking will correlate with the virtual track. However, very close distances between the points are unnecessary for large vehicles because the vehicle itself cannot drive that accurately. Should the distances between the points be too long, the CAD software would display them as polygonal curves because no rounded curve can be calculated from points which are wide apart from one another. English, Revision 01, Date: 20.09.2012 4 Introduction HG 73650 1.2 Suitable and unsuitable vehicle types The range of particularly suitable vehicle types covers all vehicles that either have a fixed axle or symmetrical steering. Vehicles such as trucks, forklift trucks, electric tow tractors and some heavy-duty transporters fulfill these requirements. A fixed axle can be applied to the axis of symmetry without the problem of dragging wheels in curves. Figure 2 Example: A selection of vehicle types The sketch below shows simplified versions of all vehicles as three-wheelers, because this is the base vehicle model used by the track guidance controller. For example also a car is only steered from one point, so the computer can consider it a three-wheeler. Both wheels on the front axle follow a specified steering angle. The track guidance controller can also be used for vehicles where the steered wheel is not in the middle (e.g. some fork-lift trucks). Fixed axle Symmetrical axle Two fixed axles particularly suitable particularly suitable reduced accuracy and partially slipping wheels less accuracy e.g. fork lift trucks e.g. some types of heavy-load vehicles e.g. large tractors e.g. loader Figure 3 Articulated steering with center pivot point Omnidirectional drive / Mecanum drive requires different firmware Sketch: Suitable vehicle types The further the actual vehicle diverges from the typical three-wheeler model (e.g. center-pivot steered vehicles such as front loaders where the distance between the axles varies when turning), the less precise the tracking will be. Omnidirectional vehicles are also suitable, but require a different firmware than the three-wheeler models. English, Revision 01, Date: 20.09.2012 5 Introduction HG 73650 1.3 How it works 1.3.1 System Structure Figure 4 System Structure Due to the strict separation of steering controller, sensor fusion and navigation system as well as the smart interaction with vehicle controller the track guidance controller offers a high degree of flexibility and is suitable for monitoring safety-critical vehicle components. 1.3.2 Steering Controller The track guidance controller includes the steering controller which calculates how to guide the vehicle from the current position to follow the track. The steering controller's outputs are - nominal steering angle - nominal vehicle velocity - various additional parameters / information English, Revision 01, Date: 20.09.2012 6 Introduction HG 73650 Some steering servos and motor controller can be directly controlled by the steering controller so that a vehicle control unit is not required in every application. Related to monitoring, redundancy and customized modifications to the vehicle, a vehicle control unit (e.g. PLC) is recommended for large vehicles. If emergency stop devices are to be used, a vehicle control unit must be used in combination with the track guidance controller to ensure maximal safety. 1.3.3 Sensor Fusion The steering controller receives information from the sensor fusion about the position. The sensor fusion can be connected internally (preferably when navigating with transponders or Sky Trax Tags) or externally (e.g. in the case of a laser scanner). The sensor fusion provides the steering controller the following data (called pose): - position on X coordinate - position on Y coordinate - velocity - angle The sensor fusion establishes these values based on the data of the connected sensors (e.g. transponder antennas, laser scanners, GPS system). If required, systems with physical guidance tracks can be integrated (e.g. inductive guide wire, optical guidance). There is a selection of different odometric sensors available, such as incremental / rotary encoders. Optionally the accuracy and load-dependence of the odometry can be enhanced by using the Götting Gyro HG 84300. It is also possible to calculate the odometry from two sources and compare their results. This way, the sensor failures can be identified. 1.3.4 Track Controller The task of the track guidance controller is to move the vehicle from the current position (given by the sensor fusion) to the next support point. The controller also calculates the rest of the track along several support points (it forms what are known as regressions) and delivers the virtual track that the vehicle can drive on. The tracks between the support points are reconstructed with smooth functions (regressions over several support points) so that a continuously controlled movement of the vehicle is possible. The values of position, accuracy, 16 free and 16 defined bits are stored at each support point. English, Revision 01, Date: 20.09.2012 7 Introduction HG 73650 Travel command: Segments 1, 2, 3, 7 Figure 5 Exemplary layout with travel commands as a combination of segments The vehicle can be placed between the support points. The track controller uses the incoming position data to identify what segment it is on and which support point follows next. The tracks to be driven on are defined from a combination of segments that for example state where the vehicle has to turn. A travel command can be entered at the central control unit, the vehicle control unit or directly at the steering controller. 1.3.5 Parameterization An RS 232 interface is provided to set the parameters and to commission the vehicle. It can be connected to a PC/ laptop with a serial interface and a terminal program. This interface can be used to monitor and record driving conditions (e.g. for debugging purposes) and to set, import or export driving parameters. Transponder and, marker lists as well as segments can be exported, imported and displayed. This interface can also be used to update the internal operating software on the track guidance controller. A display with a foil keyboard is integrated into the steering controller in order to enter the segments and show status information. English, Revision 01, Date: 20.09.2012 8 Introduction HG 73650 1.4 Preconditions / Options - If the internal sensor fusion is to be used, at least one incremental / rotary encoder must be used. Please ensure that this is a push/pull type with output voltage of 5 to 25 V and two tracks perpendicular to each other. Depending on the odometry, the Gyro HG 84300 can also be used to improve accuracy and for redundancy. - If a transponder system is to be used, the HG S71720 system can be connected via the CAN bus. ID 250 transponders can be used at a reading height of up to 10 cm. The Sky Trax System can be used as an alternative or in combination with the transponder system. - When using the HG 43600 laser scanner at least one incremental encoder must be directly connected to the track guidance controller. If the HG S57652 GPS system is to be used, the rotary encoders must be connected to the GPS controller. - To extend the input and output capabilities, the IFM module CR 2033 can be connected via the CAN Bus. English, Revision 01, Date: 20.09.2012 9 Guidance Control in Detail 2 HG 73650 Guidance Control in Detail The structure of the track guidance controller is shown in Figure 4 on page 6. Two incremental encoderscan be connected to the steering controller hardware. This is required when: - the internal sensor fusion is used and the steering controller has to control or monitor the velocity itself or - where a laser scanner is used. If the internal sensor fusion is used, the position of the vehicle is calculated from the odometry provided, initialized and adjusted by the transponder antenna and/or the Sky-Trax system. The transponder antenna is then connected via the CAN bus. Additionally the position impulse (impulse when the midpoint of the antenna crosses the transponder) has to be connected with IO 1. The Sky- Trax system is connected via the SIO 3. The optional gyro is connected via the CAN bus. Its purpose is to improve the odometry. As some odometric calculations tend to be dependent on load, we recommend the integration of the gyro. If an external sensor fusion is to be used (to identify position and angle), it can be connected to the CAN bus. The applicable protocol is specified in the reference manual supplied. External sensor fusions can be for example laser scanners (HG 43600) or GPS (HG S57652). Other position identification systems can be used as long as they comply with the CAN bus protocol (see reference manual). 2.1 Steering controller The purpose of the steering controller is to guide the vehicle on the track. It needs information about which track to drive on and the current position of the vehicle. The central control unit tells the steering controller what segment to drive on. The segments were generated in the CAD software (see below) represented by their support points. Using the current vehicle position and angle the relation to the segment is known. Then the steering angle and vehicle velocity can be calculated. 2.1.1 Segments Segments are the connecting paths between branches and end points. The routes are compiled from these segments from the start to the finish. Example A small area has four stations. To move the vehicle from the station 1 to station 3, the vehicle has to pass segments 4, 5, 8 and 9. To return to station 1 (with the same vehicle orientation), the vehi- English, Revision 01, Date: 20.09.2012 10 Guidance Control in Detail HG 73650 cle has to go through segments 10, 1, 7, 6 and 3. Since the vehicle drives backwards along segments 6 and 3, the velocity of the segments is negative (see also Figure 7 on page 12). Figure 6 Example: Segments 2.1.1.1 The segment file All segments and the associated support points are stored in the segment file. This segment file is created with a CAD software (Malz ++ Kassner CAD6). The typically large CSV file, created by the CAD software, must be compiled into a binary format using BRTool. The BRTool software is available from us on request. BRTool also allows you to directly edit individual support points and their critical attributes such as velocity without having access to CAD6. Each row of the segment file represents one support point. It contains the support point's coordinates, two velocities and an attribute field. 3;304;8920;2164;10;10;0x00000000 3;305;8920;1914;5;10;0x00000000 3;306;8920;1665;1;10;0x00000002 4;1;8920;1665;10;10;0x00000001 4;2;8920;1416;10;10;0x00000000 4;3;8920;1167;10;10;0x00000000 Segment number Point number X Position Y Position Velocity end Velocity next Attribute 3 304 8920 2164 10 10 0x00000000 3 305 8920 1914 5 10 0x00000000 3 306 8920 1665 1 10 0x00000002 4 1 8920 1665 10 10 0x00000001 4 2 8920 1416 10 10 0x00000000 4 3 8920 1167 10 10 0x00000000 Table 1 Explanation of a segment list with support points English, Revision 01, Date: 20.09.2012 11 Guidance Control in Detail HG 73650 Each row of this table is one support point. The first column contains the segment number to which the support point belongs to. The second column contains the support point number. Columns 3 and 4 contain the X and Y coordinates of the support point in mm. Columns 5 and 6 contain velocity data in dm/s. There are two velocities because on the one hand a connecting segment could exist, or the vehicle is to be stopped at the end of the segment. Therefore, where the last segment is concerned or the vehicle changes direction column 5 is automatically selected. If a connecting segment exists column 6 is selected. The velocities are interpolated linearly depending on the position between the support points so that a continual velocity profile is created. Only at the end of the last segment (or if the direction of travel changes or an error occurs) will the velocity be set to 0. NOTE! Always allow the velocity to end with 1, because if you pick 0 the vehicle will stop before reaching the end of the segment. If the velocity is negative, the vehicle travels backwarts on the segment. The vehicle always moves towards the support points (from the start of a segment to the end). This means that when the vehicle is first to be driven in one direction on a track and then to be reversed (e.g. when docking on and off a ramp) there must be two segments for the same path. The attribute field is located in column 7. The attribute is subdivided into 16 higher an 16 lower bits. The lower bits refer to internal functions of the guidance controller. See the reference manual for further detail. The 16 higher bits are freely available and are passed to the vehicle control unit. Figure 7Example for congruent segments English, Revision 01, Date: 20.09.2012 12 Guidance Control in Detail Figure 8 Segment FIFO shifting register 2.1.1.2 Segment search HG 73650 When the guidance of the vehicle is initialized, only one position of the vehicle is known at first. To identify the currently drivable segments and to transmit them to the central control unit, a segment search can be carried out. During the segment search, the track controller tests all the segments stored for drivability. The segment search can take several seconds depending on the number of segments. It is triggered by setting bit 4 in byte 1 of CAN Box 0x194. The steering controller must be in "waiting" mode (stand-by). On completion bit 5 in byte 1 in the CAN box 0x185 will be set (segment search completed). The positively found segments are transmitted as a segment listing in box 0x195 to the vehicle control unit. If the „segment-search“-bit is set to 0, the current segments will be transmittet in the segment list of box 0x195. 2.1.1.3 Specifiying the segments The vehicle control unit specifies the segments to the steering controller via CAN bus. For testing purposes, they can also be specified via a terminal program or the keyboard. To ensure that continual driving is possible, the connecting segment must always be known. Therefore the steering controller has a segment memory with eight entries designed asa FIFO (First in First Out) shift register (see Figure 8 above). Segment 0 is the current segment. Segment 1 is the next segment. Segment 7 is the last segment in the FIFO register: If the FIFO register does not have 8 segments, the rest of the entries are filled up with 255 (Note: 0 is a valid segment number). If the vehicle is finished with a segment, it is pushed out of the FIFO register and the next segments move up. English, Revision 01, Date: 20.09.2012 13 Guidance Control in Detail Before FIFO Segment 0 Example: Segment number 33 just processed HG 73650 After FIFO Segment 33 0 10 1 10 1 17 2 17 2 105 3 105 3 255 4 255 4 255 5 255 5 255 6 255 6 255 7 255 7 255 Table 2 Example: Shifting of segments - part I The list will be transferred to the vehicle controller via CAN bus. The vehicle controller can respond to the removed segment, by moving a new segment into the FIFO register. Before After FIFO Segment FIFO Segment 0 10 0 10 1 17 1 17 2 105 2 105 3 255 3 55 4 255 4 255 5 255 5 255 6 255 6 255 7 255 7 255 Table 3 Segment number. 55 reloaded Example: Shifting of segments - part II In this way more than 8 segments can be driven without stopping. In order to connect the segments consecutively, the terminal position of one segment always has to be the starting position of the next one. English, Revision 01, Date: 20.09.2012 14 Guidance Control in Detail NOTE! 2.1.1.4 HG 73650 In order to prevent the steering controller from reloading a segment currently being changed by the vehicle control unit (the revolution period from "reading the list" to "list stored" can take one second), never edit the next segment (FIFO register number 1). Instead edit the segment with FIFO register number 2. Transmission of the segments Usually the segments will be transmitted with the CAN bus. For test purposes the segments can be entered using the keypad (membrane keyboard) or via a terminal interface. For more detailed information see chapter 4 „Commissioning“ on page 28. The steering controller receives the segments in the CAN box with the identifier 0x194. The structure of the box is described in the reference manual. This box only contains one element of the buffer, wich is Number of segment (LowByte) and Number of segment (HighByte. The segment numbers will be transferred as unsigned int (16 bit), but internally only 8 bit will be used. If a 16 bit addressing is required, there is no need to change the communication. To place the segment correctly into the FIFO register, the register number will be transferred as well (Position of segment number in table). The steering controller will be called up every 50 ms. Therefore the transmission of the list takes at least 8 x 50 ms = 400 ms. This list always has to be transferred in ascending order. To prevent double transmission within 50 ms (one message would get lost and the whole table would be invalid) there is the toggle bit. If the vehicle controller sends a box, the status of the first bit in byte 1 of the CAN box will be changed previously. The next box should not be transmitted before Box 0x195 (response of the steering controller) has reached the same status. The target segment is the last segment to reach the end of a desired route. The target segment does not necessarily have to be part of the FIFO register. The CAN box of the answer by the steering controllerhas a similar structure. This box indicates the current status of the segments in the steering controller. 2.1.2 Attributes If the vehicle is driving in automatic mode, the corresponding attributes are carried out when a certain support point is reached (e.g. turn signal, horn etc.) The 16 lower bits have a specific predefined meaning and are transmittet. The function of these bits are specified in the reference manual. The upper 16 bits are transmittet in CAN box 0x191 byte 5 and 6. For most attributes sufficient information is disclosed in the annex. The only exception is offset driving. 2.1.3 Offset driving Constantly driving on the same track can lead to a strong deformation of the surface structure (e.g. asphalt). For some plants it is appropriate therefore to vary the route by a few centimeters. However, the track may only be moved so far that it is still possible to read the installed transponders. For transfer stations / end points the offset has to be switched off. English, Revision 01, Date: 20.09.2012 15 Guidance Control in Detail HG 73650 Segment 0 in the steering controller can be used as a version number of the segment file. Segment 1 is the transition for offset driving on the left. Segment 2 serves as a transition for offset driving on the right. Both segments have to start with the coordinates X = 0 and Y = 0. The X direction is the longitudinal direction. The Y direction represents the offset to the actual track. The segments should be as short as possible. Segment 3 is the return from the left offset to the actual track. Segment 4 is the return from the right offset to the actual track. Figure 9 Offset segments The offset option will be released via the attributes "offset left" (0x00000400) and offset right (0x00000200) in the segment. The offset will be released via CAN bus in message 0x196 byte 5 bit 2 (switching right) and bit 3 (switching left). If this attribute is canceled while the vehicle still moves to the side, the vehicle stops with an error message. Therefore a free attribute should mark the end of the offset track early enough to undo the offset driving. Figure 10 Example drive 2.1.4 Calculation of the Steering Angle The key task of the steering controller is to keep the vehicle on the intended track. This means that the center of the fixed axis is constantly kept on the track, e.g. the center of the rear axis of a given three- wheeler as shown in Figure 11. This is realized with the steering angle. It is comprised of 2 components: The feed back control / regulator English, Revision 01, Date: 20.09.2012 16 Guidance Control in Detail HG 73650 and the feed forward control. If the steering controller is correctly set, 80% of the calculated steering angle results from the feed forward control (dependent on the driving conditions). Only the remaining percentage of 20% are provided by the feed back control / regulator. 2.1.4.1 Feed Forward Control Figure 11 Feed forward control The feed forward control calculates a steering angle that keeps the vehicle on the track. If the three-wheeler described is e.g. driven on a circle, the feed forward control calculates a steering angle, that adjusts the steered wheel tangentially towards the track. In an ideal situation the vehicle would exactly drive around this circle. 2.1.4.2 Feed Back Control The feed back control steers the vehicle back to the intended course. At first the error in the vehicle position will be determined. Figure 12 Feed back control This error consists of two parts: The error of the angle and the lateral deviation. The steering angle is calculated in such a way that the steering wheel points towards a point within the intended course in front of the vehicle. The distance between this point and the center of the rear axis consists of one fix and one variable (velocity dependent) component. English, Revision 01, Date: 20.09.2012 17 Guidance Control in Detail HG 73650 If the vehicle starts moving with this calculated steering angle, the point towards which the vehicle aims moves on. In this way the vehicle returns to its intended track without oscillating, provided the steering velocity is sufficiently fast and the vehicle speed adjusted. To ensure a reduction of the oscillation for movements under worse conditions (higher velocities or slower steering) different parameters can be adjusted. Thus the angle at which the vehicle returns to the intended track can be limited dependent on the current velocity. For more detailed information see chapter 4 on page 28. If the vehicle drives around a curve, the intended track for the controller is calculated by the tangent at the intersection of the rear axle. The needed angle to go around the curve is computed by an algorithm and added to the angle of the feed back control. If the vehicle travels backwards, it is mirrored at the rear axis. Subsequently the steering angle of the mirrored front wheel is calculated and inverted. 2.1.5 Velocity Calculation The velocity is obtained from the information of the support points. Here the velocity of the support point just passed and the upcoming support point is interpolated. Which of the two support point velocities ("velocity endpoint" or "velocity connection") is selected will depend on whether the vehicle shall stop at the segment's end or not. Once the direction of travel is reverted from forward to backward or vice versa, the "velocity endpoint" is selected. Also, if the course has a sharp bend at its end or terminates completely, the "velocity endpoint" is selected. For some vehicles various additional protective mechanisms are integrated. If significant lateral deviations occur or if the difference between the set and actual steering angle is too large, the vehicle decelerates to 0,2m/s. It will only accelerate to the original velocity if the deviation was minimized. If an error occurs or the vehicle drives beyond the end point, the velocity is set to 0. 2.1.6 Driving Modes During normal operation of the vehicle, two different operation modes are used. The idle mode (see section Abschnitt 2.1.6.1) and the automatic mode (see section 2.1.6.3). In idle mode the vehicle can be operated by a driver or the segment search can be carried out. In the automatic mode, the steering controller controls the vehicle. The parameter test mode (see section 2.1.6.2) will only be accessed during commissioning. NOTE! 2.1.6.1 All other modes are applied in test carriers / prototypes or are applicable for demonstrations on exhibitions. They are not relevant for productive systems. Idle Mode This mode allows to operate the vehicle manually or the vehicle control unit can initiate a segment search. English, Revision 01, Date: 20.09.2012 18 Guidance Control in Detail 2.1.6.2 HG 73650 Modus Parameter Test This mode can only be activated if the vehicle is standing still. In this mode all basic functions can be tested during commissioning. For this purpose the terminal program provides a special menu where you can enter velocity and steering angle via the keyboard directly (see section 4.9 on page 40). Important characteristics including incremental data as well as actual velocity and steering angle will be displayed here. 2.1.6.3 Automatic Mode In this mode the steering controller guides the vehicle. If the vehicle shall be operated manually (by a driver) you have to exit this mode. To access or quit this mode the user sends a request to the controller via the interface of the vehicle control unit, the keypad or the terminal program. It is possible to quit this mode at any time. When requesting automatic mode, the vehicle has to fulfill the following conditions: - the vehicle must be standing still - the vehicle must be prepared for automatic mode - - no vehicle errors are active - the determined position has to correspond to the given segment it must be possible to drive the given segment 2.1.7 Vehicle Options: Fork Lift Vehicle The software of the steering controller offers various additional specifications for guided vehicles, such as triggering an emergency stop. The most common application is a fork lift vehicle (stapler). Further characteristics (maximum steering angle, maximum velocity, operation with a trailer or articulated steering) can be generated upon request. See our manual for a comprehensive list of pre-defined vehicle options. 2.2 The Internal Sensor Fusion The internal sensor fusion calculates the position and the heading of the vehicle. By using a short-term accurate odometric system (encoder) and the absolute transponder positioning sensor and / or Sky-Trax the advantages of both systems are combined. The odometric system is initialized through the absolute position sensor and outputs the vehicle position and vehicle heading everywhere along the track. The inaccuracies accumulated within the system over time and distance are reset whenever an absolute position sensor (transponder) is available. Additionally the accuracies of both systems are compared and corrected proportionally. In addition the sensor fusion outputs the velocity of the vehicle as well as the accuracy estimation of the respective position. The accuracy estimation is based on the accuracy table (see manual). The table is designed in such a manner that the inaccuracy immediately after crossing a transponder is small. That means errors grow faster related to the distance travelled since the angle is steadily worsening as well. Thus the accuracy coding declines accordingly with every meter travelled. English, Revision 01, Date: 20.09.2012 19 Guidance Control in Detail 2.2.1 HG 73650 Odometric System The odometric system determines the change in the vehicle position and vehicle heading using the wheel rotations and/or steering angle and/or gyro. There are different odometric systems available: Number Description Advantages / Disadvantages 0 There are 2 monitored wheels on 1 fixed axle. Encoder 1 measures the rotations of the left wheel. Encoder 2 measures the rotations of the right wheel. - Advantage: simple structure Disadvantage: load dependent if the vehicle has airfillled rubber tires 1 There are 2 monitored wheels on 1 fixed axle. The alteration in heading angle is determined by the steering angle. - Advantage: less load dependent Disadvantage: inaccuracies in tight turns may occur 2 There are 2 monitored wheels on 1 fixed axle. The distance travelled by the vehicle is the average distance travelled by both wheels. The alteration in heading is determined by a gyro. - Advantage: less load dependent Disadvantage: additional gyro required 3 There are 2 monitored wheels on 1 steered axle. The alteration in heading angle is determined by the steering angle. - Disadvantage: inaccuracies in tight turns may occur Load dependent if the vehicle has airfilled rubber tires There are 2 monitored wheels on 1 steered axle. The distance travelled by the vehicle is the average distance travelled by both wheels. The alteration in heading is measured by a gyro. - 4 Table 4 - Advantage: less load dependent Disadvantage: additional gyro required List of the different odometric systems available, including advantages and disadvantages All odometric systems have the advantage to be highly accurate over short distances and are prepared to supply the vehicle position and heading at any time. At start-up first of all the position must be initialized. The accuracy of odometry is affected over long distances and results in an accumulation of errors of the sensors and calculations. This may possibly cause considerable deviations. Sensor failure detection is possible by comparing two different odometric systems. Example The position of a truck is determined by odometry 2 (primary odometry). Additionally odometry 0 will be calculated also (secondary odometry). Subsequently the measured values will be compared. The tolerances of the angle, as well as X and Y position can be parameterized. Odometry 0 will slightly differ in distance travelled from odometry 2 (the inaccuracy amounts to about 1% of the distance travelled). At the next transponder / Sky English, Revision 01, Date: 20.09.2012 20 Guidance Control in Detail HG 73650 Trax tag both odometries will be corrected and the difference between both is 0 again. If the encoder is defective, odometry 0 calculates a distance. Odometry 2 measures a distance that is too short. Over a certain distance a considerable differentiation between both odometries exists (inaccuracy from 30% up to 50% of the distance travelled). Monitoring will be triggered accordingly and the vehicle stops. 2.3 Sensors for navigation 2.3.1 The Transponder Antenna The transponder antenna outputs the position and the code of the transponder currently located underneath the antenna. The position lateral to the direction of travel has an accuracy of approximately 1 cm. The detection range is -250 mm up to +250 mm. Reading distance is approximately. 50 to 100 mm. The position in direction of travel of the transponder is only transmitted when the center of the transponder antenna is crossing the transponder through the position impulse. When there is no transponder underneath the antenna, there is no output. It is only allowed to have 1 transponder at a time underneath the antenna. The parameters of the transponder antenna a set via an RS 232 interface which is described in the supplied antenna manual. 2.3.1.1 Transponder System for Positioning Calculation NOTE! In order to calculate the position it is usually not sufficient to read only one single transponder. Exception: the transponder can only be approached in one direction (e.g. transfer station). The antenna is capable of outputting the position of the transponder with regards to the antenna, however the direction of the antenna with regards to the transponder cannot be determined. Thus two transponders have to be crossed to determine the position and angle of the vehicle. The odometry determines the track between these two transponders. The transponder list enables allocating absolute positions to the individually measured points (transponders). Thus it is necessary to read two transponders in order to determine the direction of the vehicle. Depending on the degree of correlation between the measured distance and the positions of the transponders in the transponder list, the quality of the measurement can be estimated. The odometry is then corrected using the calculated position and the heading angle in relation to the measurement quality. If the quality of the measurement is not sufficient, the measurement will be ignored. The limits for the quality determination are partly definable or partly listed in the corresponding table of the reference manual. English, Revision 01, Date: 20.09.2012 21 Guidance Control in Detail HG 73650 It is the task of these tolerance definitions to protect a sufficient accuracy of the position against incorrect measurements. Thus over short distances only a measurement of high quality will be accepted. This prevents a positioning quality degradation caused by incorrect readings. The limits defining a position as too inaccurate can partly be adjusted or are defined according to the tables in the reference manual. Those tables show that after 9 meters any measurement will be accepted. This ensures the continuation of the operation after a long distance drive without transponders and avoids a system shut down. The table shows practical, experience-based values. 2.3.1.2 Initialization of the Transponder Sensor Fusion There are two options for the initialization of the transponder sensor fusion. 1. The vehicle reads the start transponder. The start transponder is a normal transponder which only has one possible direction to be crossed. This may be the case e.g. at a transfer station. The start transponder is marked accordingly and the start heading is recorded in 1/100o. A start transponder is only evaluated directly after the system has been switched on. 2. The vehicle crosses several transponders. After the first transponder a position cannot yet be calculated. After the second transponder the position and heading can be calculated. After the third transponder the position is confirmed and the accuracy is set to a good value provided the position of the third transponder corresponds to the position of the previous ones. If the vehicle is steered by a driver (manual mode) it sometimes happens that the transponders are not crossed. This results in a decreasing accuracy of the odometry. As the system has not been switched off the only remaining possibility for initialization is number 2. 2.3.1.3 Transponder List The transponder list is a CSV file (separated by a semicolon). It can be created and edited with Excel or other programs. The steering controller can import and export this list with the X-modem protocol using a terminal program. Additionally the list can be displayed from the steering controller with the terminal program. 1;1;-2480;-4555;9000;0;0;1 2;2;-2462;-3171;0;0;0;0 3;46;6000;0;0;0;0;0 4;4336;9500;0;0;0;0;0 5;8012;031;6891;9000;127;127;1 These values have the following meaning for the steering controller: English, Revision 01, Date: 20.09.2012 22 Guidance Control in Detail HG 73650 Number Code X Pos. Y Pos. Attribute 1 Attribute 2 Attribute 3 Attribute 4 1 1 -2480 -4555 9000 0 0 1 2 2 -2462 -3171 0 0 0 0 3 46 6000 0 0 0 0 0 4 4336 9500 0 0 0 0 0 5 8012 3031 6891 9000 127 127 1 Table 5 Explanation transponder list The first column displays the serial numbers of the transponder tags. The second column includes the transponder or Sky-Trax codes. The following two columns stand for the position in X or Y direction. In the fifth column the heading of the start transponder is recorded in 1/100o. For Sky-Trax tags attribute 1 and 2 display the tag size in mm. Due to size difference of the tags as well as differences in the height of the mounting points deviations may occur. The correct value is derived from commissioning (see chapter 4 on page 28). 2.3.2 Sky-Trax This system is based on an image processing technology, usually using an upward directed camera. The camera on the vehicle is positioned in such a way that it is able to read the two-dimensional tags under the ceiling. Theses readings are transmitted back and the relative position and rotational orientation will be supplied. Additionally the tag code will be transmitted. If there is no tag in the camera's coverage area no position will be transmitted. There may be several tags in the camera's detection range. As the Sky-Trax camera has only one ethernet-interface, its output must be converted by the WLAN radio modem G 76431 via RS 232 (ethernet interface of the HG 61430 is not yet available). The WLAN radio modem offers the additional advantage that the images captured by the camera can also be displayed on a stationary controller. This facilitates an easy parameterization of the camera. One disadvantage of the Sky-Trax System is the great distance between the tag and the camera. The further away the tag is from the camera, the greater is the detection range and area coverage of the camera. However uneven surfaces or a fully suspended vehicle have a negative effect. A position error caused by vehicle inclination depends on the degree of tilt and the distance to the tag. 2.4 Vehicle Control Unit The track guidance controller communicates with the vehicle control unit via CAN Bus, Profibus or Ethernet. The vehicle control unit adapts the steering controller to the vehicle. This offers the advantage of a standard interface. The customer can directly affect the adaptation and is therefore able to make the necessary adjustments. Vehicle control unit and steering controller may mutually monitor their communication. This guarantees a higher level of security. The vehicle control unit is responsible for control- English, Revision 01, Date: 20.09.2012 23 Guidance Control in Detail HG 73650 ling vehicle components such as motor controller, brake, speed and steering. In some cases a steering servo (e.g. Berger Lahr) or a motor control can be directly controlled by the vehicle control unit. In addition to the serial interfaces 4 IO channels are available. The configuration depends on the set vehicle option. For most vehicle options IO1 is the input from the position impulse of the transponder antenna. IO4 is the output for emergency stop. The number of in- and outputs can be increased by an optional IO extension by IFM (see section 1.3.1 on page 6). English, Revision 01, Date: 20.09.2012 24 Interfaces 3 HG 73650 Interfaces The steering controller has several interface options providing data transmission. These include 2 CAN, 1 Profibus, 1 Ethernet and 4 serial RS232 interfaces. Additionally the optional internal radio modem can be accessed via an integrated interface. This chapter provides an overview of the different interfaces. In the annex of the reference manual you will find a tabular listing of the data actually transferred. NOTE! You will find the hardware description of the interfaces in the provided user manual for control unit HG 61430. 3.1 CAN Bus Detailed specifications of the CAN messages are described in the reference manual. 3.1.1 CAN 1 Interface 1 is responsible for the communication of general functions of the steering controller. These are: • status information of the steering controller • steering angle, nominal velocity etc. • position output of internal sensor fusion • communication with vehicle control unit (segments, status of vehicle, etc.) • communication with transponder antenna • communication with gyro • communication with IO extension 3.1.2 CAN 2 Interface 2 is responsible for the communication of the additional functions of the steering controller. These include: • communication with the laser scanner • communication with the steering servo • communication with the angle sensor (for backward movement of the trailer) • communication with guide wire antenna HG 73350 • communication with evaluation unit for 2 cameras HG 738840 • command box of the gyro • remote control of the basic features with CAN Bus English, Revision 01, Date: 20.09.2012 25 Interfaces HG 73650 3.2 Profibus The device works as a slave with profibus-DP V0 according to DIN E 19245 T3. The interface offers an automatic baud rate detection. The profibus address may be adjusted. You will find detailed specifications accordingly in the reference manual. 3.3 Ethernet The ethernet interface operates at 10 Mbit/s. For further specifications please see the reference manual. 3.4 Serial Interfaces You will find detailed specifications of the serial interfaces in the reference manual. 3.4.1 SIO 1 SIO1 is connected to the optional internal narrow band radio modem. 3.4.2 SIO 2 SIO2 is a RS 232 interface with a predefined baud rate 8 bit, no parity and 1 stop bit. The following protocols can be configured via parameters: Name Description Camera Connection of a PC for performing edge detection with a PMD camera (company internal use) Remote control Remote control protocol of the basic functions via the narrow band radio modem SICK scanner Reads angles and distances from a SICK scanner (company internal use) SIO 2 protocols Table 6 3.4.3 SIO 3 SIO3 is an adjustable RS 232 interface with the following default values: baud rate 8 bit, no parity and 1 stop bit. The following protocols can be selected with parameters: Name Description Laser scanner Connection of a laser scanner HG 43600XA (can also be connected via CAN Bus) Sky-Trax Connection of a Sky Trax camera SICK position Connection of a PC calculating position and steering angle with a SICK scanner (company internal use) Table 7 SIO 3 protocols English, Revision 01, Date: 20.09.2012 26 Interfaces 3.4.4 HG 73650 SIO 4 SIO4 is an adjustable RS 232 interface with the following default values: baud rate 8 bit, no parity and 1 stop bit. The following protocols can be configured via parameters: Name Description Convoi Leader Telegram of the leading vehicle (electronic tow-bar, company internal use) Convoi Chaser Telegram of the following vehicle (electronic tow-bar, company internal use) Ballett protocol Connection of a PC ensuring collision free operation of 4 vehicles (company internal use) Table 8 SIO 4 protocols 3.5 Terminal Terminal is an adjustable RS 232 interface with the following default values: baud rate 8 bit, no parity and 1 stop bit. The terminal emulation is ANSI. It offers communication via a connected PC/laptop, e.g. for commissioning. The following functions are possible: • display of the current data • display of the commissioning menu, which allows monitoring and controlling all basic vehicle functions via keys • recording of the current data in order to prepare them for import into Excel • import, export and editing of parameters • import, export and editing of segments • import, export and display of transponders / Sky-Trax tags 3.6 IO 1 to 4 The configuration depends on the pre-set vehicle options. In most cases IO1 is used as the position impulse input from the transponder antenna and IO4 is the output for emergency stop. The exact allocation is shown in the corresponding tables in the reference manual. English, Revision 01, Date: 20.09.2012 27 Commissioning 4 HG 73650 Commissioning For hardware mounting please see our included hardware description for control unit HG 61430. CAUTION! When starting the commissioning of the vehicle ensure that all safety devices are installed and functional! NOTE! At the beginning of commissioning, the vehicle has to be lifted up from the ground! If the vehicle has a vehicle control unit (recommended) part of the commissioning tasks can be fulfilled without the vehicle itself. This primarily affects the communication between the steering controller and the vehicle control unit. 4.1 Commissioning of Communication Internal system communication between the components is normally done via CAN bus. Therefore it is recommended to use a corresponding CAN adapter and a CAN display program, for example Peak CAN Bus Adapter and PCAN Explorer. Figure 13 PCAN explorer displaying messages of the steering controller When switched off the resistance of the CAN bus has to be measured. The CAN bus must be terminated with 60 ohm all together (either 120 ohm each end of a line network or 60 ohm centrally of a star network). Only if this can be assured it is possible to start up the guidance controller and test the basic communication via CAN bus with the PCAN explorer. Subsequently further commissioning should be implemented using a PC / laptop and the corresponding terminal program. English, Revision 01, Date: 20.09.2012 28 Commissioning HG 73650 4.2 Commissioning Terminal Program For further commissioning purposes use the operating software running on the steering controller. The software can be called up via the RS 232 interface and a connected PC running a terminal program. Below we refer to the HyperTerminal® (Hypertrm.exe)Program, which is included in Microsoft Windows. It is also possible to use any other terminal program capable of ANSI emulation. Should you use another software please see our manual provided and adjust the values described in section 4.2.2 Please continue on page 30. 4.2.1 Finding Hyper Terminal / Adding Hyper Terminal to the system First make sure that the Hyper Terminal software is installed on your system. This is important, as it is not necessarily part of the Windows default installation. If it is not installed it can be easily added later on. Therefore the original Microsoft operating system installation CD is required. The installation process is as follows: 1. Open the system control (in the picture Windows 95). Figure 14 Add Hyper Terminal to the System 2. Select Icon Software. Select the tab Windows set-up. Select submenu Connections. Click . 3. Check whether there is a checkmark in front of (yes = ; no = ). If yes the program is installed on your system, then cancel these two dialogs and move to the next step. Otherwise add the checkmark and close both windows with . 4. Subsequently you will be asked to insert the Windows installation CD in the CD drive. Then confirm the following messages with . HyperTerminal will be installed and is available for operation. English, Revision 01, Date: 20.09.2012 29 Commissioning 4.2.2 HG 73650 Parameter Settings The following parameter settings are required. Adapt the COM-Port, if necessary (see below): Terminal Settings Monitor Program Baud rate 115200 Baud Also possible: 9600, 19200, 38400 und 57600 Baud Terminal emulation ANSI Terminal 24 lines, 80 columns Parity None Datenbits 8 Stop bits 1 Flow control None PC interface (port) COM1 (may differ in cases, see below) Table 9 Terminal settings for the monitor program If you use another port than COM1 with Hyper Terminal, change the port in the following way: 1. In the file menu select menu item properties (or click on the corresponding icon ). The window shown to te right opens. 2. Choose the corresponding port from the submenu connect and . Save the modified values, if an appropriate confirm with message appears when quitting Hyper Terminal. 4.3 Using the Terminal Program Starten Sie HyperTerminal auf dem PC und verbinden Sie den entspreStart Hyper Terminal on your PC and connect the corresponding COM port to the connector "Terminal" on the control unit HG 61430. Switch on control unit HG 64130 and wait until the last message from the operating system is visible. Subsequently fill in code 314159 and confirm with abgeschlossen werden. The following menu will be displayed: English, Revision 01, Date: 20.09.2012 30 Commissioning HG 73650 4.4 Main Menu Main Menu HG73650V10.04 14.05.09 Kompilat Jun 03 2009 A: B: C: D: E: F: Main Monitor Navigation Main Monitor Sensorfusion Vehicle Monitor Datalogging Test Monitor Errorlogger G: Parameters Navigation H: I: J: K: L: M: N: O: P: Q: R: S: Load Parameters form EEPROM Save changed Parameters Update Parameters (PC -> Controller) Download Parameters (Controller -> PC) Update Segments (PC -> Controller) Download Segments (Controller -> PC) Show Segments Update Transponder (PC -> Controller) Download Transponder(Controller -> PC) Show Transponder Show Dokumentation Stop Communication [ESC] -> back/cancel Figure 15 Screenshot: Main Menu From this menu you are able to access all other menus. Applying the characters on the left you can branch off into the corresponding submenus. Leave the submenus using the key. The main menu is divided into three sections. The top area from to is used for the display or recording of data. In this field a simple manual vehicle controller () is integrated as well. The middle section has only one menu item. With further parameter menus. you are able to branch off to all The lower section of the menus is for saving and loading the parameters. Here it is possible to transmit data from / to HG 61430. Users also have the option to view the data. English, Revision 01, Date: 20.09.2012 31 Commissioning HG 73650 4.5 (A) Main Monitor Navigation Once has been selected in the main menu, the following display appears. Main Monitor Navigation Vehicle: Angle: Pos X: Pos Y: Speed: Steer: 0.00 0.00 0.00 0.00 0.00 [ ° ] [ m ] [ m ] [m/s] [ ° ] Target: Angle: Pos X: Pos Y: Speed: Steer: Segment: Number1: 255 / 4 [R/T] Number2: 255 / 255 [R/T] Number3: 255 / 255 [R/T] Point : 0 [Nr.] Sample : 0.00 [ ] Attrib.: 0 Status : Start Error: Vehicle : Condition: Request : Status: Timer : Main : Clearance: Modus: Wait Wait Steering: Deviation: Curvature: 0.00 0.00 0.00 0.00 0.00 [ ° ] [ m ] [ m ] [m/s] [ ° ] 40 A8 0 Deviation: Angle: 0.00 Diag.: 0.00 Axis : Speed: 0.00 Steer: 0.00 Front: 0.00 Rear : 0.00 Accur: 100.00 [ ° ] [ m ] [ m ] [m/s] [ ° ] [ m ] [ m ] [ m ] 0.00 [ ° ] 0.00 [ ° ] 1 Idle Mode Figure 16 Screenshot: Main Monitor Navigation 4.5.1 Monitor Outputs Parameters "Vehicle" display the current vehicle values: Name Description Unit Angle Actual vehicle heading degrees Pos X X component of position of the symmetrical axis of the vehicle meters Pos Y Y component of position of the symmetrical axis of the vehicle meters Speed Current speed of vehicle meters / second Steer Current steering angle of vehicle degrees Table 10 Main Monitor Navigation: Section "Vehicle" English, Revision 01, Date: 20.09.2012 32 Commissioning HG 73650 Parameters "Target" summarize the nominal values of the current segment. Name Description Unit Angle nominal vehicle heading degrees Pos X Set value for X component of position of the symmetrical axis of the vehicle meters Pos Y Set value for Y component of position of the symmetrical axis of the vehicle meters Speed Nominal value for speed of the vehicle meters / second Steer nominal value for steering angle of vehicle degrees Table 11 Main Monitor Navigation: Section "Target" Parameters "Deviation" displays the difference between actual und nominal values. Name Description Unit Angle Deviation of the heading of the vehicle degrees Diag. Lateral displacement of the vehicle meters Axis Longitudinal deviation of the vehicle meters Speed Error in velocity meters / second Steer Error in steering angle degrees Front Deviation of the front axle of the vehicle meters Rear Deviation of the rear axle of the vehicle meters Accuracy Estimated position error meters Table 12 Main Monitor Navigation: Section "Deviation" Parameters "Segment" summarize all data related to segments. Name Description Number1 Segment received from / sent to the vehicle control unit. It is the most current segment. Number2 Segment received from / sent to the vehicle control unit. It is the segment following next. Number3 Segment received from / sent to vehicle control unit. It is the segment following the next segment. Point Number of the last crossed support point on the current segment Table 13 Main Monitor Navigation: Section "Segment" (part 1 of 2) English, Revision 01, Date: 20.09.2012 33 Commissioning HG 73650 Name Description Sample Position between the support points. When starting a segment, sample is set to 1, raises up to 3 and is reset to 2 when reaching the third support point of the same segment (the next support points are used for the reconstruction of the track). Once the segment has been finished, the value rises above 3 as there are no more support points available. Attrib. The current attribute is displayed in hexadecimal format. The 16 lower bits are pre-used internal bits, 16 upper bits are freely programmable; see section 2.1.2 on page 15. Status As long as the vehicle is still in front of the second support point of the segment "Start" is displayed. Between point 2 and 3 the status is "Start+1". Between the last point and the second last point the status is "End-1". Once the last point has been crossed the status is "End". For all other sections the status is "middle". Main Monitor Navigation: Section "Segment" (part 2 of 2) Table 13 Parameters "Error" summarize the different errors that might occur. Name Description Vehicle Bit coded vehicle error (see reference manual) Condition Error of automatic mode (see reference manual) Request Error when requesting automatic mode (see reference manual) Main Monitor Navigation: Section "Error" Table 14 Parameters "Steering" summarize the components of the steering angle. Name Description Deviation Part of the steering angle that is generated from the deviation of the nominal position. Curvature Part of the steering angle that is generated from the curvature of the target course. Table 15 Main Monitor Navigation: Section "Steering" Parameters "Status" indicate the status of the steering controller. Name Description Timer Status of the navigation (50 ms timer that is running the navigation) Main Status of the main program (interface user) Table 16 Main Monitor Navigation: Section "Status" English, Revision 01, Date: 20.09.2012 34 Commissioning HG 73650 In case "Clearance" is set to 1, the vehicle control unit can operate the steering controller. If there are any manual entries via the terminal software, this clearance will be cancelled. Then the steering controller only reacts to inputs from the terminal software. 4.5.2 Input Options Key Desription ESC Branch to the Main Menu 1 Set segment 1 manually (current segment) 2 Set segment 2 manually (next segment) 3 Set segment 3 manually (after next segment) A Set automatic mode manually Space bar Terminate automatic mode F Set release for control unit G Toggle release for manually set automatic mode J Drive left offset I Drive no offset L Drive right offset K Switch on convoy mode (if available for the used vehicle model) C Toggle release of central control unit R Reset of default values for vehicle during vehicle simulation Table 17 Main Monitor Navigation: Input options 4.6 (B) Main Monitor Sensorfusion Main Monitor Sensorfusion Antenna1: Status : Code : Delta Y: Sum Vo.: Current: Reading: Pos. W : Pos. Y : Odometrie1: Angle S: Dev.X S: Dev.Y S: Dist. : 0 0 0.000 0 0 0 0.000 0.000 0.00 0.00 0.00 0.00 [ ] [ ] [ m ] [ ] [ ] [ ] [ m ] [ m ] Antenna2: Status : Code : Delta Y: Sum Vo.: Current: Reading: Pos. W : Pos. Y : [ [ [ [ Odometrie2: Angle D: Dev.X D: Dev.Y D: Dist. : ° m m m ] ] ] ] Deviation Single: Angle S: 0.00 [ ° ] Dev.X S: 0.00 [ m ] Dev.Y S: 0.00 [ m ] 0 0 0.000 0 0 0 0 0 0.00 0.00 0.00 0.00 [ ] [ ] [ m ] [ ] [ ] [ ] [ m ] [ m ] [ [ [ [ ° m m m ] ] ] ] Deviation Double: Angle D: 0.00 [ ° ] Dev.X D: 0.00 [ m ] Dev.Y D: 0.00 [ m ] Odometrie: Status : 0 Angle : 0.00 Pos X : 0.00 Pos Y : 0.00 Speed : 0.00 Accur. : 100.00 [ ] [ ° ] [ m ] [ m ] [m/s] [ m ] Sky Trax: MC1/MC2: MW1/MW2: Counter: Abstand: Winkel : Pos : 0; 0; 0; 0.00; 0.00 0.00; Gyro: Angle : Offset : Move : 0.00 [ ° ] 0.00 [ ° ] 0 [ ] 0 0 0 0.00 0.00 [ESC] -> back/cancel Figure 17 Screenshot: Main Monitor Sensorfusion English, Revision 01, Date: 20.09.2012 35 Commissioning HG 73650 "Antenna 1" defines the status of antenna 1. Name Description Status Bit coded antenna status (see reference manual) Code Read transponder code Delta Y Position of the transponder underneath the antenna in Y direction Sum Vo. Signal strength of the transponder (a measure for transponder signal strength, has to be > 400) Current Current consumption of the transmitter Reading Number of transponder readings Pos. X X position of transponder taken from the transponder list meters Pos. Y Y position of transponder taken from the transponder list meters Table 18 Unit Main Monitor Sensorfusion: Section antenna 1 "Antenna 2" defines the status of antenna 2. Name Description Status Bit coded antenna status (see reference manual) Code Read transponder code Delta Y Position of the transponder underneath the antenna in Y direction Sum Vo. Signal strengthof the transponder (a measure for Transponder signal strength, has to be > 400) Current Current consumption of the transmitter Reading Number of transponder teadings Pos. X X position of transponder taken from the transponder list meters Pos. Y Y position of transponder taken from the transponder list meters Table 19 Unit Main Monitor Sensorfusion: Section antenna 2 "Odometry" defines the status of the odometric system. Name Description Status Output status byte (see reference manual) Angle Heading of the vehicle (mathematically positive) degrees Pos X X position of the vehicle meters Table 20 Unit Main Monitor Sensorfusion: Section odometry (part 1 of 2) English, Revision 01, Date: 20.09.2012 36 Commissioning HG 73650 Name Description Unit Pos Y Y position of the vehicle meters Speed Velocity of the vehicle meters / second Accur. Number of transponder readings Table 20 Main Monitor Sensorfusion: Section odometry (part 2 of 2) "Odometrie1" defines the status of the odometric system of antenna 1. Name Description Unit Angle Heading of the vehicle relative to the last transponder crossed by antenna 1 degrees Pos X X Position of the vehicle relative to the last transponder crossed by antenna 1 meters Pos Y Y Position of the vehicle relative to the last transponder crossed by antenna 1 meters Dist. Distance traveled since capturing the last transponder meters Table 21 Main Monitor Sensorfusion: Section odometry 1 "Odometrie2" defines the status of the odometric system of antenna 2. Name Description Unit Angle Heading of the vehicle relative to the last transponder crossed by antenna 2 degrees Pos X X Position of the vehicle relative to the last transponder crossed by antenna 2 meters Pos Y Y Position of the vehicle relative to the last Transponder crossed by antenna 2 meters Dist. Distance traveled since capturing the last transponder meters Table 22 Main Monitor Sensorfusion: Section odometry 2 "Sky Trax" defines the status of the Sky-Trax System. Name Description MC1/MC2 Left Tag code of the first tag Rigth Tag code of the second tag Table 23 Unit [ ] Main Monitor Sensorfusion: Section Sky-Trax (part 1 of 2) English, Revision 01, Date: 20.09.2012 37 Commissioning HG 73650 Name Description MW1/MW2 Left Tag angle of the first tag Right Tag angle of the second Tag Left Counts all characters received from Sky-Trax Right Counter of all calculated positions Left Measured distance of both tags Right Theoretical distance of both tags Counter Distance Unit [o] [ ] [meters] Angle Calculated steering angle of the Sky-Trax System [ ] Pos Left Calculated X Position of the Sky-Trax System [meters] Right Calculated Y Position of the Sky-Trax System Table 23 Main Monitor Sensorfusion: Section Sky-Trax (part 2 of 2) "Deviation Single" summarizes the deviations of the single measurements. For a single measurement, 1 antenna, 2 transponders and the distance traveled between these two transponders are required. Name Description Unit Angle S Deviation between the previous heading angle of the vehicle and the last single measurement degrees Dev.X S Deviation between the previous vehicle position in X direction and the last single measurement meters Dev.Y S Deviation between the previous vehicle position in Y direction and the last single measurement meters Table 24 Main Monitor Sensorfusion: Section "Deviation Single" "Deviation Double" summarizes the deviations of the double measurements. For a double measurement, 2 antenna, 2 transponders and the distance traveled between these two transponders are required. Name Description Unit Angle D Deviation between the previous heading angle of the vehicle and the last double measurement degrees Dev.X D Deviation between the previous vehicle position in X direction and the last double measurement meters Dev.Y D Deviation between the previous vehicle position in X direction and the last double measurement meters Table 25 Main Monitor Sensorfusion: Section "Deviation Double" English, Revision 01, Date: 20.09.2012 38 Commissioning HG 73650 Unter Gyro sind die wichtigsten Werte des Gyro zusammengefasst. Name Description Unit Angle Angle of the gyro without drift correction and angle offset degrees Offset Offset for correction of drift while standing degrees Move Status is 1 if the vehicle is moving Table 26 Main Monitor Sensorfusion: Section "Gyro" 4.7 (C) Vehicle Monitor The Vehicle Monitor is an output designed for all vehicle options. The output for each specific vehicle option is shown in the reference manual. 4.8 (D) Datalogging For trouble shooting during commissioning or operation the steering controller offers two options - data logging, as described below and error logging, described in section 4.10 on page 42. The best and more flexible solution is data logging. Using this option a laptop has to be connected during operation. It will log data applying the terminal program. Which data is logged can be selected in the corresponding parameter menu. As the selection of output values depends on the parameters, these values are described in chapter 4.11.9 „(I) Datalogging (Parameterization of the output)“. For the process of data logging first press button in the main menu. Subsequently the following window will be displayed: Please press spacebar to start logging ! [ESC] -> back/cancel Figure 18 Screenshot: Datalogging Then select Hyperterminal -> Transfer -> Capture Text, afterwards name the file and start recording with Hyper Terminal. English, Revision 01, Date: 20.09.2012 39 Commissioning HG 73650 Only then you should press the space bar! A correct sequence of these steps is essential. Otherwise the heading of data recording and the related allocation of these data would be lost. ATTENTION! When quitting the data logging, first terminate the capture by following the sequence Hyperterm -> Transfer -> Capture Text -> Stop. Then exit the submenu by pressing . 4.9 (E) Test Monitor The test monitor enables controlling the values output by the Steering Controller via keys. This is especially useful during commissioning, in order to test the interfaces and functions of the vehicle. Parameter Test Position: Angle: Pos X: Pos Y: 0.00 0.00 0.00 Steering: Speed : Aktual 0.00 0.00 Output P I D Ramp Poti Breakes : : : : : : : Odometric System: Inkrements left : Inkrements right: Gyro : Target 0.00 0.00 unit [ ° ] [m/s] Speed 0.00 0.00 0.00 0.00 0.00 127 0 [ 0 [ 0 [ 0.0000 [ ¯ ] ] ] ] Possible Action Left : A Right : Faster: W Slower: More : X Less : Stopp : Space Forwa.: F Neutr.: More : O Less : D S Y N L Rew.: R [ESC] -> back/cancel Figure 19 Screenshot: Test Monitor 4.9.1 Display outputs "Position" indicates the position of the vehicle. Name Description Unit Angle Heading of the vehicle (mathematically positive) degrees Pos X X Position of the vehicle meters Pos Y Y Position of the vehicle meters Table 27 Test Monitor: Section "Position" English, Revision 01, Date: 20.09.2012 40 Commissioning HG 73650 "Odometric System" outputs the sensor data for the odometry. Name Description Inkrements left Increments of the left wheel Inkrements right Increments of the right wheel Gyro Angle of the gyro without offsets Table 28 Unit degrees Test Monitor: Section "Odometric System" Additionally nominal and actual steering angle as well as nominal and actual velocity are displayed. Name Description Unit Steering/Aktual Actual steering angle degrees Steering/Target Nominal steering angle degrees Speed / Aktual Actual velocity meters / second Speed / Target Nominal velocity meters / second Output Output of the velocity regulator *) P P- Portion of the velocity regulator *) I I- Portion of the velocity regulator *) D D- Portion of the velocity regulator *) Rampe Acceleration ramp *) Poti Control of the digital potentiometer *) *) if available in the selected vehicle option Table 29 4.9.2 Test Monitor: Section actual and nominal steering angle Input Options Key Description ESC Return to the main menu a Nominal steering angle - 0,5 degrees A Nominal steering angle - 2 degrees b Nominal steering angle - 0,5 degrees B Nominal steering angle+ 2 degrees w Nominal velocity +0,1 meters / second Table 30 Unit Test Monitor: Input Options (part 1 of 2) English, Revision 01, Date: 20.09.2012 41 Commissioning HG 73650 Key Description Unit W Nominal velocity +0,5 meters / second s Nominal velocity -0,1 meters / second S Nominal velocity - 0,5 meters / second Space bar Nominal velocity = 0 meters / second + Increase brake (if available in the selected vehicle model) - Decrease brake (if available in the selected vehicle model) Table 30 Test Monitor: Input Options (part 2 of 2) 4.10 (F) Error Logger In order to identify errors during commissioning or operation the steering controller offers two options. The first priority is the more universal data logging, described in section 4.8 on page 39, secondly we have the error logger, described below. In order to run the error logger it is not necessary to connect a PC / laptop during operation. In case of error it is sufficient to connect the PC / laptop subsequently, as the data remains stored inside the steering controller until it is switched off. The PC / laptop can retrieve the required data via a terminal software. However, always the same variables will be recorded (see Table 31 on page 43) at the time of a transponder position impulse. This limits the possibility of troubleshooting for positioning and it only works together with a transponder system. To record data button for Error logger in the main menu has to be pressed first. Then the following window will open. Please press spacebar to start logging ! [ESC] -> back/cancel Figure 20 Screenshot: (F) Error Logger Then select Hyperterminal -> Transfer -> Capture Text, afterwards name the file and start recording with Hyper Terminal. English, Revision 01, Date: 20.09.2012 42 Commissioning ATTENTION! HG 73650 Only then you should press the space bar! A correct sequence of these steps is essential. Otherwise the heading of data recording and the related allocation of these data would be lost. When quitting the data logging, first terminate the capture by following the sequence Hyperterm -> Transfer -> Capture Text -> Stop. Then exit the submenu by pressing . The generated CSV- file has the structure in the table below. The columns will be displayed when loading the CSV- file into a spreadsheet application such as Excel. Column Name Description A Odo.dW_Neu Actual steering angle [ o ] based on odometry B Odo.dX_Neu Actual position, X component [m] based on odometry C Odo.dY_Neu Actual position, Y component [m] based on odometry D t_x_1 Transponder position underneath antenna 1 in X direction [m]. This position will be loaded via the code taken from the transponder table. E t_y_1 Transponder position underneath antenna 1 in Y direction [m]. This position will be loaded via the code taken from the transponder table. F t_x_2 Transponder position beneath antenna 2 in X direction [m]. This position will be loaded via the code taken from the transponder table. G t_y_2 Transponder position beneath antenna 2 in Y direction [m]. This position will be loaded via the code taken from the transponder table. H t_dy_1 Lateral displacement of transponder position beneath antenna 1 [m] I t_code_1 Transponder code read by antenna 1 J t_status_1 Status of transponder antenna 1 K t_dy_2 Lateral displacement of transponder position beneath antenna 2 [m] L t_code_2 Transponder code read by antenna 2 M t_status_2 Status of transponder antenna 2 N Lenkwinkel Actual steering angle [ o ] Table 31 Errorlogger: Vehicle Status (part 1 of 7) English, Revision 01, Date: 20.09.2012 43 Commissioning HG 73650 Column Name Description O M_auswertung Bitcoded; indicates the type of the latest calculation 0 x 10 individual evaluation antenna 1 0 x 20 individual evaluation antenna 2 0 x 40 double evaluation of antenna 1 0 x 80 double evaluation of antenna 2 P Schlechter_Transponder Latest transponder code where the odometry- based distance measurement between two transponders does not comply with the distance entries in the transponder table. Q Winkel_Fzg Actual vehicle heading [ o ] R Pos_X_Fzg Actual position, X component [m] S Pos_Y_Fzg Actual position, Y component [m] T Transponderabstand Distance between the current transponder and the previously read transponder taken from the transponder table [m] U Odometrieabstand Distance of the current transponder to the previously read transponder based on odometry V faktor_M Odometry and antenna offsets in longitudinal direction W faktor_N Odometry and antenna offsets in lateral direction X Winkel_V_ONS Angle calculated with factor_M and factor_N [ o ] Y Winkel_Tr Angle calculation between current and latest transponder based on the values in the transponder table Z Odo_Rechnung_1.dW_Neu Odometry- based angle for antenna 1 since current transponder [ o ] AA Odo_Rechnung_1.dX_Neu Odometry- based X position for antenna 1 since current transponder AB Odo_Rechnung_1.dY_Neu Odometry- based distance traveled for antenna 1 since current transponder [m] AC Odo_Rechnung_1.dSumme_Weg Odometry-based angle for antenna 1 since last transponder [ o ] AD Odo_Rechnung_1a.dW_Neu Odometry-based angle for antenna 1 since last transponder [m] AE Odo_Rechnung_1a.dX_Neu Odometry-based X position of antenna 1 since last transponder [m] Table 31 Errorlogger: Vehicle Status (part 2 of 7) English, Revision 01, Date: 20.09.2012 44 Commissioning HG 73650 Column Name Description AF Odo_Rechnung_1a.dY_Neu Odometry- based Y position for antenna 1 since last Transponder [m] AG Odo_Rechnung_1a.dSumme_Weg Odometry- based distance traveled for Antenna 2 since last transponder [m] AH Odo_Rechnung_2.dW_Neu Odometry-based for antenna 2 since current transponder [ o ] AI Odo_Rechnung_2.dX_Neu Odometry-based X position for antenna 2 since current transponder [m] AJ Odo_Rechnung_2.dY_Neu Odometry- based for antenna 2 since actual transponder [m] AK Odo_Rechnung_2.dSumme_Weg Odometry-based distance traveled for antenna 2 since current transponder [m] AL Odo_Rechnung_2a.dW_Neu Odometry-based angle for antenna 2 since last transponder [ o ] AM Odo_Rechnung_2a.dX_Neu Odometry-based X position for antenna 2 since last transponder [m] AN Odo_Rechnung_2a.dY_Neu Odometry-based Y position for antenna2 since last transponder [m] AO Odo_Rechnung_2a.dSumme_Weg Odometry-based distance for antenna 2 since last transponder [m] AP Calc_counter Counts the number of calculations already carried out AQ Int1_counter Counts the number of position impulses of antenna 1 AR Int2_counter Counts the number of position impulses of antenna 2 AS Zustand_Antenne_1 Status of Antenna1: 1. position impulse carried out 2. not used 3. Transponder too close or side lobe 4. Antenna switched off AT Zustand_Antenne_2 Status of Antenna 2: 1. position impulse carried out 2. not used 3. Transponder too close or side lobe 4. Antenna switched off AU Zustand_Rechnung_1 Status of positioning calculation with Antenna 1 0: no calculation 1: single measurement 2: double measurement Table 31 Errorlogger: Vehicle Status (part 3 of 7) English, Revision 01, Date: 20.09.2012 45 Commissioning HG 73650 Column Name Description AV Zustand_Rechnung_2 Status of position calculation with antenna 2: 0: no calculation 1: single measurement 2: double measurement AW t_Spannung_1 Signal strength generated by the transponder antenna 1 (should be > 400) AX t_Spannung_2 Signal strength generated by the transponder antenna 2 (should be > 400) AY Odo.siSpeed Actual velocity [m/s] AZ Richtung Direction 1: forward -1: backward BA last_t_dy_1 Position of last transponder lateral to direction of travel underneath antenna 1 [m] BB last_t_code_1 Transponder code of the last transponder read by antenna 1 BC last_t_dy_2 Position of the last transponder lateral to direction of travel underneath antenna 2 [m] BD last_t_code_2 Transponder code of the last transponder read by antenna 2 BE Fehler_Counter_5 Error counter for single measurements with antenna 1 Constant: everything OK +1: distance of transponders does not fit +10: direction not OK (parameter) - Distance of transponders too small (parameter) - Same transponder code as before BF Fehler_Counter_6 Error counter for double measurement with Antenna 1 Constant: everything OK +1: transponder distance does not fit +10: direction not OK (parameter) - Distance of transponders too small (parameter) - Same transponder code as before Table 31 Errorlogger: Vehicle Status (part 4 of 7) English, Revision 01, Date: 20.09.2012 46 Commissioning HG 73650 Column Name Description BG Fehler_Counter_7 Error counter for single measurement with antenna 2 Constant: everything OK +1: transponder distance does not fit +10: direction not OK (parameter) - Distance of transponders too small (parameter) - Same transponder code as before BH Fehler_Counter_8 Error counter for single measurement with antenna 2 Constant: everything OK +1: transponder distance does not fit +10: direction not OK (parameter) - Distance of transponders too small (parameter) - Same transponder code as before BI Fehler_Tr_ Saves the last incorrect transponder distance BJ Fehler_MN_ Saves the last incorrect odometry distance BK last_t_x_1 t_x_1 of the last transponder BL last_t_y_1 t_y_1 of the last transponder BM last_t_offset_x_1 T_offset_x_1 of the last transponder BN t_offset_x_1 Offset in X direction of transponder antenna 1 to the vehicle's zero point BO last_t_offset_y_1 T_offset_y_1 of the last transponder BP t_offset_y_1 Offset in Y direction and lateral transponder distance of the transponder antenna 1 to the vehicle's zero point BQ last_t_x_2 t_x_2 of the last transponder BR last_t_y_2 t_y_2 of the last transponder BS last_t_offset_x_2 t_offset_x_2 of the last transponder BT t_offset_x_2 Offset in X direction of the transponder antenna 2 to the vehicle's zero point BU last_t_offset_y_2 t_offset_y_2 of the last transponder BV t_offset_y_2 Offset in Y direction and lateral transponder distance of transponder antenna 2 to the vehicle's zero point BW Knickwinkel Angle of articulation angle sensor [ o ] BX Fehler_Code Indicates the type of calculation to be carried out: 1: single measurement antenna 1 2: double measurement antenna 1 3 single measurement antenna 2 4: double measurement antenna 2 Table 31 Errorlogger: Vehicle Status (part 5 of 7) English, Revision 01, Date: 20.09.2012 47 Commissioning HG 73650 Column Name Description BY System_Time Increments every 50 ms, module 16 bits BZ o_Lenkwinkel Actual steering angle of the vehicle CA Odo_LenkdW_Neu Actual steering angle odometry-based [ o ] CB Odo_LenkdX_Neu Actual position, X component [m] odometry-based CC Odo_LenkdY_Neu Actual position, Y component [m] odomtry- based CD Fehler_Quer Error between odometry and actual calculation in lateral direction CE Fehler_Laengs Error between odometry and actual calculation in longitudinal direction CF Fehler_W Error between odometry and actual angle calculation / angular difference CG Fehler_X Error between odometry and actual calculation in X direction CH Fehler_Y Error between odometry and actual calculation in Y direction CI Warte_Posi_Ant_1 Telegram counter antenna 1 A maximum of 3 telegrams between actual position impulse and telegram listed position impulse are allowed. Starts after position impulse with 3 and counts down CJ Warte_Posi_Ant_2 Telegram counter antenna 2 A maximum of 3 telegrams between actual position impulse and telegram listed position impulse are allowed. Starts after position impulse with 3 and counts down CK Abw_Tab_Winkel_Wert Maximum allowed angle error (route dependent) [ o ] CL Abw_Tab_Quer_Wert Maximum allowed lateral error (route dependent) [ o ] CM Abw_Tab_Laengs_Wert Maximum allowed longitudinal error (route dependent) [ o ] CN Abs_Fehler_W Absolute error between odometry and actual angular calculation CO Abs_Fehler_Quer Absolute error between odometry and actual calculation in cross direction CP Abs_Fehler_Laengs Absolute error between odometry and actual calculation in longitudinal direction Table 31 Errorlogger: Vehicle Status (part 6 of 7) English, Revision 01, Date: 20.09.2012 48 Commissioning HG 73650 Column Name Description CQ Sprung_Status Indicates, why the calculated position was not transferred into odometry - 0x01: Abs_Fehler_W > Abw_Tab_Winkel_Wert - 0x02: Abs_Fehler_Quer > Abw_Tab_Quer_Wert - 0x04: Abs_Fehler_Laengs > Abw_Tab:Laengs_Wert - 0x08: fabs(t_dy_1) > 0.25 m CR OdodSumme_Weg Distance since last used transponder CS Genauigkeit Estimated position accuracy CT Guete_Messung Estimated quality of measurement CU Guete_Position Estimated quality of position in odometry CV Guete_Position_Weg Estimated quality of position in odometry influenced by the distance covered CW Gewichtung Intensity of influence of the calculated position of odometry. CX Position_OK Set to 1, if position was initialized Table 31 Errorlogger: Vehicle Status (part 7 of 7) 4.11 (G) Parameters Navigation Using this menu the parameters for the sensor fusion and for the steering controller can be set Following selection screen appears: Parameter Menu Navigation Controller A: B: C: D: E: F: G: H: I: Main Geometric Accuracy Steering Steering Controller Speed Controller Sensorfusion Vehicle Specials Datalogging [ESC] -> back/cancel Figure 21 Screenshot: Parameters Navigation English, Revision 01, Date: 20.09.2012 49 Commissioning 4.11.1 HG 73650 (A) Main Using this menu the parameters for the sensor fusion and for the steering controller can be set Following selection screen appears: Main Menue -> Parameter Menue -> Main Program Variables A: B: C: D: E: F: G: H: I: J: K: L: M: N: O: P: Q: R: S: T: Vehicle Option Vehicle Number RS232 2 Protocoll RS232 2 Baudrate RS232 3 Protocoll RS232 3 Baudrate RS232 4 Protokoll RS232 4 Baudrate CAN 1 Protocoll CAN 1 Baudrate CAN 2 Protokoll CAN 2 Baudrate Fusion Senden Log Seg End Vehicle Symetrie Sensorfusion Navigation Simulation Profibus address Ethernet IP (current: (current: (current: (current: (current: (current: (current: (current: (current: (current: (current: (current: (current: (current: (current: (current: (current: (current: (current: (current: Stapler 0 no Protocoll 9600 Baud no Protocoll 115200 Baud no Protocoll 9600 Baud CAN Universal 500k Baud Las Rem 250k Baud On Off Off Extern Laser Off Off Off Off ) ) ) ) ) ) ) ) ) ) ) ) ) ) ) ) ) ) ) ) [ESC] -> back/cancel Figure 22 Screenshot: Parameters Navigation > Main Menu The different parameters are described below: Key Name Description A Vehicle Option The vehicle option adjusts basic vehicle parameters: odometry, geometry, trailer, vehicle related outputs etc. (see reference manual) B Vehicle Number Number of the vehicle, e.g. important for data logging C RS232 2 Protocol Protocol of serial interface 2 - camera: PMD Camera - Remote control: for remote control via RS 232 (basic features) - SICK scanner: reading angles and distances D RS 232 2 Baudrate Baud rate of serial interface 2: 9600, 19200, 38400, 57600, 115200 are the options For all baud rates, the parameters are: 8 data bits, no parity, one stop bit E RS232 3 Protocol Protocol of the serial interface 3 - Laser scanner: Götting laser scanner - Sky-Trax: Sky-Trax camera - SICK position: pre-processed SICK position Table 32 Parameters Navigation > Main Menu (part 1 of 3) English, Revision 01, Date: 20.09.2012 50 Commissioning HG 73650 Key Name Description F RS 232 3 Baudrate Baud rate of serial interface 3 - 9600, 19200, 38400, 57600, 115200 are the options - For all baud rates, the parameters are: 8 data bits, no parity, one stop bit G RS232 4 Protocoll Protocol of the serial interface 4 - Convoi leader: leading vehicle for convoi mode - Convoi chaser: following vehicle for convoi mode - Ballet protocol: remote control for several vehicles H RS 232 4 Baudrate Baud rate of serial interface 4 - 9600, 19200, 38400, 57600, 115200 are the options - For all baud rates, the parameters are: 8 data bits, no parity, one stop bit I CAN 1 Protokoll Protocol CAN 1, the following protocols are currently available: - CAN Universal, the standard protocol - CAN Daimler - CAN Fendt J CAN 1 Baudrate Baud Rate of CAN interface: 100k, 125k, 250k 500k and 10000k are possible K CAN 2 Protokoll Protocol CAN 2, the following protocols are available: - Ser.: CAN steering servo (Berger-Lahr/Lenze) - Las: Götting laser scanner - Kni: Articulation angle sensor - Kam: Götting optical line tracker camera - Rem: Remote control via CAN L CAN 2 Baudrate Baud Rate of CAN interface 2: 100k, 125k, 250k 500k and 10000k are possible M Fusion Senden Data of the internal sensor fusion is put on the CAN bus (CAN Message Identifier 0x192 and 0x193) N Log Seg End Steering controller keeps a once reached segment end, even if the vehicle slides backwards O Vehicle Symmetrie If this parameter is released, it is possible to move symmetrical vehicles (e.g. with symmetrical steering) from both sides onto the guidance line Q Navigation Releases the steering controller Table 32 Parameters Navigation > Main Menu (part 2 of 3) English, Revision 01, Date: 20.09.2012 51 Commissioning HG 73650 Key Name Description R Simulation BR Can be switched on for debuging purposes. Sensor fusion will then be stopped. The steering controller calculates its position using the selected segments. S Profibus address - Profibus Adress: 0 to 126 At Profibus address 127 the bus is switched off T Ethernet IP - Ethernet IP: 1.1.1.1 up to 255.255.255.255. At IP 0.0.0.0. ethernet is switched off Table 32 4.11.2 Parameters Navigation > Main Menu (part 3 of 3) (B) Geometric This menu enables setting the geometry of the steering controller and the sensor fusion. Main Menue -> Parameter Menue -> Main Geometri Variables A: B: C: D: E: F: G: H: I: J: K: L: M: Achseabstand Radabstand Raddurchmesser Li Raddurchmesser Re Inkremente/Umdreh Antenne 1 X Antenne 1 Y Antenne 2 X Antenne 2 Y Versatz Lenkung Antennen invert. Sky Trax X Sky Trax Y (current: (current: (current: (current: (current: (current: (current: (current: (current: (current: (current: (current: (current: 1.200000 0.397000 0.270000 0.270000 2300.000000 0.810000 0.000000 0.000000 0.000000 0.000000 -0.340000 0.000000 [ [ [ [ [ [ [ [ [ [ [ [ [ m m m m m m m m m m m ] ] ] ] ] ] ] ] ] ] ] ] ] ) ) ) ) ) ) ) ) ) ) ) ) ) [ESC] -> back/cancel Figure 23 Screenshot: Parameters Navigation > Geometric The following table explains those parameters: Key Name Description A Achsabstand Describes the distances between the symmetrical axis (perpendicular to the vehicle through the center of the circle in curves) and the steered axis. B Radabstand Distance between the centre of right wheel and centre of left wheel C Raddurchmesser Links Effective diameter of the left wheel at a given resolution of the encoder. If the encoder rotates with the same rotational speed as the wheel, then the effective diameter is the same as the wheel diameter. If the rotational speed is different, (e.g. encoder runs on the inner side) the ratio of the rotational speed has to be considered for effective diameter setting! Table 33 Parameters Navigation > Geometric (part 1 of 2) English, Revision 01, Date: 20.09.2012 52 Commissioning HG 73650 Key Name Description D Raddurchmesser Rechts Effective diameter of the right wheel at a given resolution of the encoder. If the encoder rotates with the same rotational speed as the wheel, then the effective diameter is the same as the wheel diameter. If the rotational speed is different, (e.g. encoder runs on the inner side) the ratio of the rotational speed has to be considered for effective diameter setting! E Inkremente/Umdreh Resolution of the rotary encoder F Antenne 1 X Offset between the center of the symmetrical axis and the transponder antenna 1 in X direction of the vehicle coordinate system G Antenne 1 Y Offset between the center of the symmetrical axis and the transponder antenna 1 in Y direction of the vehicle coordinate system H Antenne 2 X Offset between the center of the symmetrical axis and the transponder antenna 2 in X direction of the vehicle coordinate system I Antenne 2 Y Offset between the center of the symmetrical axis and the transponder antenna 2 in Y direction of the vehicle coordinate system J Versatz Lenkung It is possible to set an offset if the steering is not located in the center of the vehicle, e.g. for some of the simple forklifts K Antennen invert. Enables inverting the antennas individually. The following combinations are possible: - T1: Transponder antenna 1 - T2: Transponder antenna 2 - SX: Sky Trax in X direction - SY: Sky Trax in Y direction L Sky Trax X Offset between the centre of the symmetrical axis and the position of the Sky Trax camera in X direction of the vehicle coordinate system M Sky Trax Y Offset between the centre of the symmetrical axis and the position of the Sky Trax camera in Y direction of the vehicle coordinate system Table 33 Parameters Navigation > Geometric (part 2 of 2) English, Revision 01, Date: 20.09.2012 53 Commissioning 4.11.3 HG 73650 (C) Accuracy This menu allows adjusting thresholds, where the vehicle shall be stopped. Main Menue -> Parameter Menue -> Main Accuracy Variables A: B: C: D: E: F: Accuracy Teach In (current: Accuracy Tarck 0 (current: Accuracy Track 1 (current: Accuracy Operating(current: Deviation 0 (current: Deviation 1 (current: 20.000000 20.000000 20.000000 20.000000 0.300000 0.300000 [ [ [ [ [ [ m m m m m m ] ] ] ] ] ] ) ) ) ) ) ) [ESC] -> back/cancel Figure 24 Screenshot: Parameters Navigation > Accuracy When entering the code for the accuracy it is essential to pay attention to the type of navigation system. The set value indicates the possible error the position may have: If the vehicle is navigated with DGPS, the position is always available. If, e.g. an accuracy of 0,05 meter is set, the vehicle will be stopped if the GPS outputs a position accuracy of 0,07 meters. If a transponder system is used, the position accuracy is determined differently. Once a transponder has been crossed and the accuracy was good, the accuracy is set to 0,01 meters. With each traveled meter, the accuracy decreases. E.g. if a distance of 10 meters shall be allowed without Transponder reading, the value 0,5 meters (code 16) has to be set in the parameters. If 0,01 meters is set (code 15), 1 meter is allowed. If 0,02 meters is set, (code 14), 2 meters are allowed, with 0,03 meters set, the vehicle will be allowed to travel 3 meters etc. For the sensor fusion, it is important that the accuracy is set to a value that allows for one transponder to be missed, while the next one can still be reached safely. At a transponder distance of e.g. 3 meters, corresponding to 7 meters travelling Code 9 0,15 meters accuracy. The particular parameters are described below: English, Revision 01, Date: 20.09.2012 54 Commissioning HG 73650 Key Name Description A Accuracy Teach In Minimal necessary accuracy of the position for starting Teach In procedure (Note: Teach In is not yet implemented) B Accuracy Track 0 Minimal necessary accuracy of the position for automatic operation, if the attribute is ATTRIBUT_ABWEICHUNGS_UMSCHALT = 0 C Accuracy Track 1 Minimal accuracy of the position for automatic operation, if the attribute is: ATTRIBUT_ABWEICHUNGS_UMSCHALT = 1 D Accuracy Operating Minimal accuracy of the position for starting automatic operation E Deviation 0 Maximal allowed deviation between actual and target position for automatic operation if the attribute is: ATTRIBUT_GENAUIGKEITS_UMSCHALT = 0 F Deviation 1 Maximal allowed deviation between actual and target position for automatic operation if the attribute is: ATTRIBUT_GENAUIGKEITS_UMSCHALT = 1 Parameters Navigation > Accuracy Table 34 4.11.4 (D) Steering This submenu enables setting all parameters for steering. The first 3 parameters refer directly to the steering controller. NOTE! If the steering is controlled by a vehicle control unit, it is essential to indicate the scaling of the steering, Comp. Left 1 and Comp. Right 1! Main Menue -> Parameter Menue -> Angle Controller Variables A: B: C: D: E: F: G: H: I: J: Steering min Steering Middle Steering max Steering Scaling Comp. Left 2 Comp. Left 1 Comp. Middel Comp. Right 1 Comp. Right 2 Servo Typ (current: (current: (current: (current: (current: (current: (current: (current: (current: (current: 0 0 0 100.000000 0.000000 1.000000 0.000000 1.000000 0.000000 Lenze [ [ [ [ [ [ [ [ [ [ ] ] ] ] ] ] ] ] ] ] ) ) ) ) ) ) ) ) ) ) [ESC] -> back/cancel Figure 25 Screenshot: Parameters Navigation > Steering 4.11.4.1 Parameters The following table explains the parameters: English, Revision 01, Date: 20.09.2012 55 Commissioning HG 73650 Key Name Descriptio A Steering min Lowest limit of steering B Steering Middle Center setting of steering C Steering max Upper limit of steering D Steering Scaling Resolution of steering on interface: if the angle is transmitted with of 1/ 100o, the parameter must be 100 E Comp. Left 2 Square term of steering correction for left turn F Comp. Left 1 Linear term of steering correction for left turn G Comp. Middel Center setting of steering correction H Comp. Right 1 Linear term of steering correction for right turn I Comp. Right 2 Square term of steering correction for right turn J Servo Typ Enables setting the connected steering servo. Supported are Lenze and Berger Lahr Table 35 Parameters Navigation > Steering 4.11.4.2 Steering correction Steering correction is to improve the steering accuracy. If for example a steering trapezoid is used, then the inaccuracy increases with the degree of the angle. To compensate for any inaccuracies and deviations, the following procedures may be used: 1. Travel a straight line with the vehicle and measure the necessary steering angle. 2. Travel a left turn with ¼ of the maximal steering angle, measure the circle diameter and calculate the theoretical steering angle with arctangent (axle distance/curve radius) 3. Travel left turn with 2/4 of the maximal steering angle, measure the circle diameter and calculate the theoretical steering angle with arctangent (axle distance/curve radius) 4. Travel left turn with 3/4 of the maximal steering angle, measure the circle diameter and calculate the theoretical steering angle with arctangent (axle distance/curve radius) 5. Travel left turn with 4/4 of the maximal steering angle, measure the circle diameter and calculate the theoretical steering angle with arctangent (axle distance/curve radius) 6. Repeat points 2 through 5 for the right turn 7. Display the theoretical and the actual steering angles in a point diagram 8. Then insert a 2nd degree polynomic trend line and have the equation displayed 9. The above listed steps lead to the diagram below and the equation provides the needed correction coefficients. English, Revision 01, Date: 20.09.2012 56 Commissioning HG 73650 Figure 26 Calculation of the correction coefficients Column A describes the required steps, column B the theoretical steering angles and column C the given steering angles. Comp. Middel is the average offset of both equations (see Table 35 on page 56). 4.11.5 (E) Stering Controller The steering angle controller calculates the steering angle, required to follow the intended track. This controller consists of two parts: 1. The first part is a feed back controller in the traditional sense. It is possible to parameterize this angle controller using the parameters A-D, P, PI or PDT1. The output of the controller can be limited via the parameters G and H. This controller is only used for some vehicles for special tasks. 2. The second part is the actual feed back controller of the steering controller. Normally the vehicle is steered by this controller. It works on straight lines only (cornering is achieved via overlaying a curve feed forward control). The controller always calculates the steering angle to point to a section on the nominal track in front of the vehicle. If the steering of the vehicle is directly connected to the steering controller, it is possible to activate a steering servo. The steering servo is an subordinate controller triggered every 5 ms. It controls the steering motor in such a way that the desired steering angle will be adjusted (proportional controller). English, Revision 01, Date: 20.09.2012 57 Commissioning HG 73650 Main Menue -> Parameter Menue -> Angle Controller Variables A: B: C: D: E: F: G: H: I: J: K: L: M: N: O: P: Q: R: Angle Control Kp Angle Control Tn Angle Control Tv Angle Control Td Speed Comp. Fix Speed Comp. Var lower Limit higher Limit I Max I Min Typ forward dis. Fix forward dis. Var Approach Lim. Fix Approach Lim. Var Steeringangle Max Steerung Servo Steering Servo KP (current: (current: (current: (current: (current: (current: (current: (current: (current: (current: (current: (current: (current: (current: (current: (current: (current: (current: 12.000000 0.000000 3.000000 0.010000 1.000000 0.000000 -200.000000 200.000000 1.000000 -1.000000 0 1.500000 0.200000 10.000000 0.100000 90.000000 Off 50.000000 [ [ [ [ [ [ [ [ [ [ [ [ [ [ [ [ [ ° ° m m ° ° ° ] ] ] ] ] ] ] ] ] ] ] ] ] ] ] ] ) ) ) ) ) ) ) ) ) ) ) ) ) ) ) ) ) ] ) [ESC] -> back/cancel Figure 27 Screenshot: Parameters Navigation > Steering Controller The single parameters are described in the following table: Key Name Description A Angle Control Kp Linear amplification of the angle control (first part of the steering angle controller) applied at the following vehicle options: ABU, ABE (see reference manual) B Angle Control Tn Integration time constant of the angle control (first part of the steering angle controller) applicable for the following vehicle options: ABU, ABE (see reference manual) C Angle Control Tv Derivative time of the angle control (first part of the steering angle controller) applicable for the following vehicle options: ABU, ABE (see reference manual) D Angle Control Td Differentiation time constant of the angle control (first part of the steering angle controller) applicable for the following vehicle options: ABU, ABE (see reference manual) E Speed Comp. Fix Constant proportion of the gradient of the steering angle ramp in o / 50ms. The steering angle ramp is only used with guide wire sensors or in parameter test mode Table 36 Parameters Navigation > Steering Controller (part 1 of 2) English, Revision 01, Date: 20.09.2012 58 Commissioning HG 73650 Key Name Description F Speed Comp. Var Variable proportion of the gradient of the steering angle ramp in o / 50ms (multiplied by the vehicle velocity in m/s). G lower Limit Lower limit of the angle control (first part of the steering angle controller) H higher Limit Upper limit of the angle control (first part of the steering angle controller) I I Max Sets maximum permissible value of the integral proportion of the controller J I Min Sets minimum permissible value of the integral proportion of the controller K Typ Controller type: Should always be set to 0 (PID controller with parameterizable parts (see point A - D)) L forward dis. Fix Velocity independent part of the track from the intersection point of the vehicle's symmetry axis with the nominal track up to the point of the nominal track to which the steered wheels are directed at (second part of the steering angle controller) J forward dis. Var Velocity dependent part of the track from the intersection point of the vehicle's symmetry axis with the nominal track up to the point of the nominal track to which the steered wheels are directed at (second part of the steering angle controller) K Approach Lim. Fix Maximum angle between the nominal track and the steered wheels (velocity dependent; second part of the steering angle controller) L Approach Lim. Var Maximum angle between the nominal track and the steered wheels (velocity independent, second part of the steering angle controller) M Steeringangle Max Limitation of the calculated steering angle (second part of the steering angle controller) N Steering Servo Switch on / off of the steering servo O Sterring Servo Kp Amplification of the steering servo (proportional controller) Table 36 Parameters Navigation > Steering Controller (part 2 of 2) English, Revision 01, Date: 20.09.2012 59 Commissioning 4.11.6 HG 73650 (F) Speed Controller The speed controller is not yet used in any vehicle. Up to this point the speed control is accomplished by the vehicle control unit. Main Menue -> Parameter Menue -> Speed Controller Variables A: B: C: D: E: F: G: H: I: J: K: L: M: N: O: P: Q: R: Speed Control Kp (current: Speed Control Tn (current: Speed Control Tv (current: Speed Control Td (current: Speed Comp. Fix (current: Speed Comp. Var (current: lower Limit (current: higher Limit (current: I Max (current: I Min (current: Typ (current: Ringspeicher Peri (current: Wert Schaetzer (current: Differenz Eingriff(current: Zu hoch Wert (current: Zu hoch Perioden (current: Rampe (current: V Max Vorwaerts (current: 100.000000 0.000000 0.000000 0.000000 420.000000 300.000000 -1550.000000 1500.000000 100.000000 -100.000000 0 0 0.000000 0.000000 0.000000 0 1.000000 400.000000 [ ] ) [ ] ) [ ] ) [ ] ) [ ] ) [ ] ) [ ° ] ) [ ° ] ) [ ] ) [ ] ) [ ] ) [ ] ) [ ] ) [ ] ) [ ] ) [ ] ) [ ] ) [ ] ) [ESC] -> back/cancel Figure 28 Screenshot: Parameters Navigation > Speed Controller The different parameters are described in the table below: Key Name Description A Speed Control Kp Linear amplification of the speed controller B Speed Control Tn Integration time constant of the speed controller C Speed Control Tv Derivative time of the speed controller D Speed Control Td Differentiation time constant of the speed controller E Speed Comp. Fix Constant proportion of the gradient of the speed ramp in 1/50 ms F Speed Comp. Var Variable proportion of the gradient of the speed ramp in 1/50 ms (multiplied by the vehicle velocity in m/s) G lower Limit Lower limit of the speed controller (first part of the steering angle controller) H higher Limit Upper limit of the speed controller (first part of the steering angle controller) I I Max Sets maximum permissible value of the integral proportion of the controller J I Min Sets minimum value of the integral proportion of the controller Table 37 Parameters Navigation > Speed Controller (part 1 of 2) English, Revision 01, Date: 20.09.2012 60 Commissioning HG 73650 Key Name Description K Typ Controller Type: Should always be set to 0 (PID controller with parameterizable parts (see point A - D)) L Ringspeicher Peri Time delay for the cyclic buffer of the velocity estimator (not required for controller type 0) M Wert Schaetzer Expected value of the velocity estimator (not required for controller type 0) N Differenz Eingriff Difference between nominal and actual value activating an increased influence of the controller (not required for controller type 0) O Zu hoch Wert Velocity difference activating brake control (not required for controller type 0). P Rampe For some vehicle options velocity is output via a velocity ramp function. This parameter corresponds to the increment by which the target velocity shall be incremented or decremented every 50ms. Q V Max Vorwaerts Limitation of the forward speed for those vehicles using a velocity ramp. R V Max Rueckwaerts Limitation of the reverse speed for those vehicles applying a velocity ramp. Table 37 4.11.7 Parameters Navigation > Speed Controller (part 2 of 2) (G) Sensor Fusion Main Menue -> Parameter Menue -> Sensorfusion Variables A: B: C: D: E: F: G: H: I: J: K: L: M: N: O: P: Min Dist. Reading (current: Min Dist. Single (current: Max Dist. Double (current: Delta Angle Max (current: Delta X Pos Max (current: Delta Y Pos Max (current: Delta Posi. Max (current: Max Tol. Tr/ONS (current: Single Antenna (current: Single Ant.op.Dir.(current: Gyro (current: Primary ONS Typ (current: Secondary ONS Typ (current: Delta Posi. Max P (current: Transp. Ant. Typ (current: Skalierung Sky T. (current: 0.300000 0.500000 0.000000 400.000000 10000.000000 10000.000000 0.100000 0.100000 On On On 2 2 0.000000 HG 71720 0.000000 [ [ [ [ [ [ [ [ m m m ¯ m m m m ] ] ] ] ] ] ] ] ) ) ) ) ) ) ) ) ) ) ) ) ) ) ) ) [ESC] -> back/cancel Figure 29 Screenshot: Parameters Navigation > Sensor Fusion The different parameters are described in the following table: English, Revision 01, Date: 20.09.2012 61 Commissioning HG 73650 Key Name Description A Min Dist. Reading The antenna will only trigger a position impulse if a certain minimum distance is covered. This prevents a side lobe from generating a position impulse. B Min Dist. Single Minimum distance required for positioning calculation between two transponders with one antenna and two different transponders. If the transponder distance is too small, the angular error will be increased due to the transponder antenna's read error rate. If the transponder distance is too large, the error rate increases caused by the inaccuracy of odometry. C Max Dist. Double Maximum distance between the reading of one antenna and the transponder reading of another antenna. The highest measurement accuracy will be guaranteed if both antennas read the same transponder simultaneously. D Delta Angle Max Maximum permissible angle difference between primary odometry and the comparative / reference odometry (secondary odometry). The odometry includes two rotary encoders and one optional gyro. The secondary odometry calculates the position from two rotary encoders and the actual steering angle. E Delta X Pos Max Maximum permissible difference of the X position between primary odometry and secondary odometry. F Delta Y Pos Max Maximum permissible difference of the Y position between primary odometry and secondary odometry. G Delta Posi. Max Maximum permissible difference between odometry based transponder positions and the positions entered in the transponder list. H Max Tol. Tr/ONS Maximum permissible difference between the position based on odometry and the position just calculated. However, if this tolerance level will be exceeded, the result of the position calculation may be able to be used - but the accuracy output will not be increased! I Single Antenna Switch on / switch off of the single measurements J Single Ant.op.Dir. Setting specifies if antennas behind the symmetry axis in direction of travel will be applied. K Gyro Differential odometry without a gyro means that the steering angle is calculated from the difference of the distances of the right and left wheel. The disadvantage is that the steering calculation is strongly load dependent. If a gyro is applied the gyro determines the steering angle. The rotary encoders will be averaged and represent only a lengthwise movement. The advantage is a load independent steering angle. L Primary ONS Typ The position is calculated by the primary odometry. Table 38 Parameters Navigation > Sensor Fusion (part 1 of 2) English, Revision 01, Date: 20.09.2012 62 Commissioning HG 73650 Key Name Description M Secondary ONS Typ Secondary odometry is compared to primary odometry. Should large differences between primary and secondary odometry arise (see D, E and F), the accuracy of the internal sensor fusion will be set to a poor value and the vehicle stops. Therefore defective sensors can be detected. N Delta Posi. Max P Maximum permissible differencebetween odometry based transponder positions and the positions provided in the transponder list in percent. O Transp. Ant. Typ Types of transponder antennas: - G 71720: Used for track guidance (lateral displacement will be measured) - G 98767: Not suitable for track guidance (lateral displacement will not be measured). For this antenna an additional guidance or camera system has to be applied. P Skalierung Sky T. The Sky-Trax system specifies exact locations of the tags in pixels. This parameter provides a conversion between pixels and meters. If there are different tag sizes or different heights, a fine tuning adjustment is possible with the tag sizes of the transponder list. Table 38 4.11.8 Parameters Navigation > Sensor Fusion (part 2 of 2) (H) Vehicle Specials This output is vehicle specific. Information is available in the reference manual. 4.11.9 (I) Datalogging (Parameterization of the output) In this menu the debugging outputs of the steering controller and the sensor fusion can be parameterized. The indicated menu items function only as titles for a different number of issued variables. These various options are necessary as it would last more than 50 ms to issue all variables - this would be too time consuming for the system function. On the other hand failures of different types each require individual variables. Allocation of the variables characterized by a header field with their corresponding names can be taken from the CSV- file. English, Revision 01, Date: 20.09.2012 63 Commissioning HG 73650 Data Logging Navigation: 1: Ist Position 2: Soll Position 3: Achs Position 4: Hilfs Position 5: Ziel Position 6: Abweichungen 7: Fehler 8: Lenkwinkel 9: Stuetzpunkt A: Segmente Rx B: Segmente Tx C: Richtung D: Genauigkeit E: Mesungen BR F: Fahrzeug Abh.1 G: Segmentsuche 1 0 0 0 0 0 0 0 0 0 0 0 0 0 0 0 Sensorfusion: H: Inkremente I: Odometrie 1 J: Odometrie 2 K: Odometrie Rechnung L: Odometrie Rechnung M: Odometrie Lenkung N: Transponderantenne O: Transponderantenne P: Voraussetzungen Q: Genauigkeiten R: Gyro S: Gewichtungen T: PMD Ausgabe U: Odometrie V: Sky Trax W: fahrend loggen 1 2 1 2 1 0 0 0 0 0 0 0 0 0 0 0 0 1 0 0 [ESC] -> back/cancel Figure 30 Screenshot: Parameters Navigation > Datalogging Due to the amount of data please see the table with complete listing in the reference manual. English, Revision 01, Date: 20.09.2012 64 Commissioning HG 73650 4.12 Display and key pad of the control unit The display of the control unit provides an overview on the operating status of the steering controller, even without a laptop. Figure 31 Display of the control unit HG 61430 Before entering the password only the displayed values are available. NOTE! 4.12.1 Status output on the Display The section "Sensorfusion" provide the following data: Name Description Unit Winkel Angle of vehicle odometry [o] Position X X position of vehicle odometry [m] Position Y Y position of vehicle odometry [m] Geschw. Velocity of vehicle odometry [m/s] Genauigkeit On the left: accuracy of sensor fusion On the right: traveled distance since the last referencing [m] Table 39 Display Control Unit: Section Sensor Fusion (part 1 of 2) English, Revision 01, Date: 20.09.2012 65 Commissioning HG 73650 Name Description Unit Ubat Left: minimum supply voltage value Center: current value of supply voltage Right: maximum value of supply voltage Minimum and Maximum values adjust themselves to the current value within a short time. [V] Nothalt See emergency stop (reference manual) [] Debug See error automatic drive (reference manual) [] Table 39 Display Control Unit: Section Sensor Fusion (part 2 of 2) The section "Bahnregler (steering controller)" displays the following: Name Description Unit Modus See section vehicle options in the reference manual [ ] Fahrzeug F. See section error code in the reference manual [ ] Anforderung See section error code in the reference manual [ ] Fehler See section error code in the reference manual [ ] Winkel Feh. Error of heading [o] Abweichung Lateral displacement to the segment [m] Table 40 Display Control Unit: Section Bahnregler The section "Bahnregler Vorgaben (steering controller default values)" indicates the target values. Name Description Unit Winkel Set angle of the steering controller [o] Position X Target position of the steering controller in X direction [m] Position Y Target position of the steering controller in Y direction [m] Geschw. Target velocity of the steering controller [m/s] Abweichung Maximum permissible displacement at this position (depending on the attribute) [m] Genauigkeit Left: worst permissible accuracy in meters Right: worst permissible accuracy coded in the output telegram. [m][ ] Segment 0 Left: segment 0 preset by the vehicle controller (current segment) Right: segment 0 processed by the steering controller (current segment) [ ] Table 41 Display Control Unit: Section Bahnregler Vorgaben (part 1 of 2) English, Revision 01, Date: 20.09.2012 66 Commissioning HG 73650 Name Description Unit Segment 1 Left: Segment 1 preset by the vehicle controller (next upcoming segment) Right: segment 1 processed by the steering controller (next upcoming segment) [ ] Segment 2 Left: segment 2 preset by the vehicle controller (next segment after next) Right: segment 2 processed by the steering controller (next segment after next) [ ] Segment 3 Left: segment 3 preset by the vehicle controller Right: segment 3 processed by the steering controller [ ] Freigabe Remote control: Central control unit has access to the vehicle. Manually operated: Central control unit cannot access the vehicle. [ ] Table 41 4.12.2 Display Control Unit: Section Bahnregler Vorgaben (part 2 of 2) Direct input options at the control unit If you enter password 222555 the following input mask will be displayed to the right of vertical dividing line. Figure 32 Display after password entry Now the following input options are displayed to the right of the vertical dividing line. English, Revision 01, Date: 20.09.2012 67 Commissioning Name Description F1 Toggling start release F2 Switch mode from driving in automatic mode / standby mode F3 Browsing of vehicle errors F4 Browsing of request errors F5 Browsing of automatic mode errors 0 Preset segment 0 1 Preset segment 1 2 Preset segment 2 3 Preset segment 3 C Toggling release for vehicle control unit Table 42 HG 73650 Display Control Unit: Input options English, Revision 01, Date: 20.09.2012 68 Trouble Shooting 5 HG 73650 Trouble Shooting Following you will find a tabular listing of any possible malfunctions. This troubleshooting chart lists occurring symptoms and the malfunctions that may be causing the symptoms. In the third column you'll find instructions how to detect errors and how errors can ideally be resolved. If it is not possible to resolve the error, before contacting us please isolate the failures as precisely as possible using the table below (type of malfunction, time of occurrence etc.). Possible diagnosis / troubleshooting Error Possible causes of failure Velocity incorrectly displayed or set 1. Rotary encoder defective or connected incorrectly. 2. Parameter "increments per revolution" or wheel diameter are wrong 3. Steering angle error: When using odometry with steering angle the vehicle speed is calculated based on the steering angle 1. Check the rotary encoder via menu „(E) Test Monitor“ on page 40 and replace, if necessary 2. Re-adjust odometry (refer to chapter 4 „Commissioning“ on page 28) 3. Check actual angle using menu „(E) Test Monitor“ on page 40 Automatic mode is not accepted / is not executed 1. Vehicle is not close to the selected segment. 2. No start release for the vehicle control unit 3. Errors "Request" or "Vehicle" are displayed in menu "(A) Main Monitor Navigation" on page 33 1. 1.Drive the vehicle to the segment start and use ‘: Show Segments‘ to compare the coordinate of the corresponding segment with the ones currently displayed 2. Activate release function by pressing button in menu „(A) Main Monitor Navigation“ on page 32 or use the display (see section „Display and key pad of the control unit“ on page 65) 3. Check the indicated error message in the reference manual, section error code Table 43 Trouble Shooting (part 1 of 2) English, Revision 01, Date: 20.09.2012 69 Trouble Shooting HG 73650 Possible diagnosis / troubleshooting Error Possible causes of failure Vehicle does not steer 1. Some vehicle types only steer while driving 2. Steering angle not properly parameterized 3. Transmission fault, steering angle not transmitted 1. Try steering while driving 2. Check the following parameters. Make sure, none of the parameters is 0! - D: Steering Scaling - Comp. Left 1 - Comp. Right 1 - E: Speed Comp. Fix - Steering angle Max 3. Check the CAN Box 0x191 with the CAN monitor Transponder is not evaluated 1. Signal strength of the transponder is too low 2. position impulse missing 3. Not enough distance to other transponders 1. Check ground reinforcement; minimize reading distance; check adjustment of antenna; possible defect of the antenna or transponder. 2. Reduce threshold for antenna position impulse; re-connect antenna properly 3. Relocate the transponder. Adjust parameters Driving in automatic mode not possible 1. 1.Error is displayed in menu „(A) Main Monitor Navigation“ on page 32 2. Velocity is not transmitted 1. See section error codes in the reference manual 2. Check the CAN box 0x191 with the CAN monitor Segment list is not accepted 1. No release for vehicle control unit 2. Incomplete sequence of segments (detectable via menu „(A) Main Monitor Navigation“ on page 32 if 0x00008000 is displayed in the section "Condition" 3. Vehicle option is not suitable for segment parameters 1. 1.Activate the release function by pressing button in menu „(A) Main Monitor Navigation“ on page 32 or trigger the release with the display (see chapter „Display and key pad of the control unit“ on page 65) 2. Load the segments in the correct order and / or correct start points / end points of the segment 3. Select other vehicle options Table 43 Trouble Shooting (part 2 of 2) English, Revision 01, Date: 20.09.2012 70 List of Images 6 HG 73650 List of Images Figure 1 Example: Virtual track with support points .......................................... 4 Figure 2 Example: A selection of vehicle types................................................. 5 Figure 3 Sketch: Suitable vehicle types............................................................. 5 Figure 4 System Structure.................................................................................. 6 Figure 5 Exemplary layout with travel commands as a combination of segments 8 Figure 6 Example: Segments........................................................................... 11 Figure 7 Example for congruent segments ..................................................... 12 Figure 8 Segment FIFO shifting register.......................................................... 13 Figure 9 Offset segments................................................................................. 16 Figure 10 Example drive .................................................................................... 16 Figure 11 Feed forward control ......................................................................... 17 Figure 12 Feed back control.............................................................................. 17 Figure 13 PCAN explorer displaying messages of the steering controller ....... 28 Figure 14 Add Hyper Terminal to the System.................................................... 29 Figure 15 Screenshot: Main Menu..................................................................... 31 Figure 16 Screenshot: Main Monitor Navigation................................................ 32 Figure 17 Screenshot: Main Monitor Sensorfusion ............................................ 35 Figure 18 Screenshot: Datalogging................................................................... 39 Figure 19 Screenshot: Test Monitor ................................................................... 40 Figure 20 Screenshot: (F) Error Logger ............................................................. 42 Figure 21 Screenshot: Parameters Navigation .................................................. 49 Figure 22 Screenshot: Parameters Navigation > Main Menu............................ 50 Figure 23 Screenshot: Parameters Navigation > Geometric............................. 52 Figure 24 Screenshot: Parameters Navigation > Accuracy .............................. 54 Figure 25 Screenshot: Parameters Navigation > Steering ................................ 55 Figure 26 Calculation of the correction coefficients .......................................... 57 Figure 27 Screenshot: Parameters Navigation > Steering Controller................ 58 Figure 28 Screenshot: Parameters Navigation > Speed Controller .................. 60 Figure 29 Screenshot: Parameters Navigation > Sensor Fusion....................... 61 Figure 30 Screenshot: Parameters Navigation > Datalogging.......................... 64 Figure 31 Display of the control unit HG 61430................................................. 65 Figure 32 Display after password entry ............................................................. 67 English, Revision 01, Date: 20.09.2012 71 List of Tables 7 HG 73650 List of Tables Table 1 Explanation of a segment list with support points ............................. 11 Table 2 Example: Shifting of segments - part I .............................................. 14 Table 3 Example: Shifting of segments - part II ............................................. 14 Table 4 List of the different odometric systems available, including advantages and disadvantages ............................................................................ 20 Table 5 Explanation transponder list .............................................................. 23 Table 6 SIO 2 protocols .................................................................................. 26 Table 7 SIO 3 protocols .................................................................................. 26 Table 8 SIO 4 protocols .................................................................................. 27 Table 9 Terminal settings for the monitor program ........................................ 30 Table 10 Main Monitor Navigation: Section "Vehicle" ....................................... 32 Table 11 Main Monitor Navigation: Section "Target" ........................................ 33 Table 12 Main Monitor Navigation: Section "Deviation".................................... 33 Table 13 Main Monitor Navigation: Section "Segment" .................................... 33 Table 14 Main Monitor Navigation: Section "Error" ........................................... 34 Table 15 Main Monitor Navigation: Section "Steering" ..................................... 34 Table 16 Main Monitor Navigation: Section "Status"......................................... 34 Table 17 Main Monitor Navigation: Input options............................................. 35 Table 18 Main Monitor Sensorfusion: Section antenna 1 ................................. 36 Table 19 Main Monitor Sensorfusion: Section antenna 2 ................................. 36 Table 20 Main Monitor Sensorfusion: Section odometry .................................. 36 Table 21 Main Monitor Sensorfusion: Section odometry 1 ............................... 37 Table 22 Main Monitor Sensorfusion: Section odometry 2 ............................... 37 Table 23 Main Monitor Sensorfusion: Section Sky-Trax ................................... 37 Table 24 Main Monitor Sensorfusion: Section "Deviation Single" ..................... 38 Table 25 Main Monitor Sensorfusion: Section "Deviation Double" ................... 38 Table 26 Main Monitor Sensorfusion: Section "Gyro" ....................................... 39 Table 27 Test Monitor: Section "Position" ......................................................... 40 Table 28 Test Monitor: Section "Odometric System" ........................................ 41 Table 29 Test Monitor: Section actual and nominal steering angle ................. 41 Table 30 Test Monitor: Input Options ............................................................... 41 Table 31 Errorlogger: Vehicle Status................................................................ 43 Table 32 Parameters Navigation > Main Menu ................................................ 50 Table 33 Parameters Navigation > Geometric ................................................. 52 Table 34 Parameters Navigation > Accuracy .................................................. 55 Table 35 Parameters Navigation > Steering .................................................... 56 English, Revision 01, Date: 20.09.2012 72 List of Tables Table 36 Parameters Navigation > Steering Controller.................................... 58 Table 37 Parameters Navigation > Speed Controller....................................... 60 Table 38 Parameters Navigation > Sensor Fusion ........................................... 62 Table 39 Display Control Unit: Section Sensor Fusion ..................................... 65 Table 40 Display Control Unit: Section Bahnregler .......................................... 66 Table 41 Display Control Unit: Section Bahnregler Vorgaben ......................... 66 Table 42 Display Control Unit: Input options.................................................... 68 Table 43 Trouble Shooting ............................................................................... 69 English, Revision 01, Date: 20.09.2012 HG 73650 73 Essential Information for Reading this Manual 8 HG 73650 Essential Information for Reading this Manual In documentations of Götting KG the following symbols and assignments were used at the time of printing this manual: Security advices have the following symbols, depending on the emphasis and the degree of exposure: NOTE! ATTENTION! CAUTION! WARNING! Continuative information and tips are identified as follows: Tip! Program texts and variables are highlighted by using the font ’Courier’. Whenever input of key combinations is required for the operation of programms, the corresponding eys are ighlighted (in Götting KG programs it is usually possible to use small and capitalized characters equally). Sections, figures and tables are automatically numbered consecutively throughout the entire document. In addition, each document has an index listed behind the front page, including pages and - whenever the document has more than 10 pages - following the actual system description a figure and table index in the back. In certain cases (for long and/or complicated documents) a subject index is added. Each document provides a table block with metainformation on the front page, indicating the system designer, auther, revision and date of issue. In addition, the information regarding revision and date of issue are included within the footer of each page, enabling the exact allocation of the information with a date and certain a system revision. Online-Version (PDF) and printed manual are generated from the same source. Due to the consistent use of Adobe FrameMaker for the generation of documentation, all directory entries (including page numbers and subject index) and cross references in the PDF file can be clicked on with the mouse and will lead to the corresponding linked contents. English, Revision 01, Date: 20.09.2012 74 Copyright and Terms of Liability 9 HG 73650 Copyright and Terms of Liability 9.1 Copyright This manual is protected by copyright. All rights reserved. Violations are subject to penal legislation of the Copyright. 9.2 Exclusion of Liability Any information given is to be understood as system description only, but is not to be taken as guaranteed features. Any values are reference values. The product characteristics are only valid if the systems are used according to the description. This instruction manual has been drawn up to the best of our knowledge. Installation, setup and operation of the device will be on the customer’s own risk. Liability for consequential defects is excluded. We reserve the right for changes encouraging technical improvements. We also reserve the right to change the contents of this manual without having to give notice to any third party. 9.3 Trade Marks and Company Names Unless stated otherwise, the herein mentioned logos and product names are legally protected trade marks of Götting KG. All third party product or company names may be trade marks or registered trade marks of the corresponding companies. English, Revision 01, Date: 20.09.2012 75