1
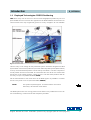
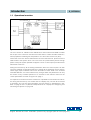
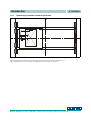
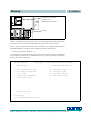
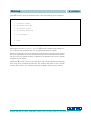
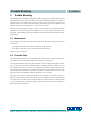
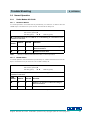
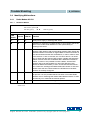
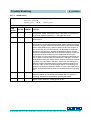
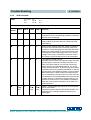
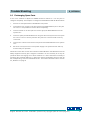
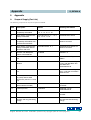
Service Manual
S_G57630-A
DGPS Positioning of
Gantry Cranes (RTGs)
DGPS Positioning for Automatic Container Tracking
S_G57630-A
English, Revision 01
Developed by: M.L. / T.N. / T.C.
Date: 15.08.2001
Author:
RAD / SIS / A.F.
Götting KG, Celler Str. 5, D-31275 Lehrte - Röddensen (Germany), Tel.: +49 (0) 51 36 / 80 96 -0,
Fax: +49 (0) 51 36 / 80 96 -80, eMail: [email protected], Internet: www.goetting.de
This manual is protected by copyright (refer to 6.2 on page 27)
Contents
S_G57630-A
Contents
1
Introduction .......................................................................4
1.1
1.2
1.3
2
1.3.1
Determining important values for the Crane.................................... 7
1.3.2
Determining important values for a stack ........................................ 8
Start-up.............................................................................9
2.1
2.2
3
Systems Function ................................................................... 4
Employed Technologies: PDGPS Positioning........................... 5
Operational overview .............................................................. 6
Initial Start-up ......................................................................... 9
Re-Start.................................................................................. 9
Trouble Shooting ............................................................. 12
3.1
3.2
3.3
Maintenance ......................................................................... 12
Function Tests ...................................................................... 12
Normal Operation ................................................................. 13
3.3.1
3.3.2
3.4
3.4.2
4
Reference Station ................................................................... 13
3.3.1.2
Mobile Station......................................................................... 13
GPS Controller HG 61417 ............................................................ 14
Radio Modem HG 761 ................................................................. 15
3.4.1.1
Reference Station ................................................................... 15
3.4.1.2
Mobile Station......................................................................... 16
GPS Controller ............................................................................ 17
Exchanging Spare Parts........................................................ 18
The System in Detail ....................................................... 19
4.1
4.2
4.3
5
3.3.1.1
Identifying Malfunctions ........................................................ 15
3.4.1
3.5
Radio Modem HG 76100 .............................................................. 13
System Components ............................................................. 19
4.1.1
Serial Interfaces .......................................................................... 19
4.1.2
Connection Plan .......................................................................... 20
Availability and Restrictions .................................................. 21
UPS supervision HG 20330 (in comb. with UPS APU 24-2) .... 22
4.3.1
Connection plan .......................................................................... 22
4.3.2
Status display .............................................................................. 23
Appendix ......................................................................... 24
English, Revision 01, Date: 15.08.2001, protected by copyright (refer to 6.2 on page 27)
2
Contents
A
B
C
D
6
S_G57630-A
Scope of Supply (Part List) .............................................................. 24
Cable Specifications......................................................................... 25
General Specifications ..................................................................... 26
C.1
Basic technical Data.................................................................................26
C.2
Minimum Requirements for a Laptop for configuring and monitoring the System .........................................................................................................26
C.3
RTG/RMG Specifications .........................................................................26
List of Abbreviations......................................................................... 26
Notices ........................................................................... 27
6.1
6.2
6.3
Proper Use of Equipment ...................................................... 27
Copyright.............................................................................. 27
Exclusion of Liability ............................................................. 27
7
List of Pictures ................................................................ 28
8
List of Tables .................................................................. 29
9
Index .............................................................................. 30
English, Revision 01, Date: 15.08.2001, protected by copyright (refer to 6.2 on page 27)
3
Introduction
1
S_G57630-A
Introduction
1.1 Systems Function
With the, in general use, Global Positioning System (GPS) it is possible to determine a
geographical position. The commonly used standard GPS provide an accuracy of approx. 10 m.
With the aid of additional equipment and under certain area conditions it is possible to
achieve a geographic position with an accuracy of up to ±3 cm.
Container Tracking
The temporary storage of containers by use of visual means with manual confirmation
leads to an error rate in the storage handling, which disrupts the efficient turn over time
of the container ships. Therefore it is better to use GPS to control the positioning and
documentation of containers within the container port environment.
It has been possible for years for Rubber Tired Gantry Cranes (RTG), working on container transport within a seaport, to communicate with the controlling container management system, via a data Radio Transceiver, when it picks up or sets down a
container at a predesignated position within the container yard. This takes some of the
load off of the driver as well as reduce the error rate, which a complicated and time
exhaustive container search entails.
English, Revision 01, Date: 15.08.2001, protected by copyright (refer to 6.2 on page 27)
4
Introduction
S_G57630-A
1.2 Employed Technologies: PDGPS Positioning
GPS offers every one the chance to find out their Geographical position by use of a
special GPS receiver. To do this the signals from the GPS satellites are decoded. For
normal civilian uses, only a signal that gives an accuracy of approx. 10 m is available.
Figure 1
Sketch DGPS
This accuracy is not enough for the presented system. Therefore alongside the GPS
system fitted to the Crane (mobile unit) a further stationary GPS system (Base station)
is set up, the base stations position can be exactly calculated, it can then compare it's
actual position with that of the GPS, and Transmits this error factor via a Data radio
Transceiver to the mobile systems. These can then calculate there positions with an
accuracy of up to 3 m (differential GPS; DGPS).
Via the determination of the carrier wave of the GPS signal it is possible to increase
this accuracy level to ±3 cm (Precision DGPS; PDGPS).
NOTE!
The system requires approx. 15 minutes after a new start to
effectively calculate the carrier wave!
The GPS system seen over a long period of time offers a very stable service but can
due to shadowing, or reflection become temporary unstable.
English, Revision 01, Date: 15.08.2001, protected by copyright (refer to 6.2 on page 27)
5
Introduction
S_G57630-A
1.3 Operational overview
Figure 2
The elements of the system
The rack consists of, a GPS receiver HG 65770, a radio modem HG 76100 to enable
the receipt of the correction data from the base station, a GPS controller HG 61417,
which prepares the GPS signal and passes it on to the Crane Control unit (PLC).
Connected to the rack are the GPS antenna and the radio antenna. Apart from this a
UPS is fitted to the system, which can in the invent of a power failure provide enough
power to keep the system operable for approx. 75 min's. Over output ports the data is
transferred to the PLC.
During the initial set up, all necessary parameters, which the crane requires, can with
use of the software incorporated within the controller be incorporated into the system.
These highly explicit software menu's are described in more detail in the included
Controller Manuals. It is to be noted that any changes within the parameters can only
be carried out by schooled personnel. An overview of the relevant values for the
cranes parameters or shown in Figure 3 on page 7.
It is important to know that for service reasons it is possible to store all relevant values,
set during the initial set up, onto a hard disk via a laptop, they can then be re-entered
if necessary. You can find more information over this subject in paragraph 2.2 „ReStart“ on page 9 and C.2 „Minimum Requirements for a Laptop for configuring and
monitoring the System“ on page 26.
English, Revision 01, Date: 15.08.2001, protected by copyright (refer to 6.2 on page 27)
6
Introduction
1.3.1
Figure 3
S_G57630-A
Determining important values for the Crane
Basic Operational Parameters
Figure 3 shows the distances that the system needs to know in order to calculate, using the GPS antenna on the Trolley, the spreader's geometrical centre point.
English, Revision 01, Date: 15.08.2001, protected by copyright (refer to 6.2 on page 27)
7
Introduction
1.3.2
S_G57630-A
Determining important values for a stack
When defining a Stack or route which a Crane should take, the following values are
important:
Figure 4
Stack Parameters
For every stack the following values have to be set, the stacks inclination over the geographical North pole (rotation), P1 is the cranes starting point in this stack, via
East_min and East_max informs the crane of the stacks sideward expansion in relation
to the position of the GPS antenna. P2 is the end point of the crane. The connection
between P1 and P2 give the stacks direction.
English, Revision 01, Date: 15.08.2001, protected by copyright (refer to 6.2 on page 27)
8
Start-up
2
S_G57630-A
Start-up
2.1 Initial Start-up
ATTENTION!
Only specialized personnel of Goetting is allowed to do the initial
start-up of the system!
The parameters of every crane are saved on disk after the commissioning.
NOTE!
These disks have to be archived by the yard operator for possible re-starts.
2.2 Re-Start
For a re-start it is assumed, that all system components have been installed and connected by qualified personnel. Since all system parameters are permanently stored
within the system, the system will be fully operationable after a power breakdown and
re-connection to power supply (however, the re-start will take a few minutes, since the
system has be re-initialized).
In case it is necessary to exchange the controller (all other components are pre-configured and will be delivered in the same pre-configured manner), it is simply necessary to download the parameters set during the initial start-up which are stored on a
disk. Use the corresponding parameter disk for the crane which was produced during
the initial start- up (s. a.).
ATTENTION!
Make sure you only use the suitable parameter disk for each
crane, since there may be differences in parameter settings
between the different cranes!
English, Revision 01, Date: 15.08.2001, protected by copyright (refer to 6.2 on page 27)
9
Start-up
S_G57630-A
Interface for connecting
a laptop to the
GPS Controller HG 61417
Not used
Figure 5
Interfaces for the connection of laptops to the controller
Connect a laptop (as described in section C.2 on page 26) using a serial cable to the
monitor port of the controller (Monitor/RS 232 port) located on its front panel.
Start a terminal program with ANSI terminal emulation (e.g. Hyperterminal of Microsoft® Windows®) on the laptop. Set the following interface parameters:
-
Interface parameters: 19200, 8, N, 1
In case the baud rate was set to the wrong value, non-readable characters will appear
on the display. Provided that all parameters were set correctly, press the space bar
and the main menu will appear.
HG 61417GG1.03
Copyright (C) 1997-1999 Goetting KG, Germany
Installation
1
2
3
4
5
-
Set Positions and Time
Set Vehicle Parameters
Set Stacks
Supervisory Parameters
Output Port Setup
Reports from Receiver
R
N
S
K
-
Receiver Status
Navigation UTM
Receiver Summary
RTK Kalman Status
Other Functions
H - History
O - Firmware/Parameter Options
Figure 6
Screenshot: Main menu GPS Controller HG 61417
English, Revision 01, Date: 15.08.2001, protected by copyright (refer to 6.2 on page 27)
10
Start-up
S_G57630-A
Press O in order to enter the parameter menu. Then the following menu will appear:
FIRMWARE/PARAMETER OPTIONS
1 - Firmware Update
2 - Firmware Download
3 - Parameter Update
4 - Parameter Download
5 - Stack Export
X - Exit
Figure 7
Screenshot: Firmware/Parameter Options of the GPS Controller HG 61417
Selecting the function Parameter Update (3) sets the controller to the waiting function. It will then wait for the transfer of a valid parameter file from a laptop.
Start the transmission of a text file from the terminal program on the laptop. Now select
the correct parameter file for the corresponding crane and controller from the parameter disk. Once the update has been completed, the parameter menu of the controller
reappears on the display.
Now press X in order to return to the main menu. The controller will then automatically
start using these transferred parameters. The detailed description of the controller
software is included in the controller description available with this service manual.
English, Revision 01, Date: 15.08.2001, protected by copyright (refer to 6.2 on page 27)
11
Trouble Shooting
3
S_G57630-A
Trouble Shooting
The PDGPS Vehicle Navigation System G 57650 is designed to independently operate
after the initial start-up (only to be effected by specialized Goetting personnel) without
any intervention. The system is so complex, that only especially trained engineers are
allowed to open it. Its perfect operation highly depends on the correct operation of all
other involved electrical equipment — e. g. the crane control.
This section shall enable the reader in case of a system failure, to determine whether
this failure was caused by System G 57650 and if so, which system component is responsible. Please always draw up a detailed description of the failure before contacting Goetting.
3.1 Maintenance
The design of the system only requires a minimum of maintenance. The maintenance
is limited to
-
the regular visual inspection of the equipment in general and
-
the regular inspection of the connections and the terminals
approx. every four weeks.
3.2 Function Tests
The GPS Controller HG 61417 is equipped with a serial service interface (monitor) located directly on the front panel (also refer to Figure 5 on page 10).
This interface enables connecting the controller to a PC (or laptop; also refer to section
C.2 on page 26). The interface operates with the following settings: 19200, 8, N, 1 (if
the baudrate of the PC is incorrect, the display will only show cryptical strings). A Terminal Program with ANSI Terminal Emulation enables checking all system functions as
well as adjusting parameters. For further information, please refer to section 2.2 on
page 9 and the also supplied system description of the controller.
This way you are able to determine whether the controller is operating correctly or
whether it outputs faulty data or none at all. Thus it is possible to restrict possible malfunctions to the controller or even to the components in front of them. It is also possible
to check whether the controller is using the parameter values set for the respective
RTG during the initial start-up.
English, Revision 01, Date: 15.08.2001, protected by copyright (refer to 6.2 on page 27)
12
Trouble Shooting
S_G57630-A
3.3 Normal Operation
3.3.1
Radio Modem HG 76100
3.3.1.1
Reference Station
In normal operation, the Power LED is permanently on, while the Tx LED of the HG
76100 slip-in card blinks once per second. The Rx LED is always off.
LEDs
LED +12V (red)
O POWER
LED AKTIV (yellow) O
LED RX (green)
O O
LED TX (green)
l = LED permanently on, O = LED off, ⊕ = LED blinking, X = LED status of no
interest for this issue
LED
Power
LED TX
LED RX
Function
l
O
O
Modem in reception mode and waiting for
data transmission
l
⊕
O
Modem transmits data
Table 1
3.3.1.2
Reference Station Radio Modem LEDs in normal operation
Mobile Station
In normal operation, the Power LED is permanently on, while the Rx LED of the HG 761
slip-in card blinks once per second. The Tx LED is always off.
LEDs
LED +12V (red)
O POWER
LED AKTIV (yellow) O
LED RX (green)
O O
LED TX (green)
l = LED permanently on, O = LED off, ⊕ = LED blinking, X = LED status of no
interest for this issue
LED
Power
LED TX
LED RX
Function
l
O
O
Modem is in reception mode and waiting for
data transmission
l
O
⊕
Modem receives data
Table 2
Mobile Station Radio Modem LEDs in normal operation
English, Revision 01, Date: 15.08.2001, protected by copyright (refer to 6.2 on page 27)
13
Trouble Shooting
3.3.2
S_G57630-A
GPS Controller HG 61417
The GPS Controller HG 61417 is only part of the Mobile Station.
-
LED Power permanently on.
-
LED 4 blinking at 10 Hz.
-
During the power-up period, first LED 1 + LED 3 and LED 2 + LED 4 are blinking
during the ROM test, and then LED 1 + LED 2 and LED 3 + LED 4 are blinking
during the.
-
All other LEDs are off!
LEDs
LED PWR
LD2
LD4
O
O O
O O
LD1
LD3
l = LED permanently on, O = LED off, ⊕ = LED blinking, X = LED status of no
interest for this issue
Mode
LED 1
LED 2
LED 3
LED 4
Function
Standard
l
l
l
⊕
normal positioningmode
System
start
l
O
l
O
O
l
O
l
ROM test (blinking at
1 Hz)
System
start
O
O
l
l
l
l
O
O
Firmware
Update
l
X
l
O
O
X
l
l
Table 3
RAM test (blinking at
1 Hz)
Intel-hex file being
received (blinking at
10 Hz)
GPS Controller LEDs in normal operation
English, Revision 01, Date: 15.08.2001, protected by copyright (refer to 6.2 on page 27)
14
Trouble Shooting
S_G57630-A
3.4 Identifying Malfunctions
3.4.1
Radio Modem HG 761
3.4.1.1
Reference Station
LEDs
LED +12V (red)
O POWER
LED AKTIV (yellow) O
LED RX (green)
O O
LED TX (green)
l = LED permanently on, O = LED off, ⊕ = LED blinking, X = LED status of no interest for this issue
LED
Power
LED TX
LED RX
Function
O
O
O
check power supply or exchange HG 76100
l
l
X
Indication for malfunction of Radio Modem. It may happen, that the Rx
LEDs of the mobile Radio Modems are also permanently on.
Exchange HG 76100.
l
O
O
Reference Station does not transmit correction data. Check GPS
Receiver, GPS Antenna and corresponding Antenna Cable. Switch the
Reference Station off and then on again. Make sure the accumulator is
also disconnected and the UPS switched off, in order to effect a reset
of the receiver. If, after 10 minutes, the Tx LED is still off, it is necessary to check with the Sharpe-CDU Program, whether the Reference
Station receives more than 4 satellites and is defined as Reference
Station. In case it is not possible to locate a defect, first the GPS
Receiver has to be exchanged by an other GPS Receiver (also
defined as Reference Station). In case 15 minutes later the malfunction is still there, exchange the Radio Modem HG 76100. In case this
neither clears the fault, check whether the RTCM Port of the GPS
Receiver is correctly configured.
l
X
l
This indicates a defect Radio Modem in a Mobile Station or an external jammer. It is also possible that the Rx LEDs of all mobile Radio
Modems are on. Exchange the mobile Radio Modem with the Tx LED
permanently on or eliminate the external jammer.
l
l
l
Modem control defective, exchange HG 76100.
Table 4
Radio Modem LEDs of the Reference Station in case of indicating a
malfunction
English, Revision 01, Date: 15.08.2001, protected by copyright (refer to 6.2 on page 27)
15
Trouble Shooting
3.4.1.2
S_G57630-A
Mobile Station
LEDs
LED +12V (red)
O POWER
LED AKTIV (yellow) O
LED RX (green)
O O
LED TX (green)
l = LED permanently on, O = LED off, ⊕ = LED blinking, X = LED status of no interest for this issue
LED
Power
LED TX
LED RX
Function
O
O
O
Check power supply; if the Power LEDs of the other components are
of, the radio modem is defective —> exchange HG 76100
l
l
X
HG 76100 is defective and has to be exchanged, since it blocks the
whole system.
l
O
O
The Reference Station does not transmit correction data. Check the
GPS Antenna and the GPS Antenna Cable. Switch Reference Station
off and then on again. Make sure the accumulator is also disconnected
and the UPS switched off, in order to effect a reset of the receiver. If,
after 10 minutes, the Tx LED is still off, it is necessary to check with
the Sharpe-CDU Program, whether the Reference Station receives
more than 4 satellites and is defined as Reference Station. In case it is
not possible to locate a defect, first the GPS Receiver has to be
exchanged by an other GPS Receiver (also defined as Reference Station). In case 15 minutes later the malfunction is still there, check the
Radio Modem HG 76100. Check the RF Antenna and the corresponding cables. If the Rx LEDs of the other mobile units are blinking, the
distance between the Mobile Station and the Reference Station may
be too far. If the Tx LED of the Reference Station is not blinking, it is
necessary to check the Reference Station. In case none of the above
helped, check whether the RTCM port of the GPS Receiver is correctly
set.
l
X
l
If the Rx LED is permanently on, an other mobile participant or the
Reference Station is permanently transmitting data or a jammer is
interfering. Eliminate the permanently jamming transmitter.
l
l
l
Modem control defective, exchange HG 76100.
Table 5
Radio Modem LEDs of the Mobile Station indicating malfunction
English, Revision 01, Date: 15.08.2001, protected by copyright (refer to 6.2 on page 27)
16
Trouble Shooting
3.4.2
S_G57630-A
GPS Controller
LEDs
LED PWR
LD2
LD4
O
O O
O O
LD1
LD3
l = LED permanently on, O = LED off, ⊕ = LED blinking, X = LED status of no interest for this issue
LED
Power
LED 1
LED 2
LED 3
LED 4
Function
O
O
O
O
O
Power supply failed. If the power LEDs of the other
modules are on, the corresponding module is defective
and has to be exchanged.
l
l
X
X
X
Status 2 bit 7 (hardware error with GPS Receiver) or
Status 3 Bit 6 (UTM zone does not comply with reference station)
l
X
l
X
X
Power supply is below lower limit. There is a failure in
the UPS. This may have been caused by faulty accumulators or a faulty charging unit. Check the UPS fuses.
Measure the UPS voltage, it must be at least 24 Volts.
Exchange the UPS if the voltage is too low. If the low
voltage occurs only in autonomous operation without
line voltage, the accumulators have to be exchanged.
l
X
X
l
X
Lock status is not 3D RTK Fix.
The GPS Receiver does not supply the highly accurate
position signal. If this status remains even after a restart of the GPS Receiver for more than 30 minutes,
check whether the other Mobile Stations, too, do not
supply accurate positions. Is this the case, the problem
is based on the current satellite constellation, or there is
a malfunction of the Reference Station or the correction
data transmission. Check whether the Reference Station is transmitting correction data. Also refer to the status description for the Radio Modem HG 76100. Via the
monitor interface of the GPS Controller HG 61417 it is
possible to check on the current satellite constellation.
Also refer to the System Description of the GPS Controller HG 61417.
l
⊕
(1sl /
1sO)
X
⊕
(1sl /
1sO)
⊕
(1sl /
1sO)
LEDs 1, 3 and 4 blinking at 0,5 Hz (on for one second,
off for one second):
The communication with the GPS Receiver failed. The
GPS Receiver is probably defective and has to be
exchanged.
Table 6
GPS Controller LEDs indicating malfunction
English, Revision 01, Date: 15.08.2001, protected by copyright (refer to 6.2 on page 27)
17
Trouble Shooting
S_G57630-A
3.5 Exchanging Spare Parts
If one of the modules of System G 57650 should be defective, it can only be exchanged completely. For example, exchange the Radio Modem HG 76100 as follows:
1.
Disconnect the System Rack HG 94420-A from power.
2.
Unscrew the four screws on the front panel of the Radio Modem (since they are
secured, it is not possible to remove them completely).
3.
Use the handle on the front panel to remove (pull) the Radio Modem from the
system rack.
4.
Insert the spare part Radio Modem in the guide rail of the system rack and push
the card in until it is correctly latched. Only then the contacts will be correctly
connected.
5.
Use the four screws to rescrew the front panel of the Radio Modem to the system
rack.
6.
Reconnect the system rack to the power supply. The system will then start-up
and be ready for operation.
Follow this routine also for the other modules. Radio Modems and GPS Receivers are
always supplied correctly pre-configured. Therefore it is not necessary to do any adjustments when exchanging one of these modules. In case it should be necessary to
exchange the Controller HG 61417, make sure that the parameters saved on disk for
the corresponding crane are downloaded into it. For further information refer to section
2.2 „Re-Start“ on page 9.
English, Revision 01, Date: 15.08.2001, protected by copyright (refer to 6.2 on page 27)
18
The System in Detail
4
S_G57630-A
The System in Detail
4.1 System Components
GPS Receiver
GPS Controller
Radio Modem
Serial Interfaces
Figure 8
4.1.1
Connections (s. a. paragraph 4.1.2 on page 20)
(s. a. paragraph 4.1.1)
System components S_G57630-A (19“ rack HG 94420-A)
Serial Interfaces
Table 7 shows, which function each individual interface has.
ATTENTION!
These interfaces are only for use within the configuration of the
individual components and can not be occupied for other uses
when the system is operating, otherwise the signal could be
blocked!
English, Revision 01, Date: 15.08.2001, protected by copyright (refer to 6.2 on page 27)
19
The System in Detail
S_G57630-A
Description
Function
RTCM/RCDR
RTCM correction data (receipt data from the radio
transceiver)
CDU
Control and Display Unit (connection to the GPS
receiver)
CDU/RCDR
GPS data from GPS receiver
DATA OUT
Data from GPS controller to sensor fusion controller
CAN
Data from sensor fusion controller CAN
PLC
Data from sensor fusion controller RS 232
MONITOR FUSION
Not used
Table 7
4.1.2
Serial interfaces in the 19“ rack
Connection Plan
The following table shows the connection plan for which connection can be used to
connect the system to the vehicle.
Connector No.
Signal Description
External Connection to Vehicle
109
PLC data 61418 TxD +
Data output to PLC RS 232 TxD
110
PLC data 61418 RxD +
Data input from PLC RS 232 RxD
116
Signal - GND
Signal ground for PLC
301
+24V input
+24 V power supply from UPS
302
GND
Power supply GND
303
Input +
Control of voltage breakdown HG 61417
304
Input -
Control of voltage breakdown HG 61417
310
GND
Power supply GND
Table 8
Connections used for connection with the vehicle
English, Revision 01, Date: 15.08.2001, protected by copyright (refer to 6.2 on page 27)
20
The System in Detail
S_G57630-A
4.2 Availability and Restrictions
•
Availability of the PDGPS:
approx. 95 % with an accuracy of ±3 cm
approx. 99,7 % with an accuracy of ±5 cm.
•
Prerequisites: Line of sight visibility to the satellites, opening angle from approx.
170o; elevation 5o.
•
Maximum distance from the base station should not exceed approx. 1 to 2 km
(restricted via HF components for the transmission of the correction data).
•
The GPS antenna has to be solidly fixed to either the main frame of the crane or
the trolley. Ideally on one of the bridge sides in the centre directly over the wheels.
•
The base station should be set up as a redundant system, because the availability
of its correction data is a requirement for the functionability of the complete terminal.
•
The positional output data is available over RS 232 interface. The position is given
as a distance (e. g. in mm) from an original reference coordinate system. It is possible to define up to 100 reference coordinate systems per terminal.
English, Revision 01, Date: 15.08.2001, protected by copyright (refer to 6.2 on page 27)
21
The System in Detail
S_G57630-A
4.3 UPS supervision HG 20330 (in comb. with UPS APU 24-2)
The UPS supervision controls the function of the UPS and switches the system off after
a set time when system is running on battery power (UPS), due to a power failure, to
avoid the batteries being completely discharged. All conditions are indicated via LEDs
(see Table 9 on page 23). Furthermore there are two optically decoupled outputs available, in order to trigger external events.
SW1 (see text below)
LEDs:
LD3 (green)
LD2 (yellow)
LD1 (red)
See also Table 9 on page 23
ST1 to 14
See also Figure 10 on page 22
Figure 9
UPS supervision module HG 20330
The duration of the UPS running time is setable via positionable switch (see Figure 9
on page 22). To obtain the time set multiply the switch’s position by 5 mins (e. g. SW1
set on 8 —> 8 x 5 minutes = 40 minutes). Changes to SW1 are only transferred to the
UPS supervision when the it is switched on and off again.
4.3.1
Figure 10
Connection plan
Connection plan for the UPS supervision
English, Revision 01, Date: 15.08.2001, protected by copyright (refer to 6.2 on page 27)
22
The System in Detail
4.3.2
S_G57630-A
Status display
LED Display
Status
Opto Coupler
all LEDs off
No main power supply,
load turned off
Power fail not active
line not active
LD3 green blinks
Main power supply on,
batteries being charged,
UPS is in charging
Power fail active
line active
LD3 green on
Main power supply on,
batteries charged, UPS
is ready
Power fail not active
line active
LD2 yellow on
Main power failure,
working on battery
power for set time
Power fail active
line not active
LD1 red on
Main power failure, battery power for one
minute
Power fail active
line not active
all LEDs blink
Battery power low, main
power supply present
Power fail active
line not active
Table 9
Interpretation of the status displays on the UPS
For a preset charging time of 30 mins LED 3 (green) blinks. If during this time the main
power fails then the load will be separated from the UPS after one minute. This prevents a complete discharge of the batteries caused by a short connection to the main
power supply.
LED 3 (green) is constantly on after the charging time — this signals that the UPS is
ready. Should the main power supply now fail then the system’s load is supplied by the
batteries for the set time, this is indicated by LED 2 (yellow) being on. After the per
SW1 preset time has past, the system is provided with power for one more minute; this
is indicated when LED 1 (red) is lit. At the end of this time period then the load is completely separated from the UPS. If the main power supply is reinstated before the system is shut down then the charging time starts again.
If the battery voltage drops below a defined limit (approx. 12 V) then the system is immediately shut down.
English, Revision 01, Date: 15.08.2001, protected by copyright (refer to 6.2 on page 27)
23
Appendix
5
Appendix
A
Scope of Supply (Part List)
S_G57630-A
The following components are part of System G 57650:
Item
Description
Model
Ordering Information
1.
Mobile Station, Subrack
completely assembled
Includes items 5, 6, 7, 8, 9,
10, 11, 13, 15, 17, 19
SG57650 Mobile Station
2.
Base Station, Subrack completely assembled
Includes items 5, 6, 7, 10, 11,
12, 13, 15, 17, 19
SG57650 Base Station
3.
Mobile Station, Subrack
completely assembled, without Antennas and UPS
Includes items 5, 6, 7, 8, 9
SG57650 Mobile Station w/o
Antenna and UPS
4.
Base Station, Subrack completely assembled, without
Antennas and UPS
Includes items 5, 6, 7
SG57650 Base Station w/o
Antenna and UPS
5.
Subrack with Backplane,
without Insert Modules
G 94420
G 94420 - A
6.
GPS - Receiver Insert Module
Sharp Card
HG65770-A / 10TE_HB /
SW2.2
7.
Radio - Transceiver Insert
Module
HG 76100
HG76100-B / 24V / 12TE_HB
/ C64 / 445,425 9600 / RS232 9600 8N1/
HG39720AA3.09
8.
GPS - Controller Insert Module
HG 61417
HG61417 / 24V / 10TE_HB /
C64 / 1*RS-422, 3*RS-232 /
HG61417GG
9.
Uninterruptable Power Supply (UPS) without UPS
Supervisor (see Pos. 11 and
12)
Thiele APU24-2 w/o Accus
APU 24-2 / XX Ah / 115 / 230
10.
Accumulator Set for UPS (2
Accumulators included)
12 V / 7,2 Ah
2 pieces Panasonic LCR127R2P
11.
UPS Supervisor
HG20330
HG20330 / N=15 /
HG20330AA2.00
12.
Base Station GPS - Antenna
CR - Antenna
GPS - CR - Antenna with Nut
and Bolt
13.
Mobile Station GPS Antenna with orig. Mounting
Flange
LWS - Antenna
GPS - LWS - Antenna with
Nut and Bolt and MountingFlange
Table 10
Part List (Part 1 of 2)
English, Revision 01, Date: 15.08.2001, protected by copyright (refer to 6.2 on page 27)
24
Appendix
S_G57630-A
Item
Description
Model
Ordering Information
14.
Base Station Radio Antenna
Kathrein Omni 450
K75 11 21
15.
Mobile Station Radio Antenna
Kathrein Gainflex
K71 53 23 6
16.
Base Station GPS - Antenna
cable
RG-58, 18m, SMA elbow /
TNC even
G09234-A / 18m
17.
Mobile Station GPS Antenna cable
RG-58, 2m, SMA elbow /
TNC even
G09232-A / 2m
18.
Base Station Radio Antenna cable
RG-58, 9m, BNC elbow / N
even
G09233-A / 9m
19.
Mobile Station Radio Antenna cable
RG-58, 2m, BNC elbow /
TNC FlaBu (flat socket)
G09231-A / 2m
20.
Heat Shrink with Glue, 4/1 for
Type TNC Plug with RG-58
cable
IAKT 16/4 Bürklin
91 F 3756 / L, (L = required
Length in Meter)
21.
Heat Shrink with Glue, 4/1 for
Type N Plug with RG-58
cable
IAKT 24/6 Bürklin
91 F 3758 / L, (L = required
Length in Meter)
Table 10
B
Part List (Part 2 of 2)
Cable Specifications
Correction Data
Transmission
GPS Mobile
(Rover)
GPS Reference Station
RG58
l <= 10 m
9 < l < 18
15 < l < 20
RG213
l <= 20 m
10 < l < 30
20 < l < 30
Table 11
Cable specifications
-
Temperature range permanently installed: -40 to +90 oC
-
Minimum bending radius permanently installed: 6 x cable diameter
-
Sea-proof
English, Revision 01, Date: 15.08.2001, protected by copyright (refer to 6.2 on page 27)
25
Appendix
C
General Specifications
C.1
Basic technical Data
S_G57630-A
Valid for system configurations:
Operating temperature of electronic components
0 to +50 oC
Operating temperature of antennas
-20 to +65 oC
Update rate of position output with Sensor-Fusion
up to 20 Hz
Power supply
130 V AC or
240 V AC
Minimum 5 minutes start-up time for self-calibration essential
Table 12
C.2
Basic technical data
Minimum Requirements for a Laptop for configuring and monitoring
the System
The laptop has to be connectable to the serial interfaces of the system and has to be
able to run a terminal program with ANSI terminal emulation. Therefore almost every
available laptop is suitable.
We recommend using a laptop with Microsoft® Windows 95® or higher with the (included in Windows 9x/NT) terminal program HyperTerminal®, since this is the program the Götting engineers use. The laptop has to have a free serial interface. In
addition, a serial cable (9pol. Sub-D) is necessary for connecting the system.
C.3
•
RTG/RMG Specifications
Sideways sway of less than 5 cm allowed, in any other case is the use of a slope
controller necessary.
D
List of Abbreviations
DGPS
Differential GPS
GPS
Global Positioning System
PDGPS
Precision DGPS
RTG
Rubber Tired Gantry Crane
UPS
Uninterruptable Power Supply
Table 13
Abbreviations
English, Revision 01, Date: 15.08.2001, protected by copyright (refer to 6.2 on page 27)
26
Notices
6
S_G57630-A
Notices
6.1 Proper Use of Equipment
The system S_G57630-A is used to determine the position of Rubber Tired Gantry
Cranes (RTGs). A pure positional determination is carried out. The determined position is made available to interconnected superordinate systems.
The installation, technical maintenance and service is only allowed to be carried out
by authorised trained personnel.
6.2 Copyright
This manual is protected by copyright. All rights reserved. Violations are subject to penal legislation of the Copyright.
6.3 Exclusion of Liability
Any information given is to be understood as system description only, but is not to be
taken as guaranteed features. Any values are reference values. The product characteristics are only valid if the systems are used according to the description.
This instruction manual has been drawn up to the best of our knowledge. Installation,
setup and operation of the device will be on the customer’s own risk. Liability for consequential defects is excluded. We reserve the right for changes encouraging technical improvements. We also reserve the right to change the contents of this manual
without having to give notice to any third party.
English, Revision 01, Date: 15.08.2001, protected by copyright (refer to 6.2 on page 27)
27
List of Pictures
7
S_G57630-A
List of Pictures
Figure 1
Sketch DGPS..................................................................................... 5
Figure 2
The elements of the system .............................................................. 6
Figure 3
Basic Operational Parameters .......................................................... 7
Figure 4
Stack Parameters .............................................................................. 8
Figure 5
Interfaces for the connection of laptops to the controller ............... 10
Figure 6
Screenshot: Main menu GPS Controller HG 61417 ........................ 10
Figure 7
Screenshot: Firmware/Parameter Options of the GPS Controller
HG 61417 ........................................................................................ 11
Figure 8
System components S_G57630-A (19“ rack HG 94420-A) ............ 19
Figure 9
UPS supervision module HG 20330 ............................................... 22
Figure 10
Connection plan for the UPS supervision ....................................... 22
English, Revision 01, Date: 15.08.2001, protected by copyright (refer to 6.2 on page 27)
28
List of Tables
8
S_G57630-A
List of Tables
Table 1
Reference Station Radio Modem LEDs in normal operation .......... 13
Table 2
Mobile Station Radio Modem LEDs in normal operation ................ 13
Table 3
GPS Controller LEDs in normal operation....................................... 14
Table 4
Radio Modem LEDs of the Reference Station in case of indicating a
malfunction...................................................................................... 15
Table 5
Radio Modem LEDs of the Mobile Station indicating malfunction.. 16
Table 6
GPS Controller LEDs indicating malfunction .................................. 17
Table 7
Serial interfaces in the 19“ rack ...................................................... 20
Table 8
Connections used for connection with the vehicle ......................... 20
Table 9
Interpretation of the status displays on the UPS............................. 23
Table 10
Part List ........................................................................................... 24
Table 11
Cable specifications........................................................................ 25
Table 12
Basic technical data....................................................................... 26
Table 13
Abbreviations .................................................................................. 26
English, Revision 01, Date: 15.08.2001, protected by copyright (refer to 6.2 on page 27)
29
Index
9
S_G57630-A
Index
A
L
abbreviations 26
accuracy 21
availability 21
Laptop 10, 26
B
maintenance 12
basic operational parameters 7
basic technical data 26
M
N
normal operation 13
C
O
cable specifications 25
operational overview 6
D
P
DGPS 5
elements 6
exclusion of liability 27
parameter disk 9
part list 24
PDGPS 5
positioning 5
proper use of equipment 27
F
R
function tests 12
re-start 9
restrictions 21
RTG/RMG specifications 26
E
G
GPS 5
H
HG
20330 22
61417 6
65770 6
76100 6
94420-A 19
G 57650 19
I
identifying malfunctions 15
initial start-up 9
interfaces 19, 21
S
scope of supply 24
stack parameter 8
system components 19
systems function 4
T
technical data 26
technologies 5
terminal program 10
U
UPS 22
connection plan 22
status displays 23
English, Revision 01, Date: 15.08.2001, protected by copyright (refer to 6.2 on page 27)
30