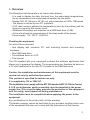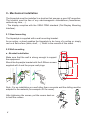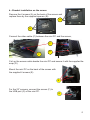
1
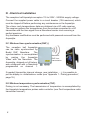
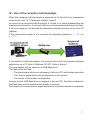
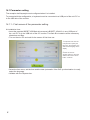
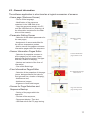
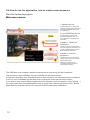
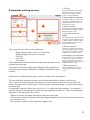
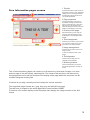
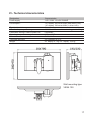
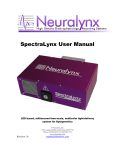
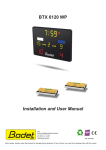
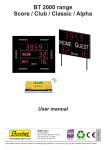
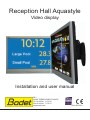
Reception Hall Aquastyle
Video display
Installation and user manual
BP1
49340 TRÉMENTINES FRANCE
Tél. 00 33 241 71 72 00
Fax 00 33 241 71 72 01
www.bodet.com
Réf. 607526 C
Upon receipt, always check the product for damage during shipment. If any is found, you may file a damage claim with the carrier.
1
Table of contents
I - Overview .................................................................................3
Checking the equipment:............................................................................ 3
II - Mechanical installation ...........................................................4
II.1 Stand mounting .................................................................................... 4
II.2 Wall mounting ....................................................................................... 4
a - Bracket installation .......................................................................... 4
b - Bracket installation on the screen ................................................... 5
III - Electrical installation ..............................................................6
III.1 Wireless (DHF) time synchronisation .................................................. 6
III.2 Wireless temperature synchronisation (THF) ...................................... 6
IV - Use of the reception hall Aquastyle.......................................7
IV-1 Parameter setting................................................................................ 8
IV-2 Time setting......................................................................................... 9
V - Screens configuration ...........................................................10
V-1 Principle .............................................................................................. 10
V-2 Software application installation.......................................................... 10
V-3 General information ............................................................................ 11
V-4 How to use the application, how to create screen sequences ............ 12
VI - Technical characteristics ......................................................17
VII - What to do if ... ? .................................................................18
Programming memo: ................................................................................. 18
Annexe 1 - How to pair the HF receiver with the master clock.................. 19
Synoptic of an Aquastyle installation ..........................................20
2
I - Overview
The Reception Hall Aquastyle is an indoor video display.
- It is used to display the date, the local time, the pools water temperatures,
the air temperature and customised information for the public.
- Display 16/9, 22“ (56 cm) or 32“ (81 cm), with a resolution of 1920 x 1080 pixels.
- The display is driven by mini PC (supplied).
- A HF radio receiver gathers the temperatures (sent by the probes) and the
local time (send by the master clock)
- Additional information are imported via a USB flash drive (2 GB).
- A time slot allows the programming of the sleep mode of the screen.
- Power supply: 115 / 230 V - 50/60 Hz.
Checking the equipment
You should have received:
• One display with miniature PC, wall mounting bracket and mounting
hardware.
• One USB flash drive.
• The software burnt on a CD
• This manual.
The CD supplied with your equipment contains the software application that
allows you to program the display. The programming can therefore be done on
a PC and transferred to the mini PC by mean of the USB flash drive.
Caution: the installation and maintenance of this equipment must be
carried out only by authorized personnel.
This product is specified for indoor use only.
It is supplied by 115 or 230V AC.
The installation must comply with the IEC 364 standard (NFC 15-100 for France).
A 10 A circuit breaker, easily accessible, must be installed in the power
supply line. This circuit breaker provides the protection of the equipment
and, for safety, must tripped off during maintenance.
The installation must be completed before applying the power to the
equipment.
Any modifications to the product will void the warranty.
The Bodet company cannot be held liable for any accident resulting from a use
of the equipment that does not comply with the instructions of this manual.
3
II - Mechanical installation
The Aquastyle must be installed in a location that ensures a good HF reception.
The location must be free of any electromagnetic disturbances (transformer,
cathode ray tube, ...).
- The display complies with the VESA FDMI standard (Flat Display Mounting
Interface).
II.1 Stand mounting
The Aquastyle is supplied with a wall mounting bracket.
As an option, a stand enables the Aquastyle to be hung of a ceiling or simply
rest on a flat surface (table, shelf, ...). Refer to the manual of this stand.
II.2 Wall mounting
28.6mm
a - Bracket installation
Make sure that the wall is strong enough to support
the equipment.
Mount the Aquastyle bracket with the 2 Ø8mm screws
supplied with it and the proper wall plugs.
152mm
104mm
Ø 10 mm
Note : For an installation on a wall other than a concrete wall the drilling must be
adapted to the material (for example: Ø5 for wood).
M8 x 80mm
After tightening the screws, put the covers back on
to hide the screws.
13 mm
4
b - Bracket installation on the screen
Remove the 4 screws (A) on the back of the screen and
replace them by the supplied spacers (B).
A
B
Connect the video cable (C) between the mini PC and the screen,
C
D
F
Coil up the excess cable beside the mini PC and secure it with the supplied tiewrap (D)
.
Mount the mini PC on the back of the screen with
the supplied 4 screws (E).
E
For the 22’’ screens, connect the screen (F) to
the USB port (G) of the mini PC.
G
5
III - Electrical installation
The reception hall Aquastyle accepts a 115 to 230V - 50/60Hz supply voltage.
Connect the supplied power cable to a circuit breaker (10A maximum) which
must be tripped off before performing any maintenance on the Aquastyle.
The «time» and «temperature» data are obtained via a HF radio receiver.
The receiver gathers the temperatures from the probes connected to a HF
transmitter and the time signal from a Nanotime master clock ensuring a
perfect precision.
Any hardware modification must be performed with powered removed from the
Aquastyle.
III.1 Wireless time synchronisation (DHF) )
The reception hall Aquastyle
can be radio synchronised by
Bodet DHF Nanotime.
The
synchronisation is accomplished
by
pairing
the
Aquastyle
Video with the Nanotime. The
Aquastyle, shipped out of factory,
was configured with a Nanotime
programmed on channel 1.
Nanotime
DHF time
transmission
If needed (transmitter channel change, new installation, ...), it is possible to
put the display in «Initialisation» mode (see “Appendix 1 - Pairing procedure”,
page 19.)
III.2 Wireless temperature synchronisation (THF)
Pairing is not necessary. The transmission of temperature is accomplished by
the Aquastyle temperature probes radio controller (see Pool temperature radio
transmitter manual ).
6
IV - Use of the reception hall Aquastyle
When the reception hall Aquastyle is powered up for the first time, parameters
must be set, see “IV-1 Parameter setting”, page 8.
As soon as the reception hall Aquastyle is turned on it starts broadcasting the
memorized information. It receives the time and temperature data sent by radio.
If the time signal is not received the Aquastyle displays the time of the mini PC
(default).
If the temperature signal is not received the Aquastyle displays « --.- °C » or
«-- °C ».
If you wish to modify the display, this must be done with the supplied software
application on a PC with a Windows OS (XP, Vista or Seven).
The new display will be saved on a USB flash drive.
The flash drive will hold:
- The parameters which are necessary to the mini PC and display operation
- The various pages which will be displayed on the screen.
- The record of the probes configuration.
As soon as the USB flash drive is plugged in the mini PC, the data contained in
the flash drive will be copied automatically in memory.
The display of the new screen pages starts as soon as the transfer is completed.
7
IV-1 Parameter setting
The reception hall Aquastyle must configured when it is installed.
To proceed with the configuration, a keyboard must be connected to a USB port of the mini PC or
to the USB hub of the monitor.
IV-1.1 - First screen of the parameter setting
At installation time:
• Insert the supplied BODET USB flash drive named «BODET_AQUA2» in one USB port of
the mini PC or in the USB hub of the 22’’ monitor. The flash drive contains all the necessary
directories and files.
• Turn on the mini PC and wait for the screen of first time use:
1 Properties of the mini PC:
Components to specify the
time zone, the local time, the
date and the language of the
display.
2 Save and Cancel:
A button «Save» to save the
data into the mini PC and a
button «Cancel».
• Select the time zone, set the time and the date (automatic if the DHF synchronisation is used),
select the language.
• Validate with the «Space» bar.
8
IV-1.2 - Second screen of the parameter setting
After validation of the first screen, the following page is displayed on the screeen.-:
You can also access this page by typing «bodet» on the keyboard while holding down the Ctrl key
(Ctrl + bodet).
1 Probes:
15 lines table that lets you assign a
name of area to each probe. A field
that is left blank is interpreted by
the system as a non-existent probe.
The probe number corresponds
to its id (position of the probes
on
the
wireless
temperature
probes card and the dips setting).
2 Sequence properties.
Group that lets you set:
- a delay before which the default
screen will be displayed in case of
failure to receive the temperature
data
- the unit for the temperature display
- the temperature refresh rate.
3 Other configuration, Backup and
cancel.
.
Dips
Probes numbers
according to the Dips setting
Pool temperature
probes
Dips
Air temperature probe
This screen lets you configure the temperature probes by giving them names of zones (logical
names: zone 1, zone 2, ...) and set general parameters of the display operation: delay before
which a default display will be put on the screen in case of failure to receive the temperature radio
signal, the unit that will be used to display the temperatures (degree or tenth of degree)and the
temperature display refresh time.
The modifications are saved directly in the sequence configuration file (modification of the
sequence parameters contained on the USB flash drive). Therefore a Bodet flash drive must be
connected to the mini-PCIl before performing a backup. If no flash drive is detected a warning
message will be displayed. The fields that make up this screen are initialised with the values of the
sequence contained in the Bodet flash drive.
In case of need, the «Other configuration» button lets you access the first parameter setting
screen; but be aware that any modifications done on the second parameter setting screen will be
lost. It is therefore recommended to backup first, or to access the first parameter setting screen
before proceding to modifications on the second screen.
IV-2 Time setting
When the Aquastyle is not synchronised by a master clock, an eventual drift of the mini-PC time
base can be corrected by typing on the keyboard the following key sequence: Ctrl + time (hold
down the «Ctrl» key while typing «time»).
9
V - Screens configuration
V-1 Principle
The software application supplied on the CD will let you create and modify the
display sequences of the reception hall Aquastyle.
Once created (or modified) the display sequence is saved on the supplied USB
flash drive.
Warning - The flash drive used for the data transfer will be formatted and the
data that it might hold will be erased.
The data is copied in memory and the display starts as soon as the USB flash
drive is installed on the reception hall Aquastyle.
V-2 Software application installation
The software application runs only on PCs equipped with a Windows OS.
Insert the CD in the reader.
If the automatic execution is activated, execute the setup when Windows asks
for your authorisation, if not access the root of the CD and click on the exec file
«bodet_aquastyle_setup.exe».
Select the language that you want to use for the installation and when running
the application. It is always possible to change the language by using the
«Language» button of the welcome screen
Once the application is installed on your PC and the setup is finished, the
Aquastyle software is ready for use. During the installation you can create a
shortcut on the Windows Desktop.
A directory named «Aquastyle» was created in the menu «Start»-«Programs»
where you can find a link to uninstall the program while keeping all your backup
copies for future use.
NoTe: Some antivirus (particularly avast! Antivirus) can corrupt part of the
installation. In this case we recommend to deactivate the antivirus during the
installation.
10
V-3 - General information
The software application is structured as a logical succession of screens.
• Home page (Welcome Screen)
- Choice of the language,
- Modification of the sequence
contained in the USB flash drive,
Welcome screen
- Copy the sequence saved in the PC
onto the USB flash drive. (Warning, all
the information contained on the flash
drive will be erased).
• Parameter Setting Screen
- Selection of the default parameters for
the new pages,
Parameter setting
screen
- Assignment of names and offset for
the various temperature probes,
- Add or remove free pages or sensors
information pages within the sequence.
• Sensor Information Pages Editor
- Selection of properties common to
all the pages you will create (name,
background and font colours, font type
and size, duration of display),
Sensors information
pages editor screen
- Number and content of the lines of
information,
- Size of the Bodet logo.
• Free Information Pages Editor
- Selection of the properties of the page
(name, background and font colours,
font type and size, duration of display),
Free information pages
editor screen
- Add/remove text,
- Add/remove images,
- Alignment of texts and images.
• Screen for Page Selection and
Sequence Backup
Page selection and
page saving screen
- Sorting of the pages within the
sequence
- Preview of the sequence,
- Permanent display / Time slot,
- USB flash drive and PC page saving.
11
V-4 How to use the application, how to create screen sequence
Start the Aquastyle program.
Welcome screen
1 Options tool bar:
3 buttons that let you change the
language, display information about
the software application and exit
the application
1
2 List of USB flash drives:
A list that lets you choose the
Aquastyle USB flash drive. You
can refresh the scrolling list with
this button.
2
3 Button « Modify the
sequence »:
This button opens a work session
from the sequence contained in the
chosen USB flash drive if it is the
Bodet Aquastyle flash drive.
3
4 Button « Load the
sequence » :
4
This button lets you load the last
version saved on the PC onto the
selected flash drive.
Warning: the flash drive is
formatted (content completely
erased) before loading.
The USB flash drive contains a default sequence that is used during the first installation.
This sequence can be edited by using the «Modify the sequence» button.
In case of mishandling, loss of the flash drive or data corruption, the backup sequence contained
in the PC can be reloaded into the flash drive by using the «Load the sequence» button. .
If you wish to save several different applications (for example: week-end special, school special ...)
you must create them on separate flash drives by using the «Load the sequence» button. But be
aware that you must first save the PC sequence before making any modification.
12
1 Tool bar:
Parameter setting screen.
3 buttons that allow quick access to
the Welcome screen, to the Page
Selection and Sequence Saving
screen or exit the application.
1
2 Pages default properties:
2
Scrolling lists that let you set for the
new pages, the display duration, the
pages background colour, the font
with its size and colour.
5
3
3 Sensor display:
Table listing the installed temperature
sensors with the possibility to assign
labels and offsets to them.
4
4 List of the sequence
pages:
6
7
List of all the pages presently created.
The choice of which particular pages
to display and the sequence in which
they’ll be displayed is done on the
Pages Selection screen.
5 Preview window:
This screen lets you set the main parameters.
- Page display duration, from 1 to 30 seconds,
- Pages background colour (16 colours),
- Text font,
- Font size,
- Font colour.
These parameters are set as default for all screens but they can be
changed on each page. .
The Sensors information pages allow displaying the temperatures
measured by the sensors installed in the different areas of the pool
complex.
A preview of the page selected from
the list (4) is displayed in this window.
The page can be modified or deleted
« Modify» and « Delete » buttons.
6 Add page in the sequence:
A button and a counter are assigned
to each type of page: Sensor Info or
Free Info. The buttons are used to
add pages and the counters show the
available number of pages.
7 Browsing buttons :
These 2 buttons lets you browse
through the application one step at
a time.
Each sensor is identified by the area in which it measures the temperature.
The user can label (name) the sensors as he wishes and define an offset to each sensor.
Thus, if the user assigns the label «Olympic pool» to the sensor in the main pool area then the
sensor will appear as «Olympic pool» on all the sensor information pages. 2 sensors cannot have
the same label. .
It is possible to apply an offset (from -9.9 to +9.9 °C) to each one of the sensors. For example: if
a sensor measures a temperature of 20°C and was assigned an offset of +5 then the temperature
displayed on the Aquastyle will be +25°C.
- Display of at least one Bodet Information page: the Home page.
- The maximum number of Sensor Information pages depends on the number of declared sensors
(up to a max of 15).
- The maximum number of Free Information pages is 20.
13
Create / modify your display sequence.
Sensor Information pages screen
1 Tool bar:
4 buttons that allow a quick access
to the Welcome screen, to the
Parameter setting screen, to the
Page Selection and Sequence
Saving screen or let you exit the
application.
1
2
2 Page properties:
General properties of the page.
It is possible to assign a name to
the page, to select the type, colour
and size of the font to be used and
to select the background colour
and the duration of the display of
the page.
3 Preview of the page:
3
4
Window that lets you see how the
page will look like when the page
is displayed on the Aquastyle video
display.
5
4 Selection of information:
6
Selection of one to three lines
of data and the type (time or
temperature).
5 Size of the Bodet logo:
Select the size of the logo within a
scrolling list
6 Browsing buttons:
Unlike the Sensor Information pages, the name of the Home page
cannot be modified.
These 2 buttons lets you browse
through the application one step
at a time.
A Sensor Information page can display up to 3 lines of information therefore up to 3 different
sensors at a time.
At least one line and no less can be displayed and there are check boxes that allow displaying of a
2nd and 3rd line. .
3 scrolling lists let you select the information to be displayed which can be of 3 types: time, date
and temperatures (only Celsius unit displayed by default the following way: 00.0°C).
Time can be displayed under 2 formats (HH:MM and HH:MM.SS), but only on the first line. On the
welcome page the first line can only display the time or the date.
There cannot be duplicates of temperature (from the same sensor) on the same page but it
possible to display the same temperature on different Sensor Information pages
14
1 Tool bar:
Free Information pages screen
4 buttons that allow a quick access to
the Welcome screen, to the Parameter
setting screen, to the Page Selection
and Sequence Saving screen or let
you exit the application.
1
2
2 Page properties:
4
5
3
General properties of the page. It
is possible to assign a name to the
page, to select the type, colour and
size of the font to be used and to
select the background colour and the
duration of the display of the page.
3 Preview of the page:
Window that lets you see how the
page will look like when the page
is displayed on the Aquastyle video
display.
6
4 Text management:
7
2 buttons let you add or remove texts.
You can select a text among a list
and edit it in the writing window. .
5 Image management:
2 buttons let you add or remove an
image or PDF.
A cursor let adjust the size of the
image.
6 Text alignment:
2 buttons let you align the text
vertically and horizontally.
7 Browsing buttons:
These 2 buttons lets you browse
through the application one step at
a time.
The «Free Information» pages can contain up to 8 elements (4 texts and 4 images, or 4 texts
and one page in the pdf format), called objects. The format of the text (font, size and colour),
the background colour and the duration of the display of the page within the sequence can be
modified using the scrolling lists.
2 buttons let you align vertically and horizontally the various elements.
The supported image formats are: jpeg, bmp, png and pdf (pdf one page).
The total size of images for the whole application cannot exceed 100MB.
To achieve a full screen display on the Aquastyle video display, the image must be in the 16/9
format.
15
1 Tool bar:
Save your display sequence.
Page Selection and Sequence Backup screen
1
3 buttons that allow a quick access
to the Welcome screen, to the
Parameter Setting screen, or let you
exit the application..
2 List of the pages:
List of the pages that lets you select
and organize the sequence in which
the pages will be displayed
2
3 Overview:
Preview of the page selected within
the list and preview of the whole
sequence in simulation mode.
3
4 Display and save the
sequence buttons:
2 buttons that let you simulate the
sequence in the preview window and
save the sequence into the USB flash
drive and the user PC.
5
5 Display the selected
pages:
4
6
The last step of the editing process is to organize the sequence in
which the selected pages will be displayed.
The sequence can be displayed
permanetly or on a schedule.
6 Browsing button:
This button lets you go back to the
previous page.
The list of available pages is displayed in the left window (2) and when
selected, a preview of the page is displayed in the overview window (3).
2 buttons let you move the selected page up or down within the sequence. The selected page can
also be moved by the «drag and drop» action.
Exception: the Home page cannot be moved and will always remain in the first position.
It is possible to choose not to display some pages by checking the pages. This option allow the
user to create pages ahead of time or to save pages that would be displayed later on (special
events, pools closing, draft of pages, etc).
You can also preview the sequence before saving it by using the button (4) «Display the
sequence».
It is possible to schedule the display of the sequence during a particular time frame or
permanently.
If the USB flash drive is removed during the page edition then the sequence cannot be saved,
The flash drive must reinserted in the same USB port than the one used when creating the Home
page. Press the button (4) «Save the sequence» to save the sequence in the USB flash drive.
A pop-up dialogue box confirms that the sequence has been saved and ask the user if he (she)
wishes to create a backup copy in the PC.
Note: if the user wishes to have several recurrent types of display (displays geared toward
schoolchildren, retired people ...) the user must save each sequence on individual USB flash drive
and load the sequence before use.
16
VI - Technical characteristics
Designation
Characteristics
Power supply
Consumption :
115V / 230V -10/+6% 50/60HZ
-22’’ display: 300 mA at 230V (600 mA at 115V).
-32’’ display: 700 mA at 230V (1,4A at 115V).
Class I
869 MHz / 100 m maxi in swimming pool building
Permanent
-0°C à +40°C
IP 20 / IK 07
≤ 0,2 sec/day at 25°C
22’’ display: 8,7 kg / 32’’ display: 16,5 kg
Electrical Insolation
HF radio frequency / Coverage
Parameters saving in case of power loss
Operating temperature range
Protection index
Time base accuracy
Weight
Wall mounting type
VESA 100
17
VII - What to do if ... ?
What to do if ...?
Check …
When turning on the power
the display does not start.
- Check the status of the green LED on the mini PC.
LED off = No power. Check the presence of mains
- Check that the blue LED of the LCD screen power button is on.
LED off = press the power button to turn on the LCD screen
- Insert the USB flash drive to reload the sequence
- If still not OK call BODET.
Drift of the time base
Install a DHF synchronisation with a Nanotime master clock or
perform the pairing (see page 6)
The radio pictogram is
blinking.
Loss of synchronisation with the master clock after a restart, a
power failure or a period > 24h without reception.
The sequence remains
stuck on the same
information page
Turn off the main power.
The displayed time and/or
the date are incoherent
Turn off the main power.
Programming memo of the installation:
Sensor physical address
1
2
3
4
5
6
7
8
9
10
11
12
13
14
15
18
Areas (logical names)
Labels (displayed names)
Appendix 1 - Pairing procedure
If channel 1 is used by another
application, it is possible to assign
a different channel.
Put the video display in INIT
mode (see procedure below).
Change the transmission channel
of the master clock and put it in
the INIT mode.
The HF receiver has a Reed relay inside.
To pair the receiver with the master clock bring a magnet near the
receiver..
Detail
When the magnet is brought near the receiver, the red LED
starts blinking rapidly (100ms ON / 100ms OFF).
Keep the magnet near the Reed relay for at least 3 sec. or
until the Led starts blinking more slowly (500ms ON / 500ms
OFF) then the receiver will try to synchronise itself with a
transmitter that is itself in the INIT mode.
When the synchronisation is achieved the LED blinks at a
rate of 1 second (50ms ON / 950ms OFF).
If needed (change of the transmitter channel, new installation, ...), the same
method can be used to put the video display in the INIT mode.
19
Synoptic of an Aquastyle installation
Technical room
Master clock with
radio antenna
DHF time distribution
230V
Reception hall
Aquastyle Video
HF reception and
information display
230V
230V
Pool area
LED Aquastyle
HF reception and
temperaturs display
Technical room
230V
20
HF temperature probes
Temperature measurement
HF transmission