1
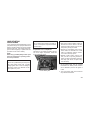
Wrangler
15JK72-126-ARA-AA
2015
O P E R AT I N G I N F O R M AT I O N
15JK72-126-ARA-AA
Wrangler
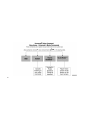
Table of Contents
1
INTRODUCTION
2
THINGS TO KNOW BEFORE STARTING YOUR VEHICLE
3
UNDERSTANDING THE FEATURES OF YOUR VEHICLE
4
UNDERSTANDING YOUR INSTRUMENT PANEL
5
STARTING AND OPERATING
6
WHAT TO DO IN EMERGENCIES
7
MAINTAINING YOUR VEHICLE
8
MAINTENANCE SCHEDULES
9
IF YOU NEED CONSUMER ASSISTANCE
10
INDEX
.....................................................................3
.............................................9
. . . . . . . . . . . . . . . . . . . . . . . . . . . . . . . . . . . . . . . . . . . . . 57
. . . . . . . . . . . . . . . . . . . . . . . . . . . . . . . . . . . . . . . . . . . . . . . . . 169
. . . . . . . . . . . . . . . . . . . . . . . . . . . . . . . . . . . . . . . . . . . . . . . . . . . . . . . . . . . . 209
. . . . . . . . . . . . . . . . . . . . . . . . . . . . . . . . . . . . . . . . . . . . . . . . . . . . . . . . . . 287
. . . . . . . . . . . . . . . . . . . . . . . . . . . . . . . . . . . . . . . . . . . . . . . . . . . . . . . . . . . 303
. . . . . . . . . . . . . . . . . . . . . . . . . . . . . . . . . . . . . . . . . . . . . . . . . . . . . . . . . . . . 345
. . . . . . . . . . . . . . . . . . . . . . . . . . . . . . . . . . . . . . . . . . . . . . . . . . . . . 347
. . . . . . . . . . . . . . . . . . . . . . . . . . . . . . . . . . . . . . . . . . . . . . . . . . . . . . . . . . . . . . . . . . . . . . . . . 351
1
2
1
INTRODUCTION
•
•
•
•
•
•
•
INTRODUCTION . . . . . . . . . . . . . . . .
ROLLOVER WARNING. . . . . . . . . . . . .
IMPORTANT NOTICE . . . . . . . . . . . . .
HOW TO USE THIS MANUAL . . . . . . . .
WARNINGS AND CAUTIONS . . . . . . . .
VEHICLE IDENTIFICATION NUMBER . . .
VEHICLE MODIFICATIONS/ALTERATIONS
.
.
.
.
.
.
.
.
.
.
.
.
.
.
.
.
.
.
.
.
.
.
.
.
.
.
.
.
.
.
.
.
.
.
.
.
.
.
.
.
.
.
.
.
.
.
.
.
.
.
.
.
.
.
.
.
.
.
.
.
.
.
.
.
.
.
.
.
.
.
.
.
.
.
.
.
.
.
.
.
.
.
.
.
.
.
.
.
.
.
.
.
.
.
.
.
.
.
.4
.4
.5
.6
.8
.8
.8
3
INTRODUCTION
Congratulations on selecting your new Chrysler
Group LLC vehicle. Be assured that it represents precision workmanship, distinctive styling, and high quality - all essentials that are
traditional to our vehicles.
This is a specialized utility vehicle. It can go
places and perform tasks that conventional
passenger cars are not intended. It handles and
maneuvers differently from many passenger
cars both on-road and off-road, so take time to
become familiar with your vehicle.
The two-wheel drive version of this vehicle was
designed for on-road use only. It is not intended
for off-road driving or use in other severe conditions suited for a four-wheel drive vehicle.
Before you start to drive this vehicle, read the
Owner’s Manual and all the Supplements. Be
sure you are familiar with all vehicle controls,
particularly those used for braking, steering,
and transmission and transfer case shifting.
Learn how your vehicle handles on different
road surfaces. Your driving skills will improve
with experience, but as in driving any vehicle,
take it easy as you begin. When driving off-road
4
or working the vehicle, don’t overload it or
expect it to overcome the forces of nature.
Always observe local laws wherever you drive.
by an authorized dealer or distributor who has
the qualified personnel, special tools and equipment to perform all service.
As with other vehicles of this type, failure to
operate this vehicle correctly may result in loss
of control or a collision. Be sure to read the
“On-Road/ Off-Road Driving Tips” in “Starting
And Operating” for further information.
The manufacturer and its distributors are vitally
interested in your complete satisfaction with this
vehicle. If you encounter a service or warranty
problem which is not resolved to your satisfaction, discuss the matter with your authorized
dealer or distributor’s management.
NOTE:
After reviewing the owner information, it
should be stored in the vehicle for convenient referencing and remain with the vehicle when sold.
Failure to operate this vehicle correctly may
result in loss of control or a collision.
Operating this vehicle at excessive speeds may
result in loss of control, collision with other
vehicles or objects, going off the road, or overturning; any of which may lead to serious injury
or death. Also, failure to use seat belts subjects
the driver and passengers to a greater risk of
injury or death.
To keep your vehicle running at its best, have
your vehicle serviced at recommended intervals
Your authorized dealer or distributor will be
happy to assist you with any questions about
your vehicle.
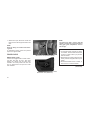
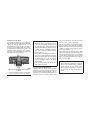
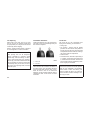
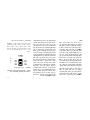
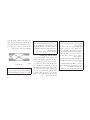
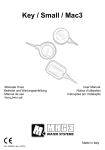
ROLLOVER WARNING
Utility vehicles have a significantly higher rollover rate than other types of vehicles. This
vehicle has a higher ground clearance and a
higher center of gravity than many passenger
cars. It is capable of performing better in a wide
variety of off-road applications. Driven in an
unsafe manner, all vehicles can go out of control. Because of the higher center of gravity and
the narrower track, if this vehicle is out of control
it may roll over when some other vehicles may
not.
Do not attempt sharp turns, abrupt maneuvers,
or other unsafe driving actions that can cause
loss of vehicle control. Failure to operate this
vehicle safely may result in a collision, rollover
of the vehicle, and severe or fatal injury. Drive
carefully.
IMPORTANT NOTICE
ALL MATERIAL CONTAINED IN THIS PUBLICATION IS BASED ON THE LATEST INFORMATION AVAILABLE AT TIME OF PUBLICATION APPROVAL. THE RIGHT IS RESERVED
TO PUBLISH REVISIONS AT ANY TIME.
This Owner’s Manual has been prepared with
the assistance of service and engineering specialists to acquaint you with the operation and
maintenance of your new vehicle. It is supplemented by a Warranty Information Booklet
and various customer-oriented documents. You
are urged to read these publications carefully.
Following the instructions and recommendations in this Owner’s Manual will help assure
safe and enjoyable operation of your vehicle.
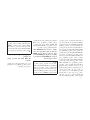
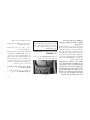
Rollover Warning Label
Failure to use the driver and passenger seat
belts provided is a major cause of severe or
fatal injury. In a rollover crash, an unbelted
person is significantly more likely to die than a
person wearing a seat belt. Always buckle up.
After you have read the Owner’s Manual, it
should be stored in the vehicle for convenient
reference and remain with the vehicle when sold.
The manufacturer reserves the right to make
changes in design and specifications, and/or to
make additions to or improvements in its products
without imposing any obligations upon itself to
install them on products previously manufactured.
The Owner’s Manual illustrates and describes
the features that are standard or available as
extra cost options. Therefore, some of the
equipment and accessories in this publication
may not appear on your vehicle.
NOTE:
Be sure to read the Owner’s Manual first
before driving your vehicle and before attaching or installing parts/accessories or
making other modifications to the vehicle.
In view of the many replacement parts and
accessories from various manufacturers available on the market, the manufacturer cannot be
certain that the driving safety of your vehicle will
not be impaired by the attachment or installation
of such parts. Even if such parts are officiallyapproved (for example, by a general operating
permit for the part or by constructing the part in
an officially approved design), or if an individual
operating permit was issued for the vehicle after
the attachment or installation of such parts, it
cannot be implicitly assumed that the driving
safety of your vehicle is unimpaired. Therefore,
neither experts nor official agencies are liable.
5
The manufacturer only assumes responsibility
when parts, which are expressly authorized or
recommended by the manufacturer, are attached or installed at an authorized dealer. The
same applies when modifications to the original
condition are subsequently made on the manufacturer’s vehicles.
Your warranties do not cover any part that the
manufacturer did not supply. Nor do they cover
the cost of any repairs or adjustments that might
be caused or needed because of the installation
or use of non-manufacturer parts, components,
equipment, materials, or additives. Nor do your
warranties cover the costs of repairing damage
or conditions caused by any changes to your
vehicle that do not comply with the manufacturers specifications.
6
Original MOPAR® parts and accessories and
other products approved by the manufacturer,
including qualified advice, are available at your
authorized dealer.
When it comes to service, remember that your
authorized dealer knows your vehicle best, has
the factory-trained technicians and genuine
MOPAR® parts, and is interested in your satisfaction.
Copyright © 2014 Chrysler International.
HOW TO USE THIS MANUAL
Consult the Table of Contents to determine which
section contains the information you desire.
Since the specification of your vehicle depends
on the items of equipment ordered, certain
descriptions and illustrations may differ from
your vehicle’s equipment.
The detailed index at the back of this Owner’s
Manual contains a complete listing of all subjects.
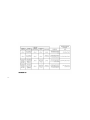
Consult the following table for a description of
the symbols that may be used on your vehicle or
throughout this Owner’s Manual:
7
WARNINGS AND CAUTIONS
This Owners Manual contains WARNINGS
against operating procedures that could result
in a collision or bodily injury. It also contains
CAUTIONS against procedures that could result in damage to your vehicle. If you do not
read this entire Owners Manual, you may miss
important information. Observe all Warnings
and Cautions.
The VIN is also stamped on either right or left
hand side of the engine block.
WARNING!
Any modifications or alterations to this vehicle could seriously affect its roadworthiness and safety and may lead to a collision
resulting in serious injury or death.
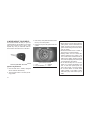
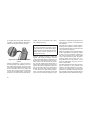
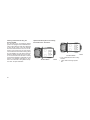
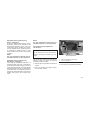
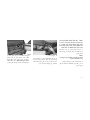
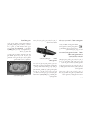
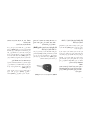
VEHICLE IDENTIFICATION
NUMBER
The Vehicle Identification Number (VIN) is
found on the left front corner of the instrument
panel pad, visible from outside of the vehicle
through the windshield. This number also appears underbody, on the right side of the frame
rail near the center of the vehicle, as well as on
the Automobile Information Disclosure Label
affixed to a window on your vehicle. Save this
label for a convenient record of your vehicle
identification number and optional equipment.
8
VEHICLE MODIFICATIONS/
ALTERATIONS
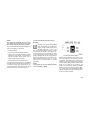
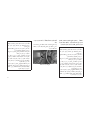
Vehicle Identification Number
NOTE:
It is illegal to remove or alter the VIN plate.
2
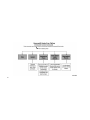
THINGS TO KNOW BEFORE STARTING
YOUR VEHICLE
• A WORD ABOUT YOUR KEYS . . . . . . . . . . . . . .
• Ignition Key Removal . . . . . . . . . . . . . . . . . .
• Key-In-Ignition Reminder . . . . . . . . . . . . . . . .
• STEERING WHEEL LOCK — IF EQUIPPED . . . . . .
• To Manually Lock The Steering Wheel . . . . . . . .
• To Release The Steering Wheel Lock . . . . . . . . .
• Automatic Transmission Ignition Interlock System
• SENTRY KEY® . . . . . . . . . . . . . . . . . . . . . . .
• Replacement Keys . . . . . . . . . . . . . . . . . . .
• Customer Key Programming . . . . . . . . . . . . . .
• General Information . . . . . . . . . . . . . . . . . . .
• VEHICLE SECURITY ALARM — IF EQUIPPED . . . .
• Rearming Of The System . . . . . . . . . . . . . . . .
• To Arm The System . . . . . . . . . . . . . . . . . . .
• To Disarm The System . . . . . . . . . . . . . . . . .
• ILLUMINATED ENTRY — IF EQUIPPED . . . . . . . .
.
.
.
.
.
.
.
.
.
.
.
.
.
.
.
.
.
.
.
.
.
.
.
.
.
.
.
.
.
.
.
.
.
.
.
.
.
.
.
.
.
.
.
.
.
.
.
.
.
.
.
.
.
.
.
.
.
.
.
.
.
.
.
.
.
.
.
.
.
.
.
.
.
.
.
.
.
.
.
.
.
.
.
.
.
.
.
.
.
.
.
.
.
.
.
.
.
.
.
.
.
.
.
.
.
.
.
.
.
.
.
.
.12
.12
.13
.13
.13
.13
.13
.13
.14
.14
.14
.15
.15
.15
.15
.16
9
• REMOTE KEYLESS ENTRY (RKE) — IF EQUIPPED .
• To Unlock The Doors And Swing Gate . . . . . . . .
• Remote Key Unlock On First Press . . . . . . . . . .
• To Lock The Doors And Swing Gate. . . . . . . . . .
• To Turn Off Flash Lights With Lock . . . . . . . . . .
• Transmitter Battery Replacement . . . . . . . . . . .
• General Information . . . . . . . . . . . . . . . . . . .
• DOORS . . . . . . . . . . . . . . . . . . . . . . . . . . . .
• Upper Half Door Window Removal — If Equipped. .
• Upper Half Door Window Installation — If Equipped
• Front Door Removal . . . . . . . . . . . . . . . . . . .
• Rear Door Removal (Four-Door Models) . . . . . . .
• DOOR LOCKS . . . . . . . . . . . . . . . . . . . . . . . .
• Manual Door Locks . . . . . . . . . . . . . . . . . . .
• Power Door Locks — If Equipped . . . . . . . . . . .
• Child-Protection Door Lock System — Rear Doors
• WINDOWS . . . . . . . . . . . . . . . . . . . . . . . . . .
• Power Windows — If Equipped . . . . . . . . . . . .
• Wind Buffeting . . . . . . . . . . . . . . . . . . . . . .
• REAR SWING GATE . . . . . . . . . . . . . . . . . . . .
• OCCUPANT RESTRAINT SYSTEMS . . . . . . . . . .
• Important Safety Precautions . . . . . . . . . . . . .
• Seat Belt Systems . . . . . . . . . . . . . . . . . . . .
• Supplemental Restraint System (SRS) . . . . . . . .
• Child Restraints . . . . . . . . . . . . . . . . . . . . .
10
.
.
.
.
.
.
.
.
.
.
.
.
.
.
.
.
.
.
.
.
.
.
.
.
.
.
.
.
.
.
.
.
.
.
.
.
.
.
.
.
.
.
.
.
.
.
.
.
.
.
.
.
.
.
.
.
.
.
.
.
.
.
.
.
.
.
.
.
.
.
.
.
.
.
.
.
.
.
.
.
.
.
.
.
.
.
.
.
.
.
.
.
.
.
.
.
.
.
.
.
.
.
.
.
.
.
.
.
.
.
.
.
.
.
.
.
.
.
.
.
.
.
.
.
.
.
.
.
.
.
.
.
.
.
.
.
.
.
.
.
.
.
.
.
.
.
.
.
.
.
.
.
.
.
.
.
.
.
.
.
.
.
.
.
.
.
.
.
.
.
.
.
.
.
.
.
.
.
.
.
.
.
.
.
.
.
.
.
.
.
.
.
.
.
.
.
.
.
.
.
.
.
.
.
.
.
.
.
.
.
.
.
.
.
.
.
.
.
.
.
.
.
.
.
.
.16
.16
.16
.17
.17
.18
.18
.18
.18
.19
.19
.20
.22
.22
.23
.24
.25
.25
.26
.26
.27
.27
.28
.33
.40
• ENGINE BREAK-IN RECOMMENDATIONS . . . . . . . . . . . .
• Additional Requirements For Diesel Engine — If Equipped . .
• SAFETY TIPS . . . . . . . . . . . . . . . . . . . . . . . . . . . . . .
• Transporting Passengers . . . . . . . . . . . . . . . . . . . . . .
• Exhaust Gas . . . . . . . . . . . . . . . . . . . . . . . . . . . . .
• Safety Checks You Should Make Inside The Vehicle . . . . . .
• Periodic Safety Checks You Should Make Outside The Vehicle .
.
.
.
.
.
.
.
.53
.54
.54
.54
.54
.55
.56
11
A WORD ABOUT YOUR KEYS
The authorized dealer that sold you your new
vehicle has the key code numbers for your vehicle
locks. These numbers can be used to order
duplicate keys. Ask your authorized dealer for
these numbers and keep them in a safe place.
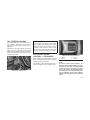
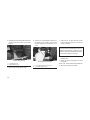
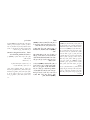
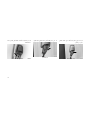
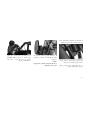
3. Push the key and cylinder inward and rotate
the key to the LOCK position.
4. Remove the key from the ignition switch lock
cylinder.
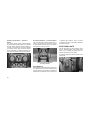
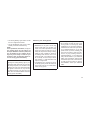
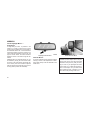
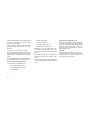
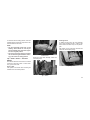
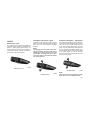
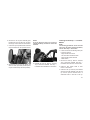
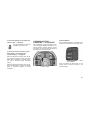
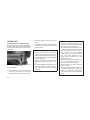
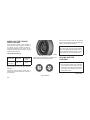
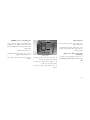
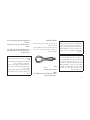
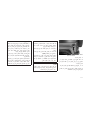
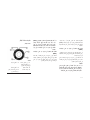
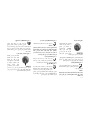
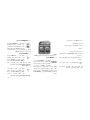
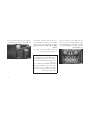
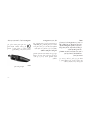
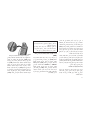
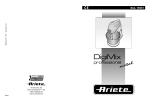
Ignition Switch Positions
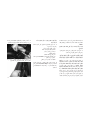
Vehicle Key With RKE Transmitter
Ignition Key Removal
1. Place the shift lever in PARK (if equipped
with an automatic transmission).
2. Turn the ignition switch to the ACC (Accessory) position.
12
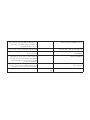
1 — LOCK
3 — ON/RUN
2 — ACC (ACCESSORY) 4 — START
WARNING!
• Before exiting a vehicle, always apply the
parking brake, shift the transmission into
PARK, and remove the Key Fob from the
ignition. When leaving the vehicle, always
lock your vehicle.
• Never leave children alone in a vehicle, or
with access to an unlocked vehicle.
• Allowing children to be in a vehicle unattended is dangerous for a number of reasons. A child or others could be seriously or
fatally injured. Children should be warned
not to touch the parking brake, brake pedal
or the transmission gear selector.
• Do not leave the Key Fob in or near the
vehicle, or in a location accessible to children. A child could operate power windows, other controls, or move the vehicle.
• Do not leave children or animals inside
parked vehicles in hot weather. Interior
heat build-up may cause serious injury or
death.
CAUTION!
An unlocked car is an invitation to thieves.
Always remove key from the ignition and lock
all doors when leaving the vehicle unattended.
Key-In-Ignition Reminder
Opening the driver’s door when the key is in the
ignition sounds a signal to remind you to remove the key.
NOTE:
The Key-In-Ignition reminder only sounds
when the ignition key is placed in the LOCK
or ACC position.
STEERING WHEEL LOCK —
IF EQUIPPED
Your vehicle may be equipped with a passive
steering wheel lock. This lock prevents steering
the vehicle without the ignition key. If the steering wheel is moved approximately a half turn in
either direction, and the key is not in the ignition,
the steering wheel will lock.
To Manually Lock The Steering Wheel
SENTRY KEY®
With the engine running, rotate the steering
wheel one–half revolution from the straight
ahead position, turn off the engine, and remove
the key. Rotate the steering wheel slightly in
both directions until the lock engages.
The Sentry Key® Immobilizer system prevents
unauthorized vehicle operation by disabling the
engine. The system does not need to be armed
or activated. Operation is automatic, regardless
of whether the vehicle is locked or unlocked.
To Release The Steering Wheel Lock
The system uses ignition keys which have an
embedded electronic chip (transponder) to prevent unauthorized vehicle operation. Therefore,
only keys that are programmed to the vehicle
can be used to start and operate the vehicle.
The system will shut the engine off in two
seconds if someone uses an invalid key to start
the engine.
Insert the key in the ignition, and turn the wheel
slightly to the left or right, to disengage the lock.
NOTE:
If you turned the wheel to the right to engage
the lock, you must turn the wheel slightly to
the right to disengage it. If you turned the
wheel to the left to engage the lock, turn the
wheel slightly to the left to disengage it.
Automatic Transmission Ignition
Interlock System
This system prevents the key from being removed unless the shift lever is in PARK. It also
prevents shifting out of PARK unless the key is
in the ON/RUN position, and the brake pedal is
depressed.
NOTE:
A key which has not been programmed is
also considered an invalid key, even if it is
cut to fit the ignition switch lock cylinder for
that vehicle.
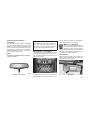
During normal operation, after turning on the
ignition switch, the Vehicle Security Light will
turn on for three seconds for a bulb check. If the
light remains on after the bulb check, it indicates
13
that there is a problem with the electronics. In
addition, if the light begins to flash after the bulb
check, it indicates that someone used an invalid
key to start the engine. Either of these conditions will result in the engine being shut off after
two seconds.
If the Vehicle Security Light turns on during
normal vehicle operation (vehicle running for
longer than 10 seconds), it indicates that there
is a fault in the electronics. Should this occur,
have the vehicle serviced as soon as possible
by an authorized dealer.
CAUTION!
The Sentry Key® Immobilizer system is not
compatible with some aftermarket remote
starting systems. Use of these systems may
result in vehicle starting problems and loss of
security protection.
All of the keys provided with your new vehicle
have been programmed to the vehicle electronics.
14
Replacement Keys
NOTE:
Only keys that have been programmed to
the vehicle electronics can be used to start
the vehicle. Once a Sentry Key® has been
programmed to a vehicle, it cannot be programmed to any other vehicle.
CAUTION!
Always remove Sentry Keys from the vehicle
and lock all doors when leaving the vehicle
unattended.
At the time of purchase, the original owner is
provided with a four-digit Personal Identification
Number (PIN). Keep the PIN in a secure location. This number is required for authorized
dealer replacement of keys. Duplication of keys
consists of programming a blank key to the
vehicle electronics. A blank key is one which
has never been programmed. See your authorized dealer if you require replacement or additional keys for your vehicle.
NOTE:
When having the Sentry Key® Immobilizer
system serviced, bring all vehicle keys with
you to the authorized dealer.
Customer Key Programming
See your authorized dealer if you require replacement or additional keys for your vehicle.
General Information
The Sentry Key® operates on a carrier frequency of 433.92 MHz. The Sentry Key® Immobilizer system is subject to the following
conditions:
• This device may not cause harmful interference.
• This device must accept any interference
that may be received, including interference
that may cause undesired operation.
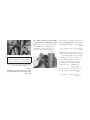
VEHICLE SECURITY ALARM —
IF EQUIPPED
The Vehicle Security Alarm monitors the vehicle
doors, hood, swing gate, and ignition for unauthorized operation.
If something triggers the alarm, the Vehicle
Security Alarm will sound the horn intermittently,
the headlights will turn on, flash the turn signal
lights, and flash the Vehicle Security Light in the
cluster.
Rearming Of The System
If something triggers the alarm, and no action is
taken to disarm it, the Vehicle Security Alarm
will turn off the horn after 29 seconds, and turn
off all of the visual signals after an additional
31 seconds, then the Vehicle Security Alarm will
rearm itself.
To Arm The System
To Disarm The System
1. Remove the key from the ignition switch and
exit the vehicle.
Either press the UNLOCK button on the RKE
transmitter or insert a valid Sentry Key® into the
ignition lock cylinder and turn the key to the
ON/RUN position.
2. Lock the doors and swing gate by pressing
the power door LOCK switch or the LOCK
button on the Remote Keyless Entry (RKE)
transmitter.
NOTE:
The Vehicle Security Alarm will not arm if you
lock the doors with the manual door lock
plungers or the driver’s door lock cylinder.
3. Close all the doors.
The Vehicle Security Light in the instrument
cluster will flash rapidly for about 16 seconds to
signal that the Vehicle Security Alarm is arming.
During this period, opening any door or the
swing gate will cancel the arming process. If the
Vehicle Security Alarm is successfully set, the
Vehicle Security Light will flash at a slower rate
to indicate the alarm is armed.
NOTE:
• Unlocking the doors with the manual door
lock plungers or the driver’s door lock
cylinder will not disarm the Vehicle Security
Alarm.
• When the Vehicle Security Alarm is armed,
the interior power door lock switches will
not unlock the doors.
The Vehicle Security Alarm is designed to protect your vehicle; however, you can create
conditions where the Vehicle Security Alarm will
give you a false alarm. If the previously described arming sequence has occurred, the
Vehicle Security Alarm will arm regardless of
whether you are inside or outside the vehicle. If
you remain inside the vehicle and open a door,
the alarm will sound. If this occurs, disarm the
Vehicle Security Alarm.
15
ILLUMINATED ENTRY —
IF EQUIPPED
REMOTE KEYLESS ENTRY
(RKE) — IF EQUIPPED
The courtesy lights will turn on when you use
the Remote Keyless Entry (RKE) transmitter to
unlock the doors or open any door.
This system allows you to lock or unlock the
doors and swing gate from distances approximately 66 ft (20 m) using a Remote Keyless
Entry (RKE) transmitter. The transmitter does
not need to be pointed at the vehicle to activate
the system.
This feature also turns on the approach lighting
in the outside mirrors (if equipped). Refer to
“Mirrors” in “Understanding The Features Of
Your Vehicle” for further information.
16
Remote Key Unlock On First Press
• For vehicles equipped with an Electronic
Vehicle Information Center (EVIC), refer to
“Electronic Vehicle Information Center (EVIC)/
Personal Settings (Customer-Programmable
Features)” in “Understanding Your Instrument
Panel” for further information.
NOTE:
• The Illuminated Entry system will not operate if the dimmer control is in the
“Dome defeat” position (extreme bottom
position).
Push and release the RKE transmitter UNLOCK
button once to unlock the driver’s door only, or
twice to unlock all the doors and swing gate.
When the RKE transmitter UNLOCK button is
pushed, the Illuminated Entry will initiate and
the turn signal lights will flash twice.
This feature lets you program the system to
unlock either the driver’s side, or all doors and
swing gate on the first push of the UNLOCK
button on the RKE transmitter.
The lights will fade to off after approximately
30 seconds or they will immediately fade to off
once the ignition switch is turned to ON/RUN
from the OFF position.
• The front courtesy overhead console and
door courtesy lights will turn on if the
dimmer control is in the ⴖDome ONⴖ position (extreme top position).
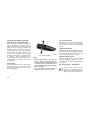
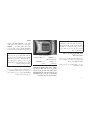
To Unlock The Doors And Swing Gate
Remote Keyless Entry (RKE) Transmitter
NOTE:
The line of transmission must not be blocked
with metal objects.
• For vehicles not equipped with the EVIC, the
Remote Unlock feature can be enabled or
disabled by performing the following steps:
1. Push and hold the LOCK button on a programmed RKE transmitter.
2. Continue to hold the RKE transmitter LOCK
button for at least four seconds, but not
longer than 10 seconds, then push and hold
the RKE transmitter UNLOCK button.
3. Release both buttons at the same time.
4. Test this feature while outside of the vehicle
by pushing the LOCK/UNLOCK button on
the RKE transmitter.
NOTE:
Pushing the RKE transmitter LOCK button
while you are inside of the vehicle will activate the Vehicle Security Alarm. Opening a
door with the Vehicle Security Alarm activated will cause the alarm to sound. Push
the RKE transmitter UNLOCK button to deactivate the Vehicle Security Alarm.
5. If the desired programming was not achieved
or to reactivate this feature, repeat the above
steps.
NOTE:
Pushing the RKE transmitter LOCK button
while you are inside of the vehicle will activate the Vehicle Security Alarm. Opening a
door with the Vehicle Security Alarm activated will cause the alarm to sound. Push
the RKE transmitter UNLOCK button to deactivate the Vehicle Security Alarm.
To Lock The Doors And Swing Gate
Push and release the LOCK button on the RKE
transmitter to lock all doors. The turn signals will
flash to acknowledge the lock signal.
To Turn Off Flash Lights With Lock
This feature will cause the turn signal lights to
flash when the doors are locked or unlocked
with the RKE transmitter. This feature can be
turned on or turned off. To change the current
setting, proceed as follows:
• For vehicles equipped with the EVIC, refer to
“Electronic Vehicle Information Center (EVIC)/
Personal Settings (Customer-Programmable
Features)” in “Understanding Your Instrument
Panel” for further information.
• For vehicles not equipped with the EVIC,
perform the following steps:
1. Push the RKE transmitter UNLOCK button
for 4 to 10 seconds.
2. While the UNLOCK button is pushed, (after
four seconds) push the RKE transmitter
LOCK button. Release both buttons.
3. Test the “Flash Lights With Lock” feature
outside of the vehicle by pushing the RKE
transmitter LOCK button with the ignition
switch in the LOCK position and the ignition
key removed.
NOTE:
Pushing the RKE transmitter LOCK button
while you are in the vehicle will activate the
Vehicle Security Alarm. Opening a door with
the Vehicle Security Alarm activated will
cause the alarm to sound. Push the RKE
transmitter UNLOCK button to deactivate
the Vehicle Security Alarm.
The “Flash Lights With Lock” feature can be
reactivated by repeating this procedure.
17
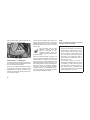
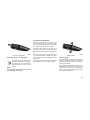
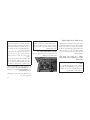
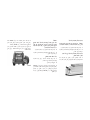
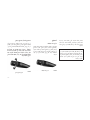
Transmitter Battery Replacement
The recommended replacement battery is
CR2032.
1. With the RKE transmitter buttons facing
down, use a flat blade screw driver to pry the
two halves of the RKE transmitter apart. Use
extreme care not to damage the seal or
internal components.
Skin oils may cause battery deterioration.
If you touch a battery, clean it with rubbing
alcohol.
3. To assemble the RKE transmitter case, snap
the two halves together.
General Information
Transmitter and receivers operate on a carrier
frequency of 433.92 MHz. Operation is subject
to the following conditions:
• This device may not cause harmful interference.
DOORS
CAUTION!
Careless handling and storage of the removable door panels may damage the seals,
causing water to leak into the vehicle’s interior.
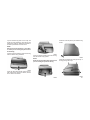
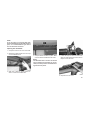
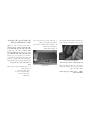
Upper Half Door Window Removal —
If Equipped
Grasp the half door window and pull upward.
• This device must accept any interference
received, including interference that may
cause undesired operation. If your RKE
transmitter fails to operate from a normal
distance, check for these two conditions:
Separating RKE Transmitter Halves
2. Remove and replace the battery. Avoid
touching the new battery with your fingers.
18
1. A weak battery in the transmitter. The expected life of the battery is a minimum of
three years.
2. Closeness to a radio transmitter such as a
radio station tower, airport transmitter, and
some mobile or CB radios.
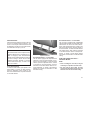
Upper Half Door Window
Upper Half Door Window
Installation — If Equipped
1. Grasp the half door window and line up the
pins with the pockets in the lower door.
2. Push down to ensure the half door window is
fully seated.
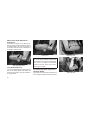
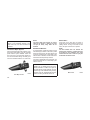
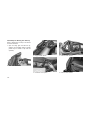
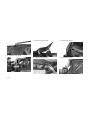
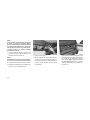
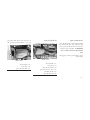
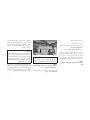
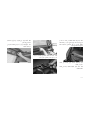
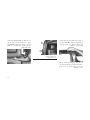
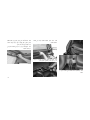
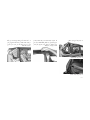
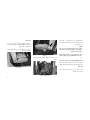
Front Door Removal
WARNING!
Do not drive your vehicle on public roads
with the doors removed as you will lose the
protection that they can provide. This procedure is furnished for use during off-road
operation only.
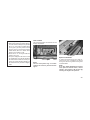
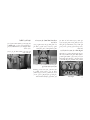
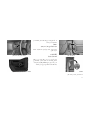
Door Removal Warning Label
Hinge Pin Screw
1. Roll down the glass window to prevent any
damage.
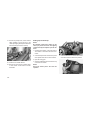
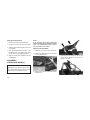
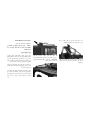
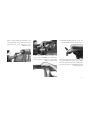
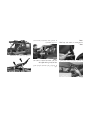
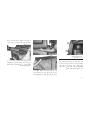
3. Unplug the wiring harness connector under
the instrument panel by pushing the tab at
the base of the connector and pulling down
to disconnect.
2. Remove the hinge pin screws from the upper
and lower outside hinges (using a #T50
Torx® head driver).
NOTE:
The hinge pin screws and nuts can be
stowed in the rear cargo tray located under
the rear loadfloor.
19
NOTE:
Doors are heavy; use caution when removing them.
To reinstall the door(s), perform the previous
steps in the opposite order.
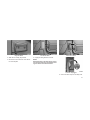
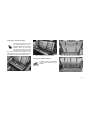
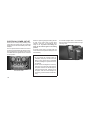
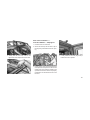
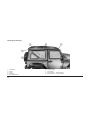
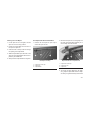
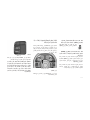
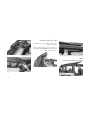
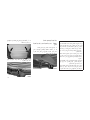
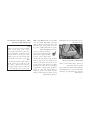
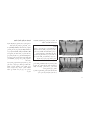
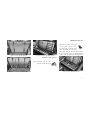
Rear Door Removal (Four-Door
Models)
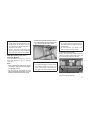
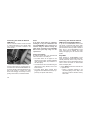
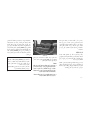
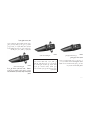
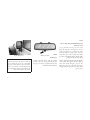
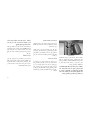
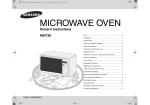
Door Strap/Harness Location
1 — Wiring Harness (follow the harness up and
under the instrument panel to the connector)
2 — Body Hook
3 — Door/Harness Strap
4. Unhook the door strap from the body hook.
Be careful not to allow the door to swing fully
open as the mirror may damage the paint.
5. With the door open, lift the door to clear the
hinge pins from their hinges and remove the
door.
20
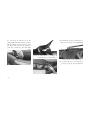
WARNING!
Do not drive your vehicle on public roads
with the doors removed as you will lose the
protection that they can provide. This procedure is furnished for use during off-road
operation only.
Door Removal Warning Label
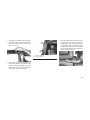
1. Roll down the glass window to prevent any
damage.
2. Remove the hinge pin screws from the upper
and lower outside hinges (using a #T50 Torx®
head driver).
NOTE:
The hinge pin screws and nuts can be
stowed in the rear cargo tray located under
the rear loadfloor.
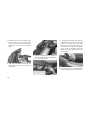
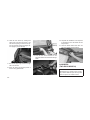
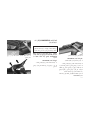
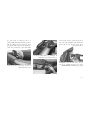
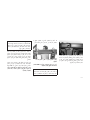
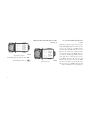
Hinge Pin Screw
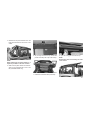
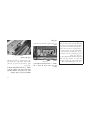
Trim Access Door
3. Slide the front seat(s) fully forward.
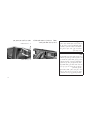
5. Unplug the wiring harness connector.
4. Remove the trim access door from the bottom of the B-pillar.
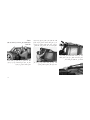
NOTE:
Squeeze the tab on the base of the connector. This will unlock the connector tab, allowing the harness to be disconnected.
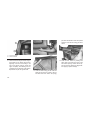
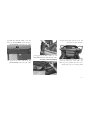
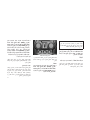
Connector Latched
Connector Unplugged
6. Unhook the door strap from the body hook.
21
7. With the door open, lift the door to clear the
hinge pins from their hinges and remove the
door.
NOTE:
The ignition key that is used to start the
vehicle is used to lock or unlock the doors,
swing gate, glove compartment, and console storage.
NOTE:
Doors are heavy; use caution when removing them.
To reinstall the door(s), perform the previous
steps in the opposite order.
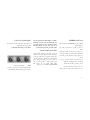
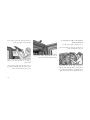
DOOR LOCKS
Manual Door Lock (Full Frame Doors)
Manual Door Locks
All doors are equipped with an interior rockertype door lock lever. To lock a door when
leaving your vehicle, push the rocker lever
forward to the LOCK position and close the
door. To UNLOCK the door push the rocker
lever rearward.
(Continued)
Manual Door Lock (Half Doors)
22
WARNING!
• For personal security reasons and safety
in a collision, lock the vehicle doors when
you drive, as well as when you park and
leave the vehicle.
• When leaving the vehicle, always remove
the Key Fob from the ignition and lock your
vehicle.
• Never leave children alone in a vehicle, or
with access to an unlocked vehicle.
WARNING! (Continued)
• Allowing children to be in a vehicle unattended is dangerous for a number of reasons. A child or others could be seriously
or fatally injured. Children should be
warned not to touch the parking brake,
brake pedal or the transmission gear selector.
• Do not leave the Key Fob in or near the
vehicle or in a location accessible to children. A child could operate power windows, other controls, or move the vehicle.
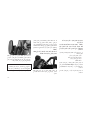
Power Door Locks — If Equipped
The power door lock switch is located on each
front door panel. Push the switch forward to lock
the doors, and rearward to unlock the doors.
Power Door Lock Switch
WARNING!
• For personal security reasons and safety
in a collision, lock the vehicle doors when
you drive, as well as when you park and
leave the vehicle.
• When leaving the vehicle, always remove
the Key Fob from the ignition and lock your
vehicle.
• Never leave children alone in a vehicle, or
with access to an unlocked vehicle.
WARNING! (Continued)
• Allowing children to be in a vehicle unattended is dangerous for a number of reasons. A child or others could be seriously
or fatally injured. Children should be
warned not to touch the parking brake,
brake pedal or the transmission gear selector.
• Do not leave the Key Fob in or near the
vehicle or in a location accessible to children. A child could operate power windows, other controls, or move the vehicle.
Automatic Door Locks — If Equipped
The auto door lock feature default condition is
enabled. When enabled, the door locks will lock
automatically when the vehicle’s speed exceeds 15 mph (24 km/h). The auto door lock
feature can be enabled or disabled by your
authorized dealer or through the Uconnect®
Settings in your radio.
(Continued)
23
Automatic Unlock Doors On Exit —
If Equipped
The doors will unlock automatically on vehicles
with power door locks if:
1. The “Automatic Unlock Doors On Exit” feature is enabled.
2. The vehicle speed returned to 0 mph (0 km/h)
and the transmission shift lever is in NEUTRAL or PARK.
3. The driver door is opened.
4. The doors were not previously unlocked.
Automatic Unlock Doors On Exit
Programming
The “Automatic Unlock Doors On Exit” feature
can be enabled or disabled as follows:
1. Close all doors and place the key in the
ignition.
2. Cycle the ignition switch between LOCK and
ON/RUN and then back to LOCK four times
ending up in the LOCK position.
3. Push the power door unlock switch to unlock
the doors.
24
4. A single chime will indicate the completion of
the programming.
5. Repeat these steps if you want to return this
feature to its previous setting.
NOTE:
Use the “Automatic Unlock Doors On Exit”
feature in accordance with local laws.
Child-Protection Door Lock
System — Rear Doors
To provide a safer environment for small children riding in the rear seats, the rear doors are
equipped with Child-Protection Door Lock system.
To Engage Or Disengage The
Child-Protection Door Lock System
Child-Protection Door Lock Function
WARNING!
Avoid trapping anyone in a vehicle in a
collision. Remember that the rear doors can
only be opened from the outside when the
Child-Protection locks are engaged.
1. Open the rear door.
2. Insert the tip of the ignition key into the lock
and rotate to the LOCK or UNLOCK position.
3. Repeat steps 1 and 2 for the opposite rear
door.
NOTE:
For emergency exit with the system engaged, move the rocker lever rearward (unlocked position), roll down the window and
open the door with the outside door handle.
WINDOWS
Power Windows — If Equipped
The power window switches are located on the
instrument panel below the radio. Push the
switch downward to open the window and upward to close the window.
Power Window Switches
NOTE:
Four-Door Models
• For vehicles not equipped with the Electronic Vehicle Information Center (EVIC),
the power window switches will remain
active for 45 seconds after the ignition
switch is turned to the LOCK position.
Opening either front door will cancel this
feature.
The lower left switch controls the left rear passenger window, and the lower right switch controls the right rear passenger window.
• For vehicles equipped with the EVIC, the
power window switches will remain active
for up to 10 minutes after the ignition
switch is turned to the LOCK position.
Opening either front door will cancel this
feature. The time for this feature is programmable. Refer to “Electronic Vehicle
Information Center (EVIC)/Personal Settings (Customer-Programmable Features)” in “Understanding Your Instrument Panel” for further information.
Auto-Down
Both the driver and front passenger window
switches have an “Auto-Down” feature. Push
the window switch past the first detent, release,
and the window will go down automatically. To
cancel the Auto-Down movement, operate the
switch in either the up or down direction and
release the switch.
To stop the window from going all the way down
during the Auto-Down operation, pull up on the
switch briefly.
To partially open the window, push halfway to
the first detent and release it when you want the
window to stop.
The top left switch controls the left front window
and the top right switch controls the right front
window.
25
Window Lockout Switch — Four-Door
Models
The window lockout switch (located between
the front window switches) allows you to disable
the rear window switches that are located on
the back of the center floor console. To disable
the window controls, push the window lockout
button downward. To enable the window controls, push the window lockout button upward.
Rear Power Windows — Four-Door Models
The rear passenger window switches are located on the back of the center floor console.
Push the switch downward to open the window
and upward to close the window.
or partially open positions. This is a normal
occurrence and can be minimized by adjusting
the window opening.
REAR SWING GATE
The rear swing gate can be unlocked by using
the key, Remote Keyless Entry (RKE) transmitter, or by activating the power door lock
switches located on the front doors.
To open the swing gate, press the button on the
gate handle.
Rear Power Window Switches
(Four-Door Models)
Wind Buffeting
Window Lockout Switch
26
Wind buffeting can be described as the perception of pressure on the ears or a helicopter-type
sound in the ears. Your vehicle may exhibit wind
buffeting with the windows down in certain open
Gate Handle
NOTE:
Close the rear flip-up window before attempting to close the swing gate (hard top models
only).
CAUTION!
Do not press on rear wiper blade when
closing the rear flip-up window, as damage to
the blade will result.
OCCUPANT RESTRAINT
SYSTEMS
Some of the most important safety features in
your vehicle are the restraint systems:
• Seat Belt Systems
• Supplemental Restraint Systems (SRS) Air
Bags
• Child Restraints
Important Safety Precautions
WARNING!
Driving with the flip-up window open can
allow poisonous exhaust gases into your
vehicle. You and your passengers could be
injured by these fumes. Keep the flip-up
window closed when you are operating the
vehicle.
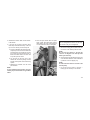
Please pay close attention to the information in
this section. It tells you how to use your restraint
system properly, to keep you and your passengers as safe as possible.
Here are some simple steps you can take to
minimize the risk of harm from a deploying air
bag:
1. Children 12 years old and under should
always ride buckled up in a vehicle with a
rear seat.
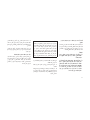
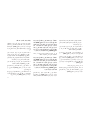
Warning Label On Front Passenger Sun Visor
2. f a child from 2 to 12 years old (not in a
rear-facing child restraint) must ride in the
front passenger seat, move the seat as far
back as possible and use the proper child
restraint. (Refer to “Child Restraints”)
3. Children that are not big enough to wear the
vehicle seat belt properly (Refer to "Child
Restraints") should be secured in a vehicle
with a rear seat in child restraints or beltpositioning booster seats. Older children who
do not use child restraints or belt-positioning
booster seats should ride properly buckled up
in a vehicle with a rear seat.
27
4. Never allow children to slide the shoulder
belt behind them or under their arm.
5. You should read the instructions provided with
your child restraint to make sure that you are
using it properly.
6. All occupants should always wear their lap
and shoulder belts properly.
7. The driver and front passenger seats should
be moved back as far as practical to allow
the Advanced Front Air Bags room to inflate.
8. Do not lean against the door or window. If your
vehicle has side air bags, and deployment
occurs, the side air bags will inflate forcefully
into the space between you and the door and
you could be injured.
9. If the air bag system in this vehicle needs to
be modified to accommodate a disabled
person, contact the Customer Center. Phone
numbers are provided under "If You Need
Assistance."
28
WARNING!
• Never place a rear-facing child restraint in
front of an air bag. A deploying Passenger
Advanced Front Air Bag can cause death
or serious injury to a child 12 years or
younger, including a child in a rear-facing
child restraint.
• Only use rear-facing child restraint in a
vehicle with a rear seat.
Seat Belt Systems
Buckle up even though you are an excellent
driver, even on short trips. Someone on the
road may be a poor driver and could cause a
collision that includes you. This can happen far
away from home or on your own street.
Research has shown that seat belts save lives,
and they can reduce the seriousness of injuries
in a collision. Some of the worst injuries happen
when people are thrown from the vehicle. Seat
belts reduce the possibility of ejection and the
risk of injury caused by striking the inside of the
vehicle. Everyone in a motor vehicle should be
belted at all times.
Enhanced Seat Belt Use Reminder System
(BeltAlert)
BeltAlert is a feature intended to remind the
driver and outboard front passenger (if equipped
with outboard front passenger BeltAlert) to
buckle their seat belts. The feature is active
whenever the ignition switch is in the START or
ON/RUN position. If the driver or outboard front
seat passenger is unbelted, the Seat Belt Reminder Light will turn on and remain on until both
outboard front seat belts are buckled.
The BeltAlert warning sequence begins after
the vehicle speed is over 5 mph (8 km/h) by
blinking the Seat Belt Reminder Light and
sounding an intermittent chime. Once the sequence starts, it will continue for the entire
duration or until the respective seat belts are
buckled. After the sequence completes, the
Seat Belt Reminder Light remains illuminated
until the respective seat belts are buckled. The
driver should instruct all other occupants to
buckle their seat belts. If an outboard front seat
belt is unbuckled while traveling at speeds
greater than 5 mph (8 km/h), BeltAlert will
provide both audio and visual notification.
The outboard front passenger seat BeltAlert is
not active when the outboard front passenger
seat is unoccupied. BeltAlert may be triggered
when an animal or heavy object is on the
outboard front passenger seat or when the seat
is folded flat (if equipped). It is recommended
that pets be restrained in the rear seat (if
equipped) in pet harnesses or pet carriers that
are secured by seat belts, and cargo is properly
stowed.
BeltAlert can be activated or deactivated by
your authorized dealer. Chrysler Group LLC
does not recommend deactivating BeltAlert.
NOTE:
If BeltAlert has been deactivated, the Seat
Belt Reminder Light will continue to illuminate while the driver’s or outboard front
passenger’s (if equipped with BeltAlert) seat
belt remains unbuckled.
Lap/Shoulder Belts
All seating positions in your vehicle are equipped
with lap/shoulder belts.
The seat belt webbing retractor will lock only
during very sudden stops or collisions. This
feature allows the shoulder part of the seat belt
to move freely with you under normal conditions. However, in a collision the seat belt will
lock and reduce your risk of striking the inside of
the vehicle or being thrown out of the vehicle.
WARNING!
• Relying on the air bags alone could lead to
more severe injuries in a collision. The air
bags work with your seat belt to restrain
you properly. In some collisions, the air
bags won’t deploy at all. Always wear your
seat belt even though you have air bags.
• In a collision, you and your passengers
can suffer much greater injuries if you are
not properly buckled up. You can strike the
interior of your vehicle or other passengers, or you can be thrown out of the
vehicle. Always be sure you and others in
your vehicle are buckled up properly.
WARNING! (Continued)
• It is dangerous to ride in a cargo area,
inside or outside of a vehicle. In a collision,
people riding in these areas are more likely
to be seriously injured or killed.
• Do not allow people to ride in any area of
your vehicle that is not equipped with seats
and seat belts.
• Be sure everyone in your vehicle is in a
seat and using a seat belt properly.
• Wearing your seat belt incorrectly could
make your injuries in a collision much
worse. You might suffer internal injuries, or
you could even slide out of the seat belt.
Follow these instructions to wear your seat
belt safely and to keep your passengers
safe, too.
(Continued)
(Continued)
29
WARNING! (Continued)
• Two people should never be belted into a
single seat belt. People belted together
can crash into one another in a collision,
hurting one another badly. Never use a
lap/shoulder belt or a lap belt for more than
one person, no matter what their size.
• A lap belt worn too high can increase the
risk of injury in a collision. The seat belt
forces won’t be at the strong hip and pelvic
bones, but across your abdomen. Always
wear the lap part of your seat belt as low as
possible and keep it snug.
• A twisted seat belt may not protect you
properly. In a collision, it could even cut
into you. Be sure the seat belt is flat
against your body, without twists. If you
can’t straighten a seat belt in your vehicle,
take it to your authorized dealer immediately and have it fixed.
WARNING! (Continued)
• A seat belt that is buckled into the wrong
buckle will not protect you properly. The
lap portion could ride too high on your
body, possibly causing internal injuries.
Always buckle your seat belt into the
buckle nearest you.
• A seat belt that is too loose will not protect
you properly. In a sudden stop, you could
move too far forward, increasing the possibility of injury. Wear your seat belt snugly.
• A seat belt that is worn under your arm is
dangerous. Your body could strike the inside surfaces of the vehicle in a collision,
increasing head and neck injury. A seat
belt worn under the arm can cause internal
injuries. Ribs aren’t as strong as shoulder
bones. Wear the seat belt over your shoulder so that your strongest bones will take
the force in a collision.
(Continued)
(Continued)
30
WARNING! (Continued)
• A shoulder belt placed behind you will not
protect you from injury during a collision.
You are more likely to hit your head in a
collision if you do not wear your shoulder
belt. The lap and shoulder belt are meant
to be used together.
• A frayed or torn seat belt could rip apart in
a collision and leave you with no protection. Inspect the seat belt system periodically, checking for cuts, frays, or loose
parts. Damaged parts must be replaced
immediately. Do not disassemble or modify
the seat belt system. Seat belt assemblies
must be replaced after a collision.
Lap/Shoulder Belt Operating Instructions
4. Position the lap belt so that it is snug and lies
low across your hips, below your abdomen.
To remove slack in the lap belt portion, pull
up on the shoulder belt. To loosen the lap
belt if it is too tight, tilt the latch plate and pull
on the lap belt. A snug seat belt reduces the
risk of sliding under the seat belt in a collision.
1. Enter the vehicle and close the door. Sit back
and adjust the seat.
2. The seat belt latch plate is above the back of
the front seat, and next to your arm in the
rear seat (for vehicles equipped with a rear
seat). Grasp the latch plate and pull out the
seat belt. Slide the latch plate up the webbing as far as necessary to allow the seat
belt to go around your lap.
Inserting Latch Plate Into Buckle
5. Position the shoulder belt across the shoulder and chest with minimal, if any slack so
that it is comfortable and not resting on your
neck. The retractor will withdraw any slack in
the shoulder belt.
6. To release the belt, push the red button on
the buckle. The seat belt will automatically
retract to its stowed position. If necessary,
slide the latch plate down the webbing to
allow the seat belt to retract fully.
Pulling Out The Latch Plate
Positioning The Lap Belt
3. When the seat belt is long enough to fit,
insert the latch plate into the buckle until you
hear a “click.”
31
Rear Center Lap/Shoulder Belt Retractor
Lockout
This feature is designed to lock the retractor
whenever the rear seatback is not fully latched.
This prevents someone from wearing the rear
center lap/shoulder belt when the rear seatback
is not fully latched.
NOTE:
• If the rear center lap/shoulder belt cannot
be pulled out, check that the rear seatback is fully latched.
• If the rear seatback is properly latched
and the rear center lap/shoulder belt still
cannot be pulled out, the AutomaticLocking Retractor (ALR) system may be
activated. To reset this feature you must
let all of the seat belt webbing return into
the retractor. You will not be able to pull
out more webbing until all of the webbing
has been returned back into the retractor.
WARNING!
The rear center lap/shoulder belt is equipped
with a lockout feature to ensure that the rear
seatback is in the fully upright and locked
position when occupied. If the rear seatback
is not fully upright and locked and the rear
center lap/shoulder belt can be pulled out of
the retractor, immediately take the vehicle to
your authorized dealer for service. Failure to
follow this warning could result in serious
injury or death.
Lap/Shoulder Belt Untwisting Procedure
Use the following procedure to untwist a twisted
lap/shoulder belt.
3. Slide the latch plate upward over the folded
webbing. The folded webbing must enter the
slot at the top of the latch plate.
4. Continue to slide the latch plate up until it
clears the folded webbing and the seat belt
is no longer twisted.
Adjustable Upper Shoulder Belt Anchorage
In the driver and front passenger seats, the top
of the shoulder belt can be adjusted upward or
downward to position the seat belt away from
your neck. Push or squeeze the anchorage
button to release the anchorage, and move it up
or down to the position that serves you best.
1. Position the latch plate as close as possible
to the anchor point.
2. At about 6 to 12 in (15 to 30 cm) above the
latch plate, grasp and twist the seat belt
webbing 180° to create a fold that begins
immediately above the latch plate.
Adjustable Anchorage
32
As a guide, if you are shorter than average, you
will prefer the shoulder belt anchorage in a
lower position, and if you are taller than average, you will prefer the shoulder belt anchorage
in a higher position. After you release the anchorage button, try to move it up or down to
make sure that it is locked in position.
NOTE:
The adjustable upper shoulder belt anchorage is equipped with an Easy Up feature.
This feature allows the shoulder belt anchorage to be adjusted in the upward position without pushing or squeezing the release button. To verify the shoulder belt
anchorage is latched, pull downward on the
shoulder belt anchorage until it is locked
into position.
Seat Belts And Pregnant Women
We recommend that pregnant women use the
seat belts throughout their pregnancy. Keeping
the mother safe is the best way to keep the
baby safe.
Pregnant women should wear the lap part of the
seat belt across the thighs and as snug across
the hips as possible. Keep the seat belt low so
that it does not come across the abdomen. That
way the strong bones of the hips will take the
force if there is a collision.
Seat Belt Pretensioner
The front seat belt system is equipped with
pretensioning devices that are designed to remove slack from the seat belt in the event of a
collision. These devices may improve the performance of the seat belt by removing slack
from the seat belt early in a collision. Pretensioners work for all size occupants, including
those in child restraints.
Energy Management Feature
This vehicle has a seat belt system with an
Energy Management feature in the front seating
positions that may help further reduce the risk
of injury in the event of a collision. This seat belt
system has a retractor assembly that is designed
to release webbing in a controlled manner.
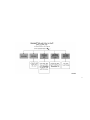
Supplemental Restraint System (SRS)
Air Bag System Components
Your vehicle may be equipped with the following
air bag system components:
• Occupant Restraint Controller (ORC)
• Air Bag Warning Light
NOTE:
These devices are not a substitute for
proper seat belt placement by the occupant.
The seat belt still must be worn snugly and
positioned properly.
• Steering Wheel and Column
The pretensioners are triggered by the Occupant Restraint Controller (ORC). Like the air
bags, the pretensioners are single use items.
A deployed pretensioner or a deployed air bag
must be replaced immediately.
• Supplemental Side Air Bags
• Instrument Panel
• Knee Impact Bolsters
• Advanced Front Air Bags
• Front and Side Impact Sensors
• Seat Belt Pretensioners
• Seat Belt Buckle Switch
33
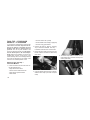
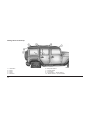
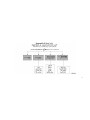
Advanced Front Air Bags
This vehicle has Advanced Front Air Bags for
both the driver and front passenger as a supplement to the seat belt restraint systems. The
driver’s Advanced Front Air Bag is mounted in
the center of the steering wheel. The passenger’s Advanced Front Air Bag is mounted in the
instrument panel, above the glove compartment. The words SRS AIRBAG or AIRBAG are
embossed on the air bag covers.
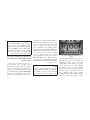
Advanced Front Air Bag And Knee Bolster
Locations
1 — Driver And Passenger Advanced Front Air Bags
2 — Driver And passenger Knee Impact Bolsters
34
WARNING!
• Being too close to the steering wheel or
instrument panel during Advanced Front
Air Bag deployment could cause serious
injury, including death. Air bags need room
to inflate. Sit back, comfortably extending
your arms to reach the steering wheel or
instrument panel.
• Never place a rear-facing child restraint in
front of an air bag. A deploying Passenger
Advanced Front Air Bag can cause death
or serious injury to a child 12 years or
younger, including a child in a rear-facing
child restraint.
• Only use a rear-facing child restraint in a
vehicle with a rear seat.
Advanced Front Air Bag Features
The Advanced Front Air Bag system has multistage driver and front passenger air bags. This
system provides output appropriate to the severity and type of collision as determined by the
Occupant Restraint Controller (ORC), which
may receive information from the front impact
sensors or other system components.
The first stage inflator is triggered immediately
during an impact that requires air bag deployment. A low energy output is used in less severe
collisions. A higher energy output is used for
more severe collisions.
This vehicle may be equipped with a driver
and/or front passenger seat belt buckle switch
that detects whether the driver or front passenger seat belt is buckled. The seat belt buckle
switch may adjust the inflation rate of the Advanced Front Air Bags.
WARNING!
• No objects should be placed over or near the
air bag on the instrument panel or steering
wheel, because any such objects could
cause harm if the vehicle is in a collision
severe enough to cause the air bags to
inflate.
(Continued)
WARNING! (Continued)
• Do not put anything on or around the air
bag covers or attempt to open them manually. You may damage the air bags and you
could be injured because the air bags may
no longer be functional. The protective
covers for the air bag cushions are designed to open only when the air bags are
inflating.
• Relying on the air bags alone could lead to
more severe injuries in a collision. The air
bags work with your seat belt to restrain
you properly. In some collisions, air bags
won’t deploy at all. Always wear your seat
belts even though you have air bags.
Advanced Front Air Bag Operation
Advanced Front Air Bags are designed to provide additional protection by supplementing the
seat belts. Advanced Front Air Bags are not
expected to reduce the risk of injury in rear,
side, or rollover collisions. The Advanced Front
Air Bags will not deploy in all frontal collisions,
including some that may produce substantial
vehicle damage — for example, some pole
collisions, truck underrides, and angle offset
collisions.
blink your eyes. The air bags then quickly
deflate while helping to restrain the driver and
front passenger.
On the other hand, depending on the type and
location of impact, Advanced Front Air Bags
may deploy in crashes with little vehicle frontend damage but that produce a severe initial
deceleration.
Knee Impact Bolsters
The Knee Impact Bolsters help protect the
knees of the driver and front passenger, and
position the front occupants for improved interaction with the Advanced Front Air Bags.
Because air bag sensors measure vehicle deceleration over time, vehicle speed and damage by
themselves are not good indicators of whether or
not an air bag should have deployed.
Seat belts are necessary for your protection in
all collisions, and also are needed to help keep
you in position, away from an inflating air bag.
When the ORC detects a collision requiring the
Advanced Front Air Bags, it signals the inflator
units. A large quantity of non-toxic gas is generated to inflate the Advanced Front Air Bags.
The steering wheel hub trim cover and the
upper right side of the instrument panel separate and fold out of the way as the air bags
inflate to their full size. The Advanced Front Air
Bags fully inflate in less time than it takes to
WARNING!
• Do not drill, cut, or tamper with the knee
impact bolsters in any way.
• Do not mount any accessories to the knee
impact bolsters such as alarm lights, stereos, citizen band radios, etc.
Supplemental Seat-Mounted Side Air Bags
(SABs)
Your vehicle is equipped with Supplemental
Seat-Mounted Side Air Bags (SABs) that are
located in the outboard side of the front seats.
The SABs are marked with a SRS AIRBAG or
AIRBAG label sewn into the outboard side of
the seats. The SABs may help to reduce the risk
35
of occupant injury during certain side impacts,
in addition to the injury reduction potential provided by the seat belts and body structure.
Supplemental Seat-Mounted Side Air Bag
Location
When the SAB deploys, it opens the seam on
the outboard side of the seatback’s trim cover.
The inflating SAB deploys through the seat
seam into the space between the occupant and
the door. The SAB moves at a very high speed
and with such a high force that it could injure
you if you are not seated properly, or if items are
positioned in the area where the SAB inflates.
36
Children are at an even greater risk of injury
from a deploying air bag.
side SAB only. Vehicle damage by itself is not a
good indicator of whether or not SABs should
have deployed.
WARNING!
Do not use accessory seat covers or place
objects between you and the Side Air Bags;
the performance could be adversely affected
and/or objects could be pushed into you,
causing serious injury.
The SABs will not deploy in all side collisions,
including some collisions at certain angles, or
some side collisions that do not impact the area
of the passenger compartment.
SABs are designed to activate in certain side
impacts. The Occupant Restraint Controller
(“ORC”) determines whether the deployment of
the SAB in a particular impact event is appropriate, based on the severity and type of collision. The side impact sensors aid the ORC in
determining the appropriate response to impact
events. The system is calibrated to deploy the
SAB on the impact side of the vehicle during
impacts that require SAB occupant protection.
In side impacts, the SABs deploy independently; a left side impact deploys the left SAB
only and a right side impact deploys the right
SABs are a supplement to the seat belt restraint
system. SABs deploy in less time than it takes
to blink your eyes. Occupants, including children, who are up against or very close to SABs
can be seriously injured or killed. Occupants,
including children, should never lean on or
sleep against the door, side windows, or area
where the SABs inflate, even if they are in an
infant or child restraint.
Seat belts (and child restraints where appropriate) are necessary for your protection in all
collisions. They also help keep you in position,
away from an inflating SAB. To get the best
protection from the SABs, occupants must wear
their seat belts properly and sit upright with their
backs against the seats. Children must be prop-
erly restrained in a child restraint or booster seat
that is appropriate for the size of the child.
If A Deployment Occurs
The Advanced Front Air Bags are designed to
deflate immediately after deployment.
WARNING!
• SABs need room to inflate. Do not lean
against the door or window. Sit upright in
the center of the seat.
• Being too close to the SABs during deployment could cause you to be severely injured or killed.
• Relying on the SABs alone could lead to
more severe injuries in a collision. The
SABs work with your seat belt to restrain
you properly. In some collisions, SABs
won’t deploy at all. Always wear your seat
belt even though you have SABs.
NOTE:
Front and/or side air bags will not deploy in
all collisions. This does not mean something is wrong with the air bag system.
NOTE:
Air bag covers may not be obvious to you, but
they will open during air bag deployment.
If you do have a collision, which deploys the air
bags, any or all of the following may occur:
• The air bag material may sometimes cause
abrasions and/or skin reddening to the occupants as the air bags deploy and unfold. The
abrasions are similar to friction rope burns or
those you might get sliding along a carpet or
gymnasium floor. They are not caused by
contact with chemicals. They are not permanent and normally heal quickly. However, if
you haven’t healed significantly within a few
days, or if you have any blistering, see your
doctor immediately.
• As the air bags deflate, you may see some
smoke-like particles. The particles are a normal by-product of the process that generates
the non-toxic gas used for air bag inflation.
These airborne particles may irritate the skin,
eyes, nose, or throat. If you have skin or eye
irritation, rinse the area with cool water. For
nose or throat irritation, move to fresh air.
If the irritation continues, see your doctor.
If these particles settle on your clothing,
follow the garment manufacturer’s instructions for cleaning.
Do not drive your vehicle after the air bags have
deployed. If you are involved in another collision, the air bags will not be in place to protect
you.
WARNING!
Deployed air bags and seat belt pretensioners cannot protect you in another collision.
Have the air bags, seat belt pretensioners,
and the seat belt retractor assemblies replaced by an authorized dealer immediately.
Also, have the Occupant Restraint Controller
System serviced as well.
37
NOTE:
• Air bag covers may not be obvious in the
interior trim, but they will open during air
bag deployment.
• After any collision, the vehicle should be
taken to an authorized dealer immediately.
Enhanced Accident Response System
In the event of an impact, if the communication
network remains intact, and the power remains
intact, depending on the nature of the event, the
ORC will determine whether to have the Enhanced Accident Response System perform the
following functions:
• Cut off fuel to the engine.
• Flash hazard lights as long as the battery has
power or until the ignition switch is turned to
the “OFF” position.
• Turn on the interior lights, which remain on as
long as the battery has power or until the
ignition switch is turned to the “OFF” position.
• Unlock the doors automatically.
38
System Reset Procedure
In order to reset the Enhanced Accident Response System functions after an event, the
ignition switch must be changed from ignition
START or ON/RUN to ignition OFF.
Air Bag Warning Light
The air bags must be ready to
inflate for your protection in a
collision. The Occupant Restraint
Controller (ORC) monitors the internal circuits and interconnecting
wiring associated with air bag system electrical
components.
The ORC monitors the readiness of the electronic parts of the air bag system whenever
the ignition switch is in the START or ON/RUN
position. If the ignition switch is in the OFF
position or in the ACC position, the air bag
system is not on and the air bags will not inflate.
The ORC contains a backup power supply
system that may deploy the air bags even if the
battery loses power or it becomes disconnected
prior to deployment.
The ORC turns on the Air Bag Warning Light in
the instrument panel for approximately four to
eight seconds for a self-check when the ignition
switch is first turned to the ON/RUN position.
After the self-check, the Air Bag Warning Light
will turn off. If the ORC detects a malfunction in
any part of the system, it turns on the Air Bag
Warning Light, either momentarily or continuously. A single chime will sound to alert you if
the light comes on again after initial startup.
The ORC also includes diagnostics that will
illuminate the instrument panel Air Bag Warning
Light if a malfunction is detected that could
affect the air bag system. The diagnostics also
record the nature of the malfunction. While the
air bag system is designed to be maintenance
free, if any of the following occurs, have an
authorized dealer service the air bag system
immediately.
• The Air Bag Warning Light does not come on
during the four to eight seconds when the
ignition switch is first turned to the ON/RUN
position.
• The Air Bag Warning Light remains on after
the four to eight-second interval.
• The Air Bag Warning Light comes on intermittently or remains on while driving.
NOTE:
If the speedometer, tachometer, or any engine related gauges are not working, the
Occupant Restraint Controller (ORC) may
also be disabled. In this condition the air
bags may not be ready to inflate for your
protection. Have an authorized dealer service the air bag system immediately.
WARNING!
Ignoring the Air Bag Warning Light in your
instrument panel could mean you won’t have
the air bags to protect you in a collision. If the
light does not come on as a bulb check when
the ignition is first turned on, stays on after
you start the vehicle, or if it comes on as you
drive, have an authorized dealer service the
air bag system immediately.
Maintaining Your Air Bag System
WARNING!
• Modifications to any part of the air bag
system could cause it to fail when you
need it. You could be injured if the air bag
system is not there to protect you. Do not
modify the components or wiring, including
adding any kind of badges or stickers to
the steering wheel hub trim cover or the
upper right side of the instrument panel.
Do not modify the front bumper, vehicle
body structure, or add aftermarket side
steps or running boards.
• It is dangerous to try to repair any part of
the air bag system yourself. Be sure to tell
anyone who works on your vehicle that it
has an air bag system.
WARNING! (Continued)
• Do not attempt to modify any part of your
air bag system. The air bag may inflate
accidentally or may not function properly if
modifications are made. Take your vehicle
to an authorized dealer for any air bag
system service. If your seat, including your
trim cover and cushion, needs to be serviced in any way (including removal or
loosening/tightening of seat attachment
bolts), take the vehicle to your authorized
dealer. Only manufacturer approved seat
accessories may be used. If it is necessary
to modify the air bag system for persons
with disabilities, contact your authorized
dealer.
(Continued)
39
Event Data Recorder (EDR)
This vehicle is equipped with an event data
recorder (EDR). The main purpose of an EDR is
to record, in certain crash or near crash-like
situations, such as an air bag deployment or
hitting a road obstacle, data that will assist in
understanding how a vehicle’s systems performed. The EDR is designed to record data
related to vehicle dynamics and safety systems
for a short period of time, typically 30 seconds
or less. The EDR in this vehicle is designed to
record such data as:
• How various systems in your vehicle were
operating.
• Whether or not the driver and passenger
safety belts were buckled/fastened.
• How far (if at all) the driver was pushing the
accelerator and/or brake pedal.
• How fast the vehicle was traveling.
These data can help provide a better understanding of the circumstances in which crashes
and injuries occur.
40
NOTE:
EDR data are recorded by your vehicle only
if a non-trivial crash situation occurs; no
data are recorded by the EDR under normal
driving conditions and no personal data
(e.g., name, gender, age, and crash location)
are recorded. However, other parties, such
as law enforcement, could combine the EDR
data with the type of personally identifying
data routinely acquired during a crash investigation.
To read data recorded by an EDR, special
equipment is required, and access to the vehicle or the EDR is needed. In addition to the
vehicle manufacturer, other parties, such as law
enforcement, that have the special equipment,
can read the information if they have access to
the vehicle or the EDR.
Child Restraints
Everyone in your vehicle needs to be buckled
up at all times, including babies and children.
Children 12 years or younger should ride properly buckled up in a rear seat, if available.
According to crash statistics, children are safer
when properly restrained in the rear seats
rather than in the front.
WARNING!
In a collision, an unrestrained child can become a projectile inside the vehicle. The
force required to hold even an infant on your
lap could become so great that you could not
hold the child, no matter how strong you are.
The child and others could be badly injured.
Any child riding in your vehicle should be in a
proper restraint for the child’s size.
There are different sizes and types of restraints
for children from newborn size to the child
almost large enough for an adult seat belt.
Always check the child seat Owner’s Manual to
make sure you have the correct seat for your
child. Carefully read and follow all the instructions and warnings in the child restraint Owner’s
Manual and on all the labels attached to the
child restraint.
Before buying any restraint system, make sure
that it has a label certifying that it meets all
applicable Safety Standards. You should also
make sure that you can install it in the vehicle
where you will use it.
Summary Of Recommendations For Restraining Children In Vehicles
Child Size, Height, Weight Or Age
Recommended Type Of Child Restraint
Infants and Toddlers
Children who are two years old or younger and who
have not reached the height or weight limits of their
child restraint
Either an Infant Carrier or a Convertible Child
Restraint, facing rearward in the rear seat of the vehicle
Small Children
Children who are at least two years old or who have
out-grown the height or weight limit of their rear-facing
child restraint
Forward-Facing Child Restraint with a five-point
Harness, facing forward in the rear seat of the vehicle
Larger Children
Children who have out-grown their forward-facing
child restraint, but are too small to properly fit the vehicle’s seat belt
Belt Positioning Booster Seat and the vehicle seat belt,
seated in the rear seat of the vehicle
Children Too Large for
Child Restraints
Children 12 years old or younger, who have outgrown the height or weight limit of their booster seat
Vehicle Seat Belt, seated in the rear seat of the vehicle
41
Infants And Child Restraints
Safety experts recommend that children ride
rear-facing in the vehicle until they are two years
old or until they reach either the height or weight
limit of their rear-facing child restraint. Two types
of child restraints can be used rear-facing: infant
carriers and convertible child seats.
The infant carrier is only used rear-facing in the
vehicle. It is recommended for children from
birth until they reach the weight or height limit of
the infant carrier. Convertible child seats can be
used either rear-facing or forward-facing in the
vehicle. Convertible child seats often have a
higher weight limit in the rear-facing direction
than infant carriers do, so they can be used
rear-facing by children who have outgrown their
infant carrier but are still less than at least two
years old. Children should remain rear-facing
until they reach the highest weight or height
allowed by their convertible child seat.
WARNING!
• Never place a rear-facing child restraint in
front of an air bag. A deploying passenger
Advanced Front Air Bag can cause death
or serious injury to a child 12 years or
younger, including a child in a rear-facing
child restraint.
• Only use a rear-facing child restraint in a
vehicle with a rear seat.
Older Children And Child Restraints
Children who are two years old or who have
outgrown their rear-facing convertible child seat
can ride forward-facing in the vehicle. Forwardfacing child seats and convertible child seats
used in the forward-facing direction are for
children who are over two years old or who have
outgrown the rear-facing weight or height limit
of their rear-facing convertible child seat. Children should remain in a forward-facing child
seat with a harness for as long as possible, up
to the highest weight or height allowed by the
child seat.
All children whose weight or height is above the
forward-facing limit for the child seat should use
a belt-positioning booster seat until the vehicle’s
seat belts fit properly. If the child cannot sit with
knees bent over the vehicle’s seat cushion while
the child’s back is against the seatback, they
should use a belt-positioning booster seat. The
child and belt-positioning booster seat are held
in the vehicle by the seat belt.
WARNING!
• Improper installation can lead to failure of
an infant or child restraint. It could come
loose in a collision. The child could be
badly injured or killed. Follow the child
restraint manufacturer’s directions exactly
when installing an infant or child restraint.
• After a child restraint is installed in the
vehicle, do not move the vehicle seat
forward or rearward because it can loosen
the child restraint attachments. Remove
the child restraint before adjusting the
(Continued)
42
WARNING! (Continued)
vehicle seat position. When the vehicle
seat has been adjusted, reinstall the child
restraint.
• When your child restraint is not in use,
secure it in the vehicle with the seat belt or
LATCH anchorages, or remove it from the
vehicle. Do not leave it loose in the vehicle.
In a sudden stop or accident, it could strike
the occupants or seatbacks and cause
serious personal injury.
Children Too Large For Booster Seats
Children who are large enough to wear the
shoulder belt comfortably, and whose legs are
long enough to bend over the front of the seat
when their back is against the seatback, should
use the seat belt in a rear seat. Use this simple
5-step test to decide whether the child can use
the vehicle’s seat belt alone:
1. Can the child sit all the way back against the
back of the vehicle seat?
2. Do the child’s knees bend comfortably over
the front of the vehicle seat – while they are
still sitting all the way back?
3. Does the shoulder belt cross the child’s
shoulder between their neck and arm?
4. Is the lap part of the seat belt as low as
possible, touching the child’s thighs and not
their stomach?
5. Can the child stay seated like this for the
whole trip?
If the answer to any of these questions was
“no,” then the child still needs to use a booster
seat in this vehicle. If the child is using the
lap/shoulder belt, check seat belt fit periodically
and make sure the seat belt buckle is latched.
A child’s squirming or slouching can move the
seat belt out of position. If the shoulder belt
contacts the face or neck, move the child closer
to the center of the vehicle, or use a booster
seat to position the seat belt on the child
correctly.
WARNING!
Never allow a child to put the shoulder belt
under an arm or behind their back. In a
crash, the shoulder belt will not protect a
child properly, which may result in serious
injury or death. A child must always wear
both the lap and shoulder portions of the seat
belt correctly.
43
Recommendations For Attaching Child Restraints
Restraint Type
Combined Weight
of the Child + Child
Restraint
Rear-Facing Child
Restraint
Up to 65 lbs
(29.5 kg)
Rear-Facing Child
Restraint
More than 65 lbs
(29.5 kg)
Forward-Facing Child
Restraint
Up to 65 lbs
(29.5 kg)
Forward-Facing Child
Restraint
More than 65 lbs
(29.5 kg)
44
Use any attachment method shown with an “X” Below
LATCH – Lower
Anchors Only
Seat Belt Only
X
X
LATCH – Lower
Anchors + Top
Tether Anchor
Seat Belt + Top
Tether Anchor
X
X
X
X
Lower Anchors And Tethers For Children
(LATCH) Restraint System
In these seating positions, the seat belt must be
used with the top tether anchorage to install the
child restraint. Please see the following table for
more information.
LATCH Positions For Installing Child
Restraints In This Vehicle
Latch Positions (Four-Door Models)
Your vehicle is equipped with the child restraint
anchorage system called LATCH, which stands
for Lower Anchors and Tethers for CHildren.
The LATCH system has three vehicle anchor
points for installing LATCH-equipped child
seats. There are two lower anchorages located at the back of the seat cushion where
it meets the seatback and one top tether anchorage located behind the seating position.
These anchorages are used to install LATCHequipped child seats without using the vehicle’s
seat belts. Some seating positions may have a
top tether anchorage but no lower anchorages.
Lower Anchorage Symbol 2 anchorages per
seating position
Top Tether Anchorage Symbol
Latch Positions (Two-Door Models)
Lower Anchorage Symbol 2 anchorages per
seating position
Top Tether Anchorage Symbol
45
What is the weight limit (child’s weight + weight of the
child restraint) for using the LATCH
anchorage system to attach the child restraint?
65 lbs (29.5 kg)
Use the LATCH anchorage system until the combined
weight of the child and the child restraint is 65 lbs
(29.5 kg). Use the seat belt and tether anchor instead
of the LATCH system once the combined weight is
more than 65 lbs (29.5 kg).
Can the LATCH anchorages and the seat belt be used
together to attach a rear-facing or forward-facing child
restraint?
No
Do not use the seat belt when you use the LATCH
anchorage system to attach a rear-facing or
forward-facing child restraint.
Can a child seat be installed in the center position
using the inner LATCH lower anchorages?
No
Use the seat belt and tether anchor to install a child
seat in the center seating position.
Can two child restraints be attached using a common
lower LATCH anchorage?
No
Never “share” a LATCH anchorage with two or more
child restraints. If the center position does not have
dedicated LATCH lower anchorages, use the seat belt
to install a child seat in the center position next to a
child seat using the LATCH anchorages in an outboard
position.
Can the rear-facing child restraint touch the back of
the front passenger seat?
Yes
The child seat may touch the back of the front passenger seat if the child restraint manufacturer also allows
contact. See your child restraint owner’s manual for
more information.
Can the head restraints be removed?
Yes (2-Door Model only)
Head restraints cannot be removed in the 4-Door model.
46
Locating The LATCH Anchorages
The lower anchorages are round
bars that are found at the rear of
the seat cushion where it meets the
seatback, below the anchorage
symbols on the seatback. They are
just visible when you lean into the
rear seat to install the child restraint. You will
easily feel them if you run your finger along the
gap between the seatback and seat cushion.
Latch Anchorages (Four-Door Models)
Tether Strap Mounting (Two-Door Models)
Locating The Tether Anchorages
In addition, there are tether strap
anchors located behind each rear
seatback.
Latch Anchorages (Two-Door Models)
Tether Strap Mounting (Four-Door Models)
47
LATCH-compatible child restraint systems will
be equipped with a rigid bar or a flexible strap
on each side. Each will have a hook or connector to attach to the lower anchorage and a way
to tighten the connection to the anchorage.
Forward-facing child restraints and some rearfacing child restraints will also be equipped with
a tether strap. The tether strap will have a hook
at the end to attach to the top tether anchorage
and a way to tighten the strap after it is attached
to the anchorage.
Center Seat LATCH: Two Door
WARNING!
This vehicle does not have a center seating
position. Do not use the center lower LATCH
anchorages to install a child seat in the
center of the back seat.
48
Center Seat LATCH: Four Door
WARNING!
• Do not install a child restraint in the center
position using the LATCH system. This
position is not approved for installing child
seats using the LATCH attachments. You
must use the seat belt and tether anchor to
install a child seat in the center seating
position.
• Never use the same lower anchorage to
attach more than one child restraint.
Please refer to “Installing The LATCHCompatible Child Restraint System” for
typical installation instructions.
To Install A LATCH-Compatible Child
Restraint
1. If the selected seating position has a Switchable Automatic Locking Retractor (ALR)
seat belt, stow the seat belt following the
instructions below. See the section “Installing Child Restraints Using the Vehicle Seat
Belt” to check what type of seat belt each
seating position has.
2. Loosen the adjusters on the lower straps
and on the tether strap of the child seat so
that you can more easily attach the hooks or
connectors to the vehicle anchorages.
3. Place the child seat between the lower anchorages for that seating position. For some
second row seats, you may need to recline
the seat and/or raise the head restraint to get
a better fit. If the rear seat can be moved
forward and rearward in the vehicle, you
may wish to move it to its rear-most position
to make room for the child seat. You may
also move the front seat forward to allow
more room for the child seat.
4. Attach the lower hooks or connectors of the
child restraint to the lower anchorages in the
selected seating position.
5. If the child restraint has a tether strap, connect it to the top tether anchorage. See the
section “Installing Child Restraints Using
the Top Tether Anchorage” for directions to
attach a tether anchor.
6. Tighten all of the straps as you push the child
restraint rearward and downward into the
seat. Remove slack in the straps according
to the child restraint manufacturer’s instructions.
7. Test that the child restraint is installed tightly
by pulling back and forth on the child seat at
the belt path. It should not move more than
1 inch (25.4 mm) in any direction.
How To Stow An Unused ALR Seat Belt:
When using the LATCH attaching system to
install a child restraint, stow all ALR seat belts
that are not being used by other occupants or
being used to secure child restraints. An unused
belt could injure a child if they play with it and
accidentally lock the seat belt retractor. Before
installing a child restraint using the LATCH
system, buckle the seat belt behind the child
restraint and out of the child’s reach. If the
buckled seat belt interferes with the child restraint installation, instead of buckling it behind
the child restraint, route the seat belt through
the child restraint belt path and then buckle it.
Do not lock the seat belt. Remind all children in
the vehicle that the seat belts are not toys and
that they should not play with them.
WARNING!
• Improper installation of a child restraint to
the LATCH anchorages can lead to failure
of the restraint. The child could be badly
injured or killed. Follow the child restraint
manufacturer’s directions exactly when installing an infant or child restraint.
• Child restraint anchorages are designed to
withstand only those loads imposed by
correctly-fitted child restraints. Under no
circumstances are they to be used for
adult seat belts, harnesses, or for attaching other items or equipment to the vehicle.
49
Installing Child Restraints Using The
Vehicle Seat Belt
The seat belts in the rear passenger seating
positions are equipped with a Switchable Automatic Locking Retractor (ALR) that is designed
to keep the lap portion of the seat belt tight
around the child restraint so that it is not necessary to use a locking clip. The ALR retractor
can be “switched” into a locked mode by pulling
all of the webbing out of the retractor and then
letting the webbing retract back into the retractor. If it is locked, the ALR will make a clicking
noise while the webbing is pulled back into the
retractor. For additional information on ALR,
refer to the “Automatic Locking Mode” description under “Occupant Restraints.”
50
Lap/Shoulder Belt Systems For Installing
Child Restraints In This Vehicle
Four-Door Models
Two-Door Models
• ALR = Switchable Automatic Locking
Retractor
•
Top Tether Anchorage Symbol
What is the weight limit (child’s weight + weight of the
child restraint) for using the Tether Anchor with the seat
belt to attach a forward facing child restraint?
Weight limit of the
Child Restraint
Always use the tether anchor when using the seat belt
to install a forward facing child restraint, up to the
recommended weight limit of the child restraint.
Can the rear-facing child restraint touch the back of the
front passenger seat?
Yes
Contact between the front passenger seat and the child
restraint is allowed, if the child restraint manufacturer
also allows contact.
Can the head restraints be removed?
Yes (2-Door Model only)
Head restraints cannot be removed in the 4-Door model.
Can the buckle stalk be twisted to tighten the seat belt
against the belt path of the child restraint?
No
Do not twist the buckle stalk in a seating position
with an ALR retractor.
Installing A Child Restraint With A
Switchable Automatic Locking Retractor
(ALR)
1. Place the child seat in the center of the
seating position. For some second row
seats, you may need to recline the seat
and/or raise the head restraint to get a better
fit. If the rear seat can be moved forward and
rearward in the vehicle, you may wish to
move it to its rear-most position to make
room for the child seat. You may also move
the front seat forward to allow more room for
the child seat.
2. Pull enough of the seat belt webbing from
the retractor to pass it through the seat belt
path of the child restraint. Do not twist the
belt webbing in the seat belt path.
3. Slide the latch plate into the buckle until you
hear a “click”.
4. Pull on the webbing to make the lap portion
tight against the child seat.
retractor. Then, allow the webbing to retract
back into the retractor. As the webbing retracts, you will hear a clicking sound. This
means the seat belt is now in the Automatic
Locking mode.
6. Try to pull the webbing out of the retractor.
If it is locked, you should not be able to pull
out any webbing. If the retractor is not
locked, repeat step 5.
5. To lock the seat belt, pull down on the
shoulder part of the seat belt until you have
pulled all the seat belt webbing out of the
51
7. Finally, pull up on any excess webbing to
tighten the lap portion around the child restraint while you push the child restraint
rearward and downward into the vehicle
seat.
8. If the child restraint has a top tether strap
and the seating position has a top tether
anchorage, connect the tether strap to the
anchorage and tighten the tether strap. See
the section “Installing Child Restraints Using
the Top Tether Anchorage” for directions to
attach a tether anchor.
9. Test that the child restraint is installed tightly
by pulling back and forth on the child seat at
the seat belt path. It should not move more
than 1 inch (25.4 mm) in any direction.
Any seat belt system will loosen with time, so
check the seat belt occasionally, and pull it tight
if necessary.
Installing Child Restraints Using The Top
Tether Anchorage:
WARNING!
Do not attach a tether strap for a rear-facing
car seat to any location in front of the car
seat, including the seat frame or a tether
anchorage. Only attach the tether strap of a
rear-facing car seat to the tether anchorage
that is approved for that seating position,
located behind the top of the vehicle seat.
See the section “Lower Anchors and Tethers
for CHildren (LATCH) Restraint System” for
the location of approved tether anchorages
in your vehicle.
Installing Child Restraints Using The Top
Tether Anchorage:
1. Look behind the seating position where you
plan to install the child restraint to find the
tether anchorage. You may need to move
the seat forward to provide better access to
the tether anchorage. If there is no top tether
anchorage for that seating position, move
the child restraint to another position in the
vehicle if one is available.
2. Route the tether strap to provide the most
direct path for the strap between the anchor
and the child seat. If your vehicle is equipped
with adjustable rear head restraints, raise the
head restraint, and where possible, route the
tether strap under the head restraint and between the two posts. If not possible, lower the
head restraint and pass the tether strap
around the outboard side of the head restraint.
3. Attach the tether strap hook of the child restraint to the top tether anchorage as shown in
the diagram.
52
4. Remove slack in the tether strap according to
the child restraint manufacturer’s instructions.
Tether Strap Mounting (Two-Door Models)
WARNING!
• An incorrectly anchored tether strap could
lead to increased head motion and possible injury to the child. Use only the anchorage position directly behind the child
seat to secure a child restraint top tether
strap.
• If your vehicle is equipped with a split rear
seat, make sure the tether strap does not
slip into the opening between the seatbacks as you remove slack in the strap.
Transporting Pets
Air Bags deploying in the front seat could harm
your pet. An unrestrained pet will be thrown
about and possibly injured, or injure a passenger during panic braking or in a collision.
Tether Strap Mounting (Four-Door Models)
Pets should be restrained in the rear seat in pet
harnesses or pet carriers that are secured by
seat belts.
ENGINE BREAK-IN
RECOMMENDATIONS
A long break-in period is not required for the
engine and drivetrain (transmission and axle) in
your vehicle.
Drive moderately during the first 300 miles
(500 km). After the initial 60 miles (100 km),
speeds up to 50 or 55 mph (80 or 90 km/h) are
desirable.
While cruising, brief full-throttle acceleration
within the limits of local traffic laws contributes
to a good break-in. Wide-open throttle acceleration in low gear can be detrimental and should
be avoided.
The engine oil installed in the engine at the
factory is a high-quality energy conserving type
lubricant. Oil changes should be consistent with
anticipated climate conditions under which vehicle operations will occur. For the recommended viscosity and quality grades, refer to
“Maintenance Procedures” in “Maintaining Your
Vehicle”.
53
CAUTION!
Never use Non-Detergent Oil or Straight
Mineral Oil in the engine or damage may
result.
NOTE:
A new engine may consume some oil during
its first few thousand miles (kilometers) of
operation. This should be considered a normal part of the break-in and not interpreted
as a problem.
Additional Requirements For Diesel
Engine — If Equipped
During the first 900 miles (1500 km) avoid
heavy loads, e.g. driving at full throttle. Do not
exceed 2/3 of the maximum permissible engine
speed for each gear. Change gear in good time.
Do not shift down a gear manually in order to
brake.
54
SAFETY TIPS
Transporting Passengers
NEVER TRANSPORT PASSENGERS IN THE
CARGO AREA.
WARNING!
• Do not leave children or animals inside
parked vehicles in hot weather. Interior
heat build-up may cause serious injury or
death.
• It is extremely dangerous to ride in a cargo
area, inside or outside of a vehicle. In a
collision, people riding in these areas are
more likely to be seriously injured or killed.
• Do not allow people to ride in any area of
your vehicle that is not equipped with seats
and seat belts.
• Be sure everyone in your vehicle is in a
seat and using a seat belt properly.
Exhaust Gas
WARNING!
Exhaust gases can injure or kill. They contain carbon monoxide (CO), which is colorless and odorless. Breathing it can make you
unconscious and can eventually poison you.
To avoid breathing (CO), follow these safety
tips:
• Do not run the engine in a closed garage or
in confined areas any longer than needed to
move your vehicle in or out of the area.
• If you are required to drive with the trunk/
liftgate/rear doors open, make sure that all
windows are closed and the climate control BLOWER switch is set at high speed.
DO NOT use the recirculation mode.
• If it is necessary to sit in a parked vehicle
with the engine running, adjust your heating
or cooling controls to force outside air into
the vehicle. Set the blower at high speed.
The best protection against carbon monoxide
entry into the vehicle body is a properly maintained engine exhaust system.
Whenever a change is noticed in the sound of
the exhaust system, when exhaust fumes can
be detected inside the vehicle, or when the
underside or rear of the vehicle is damaged,
have a competent mechanic inspect the complete exhaust system and adjacent body areas
for broken, damaged, deteriorated, or mispositioned parts. Open seams or loose connections
could permit exhaust fumes to seep into the
passenger compartment. In addition, inspect
the exhaust system each time the vehicle is
raised for lubrication or oil change. Replace as
required.
Safety Checks You Should Make
Inside The Vehicle
Seat Belts
Inspect the seat belt system periodically, checking for cuts, frays, and loose parts. Damaged
parts must be replaced immediately. Do not
disassemble or modify the system.
Front seat belt assemblies must be replaced
after a collision. Rear seat belt assemblies must
be replaced after a collision if they have been
damaged (i.e., bent retractor, torn webbing,
etc.). If there is any question regarding seat belt
or retractor condition, replace the seat belt.
Air Bag Warning Light
The light should come on and remain on for four to eight seconds
as a bulb check when the ignition
switch is first turned ON. If the light
is not lit during starting, see your
authorized dealer. If the light stays
on, flickers, or comes on while driving, have the
system checked by an authorized dealer.
Defroster
Check operation by selecting the defrost mode
and place the blower control on high speed. You
should be able to feel the air directed against
the windshield. See your authorized dealer for
service if your defroster is inoperable.
Floor Mat Safety Information
Always use floor mats designed to fit the footwell of your vehicle. Use only floor mats that
leave the pedal area unobstructed and that are
firmly secured so that they cannot slip out of
position and interfere with the pedals or impair
safe operation of your vehicle in other ways.
WARNING!
Pedals that cannot move freely can cause
loss of vehicle control and increase the risk
of serious personal injury.
• Always make sure that floor mats are properly attached to the floor mat fasteners.
• Never place or install floor mats or other
floor coverings in the vehicle that cannot
be properly secured to prevent them from
moving and interfering with the pedals or
the ability to control the vehicle.
(Continued)
55
WARNING! (Continued)
• Never put floor mats or other floor coverings on top of already installed floor mats.
Additional floor mats and other coverings
will reduce the size of the pedal area and
interfere with the pedals.
• Check mounting of mats on a regular
basis. Always properly reinstall and secure
floor mats that have been removed for
cleaning.
• Always make sure that objects cannot fall
into the driver footwell while the vehicle is
moving. Objects can become trapped under the brake pedal and accelerator pedal
causing a loss of vehicle control.
• If required, mounting posts must be properly installed, if not equipped from the
factory.
Failure to properly follow floor mat installation or mounting can cause interference with
the brake pedal and accelerator pedal operation causing loss of control of the vehicle.
56
Periodic Safety Checks You Should
Make Outside The Vehicle
Tires
Examine tires for excessive tread wear and
uneven wear patterns. Check for stones, nails,
glass, or other objects lodged in the tread or
sidewall. Inspect the tread for cuts and cracks.
Inspect sidewalls for cuts, cracks and bulges.
Check the wheel nuts for tightness. Check the
tires (including spare) for proper cold inflation
pressure.
Lights
Have someone observe the operation of brake
lights and exterior lights while you work the
controls. Check turn signal and high beam
indicator lights on the instrument panel.
Door Latches
Check for positive closing, latching, and locking.
Fluid Leaks
Check area under vehicle after overnight parking for fuel, engine coolant, oil, or other fluid
leaks. Also, if gasoline fumes are detected or if
fuel, power steering fluid (if equipped), or brake
fluid leaks are suspected, the cause should be
located and corrected immediately.
3
UNDERSTANDING THE FEATURES OF
YOUR VEHICLE
• MIRRORS . . . . . . . . . . . . . . . . . . . . . . . . . . . . .
• Inside Day/Night Mirror — If Equipped . . . . . . . . . . .
• Outside Mirrors . . . . . . . . . . . . . . . . . . . . . . . .
• Automatic Dimming Mirror — If Equipped . . . . . . . . .
• Power Mirrors — If Equipped . . . . . . . . . . . . . . . .
• Heated Mirrors — If Equipped . . . . . . . . . . . . . . . .
• Vanity Mirrors . . . . . . . . . . . . . . . . . . . . . . . . .
• Uconnect® PHONE — IF EQUIPPED . . . . . . . . . . . . .
• Operation . . . . . . . . . . . . . . . . . . . . . . . . . . . .
• Phone Call Features . . . . . . . . . . . . . . . . . . . . . .
• Uconnect® Phone Features . . . . . . . . . . . . . . . . .
• Advanced Phone Connectivity . . . . . . . . . . . . . . .
• Things You Should Know About Your Uconnect® Phone
• VOICE COMMAND . . . . . . . . . . . . . . . . . . . . . . . .
• Uconnect® 8.4/8.4 Nav . . . . . . . . . . . . . . . . . . . .
• Uconnect® Voice Commands. . . . . . . . . . . . . . . . .
• Voice Tree . . . . . . . . . . . . . . . . . . . . . . . . . . . .
.
.
.
.
.
.
.
.
.
.
.
.
.
.
.
.
.
.
.
.
.
.
.
.
.
.
.
.
.
.
.
.
.
.
.
.
.
.
.
.
.
.
.
.
.
.
.
.
.
.
.
.
.
.
.
.
.
.
.
.
.
.
.
.
.
.
.
.
.62
.62
.62
.63
.63
.63
.63
.64
.65
.69
.71
.74
.75
.82
.82
.83
.84
57
• SEATS . . . . . . . . . . . . . . . . . . . . . . . . . . . . . . . . . . . . . .93
• Front Seat Adjustment . . . . . . . . . . . . . . . . . . . . . . . . . . .93
• Manual Seat Height Adjustment — If Equipped . . . . . . . . . . . . .94
• Front Seatback Recline . . . . . . . . . . . . . . . . . . . . . . . . . . .94
• Front Passenger Easy Entry Seat — Two-Door Models . . . . . . . .94
• Tip n’ Slide™ Seats — Two-Door Models . . . . . . . . . . . . . . . . .95
• Heated Seats — If Equipped . . . . . . . . . . . . . . . . . . . . . . . .96
• Head Restraints . . . . . . . . . . . . . . . . . . . . . . . . . . . . . . .97
• Fold And Tumble Rear Seat — Two-Door Models . . . . . . . . . . . .97
• Removing The Rear Seat — Two-Door Models . . . . . . . . . . . . .98
• Replacing The Rear Seat — Two-Door Models . . . . . . . . . . . . .98
• 60/40 Split Folding Rear Seat — Four-Door Models . . . . . . . . . .99
• TO OPEN AND CLOSE THE HOOD . . . . . . . . . . . . . . . . . . . .100
• LIGHTS . . . . . . . . . . . . . . . . . . . . . . . . . . . . . . . . . . . . .101
• Multifunction Lever . . . . . . . . . . . . . . . . . . . . . . . . . . . . .101
• Headlights And Position Lights . . . . . . . . . . . . . . . . . . . . .101
• Automatic Headlights — If Equipped . . . . . . . . . . . . . . . . . .101
• Headlights With Wipers
(Available With Automatic Headlights Only) . . . . . . . . . . . . . .102
• Turn Signals . . . . . . . . . . . . . . . . . . . . . . . . . . . . . . . . .102
• Lane Change Assist . . . . . . . . . . . . . . . . . . . . . . . . . . . .102
• Lights-On Reminder . . . . . . . . . . . . . . . . . . . . . . . . . . . .102
• High/Low Beam Switch . . . . . . . . . . . . . . . . . . . . . . . . . .102
• Front Fog Lights — If Equipped . . . . . . . . . . . . . . . . . . . . .102
• Rear Fog Lights — If Equipped . . . . . . . . . . . . . . . . . . . . . .103
• Instrument Panel Dimmer . . . . . . . . . . . . . . . . . . . . . . . . .103
58
•
•
•
•
•
•
•
• Interior Lights . . . . . . . . . . . . . . . . . . . . . . . .
• Headlight Leveling System — If Equipped . . . . . . .
WINDSHIELD WIPERS AND WASHERS . . . . . . . . .
• Windshield Wiper Operation . . . . . . . . . . . . . . .
• Intermittent Wiper System . . . . . . . . . . . . . . . .
• Windshield Washers . . . . . . . . . . . . . . . . . . . .
• Mist Feature . . . . . . . . . . . . . . . . . . . . . . . . .
TILT STEERING COLUMN . . . . . . . . . . . . . . . . . .
ELECTRONIC SPEED CONTROL — IF EQUIPPED . . .
• To Activate . . . . . . . . . . . . . . . . . . . . . . . . . .
• To Set A Desired Speed . . . . . . . . . . . . . . . . . .
• To Deactivate . . . . . . . . . . . . . . . . . . . . . . . .
• To Resume Speed. . . . . . . . . . . . . . . . . . . . . .
• To Vary The Speed Setting . . . . . . . . . . . . . . . .
• To Accelerate For Passing. . . . . . . . . . . . . . . . .
ELECTRICAL POWER OUTLET . . . . . . . . . . . . . .
CUPHOLDERS . . . . . . . . . . . . . . . . . . . . . . . . .
• Front Cupholders . . . . . . . . . . . . . . . . . . . . . .
• Rear Cupholders . . . . . . . . . . . . . . . . . . . . . .
STORAGE . . . . . . . . . . . . . . . . . . . . . . . . . . . .
• Glove Compartment . . . . . . . . . . . . . . . . . . . .
• Console Storage Compartment . . . . . . . . . . . . .
• Rear Storage Compartment — If Equipped . . . . . . .
DUAL TOP — TWO-DOOR MODELS — IF EQUIPPED
• Removing The Soft Top — Two-Door Models. . . . . .
• Installing The Soft Top — Two-Door Models . . . . . .
.
.
.
.
.
.
.
.
.
.
.
.
.
.
.
.
.
.
.
.
.
.
.
.
.
.
.
.
.
.
.
.
.
.
.
.
.
.
.
.
.
.
.
.
.
.
.
.
.
.
.
.
.
.
.
.
.
.
.
.
.
.
.
.
.
.
.
.
.
.
.
.
.
.
.
.
.
.
.
.
.
.
.
.
.
.
.
.
.
.
.
.
.
.
.
.
.
.
.
.
.
.
.
.
.
.
.
.
.
.
.
.
.
.
.
.
.
.
.
.
.
.
.
.
.
.
.
.
.
.
.103
.104
.105
.105
.106
.106
.106
.107
.107
.108
.108
.108
.108
.108
.109
.110
.112
.112
.112
.112
.112
.112
.113
.113
.113
.114
59
• DUAL TOP — FOUR-DOOR MODELS — IF EQUIPPED . . . .
• Removing The Soft Top — Four-Door Models . . . . . . . . .
• Installing The Soft Top — Four-Door Models . . . . . . . . . .
• FREEDOM TOP™ THREE-PIECE MODULAR HARD TOP —
IF EQUIPPED . . . . . . . . . . . . . . . . . . . . . . . . . . . . . .
• Front Panel(s) Removal . . . . . . . . . . . . . . . . . . . . . .
• Freedom Top™ Storage Bag . . . . . . . . . . . . . . . . . . .
• Front Panel(s) Installation . . . . . . . . . . . . . . . . . . . . .
• Front Panel(s) Installation With Rear Hard Top Removed. . .
• Rear Hard Top Removal . . . . . . . . . . . . . . . . . . . . . .
• Rear Hard Top Installation . . . . . . . . . . . . . . . . . . . . .
• DOOR FRAME . . . . . . . . . . . . . . . . . . . . . . . . . . . . .
• Door Frame Removal . . . . . . . . . . . . . . . . . . . . . . . .
• Door Frame Installation — Two-Door Models — If Equipped.
• Door Frame Installation — Four-Door Models — If Equipped
• SOFT TOP — TWO-DOOR MODELS . . . . . . . . . . . . . . .
• Quick Steps To Lowering The Soft Top . . . . . . . . . . . . .
• Quick Steps To Raising The Soft Top . . . . . . . . . . . . . .
• Lowering The Soft Top . . . . . . . . . . . . . . . . . . . . . . .
• Raising The Soft Top . . . . . . . . . . . . . . . . . . . . . . . .
• SOFT TOP — FOUR-DOOR MODELS . . . . . . . . . . . . . . .
• Quick Steps For Lowering The Soft Top. . . . . . . . . . . . .
• Quick Steps For Raising The Soft Top . . . . . . . . . . . . . .
• Folding Down The Soft Top . . . . . . . . . . . . . . . . . . . .
• Putting Up The Soft Top . . . . . . . . . . . . . . . . . . . . . .
60
. . . .116
. . . .116
. . . .117
.
.
.
.
.
.
.
.
.
.
.
.
.
.
.
.
.
.
.
.
.
.
.
.
.
.
.
.
.
.
.
.
.
.
.
.
.
.
.
.
.
.
.
.
.
.
.
.
.
.
.
.
.
.
.
.
.
.
.
.
.
.
.
.119
.120
.120
.122
.122
.123
.124
.125
.125
.126
.127
.128
.130
.132
.134
.139
.144
.145
.147
.150
.156
• SUNRIDER® (TWO-DOOR MODELS) . . . . . . . . . .
• Opening The Sunrider® . . . . . . . . . . . . . . . . .
• Closing The Sunrider® . . . . . . . . . . . . . . . . . .
• SUNRIDER® (FOUR-DOOR MODELS) . . . . . . . . .
• Opening The Sunrider® . . . . . . . . . . . . . . . . .
• Closing The Sunrider® . . . . . . . . . . . . . . . . . .
• FOLDING WINDSHIELD . . . . . . . . . . . . . . . . . .
• Lowering The Windshield And Removing Side Bars
• Raising The Windshield And Replacing Side Bars .
• REAR WINDOW FEATURES — HARD TOP ONLY . .
• Rear Window Wiper/Washer — If Equipped . . . . .
• Rear Window Defroster — If Equipped . . . . . . . .
.
.
.
.
.
.
.
.
.
.
.
.
.
.
.
.
.
.
.
.
.
.
.
.
.
.
.
.
.
.
.
.
.
.
.
.
.
.
.
.
.
.
.
.
.
.
.
.
.
.
.
.
.
.
.
.
.
.
.
.
.
.
.
.
.
.
.
.
.
.
.
.
.160
.161
.162
.162
.162
.163
.163
.164
.166
.167
.167
.167
61
MIRRORS
Inside Day/Night Mirror —
If Equipped
A single ball joint mirror is provided in the
vehicle. It is a twist on mirror that has a fixed
position at the windshield. The mirror installs on
the windshield button with a counterclockwise
rotation and requires no tools for mounting. The
mirror head can be adjusted up, down, left, and
right for various drivers. The mirror should be
adjusted to center on the view through the rear
window.
Headlight glare from vehicles behind you can
be reduced by moving the small control under
the mirror to the night position (toward the rear
of the vehicle). The mirror should be adjusted
while the small control under the mirror is set in
the day position (toward the windshield).
62
Adjusting Rearview Mirror
Outside Mirrors
To receive maximum benefit, adjust the outside
mirror(s) to center on the adjacent lane of traffic
with a slight overlap of the view obtained on the
inside mirror.
Outside Rearview Mirror
WARNING!
Vehicles and other objects seen in the passenger side convex mirror will look smaller
and farther away than they really are. Relying too much on your passenger side mirror
could cause you to collide with another vehicle or other object. Use your inside mirror
when judging the size or distance of a vehicle seen in the passenger side mirror.
Automatic Dimming Mirror —
If Equipped
This mirror automatically adjusts for headlight
glare from vehicles behind you. You can turn the
feature on or off by pressing the button at the
base of the mirror. A light to the left of the button
will illuminate to indicate when the dimming
feature is activated. The sensor to the right of
the button does not illuminate.
NOTE:
This feature is disabled when the vehicle is
moving in reverse.
CAUTION!
To avoid damage to the mirror during cleaning, never spray any cleaning solution directly onto the mirror. Apply the solution onto
a clean cloth and wipe the mirror clean.
Power Mirrors — If Equipped
The power mirror switch is located on the center
of the instrument panel, below the climate controls. A rotary knob selects the left mirror, right
mirror or off position.
Use the center off position to guard against
accidentally moving a mirror position.
Heated Mirrors — If Equipped
These mirrors are heated to melt frost
or ice. This feature can be activated
whenever you turn on the rear window
defroster (if equipped). Refer to “Rear Window
Features” in “Understanding The Features Of
Your Vehicle” for further information.
Vanity Mirrors
Vanity mirrors are located on the sun visors. To
use the mirrors, rotate the sun visor down and
swing the mirror cover upward.
Power Mirror Switch
Automatic Dimming Mirror
After selecting a mirror, move the knob in the
same direction you want the mirror to move.
Vanity Mirror
63
Uconnect® PHONE —
IF EQUIPPED
Uconnect® Phone is a voice-activated, handsfree, in-vehicle communications system.
Uconnect® Phone allows you to dial a phone
number with your mobile phone* using simple
voice commands (e.g., “Call”…“Jim”… “Work” or
“Dial”…“151-1234 -5555"). Your mobile phone’s
audio is transmitted through your vehicle’s audio
system; the system will automatically mute your
radio when using the Uconnect® Phone.
NOTE:
• * The Uconnect® Phone requires a mobile
phone equipped with the Bluetooth®
ⴖHands-Free Profile,ⴖ version 1.0 or higher.
• For Uconnect® Phone with Navigation radio, refer to the Navigation radio Manual’s
(separate booklet) Uconnect® Phone
section.
• For Uconnect® Phone customer support,
visit UconnectPhone.com
• See the Uconnect® website for supported
phones.
64
Uconnect® Phone allows you to transfer calls
between the Uconnect® Phone and your mobile
phone as you enter or exit your vehicle and
enables you to mute the Uconnect® Phone’s
microphone for private conversation.
The Uconnect® Phone is driven through your
Bluetooth® “Hands-Free profile” mobile phone.
Uconnect® Phone features Bluetooth® technology - the global standard that enables different electronic devices to connect to each other
without wires or a docking station, so
Uconnect® Phone works no matter where you
stow your mobile phone (be it your purse,
pocket, or briefcase), as long as your phone is
turned on and has been paired to the vehicle’s
Uconnect® Phone. The Uconnect® Phone allows up to seven mobile phones to be linked to
the system. Only one linked (or paired) mobile
phone can be used with the Uconnect® Phone
at a time. The Uconnect® Phone is available in
English, Dutch, French, German, Italian or
Spanish languages (as equipped).
WARNING!
Any voice commanded system should be
used only in safe driving conditions following
all applicable laws, including laws regarding
phone use. Your attention should be focused
on safely operating the vehicle. Failure to do
so may result in a collision causing serious
injury or death.
• Uconnect® Phone Button
The radio or steering wheel controls (if equipped) will contain the
two control buttons (Uconnect®
button and Voice ComPhone
button) that will enable
mand
you to access the system. When you push the
button you will hear the word Uconnect® followed by a BEEP. The beep is your signal to
give a command.
NOTE:
The driver side upper windshield trim contains
the microphone for the Uconnect® Phone.
• Voice Command Button
Actual button location may vary
with radio. The individual buttons
are described in the “Operation”
section.
The Uconnect® Phone can be used with
Hands-Free Profile certified Bluetooth® mobile
phones. Some phones may not support all the
Uconnect® Phone features. Refer to your mobile service provider or the phone manufacturer
for details.
The Uconnect® Phone is fully integrated with
the vehicle’s audio system. The volume of the
Uconnect® Phone can be adjusted either from
the radio volume control knob or from the
steering wheel radio control, if so equipped.
The radio display will be used for visual prompts
from the Uconnect® Phone such as "CELL" or
caller ID on certain radios.
Operation
Voice commands can be used to operate the
Uconnect® Phone and to navigate through
the Uconnect® Phone menu structure. Voice
commands are required after most Uconnect®
Phone prompts. You will be prompted for a
specific command and then guided through the
available options.
• Prior to giving a voice command, one must
wait for the beep, which follows the “Ready”
prompt or another prompt.
• For certain operations, compound commands can be used. For example, instead of
saying “Setup” and then “Phone Pairing.” the
following compound command can be said:
“Setup Phone Pairing.”
• For each feature explanation in this section,
only the compound form of the voice command is given. You can also break the commands into parts and say each part of the
command when you are asked for it. For
example, you can use the compound form
voice command “Phonebook New Entry”, or
you can break the compound form command
into two voice commands: “Phonebook”
and “New Entry.” Please remember, the
Uconnect® Phone works best when you talk
in a normal conversational tone, as if speaking to someone sitting a few feet/meters
away from you.
Natural Speech
Your Uconnect® Phone Voice system uses a
Natural Language Voice Recognition (VR) engine.
Natural speech allows the user to speak commands in phrases or complete sentences. The
system filters out certain non-word utterances
and sounds such as “ah” and “eh.” The system
handles fill-in words such as “I would like to.”
The system handles multiple inputs in the same
phrase or sentence such as “make a phone call”
and “to Kelly Smith.” For multiple inputs in the
same phrase or sentence, the system identifies
the topic or context and provides the associated
follow-up prompt such as “Who do you want to
call?” in the case where a phone call was
requested but the specific name was not recognized.
65
The system utilizes continuous dialog; when the
system requires more information from the user
it will ask a question to which the user can
respond without pushing the “Voice Command”
button on your steering wheel.
Voice Command Tree
Refer to “Voice Tree” in this section.
Help Command
If you need assistance at any prompt, or if you
want to know your options at any prompt, say
“Help” following the beep. The Uconnect®
Phone will play all the options at any prompt if
you ask for help.
To activate the Uconnect® Phone from idle,
button and follow the ausimply push the
dible prompts for directions. All Uconnect®
butPhone sessions begin with a push of the
ton on the faceplate.
Cancel Command
At any prompt, after the beep, you can say
“Cancel” and you will be returned to the main
menu. However, in a few instances the system
will take you back to the previous menu.
66
Pair (Link) Uconnect® Phone To A Mobile
Phone
To begin using your Uconnect® Phone, you
must pair your compatible Bluetooth® enabled
mobile phone (refer to “Introduction” section to
learn about the phone type).
To complete the pairing process, you will need
to reference your mobile phone owner’s
manual. The Uconnect® website may also provide detailed instructions for pairing.
The following are general phone to Uconnect®
Phone pairing instructions:
• Activate the Bluetooth® on your mobile
phone.
• Push the
button to begin.
• After the “Ready” prompt and the following
beep, say “Setup Phone Pairing.”
• When prompted, after the beep, say “Pair a
Phone” and follow the audible prompts.
• You will be asked to say a four-digit Personal
Identification Number (PIN), which you will
later need to enter into your mobile phone.
You can enter any four-digit PIN. You will not
need to remember this PIN after the initial
pairing process.
• For identification purposes, you will be
prompted to give the Uconnect® Phone a
name for your mobile phone. Each mobile
phone that is paired should be given a unique
phone name.
• You will then be asked to give your mobile
phone a priority level between 1 and 7, with 1
being the highest priority. You can pair up to
seven mobile phones to your Uconnect®
Phone. However, at any given time, only one
mobile phone can be in use, connected to
your Uconnect® System. The priority allows
the Uconnect® Phone to know which mobile
phone to use if multiple mobile phones are in
the vehicle at the same time. For example, if
priority 3 and priority 5 phones are present in
the vehicle, the Uconnect® Phone will use
the priority 3 mobile phone when you make a
call. You can select to use a lower priority
mobile phone at any time (refer to “Advanced
Phone Connectivity”).
Dial By Saying A Number
• Push the
button to begin.
• After the “Ready” prompt and the following
beep, say “Dial.”
• The system will prompt you to say the number you want to call.
• For example, you can say “151-1234-5555.”
• The Uconnect® Phone will confirm the phone
number and then dial. The number will appear in the display of certain radios.
Call By Saying A Name
• Push the
button to begin.
• After the “Ready” prompt and the following
beep, say “Call.”
• The system will prompt you to say the name
of the person you want to call.
• After the “Ready” prompt and the following
beep, say the name of the person you want
to call. For example, you can say “John Doe,”
where John Doe is a previously stored name
entry in the Uconnect® phonebook or downloaded phonebook. To learn how to store a
name in the phonebook, refer to “Add Names
to Your Uconnect® Phonebook.”
• The Uconnect® Phone will confirm the name
and then dial the corresponding phone number, which may appear in the display of
certain radios.
Phonebook Download — Automatic
Phonebook Transfer From Mobile Phone
If equipped and specifically supported by your
phone, Uconnect® Phone automatically downloads names (text names) and number entries
from the mobile phone’s phonebook. Specific
Bluetooth® Phones with Phone Book Access
Profile may support this feature. See
Uconnect® website for supported phones.
• To call a name from downloaded (or
Uconnect®) Phonebook, follow the procedure in “Call by Saying a Name” section.
• Automatic download and update, if supported, begins as soon as the phone
Bluetooth® wireless connection is made to
the Uconnect® Phone. For example, after
you start the vehicle.
• Maximum of 2000 entries per phone will be
downloaded and updated every time a phone
is connected to the Uconnect® Phone.
• Depending on the maximum number of entries downloaded, there may be a short delay
before the latest downloaded names can be
used. Until then, if available, the previously
downloaded phonebook is available for use.
• Only the phonebook of the currently connected mobile phone is accessible.
• Either the mobile phone’s phonebook or the
mobile phones SIM card phonebook is
downloaded.
• This downloaded phonebook cannot be edited or deleted on the Uconnect® Phone.
These can only be edited on the mobile
phone. The changes are transferred and
updated to Uconnect® Phone on the next
phone connection.
67
Add Names To Your Uconnect® Phonebook
NOTE:
Adding names to the Uconnect® Phonebook
is recommended when the vehicle is not in
motion.
• Push the
button to begin.
• After the “Ready” prompt and the following
beep, say “Phonebook New Entry.”
• When prompted, say the name of the new
entry. Use of long names helps the Voice
Command and it is recommended. For example, say “Robert Smith” or “Robert” instead
of “Bob.”
• When prompted, enter the number designation
(e.g., “Home”, “Work”, “Mobile”, or “Other”).
This will allow you to store multiple numbers for
each phonebook entry, if desired.
• When prompted, recite the phone number for
the phonebook entry that you are adding.
After you are finished adding an entry into the
phonebook, you will be given the opportunity to
add more phone numbers to the current entry or
to return to the main menu.
68
The Uconnect® Phone will allow you to enter up
to 32 names in the phonebook with each name
having up to four associated phone numbers
and designations. Each language has a separate 32-name phonebook accessible only in that
language. In addition, if equipped and supported by your phone, Uconnect® Phone automatically downloads mobile phone’s phonebook.
Edit Uconnect® Phonebook Entries
NOTE:
Editing phonebook entries is recommended
when the vehicle is not in motion.
Automatic downloaded phonebook entries cannot be deleted or edited.
• Push the
button to begin.
• After the “Ready” prompt and the following
beep, say “Phonebook Edit.”
• You will then be asked for the name of the
phonebook entry that you wish to edit.
• Next, choose the number designation (home,
work, mobile, or other) that you wish to edit.
• When prompted, recite the new phone number for the phonebook entry that you are
editing.
After you are finished editing an entry in the
phonebook, you will be given the opportunity to
edit another entry in the phonebook, call the
number you just edited, or return to the main
menu.
“Phonebook Edit” can be used to add another
phone number to a name entry that already
exists in the phonebook. For example, the entry
John Doe may have a mobile and a home
number, but you can add “John Doe’s” work
number later using the “Phonebook Edit” feature.
Delete Uconnect® Phonebook Entry
NOTE:
Editing phonebook entries is recommended
when the vehicle is not in motion.
• Push the
button to begin.
• After the “Ready” prompt and the following
beep, say “Phonebook Delete.”
• After you enter the Phonebook Delete menu,
you will then be asked for the name of the
entry that you wish to delete. You can either
say the name of a phonebook entry that you
wish to delete or you can say “List Names” to
hear a list of the entries in the phonebook
from which you choose. To select one of the
button
entries from the list, push the
while the Uconnect® Phone is playing the
desired entry and say “Delete.”
• After you enter the name, the Uconnect®
Phone will ask you which designation you
wish to delete; home, work, mobile, other, or
all. Say the designation you wish to delete.
• The Uconnect® Phone will ask you to verify
that you wish to delete all the entries from the
phonebook.
NOTE:
The user can also exercise “Edit” or “Delete”
operations at this point.
• After confirmation, the phonebook entries will
be deleted.
• The Uconnect® Phone will then prompt you as
to the number designation you wish to call.
NOTE:
• The selected number will be dialed.
• Only the phonebook in the current language is deleted.
Phone Call Features
• Automatic downloaded phonebook entries
cannot be deleted or edited.
List All Uconnect® Phonebook Names
• Push the
button to begin.
• Note that only the phonebook entry in the
current language is deleted.
• After the “Ready” prompt and the following
beep, say “Phonebook List Names.”
• Automatic downloaded phonebook entries
cannot be deleted or edited.
• The Uconnect® Phone will play the names of
all the phonebook entries, including the
downloaded phonebook entries, if available.
Delete/Erase “All” Uconnect® Phonebook
Entries
• Push the
button to begin.
• After the “Ready” prompt and the following
beep, say “Phonebook Erase All.”
• To call one of the names in the list, push the
button during the playing of the desired
name, and say “Call.”
The following features can be accessed through
the Uconnect® Phone if the feature(s) are available on your mobile service plan. For example,
if your mobile service plan provides three-way
calling, this feature can be accessed through
the Uconnect® Phone. Check with your mobile
service provider for the features that you have.
Answer Or Reject An Incoming Call —
No Call Currently In Progress
When you receive a call on your mobile phone,
the Uconnect® Phone will interrupt the vehicle
audio system, if on, and will ask if you would like
button to accept
to answer the call. Push the
the call. To reject the call, push and hold the
button until you hear a single beep, indicating that the incoming call was rejected.
69
Answer Or Reject An Incoming Call —
Call Currently In Progress
If a call is currently in progress and you have
another incoming call, you will hear the same
network tones for call waiting that you normally
hear when using your mobile phone. Push the
button to place the current call on hold and
answer the incoming call.
NOTE:
The Uconnect® Phone compatible phones
in the market today do not support rejecting
an incoming call when another call is in
progress. Therefore, the user can only answer an incoming call or ignore it.
Making A Second Call While Current Call In
Progress
To make a second call while you are currently
on a call, push the
button and say “Dial” or
“Call” followed by the phone number or phonebook entry you wish to call. The first call will be
on hold while the second call is in progress.
To go back to the first call, refer to “Toggling
Between Calls.” To combine two calls, refer to
“Conference Call.”
70
Place/Retrieve A Call From Hold
button until
To put a call on hold, push the
you hear a single beep. This indicates that the
call is on hold. To bring the call back from hold,
button until you hear a
push and hold the
single beep.
Toggling Between Calls
If two calls are in progress (one active and one
button until you hear a
on hold), push the
single beep, indicating that the active and hold
status of the two calls have switched. Only one
call can be placed on hold at one time.
indicating that the two calls have been joined
into one conference call.
Call Termination
To end a call in progress, momentarily push the
button. Only the active call(s) will be terminated and if there is a call on hold, it will become
the new active call. If the active call is terminated by the phone far end, a call on hold may
not become active automatically. This is cell
phone-dependent. To bring the call back from
button until you hear
hold, push and hold the
a single beep.
Conference Call
When two calls are in progress (one active and
button until
one on hold), push and hold the
you hear a double beep indicating that the two
calls have been joined into one conference call.
Redial
Three-Way Calling
butTo initiate three-way calling, push the
ton while a call is in progress, and make a
second phone call, as described under “Making
a Second Call While Current Call in Progress.”
After the second call has established, push and
button until you hear a double beep,
hold the
• The Uconnect® Phone will call the last number that was dialed from your mobile phone.
• Push the
button to begin.
• After the “Ready” prompt and the following
beep, say “Redial.”
NOTE:
This may not be the last number dialed from
the Uconnect® Phone.
Emergency Assistance — If Equipped
If you are in an emergency and the mobile
phone is reachable:
Call Continuation
Call continuation is the progression of a phone
call on the Uconnect® Phone after the vehicle
ignition has been switched to OFF. Call continuation functionality available on the vehicle can
be any one of three types:
Uconnect® Phone Features
1. After the ignition is switched to OFF, a call
can continue on the Uconnect® Phone either until the call ends, or until the vehicle
battery condition dictates cessation of the
call on the Uconnect® Phone and transfer of
the call to the mobile phone.
• After the “Ready” prompt and the following
beep, say the name of the language you wish
to switch to (English, Dutch, French, German, Italian, or Spanish, if so equipped).
If the phone is not reachable and the
Uconnect® Phone is operational, you may
reach the emergency number as follows:
• Continue to follow the system prompts to
complete language selection.
2. After the ignition is cycled to OFF, a call can
continue on the Uconnect® Phone for a
certain duration, after which the call is automatically transferred from the Uconnect®
Phone to the mobile phone.
After selecting one of the languages, all prompts
and voice commands will be in that language.
• After the “Ready” prompt and the following
beep, say “Emergency” and the Uconnect®
Phone will instruct the paired mobile phone
to call the emergency number.
3. An active call is automatically transferred to
the mobile phone after the ignition is cycled
to OFF.
Language Selection
To change the language that the Uconnect®
Phone is using:
• Push the
button to begin.
NOTE:
After every Uconnect® Phone language
change operation, only the languagespecific 32-name phonebook is usable. The
paired phone name is not language-specific
and usable across all languages.
• Pick up the phone and manually dial the
emergency number for your area.
• Push the
button to begin.
NOTE:
• The default number is 112. The number
dialed may not be applicable with the
available mobile service and area.
• If supported, this number may be programmable on some systems. To do this,
button and say “Setup,” folpush the
lowed by “Emergency.”
71
• The Uconnect® Phone does slightly lower
your chances of successfully making a
phone call as to that for the mobile phone
directly.
WARNING!
To use your Uconnect® Phone System in
an emergency, your mobile phone must be:
• turned on,
• paired to the Uconnect® System,
• and have network coverage.
Breakdown Service — If Equipped
If you need Breakdown service:
• Push the
button to begin.
• After the “Ready” prompt and the following
beep, say “Breakdown service.”
NOTE:
The Breakdown service number has to be
setup before using. To setup, push the
button and say “Setup, Breakdown Service” and follow prompts.
72
Paging
To learn how to page, refer to “Working with
Automated Systems.” Paging works properly
except for pagers of certain companies, which
time out a little too soon to work properly with
the Uconnect® Phone.
Voice Mail Calling
To learn how to access your voice mail, refer to
“Working with Automated Systems.”
Working With Automated Systems
This method is used in instances where one
generally has to press numbers on the mobile
phone keypad while navigating through an automated telephone system.
You can use your Uconnect® Phone to access a
voice mail system or an automated service, such
as a paging service or automated customer
service. Some services require immediate response selection. In some instances, that may be
too quick for use of the Uconnect® Phone.
When calling a number with your Uconnect®
Phone that normally requires you to enter in a
touch-tone sequence on your mobile phone
button and say
keypad, you can push the
the sequence you wish to enter followed by the
word “Send.” For example, if required to enter
your PIN followed with a pound, (3 7 4 6 #), you
can push the
button and say, “3 7 4 6 #
Send.” Saying a number, or sequence of numbers, followed by “Send,” is also to be used for
navigating through an automated customer service center menu structure, and to leave a
number on a pager.
You can also send stored Uconnect® Phonebook entries as tones for fast and easy access
to voice mail and pager entries. To use this
feature, dial the number you wish to call and
button and say “Send.” The
then push the
system will prompt you to enter the name or
number and say the name of the phonebook
entry you wish to send. The Uconnect® Phone
will then send the corresponding phone number
associated with the phonebook entry, as tones
over the phone.
NOTE:
• You may not hear all of the tones due to
mobile phone network configurations;
this is normal.
• Some paging and voice mail systems
have system time out settings that are too
short and may not allow the use of this
feature.
Barge In — Overriding Prompts
The “Voice Command” button can be used
when you wish to skip part of a prompt and
issue your voice command immediately. For
example, if a prompt is asking “Would you like to
pair a phone, clear a…,” you could push the
button and say, “Pair a Phone” to select
that option without having to listen to the rest of
the voice prompt.
Turning Confirmation Prompts On/Off
Turning confirmation prompts off will stop the
system from confirming your choices (e.g., the
Uconnect® Phone will not repeat a phone number before you dial it).
• Push the
button to begin.
• After the “Ready” prompt and the following
beep, say:
• “Setup Confirmations Prompts On”
• “Setup Confirmations Prompts Off”
Phone And Network Status Indicators
If available on the radio and/or on a premium
display such as the instrument panel cluster,
and supported by your mobile phone, the
Uconnect® Phone will provide notification to
inform you of your phone and network status
when you are attempting to make a phone call
using Uconnect® Phone. The status is given for
roaming, network signal strength, phone battery
strength, etc.
Dialing Using The Mobile Phone Keypad
You can dial a phone number with your mobile
phone keypad and still use the Uconnect®
Phone (while dialing via the mobile phone keypad, the user must exercise caution and take
precautionary safety measures). By dialing a
number with your paired Bluetooth® mobile
phone, the audio will be played through your
vehicles audio system. The Uconnect® Phone
will work the same as if you dial the number
using Voice Command.
NOTE:
Certain brands of mobile phones do not
send the dial ring to the Uconnect® Phone
to play it on the vehicle audio system, so
you will not hear it. Under this situation,
after successfully dialing a number the user
may feel that the call did not go through
even though the call is in progress. Once
your call is answered, you will hear the
audio.
Mute/Un-Mute (Mute Off)
When you mute the Uconnect® Phone, you will
still be able to hear the conversation coming
from the other party, but the other party will not
be able to hear you. To mute the Uconnect®
Phone:
• Push the
button.
• Following the beep, say “Mute.”
To un-mute the Uconnect® Phone:
• Push the
button.
• Following the beep, say “Mute off.”
73
Advanced Phone Connectivity
Transfer Call To And From Mobile Phone
The Uconnect® Phone allows ongoing calls to
be transferred from your mobile phone to the
Uconnect® Phone without terminating the call.
To transfer an ongoing call from your
Uconnect® Phone paired mobile phone to the
Uconnect® Phone or vice versa, push the
button and say “Transfer Call.”
Connect Or Disconnect Link Between The
Uconnect® Phone And Mobile Phone
Your mobile phone can be paired with many
different electronic devices, but can only be
actively connected with one electronic device at
a time.
If you would like to connect or disconnect the
Bluetooth® connection between a Uconnect®
Phone paired mobile phone and the Uconnect®
Phone, follow the instructions described in your
mobile phone User’s Manual.
74
List Paired Mobile Phone Names
• Push the
button to begin.
• After the “Ready” prompt and the following
beep, say “Setup Phone Pairing.”
• When prompted, say “List Phones.”
• The Uconnect® Phone will play the phone
names of all paired mobile phones in order
from the highest to the lowest priority. To
“select” or “delete” a paired phone being
button and say
announced, push the
“Select” or “Delete.” Also, see the next two
sections for an alternate way to “select” or
“delete” a paired phone.
Select Another Mobile Phone
This feature allows you to select and start using
another phone paired with the Uconnect® Phone.
• Push the
button to begin.
• After the “Ready” prompt and the following
beep, say “Setup Select Phone” and follow
the prompts.
• You can also push the
button at any time
while the list is being played, and then
choose the phone that you wish to select.
• The selected phone will be used for the next
phone call. If the selected phone is not
available, the Uconnect® Phone will return to
using the highest priority phone present in or
near (approximately within 30 ft. (9 m)) the
vehicle.
Delete Uconnect® Phone Paired Mobile
Phones
• Push the
button to begin.
• After the “Ready” prompt and the following
beep, say “Setup Phone Pairing.”
• At the next prompt, say “Delete” and follow
the prompts.
button at any
• You can also push the
time while the list is being played, and then
choose the phone you wish to delete.
Things You Should Know About
Your Uconnect® Phone
Uconnect® Phone Tutorial
To hear a brief tutorial of the Uconnect® Phone
button and say
features, push the
“Uconnect® Tutorial.”
Voice Training
For users experiencing difficulty with the
Uconnect® Phone recognizing their voice commands or numbers, the Uconnect® Phone
Voice Training feature may be used. To enter
this training mode, follow one of the two following procedures:
when the vehicle is parked with the engine
running, all windows closed, and the blower fan
switched OFF.
This procedure may be repeated with a new
user. The system will adapt to the last trained
voice only.
To restore the Voice Command system to factory default settings, enter the Voice Training
session via the above procedure and follow the
prompts.
Voice Command
For best performance:
From outside the Uconnect® Phone mode (e.g.,
from radio mode)
• Adjust the rearview mirror to provide at least
½ in (1 cm) gap between the overhead
console (if equipped) and the mirror.
button for five sec• Push and hold the
onds until the session begins, or,
• Always wait for the beep before speaking.
• Push the
button and say the “Voice
Training,” “System Training,” “Start Voice
Training” command.
Repeat the words and phrases when prompted
by the Uconnect® Phone. For best results, the
Voice Training session should be completed
• Speak normally without pausing, just as you
would speak to a person sitting a few feet/
meters away from you.
• Make sure that no one other than you is
speaking during a Voice Command period.
Performance is maximized under:
• Low-To-Medium Blower Setting.
• Low-To-Medium Vehicle Speed.
• Low Road Noise.
• Smooth Road Surface.
• Fully Closed Windows.
• Dry Weather Condition.
Even though the system is designed for users
speaking in European English, Dutch, French,
German, Italian, or Spanish accents, the system may not always work for some.
When navigating through an automated system
such as voice mail, or when sending a page, at
the end of speaking the digit string, make sure
to say “Send.”
Storing names in the phonebook when the
vehicle is not in motion is recommended.
It is not recommended to store similar sounding
names in the Uconnect® Phonebook.
75
Phonebook (Downloaded and Uconnect® Phone
Local) name recognition rate is optimized when
the entries are not similar.
Numbers must be spoken in single digits. “800”
must be spoken “eight-zero-zero” not “eight
hundred.”
You can say “O” (letter “O”) for “0” (zero).
Even though international dialing for most number combinations is supported, some shortcut
dialing number combinations may not be supported.
In a convertible vehicle, system performance may
be compromised with the convertible top down.
Phone Far End Audio Performance
• Audio quality is maximized under:
• Low-to-medium blower setting.
• Low-to-medium vehicle speed.
• Low road noise.
76
• Smooth road surface.
• Fully closed windows.
• Dry weather conditions, and
• Operation from the driver seat.
• Performance, such as audio clarity, echo,
and loudness to a large degree rely on the
phone and network, and not the Uconnect®
Phone.
• Echo at the phone far end can sometimes be
reduced by lowering the in-vehicle audio
volume.
• In a convertible vehicle, system performance
may be compromised with the convertible top
down.
Bluetooth® Communication Link
Mobile phones have been found to lose connection to the Uconnect® Phone. When this happens, the connection can generally be reestablished by switching the phone off/on. Your
mobile phone is recommended to remain in
Bluetooth® ON mode.
Power-Up
After switching the ignition key from OFF to
either the ON or ACC position, or after a language change, you must wait at least 15 seconds prior to using the system.
77
78
79
Voice Commands
Primary
Primary
Alternate (s)
Alternate (s)
plus (+)
Primary
Alternate (s)
Dutch
Nederlands
zero
hash (#)
one
all
two
Breakdown service
English
three
call
delete all
four
cancel
five
confirmation
prompts
six
continue
seven
delete
eight
dial
nine
asterisk (*)
80
star
download
edit
all of them
emergency
erase all
Espanol
confirmation
Francais
German
Deutsch
help
home
Italian
language
Italiano
Primary
Alternate (s)
list names
Alternate (s)
pair a phone
list phones
main menu
Primary
return to main menu
Primary
transfer call
phone pairing
pairing
Uconnect® Tutorial
phonebook
phone book
voice training
mobile
previous
work
mute
redial
yes
mute off
select phone
new entry
send
no
set up
other
Alternate (s)
select
phone settings or
phone set up
81
VOICE COMMAND
Uconnect® 8.4/8.4 Nav
The Uconnect® Voice Command
system allows you to control your
AM, FM radio, disc player, SD Card
(8.4 only) and USB/iPod®.
NOTE:
Take care to speak into the Voice Command
system as calmly and normally as possible.
The ability of the Voice Command system to
recognize user voice commands may be
negatively affected by rapid speaking or a
raised voice level.
82
WARNING!
Any voice commanded system should be
used only in safe driving conditions following
all applicable laws, including laws regarding
phone use. Your attention should be focused
on safely operating the vehicle. Failure to do
so may result in an accident causing serious
injury or death.
When you press the Uconnect® Voice Combutton, you will hear a beep. The
mand
beep is your signal to give a command.
If no command is spoken the system will say
one of two responses:
• I didn’t understand
• I didn’t get that, etc.,
If a command is not spoken a second time, the
system will respond with an error and give some
direction as what can be said based on the
context you are in. After three consecutive
failures of a spoken command the VR session
with end.
Pressing the Uconnect® Voice Command
button while the system is speaking is
known as “barging in.” The system will be
interrupted, and after the beep, you can say a
command. This will become helpful once you
start to learn the options.
NOTE:
At any time, you can say the words “Cancel”
or “Help.”
These commands are universal and can be
used from any menu. All other commands can
be used depending upon the active application.
When using this system, you should speak
clearly and at a normal speaking volume.
The system will best recognize your speech if
the windows are closed, and the heater/air
conditioning fan is set to low.
At any point, if the system does not recognize
one of your commands, you will be prompted to
repeat it.
Natural Speech
Natural speech allows the user to speak commands in phrases or complete sentences. The
system filters out certain non-word utterances
and sounds such as “ah” and “eh”. The system
handles fill-in words such as “I would like to.”
The system handles multiple inputs in the same
phrase or sentence such as “make a phone call”
and “to Kelly Smith.” For multiple inputs in the
same phrase or sentence, the system identifies
the topic or context and provides the associated
follow-up prompt such as “Who do you want to
call?” in the case where a phone call was
requested but the specific name was not recognized.
The system utilizes continuous dialog; when the
system requires more information from the user
it will ask a question to which the user can
respond without pressing the Uconnect® Voice
Command
button.
Uconnect® Voice Commands
The Uconnect® Voice Command system understands two types of commands. Universal commands are available at all times. Local commands are available if the supported radio
mode is active.
Start a dialogue by pressing the Uconnect®
button.
Voice Command
To hear available commands, press the
button and
Uconnect® Voice Command
say “Help”. You will hear available commands
for the screen displayed.
83
Voice Tree
84
NOTE:
1. You can replace “AM” with “FM” or if
equipped you can say “SW” or “LW”.
2. You can replace “iPod” with any of the player
sources “USB”, “SD Card”, “AUX” or
“Bluetooth”.
3. You can replace “990 AM” with any other AM
or FM frequency, such as “98.7”.
85
86
NOTE:
1. You can replace “990 AM” with any other AM
or FM frequency, such as “98.7 FM”. If the
vehicle is equipped you can say commands
for “SW”, “MW”, and “LW” frequencies as well.
87
88
NOTE:
1. You can replace the album, artist, song,
genre, playlist, podcast and audio book
names with any corresponding names on
the current device that is playing.
2. You can replace “8” with any track on the CD
that is currently playing. Command is only
available when CD is playing.
3. Playlist, Podcast and audio book commands
are only available when the iPod® is connected and playing.
4. VR commands, Albums, Artists, and Genre
names are based on the music database
provided by Gracenote.
89
90
NOTE:
1. Only available with Navigation equipped vehicles.
2. You can replace “Player” with “Radio”, “Navigation”, “Phone”, “Climate”, “More” or “Settings”.
3. Navigation commands only work if equipped
with Navigation.
91
92
NOTE:
Available Voice Commands are shown in
bold face and shaded grey.
SEATS
Seats are part of the Occupant Restraint System of the vehicle.
WARNING!
• It is dangerous to ride in a cargo area,
inside or outside of a vehicle. In a collision,
people riding in these areas are more likely
to be seriously injured or killed.
• Do not allow people to ride in any area of
your vehicle that is not equipped with seats
and seat belts. In a collision, people riding
in these areas are more likely to be seriously injured or killed.
• Be sure everyone in your vehicle is in a
seat and using a seat belt properly.
Front Seat Adjustment
The seat can be adjusted forward or rearward
by using a bar located by the front of the seat
cushion, near the floor. While sitting in the seat,
lift up on the bar located under the seat cushion
and move the seat forward or rearward. Release the bar once you have reached the desired position. Then, using body pressure, move
forward and rearward on the seat to be sure that
the seat adjusters have latched.
WARNING!
• Adjusting a seat while driving may be
dangerous. Moving a seat while driving
could result in loss of control which could
cause a collision and serious injury or
death.
• Seats should be adjusted before fastening
the seat belts and while the vehicle is
parked. Serious injury or death could result
from a poorly adjusted seat belt.
Manual Seat Adjustment
93
Manual Seat Height Adjustment —
If Equipped
The driver’s seat height can be raised or lowered by using the ratcheting handle, located on
the outboard side of the seat. Pull upward on
the handle to raise the seat; push downward on
the handle to lower the seat.
Recline Lever
Seat Height Adjustment
Easy Entry Lever
WARNING!
Do not ride with the seatback reclined so that
the shoulder belt is no longer resting against
your chest. In a collision you could slide
under the seat belt, which could result in
serious injury or death.
Front Seatback Recline
Lean forward before lifting the handle, then lean
back to the desired position and release the
handle. Lift the handle to return the seatback to
an upright position.
94
Front Passenger Easy Entry Seat —
Two-Door Models
Pull upward on the recline lever (toward the rear
of the vehicle) and slide the entire seat forward.
Easy Entry Seat
Passenger Seat
In addition to Easy Entry, the front passenger
seat is also equipped with Tip n’ Slide™. This
feature allows for easier entry for rear passengers.
To return the seat to a sitting position, rotate the
seatback upright until it locks and push the seat
rearward until the track locks.
NOTE:
• The front passenger seats have a track
memory, which returns the seat to just
past the halfway point of the track regardless of its original position.
• The recliner and easy entry levers should
not be used during the automatic returning of the seat to its sitting position.
Tip n’ Slide™ Seats — Two-Door
Models
Pull upward on the recline lever and slide the
entire seat forward (Easy Entry).
Recline Lever
Rotate the entire seat assembly toward the
instrument panel.
This feature allows the front seats to be rotated
toward the instrument panel to allow easier
entry into the rear seats.
Easy Entry Lever
Driver’s Seat
Pull upward on the recline lever and bring the
seatback to its full forward position.
Tip n’ Slide™
95
With the seat forward, pull the entire seat assembly toward the instrument panel.
You can choose from HIGH, LOW or OFF heat
settings. Amber indicator lights in each switch
indicate the level of heat in use. Two indicator
lights will illuminate for HIGH, one for LOW and
none for OFF.
Press the switch once to select
HIGH-level heating. Press the
switch a second time to select
LOW-level heating. Press the
switch a third time to shut the heating elements OFF.
Tip n’ Slide™
Heated Seats — If Equipped
On some models, the front driver and passenger seats may be equipped with heaters in both
the seat cushions and seatbacks.
There are two heated seat switches that allow
the driver and passenger to operate the seats
independently. The controls for each seat are
located on a switch bank near the bottom center
of the instrument panel.
96
When the HIGH-level setting is selected, the
heater will provide a boosted heat level during
the initial stages of operation. Then, the heat
output will drop to the normal HIGH-level. If the
HIGH-level setting is selected, the system will
automatically switch to LOW-level after approximately 30 minutes of continuous operation.
At that time, the number of illuminated LEDs
changes from two to one, indicating the change.
The LOW-level setting will turn OFF automatically after approximately 30 minutes.
NOTE:
When a heat setting is selected, heat will be
felt within two to five minutes.
WARNING!
• Persons who are unable to feel pain to the
skin because of advanced age, chronic
illness, diabetes, spinal cord injury, medication, exhaustion or other physical condition must exercise care when using the
seat heater. It may cause burns even at
low temperatures, especially if used for
long periods of time.
• Do not place anything on the seat or
seatback that insulates against heat, such
as a blanket or cushion. This may cause
the seat heater to overheat. Sitting in a
seat that has been overheated could
cause serious burns due to the increased
surface temperature of the seat.
Head Restraints
Head restraints are designed to reduce the risk
of injury by restricting head movement in the
event of a rear impact. Head restraints should
be adjusted so that the top of the head restraint
is located above the top of your ear.
WARNING!
The head restraints for all occupants must be
properly adjusted prior to operating the vehicle or occupying a seat. Head restraints
should never be adjusted while the vehicle is
in motion. Driving a vehicle with the head
restraints improperly adjusted or removed
could cause serious injury or death in the
event of a collision.
Front Head Restraints
To raise the head restraint, pull upward on the
head restraint. To lower the head restraint,
press the adjustment button, located on the
base of the head restraint, and push downward
on the head restraint.
Adjustment Button
Rear Head Restraints — 2 Door Model
The rear seat is equipped with adjustable head
restraints. To raise the head restraint, pull upward on the head restraint. To lower the head
restraint, press the adjustment button, located
on the base of the head restraint, and push
downward on the head restraint. Refer to “Occupant Restraints” in “Things to Know Before
Starting Your Vehicle” for information on child
seat tether routing.
Rear Head Restraints — 4 Door Model
The rear seat is equipped with nonadjustable
outboard head restraints and removable center
head restraint. To remove the center head restraint, press the release button, located on the
base of the head restraint, and pull upward on
the head restraint. To install the head restraint
hold release button while pushing downward
on the head restraint. Refer to “Occupant Restraints” in “Things to Know Before Starting
Your Vehicle” for information on child seat tether
routing.
Fold And Tumble Rear Seat —
Two-Door Models
NOTE:
• Prior to folding the rear seat, it may be
necessary to reposition the front seats.
• Be sure that the front seats are fully
upright and positioned forward. This will
allow the rear seat to fold down easily.
97
1. Lift the seatback release lever and fold the
seatback forward.
Rear Seat Release
2. Slowly flip the entire seat forward.
3. Return the seat to the normal position.
4. Raise the rear seatback using the assist
strap and firmly lock the seat into position.
1. Fold the rear seat forward following steps 1
and 2 under “Fold And Tumble Rear Seat” in
this section.
Removing The Rear Seat —
Two-Door Models
2. Press down on the release bar on each side,
and pull the seat out and away from the lower
bracket.
WARNING!
• It is extremely dangerous to ride in a cargo
area, inside or outside of a vehicle. In a
collision, people riding in these areas are
more likely to be seriously injured or killed.
• Do not allow people to ride in any area of
your vehicle that is not equipped with seats
and seat belts.
• Be sure everyone in your vehicle is in a
seat and using a seat belt properly.
• In a collision, you or others in your vehicle
could be injured if seats are not properly
latched to their floor attachments. Always
be sure that the seats are fully latched.
3. Remove the seat from the vehicle.
Release Bar Location
Replacing The Rear Seat —
Two-Door Models
Reverse the steps for removing the seat.
Folding Rear Seat
98
WARNING!
• To help protect against personal injury, passengers should not be seated in the rear
cargo area with the rear seat folded down or
removed from the vehicle.
• The rear cargo space is intended for load
carrying purposes only, not for passengers
who should sit in seats and use seat belts.
• Remove the center head restraint. Failure to
do so will result in the head restraint coming in contact with the center console.
To Fold Down The Rear Seat
Remove the center head restraint. Locate the
release lever (upper outboard side of seat), and
lift it upward until the seatback releases.
60/40 Split Folding Rear Seat —
Four-Door Models
To provide additional storage area, each rear
seat can be folded flat to allow for extended
cargo space.
NOTE:
• Prior to folding the rear seat, it may be
necessary to reposition the front seat to
its mid-track position.
• Be sure that the front seats are fully
upright and positioned forward. This will
allow the rear seat to fold down easily.
WARNING! (Continued)
• Do not allow people to ride in any area of
your vehicle that is not equipped with seats
and seat belts.
• Be sure everyone in your vehicle is in a
seat and using a seat belt properly.
Center Head Restraint
WARNING!
• It is extremely dangerous to ride in a cargo
area, inside or outside of a vehicle. In a
collision, people riding in these areas are
more likely to be seriously injured or killed.
(Continued)
Release Levers
Slowly fold down the seatback.
99
To Raise The Rear Seat
Raise the seatback and lock it into place, and
install center head restraint. If interference from
the cargo area prevents the seatback from fully
locking, you will have difficulty returning the seat
to its proper position.
TO OPEN AND CLOSE THE
HOOD
Release both the hood latches.
WARNING!
Be sure the hood is fully latched before
driving your vehicle. If the hood is not fully
latched, it could open when the vehicle is
in motion and block your vision. Failure to
follow this warning could result in serious
injury or death.
NOTE:
If the rear seatback is not fully latched, the
center shoulder belt will not be able to be
extended for use. If you cannot extend the
center shoulder belt, make sure your seatback is fully latched.
WARNING!
Be certain that the seatback is securely
locked into position. If the seatback in not
securely locked into position the seat will not
provide the proper stability for child seats
and/or passengers. An improperly latched
seat could cause serious injury.
100
To close the hood, remove the support rod from
the hood panel and place it in the retaining clip.
Lower the hood slowly. Secure both of the hood
latches.
Hood Latch
Raise the hood and locate the safety latch,
located in the middle of the hood opening. Push
the safety latch to the left side of the vehicle, to
open the hood. You may have to push down
slightly on the hood before pushing the safety
latch. Insert the support rod into the slot on the
hood.
LIGHTS
Headlights And Position Lights
Automatic Headlights — If Equipped
Multifunction Lever
Turn the end of the multifunction lever to the first
detent for position lights and instrument panel
lights. Turn to the second detent for headlight
operation.
This system automatically turns the headlights on
or off according to ambient light levels. To turn the
system on, turn the end of the multifunction lever
to the AUTO position (third detent). When the
system is on, the Headlight Time Delay feature is
also on. This means the headlights will stay on for
up to 90 seconds after you turn the ignition switch
to the LOCK position. To turn the Automatic
System off, turn the end of the multifunction lever
out of the AUTO position.
The multifunction lever controls the operation of
the position lights, headlights, headlight beam
selection, passing lights (flash-to-pass), fog
lights (if equipped), instrument panel light dimming and turn signals. The lever is located on
the left side of the steering column.
NOTE:
Lens fogging can occur under certain atmospheric conditions. This will usually clear as
atmospheric conditions change to allow the
condensation to change back into a vapor.
Turning the lamps on will usually accelerate
the clearing process.
Multifunction Lever
Headlight Switch
Headlight Switch
NOTE:
The engine must be running before the headlights will turn on in the Automatic mode.
101
Headlights With Wipers (Available
With Automatic Headlights Only)
Lane Change Assist
Tap the lever up or down once, without moving
beyond the detent, and the turn signal (right or
left) will flash three times then automatically
turn off.
When this feature is active, the headlights will
turn on approximately 10 seconds after the
wipers are turned on if the multifunction lever is
placed in the AUTO position. In addition, the
headlights will turn off when the wipers are
turned off if they were turned on by this feature.
The Headlights with Wipers feature can be
turned on or off through the Electronic Vehicle
Information Center (EVIC) — if equipped. Refer
to “Electronic Vehicle Information Center
(EVIC)/Customer-Programmable Features” in
“Understanding Your Instrument Panel” for further information.
Turn Signals
Move the multifunction lever up or down and the
arrows on each side of the instrument cluster
flash to show proper operation of the front and
rear turn signal lights.
102
Lights-On Reminder
Turn Signal Operation
NOTE:
• If either light remains on and does not
flash, or there is a very fast flash rate,
check for a defective outside light bulb. If
an indicator fails to light when the lever is
moved, it would suggest that the indicator
bulb is defective.
• A tone will chime if the turn signals are
left on for more than 1 mile (1.6 km).
If the headlights or parking lights are on after the
ignition is turned OFF, the high beam indicator
light will remain illuminated and a chime will
sound when the driver’s door is opened.
High/Low Beam Switch
Push the multifunction lever away from you to
switch the headlights to high beam. Pull the
lever toward you to switch the headlights back
to low beam.
Front Fog Lights — If Equipped
The front fog light switch is in the multifunction lever. To activate the front fog
lights, turn on the position lights or headlights and pull out the end of the lever.
Instrument Panel Dimmer
Rotate the center portion of the lever to the
extreme bottom position to fully dim the instrument panel lights and prevent the interior lights
from illuminating when a door is opened.
Rotate the center portion of the lever up to
increase the brightness of the instrument panel
lights when the parking lights or headlights are
on.
Front Fog Light Switch
Rear Fog Lights — If Equipped
To activate the rear fog lights, turn on
the front position lights or headlights,
pull out the end of the multifunction
lever and rotate the lever to the last
detent.
NOTE:
The headlights will always be on when the
rear fog lamps are activated.
Rotate the center portion of the lever upward to
the next detent position to brighten the odometer and radio when the parking lights or headlights are on.
Rotate the center portion of the lever upward to
the last detent to turn on the interior lighting.
Dimmer Control
Interior Lights
The overhead light will come on when a door is
opened. It may also be turned on by rotating the
control for the dimmer switch on the multifunction lever fully upward.
The overhead light will automatically turn off in
approximately 10 minutes if a door is left open
or the dimmer control is left in the dome light
position. Turn the ignition switch ON to restore
the overhead light operation.
103
Cargo Lamp
The courtesy and dome lights will turn on when
the front doors are opened, by rotating the
control for the dimmer switch on the multifunction lever fully upward, or if equipped, when the
UNLOCK button is pressed on the Remote
Keyless Entry (RKE) transmitter.
The rear cargo light may be turned on by
pressing the lens. Press the lens a second time
to turn the light off.
The sports bar reading lights (available on
four-door models) can be turned on by pressing
the switches, located on either side of the lens.
Press a switch a second time to turn the light off.
When a door is open and the interior lights are
on, rotating the dimmer control to the extreme
bottom position will cause all the interior lights to
turn off. This is also known as the “Party” mode
because it allows the doors to stay open for
extended periods of time without discharging
the vehicle’s battery.
104
This system allows the driver to maintain proper
headlight beam position with the road surface
regardless of vehicle load. The headlight leveling switch is located on the lower switch bank
(below the climate controls).
To operate: With the low beams on,
push the upper side or lower side
of the headlight leveling switch until
the appropriate number, which corresponds to the load listed on the
following chart, illuminates on the switch.
Rear Cargo Light
Sports Bar Reading Light
Headlight Leveling System —
If Equipped
NOTE:
Headlight Leveling will not activate when the
parking lights or high beam headlights are on.
0
Driver only, or driver and front
passenger.
1
All seating positions occupied.
2
3
All seating positions occupied,
plus an evenly distributed load
in the luggage compartment.
The total weight of passengers
and load does not exceed the
maximum load capacity of the
vehicle.
Driver, plus an evenly distributed load in the luggage compartment. The total weight of
the driver and load does not
exceed the maximum load
capacity of the vehicle.
WINDSHIELD WIPERS AND
WASHERS
The windshield wiper/washer control lever is
located on the right side of the steering column.
The front wipers are operated by rotating a
switch, located at the end of the lever. For
information on using the rear window wiper/
washer, refer to “Rear Window Features” in
“Understanding The Features Of Your Vehicle”.
Windshield Wiper Operation
Rotate the end of the lever upward to the second
detent past the intermittent settings for lowspeed wiper operation. Rotate the end of the
lever upward to the third detent past the intermittent settings for high-speed wiper operation.
Calculations based on a passenger weight
of 165 lbs (75 kg).
Front Wiper Control
Windshield Wiper/Washer Lever
CAUTION!
In cold weather, always turn off the wiper
switch and allow the wipers to return to the
park position before turning off the engine.
If the wiper switch is left on and the wipers
(Continued)
105
CAUTION! (Continued)
freeze to the windshield, damage to the
wiper motor may occur when the vehicle is
restarted.
Intermittent Wiper System
Use the intermittent wiper when weather conditions make a single wiping cycle, with a variable
pause between cycles, desirable. Rotate the
end of the lever to the first detent position for
one of five intermittent settings. The delay cycle
can be set anywhere between 1 to 18 seconds.
Front Wiper Control
106
NOTE:
The wiper delay times depend on vehicle
speed. If the vehicle is moving less than
10 mph (16 km/h), delay times will be
doubled.
Mist Feature
Windshield Washers
NOTE:
The mist feature does not activate the
washer pump; therefore, no washer fluid will
be sprayed on the windshield. The wash
function must be used in order to spray the
windshield with washer fluid.
To use the washer, pull the lever toward you and
hold while spray is desired. If the lever is pulled
while in the delay range, the wiper will start and
continue to operate for two or three wipe cycles
after the lever is released, and then resume the
intermittent interval previously selected.
Push down on the wiper lever to activate a
single wipe to clear off road mist or spray from a
passing vehicle. As long as the lever is held
down, the wipers will continue to operate.
If the lever is pulled while in the off position, the
wipers will operate for two or three wipe cycles
and then turn off.
WARNING!
Sudden loss of visibility through the windshield could lead to a collision. You might not
see other vehicles or other obstacles. To avoid
sudden icing of the windshield during freezing
weather, warm the windshield with defroster
before and during windshield washer use.
Mist Control
TILT STEERING COLUMN
This feature allows you to tilt the steering column upward or downward. The tilt lever is
located on the steering column, below the turn
signal lever.
Push down on the lever to unlock the steering
column. With one hand firmly on the steering
wheel, move the steering column up or down,
as desired. Pull upwards on the lever to lock the
column firmly in place.
WARNING!
Do not adjust the steering column while
driving. Adjusting the steering column while
driving or driving with the steering column
unlocked, could cause the driver to lose
control of the vehicle. Failure to follow this
warning may result in serious injury or death.
ELECTRONIC SPEED
CONTROL — IF EQUIPPED
When engaged, the Electronic Speed Control
takes over accelerator operations at speeds
greater than 25 mph (40 km/h).
The Electronic Speed Control buttons are located on the right side of the steering wheel.
Tilt Steering Column Lever
Electronic Speed Control Buttons
1 — ON/OFF
2 — RES +
3 — SET 4 — CANCEL
NOTE:
In order to ensure proper operation, the
Electronic Speed Control System has been
designed to shut down if multiple Speed
Control functions are operated at the same
time. If this occurs, the Electronic Speed
Control System can be reactivated by pushing the Electronic Speed Control ON/OFF
button and resetting the desired vehicle set
speed.
107
To Activate
Push the ON/OFF button. The Cruise Indicator
Light in the instrument cluster will illuminate. To
turn the system off, push the ON/OFF button a
second time. The Cruise Indicator Light will turn
off. The system should be turned off when not in
use.
WARNING!
Leaving the Electronic Speed Control system on when not in use is dangerous. You
could accidentally set the system or cause it
to go faster than you want. You could lose
control and have an accident. Always leave
the system OFF when you are not using it.
To Set A Desired Speed
Turn the Electronic Speed Control ON. When
the vehicle has reached the desired speed,
press the SET (-) button and release. Release
the accelerator and the vehicle will operate at
the selected speed.
108
NOTE:
The vehicle should be traveling at a steady
speed and on level ground before pressing
the SET (-) button.
To Deactivate
To Vary The Speed Setting
To Increase Speed
When the Electronic Speed Control is set, you
can increase speed by pushing the RES (+)
button.
A soft tap on the brake pedal, pushing the
CANCEL button, or normal brake pressure
while slowing the vehicle will deactivate the
Electronic Speed Control without erasing the
set speed from memory.
The speed increment shown is dependant on
the chosen speed unit of U.S. (mph) or Metric
(km/h):
Pressing the ON/OFF button or turning the
ignition switch OFF erases the set speed from
memory.
• Pressing the RES (+) button once will result
in a 1 mph increase in set speed. Each
subsequent tap of the button results in an
increase of 1 mph.
To Resume Speed
• If the button is continually pressed, the set
speed will continue to increase until the button is released, then the new set speed will
be established.
To resume a previously set speed, push the
RES (+) button and release. Resume can be
used at any speed above 20 mph (32 km/h).
U.S. Speed (mph)
Metric Speed (km/h)
• Pressing the RES (+) button once will result
in a 1 km/h increase in set speed. Each
subsequent tap of the button results in an
increase of 1 km/h.
• If the button is continually pressed, the set
speed will continue to decrease until the
button is released, then the new set speed
will be established.
NOTE:
The Electronic Speed Control system maintains speed up and down hills. A slight
speed change on moderate hills is normal.
Metric Speed (km/h)
On steep hills, a greater speed loss or gain may
occur so it may be preferable to drive without
Electronic Speed Control.
• If the button is continually pressed, the set
speed will continue to increase until the button is released, then the new set speed will
be established.
• Pressing the SET (-) button once will result in
a 1 km/h decrease in set speed. Each subsequent tap of the button results in a decrease of 1 km/h.
To Decrease Speed
• If the button is continually pressed, the set
speed will continue to decrease until the
button is released, then the new set speed
will be established.
When the Electronic Speed Control is set, you
can decrease speed by pushing the SET (-)
button.
The speed decrement shown is dependant on
the chosen speed unit of U.S. (mph) or Metric
(km/h):
U.S. Speed (mph)
• Pressing the SET (-) button once will result in
a 1 mph decrease in set speed. Each subsequent tap of the button results in a decrease
of 1 mph.
To Accelerate For Passing
Press the accelerator as you would normally.
When the pedal is released, the vehicle will
return to the set speed.
WARNING!
Electronic Speed Control can be dangerous
where the system cannot maintain a constant
speed. Your vehicle could go too fast for the
conditions, and you could lose control and
have an accident. Do not use Electronic Speed
Control in heavy traffic or on roads that are
winding, icy, snow-covered or slippery.
Using Electronic Speed Control On Hills
The transmission may downshift on hills to
maintain the vehicle set speed.
109
There are two 12 Volt (13 Amp) auxiliary power
outlets that can provide power for accessories
designed for use with the standard power outlet
adapters.
When the optional cigar lighter heating element
is used in the power outlet, it heats when
pushed in and pops out automatically when
ready for use. To preserve the heating element, do not hold the lighter in the heating
position.
The front power outlet is located in the center of
the instrument panel below the climate controls,
and is powered from the ignition switch. Power
is available when the ignition switch is in the ON
or ACC position.
A second power outlet is located inside the
center console and is powered directly from the
vehicle battery.
ELECTRICAL POWER OUTLET
Front Power Outlet
110
CAUTION!
• Do not exceed the maximum power of
160 Watts (13 Amps) at 12 Volts. If the 160
Watt (13 Amp) power rating is exceeded
the fuse protecting the system will need to
be replaced.
• Power outlets are designed for accessory
plugs only. Do not insert any other object in
the power outlets as this will damage the
outlet and blow the fuse. Improper use of
the power outlet can cause damage not
covered by your New Vehicle Limited Warranty.
On vehicles equipped with a rear subwoofer,
there is a third power outlet located in the right
rear cargo area.
Rear Power Outlet — If Equipped
Power Outlet Fuse Locations
1 — M36 Fuse 20 A Yellow Power Outlet Console
Bin
2 — M6 Fuse 20 A Yellow Cigar Lighter Instrument
Panel
3 — M7 Fuse 20 A Yellow Power Outlet Rear with
Sub Woofer (Opt.)
WARNING!
To avoid serious injury or death:
• Only devices designed for use in this type
of outlet should be inserted into any 12 Volt
outlet.
• Do not touch with wet hands.
• Close the lid when not in use and while
driving the vehicle.
• If this outlet is mishandled, it may cause an
electric shock and failure.
CAUTION!
• Many accessories that can be plugged in
draw power from the vehicle’s battery,
even when not in use (i.e., mobile phones,
etc.). Eventually, if plugged in long enough,
the vehicle’s battery will discharge sufficiently to degrade battery life and/or prevent the engine from starting.
CAUTION! (Continued)
• Accessories that draw higher power (i.e.,
coolers, vacuum cleaners, lights, etc.), will
degrade the battery even more quickly.
Only use these intermittently and with
greater caution.
• After the use of high-power draw accessories, or long periods of the vehicle not
being started (with accessories still
plugged in), the vehicle must be driven a
sufficient length of time to allow the alternator to recharge the vehicle’s battery.
• Power outlets are designed for accessory
plugs only. Do not hang any type of accessory or accessory bracket from the plug.
(Continued)
111
CUPHOLDERS
Rear Cupholders
Console Storage Compartment
Front Cupholders
The rear cupholders are located on the back of
the center console.
To lock or unlock the storage compartment,
insert the ignition key and turn. To open the
storage compartment, press the latch and lift
the cover.
The front cupholders are located in the center
console.
Rear Cupholders
Front Cupholders
STORAGE
Glove Compartment
The lockable glove compartment is located on
the passenger side of the lower instrument
panel. Pull outward on the handle/latch to open
the glove compartment.
112
Center Console
There is an extra storage area underneath the
console lid. The console lid has an integrated
paper clip feature that can hold small items.
NOTE:
The rear storage compartment latch should
not be used as cargo tie-down.
1. Flip up the pull loop so it is perpendicular
(straight up) to the top surface of the tray.
2. Pull up on the loop and twist it 90 degrees,
so it is parallel to the slotted hole in the tray.
3. Open the rear compartment cover.
Center Console Lid Storage
DUAL TOP — TWO-DOOR
MODELS — IF EQUIPPED
If your vehicle is equipped with a Dual Top, you
must remove one of the tops from the vehicle. If the soft top is removed, the pivot
brackets must also be removed from the
sport bar. The soft top was installed at the
factory for shipping purposes only. The soft top
and the hard top are to be used independently. Removal is mandatory to prevent any
possible wear and tear on the soft top. Your
vehicle warranty will not cover damage resulting
from both tops remaining on the vehicle at the
same time for extended periods of time.
Rear Storage Compartment —
If Equipped
Removing The Soft Top — Two-Door
Models
The rear cargo area storage compartment
cover is held by a spring-loaded latch. In order
to remove the rear storage compartment cover,
use the following procedure:
1. Locate and remove the two boxes that contain the following items:
• Right and left door frames
• Four door frame attachment knobs
• Right and left quarter windows
Rear Storage Cover
113
• Rear window
• Two rear window roll up straps
• Two Sunrider® secure straps (if equipped)
• Two rear swing gate brackets
4. Disconnect the knuckles from the left and
right metal pivot brackets. Remove the soft
top from the vehicle and store in a clean, dry
location.
2. Remove the hard top. Refer to “Freedom
Top™ Three-Piece Modular Hard Top —
Front/Rear Panel Removal” in this section.
NOTE:
To aid in disconnecting the knuckles, you
may carefully tap on the knuckles using a
rubber mallet.
3. Remove the soft top bow assembly pivot
bracket screws (two per side) using a #T30
Torx® head driver.
6. Reinstall the hard top. Refer to “Freedom
Top™ Three-Piece Modular Hard Top —
Front/Rear Panel Installation” in this section.
Installing The Soft Top — Two-Door
Models
NOTE:
The following procedures are for first time
set up only. For future soft top procedures,
refer to “Soft Top” in this section.
1. Locate and remove the following items prior
to hard top removal:
• Right and left door frames
• Door frame attachment knobs (four for
two-door models, six for four-door models)
• Right and left quarter windows
• Rear window
5. Unzip the zipper on the sport bar cover to
expose the pivot brackets. Remove the brackets using a #T30 Torx® head driver. Recover
and re-zip the sports bar cover. Store the pivot
brackets and screws in a safe place.
114
2. Remove the hard top. Refer to “Freedom
Top™ Three-Piece Modular Hard Top —
Front/Rear Panel Removal” in this section.
3. Install the door frames. Refer to “Door Frame”
in this section.
4. If the soft top has been removed, follow
these steps to reinstall the soft top. If the soft
top is on the vehicle, proceed to step #5.
a. If the pivot brackets have been removed,
unzip the sport bar covers and attach the
pivot brackets to the sports bar with the
four screws that were removed using a
#T30 Torx® head driver. Re-cover and
re-zip the sport bar covers.
b. Lay the soft top into the rear of the
vehicle with the bows pointing forward
and the curved portion of the bows facing
upward.
c. Reattach the knuckles onto the metal
pivot brackets.
NOTE:
To aid in reattaching the knuckles, you may
carefully tap on the knuckles using a rubber
mallet.
d. Screw the pivot screws back into place
using a #T30 Torx® head driver. Secure
them until they are snug, being careful not
to cross-thread the screws or overtighten.
CAUTION!
Do not overtighten the screws. You can strip
the screws if they are overtightened.
5. Remove the swing gate bar (black metal bar
for bottom of rear window) and set aside.
NOTE:
Be sure the wire harness in the left rear
corner is not tangled in the soft top bows
before you lift the top.
6. Unsnap and remove the black boot cover. This
cover should be discarded. It was intended as
a protective cover for shipping only.
NOTE:
A visual instruction sheet is enclosed in the
dual top wrap.
7. Put up the soft top. Refer to “Soft Top —
Putting Up The Soft Top” in this section.
115
DUAL TOP — FOUR-DOOR
MODELS — IF EQUIPPED
If your vehicle is equipped with a Dual Top, you
must remove one of the tops from the vehicle. If the soft top is removed, the pivot
brackets must also be removed from the
sport bar. The soft top was installed at the
factory for shipping purposes only. The soft top
and the hard top are to be used independently. Removal is mandatory to prevent any
possible wear and tear on the soft top. Your
vehicle warranty will not cover damage resulting
from both tops remaining on the vehicle at the
same time for extended periods of time.
• Two rear window roll up straps
• Two Sunrider® secure straps (if equipped)
• Two rear swing gate brackets
2. Remove the hard top. Refer to “Freedom
Top™ Three-Piece Modular Hard Top —
Front/Rear Panel Removal” in this section.
3. Ensure the tether strap is secure to the pivot
bracket. Unbutton the side bow tether strap
(both sides).
5. The tether strap must be hooked onto the
pivot bracket prior to removal of soft top from
vehicle (both sides).
Removing The Soft Top —
Four-Door Models
1. Locate and remove the two boxes that contain the following items:
• Right and left door frames
• Six door frame attachment knobs
• Right and left quarter windows
• Rear window
116
4. Using the plastic reinforcement as a handle,
slide the tether strap up the side bow (both
sides).
6. Remove the soft top bow assembly pivot
bracket bolts (two per side) from the sport
bar using a 10.0 mm wrench or socket driver.
7. Lift the soft top in a upward motion to release
the pivot bracket from the sport bar bracket.
NOTE:
If you are doing this alone, use one arm to
hold the bundle up, the other to remove the
brackets.
Installing The Soft Top — Four-Door
Models
NOTE:
The following procedures are for first time
set up only. For future soft top procedures,
refer to “Soft Top” in this section.
1. Locate and remove the following items prior
to hard top removal:
• Right and left door frames
• Six door frame attachment knobs
• Right and left quarter windows
• Rear window
8. Remove the soft top from the vehicle and
store in a clean, dry location (another person
may be needed to help with this operation).
9. Reinstall the hard top. Refer to “Freedom
Top™ Three-Piece Modular Hard Top —
Front/Rear Panel Installation” in this section.
2. Remove the hard top. Refer to “Freedom
Top™ Three-Piece Modular Hard Top —
Front/Rear Panel Removal” in this section.
3. Install the door frames. Refer to “Door
Frame” in this section.
4. Install the soft top with the pivot brackets
above the sport bar brackets, lower the soft
top into the sport bar bracket slots in a
downward motion to lock tab on soft top.
117
You will need to lift the top to get the brackets
to line up. (Another person may be needed
to help with this operation.)
NOTE:
If you are doing this alone, use one arm to
hold the soft top up, the other to align the
brackets.
6. Install the pivot bracket bolts back into place
using a 10.0 mm wrench or socket driver.
Secure them until they are snug, being careful
not to cross-thread the screws or overtighten.
CAUTION!
Do not overtighten the screws. You can strip
the screws if they are overtightened.
5. Lower the pivot bracket onto the sport bar
bracket mounting tab in a downward motion
to lock into tab.
118
7. Remove the tether strap from the pivot bracket.
8. Using the plastic reinforcement as a handle
remove the tether strap from the bracket
hook by sliding strap up off hook and slide
down the side bow (both sides).
9. Button the side bow tether strap (both sides).
NOTE:
A visual instruction sheet is enclosed in the
dual top wrap.
12. Put up the soft top. Refer to “Soft Top —
Putting Up The Soft Top” in this section.
FREEDOM TOP™
THREE-PIECE MODULAR
HARD TOP — IF EQUIPPED
10. Remove the swing gate bar (black metal bar
for bottom of rear window) and set aside.
NOTE:
Be sure the wire harness in the left rear
corner is not tangled in the soft top bows
before you lift the top.
11. Unsnap and remove the black boot cover.
This cover should be discarded. It was
intended as a protective cover for shipping
only.
CAUTION!
• The hard top is not designed to carry any
additional loads such as roof racks, spare
tires, building, hunting, or camping supplies, and/or luggage, etc. Also, it was not
designed as a structural member of the
vehicle, and thus cannot properly carry
any additional loads other than environmental (rain, snow, etc.).
• Do not move your vehicle until the top has
been either fully attached to the windshield
frame and body side, or fully removed.
CAUTION!
Failure to follow these cautions may cause
interior water damage, stains or mildew:
• It is recommended that the top be free of
water prior to panel removal. Removing
the top, opening a door or lowering a
window while the top is wet may allow
water to drip into the vehicles interior.
• The hard top assembly must be positioned
properly to ensure sealing. Improper installation can cause water to leak into the
vehicles interior.
• Careless handling and storage of the removable roof panels may damage the
seals, causing water to leak into the vehicles interior.
• The front panel(s) must be positioned
properly to ensure sealing. Improper installation can cause water to leak into the
vehicles interior.
119
Front Panel(s) Removal
NOTE:
Left panel must be removed before removing right panel.
3. Turn the center L-shaped locks (two) from
the center of the roof panel.
5. Unlatch the header panel latch located at the
top of the windshield.
4. Turn the rear L-shaped lock (located above
the shoulder belt anchorage).
6. Remove the left-hand panel.
To remove the right panel, follow the steps
above except for Step 3.
1. Fold down the sun visor, and move it to the
side.
2. Turn the rear fasteners (knobs) (located on
the overhead speaker bar assembly) counterclockwise until they can be removed.
Freedom Top™ Storage Bag
Vehicles equipped with a Freedom Top™ Modular Hard Top, come with a Freedom Top™
storage bag that allows you to store your Freedom Top™ panels. The storage bag contains
two compartments and fits behind the rear seat.
120
Lay the Freedom bag down so the loops and
hooks are facing downward. Unzip the bag and
fold back the outer flap. Release the Velcro® on
the black panel divider and fold it back.
Unfold the outer flap and zip the Freedom bag
closed.
NOTE:
Ensure the front Freedom Top™ panel latch
is closed prior to inserting the panel into the
Freedom bag.
Insert the right side Freedom panel into the bag
with the latches facing downward.
Insert the left-side Freedom panel into the bag
with the latches facing upward.
NOTE:
Ensure the front Freedom panel latch is closed
prior to inserting the panel into the bag.
Install the seat attachment strap (at the top of
the bag) through the loops.
Unfold the black panel divider (ensure the divider is laying flat). Secure the Velcro®, located
at the center of the divider.
121
Lift the Freedom bag into the vehicle with the
hooks and straps facing the back of the rear
seat. Attach the clips at the bottom of the bag to
the child restraint anchorages, located at the
base of the rear seat.
Front Panel(s) Installation With Rear
Hard Top Removed
1. Turn the left and right panels over and move
the spacer block (located on the rear of the
panel) upward 90 degrees.
Front Panel(s) Installation
Wrap the upper strap around the rear head
restraints and loop the strap through the buckle.
Pull on the strap to tighten the Freedom bag
securely against the rear seat.
122
NOTE:
Set the panels on the windshield frame so
that there is no overhang. Also, make sure
that the panels are sitting flush with the
body.
1. Install the right panel first, then the left panel.
2. Reinstall the panel(s) using the same steps
for removal in reverse order.
NOTE:
The front panel(s) must be positioned properly to ensure sealing. Set the panels on the
windshield frame so that there is no overhang. Also, make sure that the panels are
sitting flush with the body.
2. Install the right panel first, then the left panel.
3. Reinstall the panel(s) using the same steps
for removal in reverse order.
5. Open the swing gate all the way to ensure
clearance of the rear window glass. Lift the
rear window glass.
Rear Hard Top Removal
1. Remove both front panels. Refer to “Front
Panel(s) Removal” in this section.
2. Open both doors.
3. Remove the two Torx® head screws that
secure the hard top at the B-pillar (near the
top of the door) using a #40 Torx® head
driver (Four–Door Only).
4. Remove the six Torx® head screws that
secure the hard top to the vehicle (along the
interior bodyside) using a #40 Torx® head
driver.
Wire Harness Connector
7. Release the red locking tab by pulling outward to the right.
6. Locate the wire harness on the left rear
inside corner of the vehicle.
Red Locking Tab
123
8. To remove the wiring harness press the tab
and pull downward to disconnect.
Rear Hard Top Installation
NOTE:
If the door frames are installed from soft top
usage, they must be removed prior to installation of the hard top.
1. Inspect the hard top seals for damage and
replace if necessary.
2. Install the hard top using the same steps for
removal in reverse order.
Pinch Grip On Hose
10. Close the swing gate.
Press Tab To Disconnect
9. To remove the washer hose, pinch the grips
on hose connector and pull downward.
11. Remove the hard top from the vehicle.
Place the hard top on a soft surface to
prevent damage.
CAUTION!
The removal of the Freedom Top™ requires
four adults located on each corner. Failure to
follow this caution could damage the Freedom Top™.
124
Make sure that the hard top is sitting flush with
the body at the sides and check to ensure that
there is a uniform gap between the lift glass and
hard top.
NOTE:
• The Torx® fasteners that attach the hard
top to the body should be torqued to 88
in lb +/- 22 in lb (10 N·m +/- 2.5 N·m).
• It is not necessary to pinch connection
when reinstalling washer hose. Push on
until click is heard.
DOOR FRAME
CAUTION!
Failure to follow these cautions may cause
interior water damage, stains or mildew:
• Opening a door or lowering a window while
the top is wet may allow water to drip into
the vehicle’s interior.
• Careless handling and storage of the removable door frame(s) may damage the
seals, causing water to leak into the vehicle’s interior.
• The door frame(s) must be positioned
properly to ensure sealing. Improper installation can cause water to leak into the
vehicle’s interior.
WARNING!
• Do not drive your vehicle on public roads
with the door frame(s) removed as you will
lose the protection that they can provide.
This procedure is furnished for use during
off-road operation only.
• Do not drive your vehicle on public roads
with the doors removed as you will lose the
protection that they can provide. This procedure is furnished for use during off-road
operation only.
Door Frame Removal
1. Unscrew and remove the door frame attachment knobs (two per door).
WARNING!
Use both hands to remove the door frames.
The door frames will fold and could cause
injury if both hands are not used.
2. Place one hand on the upper rear and one
hand on the front of the door frame.
125
3. Pull the frame toward you with your rearward
hand to remove the frame from the vehicle.
4. Screw the knobs back into the door frame and
fold for storage. Store in a secure location.
WARNING!
• Do not drive your vehicle on public roads
with the door frame(s) removed as you will
lose the protection that they can provide.
This procedure is furnished for use during
off-road operation only.
• Do not drive your vehicle on public roads
with the doors removed as you will lose the
protection that they can provide. This procedure is furnished for use during off-road
operation only.
Door Frame Installation — Two-Door
Models — If Equipped
1. Unfold door frame and unscrew thumbscrews.
2. Set the door frame pin into the hole on top of
the body side, behind the door opening.
126
3. After the door frame pin has been set into
the body side hole, carefully set the front of
the door frame into the rubber seal at the top
of the windshield.
4. Starting with the front of the door frame, clip
it over the metal side bar and then clip the
rear, making sure that the material for the
side bar covers is not pinched by the door
frame.
Door Frame Installation —
Four-Door Models — If Equipped
1. Install the rear door frame first.
2. Set the door frame pin into the hole on top of
the body side, just behind the rear door opening.
4. Loosely install the rear knob (long knob) to
hold the door rail in position.
5. Starting with the front knob, screw in and
tighten both knobs. Repeat on the other side.
3. Position the top of the door frame against the
metal sport bar and press onto the side bar
making sure not to pinch the material of the
sports bar covers and to ensure it is properly
positioned on the seal above the front of the
rear door.
127
9. Tighten the front knob, then the rear most
knob, and then the middle knob. Repeat this
procedure for the other side.
5. Carefully set the front of the front door frame in
the rubber seal at the top of the windshield.
6. Clip the front of the door rail over the side bar
making sure that the material for the side bar
cover is not pinched by the door frame.
7. Position the rear of the front door frame to
lay on top of the front of the rear door frame.
Ensure the seals are installed correctly to
avoid water leaks.
8. Loosely install both knobs beginning with the
front knob (long knob). Then, install the
middle knob (short knob) through the front
and rear door frames and screw into the top
of the B-pillar.
SOFT TOP — TWO-DOOR
MODELS
Please visit the owners manual on your DVD
for instructional videos.
CAUTION!
The soft top is not designed to carry any
additional loads such as roof racks, spare
(Continued)
128
CAUTION! (Continued)
tires, building, hunting, or camping supplies,
and/or luggage, etc. Also, it was not designed as a structural member of the vehicle
and, thus, cannot properly carry any additional loads other than environmental (rain,
snow, etc.).
If the temperature is below 72°F (24°C) and/or
the top has been folded down for a period of
time, the top will appear to have shrunk when
you raise it, making it difficult to put up. This is
caused by a natural contraction of the vinyl
coating on the fabric top.
Place the vehicle in a warm area. Pull steadily
on the top fabric. The vinyl will stretch back to
its original size and the top can then be installed. If the temperature is 41°F (5°C) or
below, do not attempt to put the top down or
roll the rear or side curtains.
CAUTION!
• Do not run a fabric top through an automatic car wash. Window scratches and
wax build up may result.
• Do not lower the top when the temperature
is below 41°F (5°C). Damage to the top
may result.
• Do not move your vehicle until the top has
been either fully attached to the windshield
frame, or fully lowered.
• Do not lower the top with the windows
installed. Window and top damage may
occur.
• Refer to “Appearance Care For Fabric Top
Models” in “Maintaining Your Vehicle” for
further information. It contains important
information on cleaning and caring for your
vehicle’s fabric top.
(Continued)
CAUTION! (Continued)
• Do not use any tools (screwdrivers, etc.) to
pry or force any of the clamps, clips, or
retainers securing the soft top. Do not
force or pry the soft top framework when
opening or closing. Damage to the top may
result.
WARNING!
• Do not drive the vehicle with the rear
window curtain up unless the side curtains
are also removed. Dangerous exhaust
gases could enter the vehicle causing
harm to the driver and passengers.
• The fabric upper doors and fabric top are
designed only for protection against the
elements. Do not rely on them to contain
occupants within the vehicle or to protect
against injury during an accident. Remember, always wear seat belts.
129
CAUTION!
Failure to follow these cautions may cause
interior water damage, stains or mildew on
the top material:
• It is recommended that the top be free of
water prior to opening it. Operating the top,
opening a door or lowering a window while
the top is wet may allow water to drip into
the vehicle’s interior.
• Careless handling and storage of the soft
top may damage the seals, causing water
to leak into the vehicle’s interior.
• The soft top must be positioned properly to
ensure sealing. Improper installation can
cause water to leak into the vehicle’s interior.
130
Quick Steps To Lowering The Soft
Top
Refer to “Lowering The Soft Top” in this section
for further information.
1. Remove the side windows.
3. Release header latches from the windshield
frame.
2. Remove the back window.
4. Release the sail panel retainers from the
body side channel at the rear corners of the
vehicle.
6. As you begin to lower the top, fold the sail
panels so that they rest on top of the soft top.
NOTE:
When releasing the sail panel retainers, it is
helpful to pull down on the rear roof bow.
8. Open the swing gate and lower the top.
NOTE:
Ensure fabric does not overhang the sides
of the vehicle.
5. Make sure the plastic sleeves are slid rearward over the Sunrider® link to lock in the
link (Sunrider® Models only).
7. Release the Sunrider® latch (both sides).
131
Quick Steps To Raising The Soft Top
Refer to “Raising The Soft Top” in this section
for further information.
1. Open the swing gate and raise the top,
engaging the Sunrider® latches (another
person may be needed to help with this
operation).
132
2. Engage header latches.
4. Install the back window.
3. Install rear corner panels.
5. Install the side windows.
6. To install the side windows, affix the window
temporarily by attaching to the Velcro® in the
rear corner. Start the zipper but close only
about 1 in (2.5 cm).
8. Insert the retainer along the bottom edge of
the window into the bottom side channel,
beginning at the front and working to the rear
of the vehicle. Finish by closing the zipper
completely and attaching the Velcro® along
the top and rear of the window. Repeat this
step for the opposite side.
7. Insert the front retainer of the window into the
door channel, making sure the retainer is fully
seated and properly positioned on the door
frame. Failure to do so can result in wind and
water leaks or damage to the window.
1 — Incorrect Insertion
2 — Correct Insertion
133
Lowering The Soft Top
1
2
3
4
5
—
—
—
—
—
134
Header Bow
2–Bow
3–Bow
Sail Panel
Body Side Retainer
6
7
8
9
—
—
—
—
Quarter Window
Check Strap
Front Retainer — Quarter Window
Bottom Retainer — Quarter Window
1
2
3
4
5
—
—
—
—
—
Zipper Start
Zipper Finish
Swing Gate Bar
Swing Gate Brackets
Sail Panels
135
NOTE:
Clean side and rear windows before removal
to assist in preventing scratching during
removal of the soft top. If zippers are difficult
to operate due to road dust, etc., clean them
with a mild soap solution and a small brush.
Cleaning products are available through
your authorized dealer.
1. If your vehicle has half doors, remove each
half-door window by opening the door and
lifting the half-door window out.
NOTE:
Stow the half-door windows carefully outside of the vehicle, never inside, to avoid
scratches.
2. Unclip and move the sun visors to the side.
3. Release the header latches and leave the
hooks in the loops on the windshield.
136
4. Open the swing gate.
5. Before unzipping the rear window, release
the first 3 in (7.6 cm) of both sail panels from
the channel. Remove the swing gate bar by
pulling it straight rearward out of the swing
gate brackets.
• Unzip the rear window starting at the right
lower corner of the window. Pull the zipper
up, across the top and down to the left
lower corner. Zipper pulls will stay on
the rear window. Pull down on the rear
window to disengage it from the zipper on
the top cover.
7. Stow the windows carefully to avoid scratching.
8. Undo the Velcro® that runs along the top
and rear edge of the side window.
11. Finish releasing the sail panel retainers from
the body side channel at the rear corners of
the vehicle.
9. Beginning from the rear lower corner, completely unzip the window.
6. Remove the rear window retainer from the
swing gate bracket on both the left and right
sides.
NOTE:
When releasing the sail panel retainers, it is
helpful to pull down on the rear roof bow.
10. Once unzipped, remove the side window
retainers from the door channel and body
side channel. Repeat this step on the opposite side.
137
12. As you begin to lower the top, fold the
sail panels so that they rest on top of the
soft top.
13. The swing gate brackets do not need to be
removed unless the hard top is being installed. To remove the swing gate brackets,
pull the front of the bracket forward while
rolling the entire bracket back in toward the
vehicle to disengage.
138
15. Make sure the plastic sleeves are slid rearward over the Sunrider® link to lock in the
link (Sunrider® Models only).
14. Completely release the latches from the
loops on the windshield frame. If your
vehicle is not equipped with the Sunrider® package, proceed to Step 15.
16. Unlatch the side bows from both door rails
(Sunrider® Models only).
19. Close the front header latches.
20. Remove the door frames, if desired. Refer
to “Door Frame” in this section for further
information.
Raising The Soft Top
1. Unclip and move the sun visors to the side.
17. Before lowering the top, open the swing
gate to prevent possible damage to the rear
center high-mounted brake light. Move to
the front of the vehicle. Grasp the side bow
behind the header and lift the top, folding it
toward the rear of the vehicle.
18. Tuck the fabric and the check straps between the bows and as far inward as possible. This will keep any portion of the top
from flapping outside of the vehicle.
2. Install door frames, if removed. Refer to
“Door Frame” in this section for further information.
3. Make sure the plastic sleeve is slid over
Sunrider® link (Sunrider® Models only).
NOTE:
Help from another person will ease this
operation.
139
4. Standing on the side of the vehicle, lift the
top by the side bow and the 2–bow (middle
bow) up and over the sports bar until the
header rests on the top of the windshield
frame.
7. If the swing gate brackets were removed,
install them by hooking the rear edge of the
bracket on the interior side of the body
channel. Then, rotate it rearward and over
the channel until it snaps onto the exterior
part of the rail. To be properly located, the
bracket must only be clipped to the shortened rail edge.
6. Open the header latches and engage the
hook on each side onto the windshield loops
(do not close the latches).
5. Make sure the Sunrider® bracket on the side
bows latches to the door rails (Sunrider®
Models only).
8. Move to the rear of the vehicle and gently
pull the sail panels over the rear roof bow.
140
11. Insert the front retainer of the window into
the door channel, making sure the retainer
is fully seated and properly positioned on
the door frame. Failure to do so can result
in wind and water leaks or damage to the
window.
9. Partially install the sail panel retainers into
the body side channel, leaving the last 3 in
(7.6 cm) toward the rear window loose (on
both sides). Pulling down on the rear roof
bow (3–bow) will aid to reach the channel
with the retainers.
10. To install the side windows, affix the window temporarily by attaching to the Velcro®
in the rear corner. Start the zipper but close
only about 1 in (2.5 cm).
141
part of the seal should be down and pointed
outward to seal with the swing gate when
closed.
1 — Incorrect Insertion
2 — Correct Insertion
14. Install the rear window by starting both
zipper ends at the lower left corner of the
rear window opening. Ensure that the zippers are properly started and aligned before zipping to prevent damage.
12. Insert the retainer along the bottom edge of
the window into the bottom side channel,
beginning at the front and working to the
rear of the vehicle. Finish by closing the
zipper completely and attaching the Velcro® along the top and rear of the window.
Repeat this step for the opposite side.
13. Locate the black swing gate bar. Slide the
swing gate bar over the receiver at the bottom inside of the rear window. The spongy
142
16. Grasp the swing gate bar and position it into
the swing gate brackets.
18. Apply downward pressure on the top corner of the rear soft top bow (3-bow), then
complete attaching the sail panel retainers
into the body side channel.
19. Close the header latches and return the
sun visors to their secured position.
17. Insert the rear window retainer into the swing
gate bracket on both the left and right sides.
15. Run the zipper fully around to the right side
of the window.
143
SOFT TOP — FOUR-DOOR
MODELS
Please visit the owners manual on your DVD
for instructional videos.
CAUTION!
The soft top is not designed to carry any
additional loads such as roof racks, spare
tires, building, hunting, or camping supplies,
and/or luggage, etc. Also, it was not designed as a structural member of the vehicle,
and thus cannot properly carry any additional
loads other than environmental (rain, snow,
etc.).
If the temperature is below 72°F (24°C) and/or
the top has been folded down for a period of
time, the top will appear to have shrunk when
you raise it, making it difficult to put up. This is
caused by a natural contraction of the vinyl
coating on the fabric top.
Place the vehicle in a warm area. Pull steadily
on the top fabric. The vinyl will stretch back to its
original size and the top can then be snapped
into place. If the temperature is 41°F (5°C) or
below, do not attempt to put the top down or
roll the rear or side curtains.
CAUTION!
• Do not run a fabric top through an automatic car wash. Window scratches and
wax buildup may result.
• Do not lower the top when the temperature
is below 41°F (5°C). Damage to the top
may result.
• Do not lower the top when the windows are
dirty. Grit may scratch the window.
• Do not move your vehicle until the top has
been either fully attached to the windshield
frame, or fully lowered.
• Do not lower the top with the windows
installed. Window and top damage may
occur.
(Continued)
144
CAUTION! (Continued)
• Refer to “Appearance Care for Fabric Top
Models” in “Maintaining Your Vehicle” for
further information. It contains important
information on cleaning and caring for your
vehicle’s fabric top.
• Do not use any tools (screwdrivers, etc.) to
pry or force any of the clamps, clips, or
retainers securing the soft top. Do not
force or pry the soft top framework when
opening or closing. Damage to the top may
result.
WARNING!
• Do not drive the vehicle with the rear
window curtain up unless the side curtains
are also open. Dangerous exhaust gases
which can kill could enter the vehicle.
(Continued)
WARNING! (Continued)
• The fabric upper doors and fabric top are
designed only for protection against the
elements. Do not rely on them to contain
occupants within the vehicle or to protect
against injury during an accident. Remember, always wear seat belts.
CAUTION!
Failure to follow these cautions may cause
interior water damage, stains or mildew on
the top material:
• It is recommended that the top be free of
water prior to opening it. Operating the top,
opening a door or lowering a window while
the top is wet may allow water to drip into
the vehicle’s interior.
• Careless handling and storage of the soft
top may damage the seals, causing water
to leak into the vehicle’s interior.
CAUTION! (Continued)
• The soft top must be positioned properly to
ensure sealing. Improper installation can
cause water to leak into the vehicle’s interior.
Quick Steps For Lowering The Soft
Top
1. Remove the side windows.
NOTE:
Do not remove any of the three attachment
knobs unless you are planning on installing
the hard top.
2. Remove the back window.
(Continued)
145
NOTE:
Start zipper from the right side to remove
back window.
4. Release the sail panel retainers from the
body side channel at the rear corners of the
vehicle.
6. Fold header rearward, pulling the fabric to the
rear.
3. Release header latches from the windshield
frame.
NOTE:
When releasing the sail panel retainers, it is
helpful to pull down on the rear roof bow.
5. Fold the sail panels so that they rest on top
of the soft top.
146
8. Open the swing gate and lower the top.
Quick Steps For Raising The Soft
Top
1. Open the swing gate and raise the top,
engaging the Sunrider® latches (another
person may be needed to help with this
operation).
7. Release Sunrider® latch (both sides).
NOTE:
Ensure the fabric does not overhang the
sides of the vehicle.
147
3. Rotate the header forward.
5. Install the back window.
4. Engage the header latches.
6. Install the side windows.
2. Install rear corner panels.
148
7. To install the side windows, affix the window
temporarily by attaching to the Velcro® in the
rear corner. Start the zipper but close only
about 1 in (2.5 cm).
9. Insert the retainer along the bottom edge of
the window into the bottom side channel,
beginning at the front and working to the rear
of the vehicle. Finish by closing the zipper
completely and attaching the Velcro® along
the top and rear of the window. Repeat this
step for the opposite side.
1 — Incorrect Insertion
2 — Correct Insertion
8. Insert the front retainer of the window into the
door channel, making sure the retainer is fully
seated and properly positioned on the door
frame. Failure to do so can result in wind and
water leaks or damage to the window.
149
Folding Down The Soft Top
1
2
3
4
5
—
—
—
—
—
150
Header Bow
2–Bow
3–Bow
4–Bow
Sail Panel
6 — Body Side Retainer
7 — Quarter Window
8 — Check Strap
9 — Front Retainer — Quarter Window
10 — Bottom Retainer — Quarter Window
1
2
3
4
5
—
—
—
—
—
Zipper Start
Zipper Finish
Swing Gate Bar
Swing Gate Brackets
Sail Panels
151
NOTE:
Clean side and rear windows before removal
to assist in preventing scratching during
removal of the soft top. If zippers are difficult
to operate due to road dust, etc., clean them
with a mild soap solution and a small brush.
Cleaning products are available through
your authorized dealer.
1. If your vehicle has half-doors, remove each
half-door window by opening the door and
lifting the half-door window out.
NOTE:
Stow half-door windows carefully outside of
the vehicle, never inside, to avoid scratches.
2. Unclip and move the sun visors to the side.
3. Release the header latches and hooks from
the loops on the windshield frame.
152
4. Open the swing gate.
5. Before unzipping the rear window, release
the first 3 in (7.6 cm) of both sail panels from
the channel. Remove the swing gate bar by
pulling it straight rearward out of the swing
gate brackets.
• Unzip the rear window starting at the right
lower corner of the window. Pull the zipper
up, across the top and down to the left
lower corner. Zipper pulls will stay on
the rear window. Pull down on the rear
window to disengage it from the zipper on
the top cover.
7. Stow the windows carefully to avoid scratching.
8. Undo the Velcro® that runs along the top
and rear edge of the side window.
11. Finish releasing the sail panel retainers from
the body side channel at the rear corners of
the vehicle.
9. Beginning from the rear lower corner, completely unzip the window.
6. Remove the rear window retainer from the
swing gate bracket on both the left and right
sides.
NOTE:
When releasing the sail panel retainers, it is
helpful to pull down on the rear roof bow.
10. Once unzipped, remove the side window
retainers from the door channel and body
side channel. Repeat this step on the opposite side.
153
12. Fold the sail panels so that they rest on top
of the soft top.
15. Fold back the front section of the top,
pulling the fabric rearward. Gently rest the
header on top of the rear portion of the
deck.
14. Grasp the front side bow behind the header,
and lift the top.
13. The swing gate brackets do not need to be
removed unless the hard top is being installed. To remove the swing gate brackets,
pull the front of the bracket forward while
rolling the entire bracket back in toward the
vehicle to disengage.
154
16. Fold the top so that the material forms a
"W" as shown. Enter the vehicle and move
the material into two folds.
18. Before lowering the top, open the swing
gate to prevent possible damage to the rear
center high-mounted brake light. Grasp the
folded side bows and slide the top along
the door frame track to the rear door frame.
17. Release the side bows by pressing down
on the latch above the front of the rear door.
Push the top rearward to disengage. Repeat this step on the other side.
19. Gently slide the side bows off the door
frame track and lower the top down into the
vehicle.
NOTE:
Help from another person will ease this
operation.
20. Tuck the fabric and the check straps between the bows as far inside as possible.
This will keep any portion of the top from
flapping outside of the vehicle.
155
21. Once the top is fully down, use the Velcro®
straps provided to secure the top to the
vehicle by wrapping the strap around the side
bows and through the slot on the body.
Putting Up The Soft Top
NOTE:
Be extremely careful when putting up the
soft top to prevent the doors from getting
scratched. It may be helpful to open the rear
doors.
1. Install the door frames, if removed. Refer to
“Door Frame” in this section for further information.
2. Undo the straps used to secure the top in the
down position and store in secure location.
3. Open the swing gate.
22. Close the front header latches.
4. Grasp the folded side bows and lift to the top
of the rear door frames.
23. Remove the door frames, if desired. Refer
to “Door Frame” in this section for further
information.
NOTE:
Help from another person will ease this
operation.
156
5. Insert the slider feature of the knuckles into the
door frame tracks and slide the top forward.
10. If the swing gate brackets were removed,
install them by hooking the rear edge of the
bracket on the interior side of the body
channel. Then, rotate it rearward and over
the channel until it snaps onto the exterior
part of the rail. To be properly located, the
bracket must only be clipped to the shortened rail edge.
6. Ensure that the top locks into the Sunrider®
locking mechanisms that are located above
the front of the rear doors.
9. Open the header latches and engage the
hook on each side onto the windshield loops
(do not close the latches).
7. Unclip and move the sun visors to the side.
8. Standing on the side of the vehicle, lift the top
by the side bow until it rests on the windshield
frame.
157
11. Ensure that the straps are positioned correctly before pulling the sail panels over the
rear roof bow (4-bow).
Partially install the sail panel retainers into the
body side channel, leaving the last 3 in (7.6 cm)
toward the rear window loose (on both sides).
Pulling down on the rear roof bow (4-bow) will
aid in reaching the channel with the retainers.
158
13. Insert the front retainer of the window into
the door channel, making sure the retainer
is fully seated and properly positioned on
the door frame. Failure to do so can result
in wind and water leaks or damage to the
window.
12. To install the side windows, affix the window
temporarily by attaching it to the Velcro® in
the upper rear corner. Start the zipper but
close only about 1 in (2.5 cm).
15. Locate the black swing gate bar. Slide the
swing gate bar over the receiver at the
bottom inside of the rear window. The
spongy part of the seal should be down and
pointed outward to seal with the swing gate
when closed.
1 — Incorrect Insertion
2 — Correct Insertion
14. Insert the retainer along the bottom edge of
the window into the bottom side channel,
beginning at the front and working to the
rear of the vehicle. Finish by closing the
zipper completely and attaching the Velcro® along the top and rear of the window.
Repeat this step for the opposite side.
159
16. Install the rear window by starting both
zipper ends at the lower left corner of the
rear window opening. Ensure that the zippers are properly started and aligned before zipping to prevent damage.
20. Complete the installation of the sail panel
by inserting the rest of the retainer into the
body channel.
21. Close the header latches and return the
sun visors to their secured position.
19. Insert the rear window retainer into the
swing gate bracket on both the left and right
sides.
17. Run the first zipper fully around to the right
side of the window.
18. Grasp the swing gate bar and position it
into the swing gate brackets.
160
SUNRIDER®
(TWO-DOOR MODELS)
CAUTION!
Operating the top, opening a door or lowering a window while the top is wet may allow
water to drip into the vehicle’s interior.
NOTE:
If you are going to be driving faster than
40 mph (64 km/h) with the Sunrider® feature
open, it is recommended that you remove
the rear window of the vehicle.
Opening The Sunrider®
1. Unclip and move the sun visors to the side.
2. Release the header latches from the loops
on the windshield frame.
4. Grasp the header and lift the top back. Make
sure the material is folded back as shown.
NOTE:
The Sunrider® latch on the door rail should
not be activated for Sunrider® use. If activated, the soft top must be reinstalled starting from the sail panels.
5. Locate the straps to secure the side bows.
Wrap the straps around the bows as shown.
Repeat on the other side.
3. Make sure to slide the plastic sleeves forward to unlock the Sunrider® links.
6. Reposition the sun visors.
161
Closing The Sunrider®
1. Remove the straps from the side bows.
2. Unclip and move the sun visors to the side.
3. Grasp the front header and pull it to the front
of the vehicle.
4. Hook the header latches to the loops on the
windshield frame, close latches, and return
the sun visors to their original positions.
NOTE:
If you are going to be driving faster than
40 mph (64 km/h) with the Sunrider® feature
open, it is recommended that you remove
the rear window of the vehicle.
Opening The Sunrider®
1. Unclip and move the sun visors to the side.
2. Release the header latches from the loops
on the windshield frame.
4. Fold back the front section of the top and
gently rest the header on top of the rear
portion of the deck.
5. Slide the plastic sleeve rearward over the
Sunrider® link.
SUNRIDER®
(FOUR-DOOR MODELS)
CAUTION!
Operating the top, opening a door or lowering a window while the top is wet may allow
water to drip into the vehicle’s interior.
162
3. Grasp the front side bow behind the header,
and lift the top.
5. Fold the top so that the material forms a "W"
as shown. Enter the vehicle and move the
material into two folds.
Closing The Sunrider®
Perform the above steps in the opposite order.
6. Secure the top by using the two provided
straps. Each strap will wrap around the side
bow and Velcro® to itself; use one strap on
each side of the vehicle.
NOTE:
Failure to fold the fabric rearward will allow
the material to sag and may block the rearview mirror.
FOLDING WINDSHIELD
The fold-down windshield and removable side
bars on your vehicle are structural elements
that can provide some protection in some accidents. The windshield also provides some protection against weather, road debris and intrusion of small branches and other objects.
Do not drive your vehicle on-road with the
windshield down and the side bars removed as
you lose the protection these structural elements can provide.
If required for certain off-road uses, the side
bars can be removed and the windshield folded
down. However, the protection afforded by
these features is then lost. If you remove the
side bars and fold down the windshield, drive
slowly and cautiously. It is recommended that
the speed of the vehicle be limited to 10 mph
(16 km/h), with low range operation preferred if
you are driving off-road with the windshield
folded down.
Raise the windshield and reinstall the side bars
as soon as the task that required their removal is
completed and before you return to on-road
driving. Both you and your passenger should
wear seat belts at all times, on-road and off-road,
regardless of whether the windshield is raised or
folded down.
Outside rearview mirrors are mounted on the
doors. If you choose to remove the doors, see
your authorized dealer for a replacement cowlmounted outside mirror. Law requires outside
mirrors on vehicles for on-road use.
163
WARNING!
Carefully follow these warnings to help protect against personal injury:
• Do not drive your vehicle on-road with the
windshield down.
• Do not drive your vehicle unless the windshield is securely fastened, either up or
down.
• Eye protection, such as goggles, should
be worn at all times when the windshield
is down.
• Be sure that you carefully follow the instructions for raising the windshield. Make
sure that the folding windshield, windshield
wipers, side bars, and all associated hardware and fasteners are correctly and
tightly assembled before driving your vehicle. Failure to follow these instructions
may prevent your vehicle from providing
you and your passengers protection in
some accidents.
(Continued)
164
WARNING! (Continued)
• If you remove the doors, store them outside
the vehicle. In the event of an accident, a
loose door may cause personal injury.
Lowering The Windshield And
Removing Side Bars
1. Lower the fabric top or remove the hard top
following the instructions in this manual.
NOTE:
To assist in properly reinstalling side bars,
mark the original locations prior to removing.
2. Remove the two top hex bolts (13 mm), and
the one side hex bolt (13 mm) visible through
the trim (Do not remove plastic corner trim,
sun visor bolts, or sport bar covering).
3. Remove the sun visor.
4. Remove the A-pillar cap.
5. Disconnect microphone (if equipped with
Uconnect® phone).
6. Open the sport bar Velcro covering.
7. Remove the one hex bolt (13 mm) visible
through the plastic trim on the bottom side of
the side bar, one hex bolt (13 mm) on the side
of the side bar, and one hex bolt (13 mm) on
top of the side bar.
NOTE:
Pull side bar out horizontally when removing.
the slots located on the floor behind the
folded rear seat at the front of the storage bin
cover.
WARNING!
You or others could be injured if you carry the
side bars loose in your vehicle. Remove the
side bars from the vehicle or securely store
them as described or they may cause personal injury if an accident occurs. See your
authorized dealer for the cinch straps.
CAUTION!
Do not remove the head impact foam from
the side bars, as damage to the foam may
result.
NOTE:
Store all of the mounting bolts in their original
threaded holes and tighten for safekeeping.
8. Remove the side bar assembly, and reattach
the sport bar Velcro® covering.
9. To safely store the side bars in your vehicle,
use four cinch straps (available from your
authorized dealer). Attach the straps through
10. Remove the windshield wiper arms by first
pulling the wiper away from the windshield
and out to the “lock” position. Unsnap the
wiper arm nut caps, and remove the retaining nuts. Lift the wiper arms off and store
them in the center console or securely
behind the rear seat.
NOTE:
It may be necessary to use a battery terminal
puller tool in order to separate the wiper
arms from the shaft after the nuts have been
removed.
11. Remove the lower windshield plates by
removing the six black round-headed Torx®
head screws (using a #40 Torx® head
driver) on each side of the base of the
windshield.
12. Lower the windshield gently until it contacts
the rubber hood bumpers.
13. Secure the windshield by passing a cinch
strap through the footman hoop on the
center of the hood and on the center of the
windshield frame. Tighten the strap to secure the windshield in place.
165
Raising The Windshield And
Replacing Side Bars
1. Raise the windshield.
2. Loosely attach the rear of the side bar to the
sport bar. Refer to Step 4 of “Lowering
Windshield And Removing Side Bars” earlier
in this section.
3. Attach the front of the side bar to the windshield frame.
• Install the top two hex bolts (13 mm) first,
then the lower side hex bolt (13 mm). The
lower side bolt will not align until the top
two bolts are installed.
5. Install the lower windshield plates with the
six black round-headed Torx® head screws
(using a #40 Torx® head driver) on each side
of the base of the windshield.
6. Reinstall the wiper arms.
4. Tighten all side bar attachment bolts.
• Reattach the sport bar Velcro® covering.
166
REAR WINDOW FEATURES —
HARD TOP ONLY
Rear Window Wiper/Washer —
If Equipped
A rotary switch on the center portion of the
control lever (located on the right side of the
steering column) controls the operation of the
rear wiper/washer function.
Rotate the switch upward past the
first detent to activate the rear
washer. The washer pump and the
wiper will continue to operate as
long as the switch is held. Upon
release, the wiper will cycle two to three times
before returning to the set position.
If the rear wiper is operating when the ignition
is turned to the LOCK position, the wiper will
automatically return to the “Park” position.
When the vehicle is restarted, the wiper will
resume function at whichever position the
switch is set at.
Rear Window Defroster —
If Equipped
Rear Wiper/Washer Control
Rotate the switch upward to the first
detent position for rear wiper operation.
The rear window defroster button is
located on the climate controls mode
control knob. Push the button to turn
on the rear window defroster. An indicator in the
button will illuminate when the rear window
defroster is on. The rear window defroster automatically turns off after approximately 10 minutes. For an additional five minutes of operation, push the button a second time.
NOTE:
To prevent excessive battery drain, use the
rear window defroster only when the engine
is operating.
CAUTION!
Failure to follow these cautions can cause
damage to the heating elements:
• Use care when washing the inside of the
rear window. Do not use abrasive window
cleaners on the interior surface of the
window. Use a soft cloth and a mild washing solution, wiping parallel to the heating
elements. Labels can be peeled off after
soaking with warm water.
• Do not use scrapers, sharp instruments, or
abrasive window cleaners on the interior
surface of the window.
• Keep all objects a safe distance from the
window.
167
168
4
UNDERSTANDING YOUR INSTRUMENT
PANEL
•
•
•
•
INSTRUMENT PANEL FEATURES . . . . . . . . . . . . . . . .
INSTRUMENT CLUSTER . . . . . . . . . . . . . . . . . . . . .
INSTRUMENT CLUSTER DESCRIPTIONS . . . . . . . . . . .
COMPASS AND TRIP COMPUTER — IF EQUIPPED . . . . .
• Control Buttons . . . . . . . . . . . . . . . . . . . . . . . . . .
• Compass/Temperature Display . . . . . . . . . . . . . . . . .
• Trip Conditions . . . . . . . . . . . . . . . . . . . . . . . . . .
• ELECTRONIC VEHICLE INFORMATION CENTER (EVIC) —
IF EQUIPPED . . . . . . . . . . . . . . . . . . . . . . . . . . . .
• Electronic Vehicle Information Center (EVIC) Displays . . .
• Gear Shift Indicator (GSI) — If Equipped . . . . . . . . . . .
• Oil Change Required . . . . . . . . . . . . . . . . . . . . . .
• EVIC Main Menu . . . . . . . . . . . . . . . . . . . . . . . . .
• Compass, Outside Temperature Display / ECO
(Fuel Saver Mode) — If Equipped . . . . . . . . . . . . . . .
• Average Fuel Economy . . . . . . . . . . . . . . . . . . . . .
• Distance To Empty (DTE) . . . . . . . . . . . . . . . . . . . .
.
.
.
.
.
.
.
.
.
.
.
.
.
.
.171
.172
.173
.181
.181
.182
.185
.
.
.
.
.
.
.
.
.
.
.185
.186
.187
.187
.188
. . .188
. . .191
. . .191
169
•
•
•
•
•
•
170
• Elapsed Time . . . . . . . . . . . . . . . . . . . . . . . . . . . .
• System Status . . . . . . . . . . . . . . . . . . . . . . . . . . . .
• Personal Settings (Customer-Programmable Features) . . .
SOUND SYSTEMS . . . . . . . . . . . . . . . . . . . . . . . . . .
iPod®/USB/MP3 CONTROL — IF EQUIPPED . . . . . . . . . .
• Connecting The iPod® Or External USB Device . . . . . . . .
• Using This Feature . . . . . . . . . . . . . . . . . . . . . . . . .
• Controlling The iPod® Or External USB Device Using Radio
Buttons . . . . . . . . . . . . . . . . . . . . . . . . . . . . . . . .
• Play Mode . . . . . . . . . . . . . . . . . . . . . . . . . . . . . .
• List Or Browse Mode . . . . . . . . . . . . . . . . . . . . . . . .
• Bluetooth® Streaming Audio (BTSA) . . . . . . . . . . . . . .
STEERING WHEEL AUDIO CONTROLS . . . . . . . . . . . . .
• Radio Operation . . . . . . . . . . . . . . . . . . . . . . . . . . .
• CD Player . . . . . . . . . . . . . . . . . . . . . . . . . . . . . . .
CD/DVD DISC MAINTENANCE . . . . . . . . . . . . . . . . . . .
RADIO OPERATION AND MOBILE PHONES . . . . . . . . . .
CLIMATE CONTROLS . . . . . . . . . . . . . . . . . . . . . . . .
• Manual Heating And Air Conditioning . . . . . . . . . . . . . .
• Automatic Temperature Control (ATC) — If Equipped . . . .
• Operating Tips . . . . . . . . . . . . . . . . . . . . . . . . . . .
.
.
.
.
.
.
.
.
.
.
.
.
.
.
.
.
.
.
.
.
.
.191
.191
.192
.193
.193
.194
.194
.
.
.
.
.
.
.
.
.
.
.
.
.
.
.
.
.
.
.
.
.
.
.
.
.
.
.
.
.
.
.
.
.
.
.
.
.
.
.
.194
.194
.195
.196
.197
.197
.197
.198
.198
.198
.199
.201
.205
INSTRUMENT PANEL FEATURES
1
2
3
4
5
6
— Air Outlet
— Instrument Cluster
— Radio
— Assist Handle
— Glove Compartment
— Power Window Switches
7 — Climate Controls
8 — Power Outlet
9 — Lower Switch Bank
10 — Power Mirror Switch — If Equipped
11 — Horn
171
INSTRUMENT CLUSTER
172
INSTRUMENT CLUSTER
DESCRIPTIONS
1. Fuel Gauge
The pointer shows the level of fuel in the fuel
tank when the ignition switch is in the ON/RUN
position.
2. Charging System Light
This light shows the status of the electrical charging system. The light should
come on when the ignition switch is
first turned to ON/RUN, and remain on briefly as
a bulb check. If the light stays on or comes on
while driving, turn off some of the vehicle’s
non-essential electrical devices or increase engine speed (if at idle). If the charging system
light remains on, it means that the vehicle is
experiencing a problem with the charging system. Obtain SERVICE IMMEDIATELY. See an
authorized dealer.
If jump starting is required, refer to “Jump Starting
Procedures” in “What To Do In Emergencies”.
3. Front Fog Light Indicator
7. Seat Belt Reminder Light
When the fuel level reaches approximately 2 U.S. Gallons (7.6L) this light
will come on and remain on until fuel
is added. The “Low Fuel Warning Light” may
turn on and off again, especially during and
after hard braking, accelerations, or turns. This
occurs due to the shifting of the fuel in the tank.
When the ignition switch is first turned
to ON/RUN, this light will turn on for
four to eight seconds as a bulb check.
During the bulb check, if the driver’s
seat belt is unbuckled, a chime will sound.
After the bulb check or when driving, if the driver
seat belt remains unbuckled, the Seat Belt
Warning Light will flash or remain on continuously. Refer to “Occupant Restraints” in “Things
To Know Before Starting Your Vehicle” for further information.
5. Speedometer
8. Turn Signal Indicators
Indicates vehicle speed.
The left or right arrow will flash with
the corresponding exterior turn signal lights when the turn signal lever
is operated. A chime will sound if
the vehicle is driven more than
1 mile (1.6 km) with either turn signal on.
This indicator will illuminate when the
front fog lights are on.
4. Low Fuel Warning Light
NOTE:
A chime will sound once if the vehicle exceeds
120 km/h (75 mph).
6. Front Axle Lock Indicator — If Equipped
Indicates when the front axle lock
has been activated.
NOTE:
If either indicator flashes at a rapid rate,
check for a defective outside light bulb.
173
9. Oil Pressure Warning Light
This light indicates low engine oil pressure. The light should turn on momentarily when the engine is started; if the bulb does
not come on, have the system checked by an
authorized dealer. If the light turns on while
driving, stop the vehicle and shut off the engine
as soon as possible. A chime will sound when
this light turns on.
Do not operate the vehicle until the cause is
corrected. This light does not indicate how
much oil is in the engine. The engine oil level
must be checked under the hood.
10. Brake Warning Light
This light monitors various brake functions, including brake fluid level and
parking brake application. If the brake
light turns on it may indicate that the parking
brake is applied, that the brake fluid level is low,
or that there is a problem with the anti-lock
brake system reservoir.
If the light remains on when the parking brake
has been disengaged, and the fluid level is at
the full mark on the master cylinder reservoir, it
174
indicates a possible brake hydraulic system
malfunction or that a problem with the Brake
Booster has been detected by the Anti-Lock
Brake System (ABS) / Electronic Stability Program (ESP) system. In this case, the light will
remain on until the condition has been corrected. If the problem is related to the brake
booster, the ABS pump will run when applying
the brake and a brake pedal pulsation may be
felt during each stop.
The dual brake system provides a reserve
braking capacity in the event of a failure to a
portion of the hydraulic system. A leak in either
half of the dual brake system is indicated by the
Brake Warning Light, which will turn on when
the brake fluid level in the master cylinder has
dropped below a specified level.
The light will remain on until the cause is
corrected.
NOTE:
The light may flash momentarily during
sharp cornering maneuvers, which change
fluid level conditions. The vehicle should
have service performed, and the brake fluid
level checked.
If brake failure is indicated, immediate repair is
necessary.
WARNING!
Driving a vehicle with the red brake light on is
dangerous. Part of the brake system may
have failed. It will take longer to stop the
vehicle. You could have a collision. Have the
vehicle checked immediately.
Vehicles equipped with the Anti-Lock Brake
System (ABS), are also equipped with Electronic Brake Force Distribution (EBD). In the
event of an EBD failure, the Brake Warning
Light will turn on along with the ABS Light.
Immediate repair to the ABS system is required.
Operation of the Brake Warning Light can be
checked by turning the ignition switch from the
OFF position to the ON/RUN position. The light
should illuminate for approximately two seconds. The light should then turn off unless the
parking brake is applied or a brake fault is
detected. If the light does not illuminate, have
the light inspected by an authorized dealer.
The light also will turn on when the parking
brake is applied with the ignition switch in the
ON/RUN position.
tected a malfunction or has become inoperative. The system reverts to standard non-antilock brakes.
NOTE:
This light shows only that the parking brake
is applied. It does not show the degree of
brake application.
If both the Brake Warning Light and the ABS
Warning Light are on, see an authorized dealer
immediately. Refer to “Anti-Lock Brake System”
in “Starting And Operating”.
11. High Beam Indicator
13. Air Bag Warning Light
This light shows that the high beam
headlights are on. Push the multifunction control lever away from you to
switch the headlights to high beam. Pull the
lever toward you to switch the headlights back
to low beam. If the driver’s door is open, and the
headlights or park lights are left on, the high
beam indicator light will remain illuminated and
a chime will sound.
This light will turn on for four to
eight seconds as a bulb check
when the ignition switch is first
turned to ON/RUN. If the light is
either not on during starting, stays
on, or turns on while driving, have the system
inspected at an authorized dealer as soon as
possible. Refer to “Occupant Restraints” in
“Things To Know Before Starting Your Vehicle”
for further information.
12. Anti-Lock Brake (ABS) Light
After the ignition is turned on, the
Anti-Lock Brake System (ABS) light
illuminates to indicate function check
at vehicle start-up. If the light remains on after
start-up or comes on and stays on at road
speeds, it may indicate that the ABS has de-
14. Rear Axle Lock Indicator — If Equipped
This light indicates when the rear
axle lock has been activated.
15. Tachometer
Indicates the engine speed in revolutions per
minute (RPM x 1000).
CAUTION!
Do not operate the engine with the tachometer pointer in the red area. Engine damage
will occur.
16. Malfunction Indicator Light (MIL)
The Malfunction Indicator Light (MIL)
is a part of an Onboard Diagnostic
System called OBD II that monitors
engine and automatic transmission
control systems. The light will illuminate when
the ignition is in the ON position before engine
start. If the bulb does not come on when turning
the key from OFF to ON/RUN, have the condition checked promptly.
Certain conditions, such as a loose or missing
gas cap, poor quality fuel, etc., may illuminate
the light after engine start. The vehicle should
be serviced if the light stays on through several
175
typical driving styles. In most situations, the
vehicle will drive normally and will not require
towing.
CAUTION!
Prolonged driving with the Malfunction Indicator Light (MIL) on could cause damage to
the engine control system. It also could affect
fuel economy and driveability. If the MIL is
flashing, severe catalytic converter damage
and power loss will soon occur. Immediate
service is required.
WARNING!
A malfunctioning catalytic converter, as referenced above, can reach higher temperatures than in normal operating conditions.
This can cause a fire if you drive slowly or
park over flammable substances such as
dry plants, wood, cardboard, etc. This could
result in death or serious injury to the driver,
occupants or others.
176
17. Coolant Temperature Warning Light
19. 4WD Indicator Light — If Equipped
This light warns of an overheated engine condition. If the light turns on
while driving, safely pull over and stop
the vehicle. If the A/C system is on, turn it off.
Also, shift the transmission into NEUTRAL and
idle the vehicle. If the temperature reading does
not return to normal, turn the engine off immediately and call for service.
This light alerts the driver that the
vehicle is in the four-wheel drive
mode, and the front and rear driveshafts are mechanically locked together forcing the front and rear
wheels to rotate at the same speed.
NOTE:
As the coolant temperature gauge approaches
ⴖH,ⴖ this indicator will illuminate and a single
chime will sound. Further overheating will
cause the temperature gauge to pass ⴖH.ⴖ In
this case, a continuous chime will sound, until
the engine is allowed to cool.
This light will flash at a fast rate for
approximately 15 seconds, when
the vehicle security alarm is arming, and then will flash slowly until
the vehicle is disarmed.
18. Rear Fog Light Indicator — If Equipped
This indicator will illuminate when the
rear fog lights are on.
20. Vehicle Security Light — If Equipped
21. Temperature Gauge
The temperature gauge shows engine coolant
temperature. Any reading within the normal
range indicates that the engine cooling system
is operating satisfactorily.
The gauge pointer will likely indicate a higher
temperature when driving in hot weather, up
mountain grades, or when towing a trailer. It
should not be allowed to exceed the upper limits
of the normal operating range.
CAUTION!
Driving with a hot engine cooling system
could damage your vehicle. If the temperature gauge reads “H” pull over and stop the
vehicle. Idle the vehicle with the air conditioner turned off until the pointer drops back
into the normal range. If the pointer remains
on the “H” and you hear continuous chimes,
turn the engine off immediately and call an
authorized dealer for service.
WARNING!
A hot engine cooling system is dangerous.
You or others could be badly burned by
steam or boiling coolant. You may want to
call an authorized dealer for service if your
vehicle overheats. If you decide to look under the hood yourself, see “Maintaining Your
Vehicle”. Follow the warnings under the
Cooling System Pressure Cap paragraph.
22. Odometer / Trip Odometer / ECO
(Fuel Saver Indicator) Button
Press this button to change the display from
odometer to either of the two trip odometer
settings or the “ECO” display. Trip A or Trip B will
appear when in the trip odometer mode. Press
and hold the button for two seconds to reset the
trip odometer to 0 miles or kilometers. The
odometer must be in trip mode to reset.
23. Shift Lever Indicator
The Shift Lever Indicator is self-contained within
the instrument cluster. It displays the gear position of the automatic transmission.
24. Gear Shift Indicator — If Equipped
This indicator will illuminate when a
manual shift is needed either up or
down.
25. Odometer / Trip Odometer Display Area
The odometer display shows the total distance
the vehicle has been driven. The trip odometer
shows individual trip mileage.
Vehicle Odometer Messages
When the appropriate conditions exist, the following odometer messages will display:
ECO . . . . . . . . . . . .Fuel Saver Indicator
door . . . . . . . . . . . . . . . . . .Door Ajar
gATE . . . . . . . . . . . . . .Swing Gate Ajar
LoW tirE . . . . . . . . . . .Low Tire Pressure
HOTOIL . . . . .Transmission Oil Temperature
Above Normal Limits
gASCAP . . . . . . . . . . . . .Fuel Cap Fault
noFUSE . . . . . . . . . . . . . . . .Fuse Fault
CHAngE OIL . . . . . . .Oil Change Required
ECO (Fuel Saver Indicator) — If Equipped
The ECO indicator will illuminate when you are
driving in a fuel efficient manner and can be
used to modify driving habits in order to increase fuel economy.
177
NOTE:
If the vehicle is equipped with the optional
Electronic Vehicle Information Center (EVIC)
in the instrument cluster, all the messages
will only be displayed in the EVIC display.
CAUTION!
Continuous driving with the Transmission
Temperature “HOTOIL” Warning message
illuminated will eventually cause severe
transmission damage or transmission failure.
LoW tirE
When the appropriate condition exists, the
odometer display will toggle between LoW and
tirE for three cycles.
“HOTOIL” Transmission Temperature
Warning Message
The “HOTOIL” cluster message will appear in
the odometer accompanied with a chime to
indicate that there is excessive transmission
fluid temperature that might occur with severe
usage such as trailer towing. It may also occur
when operating the vehicle in a high torque
converter slip condition, such as 4-wheel drive
operation (e.g., snow plowing, off-road operation). If this “HOTOIL” message turns on, stop
the vehicle and run the engine at idle or faster
with the transmission in NEUTRAL until the
message turns off.
178
WARNING!
If the Transmission Temperature “HOTOIL”
Warning message is illuminated and you
continue operating the vehicle, in some circumstances you could cause the fluid to boil
over, come in contact with hot engine or
exhaust components and cause a fire.
gASCAP
If the vehicle diagnostic system determines that
the fuel filler cap is loose, improperly installed,
or damaged, a “gASCAP” message will display
in the odometer display area. Tighten the fuel
filler cap properly and press the TRIP ODOMETER button to turn off the message. If the
problem continues, the message will appear the
next time the vehicle is started.
noFUSE
If the vehicle diagnostic system determines that
the Ignition Off Draw (IOD) fuse is improperly
installed, or damaged, a “noFUSE” message
will display in the odometer display area. For
further information on fuses and fuse locations
refer to “Fuses” in “Maintaining Your Vehicle”.
CHAngE OIL Message
Your vehicle is equipped with an engine oil
change indicator system. The “CHANgE OIL”
message will display in the instrument cluster
odometer for approximately 12 seconds after a
single chime has sounded to indicate the next
scheduled oil change interval. The engine oil
change indicator system is duty-cycle based,
which means the engine oil change interval may
fluctuate dependent upon your personal driving
style.
Unless reset, this message will continue to
display each time you turn the ignition switch to
the ON/RUN position. To turn off the message
temporarily, press and release the Trip Odometer button on the instrument cluster. To reset
the oil change indicator system (after performing the scheduled maintenance), refer to the
following procedure:
1. Turn the ignition switch to the ON/RUN
position (do not start the engine).
2. Fully depress the accelerator pedal
slowly three times within 10 seconds.
3. Turn the ignition switch to the OFF/LOCK
position.
NOTE:
If the indicator message illuminates when
you start the vehicle, the oil change indicator system did not reset. If necessary, repeat
this procedure.
26. Hill Decent Indicator
This indicator shows when the Hill
Descent Control (HDC) feature is
turned on. The lamp will be on solid
when HDC is armed. HDC can only
be armed when the transfer case is
in the “4WD LOW” position and the vehicle speed
is less then 30 mph (48 km/h). If these conditions
are not met while attempting to use the HDC
feature, the HDC indicator light will flash on/off.
27. Cruise Indicator
This indicator shows when the
electronic speed control system is
turned on.
28. Tire Pressure Monitoring Telltale Light
Each tire, including the spare (if
provided), should be checked
monthly when cold and inflated to
the inflation pressure recommended by the vehicle manufacturer on the vehicle placard or tire inflation
pressure label. (If your vehicle has tires of a
different size than the size indicated on the
vehicle placard or tire inflation pressure label,
you should determine the proper tire inflation
pressure for those tires.)
As an added safety feature, your vehicle has
been equipped with a Tire Pressure Monitoring
System (TPMS) that illuminates a low tire pressure telltale when one or more of your tires is
significantly under-inflated. Accordingly, when
the low tire pressure telltale illuminates, you
should stop and check your tires as soon as
possible, and inflate them to the proper pres-
sure. Driving on a significantly under-inflated
tire causes the tire to overheat and can lead to
tire failure. Under-inflation also reduces fuel
efficiency and tire tread life, and may affect the
vehicle’s handling and stopping ability.
Please note that the TPMS is not a substitute for
proper tire maintenance, and it is the driver’s
responsibility to maintain correct tire pressure,
even if under-inflation has not reached the level
to trigger illumination of the TPMS low tire
pressure telltale.
Your vehicle has also been equipped with a
TPMS malfunction indicator to indicate when
the system is not operating properly. The TPMS
malfunction indicator is combined with the low
tire pressure telltale. When the system detects
a malfunction, the telltale will flash for approximately one minute and then remain continuously illuminated. This sequence will continue
upon subsequent vehicle start-ups as long as
the malfunction exists. When the malfunction
indicator is illuminated, the system may not be
able to detect or signal low tire pressure as
intended. TPMS malfunctions may occur for a
variety of reasons, including the installation of
179
replacement or alternate tires or wheels on the
vehicle that prevent the TPMS from functioning
properly. Always check the TPMS malfunction
telltale after replacing one or more tires or
wheels on your vehicle, to ensure that the
replacement or alternate tires and wheels allow
the TPMS to continue to function properly.
CAUTION!
The TPMS has been optimized for the original equipment tires and wheels. TPMS pressures and warning have been established for
the tire size equipped on your vehicle. Undesirable system operation or sensor damage may result when using replacement
equipment that is not of the same size, type,
and/or style. Aftermarket wheels can cause
sensor damage. Do not use tire sealant from
a can or balance beads if your vehicle is
equipped with a TPMS, as damage to the
sensors may result.
180
29. Electronic Stability Program (ESP)
Indicator Light / Traction Control System
(TCS) Indicator Light
If the Electronic Stability Program
(ESP) / Traction Control System
(TCS) Indicator Light begins to
flash during acceleration, ease up
on the accelerator and apply as
little throttle as possible. This indicator light
starts to flash as soon as the tires lose traction
and the Electronic Stability Program (ESP) becomes active. The ESP/TCS Indicator Light
also flashes when TCS is active. Be sure to
adapt your speed and driving to the prevailing
road conditions. If the ESP/TCS Indicator Light
is on solid, the ESP system has been turned off
by the driver or a temporary condition exists that
will not allow full ESP function.
30. Sway Bar Indicator — If Equipped
This indicator will illuminate when
the front sway bar is disconnected.
31. Electronic Throttle Control (ETC) Light
This light informs you of a problem
with the Electronic Throttle Control
(ETC) system. If a problem is detected while the engine is running,
the light will either stay on or flash
depending on the nature of the problem. Cycle
the ignition key when the vehicle is safely and
completely stopped and the shift lever is placed
in the PARK position. The light should turn off.
If the light remains on with the engine running,
your vehicle will usually be drivable; however,
see an authorized dealer for service as soon as
possible.
If the light continues to flash when the engine is
running, immediate service is required and you
may experience reduced performance, an elevated / rough idle, or engine stall and your
vehicle may require towing. The light will come
on when the ignition is first turned to ON/RUN
and remain on briefly as a bulb check. If the light
does not come on during starting, have the
system checked by an authorized dealer.
32. Electronic Stability Control (ESC) OFF
Indicator Light — If Equipped
This light indicates the Electronic
Stability Control (ESC) is off.
COMPASS AND TRIP
COMPUTER — IF EQUIPPED
The Compass/Trip Computer features a driverinteractive display (displays information on outside temperature, compass direction, and trip
information). It is located on the lower left part of
the cluster below the speedometer.
Control Buttons
The Compass/Temperature control buttons are
located on the left spoke of the steering wheel.
33. Electronic Vehicle Information Center
(EVIC) Display / Compass Mini-Trip
Computer Display — If Equipped
When the appropriate conditions exist, this display shows the Electronic Vehicle Information
Center (EVIC) messages. For further information, refer to “Electronic Vehicle Information
Center”.
When the appropriate conditions exist, this display shows the Mini-Trip Computer messages.
Refer to “Mini-Trip Computer” for further
information.
Control Buttons
Compass Display
Press and release the STEP button on the
steering wheel to access the options in the
Compass display.
181
NOTE:
The system will display the last known outside temperature when starting the vehicle
and may need to be driven several minutes
before the updated temperature is displayed. Engine temperature can also affect
the displayed temperature; therefore, temperature readings are not updated when the
vehicle is not moving.
AVG ECO and ET can be reset. When the
feature is displayed, press and hold the RESET
button until the feature resets (about 2 seconds).
Press and release the STEP button to step
through each of the following CMTC features:
Compass/Temperature Display
• Compass/Outside Temperature
• AVG ECO (Average Fuel Economy)
• DTE (Distance to Empty)
• ET (Elapsed Time)
182
These messages can be cycled through by
pressing the STEP button on the steering
wheel. To reset the AVG ECO or ET, press and
hold the STEP button for approximately three
seconds.
NOTE:
If the vehicle is equipped with a Chrysler
Uconnect® gps (Navigation Radio), the NAV
system will provide the compass direction,
and the variance and calibration menus will
be unavailable. The compass will perform
accurately, based on GPS signals instead of
the Earth’s magnetic field.
Compass Variance
Compass Variance is the difference between
Magnetic North and Geographic North. To compensate for the differences, the variance should
be set for the zone where the vehicle is driven,
per the zone map. Once properly set, the compass will automatically compensate for the differences and provide the most accurate compass heading.
Compass Variance Map
183
To Set The Variance
Start the engine and leave the transmission
gear selector lever in the PARK position. Press
and hold the RESET button on the steering
wheel (for approximately ten seconds) until the
current variance zone number is displayed. To
change the zone, press and release the STEP
button to increase the variance one step. Repeat as necessary until the desired variance is
achieved.
NOTE:
The factory default zone is 8. During programming, the zone value will wrap around
from zone 15 to zone 1.
Manual Compass Calibration
If the compass appears erratic, inaccurate or
abnormal, you may wish to calibrate the compass. Prior to calibrating the compass, make
sure the proper zone is selected.
1. Start the engine and leave the transmission
in the PARK position.
2. Press and hold the RESET button (for approximately 10 seconds) until the current
variance zone number is displayed.
184
3. Release the RESET button, then press and
hold again for approximately 10 seconds,
until the direction is displayed, with the CAL
indicator on continuously in the display.
4. To complete the compass calibration, drive
the vehicle in one or more complete 360–
degree circles, under 5 mph (8 km/h) in an
area free from power lines and large metallic
objects, until the CAL indicator turns off. The
compass will now function normally.
NOTE:
• A good calibration requires a level surface
and an environment free from large metallic
objects such as buildings, bridges, underground cables, railroad tracks, etc.
• Magnetic materials should be kept away
from the top of the center of the instrument panel. This is where the compass
sensor is located.
Average Fuel Economy / Distance To
Empty (DTE) / Elapsed Time
• Average Fuel Economy
Shows the average fuel economy since the last
reset. When the fuel economy is reset, the digits
will go blank while the history information is
erased. The averaging will restart when enough
new distance and fuel data is accumulated.
• Distance To Empty (DTE)
Shows the estimated distance that can be traveled with the fuel remaining in the tank. This
estimated distance is determined by a weighted
average of the instantaneous and average fuel
economy, according to the current fuel tank
level. DTE cannot be reset.
• Elapsed Time
Shows the total elapsed time of travel since the
last reset. Elapsed time will increment when the
ignition switch is in the RUN or START positions. The elapsed timer displays minutes:seconds. After 59minutes:59seconds, it displays
hours:minutes:seconds.
Trip Conditions
Trip Odometer (ODO) / ECO
(Fuel Saver Indicator) — If Equipped
This display shows the distance traveled since
the last reset. Push and release the right button
(on the instrument cluster) to switch from odometer to Trip A or Trip B or to ECO. Push and hold
the right button while the odometer/trip odometer is displayed to reset.
Trip A
Shows the total distance traveled for trip A since
the last reset.
Trip B
Shows the total distance traveled for trip B since
the last reset.
ECO (Fuel Saver Indicator) — If Equipped
The ECO indicator will illuminate when you are
driving in a fuel efficient manner and can be
used to modify driving habits in order to increase fuel economy.
ELECTRONIC VEHICLE
INFORMATION CENTER
(EVIC) — IF EQUIPPED
The Electronic Vehicle Information Center
(EVIC) features a driver-interactive display that
is located in the instrument cluster.
Trip Display Button
Electronic Vehicle Information Center (EVIC)
This system conveniently allows the driver to
select a variety of useful information by pushing
the switches mounted on the steering wheel.
The EVIC consists of the following:
• Compass Heading (N, S, E, W, NE, NW,
SE, SW)
• Outside Temperature (°F or °C)
• Digital Speedometer
• Vehicle Info
• ECO Display
• Fuel Economy
185
• Miles/kilometers To Empty
• MENU Button
• Timer
Push and release the MENU button to advance the display to each
of the EVIC Main Menu features or
to return to the Main Menu from a
sub-menu. Upon reaching the last
item in the Main Menu the EVIC will advance to
the first item in the Main Menu with the next
MENU button push and release.
Electronic Vehicle Information
Center (EVIC) Displays
• COMPASS Button
When the appropriate conditions exist, the
EVIC displays the following messages:
Push and release the COMPASS
button to return to the Compass/
Outside Temperature/Audio Information/ECO screen whenever the
current display is not the Compass/
Outside Temperature/Audio Information/ECO
screen.
• Low Tire Pressure
• Display Units Selection
• System Warnings (Door Ajar, etc.)
• Personal Settings (Customer-Programmable
Features)
• Tire Pressure Monitor System — If Equipped
The system allows the driver to select information by pushing the following buttons mounted
on the steering wheel:
• SELECT Button
EVIC Steering Wheel Buttons
186
Push and release the SELECT button when prompted by the EVIC to
Reset Main Menu features with a
reset capability or to change Personal Settings.
• DOWN Button
Push and release the DOWN button when prompted by the EVIC to
step through stored system warning messages or Personal Settings
features.
• Low Fuel
• Service TPM System (refer to "Tire Pressure
Monitoring System" in "Starting and Operating")
• Premium TPM System Graphic Display
• Damaged Key
• Key in Ignition
• Turn Signal On (with a continuous warning
chime)
• Left Front Turn Signal Lamp Out (with a
single chime)
• Left Rear Turn Signal Lamp Out (with a
single chime)
Gear Shift Indicator (GSI) —
If Equipped
• Right Front Turn Signal Lamp Out (with a
single chime)
— Up Shift Indicator Light
The GSI indicator remains illuminated until the
driver changes gear, or the driving conditions
return to a situation where changing gear is not
required to improve fuel consumption.
• Right Rear Turn Signal Lamp Out (with a
single chime)
• Key Fob Battery Low (with a single chime)
• Personal Settings Not Avail. – Vehicle Not in
Park — automatic transmission
— Down Shift Indicator Light
• Personal Settings Not Avail. – Vehicle in
Motion — manual transmission
• Door Ajar (with vehicle graphic showing
which door is open. A single chime sounds if
the vehicle is in motion).
• Gate Ajar (with vehicle graphic showing the
Liftgate/back door open and A single chime )
• Check Gascap (refer to “Adding Fuel” in
“Starting And Operating” for more details)
• Oil Change Required (with a single chime)
• ECO (Fuel Saver Indicator) — if equipped
driver to engage a higher gear. When the down
shift indicator is shown on the display, the GSI is
advising the driver to engage a lower gear.
The Gear Shift Indicator (GSI) system is enabled on vehicles with a manual transmission,
or when a vehicle with an automatic transmission is in manual shift mode. The GSI provides
the driver with a visual indication when the
recommended gear shift point has been
reached. This indication notifies the driver that
changing gear will allow a reduction in fuel
consumption. When the up shift indicator is
shown on the display, the GSI is advising the
Oil Change Required
Your vehicle is equipped with an engine oil
change indicator system. The “Oil Change Required” message will display in the EVIC display
for approximately 5 seconds after a single
chime has sounded to indicate the next scheduled oil change interval. The engine oil change
indicator system is duty cycle based, which
means the engine oil change interval may fluctuate dependent upon your personal driving
style.
Unless reset, this message will continue to
display each time you turn the ignition switch to
the ON position. To turn off the message temporarily, push and release the MENU button.
187
To reset the oil change indicator system (after
performing the scheduled maintenance), perform the following procedure:
1. Turn the ignition switch to the ON position.
Do not start the engine.
2. Fully push the accelerator pedal slowly three
times within 10 seconds.
3. Turn the ignition switch to the LOCK position.
NOTE:
If the indicator message illuminates when
you start the vehicle, the oil change indicator system did not reset. If necessary, repeat
this procedure.
• Average Fuel Economy
• Distance to Empty
• Elapsed Time
• Vehicle Information
• Coolant Temp
• Oil Pressure
• Transmission Temp
• Oil Life Remaining (Automatic Oil Change
Indicator)
• EVIC Units Selection
• System Warnings
• Personal Settings
EVIC Main Menu
• Tire Pressure
To step to each main menu feature push and
release the MENU button once for each step.
A step from the last item in the list will cause
the first item in the feature list to be displayed.
The following features are in the Main menu:
NOTE:
For features in the EVIC that can be reset
(Average Fuel Economy and Elapsed Time),
the EVIC prompts a reset with a SELECT
button graphic and the word RESET next to it.
• Compass, Outside Temperature, and ECO
display
When the SELECT button is pushed, the selected feature will reset and RESET ALL will
display next to the SELECT button graphic.
• Digital Speedometer
188
Pushing SELECT a second time will reset both
Average Fuel Economy and Elapsed Time. After
three seconds without pushing SELECT, RESET ALL will return to RESET and only the
selected feature will have been reset.
Compass, Outside Temperature
Display / ECO (Fuel Saver Mode) —
If Equipped
The compass readings indicate the direction the
vehicle is facing. Push and release the COMPASS button to display one of eight compass
headings, the outside temperature/ECO if the
EVIC display is not already displaying this
screen.
NOTE:
The system will display the last known outside temperature when starting the vehicle
and may need to be driven several minutes
before the updated temperature is displayed. Engine temperature can also affect
the displayed temperature; therefore, temperature readings are not updated when the
vehicle is not moving.
ECO (Fuel Saver Mode) — If Equipped
The ECO message will display below the outside temperature in the EVIC display (if the
audio system is on the ECO indicator will override the audio information display line if the
"Display Fuel Saver" personal setting is ON —
see "Personal Settings" section). This message
will appear whenever you are driving in a fuel
efficient manner.
This feature allows you to monitor when you are
driving in a fuel efficient manner, and it can be
used to modify driving habits in order to increase fuel economy.
Automatic Compass Calibration
This compass is self-calibrating, which eliminates the need to set the compass manually.
When the vehicle is new, the compass may
appear erratic and the EVIC will display “CAL”
until the compass is calibrated. You may also
calibrate the compass by completing one or
more 360–degree turns (in an area free from
large metal or metallic objects) until the “CAL”
message displayed in the EVIC turns off. The
compass will now function normally.
NOTE:
A good calibration requires a level surface
and an environment free from large metallic
objects such as buildings, bridges, underground cables, railroad tracks, etc.
5. Complete one or more 360–degree turns (in
an area free from large metal or metallic
objects) until the “CAL” indicator turns off.
The compass will now function normally.
1. Start the engine. Leave the shift lever in
PARK in order to enter the EVIC Programming Menus.
Compass Variance
Compass Variance is the difference between
Magnetic North and Geographic North. To compensate for the differences, the variance should
be set for the zone where the vehicle is driven,
per the zone map. Once properly set, the compass will automatically compensate for the differences and provide the most accurate compass heading.
2. Push the MENU button until Personal Settings (Customer-Programmable Features)
displays in the EVIC.
NOTE:
Magnetic materials should be kept away
from the top of the instrument panel; this is
where the compass sensor is located.
Manual Compass Calibration
If the compass appears erratic and the “CAL”
indicator does not appear in the EVIC display,
you must put the compass into the Calibration
Mode manually as follows:
3. Push the DOWN button until “Calibrate
Compass” displays in the EVIC.
4. Push and release the SELECT button to
start the calibration. The “CAL” indicator will
display in the EVIC.
189
Compass Variance Map
190
To Change The Compass Variance:
Distance To Empty (DTE)
Elapsed time is displayed as follows:
1. Turn the ignition switch RUN (it is not necessary to start the engine).
Shows the estimated distance that can be traveled with the fuel remaining in the tank. This
estimated distance is determined by a weighted
average of the instantaneous and average fuel
economy, according to the current fuel tank
level. DTE cannot be reset.
• Hours
2. Press the MENU button until Personal Settings (Customer-Programmable Features)
displays in the EVIC.
3. Press the DOWN button until “Compass
Variance” message and the last variance
zone number displays in the EVIC.
4. Press and release the SELECT button until
the proper variance zone is selected according to the map.
5. Press and release the COMPASS button to
exit.
Average Fuel Economy
Shows the average fuel economy since the last
reset. Average Fuel Economy can be reset by
pushing and holding the SELECT button (as
prompted in the EVIC display). Upon reset, the
history information will be erased, and the averaging will continue from the last fuel average
reading before the reset.
NOTE:
Significant changes in driving style or vehicle loading will greatly affect the actual
drivable distance of the vehicle, regardless
of the DTE display value.
When the DTE value is less than 30 miles
(48 km) estimated driving distance, the DTE
display will change to a text display of "LOW
FUEL”. This display will continue until the vehicle
runs out of fuel. Adding a significant amount of
fuel to the vehicle will turn off the LOW FUEL text
and a new DTE value will display.
Elapsed Time
Shows the total elapsed time of travel since the
last reset. Elapsed time will increment when the
ignition switch is in the RUN or START position.
• Minutes
• Seconds
Elapsed time can be reset by pushing and
holding the SELECT button (as prompted in the
EVIC display). Upon reset all digits will change
to zeros and time will start incrementing again if
the ignition switch is in RUN or START.
System Status
Displays SYSTEM OK if there are no active
Warning Messages stored. Pushing and releasing the DOWN button when SYSTEM OK is
displayed will do nothing. Displays SYSTEM
WARNINGS PRESENT if there are active
Warning Messages stored. Pushing and releasing the DOWN button when SYSTEM WARNINGS PRESENT is displayed will display each
stored warning for each button push. Push and
release the MENU button to return to the Main
Menu.
191
Personal Settings
(Customer-Programmable Features)
Personal Settings allows the driver to set and
recall features when the vehicle speed is at
0 mph (0 km/h) (manual transmission) or when
the shift lever is in PARK (auto transmission).
button until a check-mark appears next to the
feature showing the system has been activated
or the check-mark is removed showing the
system has been deactivated.
Use the DOWN button to display one of the
following choices:
Auto Unlock On Exit — If Equipped
When ON is selected, all doors will unlock when
the vehicle is stopped and the transmission is in
the PARK or NEUTRAL position and the driver’s
door is opened. To make your selection, press
and release the SELECT button until “On” or
“Off” appears.
Language
When in this display you may select one of five
languages for all display nomenclature, including the trip functions and the navigation system
(if equipped). Press the SELECT button while
in this display to select English, Espanol or
Francais. Then, as you continue, the information will display in the selected language.
Sound Horn With Lock — If Equipped
When on is selected, a short horn sound will
occur when the RKE transmitter LOCK button is
pressed. This feature may be selected with or
without the Flash Lamp with Remote Key Lock
feature. To make your selection, press and
release the SELECT button until “On” or “Off”
appears.
Auto Lock Doors
When this feature is selected, all doors will lock
automatically when the vehicle reaches a
speed of 15 mph (24 km/h). The auto door lock
feature can be enabled or disabled, to make
your selection, press and release the SELECT
Flash Lamp with Lock
When on is selected, the front and rear turn
signals will flash when the doors are locked or
unlocked with the RKE transmitter. This feature
may be selected with or without the sound horn
on lock feature selected. To make your selection,
Push and release the MENU button until Personal Settings displays in the EVIC.
192
press and release the SELECT button until “On”
or “Off” appears.
Headlamp Off Delay
When this feature is selected the driver can
choose to have the headlamps remain on for 0,
30, 60, or 90 seconds when exiting the vehicle.
Press and hold the SELECT button when in this
display until 0, 30, 60, or 90 appears to make
your selection.
Key Off Power Delay
When this feature is selected, the power window switches, radio, hands–free system (if
equipped), DVD video system (if equipped),
power sunroof (if equipped), and power outlets
will remain active for up to 10 minutes after the
ignition switch is turned to the LOCK position.
Opening either front vehicle door will cancel this
feature. To make your selection, press and
release the SELECT button until “Off,” “45 sec.,”
“5 min.,” or “10 min.” appears.
Illumination Approach — If Equipped
When this feature is selected, the headlights will
activate and remain on for up to 90 seconds
when the doors are unlocked with the RKE
transmitter. To make your selection, press and
hold the SELECT button until “Off,” “30 sec,”
“60 sec,” or “90 sec” appears.
push and release the SELECT button until “On”
or “Off” appears.
Headlamps With Wipers (Available with
Auto Headlights Only)
When ON is selected, and the multifunction
lever is placed in the AUTO position, the headlights will turn on approximately 10 seconds
after the wipers are turned ON. The headlights
will also turn off when the wipers are turned
OFF if they were turned ON by this feature. To
make your selection, press and release the
SELECT button until “ON” or “OFF” appears.
Display Fuel Saver — If Equipped
The “ECO” message is located in the Compass/
Temperature display; this message can be
turned on or off. To make your selection, press
and release the SELECT button until “ON” or
“OFF” appears.
Nav–Turn By Turn — If Equipped
When this feature is selected, the navigation
system utilizes voice commands, guiding
through the drive route, mile by mile, turn-byturn until the final destination is reached. To
make your selection, press and release the
SELECT button until “ON” or “OFF” appears.
Hill Start Assist (HSA) — If Equipped
When on is selected, the HSA system is active.
Refer to “Electronic Brake Control System” in
“Starting And Operating” for system function and
operating information. To make your selection,
EVIC Units Selection (UNITS IN Display)
Displays the units used for the Outside Temperature, Average Fuel Economy and Distance
to Empty features. Push and Release the SELECT button to toggle units between "U.S." and
"METRIC".
SOUND SYSTEMS
Refer to your Sound Systems Booklet.
iPod®/USB/MP3 CONTROL —
IF EQUIPPED
This feature allows an iPod® or external USB
device to be plugged into the USB port, located
in the center console.
iPod® control supports Mini, 4G, Photo, Nano,
5G iPod® and iPhone® devices. Some iPod®
software versions may not fully support the
iPod® control features. Please visit Apple’s
website for software updates.
Compass Variance
Refer to “Compass/Temperature Display” in
“Electronic Vehicle Information (EVIC)” in “Understanding Your Instrument Panel” for more
information.
NOTE:
• If the radio has a USB port, refer to the
appropriate
Uconnect®
Supplement
Manual for iPod® or external USB device
support capability.
Calibrate Compass
Refer to “Automatic Compass Calibration” in
“Electronic Vehicle Information (EVIC)” in “Understanding Your Instrument Panel” for more
information.
• Connecting an iPod® or consumer electronic audio device to the AUX port located in the radio faceplate, plays media,
but does not use the iPod®/MP3 control
feature to control the connected device.
193
Connecting The iPod® Or External
USB Device
Use the connection cable to connect an iPod®
or external USB device to the vehicles USB/
AUX connector port which is located in the
center console.
NOTE:
If the audio device battery is completely
discharged, it may not communicate with
the iPod®/USB/MP3 control system until a
minimum charge is attained. Leaving the
audio device connected to the iPod®/USB/
MP3 control system may charge it to the
required level.
Using This Feature
By using an iPod® cable, or an external USB
device to connect to the USB port:
• The audio device can be played on the
vehicle’s sound system, providing metadata
(artist, track title, album, etc.) information on
the radio display.
Center Console USB/AUX Connector Port
Once the audio device is connected and synchronized to the vehicles iPod®/USB/MP3 control system (iPod® or external USB device may
take a few minutes to connect), the audio
device starts charging and is ready for use by
pushing radio switches, as described below.
194
• The audio device can be controlled using the
radio buttons to Play, Browse, and List the
iPod® contents.
• The audio device battery charges when
plugged into the USB/AUX connector (if supported by the specific audio device).
Controlling The iPod® Or External
USB Device Using Radio Buttons
To get into the iPod®/USB/MP3 control mode
and access a connected audio device, either
push the “AUX” button on the radio faceplate or
push the VR button and say "USB" or "Switch to
USB." Once in the iPod®/USB/MP3 control
mode, audio tracks (if available from audio
device) start playing over the vehicle’s audio
system.
Play Mode
When switched to iPod®/USB/MP3 control
mode, the iPod® or external USB device automatically starts Play mode. In Play mode, the
following buttons on the radio faceplate may be
used to control the iPod® or external USB
device and display data:
• Use the TUNE control knob to select the next
or previous track.
• Turning it clockwise (forward) by one
click, while playing a track, skips to the
next track or push the VR button and say
"Next Track."
• Turning it counterclockwise (backward)
by one click, will jump to the previous
track in the list or push the VR button and
say "Previous Track."
• Jump backward in the current track by pushing and holding the << RW button. Holding
the << RW button long enough will jump to
the beginning of the current track.
• Jump forward in the current track by pushing
and holding the FF>> button.
• A single push backward << RW or forward
FF>> will jump backward or forward respectively, for five seconds.
• Use the << SEEK and SEEK >> buttons to
jump to the previous or next track. Pushing
the SEEK >> button during play mode will
jump to the next track in the list, or push the
VR button and say "Next or Previous Track."
• While a track is playing, push the INFO
button to see the associated metadata (artist,
track title, album, etc.) for that track. Pushing
the INFO button again jumps to the next
screen of data for that track. Once all screens
have been viewed, the last INFO button push
will go back to the play mode screen on the
radio.
• Pushing the REPEAT button will change the
audio device mode to repeat the current
playing track or push the VR button and say
"Repeat ON" or "Repeat Off."
• Push the SCAN button to use iPod®/USB/
MP3 device scan mode, which will play the
first ten seconds of each track in the current
list and then forward to the next song. To stop
SCAN mode and start playing the desired
track, when it is playing the track, push the
SCAN button again. During Scan mode,
pushing the << SEEK and SEEK >> buttons
will select the previous and next tracks.
• RND button (available on sales code RES
radio only): Pushing this button toggles between Shuffle ON and Shuffle OFF modes for
the iPod® or external USB device, or push
the VR button and say "Shuffle ON" or
"Shuffle Off." If the RND icon is showing on
the radio display, then the shuffle mode is
ON.
List Or Browse Mode
During Play mode, pushing any of the buttons
described below, will bring up List mode. List
mode enables scrolling through the list of
menus and tracks on the audio device.
TUNE control knob: The TUNE control knob
functions in a similar manner as the scroll wheel
on the audio device or external USB device.
• Turning it clockwise (forward) and counterclockwise (backward) scrolls through the
lists, displaying the track detail on the radio
display. Once the track to be played is highlighted on the radio display, push the TUNE
control knob to select and start playing the
track. Turning the TUNE control knob fast will
scroll through the list faster. During fast
scroll, a slight delay in updating the information on the radio display may be noticeable.
During all List modes, the iPod® displays all
lists in “wrap-around” mode. So if the track is at
the bottom of the list, just turn the wheel backward (counterclockwise) to get to the track
faster.
195
In List mode, the radio PRESET buttons are
used as shortcuts to the following lists on the
iPod® or external USB device:
• Preset 1 – Playlists
• Preset 2 – Artists
• Preset 3 – Albums
follow the same steps to go to the desired
track in that list. Not all iPod® or external
USB device sub-menu levels are available
on this system.
MUSIC TYPE button: The MUSIC TYPE button
is another shortcut button to the genre listing on
your audio device.
• Preset 4 – Genres
• Preset 5 – Audiobooks
• Preset 6 – Podcasts
Pushing a PRESET button will display the current list on the top line and the first item in that
list on the second line.
To exit List mode without selecting a track, push
the same PRESET button again to go back to
Play mode.
LIST button: The LIST button will display the top
level menu of the iPod® or external USB device.
• Turn the TUNE control knob to list the topmenu item to be selected and push the
TUNE control knob. This will display the next
sub-menu list item on the audio device, then
196
CAUTION!
• Leaving the iPod® or external USB device
(or any supported device) anywhere in the
vehicle in extreme heat or cold can alter
the operation or damage the device. Follow the device manufacturer’s guidelines.
• Placing items on the iPod® or external
USB device, or connections to the iPod®
or external USB device in the vehicle, can
cause damage to the device and/or to the
connectors.
WARNING!
Do not plug in or remove the iPod® or external
USB device while driving. Failure to follow this
warning could result in an accident.
Bluetooth® Streaming Audio (BTSA)
Music can be streamed from your cellular
phone to the Uconnect® phone system.
Refer to the Uconnect® Radio Supplement for
further information on Bluetooth® connectivity.
Controlling BTSA Using Radio Buttons
To enter BTSA mode, push either “AUX” button
on the radio or push the VR button and say
“Bluetooth Streaming Audio.”
Play Mode
When switched to BTSA mode, some audio
devices can start playing music over the vehicle’s audio system, but some devices require
the music to be initiated on the device first, then
it will get streamed to the Uconnect® phone
system. Seven devices can be paired to the
Uconnect® phone system, but just one can be
selected and played.
Selecting A Different Audio Device
1. Push the PHONE button to begin.
STEERING WHEEL AUDIO
CONTROLS
2. After the "Ready" prompt and following the
beep, say "Setup", then say "Select Audio
Devices."
The remote sound system controls are located
on the rear surface of the steering wheel. Reach
behind the wheel to access the switches.
Pressing the center button will make the radio
switch between the various modes available.
The left-hand control is a rocker-type switch
with a pushbutton in the center. The function of
the left-hand control is different depending on
which mode you are in.
3. Say the name of the audio device or ask the
Uconnect® phone system to list the audio
devices.
The following describes the left-hand control
operation in each mode.
Next Track
Use the SEEK UP button, or push the VR button
on the radio and say “Next Track,” to jump to the
next music track on your cellular phone.
Pushing the top of the switch will “Seek” up for
the next listenable station and pushing the
bottom of the switch will “Seek” down for the
next listenable station.
Previous Track
Use the SEEK DOWN button, or push the VR
button on the radio and say “Previous Track,” to
jump to the previous music track on your cellular
phone.
Browse
Browsing is not available on a Bluetooth®
Streaming Audio (BTSA) device. Only the current song that is playing will display info.
Radio Operation
Remote Sound System Controls (Back View Of
Steering Wheel)
The right-hand control is a rocker-type switch
with a pushbutton in the center and controls the
volume and mode of the sound system. Pressing the top of the rocker switch will increase the
volume, and pressing the bottom of the rocker
switch will decrease the volume.
The button located in the center of the left-hand
control will tune to the next preset station that
you have programmed in the radio preset button.
CD Player
Pushing the top of the switch once will go to the
next track on the CD. Pushing the bottom of the
switch once will go to the beginning of the
197
current track, or to the beginning of the previous
track if it is within eight seconds after the current
track begins to play.
If you push the switch up or down twice, it plays
the second track; three times, it will play the
third, etc.
The center button on the left side rocker switch
has no function for a single-disc CD player.
However, when a multiple-disc CD player is
equipped on the vehicle, the center button will
select the next available CD in the player.
CD/DVD DISC MAINTENANCE
To keep a CD/DVD in good condition, take the
following precautions:
1. Handle the disc by its edge; avoid touching
the surface.
2. If the disc is stained, clean the surface with a
soft cloth, wiping from center to edge.
3. Do not apply paper or tape to the disc; avoid
scratching the disc.
198
4. Do not use solvents such as benzene, thinner, cleaners, or anti-static sprays.
RADIO OPERATION AND
MOBILE PHONES
5. Store the disc in its case after playing.
Under certain conditions, the mobile phone
being on in your vehicle can cause erratic or
noisy performance from your radio. This condition may be lessened or eliminated by relocating the mobile phone antenna. This condition is
not harmful to the radio. If your radio performance does not satisfactorily “clear” by the
repositioning of the antenna, it is recommended
that the radio volume be turned down or off
during mobile phone operation when not using
Uconnect® (if equipped).
6. Do not expose the disc to direct sunlight.
7. Do not store the disc where temperatures
may become too high.
NOTE:
If you experience difficulty in playing a
particular disc, it may be damaged (e.g.,
scratched, reflective coating removed, a
hair, moisture or dew on the disc) oversized,
or have protection encoding. Try a known
good disc before considering disc player
service.
CLIMATE CONTROLS
The air conditioning and heating system is
designed to make you comfortable in all types
of weather.
Manual Heating And Air Conditioning
Manual Temperature Control
The Manual Temperature Controls consist of a
series of outer rotary dials and inner push knobs.
Blower Control
Rotate this control to
regulate the amount of
air forced through the
ventilation system in
any mode. The blower
speed increases as you
move the control to the
right from the “O” (OFF) position. There are
seven blower speeds.
Mode Control (Air Direction)
Temperature Control
Rotate this control to
choose from several
patterns of air distribution. You can select either a primary mode as
identified by the symbols on the control, or a
blend of two of these
modes. The closer the
setting is to a particular
symbol, the more air distribution you receive
from that mode.
Rotate this control to
regulate the temperature of the air inside
the passenger compartment. Rotating the dial
left into the blue area
of the scale indicates
cooler
temperatures,
while rotating right into
the red area indicates warmer temperatures.
NOTE:
If your air conditioning performance seems
lower than expected, check the front of the
A/C condenser located in front of the radiator for an accumulation of dirt or insects.
Clean with a gentle water spray from behind
the radiator and through the condenser.
Fabric front fascia protectors may reduce
airflow to the condenser, reducing air conditioning performance.
Panel
Air is directed through the outlets in the
instrument panel. These outlets can be
adjusted to direct airflow.
NOTE:
The center instrument panel outlets can be
aimed so that they are directed toward the
rear seat passengers for maximum airflow
to the rear.
199
Bi-Level
Air is directed through the panel and
floor outlets.
NOTE:
For all settings, except full cold or full hot,
there is a difference in temperature between
the upper and lower outlets. The warmer air
flows to the floor outlets. This feature gives
improved comfort during sunny but cool
conditions.
Floor
Air is directed through the floor outlets
with a small amount flowing through the
defrost and side window demist outlets.
Mix
Air is directed through the floor, defrost,
and side window demist outlets. This
setting works best in cold or snowy
conditions that require extra heat to the windshield. This setting is good for maintaining comfort while reducing moisture on the windshield.
200
Defrost
NOTE:
Air is directed through the windshield
and side window demist outlets. Use
this mode with maximum blower and
temperature settings for best windshield and
side window defrosting.
• Continuous use of the Recirculation
mode may make the inside air stuffy and
window fogging may occur. Extended use
of this mode is not recommended.
NOTE:
The air conditioning compressor operates
in Mix, Defrost, or a blend of these modes,
even if the Air Conditioning (A/C) button is
not pushed. This dehumidifies the air to
help dry the windshield. To improve fuel
economy, use these modes only when necessary.
Recirculation Control
Pushing the Recirculation Control
button will put the system in recirculation mode. This can be used when
outside conditions such as smoke,
odors, dust, or high humidity are
present. Activating recirculation will cause the
LED in the control button to illuminate.
• The use of the Recirculation mode in cold
or damp weather will cause windows to
fog on the inside, because of moisture
buildup inside the vehicle. Select the outside air position for maximum defogging.
• The A/C will engage automatically to prevent fogging when the recirculation button is pushed and the mode control is set
to panel or Bi-Level.
• The A/C can be deselected manually without disturbing the mode control selection.
• When the ignition switch is turned to the
LOCK position, the recirculation feature
will be cancelled.
Air Conditioning Control
Push this button to engage the Air Conditioning. A light will illuminate
when the Air Conditioning system is engaged.
Rotating the dial left into
the blue area of the
scale indicates cooler
temperatures, while rotating right into the red
area indicates warmer temperatures.
NOTE:
The air conditioning compressor will not
engage until the engine has been running
for about ten seconds.
• MAX A/C
For maximum cooling, turn on the A/C and
recirculation buttons at the same time.
• ECONOMY MODE
If economy mode is desired, push the A/C
button to turn OFF the indicator light and the
A/C compressor. Then, move the temperature
control to the desired temperature.
Automatic Temperature Control
(ATC) — If Equipped
NOTE:
The AUTO position performs best for front
seat occupants only.
Temperature Control
Automatic Temperature Control
Automatic Operation
The Automatic Temperature Control system automatically maintains the climate in the cabin of
the vehicle at the comfort levels desired by the
driver and passenger.
Operation of the system is quite simple.
Turn the Mode Control knob (on the right) and
the Blower Control knob (on the left) to AUTO.
Dial in the temperature
you would like the system to maintain by rotating the Temperature
Control knob. Once the
comfort level is selected,
the system will maintain
that level automatically
using the heating system. Should the desired
comfort level require air conditioning, the system
will automatically make the adjustment.
You will experience the greatest efficiency by
simply allowing the system to function automatically. Selecting the “O” (OFF) position on the
blower control stops the system completely and
closes the outside air intake.
201
The recommended setting for maximum comfort is 72° F (22° C) for the average person;
however, this may vary.
NOTE:
• The temperature setting can be adjusted
at anytime without affecting automatic
operation.
• Pressing the Air Conditioning Control
button while in AUTO mode will cause the
LED in the control button to flash three
times and then turn off. This indicates
that the system is in AUTO mode and
requesting the air conditioning is not
necessary.
202
• If your air conditioning performance
seems lower than expected, check the
front of the A/C condenser located in front
of the radiator for an accumulation of dirt
or insects. Clean with a gentle water
spray from behind the radiator and
through the condenser. Fabric front fascia protectors may reduce airflow to the
condenser, reducing air conditioning
performance.
Manual Operation
This system offers a full complement of manual
override features, which consist of Blower Preferred Automatic, Mode Preferred Automatic, or
Blower and Mode Preferred Automatic. This
means the operator can override the blower, the
mode, or both. There is a manual blower range
for times when the AUTO setting is not desired.
The blower can be set to any fixed blower speed
by rotating the Blower Control knob (on the left).
• While operating in AUTO, the system will
not automatically sense the presence of
fog, mist or ice on the windshield. The
defrost mode must be manually selected
to clear the windshield and side glass.
NOTE:
Please read the Automatic Temperature
Control Operation Chart that follows for details.
203
• Bi-Level
Blower Control
For full automatic operation or for automatic
blower operation, turn
the knob to the AUTO
position. In manual
mode there are seven
blower speeds that can
be individual selected.
In off position the blower
will shut off.
The operator can override the AUTO mode
setting to change airflow distribution by rotating
the Mode Control knob (on the right) to one of
the following positions:
• Panel
Air is directed through the outlets in the
instrument panel. These outlets can be
adjusted to direct airflow.
NOTE:
The center instrument panel outlets can be
aimed so that they are directed toward the
rear seat passengers for maximum airflow
to the rear.
204
Air is directed through the panel and
floor outlets.
NOTE:
For all settings, except full cold or full hot,
there is a difference in temperature between
the upper and lower outlets. The warmer air
flows to the floor outlets. This feature gives
improved comfort during sunny but cool
conditions.
• Floor
Air is directed through the floor outlets
with a small amount flowing through the
defrost and side window demist outlets.
• Mix
Air is directed through the floor, defrost,
and side window demist outlets. This
setting works best in cold or snowy
conditions that require extra heat to the windshield. This setting is good for maintaining comfort while reducing moisture on the windshield.
• Defrost
Air is directed through the windshield
and side window demist outlets. Use
this mode with maximum blower and
temperature settings for best windshield and
side window defrosting.
• Air Conditioner Control
Press this button to turn
on the air conditioning
during manual operation only. When the air
conditioning is turned
on, cool dehumidified air
will flow through the outlets selected with the
Mode control dial. Press
this button a second time to turn OFF the air
conditioning. An LED in the button illuminates
when manual compressor operation is selected.
• Recirculation Control
The system will automatically control recirculation. However, pressing the Recirculation Control button
will temporarily put the system in
recirculation mode. This can be
used when outside conditions such as smoke,
odors, dust, or high humidity are present. Activating recirculation will cause the LED in the
control button to illuminate.
NOTE:
• When the ignition switch is turned to the
LOCK position, the recirculation feature
will be cancelled.
• In cold weather, use of the Recirculation
mode may lead to excessive window fogging. The Recirculation mode is not allowed
in the defrost mode in order to improve
window clearing. Recirculation will be disabled automatically if this mode is selected.
• Extended use of recirculation may cause
the windows to fog. If the interior of the
windows begins to fog, press the Recirculation button to return to outside air.
Some temp/humidity conditions will
cause captured interior air to condense
on windows and hamper visibility. For
this reason, the system will not allow
Recirculation to be selected while in defrost mode. Attempting to use the recirculation while in this mode will cause the
LED in the control button to blink and
then turn off.
• Most of the time, when in Automatic Operation, you can temporarily put the system
into Recirculation Mode by pressing the
Recirculation button. However, under certain conditions, while in Automatic Mode,
the system is blowing air out the defrost
vents. When these conditions are present,
and the Recirculation button is pressed,
the indicator will flash and then turn off.
This tells you that you are unable to go into
Recirculation Mode at this time. If you
would like the system to go into Recirculation Mode, you must first move the Mode
knob to Panel, Panel/Bi-Level and then
press the Recirculation button. This feature reduces the possibility of window fogging.
Operating Tips
NOTE:
Refer to the chart at the end of this section
for suggested control settings for various
weather conditions.
Summer Operation
The engine cooling system must be protected
with a high-quality antifreeze coolant to provide
proper corrosion protection and to protect
against engine overheating. A solution of 50%
OAT (Organic Additive Technology) coolant that
meets the requirements of Chrysler Material
Standard MS-12106 and 50% water is recommended. Refer to “Maintenance Procedures” in
“Maintaining Your Vehicle” for proper coolant
selection.
Winter Operation
Use of the air Recirculation Mode during winter
months is not recommended because it may
cause window fogging.
205
Vacation Storage
Anytime you store your vehicle, or keep it out of
service (i.e., vacation) for two weeks or more,
run the air conditioning system at idle for about
five minutes in the fresh air and high blower
settings. This will ensure adequate system lubrication to minimize the possibility of compressor damage when the system is started again.
Side Window Demisters
A side window demister outlet is located at each
end of the instrument panel. These nonadjustable outlets direct air toward the side
windows when the system is in the FLOOR,
MIX, or DEFROST mode. The air is directed at
the area of the windows through which you view
the outside mirrors.
Window Fogging
Interior fogging on the windshield can be quickly
removed by turning the mode selector to Defrost. The Defrost/Floor mode can be used to
maintain a clear windshield and provide sufficient heating. If side window fogging becomes
a problem, increase blower speed. Vehicle windows tend to fog on the inside in mild but rainy
or humid weather.
Outside Air Intake
Make sure the air intake, located directly in front
of the windshield, is free of obstructions such as
leaves. Leaves collected in the air intake may
reduce airflow, and if they enter the plenum,
they could plug the water drains. In winter
months, make sure the air intake is clear of ice,
slush, and snow.
NOTE:
Recirculate without A/C should not be used
for long periods as fogging may occur.
206
A/C Air Filter — If Equipped
The A/C Filter prevents most dust and pollen
from entering the cabin. The filter acts on air
coming from outside the vehicle and recirculated air within the passenger compartment.
Refer to “Maintenance Procedures” in “Maintaining Your Vehicle” for A/C Air Filter service
information or see your authorized dealer for
service. Refer to “Service and Warranty Handbook” for filter service intervals.
Control Setting Suggestions For Various Weather Conditions
207
208
5
STARTING AND OPERATING
• STARTING PROCEDURES . . . . . . . . . . . . . . . .
• Manual Transmission — If Equipped . . . . . . . . .
• Automatic Transmission — If Equipped . . . . . . .
• Normal Starting . . . . . . . . . . . . . . . . . . . . . .
• If Engine Fails To Start . . . . . . . . . . . . . . . . .
• Extreme Cold Weather (below –20°F or –29°C). . . .
• After Starting . . . . . . . . . . . . . . . . . . . . . . .
• ENGINE BLOCK HEATER — IF EQUIPPED . . . . . .
• AUTOMATIC TRANSMISSION — IF EQUIPPED . . . .
• Key Ignition Park Interlock . . . . . . . . . . . . . . .
• Brake/Transmission Shift Interlock System . . . . .
• Five-Speed Automatic Transmission — If Equipped
• Gear Ranges . . . . . . . . . . . . . . . . . . . . . . .
• AUTOSTICK . . . . . . . . . . . . . . . . . . . . . . . . .
• Operation. . . . . . . . . . . . . . . . . . . . . . . . . .
• MANUAL TRANSMISSION — IF EQUIPPED . . . . . .
• Shifting . . . . . . . . . . . . . . . . . . . . . . . . . . .
• Downshifting. . . . . . . . . . . . . . . . . . . . . . . .
• Reverse Shifting . . . . . . . . . . . . . . . . . . . . .
.
.
.
.
.
.
.
.
.
.
.
.
.
.
.
.
.
.
.
.
.
.
.
.
.
.
.
.
.
.
.
.
.
.
.
.
.
.
.
.
.
.
.
.
.
.
.
.
.
.
.
.
.
.
.
.
.
.
.
.
.
.
.
.
.
.
.
.
.
.
.
.
.
.
.
.
.
.
.
.
.
.
.
.
.
.
.
.
.
.
.
.
.
.
.
.
.
.
.
.
.
.
.
.
.
.
.
.
.
.
.
.
.
.
.213
.213
.213
.213
.214
.215
.215
.215
.215
.216
.216
.216
.217
.220
.220
.221
.222
.222
.224
209
• FOUR–WHEEL DRIVE OPERATION (COMMAND-TRAC I® OR
ROCK-TRAC®) . . . . . . . . . . . . . . . . . . . . . . . . . . . . .
• Operating Instructions/Precautions . . . . . . . . . . . . . . .
• Shift Positions . . . . . . . . . . . . . . . . . . . . . . . . . . . .
• Shifting Procedure . . . . . . . . . . . . . . . . . . . . . . . . .
• AXLE LOCK (TRU–LOK®) — RUBICON MODELS . . . . . . .
• ELECTRONIC SWAY BAR DISCONNECT — IF EQUIPPED . .
• ON-ROAD DRIVING TIPS . . . . . . . . . . . . . . . . . . . . . .
• OFF-ROAD DRIVING TIPS . . . . . . . . . . . . . . . . . . . . . .
• Side Step Removal — If Equipped . . . . . . . . . . . . . . . .
• The Basics Of Off-Road Driving . . . . . . . . . . . . . . . . .
• When To Use 4L (Low) Range . . . . . . . . . . . . . . . . . . .
• Simultaneous Brake And Throttle Operation . . . . . . . . . .
• Driving In Snow, Mud And Sand . . . . . . . . . . . . . . . . .
• Crossing Obstacles (Rocks And Other High Points). . . . . .
• Hill Climbing . . . . . . . . . . . . . . . . . . . . . . . . . . . . .
• Driving Through Water . . . . . . . . . . . . . . . . . . . . . . .
• After Driving Off-Road . . . . . . . . . . . . . . . . . . . . . . .
• POWER STEERING . . . . . . . . . . . . . . . . . . . . . . . . . .
• Power Steering Fluid Check . . . . . . . . . . . . . . . . . . .
• PARKING BRAKE . . . . . . . . . . . . . . . . . . . . . . . . . . .
• BRAKE SYSTEM . . . . . . . . . . . . . . . . . . . . . . . . . . .
• ELECTRONIC BRAKE CONTROL SYSTEM . . . . . . . . . . .
• Anti-Lock Brake System (ABS) . . . . . . . . . . . . . . . . . .
• Traction Control System (TCS) . . . . . . . . . . . . . . . . . .
• Brake Assist System (BAS) . . . . . . . . . . . . . . . . . . . .
210
.
.
.
.
.
.
.
.
.
.
.
.
.
.
.
.
.
.
.
.
.
.
.
.
.
.
.
.
.
.
.
.
.
.
.
.
.
.
.
.
.
.
.
.
.
.
.
.
.
.
.
.
.
.
.
.
.
.
.
.
.
.
.
.
.
.
.
.
.
.
.
.
.
.
.
.224
.224
.225
.226
.227
.227
.228
.229
.229
.229
.230
.230
.230
.231
.232
.234
.236
.236
.237
.237
.239
.239
.239
.240
.240
•
•
•
•
•
•
•
•
Hill Start Assist (HSA) . . . . . . . . . . . . . . . . . . . . . .
Electronic Roll Mitigation (ERM) . . . . . . . . . . . . . . . .
Electronic Stability Control (ESC) . . . . . . . . . . . . . . .
ESC Activation/Malfunction Indicator Light And ESC OFF
Indicator Light . . . . . . . . . . . . . . . . . . . . . . . . . .
• Trailer Sway Control (TSC) . . . . . . . . . . . . . . . . . . .
• Hill Descent Control (HDC) — If Equipped . . . . . . . . . .
TIRE SAFETY INFORMATION . . . . . . . . . . . . . . . . . .
• Tire Markings . . . . . . . . . . . . . . . . . . . . . . . . . . .
• Tire Identification Number (TIN) . . . . . . . . . . . . . . . .
• Tire Terminology And Definitions. . . . . . . . . . . . . . . .
• Tire Loading And Tire Pressure . . . . . . . . . . . . . . . .
TIRES — GENERAL INFORMATION . . . . . . . . . . . . . .
• Tire Pressure . . . . . . . . . . . . . . . . . . . . . . . . . . .
• Tire Inflation Pressures . . . . . . . . . . . . . . . . . . . . .
• Tire Pressures For High Speed Operation . . . . . . . . . .
• Radial Ply Tires . . . . . . . . . . . . . . . . . . . . . . . . . .
• Tire Types . . . . . . . . . . . . . . . . . . . . . . . . . . . . .
• Run Flat Tires — If Equipped . . . . . . . . . . . . . . . . . .
• Spare Tires — If Equipped . . . . . . . . . . . . . . . . . . .
• Tire Spinning . . . . . . . . . . . . . . . . . . . . . . . . . . .
• Tread Wear Indicators . . . . . . . . . . . . . . . . . . . . . .
• Life Of Tire . . . . . . . . . . . . . . . . . . . . . . . . . . . .
• Replacement Tires . . . . . . . . . . . . . . . . . . . . . . . .
TIRE CHAINS (TRACTION DEVICES) . . . . . . . . . . . . . .
TIRE ROTATION RECOMMENDATIONS . . . . . . . . . . . .
. . .241
. . .243
. . .244
.
.
.
.
.
.
.
.
.
.
.
.
.
.
.
.
.
.
.
.
.
.
.
.
.
.
.
.
.
.
.
.
.
.
.
.
.
.
.
.
.
.
.
.
.247
.248
.248
.249
.249
.252
.253
.254
.257
.257
.258
.258
.259
.259
.260
.260
.262
.262
.262
.263
.264
.264
211
• TIRE PRESSURE MONITOR SYSTEM (TPMS) . . . . . . . . .
• Base System . . . . . . . . . . . . . . . . . . . . . . . . . . . .
• Premium System — If Equipped . . . . . . . . . . . . . . . .
• TPMS Deactivation — If Equipped . . . . . . . . . . . . . . .
• FUEL REQUIREMENTS — GASOLINE ENGINES . . . . . . .
• Methanol . . . . . . . . . . . . . . . . . . . . . . . . . . . . . .
• Ethanol . . . . . . . . . . . . . . . . . . . . . . . . . . . . . . .
• Clean Air Gasoline . . . . . . . . . . . . . . . . . . . . . . . .
• MMT In Gasoline . . . . . . . . . . . . . . . . . . . . . . . . .
• Materials Added to Fuel . . . . . . . . . . . . . . . . . . . . .
• ADDING FUEL . . . . . . . . . . . . . . . . . . . . . . . . . . . .
• Locking Fuel Filler Cap (Gas Cap) . . . . . . . . . . . . . . .
• TRAILER TOWING . . . . . . . . . . . . . . . . . . . . . . . . .
• Common Towing Definitions . . . . . . . . . . . . . . . . . .
• Trailer Towing Weights (Maximum Trailer Weight Ratings)
• Trailer And Tongue Weight . . . . . . . . . . . . . . . . . . .
• Towing Requirements . . . . . . . . . . . . . . . . . . . . . .
• Towing Tips . . . . . . . . . . . . . . . . . . . . . . . . . . . .
• RECREATIONAL TOWING (BEHIND MOTORHOME, ETC.) .
• Towing This Vehicle Behind Another Vehicle . . . . . . . . .
• Recreational Towing — Four-Wheel Drive Models . . . . . .
212
.
.
.
.
.
.
.
.
.
.
.
.
.
.
.
.
.
.
.
.
.
.
.
.
.
.
.
.
.
.
.
.
.
.
.
.
.
.
.
.
.
.
.
.
.
.
.
.
.
.
.
.
.
.
.
.
.
.
.
.
.
.
.
.
.
.
.
.
.
.
.
.
.
.
.
.
.
.
.
.
.
.
.
.
.265
.267
.268
.271
.272
.272
.272
.273
.273
.273
.274
.274
.275
.275
.277
.278
.278
.282
.283
.283
.284
STARTING PROCEDURES
Manual Transmission — If Equipped
Normal Starting
Before starting your vehicle, adjust your seat,
adjust both inside and outside mirrors, and
fasten your seat belts.
Apply the parking brake, place the shift lever in
NEUTRAL, and press the clutch pedal before
starting the vehicle. This vehicle is equipped
with a clutch interlocking ignition system. It will
not start unless the clutch pedal is pressed to
the floor.
NOTE:
Normal starting of either a cold or a warm
engine is obtained without pumping or
pressing the accelerator pedal.
Cycle the ignition switch to the START position
and release when the engine starts. If the
engine fails to start within 10 seconds, cycle the
ignition switch to the LOCK/OFF position, wait
10 to 15 seconds, then repeat the “Normal
Starting” procedure.
WARNING!
• When leaving the vehicle, always remove
the key fob from the ignition and lock your
vehicle.
• Never leave children alone in a vehicle, or
with access to an unlocked vehicle.
• Allowing children to be in a vehicle unattended is dangerous for a number of reasons. A child or others could be seriously
or fatally injured. Children should be
warned not to touch the parking brake,
brake pedal or the shift lever.
• Do not leave the key fob in or near the
vehicle, or in a location accessible to children and do not leave the ignition of a
vehicle equipped with Keyless Enter-NGo™ in the ACC or ON/RUN Mode. A child
could operate power windows, other controls, or move the vehicle.
Four-Wheel Drive Models Only
In 4L mode, this vehicle will start regardless of
whether or not the clutch pedal is pressed to the
floor. This feature enhances off-road performance by allowing the vehicle to start when in
4L without having to press the clutch pedal. The
“4WD Indicator Light” will illuminate when the
transfer case has been shifted into this mode.
Automatic Transmission —
If Equipped
Start the engine with the shift lever in the
NEUTRAL or PARK position. Apply the brake
before shifting to any driving range.
Tip Start Feature — Automatic
Transmission Only
Turn the ignition switch to the START position
and release it as soon as the starter engages.
The starter motor will continue to run, but will
automatically disengage itself when the engine
is running. If the engine fails to start, the starter
will disengage automatically in 10 seconds. If
this occurs, turn the ignition switch to the LOCK
position, wait 10 to 15 seconds, then repeat the
“Normal Starting” procedure.
213
If Engine Fails To Start
WARNING!
• Never pour fuel or other flammable liquids
into the throttle body air inlet opening in
an attempt to start the vehicle. This could
result in a flash fire causing serious personal injury.
• Do not attempt to push or tow your vehicle
to get it started. Vehicles equipped with an
automatic transmission cannot be started
this way. Unburned fuel could enter the
catalytic converter and, once the engine
has started, ignite and damage the converter and vehicle.
• If the vehicle has a discharged battery,
booster cables may be used to obtain a
start from a booster battery or the battery
in another vehicle. This type of start can be
dangerous if done improperly. Refer to
“Jump Starting” in “What To Do In Emergencies” for further information.
214
Without Tip Start – Manual Transmission
Only
If the engine fails to start after you have followed
the “Normal Starting” procedure, it may be
flooded. Push the accelerator pedal all the way
to the floor and hold it there while cranking the
engine. This should clear any excess fuel in
case the engine is flooded.
CAUTION!
To prevent damage to the starter, do not
crank the engine for more than 15 seconds
at a time. Wait 10 to 15 seconds before trying
again.
If the engine has been flooded, it may start to
run, but not have enough power to continue
running when the key is released. If this occurs,
continue cranking with the accelerator pedal
pushed all the way to the floor. Release the
accelerator pedal and the key once the engine
is running smoothly.
If the engine shows no sign of starting after two
15–second periods of cranking with the accelerator pedal held to the floor, repeat the “Normal
Starting” procedure.
With Tip Start – Automatic Transmission
Only
If the engine fails to start after you have followed
the “Normal Starting” procedure, it may be
flooded. To clear any excess fuel, push the
accelerator pedal all the way to the floor and
hold it. Then, turn the ignition switch to the
START position and release it as soon as the
starter engages. The starter motor will disengage automatically in 10 seconds. Once this
occurs, release the accelerator pedal, turn the
ignition switch to the LOCK position, wait 10 to
15 seconds, then repeat the “Normal Starting”
procedure.
CAUTION!
To prevent damage to the starter, wait 10 to
15 seconds before trying again.
Extreme Cold Weather
(below –20°F or –29°C)
To ensure reliable starting at these temperatures, use of an externally powered electric
engine block heater (available from your authorized dealer) is recommended.
WARNING!
Remember to disconnect the engine block
heater cord before driving. Damage to the
110-115 Volt AC electrical cord could cause
electrocution.
After Starting
The idle speed will automatically decrease as
the engine warms up.
ENGINE BLOCK HEATER —
IF EQUIPPED
The engine block heater warms the engine, and
permits quicker starts in cold weather. Connect
the cord to a standard 110-115 Volt AC electrical
outlet with a grounded, three-wire extension
cord.
The engine block heater must be plugged in at
least one hour to have an adequate warming
effect on the engine.
The engine block heater cord is found under the
hood bundled in front of the battery tray.
AUTOMATIC TRANSMISSION —
IF EQUIPPED
CAUTION!
Damage to the transmission may occur if
the following precautions are not observed:
• Shift into or out of PARK or REVERSE only
after the vehicle has come to a complete
stop.
• Do not shift between PARK, REVERSE,
NEUTRAL, or DRIVE when the engine is
above idle speed.
• Before shifting into any gear, make sure
your foot is firmly pressing the brake pedal.
NOTE:
You must press and hold the brake pedal
while shifting out of PARK.
WARNING!
• It is dangerous to shift out of PARK or
NEUTRAL if the engine speed is higher
than idle speed. If your foot is not firmly
pressing the brake pedal, the vehicle could
accelerate quickly forward or in reverse.
You could lose control of the vehicle and
hit someone or something. Only shift into
gear when the engine is idling normally
and your foot is firmly pressing the brake
pedal.
• Unintended movement of a vehicle could
injure those in or near the vehicle. As with
all vehicles, you should never exit a vehicle while the engine is running. Before
exiting a vehicle, always apply the parking
brake, shift the transmission into PARK,
(Continued)
215
WARNING! (Continued)
turn the engine OFF, and remove the ignition key. Once the key is removed, the
transmission is locked in PARK, securing
the vehicle against unwanted movement.
• When leaving the vehicle, always remove
the ignition key from the vehicle and lock
the vehicle.
• Never leave children alone in a vehicle, or
with access to an unlocked vehicle. Allowing children to be in a vehicle unattended
is dangerous for a number of reasons. A
child or others could be seriously or fatally
injured. Children should be warned not to
touch the parking brake, brake pedal or the
transmission gear selector.
• Do not leave the ignition key in or near the
vehicle (or in a location accessible to children). A child could operate power windows, other controls, or move the vehicle.
216
Key Ignition Park Interlock
This vehicle is equipped with a Key Ignition Park
Interlock which requires the transmission to be
in PARK before the ignition switch can be turned
to the LOCK/OFF (key removal) position. The
key can only be removed from the ignition when
the ignition is in the LOCK/OFF position, and
once removed the transmission is locked in
PARK.
Five-Speed Automatic
Transmission — If Equipped
The transmission gear position display (located
in the instrument cluster) indicates the transmission gear range. You must press the brake
pedal to move the shift lever out of PARK (refer
to “Brake/Transmission Shift Interlock System”
in this section). To drive, move the shift lever
from PARK or NEUTRAL to the DRIVE position.
NOTE:
If a malfunction occurs, the system will trap
the key in the ignition switch to warn you
that this safety feature is inoperable. The
engine can be started and stopped but the
key cannot be removed until you obtain
service.
The electronically-controlled transmission provides a precise shift schedule. The transmission
electronics are self-calibrating; therefore, the
first few shifts on a new vehicle may be somewhat abrupt. This is a normal condition, and
precision shifts will develop within a few hundred miles (kilometers).
Brake/Transmission Shift Interlock
System
Only shift from DRIVE to PARK or REVERSE
when the accelerator pedal is released and the
vehicle is stopped. Be sure to keep your foot on
the brake pedal when shifting between these
gears.
This vehicle is equipped with a Brake Transmission Shift Interlock System (BTSI) that holds
the shift lever in PARK unless the brakes are
applied. To shift the transmission out of PARK,
the ignition switch must be turned to the ON/
RUN position (engine running or not) and the
brake pedal must be pressed.
The transmission shift lever has only PARK,
REVERSE, NEUTRAL, and DRIVE shift positions. Manual shifts can be made using the
Autostick shift control (refer to "AutoStick" in this
section). Moving the shift lever to the left or
right (-/+) while in the DRIVE position will manually select the transmission gear and will display
the current gear in the instrument cluster as 1,
2, 3, etc.
Shift Lever
Gear Ranges
DO NOT race the engine when shifting from
PARK or NEUTRAL into another gear range.
NOTE:
• After selecting any gear range, wait a
moment to allow the selected gear to
engage before accelerating. This is especially important when the engine is cold.
• If there is a need to restart the engine, be
sure to cycle the ignition to the LOCK/
OFF position before restarting. Transmission gear engagement may be delayed
after restarting the engine if the ignition is
not cycled to the LOCK/OFF position first.
When parking on a hill, apply the parking brake
before shifting the transmission to PARK, otherwise the load on the transmission locking
mechanism may make it difficult to move the
shift lever out of PARK. As an added precaution,
turn the front wheels toward the curb on a
downhill grade and away from the curb on an
uphill grade.
NOTE:
On four-wheel drive vehicles be sure that
the transfer case is in a drive position.
PARK (P)
This range supplements the parking brake by
locking the transmission. The engine can be
started in this range. Never attempt to use
PARK while the vehicle is in motion. Apply the
parking brake when leaving the vehicle in this
range.
WARNING!
• Never use the PARK position as a substitute for the parking brake. Always apply
the parking brake fully when parked to
guard against vehicle movement and possible injury or damage.
When parking on a level surface, you may shift
the transmission into PARK first, and then apply
the parking brake.
(Continued)
217
WARNING! (Continued)
• Your vehicle could move and injure you
and others if it is not in PARK. Check by
trying to move the shift lever out of PARK
with the brake pedal released. Make sure
the transmission is in PARK before leaving
the vehicle.
• It is dangerous to shift out of PARK or
NEUTRAL if the engine speed is higher
than idle speed. If your foot is not firmly
pressing the brake pedal, the vehicle could
accelerate quickly forward or in reverse.
You could lose control of the vehicle and
hit someone or something. Only shift into
gear when the engine is idling normally
and your foot is firmly pressing the brake
pedal.
(Continued)
WARNING! (Continued)
• Unintended movement of a vehicle could
injure those in or near the vehicle. As with
all vehicles, you should never exit a vehicle while the engine is running. Before
exiting a vehicle, always apply the parking
brake, shift the transmission into PARK,
turn the engine OFF, and remove the ignition key. Once the key is removed, the
transmission is locked in PARK, securing
the vehicle against unwanted movement.
• When leaving the vehicle, always remove
the ignition key from the vehicle and lock
the vehicle.
• Never leave children alone in a vehicle, or
with access to an unlocked vehicle. Allowing children to be in a vehicle unattended
is dangerous for a number of reasons. A
child or others could be seriously or fatally
injured. Children should be warned not to
touch the parking brake, brake pedal or the
shift lever.
(Continued)
218
WARNING! (Continued)
• Do not leave the ignition key in or near the
vehicle (or in a location accessible to children). A child could operate power windows, other controls, or move the vehicle.
CAUTION!
• Before moving the shift lever out of PARK,
you must turn the ignition switch from
the LOCK/OFF position to the ON/RUN
position, and also press the brake pedal.
Otherwise, damage to the shift lever could
result.
• DO NOT race the engine when shifting
from PARK or NEUTRAL into another gear
range, as this can damage the drivetrain.
The following indicators should be used to
ensure that you have engaged the transmission
into the PARK position:
• When shifting into PARK, firmly move the
shift lever all the way forward and to the left
until it stops and is fully seated.
• Look at the transmission gear position display and verify that it indicates the PARK
position.
• With brake pedal released, verify that the
shift lever will not move out of PARK.
REVERSE (R)
This range is for moving the vehicle backward.
Shift into REVERSE only after the vehicle has
come to a complete stop.
NEUTRAL (N)
Use this range when the vehicle is standing for
prolonged periods with the engine running. The
engine may be started in this range. Apply the
parking brake and shift the transmission into
PARK if you must leave the vehicle.
WARNING!
Do not coast in NEUTRAL and never turn off
the ignition to coast down a hill. These are
unsafe practices that limit your response to
changing traffic or road conditions. You might
lose control of the vehicle and have a collision.
DRIVE (D)
This range should be used for most city and
highway driving. It provides the smoothest upshifts and downshifts, and the best fuel
economy. The transmission automatically upshifts through underdrive first, second, and third
gears, direct fourth gear and overdrive fifth
gear. The DRIVE position provides optimum
driving characteristics under all normal operating conditions.
CAUTION!
Towing the vehicle, coasting, or driving for
any other reason with the transmission in
NEUTRAL can cause severe transmission
damage. Refer to “Recreational Towing” in
“Starting And Operating” and “Towing A Disabled Vehicle” in “What To Do In Emergencies” for further information.
When frequent transmission shifting occurs
(such as when operating the vehicle under
heavy loading conditions, in hilly terrain, traveling into strong head winds, or while towing
heavy trailers), use the AutoStick® shift control
(refer to “AutoStick®” in this section for further
information) to select a lower gear. Under these
conditions, using a lower gear will improve
performance and extend transmission life by
reducing excessive shifting and heat buildup.
219
Transmission Limp Home Mode
Transmission function is monitored electronically for abnormal conditions. If a condition is
detected that could result in transmission damage, Transmission Limp Home Mode is activated. In this mode, the transmission remains in
the current gear until the vehicle is brought to a
stop. After the vehicle has stopped, the transmission will remain in second gear regardless of
which forward gear is selected. PARK, REVERSE, and NEUTRAL will continue to operate. The Malfunction Indicator Light (MIL) may
be illuminated. Limp Home Mode allows the
vehicle to be driven to an authorized dealer for
service without damaging the transmission.
In the event of a momentary problem, the
transmission can be reset to regain all forward
gears by performing the following steps:
5. Restart the engine.
AUTOSTICK
6. Shift into the desired gear range. If the
problem is no longer detected, the transmission will return to normal operation.
AutoStick is a driver-interactive transmission
feature providing manual shift control, giving
you more control of the vehicle. AutoStick allows you to maximize engine braking, eliminate
undesirable upshifts and downshifts, and improve overall vehicle performance.
NOTE:
Even if the transmission can be reset, we
recommend that you visit your authorized
dealer at your earliest possible convenience. Your authorized dealer has diagnostic equipment to determine if the problem
could recur. If the transmission cannot be
reset, authorized dealer service is required.
Overdrive Operation
The automatic transmission includes an electronically controlled Overdrive (fifth gear). The
transmission will automatically shift into Overdrive if the following conditions are present:
1. Stop the vehicle.
• The shift lever is in the DRIVE position.
2. Shift the transmission into PARK.
• Vehicle speed is sufficiently high.
3. Turn the ignition switch to the LOCK/OFF
position.
• The driver is not heavily pressing the
accelerator.
4. Wait approximately 10 seconds.
220
This system can also provide you with more
control during passing, city driving, cold slippery
conditions, mountain driving, trailer towing, and
many other situations.
Operation
When the shift lever is in the DRIVE position,
the transmission will operate automatically,
shifting between the five available gears. To
engage AutoStick, simply tap the shift lever to
the right or left (+/-) while in the DRIVE position.
Tapping (-) to enter AutoStick mode will downshift the transmission to the next lower gear,
while using (+) to enter AutoStick mode will
retain the current gear. When AutoStick is active, the current transmission gear is displayed
in the instrument cluster.
In AutoStick mode, the transmission will shift up
or down when (+/-) is manually selected by the
driver, unless an engine lugging or overspeed
condition would result. It will remain in the
selected gear until another upshift or downshift
is chosen, except as described below.
• The transmission will automatically upshift
when necessary to prevent engine over-speed.
• Heavily pressing the accelerator pedal will
generate an automatic downshift (for improved acceleration) when reasonable.
• The transmission will automatically downshift
as the vehicle slows (to prevent engine lugging) and will display the current gear.
• The transmission will automatically downshift
to first gear when coming to a stop. After a
stop, the driver should manually upshift (+) the
transmission as the vehicle is accelerated.
• You can start out, from a stop, in first or
second gear. Tapping (+) (at a stop) will allow
starting in second gear. Starting out in second gear can be helpful in snowy or icy
conditions.
• The system will ignore attempts to upshift at
too low of a vehicle speed.
• Avoid using speed control when AutoStick is
engaged.
• Transmission shifting will be more noticeable
when AutoStick is engaged.
NOTE:
When the transfer case is in the 4L (Low)
range, the transmission will shift automatically (but no higher than the displayed gear).
To disengage AutoStick mode, hold the shift
lever to the right (+) until "D" is once again
displayed in the instrument cluster. You can shift
in or out of the AutoStick mode at any time
without taking your foot off the accelerator
pedal.
WARNING!
Do not downshift for additional engine braking on a slippery surface. The drive wheels
could lose their grip and the vehicle could
skid, causing a collision or personal injury.
MANUAL TRANSMISSION —
IF EQUIPPED
WARNING!
You or others could be injured if you leave
the vehicle unattended without having the
parking brake fully applied. The parking
brake should always be applied when the
driver is not in the vehicle, especially on an
incline.
CAUTION!
Never drive with your foot resting on the
clutch pedal, or attempt to hold the vehicle
on a hill with the clutch pedal partially engaged, as this will cause abnormal wear on
the clutch.
NOTE:
During cold weather, you may experience
increased effort in shifting until the transmission fluid warms up. This is normal.
221
Shifting
Fully press the clutch pedal before shifting
gears. As you release the clutch pedal, lightly
press the accelerator pedal.
shift speed chart. Shift at the vehicle speeds
listed for acceleration. When heavily loaded or
pulling a trailer these recommended up-shift
speeds may not apply.
You should always use first gear when starting
from a standing position.
Shift Pattern
Recommended Vehicle Shift Speeds
To utilize your manual transmission efficiently
for both fuel economy and performance, it
should be upshifted as listed in recommended
Manual Transmission Shift Speeds in MPH (KM/H)
Engine
3.6L
Speeds
1 to 2
2 to 3
3 to 4
4 to 5
5 to 6
Accel.
15 (24)
24 (39)
34 (55)
47 (76)
56 (90)
Cruise
10 (16)
19 (31)
27 (43)
37 (60)
41 (66)
NOTE:
Vehicle speeds shown in the chart above are
for 2H and 4H only, vehicle speeds in 4L
would be significantly less.
222
Downshifting
Moving from a high gear down to a lower gear is
recommended to preserve brakes when driving
down steep hills. In addition, downshifting at the
right time provides better acceleration when you
desire to resume speed. Downshift progressively. Do not skip gears to avoid overspeeding
the engine and clutch.
WARNING!
Do not downshift for additional engine braking
on a slippery surface. The drive wheels could
lose their grip, and the vehicle could skid.
CAUTION!
• Skipping gears and downshifting into lower
gears at higher vehicle speeds can damage the engine and clutch systems, Any
attempt to shift into lower gear with clutch
pedal depressed may result damage to the
clutch system. Shifting into lower gear and
releasing the clutch may result in engine
damage.
CAUTION! (Continued)
• When descending a hill, be very careful to
downshift one gear at a time to prevent
overspeeding the engine which can cause
engine damage, and/or clutch damage,
even if the clutch pedal is pressed. If
transfer case is in low range the vehicle
speeds to cause engine and clutch damage are significantly lower.
• Failure to follow the maximum recommended downshifting speeds may cause
the engine damage and/or damage the
clutch, even if the clutch pedal is pressed.
• Descending a hill in low range with clutch
pedal depressed could result in clutch
damage.
Maximum Recommended Downshift
Speeds
CAUTION!
Failure to follow the maximum recommended
downshifting speeds may cause the engine to
overspeed and/or damage the clutch disc,
even if the clutch pedal is pressed.
(Continued)
Manual Transmission Downshift Speeds in MPH (KM/H)
Gear Selection
6 to 5
5 to 4
4 to 3
3 to 2
2 to 1
Maximum Speed
80 (129)
70 (113)
50 (81)
30 (48)
15 (24)
223
NOTE:
Vehicle speeds shown in the chart above are
for 2H and 4H only, vehicle speeds in 4L
would be significantly less.
Reverse Shifting
To shift into REVERSE, bring the vehicle to a
complete stop. Press the clutch and pause
briefly to allow the gear train to stop rotating.
Beginning from the NEUTRAL position, move
the shift lever in one quick, smooth motion
straight across and into the REVERSE area
(the driver will feel a firm “click” as the shifter
passes the “knock-over”). Complete the shift by
pulling the shift lever into REVERSE.
The “knock-over” provides a resistance to the
driver from accidentally entering the REVERSE
shift area and warns the driver that they are
about to shift the transmission into REVERSE.
Due to this feature, a slow shift to REVERSE
can be perceived as a high shift effort.
FOUR–WHEEL DRIVE
OPERATION (COMMANDTRAC I® OR ROCK-TRAC®)
WARNING!
Failure to engage a transfer case position
completely can cause transfer case damage
or loss of power and vehicle control. You
could have a collision. Do not drive the
vehicle unless the transfer case is fully engaged.
Operating Instructions/Precautions
The transfer case provides four mode positions:
• 2H (Two-wheel drive high range)
• 4H (Four-wheel drive high range)
• N (Neutral)
• 4L (Four-wheel drive low range)
224
Four-Wheel Drive Shift Controls
The transfer case is intended to be driven in the
2H position for normal street and highway conditions such as hard-surfaced roads.
In the event that additional traction is required,
the transfer case 4H and 4L positions can be
used to lock the front and rear driveshafts
together, forcing the front and rear wheels to
rotate at the same speed. The 4H and 4L
positions are intended for loose, slippery road
surfaces only and not intended for normal driving. Driving in the 4H and 4L positions on
hard-surfaced roads will cause increased tire
wear and damage to the driveline components.
Refer to “Shifting Procedures” in this section for
further information on shifting into 4H or 4L.
The “4WD Indicator Light” (located in the instrument cluster) alerts the driver that the vehicle is
in four-wheel drive, and the front and rear
driveshafts are locked together. The light will
illuminate when the transfer case is shifted into
the 4H position.
NOTE:
Do not attempt to shift when only the front or
rear wheels are spinning. The transfer case
is not equipped with a synchronizer, and the
front and rear driveshaft speeds must be
equal for a shift to take place. Shifting while
the front or rear wheels are spinning at
different speeds can cause damage to the
transfer case.
When operating your vehicle in 4L, the engine
speed will be approximately three times (four
times for Rubicon models) that of the 2H or 4H
positions at a given road speed. Take care not
to overspeed the engine.
Proper operation of four-wheel drive vehicles
depends on tires of equal size, type, and circumference on each wheel. Any difference will
adversely affect shifting and cause damage to
the transfer case.
Because four-wheel drive provides improved
traction, there is a tendency to exceed safe
turning and stopping speeds. Do not go faster
than road conditions permit.
WARNING!
You or others could be injured or killed if you
leave the vehicle unattended with the transfer case in the NEUTRAL (N) position without first fully engaging the parking brake. The
transfer case NEUTRAL (N) position disengages both the front and rear drive shaft from
the powertrain, and will allow the vehicle to
roll, even if the automatic transmission is in
PARK (or manual transmission is in gear).
The parking brake should always be applied
when the driver is not in the vehicle.
Shift Positions
For additional information on the appropriate
use of each 4WD system mode position, see
the information below:
2H Position
This range is used for normal street and highway driving on hard-surfaced roads.
4H Position
This range locks the front and rear driveshafts
together, forcing the front and rear wheels to
rotate at the same speed. This range (4H)
provides additional traction for loose, slippery
road surfaces and should not be used on dry
pavement.
The “4WD Indicator Light” (located in the instrument cluster) will illuminate when the transfer
case is shifted into the 4H position.
N (Neutral) Position
This range disengages the front and rear driveshafts from the powertrain. It is to be used for
flat towing behind another vehicle. Refer to
“Recreational Towing” in “Starting and Operating” for further information.
225
4L Position
This range locks the front and rear driveshafts
together, forcing the front and rear wheels to
rotate at the same speed. This range (4L)
provides additional traction and maximum pulling power for loose, slippery road surfaces only.
Do not exceed 25 mph (40 km/h).
CAUTION!
Exceeding 25 mph (40 km/h) while the transfer case is engaged in 4L may result in an
engine overspeed condition and engine
damage.
The “4WD Indicator Light” (located in the instrument cluster) will illuminate when the transfer
case is shifted into the 4L position.
NOTE:
When in 4WD, the “ESC Off Indicator Light”
will display in the instrument cluster.
226
Shifting Procedure
2H to 4H or 4H to 2H
Shifting between 2H and 4H can be made with
the vehicle stopped or in motion. With the
vehicle in motion, the transfer case will engage/
disengage faster if you momentarily release the
accelerator pedal after completing the shift.
Apply a constant force when shifting the transfer case lever.
4H to 4L or 4L to 4H
With the vehicle rolling at 2 to 3 mph (3 to
5 km/h), shift an automatic transmission into
NEUTRAL (N), or press the clutch pedal on a
manual transmission. While the vehicle is
coasting at 2 to 3 mph (3 to 5 km/h), shift the
transfer case lever firmly to the desired position.
Do not pause with the transfer case in N (Neutral). Once the shift is completed, place the
automatic transmission into DRIVE or release
the clutch pedal on a manual transmission.
NOTE:
Shifting into or out of 4L is possible with the
vehicle completely stopped; however, difficulty may occur due to the mating teeth not
being properly aligned. Several attempts
may be required for clutch teeth alignment
and shift completion to occur. The preferred
method is with the vehicle rolling at 2 to
3 mph (3 to 5 km/h). Avoid attempting to
engage or disengage 4L with the vehicle
moving faster than 2 to 3 mph (3 to 5 km/h).
WARNING!
Failure to engage a transfer case position
completely can cause transfer case damage
or loss of power and vehicle control. You
could have a collision. Do not drive the
vehicle unless the transfer case is fully engaged.
AXLE LOCK (TRU-LOK®) —
RUBICON MODELS
The AXLE LOCK switch is located on the instrument panel (to the left of the steering column).
To activate the system, press the bottom of the
AXLE LOCK switch once to lock the rear axle
only (the “Rear Axle Lock Indicator Light” will
illuminate), press the bottom of the switch again
to lock the front axle (the “Front Axle Lock
Indicator Light” will illuminate). When the rear
axle is locked, pressing the switch again will
lock or unlock the front axle.
This system is controlled by the SWAY BAR
switch located on the instrument panel (to the
left of the steering column).
NOTE:
The indicator lights will flash until the axles
are fully locked or unlocked.
To unlock the axles, press the top of the AXLE
LOCK switch.
Axle Lock Switch
This feature will only activate when the following
conditions are met:
• Key in ignition, vehicle in 4L (Low) range.
• Vehicle speed should be 10 mph (16 km/h) or
less.
Axle lock will disengage if the vehicle is taken
out of 4L (Low) range, or the ignition switch is
turned to the OFF position.
ELECTRONIC SWAY BAR
DISCONNECT — IF EQUIPPED
Your vehicle may be equipped with an electronic disconnecting stabilizer/sway bar. This
system allows greater front suspension travel in
off-road situations.
Sway Bar Switch
Press the SWAY BAR switch to activate the
system. Press the switch again to deactivate
the system. The “Sway Bar Indicator Light”
(located in the instrument cluster) will illuminate
when the bar is disconnected. The “Sway Bar
Indicator Light” will flash during activation transition, or when activation conditions are not
met. The stabilizer/sway bar should remain in
on-road mode during normal driving conditions.
227
WARNING!
Do not disconnect the stabilizer bar and drive
on hard-surfaced roads or at speeds above
18 mph (29 km/h); you may lose control of
the vehicle, which could result in serious
injury. The front stabilizer bar enhances vehicle stability and is necessary for maintaining control of the vehicle. The system monitors vehicle speed and will attempt to
reconnect the stabilizer bar at speeds over
18 mph (29 km/h). This is indicated by a
flashing or solid “Sway Bar Indicator Light.”
Once vehicle speed is reduced below 14
mph (22 km/h), the system will once again
attempt to return to off-road mode.
To disconnect the stabilizer/sway bar, shift to
either 4H or 4L and press the SWAY BAR switch
to obtain the off-road position. Refer to “FourWheel Drive Operation” in “Starting and Operating” for further information. The “Sway Bar
Indicator Light” will flash until the stabilizer/sway
bar has been fully disconnected.
228
NOTE:
The stabilizer/sway bar may be torque
locked due to left and right suspension
height differences. This condition is due to
driving surface differences or vehicle loading. In order for the stabilizer/sway bar to
disconnect/reconnect, the right and left
halves of the bar must be aligned. This
alignment may require that the vehicle be
driven onto level ground or rocked from side
to side.
To return to on-road mode, press the SWAY
BAR switch again.
WARNING!
If the stabilizer/sway bar will not return to
on-road mode, the “Sway Bar Indicator Light”
will flash in the instrument cluster and vehicle
stability is greatly reduced. Do not attempt to
drive the vehicle over 18 mph (29 km/h).
Driving faster than 18 mph (29 km/h) may
cause loss of control of the vehicle, which
could result in serious injury. Contact your
local authorized dealer for assistance.
ON-ROAD DRIVING TIPS
Utility vehicles have higher ground clearance
and a narrower track to make them capable of
performing in a wide variety of off-road applications. Specific design characteristics give them
a higher center of gravity than ordinary cars.
An advantage of the higher ground clearance is
a better view of the road, allowing you to
anticipate problems. They are not designed for
cornering at the same speeds as conventional
two-wheel drive vehicles any more than lowslung sports cars are designed to perform satisfactorily in off-road conditions. If at all possible, avoid sharp turns or abrupt maneuvers.
As with other vehicles of this type, failure to
operate this vehicle correctly may result in loss
of control or vehicle rollover.
turns or braking. In most cases, there are no
road signs, posted speed limits or signal lights.
Therefore, you will need to use your own good
judgment on what is safe and what is not. When
on a trail, you should always be looking ahead
for surface obstacles and changes in terrain.
The key is to plan your future driving route while
remembering what you are currently driving
over.
OFF-ROAD DRIVING TIPS
Side Step Removal — If Equipped
NOTE:
Prior to off-road usage, the side steps
should be removed to prevent damage.
1. Remove the two nuts from the bodyside.
Underside Bolt
3. Remove the side step assembly.
The Basics Of Off-Road Driving
Bodyside Nut
2. Remove one bolt from the underside of the
vehicle.
You will encounter many types of terrain driving
off-road. You should be familiar with the terrain
and area before proceeding. There are many
types of surface conditions: hard-packed dirt,
gravel, rocks, grass, sand, mud, snow and ice.
Every surface has a different effect on your
vehicle’s steering, handling and traction. Controlling your vehicle is one of the keys to successful off-road driving, so always keep a firm
grip on the steering wheel and maintain a good
driving posture. Avoid sudden accelerations,
CAUTION!
Never park your vehicle over dry grass or
other combustible materials. The heat from
your vehicle exhaust system could cause a
fire.
WARNING!
Always wear your seat belt and firmly tie
down cargo. Unsecured cargo can become
projectiles in an off-road situation.
229
When To Use 4L (Low) Range
When off-road driving, shift into 4L (Low) for
additional traction and control on slippery or
difficult terrain, ascending or descending steep
hills, and to increase low speed pulling power.
This range should be limited to extreme situations such as deep snow, mud, steep inclines,
or sand where additional low speed pulling
power is needed. Vehicle speeds in excess of
25 mph (40 km/h) should be avoided when in 4L
(Low) range.
CAUTION!
Do not use 4L (Low) range when operating
the vehicle on dry pavement. Driveline hardware damage can result.
Simultaneous Brake And Throttle
Operation
Many off-road driving conditions require the
simultaneous use of the brake and throttle
(two-footed driving). When climbing rocks, logs,
or other stepped objects, using light brake pressure with light throttle will keep the vehicle from
230
jerking or lurching. This technique is also used
when you need to stop and restart a vehicle on
a steep incline.
Driving In Snow, Mud And Sand
Snow
In heavy snow or for additional control and
traction at slower speeds, shift the transmission
into a low gear and the transfer case into 4L
(Low) if necessary. Do not shift to a lower gear
than necessary to maintain headway. Overrevving the engine can spin the wheels and
traction will be lost. If you start to slow to a stop,
try turning your steering wheel no more than a
1/4 turn quickly back and forth, while still applying throttle. This will allow the tires to get a fresh
"bite" and help maintain your momentum.
CAUTION!
On icy or slippery roads, do not downshift at
high engine RPM or vehicle speeds, because engine braking may cause skidding
and loss of control.
Mud
Deep mud creates a great deal of suction
around the tires and is very difficult to get
through. You should use second gear (manual
transmission), or DRIVE (automatic transmission), with the transfer case in the 4L (Low)
position to maintain your momentum. If you
start to slow to a stop, try turning your steering
wheel no more than a 1/4 turn quickly back and
forth for additional traction. Mud holes pose an
increased threat of vehicle damage and getting
stuck. They are normally full of debris from
previous vehicles getting stuck. As a good practice before entering any mud hole, get out and
determine how deep it is, if there are any hidden
obstacles and if the vehicle can be safely recovered if stuck.
Sand
Soft sand is very difficult to travel through with
full tire pressure. When crossing soft, sandy
spots in a trail, maintain your vehicle’s momentum and do not stop. The key to driving in soft
sand is using the appropriate tire pressure,
accelerating slowly, avoiding abrupt maneuvers
and maintaining the vehicle’s momentum. If you
are going to be driving on large soft sandy areas
or dunes, reduce your tire pressure to a minimum of 15 psi (103 kPa) to allow for a greater
tire surface area. Reduced tire pressure will
drastically improve your traction and handling
while driving on the soft sand, but you must
return the tires to normal air pressure before
driving on pavement or other hard surfaces. Be
sure you have a way to reinflate the tires prior to
reducing the pressure.
CAUTION!
Reduced tire pressures may cause tire unseating and total loss of air pressure. To
reduce the risk of tire unseating, while at a
reduced tire pressure, reduce your speed
and avoid sharp turns or abrupt maneuvers.
Crossing Obstacles
(Rocks And Other High Points)
While driving off-road, you will encounter many
types of terrain. These varying types of terrain
bring different types of obstacles. Before proceeding, review the path ahead to determine
the correct approach and your ability to safely
recover the vehicle if something goes wrong.
Keeping a firm grip on the steering wheel, bring
the vehicle to a complete stop and then inch the
vehicle forward until it makes contact with the
object. Apply the throttle lightly while holding a
light brake pressure and ease the vehicle up
and over the object.
WARNING!
Crossing obstacles can cause abrupt steering system loading which could cause you to
loose control of your vehicle.
Using A Spotter
There are many times where it is hard to see the
obstacle or determine the correct path. Determining the correct path can be extremely difficult when you are confronting many obstacles.
In these cases have someone guide you over,
through, or around the obstacle. Have the person stand a safe distance in front of you where
they can see the obstacle, watch your tires and
undercarriage, and guide you through.
Crossing Large Rocks
When approaching large rocks, choose a path
which ensures you drive over the largest of
them with your tires. This will lift your undercarriage over the obstacle. The tread of the tire is
tougher and thicker than the side wall and is
designed to take the abuse. Always look ahead
and make every effort to cross the large rocks
with your tires.
CAUTION!
• Never attempt to straddle a rock that is
large enough to strike your axles or undercarriage.
• Never attempt to drive over a rock which is
large enough to contact the door sills.
Crossing A Ravine, Gully, Ditch, Washout
Or Rut
When crossing a ravine, gully, ditch, washout or
a large rut, the angled approach is the key to
maintaining your vehicle’s mobility. Approach
these obstacles at a 45-degree angle and let
each tire go through the obstacle independently.
You need to use caution when crossing large
231
obstacles with steep sides. Do not attempt to
cross any large obstacle with steep sides at an
angle great enough to put the vehicle at risk of
a rollover. If you get caught in a rut, dig a small
trench to the right or left at a 45-degree angle
ahead of the front tires. Use the removed dirt to
fill the rut ahead of the turnout you just created.
You should now be able to drive out following the
trench you just created at a 45-degree angle.
WARNING!
There is an increased risk of rollover when
crossing an obstacle, at any angle, with
steep sides.
Crossing Logs
To cross a log, approach it at a slight angle
(approximately 10 to 15 degrees). This allows
one front tire to be on top of the log while the
other just starts to climb the log. While climbing
the log, modulate your brake and accelerator to
avoid spinning the log out from under your tires.
Then ease the vehicle off the log using your
brakes.
232
CAUTION!
Do not attempt to cross a log with a greater
diameter than the running ground clearance
or the vehicle will become high-centered.
Getting High-Centered
If you get hung up or high-centered on an
object, get out of the vehicle and try to determine what the vehicle is hung up on, where it is
contacting the underbody and what is the best
direction to recover the vehicle. Depending on
what you are in contact with, jack the vehicle up
and place a few rocks under the tires so the
weight is off of the high point when you let the
vehicle down. You can also try rocking the
vehicle or winching the vehicle off the object.
CAUTION!
Winching or rocking the vehicle off hard
objects increases the risk of underbody damage.
Hill Climbing
Hill climbing requires good judgment and a
good understanding of your abilities and your
vehicle’s limitations. Hills can cause serious
problems. Some are just too steep to climb and
should not be attempted. You should always
feel confident with the vehicle and your abilities.
You should always climb hills straight up and
down. Never attempt to climb a hill on an angle.
Before Climbing A Steep Hill
As you approach a hill, consider its grade or
steepness. Determine if it is too steep. Look to
see what the traction is on the hill side trail. Is
the trail straight up and down? What is on top
and the other side? Are there ruts, rocks,
branches or other obstacles on the path? Can
you safely recover the vehicle if something goes
wrong? If everything looks good and you feel
confident, shift the transmission into a lower
gear with 4L (Low) engaged, and proceed with
caution, maintaining your momentum as you
climb the hill.
Driving Up Hill
Once you have determined your ability to proceed and have shifted into the appropriate gear,
line your vehicle up for the straightest possible
run. Accelerate with an easy constant throttle
and apply more power as you start up the hill.
Do not race forward into a steep grade; the
abrupt change of grade could cause you to lose
control. If the front end begins to bounce, ease
off the throttle slightly to bring all four tires back
on the ground. As you approach the crest of the
hill, ease off the throttle and slowly proceed over
the top. If the wheels start to slip as you
approach the crest of a hill, ease off the accelerator and maintain headway by turning the
steering wheel no more than a 1/4 turn quickly
back and forth. This will provide a fresh "bite"
into the surface and will usually provide enough
traction to complete the climb. If you do not
make it to the top, place the vehicle in REVERSE and back straight down the grade using
engine resistance along with the vehicle brakes.
WARNING!
Never attempt to climb a hill at an angle or
turn around on a steep grade. Driving across
an incline increases the risk of a rollover,
which may result in severe injury.
Driving Downhill
Before driving down a steep hill, you need to
determine if it is too steep for a safe descent.
What is the surface traction? Is the grade too
steep to maintain a slow, controlled descent?
Are there obstacles? Is it a straight descent? Is
there plenty of distance at the base of the hill to
regain control if the vehicle descends to fast? If
you feel confident in your ability to proceed,
then make sure you are in 4L (Low) and proceed with caution. Allow engine braking to control the descent and apply your brakes, if necessary, but do not allow the tires to lock.
WARNING!
Do not descend a steep grade in NEUTRAL.
Use vehicle brakes in conjunction with engine braking. Descending a grade too fast
could cause you to lose control and be
seriously injured or killed.
Driving Across An Incline
If at all possible, avoid driving across an incline.
If it is necessary, know your vehicle’s abilities.
Driving across an incline places more weight on
the downhill wheels, which increases the possibilities of a downhill slide or rollover. Make
sure the surface has good traction with firm and
stable soils. If possible, transverse the incline at
an angle heading slightly up or down.
WARNING!
Driving across an incline increases the risk of
a rollover , which may result in severe injury.
233
If You Stall Or Begin To Lose Headway
If you stall or begin to lose headway while
climbing a steep hill, allow your vehicle to come
to a stop and immediately apply the brake.
Restart the engine and shift into REVERSE.
Back slowly down the hill allowing engine braking
to control the descent and apply your brakes, if
necessary, but do not allow the tires to lock.
WARNING!
If the engine stalls or you lose headway or
cannot make it to the top of a steep hill or
grade, never attempt to turn around. To do so
may result in tipping and rolling the vehicle,
which may result in severe injury. Always
back carefully straight down a hill in REVERSE. Never back down a hill in NEUTRAL
using only the vehicle brakes. Never drive
diagonally across a hill, always drive straight
up or down.
234
Driving Through Water
Extreme care should be taken crossing any
type of water. Water crossings should be
avoided, if possible, and only be attempted
when necessary in a safe, responsible manner.
You should only drive through areas which are
designated and approved. You should tread
lightly and avoid damage to the environment.
You should know your vehicle’s abilities and be
able to recover it if something goes wrong. You
should never stop or shut a vehicle off when
crossing deep water unless you ingested water
into the engine air intake. If the engine stalls, do
not attempt to restart it. Determine if it has
ingested water first. The key to any crossing is
low and slow. Shift into first gear (manual transmission), or DRIVE (automatic transmission),
with the transfer case in the 4L (Low) position
and proceed very slowly with a constant slow
speed {3 to 5 mph (5 to 8 km/h) maximum} and
light throttle. Keep the vehicle moving; do not try
to accelerate through the crossing. After crossing any water higher than the bottom of the axle
differentials, you should inspect all of the vehicle fluids for signs of water ingestion.
CAUTION!
• Water ingestion into the axles, transmission, transfer case, engine or vehicle interior can occur if you drive too fast or
through too deep of water. Water can
cause permanent damage to engine,
driveline or other vehicle components, and
your brakes will be less effective once wet
and/or muddy.
• This vehicle is capable of crossing through
water at a depth of 30 inches (76 cm) at
speeds no greater than 5 mph (8 km/h).
Water ingestion can occur causing damage to your vehicle.
Before You Cross Any Type Of Water
As you approach any type of water, you need to
determine if you can cross it safely and responsibly. If necessary, get out and walk through the
water or probe it with a stick. You need to be
sure of its depth, approach angle, current and
bottom condition. Be careful of murky or muddy
waters; check for hidden obstacles. Make sure
you will not be intruding on any wildlife, and you
can recover the vehicle if necessary. The key to
a safe crossing is the water depth, current and
bottom conditions. On soft bottoms, the vehicle
will sink in, effectively increasing the water level
on the vehicle. Be sure to consider this when
determining the depth and the ability to safely
cross.
Crossing Puddles, Pools, Flooded Areas
Or Other Standing Water
Puddles, pools, flooded or other standing water
areas normally contain murky or muddy waters.
These water types normally contain hidden
obstacles and make it difficult to determine an
accurate water depth, approach angle, and
bottom condition. Murky or muddy water holes
are where you want to hook up tow straps prior
to entering. This makes for a faster, cleaner and
easier vehicle recovery. If you are able to determine you can safely cross, than proceed using
the low and slow method.
CAUTION!
Muddy waters can reduce the cooling system effectiveness by depositing debris onto
the radiator.
Crossing Ditches, Streams, Shallow Rivers
Or Other Flowing Water
Flowing water can be extremely dangerous.
Never attempt to cross a fast running stream or
river even in shallow water. Fast moving water
can easily push your vehicle downstream,
sweeping it out of control. Even in very shallow
water, a high current can still wash the dirt out
from around your tires putting you and your
vehicle in jeopardy. There is still a high risk of
personal injury and vehicle damage with slower
water currents in depths greater than the vehicle’s running ground clearance. You should
never attempt to cross flowing water which is
deeper than the vehicle’s running ground clearance. Even the slowest current can push the
heaviest vehicle downstream and out of control
if the water is deep enough to push on the large
surface area of the vehicle’s body. Before you
proceed, determine the speed of the current,
the water’s depth, approach angle, bottom condition and if there are any obstacles. Then cross
at an angle heading slightly upstream using the
low and slow technique.
WARNING!
Never drive through fast moving deep water.
It can push your vehicle downstream,
sweeping it out of control. This could put you
and your passengers at risk of injury or
drowning.
235
After Driving Off-Road
Off-road operation puts more stress on your
vehicle than does most on-road driving. After
going off-road, it is always a good idea to check
for damage. That way you can get any problems
taken care of right away and have your vehicle
ready when you need it.
• Completely inspect the underbody of your
vehicle. Check tires, body structure, steering,
suspension, and exhaust system for damage.
• Inspect the radiator for mud and debris and
clean as required.
• Check threaded fasteners for looseness, particularly on the chassis, drivetrain components, steering, and suspension. Retighten
them, if required, and torque to the values
specified in the Service Manual.
• Check for accumulations of plants or brush.
These things could be a fire hazard. They
might hide damage to fuel lines, brake hoses,
axle pinion seals, and propeller shafts.
236
• After extended operation in mud, sand, water, or similar dirty conditions, have the radiator, fan, brake rotors, wheels, brake linings,
and axle yokes inspected and cleaned as
soon as possible.
WARNING!
Abrasive material in any part of the brakes
may cause excessive wear or unpredictable
braking. You might not have full braking
power when you need it to prevent a collision. If you have been operating your vehicle
in dirty conditions, get your brakes checked
and cleaned as necessary.
• If you experience unusual vibration after
driving in mud, slush or similar conditions,
check the wheels for impacted material. Impacted material can cause a wheel imbalance and freeing the wheels of it will correct
the situation.
POWER STEERING
The standard power steering system will give
you good vehicle response and increased ease
of maneuverability in tight spaces. The system
will provide mechanical steering capability if
power assist is lost.
If for some reason the power assist is interrupted, it will still be possible to steer your
vehicle. Under these conditions, you will observe a substantial increase in steering effort,
especially at very low vehicle speeds and during parking maneuvers.
NOTE:
• Increased noise levels at the end of the
steering wheel travel are considered normal and do not indicate that there is a
problem with the power steering system.
• Upon initial start-up in cold weather, the
power steering pump may make noise for
a short amount of time. This is due to the
cold, thick fluid in the steering system.
This noise should be considered normal,
and it does not in any way damage the
steering system.
CAUTION!
Prolonged operation of the steering system
at the end of the steering wheel travel will
increase the steering fluid temperature and it
should be avoided when possible. Damage
to the power steering pump may occur.
Power Steering Fluid Check
Checking the power steering fluid level at a
defined service interval is not required. The fluid
should only be checked if a leak is suspected,
abnormal noises are apparent, and/or the system is not functioning as anticipated. Coordinate inspection efforts through an authorized
dealer.
CAUTION!
Do not use chemical flushes in your power
steering system as the chemicals can damage your power steering components. Such
damage is not covered by the New Vehicle
Limited Warranty.
WARNING!
Fluid level should be checked on a level
surface and with the engine off to prevent
injury from moving parts and to ensure accurate fluid level reading. Do not overfill. Use
only manufacturer’s recommended power
steering fluid.
The parking brake lever is located in the center
console. To apply the parking brake, pull the
lever up as firmly as possible. To release the
parking brake, pull the lever up slightly, press
the center button, then lower the lever completely.
If necessary, add fluid to restore to the proper
indicated level. With a clean cloth, wipe any
spilled fluid from all surfaces. Refer to “Fluids,
Lubricants, and Genuine Parts” in “Maintaining
Your Vehicle” for further information.
PARKING BRAKE
Before leaving the vehicle, make sure that the
parking brake is fully applied. Also, be certain to
leave an automatic transmission in PARK, or
manual transmission in REVERSE or first gear.
Parking Brake
When the parking brake is applied with the
ignition switch ON, the “Brake Warning Light” in
the instrument cluster will illuminate.
237
NOTE:
• When the parking brake is applied and the
automatic transmission is placed in gear,
the “Brake Warning Light” will flash. If
vehicle speed is detected, a chime will
sound to alert the driver. Fully release the
parking brake before attempting to move
the vehicle.
• This light only shows that the parking
brake is applied. It does not show the
degree of brake application.
When parking on a hill, it is important to turn
the front wheels toward the curb on a downhill
grade and away from the curb on an uphill
grade. For vehicles equipped with an automatic
transmission, apply the parking brake before
placing the shift lever in PARK, otherwise the
load on the transmission locking mechanism
may make it difficult to move the shift lever out
of PARK. The parking brake should always be
applied whenever the driver is not in the vehicle.
WARNING!
• Never use the PARK position on an automatic transmission as a substitute for the
parking brake. Always apply the parking
brake fully when parked to guard against
vehicle movement and possible injury or
damage.
• When leaving the vehicle, always remove
the Key Fob from the ignition and lock your
vehicle.
• Never leave children alone in a vehicle, or
with access to an unlocked vehicle. Allowing children to be in a vehicle unattended
is dangerous for a number of reasons. A
child or others could be seriously or fatally
injured. Children should be warned not to
touch the parking brake, brake pedal or the
shift lever.
• Do not leave the Key Fob in or near the
vehicle, or in a location accessible to children. A child could operate power windows, other controls, or move the vehicle.
(Continued)
238
WARNING! (Continued)
• Be sure the parking brake is fully disengaged before driving; failure to do so can
lead to brake failure and a collision.
• Always fully apply the parking brake when
leaving your vehicle or it may roll and cause
damage or injury. Also, be certain to leave
an automatic transmission in PARK, a
manual transmission in REVERSE or first
gear. Failure to do so may cause the vehicle
to roll and cause damage or injury.
CAUTION!
If the “Brake Warning Light” remains on with
the parking brake released, a brake system
malfunction is indicated. Have the brake
system serviced by an authorized dealer
immediately.
BRAKE SYSTEM
Your vehicle is equipped with dual hydraulic
brake systems. If either of the two hydraulic
systems loses normal capability, the remaining
system will still function. There will be some loss
of overall braking effectiveness. This may be
evident by increased pedal travel during application, greater pedal force required to slow or
stop, and potential activation of the “Brake
Warning Light.”
In the event power assist is lost for any reason
(for example, repeated brake applications with
the engine OFF) the brakes will still function.
The effort required to brake the vehicle will be
much greater than that required with the power
system operating.
ELECTRONIC BRAKE
CONTROL SYSTEM
Your vehicle is equipped with an advanced
electronic brake control system that includes
Anti-Lock Brake System (ABS), Traction Control System (TCS), Brake Assist System (BAS),
Hill Start Assist (HSA), Electronic Roll Mitigation (ERM), Electronic Stability Control (ESC),
Trailer Sway Control (TSC), and Hill Descent
Control (HDC). All of these systems work together to enhance vehicle stability and control
in various driving conditions, and are commonly
referred to as ESC.
The Anti-Lock Brake System conducts a low
speed self-test at about 12 mph (20 km/h). If for
any reason your foot is on the brake when the
vehicle reaches 12 mph (20 km/h), this check
will be delayed until 25 mph (40 km/h).
Anti-Lock Brake System (ABS)
The Anti-Lock Brake System pump motor runs
during the self-test, and during an ABS stop, to
provide the regulated hydraulic pressure. The
motor pump makes a low humming noise during
operation; this is normal.
The Anti-Lock Brake System (ABS) is designed
to aid the driver in maintaining vehicle control
under adverse braking conditions. The system
operates with a separate computer to modulate
hydraulic pressure to prevent wheel lock-up and
help avoid skidding on slippery surfaces.
All vehicle wheels and tires must be the same
size and type, and tires must be properly inflated to produce accurate signals for the computer.
WARNING!
Significant over or under-inflation of tires, or
mixing sizes of tires or wheels on the vehicle
can lead to loss of braking effectiveness.
WARNING!
• Pumping of the Anti-Lock Brakes will diminish their effectiveness and may lead to
a collision. Pumping makes the stopping
distance longer. Just press firmly on your
brake pedal when you need to slow down
or stop.
(Continued)
239
WARNING! (Continued)
• The Anti-Lock Brake System (ABS) cannot
prevent the natural laws of physics from
acting on the vehicle, nor can they increase
braking or steering efficiency beyond that
afforded by the condition of the vehicle
brakes and tires or the traction afforded.
• The ABS cannot prevent collisions, including those resulting from excessive speed
in turns, following another vehicle too
closely, or hydroplaning.
• The capabilities of an ABS-equipped vehicle must never be exploited in a reckless
or dangerous manner which could jeopardize the user’s safety or the safety of others.
CAUTION!
The Anti-Lock Brake System is subject to
possible detrimental effects of electronic interference caused by improperly installed
aftermarket radios or telephones.
NOTE:
During severe braking conditions, a pulsing
sensation may occur and a clicking noise
will be heard. This is normal, indicating that
the Anti-Lock Brake System is functioning.
Traction Control System (TCS)
This system monitors the amount of wheel spin
of each of the driven wheels. If wheel spin is
detected, brake pressure is applied to the slipping wheel(s) and engine power is reduced to
provide enhanced acceleration and stability.
A feature of the TCS system, Brake Limited
Differential (BLD), functions similar to a limited
slip differential and controls the wheel spin
across a driven axle. If one wheel on a driven
axle is spinning faster than the other, the system will apply the brake of the spinning wheel.
This will allow more engine torque to be applied
to the wheel that is not spinning. This feature
remains active even if TCS and ESC are in
either the “Partial Off” or “Full Off” modes. Refer
to “Electronic Stability Control (ESC)” in this
section for further information.
Brake Assist System (BAS)
The BAS is designed to optimize the vehicle’s
braking capability during emergency braking
maneuvers. The system detects an emergency
braking situation by sensing the rate and
amount of brake application and then applies
optimum pressure to the brakes. This can help
reduce braking distances. The BAS complements the anti-lock brake system (ABS). Applying the brakes very quickly results in the best
BAS assistance. To receive the benefit of the
system, you must apply continuous braking
pressure during the stopping sequence. Do not
reduce brake pedal pressure unless braking is
no longer desired. Once the brake pedal is
released, the BAS is deactivated.
WARNING!
The Brake Assist System (BAS) cannot prevent the natural laws of physics from acting
on the vehicle, nor can it increase the traction afforded by prevailing road conditions.
The BAS cannot prevent collisions, including
(Continued)
240
WARNING! (Continued)
those resulting from excessive speed in
turns, driving on very slippery surfaces, or
hydroplaning. The capabilities of a BASequipped vehicle must never be exploited in
a reckless or dangerous manner which could
jeopardize the user’s safety or the safety of
others.
Hill Start Assist (HSA)
The HSA system is designed to assist the driver
when starting a vehicle from a stop on a hill.
HSA will maintain the level of brake pressure
the driver applied for a short period of time after
the driver takes their foot off of the brake pedal.
If the driver does not apply the throttle during
this short period of time, the system will release
brake pressure and the vehicle will roll down the
hill. The system will release brake pressure in
proportion to amount of throttle applied as the
vehicle starts to move in the intended direction
of travel.
WARNING!
If the clutch pedal (manual transmission
only) remains pressed during the application
of the throttle, the HSA will disengage allowing the vehicle to roll down the incline. This
could cause a collision with another vehicle
or object. To avoid this, do not apply throttle
while pressing the clutch pedal until you are
ready to release the clutch. Always remember the driver is responsible for braking the
vehicle.
HSA Activation Criteria
The following criteria must be met in order for
HSA to activate:
• Vehicle must be stopped
• Vehicle must be on an 8% (approximately) or
greater incline (approximately 3% for manual
transmission equipped vehicles)
WARNING!
There may be situations on minor hills with a
loaded vehicle, or while pulling a trailer
where the system will not activate and slight
rolling may occur, which could cause a collision with another vehicle or object. Always
remember the driver is responsible for braking the vehicle.
The system will only work if the intended direction of the vehicle and vehicle gear match. For
example, if the intended direction is forward up
a hill and the vehicle is in DRIVE (automatic
transmission equipped vehicle), and the activation criteria are met, HSA will activate.
HSA On Automatic Transmission Vehicles
The system will work in REVERSE, and all
forward gears on vehicles equipped with an
automatic transmission. The system will not
activate if the vehicle is placed in NEUTRAL.
• Gear selection matches vehicle uphill direction
(i.e., vehicle facing uphill is in forward gear;
vehicle backing uphill is in REVERSE gear).
241
HSA On Manual Transmission Vehicles
The system will work in REVERSE, forward
gears, and NEUTRAL on manual transmission
equipped vehicles. The system does not recognize NEUTRAL on manual vehicles, thus it will
hold the vehicle on an incline for a short period
while in NEUTRAL, regardless of clutch position. If the vehicle is pointed down hill in NEUTRAL and your foot is not on the clutch, it will
roll down hill, HSA will not hold you in this case.
To prevent this, do not attempt to roll down a hill
simply by putting the transmission in NEUTRAL
and letting gravity act on the vehicle. Instead,
use the appropriate gear for moving in the
desired direction.
NOTE:
Towing With HSA
HSA will provide assistance when starting on a
grade when pulling a trailer.
WARNING!
• If you use a trailer brake controller with
your trailer, your trailer brakes may be
activated and deactivated with the brake
switch. If so, when the brake pedal is
released there may not be enough brake
pressure to hold the vehicle and trailer on
a hill and this could cause a collision with
another vehicle or object behind you. In
order to avoid rolling down the hill while
resuming acceleration, manually activate
the trailer brake prior to releasing the
brake pedal. Always remember the driver
is responsible for braking the vehicle.
• HSA is not a parking brake. Always apply
the parking brake fully when leaving your
vehicle. Also, be certain to leave the transmission in PARK.
(Continued)
242
WARNING! (Continued)
• Failure to follow these warnings may
cause the vehicle to roll down the incline
and could collide with another vehicle,
object or person, and cause serious or
fatal injury. Always remember to use the
parking brake while parking on a hill and
that the driver is responsible for braking
the vehicle.
NOTE:
The HSA system may also be turned on and
off if the vehicle is equipped with the Electronic Vehicle Information Center (EVIC). Refer to “Electronic Vehicle Information Center
(EVIC)” in “Understanding Your Instrument
Panel” for further information.
HSA Off
If you wish to turn off the HSA system, follow
this procedure:
Steps 1-7 must be completed within 90 seconds
to turn off HSA. Repeat steps 1-7 to re-enable
HSA functionality.
1. Start with the engine off and vehicle in PARK
(automatic transmission) or NEUTRAL with
clutch out (manual transmission) with wheels
straight. Apply parking brake on manual transmission vehicle.
Electronic Roll Mitigation (ERM)
2. Start the engine.
3. With the engine running, the brake applied,
and the clutch out, rotate the steering wheel
180° counterclockwise from center.
4. Press the ESC OFF switch four times within
twenty seconds.
5. Rotate the steering wheel 360° clockwise
(180° clockwise from center).
6. Cycle ignition switch OFF then ON.
This system anticipates the potential for wheel
lift by monitoring the driver’s steering wheel
input and the speed of the vehicle. When ERM
determines that the rate of change of the steering wheel angle and vehicle’s speed are sufficient to potentially cause wheel lift, it applies the
appropriate brake and may reduce engine
power to lessen the chance that wheel lift will
occur. ERM will only intervene during very severe or evasive driving maneuvers.
Electronic Roll Mitigation (ERM) can only reduce the chance of wheel lift occurring during
severe or evasive driving maneuvers. It cannot
prevent wheel lift due to other factors such as
road conditions, leaving the roadway or striking
objects or other vehicles.
NOTE:
Anytime the ESC system is in the “Full Off”
mode, ERM is disabled. Refer to Electronic
Stability Control (ESC) for a complete explanation of the available ESC modes.
WARNING!
Many factors, such as vehicle loading, road
conditions and driving conditions, influence
the chance that wheel lift or rollover may
occur. Electronic Roll Mitigation (ERM) cannot prevent all wheel lift or rollovers, especially those that involve leaving the roadway
or striking objects or other vehicles. The
capabilities of an ERM-equipped vehicle
must never be exploited in a reckless or
dangerous manner which could jeopardize
the user’s safety or the safety of others.
7. If the sequence was completed properly, the
“ESC Activation/Malfunction Indicator Light”
will blink several times to confirm HSA is off.
243
Electronic Stability Control (ESC)
This system enhances directional control and
stability of the vehicle under various driving
conditions. The ESC corrects for over/under
steering of the vehicle by applying the brake of
the appropriate wheel to assist in counteracting
the over/under steer condition. Engine power
may also be reduced to help the vehicle maintain the desired path.
ESC uses sensors in the vehicle to determine
the vehicle path intended by the driver and
compares it to the actual path of the vehicle.
When the actual path does not match the
intended path, ESC applies the brake of the
appropriate wheel to assist in counteracting the
oversteer or understeer condition.
• Oversteer - when the vehicle is turning more
than appropriate for the steering wheel position.
• Understeer - when the vehicle is turning less
than appropriate for the steering wheel
position.
The “ESC Activation/Malfunction Indicator
Light” (located in the instrument cluster), starts
to flash as soon as the tires lose traction and
the ESC system becomes active. The “ESC
Activation/Malfunction Indicator Light” also
flashes when TCS is active. If the “ESC
Activation/Malfunction Indicator Light” begins to
flash during acceleration, ease up on the accelerator and apply as little throttle as possible. Be
sure to adapt your speed and driving to the
prevailing road conditions.
WARNING!
Electronic Stability Control (ESC) cannot
prevent the natural laws of physics from
acting on the vehicle, nor can it increase the
traction afforded by prevailing road conditions. ESC cannot prevent accidents, including those resulting from excessive speed in
turns, driving on very slippery surfaces, or
hydroplaning. ESC also cannot prevent accidents resulting from loss of vehicle control
due to inappropriate driver input for the con(Continued)
244
WARNING! (Continued)
ditions. Only a safe, attentive, and skillful
driver can prevent accidents. The capabilities of an ESC equipped vehicle must never
be exploited in a reckless or dangerous
manner which could jeopardize the user’s
safety or the safety of others.
The ESC system has three available operating
modes in 4H range. The system has one operating mode in 4L range. Two-wheel drive vehicles and four-wheel drive vehicles in 2H range
have two operating modes.
4H Range (4WD Models)
ESC On
This is the normal operating mode for ESC in
4H range.
ESC Partial Off
This mode is entered by momentarily pressing
the ESC OFF switch. When in "ESC Partial Off"
mode, the TCS portion of ESC (except for the
limited slip feature described in the TCS section), has been disabled and the "ESC Off
Indicator Light" will be illuminated.
This mode is intended to be used if the vehicle
is in deep snow, sand, or gravel conditions and
more wheel spin than ESC would normally
allow is required to gain traction. To turn ESC on
again, momentarily press the ESC OFF switch.
This will restore the normal “ESC On” mode of
operation.
NOTE:
To improve the vehicle’s traction when driving with snow chains, or starting off in deep
snow, sand, or gravel, it may be desirable to
switch to the ⴖESC Partial Offⴖ mode by
pressing the ESC OFF switch. Once the
situation requiring ESC to be switched to the
ⴖESC Partial Offⴖ mode is overcome, turn
ESC back on by momentarily pressing the
ESC OFF switch. This may be done while the
vehicle is in motion.
WARNING!
• When in "ESC Partial Off" mode, the TCS
functionality of ESC, (except for the limited
slip feature described in the TCS section),
has been disabled and the “ESC Off Indicator Light” will be illuminated. When in
"ESC Partial Off" mode, the engine power
reduction feature of TCS is disabled, and
the enhanced vehicle stability offered by
the ESC system is reduced.
• Trailer Sway control (TSC) is disabled when
the ESC system is in the "ESC Partial Off"
mode.
evasive maneuver, the ESC system will not
engage to assist in maintaining stability. “ESC
Full Off” mode is intended for off-highway or
off-road use only.
ESC OFF Switch
ESC Full Off
This mode is entered by pressing and holding
momentarily pressing the ESC OFF switch for
five seconds.
In the "ESC Full Off" mode, the engine torque
reduction and stability features are disabled.
Therefore, the enhanced vehicle stability offered by ESC is unavailable. In an emergency
When in "ESC Full Off" mode, ESC and TCS,
except for the Brake Limited Differential (BLD)
feature described in the TCS section, are turned
off until the vehicle reaches an approximate
speed of 40 mph (64 km/h). For speeds at or
exceeding approximately 40 mph (64 km/h) the
ESC goes into "ESC Partial Off". When the
vehicle speed drops below 35 mph (56 km/h),
the ESC system goes back to "ESC Full Off".
245
To turn ESC on again, momentarily press the
ESC OFF switch. This will restore normal “ESC
On” mode of operation. The "ESC Off Indicator
Light” will always be illuminated when ESC is in
"ESC Partial Off" and "ESC full Off".
WARNING!
With the ESC in "ESC Full Off" mode, the
engine torque reduction and stability features offered by ESC and ERM are disabled.
In an emergency evasive maneuver, the
ESC and ERM systems will not engage to
assist in maintaining stability. The "ESC Full
Off" mode is intended for off-road use only.
4L Range (4WD Models)
ESC Full Off
This is the normal operating mode for ESC in 4L
range. Whenever the vehicle is started in 4L
range, or the transfer case (if equipped) is
shifted from 4H range or NEUTRAL to 4L range,
the ESC system will be in this mode. In 4L
range, ESC and TCS, except for the Brake
246
Limited Differential (BLD) feature described in
the TCS section, are turned off until the vehicle
reaches an approximate speed of 40 mph
(64 km/h). For speeds at or exceeding approximately 40 mph (64 km/h) the ESC goes into
"ESC Partial Off" When the vehicle speed drops
below 35 mph (56 km/h), the ESC system goes
back to "ESC Full Off". The ESC is in "ESC Full
Off" at low vehicle speeds in 4L range so that it
will not interfere with off-road driving, but the
ESC function returns to provide the stability
feature at speeds above 40 mph (64 km/h). The
“ESC OFF Indicator Light” will always be illuminated in 4L range when ESC is in "ESC Full Off"
or "ESC Partial Off".
NOTE:
The “ESC OFF” message will display and an
audible chime will sound when the shift
lever is placed in the PARK position from
any position other than PARK, and then
moved out of the PARK position. This will
occur even if the message was previously
cleared.
WARNING!
With the ESC in "ESC Full Off" mode, the
engine torque reduction and stability features offered by ESC and ERM are disabled.
In an emergency evasive maneuver, the
ESC and ERM systems will not engage to
assist in maintaining stability. The "ESC Full
Off" mode is intended for off-road use only.
2H Range (4WD Models) Or 2WD Models
ESC On
This is the normal operating mode for ESC in
2H range and on 2WD vehicles.
ESC Partial Off
When in "ESC Partial Off" mode, the TCS
portion of ESC (except for the limited slip feature described in the TCS section), has been
disabled and the "ESC Off Indicator Light" will
be illuminated.
This mode is intended to be used if the vehicle
is in deep snow, sand, or gravel conditions and
more wheel spin than ESC would normally
allow is required to gain traction. To turn ESC on
again, momentarily press the ESC OFF switch.
This will restore the normal "ESC On" mode of
operation.
NOTE:
To improve the vehicle’s traction when driving with snow chains, or starting off in deep
snow, sand, or gravel, it may be desirable to
switch to the ⴖESC Partial Offⴖ mode by
pressing the ⴖESC Full Offⴖ switch. Once the
situation requiring ESC to be switched to the
ⴖESC Partial Offⴖ mode is overcome, turn
ESC back on by momentarily pressing the
ⴖESC Full Offⴖ switch. This may be done
while the vehicle is in motion.
The ESC will restore to normal ESC On mode
after each key on.
WARNING!
• When in “Partial Off” mode, the TCS functionality of ESC, (except for the limited slip
feature described in the TCS section), has
been disabled and the “ESC Off Indicator
Light” will be illuminated. When in “Partial
Off” mode, the engine power reduction
feature of TCS is disabled, and the enhanced vehicle stability offered by the ESC
system is reduced.
• Trailer Sway Control (TSC) is disabled when
the ESC system is in the "Partial Off" mode.
ESC Activation/Malfunction Indicator
Light And ESC OFF Indicator Light
The “ESC Activation/Malfunction
Indicator Light” in the instrument
cluster will come on when the ignition switch is cycled to the ON/
RUN position. It should go out with the engine
running. If the “ESC Activation/Malfunction Indicator Light” comes on continuously with the
engine running, a malfunction has been detected in the ESC system. If this light remains
on after several ignition cycles, and the vehicle
has been driven several miles (kilometers) at
speeds greater than 30 mph (48 km/h), see
your authorized dealer as soon as possible to
have the problem diagnosed and corrected.
The “ESC Activation/Malfunction Indicator
Light” (located in the instrument cluster) starts
to flash as soon as the tires lose traction and
the ESC system becomes active. The “ESC
Activation/Malfunction Indicator Light” also
flashes when TCS is active. If the “ESC
Activation/Malfunction Indicator Light” begins to
flash during acceleration, ease up on the accelerator and apply as little throttle as possible. Be
sure to adapt your speed and driving to the
prevailing road conditions.
247
NOTE:
Trailer Sway Control (TSC)
• The “ESC Off Indicator Light” and the
“ESC Activation/Malfunction Indicator
Light” come on momentarily each time
the ignition switch is turned to the ON/
RUN position.
TSC uses sensors in the vehicle to recognize
an excessively swaying trailer and will take the
appropriate actions to attempt to stop the sway.
The system may reduce engine power and
apply the brake of the appropriate wheel(s) to
counteract the sway of the trailer. TSC will
become active automatically once an excessively swaying trailer is recognized. TSC cannot
stop all trailers from swaying. Always use caution when towing a trailer and follow the tongue
weight recommendations. Refer to “Trailer Towing” in “Starting and Operating” for further information. When TSC is functioning, the “ESC
Activation/Malfunction Indicator Light” will flash,
the engine power may be reduced and you may
feel the brakes being applied to individual
wheels to attempt to stop the trailer from swaying. TSC is disabled when the ESC system is in
the "ESC Partial Off" or "ESC Full Off" modes.
• Each time the ignition is cycled to the
ON/RUN position, the ESC system will be
ON even if it was cycled off previously,
except for when the vehicle is started
while in 4L Range.
• The ESC system will make buzzing or
clicking sounds when it is active. This is
normal; the sounds will stop when ESC
becomes inactive following the maneuver
that caused the ESC activation.
The “ESC OFF Indicator Light” indicates the Electronic Stability
Control (ESC) is partially off or full
off.
248
WARNING!
If TSC activates while driving, slow the vehicle down, stop at the nearest safe location,
and adjust the trailer load to eliminate trailer
sway.
Hill Descent Control (HDC) —
If Equipped
HDC is only intended for low speed off-road
driving. HDC maintains vehicle speed while
descending hills in off-road driving conditions by
applying the brakes when necessary.
The symbol indicates the status of
the Hill Descent Control (HDC) feature. The lamp will be on solid
when HDC is armed. HDC can only
be armed when the transfer case is
in the “4WD LOW” position and the vehicle
speed is less then 30 mph (48 km/h). If these
conditions are not met while attempting to use
the HDC feature, the HDC indicator light will
flash on/off.
When enabled, HDC senses the terrain and
activates when the vehicle is descending a hill.
HDC speed may be adjusted by the driver to
suit the driving conditions. The speed corresponds to the transmission gear selected.
Gear
Approximate HDC
Set Speed
1st
1 mph (1.5 km/h)
2nd
2.5 mph (4 km/h)
3rd
4 mph (6.5 km/h)
4th
5.5 mph (9 km/h)
DRIVE
7.5 mph (12 km/h)
REVERSE
1 mph (1.5 km/h)
However, the driver can override HDC operation by applying the brake to slow the vehicle
down below the HDC control speed. If more
speed is desired during HDC control, the accelerator pedal will increase vehicle speed in the
usual manner. When either the brake or the
accelerator is released, HDC will control the
vehicle at the original set speed.
Enabling HDC
1. Shift the transfer case into 4WD LOW range.
Refer to “Four-Wheel Drive Operation” in
“Starting and Operating” for further information.
TIRE SAFETY INFORMATION
Tire Markings
2. Press the “Hill Descent” button. The “Hill
Descent Control Indicator Light” in the instrument cluster will turn on solid.
NOTE:
• If the transfer case is not in 4WD LOW
range, the “Hill Descent Control Indicator
Light” will flash for five seconds and HDC
will not be enabled.
• If the ESC senses that the brakes are
overheating the “Hill Descent Control Indicator Light” will flash for five seconds
and HDC will become deactivated until
the brakes have cooled.
1 — U.S. DOT Safety
Standards Code (TIN)
2 — Size Designation
3 — Service Description
4 — Maximum Load
5 — Maximum Pressure
6 — Treadwear, Traction and Temperature
Grades
Disabling HDC
Press the “Hill Descent” button or shift the
transfer case out of 4WD LOW range. The “Hill
Descent Control Indicator” light in the instrument cluster will turn off.
249
NOTE:
• P (Passenger) — Metric tire sizing is
based on U.S. design standards. P-Metric
tires have the letter “P” molded into the
sidewall preceding the size designation.
Example: P215/65R15 95H.
• European — Metric tire sizing is based on
European design standards. Tires designed to this standard have the tire size
molded into the sidewall beginning with
the section width. The letter ⴖPⴖ is absent
from this tire size designation. Example:
215/65R15 96H.
• LT (Light Truck) — Metric tire sizing is
based on U.S. design standards. The size
designation for LT-Metric tires is the same
as for P-Metric tires except for the letters
“LT” that are molded into the sidewall
preceding the size designation. Example:
LT235/85R16.
• Temporary spare tires are designed for
temporary emergency use only. Temporary high pressure compact spare tires
have the letter “T” or “S” molded into the
sidewall preceding the size designation.
Example: T145/80D18 103M.
• High flotation tire sizing is based on U.S.
design standards and it begins with the
tire diameter molded into the sidewall.
Example: 31x10.5 R15 LT.
Tire Sizing Chart
EXAMPLE:
Example Size Designation: P215/65R15XL 95H, 215/65R15 96H, LT235/85R16C, T145/80D18 103M, 31x10.5 R15 LT
P = Passenger car tire size based on U.S. design standards, or
ⴖ....blank....ⴖ = Passenger car tire based on European design standards, or
LT = Light truck tire based on U.S. design standards, or
T or S = Temporary spare tire or
31 = Overall diameter in inches (in)
250
EXAMPLE:
215, 235, 145 = Section width in millimeters (mm)
65, 85, 80 = Aspect ratio in percent (%)
– Ratio of section height to section width of tire, or
10.5 = Section width in inches (in)
R = Construction code
– "R" means radial construction, or
– "D" means diagonal or bias construction
15, 16, 18 = Rim diameter in inches (in)
Service Description:
95 = Load Index
– A numerical code associated with the maximum load a tire can carry
H = Speed Symbol
– A symbol indicating the range of speeds at which a tire can carry a load corresponding to its load index under certain
operating conditions
– The maximum speed corresponding to the speed symbol should only be achieved under specified operating conditions
(i.e., tire pressure, vehicle loading, road conditions, and posted speed limits)
251
EXAMPLE:
Load Identification:
Absence of the following load identification symbols on the sidewall of the tire indicates a Standard Load (SL) tire:
• XL = Extra load (or reinforced) tire, or
• LL = Light load tire or
• C, D, E, F, G = Load range associated with the maximum load a tire can carry at a specified pressure
Maximum Load – Maximum load indicates the maximum load this tire is designed to carry
Maximum Pressure – Maximum pressure indicates the maximum permissible cold tire inflation pressure for this tire
Tire Identification Number (TIN)
The TIN may be found on one or both sides of
the tire, however, the date code may only be on
one side. Tires with white sidewalls will have the
full TIN, including the date code, located on the
white sidewall side of the tire. Look for the TIN
on the outboard side of black sidewall tires as
mounted on the vehicle. If the TIN is not found
on the outboard side, then you will find it on the
inboard side of the tire.
EXAMPLE:
DOT MA L9 ABCD 0301
DOT = Department of Transportation
– This symbol certifies that the tire is in compliance with the U.S. Department of Transportation tire safety standards and is approved
for highway use
MA = Code representing the tire manufacturing location (two digits)
L9 = Code representing the tire size (two digits)
252
EXAMPLE:
DOT MA L9 ABCD 0301
ABCD = Code used by the tire manufacturer (one to four digits)
03 = Number representing the week in which the tire was manufactured (two digits)
– 03 means the 3rd week
01 = Number representing the year in which the tire was manufactured (two digits)
– 01 means the year 2001
– Prior to July 2000, tire manufacturers were only required to have one number to represent the year in which the tire was manufactured. Example: 031 could represent the 3rd week of 1981 or 1991
Tire Terminology And Definitions
Term
B-Pillar
Definition
The vehicle B-Pillar is the structural member of the body located behind the front door.
Cold Tire Inflation Pressure
Cold tire inflation pressure is defined as the tire pressure after the vehicle has not been
driven for at least three hours, or driven less than 1 mile (1.6 km) after sitting for a minimum
of three hours. Inflation pressure is measured in units of PSI (pounds per square inch) or
kPa (kilopascals).
Maximum Inflation Pressure
The maximum inflation pressure is the maximum permissible cold tire inflation pressure for
this tire. The maximum inflation pressure is molded into the sidewall.
253
Term
Recommended Cold Tire Inflation Pressure
Tire Placard
Definition
Vehicle manufacturer’s recommended cold tire inflation pressure as shown on the tire placard.
A label permanently attached to the vehicle describing the vehicle’s loading capacity, the
original equipment tire sizes and the recommended cold tire inflation pressures.
Tire Loading And Tire Pressure
3. Tire size designed for your vehicle.
Tire And Loading Information Placard
Location
4. Cold tire inflation pressures for the front,
rear, and spare tires.
NOTE:
The proper cold tire inflation pressure is
listed on the driver’s side B-Pillar or the rear
edge of the driver’s side door.
Loading
The vehicle maximum load on the tire must not
exceed the load carrying capacity of the tire on
your vehicle. You will not exceed the tire’s load
carrying capacity if you adhere to the loading
conditions, tire size, and cold tire inflation pressures specified on the Tire and Loading Information placard and in the “Vehicle Loading”
section of this manual.
Example Tire Placard Location (B-Pillar)
Tire And Loading Information Placard
This placard tells you important information
about the:
1. Number of people that can be carried in the
vehicle.
Example Tire Placard Location (Door)
254
2. Total weight your vehicle can carry.
NOTE:
Under a maximum loaded vehicle condition,
gross axle weight ratings (GAWRs) for the
front and rear axles must not be exceeded.
For further information on GAWRs, vehicle
loading, and trailer towing, refer to “Vehicle
Loading” in this section.
To determine the maximum loading conditions
of your vehicle, locate the statement “The combined weight of occupants and cargo should
never exceed XXX lbs or XXX kg” on the Tire
and Loading Information placard. The combined
weight of occupants, cargo/luggage and trailer
tongue weight (if applicable) should never exceed the weight referenced here.
Steps For Determining Correct Load Limit
1. Locate the statement “The combined weight
of occupants and cargo should never exceed XXX lbs or XXX kg” on your vehicle’s
placard.
2. Determine the combined weight of the driver
and passengers that will be riding in your
vehicle.
3. Subtract the combined weight of the driver
and passengers from XXX lbs or XXX kg.
4. The resulting figure equals the available
amount of cargo and luggage load capacity.
For example, if “XXX” amount equals
1,400 lbs (635 kg) and there will be five
150 lb (68 kg) passengers in your vehicle,
the amount of available cargo and luggage
load capacity is 650 lbs (295 kg) (since 5 x
150 lbs (68 kg) = 750 lbs (340 kg), and
1400 lbs (635 kg) – 750 lbs (340 kg) =
650 lbs [295 kg]).
5. Determine the combined weight of luggage
and cargo being loaded on the vehicle. That
weight may not safely exceed the available
cargo and luggage load capacity calculated
in step 4.
NOTE:
• If your vehicle will be towing a trailer, load
from your trailer will be transferred to
your vehicle. The following table shows
examples on how to calculate total load,
cargo/luggage, and towing capacities of
your vehicle with varying seating configurations and number and size of occupants. This table is for illustration purposes only and may not be accurate for
the seating and load carry capacity of
your vehicle.
• For the following example, the combined
weight of occupants and cargo should
never exceed 865 lbs (392 kg).
255
256
WARNING!
Overloading of your tires is dangerous. Overloading can cause tire failure, affect vehicle
handling, and increase your stopping distance. Use tires of the recommended load
capacity for your vehicle. Never overload
them.
TIRES — GENERAL
INFORMATION
Tire Pressure
Proper tire inflation pressure is essential to the
safe and satisfactory operation of your vehicle.
Four primary areas are affected by improper tire
pressure:
• Safety and Vehicle Stability
• Economy
• Tread Wear
• Ride Comfort
Safety
WARNING!
• Improperly inflated tires are dangerous
and can cause collisions.
• Under-inflation increases tire flexing and
can result in over-heating and tire failure.
• Over-inflation reduces a tire’s ability to
cushion shock. Objects on the road and
chuckholes can cause damage that result
in tire failure.
• Over-inflated or under-inflated tires can
affect vehicle handling and can fail suddenly, resulting in loss of vehicle control.
• Unequal tire pressures can cause steering
problems. You could lose control of your
vehicle.
• Unequal tire pressures from one side of
the vehicle to the other can cause the
vehicle to drift to the right or left.
• Always drive with each tire inflated to the
recommended cold tire inflation pressure.
Both under-inflation and over-inflation affect the
stability of the vehicle and can produce a feeling
of sluggish response or over responsiveness in
the steering.
NOTE:
• Unequal tire pressures from side to side
may cause erratic and unpredictable
steering response.
• Unequal tire pressure from side to side
may cause the vehicle to drift left or right.
Economy
Under-inflated tires will increase tire rolling resistance resulting in higher fuel consumption.
Tread Wear
Improper cold tire inflation pressures can cause
abnormal wear patterns and reduced tread life,
resulting in the need for earlier tire replacement.
Ride Comfort And Vehicle Stability
Proper tire inflation contributes to a comfortable
ride. Over-inflation produces a jarring and uncomfortable ride.
257
Tire Inflation Pressures
The proper cold tire inflation pressure is listed
on the driver’s side B-Pillar or rear edge of the
driver’s side door.
At least once a month:
• Check and adjust tire pressure with a good
quality pocket-type pressure gauge. Do not
make a visual judgement when determining
proper inflation. Tires may look properly inflated even when they are under-inflated.
after the vehicle has not been driven for at least
three hours, or driven less than 1 mile (1.6 km)
after sitting for a minimum of three hours. The
cold tire inflation pressure must not exceed the
maximum inflation pressure molded into the tire
sidewall.
Check tire pressures more often if subject to a
wide range of outdoor temperatures, as tire
pressures vary with temperature changes.
• Inspect tires for signs of tire wear or visible
damage.
Tire pressures change by approximately 1 psi
(7 kPa) per 12°F (7°C) of air temperature
change. Keep this in mind when checking tire
pressure inside a garage, especially in the
winter.
CAUTION!
After inspecting or adjusting the tire pressure, always reinstall the valve stem cap.
This will prevent moisture and dirt from entering the valve stem, which could damage
the valve stem.
Example: If garage temperature = 68°F (20°C)
and the outside temperature = 32°F (0°C) then
the cold tire inflation pressure should be increased by 3 psi (21 kPa), which equals 1 psi
(7 kPa) for every 12°F (7°C) for this outside
temperature condition.
Inflation pressures specified on the placard are
always “cold tire inflation pressure.” Cold tire
inflation pressure is defined as the tire pressure
Tire pressure may increase from 2 to 6 psi
(13 to 40 kPa) during operation. DO NOT
reduce this normal pressure build up or your tire
pressure will be too low.
258
Tire Pressures For High Speed
Operation
The manufacturer advocates driving at safe
speeds and within posted speed limits. Where
speed limits or conditions are such that the
vehicle can be driven at high speeds, maintaining correct tire inflation pressure is very important. Increased tire pressure and reduced vehicle loading may be required for high-speed
vehicle operation. Refer to your authorized tire
dealer or original equipment vehicle dealer for
recommended safe operating speeds, loading
and cold tire inflation pressures.
WARNING!
High speed driving with your vehicle under
maximum load is dangerous. The added
strain on your tires could cause them to fail.
You could have a serious collision. Do not
drive a vehicle loaded to the maximum capacity at continuous speeds above 75 mph
(120 km/h).
Radial Ply Tires
WARNING!
Combining radial ply tires with other types of
tires on your vehicle will cause your vehicle
to handle poorly. The instability could cause
a collision. Always use radial ply tires in sets
of four. Never combine them with other types
of tires.
Tire Repair
If your tire becomes damaged, it may be repaired if it meets the following criteria:
• The tire has not been driven on when flat.
• The damage is only on the tread section of
your tire (sidewall damage is not repairable).
• The puncture is no greater than ¼" (6 mm).
Consult an authorized tire dealer for tire repairs
and additional information.
Damaged Run Flat tires, or Run Flat tires that
have experienced a loss of pressure should be
replaced immediately with another Run Flat tire
of identical size and service description (Load
Index and Speed Symbol).
Tire Types
All Season Tires — If Equipped
All Season tires provide traction for all seasons
(spring, summer, fall and winter). Traction levels
may vary between different all season tires. All
season tires can be identified by the M+S, M&S,
M/S or MS designation on the tire sidewall. Use
all season tires only in sets of four; failure to do
so may adversely affect the safety and handling
of your vehicle.
Summer Or Three Season Tires —
If Equipped
Summer tires provide traction in both wet and
dry conditions, and are not intended to be
driven in snow or on ice. If your vehicle is
equipped with summer tires, be aware these
tires are not designed for winter or cold driving
conditions. Install winter tires on your vehicle
when ambient temperatures are less than 40°F
(5°C) or if roads are covered with ice or snow.
For more information, contact an authorized
dealer.
Summer tires do not contain the all season
designation or mountain/snowflake symbol on
the tire sidewall. Use summer tires only in sets
of four; failure to do so may adversely affect the
safety and handling of your vehicle.
WARNING!
Do not use summer tires in snow/ice conditions. You could lose vehicle control, resulting in severe injury or death. Driving too fast
for conditions also creates the possibility of
loss of vehicle control.
Snow Tires
Some areas of the country require the use of
snow tires during the winter. Snow tires can be
identified by a “mountain/snowflake” symbol on
the tire sidewall.
259
If you need snow tires,
select tires equivalent in
size and type to the original equipment tires. Use
snow tires only in sets of
four; failure to do so may
adversely affect the
safety and handling of
your vehicle.
Snow tires generally have lower speed ratings
than what was originally equipped with your
vehicle and should not be operated at sustained
speeds over 75 mph (120 km/h). For speeds
above 75 mph (120 km/h) refer to original
equipment or an authorized tire dealer for recommended safe operating speeds, loading and
cold tire inflation pressures.
While studded tires improve performance on
ice, skid and traction capability on wet or dry
surfaces may be poorer than that of nonstudded tires. Some states prohibit studded
tires; therefore, local laws should be checked
before using these tire types.
260
Run Flat Tires — If Equipped
Run Flat tires allow you the capability to drive 50
miles (80 km) at 50 mph (80 km/h) after a rapid
loss of inflation pressure. This rapid loss of
inflation is referred to as the Run Flat mode. A
Run Flat mode occurs when the tire inflation
pressure is of/or below 14 psi (96 kPa). Once a
Run Flat tire reaches the run flat mode it has
limited driving capabilities and needs to be
replaced immediately. A Run Flat tire is not
repairable.
It is not recommended driving a vehicle loaded
at full capacity or to tow a trailer while a tire is in
the run flat mode.
See the tire pressure monitoring section for
more information.
Spare Tires — If Equipped
NOTE:
For vehicles equipped with Tire Service Kit
instead of a spare tire, please refer to “Tire
Service Kit” in “What To Do In Emergencies”
for further information.
CAUTION!
Because of the reduced ground clearance,
do not take your vehicle through an automatic car wash with a compact or limited-use
temporary spare installed. Damage to the
vehicle may result.
Spare Tire Matching Original Equipped Tire
And Wheel — If Equipped
Your vehicle may be equipped with a spare tire
and wheel equivalent in look and function to the
original equipment tire and wheel found on the
front or rear axle of your vehicle. This spare tire
may be used in the tire rotation for your vehicle.
If your vehicle has this option, refer to an
authorized tire dealer for the recommended tire
rotation pattern.
Compact Spare Tire — If Equipped
The compact spare is for temporary emergency
use only. You can identify if your vehicle is
equipped with a compact spare by looking at
the spare tire description on the Tire and Loading Information Placard located on the driver’s
side door opening or on the sidewall of the tire.
Compact spare tire descriptions begin with the
letter “T” or “S” preceding the size designation.
Example: T145/80D18 103M.
T, S = Temporary Spare Tire
Since this tire has limited tread life, the original
equipment tire should be repaired (or replaced)
and reinstalled on your vehicle at the first opportunity.
Do not install a wheel cover or attempt to mount
a conventional tire on the compact spare wheel,
since the wheel is designed specifically for the
compact spare tire. Do not install more than one
compact spare tire and wheel on the vehicle at
any given time.
WARNING!
Compact spares are for temporary emergency use only. With these spares, do not
drive more than 50 mph (80 km/h). Temporary use spares have limited tread life. When
the tread is worn to the tread wear indicators,
the temporary use spare tire needs to be
WARNING! (Continued)
replaced. Be sure to follow the warnings,
which apply to your spare. Failure to do so
could result in spare tire failure and loss of
vehicle control.
Full Size Spare — If Equipped
The full size spare is for temporary emergency
use only. This tire may look like the originally
equipped tire on the front or rear axle of your
vehicle, but it is not. This spare tire may have
limited tread life. When the tread is worn to the
tread wear indicators, the temporary use full size
spare tire needs to be replaced. Since it is not the
same as your original equipment tire, replace (or
repair) the original equipment tire and reinstall on
the vehicle at the first opportunity.
Limited-Use Spare — If Equipped
The limited-use spare tire is for temporary
emergency use only. This tire is identified by a
label located on the limited-use spare wheel.
This label contains the driving limitations for
this spare. This tire may look like the original
equipped tire on the front or rear axle of your
vehicle, but it is not. Installation of this limiteduse spare tire affects vehicle handling. Since it
is not the same as your original equipment tire,
replace (or repair) the original equipment tire
and reinstall on the vehicle at the first opportunity.
WARNING!
Limited-use spares are for emergency use
only. Installation of this limited-use spare tire
affects vehicle handling. With this tire, do not
drive more than the speed listed on the
limit-use spare wheel. Keep inflated to the
cold tire inflation pressures listed on your
Tire and Loading Information Placard located on the driver’s side B-Pillar or the rear
edge of the driver’s side door. Replace (or
repair) the original equipment tire at the first
opportunity and reinstall it on your vehicle.
Failure to do so could result in loss of vehicle
control.
(Continued)
261
Tire Spinning
Tread Wear Indicators
Life Of Tire
When stuck in mud, sand, snow, or ice conditions, do not spin your vehicle’s wheels above
30 mph (48 km/h) or for longer than 30 seconds
continuously without stopping.
Tread wear indicators are in the original equipment tires to help you in determining when your
tires should be replaced.
The service life of a tire is dependent upon
varying factors including, but not limited to:
• Tire pressure - Improper cold tire inflation
pressures can cause uneven wear patterns to
develop across the tire tread. These abnormal
wear patterns will reduce tread life, resulting in
the need for earlier tire replacement.
Refer to “Freeing A Stuck Vehicle” in “What To
Do In Emergencies” for further information.
WARNING!
Fast spinning tires can be dangerous.
Forces generated by excessive wheel
speeds may cause tire damage or failure.
A tire could explode and injure someone.
Do not spin your vehicle’s wheels faster than
30 mph (48 km/h) for more than 30 seconds
continuously when you are stuck, and do not
let anyone near a spinning wheel, no matter
what the speed.
262
• Driving style
• Distance driven
1 — Worn Tire
2 — New Tire
These indicators are molded into the bottom of
the tread grooves. They will appear as bands
when the tread depth becomes 1/16” (2 mm).
When the tread is worn to the tread wear
indicators, the tire should be replaced. Refer to
“Replacement Tires” in this section for further
information.
• Performance tires, tires with a speed rating of
V or higher, and summer tires typically have
a reduced tread life. Rotation of these tires
per the vehicle’s Service and Warranty Handbook is highly recommended.
WARNING!
Tires and the spare tire should be replaced
after six years, regardless of the remaining
tread. Failure to follow this warning can
result in sudden tire failure. You could lose
control and have a collision resulting in serious injury or death.
Keep dismounted tires in a cool, dry place with
as little exposure to light as possible. Protect
tires from contact with oil, grease, and gasoline.
If you ever replace a wheel, make sure that the
wheel’s specifications match those of the original wheels.
Replacement Tires
It is recommended you contact your authorized
tire dealer or original equipment dealer with any
questions you may have on tire specifications or
capability. Failure to use equivalent replacement tires may adversely affect the safety,
handling, and ride of your vehicle.
The tires on your new vehicle provide a balance
of many characteristics. They should be inspected regularly for wear and correct cold tire
inflation pressures. The manufacturer strongly
recommends that you use tires equivalent to the
originals in size, quality and performance when
replacement is needed. Refer to the paragraph
on “Tread Wear Indicator.” Refer to the Tire and
Loading Information placard or the Vehicle Certification Label for the size designation of your
tire. The Load Index and Speed Symbol for your
tire will be found on the original equipment tire
sidewall. See the Tire Sizing Chart example
found in the Tire Safety Information section of
this manual for more information relating to the
Load Index and Speed Symbol of a tire.
It is recommended to replace the two front tires
or two rear tires as a pair. Replacing just one
tire can seriously affect your vehicle’s handling.
WARNING!
• Do not use a tire, wheel size or rating other
than that specified for your vehicle. Some
combinations of unapproved tires and
wheels may change suspension dimensions and performance characteristics, resulting in changes to steering, handling,
and braking of your vehicle. This can
cause unpredictable handling and stress
to steering and suspension components.
You could lose control and have a collision
WARNING! (Continued)
resulting in serious injury or death. Use
only the tire and wheel sizes with load
ratings approved for your vehicle.
• Never use a tire with a smaller load index
or capacity, other than what was originally
equipped on your vehicle. Using a tire with
a smaller load index could result in tire
overloading and failure. You could lose
control and have a collision.
• Failure to equip your vehicle with tires
having adequate speed capability can result in sudden tire failure and loss of vehicle control.
CAUTION!
Replacing original tires with tires of a different size may result in false speedometer and
odometer readings.
(Continued)
263
TIRE CHAINS (TRACTION
DEVICES)
Use of traction devices require sufficient tire-tobody clearance. Follow these recommendations to guard against damage.
• Traction device must be of proper size for the
tire, as recommended by the traction device
manufacturer.
• Install on Rear Tires Only.
• A 235/65R17 tire with the use of a traction
device that meets the SAE type “Class S”
specification is recommended.
WARNING!
Using tires of different size and type (M+S,
Snow) between front and rear axles can
cause unpredictable handling. You could
lose control and have a collision.
CAUTION!
To avoid damage to your vehicle or tires,
observe the following precautions:
• Because of restricted traction device clearance between tires and other suspension
components, it is important that only traction devices in good condition are used.
Broken devices can cause serious damage. Stop the vehicle immediately if noise
occurs that could indicate device breakage. Remove the damaged parts of the
device before further use.
• Install device as tightly as possible and
then retighten after driving about ½ mile
(0.8 km).
• Do not exceed 30 mph (48 km/h).
• Drive cautiously and avoid severe turns
and large bumps, especially with a loaded
vehicle.
• Do not drive for a prolonged period on dry
pavement.
(Continued)
264
CAUTION! (Continued)
• Observe the traction device manufacturer’s instructions on the method of installation, operating speed, and conditions for
use. Always use the suggested operating
speed of the device manufacturer’s if it is
less than 30 mph (48 km/h).
• Do not use traction devices on a compact
spare tire.
TIRE ROTATION
RECOMMENDATIONS
The tires on the front and rear of your vehicle
operate at different loads and perform different
steering, handling, and braking functions. For
these reasons, they wear at unequal rates.
These effects can be reduced by timely rotation
of tires. The benefits of rotation are especially
worthwhile with aggressive tread designs such
as those on On/Off Road type tires. Rotation will
increase tread life, help to maintain mud, snow,
and wet traction levels, and contribute to a
smooth, quiet ride.
Refer to the “Service and Warranty Handbook”
for the proper maintenance intervals. The reasons for any rapid or unusual wear should be
corrected prior to rotation being performed.
The suggested rotation method is the “forwardcross” shown in the following diagram.
CAUTION! (Continued)
in tire size can cause damage to the transfer
case. Tire rotation schedule should be followed to balance tire wear.
TIRE PRESSURE MONITOR
SYSTEM (TPMS)
The Tire Pressure Monitoring System (TPMS)
will warn the driver of a low tire pressure based
on the vehicle recommended cold placard pressure.
Tire Rotation
CAUTION!
Proper operation of four-wheel drive vehicles
depends on tires of equal size, type and
circumference on each wheel. Any difference
(Continued)
The tire pressure will vary with temperature by
about 1 psi (7.0 kPa) for every 12°F (6.5°C).
This means that when the outside temperature
decreases, the tire pressure will decrease. Tire
pressure should always be set based on cold
inflation tire pressure. This is defined as the tire
pressure after a vehicle has not been driven for
more than three hours, or driven less than
1 mile (1.6 km) after a three-hour period. Refer
to “Tires – General Information” in “Starting
and Operating” for information on how to
properly inflate the vehicle’s tires. The tire
pressure will also increase as the vehicle is
driven; this is normal and there should be no
adjustment for this increased pressure.
The TPMS will warn the driver of a low tire
pressure if the tire pressure falls below the low
pressure warning threshold for any reason,
including low temperature effects, or natural
pressure loss through the tire.
The TPMS will continue to warn the driver of low
tire pressure as long as the condition exists,
and will not turn off until the tire pressure is at or
above recommended cold placard pressure.
Once the “Tire Pressure Monitoring Telltale
Light” has been illuminated, the tire pressure
must be increased to the recommended cold
placard pressure in order for the “Tire Pressure
Monitoring Telltale Light” to be turned OFF.
NOTE:
When filling warm tires, the tire pressure
may need to be increased up to an additional
4 psi (30 kPa) above the recommended cold
placard pressure in order to turn the Tire
Pressure Monitoring Telltale Light off.
265
The system will automatically update and the
“Tire Pressure Monitoring Telltale Light” will
extinguish once the updated tire pressures
have been received. The vehicle may need to
be driven for up to 20 minutes above 15 mph
(24 km/h) to receive this information.
For example, your vehicle may have a recommended cold (parked for more than three hours)
air pressure of 35 psi (241 kPa). If the ambient
temperature is 68°F (20°C) and the measured
tire pressure is 30 psi (207 kPa), a temperature
drop to 20°F (-7°C) will decrease the tire pressure to approximately 26 psi (179 kPa). This tire
pressure is sufficiently low enough to turn ON
the “Tire Pressure Monitoring Telltale Light.”
Driving the vehicle may cause the tire pressure
to rise to approximately 30 psi (207 kPa), but
the “Tire Pressure Monitoring Telltale Light” will
still be ON. In this situation, the “Tire Pressure
Monitoring Telltale Light” will turn OFF only after
the tires have been inflated to the vehicle’s
recommended cold placard pressure value.
266
CAUTION!
• The TPMS has been optimized for the
original equipment tires and wheels. The
TPMS pressures have been established
for the tire size equipped on your vehicle.
Undesirable system operation or sensor
damage may result when using replacement equipment that is not of the same
size, type, and/or style. Aftermarket
wheels can cause sensor damage. Using
aftermarket tire sealants may cause the
Tire Pressure Monitoring System (TPMS)
sensor to become inoperable. After using
an aftermarket tire sealant it is recommended that you take your vehicle to your
local dealership to have your sensor function checked.
• After inspecting or adjusting the tire pressure, always reinstall the valve stem cap.
This will prevent moisture and dirt from
entering the valve stem, which could damage the Tire Pressure Monitoring Sensor.
NOTE:
• The TPMS is not intended to replace normal tire care and maintenance, nor to provide warning of a tire failure or condition.
• The TPMS should not be used as a tire
pressure gauge while adjusting your tire
pressure.
• Driving on a significantly under-inflated
tire causes the tire to overheat and can
lead to tire failure. Under-inflation also
reduces fuel efficiency and tire tread life,
and may affect the vehicle’s handling and
stopping ability.
• The TPMS is not a substitute for proper tire
maintenance, and it is the driver’s responsibility to maintain correct tire pressure,
even if under-inflation has not reached the
level to trigger illumination of the “Tire
Pressure Monitoring Telltale Light.”
• Seasonal temperature changes will affect
tire pressure, and the TPMS will monitor
the actual tire pressure in the tire.
Base System
The Tire Pressure Monitor System (TPMS)
uses wireless technology with wheel rim
mounted electronic sensors to monitor tire pressure levels. Sensors, mounted to each wheel as
part of the valve stem, transmit tire pressure
readings to the Receiver Module.
NOTE:
It is particularly important for you to check
the tire pressure in all of your tires regularly
and to maintain the proper pressure.
The Tire Pressure Monitor System (TPMS) consists of the following components:
1. Receiver Module
2. Four Tire Pressure Monitoring Sensors
3. Tire Pressure Monitoring Telltale Light
A tire pressure monitoring sensor is located in
the spare wheel if the vehicle is equipped with a
matching full size spare wheel and tire assembly. The matching full size spare tire can be
used in place of any of the four road tires. A
low spare tire will not cause the “Tire Pressure
Monitoring Telltale Light” to illuminate or the
chime to sound while it is stored in the spare tire
location.
The “Tire Pressure Monitoring Telltale
Light” will illuminate in the instrument
cluster, a “Lo Tire” message will be
displayed in the odometer display at 3 second
intervals followed by the location(s) of the low
tire(s) (RR, LR, RF, LF) displayed for 3 second
intervals each. This sequence shall be repeated
for two complete cycles for each ignition “on”
cycle. Following the second cycle, the odometer
display shall revert back to the prior display
preceding the low tire message. An audible
chime will be activated when one or more of the
four active road tire pressures are low. Should
this occur, you should stop as soon as possible,
check the inflation pressure of each tire on your
vehicle, and inflate each tire to the vehicle’s
recommended cold placard pressure value. The
system will automatically update and the “Tire
Pressure Monitoring Telltale Light” and “Lo Tire”
message will extinguish once the updated tire
pressures have been received.
NOTE:
When filling warm tires, the tire pressure
may need to be increased up to an additional
4 psi (30 kPa) above the recommended cold
placard pressure in order to turn the Tire
Pressure Monitoring Telltale Light off.
The vehicle may need to be driven for up to
20 minutes above 15 mph (24 km/h) to receive
this information.
The “Tire Pressure Monitoring Telltale Light” will
flash on and off for 75 seconds, and will remain
on solid when a system fault is detected. The
system fault will also sound a chime. If the
ignition key is cycled, this sequence will repeat,
providing the system fault still exists. A system
fault can occur by any of the following scenarios:
1. Jamming due to electronic devices or driving
next to facilities emitting the same Radio
Frequencies as the TPM sensors.
2. Installing some form of aftermarket window
tinting that affects radio wave signals.
267
3. Lots of snow or ice around the wheels or
wheel housings.
4. Using tire chains on the vehicle.
5. Using wheels/tires not equipped with TPM
sensors.
NOTE:
• If your vehicle is equipped with a matching full size spare wheel and tire assembly, it has a tire pressure monitoring sensor, and can be monitored by the Tire
Pressure Monitoring System (TPMS). In
the event that the matching full size spare
tire is swapped with a low pressure road
tire, the next ignition key cycle will still
show the “Tire Pressure Monitoring Telltale Light” to be ON, a “Lo Tire” message
displayed for a minimum of five seconds,
and a chime to sound. Driving the vehicle
for up to 20 minutes above 15 mph
(24 km/h) will turn OFF the “Tire Pressure
Monitoring Telltale Light” and “Lo Tire”
message as long as none of the road tires
are below the low pressure warning
threshold.
268
• If your vehicle is not equipped with a
matching full size spare wheel and tire
assembly, it does not have a tire pressure
monitoring sensor in the spare tire. The
TPMS will not be able to monitor the tire
pressure. If you install the spare tire in
place of a road tire that has a pressure
below the low-pressure warning limit,
upon the next ignition key cycle, a chime
will sound and the “Tire Pressure Monitoring Telltale Light” and “Lo Tire” message will turn ON. After driving the vehicle
for up to 20 minutes above 15 mph
(24 km/h), the “Tire Pressure Monitoring
Telltale Light” will flash on and off for
75 seconds and then remain on solid. For
each subsequent ignition key cycle, a
chime will sound and the “Tire Pressure
Monitoring Telltale Light” will flash on
and off for 75 seconds and then remain on
solid. Once you repair or replace the original road tire, and reinstall it on the vehicle
in place of the spare tire, the TPMS will
update automatically and the “Tire Pressure Monitoring Telltale Light” will turn
OFF, as long as no tire pressure is below
the low-pressure warning limit in any of
the four active road tires. The vehicle may
need to be driven for up to 20 minutes
above 15 mph (24 km/h) in order for the
TPMS to receive this information.
Premium System — If Equipped
The Tire Pressure Monitor System (TPMS)
uses wireless technology with wheel rimmounted electronic sensors to monitor tire pressure levels. Sensors, mounted to each wheel as
part of the valve stem, transmit tire pressure
readings to the Receiver Module.
Tire Pressure Monitor Display
NOTE:
It is particularly important, for you to regularly check the tire pressure in all of your
tires and to maintain the proper pressure.
The Tire Pressure Monitor System (TPMS) consists of the following components:
• Receiver Module
• Four Tire Pressure Monitoring Sensors
• Various Tire Pressure Monitoring System
Messages, which display in the Electronic
Vehicle Information Center (EVIC), and a
graphic displaying tire pressures
• Tire Pressure Monitoring Telltale Light
A tire pressure monitoring sensor is located in
the spare wheel, if the vehicle is equipped with
a matching full-size spare wheel and tire assembly. The matching full-size spare tire can be
used in place of any of the four road tires.
Tire Pressure Monitoring Low Pressure
Warnings
The Tire Pressure Monitoring Telltale
Light will illuminate in the instrument
cluster, and an audible chime will be
activated, when one or more of the
four active road tire pressures are low. In addition, the EVIC will display a “LOW TIRE” message for a minimum of five seconds. An “Inflate
to XX” message and a graphic display of the
pressure value(s) with the low tire(s) “flashing”
will also be displayed. Refer to “Electronic Vehicle Information Center (EVIC)” in “Understanding Your Instrument Panel” for further
information.
NOTE:
Your system can be set to display pressure
units in PSI, kPa, or BAR.
Tire Pressure Monitor Display
Should a low tire condition occur on any of the
four active road tire(s), you should stop as soon
as possible, and inflate the low tire(s) that is
“flashing” on the graphic display to the vehicle’s
recommended cold tire pressure inflation value
shown in the “Inflate to XX” message. The
system will automatically update, the graphic
display of the pressure value(s) will stop “flashing,” and the Tire Pressure Monitoring Telltale
Light will extinguish once the updated tire pressure(s) have been received.
269
NOTE:
When filling warm tires, the tire pressure
may need to be increased up to an additional
4 psi (30 kPa) above the recommended cold
placard pressure in order to turn the Tire
Pressure Monitoring Telltale Light off.
The vehicle may need to be driven for up to
20 minutes above 15 mph (24 km/h) to receive
this information.
SERVICE TPM SYSTEM Warning
The “Tire Pressure Monitoring Telltale Light” will
flash on and off for 75 seconds, and remain on
solid when a system fault is detected. The
system fault will also sound a chime. The EVIC
will display a “SERVICE TPM SYSTEM” message for a minimum of five seconds. This message is then followed by a graphic display, with
“- -“ in place of the pressure value(s), indicating
which Tire Pressure Monitoring Sensor(s) is not
being received.
If the ignition switch is cycled, this sequence will
repeat, providing the system fault still exists. If
the system fault no longer exists, the “Tire
Pressure Monitoring Telltale Light” will no longer
270
flash, the "SERVICE TPM SYSTEM" message
will not be present, and a pressure value will be
displayed instead of dashes. A system fault can
occur by any of the following:
TPM Sensors but they may not be located in the
correct vehicle position. However, the system
still needs to be serviced as long as the "SERVICE TPM SYSTEM" message exists.
1. Jamming due to electronic devices or driving
next to facilities emitting the same Radio
Frequencies as the TPM sensors.
NOTE:
2. Installing some form of aftermarket window
tinting that affects radio wave signals.
3. Lots of snow or ice around the wheels or
wheel housings.
4. Using tire chains on the vehicle.
5. Using wheels/tires not equipped with TPM
sensors.
The EVIC will also display a "SERVICE TPM
SYSTEM" message for a minimum of five seconds when a system fault is detected possibly
related to an incorrect sensor location fault. In
this case, the "SERVICE TPM SYSTEM" message is then followed by a graphic display, with
pressure values still shown. This indicates the
pressure values are still being received from the
• If your vehicle is equipped with a matching full-size spare wheel and tire assembly, it has a tire pressure monitoring sensor, and can be monitored by the Tire
Pressure Monitoring System (TPMS). In
the event that the matching full-size spare
tire is swapped with a low pressure road
tire, the next ignition switch cycle will still
show the “Tire Pressure Monitoring Telltale Light” to be ON, a chime to sound, a
“LOW TIRE” message to appear in the
EVIC, and the graphic display will still
show the ⴖInflate to XXⴖ message and the
low tire pressure value “flashing.” Driving
the vehicle for up to 20 minutes above
15 mph (24 km/h) will turn OFF the “Tire
Pressure Monitoring Telltale Light” as
long as none of road tires are below the
low pressure warning threshold.
• If your vehicle is not equipped with a
matching full-size spare wheel and tire
assembly, it does not have a tire pressure
monitoring sensor in the spare tire. The
TPMS will not be able to monitor the tire
pressure. If you install the spare tire in
place of a road tire that has a pressure
below the low-pressure warning limit, upon
the next ignition switch cycle, the “Tire
Pressure Monitoring Telltale Light” will remain ON, a chime will sound, and the EVIC
will still display the ⴖInflate to XXⴖ message
and a “flashing” pressure value in the
graphic display. After driving the vehicle
for up to 20 minutes above 15 mph
(24 km/h), the “Tire Pressure Monitoring
Telltale Light” will flash on and off for
75 seconds and then remain on solid. In
addition, the EVIC will display a “SERVICE
TPM SYSTEMⴖ message for a minimum of
five seconds and then display dashes (- -)
in place of the pressure value. For each
subsequent ignition switch cycle, a chime
will sound, the “Tire Pressure Monitoring
Telltale Light” will flash on and off for
75 seconds and then remain on solid, and
the EVIC will display a ⴖSERVICE TPM SYS-
TEMⴖ message for a minimum of five seconds and then display dashes (- -) in place
of the pressure value.
• Once you repair or replace the original
road tire, and reinstall it on the vehicle in
place of the spare tire, the TPMS will
update automatically.
In addition, the “Tire Pressure Monitoring Telltale Light” will turn OFF and the graphic in the
EVIC will display a new pressure value instead
of dashes (- -), as long as no tire pressure is
below the low-pressure warning limit in any of
the four active road tires. The vehicle may need
to be driven for up to 20 minutes above 15 mph
(24 km/h) in order for the TPMS to receive this
information.
TPMS Deactivation — If Equipped
The TPMS can be deactivated if replacing all
four wheel and tire assemblies (road tires) with
wheel and tire assemblies that do not have
TPMS Sensors, such as when installing winter
wheel and tire assemblies on your vehicle To
deactivate the TPMS, first, replace all four
wheel and tire assemblies (road tires) with tires
not equipped with Tire Pressure Monitoring
(TPM) Sensors. Then, drive the vehicle for 20
minutes above 15 mph (24 km/h). The TPMS
will chime, the “TPM Telltale Light” will flash on
and off for 75 seconds and then remain on and
the Electronic Vehicle Information Center
(EVIC) will display the “SERVICE TPM SYSTEM” message and then display dashes (--) in
place of the pressure values. Beginning with the
next ignition switch cycle, the TPMS will no
longer chime or display the “SERVICE TPM
SYSTEM” message in the EVIC but dashes (--)
will remain in place of the pressure values.
To reactivate the TPMS, replace all four wheel
and tire assemblies (road tires) with tires
equipped with TPM sensors. Then, drive the
vehicle for up to 20 minutes above 15 mph
(24 km/h). The TPMS will chime, the “TPM
Telltale Light” will flash on and off for 75 seconds and then turn off, and the Electronic
Vehicle Information Center (EVIC) will display
the “SERVICE TPM SYSTEM” message. The
EVIC will also display pressure values in place
of the dashes. On the next ignition switch cycle
the “SERVICE TPM SYSTEM” message will no
longer be displayed as long as no system fault
exists.
271
FUEL REQUIREMENTS —
GASOLINE ENGINES
This engine is designed to meet all emissions
regulations and provide excellent fuel economy
and performance when using high quality unleaded gasoline with a minimum research octane rating (RON) of 91.
Light spark knock at low engine speeds is not
harmful to your engine. However, continued
heavy spark knock at high speeds can cause
damage, and immediate service is required.
Poor quality gasoline can cause problems such
as hard starting, stalling, and hesitations. If you
experience these symptoms, try another brand
of gasoline before considering service for the
vehicle.
Over 40 auto manufacturer’s worldwide have
issued and endorsed consistent gasoline specifications (the Worldwide Fuel Charter, WWFC)
which define fuel properties necessary to deliver enhanced emissions, performance, and
durability for your vehicle. The manufacturer
recommends the use of gasoline that meets the
WWFC specifications if they are available.
272
Poor quality gasoline can cause problems such
as hard starting, stalling and stumble. If you
experience these problems, try another brand
of gasoline before considering service for the
vehicle.
Methanol
(Methyl) is used in a variety of concentrations
when blended with unleaded gasoline. You may
find fuels containing 3% or more methanol
along with other alcohols called cosolvents.
Problems that result from using methanol/
gasoline are not the responsibility of the manufacturer. While MTBE is an oxygenate made
from Methanol, it does not have the negative
effects of Methanol.
CAUTION!
Do not use gasolines containing Methanol.
Use of these blends may result in starting
and drivability problems and may damage
critical fuel system components.
Ethanol
The manufacturer recommends that your vehicle be operated on fuel containing no more
than 10% ethanol. Purchasing your fuel from a
reputable supplier may reduce the risk of exceeding this 10% limit and/or of receiving fuel
with abnormal properties. It should also be
noted that an increase in fuel consumption
should be expected when using ethanolblended fuels, due to the lower energy content
of ethanol. Problems that result from using
methanol/gasoline or E-85 ethanol blends are
not the responsibility of the manufacturer.
CAUTION!
Use of fuel with Ethanol content higher than
10% may result in engine malfunction, starting and operating difficulties, and materials
degradation. These adverse effects could
result in permanent damage to your vehicle.
Clean Air Gasoline
Materials Added to Fuel
Many gasolines are now being blended that
contribute to cleaner air, especially in those
areas where air pollution levels are high. These
new blends provide a cleaner burning fuel and
some are referred to as “reformulated gasoline.”
Besides using unleaded gasoline with the
proper octane rating, gasolines that contain
detergents, corrosion and stability additives are
recommended. Using gasolines that have these
additives will help improve fuel economy, reduce emissions, and maintain vehicle performance.
The manufacturer supports these efforts toward
cleaner air. You can help by using these blends
as they become available.
MMT In Gasoline
Methylcyclopentadienyl Manganese Tricarbonyl
(MMT) is a manganese containing metallic additive that is blended into some gasoline to
increase octane. Gasoline blended with MMT
provides no performance advantage beyond
gasoline of the same octane number without
MMT. Gasoline blended with MMT reduces
spark plug life and reduces emission system
performance in some vehicles. The manufacturer recommends that gasoline without MMT
be used in your vehicle. The MMT content of
gasoline may not be indicated on the gasoline
pump; therefore, you should ask your gasoline
retailer whether or not his/her gasoline contains
MMT.
Indiscriminate use of fuel system cleaning
agents should be avoided. Many of these materials intended for gum and varnish removal
may contain active solvents or similar ingredients. These can harm fuel system gasket and
diaphragm materials.
WARNING!
Carbon monoxide (CO) in exhaust gases is
deadly. Follow the precautions below to prevent carbon monoxide poisoning:
• Do not inhale exhaust gases. They contain
carbon monoxide, a colorless and odorless gas which can kill. Never run the
engine in a closed area, such as a garage,
WARNING! (Continued)
and never sit in a parked vehicle with the
engine running for an extended period.
If the vehicle is stopped in an open area
with the engine running for more than a
short period, adjust the ventilation system
to force fresh, outside air into the vehicle.
• Guard against carbon monoxide with
proper maintenance. Have the exhaust
system inspected every time the vehicle is
raised. Have any abnormal conditions repaired promptly. Until repaired, drive with
all side windows fully open.
• Keep the swing gate closed when driving
your vehicle to prevent carbon monoxide
and other poisonous exhaust gases from
entering the vehicle.
(Continued)
273
ADDING FUEL
Locking Fuel Filler Cap (Gas Cap)
The locking gas cap is located on the left side of
the vehicle. If the gas cap is lost or damaged, be
sure the replacement cap is the correct one for
this vehicle.
Fuel Filler Cap
1. Turn off engine.
2. Insert the ignition key into the fuel cap and
turn the key one-quarter turn to the right,
then rotate the fuel cap to the left to remove.
274
3. Rotate the ignition key back to the left to
remove.
4. To replace the cap, insert it into the filler neck
and tighten to the right until at least three
clicks are heard.
CAUTION!
• Damage to the fuel system or emissions
control system could result from using an
improper fuel tank filler tube cap (gas cap).
• A poorly fitting gas cap could let impurities
into the fuel system.
• A poorly fitting gas cap may cause the
Malfunction Indicator Light (MIL) to turn
on.
• To avoid fuel spillage and overfilling, do not
“top off” the fuel tank after filling. When the
fuel nozzle “clicks” or shuts off, the fuel
tank is full.
WARNING!
• Remove the fuel tank filler tube cap (gas
cap) slowly to prevent fuel spray from the
filler neck, which may cause injury.
• The volatility of some gasolines may cause
a buildup of pressure in the fuel tank that
may increase while you drive. This pressure can result in a spray of gasoline
and/or vapors when the cap is removed
from a hot vehicle. Removing the cap
slowly allows the pressure to vent and
prevents fuel spray.
• Never have any smoking materials lit in or
near the vehicle when the gas cap is
removed or the tank is being filled.
• Never add fuel to the vehicle when the
engine is running.
• A fire may result if gasoline is pumped into
a portable container that is inside of a
vehicle. You could be burned. Always
place gas containers on the ground while
filling.
NOTE:
• When the fuel nozzle “clicks” or shuts off,
the fuel tank is full.
• Tighten the gas cap until you hear a
“clicking” sound. This is an indication
that the gas cap is tightened properly. The
MIL in the instrument cluster may turn on
if the gas cap is not secured properly.
Make sure that the gas cap is tightened
each time the vehicle is refueled.
Loose Fuel Filler Cap Message (gASCAP)
After fuel has been added, the vehicle diagnostic system can determine if the fuel filler cap is
possibly loose, improperly installed, or damaged. If the system detects a malfunction, the
“gASCAP” message will display in the odometer
display. Tighten the gas cap until a "clicking"
sound is heard. This is an indication that the gas
cap is properly tightened. Press the odometer
reset button to turn the message off. If the
problem persists, the message will appear the
next time the vehicle is started. This might
indicate a damaged cap. If the problem is
detected twice in a row, the system will turn on
the Malfunction Indicator Light (MIL). Resolving
the problem will turn the MIL light off.
TRAILER TOWING
In this section you will find safety tips and
information on limits to the type of towing you
can reasonably do with your vehicle. Before
towing a trailer, carefully review this information
to tow your load as efficiently and safely as
possible.
To maintain the New Vehicle Limited Warranty
coverage, follow the requirements and recommendations in this manual concerning vehicles
used for trailer towing.
Common Towing Definitions
The following trailer towing related definitions
will assist you in understanding the following
information:
Gross Vehicle Weight Rating (GVWR)
The GVWR is the total allowable weight of your
vehicle. This includes driver, passengers, cargo
and trailer tongue weight. The total load must be
limited so that you do not exceed the GVWR.
Gross Trailer Weight (GTW)
The GTW is the weight of the trailer plus the
weight of all cargo, consumables and equipment (permanent or temporary) loaded in or on
the trailer in its "loaded and ready for operation"
condition. The recommended way to measure
GTW is to put your fully loaded trailer on a
vehicle scale. The entire weight of the trailer
must be supported by the scale.
Gross Combination Weight Rating (GCWR)
The GCWR is the total permissible weight of
your vehicle and trailer when weighed in combination.
275
Gross Axle Weight Rating (GAWR)
The GAWR is the maximum capacity of the front
and rear axles. Distribute the load over the front
and rear axles evenly. Make sure that you do
not exceed either front or rear GAWR.
WARNING!
It is important that you do not exceed the
maximum front or rear GAWR. A dangerous
driving condition can result if either rating is
exceeded. You could lose control of the
vehicle and have an accident.
Tongue Weight (TW)
The tongue weight is the downward force exerted on the hitch ball by the trailer. In most
cases, it should not be less than 10% of the
trailer load. You must consider tongue load as
part of the load on your vehicle.
276
Frontal Area
The frontal area is the maximum height multiplied by the maximum width of the front of a
trailer.
Trailer Sway Control
The trailer sway control is a telescoping link that
can be installed between the hitch receiver and
the trailer tongue that typically provides adjustable friction associated with the telescoping
motion to dampen any unwanted trailer swaying
motions while traveling.
Weight-Carrying Hitch
A weight-carrying hitch supports the trailer
tongue weight, just as if it were luggage located
at a hitch ball or some other connecting point of
the vehicle. These kind of hitches are the most
popular on the market today and they are
commonly used to tow small- and mediumsized trailers.
Weight-Distributing Hitch
A weight-distributing system works by applying
leverage through spring (load) bars. They are
typically used for heavier loads, to distribute
trailer tongue weight to the tow vehicle’s front
axle and the trailer axle(s). When used in accordance with the manufacturers directions, it
provides for a more level ride, offering more
consistent steering and brake control thereby
enhancing towing safety. The addition of a
friction / hydraulic sway control also dampens
sway caused by traffic and crosswinds and
contributes positively to tow vehicle and trailer
stability. Trailer sway control and a weight distributing (load equalizing) hitch are recommended for heavier Tongue Weights (TW) and
may be required depending on Vehicle and
Trailer configuration / loading to comply with
gross axle weight rating (GAWR) requirements.
Trailer Towing Weights
(Maximum Trailer Weight Ratings)
The following chart provides the maximum trailer
weight ratings towable for your given drivetrain.
Body Style
Engine
2–Door
3.6L Engine
Axle Ratio
Max. GTW (Gross Trailer Wt.)
Max. Tongue Wt.
(See Note)
Manual
3.21/3.73
2,205 lbs (1,000 kg)
110 lbs (50 kg)
Automatic
3.21/3.73/4.10
2,205 lbs (1,000 kg)
110 lbs (50 kg)
Transmission
Automatic
4–Door
3.6L Engine
Manual
3.21
2,205 lbs (1,000 kg)
110 lbs (50 kg)
3.73/4.10
4,409 lbs (2,000 kg)
220 lbs (100 kg)
3.21
2,205 lbs (1,000 kg)
110 lbs (50 kg)
3.73
4,409 lbs (2,000 kg)
220 lbs (100 kg)
4.10
4,409 lbs (2,000 kg)
220 lbs (100 kg)
When towing a trailer the technically permissible laden weight may be exceeded by not more than 10% or 220 lbs (100 kg), whichever is lower
provided that the operating speed is restricted to 62 mph (100 km/h) or less.
NOTE:
The trailer tongue weight must be considered as part of the combined weight of
occupants and cargo, and should never
exceed the weight referenced on the Tire
and Loading Information placard. Refer to
“Tires – General Information” in “Starting
and Operating” for further information.
277
Trailer And Tongue Weight
Always load a trailer with 60% of the weight in
the front of the trailer. This places 10% of the
Gross Trailer Weight (GTW) on the tow hitch of
your vehicle. Loads balanced over the wheels
or heavier in the rear can cause the trailer to
sway severely side to side which will cause loss
of control of the vehicle and trailer. Failure to
load trailers heavier in front is the cause of
many trailer accidents.
Never exceed the maximum tongue weight
stamped on your trailer hitch.
Consider the following items when computing
the weight on the rear axle of the vehicle:
• The tongue weight of the trailer.
• The weight of any other type of cargo or
equipment put in or on your vehicle.
• The weight of the driver and all passengers.
NOTE:
Remember that everything put into or on
the trailer adds to the load on your vehicle.
Also, additional factory-installed options,
278
or dealer-installed options, must be considered as part of the total load on your vehicle.
Refer to the Tire and Loading Information
placard, located on the drivers door pillar,
for the maximum combined weight of occupants and cargo for your vehicle.
Towing Requirements
To promote proper break-in of your new vehicle
drivetrain components, the following guidelines
are recommended.
CAUTION!
• Do not tow a trailer at all during the first
500 miles (805 km) the new vehicle is
driven. The engine, axle or other parts
could be damaged.
• Then, during the first 500 miles (805 km)
that a trailer is towed, do not drive over
50 mph (80 km/h) and do not make starts
at full throttle. This helps the engine and
other parts of the vehicle wear in at the
heavier loads.
Perform the maintenance listed in the “Service
And Warranty Handbook.” Refer to “Service
And Warranty Handbook” for the proper maintenance intervals. When towing a trailer, never
exceed the GAWR or GCWR ratings.
WARNING!
Improper towing can lead to a collision. Follow these guidelines to make your trailer
towing as safe as possible:
• Make certain that the load is secured in the
trailer and will not shift during travel. When
trailering cargo that is not fully secured,
dynamic load shifts can occur that may be
difficult for the driver to control. You could
lose control of your vehicle and have a
collision.
(Continued)
WARNING! (Continued)
• When hauling cargo or towing a trailer, do
not overload your vehicle or trailer. Overloading can cause a loss of control, poor
performance or damage to brakes, axle,
engine, transmission, steering, suspension, chassis structure or tires.
• Safety chains must always be used between your vehicle and trailer. Always connect the chains to the hook retainers of the
vehicle hitch. Cross the chains under the
trailer tongue and allow enough slack for
turning corners.
• Vehicles with trailers should not be parked
on a grade. When parking, apply the parking brake on the tow vehicle. Put the tow
vehicle transmission in PARK. For fourwheel drive vehicles, make sure the transfer case is not in NEUTRAL. Always, block
or "chock" the trailer wheels.
• GCWR must not be exceeded.
WARNING! (Continued)
• Total weight must be distributed between the tow vehicle and the trailer
such that the following four ratings are
not exceeded:
1. GVWR
2. GTW
3. GAWR
4. Tongue weight rating for the trailer hitch
utilized.
Towing Requirements — Tires
• Proper tire inflation pressures are essential
to the safe and satisfactory operation of your
vehicle. Refer to “Tires – General Information” in “Starting and Operating” for proper
tire inflation procedures.
• Check the trailer tires for proper tire inflation
pressures before trailer usage.
• Check for signs of tire wear or visible tire
damage before towing a trailer. Refer to
“Tires – General Information” in “Starting and
Operating” for proper inspection procedure.
• When replacing tires, refer to “Tires – General Information” in “Starting and Operating”
for proper tire replacement procedures. Replacing tires with a higher load carrying capacity will not increase the vehicle’s GVWR
and GAWR limits.
Towing Requirements – Trailer Brakes
• Do not interconnect the hydraulic brake system or vacuum system of your vehicle with
that of the trailer. This could cause inadequate braking and possible personal injury.
• An electronically-actuated trailer brake controller is required when towing a trailer with
electronically-actuated brakes. When towing
a trailer equipped with a hydraulic surgeactuated brake system, an electronic brake
controller is not required.
(Continued)
279
• Trailer brakes are recommended for trailers
over 1,000 lbs (454 kg), and required for
trailers in excess of 1,654 lbs (750 kg).
CAUTION!
If the trailer weighs more than 1,000 lbs
(454 kg) loaded, it should have its own
brakes and they should be of adequate
capacity. Failure to do this could lead to
accelerated brake lining wear, higher brake
pedal effort, and longer stopping distances.
WARNING!
• Do not connect trailer brakes to your vehicle’s hydraulic brake lines. It can overload
your brake system and cause it to fail. You
might not have brakes when you need
them and could have an accident.
(Continued)
280
WARNING! (Continued)
• Towing any trailer will increase your stopping
distance. When towing, you should allow for
additional space between your vehicle and
the vehicle in front of you. Failure to do so
could result in an accident.
Towing Requirements — Trailer Lights And
Wiring
Whenever you pull a trailer, regardless of the
trailer size, stop lights and turn signals on the
trailer are required for motoring safety.
The Trailer Tow Package includes a 13 pin
wiring harness. Use a factory approved trailer
harness and connector.
NOTE:
Do not cut or splice wiring into the vehicles
wiring harness.
The electrical connections are all complete to
the vehicle but you must mate the harness to a
trailer connector.
13–Pin Connector
Pin
Number
Function
Wire Color
1
Left Turn
Signal
Black/White
2
Rear Fog
Light
White
Ground/
Common
Return for
Contacts
(Pins) 1 and
2 and 4 to 8
Brown
3
a
Pin
Number
Function
Wire Color
Pin
Number
Function
Wire Color
4
Right Turn
Signal
Black/Green
8
Reverse
lights
Blue/Red
5
Right Rear
Position,
Side Marker
Lights, and
Rear Registration Plate
Illumination
Device. b
Green/Red
9
Permanent
Power Supply
(+12V)
Red
Power Supply
Controlled by
Ignition
Switch (+12V)
Yellow
6
Stop Lights
Black/Red
Yellow/Brown
7
Left Rear
Position,
Side Marker
Lights, and
Rear Registration Plate
Illumination
Device. b
Green/Black
Return for
Contact
(Pin) 10
Reserve for
Future
Allocation
–
10
11
a
12
Pin
Number
13
a
Function
Wire Color
Return for
Contact
(Pin) 9
Red/Brown
NOTE:
The allocation pin 12 has been changed
from “Coding for coupled Trailer” to
“Reserve for Future Allocation.”
a
The three return circuits shall not be
connected electrically in the trailer.
b
The rear position registration plate illumination device shall be connected such that
no light of the device has a common connection with both pins 5 and 7.
281
Towing Tips
Before setting out on a trip, practice turning,
stopping and backing the trailer in an area away
from heavy traffic.
Automatic Transmission — If Equipped
The DRIVE range can be selected when towing.
The transmission controls include a drive strategy to avoid frequent shifting when towing.
However, if frequent shifting does occur while in
DRIVE, you can use the AutoStick® shift control
to manually select a lower gear.
NOTE:
Using a lower gear while operating the vehicle under heavy loading conditions will
improve performance and extend transmission life by reducing excessive shifting and
heat build up. This action will also provide
better engine braking.
If you REGULARLY tow a trailer for more than 45
minutes of continuous operation, then change
the transmission fluid and filter as specified for
severe usage (trailer towing, police, taxi, etc.)
Refer to the “Service And Warranty Notebook” for
the proper maintenance intervals.
282
NOTE:
Check the automatic transmission fluid level
before towing (gasoline engine only).
AutoStick®
• When using the AutoStick® shift control, select the highest gear that allows for adequate
performance and avoids frequent downshifts.
For example, choose “4” if the desired speed
can be maintained. Choose “3” or “2” if
needed to maintain the desired speed.
• To prevent excess heat generation, avoid
continuous driving at high RPM. Reduce
vehicle speed as necessary to avoid extended driving at high RPM. Return to a
higher gear or vehicle speed when grade and
road conditions allow.
Electronic Speed Control — If Equipped
• Do not use in hilly terrain or with heavy loads.
• When using the speed control, if you experience speed drops greater than 10 mph
(16 km/h), disengage until you can get back
to cruising speed.
• Use speed control in flat terrain and with light
loads to maximize fuel efficiency.
Cooling System
To reduce potential for engine and transmission
overheating, take the following actions:
City Driving
When stopped for short periods of time, shift the
transmission into NEUTRAL and increase engine idle speed.
Highway Driving
Reduce speed.
Air Conditioning
Turn off temporarily.
RECREATIONAL TOWING (BEHIND MOTORHOME, ETC.)
Towing This Vehicle Behind Another Vehicle
Towing Condition
Wheels OFF the Ground
Flat Tow
Dolly Tow
On Trailer
NONE
Four-Wheel Drive Models
•
•
•
•
See Instructions
Automatic transmission in PARK
Manual transmission in gear (NOT in NEUTRAL [N])
Transfer case in NEUTRAL (N)
Tow in forward direction
Front
NOT ALLOWED
Rear
NOT ALLOWED
ALL
OK
NOTE:
When recreational towing your vehicle, always follow applicable state and provincial
laws. Contact state and provincial Highway
Safety offices for additional details.
283
Recreational Towing — Four-Wheel
Drive Models
NOTE:
The transfer case must be shifted into NEUTRAL (N), automatic transmission must be
in PARK, and manual transmission must be
in gear (NOT in NEUTRAL) for recreational
towing.
CAUTION!
• DO NOT dolly tow any 4WD vehicle. Towing with only one set of wheels on the
ground (front or rear) will cause severe
transmission and/or transfer case damage. Tow with all four wheels either ON the
ground, or OFF the ground (using a vehicle trailer).
• Tow only in the forward direction. Towing
this vehicle backwards can cause severe
damage to the transfer case.
• Automatic transmissions must be placed in
PARK for recreational towing.
(Continued)
284
CAUTION! (Continued)
• Manual transmissions must be placed in
gear (not in Neutral) for recreational towing.
• Before recreational towing, perform the
procedure outlined under “Shifting Into
NEUTRAL (N)” to be certain that the transfer case is fully in NEUTRAL (N). Otherwise, internal damage will result.
• Towing this vehicle in violation of the
above requirements can cause severe
transmission and/or transfer case damage. Damage from improper towing is not
covered under the New Vehicle Limited
Warranty.
• Do not use a bumper-mounted clamp-on
tow bar on your vehicle. The bumper face
bar will be damaged.
Shifting Into NEUTRAL (N)
Use the following procedure to prepare your
vehicle for recreational towing.
WARNING!
You or others could be injured or killed if you
leave the vehicle unattended with the transfer case in the NEUTRAL (N) position without first fully engaging the parking brake. The
transfer case NEUTRAL (N) position disengages both the front and rear drive shaft from
the powertrain, and will allow the vehicle to
roll, even if the automatic transmission is in
PARK (or manual transmission is in gear).
The parking brake should always be applied
when the driver is not in the vehicle.
CAUTION!
It is necessary to follow these steps to be
certain that the transfer case is fully in NEUTRAL (N) before recreational towing to prevent damage to internal parts.
1. Bring the vehicle to a complete stop.
11. Firmly apply the parking brake.
2. Press and hold the brake pedal.
12. Shift the transmission into PARK or place
manual transmission in gear (NOT in NEUTRAL).
3. Shift the automatic transmission into NEUTRAL or depress the clutch pedal on a
manual transmission.
4. Turn the engine OFF.
5. Shift the transfer case lever into NEUTRAL
(N).
6. Start the engine.
7. Shift the transmission into REVERSE.
8. Release the brake pedal (and clutch pedal
on manual transmissions) for five seconds
and ensure that there is no vehicle movement.
9. Repeat Steps 7 and 8 with automatic transmission in DRIVE or manual transmission in
first gear.
10. Turn the engine OFF and leave the ignition
switch in the unlocked ACC position.
CAUTION!
Damage to the transmission may occur if the
transmission is shifted into PARK with the
transfer case in NEUTRAL (N) and the engine running. With the transfer case in NEUTRAL (N) ensure that the engine is OFF
before shifting the transmission into PARK.
Shifting Out of NEUTRAL (N)
Use the following procedure to prepare your
vehicle for normal usage.
1. Bring the vehicle to a complete stop, leaving
it connected to the tow vehicle.
2. Firmly apply the parking brake.
3. Reconnect the negative battery cable.
4. Turn the ignition switch to the LOCK position.
5. Turn the ignition switch to the ON/RUN position, but do not start the engine.
6. Press and hold the brake pedal.
13. Attach the vehicle to the tow vehicle using a
suitable tow bar.
7. Shift the transmission into NEUTRAL.
14. Release the parking brake.
8. Shift the transfer case lever to the desired
position.
15. Disconnect the negative battery cable, and
secure it away from the negative battery
post.
NOTE:
When shifting the transfer case out of NEUTRAL (N), the engine should remain OFF to
avoid gear clash.
285
9. Shift the automatic transmission into PARK,
or place manual transmission in NEUTRAL.
10. Release the brake pedal.
11. Disconnect vehicle from the tow vehicle.
12. Start the engine.
13. Press and hold the brake pedal.
14. Release the parking brake.
15. Shift the transmission into gear, release the
brake pedal (and clutch pedal on manual
transmissions), and check that the vehicle
operates normally.
286
6
WHAT TO DO IN EMERGENCIES
• HAZARD WARNING FLASHERS . . . . . . . . .
• IF YOUR ENGINE OVERHEATS . . . . . . . . .
• WHEEL AND TIRE TORQUE SPECIFICATIONS
• Torque Specifications . . . . . . . . . . . . . .
• JACKING AND TIRE CHANGING . . . . . . . .
• Jack Location . . . . . . . . . . . . . . . . . . .
• Spare Tire Removal . . . . . . . . . . . . . . .
• Preparations For Jacking . . . . . . . . . . . .
• Jacking Instructions . . . . . . . . . . . . . . .
• Road Tire Installation. . . . . . . . . . . . . . .
• JUMP-STARTING PROCEDURES . . . . . . . .
• Preparations For Jump-Start . . . . . . . . . .
• Jump-Starting Procedure . . . . . . . . . . . .
• FREEING A STUCK VEHICLE . . . . . . . . . .
• TOW EYE USAGE . . . . . . . . . . . . . . . . .
• Front Tow Eye Installation . . . . . . . . . . . .
• Rear Tow Eye Installation . . . . . . . . . . . .
.
.
.
.
.
.
.
.
.
.
.
.
.
.
.
.
.
.
.
.
.
.
.
.
.
.
.
.
.
.
.
.
.
.
.
.
.
.
.
.
.
.
.
.
.
.
.
.
.
.
.
.
.
.
.
.
.
.
.
.
.
.
.
.
.
.
.
.
.
.
.
.
.
.
.
.
.
.
.
.
.
.
.
.
.
.
.
.
.
.
.
.
.
.
.
.
.
.
.
.
.
.
.
.
.
.
.
.
.
.
.
.
.
.
.
.
.
.
.
.
.
.
.
.
.
.
.
.
.
.
.
.
.
.
.
.
.
.
.
.
.
.
.
.
.
.
.
.
.
.
.
.
.
.
.
.
.
.
.
.
.
.
.
.
.
.
.
.
.
.
.289
.289
.290
.290
.290
.291
.291
.292
.292
.294
.295
.295
.296
.297
.298
.299
.299
287
• SHIFT LEVER OVERRIDE . . . .
• TOWING A DISABLED VEHICLE
• Without The Ignition Key. . . .
• Four–Wheel Drive Models . . .
288
.
.
.
.
.
.
.
.
.
.
.
.
.
.
.
.
.
.
.
.
.
.
.
.
.
.
.
.
.
.
.
.
.
.
.
.
.
.
.
.
.
.
.
.
.
.
.
.
.
.
.
.
.
.
.
.
.
.
.
.
.
.
.
.
.
.
.
.
.
.
.
.
.
.
.
.
.
.
.
.
.
.
.
.
.300
.300
.302
.302
HAZARD WARNING FLASHERS
IF YOUR ENGINE OVERHEATS
The Hazard Warning flasher switch is located
on the instrument panel below the climate
controls.
In any of the following situations, you can
reduce the potential for overheating by taking
the appropriate action.
Press the switch to turn on the Hazard
Warning flasher. When the switch is
activated, all directional turn signals
will flash on and off to warn oncoming traffic of
an emergency. Press the switch a second time
to turn off the Hazard Warning flashers.
• On the highways — slow down.
This is an emergency warning system and it
should not be used when the vehicle is in
motion. Use it when your vehicle is disabled and
it is creating a safety hazard for other motorists.
When you must leave the vehicle to seek assistance, the Hazard Warning flashers will continue to operate even though the ignition is
placed in the OFF position.
NOTE:
With extended use the Hazard Warning
flashers may wear down your battery.
• In city traffic — while stopped, shift transmission into NEUTRAL, but do not increase
engine idle speed.
CAUTION!
Driving with a hot cooling system could damage your vehicle. If the temperature gauge
reads HOT (H), pull over and stop the vehicle. Idle the vehicle with the air conditioner
turned off until the pointer drops back into the
normal range. If the pointer remains on HOT
(H), and you hear continuous chimes, turn
the engine off immediately, and call for service.
NOTE:
There are steps that you can take to slow
down an impending overheat condition:
• If your air conditioner (A/C) is on, turn it
off. The A/C system adds heat to the
engine cooling system and turning the
A/C off can help remove this heat.
• You can also turn the temperature control
to maximum heat, the mode control to
floor and the blower control to high. This
allows the heater core to act as a supplement to the radiator and aids in removing
heat from the engine cooling system.
WARNING!
You or others can be badly burned by hot
engine coolant (antifreeze) or steam from
your radiator. If you see or hear steam coming from under the hood, do not open the
hood until the radiator has had time to cool.
Never try to open a cooling system pressure
cap when the radiator or coolant bottle is hot.
289
After 25 miles (40 km) check the lug nut/bolt
torque to be sure that all the lug nuts/bolts are
properly seated against the wheel.
WHEEL AND TIRE TORQUE
SPECIFICATIONS
Proper lug nut/bolt torque is very important to
ensure that the wheel is properly mounted to
the vehicle. Any time a wheel has been removed and reinstalled on the vehicle the lug
nuts/bolts should be torqued using a properly
calibrated torque wrench.
WARNING!
To avoid the risk of forcing the vehicle off the
jack, do not tighten the lug nuts fully until the
vehicle has been lowered. Failure to follow
this warning may result in personal injury.
Torque Specifications
Wheel Mounting Surface
Lug Nut/
Bolt Torque
**Lug Nut/
Bolt Size
Lug Nut/
Bolt Socket
Size
100 Ft-Lbs
(135 N·m)
1/2” x 20
19 mm
Tighten the lug nuts/bolts in a star pattern until
each nut/bolt has been tightened twice.
WARNING!
• Do not attempt to change a tire on the side
of the vehicle close to moving traffic. Pull
far enough off the road to avoid the danger
of being hit when operating the jack or
changing the wheel.
**Use only Chrysler recommended lug nuts/
bolts and clean or remove any dirt or oil before
tightening.
Inspect the wheel mounting surface prior to
mounting the tire and remove any corrosion or
loose particles.
(Continued)
Torque Patterns
290
JACKING AND TIRE
CHANGING
WARNING! (Continued)
• Being under a jacked-up vehicle is dangerous. The vehicle could slip off the jack and
fall on you. You could be crushed. Never
put any part of your body under a vehicle
that is on a jack. If you need to get under a
raised vehicle, take it to a service center
where it can be raised on a lift.
• Never start or run the engine while the
vehicle is on a jack.
• The jack is designed to be used as a tool
for changing tires only. The jack should not
be used to lift the vehicle for service purposes. The vehicle should be jacked on a
firm level surface only. Avoid ice or slippery
areas.
Jack Location
The jack and lug wrench are located in the rear
storage compartment.
Jack Wing Nut
Spare Tire Removal
Jack Storage
NOTE:
Turn the black plastic wing nut counterclockwise to loosen the jack from the storage bin.
To remove the spare tire from the carrier, remove the tire cover, if equipped, and remove
the lug nuts with the lug wrench turning them
counterclockwise.
NOTE:
If you have added aftermarket accessories
to the spare tire mounted carrier, it cannot
exceed a gross weight of 85 lbs (38.5 kg)
including the weight of the spare tire.
291
Preparations For Jacking
1. Park on a firm, level surface. Avoid ice or
slippery areas.
WARNING!
Do not attempt to change a tire on the side of
the vehicle close to moving traffic, pull far
enough off the road to avoid being hit when
operating the jack or changing the wheel.
2. Turn on the Hazard Warning flasher.
3. Set the parking brake.
4. Shift the automatic transmission into PARK,
or a manual transmission into REVERSE.
5. Turn the ignition to LOCK.
6. Block both the front
and rear of the wheel
diagonally opposite
of the jacking position. For example, if
changing the right
front tire, block the
left rear wheel.
NOTE:
Passengers should not remain in the vehicle
when the vehicle is being jacked.
Jacking Instructions
WARNING!
Carefully follow these tire changing warnings
to help prevent personal injury or damage to
your vehicle:
• Always park on a firm, level surface as far
from the edge of the roadway as possible
before raising the vehicle.
• Turn on the Hazard Warning flasher.
(Continued)
292
WARNING! (Continued)
• Block the wheel diagonally opposite the
wheel to be raised.
• Set the parking brake firmly and set an
automatic transmission in PARK; a manual
transmission in REVERSE.
• Never start or run the engine with the
vehicle on a jack.
• Do not let anyone sit in the vehicle when it
is on a jack.
• Do not get under the vehicle when it is on
a jack. If you need to get under a raised
vehicle, take it to a service center where it
can be raised on a lift.
• Only use the jack in the positions indicated
and for lifting this vehicle during a tire
change.
• If working on or near a roadway, be extremely careful of motor traffic.
• To assure that spare tires, flat or inflated, are
securely stowed, spares must be stowed
with the valve stem facing the ground.
Jack Warning Label
4. Operate the jack from the front or the rear of
the vehicle. Place the jack under the axle
tube, as shown. Do not raise the vehicle
until you are sure the jack is fully engaged.
CAUTION!
Do not attempt to raise the vehicle by jacking
on locations other than those indicated in the
Jacking Instructions for this vehicle.
Front Jacking Location
1. Remove the spare tire, jack and tools from
the stored location.
2. Loosen (but do not remove) the wheel lug
nuts by turning them to the left one turn while
the wheel is still on the ground.
3. Assemble the jack and jacking tools. Connect the jack handle driver to the extension,
then to the lug wrench.
Rear Jacking Location
5. Raise the vehicle by turning the jack screw
clockwise. Raise the vehicle only until the tire
just clears the surface and enough clearance
is obtained to install the spare tire. Minimum
tire lift provides maximum stability.
WARNING!
Raising the vehicle higher than necessary
can make the vehicle less stable and cause
a collision. It could slip off the jack and hurt
someone near it. Raise the vehicle only
enough to remove the tire.
293
6. Remove the lug nuts and wheel.
7. Position the spare wheel/tire on the vehicle
and install the lug nuts with the cone-shaped
end toward the wheel. Lightly tighten the lug
nuts clockwise.
WARNING!
To avoid the risk of forcing the vehicle off the
jack, do not tighten the lug nuts fully until the
vehicle has been lowered. Failure to follow
this warning may result in personal injury.
8. Lower the vehicle by turning the jack screw
to the left, and remove the jack.
9. Finish tightening the lug nuts. Push down on
the wrench while tightening for increased
leverage. Alternate nuts until each nut has
been tightened twice. Refer to “Torque
Specifications” in this section for correct lug
nut torque.
10. Remove the jack assembly and wheel blocks.
294
11. Secure the tire, jack, and tools in their
proper locations.
WARNING!
A loose tire or jack thrown forward in a
collision or hard stop, could endanger the
occupants of the vehicle. Always stow the
jack parts and the spare tire in the places
provided.
Road Tire Installation
1. Mount the road tire on the axle.
2. Install the remaining lug nuts with the cone
shaped end of the nut toward the wheel.
Lightly tighten the lug nuts.
WARNING!
To avoid the risk of forcing the vehicle off the
jack, do not tighten the lug nuts fully until the
vehicle has been lowered. Failure to follow
this warning may result in personal injury.
3. Lower the vehicle to the ground by turning
the jack handle counterclockwise.
4. Finish tightening the lug nuts. Push down on
the wrench while at the end of the handle for
increased leverage. Tighten the lug nuts in a
star pattern until each nut has been tightened twice. For the correct lug nut torque
refer to “Torque Specifications” in this section. If in doubt about the correct tightness,
have them checked with a torque wrench by
your authorized dealer or service station.
5. After 25 miles (40 km) check the lug nut
torque with a torque wrench to ensure that
all lug nuts are properly seated against the
wheel.
JUMP-STARTING
PROCEDURES
If your vehicle has a discharged battery it can be
jump-started using a set of jumper cables and a
battery in another vehicle or by using a portable
battery booster pack. Jump-starting can be dangerous if done improperly so please follow the
procedures in this section carefully.
NOTE:
When using a portable battery booster pack
follow the manufacturer’s operating instructions and precautions.
WARNING!
Do not attempt jump-starting if the battery is
frozen. It could rupture or explode and cause
personal injury.
Preparations For Jump-Start
The battery in your vehicle is located in the right
rear of the engine compartment, behind the
Power Distribution Center.
CAUTION!
Do not use a portable battery booster pack or
any other booster source with a system
voltage greater than 12 Volts or damage to
the battery, starter motor, alternator or electrical system may occur.
WARNING!
• Take care to avoid the radiator cooling fan
whenever the hood is raised. It can start
anytime the ignition switch is ON. You can
be injured by moving fan blades.
• Remove any metal jewelry such as rings,
watch bands and bracelets that could
make an inadvertent electrical contact.
You could be seriously injured.
• Batteries contain sulfuric acid that can
burn your skin or eyes and generate hydrogen gas which is flammable and explosive. Keep open flames or sparks away
from the battery.
1. Set the parking brake, shift the automatic
transmission into PARK (manual transmission in NEUTRAL) and turn the ignition to
LOCK.
Positive Battery Post
2. Turn off the heater, radio, and all unnecessary electrical accessories.
295
3. If using another vehicle to jump-start the
battery, park the vehicle within the jumper
cables reach, set the parking brake and
make sure the ignition is OFF.
WARNING!
Do not allow vehicles to touch each other as
this could establish a ground connection and
personal injury could result.
Jump-Starting Procedure
WARNING!
Failure to follow this jump-starting procedure
could result in personal injury or property
damage due to battery explosion.
CAUTION!
Failure to follow these procedures could result in damage to the charging system of the
booster vehicle or the discharged vehicle.
296
Connecting The Jumper Cables
1. Connect the positive (+) end of the jumper
cable to the positive (+) post of the discharged vehicle.
2. Connect the opposite end of the positive (+)
jumper cable to the positive (+) post of the
booster battery.
3. Connect the negative (-) end of the jumper
cable to the negative (-) post of the booster
battery.
4. Connect the opposite end of the negative (-)
jumper cable to a good engine ground (exposed metal part of the discharged vehicle’s
engine) away from the battery and the fuel
injection system.
WARNING!
Do not connect the jumper cable to the
negative (-) post of the discharged battery.
The resulting electrical spark could cause
(Continued)
WARNING! (Continued)
the battery to explode and could result in
personal injury. Only use the specific ground
point, do not use any other exposed metal
parts.
5. Start the engine in the vehicle that has the
booster battery, let the engine idle a few
minutes, and then start the engine in the
vehicle with the discharged battery.
6. Once the engine is started, remove the
jumper cables in the reverse sequence:
Disconnecting The Jumper Cables
1. Disconnect the negative (-) end of the
jumper cable from the engine ground of the
vehicle with the discharged battery.
2. Disconnect the opposite end of the negative (-) jumper cable from the negative (-)
post of the booster battery.
3. Disconnect the positive (+) end of the jumper
cable from the positive (+) post of the
booster battery.
4. Disconnect the opposite end of the positive
(+) jumper cable from the positive (+) post of
the vehicle with the discharged battery.
If frequent jump-starting is required to start your
vehicle you should have the battery and charging system inspected at your authorized dealer.
CAUTION!
Accessories plugged into the vehicle power
outlets draw power from the vehicle’s battery, even when not in use (i.e., cellular
phones, etc.). Eventually, if plugged in long
enough without engine operation, the vehicle’s battery will discharge sufficiently to degrade battery life and/or prevent the engine
from starting.
FREEING A STUCK VEHICLE
If your vehicle becomes stuck in mud, sand or
snow, it can often be moved using a rocking
motion. Turn the steering wheel right and left to
clear the area around the front wheels. Then
shift back and forth between DRIVE and REVERSE (with automatic transmission) or 2nd
gear and REVERSE (with manual transmission), while gently pressing the accelerator. Use
the least amount of accelerator pedal pressure
that will maintain the rocking motion, without
spinning the wheels, or racing the engine.
CAUTION!
Racing the engine or spinning the wheels
may lead to transmission overheating and
failure. Allow the engine to idle with the
transmission in NEUTRAL for at least one
minute after every five rocking-motion
cycles. This will minimize overheating and
reduce the risk of clutch or transmission
failure during prolonged efforts to free a
stuck vehicle.
NOTE:
Press the ⴖESC Offⴖ switch, to place the
Electronic Stability Control (ESC) system in
ⴖPartial Offⴖ mode, before rocking the vehicle. Refer to “Electronic Brake Control” in
“Starting And Operating” for further information. Once the vehicle has been freed,
press the ⴖESC Offⴖ switch again to restore
ⴖESC Onⴖ mode.
CAUTION!
• When “rocking” a stuck vehicle by shifting
between DRIVE/2nd gear and REVERSE,
do not spin the wheels faster than 15 mph
(24 km/h), or drivetrain damage may result.
• Revving the engine or spinning the wheels
too fast may lead to transmission overheating and failure. It can also damage the
tires. Do not spin the wheels above
30 mph (48 km/h) while in gear (no transmission shifting occurring).
297
WARNING!
Fast spinning tires can be dangerous.
Forces generated by excessive wheel
speeds may cause damage, or even failure,
of the axle and tires. A tire could explode and
injure someone. Do not spin your vehicle’s
wheels faster than 30 mph (48 km/h) or for
longer than 30 seconds continuously without
stopping when you are stuck and do not let
anyone near a spinning wheel, no matter
what the speed.
• Do not use the tow eye to free a stuck
vehicle. Refer to “Freeing A Stuck Vehicle”
in this section for further information.
Tow Eye
Tow Eye Usage Precautions
NOTE:
TOW EYE USAGE
Your vehicle is equipped with a tow eye that can
be used to tow a disabled vehicle.
When using a tow eye be sure to follow the “Tow
Eye Usage Precautions” and the “Towing A
Disabled Vehicle” instructions in this section.
298
• Ensure that the tow eye is properly seated
and secure in the mounting receptacle.
• The tow eye is recommended for use with
an approved tow bar and or rope.
• Do not use the tow eye to pull the vehicle
onto a flatbed truck.
WARNING!
Stand clear of vehicles when pulling with tow
eyes.
• Do not use a chain with a tow eye. Chains
may break, causing serious injury or
death.
• Do not use a tow strap with a tow eye. Tow
straps may break or become disengaged,
causing serious injury or death.
• Failure to follow proper tow eye usage may
cause components to break resulting in
serious injury or death.
Tow Eye Warning Label
CAUTION!
• The tow eye must be used exclusively for
roadside assistance operations. Only use
the tow eye with an appropriate device in
accordance with the highway code (a rigid
bar or rope) to flat tow the vehicle for a
short distance to the nearest service location.
CAUTION! (Continued)
• Tow eyes MUST NOT be used to tow
vehicles off the road or where there are
obstacles.
• In compliance with the above conditions,
towing with a tow eye must take place with
two vehicles (one towing, the other towed)
aligned as much as possible along the
same center line. Damage to your vehicle
may occur if these guidelines are not followed.
Front Tow Eye Installation
The front tow eye receptacle is located behind a
door on the front bumper fascia
To install the tow eye, open the door using the
vehicle key or a small screwdriver, and thread
the tow eye into the receptacle.
Insert the flat end of the jack handle through the
tow eye and tighten, refer to “Jacking and Tire
Changing in Section 6 for information”. The tow
eye must be fully seated to the attaching
bracket through the lower front fascia as shown.
If the tow eye is not fully seated to the attaching
bracket, the vehicle should not be towed.
Rear Tow Eye Installation
The rear tow eye receptacle is located behind a
door on the rear bumper fascia.
To install the tow eye, open the door using the
vehicle key or a small screwdriver, and thread
the tow eye into the receptacle.
Insert the flat end of the jack handle through
the tow eye and tighten, refer to “Jacking and
Tire Changing in Section 6 for information”. The
tow eye must be fully seated to the attaching
bracket through the lower front fascia as shown.
If the tow eye is not fully seated to the attaching
bracket, the vehicle should not be towed.
(Continued)
299
7. Move the shift lever to the NEUTRAL position.
SHIFT LEVER OVERRIDE
If a malfunction occurs and the shift lever cannot be moved out of the PARK position, you can
use the following procedure to temporarily
move the shift lever:
8. The vehicle may then be started in NEUTRAL.
9. Reinstall the shift lever override access
cover.
1. Turn the engine OFF.
2. Firmly apply the parking brake.
3. Using a small screwdriver or similar tool,
remove the shift lever override access cover
(located to the right of the shift lever).
4. Turn the ignition to the ACC or ON/RUN
position, but do not start the engine.
Shift Lever Override Access Cover
5. Press and maintain firm pressure on the
brake pedal.
6. Insert the screwdriver or similar tool into the
access port, and push and hold the override
release lever down.
300
TOWING A DISABLED
VEHICLE
This section describes procedures for towing a
disabled vehicle using a commercial towing
service. If the transmission and drivetrain are
operable, disabled vehicles may also be towed
as described under “Recreational Towing” in the
“Starting And Operating” section.
Towing Condition
Flat Tow
Wheel Lift or Dolly Tow
Flatbed
Proper towing or lifting equipment is required to
prevent damage to your vehicle. Use only tow
bars and other equipment designed for this
purpose, following equipment manufacturer’s
instructions. Use of safety chains is mandatory.
Attach a tow bar or other towing device to main
structural members of the vehicle, not to bumpers or associated brackets. State and local
laws regarding vehicles under tow must be
observed.
Wheels OFF the Ground
4WD MODELS
NONE
See instructions under “Recreational Towing”
• Automatic Transmission in PARK
• Manual Transmission in gear ( NOT in Neutral)
• Transfer Case in NEUTRAL
• Tow in forward direction
Front
NOT ALLOWED
Rear
NOT ALLOWED
ALL
BEST METHOD
If you must use the accessories (wipers, defrosters, etc.) while being towed, the ignition
must be in the ON/RUN position, not the ACC
position.
If the vehicle’s battery is discharged, refer to
“Shift Lever Override” in this section for instructions on shifting the automatic transmission out
of PARK for towing.
CAUTION!
• Do not use sling type equipment when
towing. Vehicle damage may occur.
• When securing the vehicle to a flatbed
truck, do not attach to front or rear suspension components. Damage to your vehicle
may result from improper towing.
301
Without The Ignition Key
Special care must be taken when the vehicle is
towed with the ignition in the LOCK position.
The only approved method of towing without the
ignition key is with a flatbed truck. Proper towing
equipment is necessary to prevent damage to
the vehicle.
Four–Wheel Drive Models
The manufacturer recommends towing with all
wheels OFF the ground. Acceptable methods
are to tow the vehicle on a flatbed or with one
end of the vehicle raised and the opposite end
on a towing dolly.
If flatbed equipment is not available and the
transfer case is operable, the vehicle may be
towed (in the forward direction, with ALL wheels
on the ground), IF the transfer case is in NEUTRAL (N) and the transmission is in PARK (for
automatic transmissions) or in gear ( NOT in
NEUTRAL, for manual transmissions). Refer to
“Recreational Towing” in “Starting And Operating” for detailed instructions.
302
CAUTION!
• Front or rear wheel lifts must not be used.
Internal damage to the transmission or
transfer case will occur if a front or rear
wheel lift is used when towing.
• Towing this vehicle in violation of the
above requirements can cause severe
transmission and/or transfer case damage. Damage from improper towing is not
covered under the New Vehicle Limited
Warranty.
7
MAINTAINING YOUR VEHICLE
• ENGINE COMPARTMENT — 3.6L . . . . . . .
• ONBOARD DIAGNOSTIC SYSTEM — OBD II
• Loose Fuel Filler Cap Message . . . . . . .
• REPLACEMENT PARTS . . . . . . . . . . . . .
• MAINTENANCE PROCEDURES . . . . . . . .
• Engine Oil — Gasoline Engine . . . . . . . .
• Engine Oil Filter . . . . . . . . . . . . . . . .
• Engine Air Cleaner Filter . . . . . . . . . . .
• Accessory Drive Belt Inspection . . . . . . .
• Maintenance-Free Battery . . . . . . . . . . .
• Air Conditioner Maintenance . . . . . . . . .
• Body Lubrication . . . . . . . . . . . . . . . .
• Windshield Wiper Blades . . . . . . . . . . .
• Adding Washer Fluid . . . . . . . . . . . . .
• Exhaust System . . . . . . . . . . . . . . . .
• Cooling System . . . . . . . . . . . . . . . .
• Brake System . . . . . . . . . . . . . . . . . .
• Automatic Transmission — If Equipped . .
.
.
.
.
.
.
.
.
.
.
.
.
.
.
.
.
.
.
.
.
.
.
.
.
.
.
.
.
.
.
.
.
.
.
.
.
.
.
.
.
.
.
.
.
.
.
.
.
.
.
.
.
.
.
.
.
.
.
.
.
.
.
.
.
.
.
.
.
.
.
.
.
.
.
.
.
.
.
.
.
.
.
.
.
.
.
.
.
.
.
.
.
.
.
.
.
.
.
.
.
.
.
.
.
.
.
.
.
.
.
.
.
.
.
.
.
.
.
.
.
.
.
.
.
.
.
.
.
.
.
.
.
.
.
.
.
.
.
.
.
.
.
.
.
.
.
.
.
.
.
.
.
.
.
.
.
.
.
.
.
.
.
.
.
.
.
.
.
.
.
.
.
.
.
.
.
.
.
.
.
.
.
.
.
.
.
.
.
.
.
.
.
.
.
.
.
.
.
.305
.306
.306
.306
.306
.307
.308
.308
.310
.311
.312
.315
.315
.318
.319
.320
.323
.324
303
•
•
•
•
•
•
•
304
• Clutch Hydraulic System (Manual Transmission) —
If Equipped . . . . . . . . . . . . . . . . . . . . . . . . .
• Manual Transmission — If Equipped . . . . . . . . .
• Transfer Case . . . . . . . . . . . . . . . . . . . . . . .
• Front/Rear Axle Fluid . . . . . . . . . . . . . . . . . .
• Appearance Care And Protection From Corrosion .
FUSES . . . . . . . . . . . . . . . . . . . . . . . . . . . . .
• Totally Integrated Power Module . . . . . . . . . . . .
VEHICLE STORAGE . . . . . . . . . . . . . . . . . . . .
REPLACEMENT BULBS . . . . . . . . . . . . . . . . . .
BULB REPLACEMENT . . . . . . . . . . . . . . . . . . .
• Headlamp . . . . . . . . . . . . . . . . . . . . . . . . .
• Front Park/Turn Signal . . . . . . . . . . . . . . . . . .
• Front Side Marker . . . . . . . . . . . . . . . . . . . . .
• Front Fog Lamp . . . . . . . . . . . . . . . . . . . . . .
• Rear Fog Lamp . . . . . . . . . . . . . . . . . . . . . .
• Rear Tail, Stop, Turn Signal, And Backup Lamp . . .
• Center High-Mounted Stop Lamp (CHMSL) . . . . . .
VEHICLE SPECIFICATIONS . . . . . . . . . . . . . . . .
FLUID CAPACITIES . . . . . . . . . . . . . . . . . . . . .
FLUIDS, LUBRICANTS AND GENUINE PARTS . . . .
• Engine . . . . . . . . . . . . . . . . . . . . . . . . . . .
• Chassis . . . . . . . . . . . . . . . . . . . . . . . . . .
.
.
.
.
.
.
.
.
.
.
.
.
.
.
.
.
.
.
.
.
.
.
.
.
.
.
.
.
.
.
.
.
.
.
.
.
.
.
.
.
.
.
.
.
.
.
.
.
.
.
.
.
.
.
.
.
.
.
.
.
.
.
.
.
.
.
.
.
.
.
.
.
.
.
.
.
.
.
.
.
.
.
.
.
.
.
.
.
.
.
.
.
.
.
.
.
.
.
.
.
.
.
.
.
.
.
.
.
.
.
.
.
.
.
.
.
.
.
.
.
.
.
.
.
.
.
.
.
.
.
.
.
.
.
.
.
.
.
.
.
.
.
.
.
.
.
.
.
.
.
.
.
.
.
.
.
.
.
.
.
.
.
.
.
.
.
.
.
.
.
.
.
.
.
.
.
.326
.326
.327
.327
.328
.332
.333
.338
.338
.338
.339
.339
.339
.340
.340
.340
.340
.341
.341
.342
.342
.343
ENGINE COMPARTMENT — 3.6L
1
2
3
4
5
6
— Integrated Power Module (Fuses)
— Battery
— Engine Oil Dipstick
— Automatic Transmission Dipstick (Under Engine Cover)
— Engine Oil Fill
— Brake Fluid Reservoir
7 — Washer Fluid Reservoir
8 — Engine Coolant Reservoir
9 — Air Cleaner Filter
10 — Coolant Pressure Cap
11 — Power Steering Fluid Reservoir
305
ONBOARD DIAGNOSTIC
SYSTEM — OBD II
Your vehicle is equipped with a sophisticated
onboard diagnostic system called OBD II. This
system monitors the performance of the emissions, engine, and automatic transmission control systems. When these systems are operating properly, your vehicle will provide excellent
performance and fuel economy, as well as
engine emissions well within current government regulations.
If any of these systems require service, the
OBD II system will turn on the “Malfunction
Indicator Light” (MIL). It will also store diagnostic codes and other information to assist your
service technician in making repairs. Although
your vehicle will usually be drivable and not
need towing, see your authorized dealer for
service as soon as possible.
306
CAUTION!
• Prolonged driving with the MIL on could
cause further damage to the emission control system. It could also affect fuel
economy and driveability. The vehicle
must be serviced before any emissions
tests can be performed.
• If the MIL is flashing while the engine is
running, severe catalytic converter damage and power loss will soon occur. Immediate service is required.
next time the vehicle is started. This might
indicate a damaged cap. If the problem is
detected twice in a row, the system will turn on
the MIL. Resolving the problem will turn the
MIL off.
REPLACEMENT PARTS
Use of genuine MOPAR® parts for normal/
scheduled maintenance and repairs is highly
recommended to ensure the designed performance. Damage or failures caused by the use
of non-MOPAR® parts for maintenance and
repairs will not be covered by the New Vehicle
Limited Warranty.
Loose Fuel Filler Cap Message
After fuel is added, the vehicle diagnostic system can determine if the fuel filler cap is possibly loose, improperly installed, or damaged. A
“gASCAP” message will be displayed in the
odometer. Tighten the gas cap until a "clicking"
sound is heard. This is an indication that the gas
cap is properly tightened. Press the odometer
reset button to turn the message off. If the
problem persists, the message will appear the
MAINTENANCE PROCEDURES
The pages that follow contain the required
maintenance services determined by the engineers who designed your vehicle.
Besides those maintenance items specified in
the fixed “Service and Warranty Handbook”,
there are other components which may require
servicing or replacement in the future.
CAUTION!
• Failure to properly maintain your vehicle or
perform repairs and service when necessary could result in more costly repairs,
damage to other components or negatively
impact vehicle performance. Immediately
have potential malfunctions examined by
an authorized dealer or qualified repair
center.
• Your vehicle has been built with improved
fluids that protect the performance and
durability of your vehicle and also allow
extended maintenance intervals. Do not
use chemical flushes in these components
as the chemicals can damage your engine,
transmission, power steering or air conditioning. Such damage is not covered by
the New Vehicle Limited Warranty. If a
flush is needed because of component
malfunction, use only the specified fluid for
the flushing procedure.
Engine Oil — Gasoline Engine
Checking Oil Level
To assure proper lubrication of your vehicle’s
engine, the engine oil must be maintained at the
correct level. The engine oil level should be
checked five minutes after a warmed up engine
has been shut off.
Checking the oil while the vehicle is on level
ground will improve the accuracy of the oil level
readings. Always maintain the oil level within
the SAFE zone on the dipstick. Adding one
quart of oil when the reading is at the bottom of
the SAFE zone will result in a reading at the top
of the safe zone on these engines.
CAUTION!
Overfilling or underfilling the crankcase will
cause aeration or loss of oil pressure. This
could damage your engine.
Engine Oil Selection
For best performance and maximum protection
under all types of operating conditions, the
manufacturer only recommend engine oils that
are API certified and meet the requirements of
Chrysler Material Standard MS-6395 or ACEA
A1/B1.
American Petroleum Institute (API) Engine
Oil Identification Symbol
This symbol means
that the oil has
been certified by
the American Petroleum
Institute
(API). The manufacturer only recommends API Certified engine oils.
Change Engine Oil
Refer to the “Service and Warranty Handbook”
for the proper maintenance interval.
307
CAUTION!
Do not use chemical flushes in your engine
oil as the chemicals can damage your engine. Such damage is not covered by the
New Vehicle Limited Warranty.
Engine Oil Viscosity (SAE GRADE)
MOPAR® 5W-20 engine oil or equivalent Pennzoil® or Shell Helix® is recommended for all
operating temperatures. This engine oil improves low temperature starting and vehicle fuel
economy.
The engine oil filler cap also shows the recommended engine oil viscosity for your engine. For
information on engine oil filler cap location, refer
to “Engine Compartment” in “Maintaining Your
Vehicle” for further information.
NOTE:
MOPAR® SAE 5W-30 engine oil approved to
Chrysler Material Standard MS-6395 such
as Pennzoil® or Shell Helix® may be used
when SAE 5W-20 engine oil is not available.
Engine Oil Filter
The engine oil filter should be replaced with a
new filter at every engine oil change.
Engine Oil Filter Selection
This manufacturer’s engines have a full-flow
type oil filter. Use a filter of this type for replacement. The quality of replacement filters varies
considerably. Only high quality filters should be
used to assure most efficient service. MOPAR®
engine oil filters are a high quality oil filter and
are recommended.
Engine Air Cleaner Filter
Refer to the “Service and Warranty Handbook”
for the proper maintenance intervals.
WARNING!
The air induction system (air cleaner, hoses,
etc.) can provide a measure of protection in
the case of engine backfire. Do not remove
the air induction system (air cleaner, hoses,
etc.) unless such removal is necessary for
repair or maintenance. Make sure that no
(Continued)
308
WARNING! (Continued)
one is near the engine compartment before
starting the vehicle with the air induction
system (air cleaner, hoses, etc.) removed.
Failure to do so can result in serious personal injury.
Engine Air Cleaner Filter Selection
The quality of replacement engine air cleaner
filters varies considerably. Only high quality
filters should be used to assure most efficient
service. MOPAR® engine air cleaner filters are
a high quality filter and are recommended.
Engine Air Cleaner Filter Inspection and
Replacement — Gasoline Engine
Follow the recommended maintenance intervals as shown in the Service And Warranty
Handbook.
Engine Air Cleaner Filter Removal
1. Remove the bolts from the air cleaner intake
tube.
2. Remove air hose and loosen clean air hose
clamp then release the spring clips on the air
intake cover.
Air Cleaner Filter Cover
Air Cleaner Filter Cover
3. Lift the air cleaner cover to access the air
cleaner filter.
Air Cleaner Air Hose
1
2
3
4
5
6
— Spring Clips
— Air Hose
— Clean Air Hose Clamp
— Clean Air Intake Tube Bolts
— Air Cleaner Filter Cover
— Clean Air Intake Tube
1 — Spring Clips
2 — Air Hose
3 — Clean Air Hose Clamp
1
2
3
4
5
— Air Filter Cleaner Cover
— Air Hose
— Clean Air Intake Tube
— Clean Air Hose Clamp
— Air Cleaner Filter
309
4. Remove the air cleaner filter element from
the housing assembly.
Engine Air Cleaner Filter Installation
NOTE:
Inspect and clean the housing if dirt or
debris is present before replacing the air
filter element.
1. Install the air cleaner filter element into the
housing assembly with the air cleaner filter
inspection surface facing downward.
2. Install the air cleaner cover onto the housing
assembly locating tabs.
Air Cleaner Filter
1 — Air Cleaner Filter
2 — Air Cleaner Filter Inspection Surface
310
3. Latch the spring clips and lock the air
cleaner cover to the housing assembly and
install air hose.
4. Tighten air intake clamp and tighten air
cleaner intake tube bolts.
Accessory Drive Belt Inspection
WARNING!
• Do not attempt to inspect an accessory
drive belt with vehicle running.
• When working near the radiator cooling
fan, disconnect the fan motor lead. The fan
is temperature controlled and can start at
any time regardless of ignition switch position. You could be injured by the moving
fan blades.
• You can be badly injured working on or
around a motor vehicle. Only do service
work for which you have the knowledge
and the proper equipment. If you have any
doubt about your ability to perform a service job, take your vehicle to a competent
mechanic.
When inspecting accessory drive belts, small
cracks that run across ribbed surface of belt
from rib to rib, are considered normal. These
are not a reason to replace belt. However,
cracks running along a rib (not across) are not
normal. Any belt with cracks running along a rib
must be replaced. Also have the belt replaced if
it has excessive wear, frayed cords or severe
glazing.
Conditions that would require replacement:
Maintenance-Free Battery
• Rib chunking (one or more ribs has separated from belt body)
Your vehicle is equipped with a maintenancefree battery. You will never have to add water,
nor is periodic maintenance required.
• Rib or belt wear
• Longitudinal belt cracking (cracks between
two ribs)
• Belt slips
• “Groove jumping" (belt does not maintain
correct position on pulley)
• Belt broken (note: identify and correct problem before new belt is installed)
• Noise (objectionable squeal, squeak, or
rumble is heard or felt while drive belt is in
operation)
Accessory Belt (Serpentine Belt)
Some conditions can be caused by a faulty
component such as a belt pulley. Belt pulleys
should be carefully inspected for damage and
proper alignment.
Belt replacement on some models requires the
use of special tools, we recommend having
your vehicle serviced at an authorized dealer.
WARNING!
• Battery fluid is a corrosive acid solution
and can burn or even blind you. Do not
allow battery fluid to contact your eyes,
skin, or clothing. Do not lean over a battery
when attaching clamps. If acid splashes in
eyes or on skin, flush the area immediately
with large amounts of water. Refer to
“Jump-Starting Procedures” in “What To
Do In Emergencies” for further information.
• Battery gas is flammable and explosive.
Keep flame or sparks away from the battery. Do not use a booster battery or any
other booster source with an output
greater than 12 Volts. Do not allow cable
clamps to touch each other.
(Continued)
311
WARNING! (Continued)
• Battery posts, terminals, and related accessories contain lead and lead compounds. Wash hands after handling.
CAUTION!
• It is essential when replacing the cables on
the battery that the positive cable is attached to the positive post and the negative cable is attached to the negative post.
Battery posts are marked positive (+) and
negative (-) and are identified on the battery case. Cable clamps should be tight on
the terminal posts and free of corrosion.
• If a “fast charger” is used while the battery
is in the vehicle, disconnect both vehicle
battery cables before connecting the charger to the battery. Do not use a “fast
charger” to provide starting voltage.
Air Conditioner Maintenance
For best possible performance, your air conditioner should be checked and serviced by an
authorized dealer at the start of each warm
season. This service should include cleaning of
the condenser fins and a performance test.
Drive belt tension should also be checked at
this time.
WARNING!
• Use only refrigerants and compressor lubricants approved by the manufacturer for
your air conditioning system. Some unapproved refrigerants are flammable and can
explode, injuring you. Other unapproved
refrigerants or lubricants can cause the
system to fail, requiring costly repairs. Refer to Warranty Information Book, located
on the DVD, for further warranty information.
(Continued)
312
WARNING! (Continued)
• The air conditioning system contains refrigerant under high pressure. To avoid risk
of personal injury or damage to the system, adding refrigerant or any repair requiring lines to be disconnected should be
done by an experienced technician.
CAUTION!
Do not use chemical flushes in your air
conditioning system as the chemicals can
damage your air conditioning components.
Such damage is not covered by the New
Vehicle Limited Warranty.
Refrigerant Recovery And Recycling
R134a — If Equipped
R-134a Air Conditioning Refrigerant is a hydrofluorocarbon (HFC) that is endorsed by the
Environmental Protection Agency and is an
ozone-saving product. However, the manufacturer recommends that air conditioning service
be performed by authorized dealer or other
service facilities using recovery and recycling
equipment.
NOTE:
Use only manufacturer approved A/C system PAG compressor oil, and refrigerants.
Refrigerant Recovery And Recycling
HFO 1234yf — If Equipped
HFO 1234yf Air Conditioning Refrigerant is a
hydrofluorocarbon (HFC) that is endorsed by
the Environmental Protection Agency and is an
ozone-saving product with a low GWP (Global
Warming Potential). However, the manufacturer
recommends that air conditioning service be
performed by authorized dealer or other service
facilities using recovery and recycling equipment.
NOTE:
Use only manufacturer approved A/C system PAG compressor oil, and refrigerants.
Air Conditioning Filter Replacement
(A/C Air Filter)
WARNING!
Do not remove the A/C air filter while the
blower is operating or personal injury may
result.
Glove Compartment
The A/C air filter is located in the fresh air inlet
behind the glove box. Perform the following
procedure to replace the filter:
1 — Glove Compartment Travel Stops
2 — Glove Compartment
1. Open the glove compartment and remove all
contents.
3. Pivot the glove compartment downward.
2. Push in on the sides of the glove compartment and lower the door.
313
4. Disengage the two retaining tabs that secure
the two air filter access doors to the HVAC
housing.
6. Remove the two particulate air filters from
the HVAC air inlet housing. Pull the filter
elements straight out of the housing, one at
a time.
7. Install the A/C air filter with the air filter
position indicators pointing in the same direction as removal.
CAUTION!
The A/C air filter is identified with an arrow to
indicate airflow direction through the filter.
Failure to properly install the filter will result
in the need to replace it more often.
8. Close A/C Air Filter access doors and secure
retaining tabs.
Air Filter Retaining Tabs
Air Filter Access Door Open
1 — Left Retaining Tab
2 — Right Retaining Tab
5. Open the two air filter access doors.
314
1 — Air Conditioning Filter Access Door
2 — Air Conditioning Air Filter
9. Rotate the glove compartment door back
into position.
Refer to the “Service and Warranty Handbook"
for the proper maintenance intervals.
Body Lubrication
Windshield Wiper Blades
Locks and all body pivot points, including such
items as seat tracks, door hinge pivot points
and rollers, liftgate, tailgate, decklid, sliding
doors and hood hinges, should be lubricated
periodically with a lithium based grease, such
as MOPAR® Spray White Lube to assure quiet,
easy operation and to protect against rust and
wear. Prior to the application of any lubricant,
the parts concerned should be wiped clean to
remove dust and grit; after lubricating excess oil
and grease should be removed. Particular attention should also be given to hood latching
components to ensure proper function. When
performing other underhood services, the hood
latch, release mechanism and safety catch
should be cleaned and lubricated.
Clean the rubber edges of the wiper blades and
the windshield periodically with a sponge or soft
cloth and a mild nonabrasive cleaner. This will
remove accumulations of salt or road film.
The external lock cylinders should be lubricated
twice a year, preferably in the Fall and Spring.
Apply a small amount of a high quality lubricant,
such as MOPAR® Lock Cylinder Lubricant directly into the lock cylinder.
Operation of the wipers on dry glass for long
periods may cause deterioration of the wiper
blades. Always use washer fluid when using the
wipers to remove salt or dirt from a dry windshield.
Avoid using the wiper blades to remove frost or
ice from the windshield. Keep the blade rubber
out of contact with petroleum products such as
engine oil, gasoline, etc.
NOTE:
Life expectancy of wiper blades varies depending on geographical area and frequency of use. Poor performance of blades
may be present with chattering, marks, water lines or wet spots. If any of these conditions are present, clean the wiper blades or
replace as necessary.
The wiper blades and wiper arms should be
inspected periodically, not just when wiper performance problems are experienced. This inspection should include the following points:
• Wear Or Uneven Edges
• Foreign Material
• Hardening Or Cracking
• Deformation Or Fatigue
If a wiper blade or wiper arm is damaged,
replace the affected wiper arm or blade with a
new unit. Do not attempt to repair a wiper arm or
blade that is damaged.
Wiper Blade Removal/Installation
CAUTION!
Do not allow the wiper arm to spring back
against the glass without the wiper blade in
place or the glass may be damaged.
315
1. Lift the wiper arm to raise the wiper blade off
of the glass, until the wiper arm is in the full
up position.
2. To disengage the wiper blade from the wiper
arm, press the release tab on the wiper
blade and while holding the wiper arm with
one hand, slide the wiper blade down towards the base of the wiper arm.
3. With the wiper blade disengaged, remove
the wiper blade from the wiper arm.
Wiper Blade Removed From Wiper Arm
Wiper Blade With Release Tab In Locked
Position
1 — Wiper Blade
2 — Wiper Arm
3 — Release Tab
316
Wiper Blade With Release Tab In Unlocked
Position
1 — Wiper Blade
2 — Wiper Arm
3 — Release Tab
1 — Wiper Blade
2 — Wiper Arm
3 — Release Tab
4. Gently lower the wiper arm onto the glass.
Installing The Front Wipers
Rear Wiper Blade Removal/Installation
1. Lift the wiper arm off of the glass, until the
wiper arm is in the full up position.
1. Remove the rear wiper arm pivot cap To
access the wiper arm nut.
2. Remove the wiper arm nut and gently rock
the wiper arm while pulling towards you to
remove wiper arm from the stud.
Rear Wiper Assembly
Wiper Arm With Pivot Cap Removed
2. Position the wiper blade near the hook on
the tip of the wiper arm.
3. Insert the hook on the tip of the arm through
the opening in the wiper blade.
4. Slide the wiper blade up into the hook on the
wiper arm, latch engagement will be accompanied by an audible click.
5. Gently lower the wiper blade onto the glass.
1 — Wiper Arm Pivot Cap
2 — Wiper Arm
3 — Wiper Blade
1 — Wiper Arm Pivot Cap
2 — Wiper Arm Nut
3 — Wiper Arm
3. To remove the wiper blade from the wiper
arm, grasp the wiper blade nearest to wiper
arm with your right hand. With your left hand
317
hold the wiper arm as you pull the wiper
blade away from the wiper arm past its stop
far enough to unsnap the wiper blade pivot
pin from the receptacle on the end of the
wiper arm.
4. Still grasping the wiper blade, move the
wiper blade away from the wiper arm to
disengage.
NOTE:
Resistance will be accompanied by an audible
snap.
Installing The Rear Wiper
1. Insert the wiper blade pivot pin into the
opening on the end of the wiper arm. Grab
the bottom end of the wiper arm with one
hand, and press the wiper blade flush with
the wiper arm until it snaps into place.
2. Install wiper assembly back on the wiper stud
at it’s original position and gently tighten nut.
3. Lower the wiper blade onto the glass and snap
the wiper arm pivot cap back into place.
Adding Washer Fluid
Wiper Blade Removed From Wiper Arm
Wiper Blade Removed From Wiper Arm
1 — Wiper Arm
2 — Wiper Blade
318
1
2
3
4
—
—
—
—
Wiper Blade
Wiper Blade Pivot Pin
Wiper Arm Receptacle
Wiper Arm
The fluid reservoir for the windshield washers
and the rear window washer (if equipped) is
shared. The fluid reservoir is located in the
engine compartment. Be sure to check the fluid
level at regular intervals. Fill the reservoir with
windshield washer solvent only (not radiator
antifreeze). When refilling the washer fluid reservoir, take some washer fluid and apply it to a
cloth or towel and wipe clean the wiper blades;
this will help blade performance.
To prevent freeze-up of your windshield washer
system in cold weather, select a solution or
mixture that meets or exceeds the temperature
range of your climate. This rating information
can be found on most washer fluid containers.
permit exhaust fumes to seep into the passenger compartment. In addition, have the exhaust
system inspected each time the vehicle is
raised for lubrication or oil change. Replace as
required.
WARNING!
Commercial windshield washer solvents are
flammable. They could ignite and burn you.
Care must be exercised when filling or working around the washer solution.
WARNING!
• Exhaust gases can injure or kill. They
contain carbon monoxide (CO), which is
colorless and odorless. Breathing it can
make you unconscious and can eventually
poison you. To avoid breathing CO, refer to
“Safety Tips/Exhaust Gas” in “Things To
Know Before Starting Your Vehicle” for
further information.
• A hot exhaust system can start a fire if you
park over materials that can burn. Such
materials might be grass or leaves coming
into contact with your exhaust system. Do
not park or operate your vehicle in areas
where your exhaust system can contact
anything that can burn.
Exhaust System
The best protection against carbon monoxide
entry into the vehicle body is a properly maintained engine exhaust system.
If you notice a change in the sound of the
exhaust system; or if the exhaust fumes can be
detected inside the vehicle; or when the underside or rear of the vehicle is damaged; have an
authorized technician inspect the complete exhaust system and adjacent body areas for broken, damaged, deteriorated, or mispositioned
parts. Open seams or loose connections could
CAUTION!
• The catalytic converter requires the use of
unleaded fuel only. Leaded gasoline will
destroy the effectiveness of the catalyst as
an emissions control device and may seriously reduce engine performance and
cause serious damage to the engine.
• Damage to the catalytic converter can result
if your vehicle is not kept in proper operating
condition. In the event of engine malfunction, particularly involving engine misfire or
other apparent loss of performance, have
your vehicle serviced promptly. Continued
operation of your vehicle with a severe malfunction could cause the converter to overheat, resulting in possible damage to the
converter and vehicle.
Under normal operating conditions, the catalytic
converter will not require maintenance. However, it is important to keep the engine properly
tuned to assure proper catalyst operation and
prevent possible catalyst damage.
319
NOTE:
Intentional tampering with emissions control systems can result in civil penalties
being assessed against you.
In unusual situations involving grossly malfunctioning engine operation, a scorching odor may
suggest severe and abnormal catalyst overheating. If this occurs, stop the vehicle, turn off
the engine and allow it to cool. Service, including a tune-up to manufacturer’s specifications,
should be obtained immediately.
To minimize the possibility of catalytic converter
damage:
• Do not shut off the engine or interrupt the
ignition, when the transmission is in gear and
the vehicle is in motion.
• Do not try to start the engine by pushing or
towing the vehicle.
• Do not idle the engine with any spark plug
wires disconnected or removed, such as
when diagnostic testing, or for prolonged
periods during very rough idle or malfunctioning operating conditions.
320
Cooling System
WARNING!
You or others can be badly burned by hot
engine coolant (antifreeze) or steam from
your radiator. If you see or hear steam coming from under the hood, do not open the
hood until the radiator has had time to cool.
Never try to open a cooling system pressure
cap when the radiator or coolant bottle is hot.
Engine Coolant Checks
Check the engine coolant (antifreeze) protection every 12 months (before the onset of
freezing weather, where applicable). If the engine coolant (antifreeze) is dirty or rusty in
appearance, the system should be drained,
flushed and refilled with fresh engine coolant
(antifreeze). Check the front of the A/C condenser (if equipped) or radiator for any accumulation of bugs, leaves, etc. If dirty, clean by
gently spraying water from a garden hose vertically down the face of the A/C condenser
(if equipped) or the back of the radiator core.
Check the engine cooling system hoses for
brittle rubber, cracking, tears, cuts, and tightness of the connection at the coolant recovery
bottle and radiator. Inspect the entire system for
leaks.
With the engine at normal operating temperature (but not running), check the cooling system
pressure cap for proper vacuum sealing by
draining a small amount of engine coolant
(antifreeze) from the radiator drain cock. If the
cap is sealing properly, the engine coolant
(antifreeze) will begin to drain from the coolant recovery bottle. DO NOT REMOVE THE
COOLANT PRESSURE CAP WHEN THE
COOLING SYSTEM IS HOT.
Cooling System — Drain, Flush And Refill
NOTE:
Some vehicles require special tools to add
coolant properly. Failure to fill these systems properly could lead to severe internal
engine damage. If any coolant is needed to
be added to the system please contact your
local authorized dealer.
If the engine coolant (antifreeze) is dirty or
contains visible sediment, have an authorized
dealer clean and flush with OAT coolant (antifreeze) (conforming to MS-12106).
Refer to the “Service and Warranty Handbook”
for the proper maintenance intervals.
Selection Of Coolant
Refer to “Fluids, Lubricants, and Genuine Parts”
in “Maintaining Your Vehicle” for further information.
CAUTION!
• Mixing of engine coolant (antifreeze) other
than specified Organic Additive Technology (OAT) engine coolant (antifreeze),
may result in engine damage and may
decrease corrosion protection. Organic
Additive Technology (OAT) engine coolant
is different and should not be mixed with
Hybrid Organic Additive Technology
(HOAT) engine coolant (antifreeze) or any
“globally compatible” coolant (antifreeze).
CAUTION! (Continued)
If a non-OAT engine coolant (antifreeze) is
introduced into the cooling system in an
emergency, the cooling system will need to
be drained, flushed, and refilled with fresh
OAT coolant (conforming to MS-12106), by
an authorized dealer as soon as possible.
• Do not use water alone or alcohol-based
engine coolant (antifreeze) products. Do
not use additional rust inhibitors or antirust
products, as they may not be compatible
with the radiator engine coolant and may
plug the radiator.
• This vehicle has not been designed for use
with propylene glycol-based engine coolant (antifreeze). Use of propylene glycolbased engine coolant (antifreeze) is not
recommended.
Adding Coolant
Your vehicle has been built with an improved
engine coolant (OAT coolant conforming to
MS-12106) that allows extended maintenance
intervals. This engine coolant (antifreeze) can
be used up to ten years or 150,000 miles
(240,000 km) before replacement. To prevent
reducing this extended maintenance period,
it is important that you use the same engine
coolant (OAT coolant conforming to MS-12106)
throughout the life of your vehicle.
Please review these recommendations for using Organic Additive Technology (OAT) engine
coolant (antifreeze) that meets the requirements of Chrysler Material Standard MS-12106.
When adding engine coolant (antifreeze):
• We recommend using MOPAR® Antifreeze/
Coolant 10 Year/150,000 Mile Formula OAT
(Organic Additive Technology) that meets the
requirements of Chrysler Material Standard
MS-12106.
• Mix a minimum solution of 50% OAT engine
coolant that meets the requirements of
Chrysler Material Standard MS-12106 and
(Continued)
321
distilled water. Use higher concentrations
(not to exceed 70%) if temperatures below
−34° F (−37° C) are anticipated.
a authorized dealer drain, flush, and refill
with OAT coolant (conforming to MS12106) as soon as possible.
• Use only high purity water such as distilled or
deionized water when mixing the water/
engine coolant (antifreeze) solution. The use
of lower quality water will reduce the amount
of corrosion protection in the engine cooling
system.
Cooling System Pressure Cap
The cap must be fully tightened to prevent loss
of engine coolant (antifreeze), and to ensure
that engine coolant (antifreeze) will return to the
radiator from the coolant recovery tank.
Please note that it is the owner’s responsibility to
maintain the proper level of protection against
freezing according to the temperatures occurring
in the area where the vehicle is operated.
NOTE:
• Some vehicles require special tools to
add coolant properly. Failure to fill these
systems properly could lead to severe
internal engine damage. If any coolant is
needed to be added to the system please
contact your local authorized dealer.
• Mixing engine coolant (antifreeze) types
is not recommended and can result in
cooling system damage. If HOAT and OAT
coolant are mixed in an emergency, have
322
The cap should be inspected and cleaned if
there is any accumulation of foreign material on
the sealing surfaces.
WARNING!
• Do not open hot engine cooling system.
Never add engine coolant (antifreeze)
when the engine is overheated. Do not
loosen or remove the cap to cool an overheated engine. Heat causes pressure to
build up in the cooling system. To prevent
scalding or injury, do not remove the pressure cap while the system is hot or under
pressure.
(Continued)
WARNING! (Continued)
• Do not use a pressure cap other than the
one specified for your vehicle. Personal
injury or engine damage may result.
Disposal Of Used Engine Coolant
Used ethylene glycol-based engine coolant (antifreeze) is a regulated substance requiring
proper disposal. Check with your local authorities to determine the disposal rules for your
community. To prevent ingestion by animals or
children, do not store ethylene glycol-based
engine coolant in open containers or allow it to
remain in puddles on the ground. If ingested by
a child or pet, seek emergency assistance
immediately. Clean up any ground spills immediately.
Engine Coolant Level
The coolant bottle provides a quick visual
method for determining that the coolant level is
adequate. With the engine idling, and warm to
normal operating temperature, the level of the
engine coolant (antifreeze) in the bottle should
be between the ranges indicated on the bottle.
The radiator normally remains completely full,
so there is no need to remove the radiator cap
unless checking for engine coolant (antifreeze)
freeze point or replacing engine coolant (antifreeze). Advise your service attendant of this.
As long as the engine operating temperature is
satisfactory, the coolant bottle need only be
checked once a month.
When additional engine coolant (antifreeze) is
needed to maintain the proper level, it should be
added to the coolant bottle. Do not overfill.
Points To Remember
NOTE:
When the vehicle is stopped after a few
miles/kilometers of operation, you may observe vapor coming from the front of the
engine compartment. This is normally a result of moisture from rain, snow, or high
humidity accumulating on the radiator and
being vaporized when the thermostat opens,
allowing hot engine coolant (antifreeze) to
enter the radiator.
If an examination of your engine compartment
shows no evidence of radiator or hose leaks,
the vehicle may be safely driven. The vapor will
soon dissipate.
• Do not overfill the coolant expansion bottle.
• Check the coolant freeze point in the radiator
and in the coolant expansion bottle. If engine
coolant (antifreeze) needs to be added, the
contents of the coolant expansion bottle must
also be protected against freezing.
• If frequent engine coolant (antifreeze) additions are required, the cooling system should
be pressure tested for leaks.
• Maintain engine coolant (antifreeze) concentration at a minimum of 50% OAT coolant
(conforming to MS-12106) and distilled water
for proper corrosion protection of your engine
which contains aluminum components.
• Make sure that the coolant expansion bottle
overflow hoses are not kinked or obstructed.
• Keep the front of the radiator clean. If your
vehicle is equipped with air conditioning,
keep the front of the condenser clean.
• Do not change the thermostat for Summer or
Winter operation. If replacement is ever necessary, install ONLY the correct type thermostat. Other designs may result in unsatisfactory engine coolant (antifreeze) performance,
poor gas mileage, and increased emissions.
Brake System
In order to assure brake system performance,
all brake system components should be inspected periodically. Refer to the “Service and
Warranty Handbook” for the proper maintenance intervals.
WARNING!
Riding the brakes can lead to brake failure
and possibly a collision. Driving with your
foot resting or riding on the brake pedal can
result in abnormally high brake temperatures, excessive lining wear, and possible
brake damage. You would not have your full
braking capacity in an emergency.
323
Power Disc Brakes
Disc brakes do not require adjustment; however, several hard stops during the break-in
period are recommended to seat the linings and
wear off any foreign material.
Brake Master Cylinder
The fluid level in the master cylinders should be
checked whenever the vehicle is serviced. If
necessary, add fluid to bring level to the full level
mark on the side of the reservoir of the brake
master cylinder. With disc brakes, fluid level can
be expected to fall as the brake pads wear. If the
brake fluid level is abnormally low, check system for leaks.
Refer to “Fluids, Lubricants, and Genuine Parts”
in “Maintaining Your Vehicle” for further information.
WARNING!
• Use only manufacturer’s recommended
brake fluid. Refer to “Fluids, Lubricants,
and Genuine Parts” in “Maintaining Your
Vehicle” for further information. Using the
(Continued)
324
WARNING! (Continued)
wrong type of brake fluid can severely
damage your brake system and/or impair
its performance. The proper type of brake
fluid for your vehicle is also identified on
the original factory installed hydraulic master cylinder reservoir.
• To avoid contamination from foreign matter
or moisture, use only new brake fluid or
fluid that has been in a tightly closed
container. Keep the master cylinder reservoir cap secured at all times. Brake fluid in
a open container absorbs moisture from
the air resulting in a lower boiling point.
This may cause it to boil unexpectedly
during hard or prolonged braking, resulting
in sudden brake failure. This could result in
a collision.
(Continued)
WARNING! (Continued)
• Overfilling the brake fluid reservoir can
result in spilling brake fluid on hot engine
parts, causing the brake fluid to catch fire.
Brake fluid can also damage painted and
vinyl surfaces, care should be taken to
avoid its contact with these surfaces.
• Do not allow petroleum based fluid to
contaminate the brake fluid. Brake seal
components could be damaged, causing
partial or complete brake failure. This
could result in a collision.
Automatic Transmission —
If Equipped
Selection Of Lubricant
It is important to use the proper transmission
fluid to ensure optimum transmission performance and life. Use only the manufacturer’s
specified transmission fluid. Refer to “Fluids,
Lubricants, and Genuine Parts” in this section
for fluid specifications. It is important to maintain
the transmission fluid at the correct level using
the recommended fluid.
NOTE:
No chemical flushes should be used in any
transmission; only the approved lubricant
should be used.
CAUTION!
Using a transmission fluid other than the
manufacturer’s recommended fluid may cause
deterioration in transmission shift quality
and/or torque converter shudder, and will require more frequent fluid and filter changes.
Refer to “Fluids, Lubricants, and Genuine
Parts” in this section for fluid specifications.
Special Additives
The manufacturer strongly recommends against
using any special additives in the transmission.
Automatic Transmission Fluid (ATF) is an engineered product and its performance may be
impaired by supplemental additives. Therefore,
do not add any fluid additives to the transmission. The only exception to this policy is the use
of special dyes for diagnosing fluid leaks. Avoid
using transmission sealers as they may adversely affect seals.
CAUTION!
Do not use chemical flushes in your transmission as the chemicals can damage your
transmission components. Such damage is
not covered by the New Vehicle Limited
Warranty.
Fluid Level Check — Gasoline Engine
It is best to check the fluid level when the
transmission is at normal operating temperature
(approximately 180° F/82° C). This occurs after
at least 15 miles (25 km) of driving. At normal
operating temperature, the fluid cannot be held
comfortably between the fingertips.
Use the following procedure to check the transmission fluid level properly:
1. Park the vehicle on level ground.
2. Remove the engine cover by pulling it up off
the mounting studs (two in the front and two
in the rear).
3. Run the engine at idle speed and normal
operating temperature.
4. Fully apply the parking brake, and press the
brake pedal.
5. Place the shift lever momentarily into each
gear position (allowing time for the transmission to fully engage in each position), ending
with the transmission in PARK.
6. Remove the dipstick, wipe it clean and reinsert it until seated.
7. Remove the dipstick again and note the fluid
level on both sides. The fluid level reading is
only valid if there is a solid coating of oil on
both sides of the dipstick. Note that the holes
in the dipstick will be full of fluid if the actual
level is at or above the hole. The fluid level
should be between the HOT (upper) reference holes on the dipstick at normal operating temperature. If the fluid level is low, add
fluid through the dipstick tube to bring it to
the proper level. Do not overfill. Use ONLY
the specified fluid (refer to "Fluids, Lubri325
cants, and Genuine Parts" for fluid specifications). After adding any quantity of oil
through the dipstick tube, wait a minimum of
two minutes for the oil to fully drain into
the transmission before rechecking the fluid
level.
CAUTION!
If the fluid temperature is below 50°F (10°C)
it may not register on the dipstick. Do not add
fluid until the temperature is elevated enough
to produce an accurate reading. Run the
engine at idle, in PARK, to warm the fluid.
NOTE:
• The holes in the dipstick will be full of
fluid if the actual level is at or above the
hole.
• If it is necessary to check the transmission below the operating temperature, the
fluid level should be between the two
COLD (lower) holes on the dipstick with
the fluid at approximately 80° F (27° C).
If the fluid level is correctly established
at 80° F (27° C), it should be between the
HOT (upper) reference holes when the
transmission reaches 180° F (82° C). Remember it is best to check the level at the
normal operating temperature.
326
8. Reinstall the engine cover and snap it down
securely onto the four mounting studs.
9. Check for leaks. Release the parking brake.
NOTE:
To prevent dirt and water from entering the
transmission after checking or replenishing
fluid, make sure that the dipstick cap is
properly reseated. It is normal for the dipstick cap to spring back slightly from its
fully seated position, as long as its seal
remains engaged in the dipstick tube.
Fluid And Filter Changes
Refer to the “Service and Warranty Handbook”
for the proper maintenance intervals.
In addition, change the fluid and filter if the fluid
becomes contaminated (with water, etc.), or if
the transmission is disassembled for any reason.
Clutch Hydraulic System (Manual
Transmission) — If Equipped
The clutch hydraulic system is fed by a segregated volume of fluid within the brake system
master cylinder reservoir. In the event of leakage or wear, use only the manufacturer’s recommended brake fluid. Refer to “Fluids, Lubricants, and Genuine Parts” in “Maintaining Your
Vehicle” for further information.
Manual Transmission — If Equipped
Selection Of Lubricant
Use only manufacturer’s recommended manual
transmission fluid. Refer to “Fluids, Lubricants,
and Genuine Parts” in “Maintaining Your Vehicle” for further information.
Fluid Level Check
Check the fluid level by removing the fill plug.
The fluid level should be between the bottom of
the fill hole and a point not more than 3/16 in
(4.76 mm) below the bottom of the hole.
Selection Of Lubricant
Use only manufacturer’s recommended fluid.
Refer to “Fluids, Lubricants, and Genuine Parts”
in “Maintaining Your Vehicle” for further information.
Add fluid, if necessary, to maintain the proper
level.
Front/Rear Axle Fluid
Frequency Of Fluid Change
Under normal operating conditions, the fluid
installed at the factory will give satisfactory
lubrication for the life of the vehicle. If the fluid
becomes contaminated with water, it should be
changed immediately. Otherwise, change the
fluid as recommended in the Service And Warranty Handbook. Refer to the “Service And
Warranty Handbook” for the proper maintenance intervals.
Transfer Case
Fluid Level Check
The fluid level should be to the bottom edge of
the fill hole (A) when the vehicle is in a level
position.
Transfer case
Adding Fluid
Fluid should be added only at filler hole until
fluid begins to run out of the hole.
Drain
First remove the fill plug (B), then the drain plug
(C). The recommended tightening torque for the
drain and fill plugs is 15 to 25 ft lbs (20 to 34 N·m).
CAUTION!
When replacing the plugs, do not overtighten
them. You could damage them and cause
them to leak.
For normal service, periodic fluid level checks
are not required. When the vehicle is serviced
for other reasons the exterior surfaces of the
axle assembly should be inspected. If gear oil
leakage is suspected inspect the fluid level.
Refer to “Fluids, Lubricants, and Genuine Parts”
in “Maintaining Your Vehicle” for further information.
Fluid Level Check
Lubricant should be at the bottom edge of the oil
fill hole.
Adding Fluid
Add lubricant only at the fill hole and only to the
level specified above.
327
Selection Of Lubricant
Use only manufacturer’s recommended fluid.
Refer to “Fluids, Lubricants, and Genuine Parts”
in “Maintaining Your Vehicle” for further information.
What Causes Corrosion?
Corrosion is the result of deterioration or removal of paint and protective coatings from your
vehicle.
Appearance Care And Protection
From Corrosion
• Road salt, dirt and moisture accumulation.
Protection Of Body And Paint From
Corrosion
Vehicle body care requirements vary according
to geographic locations and usage. Chemicals
that make roads passable in snow and ice and
those that are sprayed on trees and road surfaces during other seasons are highly corrosive
to the metal in your vehicle. Outside parking,
which exposes your vehicle to airborne contaminants, road surfaces on which the vehicle is
operated, extreme hot or cold weather and
other extreme conditions will have an adverse
effect on paint, metal trim, and underbody protection.
• Insects, tree sap and tar.
The following maintenance recommendations
will enable you to obtain maximum benefit from
the corrosion resistance built into your vehicle.
328
The most common causes are:
• Stone and gravel impact.
• Salt in the air near seacoast localities.
• Atmospheric fallout/industrial pollutants.
• Avoid using abrasive compounds and power
buffing that may diminish the gloss or thin out
the paint finish.
CAUTION!
• Do not use abrasive or strong cleaning
materials such as steel wool or scouring
powder that will scratch metal and painted
surfaces.
• Use of power washers exceeding 1,200 psi
(8 274 kPa) can result in damage or removal
of paint and decals.
Washing
• Wash your vehicle regularly. Always wash
your vehicle in the shade using MOPAR®
Car Wash, or a mild car wash soap, and rinse
the panels completely with clear water.
Special Care
• If insects, tar, or other similar deposits have
accumulated on your vehicle, use MOPAR®
Super Kleen Bug and Tar Remover to remove.
• It is important that the drain holes in the lower
edges of the doors, rocker panels, and trunk
be kept clear and open.
• Use a high quality cleaner wax, such as
MOPAR® Cleaner Wax to remove road film,
stains and to protect your paint finish. Take
care never to scratch the paint.
• If you detect any stone chips or scratches in
the paint, touch them up immediately. The
cost of such repairs is considered the responsibility of the owner.
• If you drive on salted or dusty roads or if you
drive near the ocean, hose off the undercarriage at least once a month.
• If your vehicle is damaged due to a collision
or similar cause that destroys the paint and
protective coating, have your vehicle repaired as soon as possible. The cost of such
repairs is considered the responsibility of the
owner.
• If you carry special cargo such as chemicals,
fertilizers, de-icer salt, etc., be sure that such
materials are well packaged and sealed.
• If a lot of driving is done on gravel roads,
consider mud or stone shields behind each
wheel.
• Use MOPAR® Touch Up Paint on scratches
as soon as possible. Your authorized dealer
has touch up paint to match the color of your
vehicle.
Wheel And Wheel Trim Care
• All wheels and wheel trim, especially aluminum and chrome plated wheels, should be
cleaned regularly with a mild soap and water
to prevent corrosion.
• To remove heavy soil and/or excessive brake
dust, use MOPAR® Wheel Cleaner.
NOTE:
If your vehicle is equipped with Dark Vapor
or Black Satin Chrome wheels DO NOT USE
wheel cleaners, abrasives or polishing compounds. They will permanently damage this
finish and such damage is not covered by
the New Vehicle Limited Warranty. USE
ONLY MILD SOAP AND WATER WITH A
SOFT CLOTH. Used on a regular basis this is
all that is required to maintain this finish.
CAUTION!
Do not use scouring pads, steel wool, a
bristle brush, or metal polishes. Do not use
oven cleaner. These products may damage
the wheel’s protective finish. Avoid automatic
car washes that use acidic solutions or harsh
brushes that may damage the wheel’s protective finish. Only MOPAR® Wheel Cleaner
or equivalent is recommended.
Interior Care
Use MOPAR® Total Clean or equivalent to
clean fabric upholstery and carpeting.
Interior Trim should be cleaned starting with a
damp cloth, a damp cloth with MOPAR® Total
Clean or equivalent , then MOPAR® Spot &
Stain Remover or equivalent if absolutely necessary. Do not use harsh cleaners or Armor
All®. Use MOPAR® Total Clean or equivalent to
clean vinyl upholstery.
WARNING!
Do not use volatile solvents for cleaning
purposes. Many are potentially flammable
and, if used in closed areas, they may cause
respiratory harm.
CAUTION!
When installing hanging air fresheners in
your vehicle, read the installation instructions
carefully. Some air fresheners will damage
the finish of painted or decorated parts if
allowed to directly contact any surface.
329
Glass Surfaces
All glass surfaces should be cleaned on a
regular basis with MOPAR® Glass Cleaner, or
any commercial household-type glass cleaner.
Never use an abrasive type cleaner. Use caution when cleaning the inside rear window
equipped with electric defrosters or the right
rear quarter window equipped with the radio
antenna. Do not use scrapers or other sharp
instrument that may scratch the elements.
When cleaning the rear view mirror, spray
cleaner on the towel or rag that you are using.
Do not spray cleaner directly on the mirror.
Cleaning Plastic Instrument Cluster Lenses
The lenses in front of the instruments in this
vehicle are molded in clear plastic. When cleaning the lenses, care must be taken to avoid
scratching the plastic.
1. Clean with a wet soft rag. A mild soap
solution may be used, but do not use high
alcohol content or abrasive cleaners. If soap
is used, wipe clean with a clean damp rag.
2. Dry with a soft cloth.
330
Seat Belt Maintenance
Do not bleach, dye, or clean the belts with
chemical solvents or abrasive cleaners. This will
weaken the fabric. Sun damage can also
weaken the fabric.
If the belts need cleaning, use MOPAR® Total
Clean, a mild soap solution, or lukewarm water.
Do not remove the belts from the vehicle to
wash them. Dry with a soft cloth.
Replace the belts if they appear frayed or worn
or if the buckles do not work properly.
WARNING!
A frayed or torn belt could rip apart in a
collision and leave you with no protection.
Inspect the belt system periodically, checking for cuts, frays, or loose parts. Damaged
parts must be replaced immediately. Do not
disassemble or modify the system. Seat belt
assemblies must be replaced after a collision
if they have been damaged (i.e., bent retractor, torn webbing, etc.).
Appearance Care For Fabric Top Models
CAUTION!
To maintain the appearance of your vehicle’s
interior trim and top, follow these precautions:
• Avoid leaving your vehicle unattended with
the top down, as exposure to sun or rain may
damage interior trim.
• Do not use harsh cleaners or bleaching
agents on top material, as damage may
result.
• Do not allow any vinyl cleaner to run down
and dry on the paint, leaving a streak.
• After cleaning your vehicle’s fabric top, always make sure it is completely dry before
lowering.
• Be especially careful when washing the windows by following the directions for “Care of
Fabric Top Windows.”
Washing – Use MOPAR® Car Wash or equivalent, or mild soap suds, lukewarm water, and a
brush with soft bristles. If extra cleaning is
required, use MOPAR® Convertible Cloth Top
Cleaner or equivalent, or a mild foaming cleaner
on the entire top, but support the top from
underneath.
Rinsing – Be sure to remove all traces of
cleaner by rinsing the top thoroughly with clean
water. Remember to allow the top to dry before
lowering it.
CAUTION!
Failure to follow these cautions may cause
interior water damage, stains or mildew on
the top material:
• Avoid high-pressure car washes, as they
can damage the top material. Also, increased water pressure may force past the
weather strips.
(Continued)
CAUTION! (Continued)
• It is recommended that the top be free of
water prior to opening it. Operating the top,
opening a door or lowering a window while
the top is wet may allow water to drip into
the vehicle’s interior.
• Use care when washing the vehicle, water
pressure directed at the weather strip
seals may cause water to leak into the
vehicle’s interior.
• Careless handling and storage of the removable roof panels may damage the
seals, causing water to leak into the vehicle’s interior.
• The front panel(s) must be positioned
properly to ensure sealing. Improper installation can cause water to leak into the
vehicle’s interior.
Care Of Fabric Top Windows
CAUTION!
Your vehicle’s fabric top has pliable plastic
windows which can be scratched unless
special care is taken by following these directions:
1. Never use a dry cloth to remove dust. Instead, use a microfiber towel or soft cotton cloth moistened with cold or warm,
clean water, and wipe across the window,
not up and down. MOPAR® Jeep Soft
Glass Window Cleaner or equivalent will
safely clean all plastic windows without
scratching. It removes fine scratches to improve visibility and provides UV protection to
help prevent yellowing.
2. When washing, never use hot water or
anything stronger than a mild soap. Never
use solvents such as alcohol or harsh cleaning agents.
331
3. Always rinse thoroughly with cold water,
then wipe with a soft and slightly moist, clean
cloth.
4. When removing frost, snow or ice, never
use a scraper or de-icing chemicals. Use
warm water only if you must clean the window quickly.
5. Debris (sand, mud/dirt, dust, or salt) from
off-road driving will have a major impact on
zipper operation. Even normal on-road driving and vehicle washing will eventually impact window zipper operation. To maintain
ease of use of the window zippers, each
window zipper should be cleaned and lubricated regularly. Use MOPAR® Soft Top Zipper Cleaner and Lubricant or equivalent to
ease zipper operation. Before applying,
make sure the zipper teeth are clear of sand,
mud, and other materials. Clean both sides
of the zipper, not just one side. Rinse both
zipper halves with fresh water and allow to
dry. Aggressively work the MOPAR® Soft
Top Zipper Cleaner and Lubricant or equivalent into the zipper teeth. If a stuck zipper
slide is experienced, work the MOPAR® Soft
Top Zipper Cleaner and Lubricant or equivalent into the zipper slide. Several applications may be required before the zipper
comes free.
6. Never paste stickers, gummed labels or any
tape to the windows. Adhesives are hard to
remove and may damage the windows.
FUSES
WARNING!
• When replacing a blown fuse, always use
an appropriate replacement fuse with the
same amp rating as the original fuse.
Never replace a fuse with another fuse of
higher amp rating. Never replace a blown
fuse with metal wires or any other material.
(Continued)
332
WARNING! (Continued)
Failure to use proper fuses may result in
serious personal injury, fire and/or property
damage.
• Before replacing a fuse, make sure that
the ignition is off and that all the other
services are switched off and/or disengaged.
• If the replaced fuse blows again, contact
an authorized dealer.
• If a general protection fuse for safety systems (air bag system, braking system),
power unit systems (engine system, gearbox system) or steering system blows,
contact an authorized dealer.
Totally Integrated Power Module
The Totally Integrated Power Module is located
in the engine compartment near the battery.
This center contains cartridge fuses, mini fuses
and relays. A label that identifies each component is printed on the inside of the cover.
Totally Integrated Power Module
Cavity
Cartridge Fuse
Mini Fuse
J1
–
–
Description
–
J2
30 Amp Pink
–
Transfer Case Module
J3
–
–
–
J4
25 Amp Clear
–
Driver Door Node
J5
25 Amp Clear
–
Passenger Door Node
J6
40 Amp Green
–
Anti-Lock Brake System (ABS) Pump/Stability Control System
J7
30 Amp Pink
–
Anti-Lock Brake System (ABS) Valve/Stability Control System
333
Cavity
334
Cartridge Fuse
Mini Fuse
Description
J8
–
–
–
J9
40 Amp Green
–
PZEV Sec Motor/Flex Fuel
J10
30 Amp Pink
–
Headlamp Wash Relay/Manifold Tuning Valve
J11
30 Amp Pink
–
Sway Bar
J12
30 Amp Pink
–
Rear Blower Motor/Radiator Fan
J13
60 Amp Yellow
–
Ignition Off Draw (IOD) – Main
J14
40 Amp Green
–
Rear Defroster
J15
40 Amp Green
–
Front Blower
J17
40 Amp Green
–
Starter Solenoid
J18
20 Amp Blue
–
Powertrain Control Module (PCM) Trans Range
J19
60 Amp Yellow
–
Radiator Fan
J20
30 Amp Pink
–
Front Wiper LO/HI
J21
20 Amp Blue
–
Front/Rear Washer
J22
–
–
Spare
M1
–
15 Amp Blue
Center High-Mounted Stop Light (CHMSL)/Switch Stop Lamp Feed
M2
–
20 Amp Yellow
Relay Trailer Lighting (Stoplamp)
M3
–
20 Amp Yellow
Frt/Rear Axle Locker Relay
Cavity
Cartridge Fuse
Mini Fuse
Description
M4
–
2 Amp Grey
Clock Spring
M5
–
25 Amp Clear
Power Inverter – If Equipped
M6
–
20 Amp Yellow
Power Outlet #1/Rain Sensor
M7
–
20 Amp Yellow
Power Outlet #2 (BATT/ACC SELECT)
M8
–
20 Amp Yellow
Front Heated Seat
M9
–
20 Amp Yellow
Rear Heated Seat – If Equipped
M10
–
15 Amp Blue
Ignition Off Draw – Vehicle Entertainment System, Satellite
Digital Audio Receiver (SDARS), DVD, Hands-Free Module,
RADIO, Antenna, Universal Garage Door Opener, Vanity Lamp
(Ignition Off Draw) Climate Control System, Underhood Lamp
M11
–
10 Amp Red
M12
–
30 Amp Green
Amplifier
M13
–
20 Amp Yellow
Ignition Off Draw – Cabin Compartment Node, Wireless Control
Module, SIREN, Multifunction Control Switch
M14
–
20 Amp Yellow
Trailer Tow (Export Only)
M15
–
20 Amp Yellow
Climate Control System, Rear View Mirror, Cabin Compartment
Node, Transfer Case Switch, Multi-Function Control Switch, Tire
Pressure Monitor, Glow Plug Module – Export Diesel Only
M16
–
10 Amp Red
Airbag Module
335
Cavity
336
Cartridge Fuse
Mini Fuse
Description
Left Tail/License/Park Lamp
M17
–
15 Amp Blue
M18
–
15 Amp Blue
Right Tail/Park/Run Lamp
M19
–
25 Amp Clear
Auto Shut Down (ASD #1 and #2)
M20
–
15 Amp Blue
Cabin Compartment Node Interior Light, Switch Bank
M21
–
20 Amp Yellow
Auto Shut Down (ASD #3)
M22
–
10 Amp Red
Right Horn (HI/LOW)
M23
–
10 Amp Red
Left Horn (HI/LOW)
M24
–
25 Amp Clear
Rear Wiper
M25
–
20 Amp Yellow
Fuel Pump, Diesel Lift Pump – Export Only
M26
–
10 Amp Red
Power Window Switch, Driver Window Switch
M27
–
10 Amp Red
Ignition Switch Feed, Wireless Module
M28
–
10 Amp Red
Powertrain Control Module
M29
–
10 Amp Red
Powertrain
M30
–
15 Amp Blue
Wiper Motor Frt, J1962 Diagnostic Feed
M31
–
20 Amp Yellow
Backup Lamps
M32
–
10 Amp Red
Airbag Controller, TT EUROPE
M33
–
10 Amp Red
Powertrain Controller
Cavity
Cartridge Fuse
Mini Fuse
Description
M34
–
10 Amp Red
Park Assist, Climate Control System, Headlamp Wash, Compass
M35
–
10 Amp Red
Heated Mirrors
M36
–
20 Amp Yellow
Power Outlet
M37
–
10 Amp Red
Anti-Lock Brake System, Electronic Stability Control, Stop Lamp
Switch, Fuel Pump Relay
M38
–
25 Amp Clear
Lock/Unlock Motors
CAUTION!
• When installing the Integrated Power Module cover, it is important to ensure the
cover is properly positioned and fully
latched. Failure to do so may allow water
to get into the Integrated Power Module,
and possibly result in an electrical system
failure.
CAUTION! (Continued)
• When replacing a blown fuse, it is important to use only a fuse having the correct
amperage rating. The use of a fuse with a
rating other than indicated may result in a
dangerous electrical system overload. If a
properly rated fuse continues to blow, it
indicates a problem in the circuit that must
be corrected.
(Continued)
337
VEHICLE STORAGE
REPLACEMENT BULBS
If you are leaving your vehicle dormant for more
than 21 days, you may want to take steps to
protect your battery. You may:
Interior Lights
Bulb Type
Auto. Trans. Indicator Lamp . . . . . . . . .658
• Remove Cartridge fuse #J13 in the Power
Distribution Center (PDC) labeled IgnitionOff Draw (IOD) and store it in a safe location
within the PDC.
Courtesy Lights, Under Dash (1) . . . . . .906
Heater Control Lamps (2) . . . . . . . . . .194
• Or, disconnect the negative cable from the
battery.
• Anytime you store your vehicle, or keep it out
of service (i.e., vacation) for two weeks or
more, run the air conditioning system at idle
for about five minutes in the fresh air and
high blower setting. This will ensure adequate system lubrication to minimize the
possibility of compressor damage when the
system is started again.
338
Rocker Switch Indicator Lamp
(Rear Window Defogger). . . . . . . . . . . .**
Soundbar Dome Lamp . . . . . . . . . . . .912
** Bulbs only available from authorized dealer.
Exterior Lights
Bulb Type
Backup Lamps (2) . . . . . . . . . . . .W16W
Center High-Mounted Stop Lamp (1) . . . .LED
(Serviced at Authorized Dealer)
Front Fog Lamps (2) . . . . . . . . . .PSX24W
Rear Fog Lamps (2) . . . . . . . . . . .P27/7W
Front Direction Lamps (2). . . . . . . .PY27/7W
Front Side Repeaters/Side Marker
Lamps (2) . . . . . . . . . . . . . . . . . .W5W
Headlamps (2) . . . . . . . . . . . . . . . . .H4
Front Position Lamps (2) . . . . . . . .12V14W
Stop/Rear Position Lamps (2) . . . . . .P27/7W
Rear Direction Lamps (2) . . . . . . . .PY27/7W
License Lamp (2) . . . . . . . . . . . . . .W5W
NOTE:
Numbers refer to commercial bulb types
that can be purchased from your local authorized dealer.
BULB REPLACEMENT
NOTE:
Lens fogging can occur under certain atmospheric conditions. This will usually clear as
atmospheric conditions change to allow the
condensation to change back into a vapor.
Turning the lamps on will usually accelerate
the clearing process.
Headlamp
9. Pull the bulb from the housing.
Front Park/Turn Signal
1. Open hood and support using prop rod.
10. Install the bulb into the headlamp housing.
1. Remove the front grille. Turn the retainers
along the top 1/4 turn counterclockwise and
remove.
2. Remove the front grille. Turn the retainers
along the top 1/4 turn counterclockwise and
remove.
3. Pull the bottom of the grille away starting at
one side and working toward the other.
CAUTION!
Do not touch the new bulb with your fingers.
Oil contamination will severely shorten bulb
life. If the bulb comes in contact with any oily
surface, clean the bulb with rubbing alcohol.
2. Pull the bottom of the grille away starting at
one side and working toward the other.
3. Turn the socket assembly 1/4 turn counterclockwise and remove from housing. Pull the
bulb straight from the socket to replace.
4. Turn both park and turn signal socket assemblies 1/4 turn counterclockwise and remove.
11. Latch the metal spring retainer to headlamp
bulb.
5. Remove the four screws holding the metal
retaining ring.
12. Install the rubber seal and connector to the
headlamp bulb.
1. Reach under the front fender flare and locate
the front side marker socket.
6. Remove the lamp from the collar.
13. Reinstall lamp to body with retaining ring
and four screws.
2. Turn the socket assembly counterclockwise
1/3 turn and remove it from the housing. Pull
the bulb straight from the socket to replace.
7. Remove the connector from the lamp, and
remove the rubber seal.
8. Unlatch the metal spring bulb retainer by
pushing forward and outward on retaining
legs.
14. Reinstall park and turn signal connectors,
and reinstall front grille.
Front Side Marker
339
Front Fog Lamp
Rear Fog Lamp
1. Reach under the vehicle to access the back
of the front fog lamp.
1. Reach under the vehicle to access the back
of the rear fog lamp.
2. Disconnect the wire harness connector from
the front fog lamp connector receptacle.
2. Turn the socket assembly counterclockwise
1/4 turn and remove it from the housing. Pull
the bulb straight from the socket to replace.
3. Firmly grasp the bulb by the two latch features and squeeze them together to unlock
the bulb from the back of the front fog lamp
housing.
4. Pull the bulb straight out from the keyed
opening in the housing and then connect the
replacement bulb.
Rear Tail, Stop, Turn Signal, And
Backup Lamp
1. Remove the two inboard screws attaching
the tail light housing to the body. DO NOT
REMOVE THE OUTBOARD SCREWS AT
ANY TIME.
CAUTION!
Do not touch the new bulb with your fingers.
Oil contamination will severely shorten bulb
life. If the bulb comes in contact with any oily
surface, clean the bulb with rubbing alcohol.
3. Rotate the appropriate socket 1/4 turn counterclockwise, then remove it from the housing.
4. Pull the bulb straight from the socket to
replace.
Center High-Mounted Stop Lamp
(CHMSL)
The stop lamp is mounted on a bracket that
extends upward from the tailgate behind the
spare tire. If service is needed, obtain the
LED/Cover Assembly from your local authorized dealer.
1. Remove the spare tire.
2. Remove the four screws holding the lens/
cover in place on the spare tire carrier.
3. Disconnect the wire harness from the back
of the LED cover.
Inboard Screw Location
340
2. Separate the housing from the body by
pushing the lamp inboard while pulling the
lamp away from the body.
VEHICLE SPECIFICATIONS
Engine
3.6L
Power
146 kW @ 5,000 RPM
Torque
315 N.m @ 4,000 RPM
Maximum Vehicle Speed
Consult your Salesperson
NOTE:
A chime will sound if the vehicle speed exceeds 75 mph (120 km/h). It will continue to chime until the vehicle speed is reduced below 75 mph
(120 km/h).
FLUID CAPACITIES
U.S.
Metric
Fuel (Approximate) — Two Door Models
18.5 Gallons
70 Liters
Fuel (Approximate) — Four Door Models
22.5 Gallons
85 Liters
6 Quarts
5.6 Liters
10.5 Quarts
9.9 Liters
Engine Oil With Filter
3.6 Liter Engine (SAE 5W-20, API Certified)
Cooling System *
3.6 Liter Engine-MOPAR® Antifreeze/Coolant 10 Year/150,000 Mile Formula OAT (Organic
Additive Technology) that meets the requirements of Chrysler Material Standard MS-12106
* Includes coolant recovery bottle filled to MAX level.
341
FLUIDS, LUBRICANTS AND GENUINE PARTS
Engine
Component
Fluid, Lubricant, or Genuine Part
Engine Coolant
We recommend you use MOPAR® Antifreeze/Coolant 10 Year/150,000 Mile Formula OAT (Organic
Additive Technology) that meets the requirements of Chrysler Material Standard MS-12106, or an
equivalent coolant.
Engine Oil – Gasoline
We recommend you use API Certified SAE 5W-20 engine oil, such as MOPAR®, Pennzoil®,
Shell Helix® or equivalent meeting the requirements of Chrysler Material Standard MS-6395 or
ACEA A1/B1. Refer to your engine oil filler cap for correct SAE grade.
SAE 5W-30 engine oil approved to Chrysler MS-6395 or ACEA A1/B1 such as MOPAR®, Pennzoil®,
Shell Helix® may be used when SAE 5W-20 engine oil is not available.
Spark Plugs – 3.6L Engine
We recommend you use MOPAR® Spark Plugs..
Engine Oil Filter
We recommend you use MOPAR® Engine Oil Filters.
Fuel Selection – Gasoline Engines
91 Research Octane Number (RON).
342
Chassis
Component
Fluid, Lubricant, or Genuine Part
Automatic Transmission – If Equipped
Use only ATF+4® Automatic Transmission Fluid. Failure to use ATF+4® fluid may affect the
function or performance of your transmission. We recommend MOPAR® ATF+4® fluid.
Manual Transmission – If Equipped
We recommend you use MOPAR® Manual Transmission Lubricant meeting the requirements
of Chrysler Material Standard MS-9224.
Transfer Case
We recommend you use MOPAR® ATF+4® Automatic Transmission Fluid.
Axle Differential (Front)
We recommend you use MOPAR® Gear & Axle Lubricant (SAE 80W-90) (API GL-5).
Axle Differential (Rear)
226 RBI (Model 44) – We recommend you use MOPAR® Gear & Axle Lubricant (SAE 80W-90)
(API GL-5) or equivalent. For trailer towing, use MOPAR® Synthetic Gear & Axle Lubricant
(SAE 75W-140). Models equipped with Trac-Lok™ require an additive.
Brake Master Cylinder
We recommend you use MOPAR® DOT 3 Brake Fluid, SAE J1703. If DOT 3, SAE J1703
brake fluid is not available, then DOT 4 is acceptable.
Power Steering Reservoir
We recommend you use MOPAR® Power Steering Fluid +4, MOPAR® ATF+4® Automatic
Transmission Fluid.
343
344
8
MAINTENANCE SCHEDULES
• MAINTENANCE SCHEDULE . . . . . . . . . . . . . . . . . . . . . .346
345
MAINTENANCE SCHEDULE
Refer to the “Service and Warranty Handbook”
for maintenance schedules.
346
9
IF YOU NEED CONSUMER ASSISTANCE
• IF YOU NEED ASSISTANCE . . . . . . . . . . . . . . . . . . . . . .348
347
IF YOU NEED ASSISTANCE
The manufacturer’s distributors are vitally interested in your satisfaction with their products
and services. If a servicing problem or other
difficulty should occur, we recommend that you
take the following steps:
• Discuss the problem at the authorized dealer
with the dealer principal or the service manager. Management personnel at the authorized dealer are in the best position to resolve
the problem quickly.
• Should this fail to resolve the problem, contact the manufacturer’s distributor nearest to
your location.
348
When you contact the distributor, please provide all of the following information:
• Your name, address and phone number.
• Vehicle Identification Number (this 17–digit
number is available from a plate, visible
through the windshield in the upper corner of
the instrument panel on the driver’s side. It is
also available from your vehicle registration
or title).
• Selling and servicing authorized dealer.
• Vehicle’s delivery date and current odometer
distance.
• Service history of your vehicle.
• An accurate description of the problem and the
conditions under which it occurs.
349
350
10
INDEX
351
About Your Brakes . . . . . . . . . . . . . .239
ABS (Anti-Lock Brake System) . . . .175, 239
Adding Engine Coolant (Antifreeze) . . . .321
Adding Fuel . . . . . . . . . . . . . . . . . .274
Additives, Fuel . . . . . . . . . . . . . . . .273
Air bag . . . . . . . . . . . . . . . . . . .33, 34
Air Bag
Advance Front Air Bag . . . . . . . . . .34
Air bag Operation . . . . . . . . . . . . .35
Air Bag Warning Light . . . . . . . . . . .38
Enhanced Accident Response . . . . . .38
Event Data Recorder (EDR) . . . . . . .40
Front Air Bag . . . . . . . . . . . . . .33, 34
If A Deployment Occurs . . . . . . . . . .37
Knee Impact Bolsters . . . . . . . . . . .35
Maintaining Your Air Bag System . . . . .39
Air bag Deployment . . . . . . . . . . . . . .33
Air bag Light . . . . . . . . . . . . .38, 55, 175
Air bag Maintenance . . . . . . . . . . . . .39
Air Cleaner, Engine
(Engine Air Cleaner Filter) . . . . . . . .308
Air Conditioner Maintenance . . . . . . . .312
Air Conditioning. . . . . . . . . . . . . . . .199
Air Conditioning Controls . . . . . . . . . .199
Air Conditioning Filter . . . . . . . . .206, 313
Air Conditioning Refrigerant . . . . . .312, 313
Air Conditioning System . . . . .199, 201, 312
352
Air Conditioning, Operating Tips. . . .205, 207
Air Pressure, Tires . . . . . . . . . . . . . .258
Alarm (Security Alarm) . . . . . . . . . . . .15
Alarm Light . . . . . . . . . . . . . . . . . .176
Alterations/Modifications, Vehicle . . . . . . .8
Anti-Lock Warning Light . . . . . . . . . . .175
Antifreeze (Engine Coolant) . . . . . .321, 341
Disposal . . . . . . . . . . . . . . . . .322
Appearance Care. . . . . . . . . . . . . . .328
Arming System (Security Alarm) . . . . . . .15
Auto Down Power Windows . . . . . . . . .25
Automatic Dimming Mirror . . . . . . . . . .63
Automatic Door Locks . . . . . . . . . . . . .23
Automatic Headlights. . . . . . . . . . . . .101
Automatic Oil Change Indicator . . . . . . .187
Automatic Temperature Control (ATC) . . .201
Automatic Transaxle
Interlock System . . . . . . . . . . . . .13
Automatic Transmission . . . . .216, 324, 326
Adding Fluid . . . . . . . . . . . . . . .326
Fluid and Filter Changes . . . . . . . .326
Fluid Change . . . . . . . . . . . . . .326
Fluid Level Check . . . . . . . . . . . .325
Fluid Type . . . . . . . . . . . . .324, 343
Special Additives . . . . . . . . . . . .325
Autostick . . . . . . . . . . . . . . . . . . .220
Auxiliary Electrical Outlet (Power Outlet) . .110
Auxiliary Power Outlet . . . . . . . . . . . .110
Axle Fluid . . . . . . . . . . . . . . . . . . .343
Axle Lock . . . . . . . . . . . . . . . . . . .227
B-Pillar Location . . . . . . . . . . . . . . .254
Battery. . . . . . . . . . . . . . . . . . . . .311
Keyless Transmitter Replacement
(RKE) . . . . . . . . . . . . . . . . . . .18
Belts, Seat . . . . . . . . . . . . . . . . . . .55
Body Mechanism Lubrication . . . . . . . .315
Brake Assist System . . . . . . . . . . . . .240
Brake Control System, Electronic . . . . . .239
Brake Fluid . . . . . . . . . . . . . . . . . .343
Brake System . . . . . . . . . . . . . .239, 323
Anti-Lock (ABS) . . . . . . . . . . . . .239
Master Cylinder . . . . . . . . . . . . .324
Parking . . . . . . . . . . . . . . . . . .237
Warning Light . . . . . . . . . . .174, 239
Brake/Transmission Interlock . . . . . . . .216
Brakes. . . . . . . . . . . . . . . . . . . . .239
Bulb Replacement . . . . . . . . . . . . . .338
Bulbs, Light. . . . . . . . . . . . . . . . . . .56
Calibration, Compass . . . . . . . . .184, 189
Capacities, Fluid . . . . . . . . . . . . . . .341
Caps, Filler
Fuel . . . . . . . . . . . . . . . . . . . .274
Power Steering . . . . . . . . . . . . .237
Radiator (Coolant Pressure) . . . . . .322
Car Washes. . . . . . . . . . . . . . . . . .328
Carbon Monoxide Warning . . . . . . . . . .54
Cargo Light . . . . . . . . . . . . . . . . . .104
Cellular Phone . . . . . . . . . . . . . .64, 198
Center High Mounted Stop Light . . . . . .340
Chains, Tire . . . . . . . . . . . . . . . . . .264
Changing A Flat Tire . . . . . . . . . . . . .290
Chart, Tire Sizing . . . . . . . . . . . . . . .250
Check Engine Light
(Malfunction Indicator Light) . . . . . . .175
Checking Your Vehicle For Safety . . . . . .54
Checks, Safety . . . . . . . . . . . . . . . . .54
Child Restraint . . . . . . . . . . . . . . . . .40
Child Restraints
Booster Seats . . . . . . . . . . . . . . .43
Child Restraints . . . . . . . . . . . . . .40
Child Seat Installation . . . . . . . . . . .51
How To Stow An Unused ALR
Seat Belt . . . . . . . . . . . . . . . . . .49
Infants And Child Restraints . . . . . . .42
Install A LATCH-compatible Child
Restraint . . . . . . . . . . . . . . . . . .48
Installing Child Restraints Using The
Vehicle Seat Belt . . . . . . . . . . . . . .50
Locating The LATCH Anchorages . . . .47
Lower Anchors And Tethers
For Children . . . . . . . . . . . . . . . .45
Older Children And Child Restraints . . .42
Seating Positions . . . . . . . . . . . . .44
Child Safety Locks. . . . . . . . . . . . . . .24
Clean Air Gasoline . . . . . . . . . . . . . .273
Cleaning
Wheels . . . . . . . . . . . . . . . . . .329
Climate Control . . . . . . . . . . . . . . . .198
Cold Weather Operation . . . . . . . . . . .215
Compact Disc (CD) Maintenance . . . . . .198
Compact Spare Tire . . . . . . . . . . . . .260
Compass . . . . . . . . . . . . .181, 184, 188
Compass Calibration . . . . . . . . . .184, 189
Compass Variance . . . . . . . . . . .182, 189
Computer, Trip/Travel . . . . . . . . .181, 188
Connector
UCI . . . . . . . . . . . . . . . . . . . .193
Universal Consumer Interface (UCI) . .193
Console . . . . . . . . . . . . . . . . . . . .112
Console, Floor . . . . . . . . . . . . . . . .112
Coolant Pressure Cap (Radiator Cap) . . .322
Cooling System. . . . . . . . . . . . . . . .320
Adding Coolant (Antifreeze) . . . . . .321
Coolant Capacity . . . . . . . . . . . .341
Coolant Level . . . . . . . . . . . . . .322
Disposal of Used Coolant . . . . . . . .322
Drain, Flush, and Refill . . . .
Inspection . . . . . . . . . . .
Points to Remember . . . . .
Pressure Cap . . . . . . . . .
Radiator Cap . . . . . . . . . .
Selection of Coolant (Antifreeze)
Corrosion Protection . . . . . . . .
Cruise Light . . . . . . . . . . . . .
Cupholders . . . . . . . . . . . . .
Customer Assistance. . . . . . . .
.
.
.
.
.
.
.
.
.
.
. . . .320
. . . .320
. . . .323
. . . .322
. . . .322
.321, 341
. . . .328
. . . .179
. . . .112
. . . .348
Data Recorder, Event . . . . . . . . . . . . .40
Defroster, Rear Window . . . . . . . . . . .167
Defroster, Windshield . . . . . . .55, 200, 204
Delay (Intermittent) Wipers . . . . . . . . .106
Diagnostic System, Onboard . . . . . . . .306
Dipsticks
Oil (Engine) . . . . . . . . . . . . . . . .307
Power Steering . . . . . . . . . . . . . .237
Disabled Vehicle Towing . . . . . . . . . . .300
Disposal
Antifreeze (Engine Coolant) . . . . . .322
Door Locks . . . . . . . . . . . . . . . . . . .22
Child-Protection Door Lock —
Rear Doors . . . . . . . . . . . . . . . . .24
Door Locks . . . . . . . . . . . . . . . . .22
Key Fob . . . . . . . . . . . . . . . . . .22
353
Remote . . . . . . . . . . . . . . . . . . .22
Remote Keyless Entry (RKE) . . . . . . .22
Door Locks, Automatic . . . . . . . . . . . .23
Doors . . . . . . . . . . . . . . . . . . . . . .18
Driver’s Seat Back Tilt . . . . . . . . . . . . .94
Driving. . . . . . . . . . . . . . . . . . . . .228
Dual Top . . . . . . . . . . . . . . . . .113, 116
Electric Remote Mirrors . . . . . . . . . . . .63
Electrical Outlet, Auxiliary (Power Outlet) . .110
Electrical Power Outlets . . . . . . . . . . .110
Electronic Brake Control System . . . . . .239
Brake Assist System . . . . . . . . . .240
Electronic Roll Mitigation . . . . . . . .243
Traction Control System . . . . . . . .240
Electronic Roll Mitigation (ERM) . . . . . .243
Electronic Speed Control
(Cruise Control) . . . . . . . . . . . . . .107
Electronic Stability Control (ESC) . . . . . .244
Electronic Throttle Control Warning Light. .180
Electronic Vehicle Information Center
(EVIC) . . . . . . . . . . . . . . . .181, 185
Emergency Brake . . . . . . . . . . . . . .237
Emergency, In Case of
Brake Warning Light . . . . . . . . . . .174
Jacking . . . . . . . . . . . . . . . . . .290
Jump Starting . . . . . . . . . . . . . .295
354
Engine
Air Cleaner . . . . . . . . . . . . . . . .308
Block Heater . . . . . . . . . . . . . . .215
Break-In Recommendations . . . . . . .53
Compartment . . . . . . . . . . . . . . .305
Compartment Identification . . . . . . .305
Cooling . . . . . . . . . . . . . . . . . .320
Exhaust Gas Caution . . . . . . . . . . .54
Fails to Start . . . . . . . . . . . . . . .214
Flooded, Starting . . . . . . . . . . . . .214
Fuel Requirements . . . . . . . . . . . .341
Jump Starting . . . . . . . . . . . . . .295
Oil . . . . . . . . . . . . . . . . . .307, 341
Oil Change Interval . . . . . . . . . . .187
Oil Selection . . . . . . . . . . . . . . .341
Overheating . . . . . . . . . . . . . . .289
Starting . . . . . . . . . . . . . . . . . .213
Temperature Gauge . . . . . . . . . . .176
Engine Oil Viscosity . . . . . . . . . . . . .308
Engine Oil Viscosity Chart . . . . . . . . . .308
Enhanced Accident Response Feature . . .38
Entry System, Illuminated . . . . . . . . . . .16
Ethanol . . . . . . . . . . . . . . . . . . . .272
Event Data Recorder . . . . . . . . . . . . .40
Exhaust Gas Caution . . . . . . . . . . . . .54
Exhaust System . . . . . . . . . . . . .54, 319
Exterior Lights . . . . . . . . . . . . . . . . .56
Fabric Care . . . . . . . . . . . . . . .329, 330
Fabric Top. . . . . . . . . . . . . . . . . . .330
Filters
Air Cleaner . . . . . . . . . . . . . . . .308
Air Conditioning . . . . . . . . . .206, 313
Engine Oil . . . . . . . . . . . . . . . .308
Flashers
Hazard Warning . . . . . . . . . . . . .289
Turn Signal . . . . . . . .56, 173, 339, 340
Flooded Engine Starting . . . . . . . . . . .214
Fluid Capacities . . . . . . . . . . . . . . .341
Fluid Leaks . . . . . . . . . . . . . . . . . . .56
Fluid Level Checks . . . . . . . . . . . . . .327
Engine Oil . . . . . . . . . . . . . . . .307
Manual Transmission . . . . . . . . . .327
Power Steering . . . . . . . . . . . . .237
Fluid, Brake . . . . . . . . . . . . . . . . . .343
Fluids, Lubricants and Genuine Parts . . .342
Fog Light Service. . . . . . . . . . . . . . .340
Fog Lights . . . . . . . . . . . . . . . .102, 340
Fog Lights, Rear . . . . . . . . . . . . . . .340
Fold and Tumble Rear Seat . . . . . . . . .97
Folding Rear Seat . . . . . . . . . . . . . . .99
Folding Windshield . . . . . . . . . . . . . .163
Four Wheel Drive. . . . . . . . . . . . . . .224
Four Wheel Drive Operation. . . . . . . . .224
Four-Way Hazard Flasher . . . . . . . . . .289
Freeing A Stuck Vehicle
Front Axle (Differential)
Fuel . . . . . . . . . . .
Adding . . . . . . .
Additives . . . . . .
Ethanol . . . . . . .
Filler Cap (Gas Cap)
Gasoline . . . . . .
Gauge . . . . . . .
Octane Rating . . .
Requirements . . .
Tank Capacity . . .
Fueling . . . . . . . . .
Fuses . . . . . . . . . .
.
.
.
.
.
.
.
.
.
.
.
.
.
.
.
.
.
.
.
.
.
.
.
.
.
.
.
Gas Cap (Fuel Filler Cap) .
Gasoline (Fuel) . . . . . . .
Gasoline, Clean Air. . . . .
Gauges
Coolant Temperature .
Fuel . . . . . . . . . . .
Odometer . . . . . . .
Speedometer . . . . .
Tachometer . . . . . .
Gear Ranges . . . . . . . .
Gear Select Lever Override
Glass Cleaning . . . . . . .
.
.
.
.
.
.
.
.
.
.
.
.
.
.
.
.
.
.
.
.
.
.
.
.
.
.
.
.
.
.
.
.
.
.
.
.
.
.
.
.
.
.
.
.
.
.
.
.
.
.
.
.
.
.
.
.
.
.
.
.
.
.
.
.
.
.
.
.
.
.
.
.
.
.
.
.
.
.
.
.
.
.
.
.
.
.
.
.
.
.
.
.
.
.
.
.
.
.
.
.
.
.
.
.
.
.
.
.
.
.
.
.
.297
.327
.272
.274
.273
.272
.274
.272
.173
.272
.341
.341
.274
.332
. . .274, 275, 306
. . . . . . . . .272
. . . . . . . . .273
.
.
.
.
.
.
.
.
.
.
.
.
.
.
.
.
.
.
.
.
.
.
.
.
.
.
.
.
.
.
.
.
.
.
.
.
.
.
.
.
. . . .176
. . . .173
. . . .177
. . . .173
. . . .175
.217, 222
. . . .300
. . . .330
Gross Axle Weight Rating . . . . . . . . . .276
Gross Vehicle Weight Rating . . . . . . . .275
Hill Start Assist . . . . . . . . . . . . . . . .241
Hood Release . . . . . . . . . . . . . . . .100
Hands-Free Phone (Uconnect®) . . . . .64, 67
Hard Top . . . . . . . . . . . . . . . . . . .119
Hard Top Removal . . . . . . . . . . . . . .123
Hard Top, Modular . . . . . . . . . . . . . .119
Hazard Warning Flasher . . . . . . . . . . .289
Head Restraints . . . . . . . . . . . . . . . .97
Headlights
Automatic . . . . . . . . . . . . . . . .101
Bulb Replacement . . . . . . . . . . . .339
High Beam . . . . . . . . . . . . . . . .102
High Beam/Low Beam Select Switch . .102
Leveling . . . . . . . . . . . . . . . . .104
On With Wipers . . . . . . . . . . . . .102
Replacing . . . . . . . . . . . . . . . .339
Switch . . . . . . . . . . . . . . . . . .101
Heated Mirrors . . . . . . . . . . . . . . . . .63
Heated Seats . . . . . . . . . . . . . . . . .96
Heater . . . . . . . . . . . . . . . . . . . . .199
Heater, Engine Block. . . . . . . . . . . . .215
High Beam Indicator . . . . . . . . . . . . .175
High Beam/Low Beam Select (Dimmer)
Switch . . . . . . . . . . . . . . . . . . .102
Hill Descent Control . . . . . . . . . . . . .248
Hill Descent Control Indicator . . . . . . . .248
Ignition . . . . . . . . . . . . . . . . . . . . .12
Key . . . . . . . . . . . . . . . . . . . . .12
Ignition Key Removal . . . . . . . . . . . . .12
Illuminated Entry . . . . . . . . . . . . . . . .16
Immobilizer (Sentry Key) . . . . . . . . . . .13
Information Center, Vehicle . . . . . . . . .185
Inside Rearview Mirror . . . . . . . . . . . .62
Instrument Cluster . . . . . . . . . . . . . .172
Instrument Panel and Controls . . . . . . .171
Instrument Panel Lens Cleaning . . . . . .330
Integrated Power Module (Fuses). . . . . .333
Interior Appearance Care . . . . . . . . . .329
Interior Lights . . . . . . . . . . . . . . . . .103
Intermittent Wipers (Delay Wipers) . . . . .106
Introduction . . . . . . . . . . . . . . . . . . .4
iPod®/USB/MP3 Control
Bluetooth® Streaming Audio . . . . . .196
Jack Location . . . .
Jack Operation . . .
Jacking Instructions
Jump Starting . . . .
.
.
.
.
.
.
.
.
.
.
.
.
.
.
.
.
.
.
.
.
.
.
.
.
. . . . . . .291
.290, 292, 293
. . . . . . .292
. . . . . . .295
Key-In Reminder . . . . . . . . . . . . . . . .13
355
Key, Programming . . . .
Key, Replacement . . . .
Key, Sentry (Immobilizer)
Keyless Entry System . .
Keys . . . . . . . . . . .
.
.
.
.
.
.
.
.
.
.
.
.
.
.
.
.
.
.
.
.
.
.
.
.
.
.
.
.
.
.
.
.
.
.
.
.
.
.
.
.
.
.
.
.
.
.
.
.
.
.
.14
.14
.13
.16
.12
Lane Change and Turn Signals . . . . . . .173
Lane Change Assist . . . . . . . . . . . . .102
Lap/Shoulder Belts . . . . . . . . . . . . . .29
Latches . . . . . . . . . . . . . . . . . . . . .56
Leaks, Fluid . . . . . . . . . . . . . . . . . .56
Leveling, Headlight . . . . . . . . . . . . . .104
Life of Tires . . . . . . . . . . . . . . . . . .262
Light Bulbs . . . . . . . . . . . . . . . . . . .56
Lights . . . . . . . . . . . . . . . . . . .56, 101
Airbag . . . . . . . . . . . . . .38, 55, 175
Alarm . . . . . . . . . . . . . . . . . . .176
Anti-Lock . . . . . . . . . . . . . . . . .175
Anti-Lock Warning . . . . . . . . . . . .175
Automatic Headlights . . . . . . . . . .101
Back-Up . . . . . . . . . . . . . . . . .340
Brake Assist Warning . . . . . . . . . .247
Brake Warning . . . . . . . . . . .174, 239
Bulb Replacement . . . . . . . . . . . .338
Cargo . . . . . . . . . . . . . . . . . . .104
Center Mounted Stop . . . . . . . . . .340
Check Engine (Malfunction Indicator) . .175
356
Cruise . . . . . . . . . . . . . . . . . .179
Electronic Stability Program (ESP)
Indicator . . . . . . . . . . . . . . . . .180
Electronic Throttle Control Warning . .180
Exterior . . . . . . . . . . . . . . . . . .56
Fog . . . . . . . . . . . . . . . . .102, 340
Hazard Warning Flasher . . . . . . . .289
Headlight Leveling . . . . . . . . . . . .104
Headlight Switch . . . . . . . . . . . . .101
Headlights . . . . . . . . . . . . . . . .339
Headlights On With Wipers . . . . . . .102
High Beam . . . . . . . . . . . . .102, 175
High Beam Indicator . . . . . . . . . .175
High Beam/Low Beam Select . . . . .102
Hill Descent Control Indicator . . . . .248
Illuminated Entry . . . . . . . . . . . . .16
Instrument Cluster . . . . . . . . . . . .101
Interior . . . . . . . . . . . . . . . . . .103
Lights On Reminder . . . . . . . . . . .102
Low Fuel . . . . . . . . . . . . . . . . .173
Oil Pressure . . . . . . . . . . . . . . .174
Rear Fog . . . . . . . . . . . . . . . . .340
Rear Servicing . . . . . . . . . . . . . .340
Rear Tail Lamps . . . . . . . . . . . . .340
Seat Belt Reminder . . . . . . . . . . .173
Security Alarm . . . . . . . . . . . . . .176
Service . . . . . . . . . . . . . . . . . .338
Side Marker . . . . . . . . . . . . . . .340
Tire Pressure Monitoring (TPMS) . . .179
Traction Control . . . . . . . . . .180, 247
Turn Signal . . . . .56, 102, 173, 339, 340
Voltage . . . . . . . . . . . . . . . . . .173
Warning (Instrument Cluster
Description) . . . . . . . . . . . . . . .173
Loading Vehicle
Tires . . . . . . . . . . . . . . . . . . .254
Locking Axle . . . . . . . . . . . . . . . . .227
Locks . . . . . . . . . . . . . . . . . . . . . .22
Automatic Door . . . . . . . . . . . . . .23
Child Protection . . . . . . . . . . . . . .24
Door . . . . . . . . . . . . . . . . . . . .22
Power Door . . . . . . . . . . . . . . . .23
Steering Wheel . . . . . . . . . . . . . .13
Lubrication, Body . . . . . . . . . . . . . . .315
Lug Nuts . . . . . . . . . . . . . . . . . . .290
Maintenance Free Battery .
Maintenance Procedures .
Maintenance Schedule. . .
Malfunction Indicator Light
(Check Engine) . . . . .
Manual Transmission. . . .
Fluid Level Check . . .
Lubricant Selection . .
. . . . . . . . .311
. . . . . . . . .306
. . . . . . . . .346
.
.
.
.
.
.
.
.
.
.
.
.
.
.
.
.
.
.
.
.
. . . .175
.221, 326
. . . .327
.326, 343
Shift Speeds . . . . . . . . . . . . . . .222
Master Cylinder (Brakes) . . . . . . . . . .324
Methanol . . . . . . . . . . . . . . . . . . .272
Methanol Fuel . . . . . . . . . . . . . . . .272
Mini-Trip Computer . . . . . . . . . . .181, 188
Mirrors . . . . . . . . . . . . . . . . . . . . .62
Automatic Dimming . . . . . . . . . . . .63
Electric Powered . . . . . . . . . . . . .63
Electric Remote . . . . . . . . . . . . . .63
Heated . . . . . . . . . . . . . . . . . . .63
Outside . . . . . . . . . . . . . . . . . .62
Rearview . . . . . . . . . . . . . . . . . .62
Vanity . . . . . . . . . . . . . . . . . . .63
Modifications/Alterations, Vehicle . . . . . . .8
Modular Hard Top . . . . . . . . . . . . . .119
Monitor, Tire Pressure System . . . . . . .265
MOPAR® Parts . . . . . . . . . . . . . . . .306
Multi-Function Control Lever . . . . . . . .101
Oil Filter, Selection . . . . . . . . . . . . . .308
Oil Pressure Light . . . . . . . . . . . . . .174
Oil, Engine . . . . . . . . . . . . . . . . . .307
Capacity . . . . . . . . . . . . . . . . .341
Change Interval . . . . . . . . . . . . .187
Dipstick . . . . . . . . . . . . . . . . . .307
Filter . . . . . . . . . . . . . . . . . . .308
Identification Logo . . . . . . . . . . . .307
Pressure Warning Light . . . . . . . . .174
Recommendation . . . . . . . . . . . .341
Viscosity . . . . . . . . . . . . . .308, 341
Onboard Diagnostic System. . . . . . . . .306
Operating Precautions . . . . . . . . . . . .306
Operator Manual (Owner’s Manual) . . . . . .6
Outside Rearview Mirrors . . . . . . . . . . .62
Overdrive . . . . . . . . . . . . . . . . . . .220
Overdrive OFF Switch . . . . . . . . . . . .220
Overheating, Engine . . . . . . . . . .177, 289
Owner’s Manual (Operator Manual) . . . . . .6
New Vehicle Break-In Period . . . . . . . . .53
Occupant Restraints . . . . . . . . . . . . . .27
Octane Rating, Gasoline (Fuel) . . . . . . .272
Odometer . . . . . . . . . . . . . . . .177, 181
Trip . . . . . . . . . . . . . . . . .177, 181
Oil Change Indicator . . . . . . . . . .178, 187
Oil Change Indicator, Reset . . . . . .178, 187
Paint Care . . . . . . . . . . . . . . . . . .328
Parking Brake. . . . . . . . . . . . . . . . .237
Personal Settings. . . . . . . . . . . . . . .192
Pets . . . . . . . . . . . . . . . . . . . . . . .53
Pets, Transporting . . . . . . . . . . . . . . .53
Phone (Uconnect®) . . . . . . . . . . . . . .67
Phone, Cellular. . . . . . . . . . . . . . . . .64
Phone, Hands-Free (Uconnect®). . . . . . .64
Placard, Tire and Loading Information . . .254
Power
Brakes . . . . . . . . . . . . . . . . . .239
Door Locks . . . . . . . . . . . . . . . .23
Mirrors . . . . . . . . . . . . . . . . . . .63
Steering . . . . . . . . . . . . . .236, 237
Windows . . . . . . . . . . . . . . . . . .25
Power Steering Fluid . . . . . . . . . . . . .343
Pregnant Women and Seat Belts. . . . . . .33
Preparation for Jacking . . . . . . . . . . .292
Pretensioners
Seat Belts . . . . . . . . . . . . . . . . .33
Programmable Electronic Features . . . . .192
Radial Ply Tires. . . . . . . . . . . . . . . .259
Radiator Cap (Coolant Pressure Cap) . . .322
Radio (Sound Systems) . . . . . . . . . . .193
Radio Operation . . . . . . . . . . . . . . .198
Rear Axle (Differential) . . . . . . . . . . . .327
Rear Swing Gate . . . . . . . . . . . . . . .26
Rear Window Defroster . . . . . . . . . . .167
Rear Window Features . . . . . . . . . . .167
Rear Wiper/Washer . . . . . . . . . . . . .167
Recorder, Event Data . . . . . . . . . . . . .40
357
Recreational Towing . . . . . . . . . . . . .283
Shifting into Transfer Case
Neutral (N) . . . . . . . . . . . . . . . .284
Shifting out of Transfer Case
Neutral (N) . . . . . . . . . . . . . . . .285
Refrigerant . . . . . . . . . . . . . . . . . .313
Release, Hood . . . . . . . . . . . . . . . .100
Reminder, Lights On . . . . . . . . . . . . .102
Reminder, Seat Belt . . . . . . . . . . . . . .28
Remote Control
Door Locks . . . . . . . . . . . . . . . .16
Remote Keyless Entry (RKE) . . . . . . . . .16
Remote Sound System (Radio) Controls . .197
Replacement Bulbs . . . . . . . . . . . . .338
Replacement Keys. . . . . . . . . . . . . . .14
Replacement Parts . . . . . . . . . . . . . .306
Replacement Tires . . . . . . . . . . . . . .263
Resetting Oil Change Indicator . . . . . . .187
Restraint, Head . . . . . . . . . . . . . . . .97
Restraints, Child . . . . . . . . . . . . . . . .40
Restraints, Occupant . . . . . . . . . . . . .27
Rotation, Tires . . . . . . . . . . . . . . . .264
Safety Checks Inside Vehicle . . . . . . . . .55
Safety Checks Outside Vehicle . . . . . . . .56
Safety Information, Tire . . . . . . . . . . .249
Safety Tips . . . . . . . . . . . . . . . . . . .54
358
Safety, Exhaust Gas . . . . . . . . . . . . . .54
Schedule, Maintenance . . . . . . . . . . .346
Seat Belt
Adjustable Upper Shoulder Belt
Anchorage . . . . . . . . . . . . . . . . .32
Energy Management Feature . . . . . . .33
Lap/Shoulder Belt Operation . . . . . . .31
Lap/Shoulder Belt Untwisting . . . . . . .32
Lap/Shoulder Belts . . . . . . . . . . . .29
Pregnant Women . . . . . . . . . . . . .33
Seat Belt Pretensioner . . . . . . . . . .33
Seat Belt Reminder . . . . . . . . . . . .28
Seat Belt System . . . . . . . . . . . . .27
Seat Belt Maintenance . . . . . . . . . . . .330
Seat Belt Reminder . . . . . . . . . . . . . .28
Seat Belts . . . . . . . . . . . . . . . . .28, 55
Adjustable Shoulder Belt . . . . . . . . .32
Adjustable Upper Shoulder Anchorage . .32
Child Restraint . . . . . . . . . . . . . .40
Front Seat . . . . . . . . . . . .28, 29, 31
Inspection . . . . . . . . . . . . . . . . .55
Operating Instructions . . . . . . . . . .31
Pregnant Women . . . . . . . . . . . . .33
Pretensioners . . . . . . . . . . . . . . .33
Rear Seat . . . . . . . . . . . . . . . . .29
Reminder . . . . . . . . . . . . . . . . .173
Untwisting Procedure . . . . . . . . . . .32
Seats . . . . . . . . . . . . . . . . . . . . . .93
Adjustment . . . . . . . . . . . . . . . .93
Easy Entry . . . . . . . . . . . . . . . . .94
Fold and Tumble Rear . . . . . . . . . .97
Heated . . . . . . . . . . . . . . . . . . .96
Height Adjustment . . . . . . . . . . . .94
Rear Folding . . . . . . . . . . . . . . .99
Removal . . . . . . . . . . . . . . . . . .98
Seatback Release . . . . . . . . . . . .94
Tilting . . . . . . . . . . . . . . . . . . .94
Security Alarm . . . . . . . . . . . . . . . . .15
Security System . . . . . . . . . . . . . . . .15
Sentry Key (Immobilizer) . . . . . . . . . . .13
Sentry Key Programming . . . . . . . . . . .14
Service Assistance . . . . . . . . . . . . . .348
Settings, Personal . . . . . . . . . . . . . .192
Shift Lever Override . . . . . . . . . . . . .300
Shifting . . . . . . . . . . . . . . . . . . . .215
Automatic Transmission . . . . . . . . .215
Manual Transmission . . . . . . . . . .221
Transfer Case, Shifting into Transfer
Case Neutral (N) . . . . . . . . . . . .284
Transfer Case, Shifting out of Transfer
Case Neutral (N) . . . . . . . . . . . .285
Shoulder Belts . . . . . . . . . . . . . . . . .29
Side Window Demisters (Defrosters) . . . .206
Signals, Turn . . . . . .56, 102, 173, 339, 340
Snow Chains (Tire Chains) . . . . . . . . .264
Snow Tires . . . . . . . . . . . . . . . . . .259
Soft Top . . . . . . . . . . . . . . . . .128, 144
Sound Systems. . . . . . . . . . . . . . . .193
Sound Systems (Radio) . . . . . . . . . . .193
Spare Tire . . . . . . . . . . . . .260, 261, 291
Speed Control (Cruise Control) . . . . . . .107
Speedometer . . . . . . . . . . . . . . . . .173
Starting . . . . . . . . . . . . . . . . . . . .213
Automatic Transmission . . . . . . . . .213
Cold Weather . . . . . . . . . . . . . .215
Engine Block Heater . . . . . . . . . .215
Engine Fails to Start . . . . . . . . . .214
Manual Transmission . . . . . . . . . .213
Steering
Power . . . . . . . . . . . . . . . .236, 237
Tilt Column . . . . . . . . . . . . . . . .107
Wheel Lock . . . . . . . . . . . . . . . .13
Wheel, Tilt . . . . . . . . . . . . . . . .107
Steering Wheel Audio Controls . . . . . . .197
Steering Wheel Mounted Sound System
Controls . . . . . . . . . . . . . . . . . .197
Storage . . . . . . . . . . . . . . . . . . . .338
Storage, Behind the Seat . . . . . . . . . .113
Storage, Vehicle . . . . . . . . . . . .206, 338
Storing Your Vehicle . . . . . . . . . . . . .338
Stuck, Freeing . . . . . . . . . . . . . . . .297
Sunrider . . . . . . . . . . . . . . . . .160, 162
Supplemental Restraint System - Airbag. . .34
Sway Bar Disconnect, Electronic . . . . . .227
Swing Gate, Rear . . . . . . . . . . . . . . .26
Tachometer . . . . . . . . . . . . . . . . . .175
Temperature Control, Automatic (ATC) . . .201
Temperature Gauge, Engine Coolant . . . .176
Tilt Steering Column . . . . . . . . . . . . .107
Tip Start . . . . . . . . . . . . . . . . . . . .213
Tire and Loading Information Placard . . .254
Tire Markings . . . . . . . . . . . . . . . . .249
Tire Safety Information . . . . . . . . . . . .249
Tires. . . . . . . . . . . . . . . . . . . .56, 257
Aging (Life of Tires) . . . . . . . . . . .262
Air Pressure . . . . . . . . . . . . . . .257
Chains . . . . . . . . . . . . . . . . . .264
Changing . . . . . . . . . . . . . . . . .290
Compact Spare . . . . . . . . . . . . .260
General Information . . . . . . . . . . .257
High Speed . . . . . . . . . . . . . . .258
Inflation Pressures . . . . . . . . . . . .258
Jacking . . . . . . . . . . . . . . .290, 293
Life of Tires . . . . . . . . . . . . . . .262
Load Capacity . . . . . . . . . . . . . .254
Pressure Monitor System (TPMS) . . .265
Pressure Warning Light . . . . . . . . .179
Radial . . . . . . . . . . . . . . . . . . .259
Replacement . . . . . . . . . . . . . . .263
Rotation . . . . . . . . . . . . . . . . .264
Safety . . . . . . . . . . . . . . . .249, 257
Sizes . . . . . . . . . . . . . . . . . . .250
Snow Tires . . . . . . . . . . . . . . . .259
Spare Tire . . . . . . . . . . . . . . . .291
Spinning . . . . . . . . . . . . . . . . .262
Tread Wear Indicators . . . . . . . . . .262
To Open Hood . . . . . . . . . . . . . . . .100
Tongue Weight/Trailer Weight . . . . . . . .278
Towing . . . . . . . . . . . . . . . . . .275, 300
Disabled Vehicle . . . . . . . . . . . . .300
Guide . . . . . . . . . . . . . . . . . . .277
Recreational . . . . . . . . . . . . . . .283
Weight . . . . . . . . . . . . . . . . . .277
Towing Eyes . . . . . . . . . . . . . . . . .298
Towing Vehicle Behind a Motorhome . . . .283
Traction Control. . . . . . . . . . . . . . . .240
Traction Control Light . . . . . . . . . . . .180
Trailer Sway Control (TSC) . . . . . . . . .248
Trailer Towing . . . . . . . . . . . . . . . . .275
Cooling System Tips . . . . . . . . . .282
Minimum Requirements . . . . . . . . .278
Trailer and Tongue Weight . . . . . . .278
Wiring . . . . . . . . . . . . . . . . . . .280
Trailer Towing Guide . . . . . . . . . . . . .277
359
Trailer Weight . . . . . . . . . . . . . . . . .277
Transaxle
Autostick . . . . . . . . . . . . . . . . .220
Transfer Case . . . . . . . . . . . . . . . .327
Fluid . . . . . . . . . . . . . . . . . . .343
Four-Wheel-Drive Operation . . . . . .224
Maintenance . . . . . . . . . . . . . . .327
Transmission . . . . . . . . . . . . . . . . .324
Automatic . . . . . . . . . . . . . .216, 324
Fluid . . . . . . . . . . . . . . . . . . .343
Manual . . . . . . . . . . . . . . . . . .221
Range Indicator . . . . . . . . . . . . .177
Shifting . . . . . . . . . . . . . . . . . .215
Transmitter Battery Service
(Remote Keyless Entry) . . . . . . . . . .18
Tread Wear Indicators . . . . . . . . . . . .262
Trip Computer . . . . . . . . . . . . . . . .181
Trip Odometer . . . . . . . . . . . . . . . .177
Trip Odometer Reset Button. . . . . . . . .177
Turn Signals . . . . . . . . .102, 173, 339, 340
UCI Connector . . . . . . . . . . . . . . . .193
Uconnect®
Advanced Phone Connectivity . . . . . .74
Phone Call Features . . . . . . . . . . . .69
Phone Features . . . . . . . . . . . . . .71
360
Things You Should Know About Your
Uconnect® Phone . . . . . . . . . . . . .75
Uconnect® (Hands-Free Phone) . . . . . . .64
Uconnect® Phone . . . . . . . . . . . . . . .65
Uconnect® Voice Command . . . . . . . . .82
Universal Consumer Interface (UCI)
Connector . . . . . . . . . . . . . . . . .193
Untwisting Procedure, Seat Belt . . . . . . .32
Upholstery Care . . . . . . . . . . . . . . .329
Vanity Mirrors . . . . . . . . . . . . . . . . .63
Variance, Compass. . . . . . . . . . .182, 189
Vehicle Identification Number (VIN) . . . . . .8
Vehicle Loading. . . . . . . . . . . . . . . .254
Vehicle Modifications/Alterations . . . . . . . .8
Vehicle Storage . . . . . . . . . . . . .206, 338
Viscosity, Engine Oil . . . . . . . . . . . . .308
Voice Command . . . . . . . . . . . . . . . .82
Warning Lights (Instrument Cluster
Description) . . . . . . . . . . . . . . . .173
Warnings and Cautions . . . . . . . . . . . . .8
Washers, Windshield. . . . . . . . . . . . .318
Washing Vehicle . . . . . . . . . . . . . . .328
Wheel and Wheel Trim. . . . . . . . . . . .329
Wheel and Wheel Trim Care . . . . . . . .329
Wind Buffeting . . . . . . . . . . . . . . . . .26
Window Fogging . . . . . . . . . . . . . . .206
Windows . . . . . . . . . . . . . . . . . . . .25
Power . . . . . . . . . . . . . . . . . . .25
Windshield Defroster . . . . . . . .55, 200, 204
Windshield Washers . . . . . . . . . .105, 318
Fluid . . . . . . . . . . . . . . . . . . .318
Windshield Wiper Blades . . . . . . . . . .315
Windshield Wipers . . . . . . . . . . . . . .105
Windshield, Folding . . . . . . . . . . . . .163
Wiper Blade Replacement . . . . . . . . . .315
Wiper, Rear . . . . . . . . . . . . . . . . . .167
م ا
ا -ا
دة ا
ا ٣٤.. . . . .
م ا
! اار ا
و
)٢٥٦.. . . . . . . . . . . . . . . . . (ESC
م ا
! ا
+ا*' ،ا
و ٢٥١.. . . . . .
م ا
!١٥.. . . . . . . . . . . . . . . . . . ,/
م ا
34ل دون *+ح ١٦.. . . . . . . . . . . . .
م ا
34ل ،اءة ١٦.. . . . . . . . . . . . . .
م ا
7دم ٣٤٠ ،٥٥.. . . . . . . . . . . . . . . .
م ا
+ا*' ٣٤٥ ،٢٥١.. . . . . . . . . . . . . .
ا9:ا ا
٣٤٥.. . . . . . . . . . . . 8
٢٥٠.. . . . . . . . . . . . . . . . .
ا
<;
ا
>?>
7/ق )٢٥١.. . . . . . . . . (ABS
ء ا
!٢٥١ ،١٨٠.. . . . . . . . . . . ,D
م Gا+F:ل ٤١.. . . . . . . . . . . . . . .
م ;+IGا>ب ا
و )٢٥٦.. . . (ERM
م Gا LNا
+ا*' '</ا
!آ ٢٢٨.. . . . . . . .
م Uي آ '?OG P*) Sentry Key
ا
!/ك( ١٣.. . . . . . . . . . . . . . . . . .
م * 4W8ا
+ا*' ٢٥٣.. . . . . . . . . . . . . .
م *; ا
اء ٣٣٣ ،٢١١ ،٢٠٨.. . . . . . . .
' ا
وس ٢٢٦.. . . . . . . . . . . . . . . . . .
٣٨٤
' ]Wا
وس ،ا
? إ
[ 3رج وN P
)ا
> ' ]W (^O7Gا
وس ٣٠٤.. . . . .
' ]Wا
وس ،ا
? إ
[ و) N Pا
>(^O7G
' ]Wا
وس ٣٠٣.. . . . . . . . . . .
<' ا
!آ ا:و٢٢٦.. . . . . . . . . G*G
<' ا
!آ ا
4وي ٢٣٣.. . . . . . . . . . . .
ه ;Gا
!4ث دون ا4Iام ا
_,4
)م ®٧٠ ،٦٧.. . . . . . . . . (Uconnect
وا< ا
١٦٨ ،١٦٧.. . . . . . . . Sunrider g/O
وا* jا
! _* ,Dا
٣٠٩.. . . . . . . . . . . 9I
وا* jا
! _* ,Dا
9Iر WNا٣٠٩.. . . . klG
وا*pت
إsرة ا97ف ٣٦٢ ،٣٦١ ،١٨٠ ،٥٧.. . . .
ا
! _* ,Dا
٣٠٩.. . . . . . . . . . . . 9I
و{4ة ا
! zGر wxا
9/رة )٢٦٢.. . . (TSC
و{4ة ا
~lء ا
]7ي ا
}]| ١٢٤.. . . . . . . . . .
و{4ة ا
<9ا
) ]*/ا
}U/ات( ٣٥٥.. . . . . .
وزن ا
9/رة ٢٩٥.. . . . . . . . . . . . . . . .
وزن /Wد ا
/LNوزن ا
9/رة ٢٩٦.. . . . . . . .
و<د ا
/ل ٢٩٠.. . . . . . . . . . . . . . . . .
*+ح ا3ر )ا
( 7ا
pء ا
/
7ا
pء
ا
١٠٧.. . . . . . . . . . . . . . . . . j+IU/
*+ح ا
! ا
و ا
) W8ا
! ا
W8
ا
١١٢.. . . . . . . . . . . . . . . . . . (N
*+ح ا
! iPod®/USB/MP3
Nا
}ت ٢٠٦.. . . . . Bluetooth® W
*+ح ا
! ا
) W8ا
! ا
W8
ا
١١٢.. . . . . . . . . . . . . . . . . . (N
*+ح ا
! در xا
!ارة ،ا:وG*G
)٢١١.. . . . . . . . . . . . . . . . . . (ATC
*+حU ،ي آ )* '?OG Pا
!/ك( ١٣.. . . . .
*٤.. . . . . . . . . . . . . . . . . . . . . . *4
*س در xا
!ارة 4,G ' ،ا
!/ك ١٨٣.. . .
*; ا
اء ٢٠٨.. . . . . . . . . . . . . . . . .
*; ا
اء w} ،ا
٢١٧ ،٢١٥.. . . . . . '?O
*]}^ **]7ت اFر وا
!٢٧٠.. . . . . . . . '/
* DUا
<9ا
١١٤.. . . . . . . . . . . . . N
* D+Uا
<9ا ١١٤.. . . . . . . . . . . . . .
*
'
وا xا
'/7ا
)٢٠٢.. . . . . . . (UCI
*
' وا xا
'/7ا
)٢٠٢.. . . . . (UCI
*< Pا
ا٣١١.. . . . . . . . . . . . . . . . . 7
*< Pا
/7د ا
_N '
+ا
Uا) Dب( ٢٧٠.. . . . . .
*~ات إ
و <٢٠٠.. . . . . . . . . l*]
]N
*~ات ا
~xج ا
١٧٣.. . . . . . . . . . . . . +]I
*~ة ا Nlا
~7/زة ا
!ادث ٣٩.. . . . . . .
<' ا
!آ ٣٤٦.. . . . . . . . . . . . . . . . . .
ا:و٣٤٦ ،٢٢٨.. . . . . . . . . . . . G*G
ا
٣٦٦.. . . . . . . . . . . . . . . . . . '8
ا
4وي ٢٣٣.. . . . . . . . . . . . . . . . . .
?Gا
وس ٢٢٦.. . . . . . . . . . . . . .
* sا
4/ى ١٨٤.. . . . . . . . . . . . . . .
<' ا
!آ ا:و٣٤٨ ،٣٤٦ ،٢٢٨.. . . . . G*G
إ ا
٣٤٨.. . . . . . . . . . . . . . . '8
ا
/اد ا
p/ا
٣٤٦.. . . . . . . . . .
I
?Gا
٣٤٨.. . . . . . . . . . . . . . . '8
?Gا
8ا' وا
٣٤٨.. . . . . . . . . . G>+
! *8ى ا
٣٤٧.. . . . . . . . . . . '8
ع ا
٣٦٦ ،٣٤٦.. . . . . . . . . . . . '8
<' ا
!آ ا
4وي ٣٤٨ ،٢٣٣.. . . . . . . . . . .
٣٦٦ ،٣٤٨.. . . . . . . .
ا3ر *دة ا
!O
Wت ?Gا
وس ٢٣٤.. . . . . . . . . .
! *8ى ا
٣٤٨.. . . . . . . . . . . '8
}٥٥.. . . . . . . . . . . . . *>8
N ]7* w
<9ت ا
وس ٢٣٤ ،٢٢٩.. . . . . . . . . . . . .
م ®Uconnect
ا}Gل ا
+Gا
4/م ٧٨.. . . . . . . . . . .
* { 7* |l,ل م
٧٩.. . . . . . . . . . Uconnect® Phone
*~ات ا}Gل ا
٧٣.. . . . . . . . . . . +G
*~ات ا
٧٥.. . . . . . . . . . . . . . . ;G
م ®) Uconnectه ;Gا
!4ث دون ا4Iام
ا
٦٧.. . . . . . . . . . . . . . . . . . . (_,4
م ٦٨.. . . . . . . . . Uconnect® phone
م ا
٣٤١.. . . . . . . . . . . . . . . . . . 4,
إ ' ا
P*) 4,ا
٣٤٣.. . . . . (4/l
ا3ر ' ا
P*) 4,ا
٣٦٤ ،٣٤٢.. . (4/l
٣٤٤.. . . .
ا
' _* ]Iا
4,ا
'/78/
ا
} ;,وا
;UوإWدة ا
٣٤٢.. . . . . 7
ا
٣٤١.. . . . . . . . . . . . . . . . . !+
' 7ا
٣٦٤.. . . . . . . . . . . . . 4,
٣٤٣.. . . . . . . . . . . . .
9ء ا
ادG,
*8ى ' ا
٣٤٤.. . . . . . . . . . . 4,
ط ~],م DGآه ٣٤٤.. . . . . . . . . . . . .
م ا
،4,
9ء ?٣٤٣.. . . . . . . . . . . . . . . L
٣٨٣
9 w+ء ا
!/ك ١٠٤.. . . . . . . . . . . . . .
/ت ا
٥٧.. . . . . . . . . . . . . . . . . wN}/
/ت ،ا
pء ٥٧.. . . . . . . . . . . . . . . . .
{ أ~xة ا
س و* wG+ا
! ١٧٧.. . . . . . .
* sا
! ا
~Uول *_ []Wا
7+G/ت ٢٦٣.. . .
* sا
pء ا
١٨١.. . . . . . . . . . . . . . 7
* ?G sا
~١٩٥ ،١٨٥.. . . . . . . . . . . ,
* ?G sا
~ ,ا:و١٩٥.. . . . . . . . G*G
* ?G sا
~ ،,إWدة ا
١٩٥ ،١٨٥.. . . . Lp
*sات ;]Gا
4/ات ٢٧٨.. . . . . . . . . . . .
*!ت ا
~xج ا١٠٩.. . . . . . . . . . . . **:
* Pا
4,G ') 4/lا
!/ك( ٣٦٤ ،٣٤٢.. . . .
ا
٣٤٤.. . . . . . . . . . . . . . . . . ]I
* '?OG Pا
!/ك )م Uي آ
١٣.. . . . . . . . . . . . . . . (Sentry Key
* W/lأ~xة ا
س ١٧٨.. . . . . . . . . . . . .
*!ر ا
4وران ا) **:ا
وس ا
٣٤٩.. . . (]+
*!ر ا
4وران ا
) +]Iا
وس ا
٣٤٩.. . . (]+
*!ر ' ا
!آ
ا
}7ا:و٢٣٢.. . . . . Autostick G*G
*!ر ' ا
!آ ا:وG*G
م ا
ا١٣.. . . . . . . . . . . . . . . . LN
٣٨٢
*ة ا
7ا:و٦٦.. . . . . . . . . . . . G*G
*ة ا
ؤ ,ا
+]Iا
4ا٦٥.. . . . . . . . . . . ]3
*ا< ،م ? LاFر ٢٨٢.. . . . . . . . . . .
*ا ,ا
ؤ ,ا
+]Iا
Iر٦٥.. . . . . . . . . . x
*ا ,ا
~٦٦.. . . . . . . . . . . . . . . . . . . U,
*آ~ ا
*]7/ت ،ا
8رة ١٩٢.. . . . . . . . . . .
*آ~ **]7ت ا
8رة ا
و
)١٩٢ ،١٨٨.. . . . . . . . . . . . . . (EVIC
*~ ',ا
pب *_ ا
~xج ا٢١٤ ،٢١٠ ،٥٦.. . **:
*~ ',ا
pب ،ا
~xج ا٢١٤ ،٢١٠ ،٥٦.. . . **:
*~ ',ا
pب ،ا
~xج ا
١٧٣.. . . . . . . . . +]I
*~ P
',ا
~xج ا
١٧٣.. . . . . . . . . . +]I
*~>,ت ا
_* NFا
DUة ا
l
)*~>,ت ا
}٢١٦.. . . . . . . . . . . . . (P
*4N 4W8ء ا
[]W '?Oا
7+G/ت ٢٥٣.. . . . . . .
*4W8ات ?Gا
!رة ١٠٧.. . . . . . . . . . . . .
*4W8ة ا
٣٧٠.. . . . . . . . . . . . . . . . *4I
*4W8ة ا
>/7ء ٣٧٠.. . . . . . . . . . . . . . . .
* 48ا
أس ١٠١.. . . . . . . . . . . . . . . . .
* ،4U8ا
أس ١٠١.. . . . . . . . . . . . . . . . .
*} wNا
pب ٣٦٢ ،٣٦١ ،١٠٧.. . . . . . . . .
*} wNا
pب ،ا
٣٦٢.. . . . . . . . . . . +]I
*}ح ا
! ,Dا
Iص !
Nا
و
/م
اU3ق ١٨٧.. . . . . . . . . . . . . . . . . .
*}ح ا
! ا
١٨٧.. . . . . . . . . . . . l
*}ح ا
<; ا
/آ~ي ا
]7ي ٣٦٢.. . . . . . . .
*}ح * sا
!) '97ا
!/ك( ١٨٢.. . . . .
* +Wpا
D
W8راع ?Gا
وس ٣٢٠.. . . . .
*,7ة ا
] ١٩٧ ،١٩١.. . . . . . . . . . . . .
*,7ة ،ا
] ١٩٧ ،١٩١.. . . . . . . . . . . .
*47ل ا:وآن ،ا
) _,~Uا
<د( ٢٨٩.. . . . . . . .
*47ل ا
زن ا8]
/xرة ٢٩٣.. . . . . . . . .
*47ل ا
زن ا!/]
/xر ٢٩٣.. . . . . . . . .
**]7ت ا
،*>8اFر ٢٦٤.. . . . . . . . . . .
**]7ت >* اFر ٢٦٤.. . . . . . . . . . . .
* wG+ا
! ا
}ت ا
x/دة ]l7N
ا
دة ٢٠٧.. . . . . . . . . . . . . . . . . . .
* wG+ا
! ا
Uم ا
} Gا
x/دة
]lWا
دة ٢٠٧.. . . . . . . . . . . . . . . .
* wG+ا
! *; ا
اء ٢٠٨.. . . . . . . . .
* wG+ا
! م '?OGا
}ت 47Nُ _W
)ا
اد٢٠٧.. . . . . . . . . . . . . . . . . (,
*+ح إ>ق Gس * +Wpا
٢٣٢.. . . . . . W8
ا<:اص ا
٢٠٨.. . . . . . . (CD) F?p/
ا
دة ا
ا ٤٠.. . . . . . . . . . . . .
9Nرx ,ز ارل ) wاN:اب 47Nُ _W
دون *١٨.. . . . . . . . . . . . . . . . . (wG+
*} wNا
pب ٣٦٢ ،٣٦١.. . . . . . . . .
*; ا
اء ٣٣٣.. . . . . . . . . . . . . .
? Lا
اء ،اFرات ٢٧٤.. . . . . . . . . . . .
ء اDار ١٨٣.. . . . . . . . . . . . . . . . .
ء ا
دة ا
ا ١٨١ ،٥٦ ،٣٩.. . . . . . . .
ء P* ,D!Gا?>ق ١٨١.. . . . . . . . . . .
ء ? Lا
~١٨٠.. . . . . . . . . . . . . . ,
ء * 9Uا
!١٠٨.. . . . . . . . . . . . . . /
ء م ا
! ا
W8ا
١٨٦.. . . . . . N
Fا
~xج ا١٦٩.. . . . . . . . . . . . . . **:
Fا
47/ا
١٠٣.. . . . . . . . . . . . . . . +]I
Fو<]| ا
47/ا
١٠١.. . . . . . . . . . . . +]I
4Wاد ا
١٧٩.. . . . . . . . . . . . . . . . . W8
4Wاد ا
١٨٨ ،١٨٤.. . . . . . . . . . . . . . 8/
ا
{] ١٨٨ ،١٨٤ ،١٨٣.. . . . . . . . . . .
4Wاد Wا
!/ك )ا
آ*( ١٨٢.. . . . . . . .
4Wاد * 8ا
{] ١٨٤.. . . . . . . . . . . . . . .
}Wا
س
ا
xا
~7/ز ٢٤٩.. . . . . . . . . . . . . .
ا
~) ,ا
!/ك( ٣٢٨.. . . . . . . . . . . . .
*>Wت اFر ٢٦٤.. . . . . . . . . . . . . . . .
' ]Wا
وس ٣٤٩.. . . . . . . . . . . . . . .
ا
٣٦٦.. . . . . . . . . . . . . . . . . . '8
ا
} ٣٤٩.. . . . . . . . . . . . . . . . .
'?OGا
P4ا
٢٣٦.. . . . . . . . . . . WN
/WاFرات ٢٧٩.. . . . . . . . . . . . . . . .
]/Wإزا
ا
اء~{ ،ام ا*:ن ٣٢.. . . . . . . .
_Wا
+ا*' ٢٥١.. . . . . . . . . . . . . . . . . .
ز ا
٣٣٤.. . . . . . . . . . . . . . . . . . 4,
>ت ا
~xج ا٣٣٩ ،١٠٩.. . . . . . . . **:
ا
٣٣٩.. . . . . . . . . . . . . . . . . . '8
'8ا
8رة ٣٥٠.. . . . . . . . . . . . . . . . .
9ء ا
9) _,~Uء ! 7G
ا
<د( ٣٢٧ ،٢٩٣ ،٢٩١.. . . . . . . . . . . .
9ء ا
اد9) G,ء ? ' Lا
٣٤٣.. . . (4,
9ء ? ' Lا
9) 4,ء ا
اد٣٤٣.. . . (G,
wاN:اب 47Nُ _Wدون *١٦.. . . . . (RKE) wG+
ة _]Gا
8رة ا
4,4lة ٥٤.. . . . . . . . . . . .
! *8ى ا
٣٤٩.. . . . . . . . . . . . . '8
ا
xا
~7/ز ٢٤٩.. . . . . . . . . . . . . .
٣٢٨.. . . . . . . . . . . . . .
ز ,ا
!/ك
<' ا
!آ ا
4وي ٣٤٨.. . . . . . . . . . . .
! *}ح ا
!/ك )*}ح * sا
١٨٢.. . ('97
!ص ا
3 *>8رج ا
8رة ٥٧.. . . . . . . . . .
!ص ا
*>8دا '3ا
8رة ٥٦.. . . . . . . . . .
!ص ،ا
٥٥.. . . . . . . . . . . . . . . . *>8
ا*' ا
<; ٢٥٠.. . . . . . . . . . . . . . . . .
ا*' ا
9ارئ ٢٥٠.. . . . . . . . . . . . . . . .
}' < |pا
zر ،wxإ
و ٢٤٠.. . . . . . . .
>G
xز UGا
اء ٣٢٩.. . . . . . . . . . . . .
٣٢٩.. . . . . . . . . . . . . .
ز ,ا
!/ك
*; ا
اء ٣٣٤ ،٢١٦.. . . . . . . . . . . .
] ا
~ ،,ا3ر ٣٢٩.. . . . . . . . . . . . . .
] *; ا
اء ٣٣٤ ،٢١٦.. . . . . . . . . . . .
< P9ر ®٣٢٧.. . . . . . . . . . . . MOPAR
<!* '+ر ا
4وران ٢٣٩.. . . . . . . . . . . . . .
آ G/ا
{] ١٨٨.. . . . . . . . . . . . . . . .
آ G/ا
{] ا
}ة ١٩٥ ،١٨٨.. . . . . . . . .
آ ،G/ا
{]/ا
8/ا
}ة ١٩٥ ،١٨٨.. . . .
~و xز ,ا
!/ك ٣٢٩.. . . . . . . . . . . . . .
٣٨١
'/!Gا
8رة ٢٧٠.. . . . . . . . . . . . . . . . .
اFرات ٢٧٠.. . . . . . . . . . . . . . . .
_,~IGا
8رة ٣٦٠ ،٢١٦.. . . . . . . . . . . . .
،_,~IGا
8رة ٣٦٠ ،٢١٦.. . . . . . . . . . . . .
]IGرة ٣١٧.. . . . . . . . . . . . . . W
DGآ xNد ا
+/ح ١٣.. . . . . . . . . . . . . .
Gاآ ا
pب []Wا
Uا٢١٦.. . . . . . . . . . . D
Gس * +Wpا
٢٣٢.. . . . . . . . . . . . . W8
8Gب ا
8ا' ٥٧.. . . . . . . . . . . . . . . . .
!OGا
4ن ٣٣٥.. . . . . . . . . . . . . . . .
'?OGا
اد٢٠٨.. . . . . . . . . . . . . . . . . ,
'?OGا
ا٣١٣ ،٣١٢ ،٣١٠.. . . . . . . . . . 7
9
N '?OGر ,ا
~7/زة ٣١٥.. . . . . . . . . . . .
/]7Gت ا
٣١٢.. . . . . . . . . . . . . . . . . P
?Gا
!رة وإsرات ا97ف ١٨٠.. . . . . . . .
zON UGن ز ا
7دم ٥٥.. . . . . . . . . . . . . .
LOUGا
Uم )إDار ا*:ن( ١٥.. . . . . . . . . . .
;UG
ا
>l7ت ٣٥١.. . . . . . . . . . . . . . . . .
;UGا
~xج ٣٥٢.. . . . . . . . . . . . . . . .
{
4W ;UGأ~xة ا
س ٣٥٢.. . . . . . . .
4xول ا
} ٣٦٨.. . . . . . . . . . . . . . . . .
٣٨٠
4xول ~و xز ,ا
!/ك ٣٢٩.. . . . . . . . . .
4xول ،أ{lم اFرات ٢٦٦.. . . . . . . . . . . .
xز 8GـN 'lت ا
!ادث ٤١.. . . . . . . . . .
xز 8GـN 'lت ،ا
!ادث ٤١.. . . . . . . . . .
xز N ،'l8Gت ا
!ادث ٤١.. . . . . . . . . .
xز UGا
اء ،ا
!/ك )] xز UGهاء
ا
!/ك( ٣٢٩.. . . . . . . . . . . . . . . . .
{*>ت ا:آاب ١١٧.. . . . . . . . . . . . . . .
{~ام ا*:ن
~{ 4sام ا*:ن ٣٣.. . . . . . . . . . . .
أ{~* أ*ن ا
!ض/ا
; ٢٩.. . . . . . . . .
ا
Dآ ~{ LNNام ا*:ن ٢٨.. . . . . . . . . .
~{ '?OGام ا
!ض/ا
; ٣١.. . . . . . . . .
{~ام ا
!ض/ا
; ]/Wإزا
ا
اء ٣٢.. . .
]8Uء ا
!ا*' ٣٣.. . . . . . . . . . . . . . .
* {~ام ا
; ا
]7ي ا
٣٢.. . . Lp]
'N
*~ة إدارة ا
٣٣.. . . . . . . . . . . . . . <9
م {~ام ا*:ن ٢٧.. . . . . . . . . . . . . .
{]ت ا
٣١٨.. . . . . . . . . . . . . . . . . |!8
د
' ا
)
/د
' ا
٦.. . . . . . . . . . . . . ('?O/
د
' ا
) '?O/د
' ا
٦.. . . . . . . . . . . . . (
/
د
' !| ا
9/رات ٢٩٥.. . . . . . . . . . . . .
ذراع ا
! *47د ا
; ١٠٥.. . . . . . . . . .
ر< ;,7Gا
8رة )٨.. . . . . . . . . . . . (VIN
زر 4W +}Gاد * 8ا
{] ١٨٣.. . . . . . . . .
' ا
xا
~7/ز ٣٦٦.. . . . . . . . . . . . .
' ا
+ا*' ٣٦٦.. . . . . . . . . . . . . . . . .
' ;* 4,Gا
اء ٣٣٤ ،٣٣٣.. . . . . . . . .
' *!ر ا
4وران ٣٦٦.. . . . . . . . . . . . . .
!| ا
8رة ا
٣٢٠.. . . . . . . . . . . . . ]97/
!| ا
9/رات ٢٩٣.. . . . . . . . . . . . . . .
أد[ ا
]9/ت ٢٩٦.. . . . . . . . . . . . . .
ا>:ك ٢٩٨.. . . . . . . . . . . . . . . . .
}zON wن م ا
٣٠١.. . . . . . . . . 4,
وزن ا
9/رة و
8ن ا
٢٩٦.. . . . . . . |!8
!| رة ~U* NW ;]3ل *!آ ٣٠٢.. . . . .
Iن ،آ] ا
!/ك ٢٢٦.. . . . . . . . . . . . . .
7ت ا
8ا' ٣٦٤.. . . . . . . . . . . . . . . . .
7ت ،ا
٣٦٤.. . . . . . . . . . . . . . . . . '8
>' ا
'>) 4]lاFرات( ٢٨٠.. . . . . . .
>' ،اFر ٢٨٠.. . . . . . . . . . . . . . . .
+sات *! ا
~xج ا٣٣٦.. . . . . . . . . **:
ا*' ا
>l7ت ٣١٠.. . . . . . . . . . . . . . .
أ{~* ا*:ن ٣٥٢.. . . . . . . . . . . . . .
ا
g,/
ا
<د ١٧٩.. . . . . . . . . . . . . . . . . .
در{ xارة ' ا
١٨٣.. . . . . . . . . 4,
4Wاد ا
١٧٩.. . . . . . . . . . . . . . . W8
4Wاد ا
١٨٤.. . . . . . . . . . . . . . . 8/
4Wاد Wا
!/ك )ا
آ*( ١٨٢.. . . . .
ا
*]7* ،^}]/ت اFر وا
!٢٧٠.. . . . . . '/
ا
}U/ات ٣٥٤.. . . . . . . . . . . . . . . . . .
ا
D+U/ا
،Nا )* D+Uا
١١٤.. . . . (<9
ا
D+U/ا
Nا )* D+Uا
١١٤.. . . . . . (<9
ا
/اد ا
،p/ا
<د ٢٩١.. . . . . . . . . . . . .
ا
/ل ٢٩٠.. . . . . . . . . . . . . . . . . . .
ا
8Uء ا
!ا*' وأ{~* ا*:ن ٣٣.. . . . . . . . . .
ا
Uم ا
و ]! ا
+ا*' ٢٥١.. . . . . .
;+IGا>ب ا
و ٢٥٦.. . . . . . . .
م ا
! ا
٢٥٢.. . . . . . . . . . . l
٢٥٣.. . . . . . . . . . .
م * 4W8ا
+ا*'
ا
Uم ا
}IOا
8رة ٣٢٧.. . . . . . . . . .
ا
Uم ا
،}IOا
8رة ٣٢٧.. . . . . . . . .
ا
Uا٢٥.. . . . . . . . . . . . . . . . . . . . . D
ا
٢٥.. . . . . . . . . . . . . . . <9
N ]*7
ا
٧١.. . . . . . . . . . . . (Uconnect®) ;G
ا
;Gا
]Iي ٢٠٨ ،٦٧.. . . . . . . . . . . . . .
ا
،;Gا
!4ث دون ا4Iام ا
_,4
)®٦٧.. . . . . . . . . . . . . . (Uconnect
ا
،;Gا
]Iي ٦٧.. . . . . . . . . . . . . . . . .
ا
دة ا
ا ٣٤.. . . . . . . . . . . . . . . . .
ا!]
Nlادث ا
٣٩.. . . . . . . . . _8!/
ا
دة ا
ا ا٣٤.. . . . . . . . . . **:
ا
دة ا
ا ا **:ا
٣٥ ،٣٤.. . . . *4/
'?OGا
دة ا
ا ٣٥.. . . . . . . . . . .
xز N 'l8Gت ا
!ادث )٤١.. . . . (EDR
م ا
4ا
ا ٤٠.. . . . . . . . .
ء ,D!Gا
دة ا
ا ٣٩.. . . . . . . . .
{
{4وث ا+خ ٣٨.. . . . . . . . . . . .
و ,/{ 4ا
آ *_ ا
}*4ت ٣٦.. . . . . .
ا
<د ٢٨٩.. . . . . . . . . . . . . . . . . . . .
إ ٢٩١.. . . . . . . . . . . . . . . . . .
إ,ل ٢٩٠.. . . . . . . . . . . . . . . . . .
٢٨٩.. . . . . . . . . . . . . . . . .
ا
_,~U
ا
]9/ت ٣٦٤.. . . . . . . . . . . . . . . .
ا
/س ١٧٩.. . . . . . . . . . . . . . . . .
ا
/اد ا
٢٩١.. . . . . . . . . . . . . . p/
7ا
~Iان ٣٦٤.. . . . . . . . . . . . . . .
9ء ! ا
9) 7ء ا
٢٩١.. . . . . (_,~U
*47ل ا:وآن ٢٨٩.. . . . . . . . . . . . . .
ا*>ء ا
!/ك <
Nد 4UWا
٢٢٥.. . . . . . . '?O
ا+خ ا
4ا
ا ٣٤.. . . . . . . . . . . . . .
اه~از ا
8رة |8Nهب ا
,ح ٢٦.. . . . . . . .
4Nء ا
٢٢٤.. . . . . . . . . . . . . . . . . . '?O
٢٢٥.. . . . . .
إ+3ق ا
!/ك 4Nء ا
'?O
ا
g9ا
رد ٢٢٦.. . . . . . . . . . . . . . .
Iن آ] ا
!/ك ٢٢٦.. . . . . . . . . . . .
<' ا
!آ ا:و٢٢٤.. . . . . . . . . G*G
<' ا
!آ ا
4وي ٢٢٤.. . . . . . . . . . . .
4Nء ا
'?Oا
٢٢٥.. . . . . . . . . . . . . . 9
l*Nم Uي آ ١٤.. . . . . Sentry Key
9Nر4N ,ون
٣٣٢.. . . . . . . . . . . . . .
_,~UNا
اء ا
٢٩٠.. . . . . . . . . . . . . . . U
،_,~UNهاء ; ٢٩٠.. . . . . . . . . . . . . .
) 3zGات * (79ا
!/ت ١١٠.. . . . . . . .
_,Gا
] ١٩٧ ،١٨٩.. . . . . . . . . . . . . .
lGوز ذراع ا
٣٢٠.. . . . . . . . . . . . . . . 'U
_* ,D!Gز أول أآ 48ا
Nن ٥٥.. . . . . . . .
,D!Gات وUGت ٨.. . . . . . . . . . . . . . . .
9 ,!Gء ا
!/ك ١٠٤.. . . . . . . . . . . . .
٣٧٩
ا
! ,Dا
Iص /
!
Nم اU3ق
ا
و ١٨٧.. . . . . . . . . . . . . . . .
٢٦٢.. . . . . . .
ا
!zON ,Dن * 4W8ا
+ا*'
ا
! ا
٢٦٢ ،١٨٧.. . . . . . . . . . l
ا
Dآ ~{ LNNام ا
١٧٩.. . . . . . . . . 47/
ا
<; ا
/آ~ي ٣٦٢.. . . . . . . . . . . . .
ا
!١٠٨.. . . . . . . . . . . . . . . . . /
ا
Iر٥٧.. . . . . . . . . . . . . . . . . x
ا
4ا١٠٨.. . . . . . . . . . . . . . . . . ]3
ا
xع ]٣٦٢.. . . . . . . . . . . . . . ;]I
ا
W8ا
١٨٦.. . . . . . . . . . . . . . N
ا
} ٣٦٠.. . . . . . . . . . . . . . . . .
ا
} ا
٣٦٢.. . . . . . . . . . . . . . +]I
ا
pب ٣٦١ ،١٠٧.. . . . . . . . . . . . . .
ا
pب ا
٣٦٢.. . . . . . . . . . . . . . +]I
ا
pء ا
١٨١ ،١٠٧.. . . . . . . . . . . 7
١٧٩.. . . . . . . . . . . . . . . . .
ا
+
ا
>?>
7/ق ١٨١.. . . . . . . . . . . . .
٣٦٠.. . . . . . . . . . . .
ا
wN}/ا**:
ا
wN}/ا **:ا:و١٠٦.. . . . . . G*G
ا
دة ا
ا ١٨١ ،٥٦ ،٣٩.. . . . . . . . .
ا+Iض ا
<د ١٧٩.. . . . . . . . . . . . . .
٣٧٨
,D!Gا
+ا*' ٢٥١ ،١٨٠.. . . . . . . . . . .
P* ,D!Gا?>ق ١٨١.. . . . . . . . . . .
DGآ G 4UWك ا
p* wN}/ءة ١٠٧.. . . . . .
١٠٩.. . . . . . . . .
Lا
wN}/ا**:
? Lا
~١٨٠.. . . . . . . . . . . . . . . ,
'/Wا
wN}/ا P* **:ا
!/ت ١٠٦.. . .
١٨٢.. . . . . .
! ا
!/ك )* sا
('97
* sا
! ا
~Uول *_ []W
ا
7+G/ت ٢٦٣.. . . . . . . . . . . . . . . .
* sا
pء ا
١٨١.. . . . . . . . . . . 7
* ¡*N sاار ا
و
)١٨٧.. . . . . . . . . . . . . . . . . (ESP
* W/lأ~xة ا
س ١٠٥.. . . . . . . . . .
*ا< ? LاFرات )١٨٦.. . . . (TPMS
*} wNا
3/ة ا
٣٦٢.. . . . . . . . . +]I
١٠٥.. . . . . . . . .
*+ح ا
wN}/ا**:
٣٠٩.. . . . . . . .
وا* jا
! _* ,Dا
9I
ا
wN}/ا**:
ا4ال ا
]/ت ٣٦٠.. . . . . . . . . . . . . .
ا:و١٠٦.. . . . . . . . . . . . . . . G*G
٣٦٠.. . . . . . . . . . . . . . . .
ا4ال
ا
١٠٩.. . . . . . . . . . . . . . . . . . Lp
١٠٧.. . . . . . . . . . . . . .
ا
pء ا
7
ا
P* '/7ا
!/ت ١٠٦.. . . . . . . . . . . .
ا
+/ح ١٠٥.. . . . . . . . . . . . . . . . . .
*+ح ا3ر ا
pء ا
/ 7ا
pء
ا
١٠٧.. . . . . . . . . . . . . . . . j+IU/
ا
wN}/ا **:ا:و١٠٦.. . . . . . . . G*G
ا
wN}/ا
Iر٥٧.. . . . . . . . . . . . . . . x
ا
wN}/ا
4ا١٠٨.. . . . . . . . . . . . . . . ]3
ا
١٢.. . . . . . . . . . . . . . . . . . . . . wG+/
ا
+/ح ،ا4ال ١٤.. . . . . . . . . . . . . . . .
ا
+/ح ،ا
*١٤.. . . . . . . . . . . . . . . . l
ا
٩٧.. . . . . . . . . . . . . . . . . . . . . 4W/
٩٨.. . . . . . . . . . . . . . . . . . .
إ*
ا
34ل ا
٩٨.. . . . . . . . . . . . . . . '8
٩٧.. . . . . . . . . . . . . . . . . .
ا
Lp
ا
١٠٣.. . . . . . . . . . . . . . . ;]I]
9
ا
١٠٣ ،١٠٢.. . . . . . . . . . . . . . . . +
ا
١٠٠.. . . . . . . . . . . . . . . . . UI8/
4U8* ,!Gا
٩٨.. . . . . . . . . . . . .
U¢و<]| ا
١٠١.. . . . . . . . . . . . . +]I
Lار+Gع ٩٨.. . . . . . . . . . . . . . .
ا
4W/ا
١٠٠.. . . . . . . . . . . . . . . . UI8/
ا
Uا٢٥.. . . . . . . . . . . . . . . . . . . D
ا
9ارئ{ ،ت
9
N '?OGر ,ا
~7/زة ٣١٥.. . . . . . . . .
ر Pا
8رة ٣١٠.. . . . . . . . . . . . . . .
ء ,D!Gا
+ا*' ١٨٠.. . . . . . . . . . .
ا
٣١٧.. . . . . . . . . . . . . . . . ]IG ،
7
ا
]l7و{ ٣٥١.. . . . . . . . . . . . . . . .
ا
}7ا:و٢٣٢.. . . . . . . . Autostick G*G
ا
]7ي ا
~/دوج ١٢١ ،١١٨.. . . . . . . . . . . .
ا
>9
N ,U7ء ٣٥٠.. . . . . . . . . . . . . . . . .
ا
>l7
N ,U7ت وا
>l7ت ا
٣٥١.. . . . . . . 47/
ا
٣٥٠.. . . . . . . . . . . . . . . . /
N ,U7
ا
/
N ,U7ا
4ا٣٥١.. . . . . . . . . . . . ]3
ا
+N ,U7ش ا
٣٥١.. . . . . . . . . . . . . . 4lU
ا
/N ,U7ش ا
٣٥٣ ،٣٥١.. . . . . . . . . . 4W/
ا
?>ت ،ا
~xج ا٣٣٩.. . . . . . . . . . . **:
ا
+ا*' ٢٥١.. . . . . . . . . . . . . . . . . . . .
ا
/ش ا
]7ي ٣٥٣.. . . . . . . . . . . . . . . .
ا
دة ٢٤١.. . . . . . . . . . . . . . . . . . . . .
ا
8ل ١١٧.. . . . . . . . . . . . . . . . . . .
ا
8ل ،ا:ر ١١٧.. . . . . . . . . . . . . .
ا
]~و ،xز ,ا
!/ك ٣٢٩.. . . . . . . . . . . .
ا
!/ت * 79ا
!آ )*4ة 3zG
ا
١١٠.. . . . . . . . . . . . . . . . . (!/
ا
،!/ا
١٧٣.. . . . . . . . . . . . . . . . +]I
ا
/!/ا
?] ا
١٧٣.. . . . . . . . . . . . +]I
ا
!/ك
ا3ر ا
~٣٦٤.. . . . . . . . . . . . . . . ,
ا+3ق ا
4وران ٢٢٥.. . . . . . . . . . . .
ا
٣٤١.. . . . . . . . . . . . . . . . . . 4,
ا
!lة ٣٢٦.. . . . . . . . . . . . . . . . . .
ا
~٣٦٤ ،٣٢٨.. . . . . . . . . . . . . . . ,
ا
I8ا
~ا4ة ٣٠٩.. . . . . . . . . . . . . .
ا*>ء ا
<د 4UW ،ا
٢٢٥.. . . . . . . . . '?O
4Nء ا
٢٢٤.. . . . . . . . . . . . . . . '?O
9
N '?OGر ,ا
~7/زة ٣١٥.. . . . . . . . .
;,7Gا
!lة ٣٢٦.. . . . . . . . . . . . . .
zON UGن ز ا
7دم ٥٥.. . . . . . . . . . . .
Gت zONن _]Gا
!/ك ا
٥٤.. . . . . 4,4l
xز UGا
اء ٣٢٩.. . . . . . . . . . . . .
Iن ا
] ٢٢٦.. . . . . . . . . . . . . . . .
ات ?Gا
~١٩٥.. . . . . . . . . . . . ,
*]9ت ا
<د ٣٦٤.. . . . . . . . . . . . . .
*س در xا
!ارة ١٨٣.. . . . . . . . . . .
ا
z4/ة ٢٠٨.. . . . . . . . . . . . . . . . . . . .
ا
/ا٦٥.. . . . . . . . . . . . . . . . . . . . . ,
٦٦.. . . . . . . . . . . .
ا
7ا:وG*G
ا
Iر٦٥.. . . . . . . . . . . . . . . . . x
ا
ؤ ,ا
٦٥.. . . . . . . . . . . . . . . +]I
ا
~٦٦.. . . . . . . . . . . . . . . . . . . U,
ا
٦٦.. . . . . . . . . . . . . . . <9
N ]*7
ا
٦٦.. . . . . . . . . . . . . 47Nُ _W N
ا
٦٦.. . . . . . . . . . . . . . . . . . UI8/
ا
/ا ,ا
٦٦.. . . . . . . . . . . . 47Nُ _W N
ا
/ا ,ا
٦٦.. . . . . . . . . . . . . . . . . UI8/
ا
~/ا
¡ ٥٧.. . . . . . . . . . . . . . . . . . . .
ا
١٠٥ ،٥٧.. . . . . . . . . . . . . . . . wN}/
إsرة ا97ف ٣٦٢ ،٣٦١ ،١٨٠ ،١٠٦ ،٥٧.. .
إءة 4UWا
34ل ١٦.. . . . . . . . . . . . .
إDار ا*:ن ١٨٣.. . . . . . . . . . . . . . .
ا3ر ا
pء ا
/ 7ا
pء ا
١٠٧.. . j+IU/
ا4ال ا
]/ت ٣٦٠.. . . . . . . . . . . . . .
٣٦٢.. . . . . . . . . . . . .
اsرة ا
l
اDار ١٨٣.. . . . . . . . . . . . . . . . . .
ا
!) ,Dو
; * W/lأ~xة ا
س( ١٧٩.. .
٣٧٧
.
.
.
.
.
ا
! ا
. . . . . . . . . . l
ا
! ا
~Uول *_ []Wا
7+G/ت
ا
! در xا
!ارة . . . . . .
ا
. . . . . . . . . . . . . . _,~I
ا
;]3 ،_,~Iا
. . . . . . . 47/
ا
]I
* Pا
4,G ') 4/lا
!/ك( ٣٤٤.. . . . .
ا
4و ،,اFرات ٢٨١.. . . . . . . . . . . . . . .
ا
Dآ ~{ LNNام ا*:ن ٢٨.. . . . . . . . . . . .
ا
Dآ ،إءة ا
١٠٧.. . . . . . . . . . . wN}/
ا
Dآ~{ LNN ،ام ا*:ن ٢٨.. . . . . . . . . . . .
ا
~ود <
Nد ٢٩١.. . . . . . . . . . . . . . . . .
ا
،|,8ا
8ا' ٥٧.. . . . . . . . . . . . . . . .
ا
، !Oا
4ن ٣٣٥.. . . . . . . . . . . . . . . . .
ا
'?Oا
g9ا
رد ٢٢٦.. . . . . . . . . . . .
ا
?ات /ا
>,47ت ،ا
8رة ٨.. . . . . . . . . . .
ا
?ات/ا
>,47ت ا
8رة ٨.. . . . . . . . . .
ا
?ات/ا
>,47ت ،ا
8رة ٨.. . . . . . . . . . .
ا
x
إ*
ا
/7د ١١١.. . . . . . . . . . . . . . .
ا
٢٤٩.. . . . . . . . . . . . . . . . . . <9
ا
،]l7ا*
١١١.. . . . . . . . . . . . . .
٣٧٦
.
.
.
.
.
.
.
.
.
.
.
.
.
.
.
.
.
.
.
.
٢٥٢..
٢٦٣..
٢٠٨..
٣٦٠..
١١٨..
< '+ا
١٣.. . . . . . . . . . . . . . . . . ]l7
ا
4lول ،ا
} ٣٦٨.. . . . . . . . . . . . . . .
ا
l
*_ أ 'xا/lم ٣٠٢.. . . . . . . . . . . .
ا
_* lأ 'xا/lم ٣٠٢.. . . . . . . . . . . .
ا
? إ
[ و) N Pا
>' ]W (^O7G
ا
وس ٣٠٣.. . . . . . . . . . . . . . . . .
ا
? *_ و) N Pا
>' ]W (^O7G
ا
وس ٣٠٤.. . . . . . . . . . . . . . . . .
ا
~lء ا
]7ي ا
}]| ١٢٤.. . . . . . . . . . . . .
ا
~lء ا
]7ي ا
}]| ،و{4ة ١٢٤.. . . . . . . . . .
ا
! _* ,/ا
¤آ' ٣٥٠.. . . . . . . . . . . . . . .
ا
!ات ا٥٤.. . . . . . . . . . . . . . . . +
:
ا
!ات ا ،+
:ا
٥٤.. . . . . . . . . . . . . 'U
ا
P4ا
٢٣٦.. . . . . . . . . . . . . . . . . WN
ا
P4ا
WNا
٢٣٦.. . . . . . . . . . . . . '?O
ا
اد) ,ا /:ا
}٢٠٢.. . . . . . . . . . . (G
ا
~xج ا ،**:ا
١٦٩.. . . . . . . . . . . . . 9
ا
~ ،,ا
!/ك ٣٢٨.. . . . . . . . . . . . . . . .
ا
ت ٣٦٤.. . . . . . . . . . . . . . . .
ا
٣٦٤.. . . . . . . . . . . . . . . . . . 78
ا
٣٢٩.. . . . . . . . . . . . . . . . . . ]+
ا
]~و٣٦٤ ،٣٢٩.. . . . . . . . . . . . . . x
7sر ا
٣٢٩.. . . . . . . . . . . . . . ;,7
ء ,D!Gي zONن ا+Iض ا
١٨٠.. . . L?p
}Wا
س ٣٢٨.. . . . . . . . . . . . . . .
١٩٥.. . . . . . . . . . . . . .
ات ا
?
ا
،'8ا
+ا*' ٣٦٦.. . . . . . . . . . . . . . . .
ا
٣٢٠ ،٢٩٣.. . . . . . . . . . . . . . . . . |!8
ا
زن ٢٩٥.. . . . . . . . . . . . . . . . . .
د
' ٢٩٥.. . . . . . . . . . . . . . . . . . .
٣٢٠.. . . . . . . . . . . . . .
رة *]97
ا
I8ا
~ا4ة ،ا
!/ك ٣٠٩ ،١٨٣.. . . . . . . .
ا
;8ا
9/ي ١٥٠ ،١٣٤.. . . . . . . . . . . . .
ا
،*>8زات ا
7دم ٥٥.. . . . . . . . . . . . .
ا
8ا' و*اد ا
!Oوا~x:اء ا٣٦٥.. . . . ]
:
ا
4Oادات
أ{~* ا*:ن ٣٣.. . . . . . . . . . . . . . .
ا
،Lpا
wN}/ا١٠٩.. . . . . . . . . . . **:
ا
<9
٢٣.. . . . . . . . . . . . . . .
أ<+ل اN:اب
٢٤٩.. . . . . . . . . . . . . . . . .
ا
x
ا
+ا*' ٢٥١.. . . . . . . . . . . . . . . . .
ا
/ا٦٦.. . . . . . . . . . . . . . . . . . . ,
ا4ال ا
]/ت ٣٦٠.. . . . . . . . . . . . . . . .
ا4ال ا
]٣٦٠.. . . . . . . . . . . . . . . . . /
ا4ال ا
١٤.. . . . . . . . . . . . . . . . . wG+/
ا4ال +sة ا
٣٣٦.. . . . . . . . . . . . . !/
ا4ال < P9ا
?ر ٣٢٧.. . . . . . . . . . . . . .
اN:اب ١٩.. . . . . . . . . . . . . . . . . . . .
ا9:ا ا
) 8ا
+ا*'( ٣٤٥.. . . . . . . . .
ا+<:ل ٢٢.. . . . . . . . . . . . . . . . . . . . .
ا
ب ٢٢.. . . . . . . . . . . . . . . . . . .
ا
ب ا:و٢٤.. . . . . . . . . . . . . G*G
ا
ب ا
٢٣.. . . . . . . . . . . . <9
N '*7
{ ,/ا+F:ل ٢٤.. . . . . . . . . . . . . . .
]lWا
دة ١٣.. . . . . . . . . . . . . . . .
ا *:ا
}٨٦.. . . . . . . . . . . . . . . . . G
ا /:ا
}٢٠٢.. . . . . . . . . . . . . . . G
ا /:ا
}) Gا
اد٢٠٢.. . . . . . . . . . . (,
ا:وا* ا
}U
Gم ®٨٦.. . . . . . Uconnect
اsرات ،ا97ف ٣٦٢ ،٣٦١ ،١٨٠ ،١٠٦ ،٥٧.. .
ا7sل ١٢.. . . . . . . . . . . . . . . . . . . .
١٢.. . . . . . . . . . . . . . . . . .
ا
+/ح
اءة 4UWا
34ل ١٦.. . . . . . . . . . . . . .
اFر ا{٣١١ ،٢٧٨ ،٢٧٧.. . . . . . . . F
اFر ا{ Fا
}? ٢٧٧.. . . . . . . . . . .
اFرات ٢٧٣ ،٥٧.. . . . . . . . . . . . . . . .
إFرات ا
٢٧٦.. . . . . . . . . . . . . . 4]l
اl{:م ٢٦٦.. . . . . . . . . . . . . . . . .
٣١١.. . . . . . . . . . . .
اFر ا{F
ا{ Fا
}? ٢٧٧.. . . . . . . . . . . .
٢٧٩.. . . . . . . . . . . . . . . .
ا4ال
ا
¤آ' /Nور ا
~*_ ) /WاFرات( ٢٧٩.. . .
٢٨١.. . . . . . . . . . . . . . . . .
ا
4و,
ا
4و ,ا
٢٧٨.. . . . . . . . . . . . . . P,8
ا
? ٣١٠.. . . . . . . . . . . . . . . . . .
ا
W8ا
٢٧٤.. . . . . . . . . . . . . . 7
ا
٢٨٠.. . . . . . . . . . . . . . . . . '>8
ا
٢٧٣ ،٢٦٤.. . . . . . . . . . . . . . *>8
ر Pا
8رة ٣١٣ ،٣١٠.. . . . . . . . . . . .
7ا
!٢٧٠.. . . . . . . . . . . . . . . /
? Lا
اء ٢٧٣.. . . . . . . . . . . . . . .
ء ,D!Gي zONن ا+Iض ا
١٨٦.. . . L?p
Fت <٢٧٥.. . . . . . . . . . . . . . . ,9
/WاFرات ٢٧٩.. . . . . . . . . . . . . .
*sات ;]Gا
4/ات ٢٧٨.. . . . . . . . . .
*,8ت ? Lا
٢٧٤.. . . . . . . . . . . ¥+U
**]7ت ٢٧٣.. . . . . . . . . . . . . . *W
م *ا< ا
٢٨٢.. . . . . . (TPMS) L?p
اFرات ذات ا
9ت ا
٢٧٥.. . . . . . . . . ,9
ا4Wادات ا
٢٠٠.. . . . . . . . . . . . . . }IO
ا4Wادات ،ا
٢٠٠.. . . . . . . . . . . . . }IO
اDار )إDار ا*:ن( ١٥.. . . . . . . . . . . . . .
ا~ال ا:وU]
G*Gا Dا
٢٥.. . . . <9
N ]*7
ا,ل ٢٩٠.. . . . . . . . . . . . . . . . . . .
ا
9ر٣٣٢.. . . . . . . . . . . . . . . . . . . ,
ا4ال xز إرل wاN:اب دون
*١٨.. . . . . . . . . . . . . . (RKE) wG+
ا
) _,~Uا
<د( ٢٨٩.. . . . . . . . . . . . . . . .
ا
ا Nا
4وارة ا
٢٦.. . . . . . . . . . . . . . +]I
ا
ا Nا
4وارة ،ا
٢٦.. . . . . . . . . . . . . . +]I
ا
] ١٩٦ ،١٩١ ،١٨٨.. . . . . . . . . . . . .
ا
zآ *> _* 4ا
8رة ٥٥.. . . . . . . . . . . . .
ا
،_,ا
] ١٩٧ ،١٨٩.. . . . . . . . . . . .
ا
!9 ،,ء ا
!/ك ١٠٤.. . . . . . . . . . . .
ا
!٣١٢.. . . . . . . . . . . . . . . . P]
p
ا
! ا:و4N G*Gر xا
!ارة )٢١١.. . (ATC
ا
! 47Nُ _W
١٦.. . . . . . . . . . . . . . .
أ<+ل اN:اب
٣٧٥
) ABSم ا
+ا*' ا
>?>
7/ق( ٢٥١ ،١٨١.. .
أ{~* أ*ن ا
!ض/ا
; ٢٩.. . . . . . . . . . .
أ{~* ا*:ن ٥٦ ،٢٨.. . . . . . . . . . . . . . .
٣٣.. . . . . . . . . . . . . . . . .
ا
4Oادات
ا
٥٦.. . . . . . . . . . . . . . . . . . !+
ا
47/ا٣١ ،٢٩ ،٢٨.. . . . . . . . . . **:
٢٩.. . . . . . . . . . . . . . .
ا
47/ا
+]I
ا
8Uء ا
!ا*' ٣٣.. . . . . . . . . . . . . . .
DGآ ١٧٩.. . . . . . . . . . . . . . . . . .
/]7Gت ا
٣١.. . . . . . . . . . . . . . '?O
{~ام ا
; ا
٣٢.. . . . . . . . . . Lp]
'N
٣٢.. . . . . . . . . . . .
]/Wإزا
ا
اء
* ا
; ا
]7ي ا
٣٢.. . . . . . Lp]
'N
م Gا+F:ل ٤١.. . . . . . . . . . . . .
أ{~* ا
; ٢٩.. . . . . . . . . . . . . . . . . .
أ{~* ،ا
٥٦.. . . . . . . . . . . . . . . . . 47/
أاء ا
!) ,Dو
; * W/lأ~xة
ا
س( ١٧٩.. . . . . . . . . . . . . . . . . .
أ7G ! ،9
ا
اد ' L?) G,ا
٣٤٣.. . . . . . (4,
ا
<د ٢٩١.. . . . . . . . . . . . . . . . . .
م ا
xا
~7/ز ٢٤٩.. . . . . . . . . . .
٣٧٤
أ<+ل اN:اب ٢٢.. . . . . . . . . . . . . . . . . .
أ<+ل اN:اب ٢٢.. . . . . . . . . . . . . . . .
xز إرل م wاN:اب 47Nُ _Wدون
*٢٢.. . . . . . . . . . . . . . . (RKE) wG+
{ ا
٢٢.. . . . . . . . . . . . . . . wG+/
٢٢.. . . . . . . . . . . . . . . . . . 47Nُ _W
< '+اN:اب ! ,/ا+F:ل -اN:اب
ا
٢٤.. . . . . . . . . . . . . . . . . . . +]I
أ<+ل اN:اب ا:و٢٤.. . . . . . . . . . . G*G
أ<+ل اN:اب ،ا:و٢٤.. . . . . . . . . . . G*G
أ<+ل ا*:ن ! ,/ا+F:ل ٢٤.. . . . . . . . . . .
أ G /ا+F:ل
أ G /ا+F:ل ٤١.. . . . . . . . . . . .
أ G /ا+F:ل ا
ر وا+F:ل ٤٣.. . . . .
أ G /ا
Pوا+F:ل ٤٣.. . . . . . . .
أوع ا
]lس ٤٥.. . . . . . . . . . . . . . .
٤٦.. .
ا
/ت ا
]+8و L,sا
+F¦
',9ل
٤٨.. . . . . . .
* P<* 4,4!Gت LATCH
Gآ| أ G /ا+F:ل 4INام {~ام
أ*ن ا
8رة ٥١.. . . . . . . . . . . . . . . .
Gآ| * 47ا
٥٢.. . . . . . . . . . . . . '+9
Gآ| م Gا+F:ل ا
/ا * Pم
٤٩.. . . . . . . . . . . . . . . . . LATCH
آ~{ _,~IG +ام ا*:ن ا
~/ود |! ¤Nا
'+
ا:و (ALR) G*Gا
4I8/م ٥٠.. . . . .
* 4Wا
٤٤.. . . . . . . . . . . . . . . . P
أ G /ا
آب ٢٧.. . . . . . . . . . . . . . .
أ ،G /ا+F:ل ٤١.. . . . . . . . . . . . . .
أ ،G /ا
آب ٢٧.. . . . . . . . . . . . . .
إxاءات ا
} ٣٢٧.. . . . . . . . . . . . . . .
إ3اج *+ح ا
١٢.. . . . . . . . . . . . . . '?O
إزا
ا
~lء ا
]7ي ا
}]| ١٢٨.. . . . . . . . . . .
إsرات ا97ف ٣٦٢ ،٣٦١ ،١٨٠ ،١٠٦.. . . . .
إ ا
<د ٢٩١.. . . . . . . . . . . . . . . . .
إ ' 4,Gا
!/ك )* Pا
٣٤٣.. . . . (4/l
إFرات ا
٢٧٦.. . . . . . . . . . . . . . . . . 4]l
إWدة ?G s* Lا
~١٩٥.. . . . . . . . . ,
إ*
* 47ا
٩٨.. . . . . . . . . . . . . ^8
إ*
/Wد ا
١١١.. . . . . . . . . . . . . . x
إDار ا*:ن ١٥.. . . . . . . . . . . . . . . . . . .
ا{Fت ا
٣٢٧.. . . . . . . . . . . . . . . '?O
ا4ال اFر ا
+/غ *_ ا
اء ٣١٠.. . . . . . . .
ا4ال اFرات ٢٧٩.. . . . . . . . . . . . . . .
١١
اس
٣٧٣
٣٧٢
٣٧١
إذا ا إ ا
ة
ªن *ز Wا
lا
},{ 7U}/ن ]G []W
ا{>3 _* Gxل * lU* _* *4,ت و*43ت .و
{
{4وث *>Oت ا
،*4Iأو ر أN7
,ت
أ3ىGN
ُ _!U ،ع ا
9Iات ا
:
و {
ا}Gل /
Nزع P/x G [x,ُ ،ا
*]7/ت
ا
:
• ا /وUWا ور< ه.+G
• ر< ;,7Gا
8رة ) 4x,هDا ا
47د ا
/ن *_ 17
ر<ً {
[]W /و _/,رؤ>3 _* ,ل ا
~xج ا**:
ا
آ_ ا
]7ي ]{ ا
|x []W k]Nا
.^8آ/
_/,ا
!}ل >3 _* ]Wل 'l8Gا
8رة أو ا
ا
Iص .(N
• <¬ ا
P* ]O/ا
آ' ا
،4/7/أو * Pا
آ'
ا
8/ول أو * ,4ا
{ .*4Iإن *8و
ادارة
ا
x/د4
_,ى ا
آ' ا
4/7/ه أ'{ U/, _* 'p
ا
.7ً, ]O/
• ا
آ' ا
*4I]
4/7/وا
.P
• وإذا D7Gر '{ ]Wا
/N '}G ،]O/ز Wا
lت
ا
7U}/ا
x/د
N _,ب *_ *<.7
• Gر ]8G ¥,ا
8رة وا
8/ا
>3 _* W9/ل 4Wاد
ا
.W8
٣٧٠
• Gر *43 ¥,ا
8رة.
• و
; د<^ ] ]O/وا
وف ا
{. ¢4
٩
إذا ا إ ة ا
• إذا ا إ ا
ة ٣٧٠.. . . . . . . . . . . . . . . . . . . . . . . . . . . . . . . . .
٣٦٩
#ول ا
را" Pxآ| ا
*4Iوا
/pن" ]7ف 4x []Wاول
ا
}.
٣٦٨
٨
#اول ا
•
#ول ا ٣٦٨.. . . . . . . . . . . . . . . . . . . . . . . . . . . . . . . . . . . . . .
٣٦٧
ا('&
ا
/ن
<' ا
!آ ا:و - G*Gإذا آ ا
8رة *~ودة
DN
<' ا
!آ ا
4وي -إذا آ ا
8رة *~ودة
DN
' ]Wا
وس
ا
وس ا
!/
]+ر ا
4وران )ا*:م(
ا
وس ا
!/
]+ر ا
4وران )ا
(;]I
أ9ا ا
+ا*' ا
8
~3ان ' ا
xا
~7/ز
٣٦٦
ا
8ا' أو ز,ت ا
!Oأو < P9ا
?ر ا]
:
ا4Iم '< ' Lا
!آ ا:و _/, .ATF+4® G*Gأن ¢,ا
'O+
ا4Iام ' ® []W ATF+4و '< +ا
!آ أو أداؤ4IN w}U .kام '
®.MOPAR® _* ATF+4
4IN w}Uام ز '< !OG ,ا
!آ ا
4وي *_ ® MOPARا
Dي ,ا^ *P
*]9ت *7ر ا
/اد O
MS-9224آ .Chrysler
4IN w}Uام ' <' ا
!آ ا:و.MOPAR® _* ATF+4® G*G
4IN w}Uام ز]
MOPAR® !OG ,وس و*!ر ا
4وران *_ ع
)).SAE 80W-90) (API GL-5
+) RBI 226از 4IN w}U - (44ام ز !OG ,ا
وس و*!ر ا
4وران *_
® _* MOPARع ) (SAE 80W-90) (API GL-5أو * |!8
.,
ا
9/رات ،ا4Iم ز !OG ,ا
وس و*!ر ا
4وران ا
MOPAR® WU9
)*_ ع |]9G .(SAE 75W-140ا
ُ9ز ا
~/ودة ~/Nة ™'+<" Trac-Lok
ا
* "|!8دة *.p
4IN w}Uام ' ا
+ا*' MOPAR® DOT 3و4W { .SAE J1703م
' Gا
+ا*' ،DOT 3و4Wم ' Gا
+ا*' 7 ،SAE J1703ا
'8
.ً* DOT 4
4IN w}Uام ' ا
xا
MOPAR® _* 4+ <9
N '*7و' <' ا
!آ
ا:و.MOPAR® ATF+4® G*G
-/ر ا1 ا357 و89(ا;ا>= وز<;ت ا
ك9ا
-/ر ا1 ا357 أو89(ا;ا>= أو ز<;ت ا
UG *' ذو150000/اتU 10 ن/pN [9?/
اMOPAR® _* 4,G '/4/l
اP* آG ام4IN w}U
4,G ' أوChrysler آO
MS-12106 ر *اد7* ]ت9* P* ^اG ( واOAT) ,p7
ات ا
.Á*
أوPennzoil® أوMOPAR® '* ،API دةs []W '
!
اSAE 5W-20 !ك/
ا,ام ز4IN !}U
.Chrysler آO
ACEA A1/B1 أوMS-6395 اد/
ر ا7* ت+
^ *اN9, /* , * أوShell Helix®
.!!}
اSAE x در7/
!ك/
ا, ز7G ء9 Pxرا
أوMS-6395 اد/
ر ا7* P* ^ا/
واChrysler آs ى4
4/7/
اSAE 5W-30 !ك/
ا,ام ز4I ا, 4<
.SAE 5W-20 !ك/
ا,ا ز, *4UW Shell Helix® وPennzoil® وMOPAR® '* ACEA A1/B1
.MOPAR® _* ل7sت ا7/s ام4IN w}U
.MOPAR® _* !ك/
ا, زG> ام4IN w}U
.91 ( هRON) !
ر< أوآن ا
٣٦٥
;نAا
~ان3
_,~U
ا- !ك/
ا,ز
ات3.6 7 *!ك- ل7sت ا7/s
!ك/
ا,] ز
_,~U
*!آت ا- 'ا8
ر ا3ا
'Dت ا;ا>=
اGHم اEA</
ا;;7د )ا - (EM<Pاُ5ز ذات اKLM
ا;;7د )ا - (EM<Pاُ5ز ذات ا/ر 3Lأ;Lاب
ز< ا9ك 3ا
*!ك
3.6 7ات )در 47* _* 4/7* ،SAE 5W-20 xا
ول ا((API) ,*:
Gم ا* <M
*!ك
3.6 7ات P* -ا
MOPAR® _* 4,G '/4/lا
/pN [9?/ن U 10ات/
'* 150000ذو UGات ا
(OAT) ,p7وا
Gا^ *]9* Pت *7ر ا
/اد
ا
O
MS-12106آ Chrysler
* W _/p,ة اxع ' ا
4,ا
]* ,ه إ
[ *8ى ا
! 4ا.[}<:
٣٦٤
اGHم اي
x 18.5ن
x 22.5ن
70
85
6آارت
5.6ات
10.5آارت
9.9
;ا-ت ارة
ا9ك
ا75
اVDم
أ ' 7رة
3.6ات
146آ]وات 5000 4UWدورة ا
<4
4000 4UW * _G 315دورة ا
<4
ا8* Oول ا
7/ت
< :GZر W EX EW;- &MHWوز '
ارة 120آ .('/Zً 75) ' / 8و'
ا &MHا ; ' bcHW EWارة إ أK =7
120آ.('/Zً 75) '/8
٣٦٣
Mح اMdب اEc
Mح ا; j7اآVي ا;Dي )(CHMSL
N < .1ل إ
[ أ '+ا
8رة ]
ل إ
[ ;]3
*}ح ا
pب ا
.+]I
*}ح ا
<; *آ| آN _* []W: 4/G +ب
ا
3/ة ;]3اFر ا{ { .Fا
! xإ
[
ا
،*4Iا{}' W/l* []Wا
}/ح/ا
?9ء *_ ا
آ'
ا
]!/ا
.4/7/
.2أدر * W/lا
W gW g/رب ا
1/4 W8دورة
وا~ _* Wا
./ا!| ا
}/ح ا_* 8* klG
ا
g/و< 4Nا
.
Mح اklة ،وا; ،j7وإiرة ا5Dhف،
وا;#ع jc
.1أ3ج ا
_ ا
4ا _]3ا
9N, _,Dن * ء
ا
3/ة oL 8PW h . 8l
Nزا اMا Enاcر EX #أي
و.7
ªN < .1زا
اFر ا{.F
; 37ا EnMا
اEk
.2أزل ا
ا ا:ر 7Nا
8/Gا
/47ا
?9ء
* '*{ []WاFر ا{.F
.2ا}' ا
_W /ا
^,F _W 8lد Pا
}/ح
]4ا |! P* '3ا
}/ح 4ً7Nا _Wا
. 8l
.3ا}' * W/lأ>ك ا
' *_ 9 ;]3ء
ا
}/ح.
.3أدر ا
g/ا
4/1 |U/دورة gWاklG
Wرب ا
¢ ،W8ا~ _* Wا
./
.4ا!| ا
}/ح ا _* 8* klGا
g/و<
4Nا
.
٣٦٢
ªN < .5زا
ا
ا ا:ر 7Nا
8/Gا
!] ا
47/
ا
./
.13أ G 4Wا
}/ح ا
' ]{ ^,F _W
ا
وأر.*8* 7N
.6أزل ا
}/ح *_ ا.N:
.14أ>
* G 4Wت إsرة ا97ف وا
<;،
وأ G 4Wا
Oا.**:
.7أزل ا
_* '
/ا
] ،/وأزل ا
48ادة ا
.F9/
.8ا
/ا
~آ ا
_W /]
47/ا
^,9
ا
[]W L?pأر 'xا
¦*م وا
Iرج.
.9ا!| ا
] _* /ا
./
.10رّآ| ا
] /
* /ا
wN}/ا.**:
إiرة ا5DhفM /ح ا; j7ا/
.1أزل ا
Oا .**:أدر ا
/ت
Nب *_ ا
~lء
ا
]7ي 4/1دورة gWاW klGرب ا
W8وأز
.
.2ا!| ا
~lء ا
_* ]+8ا
4ً7N Oا ً4Nء *_ أ{4
ا
_lو
ً إ
[ ا
|lا.3Æ
.3أدر * W/lا
4/1 g/دورة gWاklG
Wرب ا
W8وأز
*_ ا
./ا!| ا
}/ح
ا _* 8* klGا
g/و< 4Nا
.
!&MHW
g/]Gا
] /ا
4,4lة .7N
zNا
]ث ا
~, ,دي
إ
[ <} /Wا
] 'ON /وا .wإذا 7Gا
]/
8*>/أ ,أ w9ز!
N +UN ،,ل ا
.;+I
<
9W vLأرآن ارة ا/
.11رآ| ا
/ا
~آ ا
/
47/ا
}/ح
ا.**:
N < .1ل 9 '+:ع ا
_ ا _**:و{4د
* 4,4!G wN}* g* Pأرآن ا
8رة ا.**:
¢ .12ا
48ادة ا
F9/وا
'
/ا
/]N N
ا
}/ح ا.**:
.2أدر * W/lا
W gW g/رب ا
3/1 W8دورة
وا~ _* Wا
./ا!| ا
}/ح ا_* 8* klG
ا
g/و< 4Nا
.
Mح اMdب اE/
N < .1ل إ
[ أ '+ا
8رة ]
ل إ
[ ;]3
*}ح ا
pب ا.**:
.2ا}' *
' * W/lا>:ك *_ <'
* gN
*}ح ا
pب ا.**:
.3أ{ إ*8ك ا
]4IN /ام ا
¢ _x~/ا?L
+
7ً* /]Wا
]}* * ;]3 _* /ح ا
pب
ا.**:
.4ا!| ا
]3 /رج ! ا
/ا¢ 8* klG
' ا
}/ح ا
.',4
!&MHW
g/]Gا
] /ا
4,4lة .7N
zNا
]ث ا
~, ,دي
إ
[ <} /Wا
] 'ON /وا .wإذا 7Gا
]/
8*>/أ ,أ w9ز!
N +UN ،,ل ا
.;+I
٣٦١
K<VcWارة
إذا آUG Uي Gك ا
8رة آ+
Uة , 21 _W 4,~Gم؛
U/اIGذ 4Wة 93ات ! ,/ا
9ر:U/, { .,
• إزا
]Wا
}U/ات ر< * J13آ~ GزP,
ا
(PDC) <9ذات ا
U7ان Ignition-Off Draw
)!| إ,ف ا7sل( ) (IODوا{* N Ë+ن
*_ دا* '3آ~ Gز P,ا
.(PDC) <9
• أو '} ،ا
'Nا
_W |
8ا
9ر.,
• أي و< Gم ,ªNف ا
8رة أو _W ;<G
ا4Iا* )أU¢ء _W: (>ً* ]9Wأو أآ <
'?ONم *; ا
اء أU¢ء FGا
!/ك 4/ة 5
د<^ ً,Gو Pا
اء ا
Uو Wا
/و{
ا
}ى .إن ا
م U]
ًU* ً,~G _/p
DNم
]' إ* ;]Gا
4UW LpإWدة '?OGا
Uم.
ا'
Mال اMت
ا
wN}/ا
4ا]3ع ا
]/
*}ح * '< sا
!آ ا:و658 .. . . G*G
أاء ا
34ل ،أ '+ا
906 .. . . . . . (1) k]N
٣٦٠
*} wNا
! xز ا
194 .. . . . . (2) 4
*}ح * sا
+/ح ا
~از )*~ P
',ا
DUة
ا
** .. . . . . . . . . . . . . . . . . . . . (+]I
*}ح ا
;8ا
912 .. . . . . . . . . . . . N
** Gا
4
wN}/ى ا
آ' ا
.L 4/7/
ع ا
]/
ا
wN}/ا
Iرx
*} wNا
xع إ
[ ا
W16W .. . . . . (2) ;]I
*}ح ا
<; ا
/آ~ي ا
]7ي ) s* .. (1
)4
,ى ا
آ' ا
(4/7/
*} wNا
pب اPSX24W .. . . . . (2) **:
*} wNا
pب ا
P27/7W .. . . . . . (2) +]I
*} wNا klGاPY27/7W .. . . . . (2) **:
*} wNا
ار ا
lا wN}*/**:ا
!4,4
ا
W5W .. . . . . . . . . . . . . . . (2) l
ا
wN}/اH4 .. . . . . . . . . . . . (2) **:
*} wNا
Pا12V14W .. . . . . (2) **:
*} wNا
Pا
/+]Iا
<; )P27/7W .. . . (2
*} wNا klGا
PY27/7W .. . . . . . (2) +]I
*}ح { ا:ر<م )W5W .. . . . . . . . . (2
(W :GZا/ر7م إ أ;اع ا vLار<
اi KA< Eاؤه Kا;آ= ا Dا.E9
ا'
Mال اM
KA< :GZأن <اآ 8اMdب ا
H '
D
وث zوف EX .HD <;#اV< y1ول ذ
H
1Wا;/ال ا;< =<;9L j}A vا|
ا) }AاMdب( إ cLرl< .دي =1(Wا Mدة إ
3<WاVوال.
ا Mح اE/
.1ا wا
?9ء وأ4IN k4Uام ا
|pا
.47/
.2أزل ا
Oا .**:أدر ا
/ت
Nب *_ ا
~lء
ا
]7ي 4/1دورة gWاW klGرب ا
W8وأز
.
.3ا!| ا
~lء ا
_* ]+8ا
4ً7N Oا ً4Nء *_ أ{4
ا
_lو
ً إ
[ ا
|lا.3Æ
.4أدر آ> *_ *W/lت * gإsرة ا
<;
وا97ف 4/1دورة gWاW klGرب ا
W8
وأز
.
ا;ة
ا HاMA
ا Hا 1
20أ* أ
+
10أ* أ{/
10أ* أ{/
10أ* أ{/
M31
M32
M33
M34
–
–
–
–
M35
M36
M37
–
–
–
10أ* أ{/
20أ* أ
+
10أ* أ{/
M38
–
25أ* +sف
!&MHW
• 9 G 4UWء و{4ة ا
<9ا
~], ،]*/م ا
zآ_* 4
] _* p
و Pا
?9ء ،!!
,9Nوا
zآ 4أً ,
{ªNم { .إن 4Wم إxاء ذ
<34N w/8, 4ل ا
/ء
دا '3و{4ة ا
<9ا
, /* ]*/دي إ
[ '97Gا
Uم
ا
.N
)(3LW
ا;j-
*} wNا
xع ];]I
و{4ة ا
! ا
دة ا
اTT EUROPE ،
و{4ة ا
! * W/lا
P4وا
!آ
* 4W8ا
<; ،م ا
! در xا
!ارة '8 ،ا
wN}/
ا ،**:ا
]
ا
/ا ,ا
UI8/
* D+Uا
<9
م ا
+ا*' ا
>?>
7/ق ،م ا
! اار
ا
و+* ،ح ء ا
<; Ip* '{* ،ا
<د
*Gرات ا
/'+إ
?ء ا
'+
(3LW) !&MHW
• 4UWا4ال *!* }Uق~], ،م ا4Iام *}U
47/N P/,ل ا *:ا
.|U/آ /أن ا4Iام أي
*47/N }Uل _W ;]I,ذ
ا
47/ل ا
4< w/
,دي {4وث 93 '/!Gا
Uم ا
.Nو
{
ا/ار ا{اق ا
}U/ات ا
G ,آ،
ªن ذ
4,ل []Wوxد * ]Oا
4اة ~],م
.x>W
٣٥٩
ا;ة
ا HاMA
M15
–
M16
M17
M18
M19
M20
M21
M22
M23
M24
M25
M26
M27
M28
M29
M30
–
–
–
–
–
–
–
–
–
–
–
–
–
–
–
٣٥٨
ا Hا 1
20أ* أ
+
10أ* أ{/
15أ* أزرق
15أ* أزرق
25أ* +sف
15أ* أزرق
20أ* أ
+
10أ* أ{/
10أ* أ{/
25أ* +sف
20أ* أ
+
10أ* أ{/
10أ* أ{/
10أ* أ{/
10أ* أ{/
15أ* أزرق
ا;j-
م ا
! در xا
!ارة* ،ة ا
ؤ ,ا
+G 9 ،+]Iع
*}رة ا
آب+* ،ح ]Wا
+* ،'Uح ا
! *47د ا
;،
م *ا< ? LاFرات ،و{4ة 7/sا7sل – ,4}Gا
~,4ل
L
و{4ة ا
دة ا
ا
*}ح ا
3/ة ا}*/8,:ح { أر<م ا
8رة}*/ح ا
<;
*}ح ا
3/ة ا}*/_/,:ح ا
<;}*/ح ا
8
إ,ف ا
'?Oا:و ASD) G*Gر< 1ور< (2
ا
}/ح ا
4ا}* j/
]3رة ا
آب ;
،ا
wG+/
إ,ف ا
'?Oا:و ASD) G*Gر< (3
ا
Uا
(j+IU*/P+G*) [U/
ا
Uا
8ى )*(j+IU*/P+G
ا
!/ا
+]I
* Ipا
<د Ip* ،ر Pا
~,4ل – ا
}L ,4
*+ح ا
Uا Dا
+* ،<9
N ]*7ح Dة ا
^8
+* ,D?Gح ا
،'?Oا
{4ة ا
>]
و{4ة ا
! * W/lا
P4وا
!آ
* W/lا
P4وا
!آ
*Gر ا
!/ا ,D?G ،**:ا
{4ة ا
J1962 }IO
ا;ة
ا HاMA
ا Hا 1
20أ* أ
+
2أ* ر*دي
25أ* +sف
20أ* أ
+
20أ* أ
+
20أ* أ
+
20أ* أ
+
15أ* أزرق
M3
M4
M5
M6
M7
M8
M9
M10
–
–
–
–
–
–
–
–
M11
–
10أ* أ{/
M12
M13
–
–
30أ* أp3
20أ* أ
+
M14
–
20أ* أ
+
ا;j-
*{' <!* '+ر ا
4وران ا/**:ا
+]I
زك ا
W8
ا
!/ل ا
- Nإذا آ ا
8رة *~ودة
DN
* D+Uا
<9ر< 7O8*/1ا
9/
* D+Uا
<9ر< ) 2ا
9ر 4,4!G/,ا
!]/ت(
ا
47/ا **:ا
_I8/
ا
47/ا
+]Iا
- _I8/إذا آ ا
8رة *~ودة
DN
!| إ,ف ا7sل -م Gا
8رةx ،ز ال ا
</
ا
} /]
Gا
} ،DVD '?O* ،WUو{4ة 4!Gث ،47Nُ _W
ا
اد ،,ا
اx ،ز N wب ا
/ب}* ،ح ا
~U,
)!| إ,ف ا7sل( م ا
! ا
}* ،g9ح أ9 '+ء
ا
!/ك
* Ipا
}ت
!| إ,ف ا7sل j* -ا
،UNو{4ة ا
! ا
>]،
ا
}ة+* ،ح ا
! *47د ا
;
!| ا
9/رة )ا
}(L ,4
٣٥٧
ا;ة
ا HاMA
30أ* وردي
–
J8
J9
J10
J11
J12
J13
J14
J15
J17
J18
J19
J20
J21
J22
M1
–
40أ* أp3
30أ* وردي
30أ* وردي
30أ* وردي
60أ* أ
+
40أ* أp3
40أ* أp3
40أ* أp3
20أ* أزرق
60أ* أ
+
30أ* وردي
20أ* أزرق
–
–
–
–
–
–
–
–
–
–
–
–
–
–
–
–
15أ* أزرق
M2
–
20أ* أ
+
J7
٣٥٦
ا Hا 1
ا;j-
م ا
+ا*' ا
>?>
7/ق )/
،(ABSم/م ا
!
اار ا
و
–
ا
G/ر ا
ي /PZEVا
<د ا
/ن
*{' '8ا
}/ح ا/
/**:م ;
Gا
P/l/
< |pا
zرwx
*Gر ا
/و{ ا
*/+]Iو{ ا
ادG,
!| إ,ف ا7sل ) - (IODا
8
*~ ',ا
} _* Pا
~xج ا
+]I
ا
/و{ ا**:
ا
;]/ا
]
lز 4Nء ا
'?O
9ق <' ا
!آ {4ة ا
! م ا
P4وا
!آ )(PCM
*و{ ا
ادG,
ا
!/ا **:وٍW Pلj+IU*/
ا
?] ا/**:ا
+]I
اFر ا{F
*}ح ا
<; ا
]7ي ا
/آ~ي )}* ,D?G/(CHMSLح *+ح
ا
<;
إءة <Fة ا
}*) '{/ح ا
<;(
(3LW) !<~9W
• {
ا{اق * /: *W ,/{ }Uا*:ن
)م ا
دة ا
ا ،م ا
+ا*'( أو أ/
و{4ات ا
) <9م ا
!/ك ،م
4Uوق ا
وس(
أو م ا
،xا
N '}Gآ' ا
.4/7/
و
ة ا 75ا Aآً
4xGو{4ة ا
<9ا
]*/آ]ً ا
!/ك
Nب
*_ ا
9ر!, { .,ي هDا ا
/آ~ []Wا
}U/ات
ا
ة وا
}?ة وا
>{/ت []W ^}]* 4x, .ا
|l
ا
4ا9?]
]3ء 4!,د 7Fآ' *ن.
و
ة ا 75ا Aآً
ا;ة
J1
J2
J3
J4
J5
J6
ا HاMA
–
30أ* وردي
–
25أ* +sف
25أ* +sف
40أ* أp3
ا Hا 1
–
–
–
–
–
–
ا;j-
–
و{4ة ]Wا
'U
–
*N jب ا
^8
*N jب ا
اآ|
م ا
+ا*' ا
>?>
7/ق )/Ip* ،(ABSم ا
!
اار ا
و
٣٥٥
ا;HL <HDا ~XاVء ا;Dي ا K ;HاPش
!&MHW
!,ي ا
~lء ا
]7ي ا
_* s/ر []W GاD
7G 4< * >Nض ]4Iش * ,UW xG ,
GN
3ع ارsدات ا
:
4I8G .1م </< 79ش /Wزا
ا_* ً4N .NG:
ذ
،ا'
cم K ;H +;XاAو MXأو D57
7ش L Mء ا EPHاMرد أو ا
ا ،Xواv
Kأ
EM#ا~XHة إ ا yا ،kو /أو
, .='/م * ;Uا
Uا Dا
~ xxا
47/ل 8رات
MOPAR® _* Jeepأو * P/x ;UN ,
ا
Uا Dا
> دون .s43آ, /م ªNزا
ا
4Iوش
ا
_8!
<4ا
ؤ ,و Gا
! _* ,/ا 7s:ق
ا
PU/
l8+Uا
+ار ا
Uا.D
4UW .2ا
?
cW h ،'8م اء ا Pً5 Kkأو أي
*دة أ<ى *_
Nن 4I8G .;+3م *!
' *'
ا
!ل أو *اد .,< ;UG
.3ا ;9sداً* *ً4I8* /ء Nرد ¢ ،ا*/< 79N w8ش
+و /Wو*.>ً]< F
٣٥٤
4UW .4إزا
ا
} Pأو ا
]ج
cW h ،م 5(Aأو
;اد آ> y<~Wا};ج .ا4Iم ا
/ء ا
4ا L Áإذا
آن w8* |l,ا
Uا.W8N D
}]* PN G .6ت أو *اد Ò/
]Wأو أي
أ []W Fsا
Uا _* .Dا
} |7إزا
ا
/اد ا
>
و<4
;]G |8Gا
Uا.D
) ,]
.5ا
*ل أو ا NG:أو ا
_9أو ا
(w]/ا
lGU
_Wا
دة F []Wق *4/ة ¢zGآ '?OG []W
ا
.{8و{[ ا
دة []Wا
9ق ا
4//ة و '8ا
8رة
¢ا
{ '/W []W ,Uا
DUة+!]
.ظ []W
ا4Iام {ت ا
DUة ;UG |l, ،آ' {
Dة و . U* 'ON ,~Gا4Iم * ;Uو*دة ,~G
Gب ز MOPAR® _* ,أو * '8
,
'/Wا
'< .{8ا/7ل ا
zG ،;U/آ ]3 _* 4أUن
ا
_* {8ا
*ل وا
_9وا
/اد ا3:ى ; .آ' *_
xا
،{8و
|x gوا{+} ;9ON < .4
ا
/N {8ء واGآ+l, /ن .ا ;U* '7xوز,
G !OGب ز MOPAR® _* ,أو * ,
_N ']I,أUن ا
.{8إذا ]Wأداة ا~ق ا
،{8
4Iم * ;UوزG !OG ,ب ز_* ,
® MOPARأو * P* ,أداة ا~ق|]9, 4< .
ا *:ا/7ل ا
: ;U/آ *_ *ة <' أن !Gر
ا
.{8
ا Hات
!<~9W
• 4UWا4ال *!* }Uق ،ا4Iم داًً}U* /ا
47* g+UN ًU* >ً,4Nل أ* ا
}U/ا .]
:
48Gل *ً}Uا 47/N 3¤Nل أ* أ48G .[]Wل
*ً}Uا *!ً< >zNك * 47أو أي *دة أ3ى4< .
,دي ا
'O+ا4Iام ا
}U/ات ا
U/إ
[
إ
93 }Is Nة و/أو Oب { ^,و/أو ;]G
ا
]//ت.
• <' ا4ال *zG ،}Uآ _* 4أن *+ح ا
'?O
و Pإ,ف ا
'?Oوأن P/xا
*4Iت ا3:ى <4
إ,ف ا
'?Oو/أو *.O7
• {
ا{اق ا
}U/ا
Dي Gا4ا
*ة أ3ى،
ا
N '}Gآ' ا
.4/7/
)(3LW
ا GL <HDاُ5ز ذات ا jP'/ا K ;H
اPش
!&MHW
>{+ظ /Nا
8ة ا
4ا ]3وا
,]7ا
8رة،
ا PGه kDا{Fت:
• G |UlGك ا
8رة 4Nون *ا< أU¢ء إ~ا
]~lء
ا
]7ي, 4 ،دي 7Gض ا
8رة ] g/Oوا
9/إ
[
إ>Gف ا
8ة ا
4ا.]3
• 4I8Gم *+Uت UO3ا
g/]/أو *اد []W jG
ا
~lء ا
]7ي |8, [{ ،ذ
{4وث .;]G
• L<8N w/8Gأي ** _* ;Uدة ا
[]W 'U+ا
>9ء
وG ،+xرًآ []W 9ً3ا
>9ء.
• ;UG 47Nا
~lء ا
]7ي ا
zG ،s/آ 4داً+x _* /
<' إ~ا
.
'8 4UWا
UاGN Dع
• 3N ]Wا
!Dر ً }3
/]7Gت "ا
UN ,U7ا Dا
~lء ا
]7ي ا
U}/ع *_
ا
/ش".
ا - =1ا4Iم ' '8ا
8رات *_ ® MOPARأو
* ,أو رة ا
}Nن ا
7/دل و*ء Gوsة
ذات أUن ./Wإذا ~م ا
_* 4,~/ا
4I ،;Uم
* ;Uا~x:اء ا
_* ,]7آ8ة ا
8رة ذات ا
;8
ا
!/ك *_ ® MOPARأو * ,أو *7* ;Uدل
ذا رة []Wا~x:اء ا
'*
N ,]7و
_ ¢ا~x:اء
ا
_* ,]7أ.'+
ا(zG - j5آ _* 4إزا
P/xأ¢ر ا
;9ON ;U/ا
~lء
ا
]7ي 4IN ,U7Nام *ء ;DG .آ أن Gك ا
~lء
ا
]7ي '< ;l,إ~ا
.
!&MHW
إن 4Wم اGع ه kDا
!,Dات < |8, 4أ_W lG ً9W
8Gب ا
/ء إ
[ ا
4ا '3أو PNأو * []W _+7Gدة ا
:;8
• '8 |UlGا
8رة ا
L?pا
, 4 7دي إ
[
* ;]Gدة ا
.;8و<G 4دي ز,دة ? Lا
/ء أًp,
إ
[ *ور ا
/ء Wأ 9ا
! _* ,/ا
7ا*'
ا
.,l
(3LW) !&MHW
• ُzN [
,ن ,ن ا
_* ً
3 ;8ا
/ء <' ! .إن
'?OGا
;8أو wا
ب أو إ~ال Dة , *4UWن
ا
;8ر8N w/8, 4< ًFب ا
/ء إ
[ دا '3ا
8رة.
• Gخ ا
!ص '8 4UWا
8رة, 4 ،دي ? Lا
/ء
ا
* []W x/ا Pا
|,8ا
FszN
Iا
!,/
*_ ا
7ا*' ا
,lإ
[ 8Gب ا
/ء إ
[ دا '3ا
8رة.
• < |8, 4إه/ل * l
7أ
اح ا
;8ا
Ó
]Nزا
و ;]G U,~IGا
48ادات *, /دي إ
[ 8Gب ا
k/
إ
[ دا '3ا
8رة.
• |l,و Pا
]{ )ا
]{ت( اw!
'ON **:
/pن *4{ PUوث أN8G ,ت _/, .أن |8,
ا
آ| ا
}!8G wب ا
/ء دا '3ا
8رة.
)(3LW
٣٥٣
!<~9W
4I8Gم *,Dت Fرة :اض ا
.;Uوذ
:ن
ا
*_ ]Gا
,D/ت <7s>
'Nل ،و {
ا4Iا* * ً |8G 4< ]?* ^FUا
.g+U
!&MHW
G 4UWآ| * 97هاء رN < ،Gاءة إرsدات
ا
آ| !NصG 4< .دي j7Nأاع *97ات ا
اء
إ
[ إ>Gف >Fء ا~x:اء إذا G Gآ *sة []W
ا
.w98
ا v5'/ا##V
P/x ;UG ?U,ا w9:ا
~U* 'ON xx
4INام * ;Uا
~xج *_ ® MOPARأو أي *;U
lGري * ;U
}I* ~Uا
~xج4I8G .م *ً]9
* _* ;Uع ._O3ا ;UG 4UWا
~lء ا
4ا_* ]3
ا
DUة ا
+]Iا
~/ودة >,~/Nت
Pآ ،Nوا
DUة
ا
7Nا
+]Iا
[U/ا
~/ودة Nا راد4I8G .,م
* Lsأو أدوات {دة أ3ى *4I, 4< /ش ا
/ت.
٣٥٢
* ;UG 4UWة ا
ؤ ,ا
N < ،+]Iش ا
[]W ;U/
ا
+OU/أو < 79ا
/ش ا
*4I8Gا
.;U
Gش ا
s* ;U/ة []Wا
/ة.
'
jGHWت ; أV#ة اPس اA'ZM
PU}G Gا
47ت ا
x/دة * W/l* *4أ~xة
ا
س ا
x/دة ه kDا
8رة *_ ا
> ا
+Oف.
;UG 4UWا
47ت |l, ،ا
!N '*7ص 43 |Ulش
ا
>.
4IN ;U
N < .1ام </< 79ش _/, ./W
ا4Iام *!]ل
Nن *7دل4I8G _
،م *!ى
G _/p,آ~ _* Wا
!ل ،أو ا
+U/ت 4,4sة
ا
آ~ { .ا4Iام ا
}Nن4IN ;U
N < ،ام
</< 79ش .]]* +
/< 79N ;+l
N < .2ش ./W
أ Vا/ن jGأو Ò}Gأو ;UGا4IN *~{:ام *,Dت أو
*+Uت آ { .9sإن ذ
,دي إ
[ ;]Gأl8
pإ
[ إ7ف
ا, 4< .*~{:دي ا
]; ا
8/Oأً ,
ا.l8:
وإذا |]9Gا ;UG *:ا ،*~{:ا4Iم *GG ;Uل
*_ ® MOPARأو
Nن *7دل أو *ء +G .G
ا _* *~{:ا
8رة ?/< 79N ;+l
N < .]8ش
./W
ا4ل ا *~{:إذا آ *¤آ] أو Nأو إذا _G
ا/,~Nت .!!
,9N '/7G
!<~9W
< P9U, 4ا
!~ام ا
أو ا
~//ق 4UWا
}دم وw}G
*_ دون { .,/ا! م ا}N *~{:رة دور,
]zآ4W _* 4م وxد أ~xاء * W9أو * <~/أو .
N
و |l,ا4ال ا~x:اء ا
ً +را!G .ول ا
Uم
أو إد3ل ا
>,47ت .]Wو |l,ا4ال *W/lت
ا
!~ام ا
+]Iا
47N +و<ع أي }Gدم )*' ا
اء
ا
~/G ،/ق ا
¡8Uأو ذ
(.
)(3LW
• *_ ا:ه/N /ن أن ,ا
[]W !/وw
!ت ا
} ;,ا
x/دة ا
!اف ا
N¦
]+8اب
و
{ت ا
~از و
4Uوق ا.7*:
• إذا Wت []Wأي أ{lر أو 43وش ا
>9ء،
[]W U* ]Iا
+ر '/!, .ا
+]G
/إxاء هkD
ا
>{ت.
• إذا <
l ;]]
7Gع {دث أو أ*
DN s
* /أدى إ
[ *4Gا
>9ء أو ا
9ا
ا<>
ªN ،ح
ا
8رة zNع * '/!, ._/,ا
+]G
/إxاء هkD
ا
>{ت.
• إذا آ ا
8رة '*
3 U!s '/!Gا
/اد
ا
/و ,أو ا
}I/ت أو ا
w]/ا
/وم ]]ج ،إ
،¥
zآ ]G 7G _* 4ا
/اد 4ًxا و4Wم .N8G
• {
<دة ا
8رة +ة F []W ],Fق *]
PN < ،[}!
Nوا<ت 4اl{:ر أو ا
;]3 _9
آ' .]lW
• ا4Iم >Fء ®>7
MOPARج ا
4Iوش أ<ب
*4
, .U/ى وآ] ا
4/7/أ
ان >Fء
Gا^ *
Pن ا
8رة.
اZDL <HDت وأ 5nاآ<V
• P/x ;UG ?U,ا
>l7ت وا
>l7ت ا
،47/
و
INا
>l7ت ا
_* 9N ]9/اU/
:م وا
وم
Nم N}Nن ;9و*ء PU/ا
¤آ'.
• زا
ا
¢]/ت ا
+و/أو أ NGا
+ا*' ا
~ا4ة،
ا4Iم * ;Uا
>l7ت *_ ® MOPARأو * 7,د
.
:GZإذا آ ارة Vودة ZDLت اAوم
اcMري ا
اآ Kأو ا;داء
cW ZX ،م GHت أو ;اد
آ 5iأو آMت 3WاlX .Dدي إ إZWف
اZ5ء وه~ا ا &51< h jن ارة ا
<
ة
ا
9ود .ا'
cم PXا ;Lن اDدل واء D57 3
7ش
cW .م A =A(Lر وه~ا آ= 	W
GX9اZ5ء.
!&MHW
4I8Gم ا
! ,Oا
UOIأو ا
}ف ا
}]| أو ا
+ش
ا
UOIأو *اد ا
] P/ا
4I8G .47/م *;U
ا:ان |8G 4 .ه kDا
lU/ت ;]Gا
>9ء ا
ا<
(3LW) !&MHW
]F |UlG .]l7ق ا
? '8ا:و8]
G*Gرات
{ ,ا4Iام *!
' { p/أو ش 4< UO3
Gدي إ
[ ;]Gا
9ا
ا< ]>l7ت4IN [
,ُ .ام
* ;Uا
>l7ت *_ ® L MOPARأو * .,
اVL <HDء ا
ا Ekرة
ا4Iم *GG ;Uل *_ ® MOPARأو * ,
;Uأ l8ش ا
4lUوا
l8د.
;UG |l,ا
!اف ا
4اً4N ]3ءا /< 79Nش *]] ¢
/< 79Nش *]] _* Total Clean ;U/N
® MOPARأو * ',~/N ¢ ،,ا
_* P
® MOPARأو * ,إذا ~م ا4I8G .*:م
ا
+U/ت ا
9sأو ® .Armor Allا4Iم *;U
GGل *_ ® MOPARأو * ;U
ً* +ًUش
ا
4lUا
U}/ع *_ ا
.'U+
)(3LW
٣٥١
ا =AL <HDاcر E#وو K &<7اآ=
وا:ب ا
4!
7Oوث ذ
ه:
< ا =AواZ5ء Kاآ=
• *] wا
^,9وا:وخ و P/lGا
.NF
UGع *]9ت ا
'N ,U7ا
8رة /]
7ًGا< Pا
?lا
و ,Fا4Iام ;}G .ا
/اد ا
/و ,ا
_* '8G
]/Wا
[]W 8ا
9ق {
P/lGا
]ج وا
،4]l
و ]Gا
/اد ا
,ر []W sاls:ر وأ w9ا
9ق
أU¢ء ا
/ا ا3:ى* zN ،اد أآ
]7/دن ا
x/دة
ا
8رة .إن إ,ف ا
8رة ا
Iرج7G { ،ض
ا
8رة ]¢]/ت ا
ا ،وأ w9ا
9ق ا
'?OG ,
ا
8رات ،]Wوا
4,4s g9ا
ودة أو 4,4sا
!ارة،
وه *_ ا
وف ا
4,4Oةً¢zG ¢, ،ا 4ً,4sا []W
ا
>9ء وا
U,ت ا
47/وا
< ,ا
4ا.]3
• ¢zGاl{:ر وا
!}[.
4W8Gك ا
ت ا
ا
^!G []W }
N ]7/
أ<}[ 4ة *_ *و* ا
¤آ' ا
U/p/دا '3ا
8رة.
ا~ي <lدي إ وث اآ=؟
ا
¤آ' ه ج 4Gهر ا
>9ء وFت ا
9ا
ا< أو
OGه 8
Nرة.
٣٥٠
• ا
!Oات واls:ر وا
9ان.
• ا
w]/ا
x/د هاء ا
^FU/ا
_* ,ا{'
ا
!ر.
• ا
¢]/ت ا
/ ,lا
}.WU
=nارة
• ا4Iم *~ ',ا
W P/Oا
lدة *' *~P/s ',
® MOPARزا
أ NGا
^,9وا
Pو
!,/
>Fء ر .Gا{ص أ 4IGش ا
>9ء.
• |UlGا4Iام ا
/آت ا
UOIا
<7/
_* ']G 4ن
ا
>9ء ،أو Gدي إ
[ ^<4Gا
9ا
_* Uا
>9ء.
!&MHW
• 4I8Gم *اد ا
;Uا
,أو ا
'* UOIا
}ف
ا
}]| أو *!8ق ا
}' ،وا
Gدي إ
[ 43ش
ا w9:ا
47/وا
.]9/
• < _W lU, 4ا4Iام ا
?>ت ا
Nا
lGوز
8274آ] Nل ) 1200ر(7N*
N '
'F
;]Gأو إزا
ا
>9ء وا
}]/ت.
• ا '8ا
8رة Nم .ا{ص دوً* '8 []Wا
8رة
ا
' 4INام ' '8رات ®MOPAR
و
Nن 47* '8ل ]8رات ،وا ;9sا
]{ت
/N *ً/Gء;.
ا <HDا-c
• إذا 7/lGا
!Oات أو ا
+]I/ت ا
NO/ا3:ى []W
ا
8رة4I ،م *~ ',ا
!Oات _* Super Kleen
® MOPARو*~ ',ا
9ان.
• إذا آG Uد ا
8رة F []Wق * !]/أو * Nأو إذا
<N /دة ا
8رة
Nب *_ ا
'/!* '} ،L!/
ا
8رة *ة وا{4ة []W ,ًsا.'<:
Mا=PH
ا <j
; 9Xى ا>=
< أو ªNزا
4ادة ! ا
4 ¢ ،(B) 7ادة !
ا
}~W .(C) ;,م ا
LNا
ُ48
N [
/ادات
ا
} ;,وا
7ه 15إ
[ /*ً4< 25ر 20) 'Fإ
[
.(* _G 34
|l,أن ,ن *8ى ا
4UW '8ا
! ا
!+
]+8
ا
G *4UW (A) 7ن ا
8رة و.8* P
!&MHW
4UWا4ال ا
48ادات{ªN G ،م ر}N 9Nرة
زا4ة +]G |8G 4 .وإ{4اث 8Gب .N
اkر ز< ا(89
=P Mاوس
إ Xا>=
|l,إ ا
>3 _* '8ل ! ا
8* [{ L 7ى
ا*>ء.
ا4Iم Lا
'8ا
Dي N
Gا
lا
.7U}/راPx
"ا
8ا' وز,ت ا
!Oو< P9ا
?ر ا "]
:
"
ا
8رة" ]!}ل _* 4,~* []Wا
*]7/ت.
'>= ;9ر ا
وران ا/E/اEc
*8ى ا
.'8را" Pxا
8ا' وز,ت ا
!Oو<P9
ا
?ر ا
" "]
:ا
8رة" ]!}ل 4,~* []W
*_ ا
*]7/ت.
; 9Xى ا>=
|l,أن ,ن ز ,ا
4UW !Oا
! ا
7G !+
]+8
ا
~.,
إ Xا>=
أ; ز ,ا
>3 _* L !Oل ! ا
7وإ
[
ا
8/ى ا
4!/د أ.L k>W
اkر ز< ا(89
ا4Iم Lا
'8ا
Dي N
Gا
lا
.7U}/راPx
"ا
8ا' وز,ت ا
!Oو< P9ا
?ر ا "]
:
"
ا
8رة" ]!}ل _* 4,~* []Wا
*]7/ت.
xاء ]/Wت ا
} ا
7د~], ،,م إxاء ]/Wت
! دور8/
,ى ا
4UW .'8ا
8رة :ب
أ3ى ! |l, ،ا w9:ا
Iر!* W/l/
xر
ا
4وران { .ا
8G Oب ز ,ا
وس ،ا!
٣٤٩
!&MHW
إذا آ در{ xارة ا
'8أ<' *_ 10درxت *,
) 50در}W []W ]l8G , 4 ،(, x
ا
س ªN G .ا
P+GG [{ '8در xا
!ارة
'ONآ 9Wء <اءة د< '?ON < .ا
!/ك []W
Wا
Fو) PARK Pا
<;( 4ا
.'8
.8أG 4Wآ| 9ء ا
!/ك *{ªN G Pم *8/N
ا
ا:ر.7N
4W _* ^!G .9م وxد N8Gت{ .ر ا*' ا
<;.
3H :GZد;kل ا/و'خ واء إ =7ا9آ
9X DLأو إ K <V Xا>=W ،آ
Kإدة و3
5nء اPس K .99- P<5L &A EX
ا EDM5أن <5n Wء اPس إ اK Zً7 jc
و 3ا} Mام +آن 3اب اcص &L
} EX ًMأ L;MاPس.
1Wات ا>= وا
را" Pxآ| ا
*4Iوا
/pن" ]7ف []Wات
ا
} ا
}!!.
٣٤٨
Nإ
[ ذ
?G ?U, ،ا
'8وا
]+إذا أ
w
ا
/
N) ¢ً]* '8ء ،أو * (Nsأو إذا آن <' ا
!آ
*+ك :ي |.
Gم ا bLPا
رو =7) EAا9آ ا
وي( — إذا
آ ارة Vودة ~L
,D?G ,ا
Uم ا
4رو
]>3 _* jNل آ' /
* ]}+Uدا~3 '3ان ا9:ا ا
U
8م ا
+ا*' .
{
{4وث 8Gب أو اهاء ،ا4Iم ' Lا
+ا*'
ا
Dي ُ N
Gا
lا
.7U}/را" Pxا
8ا' وز,ت
ا
!Oو< P9ا
?ر ا
" "]
:ا
8رة"
]!}ل _* 4,~* []Wا
*]7/ت.
=7ا9آ ا
وي — إذا آ ارة Vودة ~L
<
9Wز< ا(89
ا4Iم '< ' Lا
!آ ا
4وي ا
Dي ُN
G
ا
lا
.7U}/را" Pxا
8ا' وز,ت ا
!Oو<P9
ا
?ر ا
" "]
:ا
8رة" ]!}ل 4,~* []W
*_ ا
*]7/ت.
; 9Xى ا>=
ا! *8ى ا
N '8ا 9إزا
4ادة ا
'/ء?U, .
أ 8* 4,~,ى ا
_N '8أ ! '+ا
7وإ{4ى ا
Uط
_W (
N 16/3) * 4.76 _Wأ '+ا
.!+
أ; <ً4را *_ ا
،'8إذا |]9Gا[]W !/]
،*:
ا
8/ى ا
.'8]
|U/
AWار =<
MWا>=
وف ا
'?Oا
7دª ،,ن ا
'8ا
Dي ,إ
ا
/7
ًU* /ً!OG , PU}/ا
8رة .إذا أ
w
ا
/
N ¢ً]* '8ء []W k?G |l ،ا
+ر .وإ ،
?Nا
'8آ /ه ُ*
[ Nآ| ا
*4I
وا
/pن .را" Pxآ| ا
*4Iوا
/pن" ]7ف []W
ات ا
} ا
}!!.
; 9Xى ا>= 9 -آت اK<VHM
*_ ا 'p:ا
!^ *_ *8ى ا
, *4UW '8ن <'
ا
!آ در{ xارة ا
'?Oا
7د 180) ,درx
82/,در .(ً,G ,* xو4!,ث ذ
47Nا
دة
25 8/آ ) []W (>ً* 15ا .'<:در{ xارة
ا
'?Oا
7د _/, ،,ا*8ك _N 8N '8
N
أFاف ا.PN
:
ا4Iم اxاء ا
8* !+ى ' <' ا
!آ
:w!
'ON
.1أو<; ا
8رة []Wأرض *.,8
.2أزل 9ء ا
!/ك *8* _W []W: !8Nا
)اU¢ن ا
*4/واU¢ن ا
~lء ا
.(+]I
'?ON < .3ا
!/ك W8Nا
Fو در{ xارة
ا
'?Oا
7د.,
^O7N < .4ا*' ا
<; ¢ *ً/Gا? []W Lدوا
ا
+ا*'.
P .5ذراع ا
!]
'Uت آ' وG Pس )Gرًآ
ة *_ ا
< آ '< ^O7ا
!آ '*
Nآ'
و '< PN ًU* ،(Pا
!آ وPARK P
)ا
<;(.
.6أ3ج }Wا
س ¢ ،ا*4ًx !8ا ¢أ 4Wإد
3
إ
[ أن .* 8G
.7أ3ج }Wا
س *ة أ3ى و{8* Ëى ا
'8
[]Wا
8* 7, ._lى ا
!ً!
'8إذا آ هUك
3 Fر []W ,~]
]
xآ> }W xا
س.
و{ Ëا*>ء ا
}W _!+ا
س '8
N '*
Nإذا
آن ا
8/ى ا
4UW ]7+ا
_!+أو أ |l, ./U* []Wأن
,ن *8ى ا
¢ _N '8ا
'8ا
HOT _38
)ا
(_,]7ا
}W []W _7x/ا
س در{ xارة
،p
ا
'?Oا
7د .,إذا آن *8ى ا
ً +IU* '8
ªNآ /آ *_ ا
>3 _* '8ل أ }W Nا
س
7إ
[ ا
8/ى ا
}!W h .wوز ا=ء .ا4Iم
ا
'8ا
ُ4IN [
/ا* ) Lرا" Pxا
8ا' وز,ت
ا
!Oو< P9ا
?ر ا7]
"]
:ف * []Wا
+ت
ا
47N .('8إ أ ,آ _* /ا
~>3 _* ,ل أN
}Wا
س ،ا 4/ة د<_ []Wا, [{ '<:
;,}Gا
~ *ً/G ,إ
[ <' ا
!آ <' إWدة !
*8ى ا
.'8
:GZ
• ';Aن ا};Pب EXاPس =>Lإذا آن
;ى ا>= ا H EPP9ا} yPأو أ.|Z
• إذا آن Kاdوري =7 9Xا9آ EXدر#
ارة أ K =7در #ارة ا( y< ،=1أن <;Aن
;ى ا>= EMP KLا>= اMرد )اEX (K
اPس و;AWن در #ارة ا>= 80در#
27) <Xدر .Mً<PW (<; #إذا M 8W
;ى ا>= ; Lرة H 99-در #ارة 27
در 80) <; #در(<X #؛ yXأن <;Aن
EMP KLا9ر ) HOTا (K<;Dا
H KD#
= Wدر #ارة =7ا9آ إ 82در<; #
) 180در~W .(<X #آ أ& Kا9X =dX/
ا;ى EXدر #ارة ا( =1اDد<.
٣٤٧
(3LW) !<~9W
• |Ulا
]ث *_ *اد 3ر xأو ا
4I8G ،NFم
ى ' ا*' 4,4xأو ' *{ z7و/!* ,
ا
?]^ .أ{ ]^ 9ء ~3ان ا9:ا ا
8
آ' ا:و<ت ' /, .ا
+ا*' ا
x/د {و,
* {+ا
_* NFا
اء *, /دي إ
[ ا+Iض
9ا
?]ن _W lU, 4< .ذ
]ن ا
! []W '8
*< PأU¢ء ا4Iام ا
+ا*' +UW ,9Nأو
< ،',Fوا
Dي <, 4دي 4Nور kإ
[ Áx+* '97G
ا
+ا*' .و< |8, 4ذ
{4وث }Gدم.
• _/,أن ,دي *'ء ~3ان ' ا
+ا*' 'ONزا4
_Wا
! 4إ
[ ' L<8Gا
+ا*' []Wأ~xاء ا
!/ك
*, 4< /دي إ
[ ا7sل ' ا
+ا*' .و*_ ا
_//أن
;]G pا w9:ا
]9/
' |8,ا
+ا*' أً ,
وأ w9ا
،'U+و
Dا 3G |l,ا
!Dر |Ul
*>* kD
8ا.w9:
• '8]
w/8Gذي ا:س ا
و
' ,]N
ا
+ا*' _/, .أن * ;]Gت * Pا
8ب ا
Iص
+
Nا*' *, /دي إ
[ '97Gا
+ا*' ~x 'ONأو
آ] .و< |8, 4ذ
{4وث }Gدم.
٣٤٦
=7ا9آ ا/و - EAW;Wإذا آ ارة Vودة ~L
ا;اد ا Xdا-c
<
9Wز< ا(89
Gا
lا
4ON 7U}/ة 47Nم ا4Iام أ ,إت
3إ
[ <' ا
!آ.
*_ ا
/ا4Iام ز '< ,ا
!آ ا
/p
|U/ن ا:داء
وا
/7ا
'<U
_
/ا
!آ .ا4Iم '< ' L
ا
!آ ا
4!/د *_ ِ<' ا
lا
.7U}/را" Pxا
8ا'،
وز,ت ا
!Oو< P9ا
?ر ا "]
:هDا ا
8
]7ف * []Wا
+ت ا
_* .'8ا
pوري أن ,
ا{+ظ '< '8Nا
!آ 4UWا
8/ى ا
}!w
4INام ا
'8ا
ُ4IN [
/ا*.
V< h :GZم و 3أي ;اد آ> EXأي =7
آ ،و EA< KAا'
cام ز< ا( 89ا.PX D
!&MHW
إن ا4Iام ' <' {آ >IN 3ف ا
ُ[
/
4INا* *_ ِ<' ا
lا
, 4< ،7U}/دي إ
[ 4Gهر
xدة <' ا
!آ و/أو ا{ك *!ل ا
~7م وف
4{ |]9,وث ?Gات *رة }Nرة أآ ]'8
وا
.]+را" Pxا
8ا' ،وز,ت ا
!Oو< P9ا
?ر
ا "]
:هDا ا
7]
8ف * []Wا
+ت ا
.'8
إن ' <' ا
!آ ا:و (ATF) G*Gه أ{4
ا
lU/ت ا
4Uو< ¢z, 4أداؤl ] 'ON k
4Iام *اد إ * .]/و
ªN G
Dأي
ا' إ إ
[ <' ا
!آ .واUء ا
{ 4ذ
ه ا4Iام
?ت 8G ^FU* 4,4!
3ب ا
.'8
|UlGا4Iام *اد *8G PUب <' ا
!آ ¢G 4< :
[]W ] 'ONا
48ادات.
!&MHW
4I8Gم *اد آ '< /ا
!آ *' ا
/و,ت
ا
_/,أن * ;]Gت <' ا
!آ9?, .
/ن ا
8رة ا
4,4lة ا
4!/ود *' هDا ا
];.
• ا{N Ë+آ~ ' 4,Gا
!/ك )* Pا
4UW (4/l
4,G ' _* 50%ا
!/ك ذي UGات
ا
) (OAT) ,p7ا
/ا^ * Pا
7/ر
(MS-12106آ! 4أد[ وا
/ء ا
_* ,<]
9/
¤Gآ' ا
!/ك ا
Dي !,ي * []Wت *_ اU*
:م.
• zGآ 4أن 3ا Fا
^4ا
~ا xx~
4ا*4اد '
ا
,]* 4,أو *48ودة.
• { *4* []W Ëا
اد .G,إذا آ ا
8رة
*4* []W p
*~ودة ]
;/Nاء Ë! ،أً ,
ا
.;/
• ?Gا
*ت '?OG 4UWا
8رة ا
}; أو
ا
Oء .إذا |]9Gا *:ا4ال ا
*ت ،
Nآ| *Gت *_ ا
Uع ا
{ .L >/
ا4Iام //}Gت أ3ى <G 4دي إ
[ ;7أداء '
4,Gا
!/ك )* Pا
،(4/lأو 4Wم إ*4اد ا
8رة
،w!
'ON _,~U
Nو 4W}Gا¢7ت.
Gم اا=
]zآ8* _* 4ى أداء م ا
+ا*'P/x ! ?U, ،
*ت م ا
+ا*' دورً .,را" Pxآ| ا
*4I
وا
/pن" ]7ف []Wات ا
} ا
}!!.
!<~9W
Gدي إرا{ ا
4م []Wا
+ا*' إ
[ +]Gوا{/ل و<ع
{دث }Gدم { .إن ا
دة * Pإرا{ ا
4م []Wدوا
ا
+ا*' _/,أن |8,ار+Gع در{ xارة ا
+ا*'
7F 'ONو¤Gآ' ا
9و ;]Gا
+ا*' .و
N
_ _* _/Gا+دة *_ <4رة ا
wا
*] {ت
ا
9ارئ.
اا= ا -Pا75L D
!Gج ا
+ا*' ا
إ
[ ا
،Lpو
_ [
,
xªNاء ]/Wت 47* ,< ;<Gدة أU¢ء ة ا
]_
ا
9وإزا
أ* ,اد 3ر.x
أ';5ا اا= ا>
8* ! ?U,ى ا
'8ا
x/د ا9:ات
ا
8آ] G /إxاء أ/Wل ا
8]
*4Iرة .إذا ~م
ا ªN < ،*:ا
'U, [{ '8ا
8/ى إ
[ *>W
ا*>ء ~3 |x []Wان أ9ا ا
+ا*' ا
4UW .8
ا4Iام ا
+ا*' ا
P<, ª ،هط *8ى ا
'8
آ] /زاد *8ى ا
]; 9Nا
+ا*' .إذا آن *8ى
! ،7F 'ON pا
Uم
' ا
+ا*' *ً +IU
_W ً!Nا
N8ت.
را" Pxا
8ا' وز,ت ا
!Oو< P9ا
?ر ا "]
:
"
ا
8رة" ]!}ل _* 4,~* []Wا
*]7/ت.
!<~9W
• ا4Iم ' ا
+ا*' ا
Dي N
Gا
lا
7U}/
.Lرا" Pxا
8ا' وز,ت ا
!Oو< P9ا
?ر
ا
" "]
:ا
8رة" ]!}ل _* 4,~* []W
ا
*]7/ت _/, .أن ,دي ا4Iام ع _* ÁF3
' ا
+ا*' إ
[ ;]Gم ا
+ا*' و/أو j+3أدا
'ONآ 4x, .ا
Uع ا
}! ' _* wا
+ا*'
ا
Iص 8Nر Gا
^}]/ا
x/د ~3 []Wان
ا9:ا ا
8ا
4رو
ا ]
:ا
/آ
.PU}/
N
)(3LW
٣٤٥
!<~9W
• w+Gم 4,Gا
!/ك ا
' ;pG ._38
4,Gا
!/ك )* Pا
(4/lإذا آ در{ xارة
ا
!/ك زا4ة _Wا
! +G .4ا
?9ء أو *ً/G 7G
4,ا
!/ك إذا آ در{ xار Gزا4ة _Wا
!.4
Gدي ا
I8ا
4,4Oة إ
[ ر8* Pى ا
L?p
م ا
4{ PU/
.4,وث ا{اق أو ا
+G ،N
9ء ? ' Lا
4,إذا آن م ا
Uً3 4,أو
وا<ً.L? !G 7
• 4I8Gم 9ء ? Lا
4!/د 8رlU, 4 .G
_Wذ
ا
7ض
}Is Nأو ;]Gا
!/ك.
ا <MW =>' K cا9ك ا
cم
4,G ' 47,ا
!/ك )* Pا
(4/lا
Dي أ إ_],
ا
]lل *دة *~], 47م ا
.!!
,9N U* ]I
را Pxا P* *:ا
9]8ت ا
4,4!
,4
]!/ا
ا4W
ا
]G _* ]I]
/U/ا
/اد وا
PU/
.7/l/N
I
UGو
Nا 9ا
!ات أو ا+F:ل' _,~IN G ،
4,Gا
!/ك ا
4U8/إ
[ <4Wة *_ ]xل ا _],
{و,ت * ،{+و N 's []W 7/lN w/8Gك
?ة
[]Wا:رض< { .م ا+F:ل أو ا
!ات ا+
:
٣٤٤
UNو
|]F ،ا
4W8/ة {ت ا
9ارئ []Wا
+ر.
; ¢ر ا8ب ا
~ []W ,ا
+ر.
;ى '>= <MWا9ك
'/Gز ' xxا
4,و] * _* _/, 7,
>3ا
zآ /* 4إذا آن *8ى * Pا
4/lأو '
ا
4,آً *_ .*4WأU¢ء '?OGا
!/ك *4W Pم 8G
ا
8رة 4G P* ،ا
!/ك إ
[ در{ xارة ا
'?O
ا
7د ?U, ،,أن 8* ',ى * Pا
4/lأو ' ا
4,
)* Pا
(4/lا
~ _N xxا
_<9Uا
4!/د.]W _,
',ا
ادً]/* G,ءا ،7F 'ON *ً/Gو N
9 +
x{ 4xGء ا
اد G,إ 4UWا
!
4,G ' 4/lG 9ا
!/ك )* Pا
(4/lأو ا4ا
.
]Wإدة *8ول ا
*4Iا
Iص kDN Nا
*]7/ت.
و /
Fآ در{ xارة '?OGا
!/ك *
_] ،
~],م ! ز ' xxا
4,إ *ة وا{4ة آ' .s
إذا |]9Gا *:إ ' !* 4,Gك )*(4/lG P
]!+ظ []Wا
8/ى ا
'8
|U/ا
|l ،4,
إ إ
[ ز ' xxا
lG .4,وز { 4ا
'/ء.
Pط <Vم ~Wآه
j7;W H :GZارة DdL 357 DLأل/
آ;ات DL 7ا(cL W ZW 7 =1ر K
Xn Pا9ك D< .ذ L;+ DM+
ا;;#دة EXا;اء yMLا5/ر أو ا};ج ،أو آH
3ا L;+ا Dااد< WوcMWه vX H
ا;'ت <MW => v< ،ا9ك )3
ا
( ا;k
L Kkل إ ااد<.W
إذا O* _* _/Gه4ة أي أ8]
¢ب *_ ا
اد G,أو
*_ ا
FIم !+
lا
!/ك< _/ ،دة
ا
8رة *zNن +I { .ا
Iر .7ً,
• ¦/Gز xxا*4اد ' ا
'ON 4,زا _W 4ا
!.4
• ' 4/lG 9 _* ^!Gا
4,ا
اد G,و
ز xxا*4اد ' ا
.4,وإذا |]9Gا *:إ *~4,
*_ ' 4,Gا
!/ك )* Pا
,/{ |l ،(4/l
_* pا
.4/l
*!,ت ز xxا*4اد ' ا
4,أً ,
• إذا |]9Gا *:إ ' 4,Gا
!/ك )*P
ا
* 'ON (4/lر ?U ،ا3ر *8ى ا
L?p
دا '3م ا
z]
4,آ4W _* 4م وxد أN8G ,ت.
إ =>' Xا
<M
!Gي ر 4,G ' []W Gا
!/ك )' 4,Gذي UG
ات ا
* (OAT) ,p7ا^ *]9* Pت *7ر *اد
'9, _8!* (MS-12106ا
4/ة ا
>ز* ]}_/, .
ا4Iام ' 4,Gا
!/ك )* Pا
+
(4/lة '}Gإ
[
U OWات أو 240000آ ) '< ('* 150000ا4ا
.
PU/ا+Iض *4ة ا
} ا
4//ة ه _* ،kDا
م ا4Iام g+
' 4,Gا
!/ك )' 4,Gذي UGات ا
,p7
)* (OATا^ *]9* Pت *7ر *اد ،(MS-12106
]Fة ا4Iام ا
8رة.
ُ [x,ا
xع إ
[
Gت ا4Iام ' 4,Gا
!/ك
)* Pا
(4/lذي UGات ا
(OAT) ,p7
وا
Dي ,ا^ *]9* Pت *7ر ا
/اد ا
O
MS-12106آ 4UW .Chryslerإ '
4,Gا
!/ك )* Pا
:(4/l
• 4IN w}Uام Gآ * Pا
_* 4,G '/4/l
® MOPARا
/pN [9?/ن U 10ات150000/
*' ذو UGات ا
(OAT) ,p7وا
Gا^
*]9* Pت *7ر ا
/اد ا
MS-12106
Oآ .Chrysler
• ا*~ج *!]ل ' 4,Gا
!/ك ذو UGات
ا
(OAT) ,p7وا
Dي ,ا^ *]9* Pت *7ر
ا
/اد ا
O
MS-12106آ Chrysler
* P* %50 8UNء * .9ا4Iم Gآ~ات ) W
47Gى (%70إذا آ در xا
!ارة ا
7</أ<' *_
37در 34-) ,* xدر.(, x• ا4Iم *ًء Wا
Uء '* Lا
/ء ا
9/أو ا
/ء
ا
]!* L]3 4UW _,z/ل ا
/ء *]!* Pل '
4,Gا
!/ك )* Pا
'], .(4/lا4Iام ا
/ء
ا
j+IU/ا
lدة *_ *4ار ا
! 4 ,/ا
}4أ م
4,Gا
!/ك.
ُ {>* [x,أ *_ *8و
ا
/ا
!+ظ 8* []Wى
ا
! 4 ,/ا
4
7ًG 4/lرxت ا
!ارة ا
4!Gث
ا
^FU/ا
'?OG ,ا
8رة.
:GZ
• bDL y5Wارات أدوات =>' X -k
ا; L <Mر
yM< 7 .99-م اة =ء ه~|
ا; L G/رة 99-إ وث jWداL Ek
9Lك EX .ا #9إ إ Xأي '>= <MWإ
اGHم #<ُ ،ا Whل ;Lآ= ا Dا.E9
•
c'L -;<ُ hام أ;اع '>= <MWا9ك )3
ا
( ا KA< 5cأن G jW EX yMWم
ا .
<Mإذا =>' k 8Wا HPW) HOAT <Mا;اد
ا <;dDا Xdا =>' 3 (HاOAT <M
)ذو HPWاXت ا EX (<;dDا;5ارئ،
K y+Xا;آ= ا &GHW Dو &nوإدة &
c'Lام '>= ) OAT <MWذو HPWاXت
ا;) (<;dDاM5 3 Xت Dر ;اد
EX (MS-12106أ'ع و.KA 7
5nء G 1م ا
<M
|l,إ{م ]^ ا
?9ء 4 |Ulان ' 4,Gا
!/ك
)* Pا
(4/lوا
zآ _* 4رxع ' ا
P*) 4,
ا
(4/lإ
[ 4,G sا
8رة *_ ~3ان ا
.4,
9 ! ?U,ء ? ' Lا
4,و
{ +UG
Gاآ أي *اد []W ,أ P* w9ا
8ب.
٣٤٣
Gم ا - <Mا < jوا =1وإدة اMD
bDL y5W :GZارات أدوات X -k
'>= ا; L <Mر
yM< 7 .99-م اة =ء
ه~| ا; L G/رة 99-إ وث jWداL Ek
9Lك EX .ا #9إ إ Xأي '>= <MWإ
اGHم #<ُ ،ا Whل ;Lآ= ا Dا.E9
إذا آن *!]ل 4,Gا
!/ك )* Pا
Iً8* (4/lأو
!,ي G []Wت * _* |]F ،ا
آ' ا
4/7/
+UGو4IN ]8ام ' 4,Gذو UGات
ا
P*) (OAT) ,p7ا
*) (4/lا^ *]9* Pت
*7ر *اد .(MS-12106
را" Pxآ| ا
*4Iوا
/pن" ]7ف []Wات
ا
} ا
}!!.
اkر '>= ا
<M
را" Pxا
8ا' وز,ت ا
!Oو< P9ا
?ر ا "]
:
"
ا
8رة" ]!}ل _* 4,~* []Wا
*]7/ت.
٣٤٢
!&MHW
• <]!* L]3 []W |G, 4ل 4,Gا
!/ك )*P
ا
/N (4/lدة 4,Gأ3ى ' 4,Gا
!/ك ذي
UGات ا
(OAT) ,p7ا
4!/د ;]G
ا
!/ك وا{/ل ا+Iض ا
< _* ,ا
¤آ'' .
4,Gا
!/ك ذي UGات ا
(OAT) ,p7
* ;]Iو |l,أ 4,G ' P* 9]3 ,ا
!/ك ذي
UGات ا
,p7ا
P*) (HOAT) Ul/
ا
(4/lأو أي ' *" 4,Gا^ P*) "ً/
W
ا
{ .(4/lل ' 4,G ' Gا
4,
ذي UGات ا
P*) (OAT) ,p7ا
(4/l
م ا
!
N 4,ت ا
9ر! ،ج م
ا
4,إ
[ ا
} ;,وا
;9OوإWدة '8N 7G
4,4x 4,Gذي UGات ا
(OAT) ,p7
)*ا^ *N ،(MS-12106 Pا 9وآ' * 4/7
أ<ب و<.
)(3LW
(3LW) !&MHW
• 4I8Gم ا
/ء ا
7دي Lأو *lUت ' 4,G
ا
!/ك )* Pا
(4/lذات أس آ!
4I8G .م
*اد *4}]
7أ إ أو *lUت *و* ]}4أ،
{ إ <G 4ا^ * 4,G ' Pا
اد ،G,و<4
48Gا
اد.G,
• ه kDا
8رة *} _/, !N //ا4Iام ا'
4,Gا
!/ك )* Pا
(4/lا
4U8Gإ
[ <4Wة *_
Nو _]Nا
]lل4IN [
,ُ .ام ا' 4,G
ا
!/ك )* Pا
(4/lا
4U8Gإ
[ <4Wة *_
Nو _]Nا
]lل.
l< :GZدي ا MDا GL DاEX 8A9
اDMhت إ
-ور L;Pت
ك.
Gم ا
<M
ا
/ا<; ا
7/دة ا
'97G '/OGا
!/ك4< ،
O,ا7ث را! ذ Wإ
[ ار+Gع در{ xارة ا
!/ل
ا
!+ز إ
[ در4{ { .7F xوث ذ
،أو<;
ا
8رة ،وأو<; '?OGا
!/ك واGك ا
!/ك ,د.
?U,إxاء أ/Wل ا
} ا
_/pGا
Lpوً
]/ا
+ت ا
4!/دة *_ ِ<' ا
lا
[]W 7U}/ا
+ر.
!<~9W
U/,آ _,3×
_/, /ا
7ض 9Iا{اق
Nا 4,G ' 9ا
!/ك )* Pا
(4/lأو ا
Iر
ا
_38ا
_* 4W}/ا
اد .G,إذا رأ ,أو 7/
ت اIN:ة ا
4W}/ة *_ أ9 '+ء ا
!/ك> ،
w+Gا
?9ء {[ ,د ا
اد!G .G,ول 9 wء
? Lم ا
4,إذا آن ا
اد G,أو 9ء '
ا
._U3 4,
]' ا{/ل ;]Gا
!/ل ا
!+ز:
• ,ªN Gف '?OGا
!/ك أو ]/W PFGا
'?O
'< ^O7G 4UWا
!آ و!Gك ا
8رة.
• !Gول 4Nء '?OGا
!/ك Nا 9د Pأو !|
ا
8رة.
• !Gول '?OGا
!/ك دون <دة ا
8رة أU¢ء }'
أو ~ع أي *_ أ>ك 7/sا7sل ' []W ،ا
/ل،
أU¢ء إxاء ]/Wت ا
،!+أو +ات ز*],F U
أU¢ء آ' *!و
!/]
+UW '?OGك دون <دة
ا
8رة ،أو وف ا
'?Oا
/ا.G
ت <MW =>' 9Xا9ك
ا! وا< ' 4,Gا
!/ك )* Pا
(4/lآ' 12
ًsا )<' {]ل }' ا
G [* ،4/lت ا
+
ª .(
Dذا 4,G ' _,ا
!/ك )* Pا
+ً (4/l
أو *ً]/ءا 4}
Nأ ا
ا ;,}G ?U, ،wا
Uم و]8
وإWدة *] !* 4,G '8Nك )* Pا
.4,4x (4/l
ا! *; *; ا
اء )إذا آ ا
8رة *~ودة (
DN
أو ا
اد _W ً!N G,أي Gاآ ]!Oات أو أوراق
ا
،lOا
.¥وإذا آ *^,F _W /+UN ،_I8
رش ا
/ء F3 _* ^Nم { ,4رأً إ
[ أ '+وx
*; *; ا
اء )إذا آ ا
8رة *~ودة (
DNأو
*3ة <]| ا
اد.G,
ا! 3ا Fم 4,Gا
!/ك ]zآ4W _* 4م P9G
ا
9/ط أو {4وث OGت أو ¤Gآ>ت أو 79Gت أو ^
ا
] ا
x/دة ز xxاxع ' ا
4,
وا
اد .G,ا! ا
Uم zNآz]
]/آ4W _* 4م وxد أي
8Gب.
, *4UWن ا
!/ك در{ xارة ا
'?Oا
7د،,
)دون أن ،(]?OG ,ا! 9ء ? Lم ا
4,
]zآ _* 4إ{م ]^ ا
9U/ا
_* +/ا
اء ,9N
!! ،وذ
Nا4* ;,}G 9ار
? *_ '
4,Gا
!/ك )* Pا
U
_* (4/lر ;,}G
ا
اد .G,إذا آن ا
?9ء *?]ً {ªNم48 ،أ ' 4,G
ا
!/ك )* Pا
(4/lا
8ب *_ ز xxاxع
' ا
9 PG .4,ء ? ' Lا
4,إذا آن
م ا
.Uً3 4,
٣٤١
4/lG PU/م ' '8ا
~xج ا **:ا
g9
ا
رد4{ ،د *!]ً أو *~9 ^N9, lً,ق در xا
!ارة
* 9Uأو _/, .UW 4,~,ا
7ر *]7* []Wت
ا
} ;Uه{ 7* kDو,ت ' ا
?].
ا
/!/ا
?]^ وا
<: w/8G 4د U3ا
7دم ']8
Nإ
[
دا}* '3رة ا
آب .و Nإ
[ ذ
،ا! م
ا
7دم 7/Nا
U+آ' *ة ,ر Pا
8رة
?Nض ا
!Oأو ?Gا
~ .,ا
4إذا |]9Gا.*:
!<~9W
,D* 7Gت ' '8ا
~xج ا **:ا
/ة
lGرً7s>
]N< ,ل .أي أ < '7OG 4و}G
!
Nوق .و
Dا 3G |l,ا
!Dر ]!* 7G 4UWل
' ا
? '8أو ا4Iا*.
!<~9W
• إن زات ا
7دم _/,أن |8Gا:ذى أو ا
ة .
!Gي []Wأول أآ 48ا
Nن ) (COوه ,4W
ا
]ن وا
ا! .و<4 |8, 4ان ا
Wوا
/8
إذا ا |Ul
.OUاOUق أول أآ 48ا
Nن
) ،(COرا" Pxز ا
7دم/إرsدات ا
"*>8
"أ*ر |l,أن '?OG '< 7Gر}!]
"Gل
_* 4,~* []Wا
*]7/ت.
• إن Iم ا
7دم <4!G 4ث { ً,إذا آ ا
8رة
*< +ق *اد <7s>
]Nل .و<G 4ن ه kDا
/اد
*_ ا
! ¬Oأو ا:وراق ا
P* '}Gم ا
7دم .
;<Gا
8رة أو Gم '/!, ^FU* ]?ON
{4وث ا}Gل _Nم ا
7دم وأي sء <'N
>{اق.
Gم اDدم
47Gأ 'pو] ! ,/ا
8رة *_ 8Gب ز أول أآ48
ا
Nن إ
[ دا ]3ه م Wدم ا
!/ك.
إذا { وxد
?Gت م ا
7دم ،أو إذا
{ 4W}Gأد U3ا
7دم دا '3ا
8رة ،أو {
;]Gا
|lا
_* ]+8ا
8رة أو ا
~lء ا
،U* +]I
U/اW4ء أ{ 4ا
_U+ا
/ه]_ !+م ا
7دم
'*
Nوا
lا| ا
_* ,ا
~lء ا
; *_ ه'
ا
8رة ]zآ4W _* 4م وxد آ8ر أو +]Gت ،أو Gآ|
أ~xاء ا
7دم .F3 ,9Nا
Oق أو ا
>ت
٣٤٠
!&MHW
• ~]8,م ا4Iام ا
!/ل ا
!+ز ا4Iام ا
<د ا
I
*_ ا
ص *4 .Lا
_,~Uا
]I/ط
Nص 7ا
!/ل ا
!+ز WNرx kز !G
ا¢7ت و<, 4دي إ
[ j+3أداء ا
!/ك 'ON
آ و!/
N 8x ;]G |8,ك.
• و<4!, 4ث ;]Gا
!/ل ا
!+ز إذا '?OG ,
ا
8رة وف .!!
'?OGو {
'97G
*!ك ا
8رة ،آzن 4!,ث ا{اق !/
N ÁF3ك أو
أي +Gوت وا wا:داء ]7 ،ا klGإ
[ *آ~
ا
} *4Iا
8رة { .إن ا
'?Oا
/8/
]8رة * Pوxد , 4< N 93 '9Wدي إ
[ ار+Gع
در{ xارة ا
!/ل ا
!+ز 'ONزا|G, /* ،4
4{ ]Wوث ;]Gا
!/ل ا
!+ز وا
8رة.
و ' وف ا
'?Oا
7د |]9, ،,ا *:إxاء
أ/Wل
ا
!/ل ا
!+ز .إ أ *_ ا
pوري
ا
[]W '/7ا
!/ك z]
w!
'ONآ'?OG _* 4
'*Wا
! !!
,9N ~+و*4{ PUوث أي '/!* ;]G
ا
!/ل ا
!+ز.
ا
4ً7N !/ا _Wذراع ا
!/إ
[ * 47Nأن ;<,
4Nر xآ !* _ +ر +sة ا
_* !/ا
gN
ا
x/د Fف ذراع ا
.!/
P* .4ا*8ك +ONة ا
{ ،!/ك +sة ا
!/
4ً7Nا _Wذراع ا
.]} !/
;' :GZف < yاPو ;-ت ;ع.
Wآ yا' 9اc
.1أد!* _ '3ر +sة ا
!/ا
!+ا
x/دة
,ذراع ا
.!/أ* 8ا
~lء ا
F _* ]+8ف
ذراع ا
4N !/وا{4ة ،وا?+s []W Lة ا
P* !/
ذراع ا
.* 8G [{ !/
N < .2آ| * W/lا
* !/ة أ3ى /8* []Wر
ا
!/و 7ا* ]
:ة أ3ى ¢ ،أ{ رLN
ا
}*
.^N
iة ا' 9ا W Eإزا Kذراع ا'9
.3أ+s j+3ة ا
[]W !/ا
~xج و< PNا
?9ء
ا
!/ري Dراع ا
.7* !/
إ =>' Xا'1
iة ا' 9ا W Eإزا Kذراع ا'9
— 1ذراع ا
!/
+s — 2ة ا
!/
+s — 1ة ا
!/
!* _ — 2ر +sة ا
!/
gN< — 3ذراع ا
!/
— 4ذراع ا
!/
~3 '/78,ان ا
;U
'8ا
~xج ا **:وا
~xج
ا
) +]Iإذا آ ا
8رة *~ودة 4{ []W (
DNاء.
~3 4x,ان ا
'8ا
!/كzG .آ _* 4ا
!^ *_
*8ى ا
[]W '8ات * ./Uا*¦ ا
~Iان |,D/N
' ] ا
~xج ا 4/lG P* g
) **:ا
اد.(G,
4UWإWدة *'ء ~3ان ' ا
?]ً~x D3 ،ءا *_ '
ا
?] و/< 79< []W 7ش أو Fوا*+s w8ات
ا
_8!
!/أداءه.
٣٣٩
Wآ yا'9ت ا/
.1ار Pذراع ا
[]W _* !/ا
~xج, [{ ،ن ذراع
ا
!/ا
Pا
]7ي ا
*'.
+s P .2ة ا
N !/ب *_ ا
9Iف ا
x/د []W
Fف ذراع ا
.!/
Wآ/yإزا iات ا' 9ا - cإذا آ
ارة Vودة ~L
.1أزل ا
?9ء ا
!/ري Dراع ا
!/ا
]
+]Iل
إ
[
*
ذراع ا
.!/
.2أزل
*
ذراع ا
!/و< ~Nذراع ا
!/
^NأU¢ء ! lGNه زا
ذراع ا
_* !/
ا
/8/ر.
.3أد '3ا
9Iف Fف ا
Dراع Wا
!+ا
x/دة
+sة ا
.!/
{ .4ك +sة ا
[]W: !/ا
9Iف []Wذراع
ا
،!/وف 4},ر ^O7Gا
~/ج
ت 9F
*.W/8
ذراع ا' 3 9إزا ا51ء ا;9ري
.5ا+s j+3ة ا
[]W ^N !/ا
~xج.
; ا' 9اc
— 1ا
?9ء ا
!/ري Dراع ا
!/
— 2ذراع ا
!/
+s — 3ة ا
!/
— 1ا
?9ء ا
!/ري Dراع ا
!/
*
— 2ذراع ا
!/
— 3ذراع ا
!/
.3زا
+sة ا
_* !/ذراع ا
،!/أ*+s 8ة
ا
N !/ب *_ ذراع ا
4N !/ك ا
4IN .[U/ام
4,ك ا
8ى أ* 8ذراع ا
+s |!8G /UN !/ة
٣٣٨
.1ار Pذراع ا
+s P
!/ة ا
_W !/ا
~xج،
{[ ,ن ذراع ا
!/ا
Pا
]7ي ا
*'.
+s '}+
.2ة ا
_* !/ذراع ا
،!/ا?[]W L
8ن ا
! ,ا
x/د +s []Wة ا
!/و< L?p
N
[]Wذراع ا
4N !/وا{4ة ،و{ك +sة ا
!/إ
[
ا4W< klGN '+:ة ذراع ا
.!/
iة ا' 3 9ن ا EX <9و 3ا=P
+s — 1ة ا
!/
— 2ذراع ا
!/
8
— 3ن ا
!,
.3أU¢ء }' +sة ا
،!/أزل +sة ا
_* !/
ذراع ا
.!/
iة ا' 9ا W Eإزا Kذراع ا'9
iة ا' 3 9ن ا EX <9و 3إ1ء ا=P
+s — 1ة ا
!/
— 2ذراع ا
!/
8
— 3ن ا
!,
+s — 1ة ا
!/
— 2ذراع ا
!/
8
— 3ن ا
!,
.4ا j+3ذراع ا
[]W ^N !/ا
~xج.
٣٣٧
!OG pأ9ات ا
'+ا
Iر _G* x
?U,أً ,
ا
7م ،و 'p+,إxاء ذ
*ة }' ا
;,Iو*ة
أ3ى }' ا
4* P .PNاًرا <]ً> *_ ز ,ا
!O
Wا
lدة *' ز !OG ,أ9ا ا
_* '+
®s* Moparة دا '3أ9ا ا
.'+
iات ' 9ا#Vج اE/
;UG ?U,ا
~وا ,ا
+O
F9/ات ا
{8/وا
~xج
ا **:دورًN ,ا _* 79< 9ا ¡U+أو ا
/ش
ا
;+Iو* |8, ;9
;Uأي 43وش
DN , { .
ا
G _* ]Iاآ/ت ا
w]/أو ا NG:ا
< ا
_* 7
ا
.^,9
<, 4دي '?OGا
!/ت []Wا
~xج وه xف +ات
ز* ],F Uإ
[ +s ;]Gات ا
.!/ا4Iم دوً* '
4UW '8ا4Iام ا
!/ت زا
ا
w]/أو ا:وخ _W
ا
~xج ا **:ا
lف.
٣٣٦
|UlGا4Iام +sات ا
!/زا
ا
} Pأو ا
]¡ _W
ا
~xج ا .**:ا{ص []Wإ7Nد *9ط ا
_W !/
*>* 8ا
lU/ت ا
و
*' ز ,ا
!/ك أو ا
،_,~Uإ
.¥
jc< :GZا Dا;( 37ات ا'y 9
ا P5Hا1ا XوAWار ا
c'hام G< 7 .ا/داء
ا (ات 3PL =Ai EXأو Zت أو ;5kط >
أو EX .M 3PLو;#د أي Kه~| اGوف87 ،
i jGHLات ا' 9أو ا' H MاVوم.
+s ! |l,ات ا
!/وأذرع ا
'ON !/
دوري ،و
* 4UW L gاO* xآ' أداء ا
.!/
|l,أن _/p,هDا ا
!+ا
Uط ا
:
• ا
¤آ' أو ا
!اف ا
8/و,
• ا
/اد ا
?,
• ا
+lف أو ا
Oت
• ا
kOأو ا
'97
إذا +s +]Gة ا
!/أو ذراع ا
4 ،!/ل ذراع أو
+sة ا
!/ا
¢z/ة 3zNى 4,4xة!G .ول إ
>ح
+sة أو ذراع ا
!/ا
.+
Wآ/yإزا iات ا'9
!&MHW
N w/8Gر4Gاد ذراع ا
!/إ
[ ا
~xج دون وxد
+sة ا
* !/وإ ;], 4ا
~xج.
.8أ]^ أNاب ا
ل ]+هاء *; ا
اء وأ{
Gأ
U8ا
.
N ;
.9ب {lة ا
+زات Wد Gإ
[ *.7
را" Pxآ| ا
*4Iوا
/pن" ]7ف []Wات
ا
} ا
}!!.
89(Wه =Aارة
أ X M}W Hا;اء
8
— 1ن ا
ا8,:
8
— 2ن ا
ا_/,:
L vXب ا;;-ل ا;اء
N — 1ب ا
ل ;* ]+ا
اء
] — 2هاء *; ا
اء
.5ا NN wا
ل ]+ا
اء.
.6أزل ]ي ,~xت ا
اء *_ * إد3ل ا
اء
4{Nة ا
_I8وا
,و*; ا
اء ).(HVAC
ا!|
UWا
3 ]+رج ا
/ا، 8* klG
وا{4ة آ' *ة.
N < .7آ| ] هاء *; ا
اء 4INام *sات
* ] Pا
اء ا
g+ OGا klGازا
.
!&MHW
] ~/G ,هاء *; ا
اء sÓ
8Nرة إ
[ اklG
^4Gا
اء *_ >3ل ا
, .]+دي 4Wم Gآ| ا
]+
w!
'ONإ
[ ا
! xإ
[ ا4ا
}Nرة *رة.
P/x !OG |l,ا
Uط ا
!/ر ,ا
x/دة 48x []W
ا
8رة ا
_/pGأ<+ل اN:اب و*>}+ت اN:اب
و Fا
!/ر ,وا
ب ا
'ON +]Iدوري 4INام
!sم *' رsش *_ ع ®z
MOPARآ]/W 4
' 'ONو
! 4 ,/ا
?ر وا .NG:و<' و Pأي
ز w8* ?U, ، !OG ,ا~x:اء ا
]9/ب [{ /!OG
ا
zآ _* 4زا
ا NG:وا
!ت ا
*] ،و47N
اء *_ ]/Wا
?U, ، !Oإزا
أ ,ز,ت !OGأو
pا []W kو xا
}Iص
*!sت زا4ة ?U, .أً ,
/ت *~ج 9ء ا
!/ك ]zآ,9N ]/W _* 4
!! .و {
إxاء أ ,أ/Wل 9 !G *43ء
ا
!/ك~* ;UG ?U ،ج 9ء ا
!/ك و
w
ا
?9ء و* ا*:ن و./!OG
٣٣٥
ا'Dدة '>= ا R134a <Mوإدة ا'
cا& —
إذا آ ارة Vودة ~L
' 47,ا
R-134a 4,ا
Iص ;/Nا
اء أ{4
*ت ا
4رو]روآNن ) (HFCا
W4G
ا4Iا* وآ
{ ,/ا
،آ 47, /أ{ 4ا
/ت
ا
pرة :Nوزون .إ أن ا
lا
xªN
Gُ 7U}/اء
أ/Wل ا
} ;/ا
اء 7/Nا
آ' ا
،4/7/أو
*_ >3ل *اآ~ ا
*4Iا3:ى ا
4I8Gم *47ات
ا7دة وإWدة ا
4و.,
:GZا'
cم ز< اGH PAG ndم jA
ا;اء و';ا>= ا <Mا
Dة Kا ا .PX DH
ا'Dدة '>= ا HFO 1234yf <Mوإدة
ا'
cا& — إذا آ ارة Vودة ~L
' 47,ا
HFO 1234yf 4,ا
Iص ;/Nا
اء
أ{* 4ت ا
4رو]روآNن ) (HFCا
W4G
ا4Iا* وآ
{ ,/ا
،آ 47, /أ{ 4ا
/ت
ا
pرة :Nوزون ذو ا{/ل <]' ~,دة ا
!ارة ا
/
7
) .(GWPإ أن ا
lا
xªN
Gُ 7U}/اء أ/Wل
٣٣٤
ا
} ;/ا
اء 7/Nا
آ' ا
،4/7/أو *_ >3ل
*اآ~ ا
*4Iا3:ى ا
4I8Gم *47ات ا7دة
وإWدة ا
4و.,
:GZا'
cم ز< اGH PAG ndم jA
ا;اء و';ا>= ا <Mا
Dة Kا ا .PX DH
ا'
Mال jA Xا;اء ) Xه;اء jAا;اء(
!<~9W
ªN Gزا
] هاء *; ا
اء أU¢ء '?OG
ا
/و{ {[ 4!Gث إ
.N
] 4x,هاء *; ا
اء * '34ا
اء ا
;]3 U
4Uوق ا
+زاتxN < .اء ا
4ال ا
:]+
H-وق اPزات
4 — 1ادات !Gك
4Uوق ا
+زات
4U
— 2وق ا
+زات
.1اl{ wة ا
+زات وأ3ج P/xا
,!/ت.
.3أدر {lة ا
+زات إ
[ أ.'+
.2ا?x []W Lا| {lة ا
+زات وا j+3ا
ب.
.4ا}' 8ا
ا
], _,Dن NNا
ل ]+
ا
اء * و{4ة ا
_I8وا
,و*; ا
اء
).(HVAC
!<~9W
• ' ا
9ر]!* ,ل {* pأآل و _/,أن |8,
إ
!N Nوق أو إ
4< [/7
N Nر ا
].
ا{ص []Wإ7Nد ' ا
9ر _W ,ا
_7أو ا
Oة
أو ا
48lN '/G .gN>/ك ق ا
9ر ,أU¢ء '
G
*ت ا
' ا
¢UG { .Nا
!*j
[]Wا
_7أو ا
،4]lأع '8?Nا
9U/ا
[]W N}/
ا
+ر /Nد ,آة *_ ا
/ء .را" Pxإxاءات '?OG
رة ذات 9Nر |l, *" "+7 ,أن ]7+G
ا
!ت ا
9ر" ]!}ل _* 4,~* []Wا
*]7/ت.
• ز ا
9ر7s>
'N< ,ل واl+ر .ا{ص []W
إ7Nد ا
]| أو أي *}4ر ]Oارة _Wا
9ر .,
4I8Gم 9Nر~7* ,زة أو أي *}4ر *~7ز ~* 3ود
INج أآ *_ 4!N w/8G .
12وث _N g*>G
*ت ا
.'N
• !Gي أ<9ب وأFاف ا
9ر ,وا
!]/ت ا
I
[]W Nا
ص و*آ .Gا'/{ 47N ,4, '8
ا
9ر.,
!&MHW
• *_ ا
pوري 4UWو Pا
>Nت []Wا
9ر ,أن
'
G ,ا
9ف ا
|9
N 'N]
|x/ا
|x/
ا
9ر ,وا
9ف ا
|9
N 'N]
|
8ا
|
8
]9ر ~/G , .,أ<9ب ا
9ر ,ا
*>7N |x/
) (+وا
،(-) *>7N |
8وه *{ []W Uو,
ا
9ر ?U, .,إ{م * '
Gت ا
9<zN 'Nب
ا
9ر ،,آ ?U, /أن Gن _* 3ا
}4أ.
• {
" '
Gا
_{Oا
"P,8أU¢ء وxد
ا
9ر ,ا
8رة ،ا}' آ ]Nا
9ر'< ,
'
Gا
9
N _{Oر4I8G .,م "ا
_{O
ا
4N "P,8ء ا
.'?O
jAا;اء
]
ل إ
[ أ 'pأداء * ;* ! ?U, ،_/ا
اء
وإxاء أ/Wل ا
7/N N *4Iا
آ' ا
4N 4/7/ا,
* ا
}; ?U, .أن _/pGه kDا
;UG *4I
! p
ز ;Wا
;/وإxاء ا3ر ا:داء ?U, .أً ,
<ة 4sا
'?OهDا ا
<.
!<~9W
• ا4Iم ا' ا
4,وز,ت !OGا
Lp
ا
4/7/ة '<ِ _* Lا
lا
U
7U}/م *;
ا
اء j7N .ا' ا
4,ا
4/7/ة <]N
>7sل و _/,أن , /* ،l+UGدي إ
[ إ
.N
{ < |8G 4ا' ا
4,أو ز,ت ا
!O
ا3:ى ا
4/7/ة '97Gا
Uم|]9, /* ،
إxاء إ
>{ت *]* +دً .,را Pxآب **]7ت
ا
/pن ،ا
x/د < []Wص 7]
،DVDف []W
*~ _* 4,ا
*]7/ت {ل ا
/pن.
• !,ي م *; ا
اء L? !G 4,G ' []W
Wل .و
FI* |UlGا
7ض N
Óأو ;]G
ا
Uم ?U, ،إ ' ا
4,أو إxاء أ,
إ
>{ت ا |N:ا
<N '}+UG 4اU 9
*ه'.
!&MHW
4I8Gم *اد آ /أي م ;Gهاء {
إن ا
/و,ت _/,أن * ;]Gت *; ا
اء .
/ 9?,ن ا
8رة ا
4,4lة ا
4!/ود *' هDا ا
];.
٣٣٣
357 =1(W ' 9Xا1ر
!<~9W
• !Gول ! P9< '?OGا
?ر أU¢ء '?OG
ا
8رة.
• 4UWا
N '/7ب *_ *و{ 4,Gا
اد ،G,ا}'
Fف G* '
Gر ا
/و{* '/7G .و{
ا
دا G,وً 4ر xا
!ارة و U/,أن ^]9UG
أي و< j?Nا
_W Uو+* Pح ا
4< .'?O
7Gض ¬,N N
Óا
/و{ ا
!/آ.
• U/,أن 7Gض { N
Óا
'/7دا '3أ{4
ا
!/آت أو {
G .إ /WzNل
ا
,4
* N 7و ]/Gا
47/ات ا
]
U/م .Nوإذا
4< OGر []W Gإxاء أ/Wل ا
*4I
ا
8رة DI ،ر Gإ
[ أ{ U 4ا
/
ا
/ه]_.
! 4UWر P9< '?OGا
?ر 7, ،وxد ا
Oق
ا
}?ة ا
x/دة w9 []Wا
!~ام *_ ا
P]pإ
[ ا
P]p
أ*ًا .ً7Fو 4 ً 47Gال ا
!~ام .و* Pذ
47G ،
ا
Oق ا
x/دة F []Wل ا
) P]pو
(kW gأ*ًا
|l, .ً7Fا4ال أي {~ام s Nق 8Gي F []Wل
٣٣٢
4N < pال ا
!~ام {
وxد ¤Gآ'
ا
.P]pوأً ,
*+ط أو أ>ك Nأو >Fء *
.
• ا
8* 8ر )*>{7G :ف []Wا
]O/و{ول
{] <' Gآ| (4,4x
• ء )/ع
ت
,أو 9Fأو
|I
Wأو ا
7Oر NأU¢ء '/Wا
('?O
_/,أن Gن j7Nا
وف * _W sن *|7
آة ا
N ! |l, .8ات ا
_W ً!N ,U7N 8
وxد ;]Gأو *!ذاة
!!.
' 357ا1ر )ا ا(j
|]9,ا4ال ا
j7N 8ا
ُ9ز ا4Iام أدوات
D
،
3ا xªN
ُ Uªاء
ا
8رة 4ى ا
آ'
ا
.4/7/
ا
!ت ا
|]9Gا
م ]/7Nا4ال:
5Lر< 9W hج إ أل ا
• ^OGا
) P]pا}+ل ] Pأو أآ *_ 8xا
(8
ر~* Gودة 9Nر!G ,ج إ
[ أ/Wل ا
}{ .
~],م إ *ء ،آ~], /م إxاء أ/Wل
دور,
.
• ¤Gآ' ا
P]pأو ا
8
• ^OGا
OG) ً
F 8ت (_7] _N
• ا~ق ا
8
• "3وج ا
!~وز ) "7* _Wا
8, 8
ا
P/ا
}! []W wا
ة(
.3ار9 Pء xز UGا
اء ]
ل إ
[ ] xز
UGا
اء.
.4أزل x ] }UWز UGا
اء *_ *W/l
ا
./
;+kم ا;اء Lز PHWا;اء
# Xز PHWا;اء
Wآ PHW X yه;اء ا9ك
:GZا 9Xا Mو EX &Gو;#د Mnر أو
cت =M7 &Lا'
Mال X Hا;اء.
.1رآ| ] xز UGا
اء * W/lا
P* /
UG ] ! w9 Lا
اء ا
, !N !+ن
*.'+: l
.2رآ| 9ء xز UGا
اء []Wأ
4,4!G U8
* W/lا
./
9 — 1ء ] xز UGا
اء
F3 — 2م ا
اء
— 3أب * D3zا
اء ا
U
F3 O* — 4م ا
اء ا
U
UG ] — 5ا
اء
UG ] — 1ا
اء
UG ] ! w9 — 2ا
اء
.3رآ| ا
NO/ا
~آ و< 9 '+Nء xز UG
ا
اء W/l/Nا
/و< Nآ| F3م ا
اء.
.4أ{ ر O* LNأب * D3zا
اء وأ{ رLN
* *8أب *x D3zز UGا
اء.
٣٣١
PHW X <
9Wه;اء ا9ك
إزا PHW Xه;اء ا9ك
x ;]IGدة > UG Gهاء ا
!/ك 'ONآ?U, .
Lا4Iام > Gا
~ W ,ا
lدة ]!}ل []W
أ8* 'pى UG G> 47G .*43هاء ا
!/ك *_ ع
® W G> MOPARا
lدة وُ4IN [
,ا*.
.1أزل ا
_* *8/أx D3z* Nز UGا
اء.
.2أزل F3م ا
اء و< F3 O* +Nم ا
اء
ا
{ ¢ ،Uر ا
NO/ا
~آ ا
x/دة 9 []Wء
* D3zا
اء.
PHW X 9Xه;اء ا9ك وا'
Mا& — 9ك
اK<VHM
ا PGات ا
} ا
ُ N [
/آ /ه * wآ|
ا
*4Iوا
/pن.
5nء PHW Xا;اء
5nء PHW Xا;اء
— 1ا
NO/ا
~آ
F3 — 2م ا
اء
F3 O* — 3م ا
اء ا
U
*8* — 4أب * D3zا
اء ا
U
9 — 5ء ] UGا
اء
— 6أب * D3zا
اء ا
U
٣٣٠
— 1ا
NO/ا
~آ
F3 — 2م ا
اء
F3 O* — 3م ا
اء ا
U
ر j<DW Vز< 9ك DاMول ا(API) EA</
و U7,هDا ا
*~ أ <4
ا/Wد ا
~,
G
Nا 47* 9ا
ول
).(API
ا,*:
Gا
lا
7U}/
ز,ت
4INام
ا
!/آت ا
4/7/ة *_
ا
ول
*47
ا.L (API) ,*:
!&MHW
4I8Gم *اد آ /ز ,ا
!/ك *'
ا
/و,ت ا
_/,أن ;]Gا
!/ك/ 9?, .ن
ا
8رة ا
4,4lة ا
4!/ود *' هDا ا
];.
Vو #ز< ا9ك )در(SAE #
ُ ,~N [
,ا
!/ك MOPAR® _* 5W-20أو *
Pennzoil® ,أو ® P/l
Shell Helixدرxت
{ارة ا
'/7, { .'?OهDا ا
Uع N _8!G []Wدئ
ا
'?Oدر xا
!ارة ا
p+IU/و Gا
<د
ا
8رة.
~
pو xا
~,
ُ9 ,ء ! 7Gز ,ا
!/ك أً ,
ا
ُ!/
N [
/ك ر}!]
.Gل *]7* []Wت
{ل *<9 Pء ! 7Gز ,ا
!/ك ،راl{" Pxة
ا
!/ك" "
ا
8رة" ]!}ل _* 4,~* []W
ا
*]7/ت.
8< 7 :GZا'
cام ز< ا9ك SAE 5W-30
MOPAR® Kا
Dى iآ Chrysler
وا;اD 3 Xر ا;اد =} MS-6395
® Pennzoilأو ®;< h H Shell Helixا Xز<
ا9ك .SAE 5W-20
Xز< ا9ك
?U,ا4ال ] ز ,ا
!/ك 4,4x ]+Nآ' *ة ,
?Gز ,ا
!/ك.
X <
9Wز< ا9ك
ا4Iام .ا4Iم ] *_ هDا ا
Uع 4UWا4الUG .ع
xدة ا
G>+ا
4N ],4ر L ?U, .!]* xا4Iام
> Gا
~ W ,ا
lدة ]!}ل []Wأ8* 'pى
G> 47G .*43ز,ت ا
!/آت *_ ع ®MOPAR
> W Gا
lدة و4IN [
,ا*.
PHW Xه;اء ا9ك
را" Pxآ| ا
*4Iوا
/pن" ]7ف []Wات
ا
} ا
}!!.
!<~9W
_/,أن ,م {_ ا
اء )xز UGا
اء
وا
Iا ، Fا
(¥در _* xا
! { ,/ا7sل
ا
<د * '/ا{اق دا '3ا
!/كªN G .زا
م {_ ا
اء )xز UGا
اء وا
Iا ، Fإ
(¥إ
إذا آ ه kDازا
ور>
Ó
,ح أو ا
}.
zGآ4W _* 4م ا<اب أي _* Isا
!/ك <'
ا
4ء '?OGا
8رة دون وxد م {_ ا
اء
)xز UGا
اء وا
Iا ، Fإ
{ .(¥إن 4Wم
ا
~ام 4{ ]W |G, 4<
DNوث إ
Nت 93ة.
~G ,و!* 4,آت ه kDا
lت ا
]+N 7U}/ز_* ,
ا
Uع ا
^4/ا
*' ا
Dي _/,ا
47N U* ]I
٣٢٩
!&MHW
• <, 4دي 4Wم
ا
8رة w!
'ONأو '/W
ا
>{ت وا
4UW *4Iا
]~وم إ
[ ]/Wت إ
>ح
*]4ًx +ا ،و* ;]Gت أ3ى أو ا
¢zا
[]W ]8
أداء ا
8رة []W < .ا
+ر !+Nا9W:ل ا
]/!/
4ى *زع * 4/7أو *آ~ إ
>ح *ه'.
• PU}G G 4ر _* Gا' *![]W Ë!G U8
أداء ا
8رة و<ة ]/!Gآ+N w/8G /ات
4I8G .],Fم *اد آ /ه kDا
/ت *'
ا
/و,ت ا
_/,أن ;]Gا
!/ك أو <' ا
!آ
أو م ا
xا
~7/ز أو *; ا
اء9?, .
/ن ا
8رة ا
4,4lة ا
4!/ود *' هDا ا
]; .إذا ~م
ا4Iام *دة آx
/د ']3أ{ 4ا
/ت،
4Iم ا
'8ا
/ا
4!/د x Lاء
ا
}.;,
٣٢٨
ز< ا9ك 9 -ك اK<VHM
1Wز< ا9ك
; 9Xى ا<V
را" Pxآ| ا
*4Iوا
/pن" ]7ف []Wات
ا
} ا
}!!.
]zآ!* !OG _* 4ك ا
8رة |l, ،w!
'ON
ا{+ظ 8/Nى ز ,ا
!/ك 8* 4UWى *|l, .|U
! *8ى ز ,ا
!/ك 47Nإ,ف '?OGا
!/ك
ا
4ا g/IN Áد<^.
,دي ! *8ى ا
~ ,أU¢ء ;<Gا
8رة []Wأرض
* ,8إ
[ 8* _8!Gى د< <اءات *8ى ا
~,
4Nر .!]* xا{ Ë+داً8/N /ى ا
~ _/ ,ا
9U/
ا }W []W U*Æا
سG .دي إ آارت وا{_* 4
ا
~G *4UW ,ن ا
اءة أ '+ا
9U/ا U*Æإ
[
ر ا
اءة أ []Wا
9U/ا U*Æه kDا
!/آت.
!&MHW
و< []W |G, 4ز,دة *8ى ز ]W ,ا
/ا^ أو
ا +Iإ
[ POGا
~:N ,آ _l8أو 4ان ?L
ا
~ .,و<, 4دي ذ
إ
[ ;]Gا
!/ك.
ا9ك اkر ا<V
]
ل إ
[ أ47* []Wت ا:داء وأ<}[ { U/* ,/
P/xوف ا
Gُ ،'?Oا
lا
4IN 7U}/ام
ز,ت ا
!/ك ا
4/7/ة 47* _* Lا
ول ا,*:
) (APIوا
Gا^ *]9* Pت *7ر *اد
MS-6395أو O
ACEA A1/B1آ .Chrysler
Gم ا 9ا~اOBD II - EW
ا
8رة *~ودة UNم ! ذا9* Gر ]W ^]9,ا
, { .OBD IIا<| هDا ا
Uم *8ى ا¢7ت وأداء
ا
!/ك وأ /ا
! <' ا
!آ ا:و.G*G
و '/7G *4UWه kDاª ،!!
,9N /:ن ذ
,دي
إ
[ ار+Gع *8ى أداء ا
8رة و ¢,إ[]W ًNl,
ا<}د,ت ا>ك ا
<د ،إ إ
[ أ !,
ا¢7ت ا
!/ك وً ]ا 4Wا
!* ا
اه.U
وإذا |]9Gا *:إxاء j7Nأ/Wل ا
} :ي *_ هkD
ا8 ،/:م م }*" '?ON OBD IIح *s
_,~IN pر*ز
ا
.(MIL) "'97آ, /م هDا ا
Uم أً ,
}IOGو**]7ت أ3ى 4W8/ة Uا
[]W *4I
إxاء ا
>{ت .و _*
Nإ* <دة ا
8رة دون
ا
! xإ
[ ا
،|!8إ أ ?U,ا
]lء zNع * _/,
إ
[ ا
آ' ا
4/7/إذا |]9Gا *:إxاء
.
!&MHW
• Gدي <دة ا
8رة +ات P* ],FإNء ا:اء <4
ا
'?Oإ
[ {4وث ;]Gم ا
!
[]W pا<}د,ت
ا¢7ت .آ ¢G 4< /أً ,
ا>ك ا
<د وا
4رة []Wا
دة
|l, .
ا
8رة <' إxاء أي !ص >¢7ت.
• إذا و*}*" jح * sا
"(MIL) '97أU¢ء '/W
ا
!/كª ،ن ذ
4,ل < []Wب {4وث 4,4s ;]G
ا
!/ل ا
!+ز و4ان ا
.<9و |]9, Nا*:
[]Wا
+ر إxاء أ/Wل ا
.*4I
إ
[ ا{/ل ;]Gا
?9ء .إذا GاآOف ا
_G/
]O/
*
_p8 ،ء ا
Uم ء * sا
.(MIL) '97
و s* Á+9U,ا
'{ 4UW (MIL) '97ا
.]O/
ا'
Mال 357ا1ر
ُ4ON [
,ة 4INام < P9ر ® MOPARا]
:
أ/Wل ا
} وا
>ح ا
7د ,أو ا
4ور ،,وذ
]zآ _* 4ا
8* []W !/ى ا:داء/ 9?, .ن
ا
8رة ا
4,4lة ا
4!/ود ا
']Iأو ا
]; ا
4W _W ¡GUم
ا4Iام < P9ر ® MOPARا ]
:أ/Wل
ا
} وا
>ح.
ر' م ر5n Lء MDW 9Xا;;7د
_/,أن 4!,د ا
Uم ا
8
N }IOرة 47Nإ ا
<د
إ* * إذا آن 9ء ! 7Gا
<د *! ا
?]^
أو *آ| w!
'ONأو .;
GوW ,ض ر
"9) "gASCAPء ا
4W (_,~Uاد ا
.8/أ{
ر9 LNء ! 7Gا
<د {[
P/8Gت "."9F
هDا ا
}ت O,إ
[ أن ا
?9ء Gإ{م ] 'ON
! .wا? []W Lزر إWدة 4W Lاد ا
, 8/ف
Wض ا
.إذا ا/ت ا
8 ،]O/ا
ا
/ة ا
ا
4N ,ء '?OGا
8رة .و O,ذ
إ#اءات ا
!Gي ا
}!+ت ا
*43 []Wت ا
} اL;5
وا
4,4!G ,ه Nا 9ا
_4U/ا
/}G []W _/
ا
8رة.
إ
[ UN |xد ا
} ا
اردة "د
' ا
}
وا
/pن" ا
* |]9G 4< ،Nت أ3ى ا
} أو
ا4ال ا
.'8/
٣٢٧
Xnا9ك 3.6 D' -ات
— 1و{4ة ا
<9ا
) ]*/ا
}U/ات(
— 2ا
9ر,
< }W — 3س ز ,ا
!/ك
}W — 4ا
س <' ا
!آ ا:و) G*Gأ9 '+ء ا
!/ك(
7G — 5ز ,ا
!/ك
~3 — 6ان ' ا
+ا*'
٣٢٦
~3 — 7ان ' ا
?]
~3 — 8ان ' 4,Gا
!/ك
UG ] — 9ا
اء
9 — 10ء ? ' Lا
4,
~3 — 11ان ' ا
xا
~7/ز ا
<9
N '*7
• ا;ا>= وز<;ت ا( 89و 357ا1ر ا٣٦٥.. . . . . . . . . . . . . . . . . . . . . . . -/
• ا9ك ٣٦٥.. . . . . . . . . . . . . . . . . . . . . . . . . . . . . . . . . . . . . . .
• ا('& ٣٦٦.. . . . . . . . . . . . . . . . . . . . . . . . . . . . . . . . . . . . . . .
٣٢٥
•
•
•
•
•
•
٣٢٤
• Gم اا= . . . . . . . . . . . . . . . . . . . . . . . . . . . . . . . . .
• =7ا9آ ا/و - EAW;Wإذا آ ارة Vودة . . . . . . . . . . . ~L
• Gم ا bLPا
رو =7) EAا9آ ا
وي( — إذا آ ارة Vودة ~L
• =7ا9آ ا
وي — إذا آ ارة Vودة . . . . . . . . . . . . . ~L
• Mا. . . . . . . . . . . . . . . . . . . . . . . . . . . . . . . . . . =PH
• '>= ;9ر ا
وران ا/E/ا. . . . . . . . . . . . . . . . . . . . . Ec
• ا =AL <HDاcر E#وو K &<7اآ= . . . . . . . . . . . . . . . . . .
ا Hات . . . . . . . . . . . . . . . . . . . . . . . . . . . . . . . . . . .
• و
ة ا 75ا Aآً . . . . . . . . . . . . . . . . . . . . . . . . . .
K<VcWارة . . . . . . . . . . . . . . . . . . . . . . . . . . . . . . . . .
ا'
Mال اMت . . . . . . . . . . . . . . . . . . . . . . . . . . . . . . . . .
ا'
Mال ا. . . . . . . . . . . . . . . . . . . . . . . . . . . . . . . . . . M
• ا Mح ا. . . . . . . . . . . . . . . . . . . . . . . . . . . . . . E/
• إiرة ا5DhفM /ح ا; j7ا. . . . . . . . . . . . . . . . . . . /
• <
9W vLأرآن ارة ا. . . . . . . . . . . . . . . . . . . . . /
• Mح اMdب ا. . . . . . . . . . . . . . . . . . . . . . . . . . . E/
• Mح اMdب ا. . . . . . . . . . . . . . . . . . . . . . . . . . . Ec
• Mح اklة ،وا; ،j7وإiرة ا5Dhف ،وا;#ع . . . . . . . . jc
• Mح ا; j7اآVي ا;Dي ). . . . . . . . . . . . . . . . (CHMSL
;ا-ت ارة . . . . . . . . . . . . . . . . . . . . . . . . . . . . . . . .
'Dت ا;ا>= . . . . . . . . . . . . . . . . . . . . . . . . . . . . . . . . . .
.
.
.
.
.
.
.
.
.
.
.
.
.
.
.
.
.
.
.
.
.
.
.
.
.
.
.
.
.
.
.
.
.
.
.
.
.
.
.
.
.
.
.
.
.
.
.
.
.
.
.
.
.
.
.
.
.
.
.
.
.
.
.
٣٤٥..
٣٤٦..
٣٤٨..
٣٤٨..
٣٤٩..
٣٤٩..
٣٥٠..
٣٥٤..
٣٥٥..
٣٦٠..
٣٦٠..
٣٦٠..
٣٦٠..
٣٦١..
٣٦١..
٣٦١..
٣٦٢..
٣٦٢..
٣٦٢..
٣٦٣..
٣٦٤..
٧
ارة•
•
•
•
Xnا9ك 3.6 D' -ات . . . . . .
Gم ا 9ا~ا. . . . . . OBD II - EW
• ر' م ر5n Lء MDW 9Xا;;7د
ا'
Mال 357ا1ر . . . . . . . . . . . .
إ#اءات ا . . . . . . . . . . . . .
• ز< ا9ك 9 -ك ا. . . . . K<VHM
• Xز< ا9ك . . . . . . . . . . .
• PHW Xه;اء ا9ك . . . . . . . .
• 357 =1(W ' 9Xا1ر . . . . .
• 5Lر< 9W hج إ أل ا . . .
• jA -ا;اء . . . . . . . . . .
• 89(Wه =Aارة . . . . . . . . . .
• iات ' 9ا#Vج ا. . . . . E/
• إ =>' Xا. . . . . . . . . . '1
• Gم اDدم . . . . . . . . . . . . . .
• Gم ا. . . . . . . . . . . . . . <M
.
.
.
.
.
.
.
.
.
.
.
.
.
.
.
.
.
.
.
.
.
.
.
.
.
.
.
.
.
.
.
.
.
.
.
.
.
.
.
.
.
.
.
.
.
.
.
.
.
.
.
.
.
.
.
.
.
.
.
.
.
.
.
.
.
.
.
.
.
.
.
.
.
.
.
.
.
.
.
.
.
.
.
.
.
.
.
.
.
.
.
.
.
.
.
.
.
.
.
.
.
.
.
.
.
.
.
.
.
.
.
.
.
.
.
.
.
.
.
.
.
.
.
.
.
.
.
.
.
.
.
.
.
.
.
.
.
.
.
.
.
.
.
.
.
.
.
.
.
.
.
.
.
.
.
.
.
.
.
.
.
.
.
.
.
.
.
.
.
.
.
.
.
.
.
.
.
.
.
.
.
.
.
.
.
.
.
.
.
.
.
.
.
.
.
.
.
.
.
.
.
.
.
.
.
.
.
.
.
.
.
.
.
.
.
.
.
.
.
.
.
.
.
.
.
.
.
.
.
.
.
.
.
.
.
.
.
.
.
.
.
.
.
.
.
.
.
.
.
.
.
.
.
.
.
.
.
.
.
.
.
.
.
.
.
.
.
.
.
.
.
.
.
.
.
.
.
.
.
.
.
.
.
.
.
.
.
.
.
.
.
.
.
.
.
.
.
.
.
.
.
.
.
.
.
.
.
.
.
.
.
.
.
.
.
.
.
.
.
.
.
.
.
.
.
.
.
.
.
.
.
.
.
.
.
.
.
.
.
.
.
.
.
.
.
.
.
.
.
.
.
.
٣٢٦..
٣٢٧..
٣٢٧..
٣٢٧..
٣٢٧..
٣٢٨..
٣٢٩..
٣٢٩..
٣٣٢..
٣٣٢..
٣٣٣..
٣٣٥..
٣٣٦..
٣٣٩..
٣٤٠..
٣٤١..
٣٢٣
Kدون ا'
cام ح ا(=1
3G |l,ا
!Dر |! 4UWا
8رة * Pوxد *+ح
ا
'?Oو) LOCK Pا
.('+ا
,9ا
{4ة
ا
4/7/ة |!8ا
8رة *_ دون ا4Iام *+ح ا
G '?O
Nا 9ا
U{Oا
~], .!98/م ا4Iام ُ*47ة ا
|!8
ا
4{ PU/
U/وث 8
N ;]Gرة.
ُ+ز ا
3XاEL
w}UGا
lا
P* |!8
N 7U}/ر P/x Pا
>l7ت K
ا:رض .وا
9ق ا
D
/ه !| ا
8رة []W
رة ' * ،!98أو * Pر Pأ{ F 4ا
8رة ووP
ا
9ف ا
7/آ []W
gد
!|.
٣٢٢
وإذا Gا ،!98* |! U{sوآ ]Wا
'U
|! _/ ،'/7Gا
8رة ) ا klGا P* **:وxد
3#ا
>l7ت []Wا:رض( ،إذا آ ]Wا
'U
و) NEUTRAL Pا
> (^O7Gوآن <' ا
!آ
و) PARK Pا
<;( )
><Uت ا
!آ ا:و(G*G
أو Gس ) nو) NEUTRAL Pا
>،(^O7G
><Uت ا
!آ ا
4و .(,را" Pxا
_* lأ 'xا/lم"
"ا
4ء وا
_* 4,~/
"'?Oارsدات ا
.]}+
!&MHW
• 4W |l,م ا4Iام را7ت ا
]l7ا **:أو ا
.+]I
!4ث ;]Gدا '< ]3ا
!آ أو ]Wا
'U
{
ا4Iام را ]lW 7أ** أو +]3أU¢ء
ا
.|!8
• _/,أن +
I* _W lU,ا
]9/ت ا
D/آرة أk>W
|!8ه kDا
8رة {4وث أار '< ?
N
ا
!آ و/أو ]Wا
.'Uو / 9?,ن ا
8رة
ا
4,4lة ا
]; ا
x _W xUه . ] 'ON
zوف اy9
ا
|!8ا
w98/
اZDت K ;Xا/رض
4x,
ر Pا
>l7ت أو د
!|
ا
*4/
ا
3/ة
ا=A
!98* U{s
أ~xة ا
|!8أو ا
Pا
}!! *;]G PU/
N]9
ا
8رة .ا4Iم p< Lن ا
|!8وا
47/ات ا3:ى
ا
D
//}/ا ا
7ض *ً/]7G 7ت ا
lا
7U}/
]47/ات 7, .ا4Iام >' ا
*>8إ
~ا*ً< .
|p< '
Nا
|!8أو xز !| ~x:N 3اء
ا
] ا
8]
8رة -و
4}/
N gات أو ا
4U8ات
ا
* |l, .N ]}/اWة <ا_ ا
,وا
ا_ ا
]!/
ا
[]W ^9UGا
8رات ا
lري !.
ُ+ز ا
3XاEL
را 3#اDت " EXا Kأ =#ا'hم"
• وxد <' ا
!آ ا:و G*Gو) PARK Pا
<;(
• و '< Pا
!آ []Wأي Gس )ZcLف وNEUTRAL P
)ا
>((^O7G
• ]Wا
'Uو) NEUTRAL Pا
>(^O7G
• ا
klGN |!8أE
; nح
; nح
ا P<5ا}
إذا آن ]Wا4Iام *]!ت )ا
!/ت أو أدوات إزا
ا
} ،Pإ
،(¥أU¢ء ا
|l ،|!8أن ,ن *+ح ا
'?O
و) ON/RUN Pا
/'?Oا>9ق( ،و
g
و) ACC Pا
!]/ت(.
{
اغ 9Nر ,ا
8رة *_ ا
،_!OراlG" Pxوز
ذراع ا
"'UهDا ا
7]
8ف []Wارsدات {ل
إ3اج <' ا
!آ ا:و) PARK _* G*Gا
<;(
].|!8
!&MHW
• 4I8Gم ٌ*47ة <~* 9ودة FNة |! 4UWا
8رة.
4!, 4ث 8
N ;]Gرة.
• 4UWو Pا
8رة U{s []Wذات +* w9ح ،
* _* 9NGت ا
^]7ا **:أو ا
{ .+]I
< 9< []W |G, 4ر4{ F3 ,9N Gوث
+]Gت ا
8رة.
٣٢١
Wوز ذراع ا=PH
47N _/, .8ذ
4Nء '?OGا
8رة وP
) NEUTRALا
>.(^O7G
{
{4وث ,!G 7* _/, '9Wذراع ا
'U
و) PARK Pا
<;( U/, ،ا4Iام اxاء
ا
! ,ذراع ا
:ً<* 'U
.9أG 4Wآ| 9ء ا
ل lوز ذراع ا
.'U
'' y9رة 5D
,ªN < .1ف '?OGا
!/ك.
.2أ{ ^O7Gا*' ا
<;.
4IN .3ام *N +ا
? أو أداة *ªN < ،NOزا
9ء ا
ل lوز ذراع ا
) 'Uا
x/د _/, []W
ذراع ا
.('U
.4أدر *+ح ا
'?Oإ
[ و) ACC Pا
!]/ت( أو
) ON/RUNا
/'?Oا>9ق(4N G _
،ء '?OG
ا
!/ك.
5nء ا;;-ل وز ذراع ا=PH
.5ا? P* Lا{+ظ L?p
Nا
ي []Wدوا
ا
+ا*'.
.6أد +* '3أو أداة * D+U* NOا
ل وا?L
* []W ً9ذراع ,!Gا
lوز ا
4وي ¦.'+
{ .7ك ذراع ا
'Uإ
[ وNEUTRAL P
)ا
>.(^O7G
٣٢٠
;},هDا ا
8اxاءات ا
|!8N
Iرة *]97
4INام lG |! *43ر '< '/W { .,ا
!آ
|! pا
8رات
و* W/lا
P4وا
!آ _/, ،أً ,
ا
]97/آ /ه *" wا
_* lأ 'xا/lم"
ا
" 8ا
4ء وا
."'?O
(3LW) !&MHW
• , /Nا^ * Pا
وف ا
اردة أ |l, ،k>WوP
{] ا
_N |!8ر) _Gوا{4ة |!8Gوا3:ى
*8, (N!8ان !* 'ONذي 4< [}<zNر *_/
F []Wل g+ا
LIا
/آ~ي4!, 4< .ث ;]G
8
Nرة {
4Wم اGع ه kDارsدات.
P M}Wا y9ا/
P <~9Wاy9
]{ gN< 4x,ا
|!8ا ;]3 **:ا
ب واx
ا
4}/ا**:
!&MHW
• |l,ا4Iام {] ا
]/W |!8ت ا
4W8/ة []W
ا
' []W ^,9ا
!} .ا4Iم {] ا
L |!8
*x Pز * |Uوً د ا
9ق ا
|p<) 7,8
]| أو ]
]|( |!8ا
8رة 8/
'ON
<}ة إ
[ أ<ب *<.*43 P
• |l,أ 4I8Gم {]ت ا
|!8
|!8ا
8رات []W
ا
9ق ا
Wة أو {G /ن هUك Wت.
آ| {] ا
،|!8ا wا
ب 4INام *+ح ا
8رة أو
*N +ا
? ¢ ،أ{ ]{ Gا
|!8ا
.gN
)(3LW
P M}Wا y9اc
]{ gN< 4x,ا
|!8ا
;]3 +]Iا
ب واx
ا
4}/ا
.+]I
آ| {] ا
،|!8ا wا
ب 4INام *+ح ا
8رة أو
*N +ا
? ¢ ،أ{ ]{ Gا
|!8ا
.gN
< ªNد3ل ا
9ف ا
j/
w98/ا
ا 7دا]{ '3
ا
¢ ،|!8أ{ ا
،4Oرا" Pxر Pا
8رة و?G
اFرات" ا
}!]
6 8ل []Wا
*]7/ت|l, .
]{ Gا
{ªN |!8م *ً/G 8آ +ا
LN
Wوا xا
4}/ا **:ا
]+8آ /ه * .wإذا
]{ 8Gا
[]W *ً/G |!8آ +ا
4W ?U ،LNم
!| ا
8رة.
< ªNد3ل ا
9ف ا
j/
w98/ا
ا 7دا]{ '3
ا
¢ ،|!8أ{ ا
،4Oرا" Pxر Pا
8رة و?G
اFرات" ا
}!]
6 8ل []Wا
*]7/ت|l, .
]{ Gا
{ªN |!8م *ً/G 8آ +ا
LN
Wوا xا
4}/ا **:ا
]+8آ /ه * .wإذا
]{ 8Gا
[]W *ً/G |!8آ +ا
4W ?U ،LNم
!| ا
8رة.
٣١٩
(3LW) !&MHW
• < []W |G, 4ز,دة Wا
!/ك أو 4Gو ,ا
>l7ت
W8Nآة إ
[ ار+Gع در{ xارة *!ر ا
'Uأو
pإ
[ ;]GاFراتG .
.]97Gو<, 4دي ذ
أً ,
4Nو ,ا
>l7ت 48 []W 4,~G W8Nآ 30) W/
*ً> (W/أU¢ء ا
دة Gس ) 4!,ث '
ا
.(W8
!<~9W
إدارة اFرات _/, W8Nأن ً93 'O,ا آًا .و<4
Gدي ا
ة ا
W _W lGUت >l7]
Wت إ
[ ;]G
*!ر ا
4وران واFرات أو {4وث ./N ']3و<4
l+U,اFر و |8,ا
4N G .* IO
Nو,
>lWت ا
8رة W8Nأآ *_ 48آ 30) W/
*ً> (W/أو :آ *_ * ¢ 30ا
] G *4UWن
ً
Wو Gك أي
N Isب *_ ا
4UW ]l7
4Gو,ه * /آ ا
.W8
ا'
cام Pاy9
إن ر~* Gودة |! ]!Nوا
_/,ا4Iا*
|!8رة *.]97
4UWا4Iام {] !|zG ،آ _* 4اGع ا
/]7ت ا
اردة
"ا{Fت ا4Iام {] ا
"|!8و "!| رة
* "]97هDا ا
. 8
Pاy9
ا+ت ا'
cام Pاy9
:GZ
• Wآ
P M}W KاAoL y9م وو; L Dرة
L7 EX 99-اآ.y
٣١٨
• ُ<
c'L v Hام Pا yd7 3 y9ا y9و/أو
' ا.y9
•
cW hم Pا' y9' EX y9رة Hi
.95
•
cW hم Pا' <9 y9رة .Pرا3#
"' <9Wرة EX "Pه~ا ا; 9 8Pل
K <Vا;Dت.
!<~9W
<; 4ً7Nا _Wا
8رات 4UWا
4IN |!8ام {]ت
ا
.|!8
• 4I8Gم ] ]{ P* ]8ا
'}+UG 4 .|!8ا
'>8
* |8, /إ
93 Nة أو ا
ة.
• 4I8Gم L,sا
]{ P* |!8ا
8UG 4< .|!8
أ Fsا
|!8أو 4{ |8, /* '}+UGوث إ
N
93ة أو ا
ة.
• < []W |G, 4ا4Iام {] ا
w!
'ON |!8
آ 8ا
/ت *4{ |8, /وث إ
93 Nة أو
ا
ة.
.3ا}' Fف آ 'Nا
' ا
_W (+) |x/ا
|9
ا
9
(+) |x/ر ,ا
.~,~7
.4ا}' ا
9ف ا
'N
'N/ا
' ا
(+) |x/
*_ ا
|9ا
8]
(+) |x/رة ذات ا
9ر+* ,
ا
._!O
إذا |]9Gا '?OG *:ا
9ر ,ا
8N ]
N +7pرة
أ3ى * 'ONر *_ أ4N 'xء '?OGا
8رة|l ،
! ]Wا
9ر ,وم ا
4UW _!Oا
آ' ا
.4/7/
!&MHW
'/7Gا
!]/ت ا
DU/N ]
G _/,ا
<9
ا
8
N Nرة |! []Wا
9N _* <9ر ,ا
8رة،
{[ 4W 4UWم ا4Iا* )*' ا
ا ;Gا
,]Iو* إ
[
ذ
( .و ،
Nإذا +
]
G Gات ],Fدون
'?OGا
!/ك8 ،دي إ
[ U!s Ò,+Gا
9ر,
4NرG xدي إ
[ }Gا
/7اا ]9ر ,و/أو
* PUا
!/ك *_ 4Nء ا
.'?O
إkاج 'رة P
إذا ]Wر Gا
_9أو ا
*ل أو ا
]¡,!G _/ ،
ً Nا 9ا
!آ اه~از4N < .,و ]lW ,ا
دة x
ا
x ¢ _/ا
8ر >3ء ا
9U/ا
>l7
N 9!/ت
ا ;]I]
',4
N < ، ¢ .**:وا*:م ) DRIVE _Nا
دة(
و) REVERSEا
xع ] '< P*) (;]Iا
!آ
ا:و (G*Gأو ا
س ا
ووREVERSE P
)ا
xع ] '< P*) (;]Iا
!آ ا
4وي( * Pا
^N L?p
[]Wدوا ا
<د 47, .ا4Iام ا
[]W L?pدوا ا
<د
<]ً> >{+ظ ¢zNا
!آ اه~از ,دون ا
4و ,ا
P,8
]>l7ت أو P,8Gا
!/ك .,?]
7 ]/W
!&MHW
< []W |G, 4ز,دة Wا
!/ك أو 4Gو ,ا
>l7ت
W8Nآة إ
[ ار+Gع در{ xارة *!ر ا
'Uأو
.]97Gدع ا
!/ك zF,أU¢ء وxد <' ا
!آ
و Pا
>4/
^O7Gة د< وا{4ة []Wا 47N '<:آ'
g/3دورات *_ ا
~ '], .ذ
*_ ار+Gع درx
{ارة ا
jNأو <' ا
!آ و _W +<Gا
'/7أU¢ء
ز,دة ا
,!
4lا
8رة ا
.
7
:GZا 1ح ") "ESC Offإ<Pف
Gم ا EX 8A9اP'hار(G 3; ،م ا8A9
اAو EX EاP'hار EX (ESC) ،وPartial" 3
) "Offا<Pف ا =M7 ،(E>Vأر 9#ارة .را3#
"ا 8A9اAو EX Eاا=" " EXا
Mء وا("=1
; 9ل K <Vا;DتL .د <9W
ارة ،ا 1ح ") "ESC Offإ<Pف ا8A9
EXاP'hار اAو (Eة أkى D'hدة و3
" =1(W) "ESC Onا EX 8A9اP'hار اAو.(E
!&MHW
• 4UWه~ رة * _W ]97ا
!آ ^,F _Wال
) DRIVE _Nا
دة(/ا
س ا
وGس
) REVERSEا
xع ] '7lG ،(;]Iا
>l7ت
4Gور W8Nأآ *_ 24آ [{ (>ً* 15) W/
|8,ذ
W/l* ;]Gا
P4وا
!آ.
)(3LW
٣١٧
.3إذا آ4I8G Uم رة أ3ى 4ء ا
'
N '?O
9Nر ,أ3ى,ªN ،ف ا
8رة 9 _/ق آ>Nت
ا
' وا Lا*' ا
<; ،وzGآ+* L _* 4ح
ا
[]W '?Oو) OFF Pإ,ف ا
.('?O
!&MHW
و<, 4دي ا+3ق اGع ه kDاxاءات إ
[ {4وث ;]G
UNم ا
8
N _!Oرة ا
~7/زة أو ا
8رة * +ا
._!O
=-;WآZLت ا;=-
!<~9W
g*>N w/8Gا
8ر /p7N P* _Gا
4< { j7
_* ¡U,ذ
{4وث ا}Gل أر و< []W |G, 4ذ
{4وث إ
Nت.
إ#اء ' =1(Wرة ذات 5Lر< -;L D
5MLر< أkى
!<~9W
<, 4دي ا+3ق اGع إxاء '?OGرة ذات
9Nر9N ]
N +7 ,ر ,أ3ى إ
[ ا
N
ا
}IOأو ;]Gا
]//ت |8Nاl+ر ا
9ر.,
'
N < .1ا
9ف ا
_* (+) |x/آ 'Nا
'
إ
[ ا
|9ا
(+) |x/ا
_* 47ا
8رة * +ا
._!O
'
N < .2ا
9ف ا
'N
'N/ا
' ا
|x/
) |9
N (+ا
9
(+) |x/ر ,ا
.~,~7
'
N < .3ا
9ف ا
_* (-) |
8آ 'Nا
'
|9
Nا
9
(-) |
8ر ,ا
.~,~7
'
N < .4ا
9ف ا
'N
'N/ا
' ا
(-) |
8
9Nف أر !/]
4xك )~l
Nء ا
47/ا
O/ف
*_ *!ك ا
8رة ا
4ً7N (!O/ا _Wا
9ر,
وم {_ ا
<د.
!<~9W
'
G |UlGآ 'Nا
' |9
Nا
(-) |
8
]9ر ,ا
, 4< .!O/دي {4وث sارة آN
إ
[ اl+ر ا
9ر ,و< _W lU, 4ذ
إ
.}Is N
ا4Iم 9ا
zر j,ا
،L U7/و 4I8Gم أ,
أ~xاء *W 47ر ,أ3ى.
.5ا4Nأ !* '?OGك ا
8رة ا
x/د Nا
9ر,
ا
~7/زة ،واGك ا
!/ك داًا {
ا
47
Fة د<^،
¢ا4Nأ !* '?OGك ا
8رة ا
x/د Nا
9ر ,ر
ا
._!O
l/N .6د 4Nء '?OGا
!/كªN < ،زا
آ>Nت ا
'
|G
Nا
:87
= XآZLت ا;=-
.1ا}' Fف آ 'Nا
' ا
_W (-) |
8ا
9ف
ا:ر !/ك ا
8رة ا
x/د Nا
9ر ,
ا
.!O/
.2ا}' ا
9ف ا
'N
'N/ا
' ا
_* (-) |
8
ا
|9ا
9
(-) |
8ر ,ا
.~,~7
٣١٦
إ#اءات ' =1(Wرة ذات 5Lر< D
إذا آ ا
8رة !Gي 9N []Wر_/ ،!O* ,
8N ]
N ]?OGرة أ3ى 4INام آ>Nت ا
'
و9Nر ,رة أ3ى أو 4INام {~* *!
/
~,~7ا
9ر _/, .,أن ,ن '?OGرة ذات 9Nر,
8N ]
N +7رة أ3ى أ*ًا ً93ا إذا kD+UG G
D
،w!
'ONا [x,اGع اxاءات ا
اردة
هDا ا
.*G ,U7N 8
و Hا'
cام V<VD ;9 V
:GZ
ا5Mر< ،ا 3MWا+hت وإرiدات ا( =1ا-c
Lا .DH
!<~9W
!Gول '?OGا
8رة ذات ا
9ر ,ا
+7p
8N ]
Nرة أ3ى إذا آ ا
9ر 4< ,و
]
4ر{ xارة ا
~/G 4 .4/lق أو l+UGوGدي إ
[
{4وث إ
Nت .}Is
VWات
Lء ا(5ML =-;L =1ر< أkى
9N 4xGر ,ا
8رة ا
~lء ا _/,:ا
_* +]I
ا
!/ك * ;]3آ~ Gز P,ا
.<9
!&MHW
4I8Gم ا
!~* ا
~,~7
/!/ا
9ر ,أو أي
*}4ر U]
P* 3 ~,~7Gم ،
12 _W 4,~G
وإ ;]G 4ا
9ر ,أو *Gر xز 4Nء ا
'?Oأو
*
4ا
ر ا
/دد أو ا
Uم ا
.N
y57ا5Mر< ا;y#
!<~9W
• ا{ص []Wا7Nد * _Wو{ ا
4,ا
x/دة
ا
اد G,أU¢ء ر9 Pء ا
!/ك4G 4 .أ ا
'/7
أي و< /
Fآن *+ح ا
[]W Fًp* '?O
و) ON Pا
7G 4< .('?Oض 4UW N
Ó
+s ,!Gات ا
/و{.
• 4ِGGأl* ,هات * '> '* 47ا
IاG
وا
W8ت وا:ور ،وا
<G 4دي إ
[ {4وث
g*>Gآ}* Nد7G 4< .ض
N
93ة.
• !Gي ا
9ر,ت j/{ []Wآ _/, ,أن ,دي
إ
[ إ{اق ا
Oة أو ا
،_U7آ /أ 4
Gز
ا
4رو _xا
7s>
'Nل و P,اl+ر .ا{ص
[]Wإ7Nد ا
]| أو أي *}4ر ]Oر _Wا
9ر.,
.1ا Lا*' ا
<; و4Nل <' ا
!آ ا:وG*G
إ
[ و) PARK Pا
<;( )<' ا
!آ ا
4وي
و) NEUTRAL Pا
> ¢ ،((^O7Gأدر *+ح ا
'?O
إ
[ و) LOCK Pا
.('+
.2أو<; x '?OGز ا
4وا
اد ,و P/xا
!]/ت
ا
Nا
pور.,
٣١٥
(3LW) !<~9W
ا
ا .7و4W []W |G,م اGع هDا ا
! ,Dا
7ض
.}Is N
.8ا j+3ا
8رة Nا ;
9ا
/8/ر ا
]
ا
Iص
Nا x 7ا
8ر ،و< ªNزا
ا
ا.7
/GªN < .9م إ{م
ا*' 9ء ا
.]l7ا?[]W L
*+ح ا
'+¦
LNأU¢ء ر LNا
}ا*' ~,دة 4< 7رة
ا
',4N < .Pا
}ا*' {[ ,إ{م ر LNا
}*
* ._Gرا*" Pxا
+ت ا
~7م" هDا ا
7/
'}+
ا
~7م ا
}! *}
wا
.]l7
(3LW) !<~9W
|8Nا
<; ا
7G ،Áx+/ض {ة ا
آب ا
x/د_,
دا '3ا
8رة ] .9Iا{ص دوً* []Wو Pأ~xاء
ا
ا 7واFر ا{ Fا*:آ_ ا
}}I/
.
D
Wآ yإ+ر ا<5
N < .1آ| إFر ا
!* []W ^,9ر ا
4وران.
N < .2آ|
ا*' ا
>l7ت ا
xG P* /
ا
9ف *Iو Fا
_* 'Oا
}ا*' { ا
.]l7أ{
ر LNا
}ا*' <]ً>.
ªN < .10زا
* W/lا
ا 7و{ا ~xا
>l7ت.
N < .11اFر وا
ا 7وا:دوات *ا<7
ا
}!!.
!<~9W
[]W |G, 4ا4ع اFر أو ا
ا 7ا
/
{ªNم دا '3ا
8رة 4UWا
7ض !دث ا
49ام أو
)(3LW
٣١٤
!<~9W
FI* |UlGا~ق ا
8رة _Wا
ا!G ،7
ر
LNا*' ا
>l7ت j+IG [{ *ً/Gا
8رة _W
ا
ا .7و4W []W |G,م اGع هDا ا
! ,Dا
7ض
.}Is N
.3ا j+3ا
8رة Nا ;
9ا
/8/ر ا
]
ا
Iص
NاW gW 7رب ا
.W8
/GªN < .4م إ{م
ا*' 9ء ا
.]l7ا?[]W L
*+ح ا
G /UN '+¦
LNز,دة ا
F 4UW Pف
ا
.j/أ{ ر
LNا*' ا
>l7ت /l 's []W
, !Nإ{م ر LNآ'
*
* 7/
._Gا
~7م
ا
}! *
LN
wا
]l7را*" Pxا
+ت ا
~7م"
هDا ا
. 8إذا z* _Gآً4ا *_ إ{م ر LNا
}ا*'
4IN }! U/ ،w!
'ONام *+ح ر LNذي <ة
~Wم * Uوا
4
/ى وآ] ا
4/7/أو *!9ت
ا
}.
* 47N .5ور 40آ ) (>ً* 25ا! ~Wم
ا*'
ا
>l7ت 4INام *+ح ر LNذي <ة ~Wم *z]
Uآ4
*_ أن
P/xا*' ا
>l7ت * w!
'ON
ا
>l7ت.
_Wا:رض 8/Nآ N w/8Gآ| اFر
ا{ w, { .Fذ
إ* ر PاFر إ
[ أد[
ار+Gع * P* ،
8N ,!N w/8, _/ا
!+ظ []W
أ<}[ <4ر * _* _/اار ا
8رة.
<~9WااDX
!&MHW
!Gول ر Pا
8رة PNا
ا* 7ا<]G P
ا
/]7G !/ت و Pا
ا kD
7ا
8رة.
; 37ا 3XاEc
!<~9W
,دي ر Pا
8رة أآ *_ ا
>زم إ
[ 4ان ا
8رة
از وا
|8و<ع }Gدم ^
~UG 4 .ا
8رة
*_ ق ا
اzl 7ة وlN ;, _* |}Gاره .ارP
ا
8رة +
L +, /NاFر.
.1أ3ج ا
]l7ا{ Fوا
ا 7وا:دوات *_
* Pا
._,~I
+N < .6ا
}ا*' وا
.]l7
+N < .2ا*' {ت Gا
N ]l7ا+
9
xا
8ر 4/Nار +وا{4ة )و
_ 4Nون (*ً/GأU¢ء
وxد ا
[]W ]l7ا:رض <' ر.7
.7ا Lا
]l7أو اFر ا{ P* Fا
8رة و<
Nآ|
ا*' ا
>l7ت []Wأن ,ن ا
9ف
ا
I/و Fا klGا
.]l7أ{ ر
LNا*'
ا
>l7ت <]ً> W klGNرب ا
.W8
N < .3آ| ا
ا 7وأدوات ا
x* '
N < .P
ذراع ا
ا+/N ¢ ،^!]/
N 7ح ر LNا
}ا*'.
'?ON < .4ا
ا *4* _* 7أو *3ة ا
8رةP .
ا
ا 7أ '+أب *!ر ا
4وران آ /ه *_3XW h .
ارة Wآ
Kأن اا.ًW M} DX
; 37ا 3XاE/
.5ار Pا
8رة Nا N ;
9ا
ا 7اklG
Wرب ا
.W8ار Pا
8رة w9 47, [{ LاFر
!<~9W
FI* |UlGا~ق ا
8رة _Wا
ا!G ،7
ر
LNا*' ا
>l7ت j+IG [{ *ً/Gا
8رة _W
)(3LW
٣١٣
ا 3X d9ارة
,ªN < .1ف ا
8رة N¢ w9 []Wو*|UlG .ٍ8
ا w9:ا
9?/ة 4]l
Nأو ا
~
.
!<~9W
!Gول ?GاFر |lNا
8رة
Nب *_ {آ
ا
/ور 4< ،ر4ً7N Gا _Wا
4N ^,9ر xآ
+دى ا
7ض ]4ه 4UW gا4Iا* ]ا 7أو أU¢ء
?Gا
.]l7
{ P .6ا ~xأ*م * *4و*3ة ا
]l7ا
]N/
P/ا
>ً* .Pإذا أردت
?GاFر ا **:ا_/,:
Pا
!ا ~xأ*م ا
]l7
ا
+]Iا
8ى.
<k yوج
:GZ
اآب Kارة Hر.DX
DWت ا3X
'?ّs .2وا*pت ا
! _* ,Dا
.9I
^O7N < .3ا*' ا
<;.
.4ا' <' ا
!آ ا:و G*Gإ
[ وPARK P
)ا
<;( ،أو <' ا
!آ ا
4وي إ
[ وP
) REVERSEا
xع إ
[ ا
.(;]I
.5أدر *+ح ا
'?Oإ
[ و) LOCK Pا
.('+
!<~9W
ا,D!G PGات ?GاFرات ه4W8/]
kDة *PU
ا
Nا
4أو ;]Gا
8رة:
• < داً,ªN /ف ا
8رة ٍ8* w9 []Wو
]| 4ً7Nا
{ _Wا
4< ^,9ر ا*ن <' ر Pا
8رة.
• '?ّsوا*pت ا
! _* ,Dا
.9I
• < ;]3 ~x{ PNا
]l7ا
]l7]
,ً9< ]N/ا
ر.7
)(3LW
٣١٢
(3LW) !<~9W
• ا4Iم ا*' ا
<; {ªNم و '< Pا
!آ
ا:و G*Gو) PARK Pا
<;( ،أو <'
ا
!آ ا
4وي و) REVERSE Pا
xع
].(;]I
• '?ON Gا
8رة أو 4Gو ,ا
!/ك أU¢ء وxد
ا
8رة []Wا
ا.7
• 4Gع أي g]l, Isدا '3ا
8رة G *4UWن
[]Wرا.7
• !G '34Gا
8رة G *4UWن []Wرا .7وإذا
آً9p* Uا ]34ل !Gرة *DI ،W
ا
8رة إ
[ *آ~
[]W 7را
3 7
.
DN
• ا4Iم ا
ا 7ا
/ا Pا
O/ر إ
Lو
P
ه kDا
8رة أU¢ء ?GإFر.
• 4UWا
^,F []W '/7رات أو
Nب * ،Uآ_
{ًDرا ]? _* ,ا
8رات ا
/رة.
• ]zآ _,~IG _* 4اFرات ا{ Fا
+/أو
ا
_,~IG |l, ، !* 'ON I+U/اFرات
ا{ l, !N Fق ا
}/م إ
[ ا:رض.
(3LW) !<~9W
• 47,وxدك أ '+إ{4ى ا
8رات ا
N W/ا9
راً93 ًs 7ا {ً ^
~UG 4 .ا
8رة _Wا
ا7
و .]W L8Gو< !8G 4ا
8رة '34G .أي ~xء
*_ !G /8xرة * []W Wرا .7وإذا آU
*ً9pا ]34ل !Gرة * DI ،Wا
8رة
إ
[ *آ~
[]W 7را.
DN
3 7
• OGع '?OGا
8رة أو 4Gو ,ا
!/ك أU¢ء
وxد ا
8رة []Wا
ا.7
• /}G G 4ا
ا4I>
7ام آzداة ? اFرات
.Lو4W |l,م ا4Iا* Pا
8رة ]م
*4INت ا
} |l, .ر Pا
8رة N¢ w9 []W
و* |UlG .8ا w9:ا
9?/ة 4]l
Nأو ا
~
.
; 37ااDX
4xGا
ا 7و*+ح ر LNا
}ا*' {lة ا
_,~I
ا
.+]I
ا ; ا HاDX
إkاج ا+ر اE+h
K<VcWااDX
:GZأدر ا ; ا Hا A'ZMا;داء
AاP |Wرب ا ااM K DX
ا.K<Vc
3اج اFر ا{ _* Fا
!*'ªN < ،زا
9ء
اFر إذا آ ا
8رة *~lة Nو< +Nا
}ا*'
+/Nح ر LNا
}ا*' وذ
ªNدار GاgW klG
Wرب ا
.W8
:GZإذا آP9 XoL 7 7 Hت ا
DL <i
Wارة =9ا+ر ا y< ZX ،E+hأن
<وز ا;زن ا |~ E#اP9ت 38.5آ8
) 85ر(Zً+؛ EX Lذ وزن ا+ر ا.E+h
٣١١
;ا-ت Vم ا Dوا+ر
* 47Nور 40آ ) (>ً* 25ا! ~Wم
ا*'/
* *8ا
>l7ت ]zآ _* 4أن
P/xا*'*8*/
ا
>l7ت * w!
'ONا
>l7ت.
47,ا
~7م ا
}!/8*/
*
LN
wر ا
]l7ورً,
4ًxا /pن Gآ| ا
]l7ا
8رة .w!
'ONو
{
إزا
]lWا
8رة وإWدة Gآ أي و< |l,
^9Gا
~7م /8*/
*
[]Wر ا
4IN ]l7ام *+ح
ر.w!
'ON G,7* /G LN
;ا-ت اVDم
Vم ر/;- L
ر اD
*·_G 135
)4< 100م-ر('F
**8
;/ر
اD
N 1/2
× 20
MP 8
;/ر
اD
* 19
'W v5آ yاD
أ{ ر
LNا*' *8*/ا
>l7ت /l 's []W
, !Nإ{م ر LNآ'
*
/8*/ر *._G
٣١٠
ر 3Xارة و 1Wا+رات
!<~9W
• !Gول ?GاFر ا
|lا
{ _* |,آ
ا
/ور .أو<; ر4ً7N Gا _Wا
+G ^,9دى
ا
7ض ]4ه 4UW gا4Iا* ]ا 7أو أU¢ء ?G
اFر.
**ا4Iم
ا*' *8*/ا
>l7ت ا
ُ'<ِ _* N [
/
L Chryslerو< ;UNأي ا8Gخ أو ز ,أو إزا
<' إ{م ا
.LN
ا! G w9آ| ا
G '< ]l7آ| اFر و< ªNزا
أي ¤Gآ' أو أ~xاء *.W9
!<~9W
FI* |UlGا~ق ا
8رة _Wا
ا!G ،7
ر
LNا*' ا
>l7ت j+IG [{ *ً/Gا
8رة _W
ا
ا .7و4W []W |G,م اGع هDا ا
! ,Dا
7ض
.}Is N
)(3LW
أط اVDم
واdت ا K <~9ا5c
+* 4x,ح وا* jا
! _* ,Dا
{
9Iأ~xة
<س أ wG+* '+ا
! درxت ا
!ارة.
ا? []W Lا
+/ح '?Oوا* jا
!_* ,D
ا
LOUG 4UW .9Iا
+/حP/x j* ،
إsرات ا97ف ! ,Dا
8رات ا
د* *_ وxد {
Fر .ا? []W Lا
+/ح *ة , ¢ف '?OG
وا*pت ا
! _* ,Dا
.9I
'/78Gه kDاsرة ا
pأU¢ء ا
8رة :
]!{ ,Dت ا
.9IاG *4UW ]/7ن رG
* []W ]97ا
^,9وً93 'OGا *> []Wا
_8
ا._,3Æ
إذا آن *_ ا
pوري Gك ا
8رة |]9ا
4W8/ة،
8ف /8Gوا*pت ا
! _* ,Dا
[{ '/7
N 9I
< ,!G 47Nص ا
'?Oإ
[ و) OFF Pإ,ف
ا
.('?O
:GZإن ا'
cام واdت ا K <~9ا
5cة
jDd< 7 <;+ا5Mر<.
EXارWع در #ارة ا9ك =A(L
زا>
Kا
9
أي *_ ا
!ت ا
']G U/,إ* ار+Gع درx
{ارة ا
!/ك GNع 93ات و< *.U
• ا
9ق ا
']< - 7,8ا
.W8
• دا '3ا
;<G 4UW - U,4/ا
8رة '< P ،ا
!آ
و) NEUTRAL Pا
> (^O7Gو
_ ~Gد *_
FG Wا
!/ك.
!&MHW
<G 4دي <دة ا
8رة , *4UWن م 4,Gا
!/ك
Uً3إ
[ ;]Gا
8رة .إذا آن xز <س درx
ا
!ارة و Pا
!ارة ا
|l ،(H) 7ا
!U
8
Nرة إ
[ |xا
^,9وإ,ف ا
8رة .أو<;
ا
8رة وأو<; x '?OGز *; ا
اء {[ L,
ا
s/إ
[ ا
9Uق ا
7دي .إذا Nا
s/وP
ا
!ارة ا
(H) 7وً/8* UًUF 7/اÁ+Fz ،
ا
!/ك ًرا وا.}
N '}G
:GZهHك ;5kات < KAا =P MWارWع
ارة ا9ك ا;:i
• إذا آن jAا;اء < 7ا(X ،=1و.&1(W j7
وذ /ن Gم jAا;اء ُ< jdارة إ Gم
<MWا9ك و<
إ+ء jAا;اء EXإزا
ه~| ا9ارة ا.Xd
• AoLأ<ً dو 3ح ا EX 8A9در #ا9ارة EX
و 3ا9ارة ا; Pى وو 3ح ا~XHL 8A9
ا;اء EXو 3ا ~XHا/ر وح اL 8A9و
EXو 3ل .إن ذ < vز ا
Xا =Dآ
اد< K c Wا9ارة G EXم <MWا9ك.
!<~9W
U/,آ _,3×
_/, /ا
7ض 9Iا{اق
Nا 4,G ' 9ا
!/ك )* Pا
(4/lأو ا
Iر
ا
_38ا
_* 4W}/ا
اد .G,إذا رأ ,أو 7/
ت اIN:ة ا
4W}/ة *_ أ9 '+ء ا
!/ك> ،
w+Gا
?9ء {[ ,د ا
اد!G .G,ول 9 wء
? Lم ا
4,إذا آن ا
اد G,أو 9ء '
ا
._U3 4,
٣٠٩
• ا'
cام Pا. . . . . . y9
• P M}Wا y9ا. . /
• P M}Wا y9ا. . c
• Wوز ذراع ا. . . . . . . . =PH
• '' y9رة . . . . . . . 5D
• Kدون ا'
cام ح ا(=1
• ُ+ز ا
3Xا. . . . . . EL
٣٠٨
.
.
.
.
.
.
.
.
.
.
.
.
.
.
.
.
.
.
.
.
.
.
.
.
.
.
.
.
.
.
.
.
.
.
.
.
.
.
.
.
.
.
.
.
.
.
.
.
.
.
.
.
.
.
.
.
.
.
.
.
.
.
.
.
.
.
.
.
.
.
.
.
.
.
.
.
.
.
.
.
.
.
.
.
.
.
.
.
.
.
.
.
.
.
.
.
.
.
.
.
.
.
.
.
.
.
.
.
.
.
.
.
.
.
.
.
.
.
.
.
.
.
.
.
.
.
.
.
.
.
.
.
.
.
.
.
.
.
.
.
.
.
.
.
.
.
.
.
.
.
.
.
.
.
.
.
.
.
.
.
.
.
.
.
.
.
.
.
.
.
.
.
.
.
.
.
.
.
.
.
.
.
.
.
.
.
.
.
.
٣١٨..
٣١٩..
٣١٩..
٣٢٠..
٣٢٠..
٣٢٢..
٣٢٢..
٦
< yأن EX &DWاh9ت ا5ر>
•
•
•
•
•
•
.
.
.
.
.
.
.
.
.
.
.
.
واdت ا K <~9ا. . . . . . . . . . . . . . . . . . 5c
EXارWع در #ارة ا9ك =A(Lزا>
Kا. . . . 9
;ا-ت Vم ا Dوا+ر . . . . . . . . . . . . . . . . .
• ;ا-ت اVDم . . . . . . . . . . . . . . . . . . . . . .
ر 3Xارة و 1Wا+رات . . . . . . . . . . . . . . . . . .
• ; 37اا. . . . . . . . . . . . . . . . . . . . . . . DX
• إkاج ا+ر ا. . . . . . . . . . . . . . . . . . E+h
• ا 3X d9ارة . . . . . . . . . . . . . . . . . . .
• DWت ا. . . . . . . . . . . . . . . . . . . . . . . 3X
• Wآ yإ+ر ا. . . . . . . . . . . . . . . . . . . . . <5
إ#اءات ' =1(Wرة ذات 5Lر< . . . . . . . . . . . D
• VWات
Lء ا(5ML =-;L =1ر< أkى . . . . . . . .
• إ#اء ' =1(Wرة ذات 5Lر< 5ML -;L Dر< أkى
إkاج 'رة . . . . . . . . . . . . . . . . . . . . . . . P
.
.
.
.
.
.
.
.
.
.
.
.
.
.
.
.
.
.
.
.
.
.
.
.
.
.
.
.
.
.
.
.
.
.
.
.
.
.
.
.
.
.
.
.
.
.
.
.
.
.
.
.
.
.
.
.
.
.
.
.
.
.
.
.
.
.
.
.
.
.
.
.
.
.
.
.
.
.
.
.
.
.
.
.
.
.
.
.
.
.
.
.
.
.
.
.
.
.
.
.
.
.
.
.
.
.
.
.
.
.
.
.
.
.
.
.
.
.
.
.
.
.
.
.
.
.
.
.
.
.
.
.
.
.
.
.
.
.
.
.
.
.
.
.
.
.
.
.
.
.
.
.
.
.
٣٠٩..
٣٠٩..
٣١٠..
٣١٠..
٣١٠..
٣١١..
٣١١..
٣١٢..
٣١٢..
٣١٤..
٣١٥..
٣١٥..
٣١٦..
٣١٧..
٣٠٧
٣٠٦
.9ا' <' ا
!آ ا:و G*Gإ
[ وPARK P
)ا
<;( ،أو <' ا
!آ ا
4وي إ
[ وP
) NEUTRALا
>.(^O7G
{ .10ر دوا ا
+ا*'.
'}+N < .11ا
8رة *_ رة ا
.|!8
'?ON < .12ا
!/ك.
.13ا? []W Lدوا ا
+ا*' و{ره.
{ .14ر ا*' ا
<;.
.15ا' <' ا
!آ إ
[ Gس ،و{ر دوا ا
+ا*'
)ودوا ا
>< jNت ا
!آ ا
4و ،(,و_* ^!G
أن ا
8رة .7F 'ON '/7G
٣٠٥
.3ا' <' ا
!آ ا:و G*Gإ
[ وP
) NEUTRALا
> (^O7Gأو ا? []W Lدوا ا
jN
<' ا
!آ ا
4وي.
,ªN < .4ف '?OGا
!/ك.
.11أ{ ^O7Gا*' ا
<;.
اk =PHرج و) N 3ا((DWZ
'< P .12ا
!آ ا:و G*GوPARK P
)ا
<;( أو '< Pا
!آ ا
4وي و Pأ{4
ا
وس )و
gو) NEUTRAL Pا
>.((^O7G
ا4Iم اxاء ا
! pر4I>
Gام ا
7دي.
.2أ{ ^O7Gا*' ا
<;.
?N < .5ذراع ]Wا
'Uإ
[ و) N Pا
>.(^O7G
'?ON < .6ا
!/ك.
'< ?N < .7ا
!آ إ
[ Gس REVERSE
)ا
xع ].(;]I
{ .8ر دوا ا
+ا*' )ودوا ا
>< jNت
ا
!آ ا
4و4/
(,ة ¢ g/3اٍن وzGآ4W _* 4م وxد أي
{آ ]8رة.
.9آر ا
7 _G9Iو '< P* 8ا
!آ ا:وG*G
و) DRIVE Pا
دة( أو <' ا
!آ ا
4وي
ا
س ا:ول.
.10أو<; '?OGا
!/ك واGك *+ح ا
'?O
و) ACC Pا
!]/ت( ا
.'+/
٣٠٤
.1أو<; ا
8رة ،*ً/GواGآ *}] 8Nرة ا
.|!8
!&MHW
<7, 4ض <' ا
!آ ]]; {
G ?Gس <'
ا
!آ إ
[ Gس ) PARKا
<;( * Pوxد ]W
ا
'Uو) NEUTRAL Pا
> (^O7Gو'/W
ا
!/ك .أU¢ء وxد ]Wا
'UوP
) NEUTRALا
>zG ،(^O7Gآ _* 4وxد ا
!/ك
و) OFF Pإ,ف ا
G ?G '< ('?Oس <'
ا
!آ إ
[ و) PARK Pا
<;(.
'
N < .13ا
8رة 8Nرة !| |p< ^,F _W
!| *.|U
{ .14ر ا*' ا
<;.
.15ا}' آ 'Nا
9ر ,ا
|
8وا4ً7N ]7xا _W
ا
|9ا
9]
|
8ر.,
.3أ '
G 4Wآ 'Nا
9ر ,ا
.|
8
+* P .4ح ا
'?Oو) LOCK Pا
.('+
.5أدر *+ح ا
'?Oإ
[ وON/RUN P
)ا
/'?Oا>9ق( '?ON G _
،ا
!/ك.
.6ا? []W Lدوا ا
+ا*' و{ره.
'< ' .7ا
!آ إ
[ وNEUTRAL P
)ا
>.(^O7G
.8ا' ذراع ]Wا
'Uإ
[ ا
Pا
/ب.
M =P H :GZاk =PHرج وN 3
)ا E1MH< ،((DWZإ<Pف =1(Wا9ك yHا
5-ام
اوس.
ا Kأ =#ا'hم +ُ -ز ا
3XاEL
< yأن ;AWن Mا EX =PHو3
:GZ
) NEUTRALا ((DWZو =7ا9آ EXو3
) PARKا; (j7و< yأن <;Aن =7ا9آ ا
وي
EXأي Wس )و EXوNEUTRAL 3
)ا K (((DWZأ =#ا'hم.
!&MHW
• 9N Gأي رة *~ودة P4
Nا
4IN WNام
د
ت !| .ف |8,ا
P* |!8وxد *W/l
وا{4ة *_ ا
>l7ت []Wا:رض )ا **:أو ا
(+]I
{4وث '< Ò
N ;]Gا
!آ و/أو ]Wا
.'U
< P* |!8
Nوxد P/xا
>l7ت ا:ر PNإ* []W
ا:رض أو * _W Wا:رض )4INام *9رة
رة(.
• < |!8
Nا klGا _/, .L **:أن ,دي
!| ه kDا
8رة ] ;]Iإ
[ ]7N 4,4s ;]Gا
.'U
• |l,و>< Pت ا
!آ ا:و G*GوP
) PARKا
<;( ] _* lأ 'xا/lم.
(3LW) !&MHW
• و |l,و>< Pت ا
!آ ا
4وG ,س )
و Pا
> _* l]
(^O7Gأ 'xا/lم.
• <' ا
_* lأ 'xا/lم D+ ،اxاء ا
w/
!Gا
U7ان "ال إ
[ و) N Pا
>"(^O7G
]zآ _* 4وxد ]Wا
'*
N 'UوN P
)ا
> .(^O7Gو ذ
4{ |8,وث ;]Gدا.]3
• _/,أن +
I* _W lU,ا
]9/ت ا
D/آرة أk>W
|!8ه kDا
8رة {4وث أار '< ?
N
ا
!آ و/أو ]Wا
.'Uو / 9?,ن ا
8رة
ا
4,4lة ا
]; ا
x _W xUه . ] 'ON
• 4I8Gم <* L*< |! |pآ| []Wا
4}/
ر, { .Gدي ذ
إ
[ |p< ;]Gو xا
.4}/
اPhل إ و) NEUTRAL 3ا((DWZ
ا4Iم اxاء ا
! pر _* l]
Gأ'x
ا/lم.
!<~9W
<7G 4ض أ أو ا N
Ó
_,3Æأو ا
ة إذا Gآ
ا
8رة دون ر< P* Nوxد ]Wا
'UوN P
)ا
> (^O7Gدون ا4Iام ا*' ا
<; أوً 'ON
آ*' '/7, .و) N Pا
> ]7
(^O7Gا
'} []W 'U
آ' *_ /Wدي ا
xا **:وا
W/l* _W +]I
ا
P4وا
!آ ،و8]
w/8,رة !
Nآ {[ إذا آن
<' ا
!آ ا:و G*Gو) PARK Pا
<;(
)أو <' ا
!آ ا
4وي ا
س( |l, .ا4Iام
ا*' ا
<; داً, *4UW /ن ا
ًx* ^8دا
ا
8رة.
!&MHW
*_ ا
pوري اGع ه kDا
9Iات ]zآ _* 4وxد ]W
ا
'Uو) N Pا
> (^O7Gا
*' <' ا
_* lأ'x
ا/lم ;]G PU/ا~x:اء ا
4ا.]3
.1أو<; ا
8رة .*ً/G
.2ا? []W Lدوا ا
+ا*' و{ره.
)(3LW
٣٠٣
ا Kأ =#ا'hم )VH L jkل ،=PHإ¾(.
' y9ه~| ارة ' jkرة أkى
ا
>l7ت * _W Wا:رض
وف ا
|!8
ا
|!8ا
w98/
4x,
د
ا
|!8
ا
*4/
ا
3/ة
ا
'
[]Wا
9/رة
H :GZا Kأ =#ا'hم ،ا 3MWدا>ً
ا;Pا Kا;Dل EX Lا;<hت واD+Pت .ا= W
Z' yWALا5ق ا<
L Dو واD+Pت
Dف K <Vا.=-
٣٠٢
ُFز ا
P4ا
WN
را 3#اDت
•وxد <' ا
!آ ا:و G*GوPARK P
)ا
<;(
•وxد <' ا
!آ ا
4وي Gس ) وN P
)ا
>((^O7G
• ]Wا
'Uو) N Pا
>(^O7G
•ا
klGN |!8أ**
*/8ح
*/8ح
*ا^
أو ا
9/رات أو * .(Nsرا" Pxآ| ا
} وا
/pن"
]7ف * []Wا 4Wا
} ا
}!!.
ا 8A9اAو EX Eا — إذا آ ارة
Vودة ~L
ا; 9Xى '>= =7ا9آ
:GZ
ا/و =M7 EAW;Wا9) y9آت ا.(PX K<VHM
• 4I8Gم *+ح ا
! ا
>ل أو * Pا/{:ل
ا
ة.
ا Dا/وAutoStick® AW;W
• إذا { ¢4ا+Iت ا
W8أآ *_ 16آ /
ا
10) W8أ*ل/ا
4UW (W8ا4Iام *+ح ا
!
ا
'} ،W8ا
+/ح {[ '}Gا
8رة إ
[
Wا
'?Oا
.U/
• 4UWا4Iام *+ح ا
! ' ا
}7ا:وG*G
®4{ ،AutoStickد أG []Wس
w,ا:داء ا
^<4
و PU/,ا
'Uا
/ر إ
[ Gس *' []W .j+IU
ا
/ل ،ا "4" 3إذا آن *_ ا
_//ا{+ظ W8
N
ا
.N/ا "3" 3أو " "2إذا ~م ا+{>
*:ظ
W8
Nا
.N/
• 4
G PU/ا
!ارة ا
~ا4ة |UlG ،ا
دة +ات ],F
W8Nدورات ا
!/ك ا
W ']< .
W <4
ا
8رة }
Nرة ا
>ز* |Ulا
دة +ات ],F
W8Nدورات *!ك ا
4Wُ .
W <4إ
[ 9ق
Gس أ []Wأو W8رة أ w/8G *4UW []Wوف
ا!4ار أو ا
.^,9
اPدة EXا5ق ا<D
j+3ا
.W8
jAا;اء
< ,ªNف .ً<* ]?OG
• ا4Iم *+ح ا
! ا
W8ا:را
ا
'/!G P* !98/ا
[}<zN wN}/آ+ءة ]<د.
Gم ا
<M
]' ا{/ل ار+Gع ا
~ا4
4ر{ xارة ا
!/ك و<'
ا
!آxN < ،اءات ا
:
اPدة EXا
ن
4UWا
<; +ات <}ة *_ ا
< '< P ،ا
!آ
و) NEUTRAL Pا
> (^O7Gو< ,~Nدة W
ا
!/ك.
٣٠١
ر< ا
_8
8
9
10
11أ
12
13أ
ا
~/ة
*} wNا
xع إ
[ ا
;]I
*}4ر <Fدا )(
12+
*}4ر , <Fا
! Nا+* 9ح 12+) '?OG
(
ا
7دة 9ف ا}Gل )ا
10 (_8
ا{ }I]
Fا
]8/
ا
7دة 9ف ا}Gل )ا
9 (_8
ن ا
]8
أزرق/أ{/
أ{/
أ
+
أ
UN/+
–
أ{UN//
*>{ _ ?G G :ا
+s" _* 12 }Iة ا
9/رة ا
"/إ
[ "ا{ }I]
Fا
."]8/
أ _ '}Gدوا ا
7دة ا
> ¢آ ًNا
9/رة.
ب ,ن xز إءة { 3Gا
Pا
'}, !N >ً}* +]Iأي *}ح ا
lز >Nا
5 _U8و.7
> y9' vا;5Pرات
<' ا
4ء ا
NlN < ،8ا97ف و ;<Gورxع
9/
Nرة إ
[ ا
47N 9U* ;]Iة _Wازد{م
ا
/وري.
٣٠٠
=7ا9آ ا/و - EAW;Wإذا آ ارة Vودة
~L
9 4,4!G _/,ق Gس ) DRIVEا
دة( 4UWا
.|!8
'< !G wG+* _/pGا
!آ اا lGد|Ul
P
ا
'Uا
/ر أU¢ء ا
.|!8و
_4W { ،م {4وث '
*ر أU¢ء ا
اG 4xس ) DRIVEا
دة(U/, ،
ا4Iام *+ح ا
! ' ا
}7ا:وG*G
®G 4,4!
AutoStickس أ<' 4,وً.,
l< :GZدي اkر Wس أ =7أHء =1(Wارة
z EXوف ا =9ا 'Pإ K9Wا/داء وإ +
=7ا9آ وذ =P =PLاوس اVا>
Kا
9
وا ;9دون ارWع در #ا9ارةl< .دي ه~ا ا#اء
أ<ً dإ
7 X;Wرة أ =dXا'
cام Xا9ك.
إذا آG Uم 9* |!8Nرة :آ *_ 45د< *_ ا
'?O
ا
N /8/م ' ?N ]7 ،و] <' ا
!آ آ/
ه *4I>
wام ا
Oق )ا
|!8آ8رة Fsأو أxة
; =-ذو Hً' 13
ر< ا
_8
1
2
3أ
4
5
6
7
ا
~/ة
أ/jNأد
إsرة ا97ف إ
[ ا
8ر
أjN
*}ح ا
pب ا
+]I
ا:ر/ا
7دة F:اف ا}Gل )ا
U8ن( 1و 2و*_ UN 4
إ
[ 8
أد/أp3
إsرة ا97ف إ
[ ا
_/
أ/p3أ{/
ا
Pا
+]Iا _/,:و*} wNا
! 4,4ا
lوxز
إءة { ا
3ا
.+]Iب
أد/أ{/
*} wNا
<;
أ/p3أد
ا
Pا
+]Iا 8,:و*} wNا
! 4,4ا
lوxز
إءة { ا
3ا
.+]Iب
ن ا
]8
٢٩٩
M5ت اX - y9ا= ا;5Pرة
• '
N G hم ا
+ا*' ا
4رو
]8رة UNم
ا
+ا*' ا
Iص 9/
Nرة |8, 4 .ذ
]/Wت
آ />* wوا{/ل {4وث إ
.}Is N
• ~],م أداة !Gا*' ا
9/رة '/7Gإ
وً 4UW
!| *9رة 4INام ا
+ا*' ا
'/7Gإ
وً.
9* |! 4UWرة *~ودة UNم ا*' 4N '/7,ع
ا
4رو
~], > ،م ا4Iام أداة !Gا
+ا*'
إ
و.
• ُ/7N w}U,ل ا*' ا
9/رة ]9/رات ا
4,~G
أوزا 454 _Wآ 1000) lر ،('Fأ |l,
ا4Iا* ]9/رات ا
4,~Gأوزا 750 _Wآl
) 1654ر.(>ًF
!&MHW
إذا آن وزن ا
9/رة أآ *_ 1000ر454) 'F
آ |l ،]/!G 47N ( lأن Gن *~ودة UNم ا*'
3ص Nذي <4رة آª .U* wن 4Wم ا
م
DN
)(3LW
٢٩٨
(3LW) !&MHW
_/,أن ,دي إ
[ 9N ;]Gا
+ا*' W8Nوازد,د
ا
4lا
D/ول ] []W L?pدوا ا
+ا*' و*8ت
أFل ,ف ا
8رة.
!<~9W
• '
N Gا*' ا
9/رة |NzNا
+ا*'
ا
4رو
8ر, 4 .Gدي ذ
إ
[ ز,دة ا
!'/
[]Wم ا
+ا*' ر Gو .']I]
7Gو<4
]N< 4+Gا
4UW wا{ xإ
* _/, /أن |8,
و<ع {دث.
• و,دي !| أ9* ,رة إ
[ ز,دة ا
8/ا
>ز*
]<;9* |! 4UW .رة |l, ،أن 8/N w/8G
إ _Nر Gوا
8رة ا
أ**, 4< .دي
4Wم ا
م
DNإ
[ و<ع {دث.
M5ت ا vL - y9وأ'Zك ا;5Pرة
|! 4UWأ9* ,رة j?Nا
[
,ُ ،/l{ _W U
,ªNف wN}* '?OGا
<ف ا
+]Iوإsرات ا97ف
ا
x/دة 9/
Nرة /pن ا
[]W *>8ا
.^,9
|! *~{ _/pGا
9/رة *W/lت أ>ك ذات 13
ً .Uا4Iم * W/lأ>ك و*
' *9رة *_* 4/7
ا
.PU}/
PL 8PW h :GZأو و =-أ< أ'Zك ; EX
أ'Zك ارة.
P/xا
>ت ا
Nآ*] ]8رة و
_ ]W |l,
* W/l* N9ا>:ك '
/Nا
9/رة.
!<~9W
<, 4دي ا
|!8ا
}! wإ
[ {4وث }Gدم .اPG
ه kDارsدات |! ]/W '7lا
9/رة *4< Uر
ا*ن:
• zGآ _* 4إ{م Gا
! '/ا
9/رة وأ _
!,ك أU¢ء ا
دة _/, /{ |! 4UW .إ{م
'ON Gآ*'4!G 4< ،ث {آ */8ة ا
!'/
وا
< []W |7}, 4ا
^8ا
! 4+G 4 .
ا
4رة []Wا
! ا
8رة ،و<4!, 4ث }Gدم.
• /{ |! 4UWأو !| *9رة'/!N G ،
ا
8رة أو ا
9/رة 'ONزا, 4< .4دي ا
!'/
ا
~ا 4إ
[ 4ان ا
98ة []Wا
8رة أو ا+Iض
ا:داء أو ;]Gا
+ا*' أو *!ر ا
4وران أو ا
!/ك أو
<' ا
!آ أو ]lWا
دة أو ا
^]7أو ه'
ا
Oأو اFرات.
• و |l,داً /ا4Iام >' ا*:ن _Nا
8رة
وا
9/رة < .داً '
N /ا
/N '>8ت 93ف
< |pر LNا
8رة .ار LNا
4* 'ON '>8ا'3
8
!Gن !| ا
9/رة واN w/رIGء آف
:رآن ا97ف.
(3LW) !<~9W
• 4W |l,م إ,ف ا
8رات ا
9/N 9G/رات []W
*4!Uر 4UW .إ,ف ]Gا
8رات ،ا '/7ا*'
ا
<; رة ا
'< P .|!8ا
!آ 8رة
ا
|!8و) PARK Pا
<;( .ا
8رات
ذات ا
P4ا
zG ،WNآ4W _* 4م وxد ]Wا
'U
و) NEUTRAL Pا
> < .(^O7GداًPN /
{ا ~xأو "أوGد" >l7ت ا
9/رة.
• 4W |l,م lGوز ا
زن ا /xا
O/ك ]8رة.
• G |l,ز P,ا
زن ا _N /xرة ا
|!8
وا
9/رة lG , !Nوز ا
47/ت ا:ر7N
ا
:
47* .1ل ا
زن ا8]
/xرة )(GVWR
.2إ /xوزن ا
9/رة )(GTW
47* .3ل ا
زن ا!/
/xر ا
4وران )(GAWR
47* .4ل وزن 8ن !| < |pرLN
ا
9/رة ا
4I8/م.
M5ت ا - y9ا+رات
• ,8* 7Gت ? Lا
اء ا
F U/را/* G
4ًxا ] '?OGو*ض 8ر7/
.G
إxاءات ¥+اFرات ،w!
'ONراPx
"اFرات *]7* -ت "*Wا
اردة "ا
4ء
وا
."'?O
_* pإFرات ا
9/رة ]7ف []W
• ^!Gأً ,
*,8ت ? ¥+ LاFرات <' ا4Iام ا
9/رة.
• ا _W !Nد' ¤G []Wآ' اFر أو وxد * ;]G
|! '< Nا
9/رة 7/
.آ ! +اFرات،
را" PxاFرات *]7* -ت "*Wا
اردة "ا
4ء
وا
."'?O
• 4UWا4ال اFرات ،را" PxاFرات *]7* -ت
"*Wا
اردة <" 8ا
4ء وا
7/
"'?O
إxاءات ا4ال اFرات ا
'/7, _
.U/ا4ال
اFرات FªNرات ذات <4رة {/{ '/ت []W W
ز,دة {4ود *47ل ا
زن ا8]
/xرة )(GVWR
أو *47ل ا
زن ا!/
/xر ا
4وران ).(GAWR
)(3LW
٢٩٧
وزن ا;5Pرة ون اy9
~W :GZآ أن آ= Eiء <; 3دا =kا;5Pرة أو
< jdإ ا =9ا;;ع ارة .و<y
أ<ًَ dاMر ا
Dات اkhر< اW 8W EآEX M
ا 3Hأو ا
Dات اkhر< ا7 Eم ا;آ= LآM
ًV#ءا Kإ E#ا =9ا;;ع ارة .را3#
;Dت ا+ر وا =9ا;;#د ;د Lب
ا> Dف أ 7وزن إ E#آب وا;9
ر.W
< داً '/!N /ا
9/رة _* %60 P, !Nا
زن
* *4ا
9/رة .وهDا _* %10 Pp,إ /xوزن
ا
9/رة ) |! |p< []W (GTWا
8رة|8G 4< .
ا
!/ت ا
[]W ~/ا
>l7ت أو ا
!/ت ا'¢:
ا
x/دة ا
3/ة zGر wxا
9/رة
(Lة *_ |x
إ
[ 4 |8, /* 3ان ا
98ة []Wا
8رة
وا
9/رة, .دي 4Wم '/!Gا
9/رات /!
Nت
ا '¢:ا*:م إ
[ و<ع {ادث 4,4Wة ]9/رات.
M5ت اy9
lGوز أ<}[ وزن ]8ن ا
|!8ا
x/د |p< []W
ر LNا
9/رة.
ُGN w}U,ع ارsدات ا
]_ *ت *W/l
ا
P4وا
!آ ر Gا
4,4lة .w!
'ON
|l,أ D3ا
U7ا
_7NاWر 8{ 4UWب ا
زن
ا
ا<!* []W Pر ا
4وران ا
:+]I
• وزن 8ن !| ا
9/رة.
• وزن أي ع _* 3ا
U!Oت أو ا
47/ات ا
W/
أو []Wا
8رة.
• وزن ا
^8و P/xا
آب.
٢٩٦
!&MHW
• 9* |!8N Gرة أول 805) '* 500آ (
*_ <د Gر Gا
4,4lة _/, .أن ;],ا
!/ك أو
ا
!/ر أو أ~xاء أ3ى.
)(3LW
(3LW) !&MHW
• >3 ، ¢ل أول 805آ )|! _* ('* 500
ا
9/رة
N G ،دة W8Nأ 80 _* []Wآ /
/>ً* 50) Wا
(W8و 4N Gء '?OGا
8رة
*/
w Pم اU3ق 'ONآ*'4W8 .ك هDا
_]G []Wا
!/ك وا~x:اء ا3:ى ]8رة 4UW
ا4Iام ا/{:ل ا
].
< xªNاء ا
} ا
اردة "آ| ا
*4Iوا
/pن".
را" Pxآ| ا
*4Iوا
/pن" >>Fع []Wات
ا
} ا
}!!9* |! 4UW .رةlG ،وز *ً]9
*47ل ا
زن ا!/
/xر ا
4وران ) (GAWRأو
*47ل ا
زن ا /xا
O/ك ).(GCWR
أوزان ' y9ا;5Pرة )h
Dت أ 7وزن ;5Pرة(
,ا
4lول ا
*47ت أ<}[ وزن ]9/رة <'N
]>3 _* |!8ل * W/lا
P4وا
!آ ا
8N
Iر.G
أ 7وزن ن )را3#
=Aiارة
إ E#وزن ا;5Pرة ا 7/
Mا;9ر
=7ا9آ
ا9ك
ا(GZ
50آ 110) lر('F
1000آ 2205) lر('F
3.21/3.73
4,وي
ُFز ا
8رات ذات ا
!* _Nك 3.6 78N
ات
50آ 110) lر('F
1000 3.21/3.73/4.10آ 2205) lر('F
أوG*G
50آ 110) lر('F
1000آ 2205) lر('F
3.21
أوG*G
ُFز ا
8رات ذات ا:ر!* 7Nك 3.6 78N
ات
أNاب
100آ 220) lر('F
2000آ 4409) lر('F
3.73/4.10
50آ 110) lر('F
1000آ 2205) lر('F
3.21
4,وي
100آ 220) lر('F
2000آ 4409) lر('F
3.73
100آ 220) lر('F
2000آ 4409) lر('F
4.10
9* |! 4UWرةlG _/, ،وز وزن ا
! /ا
/8/ح }N Nرة %10 _W 4,~, !N UGأو 100آ 220) lر ،(>ًFأ /,أ<' 9,sأن '?OG W []W },
<4ره 100آ />ً* 62) W/ا
(W8أو أ<'.
y< :GZاMر ن ' y9ا;5Pرة ًV#ءا K
ا;زن ا E#آب وا ،;9و< yأ< hوز EX
أي ل Kا;/ال ا;زن ا~آ;ر ;D 75L EXت
ا+رات وا .=9را" 3#ا+رات ;D -ت "
" EXا
Mء وا( K <V "=1ا;Dت.
٢٩٥
وا
ٍ8* 'ON +]IوzG .آ4W _* 4م lGوز *47ل ا
زن
ا
] !/ري ا
4وران ) (GAWRا **:أو ا
.+]I
!<~9W
*_ ا:ه/N /ن 4Wم lGوز ا
! 4ا47/
[}<:ل ا
زن
ا!/
/xر ا
4وران ) (GAWRا **:أو
ا
zOUG 4 .+]Iوف <دة 93ة {
lGوز أي
*_ ا
ز_ ا
4/ر _/ ._,ا
_//أن 4+Gا
4رة []W
ا
! ا
8رة ،و<{ P, 4دث.
وزن ن ا(TW) y9
وزن 8ن ا
|!8ه ا
ة ا
[]W '+: 9pآة
< |pا
N LNا 9ا
9/رة 7* .ا{:ال|l, ،
أ 'Gا
ة ا
D/و
_* %10 _Wوزن ا
9/رة|l, .
اWر وزن 8ن ا
ً~x |!8ءا *_ ا
! /ا
W/
[]Wا
8رة.
٢٩٤
ا P5Hا/
yd7ر;W Lز< 3ا=9
ا
9U/ا **:ه أ<}[ ار+Gع أ<}[ Wض
*4/ا
9/رة.
'/7,م Gز P,ا
!DN ^,F _W '/ل <ة ر>3 Pل
ا
pن ا
~آ .وُ4I8Gم ه kDا P* /:ا:وزان
ا
ة ز P,وزن 8ن !| ا
9/رة []Wرة
ا
|!8و*!ر ا
4وران ا **:و*!ر )*!ور( دوران
ا
9/رة .و 4UWا4Iا* وً xت ا
lت
ا
ًxG G ª ،7U}/و+
N /ً!Gا*' أآ ااًرا
و Uً8!G Nأ*ن ]/Wا
.|!8وGدي إ و{4ة
pإ
[ j+3
!Gإ
و ا
zر/wxا{ك أً ,
ا
zر wxا
{ _W ¡GUآ ا
/ور وا
,ح ا
87و8G
'ONإ |! Nl,ا
8رة واار ا
9/رةw}U,ُ .
4INام و{4ة ا
! zGر wxا
9/رة و< |pرLN
ز P,ا
!*) '/از ا
!: (
/وزان 8ن ا
|!8
ا
ة ،و<~], 4م ا4Iا*ًUN /ء _,G []Wا
8رة
وا
9/رة /ا
! '/وذ
]ا^ *]9* Pت *47ل ا
زن
ا!/
/xر ا
4وران ).(GAWR
و
ة اW EX 8A9ر v#ا;5Pرة
و{4ة ا
! zGر wxا
9/رة ه و
] *4ا_/, ]3
Gآ |p< '8* _Nا
LNو
8ن !| ا
9/رة،
وا
Gا{ًآ <!
N LG, Lp]
>ًNآ ا
4/ا]3
* /آ wأ{ ,آت zGر* wxب ]9/رة
أU¢ء ا
.8
yd7ا Lا=9
|p< W4,ا
LNا
!*' وزن 8ن !| ا
9/رة،
{ '/7,آ zأ*x* 7دة []Wآة < |pا
LNأو
9ر LNأ3ى ا
8رة .ه kDا:اع *_ <pن ا
LN
ه ا:آ Wًsا:اق اÆن وه 4I8Gم W 'ONم
!| ا
9/رات ذات اl{:م ا
}?ة وا
.9/
:GZ
•
< Hر ;X Kه 9Xا;;7د ;-ت "،"P5P+
أو oX ،7 Hن ذ <( إ أن Vkان ا;;7د
.
ا
ا
/ة ا
ا
4N ,ء '?OGا
8رة.
و O,ذ
إ
[ ا{/ل ;]Gا
?9ء .إذا GاآOف ا
]O/
p8 ،_
* _G/ء ا
Uم ء * sا
'97
) .(MILو Á+9U,ء * sا
'{ 4UW '97ا
.]O/
• أ5n nء = 9Xء ا;;7د ;- 3Wت
" (< ."P5P+ه~ا ا ;ت إ أن 5nء ا;;7د 8W 7
إAم Ed< 7 .v9- =A(L &Pnء ;ء il
ا ; EX =5DأV#ة اPس
EXم Wآy
5nء ا;;7د W .v9- =A(Lآ
KإAم nا51ء
HاVود ;7;Lد.
' y9ا;5Pرة
ر' م ر5n Lء MDW 9Xا;;7د )(gASCAP
47Nإ ا
<د*ªN w}, ،ن ا
Uم ا
}IO
8
Nرة * 4,4!Gإذا آن 9ء ! 7Gا
<د
*! ا
?]^ أو *آ| w!
'ONأو .;
Gإذا
اآ ;Oا
Uم وxد 7G ،'9Wض ر
""gASCAP
)9ء ! 7Gا
<د( W ssض 4Wاد ا
.8/
أ{ ر9 LNء ! 7Gا
<د {[
P/8Gت
" ."9FهDا ا
}ت O,إ
[ أن ا
?9ء Gإ{م ]
.w!
'ONا? []W Lزر إWدة 4W Lاد ا
8/
,ف Wض ا
.إذا ا/ت ا
8 ،]O/
4lهDا ا
*>8]
w} 8و**]7ت _Wا
د
ا
* |l,اzON GWن أ/Wل ا
|!8ا
P98Gا
م
8N Nر |! '< .Gا
9/رة ،را Pxه kDا
*]7/ت
|!8ا
!zN '/آ <4ر * _* _/ا
]W+وا*:ن.
] 9?G []W !/ا
/pن ا
4!/ود ]8رة ا
4,4lة،
ا PGا
]9/ت وا
ت ا
!/هDا ا
'
4
وا
8
N ]7/رات ا
|! *4I8/ا
9/رة.
<DWت ا y9اD
4W8Gك ا
+,7ت ا
ا
|!8N
Iا
9/رات
ا
*]7/ت ا
:
Dل ا;زن ا E#رة )(GVWR
47* 7,ل ا
زن ا8]
/xرة ) (GVWRه
أ<}[ وزن */8ح 8]
Nرة .و _/p,ذ
وزن ا
^8
وا
آب وا
! /ووزن 8ن !| ا
9/رة .و|l,
أ lGوز ا
! /ا
] *47ل ا
زن ا8]
/xرة
)).GVWR
إ E#وزن ا;5Pرة )(GTW
إ /xوزن ا
9/رة ) (GTWه وزن ا
9/رة
Nإ
[ وزن ا
! '*
N /وا
/اد ا
]N
>>ك وا
47/ات )ا
4ا /أو ا
(</ا
]/!/أو
[]Wا
9/رة {
"ا
! '/وا47اد ]."'?O
وا
,9ا
ُ
N [
/س إ /xوزن ا
9/رة
) (GTWه و Pا
9/رة ا
'ON ]/!/آ*' []W
*~ان رات .و |l,أن W4,ا
~/ان وزن ا
9/رة
.'*
N
Dل ا;زن ا E#ا(ك )(GCWR
*47ل ا
زن ا /xا
O/ك ) (GCWRه إ
/x
ا
زن ا
/8/ح 8
Nر Gوا
9/رة 4UWوز.7ً* /
Dل ا;زن ا;9 E#ر ا
وران )(GAWR
*47ل ا
زن ا!/
/xر ا
4وران ) (GAWRه
أ<}[ وزن */8ح !* []W Nري ا
4وران ا**:
وا
.+]IوG |l,ز P,ا
! []W /ا
!/ر _,ا**:
٢٩٣
5nء MDW 9Xا;;7د
.1أ Á+Fا
!/ك.
.2أد+* '3ح <ص ا
9 '?Oء ا
<د وأدر
ا
+/ح ر PNدورة إ
[ ا
¢ ،_/أدر 9ء ا
<د إ
[
ا
8ر 3ا.x
.3أدر *+ح <ص ا
¢ '?Oإ
[ ا
8ر 3ا.x
.4آ| ا
?9ء ،أد ^UW ]3ا
/رة +
¢إ
[
ا
P/8G [{ _/ت >¢ث Gت.
!&MHW
• < ;], 4م ا
<د أو م ا
! ا¢7ت
آ4I lUام 9ء *: |Uب *'ء
~3ان ا
<د )9ء ا
.(_,~U
• و<4W |8, 4م إ>ق ا
?9ء 4ًxا ]Gث م
ا
<د.
• <4W |8, 4م إ>ق 9ء ا
4ًx _,~Uا إءة
"*}ح * sا
."(MIL) '97
• +دي ا8ب ا
<د و /ا
~Iان Gا
' ¥
ا
47N _,~Uا*>ء ا
~Iان4}, *4UW .ر _Wه
! ا
<د
ت " ،"9Fأو ª ،]+< 4UWن ذ
O,إ
[ أن ~3ان ا
<د *.Á]/
!<~9W
• < 9 +Nء أ~3 7G Nان ا
<د )9ء
ا
LN (_,~Uء ¢UG PU/ا
<د *_ ^UWه ا
'/ء
وه * <, 4دي إ
[ {4وث إ
Nت.
)(3LW
٢٩٢
(3LW) !<~9W
• إن < ]Nا
j7
,9أاع ا
9ً? 4
G 4< _,~U
دا~3 '3ان ا
<د وا
Dي <~, 4ا 4,أU¢ء ا
دة .و,دي
ذ
ا
L?pإ
[ ¢UGا
's []W _,~Uرذاذ و/أو
INر أو آ] 4UW /إزا{ ا
?9ء *_ ا
8رة ا
,ن *!آ .Uً3إزا{ ا
?9ء LNء w/8G
8Nب ا
L?pو* ¢UG PUا
<د.
• ا* _W GًN PUإ7sل ا
l8دا '3أو <ب ا
8رة
, *4UWن 9ء ! 7Gا
<د * {ً+أو أU¢ء
7Gا
~Iان.
• ;pGا
<د GًNإ
[ ا
8رة أU¢ء دوران ا
!/ك.
• <4!, 4ث { ¥ { ^,آ _* /ا
_,~Uدا'3
{وx* ]U* ,دة دا '3ا
8رة .و<}G 4ب
!Nوق .داً P /ا
!و []W ,ا:رض .7G 4UW
دة EX MMTاK<VHM
إن *دة MMTه *د ,إ *!G 47ي []W
ا
j7N 9]3 , ~UlU/أاع ا
<د ~,دة ر<
ا:وآن , .ا
_,~Uا
Dي /N 9]3 ,دة MMTأي
*~ة _Wا
_,~Uا
Dي g+ر< ا:وآن 4Nون *دة
'], .MMTا
_,~Uا
Dي /N 9]3 ,دة /W _* MMT
7/sت ا7sل و '],أداء م ا¢7ت j7N
ا
8رات
Gُ .ا
lا
4IN 7U}/ام ا
4N _,~Uون
*دة MMTرO,ُ 4< .Gر إ
[ *!ى MMT
ا
Ip* []W _,~Uا
،_,~Uو
]W |l,
Dال *~ود
ا
/W _,~Uإذا آن ا
!, _,~Uي * []Wدة .MMT
ا;اد ا Xdإ ا;;7د
Nإ
[ ا4Iام ~/* _,~UNوج
Nص ذي ر<
أوآن *4IN [
,ُ |Uام ا
_,~Uا
Dي !,ي []W
+U*
UWو
UWإ *و* ]¤آ' وG
¢ت ا
!/ك .إن ا4Iام ا
_,~Uا
Dي !,ي []WهkD
ات ']G []W 4W8,ا>ك ا
<د وا¢7ت
و []W Ë!,أداء */ز ]8رة.
+G |l,دي ا4Iام ا
O7ا /اد ;UGم ا
<د.
ªن ً4Wدا آًا *_ ه kDا
/اد ا
,ن ا
?ض * Uإزا
ا
P/Oأو ا
/اد ا
!, 4< }]/ي * []Wاد *
7 ,D
أو *آت * |8G .
NOأاًرا ]!Oت ا
7/
]8ب وا.O:
!<~9W
7,ز أول أآ 48ا
Nن ) (COا
x/د
زات ا
7دم * .ً/ا PGا{Fت ا
اردة أدPU/
k
ا
zN /8ول أآ 48ا
Nن:
• OUN Gق زات ا
7دم!G .ي []Wأول
أآ 48ا
Nن وه ز
gن أو را! |8,
{4وث ا
ة []W G .ا>Fق '?ONا
!/ك
* '* ]?* 9Uا
/ب ،و ً]9* g]lGدا'3
رة *< '?OG P* +ا
!/ك +ة ز*.],F U
{
إ,ف ا
8رة *'?OG P* {+* 9U
ا
!/ك +ة LpN < ،],Fم ا
,د3ل
ا
اء ا
4,4lا
Iر xدا '3ا
8رة.
(3LW) !<~9W
• < }Nا
8رة _* ,<]
w!
'ONز أول
أآ 48ا
Nن !+N < .م ا
7دم آ' *ة ,
ر Pا
8رة>
ªN < .ح أي []W ']3ا
+ر .وإ
[
أن ,إ
>ح ا
N < ،']Iدة * P/x w Pا
UاD
ا
.'*
N l
• { []W Ëإ>ق ا
ا Nا
4وارة < 4UWدة ا
8رة PU/
أول أآ 48ا
Nن وزات ا
7دم ا
*8ا3:ى *_
ا
34ل إ
[ ا
8رة.
إ Xا;;7د
5n =7ء MDW 9Xا;;7د )5nء ا(K<VHM
9 4x,ء ا
_,~Uا
'+]
'Nا
|lا8]
8,:رة.
إذا 4ا
?9ء أو ;]G؛ zآ 4أن ا
?9ء ا
4,4lه ا
}!w
kD
8U
Nا
8رة.
)(3LW
٢٩١
]!/آت و* 8
*Gر .Gوُ
Gا
lا
7U}/
4INام و<د * P* ^N9,ا
+ت *ق ا
<د ا
/
7
).kG 4UW (WWFC
<G 4دي ا
WUت ا
د _,~U]
,إ
[ *Oآ' *'
N7
4Nء ا
'?Oوا
<; ا
Áx+/وا
'?Oا
!/]
P9/ك.
إذا { *' ه kDا
O/آ'l ،ب ً _* 3 Wا
_,~U
<' ا
+إ
>ح ا
8رة.
ا};ل
)ا
'/أو آ!ل ا
4I8, ('/م Gآ~ات *+]I
_,~U
N 9]3 4UWا
_* Iا
ص G 4< .أ**
أاع و<د !Gي %3 8 []Wأو أآ *_ ا
/ل
إ /اد آ!
أ3ى [/8Gا
,D/تPG .
*8و
ا
O/آ' ا
_W ¡UGا4Iام ا
/ل/ا
_,~U
** Pآت أ3ى []Wا
lا
[]W .7U}/ا
*_ أن
*دة MTBEه *دة *آ48ة *} _* WUا
/ل ،إ
أ gا¢Æر ا
/]
]8ل.
٢٩٠
!&MHW
4I8Gم أاع ا
_,~Uا
!Gي []Wا
/ل4< .
,دي ا4Iام ه kDا
/آت إ
[ *Oآ' 4Nء ا
'?O
وا
دة و<, 4دي إ
[ * ;]Gت { 8م
ا
<د.
!&MHW
<, 4دي ا4Iام و<د ذي *!ى إ,ل أ_* []W
10%إ
[ {4وث !/
N ']3ك و
N7ت 4N 4UWء
ا
'?OوأU¢ء ا
'?Oو ']!Gا
/اد .و< ¢, 4ذ
ً8Wو ;]G |8,دا 8Nر.G
ا<};ل
K<VHLا;اء اEPH
Gا
lا
'?ON 7U}/ر4IN Gام و<د
!,ي []Wأآ *_ _* %10ا,ل .إن sاء ا
<د
ا
Iص * _* Nرد 4x 7/8N P/,ة <FI* '], 4ة
lGوز { %10 4و/أو ]Gو<د .7F }IN
{>* pأ *_ ا
P</ز,دة ا>ك ا
<د
|l,أً ,
4UWا4Iام و<د *]Iط ,Nل !* ;7 |8Nى
ا
,N <9ل8* PG .و
ا
O/آ' ا
_W ¡UG
ا4Iام ا
/ل/ا
_,~Uأو *~ ¡,ا,ل P* E-85
*آت أ3ى []Wا
lا
.7U}/
هUك ا
* _* 4,47آت ا
_,~UاÆن []W 9]3 ,أن
8Gا
!+ظ []Wا
اء ً ]G
3 ،ا
^FU/
ذات *47ت ا
]ث ا
G .P+G/ه kDا
/آت ا
4,4lة
و<د ا{اق أ[ وO,ر إ
[ j7Nه kDا
/آت N
"ا
_,~Uا
47/ل".
و W4Gا
lا
7U}/ه kDا
lد ا
*Gإ
[ هاء
أ[ _/, .أن 4Gم 4,ا
7ن *_ >3ل ا4Iام هkD
ا
/آت وه *ة.
G =5DWم ا 1 M7ا+رات ) - (TPMSإذا
آ ارة Vودة ~L
'97G _/,م *ا< ? LاFرات ) (TPMSإذا
آG Uم 4Nال W/l* P/xت ا
>l7ت واFرات
ا:ر) PNإFرات ا
W/l/N (^,9ت >lWت وإFرات
!Gي 7O8* []Wات م *ا< ? LاFرات
) ،(TPMSوذ
آ /ه ا
!ل G 4UWآ| *W/lت
>lWت وإFرات ا
Oء 8Nر '97
.Gم *ا<
? LاFرات ) ،(TPMSا4ل أوً *W/lت
ا
>l7ت واFرات ا:ر) PNإFرات ا
FªN (^,9رات
*~ودة 7O8/Nات *ا< ? LاFرات
) 47N < .(TPMذ
N ،دة ا
8رة 4/ة 20د< W8N
أ/>ً* 15 _* []Wا
24) W8آ 4} .(W/ر م
*ا< ? LاFرات ) (TPMSإsرة
G
و" j*,ء ,D!Gم *ا< ? LاFرات" 4/ة
{ , ¢ ¢ 75اءة و7ض *آ~
**]7ت ا
8رة ا
و ) (EVICر
") "SERVICE TPM SYSTEMم *ا<
? LاFرات x!Nإ
[
( 7, ¢ض _Fs
) < _* ً4N (--ا
ً4N .L?pءا *_ دورة ا
'?Oا
_
،
4},ر م *ا< ? LاFرات ) (TPMSإsرة
Gأو 7,ض ر
"SERVICE TPM
) "SYSTEMم *ا< ? LاFرات x!Nإ
[
( *آ~ **]7ت ا
8رة ا
و )(EVIC
و
_ [ ا
FOن )* (--ن < ا
.L?p
Wدة '?OGم *ا< ? LاFرات )،(TPMS
ا4ل *W/lت ا
>l7ت واFرات ا:ر) PNإFرات
ا
FªN (^,9رات *~lة 7O8/Nات *ا< ?L
اFرات 47N < .ذ
N ،دة ا
8رة 4/ة 20د<
W8Nأ/>ً* 15 _* []Wا
24) W8آ .(W/
}4ر م *ا< ? LاFرات ) (TPMSإsرة
Gو" j*,ء ,D!Gم *ا< ?L
اFرات" 4/ة _W ;<, ¢ ¢ 75اءة،
و7ض *آ~ **]7ت ا
8رة ا
و )(EVIC
ر
") "SERVICE TPM SYSTEMم
*ا< ? LاFرات x!Nإ
[
( .ف
7,ض *آ~ **]7ت ا
8رة ا
و )(EVIC
< pا
P* L?pا
ً4N ._FOءا
أً ,
*_ دورة ا
'?Oا
W , _
،ض ر
") "SERVICE TPM SYSTEMم *ا<
? LاFرات x!Nإ
[
( ']3 4x, /
F
U
Nم.
M5ت ا;;7د 9 -آت اK<VHM
/}G GهDا ا
!/ك , !Nا P/x Wا
ا_ ا
]7/
¢7Nت ا
?زات و G !Nا<}ًدا آًا ا>ك
ا
<د وأداًء *ً/زا 4UWا/7ل _,~UNذي xدة
W
_* 3ا
ص * Pأد[ *47ل أوآن أ!Nث
) (RONوه .91
7< 7Gا7sل ا
!* W !G ++Iك
* p+IUرة !/ك ر .Gإ أن ا
7<+ا
7
ا
/8/ة Wت ا
!/ك ا
G 7دي إ
[ {4وث
أار !/
Nك و
DU{ |l,ا
!/ك []Wا
+ر.
<G 4دي ا
WUت ا
د _* ,ا
_,~Uإ
[ *Oآ' *'
4N N7ء ا
'?Oوا
<; ا
Áx+/وا
'?Oا
P9/
]!/ك .إذا { *' ه kDا
>O/تl ،ب ً3 W
*_ ا
'< _,~Uا
+إ
>ح ا
8رة.
<م * _* 40 _W 4,~,ا
lت ا
8]
7U}/رات {ل
أ!ء ا
4
ªN 7ار *ا
+ت zON N¢ن ا
_,~Uود/W
)*ق ا
<د ا
}3 ;,7
(WWFC ،/
7
ا
<د ا
pور ,ا7ث ; ]?زات وأداء 4x
٢٨٩
:GZ
• إذا آ 'رV Wودة ;Lإ+ر و
ا K+ذوي 8آ= ;9W oX ،L5ي
( Dا 1 M7ه;اء ا+رات وKA< EL
ا;L &M7ا'G 5م ا 1 M7ه;اء ا+رات
) H .(TPMSإZل ا+ر ا E+hذي ا89
ا =Aا =9 L5إ+ر bcH <+ا،1d
' =Gدورة ا( =1ا DWض ";ء <~9W
ا 1 M7ا+رات" EXو 3ا( =1و
Wر
إiرة EW;-و GWا' ""LOW TIRE
) 1ا+رات EX (bcHآ;D Vت ارة
اAو ،(EVIC) Eو' ii =GاDض
ا'; DWض ا' ") "Inflate to XXا¾
ا+ر إ (XXو 1 7ا+ر اbcH
"ا;ا ."dوlWدي 7دة ارة ة 20دP7
Lأ 24 Kآ/Zً 15) '/8ا( إ
إ<Pف ; =1(Wء <~9Wا 1 M7ا+رات"
KA< 8 +هHك أٍي Kإ+رات ا <5أ
K =7
<~9Wاcض ا.1d
٢٨٨
• إذا آ 'رV n Wة ;Lوإ+ر
ا K+ذوي 8آ= oX ،L5ن ا+ر اh E+h
<;9ي ( Dا 1 M7ه;اء ا+رات .وK
<GH KAم ا 1 M7ا+رات ) (TPMSاM7
1ا+ر .إذا L 7آ yا+ر اK hً
L E+h
إ+ر K bcH &51 <+ا 9اcص <~9L
اcض ا; PMX ،1dء "G <~9Wم ا1 M7
ا+رات" =1(W EXو' ر إiرة W;-
و'Dض آ;D Vت ارة اAو(EVIC) E
ا' ") "Inflate to XXا¾ ا+ر إ (XX
و" 1 7وا EX "dا( iا'; EXا
ورة
ا ح ا(7 DL .=1دة ارة ة أآ20 K M
د L P7أ 24 Kآ/Zً 15) '/8ا(،
';; bء G <~9Wم ا 1 M7ا+رات ة
EX M}< 8 75اءة XL .إ ذ،
<Dض آ;D Vت ارة اAو(EVIC) E
ر' "G) "SERVICE TPM SYSTEMم
ا 1 M7ا+رات #9Lإ
(-ة ; kان
اD< 8 =7/ض 7 K hً
L (- -) K+iا.1d
=A MHLدورة Wح ا(
' ،=1ر إiرة
; Wو<;;" bء G <~9Wم ا1 M7ا+رات" ة EX M}< 8 75اءة،
و'Dض آ;D Vت ارة اAو Eر'
"G) "SERVICE TPM SYSTEMم ا1 M7
ا+رات #9Lإ
(-ة ; 5ان ا8 =7/
<Dض 7 K hً
L (- -) K+iا.1d
• Lد إZ-ح أو ا'
Mال إ+ر ا <5ا E-/وإدة
Wآ EX &Mارة K hً
Lا+ر ا8< ،E+h
G <
9Wم ا 1 M7ا+رات )(TPMS
أو.ًAW;W
Nإ
[ ذ
Á+9U, ،ء ,D!Gم *ا< ?L
اFرات و7Gض ا
sOا
* *آ~ **]7ت
ا
8رة ا
و )4,4x L? /< (EVICة _* ً4N
ا
/
F (--) _FOأ 4x,إFر 9? j+IU,
,D!G 4{ _Wا
L?pا
j+IU/أي *_ إFرات
ا
^,9ا:ر 7Nا
~], 4< .*4I8/م <دة ا
8رة 4/ة
'}Gإ
[ _,OWد< W8Nأ 24 _* []Wآ /ا
W8
)/>ً* 15ا
[], (W8م *ا< ? LاFرات
) (TPMSه kDا
*]7/ت.
G) "SERVICE TPM SYSTEM" <~9Wم
ا 1 M7ا+رات #9Lإ (-
j*,ء ,D!Gم *ا< ? LاFرات 4/ة 75
{ []W , ¢ ،¢اءة 4UWاآOف z93
4UW pاآOف z93
U
Nم4}G .ر إsرة
Gأً ,
U
Nم7, .ض *آ~ **]7ت ا
8رة ا
و
) (EVICر
""SERVICE TPM SYSTEM
)م *ا< ? LاFرات x!Nإ
[ ا
}( 4/ة
¢ g/3اٍن 4!Nأد[ P, .ه kDا
'sر* *P
Wض " ( <) /< _* ً4N "- -ا
sÓ
L?pرة إ
[
*7O8*) 7O8ات( م *ا< ? LاFرات ا
'Gاsرة.
.1ا
|8N ¬,Oا~x:ة ا
و أو ا
دة
Nب *_
ا
¤OU/ت ا
4}Gر g+ UWا
ددات ا
>] ا
4}Gره *7O8ات م *ا< ? LاFرات ).(TPM
G .2آ| ع *_ ا O:ا
> ]~xج ا
W/
ا:اق وا
[]W ¢Gإsرات ا
x/ت ا
>].
.3وxد آ آ *_ ا
]¡ {ل ا
>l7ت أو *ت
ا
>l7ت.
.4ا4Iام >' اFرات ا
8رة.
.5ا4Iام >lWت/إFرات *~ودة 7O8/Nات
م *ا< ? LاFرات ).(TPM
7ض *آ~ **]7ت ا
8رة ا
و )(EVIC
pر
") "SERVICE TPM SYSTEMم
أً ,
*ا< ? LاFرات x!Nإ
[
( 4/ة g/3
¢اٍن []Wا 4UW '<:اآOف U
N z93م وxد z93
* Pأ{ 4ا
7O8/ات .ه kDا
!
W P,ض ر
") "SERVICE TPM SYSTEMم *ا<
? LاFرات x!Nإ
[
( W ssض ر*
* Pا/ار Wض < ا
.L?pوهDا O,إ
[ ا/ار
ال < ا
7O8* _* L?pات م *ا< ?L
اFرات )G 4< U
(TPMن * ا
}!w
8
Nرة .و* Pذ
' ا
Uم { xإ
[
/
F
] ر
") "SERVICE TPM SYSTEMم
*ا< ? LاFرات x!Nإ
[
(.
{
4Gو+* ,ح ا
،'?Oر هDا ا
،'8]8
* ً97أن z93ا
Uم ~,ال *ًxدا .إذا ا']3 [+3
ا
Uم j*, _] ،ء * ,D!Gا< ? LاFرات
و
_ W ,ض ر
"SERVICE TPM
) "SYSTEMم *ا< ? LاFرات x!Nإ
[
ا
}( وW ,ض < /ا
_* ً4N L?pا
._FO
_/,أن 4!,ث z93ا
Uم : lي *_ ا:ب ا
:
٢٨٧
,ن م *ا< ? LاFرات )_* (TPMS
ا
/ت ا
:
• و{4ة ال
• أر7O8* 7Nات /ا< ? LاFرات
• ر' م *ا< ? LاFرات ا
WU/ا
* Gآ~ **]7ت ا
8رة ا
و )(EVIC
ور 7,ض ? LاFرات
• ء * ,D!Gا< ? LاFرات
7,ض *آ~ **]7ت ا
8رة ا
و )(EVIC
ر
" L?) "LOW TIREاFرات *4/
(j+IUة
W pض ا
¢ g/3اٍن 4!Nأد[ .أً ,
") "Inflate to XXا ¥+اFر إ
[ (XXو
رة
7Gض < ( <) /ا
" P* Ë?pو* "jاFر
)اFرات( ذات ا
L?pا
.j+IU/را*" Pxآ~
**]7ت ا
8رة ا
و ) "(EVICا
ارد "
{ ا
س" ]!}ل _* 4,~* []Wا
*]7/ت.
M KA< :GZاGHم Dض ا
;L 1dات
ر DL -;L =A =+أو آ; A'Lل أو Lر.
= H :GZء ا+رات ا
ا;AW 7 ،Xن هHك #
إ ز<دة 1ا+ر إ 30آ;A'Lل ) 4أر+ل =A
(DL -;Lإ Xأ 1 Kا+ر اMرد
اُ;P< &L -ف ; =1(Wء G <~9Wم ا1 M7
ا+رات |]9, 4< .ا< *:دة ا
8رة 4/ة '}Gإ
[
_,OWد< W8Nأ/>ً* 15 _* []Wا
W8
) 24آ ]
(W/ه kDا
.*]7/
7O8* 4x,ا
]l7ا{ Fإذا آ ا
8رة
*~lة W/l/NإFر و ]lWا{ _Fذوي { lآ*'
* _/, .^N9ا4Iام اFر ا{ Fذو ا
! lا
*'
ا
_* ً4N ^N9/أي *_ إFرات ا
^,9ا:ر.7N
<~9Wات ا 1dاZk bcHل ا 1 M7ا+رات
" Áp,ء ,D!Gم *ا< ?L
اFرات" * W/lأ~xة ا
س و4}Gر
إsرة
4UW W/8* Gا+Iض ? Lأي
*_ إFرات ا
^,9ا:ر 7Nا
.*4I8/إ إ
[ ذ
،
٢٨٦
{
{4وث ا+Iض ? Lأي *_ إFرات ا
^,9
ا:ر PNا
]W |l, ،*4I8/ا
<; zNع * _/,
و ¥+اFرات * p+IUا
L?pا
"[]W "j*G
ssا
7ض ا
* إ
[ < L? ¥+ /اFر ا
رد
ا
N [
/ا
7/وض ر
""Inflate to XX
)ا ¥+اFر إ
[ , .(XXXم ا
Uم 8+ ,4!N
أو ًG*Gو ss ;<Gا
7ض ا
* ا
7Gض
< ( <) /ا
" _W L?pا
* "jو +I,ء ",D!G
م *ا< ? LاFرات" l/Nد L? ]GاFر
ا
4!/ث.
G iiم ا 1 M7ا+ر
:GZ
• إذا آ 'رV Wودة ;Lإ+ر و
ا K+ذوي 8آ= ;9W oX ،L5ي
( Dا 1 M7ه;اء ا+رات وKA< EL
ا;L &M7ا'G 5م ا 1 M7ه;اء ا+رات
) EX .(TPMSا'
Mال ا+ر ا E+hذي
ا 89ا+oL =Aر bcH <+اW ،1d
دورة ح ا( =1ا EXإءة ";ء <~9W
Gم ا 1 M7ا+رات" و GWر' "Lo
1) "Tireا+ر
(bcHة ; kاٍن
ا =7/و
Wر اiرة ا ;lW .Wدي 7دة ارة
ة = Wإ 20د L P7أ 24 K
آ/Zً 15) '/8ا( إ إ<Pف ;" =1(Wء
<~9Wا 1 M7ا+رات" ور' ""Lo Tire
) 1ا+ر 1 KA< 8 + (bcHأي إ+ر
<+أ K =7ا 9اcص <~9Lاcض ا.1d
• إذا آ 'رV n Wة ;Lوإ+ر
ا K+ذوي 8آ= oX ،L5ن ا+ر
ا;9< h E+hي ( Dا 1 M7ه;اء
ا+رات .وGH KA< Kم ا 1 M7ا+رات
) (TPMSا 1 M7ا+ر .إذا L 7آy
ا+ر ا K hً
L E+hإ+ر bcH &51 <+
Kا 9اcص <~9Lاcض ا
X ،1dر
إiرة W;-و<Edء ";ء G <~9Wم اM7
1ا+رات" و< 8ض ا' ""Lo Tire
) 1ا+ر EX (bcHاة ا ا;PW Eم X
oLدارة ح ا( =1إ و 3ا(7 DL .=1دة
ارة ة أآ 20 K Mد L P7أ 24 K
آ/Zً 15) '/8ا(; b;' ،ء <~9W
Gم ا 1 M7ا+رات ة EX M}< 8 75
اءة =A MHL .دورة Wح ا(،=1
' ر إiرة W;-و<;; bء G <~9Wم
ا 1 M7ا+رات ة EX M}< 8 75
اءةL .د إZ-ح أو ا'
Mال إ+ر ا<5
ا E-/وإدة Wآ EX &Mارة K hً
Lا+ر
اG <
9W 8' ،E+hم ا 1 M7ا+رات
أو ًAW;Wو'; 5Hء <~9Wا1 M7
ا+رات +أ& #;< hإ+ر <K &51 bcH
<~9Wا 1dا EX bcHأي Kإ+رات ا<5
ا/ر DLاV< 7 .
cم 7دة ارة ة = W
إ (< Kد L P7أ 24 Kآ/8ا
)/Zً 15ا( G P< EAم ا1 M7
ا+رات ) (TPMSه~| ا;Dت.
اGHم ا - Vإذا آ ارة Vودة ~L
4I8,م م *ا< ? LاFرات )(TPMS
7O8* P* ] x
UGات إ
و *آ []W
ا
]l7ا
47/ا
4ا/
]3ا< *,8ت ?L
اFرات 'UG { .ا
7O8/ات ا
[]W /آ' ]lW
آ~lء *_ ا
}/م <اءا L?p
GاFر إ
[ و{4ة
ال.
G iiم ا 1 M7ا+ر
:GZو< 3# 1 9X Dا+رات 8GH =A(L
Kا/ه ALن 9ظ ا 1dا. y'H
٢٨٥
"ء ,D!Gم *ا< ? LاFرات" أو
4ور
اsرة ا
}* U,~IG 4UW Gن اFر ا{.F
pء ء "ء * ,D!Gا< ?L
اFرات" * W/lأ~xة ا
س ،و
ا
" L?) "Lo TireاFر * (j+IU
W ssض 4Wاد ا
[]W 8/ا
' ز*¢ 3 Uاٍن 7,
Wض *<*) Pا< (PاFر )اFرات( ذات ا
L?p
ا
+]3) RR) j+IU/أ +]3) LR (_/,أRF (8,
)أ** أ) LF (_/,أ** أ+N ((8,ا
' ز*¢ 3 Uاٍن '
*, .Uر هDا ا
4
PNور _Gآ*]_ ' دورة .'?OG
47Nا
4ورة ا
7G ،د 4W ssاد ا
* 8/ة أ3ى إ
[
ا
sOا
7
N8ض ر
ا+Iض اFر4}G .ر إsرة
4UW W/8* Gا+Iض ? Lوا{ 4أو أآ *_
إFرات ا
^,9ا:ر 7Nا
4{ { .*4I8/وث ذ
،
]W |l,ا
<; zNع * _/,و! ? Lا+خ
' إFر 8
Nرة و ¥+آ' إFر إ
[ < L? /ا+خ
اFر ا
رد ا
ُ8]
N [
/رة '/7, .ا
Uم ,4!G []W
8+أو ًG*Gو" +I,ء * ,D!Gا< ?L
اFرات" ور
" L?) "Lo TireاFر *(j+IU
l/Nد L? ]GاFر ا
4!/ث.
٢٨٤
= H :GZء ا+رات ا
ا;AW 7 ،Xن هHك #
إ ز<دة 1ا+ر إ 30آ;A'Lل ) 4أر+ل =A
(DL -;Lإ Xأ 1 Kا+ر اMرد
اُ;P< &L -ف ; =1(Wء G <~9Wم ا1 M7
ا+رات.
< |]9, 4ا< *:دة ا
8رة 4/ة '}Gإ
[ _,OWد<
W8Nأ/>ً* 15 _* []Wا
24) W8آ ]
(W/
ه kDا
.*]7/
j*,ء ,D!Gم *ا< ? LاFرات 4/ة 75
{ , ¢ ¢اءة 4UWاآOف U
N z93م.
4UW pاآOف U
N z93م .
4}Gر إsرة
Gأً ,
{
4Gو+* ,ح ا
،'?Oر هDا ا
،'8]8إذا آن
z93ا
Uم ~,ال *ًxدا _/, .أن 4!,ث z93ا
Uم
: lي *_ ا:ب ا
:
.1ا
|8N ¬,Oا~x:ة ا
و أو ا
دة
Nب *_
ا
¤OU/ت ا
4}Gر g+ UWا
ددات ا
>] ا
4}Gره *7O8ات م *ا< ? LاFرات ).(TPM
G .2آ| ع *_ ا O:ا
> ]~xج ا
W/
ا:اق وا
[]W ¢Gإsرات ا
x/ت ا
>].
.3وxد آ آ *_ ا
]¡ {ل ا
>l7ت أو *ت
ا
>l7ت.
.4ا4Iام >' اFرات ا
8رة.
.5ا4Iام >lWت/إFرات *~ودة 7O8/Nات
م *ا< ? LاFرات ).(TPM
!&MHW
• _8!G Gم *ا< ? LاFرات )(TPMS
'/7, !Nأ
'pرة ** Pت اFرات
وا
>l7ت ا,8* L G .]
:ت ا
U
L?pم
*ا< ? LاFرات )l{ |U, /N (TPMS
اFر ا
/آ| 8Nر4!, 4< .Gث ] '?OG
]Uم أو 4UW 7O8/
N ;]Gا4Iام *47ات ],4N
g+UN 8ا
! lأو ا
Uع أو ا
|8G 4< .'O
ا
>l7ت ا
:N W/اق {4وث .7O8/]
;]G
< |8, 4ا4Iام *ا8G Pب اFرات ا
W/
:Nاق 7O8* '97Gم *ا< ?L
اFرات ) 47N .(TPMSا4Iام *ا8G Pب
اFرات ا
:N W/اق ُ!9
N [
,ب
ا
8رة إ
[ ا
آ' ا
4/7/م !+Nو+
ا
.7O8/
• 47Nا
م !+Nأو L? LاFر < ،داً/
WªNدة Gآ| 9ء ق ا
}/م PU/, .ذ
ا
NF
وا
ذورات *_ ا
34ل إ
[
/م اFر ،وه ا*:
ا
Dي <, 4دي إ
[ 7O8* ;]Gم *ا< ?L
اFرات.
:GZ
• G EH1< hم ا 1 M7ه;اء ا+رات )(TPMS
Kإ#اءات ا <HDاDد< +Lر و &-آ أ&
H <~9W X;L ًHDوث +L jWر.
•
c'L v H< hام Gم ا 1 M7ا+رات
) (TPMSآ
Dاد Pس 1ا+ر أHء 1 M
ا+ر.
• إن اPدة EXو;#د إ+ر =A(L bcH 1 &L
;9ظ yMWز<دة ارة ا+ر وlW 7دي إ =5DW
ا+ر .آ أن اcض 1ا+ر < =Pآءة ا;;7د
و اس ا+ر ،و l< 7ا
Pرة 7دة
ارة وإ<.XP
• إن Gم ا 1 M7ا+رات )K Zً<
L (TPMS
ا ا+É M'Hرات ،وإ& ; Kا>
اhظ 1dLا+رات ا v9إذا = < 8
اchض 1 EXا+رات إ ا;ى ا~ي <=D
إءة ";ء G <~9Wم ا 1 M7ا+رات".
• و1W lWات در #ا9ارة ا;' 1
ا+ر ،و'اG y7م ا 1 M7ا+رات
) 1 (TPMSا+ر ا.ED
اGHم اE''/
4I8,م م *ا< ? LاFرات )x
UG (TPMS
] *7O8* Pات إ
و *آ ا
>l7ت
ا
47/ا
4ا/
]3ا< *,8ت ? LاFرات{ .
'UGا
7O8/ات ا
[]W /آ' ]lWآ~lء *_ ا
}/م
<اءا L?p
GاFر إ
[ و{4ة ال.
:GZو< 3# 1 9X Dا+رات 8GH =A(L
Kا/ه ALن 9ظ ا 1dا. y'H
,ن م *ا< ? LاFرات )_* (TPMS
ا
/ت ا
:
.1و{4ة ال
.2أر7O8* 7Nات /ا< ? LاFرات
.3ء * ,D!Gا< ? LاFرات
7O8* 4x,ا
]l7ا{ Fإذا آ ا
8رة
*~lة W/l/NإFر و ]lWا{ _Fذوي { lآ*'
* _/, .^N9ا4Iام اFر ا{ Fذو ا
! lا
*'
ا
_* ً4N ^N9/أي *_ إFرات ا
^,9ا:ر_
.7N
|8,ا+Iض ? LاFر ا{ Fإءة
٢٨٣
(3LW) !&MHW
<, 4دي أي l{ ?GاFر إ
[ ]W ;]Gا
.'U
?U,ا
~ام 4lNول * ?Gا< PاFرات /از
¤Gآ' اFرات.
Gم ا 1 M7ه;اء ا+رات )(TPMS
D!,ر م *ا< ? LاFرات ) (TPMSا
_* ^8
ا+Iض ? LاFر *4ًU8ا ذ
إ
[ ? LاFر
ا
رد ا
ُ.N [
/
L? ;]I,اFرات 4
7ًGر xا
!ارة 4/Nار 7.0
آ] Nل ) 1ر 'Fا
ا
6.5 '
ً,G (7N/
درxت * 12) ,در .(, xو U7,ذ
أ 4UW
ا+Iض در xا
!ارة ا
Iر L? j+IU, ،xاFر.
|l,أن ,ن ? LاFر داً Fًp* /اًUدا إ
[
? LاFر ا
رد .وُ7,ف هDا L? zNاFر 47N
*ور أآ *_ >¢ث Wت *_ 4Wم <دة ا
8رة ،أو
<د 1.6 _* '<: Gآ ) 47N ('* 1ة >¢ث Wت.
را" 3#ا+رات ;D -ت " " EXا
Mء وا("=1
; 9ل ;Dت ;ل آ ¾ إ+رات ارة
٢٨٢
< P* pدة ا
8رة؛
~, .v9- =A(Lداد ? LاFر أً ,
وهDا ا 7F *:و |l,ا
م ]/W ,zNت D
Lا
ا
L?pا
~ا.4
D!,ر م *ا< ? LاFرات ) (TPMSا
_* ^8
ا+Iض ? Lأ{ 4اFرات إذا ا L? j+IاFر
_Wا
! 4ا
Iص ,D!Nا+Iض ? LاFر :ي |
/Nذ
¢zGات ا+Iض در xا
!ارة و4ان اFر
] L?pا
7دي .
/8,م *ا< ? LاFرات ,D!Gا
^8
+INض ? LاFر G /
Fا4xت g+ا
وف ،و
_
L? '}, [{ ;<,اFر إ
[ ? LاFر ا
رد
ا
ُ N [
/أو أ _* []Wذ
l/N .د إءة "ء ,D!G
م *ا< ? LاFرات" |l, ،ز,دة ? LاFر
إ
[ ? LاFر ا
رد ا
ُ []W N [
/ا
^}]/
إ,ف " '?OGء ,D!Gم *ا< ? LاFرات".
= H :GZء ا+رات ا
ا;AW 7 ،Xن هHك #
إ ز<دة 1ا+ر إ 30آ;A'Lل ) 4أر+ل =A
(DL -;Lإ Xأ 1 Kا+ر اMرد
اُ;P< &L -ف ; =1(Wء G <~9Wم ا1 M7
ا+رات4!, .ث ا
Uم 8+أو ًG*Gو Á+9U,ء
* ,D!Gا< ? LاFرات l/Nد ,8* ]Gت
? LاFرات ا
|]9, 4< .¢4!/ا< *:دة ا
8رة
4/ة '}Gإ
[ _,OWد< W8Nأ15 _* []W
*ً>/ا
24) W8آ ]
(W/ه kDا
.*]7/
' []Wا
/ل, 4< ،ن ? Lا+خ ا
رد ا
ُ[
/
8
Nر ;<G 47N) Gا
8رة :آ *_ W 3ت( ه
241آ]Nل ) 35ر .(7N*
N '
>ًFإذا آ
در xا
!ارة ا
9!/ه 20در 68) ,* xدرx
(,وآن ? LاFر ا
/س ه 207
آ]Nل ) 30ر8 ،(7N*
N '
>ًFدي
ا+Iض در xا
!ارة إ
[ (, 20) ,* 7-إ
[
L? j+3اFر إ
[ 179آ]Nل ) 26ر'
>ًF
.(7N*
Nو? LاFر هDا *+, /N j+IU
" '?Oء * ,D!Gا< ? LاFرات" .و<4
< |8Gدة ا
8رة ار+Gع ? LاFر إ
[ 207
آ]Nل ) 30ر (7N*
N '
'Fو
_ ',
"ء ,D!Gم *ا< ? LاFرات" {
'* .'?OGهDا ا
" '?OG ;<, ،;</ء ,D!G
*ا< ? LاFرات" ¥+ 47N LاFرات إ
[ </
? LاFر ا
رد ا
N [
/ا
x/دة []Wا
.^}]/
!&MHW
+دي {4وث أار 8ر Gأو إFرا* |l, GاWة
ا{Fت ا
:
• ًا ]]Iص ا
4!/ود lز ا
_N lاFرات
وأ~xاء ا
^]7ا3:ى _* ،ا
pوري ا4Iام
أ~xة 4x xة ~x: .Lة ا
_/, +أن Gدي
إ
[ إ
!ق أار 8
N /8xرة .أو<; ا
8رة ًرا
إذا O, Gً
7/إ
[ ا9ع xز ا
.l
و _* ]IGا~x:اء ا
x _* +ز ا
'< l
ا4Iا* *ة .¢
• < Nآ| ا
lز [}<zNإ{م * ¢ _/أ{ ر9N
*ً4lدا < 47Nدة ا
8رة 0.8) '* ;} 8/آ (
.ً,G
• lGوز 48 Wآ />ً* 30) W/ا
.(W8
• آ_ {ًDرا 4UWا
دة و |UlGا97ف ا
4,4Oوا
!+
ا
ة '/!G 4UW
3ا
8رة.
• N Gدة ا
8رة +ة x ^,F []W ],Fف.
)(3LW
(3LW) !&MHW
• * _* 4NاWة /]7Gت ا
lا
l
7U}/ز ا
l
,F 7/ا
آ| وا
W8ا
4!/دة ووف
ا4Iام .ا4Iم داً W /ا
'?Oا
{G
ا
lا
l]
7U}/ز إذا آ أ<' *_ 48آ W/
)/>ً* 30ا
.(W8
• 4I8Gم أ~xة ا
P* lإFر ا{.?
F
را" Pxآ| ا
*4Iوا
/pن" ]7ف []Wات
ا
} ا
}!! .و w!}G |l,أي , z93دي إ
[ ;]G
P,أو اWدي FÓرات <' ا
م * ?Nا<.7
وا
,9ا
* ?
N [
/ا< PاFرات ه
»ا
PFا «**:آ /ه * wا
.'O
-;Wت ; 1W Kا 37ا+رات
'/7GاFرات ا **:وا
8]
+]Iرة !Gأوزان
* +]IوGم zNد ,و; * x
+]Iا
8رة و<دG
وإ .,و
kDا:ب47/N []G ª ،ت *8و.,
و ]G ']G _/,ا
¢/ات * ?Nا< PاFرات _N
ة وأ3ى .و 7Gا* ?G 4ا< PاFرات *]/
3اFرات ذات أsل ا
4/ات ا
/7آ]
ا
'/78GاFرات ا
'N
Iا
}+ل ا
[]W '/78Gا
9ق ا
7د ,وا
9ق ا
Wة* ?G .ا<P
اFرات 4* /W _* 4,~,ات اFر و4W8,ه
ٍW |! Gل ا
_9وا
]¡ وا
9/و8,ه
< Gدة * !,وهد.
; 1Wا 37ا+رات
!&MHW
4/7,ا
'?Oا
}!8
wرات ا
P4ا
[]W WN
اFرات ذات ا
! lوا
Uع و*! Lا
]l7ا
8/وي.
)(3LW
٢٨١
* l{ L9IاFرات ا
x/د ا
*]7*" 8ت أ*ن
اFر" *_ هDا ا
7]
'
4ف []Wا
_* 4,~/ا
*]7/ت
ا
;U
IGا
! '/ور*~ ا
FÓ
W8ر.
ُ4N [
,ال اFر _,ا _**:أو اFر _,ا
_+]I
آ~و, 4< { ._xن 4ال إFر وا{ً] ¢zG 4
[]Wا
! ا
8رة .إذا <4N /ال z ،]lWآ_* 4
* ^N9Gا
+ت ا
* P* ]l7ا
+ت ا
>l7ت ا.]
:
ُ}GN [
,ل Nآ' اFرات أو وآ' ا
47/ات
ا ]
:ا
[]W NxÓ
4/7/أي أ] { ,4ل
*ا
+ت أو <4رات اFرات4W ¢, .م ا4Iام
إFرات ,8* []W * ],4Nت ا
*>8وا
x
و<دة ا
8رة.
٢٨٠
!<~9W
• '/78GإFرات أو >lWت ذات { lأو درxت G
/W ;]IGه *
ف >4Iام ر4 .G
,دي ا4Iام Wت *ا^ _* ]WاFرات أو
ا
>l7ت إ
[ g,* ?Gا
^]7و }3ا:داء */
?G _W +8,ات xGا
8رة وا
98ة ]W
وأداء ا
+ا*' .هDا <?G |8, 4ات xGا
8رة
و []W 4x L]8Gأ~xاء ]lWا
دة وا
.^]7و*_
ا
_//أن 4+Gا
98ة []Wا
8رة وأن 7Gض !دث
,دي إ
[ إ
Nت 93ة أو ا
ة .اL '/7
اFرات وا
>l7ت l{:Nم و*47ت ا
! '/ا
,ا^ []Wا4Iا* 8ر.G
• 4I8Gم إًFرا ذي * ?
'/{ '*7أو <4رة
?ة >INف اFر ا ]
:ا
~/ود * Pا
8رة.
,دي ا4Iام إFر ذي * ?
'/{ '*7إ
[ ز,دة
{ '/اFر و _* .+]Gا
_//أن 4+Gا
98ة []W
ا
8رة *<
7, /ع }Gدم.
• إن 4Wم ~Gو 4,ا
8رة FªNرات ذات <4رة *P* U
ا
_/, W8أن ,دي إ
[ ~/Gق *FÓ
Áx+ر
و4ان ا
98ة []Wا
8رة.
!&MHW
ا4ال اFرات اFªN ]
:رات ذات أ{lم *+]I
<< |8, 4اءة 47
F3اد ا
W8و4Wاد ا
.8/
' ='Zا+رات )أV#ة ا(y9
آً *_ اFر إ
[
|]9,ا4Iام أ~xة ا
ً ]3 |!8
ا
' .ا PGه kDا
ت 4{ |Ulوث ا
];.
• |l,أن x l{ |U,ز ا
l{ P* lاFر آ/
أو
ا
lا
l
7U}/ز ا
.|!8
• <
Nآ| []WاFرات ا
.L +]I
• ُ4IN [
,ام إFر P* 235/65R17ا4Iام
xز /
N +, xا
+ت *_ ع " SAEا
."S +
!<~9W
<, 4دي ا4Iام آ>Nت *_ { lأو ع *;]I
) M+Sأو _N (Snowا
!/ر ا **:وا
!/ر
ا
+]Iإ
[ {4وث إxاء *< _* .Pا
_//أن 4+G
ا
98ة []Wا
8رة *<
7, /ع }Gدم.
ا+ر
*43 /W 4/7,اFر W []Wا*' * WUو '/O,ذ
' []Wا
/ل ا
!}:
• أ]ب ا
دة
—1إFر Nل
—2إFر 4,4x
ه kDا
s/ات *!+رة أ~{ '+وز ا
4/ات.
و 'sأ ^/W '}, *4UW Fsا
4/اس إ
[
]N 4UW .(
N 1/16) * 2ا
4/ات وا
ل إ
[
*sات ]Nا
4/ات |l, ،ا4ال اFر .راPx
"ا4ال اFرات" هDا ا
}!]
8ل _* 4,~* []W
ا
*]7/ت.
• ? LاFرات _/, -أن ,دي ? Lا+خ ا
رد
ا
U/إ
[ 8* ;]Gو *4ات اFر.
*, /دي إ
[ /W ']GاFر وا
! xإ
[ ],4G
و< *.
• * 8ا
دة
• إFرات ا:داء ،اFرات ذات Gا
W8اV []W:
أو أ ،[]WوإFرات ا
};4* /W ،ات *!4ود
}Nرة /ذ4ON [
,ُ .xة 4Nو ,ه kDاFرات
{ * |8ه * wآ| ا
/pن وا
}
]8رة.
!<~9W
|l,ا4ال اFرات واFرات ا{ 47N F
أWام j?N ،ا
/W _W Uا
4/ات .و,دي 4Wم
اGع هDا ا
! ,Dإ
[ {4وث FN Áx+* '9Wر .و*_
ا
_//أن 4+Gا
98ة []Wا
8رة وأن 7Gض
!دث ,دي إ
[ إ
Nت 93ة أو ا
ة.
ا{FN Ë+رات ا
/آ *ن Nرد وxف *P
أ<' <4ر * _* _/ا
p]
j,7ء ,/!N < .اFرات
*_ ا}Gل * Pا
~ ,وا
!Oوا
._,~U
ا'
Mال ا+رات
GاFرات ا
~/ودة Nر Gا
4,4lة *از ذات
*~/ات 4,4Wة .و }! |l,ات *_W ً!N /U
N ;]Gو L? w!}Gا+خ اFر ا
رد .و
G
ا
lا
4ON 7U}/ة 4INام إFرات ذات xدة وأداء
*FÓ
_NOرات ا~], *4UW ]
:م ا4ا
.راPx
ا
+ة {ل "*sات ;]Gا
4/ات ".را^}]* Px
**]7ت اFر وا
! '/أو *]}^ sدة ^¢Gا
8رة
7/ا
! lا
4!/د FÓر ;U
4x, .ا
! '/ور*~
ا
FÓ
W8ر 4x []Wار اFر ا .]
:را* Pxل
٢٧٩
|l,ا4ال اFر ا{ Fا
</ذو ا
! lا
*'.
وًا '¢/, :اFر ا4N ،]
:ال )أو
إ
>ح( اFر ا ]
:وإWدة Gآ ا
8رة أول
.
ا+ر ا
9 E+hود ا
c'hام — إذا آ ارة
Vودة ~L
ُ4I8,م اFر ا{4!* Fود ا4Iام {ت
ا
9ارئ .L <* +}Nو ~/G ,هDا اFر ^}]/N
*xد ]l7NاFر ا{4!* Fود ا4Iام.
و!,ي هDا ا
[]W ^}]/ا
د ا
N ]7/دة 8U
N
Dا اFر ا{4, 4< .Fو هDا اFر *' اFر
ا ]
:ا
~/ود !* []Wر ا
4وران ا **:أو ا
+]I
]8رة و
g
UهG ¢, .آ| هDا اFر ا{F
*!4ود ا4Iام []Wإ* ا
! ا
8رة .وًا
'¢/, :اFر ا4N ،]
:ال )أو إ
>ح(
اFر ا ]
:وإWدة Gآ ا
8رة أول
.
!<~9W
{ < /}G G 4اFرات ا{4!* Fودة
ا4Iام >4Iام ا
!ت ا
9ر <* +}N
G ¢, .Lآ| هDا اFر ا{4!* Fود
ا4Iام []Wإ* ا
! ا
8رة .أU¢ء Gآ|
هDا اFر 4G ،ا
8رة lG W8Nوز ا
W8ت
ا
/رة >l7ت اFرات ا{4!* Fودة
ا4Iام .ا{ ¥+UN Ë+اFر 8* []Wى ? Lا+خ
اFر ا
رد ا
D/آر *]7* ^}]* []Wت اFر
وا
! []W '/ا
/7د ا
_N '
+ا
Uا) Dب( x
ا
^8أو []Wا
! ا
+]Iب ا
.^8ا4ل )أو
أ
] (wاFر ا ]
:أول
وأG 4Wآ
ا
8رة, .دي 4Wم ا
م
DNإ
[ 4ان ا
98ة []W
ا
8رة.
دوران ا+ر ا<3
4N Gو>lW ,ت ا
8رة W8Nأ30 _* []W
*ً>/ا
48) W8آ (W/أو 4/ة أFل *_ ¢ 30
/8* 'ONدون ;<Gإذا آ ا
8رة Wا
_9
أو ا
*' أو ا
.4]l
٢٧٨
را ,!G" Pxرة |l, *" "
Wأن ]7+G
ا
!ت ا
9ر" ]!}ل _* 4,~* []Wا
*]7/ت.
!<~9W
إدارة اFرات _/, W8Nأن ً93 'O,ا آًا.
{ _/,أن Gدي ا
ة ا
_W /xUا
W8ت ا
7
]>l7ت إ
[ إ>Gف *!ر ا
4وران واFرات أو
{4وث .']3و< l+U, 4اFر و |8,ا
IO
N
*4N G .و>lW ,ت ا
8رة W8Nأآ *_ 48
آ (W/>ً* 30) W/أو :آ *_ ¢ 30
*ا
] G *4UWن ً
Wو Gك أي
N Isب
*_ ا
4G 4UW ]l7و,ه أً ,آ ا
.W8
ilات jWا
ا'ت
إن ه kDا
s/ات * WاFرات ا ]
:
ا
8رة 4,4!G G4W8/ا
< ا
Dي |l,ا4ال
اFر .
ا+رات ا - +hإذا آ ارة Vودة ~L
MHL :GZرات اVودة
DLة 9م ا+ر hً
L
Kا+ر ا #<ُ ،E+hا;#ع إ "
ة 9م
ا+ر" y< " EXأن EX &DWاh9ت ا5ر>"
; 9ل K <Vا;Dت.
!&MHW
وًا ]]Iص ا
8
N /G ،j+IU/رة *_ >3ل
*? ]8رات أو G*GأU¢ء Gآ| اFر
ا{ Fا
</ا
}? أو ا
Iص 4INام
ا
4!/ود7G 4 .ض ا
8رة ]];.
ا+ر ا L5< E+hا+رات ا K -/
ا+ر وا — Dإذا آ ارة Vودة ~L
<G 4ن ر~* Gودة FªNر ا{ Fو ]lWا{F
OGا
'Oوا
FÓ
+ر وا
47/
N ]l7ة ا]
:
وا
x/د ا
!/ر ا **:أو ا
8N +]Iر .Gو<, 4
ا4Iام هDا اFر ا{* ?G ]/W Fا<P
اFرات .إذا آ ا
8رة *~ودة DNا ا
Iر ،اPx
وآ' اFرات ا
7]
4/7/ف * ?G L/ []Wا<P
اFرات ا
ُ.N [
/
ا+ر ا E+hا — 1إذا آ ارة Vودة
~L
/}G GاFر ا{ Fا
}? >4Iام
ا
!ت ا
9ر * 7* U/, .L <* +}Nإذا
آ ا
8رة *~ودة FªNر ا{?p* Fط U
Nإ
[
و
; اFر ا{ Fا
x/د *]7* ^}]/Nت
اFر وا
! '/ا
x/د N !+Nب ا
^8أو ا
4lار
ا
FÓ
lر4G { .أ *ا
+ت اFر ا{F
ا
?p/ط !Nف " "Tأو " *>W ^8, "Sا
!* . lل:
.T145/80D18 103M
!<~9W
{ < /}G G 4اFرات ا{ Fا
}?ة
>4Iام ا
!ت ا
9ر .L <* +}Nو4UW
Gآ| ه kDاFرات ا{ 4G Fا
8رة W8N
80 _W 4,~Gآ /ا
/>* 50) W8ا
.(W8إن
اFرات ا{ Fا
4* /W </ات *!4ود.
]N 4UWا
4/ات وا
ل إ
[ *sات ]N
ا
4/ات |l, ،ا4ال اFر ا{ Fا
}I/
>4Iام ا
.</ا{ص * []WاWة ا
!,Dات ا
[]W ^9UGاFر ا{ .Fوإن 4Wم ا
م _/,
DN
أن ,دي إ
[ '9WاFر ا{ Fو4ان ا
98ة
[]Wا
8رة.
و{ إن ا
/7ا
D
P</ا اFر <}w]}G |l, ،
)أو (',4GاFر ا ]
:وإWدة Gآ 8
Nرة
أ<ب و< *._/
ا+ر ا E+hذو ا 89ا — =Aإذا آ ارة
Vودة ~L
= S ،TإFر ا{<* F
و Gآ| >ً ] ]l7أو إًFرا أ
]ً ]lW []WاFر
}
ا{ Fا
}? وذ
:ن ا
ً }3 //}* ]l7
FÓر ا{ Fا
}?N G .آ| أآ *_ إFر
و ]lWا{?
Fة وا{4ة ا
8رة ا
< .8+
/}G GاFر ا{ Fا
}? ذو ا
! lا
*'
>4Iام ا
!ت ا
9ر 4, 4< .L <* +}Nو
هDا اFر *' اFر ا ]
:ا
~/ود !* []Wر
ا
4وران ا **:أو ا
8]
+]Iرة و
g
Uه .إن هkD
اFرات ا{, 4< Fن 4* /Wات *!4ود.
]N 4UWا
4/ات وا
ل إ
[ *sات ]Nا
4/ات،
٢٧٧
ا
9ق *?9ة 4]l
Nأو ا
]¡7]
.ف _* 4,~* []W
ا
*]7/ت ،ا
N '}Gآ' ا
.4/7/
_ _/pGإFرات ا
}; /}GإFرات P/xا
}+ل
أو ر*~ ا
/'lا
<< ا
] []W lا
4lار ا
FÓ
lر.
ا4Iم إFرات ا
}; *W/lت *_ أر 7NإFرات
{[ ¢,ذ
[]W ً8Wأ*ن ا
8رة وإ* ا
'*7
*.7
!<~9W
4I8Gم إFرات ا
}; وف ا
/4]lا
]¡4 .
4+Gا
! ا
8رة *4{ |8, /وث إ
N
_W pا
دة W8Nآة
93ة أو ا
ة .آ zOU, /أً ,
وف * U7ا{/ل 4ان ا
! ا
8رة.
إ+رات ا
^FU* j7N |]9Gا
>د ا4Iام إFرات ا
4]lأU¢ء
ا
Oء _/, .ا
7ف []WإFرات ا
>3 _* 4]lل ر*~
"ا
/'lا
<< ا
] []W "lا
4lار ا
FÓ
lر.
٢٧٦
إذا د Wا
! xإ
[ ا4Iام
_/
ا
،4]l
إFرات
ا
pوري ا3ر إFرات
* ا
! lوا
Uع
FÓرات ا .]
:ا4Iم
إFرات ا
]¡ *W/lت
*_ أر 7NإFرات {[
¢,ذ
[]W ً8Wأ*ن
ا
8رة وإ* ا
.7* '*7
Fرات ا
47* 4]lت Wأ<' *_ ]Gا
I
FNرات ا ]
:و |l,ا4Iا* []W /8* 'ON
Wت أآ *_ />ً* 75ا
120) W8آ .(W/
W8]
8U
Nت أ/>ً* 75 _* []Wا
120) W8آ /
،(Wرا Pxا
47/ات ا ]
:أو وآ' إFرات *4/7
]7ف W []Wت ا
'?Oا U*Æا
ُN [
/
وا
! '/و*,8ت ¥+اFرات ا
ردة.
[]Wا
*_ أن اFرات ا
~/ودة _* _8!G *8/N
ا:داء []Wا
]¡ وا
4رة []Wا~ق وا
[]W lا:رض
ا
]]/وا
G 4< ،lن أ w9ا
<9ت أأ *_ اw9:
ا
FÓ
U/رات ا
~/ودة j7N !G .*8/N
ا
4ول اFرات ا
~/ودة *8/Nو
|l,
Dا
!^ *_
ا
ا_ ا
'< ]!/ا4Iام ه kDاFرات.
ا(X H =1اغ ا;اء Kا+رات – إذا آ
ارة Vودة ~L
w,ا
4UW '?Oاغ ا
اء *_ اFرات إ*
ا
دة 80) >ً* 50 8/آ ( 47Nا
4+ا
L?p
P,8
ا+خO, .ر Dا ا
4+ا
L?p
P,8ا+خ PN
ا
4UW '?Oاغ ا
اء *_ اFرات4!, .ث وP
ا
4UW '?Oاغ ا
اء *_ اFرات , *4UWن ?L
ا+خ اFرات 14ر 96) 7N*
N '
>ًFآ]
Nل( أو أ<' *_ ذ
l/N .د أن '},ا
4UW '?Oاغ
ا
اء *_ اFرات إ
[ و Pا
4UW '?Oاغ ا
اء
*_ اFرات ،ن ,4إ*ت <دة *!4ودة
و!ج إ
[ ا4ال اFرات []Wا
+ر .اFر ا
Dي
4UW '/7,ا *_ ا
اء ,ن <>
Ó
>ًNح.
ُN [
,دة رة *! 7 '*N ]/أو |!8N
*9رة أU¢ء ا
ا 4xو Pا
4UW '?Oاغ ا
اء
*_ اFرات.
را*" 8< Pxا< ? LاFرات" ]7ف 4,~* []W
*_ ا
*]7/ت.
إZ-ح ا+رات
أ;اع ا+رات
إذا أ
wاFر , 4 ،+ً
Gإ
>{ {
ا
ء
,7/
Nا
:
إ+رات 3#ا ;ل — إذا آ ارة Vودة ~L
!<~9W
*_ ا
< 9Iدة رة *!W8N /{ [}<zN ]/
.
Wزن ا
p/ف []WإFرات ر _/, Gأن
.+]G |8,و<7G 4ض !دث }Gدم l 93
N G .
Dدة رة *! ]/إ
[ أ<}[
7
W8Nت *ا
] أ 120 _* []Wآ />ً* 75) W/
.(W
• ا
]; *xد ~x Lء ا
4/ات *_ اFر )
_/,إ
>ح ا
]; ا
!دث 4l
Nار ا
FÓ
lر(.
ا+رات ذات ا5ت ا<5P
• ا
| l,وز ر.( * 6)
N PN
!<~9W
إن ا4Iام إFرات 9Nت < P* ,9إFرات اWد,
,دي إ
[ lG ']Gوب ر!
Gآ ]lWا
دة4< .
4W |8,م اار هDا و<ع {دث .ا4Iم داً/
اFرات ذات ا
9ت ا
W/l* ,9ت *_ أرPN
إFرات .و 4I8Gم * 7أ4ًNا إFرات *_ ع .3
• < Gدة ا
8رة واFر رغ *_ ا
اء.
ا Oوآ' اFرات ا
7]
4/7/ف []Wإ
>{ت
اFرات وا
*]7/ت ا.
|l,ا4ال اFرات ا
+ا
4UW ]?OG Gا
*_ ا
اء أو اFرات ا
_* +/ا
اء ا
_* W
ا
ً L?pرا FªNرات 4UW '/7Gا *_ ا
اء
*_ g+ا
! lوو
; ا
;U
) *4Iا
! '/ور*~
ا
.(W8
GإFرات P/xا
}+ل ا
P/x lا
}+ل
)ا
PNوا
}; وا
;,Iوا
Oء(UG 4< .ع *,8ت
ا
_N lإFرات P/xا
}+ل ا
_/, .+]I/ا
7ف
[]WإFرات P/xا
}+ل *_ >3ل M+S /}Gأو
M&Sأو M/Sأو []W MSا
4lار ا
FÓ
lر.
ا4Iم إFرات P/xا
}+ل *W/lت *_ أر7N
إFرات {[ ¢,ذ
[]W ً8Wأ*ن ا
8رة
وإ* ا
.7* '*7
إ+رات ا jأو ا ;ل ا} — Zإذا آ ارة
Vودة ~L
GإFرات ا
}; ا
lآ' *_ ا
وف ا
F
وا
،lو
]
}}I* 8دة ا
]¡ أو ا
.4]lإذا
آ ا
8رة *~ودة FªNرات ا
}; ?U ،ا kإ
[
أن ه kDاFرات ]
//}* 8دة ا
Oء أو
وف ا
دة ا
g9ا
ردN < .آ| إFرات ا
Oء
رG *4UW Gن درxت {ارة ا
9!/أ<' *_
5درxت * 40) ,در (, xأو إذا آ
٢٧٥
اا Hاآ;ب وا'Pار ارة
8,ه ا+خ ا
FÓ
|U/رات Gرآب *.w,
و |8Gز,دة ا+خ ار ًx+* xًlGورآً.w,* N
1ا;اء EXا+رات
L? wG ,ا+خ اFر ا
رد []Wا
/7د "ب"
ا
_N '
+ا
Uا Dا
x/د { ا
^8أو []Wا
!
ا
+]Iب ا
.^8
*ة ا
[]W Oا:'<:
• L? _* ^!GاFر وا4IN 9ام *س
W
ا
lدة *_ ا
Uع ا
_* ^!]
lا
4/7G .L?p
[]Wا
8* 4,4!G 4UW Uى ا+خ ا
4G 4< .|U/و
اFرات * [{ w!
'ON I+Uإذا آ
* 'ON I+Uآف.
• ا! اFرات _W ً!Nوxد د' ¤G []Wآ'
اFر أو .* ;]G
٢٧٤
!&MHW
47Nا
م !+Nأو L? LاFر < ،داًWªN /دة
Gآ| 9ء ق ا
}/م .دي ذ
إ
[ *PU
ا
NFوا:وخ *_ ا
34ل إ
[ أب ا
}/م/* ،
<, 4دي إ
[ .+]G
L? < '/Gا+خ ا
4!/دة []Wا
L?" ^}]/ا+خ
اFر ا
رد" .و7,ف ? Lا+خ ا
رد L? zN
اFر 47Nا
<; < _Wدة ا
8رة >ث Wت []Wا'<:
أو <د 8/
Gأ<' *_ 1.6آ ) 47N ('* 1ة >¢ث
Wت *_ ا
<; |l, .أ l,وز ? Lا+خ اFر
ا
رد أ<}[ ? Lا+خ *9ع []Wا
4lار ا
FÓ
lر.
ا! *,8ت ? LاFرات ات أ<} إذا آن
اFر 4
Wرxت {ارة 3ر?* xة 'ONآ
{ ? ?Gط اFرات * ?G Pدرxت ا
!ارة.
L? ?,اFر {ا
7آ] Nل ) 1ر'
>ًF
?G '
(7N*
Nدر xا
!ارة *4ار7 k
درxت * 12) ,درDG ]W |l, .(, xآ
هDا ا 4UW *:ا
م L? !+NإFر ا
8رة 4Nا'3
}' ا
Oء.
ا
/ب ً }3
*ل :إذا آ در{ xارة ا
/ب = 20در,* x
) (, 68ودر xا
!ارة ا
Iر,* +
= x
) |l ،(, 32ز,دة ? Lا+خ اFر ا
رد
4/Nار 21آ] Nل ) 3أرFل ' (7N*
Nوه
* 8,وي 7آ] Nل ) 1ر'
(7N*
N '
>ًF
7درxت * 12) ,در P* |U]
(, xدرx
ا
!ارة ا
Iر.x
و<~, 4داد ? LاFر *_ 2إ
[ 6أرFل ' 7N*
N
) 13إ
[ 40آ] Nل( أU¢ء ا4Iام ']N G .هDا
ازد,د ا
: 79ن ? LاFر }4ًx >ً]< wا.
1ا+ر ( L =1
w}UGا
lا
N 7U}/دة ا
8رة /] W8Nو{|8
ا
ا_ ا
.*~]/و w/8G *4UWا
وف أو <ا_ 4,4!G
ا
N W8دة ا
8رة L? ',47G 7, W W8N
ا
اء اFرات أ*ًا *ً~], 4< ./م ز,دة ? LاFر
و /{ j+3ا
8رة '?Oا
8رة W8Nت .
W
را Pxوآ' اFرات أو وآ' ا
47/ات ا8]
]
:رات
ا
7]
4/7/ف W []Wت ا
'?Oا U*Æا
ُN [
/
وا
! '/و*,8ت ¥+اFرات ا
ردة.
!<~9W
إن و '¢ Pأآ *_ ا
>زم []WاFرات 7,أ*ًا
ً93ا |8G 4 .ز,دة ا
! _W /ا
! 4ا
/ر
{4وث *FN ]Oر أو ا
[]W ¢zا
P* '*7ا
8رة
أو ز,دة ا
8/ا
>ز* ,ف ا
8رة .ا4Iم
إFرات ذات <4رة 8
N [
*ُ '/!Gر .Gو
]/!Gأآ *_ <4ر Gأ4ًNا.
ا+رات ;D -ت
1ا+ر
L? 7,ا
اء ا
F |U/را4ًx /ً* Gا
] '?OGو*ض 8ر .GوهUك أر 7Nأ*ر أ
L?pN ¢zGهاء اFرات ا
}! wوه آ:], /
• >* ا
8رة وااره
• 4sGا>ك
• ;]Gا
4/ات
• ا
ا{ 4UWا
آب
اZ
!<~9W
• ¥+اFرات }Nرة
!! ً93 7,ا
و _/,أن ,دي إ
[ و<ع {ادث.
• <] ? Lا
اء اFر 4/G _* 4,~Gد اFر و<4
Gدي إ
[ ز,دة Iو.+]G
• ']Gز,دة ? Lا
اء اFر *_ < ]NاFر
;+IG []Wا
}*4ت .و< |8G 4اs:ء وا
!+
ا
x/دة ا
+ً]G ^,9اFر.
• < ¢G 4اFرات ذات *,8ت ا+خ ا
~ا4ة أو
ا
[]W p+IU/إ* ا
! ا
8رة و<;]G 4
zlة *د ,إ
[ 4ان ا
98ة []Wا
8رة.
• 4Wم 8Gوي ا
L?pاFرات _/,أن |8,
*Oآ' ]lW xGا
دة .و4+G 4< N
ا
98ة []Wا
8رة.
• < |8, 4ا>3ف ? Lهاء اFرات _Nأ{4
xا
8رة وا
|lا 3Æا!اف ا
8رة إ
[
ا
_/أو ا
8ر.
• ا{ص < []Wدة ا
8رة داً, *4UW /ن آ' إFر
* Iً+Uإ
[ ? Lا+خ اFر ا
رد.
¢,آ' *_ ا+خ ا
j+IU/وا
~ا []W 4اار
ا
8رة و*_ ا
_//أن ً7s 4
,را LNء ا Nlأو
.W
:GZ
• < KAأن lWدي ;1ط ا+رات nاو< K
أ
EM#ارة إ ا9اف ارة إ اK
وار Xة و
م ا5ة اPدة.
• < KAأن lWدي ;1ط ا+رات nاو< إ
ا9اف ارة إ ا Kوار.
iWاZ'hك
ُ 4,~,ا+Iض *8ى ا+خ اFر *_ *و* اFر
]4وران *, /دي إ
[ ز,دة ا>ك ا
<د.
jWا
ا'ت
< L? |8, 4ا+خ ا
رد ا
}! ;]G w
Wدي ¦/ط و4* /W ']Gات اFر, /* ،دي إ
[
ا
! xإ
[ ا4ال اFر *ًا.
٢٧٣
٢٧٢
;5kات <
9Wا 9ا 7/ا ;9 v9
.1اW _W !Nرة "The combined weight of
occupants and cargo should never
/l*) "exceed XXX lbs or XXX kgع أوزان
ا
آب وا
!/ت |l,أ l,وز XXXآ lأو XXX
ر ^}]* []W ('Fر.G
4{ .2د */lع أوزان ا
^8وا
آب ا
_,Dآن
ر.G
.3اFح */lع أوزان ا
^8وا
آب *_ XXXآl
أو XXXر.'F
.4ا
< ا
8, ¡GUوي ا
4/ار ا
/ح *_ ا
!
/
وا
!| ا
' []W .] _/,ا
/ل ،إذا آ
ا
!7G "XXX" /دل 635آ 1400) lر ('Fن
هUك 8/3رآب وز 68آ 150) lر (>ًF
ر ،Gوا
4/ار ا
/ح *_ ا
! /وا
!| ا
_/,
] ه 295آ 650) lر 68 × 5 {) (>ًFآl
) 150ر 340 = (>ًFآ 750) lر ،('Fو 635آl
) 1400ر 340 - ('Fآ 750) lر 295 = ('Fآl
] 650ر.([>ًF
4{ .5د */lع أوزان ا
!| وا
! /ا
]/!G ,
ر |l, .Gأ 47,ى ذ
ا
زن ' 7ا
!
/
وا
!| ا
N8{ Gا
9Iة ر< .4
:GZ
• إذا آ 'ر;5P y9' WرةoX ،ن أل
ا;5Pرة ' =PHإ 'رD< .Wض ا
ول اE
أ} آ ب إ E#ا ;9واD/
و
7رة ا y9رة =z EXأوع
P c
و
/اد اآب وأ .8ه~ا ا
ول n/اض
PX 9;Wو;A< h 7ن دDL D< X Pً7
ا Pوا' EX ;9ر.W
• < yأ< hوز ا;زن ا E#آب واEX ;9
ه~ا ا}ل 392آ 865) 8ر.(=+
٢٧١
; و;1ط ا+رات
ا=9
;;D 37ت ا+ر وا=9
|l,أن lGوز أ<}[ { []W /ا
8رة <4رة ا
!
/
Fرات ر .Gو
_ lGوز 7ا
!FÓ
/ر إذا
ا
~* Nوف ا
! '/و{ lاFر و? Lا+خ
ا
رد ا
4!/د *]7*" ^}]* []Wت اFر وا
!"'/
و < '/!G" 8ا
8رة" _/هDا ا
.'
4
1 v;W 8< :GZاخ ا+ر اMرد
ا;Dد "ب" ا KL =-ا;Hا ~Xا;;#د ا> أو
ا X9اM cب ا>.
}ل ; 37ا+ر )ا;Dد ا KL =-ا;Hا) ~Xب((
;Dت ا+ر وا=9
97,هDا ا
*]7* ^}]/ت ه* {ل:
4W .1د اIs:ص ا
]/{ _/,ا
8رة.
}ل ; 37ا+ر )اMب(
.2ا
زن ا /xا
Dي _/,أن ]/!Gا
8رة.
l{ .3اFر ا
8]
/}/رة.
¥+ L? < .4اFرات ا
ردة ا **:وا
+]I
واFرات ا{.F
٢٧٠
z EX :GZوف =9Wارة ، ; 7L
W y< hوز E
Dا;زن ا;9 E#ري ا
وران
ا E/وا K <V .Ecا;Dت ;ل
Dل ا;زن
ا;9 E#ر ا
وران و =9Wارة و'y9
ا;5Pرة ،را =9W" 87 3#ارة" EXه~ا ا.8P
! 4,4وف ا
! '/ا
}ى ]8رة ،اW _W !Nرة
"The combined weight of occupants and
cargo should never exceed XXX lbs or
"/l*) XXX kgع أوزان ا
آب وا
!/ت |l,أ
l,وز XXXآ lأو XXXر*]7* ^}]* ('Fت
اFر وا
! |l, .'/أ l,وز ا
زن ا]
/xآب
وا
!/
/ا 7*:و
8ن !| ا
9/رة )إذا و (4xا
زن
ا
O/ر إ
ا
.^}]/
ا 95ت ا+L PDرات وا<Dت
ا
w]9}/
ا;Dد ا KL =-ا;Hا) ~Xب(
1اخ ا+ر اMرد
أ 1 7اخ
1اخ ا+ر اMرد اُ;&L -
ا+ر
ا
;,7
ا
/7د ا
_N '
+ا
Uا) Dب( ه ~xء ه] *_ 8xا
8رة ا
x/د ;]3ا
ب ا.**:
L? ;,7G ,ا+خ اFر ا
رد []Wأ ? LاFر ;<G 47Nا
8رة 4/ة >¢ _W 'Gث
Wت []Wا ،'<:أو <د 8/
Gأ<' *_ 1.6آ )>¢ 47N ('*1ث Wت []Wا< , .'<:س
? Lا+خ 4{Nات ر 7N*
N '
'Fأو آ] Nل.
أ<}[ ? Lا+خ ه أ<}[ ? Lا+خ Nرد */8ح D
Nا اFر .أ<}[ ? Lا+خ *[]W w
ا
4lار ا
.l
? Lا+خ اFر ا
رد ا
ُ '<ِ _* N [
/ا
lا
8]
7U}/رة آ /ه *^}]* []W w
اFر.
*]}^ *xد 'ONدا ا
8رة
; /{ 7ا
8رة ا ]
:وأ{lم اFرات ]47/ة
ا ]
:و? Lا+خ ا
رد ا
ُ.N [
/
٢٦٩
ر j<DW 87ا+ر )(TIN
_/,ا
7ر []Wر< ;,7GاFر )|x []W (TIN
وا{ 4أو آ' *_ xاFر ،أن آد ا
ر|, ¥,
|x []Wوا{!G .L 4ي اFرات ذات ا
4lران
ا
lا
pء []Wر< ;,7GإFر آ*' _/p,آًدا
]ر |x []W 4x, ¥,ا
4lار ا
lا_* jN:
اFر .ا _W !Nر< ;,7GاFر []Wا
|l
ا
Iر _* xاFرات ذات ا
4lران ا
lا
8داء إذا
آ ه اFرات ا
/آ []Wا
8رة .إذا []W 7G
ر< ;,7GاFر ) []W (TINا
|lا
Iر78 ،x
[]W ]Wا
|lا
4ا _* ]3اFر.
*ل:
DOT MA L9 ABCD 0301
= DOTوزارة ا
'U
O,هDا ا
*~ إ
[ أن اFر *ا^ * *> ,7* PاFرات زارة ا
'Uا ,*:و* []W 8]
4/7ا
9ق ا
7,8 = MAر*~ PU}G P<* '/,اFر )ر</ن(
= L9ر*~ l{ '/,اFر )ر</ن(
= ABCDر*~ *4I8Gا
lا
FÓ
7U}/ر )*_ 1إ
[ 4أر<م(
= 03ر< '/,ا:ع ا
Dي PU}G GاFر )ر</ن(
O, 03اع ا
= 01ر< '/,ا
U8ا
PU}G GاFر )ر</ن(
U7G 01ا
7م 2001 <' ،2000 ,آن []Wا
lت ا
FÓ
7U}/رات ا4Iام ر< وا{ '/
4ا
7م ا
Dي PU}G GاFر* .ل '/, 4< :ا
< 031ا:ع ا
*_Wم 1981أو Wم 1991
٢٦٨
*ل:
و j-ا:
c
s* = 95ا
!
/
آد ر<FÓ
_/, /{ [}<zN LG, /ر {]/ = Hر*~ ا
W8
ر*~ O,إ
[ 9ق ا
W8ت ا
FÓ
_/,ر { P* |UG /{ '/د
' {
/وف U7* '?OG |l,ا
ل إ
[ أ<}[ U* Wة *~ ا
W8وف 4!* '?OGدة ) Lأي وً L?pاFر و{ /ا
8رة ووف ا
^,9و{4ود ا
(W8
Lن ا:;9
O,ب ر*ز ;,7Gا
! /ا
ا
x/دة []Wا
4lار ا
FÓ
lر إ
[ أن اFر ذو {:(SL) < /
• = XLإFر ذو <4رة { '/إ )أو * ،(/W4أو
• = LLإFر ذو <4رة { ++3 '/أو
• Cأو Dأو Eأو Fأو 9 = Gق ا
! _/, /{ [}<zN LG* /أن ]/!,اFر 4!* L? 4UWد
أ OG - ; 7أ<}[ { /إ
[ أ<}[ { /}G G /هDا اFر !]/
أ O, - 1 7أ<}[ ? Lإ
[ أ<}[ ? Lا+خ Nرد */8ح D
Nا اFر
٢٦٧
8 5cا+رات
*ل:
}ل Zا 89ا
9د +ÉرP215/65R15XL 95H، 215/65R15 96H، LT235/85R16C، T145/80D18 103M، 31×10.5 R15 LT:
l{ = PإFر رة رآب 4U8,إ
[ * ,7ا
} /ا ،,*:أو
" X ....رغ = " ....إFر رات رآب 4U8,إ
[ * ,7ا
} /ا:ور ،Nأو
= LTإFر U{sت 4U8, ++3إ
[ * ,7ا
} /ا ،,*:أو
Tأو = SإFر ا{ <* Fأو
= 31ا
9ا
N /x
215أو 235أو W = 145ض ا
/]]/
N 8ات
65أو 85أو = 80ا
8Uا
8U
N Wا
(% ) ,/
8ار+Gع ا
8إ
[ Wض ا
FÓ
8ر ،أوW = 10.5ض ا
N 8ت
,F = Rا
}/
O,ا
!ف " "Rإ
[ ا
} /ا
9ي ،أو O,ا
!ف " "Dإ
[ ا
} /ا
9ي أو ا
'/ 15أو 16أو 9< = 18ا
]l7ا
4ا
N ]3
٢٦٦
:GZ
• ) Pراآ 8 D< - (yا+رات ا< <D
ا 8ا<h;L -cت ا
9ة;9W .ي إ+رات
اآب ا< ا9ف "ً;9 "Pرا ا
ار
ا ZD PًL' EMا} .89ل :
.P215/65R15 95H
• ا/ورو 8 D< - Lا+رات ا< <D
ا 8ا/ور .Lوه~| ا+رات ا و~ PًXا
اDر ;9Wي 8ا+ر ً;9را ا
ار
ا 8< ،EMا
Mء PLس ض ا .8Pو
#;< h
ا9ف " 8 Z K "Pه~| اK ;H
ا+رات} .ل.215/65R15 96H :
• ) LTا(Hت ا 8 D< - (cا+رات
ا< <Dا <h;L 8ت ا
9ة .وMDW
Zا+ 89رات ا(Hت ا cا< هE
ا+oL -cرات اآب ا<
Xا
ا "LT" KX9ا;9ر< Kا
ار ا=M7 EM
Zا} .89ل.LT235/85R16 :
• 8 W 8Wا+رات ا +hا
c'Z 7lام EX
hت ا;5ارئ ;9W .PXي ا+رات ا+h
ا 7lذات ا 1dا EDف " "Tأو ""S
ً;9را ا
ار ا Z =M7 EMا} .89ل:
.T145/80D18 103M
• < 8 Dا+رات ا <D ;5ا 8
;<hت ا
9ة و
MWأ Zا 89ا;9رة ا
ار
ا 5PL EMا+ر} .ل.R15 LT 10.5×31 :
٢٦٥
,9
Nا
7د ,!G 4UW .,ا
+ا*' أو دوا ا
<د،
47,م ا
! ا
~Uول *_ []Wا
7+G/ت )(HDC
ا
98ة []Wا
8رة و N '},إ
[ ا
W8ا
Fp/
ا.]
:
• إذا G Diم ا EX 8A9اP'hار اAو(ESC) E
Lن در #ارة اا= ;X ،3WWف <;b
";ء G ilم ا EX 8A9اVHول K
اDWت" ة ; kاٍن و< 8إ1ء G (HWم
ا EX 8A9اVHول KاDWت MWد
اا=.
.1ا' ]Wا
'Uإ
[ و Pا
P4ا
WNا
.j+IU/
را '?OG" Pxم ا
P4ا
" "WNا
4ء وا
"'?O
_* 4,~/ا
*]7/ت.
G =5DWم ا EX 8A9اVHول KاDWت
)(HDC
G KAWم ا EX 8A9اVHول KاDWت
)(HDC
.2ا? []W Lزر ا
~Uول *_ []Wا
7+G/تÁp, .
"ء * sم ا
! ا
~Uول *_ []Wا
7+G/ت"
* W/lأ~xة ا
س.
:GZ
• إذا M KAW 8ا5 EX =PHق ا
3XاEL
ا;X ،bcHف <;;" bء G ilم ا8A9
EXاVHول KاDWت" ة ; 5اٍن و8< K
G KAWم ا EX 8A9اVHول KاDWت.
٢٦٤
;Dت ' Zا+ر
Zت ا+ر
ا? []W Lزر ا
~Uول *_ []Wا
7+G/ت أو ا' ]W
ا
'Uإ
[ 3رج 9ق ا
P4ا
WNا
;<G .j+IU/
إءة ء * sم ا
! ا
~Uول *_ []W
ا
7+G/ت * W/lأ~xة ا
س.
- 1ر*~ **> ,7
وزارة ا
'Uا,*:
)ر< ;,7GاFر(
*>W - 2ا
!l
- 3و
; ا
*4I
- 4أ<}[ {
/
- 5أ<}[ ?L
[]N - 6ا
4/ات وا
l
ودرxت ا
!ارة
ا
! zGر wxا
9/رة ) j*, ،(TSCء *s
¡*N ;<G/LOUGاار ا
و ) (ESCو<4
<F 'Gا
!/ك و<4IN 7OG 4ام ا
+ا*' []W
>lWت *!/
U7و
إ,ف zGر wxا
9/رة'97G , .
و{4ة ا
! zGر wxا
9/رة ), *4UW (TSCن
م ا
! اار ا
و ) (ESCوP
") "ESC Partial Offا,ف ا
U
~lم ا
!
اار ا
و( أو ") "ESC Full Offا,ف
ا
*' Uم ا
! اار ا
و(.
!<~9W
إذا 9Oو{4ة ا
! zGر wxا
9/رة )(TSC
أU¢ء ا
دة9NªN ،ء ا
8رة و 4UW ;<Gأ<ب *<P
*_ وا /{ Lا
9/رة ] _* ]Iا
zرwx
ا
!دث .N
Gم ا EX 8A9اVHول KاDWت )— (HDC
إذا آ ارة Vودة ~L
إن م ا
! ا
~Uول *_ []Wا
7+G/ت )(HDC
*4I>
}Iام []Wا
W8ت ا
[]W 9ا
9ق
ا
Wة Ë!, .Lم ا
! ا
~Uول *_ []W
ا
7+G/ت ) W []W (HDCا
8رة أU¢ء ا
~Uول *_
[]Wا
7+G/ت []Wا
9ق ا
4//ة وذ
/7Nل
ا
+ا*' |]9, *4UWا *:ذ
.
O,ا
*~ إ
[ {
م ا
!
ا
~Uول *_ []Wا
7+G/ت ).(HDC
,ن ا
}/ح {
إءة */8ة 4UW
LOUGم ا
! ا
~Uول *_ []W
ا
7+G/ت ) '?OG _/, .(HDCم ا
! ا
~Uول
*_ []Wا
7+G/ت )G *4UW L (HDCن ]Wا
'U
و" Pا
P4ا
WNا
"j+IU/وا+Iض W
ا
8رة 48 _Wآ .(W/>ً* 30) W/إذا ,
ا
ء kDNا
Oوط أU¢ء *!و
ا4Iام م ا
!
ا
~Uول *_ []Wا
7+G/ت ) j*8 ،(HDCء
* sم ا
! ا
~Uول *_ []Wا
7+G/ت و;<,
_Wا
*.j
7O8, ،U/G 4UWم ا
! ا
~Uول *_ []W
ا
7+G/ت ) (HDCا
pر g,و~ 4UW LOU,ول ا
8رة *_
[]Wا
W L _/, .P+G/م ا
! ا
~Uول *_
[]Wا
7+G/ت )N (HDCا 9ا
|U, /N ^8وف
ا
دة .و |UGا
G P* W8س <' ا
!آ ا
4I8/م.
اوس
ا:ول
ا
ا
ا
اPN
و) DRIVE Pا
دة(
وREVERSE P
)ا
xع ](;]I
ا اGH M<Pم
ا EX 8A9اVHول K
اDWت
1.5آ W/
)(W/'* 1
4آ W/
)(W/'* 2.5
6.5آ W/
)(W/'* 4
9آ /'* 5.5) W/
(W
12آ /'* 7.5) W/
(W
1.5آ /'* 1) W/
(W
_ lG ^8]
_/,وز '?OGم ا
! ا
~Uول *_
[]Wا
7+G/ت )/7N (HDCل ا
+ا*' 9Nء ا
8رة
إ
[ أ<' *_ !G Wم ا
! ا
~Uول *_ []W
ا
7+G/ت .إذا |]9Gا *:ا
_* 4,~/ا
W8أU¢ء '/W
م ا
! ا
~Uول *_ []Wا
7+G/ت )،(HDC
_/ا4Iام دوا ا
<د ~,دة Wا
8رة
٢٦٣
;ء G =5/(HW ilم ا EX 8A9اP'hار
اAو (ESC) Eو;ء G j7;W ilم ا8A9
EXاP'hار اAو(ESC) E
p,ء "ء * '9W/LOUG sم
ا
! اار ا
و )"(ESC
* W/lأ~xة ا
س 4UWإدارة *+ح
ا
'?Oإ
[ وON/RUN P
)ا
/'?Oا>9ق( .و Á+9U,أU¢ء '?OGا
!/ك .إذا
ا" /ء LOUGم ا
! اار ا
و
)/(ESCء * sا
"'97اءة أU¢ء '/W
ا
!/كª ،ن هDا 4,ل []Wأ < G 4اآOف '9Wم
ا
! اار ا
و ) .(ESCإذا ' هDا
ا
}/ح *ًpء 4W 47Nة دورات *_ ا
،'?Oو< /Gدة
ا
8رة 47ة آ]*ات/أ*ل W8Nت أ48 _* []W
آ ،(W/>ً* 30) W/ا Pxا
آ' ا
zN 4/7/ع
* IO
_/,ا
]O/و{].
4,أ ء * ;<G/LOUG sم ا
! اار
ا
و ) (ESCا
x/د * W/lأ~xة ا
س
l/N j*
Nد 4ان اFرات <9ا
lو '/Wم
اار ا
و .و j*,ء *;<G/LOUG s
٢٦٢
*4UW p
م ا
! اار ا
و ) (ESCأً ,
,ن م ا
! ا
.9ًO lإذا 4Nأ "ء *s
;<G/LOUGم ا
! اار ا
و
) "(ESCا
* jأU¢ء ا
8رع ;+I ،ا
[]W L?p
دوا ا
<د و<]' 4Nر ا*ن *_ ا4Iام
/م اU3ق.
zGآG _* 4ا^ Wوأ]ب <د
Gوف ا
.^,9
:GZ
• <Edء آ= ;" Kء G j7;W ilم اEX 8A9
اP'hار اAو "(ESC) Eو";ء il
G =5/(HWم ا EX 8A9اP'hار اAوE
) "(ESCة 7ة EXآ= ة X 8Wإدارة ح
ا( =1إ و) ON/RUN 3ا(/=1اZ5hق(.
• EXآ= ة X 8Wإدارة ح ا( =1إ و3
) ON/RUNا(/=1اZ5hق(G =1(W 8' ،م
ا EX 8A9اP'hار اAو8W ; (ESC) E
إ<Pف H}'L ،PًM &1(Wء =1(W Hارة EX
5ق ) 4Lا
3Xا ELا.(bcH
• < ر G Kم ا EX 8A9اP'hار اAوE
);- (ESCت KH+أو ;A< H Pن (ً .5وه~ا
أ دي ،و j7;Wا;-/ات G vM < Hم ا8A9
EXاP'hار اAو
DL ٍ( n (ESC) E
اHورة اG (HW EX MMW Eم اEX 8A9
اP'hار اAو.(ESC) E
" O,ء * ;<G sم ا
!
اار ا
و ) "(ESCإ
[ إ,ف
'?OGم ا
! اار
ا
و ).~x 'ON (ESC
و
ة اW EX 8A9ر v#ا;5Pرة )(TSC
4I8Gم و{4ة ا
! zGر wxا
9/رة )(TSC
*7O8ات ا
8رة آOف وxد *9رة *zر!x
7F 'ONو DIGاxاءات ا
!/
U/و
إ,ف ا
zر '], 4< .wxا
Uم <Fا
!/ك و'/78,
ا
+ا*' []Wا
]l7أو ا
>l7ت ا
7/
U/د
zGرwx
ا
9/رة LOUG .و{4ة ا
! zGر wxا
9/رة
) (TSCأوl/N ًG*Gد اآOف *9رة *zر!x
4{
_/, .7F 'ONة ا
! zGرwx
ا
9/رة ) (TSCإ,ف zGر P/x wxا
9/راتG .خ
ا
!Dر داً9* |! 4UW /رة وا PGا
ت ا
I
Nزن 8ن ا
9/]
|!8رة .را |!" Pxا
9/رة"
"ا
4ء وا
_* 4,~/
"'?Oا
*]7/ت '/W 4UW .و{4ة
!<~9W
ف," )إPartial Off" P و4x ا
ا4UW •
(TCS) l
~ء م ا
! اx '97G , ،(~l
ا
*¡ م ا
! اار ا
وN _*
"ود4!/
ء *~ة "ا~ق اUN) ،(ESC)
،((TCS) l
م ا
! ا8<
/
ا
!
<; م اG s* ء "*}حpو
P و4x ا
ا4UW ."اار ا
و
' *~ة97G , ،(~l
ف ا," )اPartial Off"
, ،(TCS) l
م ا
! اUN !ك/
< اF ']G
*_ م/
رة ا8]
_8!/
اار اj+3
.(ESC) *¡ اار ا
وN
(TSC) رة9/
اwxرzG !
ن م ا, •
ن م ا
! ا
ت ا
و, *4UW >ً97*
.(~l
ف ا," )اPartial Off" P و
3 دةP
اH
رة ا رة7 K9 :GZ
أوÌ EX = ارة1(W
ءL أو،Ì}'= اZ' ;د#و
3ل إ وPh اK9 اK ، رل أو
8A9م اGH E>Vف اP<" )اESC Partial Off"
ح1d< ا+ K (EوAار اP'h اEX
EX 8A9م اGH =Aف اP<" )اESC Full Off"
ا~يj7; اy1د اL و.(EوAار اP'hا
EوAار اP'h اEX 8A9م اG =<;9W y5<
فP<" )اESC Partial Off" 3( إ وESC)
87 ،(EوAار اP'h اEX 8A9م اGH E>Vا
(ESC) EوAار اP'h اEX 8A9م اG =1(L
ح7l =A(L 1d< ا+ K ىkة أ
EX 8A9م اGH =Aف اP<" )اESC Full Off"
;د#ء وH~ أL مP اKA< و.(EوAار اP'hا
. آEX ارة
[
إESC د م ا
! اار ا
و7
?' م ا
! اارOG) ESC On Pو
.ح+* '?OG ' آ47N دي7
ا
و( ا
٢٦١
EX 8A9م اGH E>Vف اP< )اESC Partial Off
(EوAار اP'hا
ف," )اESC Partial Off" P و4x ا
ا4UW
, ،(م ا
! اار ا
وU
~l
ا
¡*N _* (TCS) l
~ء م ا
! اx '97G
ء *~ة ا~قUN) ،(ESC) اار ا
و
l
م ا
! ا8<
/
ود ا4!/
ا
!
ف م ا, إs* ء "*}حp و،((TCS)
." اار ا
و
]¡ أو¢ رة8
ام إذا آ ا4I>
/}* P
ا اDوه
' أآON >تl7
ا,و4G ]~م, و/W [}{ ر*ل أو
م ا
! اار ا
وN w/8, /*
'?O
.l
>ت *_ اl7
_ ا/G د7/
( اESC)
( *ةESC) م ا
! اار ا
و
"ESC OFF" ح+* []W ~ةxة و+
L? ا،ى3أ
' ذ/7, .(ف م ا
! اار ا
و,)إ
!
?' م اOG) "ESC On" Pدة و7][ اW
.د7/
اار( ا
,إ,ف '?OGم ا
! اار ا
و
) (ESCوم ا
! ا
UN ،(TCS) lء *~ة
ا
'+ا
(BLD) ]+ا
O/و{ < 8م ا
!
ا
W '}G [{ ،(TCS) lا
8رة إ
[ 64آ /
/>ً* 40) Wا
W8]
8U
N .(W8ت ا
'}Gإ
[
64آ />ً* 40) W/ا
ً,G (W8أو lGوزه'34, ،
م ا
! اار ا
و ) (ESCوP
") "ESC Partial Offا,ف ا
U
~lم ا
!
اار ا
و( و 4UWا+Iض Wا
8رة إ
[
أ<' *_ 56آ />ً* 35) W/ا
،(W8ف 7,د م
ا
! اار ا
و ) (ESCإ
[ وP
") "ESC Full Offا,ف ا
*' Uم ا
!
اار ا
و( ¡*N '?OG ;<, .اار
ا
و ) (ESCو"ESC Full Off" P
)ا,ف ا
*' Uم ا
! اار ا
و(
Wت ا
8رة ا
9 p+IU/ق ) 4Lا
P4
ا
WNا
4, [{ (j+IU/ا P* '3ا
دة []Wا
9ق
ا
4//ة و
_ 7Gد و ¡*N +اار
ا
و )* '/7]
(ESCة أ3ى *~ة
اار ا
W8ت ا 64 _* []W:آ /ا
W8
)/>ً* 40ا
p, .(W8ء "ء * sإ,ف م
ا
! اار ا
و ) "(ESCداً9 /ق
٢٦٠
) 4Lا
P4ا
WNا
, *4UW (j+IU/ن م ا
!
اار ا
و ) (ESCوESC" P
) "Partial Offا,ف ا
U
~lم ا
!
اار ا
و( أو ") "ESC Full Offا,ف
ا
*' Uم ا
! اار ا
و(.
8< :GZض ر' ") "ESC OFFإ<Pف
Gم ا EX 8A9اP'hار اAو (Eو
Wر إiرة
; H Wو 3ذراع ا EX =PHوPARK 3)ا; K (j7أي و n 3و) PARK 3ا;8 ،(j7
إkا K &#و) PARK 3ا;
9< .(j7ث ذ إذا
آن v 8W 7ا' '.PًL
!<~9W
, *4UWن م ا
! اار ا
و
) (ESCو) "ESC Full Off" Pا,ف ا
*'
Uم ا
! اار ا
و('97G , ،
*~ات ~W ']Gم ا
!/ك واار ا
,ه م
ا
! اار ا
و ) (ESCوم ;+IG
ا>ب ا
و ) .(ERMا
U/ورات ا
9ر،
)(3LW
(3LW) !<~9W
_ * ^O7G ,ا
! اار ا
و
) (ESCو ;+IGا>ب ا
و )(ERM
]4W8/ة ا
!+ظ []Wاار /}G G .وP
") "ESC Full Offا,ف ا
*' Uم ا
!
اار ا
و( >4Iام []Wا
9ق ا
Wة
.L
5ق ا
3Xا} E>Hا+ُ) 3Wز ا
3Xا (ELأو
ُ+ز ا
3Xا}E>H
G =1(W) ESC Onم ا EX 8A9اP'hار
اAو(E
هDا ه و Pا
'?Oا
7دي Uم ¡*Nا
!
اار ا
و ) (ESCرات ا
P4ا
U
ا
P+G/ورات ا
P4ا
.U
ح ") "ESC OFFإ<Pف G =1(Wم ا EX 8A9اP'hار
اAو(E
4UWا
34ل و) "ESC Full Off" Pا,ف ا
*'
Uم ا
! اار ا
و( , ،إ,ف '?OG
م ا
! اار ا
و ) (ESCوم
ا
! ا
UN ،(TCS) lء *~ة ا
'+ا
]+
) (BLDا
O/و{ < 8م ا
! ا
l
) W '}G [{ ،(TCSا
8رة إ
[ 64آ W/
)/>ً* 40ا
W8]
8U
N .(W8ت ا
'}Gإ
[ 64
آ />ً* 40) W/ا
(W8أو lGوزه '34, ،م
ا
! اار ا
و ) (ESCوP
") "ESC Full Offا,ف ا
*' Uم ا
!
اار ا
و( .و W j+IUG *4UWا
8رة
56 _Wآ />ً* 35) W/ا
7, ،(W8د م ا
!
اار ا
و ) (ESCإ
[ وESC Full" P
) "Offا,ف ا
*' Uم ا
! اار
ا
و( '?O
.م ا
! اار
ا
و )* (ESCة أ3ى ،ا?+
Lة و~xة []W
*+ح ") "ESC OFFإ,ف م ا
! اار
ا
و( '/7, .ذ
[]Wا7دة و"ESC On" P
) '?OGم ا
! اار( ا
7/د .ف
"',ء * sإ,ف م ا
! اار
ا
و" *ًpء , *4UWن م ا
! اار
ا
و ) (ESCو"ESC Full Off" P
)ا,ف ا
*' Uم ا
! اار ا
و( أو
") "ESC Partial Offا,ف ا
U
~lم ا
!
اار ا
و(.
!<~9W
, *4UWن م ا
! اار ا
و
) (ESCو) "ESC Full Off" Pا,ف ا
*'
Uم ا
! اار ا
و(~* '97G , ،ات
~W ']Gم ا
!/ك واار ا
,ه م ا
!
)(3LW
(3LW) !<~9W
اار ا
و ) (ESCوم ;+IGا>ب
ا
و ) .(ERMا
U/ورات ا
9ر, _
،
* ^O7Gا
! اار ا
و )(ESC
و ;+IGا>ب ا
و )4W8/]
(ERMة
ا
!+ظ []Wاار /}G G .وESC Full" P
) "Offا,ف ا
*' Uم ا
! اار
ا
و( >4Iام []Wا
9ق ا
Wة .L
5ق ) 4Lا
3Xا ELا+ُ) (bcHز ا
3Xا(EL
) ESC Full Offا<Pف اGH =Aم اEX 8A9
اP'hار اAو(E
هDا ه و4N Pء ا
'?Oا
7دي Uم ا
!
اار ا
و 9ق ) 4Lا
P4ا
WN
ا
'?OG 4UW .(j+IU/ا
8رة 9ق ) 4Lا
P4
ا
WNا
(j+IU/أو ' ]Wا
) 'Uإذا آ ا
8رة
*~ودة 9 _* (
DNق ) 4Hا
P4ا
WNا
(P+G/أو
) NEUTRALا
> (^O7Gإ
[ 9ق ) 4Lا
P4ا
WN
ا
،(j+IU/ن م ا
! اار ا
و
هDا ا
9 .Pق ) 4Lا
P4ا
WNا
(j+IU/
٢٥٩
7 K9 :GZرة ا رة HاPدة 3
و;#د ' ='Zا} ،Ìأو
Lء =1(Wارة Ì EXأو
رل أو K ،ا K9اPhل إ و3
") "ESC Partial Offا<Pف اGH E>Vم ا8A9
EXاP'hار اAو <+ K (Eا 1dح
) ESC OFFإ<Pف G =1(Wم ÌLاP'hار
اAو .(EوLد ا y1ا; j7ا~ي <y5
G =<;9Wم ا EX 8A9اP'hار اAو (ESC) Eإ
و) "ESC Partial Off" 3ا<Pف اGH E>Vم
ا EX 8A9اP'hار اAوG =1(L 87 ،(Eم ا8A9
EXاP'hار اAو (ESC) Eة أkى <+ K
ا 7l =A(L 1dح ") "ESC OFFإ<Pف
G =1(Wم ÌLاP'hار اAو .(Eو< KAاPم
~LأHء و;#د ارة EXآ.
٢٥٨
!<~9W
• 4UWا
ا 4xو"ESC Partial Off" P
)ا,ف ا
U
~lم ا
! اار
ا
و( '97G , ،و +م ا
! ا
l
) ¡*N _* (TCSاار ا
و )،(ESC
)UNء *~ة ا~ق ا
4!/ود ا
8<
/
م ا
! ا
،((TCS) lوpء "*}ح
* sإ,ف م ا
! اار ا
و".
4UWا
ا 4xو"ESC Partial Off" P
)ا,ف ا
U
~lم ا
! اار
ا
و(~* '97G , ،ة <F ']Gا
!/ك
UNم ا
! ا
j+3 , ،(TCS) lاار
ا
8]
_8!/رة ا
_* /م ¡*Nاار
ا
و ).(ESC
• ,ن م ا
! zGر wxا
9/رة **4UW >ً97
,ن م ا
! ا
ت ا
و وP
") "ESC Partial Offا,ف ا
U
~lم
ا
! اار ا
و(.
) ESC Full Offا<Pف اGH =Aم اEX 8A9
اP'hار اAو(E
,ا
34ل إ
[ هDا ا
>3 _* Pل ا
!]
ً9* L?p
+* []Wح ) ESC OFFإ,ف '?OGم ا
!
اار ا
و( 4/ة ¢ 5اٍن.
و) "ESC Full Off" Pا,ف ا
*' Uم
ا
! اار ا
و( Uم ا
!
اار ا
و )~* '97G , ،(ESCات ']G
~Wم ا
!/ك واار~* G
D
.ة اار
ا
8]
_8!/رة ا
,ه م ا
! اار
ا
و ) .(ESCا
U/ورات ا
9ر, _
،
'?OGم ا
! اار ا
و )(ESC
]4W8/ة ا
!+ظ []Wاار /}G G .وP
") "ESC Full Offا,ف ا
*' Uم ا
!
اار ا
و( >4Iام 3رج ا
9ق ا
7,8
أو []Wا
9ق ا
Wة .L
/م اU3قzG .آG _* 4ا^ Wوأ]ب <دG
وف ا
.^,9
!<~9W
P98,م ا
! اار ا
و
)< PU* (ESCا_ ا
,~+ء ا
_* 79ا
[]W ¢z
ا
8رة آ /أ U/,ز,دة <4رة ا
lا
Gه
وف ا
.^,9و P98,م ا
! اار
ا
و ) PU* (ESCا
!ادث /Nذ
ا
!ادث
ا
_* lGUا
W8ا
~ا4ة ا
+97U/ت أو ا
دة []W
ا4,4s w9:ة ا~ق أو ا~ق ا
./آ /أ
U
pم ا
! اار ا
و
_/,أً ,
) (ESCأن PU/,و<ع ا
!ادث /Nذ
ا
!ادث
ا
4 _W /xUان ا
! ا
8رة '34G |8N
* _* |Uا
4UW ^8ا
P* '*7وف ا
.^,9
^8ا
U/وا
/ه وا
!Dر ه ا
{ 4ا
Dي U/,
|UlGو<ع ا
!ادث4W |l, .م ا?>ل <4رات
ا
8رات ا
~/ودة UNم ا
! اار
ا
و ) (ESCأ4ًNا * ,9Nرة أو 93ة
وا
<7G 4ض >* ا
^8أو >* ا_,3Æ
].9I
!,ي م ¡*Nا
! اار ا
و []W
¢>¢أوع 9 '?OGق ) 4Hا
P4ا
WN
ا
.(P+G/و!,ي ا
Uم []Wو '?OG Pوا{9 4ق
) 4Lا
P4ا
WNا
!G .(j+IU/ي رات ا
P4
ا
Uوا
P4ا
9 WNق ا
P4ا
Uا
[]W P+G/
و.'?OG 7
5ق ) 4Hا
3Xا ELا+ُ) (3Wز ا
3X
ا(EL
G =1(W) ESC Onم ا EX 8A9اP'hار
اAو(E
هDا ه و4N Pء ا
'?Oا
7دي Uم ا
!
اار ا
و )9 (ESCق ) 4Hا
P4
ا
WNا
.(P+G/
ا
و(~x '97G , ،ء م ا
! ا
l
) ¡*N _* (TCSاار ا
و )،(ESC
)UNء *~ة ا~ق ا
4!/ود ا
8<
/م
ا
! ا
،((TCS) lوpء "*}ح *s
إ,ف م ا
! اار ا
و".
وهDا ا
4I>
/}* Pام إذا آ ا
8رة ¡]¢أو
ر*ل أو {}[ /Wو~],م 4Gو ,ا
>l7ت 'ONأآ
* N w/8, /م ا
! اار ا
و
) (ESCا
7/د _/Gا
>l7ت *_ ا
'?O
.l
م ا
! اار ا
و )* (ESCة
أ3ى ،ا?+
Lة و~xة +* []Wح ""ESC OFF
)إ,ف م ا
! اار ا
و( '/7, .ذ
[]Wا7دة و '?OG) "ESC On" Pم ا
!
اار( ا
7/د.
) ESC Partial Offا<Pف اGH E>Vم اEX 8A9
اP'hار اAو(E
,ا
34ل إ
[ هDا ا
4UW Pا
+
L?pة و~xة []W
+*) ESC OFFح إ,ف م ا
! اار
ا
و( 4UW .ا
ا 4xوESC Partial" P
) "Offا,ف ا
U
~lم ا
! اار
٢٥٧
Gم jcWاZPhب اAو(ERM) E
P<,هDا ا
Uم ا{/ل ار+Gع ا
>l7ت * ^,F _Wا<
*>34ت ]lWا
دة ا
]/78,ا
^8و Wا
8رة.
و4!, *4UWد م ;+IGا>ب ا
و ) (ERMأن
*47ل ?Gزاو ]lW ,ا
دة و Wا
8رة آن
] |8ار+Gع ا
>l7ت '/78, ª ،ا
+ا*' ا
U/
و< <F j+I, 4ا
!/ك ]' ا{/ل ار+Gع ا
>l7ت.
'34,م ;+IGا>ب ا
و ) L (ERMأU¢ء
*Uورات ا
دة ا
,?]
+U7أو ا
/او.
و*ªNن م ;+IGا>ب ا
و )(ERM
j+3ا{/ل ار+Gع ا
>l7ت LأU¢ء *Uورات ا
دة
ا
+U7أو ا
/او .و
PU* P98, Uار+Gع ا
>l7ت
W |8Nا*' أ3ى *' وف ا
^,9أو ا!اف _W
ا
^,9أو ار9Gم szNء أو رات أ3ى.
G =5DW 8< :GZم jcWاZPhب )EX (ERM
أي و;A< 7ن G &Xم ÌLاP'hار اAوE
) EX EX (ESCو) "Full Off" 3ا<Pف ا.(=A
راG 3#م ا EX 8A9اP'hار اAو(ESC) E
; 9ل iح آ= Íوع ا;Xة .&L
٢٥٦
!<~9W
¢Gا
_* 4,47ا
7ا*' *' { /ا
8رة ووف
ا
^,9ووف ا
دة []Wا{/ل ار+Gع ا
>l7ت أو
ا>ب ا
8رة P98, .م ;+IGا>ب
ا
و ) PU* (ERMار+Gع P/xا
>l7ت أو
ا>Nت ]G
3ا
_/pGا!اف _W
ا
^,9أو ا
49ام szNء أو رات أ3ى|l, .
4Wم ا?>ل <4رات ا
8رات ا
~/ودة UNم ;+IG
ا>ب ا
و )* ,9N (ERMرة أو
93ة 7Gض >* ا
^8أو >* ا.9I]
_,3Æ
Gم ا EX 8A9اP'hار اAو(ESC) E
_8!,هDا ا
Uم ا
! ا
xواار ا
8رة
وف ا
دة ا
.WU/و ¡*N w!},اار
ا
و ) (ESCا
W8ا
~ا4ة/ا
8]
p+IU/رة
^,F _Wا/7ل ا*' ا
]l7ا
4W8/]
U/ة
ا
?]| []Wز,دة/ا+Iض Wا
8رة 'ON
<F j+3 pا
!/ك 4W8/ة ا
8رة
*]9ب _/, .أً ,
[]Wا{+ظ 8/
Nر ا
/ب.
4I8,م م ا
! اار ا
و
ا
7O8/ات ا
8رة ! 4,4ا
8/ر ا
Dي 4},ا
^8
xGا
8رة إ
و,ر 8/
Nر ا
Dي ]8Gا
8رة <
ا
ا< ^N9, *4UW .Pا
8/ر ا
P* ]7+ا
8/ر ا
Dي
k4,,ا
'/78, ،^8ا
Uم ا*' ا
]l7ا
U/
]4W8/ة ا
?]| []Wا
W8ا
~ا4ة أو ا
_W p+IU/
ا
! 4ا
]9/ب.
• ا
W8ا
~ا4ة 4G *4UW -ور رة }Nرة أآ *_
ا
]lW P
U/ا
دة.
• ا
W8ا
4G *4UW - p+IU/ور رة }Nرة أ<' *_
ا
]lW P
U/ا
دة.
4,أ ء LOUGم ا
! اار ا
و
)/(ESCء * sا
'97ا
x/د * W/lأ~xة
ا
س l/N j*
Nد 4ان اFرات <9ا
lو'/W
م اار ا
و .و j*,ء *s
;<G/LOUGم ا
! اار ا
و
, *4UW pن م ا
! ا
.9ًO lإذا
) (ESCأً ,
4Nأ "ء * ;<G/LOUG sم ا
! اار
ا
و ) "(ESCا
* jأU¢ء ا
8رع;+I ،
ا
[]W L?pدوا ا
<د و<]' 4Nر ا*ن *_ ا4Iام
!<~9W
• إذا آ4I8G Uم و{4ة +N !Gا*' ا
9/رةª ،ن
ا*' ا
9/رة 9OUG _/,و4IN ]97Gام
*+ح ا
+ا*' .إذا آن ا *:آ, 4 ،
Dا
? Lا*' آ ,!G 4UWدوا ا
+ا*' Nء
ا
8رة وا
9/رة []Wا
P+G/و< |8, 4ذ
{4وث }Gدم * Pرة أو |Ul
.+]3 3 8x
ا
4وران وا
~Uول *_ []Wا:رض ا
4!U/رة أU¢ء
اUف ا
8رع LOUN < ،ا*' ا
9/رة <'
,!Gدوا ا
+ا*'DG .آ داً /أن ا
8* ^8ول
]* _Wا
8رة.
• إن م *4N 4W8ء ا
[]W '?Oا
7+G/ت )(HSA
7,ا*' zG .;<Gآ 4داً _* /ا
^O7ا
*'
G _* pك
+ا*' ا
<; G 4UWآ ا
8رةzG .آ 4أً ,
<' ا
!آ و) PARK Pا
<;(.
• و<4W |8, 4م اGع ه kDا
!,Dات دوران
ا
8رة و~و
[]Wا:رض ا
4!U/رة و<49}G 4م
* Pرة أ3ى أو sء * أو |8, /* * Is
{4وث إ
Nت 93ة أو *DG ./آ داً/
ا4Iام ا*' ا
<; أU¢ء إ,ف ا
8رة []W
* ،P+Gوأن ا
^8ه ا
8/ول ]* _Wا
8رة.
G =1(W KA< :GZم
Lء ا( =1
اDWت ) (HSAأو إ< &XPإذا آ ارة Vودة
Lآ;D Vت ارة اAو .(EVIC) Eرا3#
"آ;D Vت ارة اAو "(EVIC) Eا;ارد
; 8X" EXاPس" ; 9ل K <V
ا;Dت.
إ<Pف G =1(Wم
Lء ا( =1اDWت
)(HSA
إذا آ |G Uإ,ف '?OGم *4N 4W8ء ا
'?O
[]Wا
7+G/ت ) PG ،(HSAهDا اxاء:
.1ا4Nأ ا
'?OأU¢ء إ,ف ا
!/ك ووxد ا
8رة
و) PARK Pا
<;( )<' ا
!آ ا:و (G*Gأو
و) NEUTRAL Pا
> ,!G P* (^O7Gا
jN
)<' ا
!آ ا
4وي( وا
>l7ت * ./8ا4Iم ا*'
ا,ف ا
8رات ذات <>ت ا
!آ ا
4و.,
.4ا? []W Lا
+/ح ) ESC Offإ,ف م ا
!
اار ا
و( أر* 7Nات >3ل .¢ 20
.5أدر ]lWا
دة ~Nاو 360 ,در xاW klGرب
ا
180) W8در xاW klGرب ا
_* W8
ا
.(;}U/
.6ا' *+ح ا
_N '?Oو) OFF 7إ,ف
ا
('?Oو) ONا
.('?O
.7إذا Gإآ/ل هDا ا
j*8 ،w!
'ON '8]8
" LOUGم ا
! اار ا
و )/(ESC
ء * sا
4W "'97ة *ات zآ 4إ,ف م *4W8
4Nء ا
[]W '?Oا
7+G/ت ).(HSA
|l,إ/Gم ا
9Iات *_ 1إ
[ >3 7ل , ¢ 90ف
م *4N 4W8ء ا
[]W '?Oا
7+G/ت ) .(HSAآر
ا
9Iات *_ 1إ
[ W 7دة _/Gو4N 4W8* +ء
ا
[]W '?Oا
7+G/ت ).(HSA
'?ON < .2ا
!/ك.
.3أU¢ء '?OGا
!/ك وا
[]W L?pا
+ا*' و,!G
ا
،jNأدر ]lWا
دة *_ ا
~N ;}U/او180 ,
در gW xاW klGرب ا
.W8
٢٥٥
L (HW <Dء ا( =1اDWت
)(HSA
|l,ا
ء O
Nوط ا
4N 4W8* LOUء ا
'?O
[]Wا
7+G/ت ):(HSA
• |l,أن Gن ا
8رة *<+
• |l,أن Gن ا
8رة (ً,G) %8 []Wأو أآ []W
ا
U!U/ت )8]
ً,G %3رات ا
~/ودة '<UNا
!آ
ا
4وي(
• * N9ا3ر ا
س klGا
8رة )أي أن ا
8رة
N []W: lGس أ** ،وGا Pxإ
[ ا
N ;]Iس
) REVERSEرxع إ
[ ا
.((;]I
!<~9W
<G 4ن هUك j7Nا
/ا<; 7+G* []Wت
?ة
ا
! lوا
8رة *! ]/أو أU¢ء !| *9رة {
LOU,ا
Uم و<4!, 4ث دوران 4{ |8, ;+3وث
}Gدم * Pرة أو DG .3 8xآ داً /أن ا
^8
*8ول ]* _Wا
8رة.
٢٥٤
'/7,ا
Uم N9* 4UW Lا klGا
}/د ]8رة *P
ا
س ا
4I8/م ' []W .ا
/ل ،إذا آن اklG
ا
}/د ه ¦*م
ً7دا ] P+G/وآ ا
8رة
و) DRIVE Pا
دة( )رات <>ت ا
!آ
ا:و ،(G*Gو LOUG ,7* N9Gا
Uمª ،ن م
*4N 4W8ء ا
[]W '?Oا
7+G/ت ).LOU, (HSA
Lء ا( =1اDWت )EX (HSA
ارات اVودة Z7HLت ا9آ ا/وAW;W
'/7,ا
Uم Gس ) REVERSEا
xع إ
[
ا
،(;]Iو P/xا
وس ا **:ا
8رات ا
~/ودة
{ '<UNآ أو LOU, _
.G*Gا
Uم إذا GوP
ا
8رة و) NEUTRAL Pا
>.(^O7G
Lء ا( =1اDWت )EX (HSA
ارات اVودة =7HLك <
وي
'/7,ا
Uم و) REVERSE Pا
xع إ
[
ا
(;]Iو ا
وس ا **:وGس NEUTRAL
)ا
> (^O7Gا
8رات ا
~/ودة { '<UNك 4,وي .
7,ف ا
Uم []Wو) NEUTRAL Pا
> (^O7G
ا
8رات ا
~/ودة { '<UNك 4,وي و
Dا ,ا
8رة
[]Wا:رض ا
4!U/رة +ة <}ة أU¢ء ا
ا 4xوP
) NEUTRALا
> j?N (^O7Gا
P* _W U
ا
.jNإذا آ ا
8رة * lإ
[ هط ا
>ل
و) NEUTRAL Pا
> ،(^O7Gو
[]W *4< _G
ا
8 ،jNف ~UGل ا
' و
_ P98,م *4N 4W8ء
ا
[]W '?Oا
7+G/ت ) (HSAا*8ك NهkD
ا
!
.و
4{ PU/وث ذ
!G ،ول ا
~Uول '+:ا
'
'< PNا
!آ و) NEUTRAL Pا
>(^O7G
وGك ا
lذ []W ¢G Nا
8رة _* :ً4N .ذ
،ا4Iم
ا
س ا
!]
|U/ك ا klGا
]9/ب.
:GZ
ا 3 y9ا'
cام
Lء ا( =1
اDWت )(HSA
,م *4N 4W8ء ا
[]W '?Oا
7+G/ت )(HSA
ا
4W8/ة 4N 4UWء ا
4!U* []W '?Oر g+ا
< ا
Dي
9* |! ,رة.
ا
~W _* 4,~/م ا
!/ك []Wا
]l7ا
4اة [G .هkD
ا
~/ة [{ 9Oإذا آن * ا
! ا
(TCS) l
و ¡*Nاار ا
و ) (ESCأي *_
و) "Partial Off" 7ا,ف ا
(~lأو "Full
) "Offا,ف ا
]( .را" Pxم ا
! اار
ا
و ) "(ESCهDا ا
_* 4,~/
8ا
*]7/ت.
Gم اا= )(BAS
و< /}G G 4م * 4W8ا
+ا*' )4< _8!
(BASرة
ا*' ا
8رة أU¢ء ا4Iام ا
+ا*' ا
U/ورات
{ت ا
9ارئ ;O, .ا
Uم ا
!ت ا
W48G
ا4Iام ا
+ا*' F 'ONرئ ^,F _Wا7Oر *47ل
و*4ار ا4Iام ا
+ا*' '/78, ¢أ<}[ ?[]W L
ا
+ا*' .إن ذ
']G 4W8,ا
8/ت ا
79G
ا
+ا*' {4اث *] 7, .م * 4W8ا
+ا*'
)U
>ً/* *ً (BASم ا
+ا*' ا
>?>
7/ق
) .(ABSو,دي ا
[]W L?pا
+ا*' W [}<zNإ
[
ا+دة ا
}ى *_ ا
4W8/ة ا
,ه م *4W8
ا
+ا*'+>
.دة *_ ا
Uم |l, ،ا
[]W L?pا
+ا*'
* 'ONا
' أU¢ء PNGا
<; j+IG .ا
[]W L?p
دوا ا
+ا*' {[ zGآ4W _* 4م ا
! xإ
[ ا4Iام
ا
+ا*' ;<, .م * 4W8ا
+ا*' ) _W (BASا
'/7
l/Nد ,!Gدوا ا
+ا*'.
!<~9W
P98,م * 4W8ا
+ا*' )< PU* (BASا_
ا
,~+ء ا
_* 79ا
[]W ¢zا
8رة آ /أ U/,
ز,دة <4رة ا
lا
Gه وف ا
.^,9آ /
P98,م * 4W8ا
+ا*' ) PU* (BASا
}د*ت
/Nذ
ا
}د*ت ا
_W lGUا
W8ا
~ا4ة
ا
+97U/ت أو ا
دة []Wا4,4s w9:ة ا~ق أو
ا~ق ا
4W |l, ./م ا?>ل <4رات ا
8رات
ا
~/ودة UNم * 4W8ا
+ا*' )* ,9N (BASرة
أو 93ة وا
<7G 4ض >* ا
^8أو >*
ا.9I]
_,3Æ
Lء ا( =1اDWت )(HSA
إذا 4I8,م ا
/
^8م اU3ق ه kDا
+ة
ا
}ة!, ،ر ا
Uم ? Lا
+ا*' و4Gأ ا
8رة
ا
4وران وا
~Uول *_ ق ا
! .P+G/ر ا
Uم ?L
ا
+ا*' P* |U
Nآ /ا
/
[]W L?pم اU3ق
4N 4UWء '?OGا
8رة ]!ك ا klGا
8ا
]9/ب.
!<~9W
إذا ا /ا
[]W L?pدوا ا
><) jNت ا
!آ
ا
4و (L ,أU¢ء ا4Iام
/م اU3ق'} , ،
م *4N 4W8ء ا
[]W '?Oا
7+G/ت )/N (HSA
8]
w/8,رة 4
Nوران وا
~Uول []Wا:رض ا
4!U/رة.
إن ذ
<4{ |8, 4وث }Gدم * Pرة أو 8x
.3و
|Ulذ
4I8G ،م
/م اU3ق أU¢ء
ا
[]W L?pدوا ا
4ً78* w}G [{ jNا !,
ا
DG .jNآ داً /أن ا
8* ^8ول ]* _W
ا
8رة.
/}G Gم *4N 4W8ء ا
[]W '?Oا
7+G/ت
)4W8/
(HSAة ا
4N ^8ء '?OGا
8رة []W
أرض *4N 4W8* Ë+!, .7+Gء ا
[]W '?Oا
7+G/ت
)8* []W (HSAى ? Lا
+ا*' ا
Dي ]/78,ا
^8
+ة <}ة 47Nر Pا
[]W _* *4< ^8دوا ا
+ا*'.
٢٥٣
|l,أن Gن >lW P/xت ا
8رة واFرات *_ {l
وع وا{ 4و ¥+ |l,اFرات ] 'ONأدق
اsرات ].G/
!<~9W
< |8G 4ا
~,دة ا
ا! ¥+اFرات أو ا
U
ا
ا wا
،¥+Uأو ا4Iام أ{lم * 7ً* +]I
ا
8رة 4ان 7ا
+ا*'.
ُl,ي م ا
+ا*' ا
>?>
7/ق اً3را ذا ًG
20 Ò]G p+IU* Wآ .ً,G (W/'* 12) W/
إذا آ < []W *4ا
+ا*': ،ي | *_ ا:ب*4UW ،
و
] Wا
8رة 20آ (W/'* 12) W/
3zG 8هDا ا
[{ !+ا
ل 40 W8
آ .(W/'* 25) W/
4,ور *!ك * Ipم ا
+ا*' ا
>?>
7/ق أU¢ء
ا3ر ا
Dا GوأU¢ء ;<Gا
Uم ا
L?p
ا
4رو
ا
. U/و4},ر Ip* _Wا
!/ك
ء 98NأU¢ء ا
،'?Oوه أ* W4, 7F
]]^.
٢٥٢
!<~9W
• إن ¥ا
+ا*' ا
>?>
7/ق 7 _* '],و<4
|8,ذ
و<ع }Gدم ¥p .ا
+ا*' '7l,ا
8/
ا
<]
N]9/ف أFل .ا?{ªN Lم []Wدوا
ا
+ا*' !G *4UWج إ
[ j+3ا
W8أو ا
<ف.
• 4/N gور م ا
+ا*' ا
>?>
7/ق )(ABS
*< PUا_ ا
,~+ء ا
_* 79ا
98ة []Wا
8رة،
آ /أ P98,ز,دة آ+ءة ا
wأو ا
98ة []W
ا
xأآ *_ ]Gا
G _/,ه *_ ا*'
ا
8رة واFرات أو < ]Nا
! ا
.l
• و P98,م ا
+ا*' ا
>?>
7/ق )(ABS
* PUو<ع ا
}د*ت /Nذ
]Gا
_* ¡UG
ا
دة 4UW W W8Nا
+97U/ت أو *_ *>{
رة أ3ى < _Wب أو 4UWا
دة ق Fق
*?/رة .k/N
• 4W |l,م ا?>ل <4رات ا
8رات ا
~/ودة UNم
ا
+ا*' ا
>?>
7/ق ) (ABSأ4ًNا * ,9Nرة
أو 93ة وا
<7G 4ض >* ا
^8أو >*
ا.9I]
_,3Æ
!&MHW
7G '/!,ض م ا
+ا*' ا
>?>
7/ق ¢zات
رة آ ¬,O]
lUا
و *_ أ~xة ا
اد,
وا
ا ;Gا
lر ,ا
/آ .w!
'ON
8< 7 :GZا'(Dر ذL~Lت آ < =9ا'hع
إ ;-ت H P5P+ا'Dل اا= ;PLة .إن ه~ا ا/
،EDM+وه; <( إ أن Gم اا= اZ1Z Dق
.=1(W EX
Gم ا EX 8A9ا )(TCS
,ا<| هDا ا
Uم *4ار دوران P/xا
>l7ت ا
.*4I8/
{
اآOف دوران ا
>l7ت , ،ا4Iام ?L
ا
+ا*' ) []Wا
(]l7ا
>l7ت ا
~U/و<F j+3 ,
ا
!/ك ! _8إ* ا
P,8واار.
وهUك *~ة م ا
! ا
،(TCS) lا
'+
ا
}N '/7G ،(BLD) ]+رة *]
NOوس
ا
4!* ]+ودة ا~ق و !Gدوران ا
W ]l7
*!ر ا
4وران ا
{ .'/78/دوران إ{4ى ا
>l7ت
!* []Wر دوران ُ* 'ON '?Oأع *_ ا ،3Æم
ا
Uم 4INام ا*' ا
]l7ا
4اة .و wذ
ا4Iام
(3LW) !<~9W
• Gك أ4ًNا ا+F:ل +/Nده ا
8رة أو
w/8G
<Nاب *_ رة *G 47, .]+ك ا+F:ل
ا
8رة *_ دون *ا< أ*ًا ً93ا :ب 4,4Wة4 .
},ب ا+F:ل أو ا3Æون N
ªNت 93ة أو
* ./و |l ]Wا
[]W Uا+F:ل 47Nم g/
ا*' ا
<; أو دوا ا
+ا*' أو ذراع ا
.'U
• Gك { ا
wG+/ا
8رة أو
Nب * Uأو
و _/, Pا+F:ل *_ ا
ل إ
W9 .
ا+F:ل '?OGا
Uا Dا
<9
N ]*7وأزرار ا
!
ا3:ى أو ,!Gا
8رة.
• zGآ _* 4إ>Fق ا*' ا
<; <' ا
4ء Nدة ا
8رة: :ن
4Wم ا
م , 4<
DNدي إ
[ '9Wا
+ا*' وو<ع {دث.
• < داً4IN /ام ا*' ا
<; G 4UWك ا
8رة ،وإ
|]UG 4ا
8رة و ;]G |8Gا
]//ت أو
G _* pك <' ا
!آ
ا
.NوzGآ 4أً ,
ا:و G*Gو Pا
<; ،أو <' ا
!آ
ا
4وي و Pا
xع ] ;]Iأو ا
س ا:ول .إن
4Wم D+UGذ
< |8, 4ا>ب ا
8رة و;]G
ا
]//ت أو و<ع إ
Nت.
!&MHW
إذا ا" /ء ,D!Gا
+ا*'" اءة ,!G 47N
ا*' ا
<;ª ،ن ذ
O,إ
[ ا{/ل وxد ']3
UNم ا
+ا*' .ا! م ا
+ا*' 4ى ا
آ' ا
4/7/
[]Wا
+ر.
Gم اا=
إن ر~* Gودة UNم ا*' ه4رو
*~دوجª .ذا
4أ{ 4ا
_*Uا
4رو
_ ا
4رة ا
7/دة /8,
ا
Uم ا 3Æا
.'/7و
_ ن ذ
* j7N Pا
4<+
<4رة ا
wا
] .و<, 4ن ذ
*] 4UW ً/ز,دة *4ى
{آ ا
4وا 4UWا
]W L?pوا
! xإ
[ <ة ?L
أآ j+Iا
W8أو ا
<; وا{/ل ر "ء
,D!Gا
+ا*'".
{
4ان ا
<9ا
~7/زة :ي | )*' ا4Iام
ا
/ر ]+ا*' * Pوxد ا
!/ك < 4إ,ف ا
('?O
/8ا
+ا*' أداء .]/Wو} wا
4lا
]9/ب
,ف ا
8رة أآ * /ه زم '?OG 4UWم ا
+ا*'
ا
.<9
N ]*7
Gم ا 8A9اAو EX Eاا=
إن ر~l* Gة UNم إ
و ]! ا
+ا*'
وا
Dي _/p,م ا
+ا*' ا
>?>
7/ق )(ABS
وم ا
! ا
(TCS) lوم * 4W8ا
+ا*'
) (BASو*4N 4W8ء ا
[]W '?Oا
7+G/ت )(HSA
وم ;+IGا
4وران ا
و ) (ERMوم ا
!
اار ا
و ) (ESCوو{4ة ا
!
zGر wxا
9/رة ) (TSCم ا
! ا
~Uول *_ []W
ا
7+G/ت ) .(HDCو P/x '/7Gه kDا7ً* /:
! _8اار ا
8رة وا
! وف ا
دة
ا
WU/وُO,ر إ
[ ه kDاW 'ON /:م آUم ا
!
اار ا
و ).(ESC
Gم اا= اZ1Z Dق )(ABS
/}G Gم ا
+ا*' ا
>?>
7/ق )4W8/
(ABSة
ا
^8ا{+ظ 98
Nة []Wا
8رة ا
وف
ا
/ا/7 /ل ا
+ا*' .و '/7,ا
Uم *x Pز
آ Lp
'}+U* G/ا
L?pا
4رو
'+< PU/
ا
>l7ت و |UlGا~ق []Wا w9:ا
~
.
٢٥١
4UWا
<; _* ،'G []Wا
4G /و ,ا
>l7ت ا **:إ
[
{ ا
; []Wا
4!U/ر و4ً7Nا { _Wا
;
[]Wا
8]
8U
N .P+G/رات ا
~/ودة '<UNا
!آ
ا:و '?ON < ،G*Gا*' ا
<; <' و Pذراع
ا
'Uو) PARK Pا
<;( وإ ªن ا
! '/ا
x/د
'< '+< []Wا
!آ < _* '7l, 4ا
},!G |7
ذراع ا
'Uإ
[ 3رج و) PARK Pا
<;(|l, .
ا4Iم ا*' ا
<; داً, *4UW /ن ا
ًx* ^8دا
ا
8رة.
_* pا
'}G [{ '8
وإذا ~م اً 7N ;z ،*:
8/Nى ا
'8إ
[ *8ى * .|Uوا* w8أي '
* []W |8Uا w9:ا
4IN 9!/ام </< 79ش
.+را" Pxا
8ا' وز,ت ا
!Oو< P9ا
?ر
ا
" "]
:ا
8رة" ]!}ل _* 4,~* []W
ا
*]7/ت.
Xا= ا;j7
و<' Gك ا
8رةzG ،آ _* 4ا
^O7ا
*' +ا*'
G _* pك <' ا
!آ ا:و G*G
ا
<; .وzGآ 4أً ,
و Pا
<; أو <' ا
!آ ا
4وي و Pا
xع
] ;]Iأو ا
س ا:ول.
4x,ذراع ا*' ا
<; ا
8ل ا
/آ~ي'?O
.
ا*' ا
<; ،ار Pا
Dراع إ
[ ا< [}<zN []W:ة *.U/
! ,ا*' ا
<; ،ار Pا
Dراع <]ً> ¢ ،[]W:ا?L
[]Wا
~ر ا:و ¢ ،Lأ~ل ا
Dراع .'*
N
Xا= ا;j7
G *4UWن ا*' ا
<; * ]/78أU¢ء وxد *+ح
ا
'?Oو) ON Pا
p, ،('?Oء "ء ,D!G
ا
+ا*'" * W/lأ~xة ا
س.
:GZ
• ;AW Hن Xا= ا; D j7أHء و;#د =7
ا9آ ا/و EX EAW;Wاس;" b;< ،ء <~9W
اا=" EX .اآ(ف ' ارة
' ،ر
إiرة &MH W;-ا>X <9L 87 .ا= ا;j7
=A(Lآ= 9 =M7و <9Wارة.
• <
ل ه~ا ا;dء PXأن Xا= ا;.D j7
و KM< hدر DX #ا'
cام اا=.
٢٥٠
!<~9W
• 4I8Gم و) PARK Pا
<;( * ً]9إذا آن <'
ا
!آ أو G*Gآ+
',4ا*' ا
<; .وا'/7
ا*' ا
<; داً}N /رة آ*] +دي !Gك
ا
8رة و{4وث إ
Nت.
• ?* 4UWدرة ا
8رة < ،داً3ªN /اج { ا
wG+/
*_ <ص ا
'?Oو< '+Nا
8رة.
)(3LW
!<~9W
< |8, 4ا4Iام *اد آ []W 9sأي ~xء *_ ا
+ا*'
~Gا ]N 4,ا
+ا*' أو ا
]*+ا
4< .7</
Gا <F ,4ا
+ا*' ا
*] 4UWا{PU/
x
ا
}دم .إذا آG Uد ا
8رة وف *،N
! ا
+ا*' و +إذا ~م ا.*:
• إذا وا xاه~از Wدي 47Nا
دة ا
9ق
ا
U9أو ا
]{/أو * ! ،NO,ا
>l7ت
]zآ4W _* 4م Gا 4xا:وخ _Nا
U8ن|8G 4 .
ه kDا:وخ 4Wم ا~Gان ا
'l7و ]IGا
>l7ت
* w!}, UهDا ا
.;</
ا; &#اVDز
,م م ا
xا
~7/ز ا
9 Nة */زة
[]Wا
8رة و _* 4,~,ا4ارة ا
^FU/
ا
.pو ,ا
Uم إ* <دة * إذا 4ت
ا
.<9
وإذا 4ت *4W8ة ا
: <9ي |8 ،ف *N ',ن
xGا
8رة .و |]9ه kDا
!
DNل 4xأآ x
ا
8رة و
3ا
W8ت ا
4ًx 9ا و >3ل
*Uورات ا
<;.
:GZ
• MDWز<دة
iة ا ;ت
W Hو< اPدة
ا =AL 75L Dإ أ
ا KMأًا ًDM+
و
W hل و;#د (G EX Aم ا; &#اVDز.
•
L Hء =1(Wارة EXا P5اMرد
< 7 ،ر
cd KاPدة ا Wً;- 75L Dة
ز 7 Hة .وذ ;;#د '>= Lرد آ}EX j
Gم ا; .&#و< yاMر ه~ا ا ;ت ًDM+وh
<lدي Lي K =AiاAi/ل إ إZWف Gم ا;.&#
!&MHW
إن ; ]lWا
دة '*
NوإNءه +ة ],FهDا
ا
, Pدي إ
[ ر Pدر{ xارة ' ا
،xو
Dا
+G |l,دي ذ
إن أ*_ '}!, 4< .ر Ip/
ا
xا
.<9
N ]*7
=>' 9Xا; &#اVDز
~],م ! *8ى ' ا
xا
~7/ز []Wات
ز*4!* Uدة8* ! L ?U, .ى ا
'8إذا OG
{4وث 8Gب أو *>{
4ور ،7F ¡l
و/أو أن ا
Uم '/7,وً /ه *7د .ا{ص []W
x ^8UGد ا
>3 _* !+ل ا
آ' ا
.4/7/
!&MHW
* '/78Gاد آ /م ا
xا
~7/ز {
أن ا
/و,ت _/,أن * ;]Gت م ا
x
ا
~7/ز/ 9?, .ن ا
8رة ا
4,4lة ا
4!/ود *'
هDا ا
];.
!<~9W
8* ! |l,ى ا
'8أU¢ء ;<Gا
8رة []W
P* 8* w9إ,ف '?OGا
!/ك 4{ PU/وث
إ
Nت 7]
lض ,:أ~xاء *!آ و
]zآ_* 4
<اءة *8ى ا
lG .<4N '8وز { 4ا
'/ء .ا4Iم
' ا
xا
~7/ز ا
<9
N '*7ا
Dي ُN
G
ا
lا
.L 7U}/
٢٤٩
ا
34ل '8, .هDا P,8G ]/Wا
8رة و+UG
وإ
>{ .وإذا آن *ªNا
zآ* _* 4ورك *zNن،
PNا
4م LNء و{Dر.
!&MHW
k/]
_/,ا
']G ]!pآ+ءة م ا
>3 _* 4,ل
ا
ت ا
4N ¡UGا '3ا
اد.G,
;Mر ا رف أو Wرات ا| أو ا/ر ا 9dأو
أ< PX
Wت >
<G 4ن ا
4ت ا
4,4s /ة ا
9Iرة!G .ول أ4ًNا
Wر 4Gت * 7, kأو أو أي *_/, .]! k
أن P4Gا
4,4s k/ة ا
^4ا
8رة *4+, 4< /ك ا
! .N
{[ ا
k/ا
, 4< ،]!pدي ^4Gا
4ON k/ة إ
[
;UGاFرات *_ ا:وخ و
_ *7G Pض رG
9Iآ .و* زال 4{ 93وث أ ,إ
Nت }Is
*ًxدا Nإ
[ ;]Gا
8رة 4UWا
/ور *k
/Wأآ *_ ار+Gع إFرات ا
8رة!G .ول أ4ًNا
Wر * /W 4* kأآ *_ ار+Gع ا
8رة .و{[
ا
k/ذات ا
ر 4,4sا+Iض _/,أن P4Gا
8رة
ا
] و4+Gك ا
4رة []Wا
! Nإذا آ ا
/W k/
٢٤٨
'ONآف ~x P4ء آ *_ ه' ا
8رة7N* '< .
ا
4م4{ ،د G Wر ا
k/و ^/Wا
k/وزاو ,ا
4م
و{
أ '+ا
k/و* إذا آ 4xGأي Wا^ ¢ .اW
~Nاو ++3 ,إ
[ اLN []W:ء و.p+IU* W8N
!<~9W
4Gر Gأ4ًNا 7, /W k* Wا
: .^4ن
ذ
<, 4دي إ
[ د Pا
8رة و4ا ا
! 4< .N
,دي ذ
إ
[ إ
Nأو < أ وا
آب.
DLاPدة +ق وة
PpGا
دة []Wا
9ق ا
Wة ا
_* 4,~/ا
[]W L?p
ا
8رة أآ * /ه {دث 4UWا
دة 7* []Wا
9ق.
47N 'p+,اء *_ ا
دة 4/* ^,F []Wا
zآ4
*_ 4Wم وxد أي +]Gت .و kDNا
, ,9ا
P* '*7أي
* w!
'ON ]OوGن رx Gه~ة {ل ا{x
.
• ا! ا
~lء ا
_* ]+8ا
8رة .'*
Nا!
اFرات وه' ا
4ن و ]lWا
دة و
ا
^]7
وم ا
7دم ]zآ4W _* 4م وxد .;]G
• ا! ا
اد _W ً!N G,وxد _Fأو روا| ،و<
+UNإذا ~م ا.*:
]G
• ا! ا
/ت ]zآ4s _* 4هً }3 ،
ا
x/دة []Wا
Oو*ت * W/lا
P4
وا
!آ و ]lWا
دة و
ا
.^]7أ 4s 4WهkD
ا
/ت إذا |]9Gا ،*:وا' ا
~7م إ
[ ا
ا
4!/دة
آ| ا
}.
• zGآ4W _* 4م Gاآ ا
GUت أو أي أ}ن '/G .هkD
اs:ء *}ً4را ]!ا^ .و< ;]G |8G 4ه
93ط ا
<9و3ا Fا
+ا*' و4ادات *!ر
ا
4وران وأ4/Wة ا
. W4
• 47Nا
دة 4/د ],Fا
_9أو ا
*' أو ا
/ء ،أو
وف *p3ªN < ،]¢/ع أ9ات و9Nت s
4,Gا
8رة وا
/و{ وا
+ا*' وا
>l7ت وو
>ت
*!ر ا
4وران ] !+وا
zN ;Uع * ._/,
(3LW) !<~9W
*~ 4UW ً]9ول * P+GوNEUTRAL P
)ا
> *ً4I8* (^O7Gا*' ا
8رة 4G .Lا
8رة
أ4ًNا ا W '* klGا
،P+G/وzGآ _* 4ا
دة داً /
ا []W: 8* klGأو .'+:
ا
4م LNء '7x P*} 4,4sا
5 _N * W8إ
[ 8
آ 3) W/إ
[ 5أ*ل/ا
(W8آ! 4أ<}[{ * Pا4Iام
/}
L8Nم اU3ق PNG .ا
8
N 8رة ،و !Gول
ز,دة ا
W8أU¢ء ا
7رW 47N .ر أي * kأ_* []W
Gس ا
!/ر ا
! |l, ،]+ا' ا
8رة
z]
'*
Nآ4W _* 4م 8Gب ا
k/إ
.
اPدة +ق ;1رة |L
|l,ا
~ام ا
!Dر 4UWا
/ور *_ []Wأي ع *_ ا
.k/
|UlG |l,ا
/ور *_ ا
4N k/ر ا*ن ،وU/,
ا
/ور إذا ~م ا *:و
_ ]zNب *_ |l, .ا
/ور *_
ا
^FU/ا
}}I/وا
4/7/ة ] |l, .8ا4Iام
ا
8رة ^Nودون اار |l, .
Nأن 4Gرك
<4رات ر Gوأن Gن <دًرا []Wإ
>{ إذا {¢4
Nأ ,أ9Wل4W |l, .م ا
<; أو إ,ف *!ك ا
8رة
4UWا
/ور *_ * /W k* N 9Uإ إذا د ]3ا
k/
إ
[ أب L+sا
اء ا
Iص !/
Nك .إذا ;<G
ا
!/ك zlة!G > ،ول إWدة zG .]?OGآ4W _* 4م د3ل
ا
N k/أوً .وا
!' ه ا
/ور LNء و{Dر .ا' إ
[
ا
س ا:ول )<' ا
!آ ا
4وي( ،أو إ
[ وP
) DRIVEا
دة( )<' ا
!آ ا:و P* ،(G*GوP
]Wا
'Uو) 4L Pا
P4ا
WNا
(j+IU/وPNG
!&MHW
• <4!, 4ث 8Gب ]4N k/ا!* '3ور ا
8رة أو <'
ا
!آ أو ]Wا
'Uأو دا '3ا
!/ك أو ا
8رة إذا
آG Uد W8Nآة أU¢ء Wرك *_ */W k
]?G 4< .,دي ا
k/إ
[ {4وث ;]Gدا !/
Nك أو
* ' W/lا
!آ أو *ت ا
8رة ا3:ى و<4
'Gآ+ءة ا
+ا*' l/Nد ا >Nو/أو ا._9
N 38G
• ه kDا
8رة <درة W []Wر ا
30) 76 ^/7N k/
8 _W 4,~G W8N (
Nآ 5) W/أ*ل/
ا
_/, .(W8أن |8,د3ل ا
8]
k/رة
.+]G
;M =M7ر أي ;ع Kا|
l/Nد ا<ا _* Nأي * N 9Uأي ع *_ ا
~], ،k/م
4,4!Gإ* *ورك *zNن وª .Nذا ~م ا3 ،*:ج
*_ ا
8رة و4Gم ًا Wا
k/أو < ~], .}7N 8lNم
ا
zآ ،/W _* 4وزاو ,ا
/ور Nو{
w9ا
k/و*
أ .]+آ_ {ًDرا أU¢ء ا
/ور ]! k/Nأو <Dرة^!G ،
*_ وxد أW ,ا^ *zG .+Iآ4W _* 4م د
3إ
[ أ,
*+* ^FUة و*_ أ U/,إ
>ح ا
8رة إذا ~م ا.*:
7Gأ/]
,F 'pور ه * ^/W 7ا
k/و{
ا
!98وا
.]+8ا/W:ق ا
? ،/WUق ا
8رة
k/
Nو~8* 4,ى ا
[]W k/ا
8رةzG .آ _* 4وP
ذ
اWرك أU¢ء ^/W 4,4!Gا
k/و<4ر[]W G
ا
/ور *_ .
>3
اور Zk Kل اMك أو ا +Hا;1رة |L
!Gي ا
ك أو ا{:اض أو أي */?* ^FUرة k/
N
]! k* []Wأو 4,4sة ا8Gخ!G .ي ه kDا
^FU/
ا
/?/رة W []W k/
Nا^ _* '7l, /* +3ا
}|7
^/W 4,4!Gا
k/وزاو ,ا klGو{
ا
_* k/ا'+:
7G .<4Nا*:آ_ ا
/?/رة k/
Nا
4,4s ]!pة
ا8Gخ ه ا
4s N *~],أ Fsا
'< |!8
٢٤٧
وl/Nد اlGه /ا
'/
[]W 9? _* ;+3 ،م
اU3ق وLN PNGء إ
[ ا
./إذ 4Nأت اFرات
ا~ق أU¢ء اlGه /ا
'W _* ;+I ،
وا{!N Ë+آ إ
[ ا*:م *_ >3ل 4Gو ]lW ,ا
دة
_* '<:ر 7, +
PNإ
[ ا*:م وإ
[ ا
, 4< .;]I
ذ
4,4x OG <Fة w98Nا
^,9و ,ا
_* 4,~/
<Fا
lآ/ل ا
}7د .إذا '}Gإ
[ ا
Pp ،/
ا
8رة و) REVERSE Pا
xع ](;]I
وار4IN ;]I]
Pxام *و* ا
!/ك * Pا*'
ا
8رة.
!<~9W
!Gول
7د U!U* N 'Gت أو ا
+ف {ل *4!Uر.
4,~Gا
دة []Wا
U!U/ت *_ 93ا>ب ا
8رة */
<, 4دي إ
[ {4وث إ
.?
N N
Vول اZل
<' ~ول 4!U* 'Gر !Gج !4* 4,4ى ا!4ار^!
k
هط *_< * .ة !| ا
w98؟ ه' ا
4,4s ^,9
ا!4ار ]' ا
4UW W8ا
ط؟ ه' W 4xGا^؟ ه'
ا
8* L/؟ ه' 8* 4xGآ 4W< 4UWة ا
'
٢٤٦
7دة ا
! ا
8رة {
هW8N F
آة؟ إذا 7sت 4< Nر []W Gا
z ،7N/آ 4أ
4I8Gم ) 4Lا
P4ا
WNا
(j+IU/و P* PNGأD3
ا
!Dر .دع *] ا
!/ك !Gا
ط وا4Iم
ا
+ا*' 4UWا
]~وم ،و
_ '+N w/8GاFرات.
!<~9W
LGا
4!U/ر وأ 4I8Gم وNEUTRAL P
)ا
> .(^O7Gا4Iم ا*' ا
8رة * Pا*' ا
!/ك.
<, 4دي هط ا
4!U/ر W8Nآة إ
[ 4ان ا
!
و{4وث إ
Nت 93ة أو ا
ة.
اPدة اH9Hت
|UlGا
دة []Wا
U!U/ت * أ*_ ذ
.إذا ~م ا،*:
ا4< Pxرات ر, .Gدي ا
8ا
U!U/ت إ
[
ز,دة ا
! []W '/اFرات * _* 4,~, /ا{/ت
^]{~Gا
8رة أو ا>zG .Nآ< _* 4ة ا{ك ا
P* ^,9
¢ت ا
Nو
> .Nا7ض ا
~N [U!U/او++3 ,
إ
[ ا []W:أو ا ،'+:إن أ*_ ذ
.
!<~9W
4,~Gا
دة []Wا
U!U/ت *_ 93ا
+ف ا
8رة {ل
8+وهDا <, 4دي إ
[ {4وث إ
.?
N N
إذا 7;Wارة أو
PXت ا
Pرة ا
Pم Íم
إذا +<Gر Gأو 4Nأت 4ان ا
4م ¦*م أU¢ء
7د *s P+Gه^8]
w/ ،رة ¢ ;<
Nا?L
[]Wا
+ا*' ًرا .أ '?OG 4Wا
!/ك وا' إ
[ Gس
) REVERSEا
xع ] .(;]Iاه Lا
' LNء *P
ا
/8ح '?ONا*' ا
!/ك ]! ه Fوا4Iم
ا
+ا*' إذا ~م ا ،*:و
_ '+N w/8GاFرات.
!<~9W
إذا ;<Gا
!/ك أو 4ت ا
8رة <ة ا
*¦
P4م []W
ا
P+G/أو ا
4!U/ر!G > ،ول ا97ف, 4< .دي ذ
إ
[ إ*
ا
8رة أو ا
, 4< /* +دي إ
[ {4وث
إ
.?
N Nار Pxدوً* ]!N ;]Iص ا8* klG
~ 4UWول * P* P+Gو Pا
8رة Gس
) REVERSEا
xع ]8
N PxG .(;]Iرة
)(3LW
!<~9W
~,داد 93ا
+ف 4UWا
/ور *_
W ^W
ا
lا| zNي زاو.,
اور Mا;Dا> ا}L
]/ور *_ 7N < ،N¢ ^Wر~N kاو?
,ة ){ا
10إ
[ 15در w/8, .(xذ
FÓر ا **:ا:ول zNن
,ن ق ا
^7أU¢ء *>* 8ا .^7]
3ÆأU¢ء ا
/ور
*_ ق ;+IN < ،N¢ ^Wا
+ا*' وا
|Ul
W8
~ول اFر *_ []Wا
¢ .^7أ 47Nا
8رة _Wا
^7
4INام ا
+ا*'.
!&MHW
!Gول ا
/ور ق k9< N¢ ^Wأآ ا
]Iص
ا:ر وإ ^]7G 4ا
8رة *_ ا
/آ~.
اور Zkل > 3W
إذا ]Wا
8رة أو ا!Oت *_ ا
/آ~ 3 ،* ^7Nج
*_ ا
8رة و{ول N ]W * 4,4!Gا
8رة و* 7,ق
ا
8رة ه] ا
4{ ¢ ]+8د أI]
,F 'pوج
8
Nرة *_ هDا ا
.;</و{ |8ا
Oء ا
Dي N ]7G
ا
8رة PN < ،ا
8رة إ
[ ا []W:و Pا
]' *_
ا
}Iر !GاFرات {[ ;I,وزن ا
8رة *_ []W
pه~
ا
^7ا
¢ 7أ~ل ا
8رة ¦ U/, .'+أً ,
ا
8رة أو ر4ً7N 7ا _Wا
.^7
!&MHW
4,~,ر Pا
8رة أو ه~ه 4ً7Nا _Wا8x:م ا
}] *_
ا{/ت ;]Gا
' ا
8]
]+8رة.
;Dد اDWت7
|]9,د ا
7+G/ت /ًGوً4
_,4x /راG
و{4ود ر |8G 4< .Gا
7+G/ت {4وث *Oآ'
93ة .و j7Nا
4!U/رات Gن 4,4sة ا!4ار و |l,
*!و
7ده |l, .أن 7OGدوً* 4< klG NراG
وإ*ت ر |l, .Gدوً*
7د ا
7+G/ت
ا
[]W¦
/8/و
¦!G .'+ول أ4ًNا
7د *[U!U
~Nاو.,
;D- =M7د <
i =Wا
9hار
* Pا<ا7}
Nد * P ،P+GاWرك 4Gر xو*4ى
ا!4ار4{ .kد * إذا آن 4,4sا!4ار Ë{ .ا
ة
ا
D/و
ا
x []W |!8ا
.P+G/ه' ا
|!8
* []W¦
8وا'+:؟ *ذا 4x,أ []Wا
P+G/و*ذا
ا
|lا3Æ؟ ه' +{ 4xGأو
Iر أو W+Gت أو
أW ,ا^ أ3ى ا
^,9؟ ه' U/,إ
>ح ا
8رة
*zNن {
{4وث أي '9W؟ إذا 4Nا آ' sء 4ًxا
و7sت '< ' ،
Nا
!آ إ
[ Gس أ<' * PاNء
^O7G []Wو) 4L Pا
P4ا
WNا
(j+IU/وPNG
D!Nر * Pا
!}ل []Wأ 'pد PأU¢ء ^]8Gا
.P+G/
اPدة ;Xق اZل
l/Nد 7sرك 4
Nرة 7N* []Wا
4م و<'UN /
ا
W8إ
[ Gس * '7x ،|Uر Gأآ وP
*,~N < . 8دة P* Wا4Iام
/م اU3ق
~* 'ONا*_ وزد د Pا
8رة 4UWا
4ء
7د ا
'.
~Gد *_ 4,4s ^,F []W Wا!4ار؛ G 4دي
ا
~,دة ا
x+/ا
W8إ
[ 4ا ا
! ا
8رة.
إذا 4Nأت ا
8رة ا
/
[]W 9? _* ;+I ،|¢م
اU3ق {[ Gا:ر 7NإFرات []Wا:رض.
٢٤٥
(3LW) !&MHW
4Wم ¢ت ا
8رة وإاغ اFرات أU¢ء وxد ?L
* W ']N < ،j+IUا
8رة و |UlGا!Uءات
ا
9Iة أو ا
U/ورات ا
x+/أU¢ء L? ']G
اFرات.
Wوز ا;Dا> )ا ;cر وأ< ( +H
4UWا
دة ^,F []Wو}G 4< ،Wد 4Wة أاع *_
ا
pر _/pG 4< .g,ه kDا
pر4W g,ة أاع *+]I
*_ ا
7ا^ 7N* '< .ا
،8را Pxا
4,4!
^,9
أ]ب ا
دة ا
}! wو<4ر []W Gإ
>ح ا
8رة
{
{4وث أي 4ًx 8/G .'9Wا ]l7Nا
دة * Pإ,ف
ا
8رة 4G ¢ *ً/Gم LNء {[ Gم xNز ا
< .^7
/
'?ONم اU3ق * Pا
[]W L?pا
+ا*' +INو<
xNز ا
.^7
!<~9W
_/,أن ,دي Wر ا
7ا^ إ
[ U
93 '?OGم
ا
دة *, 4< /دي إ
[ 4ا ا
98ة []Wا
8رة.
٢٤٤
ا'
cام #ز ا'(Aف
ا
*_ ا:و<ت ,ن *_ ا
} |7رؤ ,ا
7ا^ أو
4,4!Gا
8/ر ا
}! .wو<, 4ن *_ ا
} |7إ
[ {47N 4
4,4!Gا
8/ر ا
}! 4UW wا
دة ]* ^,Fء
7
Nا^ .ه kDا
!ت |l,أن 4s,ك أ{ 4اIs:ص
]/ور Wا
7ا^ أو {
.ا '7xا
;, IO
*ن *_ أ** آ U/,رؤ ,ا
7ا^ و*>{
اFرات و*! '/ا
8رة وإرsدك ]/ور.
اور ;c- Mر آMة
4UWا
دة I
N ^,Fر ،/Iاً8* 3را _*,
ا
/ور ق أآ ا
}Iر FNرات .دي ذ
إ
[
ر '/!* Pا
8رة []Wا
7ا^4* .ات ا
8رة أ<ي
وأ _* /ا
4lار ا
lو<'/!
//}G G 4
ا
}*4ت .ا دوً* ¦*م واDNل آ' *lدك ]/ور
*_ ا
}Iر ا
ة FªNرا.G
!&MHW
• !Gول أ4ًNا ا
/ور *_ ق
Iة آة <G 4دي
إ
[ !* 9!Gور ا
>l7ت أو *! '/ا
8رة.
• !Gول أ4ًNا ا
/ور ق
Iة آة <|7N !G 4
اN:اب.
;Mر واد أو H7ة أو
Hkق أو ااف أو أ
kود
W 4UWر واد أو <Uة أو 4U3ق أو اlاف أو أ43ود آ
ªن زاو ,ا<اب ه *+ح ]{ []W !/آ
ا
8رة .ا Wه kDا
7ا^ ~Nاو 45 ,در xوا '7xآ'
إFر !,ك []Wا
3G |l, .'}+U* 'ON ^7ا
!Dر
W 4UWر ا
7ا^ ا
ة Wا
lا|!G .ول Wر
أW ,ا^ آة Wا
lا| ~Nاو ,آة 4Nر xآ
'7lا
8رة 93ا
+ف .إذا 7Gت اFرات
{+ة _l
N +!
N ،ا _/,:وا 8,:و~Nاو45 ,
در xأ*م اFر _,ا ._**:ا4Iم ا:وخ '/ء
ا
! +ا
< |l, .OªN /أن ,ن *ªNن ا
دة W
ا
! +ا
<+!N /ه ~Nاو4< ,ره 45در.x
ا اVا Hو- =1(Wم اHkhق.
|]9Gوف آة ]دة []Wا
9ق ا
Wة ا4Iام
ا
+ا*' ~* 'ONا*_ إ
[ /
|xم اU3ق )ا
دة
4INام ا
4UW .(_*4ا
/ور ,I
^FU/Nأو أ,
Wا^ , ،N¢دي ا
L?pا
[]W ;+Iا
+ا*' */
Pم
اU3ق إ
[ ا{+ظ Nت ا
8رة و4Wم 4I8G .],/Gم
pه kDا
4,G *4UW Uا
<; ¢إWدة '?OGا
8رة
أً ,
4,4s [U!U* []Wا!4ار.
اPدة ا5ق ا} وا H5وا
ا};ج
وف L<8Gا
]ج Nة أو ]! 'ONإ
وا
W8N |!8ت ،9Nا' ذراع ا
! إ
[ Gس *j+IU
وا' ا
!
إ
[ ) 4Lا
P4ا
WNا
(j+IU/إذا ~م ا.*:
'UGإ
[ Gس * j+IUأآ *_ ا
>زم ][]W !/
ا
!آ ¦*م .إن ز,دة 4Wد دورات ا
!/ك <, 4دي إ
[
8Gرع دوران ا
>l7ت و4ان ا
.lإذا 4Nأت إ9Nء
ا
8رة ! ،,ول أ Gم ªNدارة ]lWا
دة أآ *_
ر*Ó
+
PNم أو ] ;]IأU¢ء ا4Iام
/م اU3قw/8 .
ذ
Nت اFرات * Pا{+ظ GNا
4ا.7
!&MHW
[]Wا
9ق ا
,4]lأو ا
~
'U
N G ،س
*4G P* j+IUو ,ا
!/ك W8Nت Wو G
W ;+INا
8رة :ن ذ
<, 4دي إ
[ ا~ق
ا
8رة و4ان ا
! .
اK5
Gدي ا
9ق ا
U9ا
/7إ
[ إOء { UF Fل
إFرات ا
8رة *{ |7},ُ /آ ?U, .ا4Iام
ا
س ا
)<' ا
!آ ا
4وي( ،أو و Pا
دة
'<) DRIVEا
!آ ا:و ]W P* ،(G*Gا
'U
و) 4L Pا
P4ا
WNا
+{>
(j+IU/ظ GN
ا
4ا .7إذا 4Nأت إ9Nء ا
8رة ! ،,ول أ ,4G
]lWا
دة أآ *_ ر*Ó
+
PNم أو ]}!]
;]Iل
< []Wة xة إ '/G .ا
! +ا
ً93 U9ا *~ا4ً,ا
>Gف ا
8رة و< ]7xدرة []Wا
!آ .و*_
ا
79أن _* ,N 4xGا
8رات ا
*ت kDNا
ب
*_ <' 47
lم <4ر []W Gا
!آ .وآxªاء '< 4x
ا
34ل أ~U
N < ،UF +{ ,ول *_ ا
8رة و*U,7
ا
! {>/
،/W 4,4!
+أW ,ا^ +3وه' _/
]8رة اxزه *zNن.
ا=
*_ ا
} ,?]
|7ا
W +8ا:را ا
*] ا
P* /WU
اآ/ل ? LاFرات 4UW .ا
/ور ^FU* Wر*]
،/Wا{N Ë+ت ر Gو ;<Gا
8رة7G .
ا
] ا]
'p:دة Wا:را ا
*] ا
/WUه
ا4Iام ? LاFرات ا
P* |U/ا
LN 8ء و|UlG
ا
U/ورات ا
9Iة * Pا{+ظ Nة د Pا
8رة .إذا آU
UGي ا
^FU* W 8وا _* 7ا:را ا
*]
ا
/WUأو ا
ن L? ']N ،اFرات ن {4ه
ا:د[ ه 15ر 103) 7N*
N '
>ًFآ]
Nل( ]/8ح ,~Nدة * w9 {8اFرات .دي
L? ']GاFرات إ
[ ز,دة <ة !| ا
8رة أU¢ء
ا
دة Wا
9ق ا
*] ا
،/WUو
_ |l,إرxع
? Lهاء اFرات إ
[ و 7ا
[]W 79ا
9ق
ا
/أو ا w9:ا
}] ا3:ىzG .آ _* 4أن ,4
و] ¥+UاFرات <' L? ']Gا
اء .N
!&MHW
<, 4دي L? ']GاFرات إ
[ 4Wم ¢ت ا
8رة
و4ان ? Lا
اء ']
.'*
Nا
9Iا
_W ¡GU
)(3LW
٢٤٣
ا
!ت*>W 4xG ،ت []Wا
>WÓ
^,9ن 4{ _Wود
ا
W8أو إsرات .و
Dا *~],ا4Iام ,4Gك
ا
/
4lه *_ و* ه *_ 4UW .ا
دة |l, /* []W
دوً* ا
Uأ** {>/أي Wا^ أو ?Gات
pGر g,ا
.9U/وا
!' ه ا
,9
L9Iا
دم أU¢ء
DGآ ا
^,9ا
Dي Gد ]WاÆن.
ر أ'= y#ارة
ªN < .3زا
* W/lدر xا
}7د ا
.l
!&MHW
Gأ4ًNا ,ªNف ر x ¬O{ []W Gأو أ* ,اد
<7s>
]NلG 4< .دي ا
!ارة ا
_W lGUم ا
7دم
إ
[ ا7sل {.^,
أ''ت اPدة ا5ق ا;ة
<}G 4د 4Wة أاع *_ ا
9ق ا
Wة |l, .أن ]7G
pGر g,ا
'< 9U/ا
7N/ا
دة4W 4xG .ة أاع
وف ا
]* |]
:w98ء :Nوخ و{}ي و
Iي
و OWور*] و UFإ
[ |xا
9ق ا
'
.,4]l
k¢zG ^,Fا
xG []W ;]I/ر Gو<4ر[]W G
ا
.|!8ا
! ا
8رة ه أ{ 4ا
lU
wG+/ح ا
دة []W
ا
9ق ا
Wة ،و
Dا دوً* 8*ªNك ]lWا
دة ~!Nم
وا{N Ë+ت و Pا
8رة []Wا
|UlG .^,9ز,دة
ا
W8أو ا!Uء أو ا
7* .Áx+* 'ON ]*+
٢٤٢
!<~9W
< دوً* Nر4Gاء {~ام ا*:ن * Pر LNأي {8
N /رة
w}G 4< .4x 'ONأ/{ ,ت *D< Uا; 4UW
{4وث أي *<; []Wا
9ق ا
Wة.
cWم 5ق ) 4Lا
3Xا ELا(bcH
4UWا
دة []Wا
9ق ا
4//ة ،ا' إ
[ و4L P
)ا
P4ا
WNا
}!]
(j+IU/ل <F _* 4,~* []W
ا
lوا
4رة []Wا
! []Wا
9ق ا
~U/أو ا
Wة
أو
7د *4!Uر 4,4sا!4ار أو ا
~Uول * UوآDا ~,دة
<Fا
j+IU* |!8ا
|l, .W8أن ,ن ا4Iام هDا
ا
9Uق *!4وًدا Nوف ا
دة ?
Nا
} /]* N7ه
ا
!ل 4UWا
دة ا:را ا
] lا
/7أو ا
U9أو
ا
*] أو 4UWا{ج إ
[ j+IU* |! <Fا
.W8
W |UlG |l,ت ا
8رة ا
40 []W 4,~Gآ W/
)/'* 25ا
4UW (W8ا
ا9 4xق ) 4Lا
P4
ا
WNا
.(j+IU/
!&MHW
4I8Gم 9ق ) 4Lا
P4ا
WNا
< 4UW (j+IU/دة
ا
8رة []Wا
9ق ا
/ا
|8, 4 .lذ
' W/l* ;]Gا
!آ.
V =7 8< 7 :GZم ر Lا;ازن yd7/ارv#
اXZkhت EXارWع ا KPDا </وا.K</
و<
9ث ه~ا اGف اXZkhت v5' EXاPدة أو
=9Wارة .و = X 8< EAأو إدة =-;Wا;ازن/
yd7ار9 y< ،v#ذاة ا K Hا K</واK </
ا y5W 7 .ydPه~| ا9ذاة 7دة ارة 'v5
ٍ; أو هVه y# Kإ .kÎ
]7دة إ
[ و Pا
9ق ا
4//ة ،ا?+* []W Lح
|p<) Sway Barا
zر* (wxة أ3ى.
!<~9W
إذا 47,ا
/ازن |p</ا
zر wxإ
[ و Pا
9ق
ا
4//ة" j*8 ،ء * |p< sا
zر "wx
{ أ~xة ا
س و¢ j+IU,ت ا
8رة 'ONآ .
!Gول <دة ا
8رة W8Nأ 29 _* []Wآ W/
) .(W/>ً* 18إن ا
دة W8Nأ 29 _* []Wآ /
4 |8G 4< (W/>ً* 18) Wا
! ا
8رة
*4{ UW ¡U, 4< /وث إ
93 Nة .ا
N '}Gآ'
ا
4/7/ا
}!]
]!/ل []Wا
4W8/ة.
إرiدات اPدة ا<5
إرiدات اPدة ا5ق ا;ة
~/Gرات ا
zN *4Iن *]3 {8ص أر أآ
وWض أ^ آ _/,ا
[]W '/7أاع *47دة *_
أ w9ا
9ق ا
Wة/ .ا
+ت ا
} /ا
I
97Gه kDا
8رات ]3ص أر أ _* []Wا
8رات
ا
7د.,
إزا ا
ر #ا — Mإذا آ ارة Vودة ~L
و*_ *~ا ,ا
]Iص ا:ر ا []W:ه _8!Gا
ؤ,
] ^,9وإ*ن P<Gا
>O/ت .إن ه kDا
8رات
*}97>
//ف W g+UNرات ا
P4ا
U
ا
] ،,4وه أ* []W ^9U, /N sا
8رات ا
,
ا
}N '/7]
//}* p+IU/رة 4xة
ا
9ق ا
Wة .آ] /أ*_{ ،ول +Gدي ا97ت ا
!دة
أو ا
U/ورات ا
.x+/و<, 4دي 4Wم '?OGه kDا
8رة
}Nرة
!! ،آ /ه ا
!ل 8]
8U
Nرات ا3:ى
*_ g+ا
Uع ،إ
[ 4ان ا
98ة ]Wأو ا>ب
ا
8رة.
=M7 :GZا'
cام ارة ا5ق n
ا
ة y< ،إزا در #ا ;Dد ا.W 3H M
ªN < .1زا
ا
}*
_ *_ |xه' ا
8رة.
y# ;-ه =Aارة
ªN < .2زا
*/8ر وا{ _* 4أ '+ا
8رة.
٢٤١
!* '+< '} ,ور ا
4وران إذا ' Gا
8رة *_ 9ق
) 4Lا
P4ا
WNا
(j+IU/أو /Gإدارة *+ح ا
'?O
إ
[ و) OFF Pإ,ف ا
.('?O
yd7 = Xار v#اAو - Eإذا آ
ارة Vودة ~L
<G 4ن ر~l* Gة /Nازن }' إ
و أو <|p
zGر '}+]
wxا
و w/8, .هDا ا
Uم ,~Nدة *8
!Gك ا
^]7ا **:وف ا
دة []Wا
9ق
ا
4//ة.
,ا
! ا
Uم *_ >3ل *+ح SWAY BAR
)< |pا
zر {
[]W (wxأ~xة ا
س )إ
[ 8,ر
/Wد ا
.(x
٢٤٠
ح yd7ارv#
ا?+* []W Lح |p<) SWAY BARا
zر(wx
'?Oا
Uم .ا? []W Lا
+/ح *ة أ3ى ?ء
LOUGا
Uمp, .ء "ء * |p< sا
zر"wx
)ا
x/د * W/lأ~xة ا
س( '} 4UWا
.|p
" j*,ء * |p< sا
zر "wxأU¢ء ال إ
[
*{] ا
LOUأو s ^!G *4UWوط ا
|l, .LOUأن
',ا
/ازن |p</ا
zر wxو Pا
9ق ا
4//ة
أU¢ء وف ا
دة ا
7د.,
!<~9W
|p< '}+Gا
/از وGد ا
8رة F []Wق ذات
أ ]
w9أو W []Wت أ 29 _* []Wآ W/
) 4+G 4 ،(W/>ً* 18ا
! ا
8رة *4< /
,دي إ
[ {4وث إ
93 Nة |p< _8!, .ا
/از
ا _* **:اار ا
8رة وه وري >{+ظ
!
Nا
8رة, .ا<| ا
Uم Wا
8رة و!,ول
إWدة |p< '
Gا
/از W []Wت أ_* []W
29آ .(W/>ً* 18) W/وO,ر إ
[ ذ
Nا9
"*}ح * |p< sا
zر "wxا
ا* jأو ا
.N
l/Nد ا+Iض Wا
8رة إ
[ أ<' *_ 22آ W/
)! ،(W/>ً* 14ول ا
Uم *ة أ3ى ا
7دة إ
[
و Pا
9ق ا
Wة.
'}+ا
/ازن |p</ا
zر 'U
N < ،wxإ
[ ) 4Hا
P4
ا
WNا
(P+G/أو ) 4Lا
P4ا
WNا
(j+IU/
وا?+* []W Lح |p<) SWAY BARا
zر(wx
]
ل إ
[ و Pا
9ق ا
4//ة .را'?OG" Px
م ا
P4ا
" "WNا
4ء وا
_* 4,~/
"'?O
ا
*]7/ت" j*, .ء * |p< sا
zر[{ "wx
'} ,ا
/ازن |p</ا
zر.'*
N wx
و) 4H 3ا ELا (3Wإ ) 4LاEL
ا (bcHأو ) 4Lا ELا (bcHإ و4H 3
)ا ELا(3W
أU¢ء ا
8رة G W8Nاوح *_ 3إ
[ 5آ 2) W/إ
[
'< 'UN < ،(W/'* 3ا
!آ ا:و G*Gإ
[ وN P
)ا
> (^O7Gأو ا? []W Lدوا ا
'< jNا
!آ
ا
4وي .أU¢ء هط ا
8رة *_ *ن * 3 W8N P+Gإ
[ 5
آ 2) W/إ
[ 3أ*ل ،(W/ا' ذراع ]Wا
N 'Uة إ
[
ا
Pا
]9/ب ;<G .أU¢ء وxد <' ا
!آ Gس N
)ا
>l/N .(^O7Gد اآ/ل ' <' ا
!آ '< P ،ا
!آ
ا:و G*Gو) DRIVE Pا
دة( أو {ر دوا
ا
>< jNت ا
!آ ا
4و.,
KA< :GZأن < 8اPhل Kوإ و 3ا
4L 3X
)ا ELا (bcHأHء ا; j7ا =Aرة ،وKA
KAW 7ا
EX L;Dم 9ذاة ' bL7 Kاآy
V< 7 .v9- =A(Lم ا /أآ} 9 Kو آKA< E
9ذاة ' Kا bLPواآل ا .=PHو< =dاPم ~L
أHء ' ارة 3 Lإ 5آ 2) '/8إ 3
أل9 yHW .('/و (DWأو <9Wو4L 3
)ا
3Xا ELا (bcHأHء ' ارة L
أآ 3 K Mإ 5آ 2) '/8إ 3أل.('/
!<~9W
<4W |8, 4م ^O7Gو ]W Pا
;]G '*
N 'U
]Wا
'Uأو 4ان ا
! ا
<9وا
8رة4< /* .
,دي إ
[ و<ع }GدمN G .دة ا
8رة إ *P
]W ^O7Gا
.'*
N 'U
;9 =7ر ا
وران ) =7ا ®(TRAC-LOK
ُ+ز RUBICON+* 4x,ح !* '+<) AXLE LOCKر ا
4وران( []W
{ أ~xة ا
س )إ
[ 8,ر /Wد ا
.(x
LOUGه kDا
~/ة G 4UW Lا
Oوط ا
:
• وxد ا
+/ح <ص ا
'?Oوا
8رة 9ق 4L
)ا
P4ا
WNا
.(j+IU/
• |l,أن Gن Wا
8رة 16آ W/
) 10أ*ل/ا
(W8أو أ<'.
LOUا
Uم ،ا? []W Lا
~lء ا
+* _* ]+8ح <'+
*!ر ا
4وران * AXLE LOCKة وا{4ة !* '+ر
ا
4وران ا
}*" Áp,) L +]Iح *!* '+< sر
ا
4وران ا
،("+]Iا? []W Lا
~lء ا
_* ]+8ا
+/ح
*ة أ3ى !* '+ر ا
4وران ا}*" Áp,) **:ح
*!* '+< sر ا
4وران اl/N .("**:د <!* '+ر
ا
4وران ا
, +]Iدي ا
[]W L?pا
+/ح *ة أ3ى إ
[
<!* '+ر ا
4وران ا **:أو إ
?ء <.]+
b;W :GZأ;اء اilات < 8ا =Pأو
ا vا9 =Aور ا
وران.
?ء <!* '+ور ا
4وران ،ا? []W Lا
~lء ا
]7ي *_
*+ح !* '+<) AXLE LOCKر ا
4وران(.
ح ;9 =7ر ا
وران
٢٣٩
أوع ا=PH
و) N 3ا((DWZ
_* 4,~/ا
*]7/ت {ل ا4Iام ا
'
|U/وP
*_ أوع م ا
P4ا
،(4WD) WNا
ا
*]7/ت ا
!/أد:k
'/7,هDا ا
9Uق ,!G []Wآ' *_ /Wدي ا
x
ا **:وا
W/l* _* +]Iا
P4وا
!آ , .ا4Iا*
] |!8ا
;]3 w98/رة أ3ى .را" Pxا
_* lأ'x
ا/lم" "ا
4ء وا
_* 4,~/
"'?Oا
*]7/ت.
و) 2H 3ا
3Xا} E>Hا(3W
ُ4I8,م هDا ا
9Uق ]دة ا
9ق ا
7د ,وا
7,8ذات
ا w9:ا
}].
و) 4H 3ا
3Xا ELا(3W
'/7,هDا ا
9Uق /W '+< []Wدي ا
xا**:
وا
7ً* +]Iوإxر ا
>l7ت ا **:وا
[]W +]I
ا
4وران g+UNا
, .W8هDا ا
9Uق )ا
P4ا
WN
ا
4< (4H P+G/رة xإ []Wا
9ق ذات اw9:
ا
~
و4W |l,م ا4Iا* []Wا
9ق ا
.l
Áp,ء * sا
P4ا
) WNا
x/د W/l* []W
أ~xة ا
س( G ' 4UWوس ]Wا
'Uإ
[ و4H P
)ا
P4ا
WNا
.(P+G/
٢٣٨
و) 4L 3ا
3Xا ELا(bcH
'/7,هDا ا
9Uق /W '+< []Wدي ا
xا**:
وا
7ً* +]Iوإxر ا
>l7ت ا **:وا
[]W +]I
ا
4وران g+UNا
;p, .W8هDا ا
9Uق )) 4Lا
P4
ا
WNا
< ((j+IU/ة xإ و}< |! <Fى
[]Wا
9ق ذات ا w9:ا
~
lG .Lوز 25 W
*ً>/ا
40) W8آ .(W/
!&MHW
<lG |8, 4وز 40 Wآ />ً* 25) W/ا
(W8
أU¢ء ]W ^O7Gا
'Uو) 4L Pا
P4ا
WN
ا
(j+IU/ز,دة Wا
!/ك و ;]Gا
!/ك.
Áp,ء * sا
P4ا
) WNا
x/د W/l* []W
أ~xة ا
س( G ' 4UWوس ]Wا
'Uإ
[ و4L P
)ا
P4ا
WNا
.(j+IU/
EX :GZو 3ا
3Xا;' ،ELف GW
ا' ";) "ESC Off Indicator Lightء
ilإ<Pف Gم ا EX 8A9اP'hار اAوEX (E
; أV#ة اPس.
إ#اءات =Pا
) 2Hا
3Xا} E>Hا (3Wإ ) 4Hا
3XاEL
ا (3Wأو ) 4Hا
3Xا ELا (3Wإ 2H
)ا
3Xا} E>Hا(3W
_/,أن ,ال ) 2H _Nا
P4ا
Uا
(P+G/و4H
)ا
P4ا
WNا
(P+G/أU¢ء ;<Gا
8رة أو أU¢ء
!Gآ .أU¢ء !Gك ا
8رة ]W ^O7G , ،ا
'U
و,!Gه 'ONأع ,!G 4UWدوا ا
!]
_,~U
47Nإآ/ل ا
.'Uا' ذراع ]Wا
8/N 'Uى .N¢
vWا EX 8A9اG EX =PHم ا
3XاEL
إن ]Wا
]
//}* 'Uدة و) 2H Pا
P4ا
U
ا
(P+G/وف ا
9ق ا
7د ,وا
/]* 7,8ه
ا
!ل 4UWا
دة []Wا
9ق ذات ا w9:ا
.l
4UWا
! xإ
[ *~ <F _* 4,ا
_/, ،lا4Iام و7
]Wا
'U؛ ا
WNا
P+G/وا
WNا
'+
j+IU/
/Wدي ا
xا **:وا
+]Iوإxر ا
>l7ت ا**:
وا
[]W +]Iا
4وران g+UNا
.W8و 7ا
4H P4
)ا
WNا
(P+G/و) 4Lا
WNا
}}I* (j+IU/ن
]دة []Wأ w9ا
9ق ا
~
Lو
[]W gأw9
ا
9ق ا
7د |8G 4< .,ا
دة ا
9) 4H _7ق
د Pر (P+G* WNو9) 4Lق د Pر[]W (j+IU* WN
ا
9ق ذات ا w9:ا
}] ز,دة ¤Gآ' اFر و;]G
*ت * W/lا
P4وا
!آ .را" Pxإxاءات ا
"'U
هDا ا
_* 4,~/
8ا
*]7/ت {ل ا
'Uإ
[ ) 4Hا
P4
ا
WNا
(P+G/أو ) 4Lا
P4ا
WNا
.(j+IU/
4/7,ا
'?Oا
}!8
wرات ا
P4ا
[]W WN
اFرات ذات ا
! lوا
Uع و*! Lا
]l7ا
8/وي.
و ¢,أي ا>3ف ' []W ً8Wا
W8و< |8, 4
]W ;]Gا
.'U
}*" U,ح * sا
P4ا
) "WNا
x/د *W/l
أ~xة ا
س( ا
^8إ
[ أن ا
8رة و Pا
P4
ا
WNوأن /Wدي ا
xا **:وا
_
+* +]I
*ًp, .7ء ا
pء G ' 4UWوس ]Wا
'Uإ
[ وP
ا
P4ا
WNا
.
7
ًا :ن ا
P4ا
ًx , WNا *! '/G ،Uً8رات
ا
P4ا
WNإ
[ lGوز Wت ا97ف وا
<; .
4Gا
8رة W8Nت N w/8Gوف ا
.^,9
9W h :GZول =Pاوس Hا
وران ا<3
ZDت ا /أو ا=P M VW 8< 8 .PX c
اوس VLا ،Kو~ < yأن ;AWن ' ;دي
ا; &#ا E/وا Ecو<
9< EA Kث ا
7 .=PH
< =P yMا
W 3و< اZDت ا /أو اc
M jW EXا.=PH
'?OG 4UWا
8رة و Pا
P4ا
WNا
،j+IU/
8Gوي Wا
!/ك * ¢>¢ات ) ً,Gأر* PNات
ُFز (Rubiconا
W8و Pا
P4ا
Uا
P+G/
أو ا
P4ا
WNا
.U7* ^,F W 4UW P+G/ا{ص
4W []Wم ز,دة Wا
!/ك _Wا
!.4
!<~9W
<7G 4ض أ أو ا N
Ó
_,3Æأو ا
ة إذا Gآ
ا
8رة دون ر< P* Nوxد ]Wا
'UوN P
)ا
> (^O7Gدون ا4Iام ا*' ا
<; أوً 'ON
آ*' '/7, .و) N Pا
> ]7
(^O7Gا
'} []W 'U
آ' *_ /Wدي ا
xا **:وا
W/l* _W +]I
ا
P4وا
!آ ،و8]
w/8,رة !
Nآ {[ إذا آن
<' ا
!آ ا:و G*Gو) PARK Pا
<;(
)أو <' ا
!آ ا
4وي ا
س( |l, .ا4Iام
ا*' ا
<; داً, *4UW /ن ا
ًx* ^8دا
ا
8رة.
٢٣٧
(W '
*] )آW '
'/
N وي4
<' ا
!آ اU
تW8
' ا,~UG
1 [
إ2
15 (24)
2 [
إ3
30 (48)
=1(ت ا+ا/داتiإر
: أوع7N' أرU
] اW G
(
W U¢ Pق د9) 2H •
(P+G* WN رPق د9) 4H •
(^O7G>
س اG) N •
(j+IU* WN رPق د9) 4L •
3 [
إ4
50 (81)
4 [
إ5
70 (113)
سG ' 9U* [
ل إ34
^ *و* ا8]
"8N!
"اG
^8
ر اD!G و4}< ];( دونI]
عx
)اREVERSE
سG [
' <' ا
!آ إs][ وW *_ أ
،~ة/
اkD
l .(;]I]
عx
)اREVERSE
سG [
ء إ9
' اU]
^8
اU, _ أن/,
|]9G ] ][ أW (;]I]
عx
)اREVERSE
.ا آًا4ًx
ةV) EL ا3X
م اG =1(W
ةV أوCOMMAND-TRAC I®
(ROCK-TRAC®
!<~9W
;]G '*
N 'U
] اW P^ وO7G م4W |8, 4<
4< /* .رة8
< وا9
ان ا
! ا4 ' أوU
] اW
P* رة إ8
دة اN G .}دمG دي إ
[ و<ع,
.'*
N 'U
] اW ^O7G
5 [
إ6
80 (129)
ر ا
س3ا
W [}<أ
|Z ا
ول أEX وD 'ت ارة ا:GZ
EL ا3X
واED اE>H} ا3X
ز ا5ُ c
3X
ز ا5ُ ;ن 'ت ارةA' و،PX EDا
.}AL =7 أbcH اELا
jc ;ع#س اW = إPHا
;< أو،(;]I]
عx
)اREVERSE سG [
' إU]
ح/8]
ً<* ;<G وjN
][ اW L? ا.*ً/G رة8
ا
Pًءا *_ و4N . ا
وسW/l* <; دورانN
!آN 'U
{ك ذراع ا،(^O7G>
)اNEUTRAL
سG 9U* [
إ8* 'ON و8] و7,
}تN ^8
ا7O) (;]I]
عx
)اREVERSE
.("8N!
ذراع ' ا
وس "ا7, *4UW /!* "G"
REVERSE سG [
' إU
!| ذراع ا8N 'U
' ا/أآ
.(;]I]
عx
)ا
٢٣٦
' :GZت ارة اDو EXا
ول أ|Z
ُ5ز ا
3Xا} E>Hا EDوا
3XاEL
c
ا ،PX EDو';Aن 'ت ارة ُ5ز ا
3X
ا ELا bcHأ.}AL =7
اPhل إ Wس أ=7
ُN [
,ل *_ ا
س ا []W:إ
[ ا
س ا+!]
'<:ظ
[]Wا
+ا*' 4UWا
دة أ '+ا
7+G/ت ا
Oه .إ
إ
[ ذ
, ،ال إ
[ ا
س ا '<:ا
< ا
|U/
*47ل 8Gرع أ 4UW 'pا
اUف ا
< .W8
'U
Nإ
[ ا
وس ا
4G 'ON ]+8رlG .l,وز
ا
وس |Ulا
W8ا
~ا4ة ]!/ك وا
.jN
!<~9W
j+IGا
}!]
W8ل _* 4,~* []Wا
]*+
]!/ك []Wا
9ق ا
~
: .ن ذ
< 4+, 4ا
>l7ت
<4ر []W Gا
/و ^
~UGا
8رة.
!&MHW
• _/,أن ,دي lGوز ا
وس و j+3ا
س إ
[
Gس أ<' Wت ا
8رة ا
7إ
[ إ>Gف
ا
!/ك وأ /ا
،jNآ _/, /أن Gدي أي
*!و
] ',4إ
[ Gس أ<' * Pا
[]W L?pدوا
ا
jNإ
[ إ>Gف م ا
, 4< .jNدي ا
',4إ
[
Gس أ<' و ,!Gا
jNإ
[ إ>Gف ا
!/ك.
} 4ًxا []Wا
'Uإ
[ ا
وس
• 4UWهط ،'Gآ_ {ً ,
ا
ًG ]+8وا{ً4ا آ' *ة PU/ا
W8ا
~ا4ة
4UWا
!!/]
4ك وا
<G 4دي إ
[ ;]Gا
!/ك
و/أو ;]Gا
[{ jNإذا آ دوا ا
jN
* .F?pإذا آ ]Wا
9 'Uق *ª j+IUن
Wت ا
8رة ا
;]G |8Gا
!/ك
وا
G jNن *4ًx p+IUا.
)(3LW
(3LW) !&MHW
• <4W |8, 4م اGع Wت ال إ
[ ا
وس
ا
]+8ا
ُ N [
/آ! 4أد[ إ>Gف ا
!/ك و/أو
إ>Gف ا
[{ ،jNإذا آ دوا ا
jN
*.F?p
• < |8, 4ا
~Uول *_ * []Wن **4I8* P+G
ا
9Uق ا
P* j+IU/ا
[]W L?pدوا ا
jN
;]Gا
jN
أ' 7ت ُ; =PH L -إ اوس ا
!&MHW
<4W |8, 4م اGع Wت ال إ
[ ا
وس ا
]+8
ا
ُ N [
/ز,دة Wا
!/ك _Wا
! 4و/أو ;]G
أ9ا ا
[{ jNإذا آ دوا ا
jN
*.F?p
٢٣٥
=Pاوس
!&MHW
|UlGا
دة * Pو Pا
4م []Wدوا ا
،jNو
!Gول ا
<ف 8
Nرة 4!U* w+ []Wر * Pا
L?p
[]W ً~xدوا ا
, 4< { jNدي ذ
إ
[ ;]G
Wدي .jN
N
ا? []W Lدوا ا
?G '< '*
N jNا
وس*4UW .
Gم jN< ,!Nا
4وا <]ً> ،ا? []W Lدوا ا
<د.
]W |l,ا4Iام ا
س ا:ول داً 4UW /ا
4ء *_ وP
.;<G
EX :GZا P5اMرد;W 7 ،ا
ً# &#ا زا>ً
ا EX
ا =7 =>' KcW 8< =PHا9آ .وه~ا
ا.EDM+ /
'ت ا =PHاُ; L -رة
4Iام <' ا
!آ ا
4وي , 'ONا>ك ا
<د
وا:داء ا
4l؛ ' ?U,ا
وس ¦ []Wآ /ه *_
4xول Wت ا
'Uا
ُ, .N [
/ن ا
'Uوً
W8ت ا
8رة ا
D/آرة ]8رع '/!G 4UW .ا
8رة
'ONزا 4أو 9* |! 4UWرةW ^9UG 4< ،ت
ا
]
'Uوس ا []W:ا
ُ N [
/ه.kD
1Wاوس
Wت <' ا
!آ ا
4وي ) W '
'/
Nآ]* ' (W
ا
!/ك
3.6ات
٢٣٤
Wت
ا
8رع
ا
{]
1إ
[ 2
)15 (24
)10 (16
2إ
[ 3
)24 (39
)19 (31
3إ
[ 4
)34 (55
)27 (43
4إ
[ 5
)47 (76
)37 (60
5إ
[ 6
)56 (90
)41 (66
و Pا
}7ا:و ،AutoStick G*Gف 'U,
<' ا
!آ []W:أو , *4UW '+:م ا
4,4!N ^8
)4, (-/+وً ،L ,إ إذا آن ذ
|8إxد
ا
!/ك أو ا
W8ا
~ا4ة .و' ا
س ا
4!/د {[
,ا3ر ' س 3أ []Wأو أUN ،'+ء * ه
*
ف أد.k
• '< 'Uا
!آ إ
[ ا
س ا []W:أو4UW ًG*G
ا
pورة PU/ا
W8ا
~ا4ة ]!/ك.
• ,دي ا
[]W L?pدوا ا
<د Nة إ
[ {4وث '
أو
]
) G*Gل إ
[ 8Gرع أ, *4UW ('pن
*.ًU
• '< 'U,ا
!آ أو ًG*Gإ
[ Gس أ<' zFG *4UW
ا
8رة )
PU/إxد ا
!/ك( و7ض ا
س
ا
!
.
• '< 'U,ا
!آ أو '+¦
ًG*Gإ
[ Gس ا
W8
ا:ول 4UWا
ا
<; 47N .ا
<;[]W |l, ،
ا
^8أن '< 'U,ا
!آ 4,وً (+) []W: ,أU¢ء
8Gرع ا
8رة.
• 4N U/,ء ا
!آ *_ ا
<; 4INام ا
س ا:ول أو
ا
w/8, .ا
[]W L?pدوا ) 4UW) (+ا
<;(
4Nء '?OGا
8رة و Pا
س ا
4N 47, .ء
'?OGا
8رة []Wا
س ا
*4ً+ا وف
ا:را ا
9?/ة 4]l
Nأو ا
]¡.
• وl,ه' ا
Uم *!وت ' ا
وس 4UW []W:
ا
W8ا
8]
p+IU/رة.
• |UlGا4Iام م ا
! ^O7G 4UW W8
Nا
}7
ا:و.AutoStick G*G
• و w}Gات <' ا
!آ أآ وً{ ^O7G 4UW
ا
}7ا:و.AutoStick G*G
;AW H :GZن Mا5 EX =PHق ) 4Lا
3X
ا ELا;P' ،(bcHم =7ا9آ ً>PW =PHL
)و KAس أ Kاس اDوض(.
?ء ^O7Gو Pا
}7ا:و،AutoStick G*G
Lا? []W ً9* Lذراع ا
'Uإ
[ ا
[{ (+) _/
,ا
*~ "* "Dة أ3ى * W/lأ~xة ا
س.
,!G _/,ذراع ' ا
وس إ
[ دا '3أو 3رج وP
ا
}7ا:و AutoStick G*Gأي و< دون رP
< _W *4دوا ا
<د.
!<~9W
j+IGا
}!]
W8ل _* 4,~* []Wا
]*+
]!/ك []Wا
9ق ا
~
: .ن ذ
< 4+, 4ا
>l7ت
ا
4< x/ر []W Gا
/و ^
~UGا
8رة *4< /
|8,و<ع }Gدم أو إ
.}Is N
=7ا9آ ا
وي -إذا آ ارة Vودة
~L
!<~9W
<7G 4ض أ أو ا N
Ó
_,3Æإذا Gآ ا
8رة
دون *ا< 4Nون ^O7Gا*' ا
<; |l, .*ً/Gداً/
^O7Gا*' ا
<; , *4UWن ا
4ا
8رة،
[]W
3ا
4!U/رات.
٢٣٣
{
{4وث * _/, ،<* ]OإWدة '< L
ا
!آ داد P/x '/Wا
وس ا **:وذ
_W
D+UG ^,Fا
9Iات ا
:
.1أو<; ا
8رة.
'< ?N < .2ا
!آ إ
[ Gس ) PARKا
<;(.
.3أدر *+ح ا
'?Oإ
[ وLOCK/OFF P
)ا
/'+إ,ف ا
.('?O
.4ا ¢ 10اٍن .ً,G
d =1(Wا
'< _/p,ا
!آ ا:وG G*Gس *W +Wp
,ا
! Nإ
وً )ا
س ا
.(g*Iوف 'U,
<' ا
!آ أو ًG*Gإ
[ Gس Overdrive
)* +Wpا
(W8إذا * Gات ا
وف ا
:
• ذراع ا
'Uو) DRIVE Pا
دة(.
• Wا
8رة .+, /N W
• ,ا
[]W L?p
N ^8دوا ا
<د 'ONآ.
.5أ '?OG 4Wا
!/ك.
P .6ذراع ?Gا
وس 9ق ا
س ا
]9/ب.
4UWاء ا
7, ،]O/د <' ا
!آ إ
[ وف ا
'?O
ا
7د.,
<VL v H< :GZرة ا;آ= ا EX Dأ7ب -X
HAو; آن ALن إدة =7 Mا9آ.
Xى ا;آ= ا
D Dات <
9 -k c(Wإذا
آ ه~| ا(A' Aر أم .hإذا ~DWر إدة =7 M
ا9آ KX ،اdوري ا D#ا;آ= ا.
D
٢٣٢
ا Dا/وAutostick AW;W
ا
}7ا:وW AutoStick G*Gرة ~* _Wة ]W+G
<' ا
!آ ^8]
Gا
! ' ا
!آ
ا
4وي ،و*_ ¢ا
! ا
8رة 'ONأwG .'p
ا
}7ا:و AutoStick G*Gإ* ز,دة <4رة
*] ا
!/ك إ
[ أ<}[ <4ر * ،_/وا
' _* ]I
ا
وس ¦ []Wو
¦]9* 'ON '+ب و _8!Gأداء
ا
8رة ا
].
آ , /هDا ا
Uم *~4ً,ا *_ ا
! أU¢ء ا
/ور *_
ا
8رات وا
دة دا '3ا
4/ن ،وا
دة وف
ا:را ا
~
،وا
دة []Wا
lل ،و!| ا
9/رة،
وا
*_ ا
/ا<; ا3:ى.
ا(=1
, *4UWن ذراع ا
'Uو) DRIVE Pا
دة(،
'< '/7ا
!آ _N >ًU* ،ً]Gا
وس ا
8/I
ا
/ة ^O7
.ا
}7ا:و< ،AutoStick G*G
[]W L?p
Nذراع ا
'Uإ
[ ا
_/أو ا
8ر ) (-/+أU¢ء
ا
ا 4xو) DRIVE Pا
دة(, .دي ا
[]W L?p
) _* (-أ 'xا
34ل إ
[ و Pا
}7ا:وG*G
AutoStickإ
[ ' <' ا
!آ إ
[ ا
س ا
ا،'<:
, /UNدي ا4Iام ) _* (+أ 'xا
34ل إ
[ و Pا
}7
ا:و AutoStick G*Gإ
[ ا
[]W !/ا
ء
ا
س ا
!
G *4UW .ن ا
}7ا:وG*G
7,ُ ،9O AutoStickض Gس <' ا
!آ ا
4I8/م
{
ً * W/lأ~xة ا
س.
و 3ا;#ع (R) jc
4I8,م هDا ا
9Uق ! ,ا
8رة إ
[ ا
.;]Iا' ذراع
?Gا
وس إ
[ و) REVERSE Pا
xع ](;]I
47N Lإ,ف ا
8رة .*ً/G
ا(N) (DWZ
ا4Iم هDا ا
9Uق 4UWو<ف ا
8رة +ات P* ],F
'?OGا
!/ك .و*Nن 4Nء '?OGا
!/ك 4UWوP
<' ا
!آ هDا ا
.Pا4Iم ا*' ا
<; و4Nل
<' ا
!آ إ
[ و) PARK Pا
<;( ،إذا آن *_
ا
pوري *?درة ا
8رة.
!<~9W
N Gط *_ *ن * P* P+Gا4Iام وP
) NEUTRALا
> (^O7Gو ,ªN Gف '?OG
ا
!/ك ه kDا
وف 7G .ه kDا
//رت
ا4* U*Æة ?G 4UW Nlوف ا
/ور أو
ا
4+G 4 .^,9ا
4رة []Wا
! ا
8رة ،و<4
4!,ث }Gدم.
!&MHW
< |! _W lU, 4ا
8رة أو Gآ '7+N LGا
lذN
أو ا
دة :ي | ' وxد <' ا
!آ وP
) NEUTRALا
> ;]G (^O7Gآ '<UNا
!آ.
را" Pxا
_* lأ 'xا/lم" "ا
4ء وا
"'?O
و"!| رة * |l, *" _/ "]97أن ]7+G
ا
!ت ا
9ر" ]7ف _* 4,~* []Wا
*]7/ت.
ا4Iم *+ح ا
! ' ا
}7ا:وG*G
®) AutoStickرا" Pxا
}7ا:وG*G
® "AutoStickهDا ا
_* 4,~/
8ا
*]7/ت(
!G 4,4س *, .j+IUدي ا4Iام Gس * j+IU
*' ه kDا
وف إ
[ _8!Gا:داء وإ'< /W F
ا
!آ وذ
' ']Nا
وس ªNاط وا
!]
دون
ار+Gع در{ xارة <' ا
!آ.
و 3ا9ك اE5Mء =7Hا9آ
اPدة )(D
?U,ا4Iام هDا ا
9Uق 4UWا
8دا '3ا
4/ن
و []Wا
9ق ا
47, { .7,8هDا أآ Gوس ا
W8
> ا
'Uس أ []Wأو أ<' وأآه 4ًsGا
>ك ا
<د '< 'U, .ا
!آ أو[]W: ًG*G
{[ Gوس ا
دة ا:ول وا
وا
ا _* '<:ا
47/ل
وا
س ا
ا PNا
s/وGوس * +Wpا
W8ا
.g*I
و ,و) DRIVE Pا
دة( 3اص ا
دة ا
}ى
P/xوف ا
'?Oا
.79
G 4UWار ' <' ا
!آ )آ4!, /ث '?OG 4UWا
8رة
' وف <s '/!Gأو []Wا
7+G/ت أو
*ا xا
w,ا
,أو أU¢ء !| *9رات ،(/I
* Gا< و '< +ا
!آ إ
وً * 4UWاx
وف Wد 4UW .,اآOف أي {
*_ ا
!ت ا
< '< ;]G |8G 4ا
!آ LOUG , ،و Pا
!ك
ا
9ء '<Uا
!آ .هDا ا
'< [, ،Pا
!آ
ا
س ا
!
{[ ;<Gا
8رة _Wا
!آ47N .
;<Gا
8رة '< ' ،ا
!آ ا
س ا
j?N
ا
_W Uا3ر Gس ا
8إ
[ ا*:م /8G .أوع
) PARKا
<;( و) REVERSEا
xع ](;]I
و) NEUTRALا
> (^O7Gا
p, 4< .'/7ء *}ح
* sا
w, .(MIL) '97و Pا
!ك ا
9ء إ*
<دة ا
8رة إ
[ ا
آ' ا
}
4/7/دون {4وث أي
'<U
;]Gا
!آ.
٢٣١
(3LW) !<~9W
• إن ?Gا
وس *_ و) PARK Pا
<;( أو
و) NEUTRAL Pا
>G *4UW (^O7Gن W
ا
!/ك أ W _* []Wا
9U, Fي 93 []Wرة.
ªذا []W *4< _Gدوا ا
+ا*' zNآ،]/
W9ا
8رة ا
! 'l7ا*:م أو ا
;]I
.
W W8Nو< 4+G 4ا
98ة []Wا
8رة و9GG
4{zNأو ONء * ?N < .ا
وس FG 4UW L
ا
!/ك G /UN 7F 'ONن < []W *4دوا
ا
+ا*' }Nرة .*G
• Gدي {آ ا
8رة }* 'ONد إ
[ إ
_* N
;,دا '3ا
8رة أو
Nب * .UوP/l
8U
N
ا
8رات?* ً]9* ]W ?U, ،درة ا
8رة أU¢ء
'?OGا
!/ك '< ]W |l, .ا
Iوج *_ ا
8رة،
ا
م دوً* ^O7Nا*' ا
<; و' <' ا
!آ
إ
[ و) PARK Pا
<;( وإ,ف '?OGا
!/ك
وإ3اج *+ح ا
.'?Oوl/Nد إ3اج ا
+/ح, ،
ا{lز <' ا
!آ و) PARK Pا
<;(
_*zا
8رة *_ أي {آ *!.N* ]/
)(3LW
٢٣٠
(3LW) !<~9W
• ?* 4UWدرة ا
8رة < ،داً3ªN /اج *+ح ا
'?O
*_ ا
8رة و< '+Nا
8رة.
• Gك أ4ًNا ا+F:ل +/Nده ا
8رة أو
w/8G
<Nاب *_ رة *G 47, .]+ك ا+F:ل
ا
8رة *_ دون *ا< أ*ًا ً93ا :ب 4,4Wة4 .
},ب ا+F:ل أو ا3Æون N
ªNت 93ة أو
* ./و |l ]Wا
[]W Uا+F:ل 47Nم g/
ا*' ا
<; أو دوا ا
+ا*' أو ذراع ا
.'U
• Gك *+ح ا
'?Oا
8رة أو
Nب *) Uأو
و _/, Pا+F:ل *_ ا
ل إ
(.
W9ا+F:ل '?OGا
Uا Dا
<9
N ]*7
وأزرار ا
! ا3:ى أو ,!Gا
8رة.
!&MHW
• <' ,!Gذراع ا
_* 'Uو) PARK Pا
<;(،
|l,إدارة *+ح ا
_* '?OوLOCK/OFF P
)ا
/'+إ,ف ا
('?Oإ
[ وON/RUN P
pا
[]W L?pدوا
)ا
/'?Oا>9ق( ،وأً ,
ا
+ا*' .وإ , 4دي ذ
إ
[ {4وث ;]Gذراع
ا
.'U
• P,8N Gا
!/ك ' 4UWا
وس *_ وP
) PARKا
<;( أو وNEUTRAL P
)ا
> (^O7Gإ
[ 9ق Gس : 3ن ذ
<;], 4
* W/lا
P4وا
!آ.
?U,اGع ا
s/ات ا
/pن '< ^O7Gا
!آ
و) PARK Pا
<;(:
• 4UWا
'Uإ
[ و) PARK Pا
<;({ ،ك ذراع ا
'U
'*
Nإ
[ ا
8ر {ªNم {[ ;<,و.*ً/G 8,
• ا إ
[ ssوG Pس <' ا
!آ و _* ^!Gأ
OGإ
[ و) PARK Pا
<;(.
• ,!G 4UWدوا ا
+ا*' _* ^!G ،أن ذراع ا
'U
IGج *_ و) PARK Pا
<;(.
) LOCK/OFFا/=Pإ<Pف ا( =M7 (=1إدة
Lء
ا(W (DW k< 7 .=1س =7ا9آ DLإدة
=1(Wا9ك إذا 8< 8إر#ع اح إ و3
) LOCK/OFFا/=Pإ<Pف ا( (=1أوً.h
ا;(P) j7
ذراع ا=PH
75ت اوس
P,8N Gا
!/ك ' 4UWا
وس *_ وPARK P
)ا
<;( أو ) NEUTRALا
> (^O7Gإ
[ 9ق Gس
.3
:GZ
• DLاkر أي و 3وس ،ا Zً7 Gح
(DLاس ا
9د
L =M7ء ارع .وه~ا ا/
< Dهً ;A< Hن ا9ك Lرًدا.
• إذا د اdورة إ إدة
Lء 9 =1(Wك
'ر DX ،Wاآ
Kإدارة اح إ و3
7,هDا ا
9Uق *+
>ً/ا*' ا
<; إذ إ ,م '< '+N
ا
!آ .و*Nن 4Nء '?OGا
!/ك 4UWو'< P
ا
!آ هDا ا
.Pا* _W GًN 7ًU* PUا4Iام وP
) PARKا
<;( أU¢ء !Gك ا
8رة LOUN < .ا*'
ا
<; G 4UWك ا
8رة []WهDا ا
9Uق.
4UWا
<; '< ' U/, ،ٍ8* w9 []Wا
!آ إ
[
و) PARK Pا
<;( أوً ¢ا4Iام ا*' ا
<;.
4UWا
<; ،P+G* []Wا4Iم ا*' ا
<; <' '
<' ا
!آ إ
[ و) PARK Pا
<;( ،وإ , 4دي
ا
! '< '+< * []W '/ا
!آ إ
[
{ N7آ
ذراع ا
3 'Uرج و) PARK Pا
<;( .و
_* 4,~/
ا{ط أدر ا
>l7ت ا klGN **:ا
; 4UW
ا
<ف 4!U* w+ []Wر و4ً7Nا _Wا
; 4UWا
<ف
.P+G* w+ []W
' EX :GZرات ا
3XاW ،ELآ
Kو;#د M
ا EX =PHو) DRIVE 3اPدة(.
!<~9W
• 4I8Gم و) PARK Pا
<;( آ+
',4ا*'
ا
<; .وا '/7ا*' ا
<; داً}N /رة آ*]
+دي !Gك ا
8رة و{4وث إ
Nت.
• <!G 4ك ر Gو |8Gإ
Nوا _,3Æإذا
_Gو) PARK Pا
<;( _* ^!G .ذ
!* ^,F _Wو
,!Gذراع ا
3 'Uرج وP
) PARKا
<;( * ,!G Pدوا ا
+ا*'zG .آ_* 4
وxد <' ا
!آ و) PARK Pا
<;( <'
*?درة ا
8رة.
)(3LW
٢٢٩
Gم Wا Lو 3ا; 3 j7ح ا(=1
ه kDا
8رة *~ودة UNم Gا LNو Pا
<; *+* Pح
ا
'?Oوا
Dي |]9,أن '< P,ا
!آ وP
) PARKا
<;( <' 4Gو+* ,ح ا
'?Oإ
[ وP
) LOCK/OFFا
/'+إ,ف ا
) ('?Oإزا
ا
+/ح(.
و _/,إ3اج ا
+/ح *_ <ص ا
' '?Oوxد
*+ح ا
'?Oو) LOCK/OFF Pا
/'+إ,ف
ا
('?Oوl/Nد إزا
'< '+< ,ا
!آ وP
) PARKا
<;(.
; H :GZل أي ;P< =5م اGHم PLoLء
اح 7 EXص ا( &MH =1إ و;#د V EX =kة
ا/ن ه~| .و';Aن ALن =1(Wا9ك وإ<KA &XP
'~Dر إkاج اح إ DL hإ#اء ا .
Gم Wا Lاا= =7/ا9آ
~G Gو 4,ه kDا
8رة UNم Gا _N LNا
+ا*' و<'
ا
!آ ) (BTSIوا
Dي DN Ë+!,راع ا
'UوP
) PARKا
<;( * ,ا
[]W L?pا
+ا*',!
.
<' ا
!آ 3رج و) PARK Pا
<;( |!, ،إدارة
٢٢٨
*+ح ا
'?Oإ* إ
[ و) ON/RUN Pا
/'?O
ا>9ق( )اء آن ا
!/ك < 4ا
'?Oأم ( *P
ا
[]W L?pدوا ا
+ا*'.
=7آ أو E'k EAW;Wات — إذا آ
ارة Vودة ~L
W ss OGض وG Pس <' ا
!آ )ا
x/دة
* {
W/lأ~xة ا
س( إ
[ 9ق Gس <'
ا
!آ |l, .ا
[]W L?pدوا ا
+ا*' ! ,ذراع
ا
'Uإ
[ 3رج و) PARK Pا
<;( )را" Pxم
Gا LNا
+ا*' '</ا
!آ" هDا ا
]
.( 8دة{ ،ك
ذراع ا
_* 'Uو) PARK Pا
<;( أو وP
) NEUTRALا
> (^O7Gإ
[ وDRIVE P
)ا
دة(.
'< ,ا
!آ ا
4/ار إ
وً 4xول ' د<^
]وس .و ~/Gا~x:ة ا
و '<Uا
!آ
,7/
Nة ا
DاD
،Gا <79G Ë{>G 4ت >3 lل
>,4Gت ا
وس ا:و
[ ا
8رة ا
4,4lة ا4Iام.
وهDا ا 7F *:و ,ا
xع إ
[ Wت ال
W
ا
47N <4ا
دة * 7pت *_ ا
]*ات )ا*:ل(.
,ال *_ و) DRIVE Pا
دة( إ
[ وP
) PARKا
<;( أو ) REVERSEا
xع ](;]I
,!G 4UWدوا ا
<د و ;<Gا
8رة zG .Lآ_* 4
إNء < []W *4دوا ا
+ا*' 4UWا
_N 'Uه kDا
وس.
,ذراع <' ا
!آ أوع ا
PARK 'U
](;]I
)ا
xع
وREVERSE
)ا
<;(
و) NEUTRALا
> (^O7Gو) DRIVEا
دة( .L
_/,ا
م >U
Nت ا
4و4IN ,ام *+ح ا
! '
ا
}7ا:و) AutoStick G*Gرا" Pxا
}7
ا:و "AutoStick G*GهDا ا
, .( 8دي ,!G
ذراع ا
'Uإ
[ ا
_/أو ا
8ر )– (+ /أU¢ء ا
ا 4x
و) Drive Pا
دة( إ
[ ا3ر Gس ' ا
!آ 4,وً،,
وWض ا
س ا
!
* W/lأ~xة ا
س آ
س
1أو 2أو 3أو* .Ns
(3LW) !&MHW
• _N ',4
N Gو) PARK Pا
<;( أو وP
) REVERSEا
xع ] (;]Iأو وP
) NEUTRALا
> (^O7Gأو وDRIVE P
)ا
دة( G *4UWن Wا
!/ك أآ *_ W
ا
.F
• <' ,!Gذراع ?Gا
وس إ
[ أي Gس zGآ_* 4
و []W *4< Pدوا ا
+ا*' }Nرة *!./
y< :GZا hً;5 1dدوا' اا= أHء
اcوج Kو) PARK 3ا;.(j7
!<~9W
• إن ?Gا
وس *_ و) PARK Pا
<;( أو
و) NEUTRAL Pا
>G *4UW (^O7Gن W
ا
!/ك أ W _* []Wا
9U, Fي 93 []Wرة.
ªذا []W *4< _Gدوا ا
+ا*' zNآ،]/
W9ا
8رة ا
! 'l7ا*:م أو ا
;]I
.
W W8Nو< 4+G 4ا
98ة []Wا
8رة و9GG
4{zNأو ONء * ?N < .ا
وس FG 4UW L
ا
!/ك G /UN 7F 'ONن < []W *4دوا
ا
+ا*' }Nرة .*G
• Gدي {آ ا
8رة }* 'ONد إ
[ إ
_* N
;,دا '3ا
8رة أو
Nب * .UوP/l
8U
N
ا
8رات?* ً]9* ]W ?U, ،درة ا
8رة أU¢ء
'?OGا
!/ك '< ]W |l, .ا
Iوج *_ ا
8رة،
ا
م دوً* ^O7Nا*' ا
<; و' <' ا
!آ
إ
[ و) PARK Pا
<;( وإ,ف '?OGا
!/ك
وإ3اج *+ح ا
.'?Oوl/Nد إ3اج ا
+/ح, ،
ا{lز <' ا
!آ و) PARK Pا
<;(
_*zا
8رة *_ أي {آ *!.N* ]/
(3LW) !<~9W
• ?* 4UWدرة ا
8رة < ،داً3ªN /اج *+ح ا
'?O
*_ ا
8رة و< '+Nا
8رة.
• Gك أ4ًNا ا+F:ل +/Nده ا
8رة أو
w/8G
<Nاب *_ رة *G 47, .]+ك ا+F:ل
ا
8رة *_ دون *ا< أ*ًا ً93ا :ب 4,4Wة4 .
},ب ا+F:ل أو ا3Æون N
ªNت 93ة أو
* ./و |l, ]Wا
[]W Uا+F:ل 47Nم g/
ا*' ا
<; أو دوا ا
+ا*' أو *!4د Gس <'
ا
!آ.
• Gك *+ح ا
'?Oا
8رة أو
Nب *) Uأو
و _/, Pا+F:ل *_ ا
ل إ
(.
W9ا+F:ل '?OGا
Uا Dا
<9
N ]*7
وأزرار ا
! ا3:ى أو ,!Gا
8رة.
)(3LW
٢٢٧
Lء ا( =7 - k LdL =1ا9آ ا/وEAW;W
PX
ا <
i P5اMودة )أ 20- K =7در <X #أو
29-در(<; #
{ل 4Wم 4Nء '?OGا
!/ك 47NاGع إxاء "ا
'?O
ا
7دي", 4 ،ن ا
!/ك {
_,~UN) _,~U
N /
زا _* ]I]
.(4أي و<د زا ،4ا? []W Lدوا
ا
<د إ
[ ا:ر وأ NهDا ا
، ¢ .Pأدر *+ح
ا
'?Oإ
[ و4N) START Pء ا
('?Oو{رk
l/Nد x ^O7Gز 4Nء ا
G* ;<, .'?Oر xز 4Nء
ا
'?Oأو>3 ًG*Gل ¢ 10اٍنl/N .د {4وث
ذ
{ ،ر دوا ا
<د ،وأدر *+ح ا
'?Oإ
[ وP
) LOCKا
('+وا *_ 10إ
[ ¢ ¢ 15آر
إxاء "ا
'?Oا
7دي".
/pن 4Nء ا
w!
'ON '?Oدرxت ا
!ارة
ه4IN [
,ُ ،kDام Iن آ] *!ك إ
و آN
*4ار *_ ا
Iرج )* 4ى ا
آ'(.
'cن آ ا9ك -إذا آ ارة Vودة
~L
!&MHW
x ;]G PU/ز 4Nء ا
،'?Oا *_ 10إ
[ ¢ 15
<' ا
!/و
*ة أ3ى.
,م Iن آ] ا
!/ك _I8Nا
!/ك و]/7N w/8Gت
7, '?OGا
g9ا
رد '
N < .ا
D+U/N ]8
Gر آ* Nدد < Gاوح 110 _* G4sإ
[ 115
** ',9G ] Pرض .¢>¢
L DLء ا(=1
4G W 'Gو ,ا
!/ك أU¢ء ;<Gا
8رة z4, *4UW
ا
!/ك.
I '
G |l,ن آ] ا
!/ك >3ل Wوا{4ة []W
ا}!]
'<:ل 4G ¢zG []Wآف []Wا
!/ك.
٢٢٦
I ] 4x,ن آ] ا
!/ك أ9 '+ء ا
!/ك
ا
x/د ا
~lء ا{ _* **:و ,ا
9ر.,
!<~9W
DGآ }' ] Iن آ] ا
!/ك <' ا
دة4< .
] ;]G |8,ا
ر ا
Nا
Dي Gاوح _* G4s
110إ
[ _* 115ا
ر ا
/دد {4وث
*4آ.N
=7ا9آ ا/و - EAW;Wإذا آ ارة
Vودة ~L
!&MHW
<7, 4ض <' ا
!آ ]]; إذا Gاع ا{Fت
ا
اردة أد:k
• ا' إ
[ و) PARK Pا
<;( أو وP
) REVERSEا
xع ] (;]Iأو < 'U
N
3ر 47N L /xإ,ف ا
8رة .*ً/G
)(3LW
Vة
Lء ا( =1ا =7 - EX5ا9آ ا/وEAW;W
PX
أدر *+ح ا
'?Oإ
[ و4N) START Pء ا
('?O
و{رl/N kد x ^O7Gز 4Nء ا
G* /8, .'?Oر
4Nء ا
'?Oا
8+ '}+, U
،'/7أو*4UW ًG*G
'/7,ا
!/ك .إذا 4,أ '?OGا
!/كx ;<8 ،ز
4Nء ا
'?Oأو>3 ًG*Gل ¢ 10اٍن .إذا {4ث ذ
،
zدر *+ح ا
'?Oإ
[ و) LOCK Pا
('+وا *_
10إ
[ ¢ ¢ 15آر إxاء 4Nء ا
'?Oا
7دي.
إذا
M< 8أ =1(Wا9ك
!<~9W
• !Gول أ4ًNا '?OGا
8رة |8Nا
<د أو أي
ا' أ3ى <7s>
'Nل * D+Uا
اء ا
Iص
/}
Nم ا
: .^Iن ذ
< |8, 4ر sر
ري *, 4< Áx+دي إ
[ إ
93 }Is Nة.
)(3LW
(3LW) !<~9W
• !Gول د Pأو !| ر4
Gء '?OGا
8رة.
ا
8رات ا
~/ودة { '<UNآ أو4N _/, G*Gء
kDN ]?OGا
j7N '}, 4 .,9ا
<د
ا
!/ق إ
[ ا
!/ل ا
!+ز l/N '7Oد دوران
ا
!/ك *, /دي إ
[ ;]Gا
!/ل وا
8رة.
• ªذا آ ا
9ر _/ ،!O* ,ا4Iام
أ>ك ُ*َ~ِ7زة ]!}ل U!s []Wا
4ء *_ 9Nر,
ُ*~7زة أو *_ رة أ3ى .و '/,ذ
ا
Uع *_
ا
93 '?Oرة { * ,9
N kD+UG ,
ا
}!! .را '?OG" Pxرة ذات 9Nر+7 ,
4INام 9Nر~7* ,زة" "* |l,أن ]7+G
ا
!ت ا
9ر " ]!}ل _* 4,~* []Wا
*]7/ت.
دون Vة
Lء ا( =7 - k L =1ا9آ
ا
وي PX
{ل 4Wم 4Nء '?OGا
!/ك 47NاGع إxاء "ا
'?O
ا
7دي", 4 ،ن ا
!/ك {
_,~UN) _,~U
N /
زا .(4ا? []W Lدوا ا
<د {[ '}Gإ
[ أر
ا
8رة ¢أ []W *4< ^NهDا ا
'?OG P* Pا
!/ك.
و,دي اGع ه kDا
9Iة إ
[ ر Pأي *4ار زا _* 4ا
<د
{ل /ا
!/ك.
!&MHW
و
4{ PU/Gوث ا
]; lNز 4Nء ا
ªN G ،'?Oدارة
ا
!/ك :آ *_ ¢ 15ا
/ة ا
ا{4ة .ا *_
10إ
[ '< ¢ 15إxاء ا
!/و
*ة أ3ى.
وإذا آن ا
!/ك {
4, 4 ،/أ ا
4وران و
U
4+,إ
[ ا
<9ا
_* U/Gا/ار ا
4وران 4UW
إ>Fق ا
+/ح4!, *4UW .ث ذ
،ا /إدارة ا
!/ك
* Pا
[]W L?pدوا ا
<د {[ N '}Gإ
[ أر
ا
8رة .أ ^]Fدوا ا
<د وا
+/ح l/Nد دوران
ا
!/ك .>8N
إذا ُ ِ,ا
!/ك أي إsرة 4Gل 4N []Wء ا
47N '/7
*!و
إدار _G* Gة آ' * P* ¢ 15 Uا{+ظ
4Nوا ا
<د []Wا:رضG |l, ،ار إxاءات
"ا
'?Oا
7/د".
٢٢٥
إ#اءات
Lء ا(=1
<' 4Nء '?OGا
8رة؛ ا Lا
،47/وا Lآ' *_
ا
/ا ,ا
4ا ]3وا
Iر ،xوأ{ ر LNأ{~* ا*:ن.
!<~9W
• ?* 4UWدر Gا
8رة < ،داً3ªN /اج { ا
wG+/
*_ <ص ا
'?Oو< '+Nا
8رة.
• Gك أ4ًNا ا+F:ل +/Nده ا
8رة أو
w/8G
<Nاب *_ رة *.]+
• G 47,ك ا+F:ل ا
8رة *_ دون *ا< أ*ًا
ً93ا :ب 4,4Wة}, 4 .ب ا+F:ل أو ا3Æون
N
ªNت 93ة أو * ./و |l ]Wا
[]W U
ا+F:ل 47Nم g/ا*' ا
<; أو دوا ا
+ا*' أو
ذراع ا
.'U
)(3LW
(3LW) !<~9W
• Gك { ا
wG+/ا
8رة أو
Nب * Uأو
*ن _/,ا+F:ل *_ ا
ل إ
،و Gك
*+ح ا
8N '?Oرة *~ودة ~/Nة د3ل ا
8رة دون
*+ح ™ Keyless Enter-N-GoوP
) ACCا
!]/ت( أو وON/RUN P
)ا
/'?Oا>9ق( W9 .ا+F:ل '?OG
ا
Uا Dا
<9
N ]*7وأزرار ا
! ا3:ى أو
,!Gا
8رة.
=7ا9آ ا
وي -إذا آ ارة Vودة ~L
ا4Iم ا*' ا
<; P ¢ ،ذراع ا
'UوP
) NEUTRAا
> ¢ ،(^O7Gا? []W Lدوا ا
jN
<' '?OGا
8رة .ه kDا
8رة *~ودة UNم LG* '?OG
.jN
Nو
_ '/7Gإ 4UWا
[]W L?pدوا ا
jN
.*ً/G
ُ+ز ا
3XاPX EL
و) 4L Pا
P4ا
WNا
4G ،(j+IU/أ ا
8رة
ا
j?N '/7ا
/W Uإذا آن < G 4ا
[]W L?pدوا
ا
jNأم .وه kDا
~/ة _8!Gا:داء []Wا
9ق ا
Wة
٢٢٤
*_ >3ل ا
/8ح ]8رة 4
Nء و) 4L Pا
P4
ا
WNا
(j+IU/دون ا
! xإ
[ ا
[]W L?pدوا
ا
" Áp, .jNء * sو Pا
P4ا
4UW "WN
G ?Gوس ]Wا
'Uإ
[ هDا ا
.P
=7ا9آ ا/و - EAW;Wإذا آ ارة Vودة ~L
< '?ONا
!/ك * Pوxد ذراع ا
'UوP
) NEUTRALا
> (^O7Gأو ) PARKا
<;(.
ا4Iم ا
+ا*' <' ا
'Uإ
[ أي 9ق *_ <9ت ا
دة.
Lء ا( =1اDدي
y5< h :GZا( =1اDدي 9ك ';اء أآن
Lرًدا أو دا ًXا 1dا 35Pأو ا 1dاDدي
دوا' ا;;7د.
]W /ى 4Gو+* ,ح ا
'?Oإ
[ وSTART P
)4Nء ا
4N 4UW k,!G ¢ ('?Oء '/Wا
!/ك .إذا 4,أ
'?OGا
!/ك >3ل ¢ 10اٍنz ،در *+ح ا
'?O
إ
[ و) LOCK/OFF Pا
/'+إ,ف ا
،('?Oوا
*_ 10إ
[ ¢ ،¢ 15آر إxاء "ا
'?Oا
7/د".
• K<VHLا;اء ا. . . . . . . . . . . . . . . . EPH
• دة EX MMTا. . . . . . . . . . . . . . . K<VHM
• ا;اد ا Xdإ ا;;7د . . . . . . . . . . . . .
• إ Xا;;7د . . . . . . . . . . . . . . . . . . . . .
• 5n =7ء MDW 9Xا;;7د )5nء ا. . . . (K<VHM
• ' y9ا;5Pرة . . . . . . . . . . . . . . . . . . . .
• <DWت ا y9ا. . . . . . . . . . . . . . . D
• أوزان ' y9ا;5Pرة )h
Dت أ 7وزن ;5Pرة(
• وزن ا;5Pرة ون ا. . . . . . . . . . . y9
• M5ت ا. . . . . . . . . . . . . . . . . . y9
• > y9' vا;5Pرات . . . . . . . . . . . . . .
• ا Kأ =#ا'hم )VH L jkل ،=PHإ¾. (.
• ' y9ه~| ارة ' jkرة أkى . . . . . . . .
• ا Kأ =#ا'hم +ُ -ز ا
3Xا. . . . EL
.
.
.
.
.
.
.
.
.
.
.
.
.
.
.
.
.
.
.
.
.
.
.
.
.
.
.
.
.
.
.
.
.
.
.
.
.
.
.
.
.
.
.
.
.
.
.
.
.
.
.
.
.
.
.
.
.
.
.
.
.
.
.
.
.
.
.
.
.
.
.
.
.
.
.
.
.
.
.
.
.
.
.
.
.
.
.
.
.
.
.
.
.
.
.
.
.
.
.
.
.
.
.
.
.
.
.
.
.
.
.
.
.
.
.
.
.
.
.
.
.
.
.
.
.
.
.
.
.
.
.
.
.
.
.
.
.
.
.
.
.
.
.
.
.
.
.
.
.
.
.
.
.
.
.
.
.
.
.
.
.
.
.
.
.
.
.
.
.
.
.
.
.
.
.
.
.
.
.
.
.
.
.
.
.
.
.
.
.
.
.
.
.
.
.
.
.
.
.
.
.
.
.
.
.
.
.
.
.
.
.
.
.
.
.
.
.
.
.
.
.
.
.
٢٩٠..
٢٩١..
٢٩١..
٢٩١..
٢٩١..
٢٩٣..
٢٩٣..
٢٩٥..
٢٩٦..
٢٩٦..
٣٠٠..
٣٠٢..
٣٠٢..
٣٠٣..
٢٢٣
•
•
•
•
•
٢٢٢
.
.
.
.
.
.
.
.
.
.
.
.
.
.
.
.
.
ا+رات ;D -ت . . . . . . . . . . . . . . . . . . . . . . . . .
• 1ا+ر . . . . . . . . . . . . . . . . . . . . . . . . . . . . . .
• 1ا;اء EXا+رات . . . . . . . . . . . . . . . . . . . . . . .
• 1ا+ر (. . . . . . . . . . . . . . . . . . . L =1
• ا+رات ذات ا5ت ا. . . . . . . . . . . . . . . . . . . . . <5P
• أ;اع ا+رات . . . . . . . . . . . . . . . . . . . . . . . . . . . . .
• ا(X H =1اغ ا;اء Kا+رات – إذا آ ارة Vودة . . ~L
• ا+رات ا - +hإذا آ ارة Vودة . . . . . . . . . . . ~L
• دوران ا+ر ا<. . . . . . . . . . . . . . . . . . . . . . . . . 3
• ilات jWا
ا'ت . . . . . . . . . . . . . . . . . . . . . . . .
• ا+ر . . . . . . . . . . . . . . . . . . . . . . . . . . . . . .
• ا'
Mال ا+رات . . . . . . . . . . . . . . . . . . . . . . . . . . .
' ='Zا+رات )أV#ة ا. . . . . . . . . . . . . . . . . . . . . (y9
-;Wت ; 1W Kا 37ا+رات . . . . . . . . . . . . . . . . . . . . .
Gم ا 1 M7ه;اء ا+رات ). . . . . . . . . . . . . . . . (TPMS
• اGHم ا. . . . . . . . . . . . . . . . . . . . . . . . . . . . . E''/
• اGHم ا - Vإذا آ ارة Vودة . . . . . . . . . . . . . . ~L
• G =5DWم ا 1 M7ا+رات ) - (TPMSإذا آ ارة Vودة ~L
M5ت ا;;7د 9 -آت ا. . . . . . . . . . . . . . . . . . . . . . K<VHM
• ا};ل . . . . . . . . . . . . . . . . . . . . . . . . . . . . . . . .
• ا<};ل . . . . . . . . . . . . . . . . . . . . . . . . . . . . . . . . .
.
.
.
.
.
.
.
.
.
.
.
.
.
.
.
.
.
.
.
.
.
.
.
.
.
.
.
.
.
.
.
.
.
.
.
.
.
.
.
.
.
.
.
.
.
.
.
.
.
.
.
.
.
.
.
.
.
.
.
.
.
.
.
.
.
.
.
.
.
.
.
.
.
.
.
.
.
.
.
.
.
.
.
.
.
.
.
.
.
.
.
.
.
.
.
.
.
.
.
.
.
.
.
.
.
٢٧٣..
٢٧٣..
٢٧٤..
٢٧٤..
٢٧٥..
٢٧٥..
٢٧٦..
٢٧٧..
٢٧٨..
٢٧٨..
٢٧٩..
٢٧٩..
٢٨٠..
٢٨١..
٢٨٢..
٢٨٣..
٢٨٥..
٢٨٩..
٢٨٩..
٢٩٠..
٢٩٠..
٢٤٨.. . . . . . . . . . . . . . . . . . . . . . . . . . . . . . ق وة+ دةP
اDL •
٢٤٩.. . . . . . . . . . . . . . . . . . . . . . . . . . . . . . . . . . . . . زVD& ا#;ا
٢٤٩.. . . . . . . . . . . . . . . . . . . . . . . . . . . . . زVD& ا#; '>= ا9X •
٢٥٠.. . . . . . . . . . . . . . . . . . . . . . . . . . . . . . . . . . . . . . j7;ا= اX
٢٥١.. . . . . . . . . . . . . . . . . . . . . . . . . . . . . . . . . . . . . . . =م ااG
٢٥١.. . . . . . . . . . . . . . . . . . . . . . . . . . . . = ااEX EوA ا8A9م اG
٢٥١.. . . . . . . . . . . . . . . . . . . . . . . . (ABS) قZ1Z Dم اا= اG •
٢٥٢.. . . . . . . . . . . . . . . . . . . . . . . . . . . . (TCS) اEX 8A9م اG •
٢٥٣.. . . . . . . . . . . . . . . . . . . . . . . . . . . . (BAS) =م ااG •
٢٥٣.. . . . . . . . . . . . . . . . . . . . . (HSA) تDW= ا1(
ء اL •
٢٥٦.. . . . . . . . . . . . . . . . . . . . . . (ERM) EوAب اZPh اjcW مG •
٢٥٦.. . . . . . . . . . . . . . . . . . . . . (ESC) EوAار اP'h اEX 8A9م اG •
j7;W il ( و;ءESC) EوAار اP'h اEX 8A9م اG =5/(HW il • ;ء
٢٦٢.. . . . . . . . . . . . . . . . . . . . . (ESC) EوAار اP'h اEX 8A9م اG
٢٦٢.. . . . . . . . . . . . . . . . . . . . . . (TSC) ;رة5P اv#رW EX 8A9• و
ة ا
٢٦٣.. . ~L ودةV ( — إذا آ ارةHDC) تDW اK ولVH اEX 8A9م اG •
٢٦٤.. . . . . . . . . . . . . . . . . . . . . . . . . . . . . . . . . . ر+ اZ' ;تD
٢٦٤.. . . . . . . . . . . . . . . . . . . . . . . . . . . . . . . . . . . . ر+ت اZ •
٢٦٨.. . . . . . . . . . . . . . . . . . . . . . . . . . . . . . . (TIN) ر+ اj<DW 87• ر
٢٦٩.. . . . . . . . . . . . . . . . . . . . . . <تDرات وا+L PDت ا95 • ا
٢٧٠.. . . . . . . . . . . . . . . . . . . . . . . . . . . . . . . رات+;ط ا1• ; و
٢٢١
•
•
•
•
•
•
•
•
•
•
•
٢٢٠
=7ا9آ ا
وي -إذا آ ارة Vودة ٢٣٣.. . . . . . . . . . . . . . . . . . . . ~L
• =Pاوس ٢٣٤.. . . . . . . . . . . . . . . . . . . . . . . . . . . . . . . . . . . . .
• اPhل إ Wس أ٢٣٥.. . . . . . . . . . . . . . . . . . . . . . . . . . . . . . . . . =7
• ا =PHإ Wس ا;#ع ٢٣٦.. . . . . . . . . . . . . . . . . . . . . . . . . . . . jc
G =1(Wم ا
3XاV) ELة ® COMMAND-TRAC Iأو Vة ®(ROCK-TRAC
٢٣٦.. . . . . . . . . . . . . . . . . . . . . . . . . . . . . . . . . . . . . . . . . . . . .
• إرiدات/ا+ت ا(٢٣٦.. . . . . . . . . . . . . . . . . . . . . . . . . . . . . . =1
• أوع ا٢٣٨.. . . . . . . . . . . . . . . . . . . . . . . . . . . . . . . . . . . . . =PH
• إ#اءات =Pا ٢٣٨.. . . . . . . . . . . . . . . . . . . . . . . . . . . . . . . . .
;9 =7ر ا
وران ) =7ا ®+ُ - (TRAC-LOKز ٢٣٩.. . . . . . . . . . RUBICON
yd7 = Xار v#اAو - Eإذا آ ارة Vودة ٢٤٠.. . . . . . . . . . . . . . ~L
إرiدات اPدة ا٢٤١.. . . . . . . . . . . . . . . . . . . . . . . . . . . . . . . <5
إرiدات اPدة ا5ق ا;ة ٢٤١.. . . . . . . . . . . . . . . . . . . . . . . . . . . .
• إزا ا
ر #ا — Mإذا آ ارة Vودة ٢٤١.. . . . . . . . . . . . . . . . . ~L
• أ''ت اPدة ا5ق ا;ة ٢٤٢.. . . . . . . . . . . . . . . . . . . . . . . . . .
•
cWم 5ق ) 4Lا
3Xا ELا٢٤٢.. . . . . . . . . . . . . . . . . . . (bcH
• ا اVا Hو- =1(Wم اHkhق٢٤٣.. . . . . . . . . . . . . . . . . . . . . . . .
• اPدة ا5ق ا} وا H5وا ٢٤٣.. . . . . . . . . . . . . . . . . . . . . .
• Wوز ا;Dا> )ا ;cر وأ< ٢٤٤.. . . . . . . . . . . . . . . . . . . . . . ( +H
• ;D-د اDWت ٢٤٥.. . . . . . . . . . . . . . . . . . . . . . . . . . . . . . . . . . .
• اPدة +ق ;1رة ٢٤٧.. . . . . . . . . . . . . . . . . . . . . . . . . . . |L
٥
ا
Mء وا(=1
•
•
•
•
.
.
.
.
.
.
.
.
.
.
.
إ#اءات
Lء ا(. . . . . . . . . . . . . . . . . . . . . . . . . . =1
• =7ا9آ ا
وي -إذا آ ارة Vودة . . . . . . . . . . ~L
• =7ا9آ ا/و - EAW;Wإذا آ ارة Vودة . . . . . . . ~L
•
Lء ا( =1اDدي . . . . . . . . . . . . . . . . . . . . . . . . . .
• إذا
M< 8أ =1(Wا9ك . . . . . . . . . . . . . . . . . . . . . . .
• ا <
i P5اMودة )أ 20- K =7در <X #أو 29-در(<; #
•
L DLء ا(. . . . . . . . . . . . . . . . . . . . . . . . . . . =1
'cن آ ا9ك -إذا آ ارة Vودة . . . . . . . . . . . . ~L
=7ا9آ ا/و - EAW;Wإذا آ ارة Vودة . . . . . . . . . ~L
• Gم Wا Lو 3ا; 3 j7ح ا(. . . . . . . . . . . . . . =1
• Gم Wا Lاا= =7/ا9آ . . . . . . . . . . . . . . . . . . . .
• =7آ أو E'k EAW;Wات — إذا آ ارة Vودة ~L
• 75ت اوس . . . . . . . . . . . . . . . . . . . . . . . . . . . .
ا Dا/و. . . . . . . . . . . . . . . . . . . . . Autostick AW;W
• ا(. . . . . . . . . . . . . . . . . . . . . . . . . . . . . . . . =1
.
.
.
.
.
.
.
.
.
.
.
.
.
.
.
.
.
.
.
.
.
.
.
.
.
.
.
.
.
.
.
.
.
.
.
.
.
.
.
.
.
.
.
.
.
.
.
.
.
.
.
.
.
.
.
.
.
.
.
.
.
.
.
.
.
.
.
.
.
.
.
.
.
.
.
.
.
.
.
.
.
.
.
.
.
.
.
.
.
.
٢٢٤..
٢٢٤..
٢٢٤..
٢٢٤..
٢٢٥..
٢٢٦..
٢٢٦..
٢٢٦..
٢٢٦..
٢٢٨..
٢٢٨..
٢٢٨..
٢٢٩..
٢٣٢..
٢٣٢..
٢١٩
٢١٨
ا7ات إ
اد ا EX 8A9ا;/ال ا;< اc
٢١٧
ارة أHء ا5D
Z<Vت ا K 3Pا;Hا ~XاM
أي و< Gم ,ªNف ا
8رة أو _W ;<G
ا4Iا* )أU¢ء _W: (>ً* ]9Wأو أآ < '?ON
م *; ا
اء أU¢ء FGا
!/ك 4/ة 5د<^ ً,G
و Pا
اء ا
Uو Wا
/و{ ا
}ى .إن ا
م
U]
ًU* ً,~G _/p
DNم ]' إ* ;]G
ا
4UW LpإWدة '?OGا
Uم.
DU]
P
',~* D+U* 4x,ة ا
[]W lآ' _* |x
xا| { أ~xة ا
س '/7G .ه kDا
DU/ا
]N
] xG []W Lpا
اء klGا
Uا Dا
lأU¢ء وxد
ا
Uم أوع ا:ر أو ا
~/ج أو إزا
ا
pب, .
xGا
اء klGا
Uا Dا
U/,رؤ ,ا
/ا,
ا
Iر.
>3 _* x
Wاآ 8اMdب ا;Hا~X
ا ~XHاcر;k
#ل ا;اء
و _/,إزا
ا
pب ا
P/l/ا
4ا []W '3ا
~xج
اªN W8N **:دارة ذراع ا3ر ا
Pإ
[ وP
*~ ',ا
} .Pو _/,ا4Iام و ',~* Pا
}/P
ا:ر ] []W !/ء ا
~xج ا **:و ,4Gا
4
ا
.وإذا أ
wب ا
Uا _/ ،]O* '/, Dز,دة
Wا
/و{, 4< .اآ ا
pب []Wزxج ا
8رة *_
ا
4ا '3ا,:م ا
9//ة أو ا
.F
zGآ4W _* 4م وxد أsء *' أوراق اls:ر وه
{ل !ت إد3ل ا
اء ا
ا< 7أ*م ا
~xج ا4 .**:
']Gأوراق اls:ر ا
/اآ{ /ل !ت إد3ل ا
اء
*_ *4ار ا
اء ا
4ا '3وGدي إ
[ ا?>ق !ت ;,}G
ا
/ء .و }' ا
OءzG ،آ DU* ]3 _* 4د3ل ا
اء
*_ ا
4]lوا
_9وا
]¡.
y< h :GZا'
cام إدة
Wو< ا;اء دون
jA =1(Wا;اء ات < h <;+اآ8
اMdب.
٢١٦
Xه;اء jAا;اء — إذا آ ارة Vودة
~L
;* ] PU/,ا
اء * 7ا
اب وا
Dرات ا
_* <4
ا
34ل إ
[ ا
}/رة .و '/7,ا
P* ]+ا
اء ا
دم *_
3رج ا
8رة وا
اء ا
7/د 4Gو k,دا}* '3رة
ا
آب .را" Pxإxاءات ا
}" <
" 8
ا
8رة" ]!}ل *]7* []Wت ]
_Wهاء
*; ا
اء أو را Pxوآ] ا
}!]
4/7/ل []W
ا
} .را" Pxد
' ا
} وا
/pن" 7/ا
+ات
ا
~* }
Uا
.G>+
• ا
W EX 8A9و< ا;اء
!,ا
Uم إWدة 4Gو ,ا
اء
أو .ًG*Gإ أن ا
[]W L?pزر ا
!
إWدة 4Gو ,ا
اء []W '/7,وP
ا
Uم و PإWدة ا
4و.<* 'ON ,
و _/,ا+دة 4UW
DNوxد أد U3أو روا wأو أNG
أو ر .
W NFودي إWدة 4Gو ,ا
اء إ
[ إءة
ا
s/ا
pزر ا
! .
:GZ
• Hو 3ح ا( EX =1و) LOCK 3ا(=P
< 8إ<Pف Vة
Wو< ا;اء.
• EXا P5اMرد l< 7دي ا'
cام
Wو< ا;اء إ
ااآ 8اMd j}Aب ا;Hا .~XوkL v<ُ hر
و 3إدة
Wو< ا;اء EXو 3إزا ا 3P
jGHW K9ا;Hا=5DW 8< .~X
) Recirculationإدة ا
و<( أوEX ًAW;W
<
9Wه~ا ا;.3
• K 8H< 7ا
c'hام ا;5ل دة
Wو< ا;اء
3WاMdب ا;Hا .~Xإذا
Lأ ;AWن اMdب
اV#/اء ا
ا K kا;Hا 1X ،~Xزر إدة
Wو< ا;اء ;Dدة إ ا'
cام ا;اء اcر
7 .E#
z bDL yMWوف در #ا9ارة/اjAW EX L;+
ا;اء ا
ا Ekا;M9س ا;Hا ~Xوإ 7اؤ<.
~ا ا v< K ،yMاGHم kLر و
W 3و<
ا;اء أHء ا;ا EX #و 3إزا ا .3Pإن
9و ا'
cام و 3إدة
Wو< ا;اء EXه~ا
ا; EX yM< 7 3وM bح LEDا;;#د
EXزر ا K &7;W 8 8A9اءة.
• < 8GD HAا; 7ا~ي ;Wا EX &X #و 3ا(=1
ا/و =P EAW;WاGHم 7l =A(Lإ و 3إدة
Wو< ا;اء 1dLزر إدة ا
و< .و،KA
z =z EXوف ،HDأHء ا;ا EX #ا;3
ا/و;P< ،EAW;Wم اGHم koLاج ا;اء 9X Kت
إزا ا ;W H .3Pا Xه~| اGوف وا 1d
زر إدة
Wو< ا;اء b;< ،ا.5H< 8 il
و< EHDذ أ& HA< hاPhل إ و 3إدة
ا
و< ه~| اة .إذا آ EX ynW HاPل اGHم إ
و 3إدة
Wو< ا;اءbMP <9W yX ،
ا/وع أوً hإ أوع ) Panelا;( أو
) Panelا;( E>H) Bi-Level/ا;ى( 8
ا 1dزر إدة
Wو< ا;اء .و =PWه~| اVة
KإW Aاآ 8اMdب ا~XHة.
إرiدات ا(=1
:GZرا 3#ا
ول ا;;#د < EXه~ا ا8P
Dف إ
ادات ا 8A9اG Pوف اP5
ا.;H
ا( = X EX =1ا j
,/{ |l,م ' 4,Gا
!/ك 4INام ' 4,G
* 4/l]
Pذي xدة _* />* ,/{ Wا
¤آ'
و
PU/ار+Gع ا
+/ط {ارة ا
!/ك4IN [
,ُ .ام
*!]ل ' ا
4,ذو UGات ا
(OAT) ,p7
50% 8UNوا
Dي ]9/N +,ت *7ر ا
/اد ا
O
MS-12106آ Chryslerو* 50%ء .ار Pxإ
[
"إxاءات ا
}" ا
اردة "
ا
8رة" 3ر
' ا
4,ا
.|U/
ا( = X EX =1ا(ء
و ُ4IN w}U,ام 4Gو ,ا
اء ا
4ا>3 ]3ل }'
ا
Oء P/lG |8, 4< :ا
pب []Wا
Uا.D
٢١٥
ح 8A9Wاو
]!}ل []Wا
'?Oا
*'
أو '?OGا
/و{ ا
*'،
أدر ا
j/إ
[ ا
P
)أو.(G*G
AUTO
W P 4,4!G _/,ت
]/و{ آٍ' 4{ []Wة
ا
Pا
4وي .إ,ف
'?OGا
/و{ و Pا,ف.
lG '?O/]
_/,وز ا
) AUTO Pأو?
(G*G
Gز ^4G P,ا
اء ªNدارة * jا
! ا
P
)ا
x/د []Wا
(_/إ
[ أ{ 4ا:وع ا
:
• و) Panel 3ا;(
xG ,ا
اء *_ >3ل ا
DU/ا
x/دة
{ أ~xة ا
س .و ]G L _/,ا
DU/
^4G xا
اء.
:GZ
< ; ~XH &#;W KAأV#ة اPس #;W 8< 9L
|WLرآب ا DPا; 9 Ecل أX
W 7
ه;اء .jc
٢١٤
• و E>H) Bi-Level 3ا;ى(
xG ,ا
اء *_ >3ل ا
]{ وا
DU/ا
.]+8
:GZ
3 MHLا
ادات ا ا <Mا =AواKc
ا =AهHك اZkف EXدر #ا9ارة KLا ~XHا<;D
وا &< .ا;اء ا/آ} د ًXإ ~XH
ا/ر .وه~| اVة
ً<V X;Wا Kاا أHء ا
z EXوف ا P5اMرد ;5' 3ع ا(.
• و) Floor 3ا/ر(
xG ,ا
اء *_ >3ل * DUا:ر
Nإ
[ *4ار <]' *_ ا
اء *_ >3ل
*D+Uي إزا
Pوإزا
ب ا
Uا Dا
.l
• و) Mix 3اVج(
xG ,ا
اء *_ >3ل ا:ر و* DUإزا
ا
pب و* DUا
Uا Dا
.lو '/7,هDا ا
Lp
}Nرة أ 'pا
وف ا
ردة أو أU¢ء ه9ل
ا
]ج ،وا
UًI8G |]9Gإً ]~xج ا .**:وw]},
هDا ا
+!]
Lpظ 8* []Wى را{ ا
آب *8* ']G Pى
ا
NFا
[]W 7/l/ا
~xج ا.**:
• و) Defrost 3إزا ا (3P
xG ,ا
اء *_ >3ل * DUا
~xج
ا **:و* ',~* DUا
NFا
Iص x~Nج
ا
Uا Dا
.lا4Iم هDا ا
'?OG P* Pا
/و{
[]Wأ<}[ در xو Lإ4Wادات در xا
!ارة زا
ا
pب ا
[]W P/l/ا
~xج ا **:وا
Uا Dا
l
.'s 'pzN
• ح ا jA EX 8A9ا;اء
ا? []W LهDا ا
~ر '?O
*; ا
اء أU¢ء ا
'?O
ا
4وي '?OG 4UW .L
*; ا
اء ^4 ،ا
اء
ا
رد * j+IUا
_* NF
ا
4!/دة
ا
DU/
>3ل
4INام <ص ا
!
ا
.Pو,دي ا
[]W L?pهDا ا
~ر *ة أ3ى إ
[
إ,ف ;* '?OGا
اءp, .ء * sا
~ر
4UWا3ر '?OGا
4, Lpوً.,
٢١٣
و 4lأن ا
Uم +N '/7,ءة *][ إذا Gآ }N '/7,رة
أو, .G*Gدي ا3ر و Pإ,ف ا
"O" '?O
*+ح ا
! /
Nو{ إ
[ إ,ف ا
Uم *ً/Gوإ>ق
* D3zا
اء ا
Iر.x
7Gدر xا
!ارة 22در 72) ,* xدرx
(,ه ا4Wاد ا
ُ N [
/أ<}[ را{
] IOا
7دي ،و
_ ذ
<.3Æ Is _* ;]I, 4
:GZ
• < M KAإ
اد در #ا9ارة EXأي و 7دون
ا ا( =1ا/و.EAW;W
• <lدي ا 1dزر jA 8A9Wا;اء أHء ا;ا
#
EXا;) AUTO 3أو (EAW;Wإ و bاil
ا EX E>;dح اZ 8A9ث ات 8ا(< .&>5
ذ إ أن اGHم EXا;) AUTO 3أو(EAW;W
وأ& هHك ورة jA y5ا;اء.
٢١٢
• إذا
Lا ;ى أداء jAا;اء K dًcH
ا; jA j}A P 9XX ،37ا;اء ا;;#د
P EXااد< K c Wا LW/أو ا(9ات
ا;AW 7 Eن jG .& DاL j}Aش اء
& jk K XLااد< WوZk Kل ا
7 .j}A
; =PWاد ا <9ا X
W K PL Hا;اء
إ ا; K =P< ،j}Aى أداء ا.jA
• Hا( EX =1و) AUTO 3أوh ،(EAW;W
<( DاGHم أو ًAW;Wو;#د اMdب أو اذاذ أو
ا
ا#Vج ا <
9W y< .E/و 3إزا
ا
< 3Pوً< vا#Vج ا E/وا#Vج ا.EM
ا( =1ا
وي
,هDا ا
Uم *~* _* ]** W/lات ا
lوز
ا
4وي وا
Gن *_ "ا
Pا
/]
'p+/و{
أو "G*Gأو "ا
Pا
'p+/أو "G*Gأو
"ا
/و{ وا
Pا
'p+/أو ."G*GوهDا U7,أن
ا
lG U/, '?O/وز ا
/و{ أو ا
Pأو ا.7ً* _U¢
هUك 9ق ] Lpا
4وي ]/و{ ¦و<ت ا
,ن
ا4Wاد ) AUTOأو* (G*Gب _/, .
Lا
/و{ []Wأي 4!* Wدة 4G ^,F _Wو,
* jا
! ا
/و{ )ا
x/د []Wا
8ر(.
7 #<ُ :GZاءة
#ول G =1(Wم ا8A9
ا/و EX EAW;Wدر #ا9ارة D E< Xف
ا.=-
ح jA 8A9Wا;اء
*; ا
اء{ .ك *+ح ا
! در xا
!ارة 47N
ذ
إ
[ در xا
!ارة ا
.N]9/
ا? []W LهDا ا
~ر '?O
*; ا
اءp, .ء أ{4
ا
'?OG 4UW wN}/م
*; ا
اء OG .إدارة
ا
ص إ
[ ا
8ر إ
[
ا
9U/ا
~ر<ء *_ ا
/س
إ
[ درxت ا
!ارة ا'<:
OG /UNإدار Gإ
[ ا
_/إ
[ ا
9U/ا
!/اء إ
[
درxت ا
!ارة ا.[]W:
Gم ا 8A9ا/و EX EAW;Wدر #ا9ارة )- (ATC
إذا آ ارة Vودة ~L
jA n =D< h :GZا;اء <=1(W 8
ا9ك ; 10 ;9Hاٍن.
• إ
اد ) MAX A/Cا 9ا jA 7/ا;اء(
]!}ل []Wأ<}[ '?s ،4,Gزري ;*) A/C
ا
اء( وإWدة ا
4و g+ ,ا
<.
• و 3ا( =1ا 7hدي
إذا ر و Pا
'?Oا<}دي []W L? ،زر
;*) A/Cا
اء( +Fء ء ا
s/وL
أدر * jا
! ا
) Pا
x/د []Wا
(_/
و* jا
! ا
/و{ )ا
x/د []Wا
8ر( إ
[
ا
) AUTO Pأو.(G*G
=D< :GZا;) AUTO 3أو (EAW;W
أ =dXو MHL &#آب ا DPا.PX E/
ح 8A9Wدر #ا9ارة
ح ا 8A9ا/و EX EAW;Wدر #ا9ارة
ا( =1ا/وEAW;W
,م م ا
! ا:و4N G*Gر xا
!ارة !/
N
أو []W ًG*Gدر xا
!ارة آ UNا
8رة 4UW
ا
,8/ت ا
!,/ا
'<ِ _* N/ا
^8وا
اآ|.
أد '3در xا
!ارة ا
|Gأن N Ë+!,
ا
Uم ^,F _Wإدارة
* jا
! درx
ا
!ارةl/N .د ا3ر
ا
8/ى ا
Ë!, ،w,/
ا
Uم []WهDا ا
8/ى
أو4IN ًG*Gام م ا
.4و {ل 8* |]9Gى
ا
ا{ ا
]9/ب *~4ً,ا *_ *; ا
اء, ،م ا
Uم '/7N
ا
',47أو.ًG*G
إن '?OGا
Uم .,?]
L8N
٢١١
و) Floor 3ا/ر(
xG ,ا
اء *_ >3ل * DUا:ر
Nإ
[ *4ار <]' *_ ا
اء *_ >3ل
*D+Uي إزا
Pوإزا
ب ا
Uا Dا
.l
و) Mix 3اVج(
xG ,ا
اء *_ >3ل ا:ر و*DU
إزا
ا
pب و* DUا
Uا Dا
.lو'/7,
هDا ا
}N Lpرة أ 'pا
وف ا
ردة
أو أU¢ء ه9ل ا
]ج ،وا
UًI8G |]9Gإً ]~xج
ا .**:و w]},هDا ا
+!]
Lpظ 8* []Wى را{
ا
آب *8* ']G Pى ا
NFا
[]W 7/l/ا
~xج
ا.**:
و) Defrost 3إزا ا (3P
xG ,ا
اء *_ >3ل * DUا
~xج
ا **:و* ',~* DUا
NFا
Iص x~Nج
ا
Uا Dا
.lا4Iم هDا ا
'?OG P* Pا
/و{
[]Wأ<}[ در xو Lإ4Wادات در xا
!ارة زا
ا
pب ا
[]W P/l/ا
~xج ا **:وا
Uا Dا
l
.'s 'pzN
٢١٠
jA n =D< :GZا;اء EXآ= KوED
) MixاVج( و) Defrostإزا ا (3Pأو K k
ه~< Kا; KDإذا 8W 7 KA< 8ا 1dزر A/C
) jAا;اء(l< .دي ذ إ ; =PWى اEX L;+
ا;اء ة jWا#Vج اK9 .E/
ا 7د<ت ا'Zك ا;;7د ،ا'
cم ه~| ا/وع PX
Hاdورة.
ا
W EX 8A9و< ا;اء
إ أن ا
[]W L?pزر ا
! إWدة
4Gو ,ا
اء دي إ
[ و Pا
Uم
و PإWدة 4Gو ,ا
اء .و _/,ا+دة
4UW
DNوxد أد U3أو روا wأو أ NGأو
ر .
W NFودي إWدة 4Gو ,ا
اء إ
[ إءة
ا
s/ا
pزر ا
! .
:GZ
• l< 7دي ا
c'hام ا ; 3إدة
Wو< ا;اء
إ Xد ا;اء ا;;#د
Lا =kارة؛ وl< 7دي
إ 3WاMdب ز#ج ا;Hا-;<ُ h .~X
c'hLام ا
~ا ا;.3
• z EXوف ا P5اMرد أو اl< ،y+دي ا'
cام
و 3إدة
Wو< ا;اء إ 3WاMdب
ا;Hا K ~Xا
اًG =kا ;Aن ا L;+دا =kارة.
ا kو 3ا;اء اcر K c E#اMdب
7 7Lر .KA
• < jA =Dا;اء أوW 3H ًAW;Wاآ 8اMdب
H
ا 1dزر إدة
Wو< ا;اء و Mح
ا EX 8A9ا; 3و) Panel EDا;( أو
و E>H) Bi-Level 3ا;ى(.
• < KAإ1ء jA <
9Wا;اء <
وً< دون
<
9W 1W
ح ا EX 8A9ا/وع.
• Hو 3ح ا( EX =1و) LOCK 3ا(=P
< 8إ<Pف Vة
Wو< ا;اء.
ح 8A9Wاو
أدر هDا ا
+/ح Uآ/
ا
اء ا
>3 _* 74U/ل م
ا
,أي و4!G Pد.k
W 4,~Gا
/و{ آ]/
{آ زر ا
! إ
[ ا
_/
*_ و Pإ,ف ا
'?O
"/]
."Oو{ W Pت.
ح 8A9Wدر #ا9ارة
أدر *+ح ا
! هDا U
در{ xارة ا
اء دا'3
*}رة ا
آب OG .إدارة
ا
ص إ
[ ا
8ر إ
[
ا
9U/ا
~ر<ء *_ ا
/س
إ
[ درxت ا
!ارة ا'<:
OG /UNإدار Gإ
[ ا
_/
إ
[ ا
9U/ا
!/اء إ
[ درxت ا
!ارة ا.[]W:
:GZإذا
Lا ;ى أداء jAا;اء K dًcH
ا; jA j}A P 9XX ،37ا;اء ا;;#د EX
Pااد< K c Wا LW/أو ا(9ات ا
7 E
;AWن jG .& DاL j}Aش اء & XL
jk Kااد< WوZk Kل ا; =PW 7 .j}Aاد
ا <9ا X
W K PL Hا;اء إ ا،j}A
<; K =Pى أداء ا.jA
ح ا EX 8A9ا; &#;W) 3ا;اء(
ا4Iم هDا ا
+/ح >3ر
*_ _Nأ/ط 4,4Wة زP,
ا
اء U/, .ا3ر ا
P
ا ،:آ /ه *w
Nا 9ا
s/ات ا
x/دة
+* []Wح ا
! ،أو L]3
*_ ه _,Dا
._7وآ]/
ا<ب *+ح ا
! *_ و4!* Pد ،زاد *47ل GزP,
ا
اء ا
Iرج *_ ا
.P
و) Panel 3ا;(
xG ,ا
اء *_ >3ل ا
DU/ا
x/دة
{ أ~xة ا
س .و ]G L _/,ا
DU/
^4G xا
اء.
:GZ
< ; ~XH &#;W KAأV#ة اPس #;W 8< 9L
|WLرآب ا DPا; 9 Ecل أX
W 7
ه;اء .jc
و E>H) Bi-Level 3ا;ى(
xG ,ا
اء *_ >3ل ا
]{ وا
DU/
ا
.]+8
3 MHL :GZا
ادات ا ا <Mا=A
وا Kcا =AهHك اZkف EXدر #ا9ارة KL
ا ~XHا <;Dوا &< .ا;اء ا/آ} د ًXإ
~XHا/ر .وه~| اVة
ً<V X;Wا Kاا أHء
ا z EXوف ا P5اMرد ;5' 3ع ا(.
٢٠٩
أ7اص CD/DVD
]!+ظ []Wأ<اص 4x { CD/DVDةGN < ،ع
ا{Fت ا
:
P* '*7G .1ا
ص *_ >3ل {ا وg/
|UlG
.!9
.2إذا ت []W PNا
ص w9 ;U ،ا
ص
/< 79Nش P* /Wا
_* w8/ا
;}U/إ
[ ا
!.
PpG .3أوراً< أو أ []W Fsا
ص و43 |UlGش
ا
ص.
4I8G .4م ا
/اد ا
'* ,D/ا
_,~Uأو ا
Uأو
ا
+U/ت أو ا
ذاذ ا
N]
P/ء ا.G
~3 .5ن ا
ص 47N ]Wاء .]?OG
7G .6ض ا
ص 7s:ا
g/Oا
s/ة.
~IG .7ن ا
ص { P+GGدرxت ا
!ارة ]?.,
٢٠٨
:GZإذا وا7 =1(W H A( #ص
PX ،KD
<;Aن اPص ) ًWآن <;Aن
cوً iأو أز< &PM+
اDآ أو & Diأو ر L;+أو اوة( أو & زا>
أو # .< VW &Xب أ
ا7/اص ا
ة =M7
ا &#;L Aإ kإZ-ح ( =1ا7/اص.
vWا EX 8A9در#ت ا9ارة
/م *; و 4Gا
اء ا
ا{ آ'
ا
وف * /آ {
ا
.g9
ا 8A9ا
وي G EXم ا
Xو jAا;اء
=1(Wااد<; وا;ا jWا;9
وف *, 4< ،U7دي '?OGا
;Gا
/!/ل
8Nر Gإ
[ '/Wا
ادO* 'ON ,ش أو *!.l ¢ً4
']G _/,هDا ا
¬,Oأو إؤ P<* ?N kها
ا
;Gا
/!/ل .وهDا ا
ً 7, ¬,Oرا
Nاد.,
إذا _,أداء ا
ادP* ?G P* [{ ً* ,
ا
ا j+IN w}U ،أو إ,ف
ت ا
اد ,أU¢ء
'?OGا
;Gا
]Iي 4W 4UWم ا4Iام م
®) Uconnectإذا آ ا
8رة *~ودة .(
DN
ا 8A9ا
وي EXدر #ا9ارة
Gن * wG+ا
! ا
4وي 4Nر xا
!ارة *_ ]_* ]8
ا<:اص ا
4ا ,ا
Iر xو* jNا
L?pا
4ا.]3
اD'hاض
,ا7اض x []Wز Nا
}ت UG W
®W .(Bluetooth (BTSAض **]7ت
ا U:ا
!
< 4ا
.L '?O
+* 7,ح ا
! ا _* _/,:ا
Uع ا
~از وه !,ي
[]Wزر < L?p]
'Nا
!, ;}U/درx
وو Pم ا
}ت P/ .ا
[]W L?pا
~lء ا
]7ي *_
ا
+/ح8* P+G, ،ى ا
}ت8* j+IU, /UN ،ى
ا
}ت []W L?p
Nا
~lء ا
.]+8
vWا EX 8A9ا ;ت ا;;#دة
اPدة
و,دي ا
[]W L?pا
~ر ا:و Lإ
[ '7xا
اد'U, ,
_Nا:وع ا
WU/ا
.{/
wG+* 4xGا
! 47Nُ _Wم ا
}ت []Wا
w98
ا
]l7
+]Iا
دة
N < .ل إ
[ ;]3ا
]l7
]
ل إ
[ ا
.wG+/
+* 7,ح ا
! ا _* 8,:ا
Uع ا
~از و!,ي []W
زر < L?p]
'Nا
.Lو ;]IGو+* +ح ا
!
ا>3N 8,:ف ا
Pا
Dي Gا.N 4x
و ], /و
ً+* '?OG ,9
+ح ا
! ا 8,:آ'
و.P
=1(Wااد<;
vWا EX DLُ K 8A9ا ;ت ) D Ek GHاPدة(
,دي ا
[]W L?pا
~lء ا
]7ي *_ ا
+/ح إ
[ "ا
!"
ا klGا
]7ي _Wا
9!/ا
ا
_/,ا/ع
إ
و,دي ا
[]W L?pا
~lء ا
_* ]+8ا
+/ح إ
[
ا
! ا klGا
_W ]+8ا
9!/ا
ا
_/,
ا/ع إ
.
,م ا
~ر ا
x/د +* ;}U/Nح ا
! ا;
N 8,:
إ
[ ا
9!/ا
ً8* Fp/ا
وا
<l*N /
4INام زر ا
Lpا
]
^8/اد.,
( =1ا7/اص ا+;1d
,دي ا
[]W L?pا
~lء ا
]7ي *_ ا
+/ح *ة وا{4ة
إ
[ ال إ
[ ا
8/ر ا
[]Wا
ص ا
?p/ط.
,دي ا
[]W L?pا
~lء ا
_* ]+8ا
+/ح *ة وا{4ة
إ
[ ال إ
[ 4Nا ,ا
8/ر ا
!
أو إ
[ 4Nا ,ا
8/ر
ا
^N8إذا آن p P,ن ¢ /¢اٍن *_ 4Nا'?OG ,
ا
8/ر ا
!
.
إذا < []W L?p
N /ا
+/ح []W:أو ،_G* '+:
'?OG 8ا
8/ر ا
،وإذا <>¢ L?p
N /ث *ات
'?OG 8ا
8/ر ا
،وهDا.
4xGو~]
+ر ا:و Lا
+/ح ا
~از ا8,:
'?O/ا
ص ا
?p/ط ا
ا{ .4أ* ~G 4UWو 4,ا
8رة
'?O/Nأ<اص *47* F?pدª ،ن ا
~ر ا:وI, Lر
ا
ص ا
?p/ط ا
ا
.'?O/
٢٠٧
jc ;ت- ز# <
9W
(BTSA) Bluetooth® HPW M ا ;تL
.ء4]
;G
][ زر اW L? ا.1
ل إ
[ م/!/
; اG
[ *_ ا/
اN _/,
.Uconnect® phone
اد( وا
}ة47" )اReady" 9* ر47N .2
Select Audio" '< ¢ ،(اد4W" )إSetup" '< ،
ا
.(~ة ا
}تx أ4,4!G) "Devices
]| *_ مFز ا
}ت أو اx <' ا.3
.~ة ا
}تx د أUconnect® phone
Eار ا
[]W L? أو ا،([]W: !N) SEEK UP م ا
~ر4Iا
ر8/
" )اNext Track" '< ¢ , ا
ادVR ا
~ر
;G
][ اW [ ا/
ر ا8* [
ا
( >ل إ
.,4
]يI
ا
Lار ا
VR ][ ا
~رW L? أو ا،'+: !N م ا
~ر4Iا
(^N8
ر ا8/
" )اPrevious Track" '< ¢ ,ا
اد
]يI
; اG
][ اW ^N8
[ ا/
ر ا8* [
>ل إ
.,4
[]W ]!}لUconnect® Radio *]!^ مPxرا
.Bluetooth® }ل *~ةG]*ت {ل ا7/
*_ ا4,~*
;<
ام أزرار اادc'L BTSA EX 8A9ا
][ ا
~رW * إL? ا،BTSA Pل إ
[ و34]
'< وVR ][ ا
~رW L? أو ا,
ادN "AUX"
ا
}تN) "Bluetooth Streaming Audio"
.(Bluetooth UG W
(=1( )اPlay 3و
~ةx أj7N أ4G _ أن/, ،BTSA P' إ
[ و,4
ا4UW
،رة8
][ م ا
}ت اW [/
?' اOG ا
}ت
ًز أوl
][ اW [/
ء ا4N |]9G ~ةx: اj7N _
و
_ إ<ان/, .Uconnect® phone ء ا
إ
[ م4N ¢
_/, _
وUconnect® phone مP* ~ةx أ7
.]?OG وL 4{ز واx 4,4!G
زر:([/
)ع اMUSIC TYPE ا
~ر
3 }ر3[( ه زر ا/
)ع اMUSIC TYPE
.N صI
ز ا
}ت اx []W [/
أاع ا/
!&MHW
أوxر3 USB ة4{ك وG |8, _ أن/, •
4,4s م( أي *نW4* زx )أو أيiPod®
}3 ?G رة8
' ا3ا
!ارة أو ا
ودة دا
داتsع إرGN < .زl
N ;]
?' أو إ
!ق اO
ا
.زl]
7U}/
اl
ا
أوiPod® زx []W ءs: اPدي و, _ أن/, •
زx ][ و
>تW أوxرI
اUSB ة4{و
[
رة إ8
اxرI
اUSB ة4{ أو وiPod®
.أو ا
>ت/ز وl
N ;]
إ
!ق ا
!<~9W
xرI
اUSB ة4{ أو وiPod® زx '
N G ,D!
ا اDع هGN م ا
~ام4W .ء ا
دةU¢ أ/
أو إزا
.دي إ
[ و<ع {دث, 4<
٢٠٦
و) List 3ا (>Pأو ) Browseا'Dاض(
أU¢ء ا
ا 4xو) Play Pا
, ،('?Oدي ا
L?p
[]Wأي *_ ا:زرار ا
4!/دة أد kإ
[ ] إ
[ وList P
)ا
Uّ/, .(/و) List Pا
_* (/ا
W 'U
ا
ا وا
8/رات ا
x/دة x []Wز ا
}ت.
* jا
! j* '/7, :(;
G) TUNEا
!
]zN (;
G) TUNEب * ]l7
NOا
lN ,/ز
ا
}ت أو و{4ة USBا
Iر.x
• ,دي ; ا
j/اW klGرب ا
*¦
) W8م(
وو اW gW klGرب ا
(;]I]
) W8إ
[ ا
,/
>3ل ا
ا وWض '
+Gا
8/ر ss []W
ا
ادl/N .,د ~/Gا
8/ر ا
Dي []W ]?OG
ssا
اد ،,ا? j* []W Lا
! TUNE
)ا
;( ! 4,4ا
8/ر و4Nء +* j* ;
.]?OGح
ا
! ) TUNEا
;( W8Nدي إ
[ ا
,/
Wا
'ON /أع Ë{>G 4< .أU¢ء ا
,/ا
P,8
ً3zGا ,4!G 9ً8Nا
*]7/ت ss []Wا
اد.,
>3ل آ' أوع ا
7, ،/ض xز ®P/x iPod
ا
ا * 'ONأوع P/xا
ا .و Nإذا
آن ا
8/ر ا
Dي k4,4!G |Gأ '+ا
،/
;
U/ا
j/إ
[ ا
gW) ;]IاW klGرب
ا
]
(W8ل إ
[ ا
8/ر 'ONأع.
و Pا
4I8G ،/م أزرار ) PRESETا
Lp
ا
(^8/ا
اد ,آ}3رات إ
[ ا
ا ا
[]W
xز ® iPodأو و{4ة USBا
Iر:x
• ا
~ر ا
p/ط *< - 1 ً8ا ا
'?O
• ا
~ر ا
p/ط * - 2 ً8ا
U+ن
• ا
~ر ا
p/ط * - 3 ً8ا*
:ت
• ا
~ر ا
p/ط * - 4 ً8أاع ا
[/
• ا
~ر ا
p/ط * - 5 ً8ا
| ا
}G
• ا
~ر ا
p/ط * N - 6 ً8ا~x:ة ا
/!/
,دي ا
[]W L?pزر ) PRESETا
Lpا
(^8/إ
[
Wض ا
/ا
!
[]Wا
98ا
]7ي وا
}U7ا:ول
ه kDا
[]W /ا
98ا
.
]Iوج *_ و) List Pا
_* (/دون 8* 4,4!Gر،
ا? []W Lزر ) PRESETا
Lpا
* 8+ (^8/ة
أ3ى ]xع إ
[ و) Play Pا
.('?O
ا
~ر ) LISTا
7 :(/ض ا
~ر ) LISTا
(/
< /ا
8/ى اl
[]W:ز ® iPodأو و{4ة USB
ا
Iر.x
• < j* ;]Nا
! ) TUNEا
;( 8د }UW
ا
/ا
,]7ا
|Gا3ره ¢ ،ا?[]W L
* jا
! ) TUNEا
;( .دي ذ
إ
[
Wض }UWا
/ا
W+ا
x []Wز
ا
}ت ،و*_ g+ 7N* U/, ¢ا
9Iات >ل
إ
[ ا
8/ر ا
/ب ه kDا
P/x G ./
*,8ت ا
ا ا
l
W+ز ® iPodأو و{4ات
USBا
Iر xهDا ا
Uم.
٢٠٥
• 4G 4UWو k,اW klGرب ا
*¦
) W8م( 4/Nار
در xوا{4ة ،أU¢ء '?OGأ{ 4ا
8/رات, ª ،
ا
8/]
9Iر ا
أو _/,ا
[]W L?pا
~ر VR
و<ل ") "Next Trackا
8/ر ا
(.
• و4G 4UWو gW k,اW klGرب ا
(;]I]
) W8
4/Nار در xوا{4ة8/]
'U, ª ،ر ا
^N8ا
/
أو _/,ا
[]W L?pا
~ر VRو<ل "Previous
) "Trackا
8/ر ا
.(^N8
• < Px
Nا
8/ر ا
!
[]W ً9* L?p
Nا
~ر
) <<RWا
, .(Pxدي ا
+
L?pة []W ],F
زر >>) RWا
(Pxإ
[ إWد Gإ
[ 4Nا ,ا
8/ر
ا
!
.
• ا' إ
[ ا*:م ا
8/ر ا
!
[]W ً9* L?p
N
ا
~ر >>) FFا
,4ا
.(P,8
• Gدي ا
9?pا
ا{4ة ) << RW []Wا
(Pxأو زر
>>) FFا
,4ا
(P,8إ
[ ا
Pxأو ا
[]W ,4
ا
ا
4/ة ¢ g/3اٍن.
٢٠٤
• ا4Iم زري >> SEEKو (!N) << SEEK
>ل إ
[ ا
8/ر ا
^N8أو ا
, .دي ا
[]W L?p
ا
~ر (!N) << SEEKأU¢ء و Pا
'?Oإ
[
ال إ
[ ا
8/ر ا
ا
،/أو _/,ا
L?p
[]Wا
~ر VRو<ل "Next or Previous
) "Trackا
8/ر ا
أو ا
.(^N8
• أU¢ء '?OGا
8/ر ،ا? []W Lزر INFO
)ا
*]7/ت( O/ه4ة **]7ت )ا
U+ن وUWان ا
8/ر
وا
:م ،إ
{ (¥ل هDا ا
8/ر .ا
[]W L?pزر
) INFOا
*]7/ت( *ة أ3ى ,دي إ
[ ال إ
[
ssا
ت ا
Dا ا
8/رl/N .د رؤ
,
ا
sOت47 ،ك ا
9?pا3:ة []Wزر INFO
)ا
*]7/ت( إ
[ ssو Pا
[]W '?Oا
اد.,
• ,دي ا
[]W L?pا
~ر G) REPEATار( إ
[
?Gوx Pز ا
}ت ار ا
8/ر < 4ا
'?Oأو
_/,ا
[]W L?pا
~ر VRو<ل ""Repeat ON
) '?OGا
ار( أو ") "Repeat Offإ,ف ا
ار(.
• ا? []W Lا
~ر ) SCANا
! ا
/ا
' _W
ا
9!/ت( 4Iام و Pا
! l
Nز ا
W '}/
'?O
iPod®/USB/MP3ا
ا ا
O7ا:و
[
*_ آ' *8ر ا
/ا
!
¢ال إ
[ اU:
ا
, .ف و) SCAN Pا
! ا
/ا
' _W
ا
9!/ت( و4Nء '?OGا
8/رات ا
< ،N/أU¢ء
'?OGا
8/ر []W L?p
N ،زر ) SCANا
!
ا
/ا
' _Wا
9!/ت( *ة أ3ى .أU¢ء وP
) Scanا
! ا
/ا
' _Wا
9!/ت(, ،دي
ا
[]W L?pزري >> SEEKو<< SEEK
) (!Nإ
[ 4,4!Gا
8/ر ا
وا
.^N8
• زر ) RNDا
'?Oا
O7ا( )* []Wر*~
*7ت راد, :(L RES ,دي ا
[]W L?pهDا ا
~ر
إ
[ ا
'?OG) Shuffle ON _N ',4ا
'?O
ا
O7ا( و) Shuffle OFFإ,ف '?OGا
'?O
ا
O7ا( lز ® iPodأو xز USBا
Iر،x
أو ا
[]W L?pزر VRو<ل ""Shuffle ON
) '?OGا
'?Oا
O7ا( أو ") "Shuffle Offإ,ف
'?OGا
'?Oا
O7ا( .إذا آن ر*~ , RND
W ss []Wض ا
اد8 ،,ن ا
'?Oا
O7ا
< 4ا
.'?O
#رk USB أو و
ةiPod® ز# EX 8A9ا
;<
ام أزرار اادc'L
~ةxأ
!
ا
Pو
[
إ
ل34]
ز
تx [
وا
ل إiPod®/USB/MP3
~ةx:" )اAUX" ][ زرW L?p
N * < إ،'}*
][ زرW L?p
أو ا,** ]اد:
]{ اN (ا
[
' إ,4
" )اSwitch to USB" " أوUSB" '< وVR
~ةx ا
! أPل إ
[ و34
د اl/N و.(USB
رات ا
}ت )إذا آ8* أ4G ،iPod®/USB/MP3
][ م ا
}تW '?O
N (ز ا
}تx _* *ة
.رة8
N
(=1( )اPlay 3و
~ةx أ
!
اP' إ
[ و,4
ا4UW
ة4{ أو وiPod® زx أ4, ،iPod®/USB/MP3
P و.ًG*G?' أوO
اP وxرI
اUSB
{]
][ اW زرار ا:م ا4I8Gُ 4< ،('?O
)اPlay
USB ة4{ أو وiPod® زx !]
,** ]اد:ا
:ض ا
ت7
D وآxرI
ا
(;
)اTUNE !
ح ا+* j* م4I• ا
.^N8
ر ا
أو ا8/
ر ا3
٢٠٣
ز ا ;ت# <ر5L H9i دEX :GZ
ةV# أEX 8A9م اG 3 =- <;اh 7 ،ًW
ر7 ;ل أد9 ا8< iPod®/USB/MP3
مGHL Zً ز ا ;ت# كW ديl< 7 .K9( اK
& إH9i إiPod®/USB/MP3 ةV# أEX 8A9ا
.;ب5ا;ى ا
#رc اUSB أو و
ةiPod® ز# =-;W
زx أوiPod® زx '
'
' اNم آ4Iا
رة8]
USB/AUX '
* D+U/N xرI
اUSB
.آ~ي/
ل ا8
د اx/
ا
ةV
ام ه~| اc'ا
xر3 USB زx أو،iPod® 'Nام آ4IN
:USB D+U/N }لG>
رة8
][ م
ت اW ز ا
}تx '?OG _/, •
انUWن وU+
; )ا,7
ت اN ]*ت7* Gو
., ا
ادss []W (¥
إ،
م:ر وا8/
ا
يV;;ل اآA اEX USB/AUX =-;W ~H
,ام أزرار ا
اد4IN ز ا
}تx !
_ ا/, •
.iPod® زx ت,!* اض ود7?' واO
'
/N ]
G 4UW ز ا
}تx ,ر9N _!s , •
.(د4!/
ز ا
}ت اx W4, )إذا آنUSB/AUX
!
م اP* U*ز ا
}ت و*~اx '
G دl/N
?ق8, 4<) رة8
N iPod®/USB/MP3 ~ةxأ
م/G ^< دPpN xر3 USB زx أوiPod® زx
هً~اx ن,!_ وO
ز ا
}ت اx أ4, ،(]
G
w* ه/ آ, ا
ادwG+* 'W L?p
N ام4I>
.kأد
iiض X;Wا;;7د — إذا آ ارة Vودة
~L
4xGر
") "ECOا>ك ا
<د( W ssض
ا
]/درxت ا
!ارة ،و '?OG _/,ه kDا
أو
إ,ف 3>
.]?OGر ،ا? []W Lزر SELECT
) (4,4!Gو{ر G [{ kر
") "ONا
('?Oأو
") "OFFإ,ف ا
.('?O
<
9Wو
ات آ;D Vت ارة اAوE
)) (EVICا;
ات ا((i
7,ض ا
{4ات ا
~* *4I8/ات در xا
!ارة
ا
Iر47* ،xل ا>ك ا
<د ،وا
8/ا
_/,
<+ '< 79د ا
<د .ا? []W Lزر SELECT
) (4,4!Gو{ر ',4
kا
{4ات ) ".U.S" _Nا
Uم
ا (,*:و") METRICا
Uم ا
/ي(.
K<MWا-;M
راW ss" Pxض ا
]/درxت ا
!ارة"
"*آ~ **]7ت ا
8رة ا
و )8< "(EVIC
" { أ~xة ا
س" ]!}ل _* 4,~* []W
ا
*]7/ت.
٢٠٢
<Dة ا-;M
را" Pxا
,7/ة ا:و*" 8< "]
]
G*Gآ~
**]7ت ا
8رة ا
و )" 8< "(EVIC
{ أ~xة ا
س" ]!}ل _* 4,~* []Wا
*]7/ت.
ا G/ا ;W
را Pxآ| ا /:ا
}.G
ح ا# EX 8A9ز ®/iPodو
ة
/USBو
ة - MP3إذا آ ارة Vودة
~L
w/8Gه kDا
~/ة x '
Nز ® iPodأو و{4ة USB
3ر xدا USB D+U* '3ا
x/د ا
8ل
ا
/آ~ي.
~* W4Gة ا
! أ~xة ® iPodأ~xة Miniو4G
و Photoو Nanoو® 5G iPodو® 4< .iPhone
j7N W4Gإ
4ارات Nا*¡ ®~* iPodات ا
!
Nا*¡ xز ® 'ON iPodآ*' [x,ُ .ز,رة *<P
[]W Appleا ,4!G 7/ت ا
ا*¡.
:GZ
• إذا آ ااد<; Vوًدا X ،USB ~HLا 3#د=
G 9م ®D Uconnectف إA
د& ز ® iPodأو و
ة k USBر.#
• <lدي # =-;Wز ® iPodأو #ز ;-ت إAوE
AUX ~HLا;;#د EXا; ا /اد<; إ
=1(Wا;'> ،و
c< h KAم Vة اEX 8A9
EX 8A9 iPod®/MP3از ا =.
و bا;/اء Hا=P
'?OG 4,4!G 4UWه kDا
~/ة j*G ،إsر Gا97ف
ا **:وا
'+< 4UW +]IاN:اب أو إ
?ء <4IN ]+ام
xز إرل م wاN:اب 4N 47Nُ _Wون *wG+
) _/, .(RKEا3ر ه kDا
~/ة * Pأو دون ا3ر *~ة
إ>Fق
ت اDار 4UWا
3>
.'+ر ،ا? []W Lزر
(4,4!G) SELECTو{ر G [{ kر
""ON
)ا
('?Oأو ") "OFFإ,ف ا
.('?O
kWإ+ء ا vLا/
4UWا3ر ه kDا
~/ة ,ن *ªNن ا
^8ا3ر إNء
ا
wN}/اp* **:ءة 4/ة 0أو 30أو 60أو 90
47N ¢ا
Iوج *_ ا
8رة .ا? []W ً9* Lزر
W 4UW(4,4!G) SELECTض ه kDا
G [{ sO
ا:ر<م 0أو 30أو 60أو U/, !N 90ا3ر *_
.UN
kWإ<Pف ا75
4UWا3ر ه kDا
~/ة wG+* [G ،ا
Uا Dا
<9
N ]*7
وا
اد ,وم ا
!4ث ) 47Nُ _Wإذا آ ا
8رة *~ودة
(
DNوم ) DVD ,4إذا آ ا
8رة *~ودة (
DN
وا
;8ا
!/ك ا
) <9
N 7إذا آ ا
8رة *~ودة
(
DNو* D3¤ا
4/
9O <9ة '}Gإ
[ 10د< 47NوP
*+ح ا
'?Oو) LOCK Pا
, .('+دي wأي *_
اN:اب ا8]
**:رة إ
[ إ
?ء ه kDا
~/ة3>
.ر،
ا? Lزر (4,4!G) SELECTو{ر G [{ kآ]/
") "Offإ,ف ا
('?Oأو " "¢ 45أو " 5د<^" أو
" 10د<^".
أ;اء ا7hاب -إذا آ ارة Vودة ~L
4,4!G 4UWه kDا
~/ة LOUG ,ا
wN}/ا **:وG
{
OGـ?' 4/ة ،¢ 90وذ
4UWإ
?ء < '+اN:اب
4INام xز إرل م wاN:اب 4N 47Nُ _Wون
*3>
.(RKE) wG+ر ،ا? Lزر SELECT
) (4,4!Gو{ر G [{ kآ]) "Off" /إ,ف ا
('?O
أو " "¢ 30أو " 60د<^" أو " 90د<^".
=1(Wا vLا 3 /ا'9ت );Xة PX
3ا vLا /ا =DW Eأو(ًAW;W
4UWا3ر '?OGه kDا
~/ة ووxد *+ح ا
}/ح
ا **:و) AUTO Pأو '/7G ،(G*Gا
wN}/
ا4/
**:ة ¢ 10اٍن '?OG 47N ً,Gا
!/ت, .
4UW pإ,ف '?OG
إ,ف '?OGا
wN}/ا **:أً ,
ا
!/ت إذا آن <4IN ]?OG G 4ام ه kDا
~/ة.
>3ر ،ا? []W Lزر (4,4!G) SELECTو{رk
{[ Gر
") "ONا
('?Oأو ") "OFFإ,ف
ا
.('?O
ا - Zا5Dف ;Wا - kإذا آ ارة Vودة
~L
4UWا3ر ه kDا
~/ة4I8, ،م م ا
{>/ا:وا*
ا
} ,4G P* ،Gا
xت >3ل *8ر ا
دة'* '
،
و
' *]N , [{ ;97Uغ ا
xا
3>
.Uر،
ا? []W Lزر (4,4!G) SELECTو{رG [{ k
ر
") "ONا
('?Oأو ") "OFFإ,ف ا
.('?O
Lء ا( =1اDWت ) - (HSAإذا
آ ارة Vودة ~L
4UWا3ر و Pا
LOUG , ،'?Oم *4N 4W8ء
ا
[]W '?Oا
7+G/ت ) .(HSAرا" Pxم ا
!
ا
و ا
+ا*'" <" 8ا
4ء وا
"'?O
]!}ل *]7* []Wت {ل و +ا
Uم وآ.]?OG +
xاء ا
! ،4,4ا? []W Lزر (4,4!G) SELECT
و{ر) "On" G [{ kا
('?Oأو ") "Offإ,ف
ا
.('?O
٢٠١
إذا آ- وجc
اH EAW;Wو/= اPء ا1إ
~L ودةV ارة
P/x '+< إ
?ء, ،('?O
)اON Pر و3 ا4UW
Pد <' ا
!آ وxرة وو8
<; اG 4UW ابN:ا
(^O7G>
)اNEUTRAL P )ا
<;( أو وPARK
][ زرW L? ا،ر3>
.^8
ب اN w P*
"ON" رG [{ k( و{ر4,4!G) SELECT
.('?O
ف ا," )إOFF" ?'( أوO
)ا
= — إذا آ ارةP
اH &MH اÎ ;ت-
ور~L ودةV
<}ةG
UG رةsر إ4}G ،~ة/
اkD?' هOG 4UW
زlN ('+
)اLOCK ][ زرW L?p
ا4UW U
*_
ا
.(RKE) wG+* دون47Nُ _W ابN: اw إرل م
اء: اj*ون *~ة و4N أوP* ~ة/
اkD ه4,4!G _/,
][ زرW L? ا،ر3>
.47Nُ _W !
ح ا+/N '+
ا4UW
"ON" رG [{ k( و{ر4,4!G) SELECT
.('?O
ف ا," )إOFF" ?'( أوO
)ا
, [{ k( و{ر/
)اMENU ][ زرW L?ا
(}IO
ادات ا4W )اPersonal Settings ضW
.(EVIC) رة ا
و8
]*ت ا7* ~ *آ
:
رات اI
ا4{ض أ7
'+: ,/
م زر ا4Iا
(1 )اLanguage
_* ?
4,4!G U/, ،kDض ه7
اss 4x ا
ا4UW
ض7
اss ]!ت9}* { ر/
اg/I
ا
]?ت ا
>{ )إذا آ/
ذ
و; ا
{] وم ا/N ،N
SELECT ][ زرW L? ا.(
DN رة *~ودة8
ا
أو,~]lر ا3 sO
اkDض هW ءU¢( أ4,4!G)
أن7N/
ا4UW ،
ذ47N 4lG .8+
ا أو ا
.دة4!/
]? اN G ]*ت7/
ا
ًAW;W;اب أوL/= ا7
ًG*Gاب أوN: اP/x '+< , ،~ة/
اkDر ه3 ا4UW
/>ً* 15) W/ آ24 W8
رة8
و
ل ا4UW
،]97G ]ً أوG ' ا
ب+< _ *~ة/G _/, .(W
(4,4!G) SELECT ][ زرW L? ا،4,4!
اء اx
ا+
ار اlN ر3>* اW G إ
[ أنkو{ر
أw
*>7
ا+IG م أوU
اLOUG G 4< أwG
.مU
اLOUG إ
?ءG 4<
مGH ا
'ON '/7, مU
)اSYSTEM OK ض ا7,
_
.~I* 9O ,D!G 'د رxم و4W { ( ]
ضW 4UW k,!G' و+: ,/
][ زر اW L?p
دي ا,
.ءs ' ] ( إ
[ أيON '/7, مU
)اSYSTEM OK
SYSTEM WARNINGS ض ا7,
دxدة( {
وx* مU
ات ا,D!G) PRESENT
][ زرW L?p
دي ا, ف.~I* 9O ,D!G 'ر
SYSTEM ض رW ءU¢ أk,!G' و+: ,/
ا
مU
ات ا,D!G) WARNINGS PRESENT
9? '
~I* ,D!G ض آ' رW [
دة( إx*
عx]
k( و{ر/
)اMENU ][ ا
~رW L? ا.زر
.8
ا/
إ
[ ا
5';اL M LPات اV )اc(ا
ادات ا
(=Dا
~ات/
اL ^8]
}IO
ادات ا4W اwG
W/ آ0 رة8
اW نG *4UW W4وا
ن ذراع, *4UW وي( أو4
( )<' ا
!آ اW/'* 0)
.(G*Gو: ا
<; )<' ا
!آ اP' وU
ا
٢٠٠
K<MW 1ا:-;M
.1أدر *+ح ا
'?Oإ
[ و) RUN Pا>9ق( )
g
*_ ا
pوري '?OGا
!/ك(.
.2ا? []W Lزر ) MENUا
W , [{ (/ض
ا4Wادات ا
) }IOا
~/ات ا
N l*]
]Nا9
ا
* ('/7آ~ **]7ت ا
8رة ا
و ).(EVIC
.3ا? []W Lزر ا
G [{ '+: ,/ر
_,Gا
] " "Compass VarianceوW ,ض
3ر< ** _,G 9Uآ~ **]7ت ا
8رة
ا
و ).(EVIC
.4ا? []W Lزر (4,4!G) SELECTو{ر, [{ k
9U* 4,4!Gا
_,ا
U/وً ].9,I
.5ا? []W Lزر ) COMPASSا
]({ ¢ ،رk
]Iوج.
Dل iWا'Zك ا;;7د
7Gض ه kDا
47* sOل ا>ك ا
<د *]/W 3 DU
إWدة _/, .LإWدة 47* Lل ا>ك ا
<د
[]W ً9* L?p
Nزر ) (4,4!G) SELECTآ, /
* ss []Wآ~ **]7ت ا
8رة ا
و( 4UW .إWدة
ا
w8* , ،Lpا
ت ا
N8و8{ 7N* Gب
ا
< 3 _* L/اءة L/ا>ك ا
<د <' إWدة
ا
.Lp
ا Xا =M7 D57 KA< Eد ا;;7د )(DTE
ا
8/ا
4/رة ا
< _/,دة ا
8رة + '< >3د
ا
<د ا
/ا
~Iان 4,4!G , .ا
8/ا
4/رة
Nا> wx* L* 9ك ا
<د ا
+ري وا
L/
ًUNء 8* []Wى ~3ان ا
<د ا
!
_/, .إWدة L
ا
8/ا
+ '< 79< _/,د ا
<د ).(DTE
) LOW FUELا+Iض ا
<د( وWض <4,4x /ة
] 8/ا
+ '< 79< _/,د ا
<د ).(DTE
ا; 7اEdPH
,و< ا
+8ا
pU/ا* 3 DU* /xة G
~, .9داد ا
< ا
, *4UW pU/ن *+ح ا
'?O
أوع ) RUNا>9ق( أو 4N) STARTء
ا
.('?O
W ,ض ا
< ا
pU/آ
:
• Wت
lW :GZا1ات ا;ا EX 9اPدة أو
; ارة ; Lرة آMة ا Xا DاE
<7 X KAدة ارة b1Lا 7 K GHاX
ا =M7 D57 KA< Eد ا;;7د اDو.
• ¢ا
G *4UWن < /ا
8/ا
+ '< /د ا
<د )(DTE
أ<' *_ 48آ )W ss 'UG ،('* 30ض 8/
ا
+ '< /د ا
<د )7
(DTEض ا
ا
}U
") "LOW FUELا+Iض *8ى ا
<د(/8G .
ssا
7ض ه 4+U, [{ kDا
<د *_ ا
8رة, .دي
إ آ /آة *_ ا
<د إ
[ ا
8رة إ
[ إ,ف ر
_/,إWدة Lا
< ا
[]W ً9* L?p
N pU/زر
) (4,4!G) SELECTآ* ss []W , /آ~
**]7ت ا
8رة ا
و( 4UW .إWدة ا
?G Lp
P/xا:ر<م إ
[ ا
} +و4,أ ا
< ا
~,دة *ة أ3ى
إذا آن *+ح ا
'?Oو) RUN Pا>9ق( أو
4N) STARTء ا
.('?O
• د<^
١٩٩
-;M اK<MW 5<k
١٩٨
ا<Dة ا/و-;M AW;W
ا<Dة ا
و< -;M
7Gه kDا
] ذا Gا
,7/ة وهDا _W U?,ا
!x
إ
[ 4, 9وًG *4UW .,ن ا
8رة 4,4xةG 4< ،
ا
] {
ا9اب و7,ض *آ~ **]7ت
ا
8رة ا
و ) (EVICر
"x) "CALري
,7* pة
ا
,7/ة( {[ ,7* Gة ا
] U/, .أً ,
ا
] ªNآ/ل دورة أو أآ ~Nاو 360 ,در) x
* _* 3 9Uا
/اد ا
47/ا
/Ipأو ا8x:م
ا
W ;<, [{ (47/ض ر
) CALا
,7/ة(
*آ~ **]7ت ا
8رة ا
و ) .(EVICف
'/7Gا
] 47N 7F 'ONذ
.
إذا 4Nا أن '/Wا
] 7Fو
s* ,
) CALا
,7/ة( W ssض *آ~ **]7ت ا
8رة
ا
و |l ،و Pا
] و Pا
,7/ة 4,وً,
آ:], /
y5< :GZا Mdا
' <ً; 9ً5وL
K kا#/م ا DاMAة آ EMأو ا;ر أو
اZLAت 9Wا/رض أو Md7ن ا Aا،<
<
9
وnه.
'?ON < .1ا
!/ك .اGك ذراع ا
'UوP
) PARKا
<;( ]34ل إ
[ <ا * l*Nآ~
**]7ت ا
8رة ا
و ).(EVIC
.2ا? []W Lزر ) MENUا
W , [{ (/ض
ا4Wادات ا
) }IOا
~/ات ا
N l*]
]Nا9
ا
* ('/7آ~ **]7ت ا
8رة ا
و ).(EVIC
.3ا? 47N Lذ
[]Wزر ا
G [{ '+: ,/
ر
",7*) "Calibrate Compassة ا
](
*آ~ **]7ت ا
8رة ا
و ).(EVIC
.4ا? []W Lزر { ¢ (4,4!G) SELECTر4
kء
ا
,7/ة) CAL s* , .ا
,7/ة( *آ~
**]7ت ا
8رة ا
و ).(EVIC
.5أآ '/دورة وا{4ة ~Nاو 360 ,در xأو أآ )
* _* 3 9Uا
7/دن أو ا8x:م ا
47/ا
ة( {[
W ;<,ض *) CAL sا
,7/ة( .ف '/7G
ا
] 47N 7F 'ONذ
.
K<MWا-;M
_,Gا
] ه ا
+ق _Nا
/Oل ا
8FU?/وا
/Oل
ا
?lا j,7
.هDا ا
+ق L |l, ،ا
9U/]
_,
ا
N 8Gا
8رة ،وذ
' l/N .9U* 9,3د
Lذ
،w!
'ONم ا
] أوًG*G
j,7Nا
+رق و< ,4Gاءة د<.
y< :GZاhظ ;Lاد ا
ًDL +H1ا K
اVء ا;Dي ; KأV#ة 7س /ن ه~ا ه; Aن
;Wا D( #ا.-;M
١٩٧
• ا
< ا
pU/
• **]7ت ا
8رة
• در{ xارة ' ا
4,
• ? Lا
~,
• در{ xارة <' ا
!آ
• ة /Wا
~ ,ا
?G s*) /ا
~,
ا:و(G*G
• 4,4!Gو{4ات *آ~ **]7ت ا
8رة ا
و
)(EVIC
• ,D!Gات ا
Uم
• ا4Wادات ا
}IO
• ? LاFرات
V MHL :GZات EXآ;D Vت ارة
اAو (EVIC) Eا KA< Eإدة
D) 5Mل
iWا'Zك ا;;7د وا; 7ا y5< ،(EdPHآV
;Dت ارة اAو (EVIC) Eإدة اK Md
;- <+رة اVر (
<
9W) SELECTواA
) RESETإدة ا;L (Mdار|.
١٩٦
4UWا
[]W L?pزر ،(4,4!G) SELECTإWدة
Lا
~/ة ا
4!/دة و) RESET ALL GإWدة
Lا
'( lNار
رة ا
~ر .(4,4!G) SELECT
,دي ا
[]W L?pزر * (4,4!G) SELECTة أ3ى
إ
[ إWدة Lآ' *_ *47ل 4sGا>ك ا
<د
وا
< ا
.pU/و* 47Nور >¢ث ¢اٍن دون ا
L?p
[]Wزر 7G ،(4,4!G) SELECTد آ]RESET /
) ALLإWدة Lا
'( إ
[ ) RESETإWدة ا
(Lp
و GإWدة Lا
~/ة ا
4!/دة .L
iiض ا -;Mودر #ا9ارة اcرECO / #
)و X;W 3ا;;7د( -إذا آ ارة Vودة ~L
< OGاءات ا
] إ
[ ا klGا
Dي Gا xا
8رة.
ا? []W Lزر ) COMPASSا
]( 7ض إ{4ى
<اءات ا
] ا
،/ودر xا
!ارة ا
Iر/xوP
Gا
<د ) (ECOإذا * _,آ~ **]7ت ا
8رة
ا
و )7, (EVICض ه kDا
.'7+
N sO
;P' :GZم اGHم DLذ DLض أ kدر#
ارة kر
L H ;D #ء =1(Wارة و;A< 7ن
Kاdوري أن 7 8Wدة ارة
Dة د =M7 >7أن <8
ض در #ا9ارة ا .
9آ أن در #ارة
ا9ك < KAأن lWدر #ا9ارة اDو؛
و7 <
9W 8< h ELاءات در #ا9ارة
Hم
ُ9Wك ارة.
) ECOو X;W 3ا;;7د( — إذا آ ارة
Vودة ~L
Wض ر
4sG) ECOا>ك ا
<د( أ'+
در xا
!ارة ا
Iر* ss xآ~ **]7ت ا
8رة
ا
و )) (EVICإذا آن م ا
}ت s* 4UW
Gا
<د )l (ECOوز *]7* ss L3ت
ا
}ت إذا آن ا4Wاد ا
W" }IOض Gا
<د"
و) ON Pا
— ('?Oرا" 8< Pxا4Wادات
ا
.("}IOو ه kDا
< 4UWدة ا
8رة
* ,9Nة ا
<د.
wGه kDا
~/ة ا
/ا< G *4UWد ا
8رة ,9N
*ة ]<د ،آ _/, /ا4Iا* W ',47دات ا
دة
~,دة 4sGا>ك ا
<د.
=<
MW ilاس ) - (GSIإذا آ ارة Vودة
~L
-ء * sا
[]W: ',4
',4G s* ',ا
س )* (GSIآ~ **]7ت
ا
8رة ا
و )ًp* (EVICء {[ ,م ا
^8
?Nا
س ،أو Wدة وف ا
دة إ
[ *<; |]9,
?Gا
س ! _8ا>ك ا
<د.
V<) Oil Change Requiredم 1Wا(<V
ء * sا
'+: ',4 _/G ,م * ',4G sا
س )(GSI
[]Wا
8رات ا
~/ودة { '<UNآ 4,وي،
أو G *4UWن ا
8رة ا
~/ودة { '<UNآ
أو G*Gو Pا
'Uا
4وي, .
م * ',4G sا
س ) ^8]
(GSIإsرة * 4UW
ا
ل إ
[ ' 9ا
س ا
ُ 7OGُ .N [
/هkD
اsرة ا
^8أن ?Gا
س دي إ
[ ']Gا>ك
ا
<دW 4UW .ض * sا
[]W []W: ',4ا
،sO
w}U,م * ',4G sا
س ) (GSIا
^O7N ^8
Gس أW 4UW .[]Wض * sا
[]W '+: ',4ا
،sO
w}U,م * ',4G sا
س ) (GSIا
^O7N ^8
Gس أ<'.
إن ر~* Gودة UNم * ?G sز ,ا
!/ك .ف
7Gض ر
"~],) "Oil Change Requiredم
?Gا
~* ss (,آ~ **]7ت ا
8رة
ا
و )4/
(EVICة ¢ 5اٍن 47N ً,Gإ
4ار إsرة
Gوا{4ة ،وذ
sÓرة إ
[ * ?G 4Wا
~,
ا
4وري ا
4U8, .م * ?G sز ,ا
!/ك []W
دورة ا
،*4Iو U7,ذ
أن * ?G 4Wز ,ا
!/ك
;]I,وً L/Uا
دة ا
.}IO
و* GإWدة ا
ª Lpن ه kDا
/8Gا
7ض
آ' *ة +* ,4Gح ا
'?Oإ
[ وON P
)ا
, .('?Oف Wض ا
*<ً ،ا? []W Lزر
) MENUا
(/و{رW .kدة Lم *?G s
ا
~ D+UG 47N) ,ا
} ا
4ور D+ ،(,اxاء ا
:
+* P .1ح ا
'?Oو) ON Pا
8PW h .('?O
=1(Lا9ك.
.2ا? []W '*
N Lدوا ا
<د LNء >* ¢ات
pن ¢ 10اٍن.
+* P .3ح ا
'?Oو) LOCK Pا
.('+
:GZإذا أءت ر' ا
L H ilء =1(W
ارةoX ،ن ذ <
EHDم إدة G Mم 1W il
ا .<Vآر ا#اء ا Lإذا Vم ا./
ا >Pا> Lآ;D Vت ارة اAوE
)(EVIC
>ل إ
[ آ' *~ة *_ *~ات ا
/ا
8ا?L
[]Wزر ) MENUا
* (/ة وا{4ة ' 93ة .دي
93ة *_ ا
}U7ا 3:ا
/إ
[ ا
ل إ
[
ا
}U7ا:ول < /ا
~/ات ا
4xG .W ,
ا
~/ات ا
ا
/ا
:8
• ssا
] ،در xا
!ارة ا
IرG s* ،x
ا
<د )(ECO
• 4Wاد ا
W8ا
</
• *47ل 4sGا>ك ا
<د
• ا
8/ا
+ '< 79< _/,د ا
<د
١٩٥
ادات4W )اPersonal Settings Not Avail •
Vehicle in Motion - .(} *ةIO
ا
وي4
<' ا
!آ ا- (رة {
{آ8
)ا
)*}حLeft Front Turn Signal Lamp Out •
G
رةs إP*) (z+9* 8,:** ا:ف ا97ا
(ة4{وا
's رP*) (ح+* ابN: ا4{ )أDoor Ajar •
G
رةsر إ4}G .ح+* أن ا
ب, رة
.(رة {
{آ8
ة إذا آ ا4{وا
)*}حLeft Rear Turn Signal Lamp Out •
G
رةs إP*) (z+9* 8,: ا+]I
ف ا97ا
(ة4{وا
رP*) (ً~x ح+* ة3/
ب اN) Gate Ajar •
P* ح+* +]I
ا/ة3/
ب اN أن, ' رةs
(ة4{ واG
رةsور إ4
Right Front Turn Signal Lamp Out •
رةs إP*) (z+9* _/,:** ا:ف ا97)*}ح ا
(ة4{ واG
"Pxء ا
<د( )را9 ! )اCheck Gascap •
_* 4,~/
"'?O
ء وا4
"ا8< "إ ا
<د
('
+
ا
Right Rear Turn Signal Lamp Out •
رةs إP*) (z+9* _/,: ا+]I
ف ا97)*}ح ا
(ة4{ واG
P*) (,~
? اG ]~م,) Oil Change Required •
(ة4{ واG
رةsإ
,ر9N <F ض+I )اKey Fob Battery Low •
(ة4{ واG
رةs إP*) (wG+/
{ ا
رة8
ا
<د( — إذا آ اG s*) ECO •
DN *~ودة
ادات4W )اPersonal Settings Not Avail •
Vehicle Not in Park - .(} *ةIO
ا
ا
<;( — <' ا
!آP و8
رة8
)ا
G*Gو:ا
EوA;ت ارة اD Vت ض آii
(EVIC)
]*ت7* ~ض *آ7, ،U/
ا ا
وف اG 4UW
:
( ا
' اEVIC) رة ا
و8
ا
(j+IU* رF اL?) Low Tire Pressure •
(ى ا
<د8* ض+I )اLow Fuel •
L? < )م *اService TPM System •
L? < "م *اPx ]}( )راx!N راتFا
("'?O
ء وا4
رات" "اFا
Premium TPM System Graphic •
مUN
I
ض ا
* ا7
اss) Display
(^+
رات اF اL? <*ا
( ] ح+*) Damaged Key •
('?O
ح <ص ا+/
)اKey In Ignition •
('?O
ا4< ف97رة اs )إTurn Signal On •
(ة/8* G
رةs إP*)
١٩٤
• G s*) ECO ssا
<د(
• زر ) COMPASSا(-;M
• 4sGا>ك ا
<د
ا? []W Lزر ) COMPASSا
](
و{ر7]
kدة إ
[ ssا
]/درx
ا
!ارة ا
Iر*]7*/xت ا
}تs*/
Gا
<د )G *4UW (ECOن ا
sO
ا
!
ه ا
]/در xا
!ارة ا
Iر*]7*/xت
ا
}ت G s*/ا
<د ).(ECO
• زر (
<
9W) SELECT
• 4Wد ا*:ل/ا
]*ات {[ +د ا
<د
• ا
</
• 4,4!Gو{4ات ssا
7ض
• ,D!Gات ا
Uم )) Door Ajarأ{ 4اN:اب *+ح(،
و* (Ns
• ا4Wادات ا
) }IOا
~/ات ا
N l*]
]Nا9
ا
('/7
• م *ا< ? LاFرات -إذا آ ا
8رة *~ودة
DN
w,ا
Uم ] ^8ا3ر ا
*]7/ت []W L?p
N
ا:زرار ا
ا
/آ ]lW []Wا
دة:
أزرار اPدة آ;D Vت ارة اAو(EVIC) E
• زر ) MENUا(>P
ا? []W Lزر ) MENUا
(/و{رk
,4ا
sOإ
[ آ' *~ة *_ *~ات
ا
/ا
* 8آ~ **]7ت ا
8رة
ا
و ) (EVICأو ا
xع إ
[
ا
/ا
.W /< _* 8و 4UWا
ل إ
[
ا
}U7ا 3:ا
/ا
4, 8م *آ~ **]7ت
ا
8رة ا
و ) (EVICا
}U7ا:ول ا
/
ا
P* 8ا
9?pا
[]Wزر ) MENUا
(/
و.k,!G
ا? []W Lزر (4,4!G) SELECT
و{ر*
9, *4UW kآ~ **]7ت
ا
8رة ا
و )~/N (EVICات
) Reset Main MenuإWدة L
ا
/ا
(8ا
W ]Nدة ا
Lpأو ?G
) Personal Settingsا4Wادات ا
.(}IO
• زر ا< ='/
ا? []W Lزر ا
'+: ,/و{رk
*
9, *4UWآ~ **]7ت ا
8رة
ا
و )N (EVICل Wر'
,D!Gا
Uم ا
~I/أو *~ات
) Personal Settingsا4Wادات ا
.(}IO
١٩٣
hت ا
ا أ
اد Xا )/ (ODOوil) ECO 3
X;Wا;;7د( — إذا آ ارة Vودة ~L
7Gض إ /xا
8/ا
]{]
W9/أ * 3 DUإWدة
.L
7Gض ssا
7ض ه kDا
8/ا
3 DU* W9/
]/WإWدة .Lا? []W Lا
~ر اW/l* ) _/,:
أ~xة ا
س( و{ر4W _* ',4]
kاد ا
8/إ
[ 4Wاد
) Trip Aا
{] أ( أو ) Trip Bا
{] ب( أو إ
[ ECO
)* G sا
<د( .ا? []W ً9* Lا
~ر ا_/,:
أU¢ء Wض 4Wاد ا
4W/8/اد * 8ا
{] Wدة
ا
.Lp
ا ب
7Gض إ /xا
8/ا
]{]
W9/ب * 3 DUإWدة
.L
X;W il) ECOا;;7د( — إذا آ ارة
Vودة ~L
pء * G sا
<د )G *4UW (ECOد ,9N
*ة ]<د و _/,ا4Iا* W ',47دات ا
دة ~,دة
4sGا>ك ا
<د.
آ;D Vت ارة اAو- (EVIC) E
إذا آ ارة Vودة ~L
زر iiض ا
* _/p,آ~ **]7ت ا
8رة ا
و )(EVIC
W ssض P* ]W+Gا
W/l* 4xG ^8أ~xة
ا
س.
آ;D Vت ارة اAو(EVIC) E
w,هDا ا
Uم ] ^8ا3ر *_* WU* W/l
ا
*]7/ت ا
4+/ة []W L?p
N 8Nا
wG+/ا
/آ
]lW []Wا
دة .و* ;
z,آ~ **]7ت ا
8رة
ا
و ):], /* (EVIC
• <اءة ا
] )/s) Nل(Ux) S ،ب(s) E ،ق(،
) Wب(/s) NE ،ل sق(/s) NW ،ل ب(،
Ux) SEب sق(Ux) SW ،ب ب((
• در xا
!ارة ا
Iر ,*) xأو (,
• 4Wاد ا
W8ا
</
• **]7ت ا
8رة
١٩٢
MdاK<M
ا4Nأ '?OGا
!/ك واGك ذراع G 4,4!Gوس <' ا
!آ
و) PARK Pا
<;( .ا?!
) ً9* Lا
OWة ¢اٍن( []Wزر ) RESETإWدة ا
[]W (Lp
]lWا
دة {[ W ,ض ر< * 9Uا
_,ا
!
.
? ا
،9U/ا? []W Lزر ) STEPا
9Iة(
و{ر,~
kدة ا
_,در xوا{4ة
N < .ار {/8
]9,ا , [{ *:ا
!}ل []Wا
_,ا
]9/ب.
:GZإن P5Hا K<Mا +;MdاXاً EX
ا 3Hه .8 EأHء ا < ،MاPل 7اP5H
Kا 15 P5Hإ ا.1 P5H
ا<Dة ا
و< -;M
إذا 4Nت ا
] * N9pأو د< أو ،7F
!G 4ج إ
[ *,7ة ا
] .و<' *,7ة ا
]؛ zGآ4
*_ ا3ر ا
9U/ا
~* Uا
}!!.
.1ا4Nأ '?OGا
!/ك واGك <' ا
!آ وP
ا
<; ).(PARK
.2ا?!
) ً9* Lا
¢ OWاٍن( []Wزر
) RESETإWدة ا
W , [{ (Lpض ر< *9U
ا
_,ا
!
.
Dل ا'Zك ا;;7د /ا Xا=M7 D57 KA< E
د ا;;7د ) / (DTEا; 7اEdPH
•
Dل iWا'Zك ا;;7د
{ .3ر زر ) RESETإWدة ا
¢ ،(Lpا?L
** ً9ة أ3ى []Wا
~ر !ا
OWة ¢اٍن {[ ,
Wض ا P* klGا/ار Wض *CAL s
)ا
,7/ة( []Wا
.sO
7Gض ه kDا
47* sOل ا>ك ا
<د * ]/W 3 DUإWدة
4UW .LإWدة 4sG Lا>ك ا
<دw8* ،
ا:ر<م و*]7* !* ,ت ا
G .'l8إWدة 8{ 4Nب
ا
4UW L/ا
!}ل 4,4x 8* []Wة آ وNت ا
<د.
• ا Xا =M7 D57 KA< Eد ا;;7د )(DTE
.4آ/ل *,7ة ا
] 4< ،ا
8رة دورة *]/
وا{4ة أو أآ ~Nاو 360 ,در 5 W8N xأ*لW/
) 8آ _* 3 9U* (W/أ>ك ا
<9وا8x:م
ا
47/آة ا
!W ;<, [{ lض * sا
,7/ة
.CALف '/7Gا
] 47N 7F 'ONذ
.
:GZ
• y5Wا<Dة ا
ة ' <ً; 9ً5وK k L
ا#/م ا DاMAة آ EMأو ا;ر أو
اZLAت 9Wا/رض أو Md7ن ا Aا،<
<
9
وnه.
• < yإDLد ا#/م ا K +H1اVء ا;Dي K
; j HأV#ة اPس;< .اD( #
ا.-;M
ا
8/ا
4/رة ا
< _/,دة ا
8رة + '< >3د
ا
<د ا
/ا
~Iان 4,4!G , .ا
8/ا
4/رة
Nا> wx* L* 9ك ا
<د ا
+ري وا
L/
ًUNء 8* []Wى ~3ان ا
<د ا
!
_/, .إWدة L
ا
8/ا
+ '< 79< _/,د ا
<د ).(DTE
• ) Elapsed Timeا; 7ا(EdPH
,و< ا
+8ا
pU/ا* 3 DU* /xة G
~, .9داد ا
< ا
, *4UW pU/ن *+ح ا
'?O
أوع ) RUNا>9ق( أو 4N) STARTء
ا
7, .('?Oض *< ا
< ا
pU/ا
ا:ا
.^<4
59 47Nد<7, ،¢ 59:ض ا
ا:ا
:^<4ا
W8ت.
١٩١
-;M اK<MW 5<k
١٩٠
ارة9ت ا#در/-;M ض اii
Chrysler مGHL ودةV إذا آ ارة:GZ
ضD< ;فX ،(Z )راد<; اUconnect® gps
<ةD ا8>;ا7 ;نAW K و،-;M| اW اZم اG
ءHL 7= دA(L -;M= اDW .ةX; فZkhوا
K hً
L (GPS) ED ا37
<
ا;ا9W مG راتiإ
.ر/ ا+H1ت اhا
-;M اK<MW
ل/O
وا8FU?/
ل ا/O
_ اN ق+
_ ا
] ه ا,G
9U/]
_,
اL |l, ،ق+
ا اD هj,7
.?اl
ا
دl/N .9U* 9,3 '
وذ،رة8
اN 8G ا
ًّG*G م ا
] أو،w!
'ON
ذL
.< <اءة د,4Gرق و+
اj,7N
W >لk {ر¢ ،(ة9I
)اSTEP ][ زرW L?ا
]
ا
{>ت ا
}ة واG/آ' *~ة *_ *~ات آ
:
( اCMTC)
Compass / Outside Temperature •
(xرI
ا
!ارة اx در/ ]
)ا
( ا>ك ا
<د4sG ل47*) AVG ECO •
(د ا
<د+ '< 79< _/, ا8/
)اDTE •
(pU/
)ا
< اET •
( ا>ك ا
<د4sG ل47*) AVG ECO L _/,
L? ا،~ة/
ض اW 4UW .(pU/
)ا
< اETو
دةW إ, [{ (Lp
دة اW )إRESET ][ زرW ً9*
.(¢ 2 {ا47N) ~ة/
اL
[]W L?p
>ل ا3 _* '
اkD>ل ه3 ,/
_ ا/,
L دةW .] ا
دةlW []W (ة9I
)اSTEP زر
ET ا>ك ا
<د( أو4sG ل47*) AVG ECO
STEP ][ زرW ً9* L? ا،(pU/
)ا
< ا
.ً,G ان¢ >ث¢ ة4/
(ة9I
)ا
١٨٩
; .32ء G j7;W ilم ا EX 8A9اP'hار
اAو - (ESC) Eإذا آ ارة Vودة ~L
O,هDا ا
pء إ
[ إ,ف '?OGم
ا
! اار ا
و ).(ESC
.33آ;D Vت ارة اAو/(EVIC) E
آ W;MاZت ا Pة وا - -;Mإذا آ ارة
Vودة ~L
G 4UWا ا
وف ا
7G ،U/ض ه kDا
sOر'
*آ~ **]7ت ا
8رة ا
و )}!]
.(EVICل
_* 4,~* []Wا
*]7/ت ،را*" Pxآ~ **]7ت ا
8رة
ا
و )."(EVIC
iiض ا -;Mوآ W;Mا — إذا
آ ارة Vودة ~L
G~* _/pGا
]/آ G/ا
{>ت ا
}ة ss
Wض P* ]W+Gا
7G) ^8ض **]7ت درx
ا
!ارة ا
Iر xوا klGا
] و**]7ت ا
{](.
و 4xGا
~lء ا 8,:ا
W/l* _* ]+8أ~xة ا
س
أ4W '+اد ا
.W8
أزرار ا8A9
ا? []W Lا
~ر ) STEPا
9Iة( و{ر]lW []W k
ا
دة ]
ل إ
[ ا
Iرات ssا
].
G 4UWا ا
وف ا
7G ،U/ض ه kDا
sOر'
آ G/ا
{>ت ا
}ة .را" Pxآ G/ا
{>ت
ا
}ة" ]!}ل _* 4,~* []Wا
*]7/ت.
iiض ا-;M
أزرار ا8A9
4xGأزرار ا
]/ا
! در xا
!ارة ا
!+
ا
8ى ]l7ا
دة.
١٨٨
;P' :GZم اGHم DLذ DLض أ kدر #ارة
kر
L H ;D #ء =1(Wارة و;A< 7ن K
اdوري أن 7 8Wدة ارة
Dة د =M7 >7أن <8
ض در #ا9ارة ا .
9آ أن در #ارة
ا9ك < KAأن lWدر #ا9ارة اDو؛
و7 <
9W 8< h ELاءات در #ا9ارة
Hم
ُ9Wك ارة.
وا{4ة أو أآ ا
8رة ]zآ/ _* 4ح اFرات أو
ا
>l7ت ا
U
],4م *ا< ? LاFرات )(TPMS
.w!
'ON '/7
N
!&MHW
_8!G Gم *ا< ? LاFرات )(TPMS
'/7, !Nأ
'pرة ** Pت اFرات
وا
>l7ت ا,8* 4,4!G G .]
:ت ? Lم
*ا< ? LاFرات ) (TPMSو,D!Gا Gوً
! lاFر ا
~/ود ر4!, 4< .Gث '?OG
] ]Uم أو 4UW 7O8/
N ;]Gا4Iام *47ات ],4N
g+UN 8ا
! lأو ا
Uع أو ا
|8G 4< .'Oا
>l7ت
ا
:N W/اق {4وث 4I8G .7O8/]
;]Gم
*8]
Pب []WاFر *_ ]Wأو درزات ا~Gان إذا
آ ا
8رة *~ودة UNم *ا< ? LاFرات4 ،
_W ¡U,ذ
{4وث 7O8/
N ;]Gات.
M .29ح G ilم ÌLاP'hار اAوE
M /ح G ilم ا EX 8A9ا
4,أ و* s* jء ¡*Nاار
ا
و /م ا
! ا
lأU¢ء
ا
8رع ;+I ،ا
[]W L?pدوا ا
<د
وا '/7أ<' <4ر *_
/م اU3ق4, .أ
هDا ا
pء ا
s/ا
*l/N jد 4
اFرات ة ا
lوOط ¡*Nاار ا
و.
و}* j*,ح * sم اار ا
و/م
, *4UW pن م ا
! ا
l
ا
! ا
lأً ,
zG .9ًOآG _* 4ا^ Wوأ]ب <د
Gوف
ا
.^,9إذا أء *}ح * ¡*N sاار
ا
و/م ا
! ا
* 'ON lا
'D ،ا
U7,أ Gإ,ف ¡*N '?OGاار ا
و
Nا 9ا
^8أو Nا4{ 9وث *<; *< w/8,
¡*N '?ONاار ا
و 'ONآ*'.
yd7 il .30ار - v#إذا آ ارة Vودة
~L
هDا ا
pء |p< '} 4UW
ا
zر wxا.**:
; .31ء Gم ا 8A9اAو- EX Eم اHkhق
)(ETC
I,ك هDا ا
pء xNد * ]Oم
ا
! ا
و
/م اU3ق
) .(ETCإذا GاآOف * ]OأU¢ء '?OG
ا
!/ك '8 ،ا
}/ح *ًpء أو
*ًUN jء 7F []Wا
.]O/أدر *+ح ا
'?O
G *4UWن ا
8رة *<*zN +ن و 'ONآ*' و*4UW
,ن ذراع و) PARK Pا
<;( |l, .أن ;<,
'?OGا
pء .إذا ' ا
}/ح *ًpء أU¢ء '?OG
ا
!/ك7 ،دة * ,ن < *ªNدة ا
8رة و
_ راPx
ا
/زع ا
}
4/7/ا
8رة أع و< *._/
إذا ا /ا
}/ح ا
* jأU¢ء '?OGا
!/كD ،ا
U7,أ ~],م
ا
8رة []Wا
+ر و<7G 4ض
ا
8رة +Iض ا:داء و P+G* FGو*~ ¡Wأو
;<,ا
!/ك و~],م !| ا
8رةp .ء ا
pء 4UW
إدارة *+ح ا
'?Oإ
[ وON/RUN P
)ا
/'?Oا>9ق( :ول *ة ،وًp* ',ء +ة و~xة
آxªاء ]!^ *_ >* ا
}/ح .إذا p,ء ا
pء
أU¢ء 4Nء ا
! ،'?Oا
Uم 4ى ا
آ' ا
.4/7/
١٨٧
il .26اVHول KاDWت
p,ء هDا ا
~* '?OG 4UW s/ة ا
!
ا
~Uول *_ []Wا
7+G/ت ).(HDC
,ن ا
}/ح {
إءة */8ة 4UW
LOUGم ا
! ا
~Uول *_ []W
ا
7+G/ت ) '?OG _/, .(HDCم
ا
! ا
~Uول *_ []Wا
7+G/ت )*4UW L (HDC
Gن ]Wا
'Uو" Pا
P4ا
WNا
"j+IU/
وا+Iض Wا
8رة 48 _Wآ />ً* 30) W/
.(Wإذا ,ا
ء kDNا
Oوط أU¢ء *!و
ا4Iام
م ا
! ا
~Uول *_ []Wا
7+G/ت )،(HDC
j*8ء * sم ا
! ا
~Uول *_ []W
ا
7+G/ت و _W ;<,ا
*.j
il .27ا CRUISE
p,ء هDا ا
'?OG 4UW s/م ا
!
ا
و ا
.W8
١٨٦
; .28ء <~9Wا 1 M7ا+رات
! |l,آ' إFر /Nذ
اFر
ا{) Fإذا آ ا
8رة *~ودة (
DN
G *4UW ,ًsن اFرات Nردة
و* I+Uإ
[ ? Lا+خ ا
ُ_* N [
/
ا
lا
8]
7U}/رة ^}]* []W
ا
8رة أو *]}^ ? Lا+خ اFر) .إذا آ رG
!Gي []WإFرات l{zNم * ]G _W +]Iا
O/ر إ
^}]* []Wا
8رة أو *]}^ ? Lا+خ اFر|l ،
L? 4,4!G ]Wا+خ اFر ا
kD
|U/اFرات(.
آ~/ة أ*ن إ~G G ،و 4,رUN Gم *ا< ?L
اFرات ) (TPMSا
Dي p,ء ء ,D!Gا+Iض
? LاFرات , *4UWن *8ى ا+خ وا{ 4أو أآ
*_ إFرات ر Gأ<' *_ *8ى ا+خ ا
}Nرة آة .و []WهDا 4UWإءة إsرة ا+Iض ?L
اFر ]W |l, ،ا
<; و! اFرات zNع *
_/,و I+إ
[ *8ى ا
L?pا
.|U/إن ا
دة
وxد إFر !]* 'ON j+IU* L? Nظ |8Gز,دة
{ارة اFر و<G 4دي إ
[ '97GاFر .آ /أن
ا+Iض ? LاFر '],آ+ءة ا
<د و4* /Wاس
اFر ،و< []W ¢, 4ا
4رة < []Wدة ا
8رة وإ.,
ُ {>* [x,أن م *ا< ? LاFرات
) _W >ً,4N 47, (TPMSا
} ا
FÓ
U/ر وا]W
أ *8و
ا
^8ا
!+ظ L? []WاFر ا
}!w
{[ إذا '},ا+Iض ? LاFر إ
[ *8ى
^]9,إsرة ا+Iض ? LاFر Uم *ا< ?L
اFرات.
U
'9W s/N pم *ا< ?L
~G Gو 4,ر Gأً ,
اFرات )sÓ
(TPMSرة إ
[ 4Wم '/Wا
Uم 'ON
! '9W s* ¡*4U, .wم *ا< ? LاFرات
)}* P* (TPMSح إDار ا+Iض ? LاFرات.
;O, *4UWا
Uم وxد }* j* ،'9Wح
اDار 4/ة د< وا{4ة ًp* ', ¢ ً,Gء +}N
*/8ة /8, .هDا ا
'8]8أU¢ء ]/Wت '?OGا
8رة
ا
' /
F 7N/ا
ًx* '97داp, *4UW .ء *s
ا
_/, 4< ،'97ا
Uم *_ اآOف أو اsرة إ
[
ا+Iض ? LاFر آ4!, 4< .|l, /ث ']3م
*ا< ? LاFرات :ب * /N ،WUذ
Gآ| إFرات أو >lWت ],4Nا
8رة وا
PU/G
م *ا< ? LاFرات ) _* (TPMSا
'ON '/7
! ^!G .wداً}* _* /ح إDار '9Wم *ا<
? LاFرات ) 47N (TPMSا4ال إFر أو ]lW
!&MHW
ف |8Gا
دة ا
/8/ة ' ،ر ر
" "HOTOILا
!4
,,Dر{ xارة <' ا
!آ ،
ا
,Uإ
[ '<U
8x ;]Gا
!آ أو .]97G
!<~9W
{
ا/ار '?OGا
8رة أU¢ء إءة ر
ا
! _* ,D!]
"HOTOIL" ,Dدر{ xارة <'
ا
!آ j7N |8G 4 ،ا{:ال ار+Gع درx
{ارة ا
l, /N '8وز ا
?]ن ،و<P* g*>, 4
ا
!/ك ا
_38أو *ت م ا
7دم * |8, 4< /
Oب {.^,
gASCAP
إذا {4د ا
Uم ا
8]
}IOرة أن 9ء ! 7G
ا
<د *! ا>ق أو *آ| w!
'ONأو
W 8 ،;
Gض ر
9) gASCAPء ا
(_,~U
*W ss 9Uض 4Wاد ا
.8/أ{ إ>ق 9ء !
7Gا
<د w!
'ONوا? []W Lزر 4Wاد *8
ا
{] ,ف Wض ا
.إذا ا/ت ا
،]O/
8ا
ا
/ة ا
ا
'?OG ,ا
8رة.
noFUSE
إذا {4د ا
Uم ا
8]
}IOرة أن * |! }Uإ,ف
ا
* (IOD) '?Oآ| w!
'ONأو 8 ،;
G
Wض ر
"4W) "noFUSEم وxد * (}U
*W 9Uض 4Wاد ا
_* 4,~/
.8/ا
*]7/ت {ل
ا
}U/ات و*ا< ،7را" Pxا
}U/ات" "
ا
8رة".
ر' 1W) CHAngE OILا(<V
إن ر~* Gودة UNم * ?G sز ,ا
!/ك.
7Gض ر
" ?G) "CHAngE OILا
~ (,
4Wاد * W/l* 8أ~xة ا
س 4/ة ً,G ¢ 12
47Nإ
4ار إsرة
Gوا{4ة sÓرة إ
[ *?G 4W
ا
~ ,ا
4وري ا
4U8, .م * ?G sز,
ا
!/ك []Wدورة ا
،*4Iو U7,ذ
أن *?G 4W
ز ,ا
!/ك ;]I,وً L/Uا
دة ا
.}IO
* W/lأ~xة ا
س و{رW .kدة Lم *s
?Gا
~ D+UG 47N) ,ا
} ا
4ور D+ ،(,اxاء
ا
:
أدر *+ح ا
'?Oإ
[ و) ON/RUN Pا
/'?O
ا>9ق( ) '?ON Gا
!/ك(.
ا? []W '*
N Lدوا ا
<د LNء >* ¢ات
pن ¢ 10اٍن.
أدر *+ح ا
'?Oإ
[ و) OFF/LOCK Pإ,ف
ا
/'?Oا
.('+
:GZ
إذا أءت ر' ا
L H ilء =1(WارةoX ،ن
ذ <
EHDم إدة G Mم 1W ilا .<Vآر
ا#اء ا Lإذا Vم ا./
و* GإWدة ª ،9ن ه kDا
/8G
ا
7ض آ' *ة +* ,4Gح ا
'?Oإ
[ وP
) ON/RUNا
/'?Oا>9ق(, .ف Wض ا
*<ً ،ا? []W Lزر 4Wاد * 8ا
{] ا
x/د
١٨٥
il .23ذراع ا=PH
* sذراع ا
x* 'Uد W/l* _/أ~xة ا
س.
7,ض وG Pوس <' ا
!آ ا:و.G*G
=P il .24اوس -إذا آ ارة Vودة
~L
p,ء هDا ا
~], *4UW s/م ا
4, 'Uوً,
إ* []W:أو .'+:
ii P5H .25اد ا
/ Xاد Xا
W ss OGض 4Wاد ا
8/إ
[ ا
8/ا
] ا
< 79ا
8رة .آ4W O, /اد * 8ا
{] إ
[ ا
8/
ا
'
W9/ر{] *+Uدة.
١٨٤
ر'>= اد اL Xرة
G 4UWا ا
وف ا
W , ،U/ض ر' 4Wاد
ا
8/ا
:
G s* .. . . . . . . . . . . . . ECOا
<د
.. . . . . . . . . . . . . doorأ{ 4اN:اب *+ح
.. . . . . . . . . . . gATEا
ا Nا
4وارة *{+
Low Tire Pressure .. . . . . . . LoW tirE
)? LاFر *(j+IU
.. . . . . HOTOILدر{ xارة ز '< ,ا
!آ
ا:و G*Gأ _* []Wا
!4ود ا
79
9?N z93 .. . . . . . . . . . gASCAPء ا
<د
}U/
N z93 .. . . . . . . . . . . . noFUSE
~], .. . . . . . . . CHAngE OILم ?Gا
~,
X;W il) ECOا;;7د( — إذا آ ارة Vودة
~L
pء * G sا
<د )G *4UW (ECOد ,9N
*ة ]<د و _/,ا4Iا* W ',47دات ا
دة ~,دة
4sGا>ك ا
<د.
:GZإذا آ ارة Vودة Lآ;D Vت
ارة اAو (EVIC) Eاkhري ; EX
أV#ة اPس 8X ،ض 3#ا'>= ii EX
ض آ;D Vت ارة اAو.PX (EVIC) E
LoW tirE
G 4UWا ا
وف ا
/د4G ،
D
,ل ssا
7ض
* LoW _Nو>
tirEث دورات.
ر' <~9Wدر #ارة =7ا9آ ""HOTOIL
ف Gر
* W/lأ~xة ا
س ""HOTOIL
4Wاد ا
sÓ
UG /?UN N!}* 8/رة إ
[ ار+Gع
در{ xارة ' <' ا
!آ ا
<4!G 4ث *P
p
ا4Iام ا
9< '* 4,4Oا
9/رة4!, 4< .ث ذ
أً ,
'?OG 4UWا
8رة وف ا~ق *!ل ذو ~Wم
'* ،
Wا
'?Oو Pا
P4ا
[]W) WNا
9ق
ا
4//ة أو lف ا
]¡( { .ر ه kDا
",ªN ،"HOTOILف ا
8رة و '?OGا
!/ك []W
Wا
Fأو أع *_ ذ
* Pوxد <' ا
!آ
و Pا
> +IG [{ ^O7Gه kDا
.
; il .18ء اMdب ا - Ecإذا آ ارة
Vودة ~L
p,ء هDا ا
G *4UW s/ن *}wN
ا
pب ا
p* +]Iءة.
P .21س در #ا9ارة
4,ل *س در xا
!ارة []Wدر{ xارة ' 4,G
ا
!/كª .ذا آن *ن ا
s/ا
4/ى ا
8 ،79ف
4,ل ذ
[]Wأن م 4,Gا
!/ك }N '/7,رة
!!.
; .19ء ilا
3Xا - ELإذا آ ارة
Vودة ~L
U,هDا ا
pء ا
'?ON ^8ا
8رة
و9 Pق ا
P4ا
WNا
،
7و<'+
/Wدي ا
xا **:وا
ً* +]I
xر ا
>l7ت ا **:وا
[]W +]I
ا
4وران g+UNا
.W8
و<4, 4ل * sا
/س إ
[ درxت {ارة أ_* []W
ا
47/ل 4UWا
دة { gFر و ^]8G 4UWا
7+G/ت أو
|! 4UWا
9/رات .و4W |l,م ا
/8ح zNن l,وز
ا
s/ا
!4ود ا
}ى 4ر{ xارة ا
'?Oا
.79
; .20ء أن ارة — إذا آ ارة Vودة
~L
j*,هDا ا
pء 4/ة ً,G ¢ 15
'?OG 4UWإDار أ*ن ا
8رةj*, ¢ ،
LNء {[ '97G ,أ*ن ا
8رة.
!&MHW
إن <دة ا
8رة , *4UWن م 4,Gا
!/ك Uً3
_/,أن ^!],ا
pر 8Nر .Gإذا آن xز <س
در xا
!ارة و Pا
!ارة ا
"H" 7؛ |l
ا
<; _Wا
دة وإ,ف ا
8رة .أو<; ا
8رة وأو<;
x '?OGز *; ا
اء {[ L,ا
s/إ
[ ا
9Uق
ا
7دي .إذا [Nا
s/و Pا
!ارة ا
"H" 7
وً/8* UًUF 7/ا Á+Fz ،ا
!/ك ًرا وا'}G
4
}
Nى ا
آ' ا
.4/7/
!<~9W
'O,ار+Gع {ارة م 4,Gا
!/ك 93رة .?
N
و<
|8, 4و
×{ _,3وً< I
Nر أو ا
'8ا
_38
4ًxا إ
[ در xا
?]ن .ر}GN |G /Nل
Nآ'
ا
_* 4/7/أ 'xا
} إذا ار 7+Gدر{ xارة
ا
8رة .وإذا <رت ا
9 !G Uء ا
!/ك ،8+UN
>FNع
" []Wر ."Gا PGا
!,Dات
ا
اردة ا
+ة ا
9?N
Iء ? Lم 4,G
ا
!/ك.
.22اد ا
/ Xاد Xا /زر ECO
) X;W ilا;;7د(
ا? []W LهDا ا
~ر ? ssا
7ض *_ 4Wاد
ا
8/إ
[ أي *_ إ4Wادي 4Wاد * 8ا
{] أو ss
" G s*) "ECOا
<د( .ا
{] أ أو
ا
{] ب 4UWا
ا 4xو4W Pاد * 8ا
{].
ا? []W ً9* Lا
~ر _ Wدة 4W Lاد *8
ا
{] إ
[
+آ )
.('* +و |l,أن ,ن 4Wاد
ا
8/و Pا
{] آ _/,إWدة .9
١٨٣
.15اد ' ا9ك )اآ;(
W _,ا
!/ك * 47Nد ا
4ورات ا
4W) <4د
ا
4ورات ا
.(1000 × <4
!&MHW
'?ON Gا
!/ك أU¢ء وxد * sا
آ*
ا
9U/ا
!/اء, .دي ذ
إ
[ ;]Gا
!/ك.
; .16ء ilا(MIL) =5D
إن ء * sا
W (MIL) '97رة _W
~xء *_ م IOGا
'97دا '3ا
8رة
ا
Dي ،OBD II [/8,وا
Dي ,ا<| أ/
ا
!/ك و<' ا
!آ
ا
!
ا:و .G*Gو ,هDا ا
pء ا
+ة _NوP
*+ح ا
'?Oو) ON Pا
('?Oو '?OGا
!/ك.
إذا p,ء ا
}/ح 4G 4UWو+* ,ح ا
_* '?OوP
) OFFإ,ف ا
('?Oإ
[ وON/RUN P
)ا
/'?Oا>9ق( ؛ _/ا8]
! 'p:رة
أع و< *._/
و<G 4دي j7Nا
!ت *' 4Wم ر9 LNء ! 7G
ا
<د أو 4ا أو ا/7ل Wرد _* ,ا
<د إ
[
١٨٢
إءة ا
pء '?OG 47Nا
!/ك ! |l, .ا
8رة إذا
ا
pء وًp* [Nء أU¢ء <دة ا
8رة !Gوف
* .+]Iو أ]| ا
!ت < _/,دة ا
8رة }Nرة
Wد ,و
_* gا
pوري !.
(3LW) !<~9W
*اد <7s>
]Nل *' ا
GUت ا
lأو ا
|OIأو
ا
Gن و* إ
[ ذ
, 4< .دي ذ
إ
[ ا
ة أو ا
N
ا
9Iة ] ^8أو ا
آب أو ه .
!&MHW
إن ا
دة +ات ],Fإءة *}ح * sا
'97
) ;]G |8, 4< (MILم ا
! ا
!/ك .آ/
47* []W pل 4sGا>ك ا
<د
أن ذ
< ¢, 4أً ,
وإ* ا
دة .وإذا آن *}ح * sا
(MIL) '97
j*,؛ ªن ذ
4,ل 4{ P<G []Wوث ;]Gا
!/ل
ا
!+ز و <9]
4و< < .|,و |]9, Nا*:
[]Wا
+ر إxاء أ/Wل ا
.*4I
; .17ء <~9Wدر #ارة '>= ا
<M
U,هDا ا
pء إ
[ ار+Gع {ارة ا
!/ك4UW .
إءة ا
pء أU¢ء ا
دة!G ،ك *zNن
8
Nرة إ
[ |xا
^,9و< .,ªNإذا آن
م *; ا
اء و Pا
z ،'?Oو<; .]?OGا'
'< pا
!آ إ
[ و) NEUTRAL Pا
>(^O7G
أً ,
وا '7xا
8رة {
.FGإذا < 47Gاءة درx
ا
!ارة إ
[ ا
Pا
z ،79و<; '?OGا
!/ك []W
ا
+ر وا.}
N '}G
!<~9W
_/,أن '},ا
!/ل ا
!+ز ا
Dي ،']3 Nآ /ه
*Oر إ
أ ،k>Wإ
[ درxت {ارة أ _* []Wدرxت
ا
!ارة وف ا
'?Oا
7د _/, .,أن |8,ذ
{ ً,إذا آ ا
8رة LN 8Gء أو إذا +<Gق
:GZ
3ا7اب اد در #ارة '>= ا5P K <M
ا9ارة اEd< ،H Dء ه~ا ا ilو
Wر إiرة
; Wوا
ة .و yMWا ;cاW EX +وزPس در #ا9ارة ."H" 5PHو EXه~| ا،9
' ر إiرة 8< DL W;-اح 9ك
Lن <Mد.
)(3LW
ا
8رات ا
~/ودة UNم ا
+ا*' ا
>?>
7/ق )(ABS
Gن *~ودة آUN
Dم Gز< P,ة ا
+ا*' ا
و
) .(EBDو {
'9Wم Gز <F P,ا
+ا*'
ا
و )p, (EBDء ء ا
!zON ,Dن ا
+ا*'
* Pء م ا
+ا*' ا
>?>
7/ق ) .(ABSو هkD
ا
!
|l,إ
>ح م ا
+ا*' ا
>?>
7/ق
)ً (ABSرا.
و*_ ا
! _//ء ,D!Gا
+ا*' وذ
4Nو,
*+ح ا
_* '?Oو) OFF Pإ,ف ا
('?Oإ
[ وP
) ON/RUNا
/'?Oا>9ق(, /* .دي إ
[ ر
ا
pء 4/ة .ً,G _¢و |l,أن +I,ا
pء 47N
ذ
إ إذا آ ا*' ا
<; * *4I8أو إذا آن هUك
'9Wا
+ا*' .وإذا p,ء ا
pء! _7, ª ،
ا
pء *_ ِ<' ا
آ' ا
.4/7/
4UW pا4Iام ا*' ا
<; و*4UW
و ,ا
pء أً ,
,ن *+ح ا
'?OوON/RUN P
)ا
/'?Oا>9ق(.
:GZ
ه~ا ا;dء < PX KMأن Xا= ا; .
c j7وh
< KMدر DX #ا'
cام اا=.
il .11ا;dء اED
O,هDا ا
pء إ
[ أن ا
wN}/ا**:
ا
p* 7ءة .اد Pا
Dراع *47د ا
;
4ً7Nا ',!
UWا
wN}/ا **:إ
[ وP
ا
pء ا
.
7اDxب ا
Dراع { ! ',ا
wN}/
ا* **:ة أ3ى إ
[ ا
pء ا
.j+IU/إذا G Gك Nب
ا
،{ً+* ^8وآ ا
wN}/ا **:أو *}wN
ا
<; *pءة j*8 ،ء * sا
pء ا
7
و4}Gر إsرة
.G
; .12ء اا= اZ1Z Dق )(ABS
47Nإدارة *+ح ا
'?Oإ
[ و Pا
،'?O
j*,ء م ا
+ا*' ا
>?>
7/ق
آ}/ح ! 4N 4UWء '?OGا
8رة .إذا
ا /هDا ا
pء 4N 47Nا ,ا
،'?Oأو أء وا[]W /
ه kDا
!
[]Wا
O, 4 ،^,9ذ
إ
[ ا7Oر م
ا
+ا*' ا
>?>
7/ق ']Iأو أ 7, .'/7,د ا
Uم
إ
[ ا
+ا*' ا
>?>
7/ق ا
.
; .13ء <~9Wي (Lن ا;'دة ا;ا>
pء هDا ا
pء 4/ة Gاوح 4 _Nو8
¢اٍن آUع *_ ا3ر 4INام *}ح 47N
و< Pص ا
'?OوON/RUN P
)ا
/'?Oا>9ق( :ول *ة .إذا p,ء
هDا ا
pء 4N 4UWء ا
'?Oأو إذا ا /
اءة أو إذا أU¢ء ا
دة ! |l ،ا
Uم 4ى
ا
آ' ا
4/7/أ<ب و< * ._/را" PxأG /
ا
آب" "أ*ر |l,أن '?OG '< 7Gر"G
]!}ل _* 4,~* []Wا
*]7/ت.
;9 =7 il .14ر ا
وران ا - Ecإذا آ
ارة Vودة ~L
,هDا ا
pء '+< LOUG 4UWا
!/ر
ا
.+]I
إذا آن آ' *_ ء ,D!Gا
+ا*' وء ,D!Gا
+ا*'
ا
>?>
7/ق {
* ]7 ،'?OGا 7xا
آ'
ا
[]W 4/7/ا
+ر .را" Pxم ا
+ا*' ا
>?>
7/ق"
ا
" 8ا
4ء وا
."'?O
١٨١
il .8ات إiرات ا5Dhف
j*,ا
8ا _/,:أو ا P* 8,:أاء
إsرة ا97ف ا **:وا
+]Iا
U/ة
'?OG 4UWذراع إsرة ا97ف4}G .ر
إsرة
Gإذا < /Gدة ا
8رة :آ
*_ 1.6آ ) ('* 1أU¢ء '/Wأي *_
إsر Gا97ف.
; .10ء <~9Wاا=
,م ء ,D!Gا
+ا*' /Nا< و;
*47دة Uم ا
+ا*' /Nذ
*8ى '
ا
+ا*' وا4Iام ا*' ا
<; .إذا أء
*}ح ا
+ا*' O, 4 ،ذ
إ
[ ا4Iام ا*' ا
<;
أو ا+Iض *8ى ' ا
+ا*' أو وxد *~IN ]Oان
م ا
+ا*' ا
>?>
7/ق.
:GZ
إذا و bأ
اilات DM+ n Lا9X
ا vLاcر;A< PX ،#ن هHك EX =kأ
ه.
إذا ' ا
}/ح *ًpء '} 4UWا*' ا
<; ،وآن
*8ى ا
*>W 4UW '8اآ/ل ~3 []Wان ا9ا
ا
ª ،8ن ذ
O,إ
[ ا{/ل وxد ']3ا
Uم
ا
4رو
]+ا*' أو {4وث *~7* ]Oز ا
+ا*' G
اآN Oا 9م ا
+ا*' ا
>?>
7/ق )/ (ABS
¡*Nاار ا
و ) .(ESPه kDا
!
،
' ا
}/ح *ًpء {[ ,إ
>ح ا
.']Iإذا آ
ا
~7/N ]7* ]O/ز ا
+ا*' Ip* '/78 ،ا
+ا*'
ا
>?>
7/ق ) 4UW (ABSا4Iام ا
+ا*' و<, 4
ا
7Oر Nه~از دوا ا
+ا*' >3ل آ' .;<G ]/W
; .9ء <~9Wي (Lن 1ا<V
O,هDا ا
pء إ
[ ا+Iض ? Lز,
ا
!/ك |!, .أن ,هDا ا
pء +ة
<}ة 4N 4UWء '/Wا
!/ك ،إذا Áp,ا
}/ح،
!^ *_ ا
Uم ONرة أي وآ' * .4/7وإذا
ا
pء أU¢ء ا
دةً ;< ،را وأ Á+Fا
!/ك أع
و< * ._/و 4UW UًUF P/8ر هDا ا
pء.
'?ON Gا
8رة إ w]}G 47Nا
.'97و O,هDا
ا
pء إ
[ آ /ا
~ ,ا
!/كD
.ا ! |l,
*8ى ز ,ا
!/ك {lة ا
!/ك.
١٨٠
,ا
Uم ا
~/دوج ]+ا*' 7آ wا{
{ F
'9Wأ{ 4أ~xاء ا
Uم ا
4رو
]+ا*' .و*_ ا
_//
* 7وxد '9Wأي ~xء *_ م ا
+ا*' ا
~/دوج
p, *4UWء ء ا
Uإ
[ م ا
+ا*' ا
Dي 4,ل []W
ا+Iض *8ى ' ا
+ا*' ا9:ا ا
8إ
[
{._7* 4
و /8,ا
pء Nءة {[ w]}G ,ا
.'97
:GZ
b;< 7ا;dء 3<' =A(LأHء Hورات ا5Dhف
ا9دة
yMLث 1Wات ; EXى ا>=y< .
ارة ،و; 9Xى '>= اا=. {
أي '9Wا
+ا*' < ً !]}Nرا.
!<~9W
*_ ا
9Iرة <دة ا
8رة p, *4UWء ء ا
+ا*'
ا U7, 4 ./{:ذ
أن 4{ 4< * >ً9Wث أ{ 4أ~xاء
م ا
+ا*' .و!ج إ
[ و< أFل ,ف ا
8رة.
*, 4< /دي إ
[ و<ع }Gدم .ا! ا
+ا*' ًرا.
;ا-ت ; أV#ة اPس
P .1س ا;;7د
O,هDا ا
s/إ
[ *8ى ا
<د ا
~Iان 4UWوP
*+ح ا
'?Oو) ON/RUN Pا
/'?Oا>9ق(.
M .2ح K9iاGHم
O,هDا ا
}/ح إ
[ {
م ا
_!O
ا
|l, .Nأن p,ء ا
pء 4UWإدارة
*+ح ا
'?Oإ
[ وON/RUN P
)ا
/'?Oا>9ق( :ول *ة ،وًp* ',ء +ة و~xة
آxªاء ]!^ *_ ا
}/ح .إذا ا /ا
pء *ًpء أو
أء أU¢ء ا
دةz ،و<; j7N '?OGا~x:ة ا
N
ا
8
N //رة أو < ,~Nدة Wا
!/ك )إذا آن
W []Wا
.(Fإذا ' ء م ا
ًp* _!Oء،
Dا U7,أن ا
8رة ]O* Nم ا
._!Oا4ع
ا
ً *4Iرا .را Pxوآ' *.4/7
إذا آن *_ ا
pوري '?OGرة ذات 9Nر+7 ,
4INام 9Nر~7* ,زة ،ا" Pxإxاءات '?OGرة
ذات 9Nر4IN +7 ,ام 9Nر~7* ,زة" "* |l,
أن ]7+Gا
!ت ا
9ر".
M il .3ح اMdب اE/
p,ء هDا ا
G *4UW s/ن *}wN
ا
pب اp* **:ءة.
; .4ء <~9Wاcض ;ى ا;;7د
8* '}, *4UWى ا
<د إ
[ * ,ب *_
x 2) 7.6ن(p, ،ء هDا ا
pء و[,
آ7, [{
Dد ~Gو 4,ا
8رة <
Nد'/7, 4< .
ء ,D!Gا+Iض *8ى ا
<د أو _W ;<,ا
'/7
*ة أ3ى
3أU¢ء و 47Nا4Iام ا
+ا*' Nة أو
ا97ت .وا
|8ذ
7,د إ
[ !Gك ا
<د
ا
~Iان.
.5اد ا
O,إ
[ Wا
8رة.
:GZ
< ر ;-ت ر Kة وا
ة W EXوز '
ارة 120آ.(' / Zً 75) ' / 8
;9 =7 il .6ر ا
وران ا - E/إذا آ
ارة Vودة ~L
'+< LOUG 4UW Áp,ا
!/ر ا.**:
; .7ء V L &MHWام ا
DP
4UWإدارة <ص ا
'?Oإ
[ ON/RUN
)ا
/'?Oا>9ق(p, ،ء هDا ا
pء 4/ة
*_ أر PNإ
[ /¢ن ¢اٍن آUع *_ ا3ر
آ}/]
!+ح .أU¢ء ا
}/
N !+ح،
4}Gر إsرة
Gإذا آن ا
4G, ^8ي {~ام ا
.47/
إذا ا~{ /ام * 47ا
^8دون ر 47N LNاء ا
!+
}/
Nح أو أU¢ء ا
دة8 ،ف j*,ء ,D!G
{~ام ا
47/أو p,ء * 'ONا
' .را" PxأG /
ا
آب" "أ*ر |l,أن '?OG '< 7Gر"G
]!}ل _* 4,~* []Wا
*]7/ت.
١٧٩
; أV#ة اPس
١٧٨
Vات ; أV#ة اPس
D+U* - 1ا
اء
W/l* - 2أ~xة ا
س
- 3ا
اد,
— 4ا
j/ا
4W8/
4U
— 5وق ا
+زات
wG+* — 6ا
Uا Dا
<9
N ]*7
wG+* - 7ا
! در xا
!ارة
D+U* - 8ا
<9
W/l* - 9ا
wG+/ا
]+8
+* — 10ح ا
/ة ا
— <9
N ]*7إذا آ ا
8رة *~ودة
DN
- 11ا
U
١٧٧
•
•
•
•
•
•
١٧٦
• ا; 7ا. . . . . . . . . . . . . . . . . . . . . . . . . . . . . . . . . EdPH
• اGHم . . . . . . . . . . . . . . . . . . . . . . . . . . . . . . . . . . . .
• ا
ادات ا() cاVات ا;L M LPا' 5ا. . . . . . . . . . . (=D
ا G/ا ;. . . . . . . . . . . . . . . . . . . . . . . . . . . . . . . . . . . W
ح ا# EX 8A9ز ®/iPodو
ة /USBو
ة - MP3إذا آ ارة Vودة ~L
• # =-;Wز ® iPodأو و
ة USBاcر. . . . . . . . . . . . . . . . . #
• ا'
cام ه~| اVة . . . . . . . . . . . . . . . . . . . . . . . . . . . . . . . .
• ا# EX 8A9ز ® iPodأو و
ة k USBر
c'L #ام أزرار ااد<; . . . . .
• و) Play 3ا(. . . . . . . . . . . . . . . . . . . . . . . . . . . . . . (=1
• و) List 3ا (>Pأو ) Browseا'Dاض( . . . . . . . . . . . . . . . . .
• Lا ;ت . . . . . . . . . . . . . . . . (BTSA) Bluetooth® HPW M
vWا EX 8A9ا ;ت ا;;#دة اPدة . . . . . . . . . . . . . . . . .
• =1(Wااد<; . . . . . . . . . . . . . . . . . . . . . . . . . . . . . . . . . .
• ( =1ا7/اص ا. . . . . . . . . . . . . . . . . . . . . . . . . . . . +;1d
أ7اص . . . . . . . . . . . . . . . . . . . . . . . . . . . . . . CD/DVD =1(Wااد<; وا;ا jWا. . . . . . . . . . . . . . . . . . . . . . . . . . ;9
vWا EX 8A9در#ت ا9ارة . . . . . . . . . . . . . . . . . . . . . . . . . . .
• ا 8A9ا
وي G EXم ا
Xو jAا;اء . . . . . . . . . . . . . . . . . . .
• Gم ا 8A9ا/و EX EAW;Wدر #ا9ارة ) - (ATCإذا آ ارة Vودة ~L
• إرiدات ا(. . . . . . . . . . . . . . . . . . . . . . . . . . . . . . . . =1
.
.
.
.
.
.
.
.
.
.
.
.
.
.
.
.
.
.
.
١٩٩..
٢٠٠..
٢٠٠..
٢٠٢..
٢٠٢..
٢٠٣..
٢٠٣..
٢٠٣..
٢٠٣..
٢٠٥..
٢٠٦..
٢٠٧..
٢٠٧..
٢٠٧..
٢٠٨..
٢٠٨..
٢٠٨..
٢٠٨..
٢١١..
٢١٥..
٤
; 8XأV#ة اPس
•
•
•
•
•
Vات ; أV#ة اPس ١٧٧.. . . . . . . . . . . . . . . . . . . . . . . . . . . . . . . .
; أV#ة اPس ١٧٨.. . . . . . . . . . . . . . . . . . . . . . . . . . . . . . . . .
;ا-ت ; أV#ة اPس ١٧٩.. . . . . . . . . . . . . . . . . . . . . . . . . . . .
iiض ا -;Mوآ W;Mا — إذا آ ارة Vودة ١٨٨.. . . . . . . . . . ~L
• أزرار ا١٨٨.. . . . . . . . . . . . . . . . . . . . . . . . . . . . . . . . . . . . . 8A9
• iiض ا/-;Mدر#ت ا9ارة ١٨٩.. . . . . . . . . . . . . . . . . . . . . . . . .
• hت ا ١٩٢.. . . . . . . . . . . . . . . . . . . . . . . . . . . . . . . . . . . . .
آ;D Vت ارة اAو - (EVIC) Eإذا آ ارة Vودة ١٩٢.. . . . . . . . ~L
• iiت ض آ;D Vت ارة اAو١٩٤.. . . . . . . . . . . . . . (EVIC) E
• =<
MW ilاس ) - (GSIإذا آ ارة Vودة ١٩٥.. . . . . . . . . . . . . . . ~L
• V<) Oil Change Requiredم 1Wا١٩٥.. . . . . . . . . . . . . . . . . . (<V
• ا >Pا> Lآ;D Vت ارة اAو١٩٥.. . . . . . . . . . . . . (EVIC) E
• iiض ا -;Mودر #ا9ارة اcر) ECO / #و X;W 3ا;;7د( -إذا آ
ارة Vودة ١٩٦.. . . . . . . . . . . . . . . . . . . . . . . . . . . . . . . . . ~L
•
Dل iWا'Zك ا;;7د ١٩٩.. . . . . . . . . . . . . . . . . . . . . . . . . . . . .
• ا Xا =M7 D57 KA< Eد ا;;7د )١٩٩.. . . . . . . . . . . . . . . . . . . (DTE
١٧٥
3H :GZاZ'hك اط ( H9ا5Mر<،
ا'
cم =<Vا K 3Pا~XHة ا;A< H cن
ا9ك (.PX Zً1
!&MHW
إن 4Wم اGع ه kDا
Uت <
UW ;]G |8, 4
ا
:_I8
• 3N ]Wا
!Dر '8 4UWا
~lء ا
4ا_* ]3
ا
DUة ا
4I8G .+]Iم *+Uت ا
Uا Dا
9s
[]Wا
w98ا
4اDU]
]3ة .ا4Iم </< 79ش
/Wو*!]ل 47* '8ل ،و< 'ON w8/
N
*ازي ~x:اء ا
._I8و*Nن إزا
ا
}]/ت
ا
x/دة []Wا
~xج 47Nأن /N ']Gء دا.Á
• 4I8Gم أدوات ;UGآ 9sأو أدوات {دة أو
*+Uت ا
Uا Dا
[]W 9sا
w98ا
4اDU]
]3ة.
• ا{ P/lN Ë+ا
]7/ت _* U* 8* []Wا
DUة.
١٧٤
N < .5آ| أ
اح ا
~xج ا **:ا
4IN ]+8ام
ا
ا ا
4 8ا ا
أس ® Torxا
4ا ,ا
8داء
)* +* *ً4I8ر< 4 40ا ا
أس ® []W (Torxآ'
4W< _* |xة ا
~xج ا.**:
Vات ا~XHة ا - cاVء ا;Dي ا y
PX
' 'n/9ا~XHة ا — cإذا آ ارة
Vودة ~L
!,ا
+/ح []Wا
~lء ا:و _* Lذراع ا
!
)ا
x/د []Wا
|lا/W _* _/,:د ا
(x
'?OGو +ا
/!/ا
?] ا
.+]I
أدر ا
+/ح ;]3 []W:ا
! 8Nا:و
[
LOUا
?] ا
Ip* /8G .+]I
ا
?] وا
!/ا
/
F '/7ا/
ا
[]W L?pا
+/ح .و ,!G 4UWا
~ر،
,!G ,ا
4
!/ور _Gأو >¢ث <'
ا
xع إ
[ ا
Pا
.
_7/
إذا آ ا
!/ا
'/7G +]IأU¢ء إدارة *+ح ا
'?O
إ
[ و) LOCK Pا
78 ،('+د ا
ً]G !/إ
[
و" Pا
<;" 4UW .إWدة '?OGا
8رة;z8G ،
ا
!/ا
'/7أً ,آن ا
Pا
Dي L Gا
+/ح .]W
=<Vا K 3Pا~XHة ا — cإذا آ ارة
Vودة ~L
.6أG 4Wآ| أذرع ا
.!/
ح 8A9Wا'/9ا '1اc
أدر ا
+/ح []W:إ
[ و Pا
! 8Nا:و
[
'?Oا
!/ا
.+]I
4x,زر *~ ',ا
} _W Pا
DUة ا
+]I
* jا
! ا
Pا
Iص wG+/Nا
!
در xا
!ارة .ا? []W Lا
~ر '?O
*~ ',ا
} _W Pا
DUة ا
.+]Iف p,ء * s
ا
~ر , *4UWن *~ ',ا
} _W Pا
DUة ا
+]IوP
ا
, .'?Oأو ًّG*Gإ,ف ',~* '?OGا
}_W P
ا
DUة ا
10 47N +]Iد<^ .ً,Gو
4/
]?Oة 5د<^
إ ،ا? []W Lا
~ر *ة .¢
١٧٣
:GZ
;A< 7ن Kاdوري ا'
cام أداة '+ y9ف ا5Mر<
= أذرع ا'; K 9د ا
;- X DL 3Xا.
ªN < .11زا
أ
اح ا
~xج ا **:ا
^,F _W ]+8
إزا
ا
N 8ا 4ا ا
أس ® Torxا
4ا,
ا
8داء )* +* *ً4I8ر< 4 40ا ا
أس ®(Torx
[]Wآ' 4W< _* |xة ا
~xج ا.**:
ر 3Xا#Vج ا E/وا'
Mال ا;9ا V#اM
.1ار Pا
~xج ا.**:
3* N < .2ة ا
! ~xا
~x!
N lا
,
*4W Pم إ{م .Gرا Pxا
9Iة !G 4ا
U7ان
" j+3ا
~xج ا **:وإزا
ا
!ا ~xا
ًN "l
هDا ا
. 8
N < .3آ| * *4ا
! ~xا
FªN lر ا
~xج
ا.**:
• < Nآ| ا
/8/ر _,ا
4 _,]7ا ا
أس
) ( * 13أوً ¢ ،ا
/8/ر ا
lا
4 ]+8ا
ا
أس )!* G _
.( * 13ذاة */8ر ا
|lا
]+8
{[ G ,آ| ا
/8/ر _,ا
._,]7
.4أ{ ر G *8* P/x LNا
!ا ~xا
.l
.12أ~ل ا
~xج اLN **:ء {[ 4}/N '},ات
9ء ا
!/ك ا
.F9/
.13أ{ Gا
~xج اW ^¢G L,s ,/N **:
ا
!] 9 ;}U/Nء ا
!/ك و ;}U* []WإFر ا
~xج
ا 4ON < .**:ا
L,Oا
~xج ا.7* **:
١٧٢
• أG 4Wآ| 9ء ® ~x!]
Velcroا
.,
_,~I]
.9ا!]
_*:ا ~xا
lدا '3ر،G
ا4Iم أر _* PNأ Fsا
) ^¢ا
/ة 4ى ا
آ'
ا
N < .(4/7/آ| ا W Fs:ا
!+ت ا
x/دة
[]Wا:ر ;]3ا
47/ا
+]Iا
9/ي *4* 4UW
9ء {lة ا
._,~I
ªN < .3زا
{xت ا
.g/O
ªN < .4زا
9ء ا
/7د أ.
'}+N < .5ا
/ون )إذا آ ا
8رة *~ودة UNم
Uconnect® Phone).
9 w+N < .6ء ~x!]
Velcroا
.,
ªN < .7زا
ا
/8/ر ا
]7ي 4ا ا
أس )( * 13
ا
Dي _/,رؤ W ,ا
8ة ا
> []Wا
|l
ا
_* ]+8ا
! ~xا
lوا
/8/ر 4ا ا
أس
) |x []W ( * 13ا
! ~xا
،lوا
/8/ر 4ا
ا
أس ) []W ( * 13ا
~lء ا
]7ي *_ ا
! ~xا
.l
:GZ
ا' y9ا V#9ا EMإ اcرج Hإزا& و EXا|W
أ.EPX
!&MHW
P9< +N Gا*}ص ا
} _W *4ا
أس *_
ا
!ا ~xا
_W ¡U, 4 ،lذ
;]Gه kDا~x:اء.
:GZ
3# K<VcL 87اآ W9X EX yا-/
وأ
i 8Aه K <Vا/ن.
ªN < .8زا
* W/lا
! ~xا
lوأG 4Wآ| 9ء
® ~x!]
Velcroا
.,
!<~9W
<7G 4ض أ و*_ * 7ا
8رة N
ÓآlU
! '/ا
!ا ~xا
lدون Gا
8رة .أ3ج
ا
!ا ~xا
_* lا
8رة أو < _* 'ON U,~IN
آ /ه *N
Ó
7G |8G [{ ،w
ا
{ }IOو<ع {دث .را Pxا
آ' ا
4/7/
]!}ل []Wأ Fsا
.^¢
+N < .10أذرع *! ا
~xج ا |!8N **:ا
!/
أوً 4ً7Nا _Wا
~xج ا **:وإ
[ ا
Iرج إ
[ و Pا
.'+
< +Nأ
9ا*' أذرع ا
!/و< ªNزا
ا*'
ا
.ار Pأذرع ا
!/زا
و ~3ا
8ل
ا
/آ~ي أو ;]3 _* 'ONا
47/ا
.+]I
١٧١
ا
!ا ~xا
lو Fا
~xج ا4,4!N w}U, .**:
Wا
8رة إ
[ 16آ 10) W/أ*ل،(W/
و '?OG 'p+,ا
9Uق ا
j+IU/إذا آG Uم
Nدة []W
Fق وWة * F Pا
~xج ا.**:
ار Pا
~xج ا **:وأG 4Wآ| ا
!ا ~xا
l
l/Nد اآ/ل ا
//ا
]9Gإزا
و<' ا
xع
إ
[ ا
دة []Wا
9ق ا
4//ة |l, .أن 4GGي أ و*_
* _* 7ا
آب أ{~* ا*:ن Fال ا
< []W ،ا
9ق
ا
4//ة وا
Wة j?N ،ا
/W Uإذا آن < G 4رP
ا
~xج ا **:أو Fأم .
* 4xGا ,ا
ؤ ,ا
+]Iا
Iر* xآ []WاN:اب.
إذا <رت إزا
اN:اب ،ر Pxإ
[ وآ] ا
4/7/
4ال ا
/ة ا
Iر |]9, .xا
ن وxد ا
/ا,
ا
Iر8
N xرات 4UWا
دة []Wا
9ق ا
4//ة.
١٧٠
!<~9W
ا PGه kDا
!,Dات ]4W8/ة ا
<4{ _* ,وث
إ
:}Is N
• 4Gا
8رة []Wا
9ق ا
4//ة أU¢ء إ~ال ا
~xج
ا.**:
• 4Gر Gدون Gا
~xج ا{ªN **:م أ*
[]W:أو .'+:
• |l,ار4Gاء وا<ت ا ،_W:آ
UراتF ،ال ا
<
ا
Dي ,إ~ال ا
~xج ا.**:
• zGآ _* 4اÓ
WGرsدات !Nص Pا
~xج
اzG .**:آG !
_* 4آ| *!ت ا
~xج
ا **:وا
!ا ~xا
lو P/xا~x:ة وا
/ت
ا
9G/و4sه <' <دة ا
8رة .إن 4Wم اGع هkD
ارsدات < PU/, 4ا
8رة *_ { ,/أ وا
آب
j7Nا
!ادث.
• إذا <ªN /زا
اN:اب3 U,~IN ،رج ا
8رة.
{
ا
7ض !دث |8, 4< ،ا
ب ا
/
{4وث إ
.}Is N
bkا#Vج ا E/وإزا ا;9ا V#اM
.1أ~ل ~xء ا
/ش ا
]7ي أو < ªNزا
ا
~lء ا
]7ي
ا
}]| *ً 7ارsدات ا
اردة هDا ا
|.
:GZ
8DL 87ا;ا 37ا =M7 -/إزا ا;9ا V#اM
وذ ة EXإدة اآ yا ;9 v9اV#
ا.M
ªN < .2زا
ا
/8/ر _,ا
4 _,]7ا ا
أس
) ( * 13وا
/8/ر ا
4 lا ا
أس ) ( * 13ا
Dي
_/,رؤ W ,ا
8ة ) ªN Gزا
آ8ة ا
آ_
ا
> أو * *8وا< ا
g/Oأو 9ء ا
!~x
ا
.(,
إZnق 9Xا( ®Sunrider
.4أ F 4Wا
8ا _* **:ا
~lء ا
]7ي ،وP
ا
أس []WzN ^Nا
~lء ا
_* +]Iا
!.
D+ا
9Iات ا
.8W |GN N8
l< :GZدي E+اVء ا K EcاPش إ
ا &cو K yM< 7ذ yاؤ< Î Kة
اؤ< ا.c
E+ا#Vج اE/
* 9N < .5دة ا
~lء ا
]7ي 'OG !Nا
!ف ""W
آ /ه *_ .اد '3ا
8رة و< * 9Nدة ا
~lء ا
]7ي
إ
[ ._F
.6أ{ ر LNا
~lء ا
]7ي 4INام ا
_9,O
ا
~/ود ;], ._,آ' { L,sل ا
Uا
lو*دة
®{ ¢ Velcroل ،8+و4IN ]Wام []W L,s
آ' x _* |xا
8رة.
7,ا
~xج ا **:ا
'+: 9]
'Nوا
!ا~x
ا
lا
Ó
]Nزا
ر Gأ~xاء ه] U/,
Gع *_ ا
! j7N ,/ا
!ادث .آ, /
j7N pا
! _* ,/ا
g9و{lرة
ا
~xج ا **:أً ,
ا
^,9ود3ل ا
+وع ا
}?ة واs:ء ا3:ى.
4Gا
8رة []Wا
9ق ا
/أU¢ء إزا
إFر
ا
ب أو إ~ال ا
~xج ا 4+G 4<
DN : **:ا
!,/
ا
Gه ه kDا
/اد.
_/,إزا
ا
!ا ~xا
4UW lا
دة []Wا
9ق
ا
4//ة و Fا
~xج ا **:إذا |]9Gا *:ذ
.إ أن
ا
م ,
DNدي إ
[ 4ان ا
! ,/ا
]+GهkD
ا
~/ات 4< .ا
8رة LNء و{ص إذا <ªN /زا
١٦٩
9Xا( ®) SUNRIDERاُ5ز ذات
ا/ر DLأ;Lاب(
!&MHW
إن '?OGا
;8أو wا
ب أو إ~ال Dة , *4UWن
ا
;8ر8N w/8, 4< ًFب ا
/ء إ
[ دا '3ا
8رة.
إZnق 9Xا( ®Sunrider
:GZإذا آ;P' Hد ارة Lأآ64 K M
آV vX 3 ('/= 40) '/8ة 9Xا(
®oL v HX ،Sunriderزا ا~XHة اK c
ارة.
ªN < .1زا
ا _* Fs:ا
Uت ا
.l
9X vXا( ®Sunrider
x{ +N < .2ت ا
g/Oو ,!Gإ
[ ا
.|l
x{ +N < .1ت ا
g/Oو ,!Gإ
[ ا
.|l
.3أ* 8رأس ا
~xج ا **:وا! إ
[ * *4ا
8رة.
{ .2ر *~ا
¡ ا
أس *_ ا
!]ت []WإFر ا
~xج
ا.**:
x{ P<* ?N < .6ت ا
.g/O
~* N < .4ا
¡ رأس ا
~xج ا **:ا
!]ت
ا
x/دة []WإFر ا
~xج ا ،**:وأ]^ ا
~/ا
¡
وأx{ 4Wت ا
g/Oإ
[ *ا 7ا.]
:
{ .5ك ا
]lا
> إ
[ ا
;]Iق و
] !
ا
.Sunrider® g/O
١٦٨
.3ا* 8ا
Uا
lا ;]3 **:ا
أس وارP
ا
~lء ا
]7ي.
[
]ي إ7
~ء اl
اP** وار:ج اx~
رأس ا8* أ.4
.w* ه/]; آI
اد إ
[ ا/
اF _* 4آzG .;]I
ا
ز ذات5ُ )اSUNRIDER® ( ا9X
(KLMا
:GZ
Sunrider® ( ا9X جhV (HW 8< h أy<
( ا9X لD'h بM اyd7 ;دة#;ا
yآW إدةyX ،&1(W 8W ذاoX .Sunrider®
.&#; ;ت اK
ًءاL K;ي اDء ا51ا
!&MHW
ن, *4UW ةD ا
ب أو إ~الw ; أو8
?' اOG إن
.رة8
' ا3ء إ
[ دا/
ب ا8N w/8, 4< ًF; ر8
ا
'+< ]ت ا
> ¦*م ?ءl
اP *_ و4آzG .3
.Sunrider® g/O
و
>ت ! ا
64 K M أآL ;د ارةP' H إذا آ:GZ
( ا9X ةV vX 3 ('/= 40) '/8آ
K c~ة اXHزا اoL v HX ،Sunrider®
.ارة
Sunrider® ( ا9X vX
.|l
إ
[ ا,!G وg/O
ت اx{ +N < .1
جx~
ر اF][ إW {ر *~ا
¡ ا
أس *_ ا
!]ت.2
.**:ا
< .l
ت اU
إ{م اFs: اP<* د4{ .5
[]W
آر ذ.w* ه/ت آU
{ل اFs:]; اN
.3Æ| اl
ا
١٦٧
.20أآG '/آ| ح ا
^,F _W xإد3ل N
ا
U< /ة ا
4ن.
N < .16آ| ا
DUة ا
>3 _* +]Iل 4Nء آ' *_
Fا
4UW {8ا
آ_ ا
]+8ا ! _* 8,:ا
DUة
ا
zG .+]Iآ4N _* 4ء آ> ا
_{8و*!ذا'ON /G
! '< wا
PU/
+ا
];.
.21أ]^ أ<+ل ا
أس وأ 4Wوx{ Pت ا
g/O
* 7ا.]
:
.19أد * '3ا
DUة ا
+]IآN +ب ا
3/ة
ا
4وارة []Wآ' *_ ا
_lا _/,:و.8,:
'?ON < .17ا
{8ا:و
[ [{ '*
Nا
|l
ا _* _/,:ا
DUة.
.18ا* ~x{ 8ا
! ا
+]Iو 7آ;
ا
! ا
.+]I
١٦٦
4{ .15د *< Pا
! ~xا:د ]! ا
{ .+]Iك
{N ~xب ا
3/ة ا
4وار ق xز ال ا
x/د
ا
~lء ا
4ا ]3ا
]+8ا
4ا _* ]3ا
DUة ا
|l, .+]I
أن ,ن ا
~lء ا P* _* lU+ا
8ب ا'+:
و* ًlإ
[ ا
Iرج PU/,ا
8ب *_ Nب ا
3/ة
ا
4وار .] 4UW
— 1إد3ل
!w
— 2إد3ل
!w
.14أد '3ا
W /ا
!+ا
DU]
]+8ة <Uة
ا
|lا
ً4N ،]+8ءا *_ ا
*4/و{[ *3ة ا
8رة< .
أً3ا >ªNق ا
~*م ا
*ً/G ^
~U/و* Gدة
®F []W Velcroل ا
~lء ا
]7ي و*3ة ا
DUة.
آر ه kDا
9Iة 8U
Nا
|lا
.87
١٦٥
.13أد '3ا
/اDU]
**:ة <Uة ا
ب P* ،ا
zآ4
*_ Gا
'*
N /وو w!
'ON 7إFر
ا
ب, .دي 4Wم ا
م
DNإ
[ {4وث 8Gب ],ح
وا
k/أو DU]
;]Gة.
zG .11آ _* 4و PاDx '< !!
,9N Fs:ب
{ت ا
U¢ []W xا
;8ا
) +]Iا
.(4-U
< Nآ| *ت { ا
U< ً~x xة |x
ا
'G P* ،ك >¢ 3ث
Nت ) ( 7.6اklG
ا
DUة ا
[]W) IG* +]Iآ> ا
Dx 4W8, .(_lب
U¢ا
;8ا
) +]Iا
'+: (4 - Uا
ل إ
[
ا
Uة 4INام ا
/ت.
١٦٤
.12آ| ا
Uا Dا
N < ،lآ| ا
DUة *<ً _W
* G ^,Fدة ® Velcroا
x/دة ا
آ_
ا
+]Iا
]7ي .ا4Nأ >ªNق ا
~*م ا
^
~U/و
_ 4/Nار
N) 2.5وا{4ة( .L
.10إذا /Gإزا
آ; Nب ا
3/ة ا
4وار ،
Nآ *_ >3ل Gا
! ا
+]
+]Iا
|l
ا
4اU< _* ]3ة ا
4ن +]N < ¢ .إ
[ ا
;]Iوق ا
Uة
{[ ^O7Gا
~lء ا
Iر _* xا
! , .~xوP
ا
{ G |l, ،w!
'ON +ا
!~x
ا
}ة.
zG .6آ '+< _* 4ا
~lء ا
]7ي
ت < ! '+ا
g/O
® Sunriderا
x/دة *4* []WzNاN:اب ا
.+]I
.9ا wأ<+ل ا
أس و< Nآ| ا
9Iف []Wآ' |x
{]ت ا
~xج ا ^]?G ) **:ا+<:ل(.
x{ +N < .7ت ا
g/Oو ,!Gإ
[ ا
.|l
|lN ;< .8ا
8رة وار Pا
~lء ا
]7ي *_ >3ل
ا
Uا
[]W 8, [{ lإFر ا
~xج ا.**:
١٦٣
l/N .21د إ~ال ا
~lء ا
]7ي ،'*
N '+:ا4Iم
أ Velcro® Fsا
x/دة ا
~lء ا
]7ي *_
ا
8رة *_ >3ل ; ا{ Fs:ل ا
Uت ا
lوW
ا
!+ا
x/دة |x * []Wا
4ن.
و 3اVء ا;Dي اK
:GZاص أ iا9ص Hو 3اVء
ا;Dي ا
k yH Kش ا;L/اب;A< 7 .ن Kا
vXا;L/اب ا.c
N < .1آ| إFرات اN:اب {
إزا
.راPx
"إFر ا
ب" هDا ا
}!]
8ل _* 4,~* []W
ا
*]7/ت.
+N < .2ا Fs:ا
*4I8/ا
~lء ا
]7ي
ا
Pا
]+8و* ~3ن *_.
.3ا wا
ا Nا
4وارة.
.22أ]^ *~ا
¡ رأس ا
~xج ا.**:
.4ا* |x 8ا
Uت ا
,9/وار 7إ
[ ا
~lء
ا
]7ي *_ إFرات ا
ب ا
.+]I
ªN < .23زا
إFرات اN:اب 4UWا
ذ
.
را" PxإFر ا
ب" هDا ا
}!]
8ل _* 4,~* []W
ا
*]7/ت.
:GZ
'= ا; 9ل ة Kأي kÎ ciاPم
|~Lا.D
١٦٢
.5أد~* '3ة ا~ق ]8* '
+/رات إFر ا
ب
و{ك ا
~lء ا
]7ي ¦*م.
j+3 '< .18ا
~lء ا
]7يN w+N < ،ا Nا
3/ة
ا
4وارة PU/ا
]; ا
}/
'/!/ح ا
+ا*' ا
]7ي
ا
/آ~ي .ا* |x 8ا
Uت ا
,9/و{ك ا
~lء
ا
]7ي 9Nل *8ر إFر ا
ب إ
[ إFر ا
ب ا
.+]I
:GZ
'= ا; 9ل ة Kأي kÎ ciاPم
|~Lا.D
{ .17ر ا
Uت ا
[]W L?p
N lا
'+ا
x/د
*4* []WzNا
ب ا
.+]Iاد Pا
~lء ا
]7ي ];]I
.]}+آر ه kDا
9Iة []Wا
|lا.3Æ
{ .19ك ^Nا
Uت ا
lإ
[ 3رج *8ر إFر
ا
ب وأ~ل ا
~lء ا
]7ي '+:إ
[ ا
8رة.
¢ .20ا
/ش وأ Fsا
_N 4ا
Uت ]4ا'3
:آ <4ر * PU/, ._/ذ
ا
49ام أي ~xء *_ ا
~lء
ا
]7ي |l
Nا
Iر _* xا
8رة.
١٦١
.15أ F 4Wا
8ا _* **:ا
~lء ا
]7ي4s P* ،
ا
~lء ا
_* +]Iا
/ش P .ا
أس []WzN ^Nا
~lء
ا
_* +]Iا
!.
9N < .12أ
اح ا
[]WzN 8G !N 8ا
~lء
ا
]7ي ا
]_.
.14ا* 8ا
Uا
lا ;]3 **:ا
أس وارP
ا
~lء