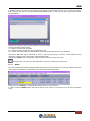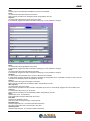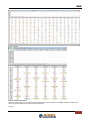
1
ENG RAM COMM User’s manual Software for advertising scheduling (Rev 3.0 ENG) | GENERAL NOTIONS 1 ENG CONTENT 1 2 GENERAL NOTIONS ................................................................................................................................................. 5 IDENTIFYING ............................................................................................................................................................. 7 2.1 ARCHIVES ............................................................................................................................................................. 7 2.2 TABLES ................................................................................................................................................................. 7 General hints ..................................................................................................................................................................................7 Detailed analisys ............................................................................................................................................................................8 2.2.1 Agents ................................................................................................................................................................................8 2.2.2 Agencies ............................................................................................................................................................................8 2.2.3 Banks .................................................................................................................................................................................8 2.2.4 Changes .............................................................................................................................................................................9 2.2.5 Campaigns .........................................................................................................................................................................9 2.2.6 Program ............................................................................................................................................................................9 2.2.7 Product categories.............................................................................................................................................................9 2.2.8 Offset .................................................................................................................................................................................9 2.2.9 Bills ...................................................................................................................................................................................9 2.2.10 Broadcastings..............................................................................................................................................................10 2.2.11 Advertising bands ........................................................................................................................................................10 2.2.12 Holidays ......................................................................................................................................................................10 2.2.13 Hour point groups .......................................................................................................................................................10 2.2.14 VAT .............................................................................................................................................................................10 2.2.15 Messages .....................................................................................................................................................................11 2.2.16 Broadcasters ...............................................................................................................................................................11 2.2.17 Tape type .....................................................................................................................................................................11 2.2.18 Hour points .................................................................................................................................................................11 2.2.19 Predefined hour points ................................................................................................................................................12 2.2.20 Payment.......................................................................................................................................................................13 2.2.21 Areas ...........................................................................................................................................................................13 2.2.22 Rotation .......................................................................................................................................................................14 2.2.23 Invoicing Society .........................................................................................................................................................14 2.2.24 Recording studios ........................................................................................................................................................14 2.2.25 Tape type .....................................................................................................................................................................15 2.2.26 Export type ..................................................................................................................................................................15 2.2.27 Spot type ......................................................................................................................................................................15 2.2.28 Sale type ......................................................................................................................................................................15 2.2.29 Sale typology ...............................................................................................................................................................16 2.2.30 Typology......................................................................................................................................................................16 2.2.31 Users ...........................................................................................................................................................................16 2.2.32 Currency .....................................................................................................................................................................16 2.2.33 Items ............................................................................................................................................................................17 2.2.34 Bill Book items ............................................................................................................................................................17 2.2.35 Zones ...........................................................................................................................................................................17 2.3 PURCHASED ........................................................................................................................................................ 17 2.4 CLIENTS .............................................................................................................................................................. 19 2.4.1 Main window ...................................................................................................................................................................19 2.4.2 Insert/modify client ..........................................................................................................................................................19 2.5 CONTRACTS ........................................................................................................................................................ 21 2.5.1 Main window ...................................................................................................................................................................21 2.5.2 Insert/modify contract......................................................................................................................................................22 2.5.3 General data ....................................................................................................................................................................22 2.5.4 Agents + amounts ............................................................................................................................................................23 2.5.5 Installments .....................................................................................................................................................................26 2.5.6 Summaries .......................................................................................................................................................................29 2.5.7 Scheduling .......................................................................................................................................................................29 2.5.8 Boxer ...............................................................................................................................................................................39 2.6 IMPORT PLANNINGS .............................................................................................................................................. 40 2.7 EXPORT PLANNING ............................................................................................................................................... 41 3 SCHEDULE .............................................................................................................................................................. 43 3.1 MODIFY SCHEDULE ............................................................................................................................................... 43 3.1.1 Start mask ........................................................................................................................................................................43 3.1.2 Insert/Modify schedule ....................................................................................................................................................44 3.2 DATA TRANSMISSION ............................................................................................................................................ 45 3.3 EXECUTE OPTIMIZER ............................................................................................................................................. 46 3.4 LISTS .................................................................................................................................................................. 46 3.4.1 Advertising crowding.......................................................................................................................................................47 3.4.2 Crowding advertising length (Sec.) .................................................................................................................................47 3.4.3 Tape based media ............................................................................................................................................................47 | GENERAL NOTIONS 2 ENG 3.4.4 Tape based media in the period .......................................................................................................................................47 3.4.5 Media check .....................................................................................................................................................................47 3.4.6 Commercials list ..............................................................................................................................................................47 3.4.7 Commercials length list ...................................................................................................................................................47 3.4.8 Number of commercials per day ......................................................................................................................................48 3.4.9 Number of comemrcials per period .................................................................................................................................48 3.4.10 Number of commercials per clock ...............................................................................................................................48 3.4.11 Number of commercials per group ..............................................................................................................................48 3.4.12 Number of commercials per hour ................................................................................................................................48 3.4.13 Occupation ..................................................................................................................................................................48 3.4.14 Time available per day ................................................................................................................................................48 3.4.15 Time available per period ...........................................................................................................................................48 3.4.16 Time available per clock .............................................................................................................................................49 3.4.17 Time available per group ............................................................................................................................................49 3.4.18 Time available per hour ..............................................................................................................................................49 3.4.19 Time used per day .......................................................................................................................................................49 3.4.20 Time used per period ...................................................................................................................................................49 3.4.21 Time used per clock .....................................................................................................................................................49 3.4.22 Time used per group....................................................................................................................................................49 3.4.23 Time used per hour......................................................................................................................................................49 3.5 CERTIFICATION .................................................................................................................................................... 50 4 RECORDINGS .......................................................................................................................................................... 51 5 INVOICES ................................................................................................................................................................. 53 5.1 PROVISIONAL INVOICES ......................................................................................................................................... 53 5.2 DEFINITIVE INVOICES ............................................................................................................................................ 56 5.3 CASH ORDER ....................................................................................................................................................... 57 5.4 STATEMENT OF ACCOUNT ...................................................................................................................................... 59 5.4.1 Insert/Modify Movement ..................................................................................................................................................60 6 STATISTICS ............................................................................................................................................................. 62 6.1 STATISTICS: COMMERCIAL ..................................................................................................................................... 62 6.1.1 Active contracts by date ...................................................................................................................................................62 6.1.2 Expired contracts for expiring date .................................................................................................................................63 6.1.3 Expired contracts for remained .......................................................................................................................................63 6.1.4 Contracts without commercial price ................................................................................................................................63 6.1.5 Suspended contracts ........................................................................................................................................................63 6.1.6 Commercials monthly list ................................................................................................................................................63 6.1.7 Summary monthly list ......................................................................................................................................................64 6.1.8 Summary monthly list by agent ........................................................................................................................................64 6.1.9 Monthly list by agent with payments................................................................................................................................65 6.1.10 Summary monthly list by year .....................................................................................................................................65 6.1.11 List of commercials to be invoiced ..............................................................................................................................65 6.1.12 Summary list of commercials to be invoiced ...............................................................................................................65 6.1.13 Period start dates ........................................................................................................................................................66 6.1.14 Programming periods .................................................................................................................................................66 6.1.15 Accruals and deferrals ................................................................................................................................................66 6.1.16 Reclassification standard format.................................................................................................................................67 6.1.17 Periods maturities .......................................................................................................................................................67 6.1.18 Statistics contract verification .....................................................................................................................................67 6.2 STATISTICS: ACCOUNTING ..................................................................................................................................... 68 6.2.1 Analisys remained commercials ......................................................................................................................................68 6.2.2 Commercials programmed ..............................................................................................................................................69 6.2.3 Contracts per vendor .......................................................................................................................................................69 6.2.4 Contracts control .............................................................................................................................................................69 6.2.5 Contracts list ...................................................................................................................................................................69 6.2.6 Payments .........................................................................................................................................................................70 6.2.7 Broadcaster payments .....................................................................................................................................................70 6.2.8 Broadcaster payments by installments.............................................................................................................................70 6.2.9 Business statements .........................................................................................................................................................71 6.3 STATISTICS: AGENT .............................................................................................................................................. 71 6.3.1 Agent calculation .............................................................................................................................................................72 6.3.2 Control statement ............................................................................................................................................................72 6.3.3 Control statement on invoices .........................................................................................................................................72 6.3.4 Total of commissions .......................................................................................................................................................73 6.4 STATISTICS: BOXER .............................................................................................................................................. 73 6.4.1 Boxer ...............................................................................................................................................................................73 6.4.2 Boxer per recording studios ............................................................................................................................................74 6.4.3 Invoicing ..........................................................................................................................................................................74 6.5 STATISTICS: INVOICES ........................................................................................................................................... 74 | GENERAL NOTIONS 3 ENG 6.5.1 VAT counts ......................................................................................................................................................................75 6.5.2 Turnover per vendor ........................................................................................................................................................75 6.5.3 Invoices issued .................................................................................................................................................................75 6.5.4 Invoices for agent ............................................................................................................................................................75 6.5.5 Bill book ..........................................................................................................................................................................75 6.5.6 Billing verificationstatistics .............................................................................................................................................75 6.5.7 Monthly billing’s verification statistics ...........................................................................................................................76 7 UTILITY..................................................................................................................................................................... 76 7.1 RECALCULATION .................................................................................................................................................. 76 7.1.1 Consumed and/or installments ........................................................................................................................................76 7.1.2 Length ..............................................................................................................................................................................76 7.1.3 Hour points ......................................................................................................................................................................76 7.1.4 Schedule ..........................................................................................................................................................................77 7.1.5 Restore alerts ...................................................................................................................................................................77 7.2 CHECK ................................................................................................................................................................ 77 7.2.1 Advertisement transmitted ...............................................................................................................................................77 7.2.2 Periods without hour point + not same as frequency ......................................................................................................77 7.2.3 Supporti non usati............................................................................................................................................................77 7.2.4 Supports without programming .......................................................................................................................................78 7.2.5 Delete unusable data .......................................................................................................................................................78 7.2.6 Contracts loading ............................................................................................................................................................78 7.2.7 Delete expire dontracts ....................................................................................................................................................78 7.3 ERASE ARCHIVED HOUR POINTS ............................................................................................................................. 78 7.4 MOVE HOUR POINTS ............................................................................................................................................. 78 7.5 SETUP ................................................................................................................................................................ 79 7.5.1 Aspect ..............................................................................................................................................................................79 7.5.2 Advertising.......................................................................................................................................................................79 7.5.3 Invoicing ..........................................................................................................................................................................91 7.5.4 Optimizer .........................................................................................................................................................................93 7.5.5 Jingle ...............................................................................................................................................................................94 7.6 MAINTENANCE ..................................................................................................................................................... 95 7.7 REPAIR ............................................................................................................................................................... 95 7.8 INFORMATION....................................................................................................................................................... 95 7.9 PROGRAM CONTROL ............................................................................................................................................ 95 7.10 COPY ARCHIVE ..................................................................................................................................................... 95 7.11 DOWNLOAD UPDATES ........................................................................................................................................... 95 7.12 EXIT ................................................................................................................................................................... 95 8 FINAL CONSIDERATION AND CONTACTS ........................................................................................................... 96 | GENERAL NOTIONS 4 ENG 1 GENERAL NOTIONS In all the masks the following buttons will always get the same meaning: OK (F10): Confirm the operation done. UNDO (ESC): Undo the operation and come back to the main window. EXIT (ESC): Exit from the current mask. DELETE (F5): Execute the deletion. INSERT (F2): Execute the insertion PRINT (F6): Execute the print. SEARCH: Allows you to search the information in a more detailed way (for example on the Banks) visualizing a search mask. The tapes where data are inserted are called FIELDS and can be the following types: NUMERICAL: In these fields you can only insert numerical values, the insertion of letters or symbols is not allowed. Example: the fields CODE, GROUP and COMMISSION. ALPHANUMERIC: In these fields you can insert Numbers, letters and Symbols. Example: the field DESCRIPTION. LIST: They are fields that suggest a series of data to choose among. Some of them are updatable because they come from tables where the user can access, some other are not updatable. Example: The field BILL comes from the table BILLS so it is updatable. The fields NR. MATURITIES, DAY, % DISCOUNT, ENFORCEMENT MONTHS, ENFORCEMENT DAYS, MONTHS INTERVAL, DAYS INTERVAL suggest, instead, the data that cannot be changed by user. | GENERAL NOTIONS 5 ENG CHECK OFF : They are not fields that allow you data insertion, but fields that have as value YES or NO, that is to be or not selected. If you want a particular day, a particular hour or any suggested voice to be active (selected) it is enough a click with the left key of the mouse and in the white square will appear a check off . Example: the fields OPEN BIP and CLOSE BIP are selected only in the days of Wednesday and Thursday, so the open and close bip will be executed only in those two days. Opening some windows even the menu will remain visualized to allow you the contemporaneous visualization of more information (for example Client Personal Data, Contracts, Tables, ...) and the passage from a window to another using the menu voice “Windows”. At the bottom of the main window, it will visualize the information about the free space of the disks used by the application (we suggest never to go under 50,000,000) date, hour, busy memory (in percentage) and name of the radio station. | GENERAL NOTIONS 6 ENG 2 IDENTIFYING 2.1 ARCHIVES The voice “Archives”, from the Identifying menu, suggests the list of the created archives (Utility -> Copy Archive). The <Actual> archive is the only one where it is possible to work, the others are only for consultation. 2.2 TABLES General hints A window will appear where you can choose from a predefined list, the table on which to work. In all these lists the possible operations are the following: - Insert a new element in the table using the INSERT key. - Edit an item in the table by double clicking on it or by pressing ENTER. - Delete from the table the item on which you have placed using the DELETE key. - Print the list using the PRINT button. - Exit the dialog management window using the EXIT button. - Confirm the change/insert of an item using the OK button. - Cancel the edit/insert of an item using the CANCEL button. The fields with a blue background indicate the mandatory information to be stored. The ordering in the list is done by clicking with the mouse on the column title. | IDENTIFYING 7 ENG Detailed analisys 2.2.1 Agents Usable only with GEST PACK. This table allows you the management of the Agents list that you can associate to the client and/or the contract, in order to calculate the commissions. Data can be used in the statistics. It visualizes the list composed by the fields: Code Numerical compulsory given automatically (progressive), but changeable. It doesn’t allow you to insert more than one time the same value (5 numbers maximum). Description Alphanumeric compulsory (30 characters maximum). Description, name or Company Name of the Agent. Group Numerical that can also have value 0 (zero) (max. 5 numbers). Value used in the statistic “turnover per vendor” (jn Statistics ->Invoices) to group together the agents and print the subtotal. Commission Numerical that can also have value 0 (zero) (max. 5 numbers included the 2 decimals). Percentage of commission due to the agent. 2.2.2 Agencies Usable only with GEST PACK. This table manages the list of the Agencies that you can associate to the contract in order to calculate the commissions. Visualizes the list composed by the fields. Code Numerical compulsory given automatically (progressive), but changeable, It doesn’t allow you to insert more than one time the same value (5 numbers maximum). Description Alphanumeric compulsory (max. 30 characters). Description, name or company name of the Agency. Commission Numerical that can even have value 0 (zero) (max. 5 numbers included the 2 decimals). Percentage of commission due to the Agency. 2.2.3 Banks This table contains data related to the Banks used by the clients and the Company itself. It visualizes the list composed by the fields: Code Numerical compulsory given automatically (progressive), but changeable. It doesn’t allow you to insert more than one time the same value (max. 5 numbers). Bank Alphanumeric compulsory (max. 40 characters). Description, name or Company name of the Bank. Branch Alphanumeric optional (max. 40 characters). Description, Number, Name or Company Name of the Branch. Address Alphanumeric optional (max. 40 characters). ZIP code Numerical optional (max 5 numbers). City Alphanumeric optional (max 30 characters). Province Alphanumeric optional (max 3 characters). CIN Alphanumeric optional (max 1 character). Sorting code Numerical optional (max 5 numbers). ABI Numerical optional (max 5 numbers). Current account Alphanumeric optional (max 20 characters). | IDENTIFYING 8 ENG IBAN Alphanumeric optional (max 27 characters). 2.2.4 Changes Use this table to modify temporarily (only for the entered interval) the onair time of an advertising cluster. Start Date – End Date Enter the period when the advertising cluster must be changed (first and last day). Hour Enter the hour, as inserted in the time table that must be modified. New Hour-Point Enter the new broadcasting hour. 2.2.5 Campaigns This table allows you the management of the list of the promotional campaigns linked with one or more contracts. Visualizes the list composed by the fields: Code Numerical compulsory given automatically (progressive), but changeable. It doesn’t allow you to insert more than one time the same value (max. 5 numbers). Description Alphanumeric compulsory (max. 30 characters). Description or name of the promotion/campaign. 2.2.6 Program This table allows you to manage the program list linked to one or more contracts in order to assign different prices to the spots. Data can be used in statistic step. It visualizes the list composed by the fields: Code Numerical compulsory given automatically (progressive), but changeable. It doesn’t allow you to insert more than one time the same value (max. 5 numbers). Description Alphanumeric compulsory (max. 30 characters). Description or name of the program. 2.2.7 Product categories The table manages the list of the product categories linked to the sponsored products. This information is very important because on it depend the timetable rotation, trying to create the minimum number of conflicts among the clients which promote products of the same type. Data can be used in commercial and accounting statistics. It visualizes the list composed by the fields: Code Numerical compulsory given automatically (progressive), but changeable. It doesn’t allow you to insert more than one time the same value (5 numbers maximum). Description Alphanumeric compulsory (30 characters maximum). Description or name of the product category. 2.2.8 Offset Usable only with the BILLING pack. This table allows you to manage the list or the offsets and it is a necessary datum if you want to link the invoices to an accounting program. Inserted values are always used during the VOICES table filling, during the VAT table filling and during the billing only when in Billing Setup is set the Export Type. It visualizes the list composed by the fields: Code Alphanumeric compulsory. It doesn’t allow you to insert more than one time the same value (max. 10 characters). The code must coincide with the one inserted in the external accounting program. Description Alphanumeric compulsory (max. 50 characters). Description or name of the offset. 2.2.9 Bills This table allows you to manage the bills list. The inserted values will be used during the filling of the PAYMENT table. Do not change the information already present, if necessary add new ones. It visualizes the list composed by the fields: Code | IDENTIFYING 9 ENG Numerical compulsory given automatically (progressive), but changeable. It doesn’t allow you to insert more than one time the same value (max. 5 numbers). Description Alphanumeric compulsory (30 characters maximum). Description or name of the bill. Cash Order Select if it is a Cash Order. 2.2.10 Broadcastings The table indicates the channels on which you can work. The Broadcasting can also be associated with an image by double-clicking on the window down "image" and select the desired one. 2.2.11 Advertising bands The table defines the time slots in which it is possible to divide a day and within which will be aired the adverts. The rotation of the spots is performed within each band. This parameter is very important to ensure a fair distribution of the spots within the day. You need to define these bands for every area; it is however possible to copy them from an area to another (if they don’t need to be changed) by using the F11 key. It visualizes the list composed by the fields: Start time Numerical compulsory in HH:MM format. It doesn’t allow value 0 (zero). End time Numerical compulsory in HH:MM format. It doesn’t allow value 0 (zero). 2.2.12 Holidays For every year it is possible to set the festive days, in order to make Ram-Comm consider them as “Sunday”. To set them, select the year, press F2 and double click on the non working days that will be shown in red. At the end of the changes press F10 to confirm or ESC to exit undoing the changes. The changes relating to holidays (insertion or deletion) will take effect only after you close and open again Ram Comm. 2.2.13 Hour point groups It allows you to define hour point groups where the spots will be inserted. You can create specific groups for the advertising broadcast or promo or, even, news bulletins. You must define these groups for every area; however it is possible to copy them from an area to another one (if they don’t need to be changed) using the F11 key. It visualizes the list composed by the fields: Code Numerical compulsory given automatically (progressive), but changeable. It doesn’t allow you to insert more than one time the same value (max. 5 numbers). Description Alphanumeric optional (max. 30 characters). Description or name of the Hour Point Group. Days of the week The program suggests as already selected all the days of the week where the group will be applied. To exclude a day select it with a click and take off the tick. Hour The hours considered by the Hour Point Group will be the ones selected with the tick. It is necessary to enter at least one. 2.2.14 VAT Usable only with the BILLING pack. The table allows you to manage different kind of VAT rates. The inserted values will be used during the filling of the ITEMS table and the invoices. | IDENTIFYING 10 ENG Visualizes the list composed by the fields: Code Numerical compulsory given automatically (progressive) but changeable. It doesn’t allow you to insert more than one time the same value (max. 5 numbers). Description Alphanumeric compulsory (30 characters maximum). Description or name of the VAT type. % Numerical that can even have value 0 (zero) (max. 5 numbers included the 2 decimals). Export Code Alphanumeric optional (5 characters maximum). It is useful to link the invoices to another accounting program. The inserted value must be the same as the VAT code of the linked program. Contra The list suggests all the values inserted in the offset table and it is essential in event of data export to another accounting program for the values association. 2.2.15 Messages In this table you can define all the information, essential for the user, to be associated to the scheduling period. The information will be used in statistics (Statistics -> Commercial) It visualizes the list composed by the fields: Code Numerical compulsory given automatically (progressive), but changeable. It doesn’t allow you to insert more than one time the same value (max. 5 numbers). Description Alphanumeric compulsory (max. 30 characters). Text of the message. 2.2.16 Broadcasters The table BROADCASTERS is used in the case of an installation with more Ram Comm broadcasters, but with a single customer database for all broadcasters. This table allows you to define the several broadcasters among which separate a contract. The information will be used during the insertion of the schedule and in the statistics. It visualizes the list composed by the fields: Code Numerical compulsory given automatically (progressive), but changeable. It doesn’t allow you to insert more than one time the same value (max. 5 numbers). Description Alphanumeric compulsory (max. 30 characters). Description or name of the broadcaster. Newspaper If selected during the invoicing will visualize the broadcasting dates. Contra The list suggests all the values inserted in the Contra table and essential in event of data export to another accounting program for the values association. 2.2.17 Tape type The table Tape Type allows you to define the conditions of a contract. The values will be used during the statistics (Statistics -> Invoices, Statistics -> Commercial). It visualizes the list composed by the fields: Code Numerical compulsory given automatically (progressive), but changeable. It doesn’t allow you to insert more than one time the same value (max. 5 numbers). Description Alphanumeric compulsory (max. 30 characters). Description of the conditions of a contract. 2.2.18 Hour points In the Hour Points table you will set the hour points where the spots will be broadcasted. For every hour point you can set the days of the week where they can be used, the maximum number of spot to broadcast and the maximum length of the hour point. It visualizes the list composed by the fields: Hour Numerical compulsory in HH:MM format. It doesn’t allow value 0 (zero). It shows the hour of broadcasting of the spot. | IDENTIFYING 11 ENG Max spot Numerical optional (max. 2 numbers). Maximum number of spot for that passage. Max length Numerical optional in MM:SS format. Maximum global length of the spots. Song If selected, it will insert a song from a particular gendre. The gendre can be set in Utility -> Setup -> Advertising Gender Alphanumeric optional (max. 10 characters). The field appears only if Song is selected. Linked If selected it links the spot passage with the previous one during the broadcast. Advertising Type Usable only with PREMIUM PACK. It shows if it is possible to insert only spots, only promo (not table advertising) or both, for every hour point. Making double click on the days of the week the will be enabled or disabled. Spot Type Usable only with PREMIUM PACK. With this option is possible to specify what kind of spot (eg. Table advertising, sponsorship, radiosale) must be scheduled on every hour point. It shows the voices set in the Spot Type table. Same values If selected every information inserted on the single day will be related even on the other days. Priority Optional numeric. Appears by default value of 0 (zero). Indicates with which priority the time in question must be filled during the advertising schedule. With 0 indicating the highest priority, with 9 minimum. First are filled times with lower priority value (0) when these reach the maximum time of programming, the program proceeds to fill times with the next priority (1, 2, ...). To take advantage of this feature you must enable the option that makes it impossible to exceed the maximum hour-point length, it can be set in Tools -> Setup -> Advertising. Opening Bip If selected, there will be the signal for disconnecting the satellite for syndication. The signal is set in Utilities -> Setup -> Advertising -> Bip. Closing Bip If selected, there will be a reconnection signal from the satellite. Min. length Optional numeric format MM: SS. Indicates the minimum duration of the advertising block. In the case where the duration of the spot is less than the minimum expected time, will be inserted one or more audio or video files, chosen among those included in the Setup -> Optimizer, until the duration. Start Date – End Date You can limit the use of a time just to a few well-defined periods. In these two fields indicate the dates of the beginning and end of those periods. You have to define these times for each network; However, you can copy them from one network to another (if they were not to be changed). 2.2.19 Predefined hour points The table allows you to define the hour points of scheduling for every loaded packet. If, in the Rotation table, there are no pre defined hour points selected, it won’t exist any Pre defined Hour Points table. It visualizes the list composed by the fields: Numerical Pre defined list that suggests standard values not changeable by the user and that depend from the choice taken in the Rotation -> Pre Defined Hour Points table. Week of the year: you choose the hour points for every week of the year (from 1 to 52). Day of the week: you choose the hour points for every of the 7 days of the week (from Monday to Sunday). Every MONDAY of the chosen period will have the same hour points, an so on for the other days. Day of month: you choose the hour points for every month day (from 1 to 31). The first day of every month will have the same hour points, same for the second, the third, till the last one. Day of year: you choose the hour points for every day of the year (from 1 to 366). Every day of the year will have its broadcasting hour points. Hour The mask suggests all the available hour points for the advertising passage. With a click of the mouse you can select the hour point where the advertising will be really scheduled. | IDENTIFYING 12 ENG 2.2.20 Payment This table manages the ways of payment used by the clients. It visualizes the list composed by the fields: Code Numerical compulsory given automatically (progressive), but changeable. It doesn’t allow you to insert more than one time the same value (max. 5 numbers). Description Alphanumeric compulsory (max. 30 characters). Description of the way of payment. Bill Usable only with BILLING pack. List where to choose the kind of Bill to link to the payment. Data in the list are taken from the BILLS table changeable by the user. Maturities Nr. Numerical list (from 0 to 99). It shows the number of Bank Transfers/ Credit transfers to release for every payment. Day Numerical list (from 0 to 31). It shows the day of the month to release the bills (31 End Month). % discount Numerical list (from 0 to 99). Months effective date Numerical list (from 0 to 99). When to release the first bill. Days effective date Numerical list (from 0 to 99). When to release the first bill. Example: if the payment is a bank transfer 60/90 days you must set ENFORCEMENT MONTHS at 2 and ENFORCEMENT DAYS at 0. Months interval Numerical list (from 0 to 99). When to release the bills after the first. Days interval Numerical list (from 0 to 99). When to release the bills after the first. Example: If the payment is a bank transfer 60/90 days you must set ENFORCEMENT MONTHS at 1 and ENFORCEMENT DAYS at 0. 2.2.21 Areas The table allows you to define the broadcasting areas until a maximum of 999. To set the parameters of Path, Type, Export, Card, Channel, Extension, call the assistance. It visualizes the list composed by the fields: Code Numerical compulsory given automatically (progressive), but changeable. It doesn’t allow you to insert more than one time the same value (3 numbers maximum). Area Name Alphanumeric compulsory (max. 20 characters). Description or name of the area. Card Numerical list (from 00 to 99). It shows the number of areas. If this value is 00 and also the Channel value is 0, it means “all the areas”. It identifies the audio card. Channel Numerical list (0 -1). It identifies the audio card. Extension List of values to choose among. It identifies the extension type that the audio file must have. Path Alphanumeric compulsory (max. 50 characters). It shows the path where to record the audio file. Export Type List where to choose the Export Type. Data in the list are taken from the table EXPORT TYPE changeable by the user. It shows where to send the data for the broadcast. Broadcaster | IDENTIFYING 13 ENG List where to choose the Broadcaster. Data in the list are taken from the BROADCASTER table changeable by the user. Calculation of automatic hour point also consider splits. If selected, with Card = 00 and Channel = 0, consider these hour points for the calculation on the split. Circuits Select the circuit membership of the area you are inserting. E-mail Alphanumeric (max. 90 characters). Enter the e-mail address of the area where you want to send the scheduling data. 2.2.22 Rotation The table allows you to define the rotation types of the broadcasting hours (normal, with rotation of <nn> steps, only in odd days, every other day, etc.) or the rotation type for predefined hour points (for the insertion see Predefined Hour Points). It visualizes the list composed by the fields: Code Numerical comulsory given automatically (progressive) but changeable. It doesn’t allow you to insert the same value more than one time (max. 5 numbers). Description Alphanumeric compulsory (max.50 characters). Description to identify the rotation type. Rotation If not selected suggests a FIXED rotation type. If selected suggests a CYCLIC rotation type. Steps Numerical compulsory (max. 3 numbers). Number of the progress steps during the rotation. The field appears only if Rotation is selected. Alternate If selected, the scheduling will happen in alternated way, that is a day yes and a day no. Even If selected, the scheduling will happen only in even days (2, 4, 6, 8, … 30 of every month). Odd If selected, the scheduling will happen only in odd days (1, 3, 5, 7, … 31 of every month). Predefined hour points List, not changeable, where select the predefined hour point to be associated to the rotation. (See explanation table PREDEFINED HOUR POINTS). Every <nn> Days Numerical list (from 1 to 365) not changeable. It shows that the broadcasting takes place every <nn> days. 2.2.23 Invoicing Society Usable only with FATT PACK. The table manages the list of the invoicing societies that can issue invoices, bank transfer or manage bank statements. It visualizes the list composed by the fields: Code Numerical compulsory given automatically (progressive) but changeable. It doesn’t allow you to insert more than one time the same value (max. 5 numbers). Description Alphanumeric compulsory (max. 30 characters). Description or name of the Product Category. 2.2.24 Recording studios Usable Only with GEST PACK. The table manages the list of the studios that make the recoding of the spots. Data are used in the filling of the data related to the tape recording and in statistic (Statistics->Tape). It visualizes the list composed by the fields: Code Numerical compulsory given automatically (progressive), but changeable. It doesn’t allow you to insert more than one time the same value (max. 5 numbers). Description Alphanumeric compulsory (max. 30 characters). Description or name of the recording studio. | IDENTIFYING 14 ENG 2.2.25 Tape type The table allows you to define the various tape typologies that the client can manage. This value will be used in the Tape Based Media section of the contract. It visualizes the list composed by the fields: Code Numerical compulsory given automatically (progressive), but changeable. It doesn’t allow you to insert more than one time the same value (max. 5 numbers). Description Alphanumeric compulsory (max. 30 characters). Description of the tape type. 2.2.26 Export type The table allows you to define where to send the daily schedule in order to broadcast it. Before modifying or changing elements to this table, call the Assistance. It visualizes the list composed by the fields: Code Numerical compulsory given automatically (progressive) but changeable. It doesn’t allow you to use more than one time the same value (max. 5 numbers). Description Alphanumeric compulsory (max. 9 characters). Name assigned to the Export type. Extension List where to choose the extension of the export file. Path Alphanumeric compulsory (max. 50 characters). Shows the path to use for the export. National List not changeable. The choice is among: STAND ALONE (sent separately), WITH SPLIT EXCLUDING AREAS (sent with the area with Card = 00 and Channel = 0 keeping the information of the type area), EXPAND EXCLUDING AREAS (as Split Units but the “National” area will be sent on the other areas). Reentry If selected it re enters to the main area. Used when National = Alone 2.2.27 Spot type The table allows you to define the “type” of the loaded spots (SPONSORSHIP, RADIO SALE, ...) with the chance to set the length of the spot, under the terms of act, or a or a length calculated on the basis of a percentage on the real length of the spot. It is possible to assign a colour to every “type”, in order to uset it to visualize the spots during the schedule changing. It visualizes the list composed by the fields: Code Numerical compulsory given automatically (progressive), but changeable. It doesn’t allow you to insert more than one time the same value (max. 5 numbers). Description Alphanumeric compulsory (max. 30 characters). Description or name of the spot type. Length Numerical optional in MM:SS format Length to be considered as advertising. Percentage Numerical it can even have value 0 (zero) (max 5 numbers included the 2 decimals). Percentage of advertising to calculate on the real length of the spot. Only end day If selected it calculates the length of the advertising only at the end of the day, otherwise at every hour. Colour Clicking on the button it will open a window for the colour choice to associate to the spot type. 2.2.28 Sale type This table allows you to define the Sale Type of a a contract (direct, telephone, etc.) the information will be used in the statistics (Statistics -> Commercial and Accounting). It visualizes the list composed by the fields: Code | IDENTIFYING 15 ENG Numerical compulsory given automatically (progressive) but changeable. It doesn’t allow you to insert more than one time the same value (max. 5 numbers). Description Alphanumeric compulsory (max. 30 characters). Description of the sale conditions of a contract. 2.2.29 Sale typology This table allows you to define the Sale Typology of a contract (New, Renew etc.). It visualizes the list composed by the fields: Code Numerical compulsory given automatically (progressive), but changeable, It doesn’t allow you to insert more than one time the same value (max. 5 numbers). Description Alphanumeric compulsory (max. 30 characters). Description of the type of contract. 2.2.30 Typology The table allows you to define the typologies of the scheduling periods, that is the different lengths that the spot can have. It visualizes the list composed by the fields: Code Numerical compulsory given automatically (progressive), but changeable. It doesn’t allow you to insert more than one time the same value (max. 5 numbers). Description Alphanumeric Compulsory (max. 30 characters). Description of the spot type (eg. SPOT 30 SECONDS). Format Numerical optional (max. 5 numbers). Insert the value, in numbers, of the typology you are entering. For example if the typology is “SPOT 30 SECONDS” in the format field you must insert “30”. Filling Usable only with PREMIUM PACK. If selected it loads automatically ( FREQ. DAY) the hours. At the moment of the daily schedule creation (if set in Setup -> Advertising) or on request by the user. It is possible to insert a typology defined “Stand By” and select the Filling field. Stand By will be used as filling spot, in which way can be set in Setup -> advertising -> Stand By. 2.2.31 Users It allows you to define the users that can enter the program, with the related password and the operations that they can do. It visualizes the list composed by the fields: User Alphanumeric compulsory (max. 30 characters). Description or name of the user. Type List where to choose the type of user (User or Administrator). Password Alphanumeric optional (max. 30 characters). Confirm Password Alphanumeric compulsory if you inserted the password (max. 30 characters). Edit Print If selected, the user can make changes to the print models. Pack list Shown only if owner of a network dongle. It allows you to enable the user to the use of the single packs. Enable Functions Clicking on this button it will open a window with the list of the functions that can be enabled (if selected) to the user. 2.2.32 Currency The table manages the exchange rate regarding with your currency, in a particular day. It visualizes the list composed by the fields: Code Numerical compulsory given automatically (progressive), but changeable. It doesn’t allow you to insert more than one time the same value (max. 5 numbers). Description | IDENTIFYING 16 ENG Alphanumeric compulsory (max. 30 characters). Name of the currency. Symbol Alphanumeric compulsory (max 5 characters). Symbol to identify the currency. Update Date Numerical compulsory in DD/MM/YY format. It shows the update date of the change. It will be requested after the insertion of the first three fields and only after clicking the insert button (F2). Change Numerical compulsory (max 14 characters included the 6 decimals. Shows the change value It will be requested after the insertion of the first three fields only after clicking the insert button (F2). 2.2.33 Items Usable only with BILLING pack. The table manages the voices that will be useful for the invoices filling. It visualizes the list composed by the fields: Code Alphanumeric compulsory, it doesn’t allow you to insert more than one time the same value (max. 10 characters). MU Alphanumeric optional (max 2 characters). Indicate the measure unit. Price Numerical optional (max. 14 characters included 2 decimals). Discount Numerical optional (max. 5 characters included 2 decimals). Expenses If selected it shows that the voice is considered as expense. This value will be used in the statistics (Statistics -> Invoices and Accounting). 2.2.34 Bill Book items Usable only with BILLING pack. The table manages the bill book items. Data will be used in the statistics (Statistics -> Invoices -> Bill Book). It visualizes the list composed by the fields: Code Numerical compulsory given automatically (progressive) but changeable. It doesn’t allow you to insert more than one time the same value (max. 5 numbers). Description Alphanumeric compulsory (max. 30 characters). Description to assign to the Bill Book item. Example: Bankruptcy in action, file given to lawyer, it will follow credit note. 2.2.35 Zones The table manages the sale zones of the contract. This datum is useful during statistics (Statistics -> Commercial, Statistics -> Accounting, Statistics -> invoices). It visualizes the list composed by the fields: Code Numerical compulsory given automatically (progressive), but changeable. It doesn’t allow you to insert more than one time the same value (max 5 numbers). Description Alphanumeric compulsory (max. 30 characters). Name assigned to the zone. Example: Milan, Turin, Bologna, Rome, etc. 2.3 PURCHASED The table Purchased allows you to manage the purchases of the spots giving the user the chance to differentiate the price for program, campaign, typology, media and areas. The inserted amounts will be useful during the insertion of the contract: the sold packs will be automatically subtracted from the total purchased. | IDENTIFYING 17 ENG The fields of this table are the following: Description Alphanumeric compulsory (max 40 characters). Name assigned to the purchase. Program Select from the list the Program associated to the purchase. The values of the list are the ones inserted in the Program table. Campaign Select from the list the Campaign associated to the purchase. The values of the list are the ones inserted in the Campaign table. Broadcaster The values of the list are the ones inserted in the Broadcaster table. Typology Select from the list the typology associated to the purchase. The values of the list are the ones inserted in the Typology table. Area Select from the list the area to be associated to the spot purchase. The values of the list are the ones inserted in the Areas table. If the Broadcaster was already chosen, it will visualize only the areas related to it. Typology Ref. Select from the list the reference format associated to the purchase. The values in the list are the ones inserted in the Typology table. If there is already a value inserted in Typology field, it must be the same. Start date – End date Numerical compulsory in DD/MM/YY format. It is the validity period of the purchased spots, after this period it won’t be possible to use them anymore. Purchase Date Numerical compulsory in DD/MM/YY format. It is the purchase date of the spots. Purchased Numerical compulsory (max 10 numbers). It is the number of the purchased spot. Used The field will update automatically according with the inserted schedules. Amount Insert the purchase value of the spots. Total It updates automatically multiplying the amount by the number of the purchased. Purchased by Client where the spots were purchased. Person In Charge Contact c/o the client. E-Mail E-Mail address where to send the Scheduling order. Buyer Agent who followed the purchase. | IDENTIFYING 18 ENG Notes Description field related to the purchase. 2.4 2.4.1 CLIENTS Main window It shows the list of clients and allows you to insert new ones and change or delete the existing ones. Use the vertical scroll bar on the right of the list to move from a client to another, and the horizontal bar to see the other data of the list. Clicking the PRINT button will appear the mask that allows you to choose among: List Clients: complete list of the names. Labels: allows you to print the personal data of the client on labels. Both the choices allow you to print the master data of all the customers or to make a focused print: only some customers, only customers from one or more zones, only customers matched with particular agents. Clicking the button DELETE after checking that any other user is changing the data of this client (Personal data, Contracts, etc.), will appear a message where is visualized the client name to be deleted: click [YES] to do the deletion, [NO] to undo. N.B.: It will delete only the contracts and scheduling periods of this client. Clicking the INSERT button will appear the Client Insertion mask. The modification will be done double clicking on the left key of the mouse on the wanted client, or pressing the button ENTER after highlighting the client. All the other practices are contained on the Modify client described the hereafter. With the button Change Client it is possible to match an already inserted contract to a client different from the original one. Clicking it, it will show a list with all the clients present in identifying, then double click on the “new” client. Clicking the button EXIT you will escape from the clients manage mask. 2.4.2 Insert/modify client The Clients insert/modify mask, allows to store personal data and payment data related to the clients. | IDENTIFYING 19 ENG The fields to be filled are the following: Code Alphanumeric compulsory given automatically (progressive), but changeable. It doesn’t allow you to insert more than one time the same value (max. 10 characters). Name Alphanumeric compulsory (max. 55 characters). Name or company name of the Client. Address Alphanumeric optional (max. 100 characters on 2 lines). ZIP code Numerical optional (max. 6 numbers). City Alphanumeric optional (max. 30 characters). Province Alphanumeric optional (max. 3 characters). Phone number Alphanumeric optional (max. 20 characters). Fax Alphanumeric optional (max. 20 characters). Tax code Alphanumeric optional (max. 25 characters). It must be in its exact form; or it will show an error message that can be however ignored choosing the option [YES]. VAT number Alphanumeric optional (max. 13 characters). It must be in its exact form; or it will show an error message that can be however ignored choosing the option [YES]. VAT List where to choose the VAT rate to be applied to the client. Data from the list will be taken from the VAT table changeable by the user. (foreign clients or with a VAT rate different from the standard). Bank expenses If selected, it will charge to the client the bank expenses on every issued invoice. Bank Expenses If selected it shows that in all the invoices headed to the client it will insert also the bank expenses. The amount to charge must be set in the setup (see Utility -> Setup -> Advertising). Divide invoice: different Bank or payment If selected shows that for the same client must be generated more than one invoices during the same month. This can happen when the client has more than one contract in action with different payments or banks. Privacy If selected it means that the client filled the privacy form. Customer List where to select the Agency where the client was acquired. Data in the list are taken from Identifying clients and are changeable by the user. | IDENTIFYING 20 ENG Data will be used during the invoicing and in statistics (Statistics -> Commercial). Invoicing List where select the destination place of the invoices. The field will be used if the destination place of the invoice is different from the client that broadcast the spot. Zone List where to select the zone of membership of the client. Data in the list are taken from the Zone table, changeable by the user. Data will be used in the statistics (Statistics -> Commercial and Accounting). Agent List where choose the Agent to match with the Client. Data in the list are taken from the Agents table, changeable by the user. Data will be used in the statistics (Statistics -> Commercial and Accounting). Worth’s class Alphanumeric (max 5 characters). It is possible to group together the clients by Worth’s class; this value will be useful during the printing of the cash orders in order to decide which group (class) print. Payment List where choose the Payment type used by the client. Data in the list are taken from the Payment table, changeable by the user. Bank List where choose the client’s Bank. Data in the list are taken from the Bank table, changeable by the user. Branch Value given automatically after choosing the bank. Sorting code Value given automatically after choosing the bank. ABI Value given automatically after choosing the bank. Notes Alphanumeric optional. Every additional information related to the client. Author Alphanumeric optional (max. 50 characters) Name of the person who stored the client file. Preferential Contact Select from the list the preferential way to communicate with the client: PRINT, FAX, EMAIL, PRIVATE COMMUNICATION (it will save a pdf file in a default folder). The preferential contact will be used to send prints to the client. Group leader List where to select the Head Group to match with the client (if different from itself). Person in charge Alphanumeric optional (max. 50 characters). Contact person of the client. Phone Number Alphanumeric optional Phone number of the contact E-Mail Alphanumeric optional (max. 100 characters). E-mail of the client. Data in the list are taken from the Clients table, changeable by the Clients table, changeable by the user. These data will be used in the statistics (Commercial, Accounting, Tape Based Media). Clicking the OK button it will execute the validity controls on the inserted data and before coming back to the list it will save the information. Clicking the button ESC you will cancel the operation and come back to the list. Clicking the button PRINT it will appear the mask print schedule clients. For all the fields of table origin (VAT, Zone, Agent, Payment, Bank) insert a new element without opening the table management mask: select the field and press F2, enter the new description and press OK to confirm the insertion. 2.5 2.5.1 CONTRACTS Main window It shows the contract list allowing you the insertion of new ones and to modify or delete the existing ones. Use the vertical scroll bar, on the right of the screen, to move among the contracts. | IDENTIFYING 21 ENG The names highlighted with red backcolour show an archived contract, that is an out of date contract that remains as historic. Pressing the PRINT button it will appear the Print List Contacts mask. If in the Main Window you are positioned on a client, the contracts visualized on the lower part of the screen will be the ones related to the single client. If you are positioned on the first line (of the upper part) it will visualize and then print all the contracts. Clicking the button DELETE after controlling that no other user is changing the data of this contract (that can be Personal Data or Programming Files) it will show a message where is visualized the code of the contract to delete: press [YES] to do the deletion, [NO] to undo. N.B.: It will delete all the programming periods of this contract. Clicking the button INSERT will appear the insertion contract mask. The modification will be executed by double clicking with the left key of the mouse on the wanted contract, or pressing the ENTER key after highlighting the client. All the other practices are shown in the Modify Contract section explained the hereafter. Clicking the EXIT button you will escape from the contract management mask. 2.5.2 Insert/modify contract You enter in the insertion mask of the contract, where you can insert or change the data related to it. Clicking the button PRINT (F7), it will show the print mask: CONTRACTS FORM MEMO FORM TOTAL CONTRACTS BY BROADCASTERS FORM TAPE BASED MEDIA INSTALLMENTS Clicking the OK button, you will escape from the management mask of the contracts confirming the inserted data. Clicking the ESC button you escape from the management mask of the contracts without saving the changes done. 2.5.3 General data The mask allows you the insertion of the general data of a contract, for example the client of the contract, the number assigned to it, the product promoted and the stipulation date. The fields to be filled are the following: Client List where select the Client holder of the contract. The list data are taken from the identifying Clients. If in the main window you are positioned on a client, this will be assigned automatically to the new contract and it is not changeable. To change it you must come back to the previous mask. Contract Alphanumeric compulsory given automatically (progressive), but changeable. It doesn’t allow you to insert more than one time the same value (max. 10 characters). | IDENTIFYING 22 ENG The contract number is very important because in particular cases it makes reference to the contract by this datum. Nickname Alphanumeric optional but essential (max. 55 characters). The nickname is a description associated to every contract. This description is useful to ease the search of the contract in case of a client that has a Company name completely different from the promoted brand, or to remember the client in event of contracts stipulated with advertising agencies. Order Form Alphanumeric optional (max. 10 characters). Reference code of the estimate number. Ref. Client Alphanumeric optional (max. 30 characters). Number of contract assigned by the Client. Stipulation Numerical compulsory in DD/MM/YY format. Shows the date of the contract signature. Maturity Numerical optional in DD/MM/YY. Shows the expiration date of the contract. If not specified, it means that the contract is open. Archived If selected it means that the contract is expired. If not selected it means that the contract is ongoing. Author Alphanumeric optional (max. 50 characters). Name of the person who inserted the contract. Customer List where select the Agency with whom the client was acquired. The data of the list are taken from the identifying clients and are changeable by the user. If in the identifying client the customer was already assigned in this mask it appears without selecting it. In any event, it can be changed; the modification will remain matched with the single contract because in the identifying client the datum remains unchanged. Data will be used in the statistics (Statistics -> Commercial). Invoicing Society List where select the Society that will invoice the contract. Category List where select the product Category of the promoted product. Data in the list are taken from the CATEGORIES table and they are changeable by the user. Data are used in the statistics (Statistics -> Commercial, Accounting). Zone List where select the zone membership of the Client. Data in the list are taken from the ZONE table and they are changeable by the user. If in the identifying Client the zone was already assigned, in this mask it will appear without selecting it. In every case it can be changed, the change will be matched to the single contract because in the identifying client the datum will remain unchanged. Data will be used in the statistics (Statistics -> Commercial, Accounting). Sale Type List where select the Sale Type of the contract. Data of the list are taken from the Sale Type table and are changeable by the user. Data will be used in the statistics (Statistics -> Accounting). Terms List where select the Term of the contract sale. Data of the list are taken from the TERMS table and changeable by the user. Data will be used in statistics (Statistics -> Accounting). Sale Typology List where to select the Sale Typology of the contract. Data in the list are taken from the SALES TYPOLOGY table and are changeable by the user. Data are used in the statistics (statistics -> Accounting). Notes Alphanumeric optional. Every additional information related to the client. 2.5.4 Agents + amounts The mask allows you the insertion of data related to the Agency and/or the Agents and the number of spots purchased and their price. | IDENTIFYING 23 ENG The fields to be filled are the following: Agency List where select the Agency which stipulated the contract for the Commission count. Data of the list are taken from the Agencies table, changeable by the user. Data are used in the statistics (Statistic -> Commercial, Accounting and Agent). % Numerical that can even have value 0 (zero) (max. 5 numbers included the 2 decimals). Field active only if you selected an Agency. Percentage of commission for the Agency. In the grid below you can enter the agent (or agents) connected to the contract. To compile the data relating to an agent for the contract in question, double click on the first empty row of the table. Broadcaster Broadcaster related to the Agent because he could receive different percentages depending on the broadcaster. Agent List where select the Agent who stipulated the contract for the commission count. % Numerical it can also have value 0 (zero) (max. 5 numbers included the 2 decimals). Percentage of commission due to the agent. Agent Type List where choose the Type of Agent. It is useful to calculate his percentage: ON A CONTRACT: Amount calculated at the contract stipulation. ON A COMMISSION: Amount calculated when the client makes the payment of the instalment. Subordination The list suggests the data of the Agents table, changeable by the user. In this field is set the Agent from whom depends the sub-agent. Data are used in the statistics (Statistics -> Commercial, Accounting, Agent, Tape Based Media, Invoices). Example: Agent 1 with 10% of commission and no Subordination. Agent 2 with 10% of commission and Subordination from Agent 1. Commission on a €1.000,00 amount: Agent 1 = 100,00 € Agent 2 = 90,00 € (1.000,00 - 100,00 = 900,00 € from which calculate the commission). Contracts If selected considers the agent in Contracts statistics. Turnover If selected it considers the agent during the count of the statistics on the invoices. Commercial If selected, it considers the agent during the count of the commercial statistics. Clicking the button DELETE (F4) it deletes from the contract the agent where you are positioned. | IDENTIFYING 24 ENG Currency List where select the Currency used during the contract stipulation. Data in the list will be taken from the VALUE table and are changeable by the user. The table below provides the inclusion of the number of spots purchased and the amounts involved. To insert/modify data of the COMMERCIALS double click with the left key of the mouse on the wanted campaign or an empty line. Program List where choose the Program the Contract belongs to. Data in the list are taken from the PROGRAM table and are changeable by the user. Campaign List where choose the Campaign the Contract belongs to. Data in the list are taken from the CAMPAIGN table and are changeable by the user. Broadcaster List where select the Broadcaster where the spot will be programmed. Data in the list are taken from the BROADCASTER table and are changeable by the user. Typology List where select the spot Typology. Data in the list are taken from the TYPOLOGY and are changeable by the user. With the use of the fields Campaign, Broadcaster, and Typology it is possible to divide the prices of the contract according to the seasons, the broadcaster and the typology. Amount for area If selected it allows you to set a different price for every programmed area. Package If selected means that it was sold in Package, that means that it is possible to assign to the spots different prices for every programming area, but in the Program Order print, in the Program mask, will be visualized the average price. Purchased Numerical optional (max. 5 numbers). Number of purchased commercials. Premium Numerical optional (max. 5 numbers). Number of free spots among the purchased ones. Spot price Numerical optional (max. 14 numbers included 2 decimals). Price of the purchased spots. Amount | IDENTIFYING 25 ENG Numerical given automatically after the insertion of the number of purchased spots and the price of the single spot (max. 14 characters included 2 decimals). Total amount of the purchased spots. Subtract % Numerical optional (max. 5 numbers included 2 decimals). Percentage to be deducted from the price of the purchased spots (Spot Price) in order to calculate the price of the spot that the Broadcaster will charge. Broad. Spot Price Numerical given automatically after entering Subtract (max 14 numbers included 2 decimals). Price, for the broadcaster, of the purchased spots. Broad. Amount Numerical given automatically after inserting the number of purchased spots, the price of the single spot and the percentage of Subtract (max. 14 characters included 2 decimals). Total amount for the broadcaster of the purchased spots. Purchased Spots Depending on the Campaign, the Typology and the Broadcaster selected, the field will contain the list of the purchased spots that meet the inserted parameters; after selecting the wanted voice it will update also the fields Subtract and as a consequence Spot Price, Broadcaster and Price Spot Broadcaster. Full Amount Spot Price Numerical given automatically after inserting the Spot Price (max. 14 numbers included 2 decimals). It shows the full price (not discounted) to the client. Amount Numerical given automatically after inserting the number of purchased spots and the single price of the spot) max 14 characters included 2 decimals). It shows the full amount (not discounted), to the client, of the purchased spots. % Discount Numerical optional (max. 5 numbers included 2 decimals). Percentage of discount to be subtracted from the price of the purchased spots. Once inserted it changes the amount in the Spot Price field. Broad. Spot Price Numerical given automatically after inserting Subtract (max. 14 numbers included 2 decimals). Full price (not discounted), to the broadcaster, of the purchased spots. Broad. Amount Numerical given automatically after inserting the number of purchased spots, the price of the single spot and the percentage of Subtract (max. 14 characters included 2 decimals). Clicking the DELETE button it will erase from the contract the selected commercials. 2.5.5 Installments The mask allows you the insertion of the data related to the payment, to the modes and times of the payment. | IDENTIFYING 26 ENG The fields to be filled are: Installments List where select the type of payment applied. Monthly: the import of every installment will be calculated on the basis of the number of installments. If the full amount is 1.000,00 € and the number of installments is 5, it will automatically calculate 5 installments of 200,00 € each. To be defined: the amount of every installment will be manually inserted. If the full amount is 1.000,00 € and the installments number is 5, it will visualize 5 empty lines where insert the amounts of the installments and the dates. The installments can be different. On consumption: the import of every installment will be calculated on the basis of the inserted programs. On consumption scheduled: the amount of every installment will be calculated on the basis of the commercials broadcasted in the scheduled periods. On consumption certified: the amount of every installment will be calculated on the basis of the certified commercials. On consumption days: the amount of every installment will be calculated on the basis of the scheduled commercials, but if the period ends on the first <nn> days of the month, the installment will be predated to the previous month. On consumption days end: the import of every installment will be calculated on the basis of the programmed commercials, but if it starts on the last <nn> days of the month, the installment will be postponed to the following month Installments number Numerical (max. 2 numbers). Number of installments to divide the payments, asked only if the installments count is MONTHLY or TO BE DEFINED. Start Date Numerical, it suggests automatically the daily date, in DD/MM/YY format. It is the start date of the invoices; it is taken as base for the count of the installments. Example: if the stipulation date is 10/01/02 and the start date is 31/01/02, the calculation of the installments will start from 31/01/02. If the stipulation date is 10/01/02 and the start date is 20/02/02, the installments count will start from the 28/02/02. Payment List where choose the way of payment used by the client for the contract at issue. Data of the list are taken from the PAYMENT table, changeable by the user. If in the identifying client the payment was already assigned, in this mask it will appear without selecting it. In any event it can be changed and the change will remain matched with the single contract, in identifying client the datum will remain unchanged. Bank List where select the support bank used for the payments related to the contract. Data in the list are taken from the BANKS table, changeable by the user. If in Identifying Client the bank was already assigned, in this mask will appear without selecting it. In any event it can be changed and the change remains matched with the single contract, in identifying client the datum remains unchanged. Branch Value given automatically after choosing the bank. Sorting Value given automatically after choosing the bank. ABI Value given automatically after choosing the bank. Spot costs Numerical optional (max. 14 numbers included 2 decimals). Shows the amount of the expenses incurred for the making of the spot and credited to the client. Broad. Spot costs Numerical optional (max. 14 numbers included 2 decimals). Shows the amount of the expenses incurred for the making of the spot and credited to the broadcaster. Operating Costs Numerical optional (max. 14 numbers included 2 decimals). Shows the amount of the expenses incurred, not for the making of the spot, and credited to the broadcaster. Advance Numerical optional (max. 14 numbers included 2 decimals). Amount paid at the stipulation of the contract (Pay in Advance). Advance Date Numerical in format DD/MM/YY. Date of the advance deposit. Deposit Numerical optional (max. 14 numbers included 2 decimals). Amount paid at the contract stipulation. Deposit Date Numerical in DD/MM/YY format. Date of the deposit. Subtract deposit from last installment If selected the amount paid in advance will be subtracted from the last calculated installment. The field is selectable only if the installments are MONTHLY. Subtract deposit Date Numerical in DD/MM/YY format. | IDENTIFYING 27 ENG Date when subtract the advance. The field is selectable if you didn’t choose the previous solution (Subtract deposit from last installment). It is not selectable if the installments are TO BE DEFINED. Bank expenses If selected it means that the bank expenses must be invoiced to the client. Separate invoice If selected shows that, in case of more than one contract in action, it must issue separated invoices. Accrual Closed Contract If selected, means that the accrual and rediscounts on this closed contract were executed in the right way. To change the INSTALLMENT data double click with the left key of the mouse on the wanted installment. Date Numerical in DD/MM/YY. Date when the installment should be invoiced. It is not changeable if the installments are defined monthly or the paid field was selected. Ref. Per. Numerical in format MM/YY. It allows you to associate the installment to a month (when the commercials were broadcasted). It is a necessary value, when the installments are calculated on consumption, in order to know to which consumption is matched the installment at issue. Amount Numerical optional (max. 14 numbers included 2 decimals). It is the installment amount. Type Numerical optional (max. 2 characters). Useful field for additional information; the insertion of numbers allows you to invoice spot costs by multiplying them by that number. Settled If selected means that the installment was paid. As a consequence the fields Date, Ref. Per. and Amount are not changeable anymore and the field Settled Date becomes active. Settled Date Numerical in format DD/MM/YY. Date of the real invoice of the installment. Payment List where select the Payment type that the client uses for the installment at issue. Data from the list are taken from the PAYMENT table, changeable by the user. Invoiced If selected, shows that the installment was invoiced. Insert Invoice Clicking two times on the writing <Insert Invoice>, that appear only after selecting Invoiced, you are allowed to insert the invoice number and the date for the specific installment; if you want to delete, double click on the invoice and set number to 0 (zero). Bank List where select the Bank of the client. Data in the list are taken from the BANKS table, changeable by the user. Branch Value given automatically after choosing the bank. Sorting Code Value given automatically after choosing the bank. ABI Value given automatically after choosing the bank. | IDENTIFYING 28 ENG Notes Alphanumeric optional. Every additional information related to the installment. Possible operations: check an installment as already paid, undo the payment of an installment, modify the date or amount of an installment if it wasn’t paid yet and if the payment is different from MONTHLY INSTALLMENT, check or annul an installment as invoiced. 2.5.6 Summaries The mask visualizes information about the number of commercial purchased, consumed and remained for this contract and about the economic situation of the contract. 2.5.7 Scheduling The mask allows you to insert, modify or delete the programming periods of a single contract. It shows the list of periods composed by Campaign, Broadcaster, Typology, Subject, Start and End Date of the period, Daily Frequency, Medium, Length, Priority, Spot programmed in the period, Spot consumed until today, Remaining Spots, Association. Use the vertical scroll bar, on the right of the list, to move from a period to another. The red highlighted subjects show an archived period, that is an expired period that remains as archive. | IDENTIFYING 29 ENG SEARCH In order to do a search you must highlight an element from the list and start to enter the date, the Nickname or the Subject, according with the order defined, and the list will move according with the entered characters. To undo the search and start another, press the BACKSPACE button. Clicking the CANCEL (ESC) button you escape form the management mask of the contracts. Clicking the PRINT (F6) button it will show the print period list mask: List programming period Clicking the PRINT (F7) button it will show the print hour points mask: Clicking the CANCEL (F5) button after checking that no other user is changing the data of this period, it will show a message where will be visualized the Subject to delete: click [YES] to execute the deletion, [NO] to undo. Clicking the INSERT (F2) button will appear the period insertion mask. The modify will be executed by double clicking with the left key of the mouse on the wanted period. All the other praxis are in the Insert/Modify periods section described the hereafter (General data, Summaries, Hours, Media). DIVIDE If you want to change something on a scheduling already created (eg. the subject or the frequency) you can do it by clicking with the right mouse button on the scheduling option and i twill appear the DIVIDE option. Selecting it and inserting the date in which you want to stop the schduling and change it, you open the form with the scheduling residual (from the first day in which you have to change the scheduling). Choosing the new subject or frequency and confirming with OK we make changes on our scheduling on the air without changing the previous programming. By pressing the COPY key (F11) you perform the duplication of the period shown without airing hour points. Usable only with PREMIUM PACK. With GEST PACK, clicking the F11 button it is possible to make 5 types of data copy: Programming: it duplicates the selected programming period. | IDENTIFYING 30 ENG priority association: it duplicates the selected programming period, but it will be associated with On Priority (Programming -> General Data). Head association: it duplicates the selected programming period, but it will be associated withHead (Programming -> General Data). Tail association: it duplicates the selected programming period, but it will be associated with Tail (Programming -> General Data). From other contract: it will open a list of the subjects inserted in other contracts where you can choose the one to be duplicated. Usable only with PREMIUM PACK. It allows you to recalculate the media rotation in event of changes, or to visualize the media rotation graphic. It allows you to delete, change or set the premium and/or the hour point in particular days and, if necessary, it will recalculate the media rotation and/or instalments. If the count of the instalments is set On Consumption, Clicking on this button, it will open a window that visualizes the dates already calculated. Double clicking on the wanted date it will open another window another window where it will be possible to modify it. The new date will be visualized next to the original one. To undo a change select the wrong date and click the CANCEL (F5) button. In any event the change will be automatically reported on the Instalments mask. | IDENTIFYING 31 ENG 2.5.7.1 Insert/Change periods GENERAL DATA The fields to be filled are the following: Subject Alphanumeric compulsory (max. 40 characters). Name associated to the spot. Example: if the supermarket SUPER programs a Christmas spot it will be useful to enter SUPER CHRISTMAS. Start date Field compulsory, numerical in format DD/MM/YY. Start date of the programming. End date Field compulsory, numerical in format DD/MM/YY. End date of the programming. Days Numerical field (max. 5 numbers). It is the number of days of the programming; it updates automatically after the Start and End Date insertion. Exclude Days Clicking this button it will show a panel that represents the scheduling period you are inserting and with a double click you will be able to exclude some days from the scheduling. | IDENTIFYING 32 ENG Ref. Order Alphanumeric optional (max. 20 characters). Order number of the client. Medium Alphanumeric optional, automatically it suggest a progressive changeable number (max. 8 characters). It is the reference to the recording number of the spot. We suggest you to enter a number that matches with the archive system used for the spots. This datum is important because it is used by the automatic direction to broadcast the spot. It allows you to select the tape of an already inserted period. Length Numerical in HH:MM:SS:DD format. It is the real length of the spot; calculated automatically during the recording. It is possible to make this field compulsory (see Setup section). With F12 button it is possible to open (for the Radio) the RECORDER to import, record, edit an audio file and save it with the name entered in Medium field. For the television it will be possible to open Digiware, creating a clip file associated with the programming. It is also possible, for Radio and Agencies, to import a file without using the recorder or another audio manager software: to enable this function see the Setup section. Author Alphanumeric optional (max. 50 characters). Name of the person who inserted/modified the programming. Media Rotation Usable only with PREMIUM PACK. List where select the media rotation to be followed during the broadcast, in event of more than one media available. Day cyclic: During the whole programming period, every day it will broadcast a different media among the inserted ones. If we have media A, B and C, one day it airs only A, only B on the next day and the day after day only C. Hour cyclic: During the planning period, at each time step it broadcasts a different medium among those included in rotation from the first to the last and then start again from the first. If we have media A, B and C, each day the rotation will be A, B, C, A, B, C and so on. The following day will begin with the support that follows the order of rotation depending on how it had ended the previous day (Es. if the day 1 was completed with support of B, the second day will begin with support C). Fixed hour cyclic: during the whole programming period, for every hour passage it will broadcast a different medium among the inserted ones and every day it starts with the first medium (A). Asyncronous Hour cyclic: during the whole programming period, for every hour passage it will broadcast a different medium among the inserted ones and every day starts with the medium that follows the one which started the previous day. (Eg. day 1 A, B, C, day 2 B, C, A, day 3 C, A, B, etc…) Fixed: (default) the medium is always the same and the page for creation of other media is hidden. Manual: the sequence of rotation is established manually. It opens a green window where you can enter the desired sequence. Eg. If we have media A, B and C, you can enter the sequence AABAACAA to give greater emphasis to support A. WARNING: The system distinguishes between uppercase and lowercase letters, so make sure to write the letter corresponding to the support (verified in section media). By default it creates before the media with capital letters and then those with small letters. Periodical: every day it will broadcast a different medium, as replacement for the main, chosen among the ones inserted on a limited period, with a rotation that can be Day Cyclic, Hour Cyclic, Hour Cyclic Fix, Hour Cyclic Moved or Periodical. For a period the default support (A) is replaced by one or more different media. In the form for creating media will be asked to indicate a date and time that indicate the beginning and end of the period in which the support will have to replace the one normally aired. If during the replacement period of the media A there will be more media in rotation, it is possible, in the form of media creation, to specify which rotation to give. At the end of the period of rotation of the it will automatically broadcast only support A. Periodical with Basic Medium equal to the periodical rotation, but together with the media on the air for a limited period, it will also rotate the subject A. At the end of the period it will automatically broadcast only support A. this button allows you to visualize a media rotation table for every programmed area with the chance to modify one or more rotations. Spot Type List where select the Spot Type to be programmed. Enter if it is table Advertising, Sponsorship, Radio sale,.. Data of the list are taken from the SPOT TYPE table, changeable by the user. To make this field compulsory, see the Setup section. Program It shows the program to which the spot belongs. | IDENTIFYING 33 ENG It suggests automatically the value inserted in the Agents + Amounts mask. The values are used during statistics and to assign spot prices different to more programmings of the same contract. Campaign It shows the campaign the spot belongs to. Automatically it suggests the value inserted in the Agents + Amounts mask (Fig.8). Values are using during statistics (Statistic -> Commercial) and to assign different spot prices to more programmings of the same contract. Broadcaster If the user is an Agency. Shows the Broadcaster where the spot will be programmed. It automatically suggests the value inserted in the Agents + Import mask and it is not changeable in this point. Values are used during statistics (Statistics -> Commercial). Typology It shows the typology the spot belongs to. It automatically suggests the value inserted in the Agents + Imports mask and it is not changeable in this point. The values are used during statistics (Statistics -> Commercial). Associated Usable only with PREMIUM PACK. It gives the chance to associate the tape with the hour of another one in 3 different ways: On Priority: the spot will be broadcasted in the hour point of the associated tape based media. Heading: the spot will be broadcasted in the hour points of the associated tape based media always before the tape based media itself. Tail: the spot will be broadcasted in the hour points of the associated tape based media always after the tape based media itself. Category List where select the Category of the product. Data of the list are taken from the CATEGORIES table changeable by the user. Values are used during statistics (Statistics -> Commercial) and for the hour point rotation in order to avoid the Category conflicts. . Message List where select the message to be associated to the spot. Data in the list are taken from the MESSAGES table, changeable by the user. Values are used during statistics (Statistics -> Commercial). Archived If selected, shows the programming periods already expired that remain as archive. Start time – End time Numerical in HH:MM format. Time interval when the spot can be broadcasted. Priority List where choose the priority to assign, inside the cluster, to the spot. If the priority is 11, the spot will be the first broadcasted; if the priority is 9, the last. We suggest, except in event of particular needs, to choose 5 (middle priority). It is also possible to manage the Promo priority, either opening or closing; if you want to activate the option, see the Setup section. Frequency List where choose the number of daily passages of the spot. If the frequency is 0 the spot is free. If you set MAN., it will be possible to insert manually the hour points on all the programming period, matching a different priority for every hour point; the insertion mask will suggest a column for every day of the programming. Tape Based Media List where choose the Tape Based Media. Data of the list are the one inserted in the mask related to the Tape Based Media, that will be explained later. Notes | IDENTIFYING 34 ENG Alphanumeric optional. Every additional information related with the spot. 2.5.7.2 SUMMARIES The mask visualizes information about the number of purchased consumed and remained commercials for this subject. 2.5.7.3 HOUR POINTS AREA shows the areas where the spot must be broadcasted. The grey background areas are not scheduled, the red background areas are the ones where the spots were purchased. Clicking the CANCEL button you will delete all data in the list where you are positioned. Clicking the PRINT (F7) button it will show the print hours of the selected area: AREA HOUR POINTS AREA HOUR POINTS DIVIDED PER MEDIUM AREA HOUR POINTS WITH MEDIUM LETTER BANDS Clicking the OK button it will execute the validity controls on inserted data and, before coming back to the list, it saves the information, making a recount of the hour points in the days after the start date of the period, if necessary, after user’s confirmation. If in Setup -> Advertising -> Programming periods is selected “Check overshooting and conflicts”, clicking OK in addition to the already listed checks, the program asks if it must make checks about overshooting and conflicts, on the first programming day, on every programming day or if they must not be checked. After the check, it opens a mask with the information about the examined data. Clicking the CANCEL button you undo the operation and go back to the list. Clicking the PRINT (F6) button wil appear the print programming schedule mask: PROGRAMMING PERIODS FORM FORM WITH PROGRAMMED To insert the HOUR POINTS double click with the left key of the mouse on the wanted area, it will open the following mask. It is possible to insert until 40 hour points for every day. | IDENTIFYING 35 ENG The fields to be completed are as follows: rotation Type List from which to select the type of rotation to apply. FIXED = Everyday the same hour points FIXED ALTERNATE = Always the same hour points but on alternate days ALTERNATE FIXED ODD = Always the same hour points but only on odd days alternating between a day and one not (eg. Days 1, 5, 9, etc..) FIXED ALTERNATE PARI = Always the same hour points but only on even days alternating between a day and one not (eg. Days 2, 6, 10 etc.). FIXED ODD DAYS = Always the same hour points but only on odd days FIXED DAYS LIKE = Always the same hour points but only on even days ROTATION = Every day a different time ROTATION ALTERNATE = Every day a different time a day and one not ROTATION ALTERNATE ODD = Each day a different time only on odd days alternating between one day and one not (eg. Days 1, 5, 9, etc..) ROTATION ALTERNATE EVEN = Every day a different time only on odd days alternating between one day and one not (eg. Days 2, 6, 10 etc.). ROTATION ODD = Each day a different time but only on odd days ROTATION EVEN = Each day a different time but only on even days Days of week Check off the days of the week enabled for the broadcasting. Pay If selected shows on which areas charge the import for the spot broadcasting. Premium Type Usable only with PREMIUM PACK. List where select the programming of Premium spots. Premium on total: the last <nn> programmed spots will be counted as premium. All premiums: all the spots are free. Manual premium: in “modify/delete hour points” you can manually define the premium spots. Premium per day: the number of spots of every day set in Premium is free. Premium per day on total: it calculates the premium spots distributing them on the whole period. Premium Numerical optional (max. 5 numbers). It defines the number of premium spots. Ref. Order Alphanumeric optional (max. 20 characters). Insert the reference number of the client. Manual Hour point insert The visualized column is referred to the first programming day, as set in the header. The hour points can be inserted manually by positioning on the column lines or pressing the F1 key. With F1 it will open a window that visualizes all the hour points available for the programming. If in the HOUR POINT GROUPS were set particular groups, it is possible to see only the hour points that belong to that groups selecting from the list at the bottom of the mask, the wanted group. With the button Automatic Hour Points (F9), it opens a mask where it is possible to enter the number of commercials you want to broadcast (Commercial column) with the Automatic Hour Points (F9), it opens a mask where it | IDENTIFYING 36 ENG is possible to enter the number of commercials to be broadcasted (Commercials column) and it is possible to distribute them according with the hour bands (ADVERTISING BANDS table) or with the hour point group (HOUR POINT GROUPS table). frequency Indicates the maximum number of hour points that can be scheduled. The figure should be read as follows: 3/ = number of commercials scheduled /80 = maximum number of spot that can be scheduled in a day (3) = number of spots included in the FREQUENCY field in the General Data section of the scheduling. Pressing the OK button will be calculated air times on the start date (trying to avoid the conflict between product categories, customer and an overcrowding of the advertising slots). Pressing the CANCEL button the operation will be undone and returns to insert hour points. With the COPY (F11) button you will be allowed to copy the hour points from another area. 2.5.7.4 MEDIA The mask visualizes data related to different Media that a spot can have in addition to the main one already inserted. The mask cannot be visualized if, in General Data, was chosen Fixed as Media Rotation. Clicking the button CANCEL you will delete the medium where you are positioned. In order to insert the MEDIA double click with the left key of the mouse on the empty lines, it will open the following mask. | IDENTIFYING 37 ENG The fields to be filled are the following: Subject Alphanumeric compulsory (max. 40 characters). Name associated to the spot. Start date Start day of the period, if it is Periodic Rotation or Periodic with basic medium. Start Time Start hour, the first day, of the period. End date Last day of the period, if it is Periodic Rotation or Periodic with basic medium. End Time End time the last day of the period. In the days included between the start date and end date, the rotation will happen in the 24 hours, not depending on the start and end date. Medium Alphanumeric optional, automatically it suggests a progressive changeable number (max. 8 characters). It is the reference to the recording number of the spot. We suggest to insert a number that coincide with the archive system used for the spots. This datum is important because used by the automatic direction for the spot broadcasting. It allows you to select the medium of an already inserted period. Length Numerical in HH:MM:SS.DD format. It is the real length of the spot; it is calculated automatically during the recording. Allows you to record the spot with the given name in the field Subject, only for radio. TV station must create the media in DIGIWARE and go and pick up using the key Area List where select the area where the medium will be broadcasted. If the area is not specified, the medium will be broadcasted on all the programmed areas. Data in the list are taken from the AREAS table, changeable by the user. Media rotation Field shown only if in the mask Hour Points -> General Data was chosen as Media Rotation the option Periodic or Periodic with basic medium The rotation typologies listed in this field are: Day Cyclic, Hour Cyclic, Hour Cyclic Fix, Hour Cyclic Moved and Periodic and for them you can apply the explanation given formerly. Tape Based Media List where choose the Tape Based Media. Data in the list are the ones inserted in the mask related with the Tape Based Media, that will be explained later. Notes Alphanumeric optional. Every additional information related with the medium or the spot. | IDENTIFYING 38 ENG Category List where select the Category of the promoted product. Data in the list are taken from the CATEGORIES table changeable by the user. The values will be used during statistics (Statistics -> Commercial). Exclude hour points You can select some hour points to exclude them from the media rotation. Clicking the OK button the medium will be inserted. Clicking the CANCEL button you will undo the operation and go back to the list. 2.5.8 Boxer Usable only with GEST PACK. The mask allows you to insert, change or delete the expenses related to the spot realization. It shows the Tape Based Media list composed by Subject, Length, Code, Responsible, Realisation, Invoicing, Settled, Cost. Use the vertical scroll bar, on the right of the list, to move from a Tape Based Media to another one. SEARCH If you want to make a search, you need to highlight an element from the list and start writing the name of the Subject, the Length, the Code or the Responsible, according with the set order and the list will move in correspondence of the entered characters. To undo the search and start another, click the BACKSPACE button. Clicking the CANCEL button you will delete the subject where you are positioned. Clicking the INSERT button it will show the insert Tape Based Media mask. With the Copy (F11) button, you will be allowed to copy the data of the Tape Based Media where you are positioned. The change will be executed by double clicking with the left key of the mouse on the wanted Tape Based Media. The fields to be filled are: Subject Alphanumeric compulsory (max. 40 characters). Name associated with the spot. Length Numerical in HH:MM:SS:DD format. It is the real length of the recording. Production Date Numerical in format DD/MM/YY suggests automatically the daily date. Enter the realization date of the Tape Based Media. | IDENTIFYING 39 ENG Type List where select the spot Type to be recorded. Enter if it is table advertising, sponsorship, radio sale,... Data in the list are taken from the SPOT TYPE table, changeable by the user. Tape type List where select the Tape Type to be recorded. Data in the list are taken from the table TAPE TYPE changeable by the user. File Code Alphanumeric optional (max. 20 characters). Code assigned for the tape filing. Responsible Alphanumeric optional (max. 20 characters). Name of the person who looks after tape sending. Recording studio List where select the Recording Studio where the tape was recorded. Data in the list are taken from the RECORDING STUDIO table, changeable by the user. I Cost Numerical optional (max. 14 numbers included 2 decimals). Cost for the tape recording to be charged to the client. Studio Cost Numerical optional (max. 14 numbers included 2 decimals). Cost for the Recording Studio use. E-Mail Expenses Numerical optional (max. 14 numbers included 2 decimals). Internet Expenses Numerical optional (max. 14 numbers included 2 decimals). Mail expenses Numerical optional (max. 14 numbers included 2 decimals). Any additional cost for the spot production and Tape Based Media shipping. Invoicing Date Numerical format DD/MM/YY. Date of the tape production invoice. Invoice If selected means that the tape realization was invoiced. Settled If selected, it means that the invoice related to the production costs was really paid. Settled Date Numerical format DD/MM/YY. Field active only if selected the Settled field. Enter the payment date. Broadcast list – If the user is an Agency. Numerical format DD/MM/YY. Send date of the tape to the radio. Clicking the OK button it asks if you want to recalculate the instalments, then it saves the inserted data and come back to the previous window. Clicking the CANCEL button you come back to the previous window without saving the inserted data. 2.6 IMPORT PLANNINGS Usable only with OPTION PACK. It allows you to import automatically some contracts from other softwares (or from another Ram Comm) without inserting them manually . | IDENTIFYING 40 ENG Import Type List where choose the import type. - SPER with client (you import data related to the contracts as if they all belong to the selected client) - SPER: (you import data related dividing them by client and giving every client a progressive code SP<nn>) - PK Televisions - Presnet - RAM-COMM (you import data from another Ram-Comm) Data Transmission If the field is selected, after importing the planning it will automatically execute the Data Send. click this button to import. Client List where select the client to associate with imported data. Field active only when Import Type is Sper with client. Customer List where select the customer to associate with imported data. File Name Enter the file name with the related path where take the data. Areas Select the area where the imported spots must be programmed. Clicking the OK button it will execute the data import. Clicking the CANCEL button it will close the window without making any operation. 2.7 EXPORT PLANNING Usable only with OPTION PACK. It allows you to export contract automatically. | IDENTIFYING 41 ENG Export Type Select from the list the export type you want to execute: - Broad. Agency in amount radio: values inserted in Medium fields of the agency’s Ram-Comm will be inserted in Amount fields for the radio. - Same amount: the amounts will be exported in the same position where they are. - No amount: data will be exported without amounts. Prefix Alphanumeric (max. 5 characters). The prefix will be the first part of the file name created by the export. Path Enter the path where you want to save the file. FTP Upload Command Insert the command for the upload of the files from ftp. FTP media upload command Insert the upload on ftp command of the audio supports of all the sent planning. Areas Select the areas whose data must be exported. Start Date – End Date DD/MM/YY format Enter the period to be exported. Clicking the OK button it will execute the export of the data. Clicking the button CANCEL it will close the window without making any operation. | IDENTIFYING 42 ENG 3 SCHEDULE 3.1 3.1.1 MODIFY SCHEDULE Start mask The start mask is a calendar where it is possible to select month and year in the upper part, and area and visualization type in the lower part. The visualization can be of 4 types: SINGLE AREA: it will visualize the schedules of one area, the selected one. SINGLE AREA WITH COLOURS: it will visualize the schedules of the selected area with the colours associated to the spot type, defined by the Spot Type table. SINGLE AREA WITH COLOURS PRIORITY: displays the schedule for the selected area, with the colors associated with the type of commercials, as defined in table Spot Type and the colors assigned to the priority (eg. Head or tail of break). ALL AREAS: it will visualize the schedules of all the areas in the Areas table and the colours associated with the spots. To see the playlist of a day double click on the wanted day, it will open the mask for the insert/modify of the schedule described hereafter. Clicking the CANCEL button you will delete the schedule of the day where you are positioned. CAUTION: If you delete a playlist, it will not delete the scheduling inserted by the contracts/scheduling, but only the changes made manually inside the playlist. If you delete a schedule with the F5 button, if you open it again you will have the playlist containing all the commercials scheduled in contracts/scheduling. Clicking the PRINT (F6) button, it will show the print schedule mask: SCHEDULE SCHEDULE WITH LENGTH SCHEDULE WITH CONTRACT SCHEDULE FROM (first day of the week) TO (last day of the week) NUMBER OF COMMERCIALS FROM (first day of the week) TO (last day of the week) After choosing the print type, it will show a window with the following message: “Use length of the typology?” selecting YES, in the print the spot lengths will not be the real ones but the ones associated with the spot typology (Typologies table). Clicking the CANCEL button it will exit from the Modify mask of the schedule. | SCHEDULE 43 ENG Clicking the Compensate (F4) button it will ask you “execute filling in schedule of DD/MM/YY?” clicking [YES] it will insert in the schedule of the selected day the “stand by” spot set in the Typology table, as filler, clicking [NO] it will undo the operation. This button appears only if in the Typologies table a datum , at least, has the “filling” field checked. Pressing this button it will show the following options: playlist from. ... to. ... (displays the week on which I am) and Playlist of .... (displays the day on which I am), choosing with one-click one of the two options we can create in DIGIWARE the schedule of the day or week that interests us. Pressing the key Send Data (F3) I send the advertising schedule of the day on which I am placed to DIGIWARE. This symbol, when appearing on one day means that the day has already been sent to DIGIWARE. 3.1.2 Insert/Modify schedule The first column shows the hour points, where the spots will be broadcasted, defined in the Hour Points Table. The bands defined in table Advertising Bands are highlighted with different colors (alternating blue and gray). Length Numerical in HH:MM:SS.DD format.. Shows the total length of the Hour Point, summing the length of every spot scheduled in that hour point. Spot <nn> In these columns are listed the spots scheduled for every Hour Point. For every column, starting from the first (Spot 1), it shows the spot name (Subject) and its length. When the name of two or more spots is written in red it means that there is a category conflict, that is when they belong to the same category. When the name of two or more spots is highlighted in blue it means that they are associated to the same client. Confirmed If selected, the daily schedule will not be calculated anymore. After this operation if you insert/modify programmings they will not be broadcasted unless you take off the confirmation. When the schedule is confirmed, in the main mask the check of the day is green. Transmitted If selected, it shows that the schedule was sent to the onair machine. All Hours If not selected, it visualizes only hour points that contain spots. | SCHEDULE 44 ENG It is possible to modify manually the schedule. With a double click on the wanted spot it will visualize a mask with the name of the spot, the hour when it is programmed and the category membership. At this point it is possible to move it on the chosen hour: you can drag it with the mouse as far as the wanted cell, you can click once with the mouse on the destination cell and the press ENTER, or double click on the cell where you want to insert it. If there are conflicts caused by the movement of the spot it will show a window that asks if you want to continue in spite of the conflicts or not: clicking [YES] the operation will be completed, clicking [NO] the operation will be deleted. In the lower part of the screen you can even see two summarize fields: the number of programmed spots for that day and their global length. Clicking the INSERT button (after positioning on the cell where you want to insert the spot) it will show a complete table of the contracts and spots, not archived, where you can choose the one to be inserted (if in the setup it has been selected the item “MODIFY: insert spot check date”, will be proposed only spot scheduled on the day on which we are working); once selected, with the OK button you confirm the insertion and go back to the schedule, clicking CANCEL you undo the operation. The subject of the spot manually inserted will be preceded by “#|#”. Pressing F1 it will open a window with the information related to the selected spot. It will visualize the client code, client name, contract number, spot subject, length, medium, priority, frequency and category. If you want to search, inside the schedule the spots of a particular client, enter the first letters that compose the name of the client and press F8 button: it will show a message with the spot hours. To search the spots on the basis of the subject, enter the first letters that compose the subject and press F9: it will show a message with the spot hours. Click this button to visualize the graph related with the advertising crowding of the day. Clicking F12 it will be possible to listen or see (depending if it is a TV or a radio) to the selected spot. Clicking i twill be possible to sort by author.. Clicking the DELETE button you will delete from the schedule the spot where you are positioned. Clicking the OK button it will save the changes done. Clicking the CANCEL button 3.2 you will close the window without saving the changes. DATA TRANSMISSION It is the mask that allows you the transmission of data to the broadcast machine. Start date Numerical in DD/MM/YY format. It is the date of the first schedule day to send. It automatically suggests the date of “tomorrow”. End date Numerical in DD/MM/YY format. It is the date of the last schedule day to send. It automatically suggests the date of “tomorrow”. Enter the period to send data to the onair machine and click OK to send the schedules, creating the missing ones. If it was enabled the execution of the optimizer, at the end of the transmission it will visualize a list where it will specify if the data transmission was sent correctly or if there are some missing advertising media. Clicking the CANCEL button the operation will be left undone. | SCHEDULE 45 ENG Warning: after those days the machine will be without advertising data, so it will be necessary to transmit again the schedule. We suggest you to make periodically this operation (once a day) and to use it every time you change the advertising programming. In event of the transmission of more than 10 days, it will ask the confirmation ant it will not be possible to sendo schedules for a number higher than 100. 3.3 EXECUTE OPTIMIZER It is the mask that allows you to execute the musical filling of the splits with less commercials. Start Date Numerical in DD/MM/YY format. It is the date of the first schedule day to optimize. It automatically suggests “tomorrow” date. End Date Numerical in DD/MM/YY format. It is the date of the last schedule day to fill. It automatically suggests “tomorrow” date. Enter the data period to send to the onair machine and click OK button to send the schedules. 3.4 LISTS It is the mask that allows you to make statistics on the schedule. Data can be filtered in order to make a focused search. The fields that it is possible to select are the following: Area Agent Program Campaign Typology Spot Type Product Categories Client For every field data visualized are the ones present in their tables, changeable by the user. Once you do the selection, it will consider, for the list, data that match with the selected features. All the lists can be visualized using the OK button. Once you visualize the list, the CANCEL button is useful to leave the visualization, while the PRINT button starts printing. | SCHEDULE 46 ENG If requested data are non existent, the program will visualize a message. In all these lists it is possible to visualize also the information about a single client. 3.4.1 Advertising crowding It visualizes the day divided in 1 hour bands, entering the programmed time in HH:MM:SS,DD, format in percentage and the number of spots. Clicking the F6 button, it will be possible to choose if you want to print in tabular (text only) format or diagrams format. 3.4.2 Crowding advertising length (Sec.) It visualizes the day divided in bands of one hour, entering the programmed in SS,DD format. 3.4.3 Tape based media It visualizes a list with the Tape Based Media. This function makes sense only if you use a univocal name (MEDIUM) for every spot. In this way it is possible to know to which client belongs a particular spot. FILE NAME DAILY FREQUENCY SUBJECT LENGTH CATEGORY CLIENT CONTRACT NICKNAME 3.4.4 Tape based media in the period It visualizes a list with the Tape Based Media occupation in a particular time interval and for a specific area. DATE HOUR MEDIUM CLIENT 3.4.5 Media check It checks if from a particular date there are two or more media with the same name associated with different clients. MEDIUM CLIENT CONTRACT TAPE BASED MEDIA PERIOD CAMPAIGN BROADCASTER TYPOLOGY It is possible to enter the spot type to consider: only advertising, advertising + promo, only promo. 3.4.6 Commercials list It visualizes a list of the programming periods that will be broadcasted in a particular day, with the hours. HOUR PRIORITY CLIENT SUBJECT LENGTH CATEGORY PERIOD It is possible to specify what kind of spot must be considered: only advertising, advertising + promo, only promo. 3.4.7 Commercials length list It visualizes a list with the length of the cluster for every area, in a particular period, on all clusters. For every hour it visualizes two lines: in the first it inserts the length of the area (in bold the longest area), while in the second the difference of the other areas on the longest one. DATE HOUR AREA It is possible to enter which spot type consider (only advertising, advertising + promo, only promo) and if the main area spots (card = 00, channel = 0) must be considered as singles or linked with splits. | SCHEDULE 47 ENG 3.4.8 Number of commercials per day It visualizes a list with the number of spot broadcasted for every area, for every day of the specified period. The parameters for data selection are the start and end dates, the hour band interested and the length (minimum and maximum) of the spots. DATE AREAS It is possible to enter what kind of spot to consider (only advertising, advertising + promo, only promo) and if the spots of the main areas (card = 00, channel = 0) must be considered as singles or linked with splits. 3.4.9 Number of comemrcials per period Same as Number Of Commercials Per Day but entering data for the whole wanted period. PERIOD AREAS It is possible to decide what kind of spot consider (only advertising, advertising + promo, only promo) and if the spots of the main area (card = 00, channel = 0) must be considered as singles or linked with splits. 3.4.10 Number of commercials per clock The same as Number of Commercials per Day but grouping data for every band. BAND DAYS It is possible to decide what kind of spot consider (only advertising, advertising + promo, only promo) and if the spots of the main area (card = 00, channel = 0) must be considered as singles or linked with splits. 3.4.11 Number of commercials per group Same as Number of Commercials Per Day but only on one area and divided by priority groups set in the Hour Points table. It visualizes a list with the number of spot broadcasted on the selected area for every day of the specified period and divided in groups. The parameters for data selection are the dates of start and end period, the hour band interested and the length (minimum and maximum) of the spots. GROUP DAYS It is possible to decide what kind of spot consider (only advertising, advertising + promo, only promo) and if the spots of the main area (card = 00, channel = 0) must be considered as singles or linked with splits. 3.4.12 Number of commercials per hour Same as Number Of Commercials Per Day but it shows data for the cluster of every day. HOUR DAYS It is possible to decide what kind of spot consider (only advertising, advertising + promo, only promo) and if the spots of the main area (card = 00, channel = 0) must be considered as singles or linked with splits. 3.4.13 Occupation Displays the total time of space occupied for each day 3.4.14 Time available per day It visualizes a list with the available advertising time, for every area, for every day in the specified period, a second line with the maximum length of the spot in that day and a third line with the percentage still available. DATE AREA It is possible to decide what kind of spot consider (only advertising, advertising + promo, only promo) and if the spots of the main area (card = 00, channel = 0) must be considered as singles or linked with splits and if you must enter the time in seconds. 3.4.15 Time available per period Same as Time Available Per Day but showing the data related to the whole period and not for every day. PERIOD AREA It is possible to decide what kind of spot consider (only advertising, advertising + promo, only promo) and if the spots of the main area (card = 00, channel = 0) must be considered as singles or linked with splits and if you must enter the time in seconds. | SCHEDULE 48 ENG 3.4.16 Time available per clock Same as Time Available Per Day but grouping data for every band. BAND DAYS It is possible to decide what kind of spot consider (only advertising, advertising + promo, only promo) and if the spots of the main area (card = 00, channel = 0) must be considered as singles or linked with splits and if you must enter the time in seconds. 3.4.17 Time available per group Same as Time Available Per Day but grouping data for the various priority groups, entered in the Hour Points table. GROUP DAYS It is possible to decide what kind of spot consider (only advertising, advertising + promo, only promo) and if the spots of the main area (card = 00, channel = 0) must be considered as singles or linked with splits and if you must enter the time in seconds. 3.4.18 Time available per hour Same as Time Available Per Day but showing data for the clusters of every day. HOUR DAYS It is possible to decide what kind of spot consider (only advertising, advertising + promo, only promo) and if the spots of the main area (card = 00, channel = 0) must be considered as singles or linked with splits and if you must enter the time in seconds. 3.4.19 Time used per day It visualizes a list with the time related with the occupation of the spot broadcasted, on every area, for every day of the specified period, a second line with the maximum length of the spots in that day and a third line with the percentage of time spent. DATE AREA It is possible to decide what kind of spot consider (only advertising, advertising + promo, only promo) and if the spots of the main area (card = 00, channel = 0) must be considered as singles or linked with splits and if you must enter the time in seconds. 3.4.20 Time used per period Same as Time Used Per Day but entering data related to the whole period and not for every day. PERIOD AREA It is possible to decide what kind of spot consider (only advertising, advertising + promo, only promo) and if the spots of the main area (card = 00, channel = 0) must be considered as singles or linked with splits and if you must enter the time in seconds. 3.4.21 Time used per clock Same as Time Used Per Period but grouping data for every band. BAND DAYS It is possible to decide what kind of spot consider (only advertising, advertising + promo, only promo) and if the spots of the main area (card = 00, channel = 0) must be considered as singles or linked with splits and if you must enter the time in seconds. 3.4.22 Time used per group Same as Time Used Per Period but grouping data for the various priority groups, entered in the Hour Table. GROUP DAYS It is possible to decide what kind of spot consider (only advertising, advertising + promo, only promo) and if the spots of the main area (card = 00, channel = 0) must be considered as singles or linked with splits and if you must enter the time in seconds. 3.4.23 Time used per hour Same as Time Used Per Period but showing data for the clusters of every day. HOUR DAYS | SCHEDULE 49 ENG It is possible to decide what kind of spot consider (only advertising, advertising + promo, only promo) and if the spots of the main area (card = 00, channel = 0) must be considered as singles or linked with splits and if you must enter the time in seconds. 3.5 CERTIFICATION It is the mask that shows the list of the spots scheduled in the wanted date and shows the exit of that programming, that is if it was regularly broadcasted or not, or if it reported an error. To activate and configure the proper certification of the spots we recommend that you contact technical support. Before entering the details of the certification you want to get, you need to import on air data by pressing the IMPORT button (F3). start Date Enter the start date of the period you want to display end Date Enter the end date of the period you want to display contract Enter the contract number you want to display (optional) In the dropdown menu you can also select: - The AREA for which affects the certification (if left blank it will display all the areas). - The CLIENT you are certifying (if left blank it will display all the customers broadcasted in the selected period) Pressing the F10 key it will display the list of commercials scheduled in the period with information about the real broadcasting of them. Press the IMPORT button (F3) it will import schedulings from on air. Clicking the DELETE button it deletes the spot where you are positioned. Clicking the PRINT (F6) button it prints out of data shown on the screen. Clicking the CANCEL button you escape from the mask. For each spot will be shown the following information: Date Date of the actual transmission of the spot Hour Time for the actual transmission of the spot Hour Time scheduled of the spot Contract Number of the contract to which the spot is matched Subject | SCHEDULE 50 ENG It 's the subject indicated in the programming of the spot Length It 's the real duration of the spot Error Transmission result of the spot. It can get 3 options: PAS, the commercial was aired regularly. NO Audio, the spot was not sent because there is no audio. ERR, there was an error during the transmission of the spot. If the Status field is blank, it means that the advertising cluster was not sent. Medium Number of the support shown in the programming of the spot Area Area in which the spot was broadcasted With a double click of the mouse you can insert/modify: Date In DD/MM/YY format is the scheduling date of the spot. It suggests the date entered for the general visualization. Hour In HH:MM:SS,DD format it is the hour when the spot was broadcasted. Length In HH:MM:SS,DD format it is the length of the spot. Error It is possible to choose among 3 options: OK, the spot was regularly broadcasted. NO Audio, the spot wasn’t broadcasted because there was no audio. ERR, there was an error during spot broadcasting. Clicking the OK button the inserted information will be saved. Clicking the CANCEL button the operation will be left undone. 4 RECORDINGS Entering the date of the wanted period, it allows you to visualize the spot broadcasted during that time interval, highlighting them with green if the audio were already recorded with date and hour, and highlighting them in red if they are not recorded yet. It is also possible to see a reduced visualization of the information by clicking on the reduced display box. When you exit and enter again in the list, the same order settings will be kept. It allows you to record the spot where you are positioned. Clicking the CANCEL button you close the mask. | RECORDINGS 51 ENG | RECORDINGS 52 ENG 5 INVOICES The invoices have to be created first as a provisional and then, once checked and, if necessary, modified, can be transferred to definitive where they will be associated with progressive numbering required by law. 5.1 PROVISIONAL INVOICES It shows, in the first part, the list of the provisional invoices already done and allows you the insertion of new ones and modification or deletion of the existing ones. In the second part, down, it shows the detail of the invoice selected in the upper part. Use the vertical scroll bar, on the right of the list, to move from an invoice to another one, and the horizontal bar to see the other data of the list. YEAR: select from the list the year of the invoices you want to see. Clicking the PRINT button will appear the print mask that allows you the choice among: PRINT ON FORM PRINT ON WHITE PAGE Clicking the INCLUSION (F2) button it will show the line insertion mask, to insert a new invoice, explained later. Clicking the ENTER LINE (F4) button it will show the line insertion mask, to insert the description lines of the invoices, explained later. Clicking the DELETE (F5) button it asks which time interval of Provisional Invoices (From number To number) and of which Year delete. Clicking OK the operation will be executed, clicking CANCEL it will be left undone. Clicking the DELETE LINE (F7) it will delete the description line of the invoice where you are positioned. Clicking the EXIT button you escape from the invoice management mask. The modification can be done by double clicking with the left key of the mouse on the wanted invoice or pressing ENTER after the invoice selection. Insert/Modify invoice The fields to be filled are the following: Invoice Type List where select the document type to fill. NORMAL: it creates a provisional invoice inserting manually the data. AUTOMATIC: it creates some provisional invoices automatically, recovering information from the contracts. You must only insert the time interval and the interval of the clients to invoice. CREDIT NOTE: it creates a credit note inserting manually the data. Invoice Numerical compulsory given automatically (progressive), but changeable. It doesn’t allow you to insert more than one time the same value (max 6 numbers). C.N.. (Credit Note) Numerical compulsory given automatically (progressive), but changeable. It doesn’t allow you to insert more than one time the same value (max. 6 numbers). It will be visualized only if the Invoice Type is CREDIT NOTE. | INVOICES 53 ENG Date Numerical given automatically in DD/MM/YY format but changeable. Client List where select the Client holder of the invoice . Data in the list are taken from Identifying Clients changeable by the user. Payment List where select the Payment Type used by the client. It automatically suggests the datum inserted in Identifying, but it is possible to change it. Bank List where select the Support Bank of the client. It automatically suggests the datum inserted in Identifying, but it is possible to change it. Agent List where select the Agent associated to the client. It automatically suggests the datum inserted in Identifying, but it is possible to change it. Recipient List where select the addressee of the invoice if different from the holder. It automatically suggests the datum inserted in Identifying (Invoicing field), but it is possible to change it, data in the list are taken from Identifying Clients changeable by the user. Agency List where select the Agency associated to the client. Data in the list are taken from the AGENCY table, changeable by the user. VAT expenses List where select the VAT to apply. Data in the list are taken from the VAT table, changeable by the user. It automatically suggests the VAT normally used. Currency List where select the Currency of the invoice. Data in the list are taken from the CURRENCY table, changeable by the user. Notes Alphanumeric (max. 30 characters). Every additional information related with the invoice. Start date Numerical in DD/MM/YY format . Date where start counting the expiry of the payments. Bank Expenses Numerical Optional (max. 14 numbers included 2 decimals). Any bank expense incurred, to be invoiced to the client. Operating Costs Numerical optional (max. 14 numbers included 2 decimals). | INVOICES 54 ENG Any operating cost incurred, to be invoiced to the client. Fix Right Numerical optional (max. 14 numbers included 2 decimals). Amount to charge for the invoice issue. Blocked If selected, the invoice will not pass in definitive. Taxable – VAT – Withholding tax Summary fields. Clicking the OK button it will save the invoice. Clicking the button CANCEL it will close the window without saving the inserted data. The fields to fill are the following: Line number Numerical given automatically by the program but changeable (max. 5 numbers). Voice List where select the voice to insert in the line. Data are taken from the ITEM table, changeable by the user. MU Alphanumeric (max. 3 characters). Pressing the INSERT LINE (F4) you will have access to the input window of the amounts and description lines of the invoice. Contract Alphanumeric (max. 10 characters). Number of the contract related to the invoice. Quantity Numerical (max. 6 numbers). Price Numerical (max. 14 numbers included 2 decimals). % Discount Numerical (max. 5 numbers included 2 decimals). % Agency Numerical (max. 5 numbers included 2 decimals). VAT List where select the VAT to apply. It automatically suggests the one associated with the chosen Item in Items table. Contra List where select the Contra. It automatically suggests the one associated with the chosen Item in Items table. Blocked If selected, the invoice passes in Definitive. | INVOICES 55 ENG Description Alphanumeric it suggests automatically the associated description, to the selected Item, in the Items table. % Withholding Tax Numerical optional (max. 5 numbers included 2 decimals). Percentage for the Withholding Tax calculation. % of rateable value Numerical optional (max. 5 numbers included 2 decimals). Percentage of the taxable to calculate the withholding tax. Withholding tax – Amount – Taxable – VAT Summary fields. Clicking the OK button it saves the invoice line. Clicking the button CANCEL it will close the window without saving the inserted data. If in the Invoice Type you selected “AUTOMATIC”, the fields to fill are the following: Date Numerical in DD/MM/YY format, it automatically suggests today’s date. Invoice date. Date from – Date to Numerical in DD/MM/YY format. It will consider the instalment to invoice, specified in the contract, included in the entered period. Client from List where select the start client of the interval to consider for the invoicing. Client To List where select the final client of the interval to consider for the invoicing. Start date Numerical in DD/MM/YY format. Date where start calculating the expiry of the payments. 5.2 DEFINITIVE INVOICES It shows, in the first part, the list of the definitive invoices already done and allows you to insert new ones and modify or delete the existing ones. In the second part, down, it shows the detail of the invoice selected in the upper part. Clicking the button STATEMENT OF ACCOUNT it opens a window that allows you to give an interval of invoices (From number, To number) and Year, to update data of the statement of account. Clicking the PRINT button will appear the print mask that let you choose among: PRINT ON FORM PRINT ON WHITE PAGE LABELS | INVOICES 56 ENG Clicking the INCLUSION (F2) it will show the following mask. It shows the number of the last credit note and the last invoice issued and allows you to insert a numerical interval for the record of the invoices, from provisional to definitive. Clicking the DELETE (F5) button it asks which interval of definitive invoices (From number, To number) and of which year, delete. Clicking OK the operation will be executed, clicking CANCEL it will be left undone. Clicking the ENTER LINE (F4) button it will show the enter line mask. Clicking the button DELETE LINE (F7) it will delete the description line of the invoice where you are positioned. Clicking the EXIT button you escape from the invoices management mask. The modification can be done by double clicking with the left key of the mouse on the wanted invoice or pressing the ENTER key after the selection of the invoice. The mask for the definitive invoices is the same as the provisional ones. 5.3 CASH ORDER It will visualize the expiration date dates of the Cash Orders inserted. Data shown are: the number of Cash Order, the expiration date, the amount, the number of the referential invoice, the invoices date and the client. Clicking the button BALANCING it will open a mask for the insertion of the search parameters: Cash orders number interval, date interval, year and bank. Clicking OK it will give back the Cash orders amounts grouped by bank. Clicking the PRINT button it will show the print mask that allows you to select the Cash Orders in a particular numeric interval (From number <nn> to number <nn>) or in a time interval (From Date – To Date), or the ones of the same bank. Clicking the INCLUSION button it will show the cash order insertion mask, to insert a new expiry, explained later. Pressing the CANCEL requests the Cash Order range (From number To number) and the year, to be erased. Clicking on OK it will be executed, clicking on CANCEL it will be abandoned. Pressing the F3 button you can export the Cash Order in a file to be sent directly to the banks. Clicking ESC button you escape from the mask. The modification will be done double clicking with the left key of the mouse on the wanted cash order or clicking the ENTER button after selecting it. From Number: Number of the first Cash Order to be exported To number: Number of the last Cash Order to be exported | INVOICES 57 ENG Start Date: start date of the period to be exported End date: end date of the period to be exported Year: Year of the bank receipt to be exported Bank: Select the receiving bank (the list is taken from the table Banks) Export File Name: enter the path and name of the file that will be created CR / LF: Select whether you want the file as a CR/LF Add Export in queue if the file already exists: If a file already exists with the same name that contains data, the data of the export will be appended to those already present in the file When all required fields have been completed, press F10 to export the data. Press the ESC key to exit the main form of bank receipt. The modification is done by double clicking with the left mouse button on the desired bank receipt, or by pressing the ENTER key after you have highlighted it. Insert/Modify Cash Order The fields to fill are the following: Cash orders Type List where select the type of cash order you want to fill. UNIQUE: it will create a cash order by manually inserting the required data. AUTOMATIC: it will create some cash orders automatically, inserting the interval of the invoices to consider. Number Numerical assigned automatically (progressive) but changeable (max. 5 numbers). Invoice List of all the definitive invoices issued where to choose the one to calculate the cash order. The list visualizes only the number and date of the invoices, to see also the other data of the invoice click on the search button. Field shown only if Cash Orders Type is Unique. | INVOICES 58 ENG Invoice From Enter the start of the invoices interval to consider. The list visualizes only the number and date of the invoices, to see the other data of the invoice click on the search button. Field shown only if Cash Order Type is Automatic. Invoice To Enter the end of the invoices interval to consider. The list visualizes only the number and date of the invoices, to see the other data of the invoice click on the search button. Field shown only if Cash Order Type is Automatic. Maturity Numerical in DD/MM/YY format, it automatically suggests today’s date but after selecting the invoice for the cash order it will update. Enter the expiration date of the cash order. Field shown only if Cash Order Type is Unique. Amount Numerical (max. 14 numbers included 2 decimals). It automatically suggests the amount of the cash order taking it from the invoice, but it is changeable. Field shown only if Cash Order Type is Unique. Creditor Bank List where choose the creditor bank. The list is taken from the Banks table, changeable by the user. The list visualizes only the name of the bank, to see the other data click on search button. Branch Alphanumeric optional (max. 30 characters). Field visible only if Cash Order Type is Unique. Currency List where select the Currency of the cash order. Data in the list are taken from the CURRENCY table, changeable by the user. Field shown only if Cash Order Type is Unique. Notes Every additional information related to the Cash Order. Field shown only if Cash Order Type is Unique. Client Company name and address of the client. During the insertion data are taken automatically from the invoice, during the modify phase data can be changed and chosen from a list (Identifying Clients). Field shown only if Cash Order Type is Unique. Recipient Company name and address of the addressee of the Cash Order. During the insertion data are taken automatically from the invoice, during the modify phase data can be chosen from a list (Identifying clients). Field shown only if Cash Order Type is Unique. Clicking the OK button it sill save the line of the Cash Order. Clicking the CANCEL button it will close the window without saving the data inserted. 5.4 STATEMENT OF ACCOUNT It will visualize the statement of account of every client, composed by client name, date, description movement, debit and credit. | INVOICES 59 ENG In the lower part of the mask it is possible to select the client you want to visualize the situation, next it shows the balance. Under the Client field, you can select the billing company for which to display the balance. Clicking the PRINT button it will print the statement of account of the selected client. Clicking the INCLUSION button it will show the insertion mask, to insert a new movement, explained the hereafter. Clicking the DELETE button it will erase the movement where you are positioned. Clicking the EXIT button you escape from the mask. The modification will be done by double clicking with the left key of the mouse on the wanted movement or pressing the ENTER key after selecting the movement. 5.4.1 Insert/Modify Movement The fields to fill are the following: Date Numerical in DD/MM/YY, automatically it suggests today’s date. Undischarged If selected means that the client rejected the Cash Order. Re-Issue If selected means that the Cash Order will be re-issued after outstanding accounts. Payment If selected it means that the client paid the movement. | INVOICES 60 ENG Without repetition <Manual> ISSUE INVOICE ISSUE CREDIT NOTE ISSUE BANK TRANSFER ISSUE TRANSFER ISSUE R.B. ISSUE R.D. ISSUE DRAFT Description Alphanumeric (max. 80characters) It automatically suggests descriptions related with the selected fields (Undischarged, Payment, ...) the description is changeable. Debit Numerical (max. 14 numbers included 2 decimals). Credit Numerical (max. 14 numbers included 2 decimals). Bill book item List where select the Bill Book Item. Data are the ones inserted in BILL BOOK ITEM table, changeable by the user. Currency List where select the Currency. Data are the ones inserted in the CURRENCY table, changeable by the user. Notes Every additional information related with the movement. | INVOICES 61 ENG 6 STATISTICS 6.1 STATISTICS: COMMERCIAL For every LIST TYPE selected it will be possible to choose if in the visualization must be included the FILED contracts, only CUSTOMER (in event of a client selected in the following parameters, this will be considered as customer), with CLIENT (if Client and Customer were selected, confirming this option it will show in the list in addition to the clients of the customer, even the customer itself) and the TYPE and AMOUNT to be visualized: none, sum % Agency (to the amounts sums the percentage assigned to the Agency), detract % Agency (to the amounts inserted it detract the percentage assigned to the Agency). If a contract is filed, it will be visualized in red. Data can be filtered in order to make a focused search. The fields that can be selected are the following: Currency Broadcaster Area Agent Agencies Zone Campaign Typology Message Product Category Client For every field data visualized are the ones in their own tables, changeable by the user. Once you made the selection, it will consider, for the list, only the contracts that will respect the selected features. In event of the agent, if during the insertion of the contract in the mask Agents + Amounts wasn’t selected the Commercial option, in these statistics it will not be considered. All the lists are visualized using the OK button. Once you visualized the list, the CANCEL button is to leave the visualization, while the PRINT button starts the printing. In event of non existent requested data, the program will visualize a message. 6.1.1 Active contracts by date The statistic provides the user with a list of all active contracts in the period. Data selection is done by controlling the Maturity Date, as defined when entering the contract, which must be within the specified time interval. The list will be shown in the following form: CUSTOMER CONTRACT DATE AGREED EXPIRATION DATE | STATISTICS 62 ENG 6.1.2 Expired contracts for expiring date The statistic offers to the user a list of all expired contracts in the period set. Data selection will happen through the check of the Maturity date, given during the insertion of the contract, that must fall within the entered time interval The list will be shown in the following way: CLIENT CONTRACT STIPULATION MATURITY 6.1.3 Expired contracts for remained The statistic offers to the user a list of all the contracts that, at the entered date, result as expired for remained (remained spots). The check will be done on the programming period that, at the date set as reference (To), must be expired. If you select the option Without suspende, it will visualize the contracts that broadcasted all the purchased spots and the suspended will be 0, otherwise it will insert also the ones with expired programming but with remaining spots and, in that case it will also show the number. For example if the client purchased 100 spots and at the inserted date it consumed 100 spots, the remained is 0 and the contract results expired for remained. If the client purchased 100 spots and at the inserted date it consumed 80 spots, the remaining is 20 and the contract results expired with outstanding. The list will be shown in the following way: CLIENT CONTRACT STIPULATION NICKNAME PURCHASED REMAINED AMOUNT This button will appear only by positioning on EXPIRED contracts, that is that they have no programming onair or with expiration date and the last installment after today’s date, and allows you to Archive the selected contract. It is possible to select the function entering Alt-R. 6.1.4 Contracts without commercial price It visualizes all the contracts with the stipulation date included in the assigned interval, and where the spot price is not specified. The list will be shown in the following way: ARCHIVED CLIENT CONTRACT STIPULATION NICKNAME PURCHASED 6.1.5 Suspended contracts It visualizes all the contracts without any active programming but have some spots to consume at a particular date. The parameters to insert for the search are: the reference day and the percentage of remaining spots, if it must be lower, upper, same or different compared to the entered percentage. The list will be shown in the following way: CLIENT CONTRACT STIPULATION NICKNAME PURCHASED REMAINED AMOUNT 6.1.6 Commercials monthly list This statistics is useful to have a complete list of the commercials with at least one programming day included in the entered time interval, with the related amount. It lists all the commercials used in the period under review, with the amounts involved (individual and total) and the average price of all of the spots used in the period. From this release are | STATISTICS 63 ENG EXCLUDED all amounts relating to contracts without programming (for example, contracts with monthly installments or to be dfined but without commercials scheduled) INCLUDED all the commercials and amounts that will be billed at a different time from the selected period (for example, the installments "At the consumption end period" or "on consumption <nn> days") In the visualization can be inserted some additional parameters: Amounts without premium If selected, it will visualize the amounts of the spots without counting the Premium. Commercials without gifts If selected, it will not visualize the Premium spots. Premium spot price = 0 If selected, the commercials with spot price = 0 must be considered as Premium. Full amount If selected, it will consider the amounts not discounted. Divide price on areas If selected, the full amount will be equally divided for every area. This happens if the filling of the amounts in the contract was not done by area. Only area with hour-points If selected, it considers only the areas with charged hour points. Only first area If selected, in event of more than one area programmed, it will consider only the first one. Broadcaster Price If selected, the amounts visualized will be the one related with the Broadcasters. The list will be shown in the following way: ARCHIVED CLIENT CONTRACT STIPULATION AREA PURCHASED CONSUMED SPOT PRICE AMOUNT TURNOVER MESSAGE TYPOLOGY AGENT NICKNAME In the lower part of the table you see the summary fields: total consumed spots, total amount, average price, total premium, average price premium. 6.1.7 Summary monthly list It calculates the consumed commercials and the total price of them, in a particular period, grouping them for every broadcaster and area. The selection parameters are the same of statistic Commercial Monthly List. The list will be shown in the following way: AREA BROADCASTER AMOUNT CONSUMED FREE CONSUMED AVERAGE PRICE TYPOLOGY 6.1.8 Summary monthly list by agent It calculates the consumed spots and the total price of them, in a particular period, grouping them by Agent. The selection parameters are the same of the previous statistic (Summary monthly list). The list will be shown in the following way: AGENT AMOUNT CONSUMED FREE CONSUMED COMMISSION | STATISTICS 64 ENG 6.1.9 Monthly list by agent with payments The statistic shows, for every Agent, the total price of the commercials consumed, of the installments and the difference between these two data, inside the entered time interval. The selection parameters are the same of the statistics Commercials Monthly List, the only missing is Price Broadcast. The list will be shown in the following way: AGENT AMOUNT INSTALLMENTS DIFFERENCE 6.1.10 Summary monthly list by year This statistic displays the amount of advertising collected in each year divided by months and quarters. The selection parameters are the same as statistical Commercials Monthly List. Exclusions and inclusions are the same as Commercials Monthly List. The result will be shown in the following form: 6.1.11 List of commercials to be invoiced This choice is useful to visualize a spot list that, in the entered ‘period, must be invoiced. The selection parameters are the same as statistics Commercial monthly list. From this list are EXCLUDED all the commercials broadcasted during the period, but to be billed at a different time INCLUDED any rate contained in a contract-free scheduling The selection parameters are the same as statistical Commercials Monthly List. The list will be shown in the following way: ARCHIVED CLIENT CONTRACT STIPULATION REF. CLIENT PURCHASED SUBJECT AREA REF. ORDER CONSUMED SPOT PRICE AMOUNT MESSAGE 6.1.12 Summary list of commercials to be invoiced It counts the spots to be invoiced, as the statistics List of Commercial to be Invoiced, but data are grouped by every broadcast and area. The selection parameters are the same as statistics Commercial monthly list. The list will be shown in the following way: AREA BROADCASTER AMOUNT CONSUMED FREE CONSUMED | STATISTICS 65 ENG 6.1.13 Period start dates It visualizes a list of all programmings that have the start date included int the entered period. The list will be shown in the following way: MEDIUM (if existing) ARCHIVED PERIOD (of programming) SUBJECT FREQUENCY CATEGORY MISSING DAYS (to the programming expiry) PROGRAMMED AREAS NICKNAME MESSAGE CUSTOMER SENDING DATE CAMPAIGN BROADCASTER TYPOLOGY In event of “missing days” already finished, that is when end programming date is previous to today’s date, in the related column there will be the wording “EXPIRED” and the matched programming will be red highlighted. In event of a programming period that starts after today’s date in the column “missing days” there will be the wording “WAITING” and the matched programming will be green highlighted. 6.1.14 Programming periods It visualizes the programming periods in a particular interval. Once inserted the reference dates (From/To) the program will visualize, in start date order, only the programming with at least one day included in the requested period. The list will be shown in the following way: PERIOD (of programming related to the contract) CLIENT SUBJECT FREQUENCY CATEGORY PROGRAMMED AREAS CONTRACT STIPULATION NICKNAME LENGTH (of the spot) MEDIUM TYPOLOGY If selected the voice, the date of the programming insertion will attest the selection of the programming periods and not the period itself. 6.1.15 Accruals and deferrals It visualizes a summary of the contracts with at least one programming day included in the wanted time interval. The selection parameters are the same of the statistic Commercial Monthly List and moreover there is the chance to visualize the Contracts with Closed Accruals. The list will be shown in the following way: ARCHIVED CLIENT CONTRACT STIPULATION YEAR PURCHASED CONSUMED PURCHASED PREMIUM CONSUMED PREMIUM BALANCE AMOUNT TURNOVER ACCRUAL DEFERRAL In the lower part of the table you will find the summary fields: total amount, total invoices, total accrual, total deferral. | STATISTICS 66 ENG 6.1.16 Reclassification standard format This statistic sums the duration of all the commercials, customer by customer, broadcasted in a given period and divide it by the "standard" set up in the statistics. It is very useful to check the time used by a customer in a given period, especially if the spots provided by the customer exceed the time agreed under contract. Example: A customer purchases 100 spots of 30 seconds, but then provide a spot lasting 40 seconds. Once passed the 100 spot, they have taken 4000 seconds, or the equivalent of 133 30-second spot. This statistic is possible to quantify the spot "extra" to be billed to the customer. Enter the period of reference in the fields From and To and the standard duration that you want to check. The list will be shown in the following form: ARCHIVED CLIENT CONTRACT STIPULATION AREA TYPOLOGY CONSUMED TYPOLOGY LENGTH TOTAL TYPOLOGY LENGTH SPOT LENGTH TOTAL SPOT LENGTH STANDARD SPOT 6.1.17 Periods maturities It visualizes all the programmings with expiration date included in the wanted period. Once you inserted the time interval, the program will visualize, in Start Date period order, only the programming whose end date is included in the chosen time interval. The list will be shown in the following way: MEDIUM (if existing) ARCHIVED PERIOD (programming) SUBJECT FREQUENCY CATEGORY MISSING DAYS (to the programming expiration) PROGRAMMED AREAS NICKNAME MESSAGES CUSTOMER CAMPAIGN BROADCASTER TYPOLOGY If the “missing days” at the expiration of the programming were ended, in the related column there will be the writing “EXPIRED” and the matched programming will be red highlighted. If the programming period should start after today’s date, in the column “missing days” there will be the writing “WAITING” and the matched programming will be green highlighted. Clicking this button (Alt-R), it will appear only on EXPIRED periods, you will be able to Archive the programming period 6.1.18 Statistics contract verification The statistic allows you to obtain a complete list of all contracts whose stipulation date is included in the inserted time interval. Data can be ordered by Client or Import, and inside of them they can further be ordered by Sales Type, by Broadcaster, by Terms or by Area The list will be shown in the following way: ARCHIVED CLIENT CONTRACT STIPULATION TYPE TERMS BROADCASTING BROADCASTER AMOUNT | STATISTICS 67 ENG 6.2 STATISTICS: ACCOUNTING For every selected LIST TYPE it will be possible to choose if in the visualization must be included the FILED contracts, the TYPE AMOUNT to be visualized (none, sum % Agency, subtract % Agency), if the imports must be calculated without premiums and if the must be calculated as full, without discounts. If a contract is filed, it will be visualized in red. Data can be filtered in order to make a focused search. The fields it is possible to select are the following: Currency Broadcaster Area Agent Agencies Zone Campaign Typology Product Category Sale type Sale Typology Client For every field, data visualized are the ones present in their tables, changeable by the user. Once you make the selection, it will consider, for the list, only the contracts that will correspond If during the contract insertion in the Agents + Amounts mask, wasn’t selected the Contract option Contracts, referred to the agent, in these statistics that contract will not be considered. All the lists are visualized using the OK button. Once you visualized the list, the CANCEL button is useful to leave the visualization, while the PRINT button starts the printing praxis. In event of the requested data are non existent, the program will visualize a message. 6.2.1 Analisys remained commercials It will visualize for every broadcaster and area the number of spots not broadcasted yet, the related amount and the number of premium. If selected With Clients, the print will also visualize the clients. The list will be shown in the following way: BROADCASTING AREA SPOT AMOUNT FREE SPOT In the lower part of the table you find the summary fields: spot, amount, average price, premium spot, average price premium. | STATISTICS 68 ENG 6.2.2 Commercials programmed It visualizes, for every agent, the amount related to the spots programmed in the entered time interval, grouping them depending on the broadcaster and the area. In the visualization it is possible to choose if consider premiums, amounts without premium and full amounts without discount. The list will be shown in the following way: AGENTS BROADCASTING AREA MONTHS SEMESTER SUMMARY TOTALS 6.2.3 Contracts per vendor It will list the amounts of the contracts with stipulation date included in the chosen time interval. Data will be grouped monthly and divided for every agent. The list will be shown in the following way: AGENTS MONTHS SEMESTER SUMMARY TOTALS 6.2.4 Contracts control The option Contracts Control allows you to obtain a complete visualization, in alphabetical order, of all the inserted contracts, with the outstanding between paid spots and broadcasted spots and with possible expenses. The parameter for data selection is the stipulation date of the contract. The list will be shown in the following way: ARCHIVED CONTRACT CLIENT COMMERCIALS PAYED AMOUNT DIFFERENCE AMOUNT PURCHASED PURCHASED FREE SPOT PRICE EXPENSES CONSUMED CONSUMED AMOUNTS FREE CONSUMED At the bottom of the screen it will visualize a general count composed by: 1st line: Commercials consumed and related Amount. 2nd line: Commercials paid and related Amount with number of contracts. 3rd line: Commercials purchased, total Difference commercial paid and consumed, expenses. 6.2.5 Contracts list It visualizes the list of the contracts of a period reporting their value. The list contracts option needs the input of two limit dates to search between. It allows you, moreover, to consider filed contracts, expenses and the possible cash advance. The list will be shown in the following way: STIPULATION CONTRACT CLIENT AMOUNT PURCHASED PURCHASED FREE SPOT PRICE ACCOUNT LAST INVOICE SPOT COSTS OPERATING COSTS ADVANCE | STATISTICS 69 ENG DEPOSIT SALE TYPE SALE TYPOLOGY AGENT In the lower part of the screen it will visualize a general count of the Amount, Spot Costs and Operating Costs of the contracts ACTIVE, FILED and their Total. 6.2.6 Payments It visualizes the payments list with the chance of changing data. Use this function to record quickly the payments (if you don’t use the invoicing). The option payments list needs the insertion of two dates to set a time interval where do the search and if it must consider only the paid installments, both paid installments and not paid, or only not paid. It is also possible to choose if include the visualization the payments with Tape Based Media or not. The parameter for data choice is the date of the installment. The names highlighted in red did not make the payment yet. The list will be shown in the following way: ARCHIVED CONTRACT CLIENT MATURITY REF. PER AMOUNT FULL DIFFERENCE SETTLED ACCOUNT TYPE NICKNAME Moreover, at the bottom of the screen, it will visualize a line that shows: Amount: sum of the amounts and all the expiries; Cashed: sum of the mounts of the expiries already paid; To be Cashed: sum of the amounts of the expiries not already paid. In this function, once you positioned on the line relative to the payment, using the right key of the mouse it will visualize a little menu that allows you the choice among: Set payment date (Alt-P): It suggests the expiration date, that can be changed if necessary. Modify Amount (Ins): if you are positioned on a payment highlighted in red. Or: Cancel Payment (Alt-N): If you are positioned on a payment highlighted in green. 6.2.7 Broadcaster payments It visualizes the payments list (always on consumption) with amount gross and net for every programming period. The list will be shown in the following way: ARCHIVED CONTRACT CLIENT PERIOD FREQUENCY AMOUNT BROADCASTING AMOUNT SETTLED INVOICE NICKNAME At the bottom of the screen it will visualize a summary amount table, both for the Client, and for the Broadcaster: Total: sum of the amounts. Cashed: sum of the amounts of the expiries already paid. To be cashed: sum of the amounts of the expiries not already paid. 6.2.8 Broadcaster payments by installments It visualizes the list of the payments with gross and net amount for every programming period. It doesn’t consider only the installments on consumption. The parameter for data choice is the installments date. The list will be shown in the following way: ARCHIVED CONTRACT CLIENT PERIOD | STATISTICS 70 ENG AMOUNT BROAD. AMOUNT SETTLED INVOICE NICKNAME At the bottom of the screen, it will visualize a summary table, both for the Client, and for the Broadcaster: Total: sum of the amounts. Cashed: sum of the amounts of the expiries already paid. To be cashed: sum of the amounts of the expiries not already paid. 6.2.9 Business statements It visualizes the list of the contracts consumed and remained in a particular period, grouped by client and ordered on the basis of the investment done. The parameters to insert for the search are: number of spot remained (if more than zero, same as zero, or less than zero), if it must list even the amounts of the remained spots, if it must ignore the contracts and if it must consider the remained in the last period, that is the spots not already broadcasted. The list will be shown in the following way: ARCHIVED STIPULATION MATURITY CONTRACT CLIENT NICKNAME AMOUNT + EXPENSES BROADCASTER PURCHASED CONSUMED REMAINED PURCHASED PREMIUM CONSUMED PREMIUM REMAINED PREMIUM LAST PERIOD LAST INSTALLMENT The contracts that have commercials yet will be visualized in green, while the ones that consumed more commercials than the purchased, will be visualized in red. 6.3 STATISTICS: AGENT Usable only with GEST PACK. For every TYPE LIST selected it will be possible to choose if in the visualization must be included the FILED contracts, the way to calculate the commissions (on invoices, on settlements, on invoice settled, on settlements by bank receipts + | STATISTICS 71 ENG 1 month, on invoice settled by bank receipt + 1 month, on expiration date) and if it must consider the percentage for the agency. If the count of the commissions is on invoiced there will be a further field to fill: with Tape Based Media. If selected, in the visualization it will also consider the amounts related with the Tape Based Media. Data can be filtered in order to make a focused search. The fields which can be selected are the following: Currency Agent Agency If the window doesn’t appear, it means that no agent was inserted. All the lists are visualized using the OK button. Once visualized the list, the CANCEL button is useful to leave the visualization, while the PRINT button starts the printing. If the required data were lacking, the program will display a message. 6.3.1 Agent calculation It visualizes the commissions due to an agent in a particular period, with the list of the reference contracts. The list will be shown in the following way: CONTRACT STIPULATION BROADCASTER CLIENT N. SPOT CONSUMED SPOT PRICE AMOUNT % COMMISSION ACCOUNT PAYMENT ADVERTISING TAPE BASED MEDIA At the bottom of the screen you can see a total summary of Fee and Contract with Total Amounts, average percentage, total commission and total amounts already paid. 6.3.2 Control statement It visualizes a prospect that represents the commercial trend of the advertising sales divided per agent in a particular period. The list will be shown in the following way: CONTRACT BROADCASTER CLIENT AMOUNT STIPULATION % COMMISSION TRANSMITTED INVOICED TAPE BASED MEDIA At the bottom of the screen you can see a total summary of the advertising transmitted and invoiced, Difference and Commission. 6.3.3 Control statement on invoices Same as Control Statement, but with the information about the invoices instead of the contract. The list will be shown in the following way: INVOICE DATE CLIENT BROADCASTER AMOUNT % COMMISSION At the bottom of the screen you can see a total summary of Total Invoices, Total Commission, % average of the commission. | STATISTICS 72 ENG 6.3.4 Total of commissions It visualizes the total of the commissions due to the agents in a particular period. The list will be shown in the following way: AGENT COMMISSION AMOUNT COMMISSION COMMISSION COMMISSION % COMMISSION ACCOUNT CONTRACT AMOUNT CONTRACT COMMISSION CONTRACT % CONTRACT ACCOUNT TOTAL AMOUNT TOTAL COMMISSION TOTAL % TOTAL ACCOUNT 6.4 STATISTICS: BOXER Usable only with GEST PACK. For every TYPE LIST selected it will be possible to choose if in the visualization must be included the FILED contracts. Data can be filtered in order to make a focused search. The fields that can be selected are the following: Currency Agent Spot Type Recording Studios Client If the window does not appear, it means that no agent was inserted. All the lists are visualized using the OK button. Once visualized the list, the button CANCEL is useful to leave the visualization, while the PRINT button starts the printing. If the required data were lacking, the program will display a message. 6.4.1 Boxer It visualizes the list of the Tape Based Media realized in a particular period. The parameter for the choice is the realization date of the Tape Based Media. The list will be shown in the following way: ARCHIVED CLIENT CONTRACT | STATISTICS 73 ENG RECORDING STUDIOS REALIZATION RESPONSIBLE SUBJECT SPOT TYPE TAPE TYPE STUDIO COST COST E-MAIL EXPENSES INTERNET MAIL EXPENSES INVOICING DATE 6.4.2 Boxer per recording studios It visualizes a summary of the costs for the realization of the Tape Based Media, ordered by recording studios. The parameter for data choice is the realization date of the Tape Based Media. The list will be shown in the following way: RECORDING STUDIOS STUDIO COST COST E-MAIL EXPENSES INTERNET MAIL EXPENSES 6.4.3 Invoicing It visualizes the list of the Tape Based Media to be invoiced or invoiced in a particular period. It is possible to choose if include spot costs. The parameter for data choice is the invoicing date. The list will be shown in the following way: ARCHIVED CLIENT CONTRACT COST SPOT COSTS At the bottom of the screen you can see the summary of the costs (total, paid, to be paid) for the media recording costs. 6.5 STATISTICS: INVOICES If the window doesn’t appear it means that no agent was inserted. If during the contract insertion in the mask Agents + Amounts was not selected the Invioces option, attributed to the agent, in these statistics it won’t be considered. All the lists will be visualized using the OK button. | STATISTICS 74 ENG Once visualized the list, the CANCEL button is useful to leave the visualization, while the PRINT button starts printing. In event of non existent requested data, the program will visualize a message. 6.5.1 VAT counts It visualizes the VAT count for all the months of the wanted year. It shows the amount for every month, the partial for every three months and the annual total. 6.5.2 Turnover per vendor It visualizes the invoiced for every month, with summaries every three months, six months and annual for every agent. The data selection parameters are the following: year, agent (it is allowed the multiple selection), broadcasters (multiple selection), the currency and the client. The invoicing date must belong to the entered year to be included in the list. 6.5.3 Invoices issued It shows the list of the invoices issued in the entered time interval. Data can be visualized with or without the following information: provisional, invoice amounts and Subdivide by expenses. The data selection parameters are the following: the agent (multiple selection), the modality (multiple selection), the sale type (multiple selection), the broadcasters (multiple selection), the area (multiple selection), the typology (multiple selection), the sale typology (multiple selection), the currency and the client. The list will be shown in the following way: TYPE DATE INVOICE C.N. CLIENT PAYMENT TAXABLE VAT TOTAL CONTRACTS In the lower part of the screen will be visualized a summary with the Total rateable value, Total VAT and Total. 6.5.4 Invoices for agent It shows the list of the invoices issued in the wanted time interval and ordered by agent. Data can be visualized with or without summaries, and can be also visualized the invoices without contract. The given selection parameters are the following: the agent multiple selection) and the currency. The list will be shown in the following way: DATE INVOICE CLIENT % AMOUNT – EXPENSES EXPENSES In the lower part of the screen it will visualize a summary with the Total amount minus expenses and the Total expenses. 6.5.5 Bill book It shows the list of the expiries ordered by date. The expiration date must be included in the entered time interval. The selection parameters given are the following: the agent (multiple selection), the currency, the insertion type (multiple selection), the bill book item (multiple selection), if undischarged, if re-issue, if payment, if ordered by client, client, if all movement (paid and not). The list will be shown in the following way: CLIENT DATE DESCRIPTION DEBIT CREDIT NOTES DATE COMMERCIAL PAPERS In the lower part of the screen it will visualize a summary of Debit and Credit. 6.5.6 Billing verificationstatistics It visualizes the billing of every client in the entered period. | STATISTICS 75 ENG 6.5.7 Monthly billing’s verification statistics It visualizes the billing of every client divided by months. 7 UTILITY 7.1 7.1.1 RECALCULATION Consumed and/or installments It visualizes a window where you can choose the update of broadcasted commercials and/or the installments on consumed of the Active contracts, of the Filed contracts or all contracts. We suggest to use this function if, somehow, there is an incongruity among the count of the consumed commercials in the programming periods. 7.1.2 Length It visualizes a window where it is possible to insert a date. Clicking OK it will start the update of the length of the media that will be broadcasted in the specified day or next. 7.1.3 Hour points It visualizes a window where you can choose the recount of the broadcasted hour points in a particular time interval. It is possible to specify the update parameters: for which area, for which client, if only for predefined hour points or even for the fixed time. | UTILITY 76 ENG 7.1.4 Schedule It allows you to recalculate the schedule of a particular day on one or more specified areas. 7.1.5 Restore alerts It allows you to restore all notices to which it was put the check "do not show" 7.2 7.2.1 CHECK Advertisement transmitted Check if sending data on a certain day was successful. In the event that one or more files are missing, it displays the time and the name of the file is missing. 7.2.2 Periods without hour point + not same as frequency It will visualize all the periods, that will be broadcasted during a particular day or next, entering the ones that don’t have broadcasting hour points or have a number of hour points different from the frequency. 7.2.3 Supporti non usati It visualizes a list of the programmed and expired media not used afterwards. In data search it checks if the not used media, in the entered period (start date/end date), are not scheduled not even in following periods. Enter the date of start and end period to make the check and set if the search must be done only among filed media or not. Filed media will be shown in red. The list will be shown in the following way: MEDIUM CONTRACT SUBJECT START DATE END DATE Clicking the button MOVE (F11) it will allow you to choose between 2 options | UTILITY 77 ENG Move now: the selected medium will immediately moved on the traditional file PUB and saved in C:\RADIO\COPIEPUB in order to keep cleaned the archive in use, but not delete the medium. Create Batch: it will create a file named SPOSTA.BAT which allows you to move all the media in the list from the PUB archive to the COPIEPUB archive. The movement can’t happen immediately, but only when the Batch file will be executed. Clicking the CANCEL button, it will be deleted from the list, and only from the list, the selected medium. This operation can be useful when, among a large number of not used media, there are some of them that can be useful to keep stored. Once removed the ones you want to keep, you can then proceed to the creation of the Batch file or the immediate movement of the other media. Next, the media deleted in this phase, will be reconsidered and visualized again among the ones not in use, if they should match again the selection criterion. 7.2.4 Supports without programming This function allows you to view all files in the folder chosen for the spots that are not reflected in any programming. Once you see the list, you can delete one or more files or move them to a backup folder using the button F11. 7.2.5 Delete unusable data This function allows you to delete unusable data that can be created after an unexpected power cut. 7.2.6 Contracts loading The mask allows you to control the loading of the contracts in a particular time interval; it is possible to control only filed and also the hour points without area and highlight the possible incongruity. 7.2.7 Delete expire dontracts The mask allows you to delete the expired contracts in a specified time interval. It is possible to delete only the filed contracts or only the contracts linked to a selected Broadcaster. 7.3 ERASE ARCHIVED HOUR POINTS It allows you to delete from the archive, in a particular period of time, all the hour points of the filed Tape Based Media. It is possible to specify on which area and for which Client make data deletion. 7.4 MOVE HOUR POINTS | UTILITY 78 ENG It allows you to modify an hour point, in a particular period, in a particular area, without calculating again all the hour points. If you settle a new hour point, it must be present in the Hour Points table of the specified area. 7.5 7.5.1 SETUP Aspect To give a new style to the visualization of the program select New Aspect from the menu, it will open the mask for the modification. It is possible to change the aspect of the interface of the program and it is possible to assign a name to every style. If styles different from the base style were already created, in the style field it will visualize the list with the names given by the user, selecting them it is possible to modify them. To create a new style insert the name you want to give it in the Style Name field and proceed with the modifications. It is possible to change the look of the Buttons, of hte Field Insertion, of the Compulsory Fields, of the Cells in the list, of the Labels and Windows. For every alement you can modify the Back Colour and the Font clicking the button . For the Cells it can redefine the borders style. Every modification will be visualized in the example fields. Once finished, clicking the OK button, it will assign to the wanted style all the modifications done. To escape from the mask, press ESC. The entered style will be not automatically applied, in order to do this you must select it from the Aspect menu. 7.5.2 Advertising It visualizes a window where you can set: 7.5.2.1 Archives It visualizes the list of the archives already created. It is useful to link more than one Ram-Comm archive so, when you calculate automatically the media of a programming, there are no chances to have two or more identical media on different broadcasters. To create new ones, double click on <New Archive>, it will show two fields to fill: Data File (name of the archive file) and Block File (name of the file where are recorded data in use to avoid making changes to the same subject, from more than one person at the same time). 7.5.2.2 Player It is possible to assign to every broadcaster inserted in Broadcaster table, a different software for the listening/visualization of the spots: to differentiate the settings, select the broadcaster and insert the data. The value inserted for <All broadcasters> will be valid for all broadcasters. Data set in General will be used by all computers, the ones set in Local will be used only by the computer where they are set. File Name Enter the file to use for audio playing during the schedule modification. Parameters | UTILITY 79 ENG * (it will use the program associated to Dj-Pro), otherwise %1 (name of the audio file you want to listen). Title Name of the program. 7.5.2.3 Backup Program Insert the launch line of the program used for the backup (eg. C:\PROGRAMMI\WINZIP\WINZIP32.EXE). Parameters Enter the parameters necessary to the software opening. If Winzip “-a -p”. Backup Folder Enter the folder where it will save data copies. 7.5.2.4 Bip Opening / Closing Enter the audio file names that contain the signal of connection and disconnection to the satellite in event of syndication. 7.5.2.5 Songs Gender Enter the gender of the songs to use and insert in some hour points (cluster) when in Hour Points Table is enabled “Song” but the “Gendre” field is empty. Break Jingle Enter the break jingle to use after the song. 7.5.2.6 Hardware key BLOCKS Indicate the software used for the control of the blocks, in order to prevent two users try to simultaneously edit the same contract or customer. Type: Select the software used for managing blocks (Communication Server) Waiting Time (sec): Maximum time to wait to send TCP/IP commands Lock port: The port number of TCP/IP communication PC Name/IP Address: Enter the name of the PC on which you installed the program that manages the blocks COMMUNICATION SERVER LICENSING Indicate the type of dongle being used: Local, Automation Server, Communication Server local If the key is a USB to select the "Enable USB" Communication Server Client Port: The TCP/IP communication port number for Waiting for Answer (ms): Maximum time to wait to send TCP/IP commands PC Name/IP Address: Enter the name of the PC on which the program is installed COMMUNICATION SERVER 7.5.2.7 Clients/Tables Automatic Code Enter if, during the insertion of a new client, it must assign automatically a code and, if yes, in which way (First Available, Last). Initial Letter Enter the letter you want to insert in the client code. If you don’t want it, don’t fill the field. Broadcasting Enter if consider the broadcasting as a Radio or as an Agency. In this way at the contract insertion there will be some additional fields for the amounts related to the radio. Automatic Code Tables Enter if, during the insertion of a new element, it must assign a code in Tables and, if so, in which way (First Available, Last). Amount on bill until Enter up to what amount can be billed. Bank Expenses Enter the mount of the Bank Expenses to charge in the invoice. Invoicing society Indicate the company with which you want to bill. Check Tax Code and VAT number If selected, it means that it must check the validity of Tax Code and VAT number. Amount for Area If selected it means that during the contract insertion, in the Commercials mask, it will suggest automatically to insert the amounts for every area. Insert contract if new client If selected, any time a new client will be inserted in Identifying, it will create a new contract with its name. Automatic author | UTILITY 80 ENG If selected, the Author field will always be filled automatically with date and time of the insertion and it will be not changeable. Compulsory VAT number or tax code If selected, in the client schedule it will be compulsory to insert the Tax Code or VAT Number. 7.5.2.8 Contracts Automatic Code Enter if, during the insertion of a new contract, it must automatically assign a code and, if yes, in which way (First Available, Last). Initial Letter Enter the letter you want to insert in the client code. If you don’t want it, don’t fill the field. Premium Type Enter the type of premium to be suggested automatically during the contract insertion. Of which (<nn> spot purchased of which <nn> premium) Plus (<nn> spot purchased, plus <nn> premium). Commission Enter the calculation type of the Agent’s commission. On invoices (the commission will be calculated on installments). On settlements (the commission will be calculated when the statement of account shows that the client paid). On invoice settled (the Agent will be paid when the whole invoice is settled). On settlements by bank receipts + 1 month (same as On settlements but if it is a Bank Receipt it waits the next month waiting for possible outstanding accounts). On invoice settled by bank receipt + 1 month (same as On invoice settled but, in event of a Bank Receipt it waits the next month waiting for possible outstanding accounts). Summaries with accepted commercials In the summaries of the contract it visualizes the number of passages of a programming, independently of the daily frequency, but based on the hour points actually charged. Agent from agency automatic If selected it shows that during the filling of the contract, the Agent associated with the client, in identifying, will be reported automatically. Head and tail: do not calculate number of spot If selected, in the management of Head and Tails, it will not calculate the number of spots in event of they are charged without inserting the price of the tail separated from the spot price. Show archived If Selected, archived contracts will appear anyway in contracts list. Maximum amount divided per area In case of standby spots, the maximum amount set in the contract will be set in the various areas. 7.5.2.9 Export Clients Usable only with PREMIUM PACK. It visualizes the list of the radio already created. To insert new ones double click on <New Radio>, it will show two fields to be filled. Broadcaster Name Enter the name of the radio where data are addressed. INI File Enter the name of the INI file to be used. 7.5.2.10 Export Contracts Usable only with PREMIUM PACK. Export Type Indicate if the export must be executed with Same Amounts, Broad. Agency in Amount Radio (that is the Agency considered as Broadcaster) or No amount. It visualizes the list of the already created broadcasters with the following fields: Broadcaster Name of the broadcaster inserted in the table. Radio Station Enter the code of the corresponding Broadcaster (usually 0). Broadcaster Name Enter the name of the radio where data are addressed. Area Name of the area of the broadcaster. Radio Station Code Assign to every area the corresponding code. 7.5.2.11 Amounts Rounding Enter the rounding to apply to the amounts (0 – 0,01 – 0,001 ..) Rounding Type | UTILITY 81 ENG Enter if the rounding must be Normal, Always round up, Always round Down. Discount decimal Enter how many decimals must be considered in Discount field. VAT Rounding Enter what type of VAT rounding must be applied, if Normal, Always Round Up, Always Round Down. Currency Enter what type of currency must be applied by default. Commercial price decimal Enter how many decimals must be considered in the field Spot Price. VAT decimal Enter the rounding to be applied on the VAT amounts (0 - 0.01 to 0.001 ..) 7.5.2.12 Invio Dati Do not insert break jingle with one commercial only If selected shows that the areas with hour points filled with only one spot must have the Break jingle. Divide product categories If selected, the spots belonging to the same product category will be separated by a spot, if possible. Rotates Priority If selected shows that the spots with the same priority must rotate, so that if you have more spots with priority 1 every day the first one will be different. Executes Optimizer If selected shows that, after Data Transmission, it must execute the optimizer of the areas. Filling areas without commercials If selected, the optimizer filling must be executed even in the hour points without spot. Add extra information If selected, it adds information related to the certification. Closing Jingle before filler If selected shows that the Close Jingle of the commercial cluster must be inserted before the fillers. Backup If selected, every time you make a data transmission, it will execute a backup of the previous one. Export plannings without support If selected, in data transmission file, it will insert also the programming without support. Divide voices If selected, it separates spots with the same voice Do not send quotes If selected, it will not send quotes inside the exported playlist file. Length Enter the extension time of the last filler. Description Enter the description of the extension. Exclude Area Select the areas to exclude from the extension. File Send E-Mail Enter the path where to find the file that must be sent by e-mail during data transmission. 7.5.2.13 Automatic hour points Filling Check Select the check type to do during the programming to fill the Hour Points. If it Never must be done, if it must fill the HourPoints Good or if it must fill the Hour-Points more empty. Rotate hour points on previous days If selected, it will try to rotate the spots moving from the previous day Automatic Move If selected, in programming it creates automatically another valid hour point, in event of the one coming out from the rotation would not satisfy the entered criterion. Insert with Groups If selected, during the insertion of the programming with automatic hour points, it will suggest as first choice the insertion by groups instead of by advertising bands. Hour points move type Enter what type of hour point movement must be applied. If Maximum gap from other hour points (it will choose the furthest hour point from the selected ones trying to keep the same distance among the hours) or if nearest rotation hour point (it will choose the first available hour point). Filling gap If two advertising cluster have a spot number difference higher than the set one, the cluster with more spot will be removed from the rotation. Filling gap (sec) If two advertising cluster have a length difference higher than the set one (usually 20”), the cluster with the highest length will bre removed from the rotation. Same length if <= | UTILITY 82 ENG Two cluster with length difference lower than the set one (usually 15”/20”), they will be considered as if they had the same length. Filling type Enter the filling type to be done during the choice of the hour points. If Number of commercials (it must not exceed a given number of spots), length per hour point (it must not exceed a particular length) or Number of commercials + Length per hour (it must not exceed number of spot and <nn> minutes per hour). The maximum values are taken from the Hour point table. Exceeding maximum settings Indicate if it is possible to exceed the maximum settings (Max Length and Max spot indicated in Hour Table) and in which way. Yes (it always exceed), Never (it never exceed), Only if necessary (it exceed only if there are no other hour points that satisfy the settings) Only if necessary length (it exceed only of there are no other hour points that don’t exceed the maximum length). Filling type in respect to maximum settings If selected, the filling type previously established will be calculated in respect to the maximum settings (maximum values – present values). If selected, it works on the free time, otherwise on the busy time. Field not selectable if in “Filling type” was selected “Number of Commercials + Length per Hour”. Check audio conflicts Indicate if make the audio conflicts check (Never, Always, Only if necessary). The check will be done on the name of the media. Check product category conflicts Indicate if make the check for the conflicts among the product categories (Never, Always, Only if necessary). Check client conflicts Indicate if make the check for the conflicts among the clients (Never, Always, Only if necessary). Lower than rotation seek another one If selected, in event of the found hour point is too near (lower than the rotation) it will search another one. 7.5.2.14 Orari automatici beta Here you can activate the algorithm of rotation for ALL BROADCASTINGS or for individual stations with the chance to give different rules for each station. To enable these rotation rules, click ENABLE turning the check box into GREEN. WARNING: WHEN YOU ENABLE THIS ALGORITHM YOU AUTOMATICALLY DISABLE "AUTOMATIC HOUR POINTS" (leave enabled Automatic Hour Points anyway or the F9 key on schedulings will appear disabled) It is possible at any time to return to the old rules of programming, bringing the ENABLE button in RED colour (disabled). In this algorithm, are available 7 different types of conflict/rules that assign a VALUE according to the importance of every rule. Here is the list of available rules: Adjacency conflict weight = The same spot into two consecutive hour points Previous day conflict weight = The same spot on the same hour point for two consecutive days Product category conflict weight = The same product category many times on the same hour point Client conflict weight = The same client many times on the same hour point Duration overshoot conflict weight =Exceed the maximum length set for that hour point Spots number overshoot conflict weight = Exceed the maximum spot number set for that hour point Delta rotation = Maximum distance from the roatation step set on Tables – Rotation on the single rotation set (image 1) Delta adjacent points = Minimum distance (expressed in hour points) to be kept between a passage and the next. NOTE: Delta Adjacent Points must be higher than Delta Rotation Image 1 The Rotation Step is the movement, expressed in hour points, that the spot will make from a day to another (in absence of conflicts). Example: In our station we created the following hour points: 10.00 10.15 10.30 10.45 If today we schedule a spot at 10.00 using a rotation with step 3, in absence of conflicts, our spot the day after will be scheduled moving of 3 “steps”, that is at 10.45. The set values go from 0 to 10 where 0 = no importance and 10 = very important. There also is the UNBREAKABLE value that means that the rule will never be broken. | UTILITY 83 ENG The sum of all the values set will give the maximum “score” to be assigned to every hour point, this score will be deducted of the value of every broken rule every time that a hour point will not respect the rule itself. Example: On our station we gave the following values to the rules (image2) The sum of all these values is 34 (Delta Rotation and Delta adjacent points are not a “score”, but a value itself and 2 means that the maximum movement from the rotation step is of 2 hour points) that is the “maximum score” that can be scored by a hour point. If the inserion of a spot in a hour point will not break any rule, this hour point will have a score of 34. If a hour point does not respect one or more rules, it will subtract the score equal to the sum of all the broken rules. If on our example a hour point has a product conflict and a previous day conflict, the hour point will have a score of 22 (that is 34 – 12 where 12 is the sum of the values of the two conflicts whose value is 6 each). In the choice of times where to place the spot, it will always privilege hour points with a higher score. ROTATIONS SCHEME When you are planning to recalculate hour points (for example, if you change the product category), you can view a schematic distribution of the spots in the first 100 days of scheduling, so that we can check if the rotation meets our expectations. To view the scheme, just recalculate the hour points of scheduling (for example, changing the product category) and by checking "Show hour points distribution (100 days max)" (image 3) Image 3 Once confirmed, you will see the scheme as Image 4: Image 4 | UTILITY 84 ENG Image 5 (detail) How to read the information At the top of the screen you can see the scheme with the hour points sorted by COLUMNS, useful for checking how often a spot is scheduled on the same time point (image 6). Image 6 | UTILITY 85 ENG At the bottom of the screen there is a detail of the distribution of the spots with the hour points now sorted by ROWS, useful to check the distribution of the spots in the day (image 7) | UTILITY 86 ENG Image 7 Points highlighted in RED are now NOT ENABLED to the scheduling of that spot for several reasons (day not enabled for that hour point, advertising clock not included in the scheduling, spot type not enabled at that hour point) or hour points with a score of less than 1/2 of the maximum score. Items in RED are now largely excluded from the planning. The hour points in LIGHT GREEN are those who "break" some rule, and then have a lower score (total score minus che score of rule broken) Finally, the points now in DARK GREEN are those "perfect score", that do not break any rules. Next to the hour points there are some letters to indicate which rules are not observed at that particular hour point. This helps the programmer to understand why the spot has not been scheduled at this particular hour point. Here is the key of the letters: (T) spot type, for example. radio sales, sponsorship, etc. (S) outside advertising clock (E) time not enabled on that day (G) product category conflict (C) client conflict (A) adjacency conflict (P) previous day conflict (N) spots number overshoot conflict (D) duration overshoot conflict 7.5.2.15 Schedule Max commercials per schedule List where select the maximum number of commercials to be visualized during schedule modification, when you set the single area. Max. Column Width Maximum width of the spot columns visualized during the schedule modification. The size is shown in Pixel. View schedule Default view when opening a schedule File name for certification Name of the file to read for the certification of the broadcasted spots. Consider break jingle in the lengths If selected, in the schedule visualization, in the cluster length it will also consider the “Break Jingle”. Show also hour points not enabled in previous days If selected, in the visualization of the previous days in the schedule, it will show also the hour points not enabled in hour points table. Modifying hour-points changes programming card | UTILITY 87 ENG If selected, when in the schedule you move a spot, the programming hour points will be updated in order to update also the hour point print. Inserting hour-points changes clients hour points Same as Modifying but in Insertion. Deleting hour-points changes programming card Same as Modifying but in Deletion. Modifies ignoring priorities If selected, it allows you to move all the spots ignoring the order imposed by the priorities. PRINT: main area merging with splits If selected, the spot charged on an area, with card = 00 and channel = 0, will be printed as if they were charged on every area. MODIFY: main area merging with splits Same as PRINT but in visualization. Show only areas with export type If selected, you will only see areas that are matched to a export type Modifying fixed hours changes all period If selected, if on the schedule you move a spot with a fixed hour points, the movement will be carried out throughout the scheduling period of the spot from the day in question until the end of scheduling (on request confirmation). Insert/move spot checks start and end hour If selected, when you move or insert a spot, it checks whether the inclusion or shifti s included between start and end time as set on the scheduling. PRINT Weekly schedules with summaries If selected, the weekly program printout of the schedule will include a summary table of the commercials broadcasted during the period for each customer. MODIFY: playlist visualizes premiums If selected, the commercials scheduled or inserted as premium will be shown with the keys #O# MODIFY: insert spor always ask if premiums If selected, each time you insert manually a spot in the schedule, you will be asked if you want calculate it as a gift or not. Insert/move spot checks spot type If selected, when entering or moving, it will check if the spot type of the hour point is now compatible with the spot type scheduled for that subject. Enable trash management If selected, adds a button to the schedule view: When you delete a spot in the schedule, it is inserted in a list displayed by pressing the button. If you want to re-schedule a spot previously deleted, select it from the list and press F10. MODIFY: Hide length If selected, the schedule will not display durations of individual spots. Use for broadcaster If selected, the stations will be handled through the broadcasters created in tables - Broadcasters EDIT PLAYLIST: All areas visualizes length area If selected, on the display of the multi-area of the playlist, it will always display in the upper left the longest area and its duration. 7.5.2.16 Programming periods Start Time Enter the predefined start hour of the programming that will be suggested in the mask programming -> General Data. End Time Enter the predefined end hour of the programming that will be suggested in the mask Programming -> General Data. Max. Spots in one hour Enter the maximum length of the spots for every hour, allowed by law. Max spot per Hour Point Enter the maximum number of spot that can be programmed for every hour point. If they are not inserted in the hour table, this will be the considered value. Max length per Hour Point Enter the maximum length, predefined, of every hour point. If they are not inserted in the hour point table, this will be the considered length. Selection fixed times Enter if No, Day Of The Week, Date. If in the hour point insertion, in Programming, the rotation is set to “Fixed” and in the Hour Table was excluded a day, selecting: “Day of the Week”: it will suggest a list with the selectable hour points as replacement for the one that can’t be broadcasted. “date”: every not enabled day you must choose another one, for the whole entered period. Hour points rotation type Select the rotation type that will be suggested automatically during the programming. Enabled days Select the days of the week that must appear enabled when you open the programming mask. | UTILITY 88 ENG Print programming order without price If selected, in the print of the Programming Order it will not show the amounts. Copy also hour points If selected, with the copy of the programming period, it will also copy the hour points. Enable fake hour points If selected, during the automatic calculation of the hour points (with setting “not exceed maximum settings”) if all clusters are full, it will however report all the hour points. This is to know how many spots were programmed originally. Check overshooting and conflicts with confirmation. If selected it indicates that the overshooting check of the maximum settings and the possible conflicts (category, client) must be executed giving a confirmation. Check overshooting and conflicts If selected it indicates that the overshooting check of the maximum settings and the possible conflicts (category, client) must be executed automatically with the programming confirmation. Instant media check If selected, during the programming (Programming -> General Data) when it changes the media it checks immediately if it was already charged. Copy from other contract: ask for copy medium If selected, copying the programming from another contract, it will ask if you want to copy also the audio file and, in that event, it will be associated to another name. Campaign – Medium – Typology from table If selected, for these 3 fields in the mask programming -> General Data it will be possible to choose data among all the data inserted in the respective tables and not only the ones charged in the mask Agents + Amounts. Compulsory Spot Type If selected, in the spot programming, the field Spot Type will become compulsory. Compulsory Length If selected, in spot programming, the field Length becomes compulsory. 7.5.2.17 Post Processor It is useful to connect with other playout different from DjPro, Soundtrack and Digibroadcast. Type None, Generates file .DBF, Generates file .AEV 7.5.2.18 Promo Maximum number of promos per Hour Point Enter the maximum number of Promos that you can insert in Opening or Closing the Hour Points. If both fields are set as zero, in the programming insertion form, the values of the priority will be included between 1 and 9; otherwise there will also be 10 positions for the opening (A1-A10) and 10 for the closing (C1-C10). Promos like advertising Indicate if the Promos must be considered as advertising in the count of the hour point rotation and so if they must be calculated in the check of the length or spot number. 7.5.2.19 Installments Broadcast Calculation Indicate if the count of the spot on consumed must be done on programmed or accepted. Number Of Days Per Instal. On Consumption Enter the number of Days for the count of the Installments On Consumption (Using the count INSTALLMENTS CONSUMPTION nn DD). Installment Type Select the predefined installment type that will be suggested during the insertion. Monthly Installments WITH EXPENSES If selected, the monthly installments will include also the expenses. Installments End Month If selected, the installments will be at the end of the month, otherwise they will be based on the Start Date. Recalculation Installments with no confirmation required If selected, it makes the count of the installments without asking for confirmation. INSTALLMENT ON CONSUMPTION without premium If selected, the Premium must not be considered in the count of the installments. Show installments without amounts If selected, it will visualize also the installments without amounts. ON CONSUMPTION round amounts on contract If selected, when the count of the installments is on consumption, in the contract it will around the amounts in event of a spot price particularly fractioned. 7.5.2.20 Recording It is possible to assign to every broadcaster inserted in the Broadcaster table, a different software for spot recording: to differentiate the settings, select the broadcaster and insert the data. The values inserted for <All broadcasters> will be valid for all the broadcasters. | UTILITY 89 ENG Data entered in General will be used by every computer, the ones inserted in Local will be used only by the computer where they are set. File Name Enter the file to be used for the audio recording during the programming. Parameters * (it will use the program associated to DjPro), otherwise %1 (name of the audio file you want to listen). Title Name of the program. Program check file on FTP Enter the name of the software used for data verification on ftp site. 7.5.2.21 Print Predefined settings for Preview and print with Heading. Waiting Enter the waiting seconds between a print and the following one; field used usually for printing the invoices on computer particularly slow on printing. WinFax: Cover File Enter the file to be used as Cover for fax sending. File Private Communication Path Enter the folder where Ram-Comm will save the pdf files created by printing with “private communication”. Preview If selected, it will display a print preview, instead of sending the data directly to the printer. Heading If selected, i twill insert on the print the header previously set. 7.5.2.22 Stand By Settings used when in the Typology table was also inserted the value “Stand By” (Typology with Filling field enabled). Filling Type Enter the filling type to be used in the area where the “Stand By” is programmed. Length of the longest area: it takes as reference the area with the longest length. Length of the longest area (A)+ Max. length Hour-Points (B): If A is higher than B it considers B, otherwise it considers A. Length first area: the reference will be the length of the main area. Length of the longest Area (A)+ Max. Length Hour-Points (B): If A is higher than B it considers B, otherwise it considers A. Max. Length Hour-Points: the reference is always the maximum length set in the Hour-Points table. Filling areas without commercials If selected, it will be used as optimizer. Automatic Execution If selected, the first time you enter in Schedule Modifying of a particular day, the Stand by spots will be inserted automatically. Check audio conflicts Enter if make the check for audio conflicts (Never, Always, Only If Necessary). The check will be done on the media name to see if there are conflicts. Check product category conflicts Enter if make the check for the conflicts among the product categories (Never, Always, Only if necessary). Check client conflicts Enter if make the control for the conflicts among the clients (Never, Always, Only If Necessary). Main area Select the area that will be used to calculate the maximum reference length. 7.5.2.23 Media Medium It is possible to indicate in which way the name of the media will be assigned. If you don’t make any specific choice the field will be empty. Selecting the Client Code the name assigned will be “Client code-<progressive number> (eg. For the first medium of the client with code 3 it will be “3-1”). Selecting Contract Code the name assigned will be “Contract code<progressive number> (eg. For the first medium of the contract 518 it will be “518-1”). Import Media Ram-Comm, Advertising (Jingle), Advertising. It is useful to connect other automations. Radio automation archives Enter where the automation archives are. Medium in automatic If selected, the medium name will be assigned automatically. If in the Medium item you didn’t make any choice, the medium name will be a progressive number. Media with different extension Selecting this option, in the media insertion mask, it will show 2 additional fields, path and extension, that allows you to select media with different path and extension. Hide Exclude Hour Points | UTILITY 90 ENG If selected, in the mask Programming -> Media, it will not visualize the option that allows you to exclude some hour points from the programming. Manual Import Path Enter the predefined folder for the manual selection of the file during the programming insertion. 7.5.3 Invoicing 7.5.3.1 Installments description During the Automatic invoicing it will use the items here indicated. The information preceded by the % symbol will be preserved. 7.5.3.2 Export Export Type None, Team System, Piccadilly, Spiga Pc III, Esatto2000. Export File Enter the destination file of the data to be exported. Block Expo. Items If selected, once you export the invoices, they can be blocked with F9 button, so you can’t export them again. Additional Description Field valid only with Export Type “Piccadilly”. Company Code Field valid only with Export Type “Piccadilly”. Offset means Field valid only with Export Type “Spiga Pc III”. 7.5.3.3 Statement of account Statement Of Account If selected, in the mask of visualization of definitive invoices, it will show also the Statement of Account button. Cash Orders not settled If selected, in the Statement of Account, the Cash Orders will be considered as not paid and you must insert manually the executed payment. 7.5.3.4 Invoices VAT on expenses It is possible to select which rate associate to the expenses. Data suggested are taken from the VAT table. VAT expenses Art.15 It is possible to select which rate associate to the expenses subject to Art. 15. Data suggested are taken from VAT table. Offset Expenses It is possible to select the Offset to associate to the expenses. Data suggested are taken from the Offset table. Offset Invoice It is possible to select the Offset to associate with the invoice. Data suggested are taken from the Offset table. Total Material If selected, in the prints, at the bottom of the invoice, it will group the expenses in a single item. Amounts without decimal If selected, all the amounts will be shown without decimals. Invoice even promo If selected, it will insert in the invoice also the Promo. Package Without Amounts If selected, in the print, for example, of the package contracts, it will not show the single amounts, but a total amount and the wording FORFAIT. Deleting Bill Delete Reference To Contract. If selected, deleting a definitive invoice, it will delete also the references inside the contract (Section Installments). Fix Right Enter the predefined amount to charge for the invoice issue. 7.5.3.5 Automatic Invoices Spot Cost Select among the following items the one to associate to the Spot Costs during the automatic invoicing. Advertising Advance, Deposit, VAT on expenses, Radio Advertising, Spot Realization (changeable in ITEMS table). Operating Cost Select among the following items the one to associate to the Operating Costs during the automatic invoicing. Advertising Advance, Deposit, VAT on expenses, Radio Advertising, Spot Realization (changeable in ITEMS table). Advance Select among the following items the one to associate to the Advance during the automatic invoicing. Advertising Advance, Deposit, VAT on expenses, Radio Advertising, Spot Realization (changeable in ITEMS table). Deposit | UTILITY 91 ENG Select among the following items the one to associate to the Deposit during the automatic invoicing. Advertising Advance, Deposit, VAT on expenses, Radio Advertising, Spot Realization (changeable in ITEMS table). Installment Description Select among the following items the one to associate to the Installment Description during the automatic invoicing. Advertising Advance, Deposit, VAT on expenses, Radio Advertising, Spot Realization (changeable in ITEMS table). Replace the following notes with the campaign When in the description you will find the entered notes, these will be substituted from the campaign assigned to the programming period. Terms If selected it inserts the contract terms. Enter Discount If selected it inserts the percentage of discount of the contract. Enter Commission copy If selected, it will show the number of Commission Copy of the contract. Do not enter network name if unique If selected, in event of a single network, it will not show the name. Subdivide material with Tape Based Media If selected, during invoices generation, in event or more than one Tape Based Media, it will insert a line for every Tape Based Media. Nickname Select the box if you want to have in the invoice also the Nickname of the contract. % Agency Select the box if you want to have in the invoice also the Agency percentage. Tape without additional descriptions If selected, in the invoice it will insert the item or Tape Based Media realization, but without additional descriptions. Insert date of contract’s stipulation Select the box if you want to have in the invoice also the stipulation date of the contract. Boxer insert expenses Select the box if you want to insert in the invoice also the expenses related with Tape Based Media. 7.5.3.6 Installments on consumption Subject If selected, it will also show the spot name. Installments notes If selected, it will print also the rates on the installments. Spot price If selected, it will show the price of the single spot. Number of spots per day If selected, it will show the daily frequency of the spots. Transmitted spots number If selected, it will show the total number of the broadcasted spots. Premium If selected, in the description (installments on consumption), it will insert also the premium spots. Invoicing for Buyer If selected, the invoices will be addressed to the buyer, if it was inserted in Identifying Clients or Contracts. Management expenses on invoice If selected, the management expenses will be charged on every invoice issued for that contract. Week days on-air If selected, in the invoice it will insert also the days of the week when the spot were broadcasted (mon,..., sun). Number of days in the period If selected, in the invoice it will show the number of programming days in the period. Enter type of time rotation If selected, in the invoice it will show the type of time rotation applied. Charge expenses on cash orders If selected, in event of payment with Cash Order, it will even charge the bank expenses (Setup Advertising -> Clients) for the number of Cash Orders to issue, otherwise it will do it only if in the Contract or in Client was enabled the Expenses field. Subdivide according to price If selected, in event of a contract with more than one price, in the automatic invoicing it will create a line for every price. Subdivide according to length If selected, in the invoice it will use as Measure Unit the length of the broadcasted commercials. Spot broadcasted in quantity If selected it will show the broadcasted commercials number. Subdivide by quantity If selected, during automatic invoicing, data will be divided by quantity. Typology in length If selected and the spot typology should be, for example 30”, the spot will be considered as 30”. | UTILITY 92 ENG Quantity sum If selected, the quantity of the various programmings will be summed. Eg: Prog. A 10 spot 10 € Prog. B 10 spot 20 € In invoice it will write Prog. A 20 spot 30 € Prog. B Subdivide by Enter in which way the programmings must be grouped. Broadcasting Broadcasters Campaign Typology Spot type 7.5.3.7 Monthly instalments Period in monthly installments If selected, in the invoice it will report as reference the Start and End Date of the period set during the automatic creation of the invoices. Monthly installments as consumption If selected, the monthly installments will be treated, in the description, as on consumption. Description Enter the description you want to print in the presence of monthly installments. 7.5.3.8 Cash Order Do not print cash orders already printed If selected, once you printed the cash orders they can be blocked with the F9 button in order not to print them anymore. Contra Enter the contra that will be useful for the connection with other accounting software. 7.5.4 Optimizer The mask allows you to set the music filling to insert before or after the advertising broadcast. Clicking the PRINT button, it will print the list of the fillers. Clicking the UPDATES DATA (F8) button it will update the inserted data (Length, Mark in, Mark Out, File Name) Clicking the DELETE button it will delete the filler where you are positioned. Clicking the EXIT button you escape from the mask. Clicking the INCLUSION button it will show the mask that allows the insertion of a new filler. The modification will be executed by double clicking with the left key of the mouse on the selected element or pressing ENTER after highlighting it. The insertion mask allows you to choose the filler to be used (eg. Bases, Song, Voice Over, Jingles, News Bulletins, Programs, Initials). | UTILITY 93 ENG Cut Enter the minimum point where it is possible to cut the song. The audio will be broadcasted at least until the value inserted in this field. Start Time – End Time Enter the hour band when this filler can be used. Days of the week Select the days of the week when the filler can be used. Filling Enter if the filler must be broadcasted before or after the commercials. Rotation Enter the rotation type of the filler (None, Random, Last passage, Last Random Passage). Without repetition It is possible to choose among these options: - Without repetitions The same audio file can’t be broadcasted at the same time on more than one split. - Same audio on the areas For all the splits it will use the same audio file. - Same audio on the areas without spot It will choose the same audio files for all the areas that have no programmed spots. Execute if difference > The filling of the areas without spot will be done if the length difference among the areas will be more than the value inserted in this field. Closing Jingle Indicate if insert a Closing Jingle after the filler. Append file If selected, the file content will be added to data transmission. With start If selected, it uses the start to broadcast the filler. Area It is possible to differentiate the fillers for every area. If they are inserted keeping the field empty, the filler will be usable by all the splits, on the contrary, choosing a specific area, the filler inserted will be valid only for that area. 7.5.5 Jingle The mask allows you to create various hour bands, in different periods and in different days of the week, by indicating: Opening jingle (Indicate if it must go before or after the Promos). Break jingle between two spots. Closing jingle (indicate if it must go before or after the Promos). Clicking the DELETE JINGLE button you delete the band where you are positioned. Clicking the CANCEL button you escape from the mask. The modification and insertion will be executed by double click with the left key of the mouse on the selected element, or on an empty line, or pressing the ENTER key after highlighting it. In the jingle setup it is possible to decide: Start date – End date | UTILITY 94 ENG Enter the period when the jingle can be used. Start Time – End Time Enter the hour band when the jingle can be used. Days of the week Select the days of the week when the jingle can be used, always inside the period. Opening Type Select the opening type, if After PROMO, Before PROMO, None with PROMO. Break Type Select the break type, if Also with PROMO or None with PROMO. Closing Type Select the closing type, if After PROMO, Before PROMO or None with PROMO. < New Jingle> Double click on the writing to insert a new jingle. It is possible to select an already existing one or create new ones. In the second event enter the name of the new jingle and select, if wanted, the hour points when it must not be used. Type Spot as Promo Select the type spot (created in the table Type Spot) which must be considered by Ram-Comm as Promo in the jingles management. Opening jingle also areas without spot If selected, the jingle will be used also in the areas without programmed spots. Closing jingle also areas without spot If selected, the jingle will be used also in the areas without programmed spots. Audio empty clusters If selected, in the empty hour points it will add this audio. Field shown only if “Opening jingle also without spot” is selected. Clicking the DELETE button it deletes the jingle where you are positioned. 7.6 MAINTENANCE It deletes definitely data not used anymore. We suggest you to use periodically this function after making backup copies (once a week). 7.7 REPAIR With this function it is possible to repair and try to recover data from ruined files. Select the archives that you think ruined and click OK; when Ram-Comm end the operation press ESC, close the software and run it again to control the effective data restore. 7.8 INFORMATION It visualizes information about the name of the application, the version and copyright. 7.9 PROGRAM CONTROL The Program Control section is used to enable the hardware key of the client, to new functions or new users. The Code must be communicated to the assistance that will communicate an Enabling Code to be inserted in the field. Click OK to confirm the inserted data. Close the software and run it again to check the real update of the key. 7.10 COPY ARCHIVE It makes a copy of the archives. It will be possible to see the content by the item Identifying -> Company. It is used at the start of a new year to do the cleaning of the expired contracts. 7.11 DOWNLOAD UPDATES If your computer is connected to internet you can download the latest version of the software. 7.12 EXIT | UTILITY 95 ENG 8 FINAL CONSIDERATION AND CONTACTS ________________________________________________________________________________________________ ________________________________________________________________________________________________ ________________________________________________________________________________________________ ________________________________________________________________________________________________ ________________________________________________________________________________________________ ________________________________________________________________________________________________ ________________________________________________________________________________________________ ________________________________________________________________________________________________ ________________________________________________________________________________________________ ________________________________________________________________________________________________ ________________________________________________________________________________________________ ________________________________________________________________________________________________ ________________________________________________________________________________________________ ________________________________________________________________________________________________ ________________________________________________________________________________________________ ________________________________________________________________________________________________ ________________________________________________________________________________________________ ________________________________________________________________________________________________ ________________________________________________________________________________________________ ________________________________________________________________________________________________ ________________________________________________________________________________________________ ________________________________________________________________________________________________ ________________________________________________________________________________________________ ________________________________________________________________________________________________ ________________________________________________________________________________________________ ________________________________________________________________________________________________ ________________________________________________________________________________________________ ________________________________________________________________________________________________ ________________________________________________________________________________________________ ________________________________________________________________________________________________ ________________________________________________________________________________________________ ________________________________________________________________________________________________ ________________________________________________________________________________________________ ________________________________________________________________________________________________ ________________________________________________________________________________________________ ________________________________________________________________________________________________ ________________________________________________________________________________________________ ________________________________________________________________________________________________ Main Office BOLOGNA: Via Caduti Di Sabbiuno 6/F 40011 Anzola Emilia - Bologna - Italy Tel. +39 051 736555 - Fax. +39 051 736170 Per informazioni tecniche o supporto [email protected] Per informazioni generali e Ufficio vendite [email protected] www.axeltechnology.com | FINAL CONSIDERATION AND CONTACTS 96