1
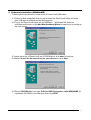
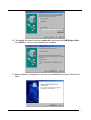
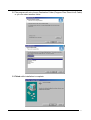
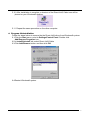
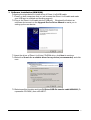
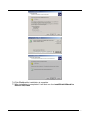
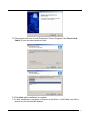
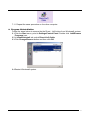
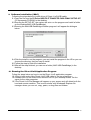
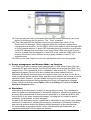
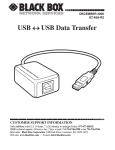
User’s Manual
Direct-LinQ : USB File Transfer Cable
1. Introduction
Congratulations on your purchase of the Direct-LinQ, an USB file transfer cable. This
unique cable allows you to easily connect two computers with USB port and instantly
transfer files at great speed. The Direct -LinQ USB cable is your fast solution for
peer-to-peer file transfer between two computers via the USB port. The cable provides
true plug-and-play capability while transferring files at much greater speed than
traditional file transfer products via serial or parallel port, up to 6M bits/sec can be
achieved.
Direct -LinQ application program, a Windows® Explorer-like user interface, provides
drag-and-drop user-friendly interface to transfer files. You simply plug in the Direct
-LinQ cable and install the application software into your PC.
2. Package Content
?? Hardware: Direct -LinQ USB file transfer cable
?? Software: Direct -LinQ driver software on CD
?? Quick User’s Guide
3. Product Features
?? USB specification revision 1.1 compliant
?? Single cable solution for files transfer, High-speed data transfer rate up to 6M bits
per second
?? Drag-and-drop user-friendly interface. Includes print function for remote files,
power management and remote wake-up functions
4. System Requirements
PC
?? IBM® PC 486DX4-100 MHz or higher or compatible system
?? Available USB port
?? CD-ROM drive
?? Windows® 95 OSR2.1, Windows® 98, Windows® ME, Windows® 2000
MAC
?? Power PC G3, G4, or i-Mac
?? Available USB port
?? CD-ROM drive
?? Mac O/S 8.6 or higher
USB FILE TRANSFER CABLE USER’S MANUAL
1
5. Software Installation (WIN98&ME)
Following the steps below to install driver of Direct-LinQ USB cable:
5.1 Power on both computers that you will connect the Direct-LinQ cable and make
sure USB port is enabled and working properly.
5.2 Plug in the Direct-LinQ cable into the USB port. Windows® will detect an
unknown device and run the Add New Hardware Wizard to assist you in setting up
the new device.
5.3 Insert the driver of Direct-LinQ into CD-ROM drive, click Next to continue.
5.4 Select Search for the best driver for your device and click Next
5.5 Select CD-ROM drive and type D:\Driver\USB file transfer cable\WIN98&ME (D:
represents CD-ROM) in the dialogue, then click NEXT
USB FILE TRANSFER CABLE USER’S MANUAL
2
5.6 Windows® will detect the driver (usbbc.inf) and shows the USB Bridge Cable
Click NEXT to continue until installation is complete.
5.7 After installation is completed. It will auto run InstallShield Wizard for Direct-LinQ
Cable
USB FILE TRANSFER CABLE USER’S MANUAL
3
5.8 The program will auto choose Destination Folder (Program Files\ Direct-LinQ Cable)
or you can select another folder.
5.9 Finish while installation is complete.
USB FILE TRANSFER CABLE USER’S MANUAL
4
5.10 After installation is complete, a shortcut of the Direct-LinQ Cable icon will be
placed on your Windows® desktop.
5.11 Repeat the same procedure on the other computer.
6. Program Uninstallation
Follow the steps below to remove the the Direct-LinQ driver from Windows® system:
6.1 Click the Start menu, point to Settings\Control Panel. Double click
Add/Remove Programs icon.
6.2 In Install/Uninstall tab, select Direct-LinQ Cable
6.3 Click Add/Remove button and then click OK.
6.4 Restart Windows® system.
USB FILE TRANSFER CABLE USER’S MANUAL
5
7. Software Installation (WIN 2000)
Following the steps below to install driver of Direct -LinQ USB cable:
7.1 Power on both computers that you will connect the Direct -LinQ cable and make
sure USB port is enabled and working properly.
7.2 Plug in the Direct -LinQ cable into the USB port. Windows® will detect an
unknown device and run the Upgrade Device Driver Wizard to assist you in
setting up the new device.
7.3 Insert the driver of Direct -LinQ into CD-ROM drive, click Next to continue.
7.4 Select the Search for a suitable driver for my device (recommended) and click
next.
7.5 Select specified location and type D:\Driver\USB file transfer cable\WIN2000 (D:
represents CD-ROM.) then click NEXT.
USB FILE TRANSFER CABLE USER’S MANUAL
6
7.6 Click Finish while installation is complete.
7.7 After installation is completed. It will auto run the InstallShield Wizard for
Direct-LinQ Cable
USB FILE TRANSFER CABLE USER’S MANUAL
7
7.8 The program will auto choose Destination Folder (Program Files\ Direct-LinQ
Cable) or you can select another folder.
7.9 Click Next while installation is complete.
7.10 After installation is complete, a shortcut of the Direct –LinQ Cable icon will be
placed on your Windows® desktop.
USB FILE TRANSFER CABLE USER’S MANUAL
8
7.11 Repeat the same procedure on the other computer.
8. Program Uninstallation
Follow the steps below to remove the the Direct - LinQ driver from Windows® system:
8.1 Click the Start menu, point to Settings\Control Panel. Double click Add/Remove
Programs icon.
8.2 In Install/Uninstall tab, select Direct-LinQ Cable
8.3 Click Change/Remove button and then click OK.
8.4 Restart Windows® system.
USB FILE TRANSFER CABLE USER’S MANUAL
9
9. Software Installation ( MAC)
Following the steps below to install driver of Direct -LinQ USB cable:
9.1 Copy the file from the D:\Driver\USB FILE TRANSFER CABLE \MAC\SETUP.SIT
(D: represents CD-ROM) to the desktop.
9.2 Running the SETUP.SIT, the system will auto run the program and install a folder
on the desktop(MAC USB DataBridge)
9.3 Running the MacUSB DataBridge Installer program it will appear the dialogue
below
9.4 Click the install to run the program, you can install the program in the HD or you can
choose the directory that you want to install
9.5 Follow the step to finish the installation
9.6 After all the step finished, you can see a folder (MAC USB DataBridge) in the
desktop
10. Running the Direct-LinQ Application Program
Follow the steps below on how to run the Direct -LinQ application program:
10.1 Plug in both ends of the Direct -LinQ USB cable to the two computers.
10.2 Double-click on the Direct-LinQ shortcut icon on your desktop screen. Do the
same for the other computer.
10.3 The Direct-LinQ File Manager will appear on your screen and will detect both the
local and remote machine. This is much similar with Windows® Explorer file
manager where you can cut, copy, paste, or drag files and folders.
USB FILE TRANSFER CABLE USER’S MANUAL
10
10.4 You can also print text or document files from the remote machine to your local
printer by clicking on the file and run “File”, “Print” command.
10.5 There are two LED-like indicators found on the bottom-right corner of the
Direct-LinQ File Manager. These indicators show the connection status of the
remote and local machine. The left LED is for the local machine, while the right LED
is for the remote machine. A green LED indicates that the connection is good while
a red LED indicates that connection is not found. Both LEDs need to be in green
color for a proper link and operation. If one LED is red, either the USB cable is not
properly connected, or the software is not properly installed, or the PC is in
suspend mode.
10.6 Click on the Help Topics icon for more information how to use the program.
11. Power management and Remote Wake -up Function
The Direct-LinQ cable supports power management of USB. When either of the two
connected PC gets into suspend, the Direct-LinQ cable will draw less than 500 ? A of
current from it. This is essential for the notebook or other mobile PC. The Direct-LinQ
application program (Direct-LinQ) also includes the remote wakeup function.
Whenever the remote machine goes into suspend mode, you just click on any file or
folder inside the remote machine folder and the remote machine will resume to normal
operation mode. However, you can disable this function to avoid the annoyance of
suspend-wakeup sequence during operating the Direct-LinQ application program.
Please click the pull-down menu Option, then click Setting, and disable the Allow
System to Suspend option.
12. Disclaimer
Information in this document is subject to change without notice. The manufacturer
does not make any representations or warranties (implied or otherwise) regarding the
accuracy and completeness of this document and shall in no event be liable for any
loss of profit or any other commercial damage, including but not limited to special,
incidental, consequential, or other damages.
No part of this document may be reproduced or transmitted in any form by any means,
electronic or mechanical, including photocopying, recording or information recording
and retrieval systems without the express written permission of the manufacturer.
All brand names and product names used in this document are trademarks, or
registered trademarks of their respective holders.
USB FILE TRANSFER CABLE USER’S MANUAL
11
13. FCC Statement
This device generates and uses radio frequency and may cause interference to radio
and television reception if not installed and used properly. This has been tested and
found to comply with the limits of a Class B computing device in accordance with the
specifications in Part 15 of FCC Rules. These specifications are designed to provide
reasonable protection against such interference in a residential installation. However,
there is no guarantee that interference will not occur in a particular installation. If this
device does cause harmful interference to radio or television reception, which can be
determined by plugging the device in and out, the user can try to correct the
interference by one or more of the followings:
?? Reorient or relocate the receiving antenna.
?? Increase the separation between the device and receiver.
?? Connect the computer into an outlet on a circuit different from that to which the
receiver is connected.
?? Consult the dealer or an experienced radio/TV technician for help.
USB FILE TRANSFER CABLE USER’S MANUAL
12