1
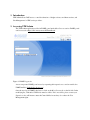
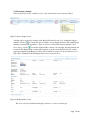
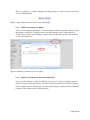
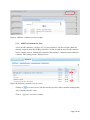
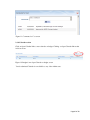
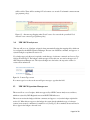
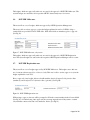
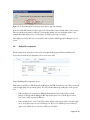
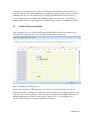
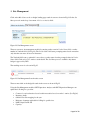
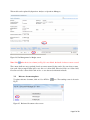
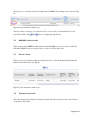
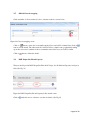
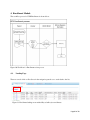
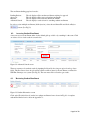
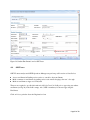
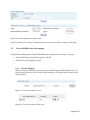
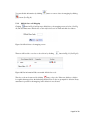
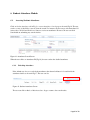
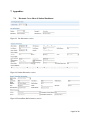
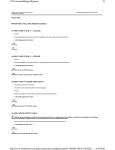
NYC DOE
UPK Admin User
Manual
User Manual for UPK Admin application users
v 0.4
10/20/2010
Table of Contents
1.
Introduction ................................................................................................................................... 4
2.
Accessing UPK Admin ................................................................................................................... 4
2.1.
Landing page .............................................................................................................................. 6
2.2.
Accessing a budget ..................................................................................................................... 6
2.3.
Reviewing a budget .................................................................................................................... 7
2.3.1.
Add/View Comments for Budget ........................................................................................... 8
2.3.2.
Add/View Comments for Allocation Methodology ............................................................... 8
2.3.3.
Add/View Comments for Costs .............................................................................................. 9
2.3.4.
Calendar section ................................................................................................................... 10
2.3.5.
Total Contract Cost .............................................................................................................. 11
2.4.
UPK OECE Analyst user ......................................................................................................... 12
2.5.
UPK OECE Operations Manager user ................................................................................... 12
2.6.
DCP UPK Office user .............................................................................................................. 13
2.7.
DCP UPK Registration user .................................................................................................... 13
2.8.
Budget Re-assignment ............................................................................................................. 14
2.9.
Calendar Management Module ............................................................................................... 15
3.
Site Management ......................................................................................................................... 16
3.1.
Reference document updates ................................................................................................... 17
3.2.
DOHMH Certificate details ..................................................................................................... 18
3.3.
Insurance details ...................................................................................................................... 18
3.4.
Workman Comp details ........................................................................................................... 18
3.5.
Official Class-site mapping ...................................................................................................... 19
3.6.
DOE Unique Site ID and Capacity .......................................................................................... 19
4.
Enrollment Module ...................................................................................................................... 20
4.1.
Landing Page ........................................................................................................................... 20
4.2.
Accessing Student Enrollment ................................................................................................. 21
4.3.
Reviewing Student Enrollment ................................................................................................ 21
4.4.
OECE user ............................................................................................................................... 22
5.
Provider Management Module .................................................................................................... 23
Page 2 of 28
5.1.
Setting up ACS vendor ............................................................................................................ 23
5.2.
Class site/Official class code mapping ..................................................................................... 24
5.2.1.
Class Site Mapping ............................................................................................................... 24
5.2.2.
Official class code Mapping ................................................................................................. 25
6.
Student Attendance Module ........................................................................................................ 26
6.1.
Accessing Students Attendance ............................................................................................... 26
6.1.1.
7.
7.1.
Unlocking Attendance .......................................................................................................... 26
Appendices ................................................................................................................................... 27
Electronic Cover Sheet of Student Enrollment ....................................................................... 27
Page 3 of 28
1. Introduction
UPK Admin allows DOE users to control the functions of budget reviews, enrollment reviews, and
Site Management for UPK service providers.
2. Accessing UPK Admin
The UPK Admin application resides in FAMIS portal under Miscellaneous section. FAMIS portal
can be accessed at https://dfoforms.nycenet.edu/FamisPortal/
Figure 1: FAMIS Logon site
A user can procure FAMIS portal access by requesting their supervisors to send an email to the
FAMIS mailbox ([email protected] ).
Once the user logs in FAMIS, they have to click on the Miscellaneous tab on the left side. In the
underlying list, a link titled UPK Admin must be visible. If it is not visible, please contact your
Supervisor, who will in turn contact the Central Office in case they do not have the User
Management rights.
Budget review tasks
Every year, UPK providers submit budgets for upcoming year. These budgets are reviewed by the
users in a workflow fashion as indicated in the figure below:
Figure 2: Workflow for budget review process
Workflow States:
10 – Saved budget
60 – Approved by OECE Borough Contract
Manager
20 – Sent for DOE approval
70 – Approved by DCP UPK Office
30 – Rejected by OECE Contract Analyst
40 – Rejected by OECE Borough Contract
Manager
80 – Rejected by DCP
90 – Approved by DCP Registration
50 – Approved by OECE Contract Analyst
Page 5 of 28
2.1. Landing page
Once the user logs in, the Budget page is the landing page. The user can also click on Budget in the
navigation pane above to reach back to the list.
Figure 3: Budget-landing screen
The budget-landing page has main four tabs namely Invoices, Enrollments, Budgets, and Miscellaneous
There are three sub-tabs within Budget:
Waiting for Review:
Rejected by you:
Advance Search
The tab displays all the budgets assigned for the user
The tab displays all the budgets rejected by the user
The tab displays search screen for searching budgets
2.2. Accessing a budget
A user can access a budget either via the default grids provided or by searching for the same.
Click on Advanced Search tab results in screen below:
Figure 4: Advanced Search screen
The user can narrow down their search by inputting fields and by choosing an option from drop down
fields. The Budget Status drop down lists all the workflow status for the budget as reflected in UPK
budget process system (See Fig 4). For instance, Sent for DOE approval, means budget is waiting to be
reviewed by OECE Contract Analyst in UPK budgeting process system.
Page 6 of 28
2.3. Reviewing a budget
Click on Waiting for Review and Rejected by you tab results in the screen as shown in Fig 5.
Figure 5: Review budget screen
A budget can be reviewed by clicking on the Budget ID (circled in red) or by viewing the budget’s
icon under the Action column to review budget summary. The sample budget
summary. Click on
summary is displayed in Appendix A. There is a mouse over line item feature in which if a user
moves cursor over the
icon under Additional Info column of every budget, the budget details can
be viewed. The Budget Status column will be updates as per the action taken by the users on their
respective budgetids in the Budget workflow. The workflow flow states are shown at the bottom of
Fig3. Click on budgetid results in Budget Detail screen as shown below:
Figure 6: Budget Details screen
The Contract# can stay blank if the budget contract is of a new or renewal type.
Page 7 of 28
The users can Approve or Reject a Budget by clicking on Approve or Reject button located at the
bottom of Budget Details.
Figure 7: Approve/Reject buttons at the bottom of the Budget
2.3.1. Add/View Comments for Budget
A user can add comments in Budget for only those budgets, which are currently assigned to them.
By clicking on Add/View Comments, the user can add comments in the Comments text box.
Clicking Save each time after entering a comment results in additional comments. The resulting
screen is displayed below:
Figure 8: Add/View comments screen for budgets
2.3.2.
Add/View Comments for Allocation Methodology
A user can add comments for Allocation Methodology section for only those budgets, which are
currently assigned to them. By clicking on Add/View Comments link, the user can add comments
in the Comments text box. Clicking Save each time after entering a comment results in additional
comments. The resulting screen is displayed below:
Page 8 of 28
Figure 9: Add/View comments screen for budgets
2.3.3.
Add/View Comments for Costs
A user can add comments for all types of Costs in site details for only those budgets, which are
currently assigned to them. By clicking on Add/View Comments link, the user can add comments
in the Comments text box. Clicking Save each time after entering a comment results in additional
comments. The resulting screen is displayed below:
Figure 10: Add/View comments for Costs screen
Clicking on
icon can be used to add and view the previously added comments existing which
were comments added by others.
Click on
icon to add a new comment.
Page 9 of 28
Figure 11: Comments for Cost screen
2.3.4. Calendar section
Click on Open Calendar link to enter calendar on budget. Clicking on Open Calendar link results
in below screen.
Figure 12: Budget form- Open Calendar on budget screen
Vendor submitted Calendar is non-editable to any of the Admin users.
Page10 of 28
Figure 13: Calendar screen
The bottom section of School Calendar shows the total for each type of day indicated by
a provider.
The user can close out of the screen by
• Clicking on Cancel
• Clicking on the red X on the right top
2.3.5. Total Contract Cost
The fields under Total Contract Cost section are auto-calculated from the information entered in
Appendix C1 and Appendix C2 for each site information.
Figure 14: Total Contract Cost for vendor selected fiscal year 2010-2011
When budgets with RFP number that follow payment policy [specifically RFPs: R0051, R0217,
A0709, B0709, A0608] are amended and there is an under-enrollment in the revised budget, then
the Cost per child field will be hidden and the Total Annual Amount (per payment policy) field
Page11 of 28
will be visible. There will be warnings if Total contract cost exceeds Total annual contract amount
(per payment policy).
Figure 15 : Alert message flagging when Total Contract Cost exceeds the prescribed Total
Annual Contract Amount (per payment policy)
2.4.
UPK OECE Analyst user
This user will see a set of budgets assigned to them automatically using the mapping table, which can
be configured by the OECE Operations Manager. The user can Add/View comments, and approve or
reject the budget as explained in section 2.3.
For a budget approval, this user is required to mark the type of reference contract from Contract Type
field as shown in Fig 15. The budgets, which are approved by this user, are sent for the approval of
OECE Operations Manager user. The rejected budgets are sent back to the respective vendor for
review and re-submission.
Figure 16: Contract Type screen
If a contract type is not chosen, the user will get a message to populate the field.
2.5.
UPK OECE Operations Manager user
This user will see a set of budgets, which are approved by OECE Contract Analyst user, and those,
which are rejected by DCP-Registration user and DCP UPK Office user.
This user can review the budget, add/view comments, and approve or reject the budget explained in
section 2.3. When this user approves the budget, the system checks whether the type of reference
contract (new, renewal, continuance) is marked or not (See Fig 15). If not marked, the user will not be
able to approve the budget to the next level.
Page12 of 28
The budgets, which are approved by this user, are sent for the approval of DCP UPK Office user. The
rejected budgets are sent back to the respective OECE Contract Analyst user for review.
2.6.
DCP UPK Office user
This user will see a set of budgets, which are approved by OECE Operations Manager user.
This user is able to review, approve or reject the budget explained in section 2.3.While doing so,
certain fields are provided for DCP -UPK office. DCP office fields are mandatory prior to approval
(See Fig 19).
Figure 17: DCP UPK Office user only screen
The budgets, which are approved by this user, are sent for the approval of DCP UPK Registration
user. The rejected budgets are sent back to the respective OECE Operations Manager user for review.
2.7.
DCP UPK Registration user
This user will see a set of budgets approved by DCP UPK Office user. The budgets sent to this user
are of contract reference type New or Renewed only. This user is able to review, approve or reject the
budget explained in section 2.3.
Prior to approval of any budget, this user should mark the dates in Comptroller Registration Date
(mandatory) and Comptroller Confirmation Date (optional). (See Fig 20)
Figure 18: DCP UPK Registration user
While trying to approve, the user will be prompted to fill in the contract number in the Contract# field
(See Fig 18), if found missing. Once approved, the system prompts the user if they want to commit
only when the contract exists but is not marked as Active. (See Fig 21).
Page13 of 28
Figure 19: Contract Invalid error message screen before approval of budget
If the user clicks OK, then the budget is approved and an email composed with details of the contract.
The user can direct the email to whoever is relevant. By default, any user (including vendor), who
touched the budget in the process, is listed in the To field for the composed email.
The budgets rejected by this user are sent back to the respective OECE Operations Manager user for
review.
2.8.
Budget Re-assignment
The user must click on the Miscellaneous tab on budget landing page and then select Budget ReAssignment from the drop down menu of Select an Activity field.
Figure 20: Budget Re-assignment screen
This feature is available to OECE Operations Managers and UPK Central users only. They can search
on any budget using various search options. If a user searched without providing any search options,
and
•
If the searching user is Operations Manager then default search results will provide all
budgets of that Operations Manager's Borough and in states Sent for DOE Approval and
Rejected by OECE Operations Manager.
•
If the searching user's role is Central User, then default search results will provide all budgets
across boroughs in states Sent for DOE Approval, Rejected by OECE Operations Manager,
Approved by OECE Contract Analyst, and Rejected by DCP.
Page14 of 28
The values shown under Assigned To drop down field menu will depend upon the user and state of
budget. For instance, if Operations Manager is re-assigning, the users from that borough only will be
available in the drop down. If Central user is re-assigning, the OECE Analysts will be shown for
“Sent for DOE Approval” and “Rejected by OECE Borough Contract Manager ” and Operations
Managers will be shown for states “Approved by OECE Contract Analyst”, and “Rejected by DCP”.
2.9.
Calendar Management Module
Click on the Miscellaneous tab on the landing page in UPK Admin. Select Calendar Management
from the drop down menu of Select an Activity field. Following screen shows up.
Figure 21: Budget Year Calendar screen
This feature is available to UPK Central users only. The users can specify holidays date (except
Saturday and Sunday) on Budget year Calendar of only those fiscal years for which a budget has been
created by vendor. Vendors will be not able to edit School Calendar unless the UPK Central user has
finalized the budget year calendar for that fiscal year. Click on Save to save the Budget Year
Calendar. Click on Finalize to finalize the Budget Year Calendar.
Page15 of 28
3. Site Management
Click on the Miscellaneous tab on budget landing page results in screen as shown in Fig 24. Select Site
Management from the drop down menu of Select an Activity field.
Figure 22: Site Management screen
The user can access site management module by entering vendor name in Vendor Name field or vendor
number in Vendor# field. (See Fig 24). The Vendor Name field starts prompting names based on matches
only after the user enters at least four characters.
The Vendor# field is auto-populated if a user selects a vendor name from the prompted values in Vendor
Name field. Click on Search to retrieve search details. The Site Management is available only when a
budget is approved by DCP.
The resulting screen is as shown in Fig 25.
Figure 23: Site Management Search results screen
The user must click on the budget id results in the screen as shown in Fig 25.
Using the Site Management module, OECE Operations Analysts and OECE Operations Managers can
update the following for a provider:
•
•
•
•
•
•
Contacts for various functions based on their necessities based on vendor’s entries. (See Fig 26).
Insurance details
Official Class-Site mapping for the year
Reference document applicable for billing for specific sites
DOE Unique Site ID and
Capacity
Page16 of 28
This module can be updated by Operations Analysts or Operations Managers.
Figure 24: Site Management for Budget screen
Note: If the
under the Actions column (see Fig 31) is not clicked, the details for that row are not saved.
The contact details are auto-populated (based on contacts entered by the vendor) if a user selects a name
from each of the prompted values in Executive Director's Name field, Educational Director's Name field,
Enrollment Contact's Name field. Click on Save to save the vendor information details.
3.1.
Reference document updates
To update reference document, click on Select RFV# or
Fig 27.
icon. The resulting screen is shown in
Figure 25: Reference Document select screen
Page17 of 28
Click on Select to select the reference document # from FAMIS. The resulting screen is shown in Fig
28.
Figure 26: Site information detail screen
The user can choose the type of provider from Type of Provider drop down field menu. Use the
horizontal scrollbar using
3.2.
and
buttons to navigate through the area.
DOHMH Certificate details
The user must enter DOHMH Certificate details in the DOHMH Certificate or Article 43 DCID #
field and DOHMH Certificate Expiration Date or Article 43 Filing Date field.
3.3.
Insurance details
The user can provide details in Insurance details in Insurance Policy#, Insurance Expiry Date and
Insurance Issue Date fields. (See Fig 29)
Figure 27: Site information detail screen
3.4.
Workman Comp details
The users should provide details for Workman Group#, Workman Comp Issue Date, and Workman
Comp Expiry Date fields.
Page18 of 28
3.5.
Official Class-site mapping
Click on number of classes under #of classes column, results in a screen below:
Figure 28: Class-site mapping screen
Click on
button to enter classroom number under Classroom # (ATS) column. Next, click on
button save the details. The value under No Of ATS Children column is auto-populated depending
upon the total count of students in classroom number entered in Classroom # (ATS) column.
Click on
3.6.
button to delete the details.
DOE Unique Site ID and Capacity
The user should provide DOE Unique Site ID in DOE Unique Site ID field and Capacity in Capacity
field. (See Fig. 31)
Figure 29: DOE Unique Site ID and Capacity in Site details screen
Click on
under the Actions column to save the site details. (See Fig 31)
Page19 of 28
4. Enrollment Module
The workflow process for UPK Enrollment is shown below:
Figure 30: Workflow for Enrollment review process
4.1.
Landing Page
The user can also click on Enrollment in the navigation pane above to reach back to the list.
Figure 31: Enrollment landing screen with ability to bulk reject enrollments
Page20 of 28
The enrollment-landing page has four tabs:
Pending Review:
Approved:
Rejected:
Advanced Search:
The tab displays all the student enrollments waiting for approval
The tab displays all the approved student enrollments
The tab displays all the rejected student enrollments
The tab displays search screen for searching student enrollments
In order to reject multiple enrollments (bulk rejection), select the enrollment IDs and click on Reject
button. (See Fig 33)
4.2.
Accessing Student Enrollment
A user can access an enrollment either via the default grids provided or by searching for the same. Click
on Advanced Search tab results in screen below:
Figure 32: Advanced Search screen
The user can narrow down their search by inputting fields and by choosing an option from drop down
fields. The Enrollment Status drop down lists all the workflow status for the enrollment as reflected in
UPK Enrollment process system (See Fig 32). The user must click on Search to get results.
4.3.
Reviewing Student Enrollment
Figure 33: Student Information screen
Click on the ID (circled in red) results in a student enrollment form as shown in Fig 36. A complete
student Enrollment form is shown in Appendix 7.1.
Page21 of 28
Figure 34: Student Enrollment form for OECE user
4.4.
OECE user
OECE Contract analyst and OECE Operations Manager can perform possible actions as listed below:
Access enrollments in Pending review section or search for other enrollments
Make comments on enrollments in pending review section and belonging to the user’s borough
Mark an enrollment as Approved or Rejected
The users are required to provide information in Official Class Code field prior to approving any student
enrollment (see Fig 36), if the field is empty. Also, OSIS is mandatory for the user approving the
Enrollment.
Click on Print to print the electronic Registration form.
Page22 of 28
5. Provider Management Module
Click on the Miscellaneous tab and Select Provider Management from the drop down menu of Select an
Activity field. (See Fig 38) This module can be updated by OECE Operations Managers.
Figure 35: Provider Management screen
The user can access Provider Management module by entering fiscal year in Fiscal Year field and either
vendor name in Vendor Name field or vendor number in Tax # field. (See Fig 38)
The Tax # field is auto-populated if a user selects a vendor name from the prompted values in Vendor
Name field. Click on Search to retrieve search details. Vendor Name field has auto-populate, which will
prompt the user for any database matches once the user keys in at least 4 characters.
The resulting screen is as shown in Fig 39.
5.1.
Setting up ACS vendor
The user can set up a vendor as ACS for specific fiscal year by clicking Yes for Is ACS field and Active
field. Select the values and click Submit.
Note: A vendor with budget cannot be marked as ACS.
Page23 of 28
Figure 36: Provider Management details screen
If ACS is marked as Yes, then upon clicking submit button, the screen will be prompted as in Fig 40.
5.2.
Class site/Official class code mapping
Using the Provider Management module, OECE Managers can update the following for a provider:
•
•
District, DOE Unique Site ID and Capacity for the FY
Official Class-Site mapping for the FY
5.2.1. Class Site Mapping
The user should provide District code in District field, DOE Unique Site ID in DOE Unique Site
ID field and Capacity in Capacity field and click Add button. (See Fig 40) It will result in screen
shown in Fig 41.
Figure 37: class site information screen
Figure 38: Class site information Edit screen
Page24 of 28
You can edit this information by clicking
button or remove class site mapping by clicking
button. (See Fig 41).
5.2.2.
Official class code Mapping
Clicking
button in Fig 41 will prompt official class code mapping screen as below. (See Fig
42) The user must enter official class code in Official Class Code field and click Save button.
Figure 39: Official class code mapping screen
The user will be able to see class code as below by clicking
button in Fig 41. (See Fig 43)
Figure 40: Site information Edit screen with official class code
The class code can be removed by clicking
next to class code. If the user decides to edit the
borough in the mapped site, the underlying Official Class Codes are prompted for deletion. If any
attendance is present for the mapping, such a deletion is not allowed.
Page25 of 28
6. Student Attendance Module
6.1.
Accessing Students Attendance
Click on Student Attendance tab in Fig 3, to access Attendance Search page as shown in Fig 16. The user
can choose any of the fields to narrow down the search. For instance, the user can provide Attendance Id
in Attendance Id field and click Search button to review an attendance. However, the user can click
Search without submitting any search criterion.
Figure 41: Attendance Search Screen
When the user clicks on Attendance ID (Fig 16), the user reaches the detailed attendance.
6.1.1.
Unlocking Attendance
If the Admin user chooses to unlock the attendance, then the unlock button is located inside the
attendance details as shown in Fig 17. The user can also
Figure 42: Student Attendance Screen
The user can click on Back to Main Attendance Page to return to the search results.
Page26 of 28
7. Appendices
7.1.
Electronic Cover Sheet of Student Enrollment
Figure 43: Site Information section
Figure 44: Student Information section
Figure 45: Parent/Guardian Information section
Page27 of 28
Figure 46: Other Pertinent Information section
Page28 of 28