1
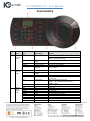
IC-CONSOLE-5X – User Manual Contents Functionality ....................................................................................................................................................... 2 Login/Shutdown ................................................................................................................................................. 4 Login:.............................................................................................................................................................. 4 Shut Down: ......................................................................................................Error! Bookmark not defined. How to use Zones ............................................................................................................................................... 5 Configuration: ..................................................................................................Error! Bookmark not defined. Control point .................................................................................................................................................. 5 Zones (Menu Settings > Zone) ....................................................................................................................... 6 Operation ........................................................................................................................................................... 6 Cable Connection ........................................................................................................................................... 6 Keyboard Setup .............................................................................................................................................. 6 Operation ....................................................................................................................................................... 6 Speed Dome Menu (Step) .................................................................................................................................. 8 Iris/Zoom/Focus ............................................................................................................................................. 8 Preset ............................................................................................................................................................. 8 Set Preset ....................................................................................................................................................... 8 Go to preset ................................................................................................................................................... 8 Delete preset ................................................................................................................................................. 8 Scan ..................................................................................................................Error! Bookmark not defined. Pan ...................................................................................................................Error! Bookmark not defined. Tour ......................................................................................................................Error! Bookmark not defined. Pattern .............................................................................................................Error! Bookmark not defined. Playback/Channel Changing ............................................................................................................................... 9 Note ............................................................................................................................................................... 9 Logout ............................................................................................................................................................ 9 Playback ......................................................................................................................................................... 9 Record ............................................................................................................................................................ 9 PTZ Control and Video Color ........................................................................................................................ 10 Tour .............................................................................................................................................................. 10 Single-Window/Multiple-Window Switching ............................................................................................... 10 IC-CONSOLE-5X – User Manual Functionality SN Note Icon Button Name Function 1 General function panel ESC ESC SETUP Cancel current operation In playback mode, click this key to go back to dynamic surveillance mode. Go back to main menu. Main menu shortcut button Change input method Switch between input methods Confirm button Confirm current operation Character and Switch between numeral/characters, click numerals Shift to switch. SHIFT ENTER 0~9 2 3 DVR control panel Speed dome control panel ID CAM MULT AUX ID shortcut Device channel number Split button Auxiliary FN Function key PTZ PLAY IRIS FOCUS ZOOM OTHER PERSET SCAN PAN TOUR PATTERN PTZ button Playback button iris focus zoom Speed dome menu Preset Scan Pan Tour Pattern Shortcut key to go to ID zone search Control DVR channel. Control DVR window split Go to video color interface and open DVR local PTZ interface. Work with the number buttons. 【FN】+1: Go to DVR assistant interface. 【FN】+2: Tour Control channel PTZ. Control DVR playback Control iris. Control focus Control zoom. Go to speed dome menu. Go to preset setup interface. Go to scan setup interface. Go to pan setup menu. Go to tour setup menu. Go to pattern setup menu. IC-CONSOLE-5X – User Manual SN Note Icon Button Name Function 4 Joystick - - Aux menu and function operation. 5 Indicator light panel PWR The light is on when the keyboard is properly connected to the power supplying. The light is flashing when the keyboard is connected to the network. USB Power indicator light Network data receive and send indicator light Network indicator light RS232 indicator light RS485 indicator light USB indicator light - - TR/TX NET 232 485 6 LCD The light is on when the device is connected to the network. The light is flashing when there is 232 data transmission. The light is flashing when there is 485 data transmission. The light is on when the keyboard is connected to the USB device. OSD menu IC-CONSOLE-5X – User Manual Login Login: Connect the keyboard to the power supply. Check to see if the power light is on. You can see the welcome interface after the device is properly booted up. Click either the ENTER or SETUP button to go to the following screen: Select the user you wish to log in as and input the appropriate password. Then click ENTER. How to change the Username: You cannot directly go and change the username; instead you must remove a user and re-add them. How to delete a pre-existing user. To do this: Login and go to Menu Settings > 3. Account > (3)Del User. Now highlight the user you wish to modify using left and right on the joystick, and then press ENTER to confirm deletion. How to add a new user. To add the user back in; go to Menu Settings > 3. Account > (2)Add User. Now input the username in the USER: field. Input a password in the PW: field - The password MUST contain only numbers. And repeat the password once again in the OK: field. Define which group you wish to add the user to using left and right on the joystick, then press ENTER to confirm adding the user. To delete an incorrectly input character move the joystick to the left. To switch between character input; press SHIFT on the keyboard this will switch between Uppercase letters, Lowercase letters and Numerical characters. PLEASE NOTE: The 3 default usernames (admin, default, guest) CAN NOT be deleted. Once you have input the user name and password, the system will take you to the main menu. The user you wish to log in as can be changed by moving the joystick to the left or right. Username Password admin 888888 default 888888 guest 888888 The admin has full control over the keyboard, with no limitations. The default cannot add or delete a user, modify user rights or manage rights. The guest can only operate control points. There are no other rights available to this user. IC-CONSOLE-5X – User Manual How to use Zones Control point This is used to set control point information. See the image below. All the items listed below should be set. You can use the ID, device name, COM address or the IP address to search a device easily in zones. NOTE: The information which you input here should be unique. Otherwise, the system cannot save the setup. ID: Is the device ID number so that you can recognize the device quickly. Name: Here you can define a customised device name. Type: Device type. The options for this include: SD/NVS/DVR. Link: Please select the type and set the corresponding parameters. The options for this include: NET/RS232/RS485. The interface is shown below. IC-CONSOLE-5X – User Manual PLEASE MAKE SURE THE COM TYPE AND THE PARAMETERS YOU SET HERE ARE THE SAME AS THE ACTUAL SITUATIONS. OTHERWISE, THE KEYBOARD CAN NOT CONTROL THE DEVICE! Zones (Menu Settings > Zone) With this interface, you can quickly search a device via device ID, device name, COM address, IP and etc. The Keyboard can automatically connect to the device and you can use the keyboard to control it. Operation Cable Connection Please connect the keyboards A/B line to the speed dome A/B line connection so that the connection is correct. Keyboard Setup a) Ensure that the keyboard A/B line and speed dome A/B line connection is set up correctly. b) Set the speed dome address so that the speed dome address and the keyboard RS485 address are the same. c) Go to the zones interface on the keyboard. Note: Please select protocol according to the speed dome type. The default setup is DHSD. d) After the setup, click ESC to exit control point control interface. System pops up a dialogue box you can click ENTER to save data or click ESC to cancel setup. Operation On the keyboard, click ID to go to the control point interface to set speed dome ID to connect to the speed dome. After successful connection, the interface is shown as below. See the image below. IC-CONSOLE-5X – User Manual Step: Defines the movement speed. Input number buttons on the keyboard and then click ENTER to confirm. The speed ranges from 1 to 8. The step 1 is faster than step 8. The lens movement supports 8 directions. It includes: up/down/left/right/top left/top right/bottom left/bottom right. Please use the joystick to control. IC-CONSOLE-5X – User Manual Speed Dome Menu (Step) On the keyboard, click the OTHER button. The interface is shown as below. Iris/Zoom/Focus Iris On the keyboard, use the + and – buttons on the IRIS button, or turn joystick up/down to control the iris. Focus On the keyboard, use the + and – buttons on the FOCUS button, or turn joystick left/right to control the focus. Zoom On the keyboard, use the -1W and T+1 buttons on the ZOOM button, or turn joystick clockwise or counter clockwise to control the zoom. Preset On the keyboard click PRESET, the interface is shown as below. Set Preset a) Use joystick to control the PTZ to set the preset position. b) On the keyboard click the PRESET button, you will be brought to the preset interface. c) Input the desired preset number and then select set preset, click ENTER to save preset setup. Go to preset Select Preset and then input preset number, click PRESET to go to the corresponding preset position. Delete preset Input the preset number at the preset No. item and then select Delete, click ENTER go remove it. IC-CONSOLE-5X – User Manual Playback/Channel Changing The DVR local user has the higher priority than then keyboard user. Before you login, please logout the DVR local menu user, otherwise, you can not use the keyboard to control the device. a) Click ENTER on the keyboard, you can go to the menu options interface. b) Select zones. c) Input the ID, device name, IP address.RS232, RS485 which you have set on the control point interface, Click ENTER to begin the search. The system can automatically connect to the DVR if the search is successful. If the system pops up with a dialogue box to inform you the address does not exist, Please check the information and input again. Note Click ID on the keyboard and then input ID number. Click ENTER to quickly find the device. Logout Click ID on the keyboard and then click ESC to exit. Playback When PLAY is pressed on the keyboard; you will be brought to the DVR search interface. Use the joystick to control the playback buttons and click ENTER to confirm. See the image below for an example of what this should look like. Record On the keyboard, click AUX and 1 at the same time,to go to the DVR record control interface. Use the joystick to set channel number and status. Click ENTER to save current setup. IC-CONSOLE-5X – User Manual PTZ Control and Video Color On the keyboard, if you press FN followed by 1, you can go to the DVR aux interface. Use the joystick to select PTZ or video colour set. If you press the AUX followed by the 2 button, you can directly go to the PTZ control interface. Tour On the keyboard, press FN followed by the 2 button, you can control the tour function of the DVR. Note: This function is only valid when the tour function of the DVR is enabled. You need to go to the (Setting >Display) to enable tour function. Single-Window/Multiple-Window Switching On the keyboard, if you press channel number followed by CAM, you can go to the specified channel. For example, click number 1 then CAM to go to channel 1. On the keyboard, press a number followed by MULT, you can enable multiple-channel display mode. For example, if you press number 4 then MULT, the system goes to 4window display mode. IC-CONSOLE-5X – User Manual Network & Com Setup Defining the Console 5X network settings. Log in to the keyboard. Go to Menu Settings > System > Network. This is the location for defining the address of the IC-Console-5X Keyboard. 1. 2. 3. 4. In the Network screen you will see the following, please note the description of each heading. IPAddr: 192.168.1.7 – This is the IP address which you wish to assign the Keyboard. Subnet Mask: 255.255.255.0 – This is the subnet mask of the Keyboard. Gateway: 192.168.1.1 – This is the default gateway of the Keyboard. It is usually, but not always, the internal network IP of the router to which the keyboard and recorder are connected. Port: 32789 – This is the port number that you wish to assign to the Keyboard. 5. 6. IC-CONSOLE-5X – User Manual Assigning an Address to the keyboard. Go to Menu Settings > System > Address. This is where you assign the keyboard an address this would be used in an instance where you have two or more keyboards or network devices, capable of interaction with either the Speed Dome PTZ’s or Recorders on the network. The address range is from 0 – 255. 7. 8. IC-CONSOLE-5X – User Manual Defining Zones connection to other network devices such as PTZ Speed Domes, Recorders & Network Video Servers. Go to: Menu Settings > Zone. In the Zone screen you will see the following, please note the description of each heading. ID: 2 - This is the ID of the Zone of the Network connection, in order to have multiple Network connections you will need to assign each Zone a unique ID ranging from 0 – 2048. Name: Test – This is the identifier by which you will know which network that you are adding. (Press SHIFT on the keyboard to cycle through numerals, uppercase and lowercase letters). Type: DVR – The type of device which you are connecting to. These can be DVR (Digital Video Recorder, Network Video Recorder); SD (Speed Domes, PTZ’s); or NVS (Network Video Server). Link: Net – This is the type of connection you wish to have going to your device it can be any of: NET (Network, Ethernet connection); COM 232 or COM 485. IPAddr: 192.168.1.108 – This is the IP Address of the device which you are trying to connect to. Port: 32789 – This the TCP port number of the device you are trying to connect to. Rule: DH-2 – This is the unchangeable rule protocol for the connection to the keyboard. IC-CONSOLE-5X – User Manual PW: admin – This is the password of the DVR, Speed Dome or NVS which you are trying to connect to. IC-CONSOLE-5X – User Manual Com Configuration Go to: Menu Settings > Zone. The configuration for COM 232 & COM 485 is similar to that for a network configuration but contains some notable differences listed below: ID: 3 - This is the ID of the Zone of the Network connection, in order to have multiple Network connections you will need to assign each Zone a unique ID ranging from 0 – 2048. Name: Comlin – This is the identifier by which you will know which network that you are adding. (Press SHIFT on the keyboard to cycle through numerals, uppercase and lowercase letters). Type: DVR – The type of device which you are connecting to. These can be DVR (Digital Video Recorder, Network Video Recorder); SD (Speed Domes, PTZ’s); or NVS (Network Video Server). Link: COM 232 – This is the type of connection you wish to have going to your device it can be any of: NET (Network, Ethernet connection); COM 232 or COM 485. 232Addr: 1 – This is the address of the COM 232 connection in case there are multiple 232 connections set up on the same range. Rule: DH-2 – This is the unchangeable rule protocol for the connection to the keyboard. BaudRate: 9600 – This is the baud rate for the device which you are trying to connect to. The baud rate can be any of: 300, 600, 1200, 2400, 4800, 9600, 192000, 38400, 56000, 57600 or 115200. DataBit: 8 – IC Realtime machines always have a default of Databit: 8. (5, 6 & 7 are also available). Parity: None – On IC Realtime recorders it always set to None. This can be set to Even, Odd or None. StopBit: 1 – On IC Realtime devices our default Stopbit is 1. This can also be set to 1.5 & 2.