1
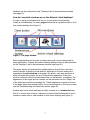
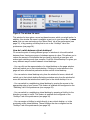
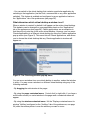
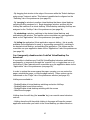
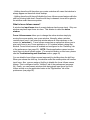
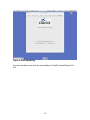
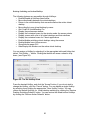
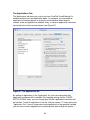
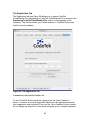
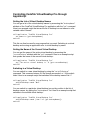
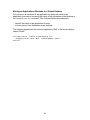
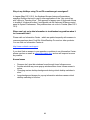
User’s Manual
CodeTek Studios, Inc.
2401 S. Neil St., Suite 201
Champaign, IL 61820
(217) 355-6550
(866) 926-3383 (Toll Free, US Only)
CodeTek VirtualDesktop (patent pending) is a trademark of CodeTek Studios
and is registered in some jurisdictions.
Copyright © 2002-2004 CodeTek Studios, Inc. All Rights Reserved.
Portions of the software copyright © 2003 Red Shed Software/Jonathan 'Wolf'
Rentzsch
CodeTek VirtualDesktop Pro (patent pending) is a trademark of CodeTek
Studios, Inc., and is registered in some jurisdictions.
All other trademarks are the property of their respective owners. Mention of thirdparty products is for informational purposes only and does not constitute an
endorsement or a recommendation of those products. CodeTek Studios, Inc.
assumes no responsibility or liability for the performance or use of any such thirdparty products.
2
Table of Contents
Introduction to CodeTek VirtualDesktop Pro
4
Getting Started With CodeTek VirtualDesktop Pro
6
Key Concepts & Terminology
What are virtual desktops?
How do I see which windows are on the different virtual desktops?
How do I switch between virtual desktops?
What determines which virtual desktop a window is on?
Can I temporarily disable certain CodeTek VirtualDesktop Pro behaviors?
What is focus follows mouse?
6
6
7
8
9
10
11
Registering CodeTek VirtualDesktop Pro
12
Using CodeTek VirtualDesktop Pro for the First Time
15
Customizing CodeTek VirtualDesktop Pro to Your Preferences
19
Customizing CodeTek VirtualDesktop Pro's Appearance and Behavior
The Desktops Tab
The Switching Tab
The Pager Tab
The Menu Extra Tab
The Startup Tab
The HotKeys Tab
The Applications Tab
The Registration Tab
21
21
23
26
30
32
34
36
39
Controlling CodeTek VirtualDesktop Pro through AppleScript
Getting the List of Virtual Desktop Names
Getting the Name of the Current Virtual Desktop
Switching to a Virtual Desktop
Moving an Applications Windows to a Virtual Desktop
41
41
41
41
42
Troubleshooting and Questions
43
Skin Creation
45
Special Thanks
46
Index
47
3
Introduction to CodeTek VirtualDesktop Pro
CodeTek VirtualDesktop Pro revolutionizes the way that you work in Mac OS X
by giving you the ability to truly multitask. If you work with more than one
application at a time, as most Mac users do, then your screen quickly fills up with
windows. With CodeTek VirtualDesktop Pro, you see only the windows for the
task you're currently working on. When you start a new task, switch to an empty
virtual desktop and open all the windows you need. When you need to switch
back to a task, just go back to its desktop, and you will see only that task's
windows, just as you had left them. It's that simple.
CodeTek VirtualDesktop Pro features include:
•
•
•
•
•
•
•
•
•
•
•
•
•
•
•
•
Up to 100 virtual desktops
Support for skins
The ability to give each virtual desktop a name
Virtual desktop switching using mouse
Menu extra for accessing CodeTek VirtualDesktop Pro features
Automatically restore window positions on startup
Configurable HotKeys for accessing CodeTek VirtualDesktop Pro features
Configurable HotKeys for switching between virtual desktops
Setting of custom desktop background for each virtual desktop
Focus follows mouse support
Configurability of virtual desktop switching pop-up background, text, and
dissolve speed
Configure opacity of pager
Configure whether icon, or virtual desktop names display in menu extra.
Configure menu extra font
Configure default startup virtual desktop
Per application configurations for virtual desktop behavior
New features for CodeTek VirtualDesktop Pro 3.0 include:
•
•
•
•
•
•
•
•
•
•
•
Full support for X11
Focus Follows Mouse working with X11
Full support for Expose
Automatic locking of pager to edge of screen
Autohide feature for pager
Feature to automatically launch VirtualDesktop at login
Remote control of VirtualDesktop through AppleScript and Cocoa
The ability to turn off individual HotKeys
HotKey that displays window list at mouse pointer location
Contextual menus in pager to control windows
ToolTips display information in pager
4
•
•
Configure ToolTip information displayed and ToolTip fonts
Feature to have VirtualDesktop only use the main display. All windows on
other displays are "sticky".
5
Getting Started With CodeTek VirtualDesktop Pro
Key Concepts & Terminology
CodeTek VirtualDesktop Pro is a unique application for Mac OS X.
Understanding the key concepts behind its usefulness and the terminology used
to describe its functionality will help you to understand this document. This
section discusses these concepts and defines terminology that is used
throughout the rest of this document.
What are virtual desktops?
Virtual desktops are groups of windows, which appear on your display one
group at a time. These groups can consist of windows from any applications that
you choose, and windows from one application can be in multiple groups. Each
window group is called a virtual desktop, and the windows in that group are said
to appear on that virtual desktop.
All windows in Mac OS X do not behave the same. Palettes, such as the toolbars
for Adobe Photoshop® or Microsoft Excel®, are displayed only when the
application is active. “Floating” windows, such as iChat® notification panels, are
displayed over the other windows on the screen. These windows appear on
every virtual desktop (that is, they are included in every window group), because
of their special behaviors. Windows that appear on every virtual desktop are
called sticky, in that they “stick” to the display and are unaffected by virtual
desktops. Palette & floating window “stickiness” can be overridden on a perapplication basis via the “Applications” tab of the preference window (see page
37). Also, all windows for an application can be made sticky on that same
“Applications” tab.
Applications that use the Classic environment (Classic applications) are very
different from other applications, and are handled differently by CodeTek
VirtualDesktop. All windows for a Classic application will be displayed on the
same virtual desktop.
Also, all windows can be hidden to reveal the Finder desktop. There is a custom
key sequence, or HotKey, that allows you to display or hide all windows on the
screen that can be configured on the “HotKeys” tab of the preferences (see page
35). By pressing this HotKey while the windows are displayed, the windows will
be hidden without being closed. Pressing this HotKey again (while the windows
are hidden) will re-display the windows.
CodeTek VirtualDesktop Pro supports having up to 100 virtual desktops. Virtual
desktops are laid out in rows and columns, forming a grid. The number of virtual
6
desktops can be configured on the “Desktops” tab of the preferences window
(see page 21).
How do I see which windows are on the different virtual desktops?
In order to easily see windows that are not on your active virtual desktop,
CodeTek VirtualDesktop Pro has a pager window that is a graphical view of all of
your virtual desktops (see Figure 1).
Figure 1: The pager window
Each virtual desktop can be given a unique name and custom background for
easy identification. Names and custom desktop backgrounds can be customized
on the “Desktops” tab of the preferences window (see page 21).
The pager window is separated into multiple sections by grid lines, and each
section denotes a different virtual desktop. Windows on a virtual desktop are
represented by mini-windows in the pager. By default, each mini-window is a
white rectangle that contains the icon of the window application. Each miniwindow is proportionally sized and shaped like its ‘real window’ counterpart. The
appearance of the pager and its contents can be customized on the “Pager” tab
of the preferences window (see page 26). Classic applications cannot be shown
in the pager due to their special nature (for more information on this issue, please
see the Troubleshooting and Questions section, page 43).
Another way to see virtual desktops and their contents is in a window list view:
that is, in a menu that contains a submenu for each virtual desktop which in turn
contains a menu item for each window on that virtual desktop (see Figure 2).
7
Figure 2: The window list menu
This window list view gives a more text-based access, which you might prefer. In
addition, this window list menu is available as an icon in your menu bar, or menu
extra, that you can customize on the “Menu Extra” tab of the preferences (see
page 31), or by pressing a HotKey that is set on the “HotKeys” tab of the
preferences (see page 34).
How do I switch between virtual desktops?
Of course the point of having different groups of windows is to be able switch
between them, having one group of windows appear at a time. This allows you to
reduce the amount of information that you have to deal with at one time, and
makes task switching much less complex. CodeTek VirtualDesktop Pro gives you
many different ways to switch between virtual desktops:
- You can click on the representation of a virtual desktop on the pager window,
which will switch you to that virtual desktop. Clicking on a mini-window in the
pager will also activate that particular window on that virtual desktop.
- You can select a virtual desktop entry from the window list menu, which will
switch you to that virtual desktop Selecting a window entry from the window list
menu will activate that window and switch you to the virtual desktop it is on.
- You can switch to a neighboring virtual desktop by moving the mouse to the
appropriate edge of your screen. This feature is enabled and configured on the
“Switching” tab of the preferences (see on page 23).
- You can switch to a neighboring virtual desktop by pressing a HotKey for the
direction you want to travel. This feature is enabled and configured on the
“HotKeys” tab of the preferences (see page 34).
- You can assign a HotKey to switch directly to any virtual desktop, or to the
previously active virtual desktop. These HotKeys are also configured on the
“HotKeys” tab of the preferences (see page 34).
8
- You can switch to the virtual desktop that contains a particular application by
switching to that application (via the Dock, command-tab or any other application
switcher). This feature is enabled and configured on a per-application basis on
the “Applications” tab of the preferences (see page 36).
What determines which virtual desktop a window is on?
When a window is created, by default it will appear on the active virtual desktop.
This behavior can be changed on a per-application basis on the “Applications”
tab of the preferences (see page 36). Classic applications are an exception in
that they will only start up on the active virtual desktop. However, you can move
Classic applications to a different virtual desktop by using the Classic application
pop-up menu (see Figure 3). This menu lists all Classic applications, and allows
you to choose the virtual desktop that any Classic application’s windows will
appear on.
Figure 3: The Classic application pop-up menu
You can move a window from one virtual desktop to another, unless that window
is sticky. You may move a window to a different virtual desktop using any of the
following methods:
- By dragging the mini-window in the pager.
- By using the pager contextual menu. Control-click (or right-click, if you have a
multi-button mouse) on a mini-window in the pager and a contextual menu will
appear.
- By using the window contextual menu. Hit the “Display contextual menu for
window” HotKey (configured on the “HotKeys” tab of the preferences, see page
34) while the mouse pointer is over the window you want to move.
9
- By dragging that window to the edge of the screen while the “Switch desktops
using mouse” feature is active. This feature is enabled and configured on the
“Switching” tab of the preferences (see page 23).
- By “carrying” a window to another virtual desktop that has a virtual desktop
switching HotKey assigned to it. Begin dragging a window, and then hit the
HotKey that switches to a virtual desktop. Virtual desktop switching HotKeys are
assigned on the “HotKeys” tab of the preferences (see page 34).
- By minimizing a window, switching to the desired virtual desktop, and
unminimizing the window. This feature can be overridden on a per-application
basis on the “Applications” tab of the preferences (see page 36).
- By hiding the application (if that application supports hiding – this is usually
available via the application’s menu, or by pressing command-H), switching to
the desired virtual desktop, and unhiding that application. This feature can be
overridden on a per-application basis via the “Applications” tab of the preferences
(see page 36).
Can I temporarily disable certain CodeTek VirtualDesktop Pro
behaviors?
It is possible to disable some CodeTek VirtualDesktop behaviors and features
permanently, or temporarily through the “override” key, or toggle them on or off
via HotKeys. Other features can be overridden on a per-application basis via the
“Applications” tab of the preferences (see page 36).
In order to reduce the screen space the pager occupies, you can resize the
pager, autohide the pager, or hide the pager entirely. These options can be
customized on the “Pager” tab of the preferences window (see page 26).
HotKeys are available to:
- Disable/Enable all virtual desktop switching and action HotKeys
- Disable/Enable focus follows mouse
- Disable/Enable virtual desktop switching with the mouse
- Hide/Show the pager
Holding down the shift key (the ‘override’ key) can override some behaviors
such as:
- Holding down the shift key while clicking in the pager will keep the current
application active after you switch to the virtual desktop you have clicked on.
10
- Holding down the shift key when you create a window will cause that window to
always appear on the active virtual desktop.
- Holding down the shift key will disable the focus follows mouse feature while the
shift key is being held down. Once the shift key is released, focus will be given to
the window under the mouse pointer.
What is focus follows mouse?
A window has input focus when it accepts keyboard and mouse input. Only one
window may have input focus at a time. This window is called the active
window.
Focus follows mouse allows you to change the active windows simply by
moving the mouse pointer over a new window. Normally, when a window
receives input focus, it will raise that window above all other windows on the
screen (or, autoraise it). Focus follows mouse has an option that allows you to
give input focus to any Cocoa application or X11 window without raising that
window. Focus follows mouse is enabled and configured on the “Switching” tab
of the preferences (see page 23). NOTE: Classic applications cannot receive
input focus via focus follows mouse. (For more information on this issue, please
see the Troubleshooting and Questions section, page 43)
You can disable focus follows mouse temporarily by holding down the shift key.
When you release the shift key, the window under the mouse pointer will receive
input focus. Also, you can assign a HotKey to disable the focus follows mouse
feature. This is configured on the “HotKeys” tab of the preferences (see page
34). Finally, you can prevent windows from being given input focus via focus
follows mouse on a per-application basis on the “Applications” tab of the
preferences (see page 36).
11
Registering CodeTek VirtualDesktop Pro
To use CodeTek VirtualDesktop Pro, you must either obtain a demo Registration
Key or purchase a full Registration Key. If you register for a CodeTek
VirtualDesktop Pro demo Registration Key, you will enjoy full functionality for 15
days. At the end of the demo period, you must purchase a Registration Key to
continue using CodeTek VirtualDesktop Pro.
To obtain a demo Registration Key, please go to:
http://www.codetek.com/php/demo_ctvd.php
If you purchase a Registration Key, you will receive CodeTek VirtualDesktop
Pro's full functionality and our 90-day, money back guarantee. To purchase a
Registration Key, please go to the CodeTek VirtualDesktop Pro page on our Web
Site:
http://www.codetek.com/php/virtual_pro.php
To learn more about our 90-day, money back guarantee, please go to this page
on our Web Site:
http://www.codetek.com/php/guarantee.php
To start CodeTek VirtualDesktop Pro, double-click on the CodeTek
VirtualDesktop Pro application icon found in your Applications folder. CodeTek
VirtualDesktop Pro will display a splash screen informing you that it is starting up
(see Figure 4).
Figure 4: The startup splash screen
12
After you have started CodeTek VirtualDesktop Pro, you will be taken to the
registration tab of the preferences window (see Figure 5).
Figure 5: Registration tab
Type or copy and paste the registration key into the registration key fields, and
click the “Activate Registration Key” button below the fields. If you have entered a
valid registration key, a pager window will appear, and the registration key fields
will be replaced by a “valid registration” message (see Figure 6). You may then
close the preferences window.
13
Figure 6: After registering
You are now able to use all of the functionality of CodeTek VirtualDesktop Pro
3.0!
14
Using CodeTek VirtualDesktop Pro for the First Time
To start CodeTek VirtualDesktop Pro, double-click on the CodeTek
VirtualDesktop Pro application icon found in your Applications folder.
If you have not already registered CodeTek VirtualDesktop Pro, see the previous
section, Registering CodeTek VirtualDesktop Pro, on page 12 for instructions
on completing the registration process.
When you have no windows open on your screen (and the preference window is
closed), the pager will be empty and your screen will look like the example
screen in Figure 7.
Figure 7: An Empty Virtual Desktop
Opening a Finder window (e.g., by double-clicking on your hard drive icon) will
result in the pager displaying a corresponding Finder “mini-window” (see Figure
8).
15
Figure 8: Finder window open on active virtual desktop
You can move the Finder window from the active virtual desktop to another
virtual desktop by dragging the mini-window in the pager from its active square to
the square immediately to the right in the pager. You will see the Finder window
move as you move the mini-window in the pager. After you drag the mini-window
to the new virtual desktop and release the mouse button, the window will no
longer be visible on your screen (but it will still be visible in the pager). (see
Figure 9).
16
Figure 9: Finder window open on a different virtual desktop
Click on the square to the right of the active virtual desktop that contains the
Finder mini-window to switch to that virtual desktop. You will notice that the
Finder window once again appears on your screen, and the square that contains
the Finder window is now highlighted, signifying that it is the currently active
virtual desktop (see Figure 10).
17
Figure 10: Virtual desktop 2 is now the active virtual desktop
Clicking on the empty square on the left side of the pager will bring you back to
your original virtual desktop (and cause the Finder window to disappear). Then,
open another Finder window. The new window will be visible on your screen and
a corresponding mini-window will appear in the pager (see Figure 11). Click on
the different squares in the pager to switch between the two virtual desktops, and
notice how only the Finder window for the currently active virtual desktop is
displayed on the screen.
18
Figure 11: One Finder window open on each virtual desktop
By using CodeTek VirtualDesktop Pro to group your different windows on
different virtual desktops, you can organize your applications and their windows
in whatever way you find most comfortable and efficient. For example, you can
group applications on different virtual desktops by their function: one virtual
desktop for your web browser windows, one virtual desktop for email, and one
virtual desktop for graphics editing.
Customizing CodeTek VirtualDesktop Pro to Your Preferences
In addition to displaying all of your virtual desktops and their mini-windows, the
CodeTek VirtualDesktop Pro pager has two buttons that allow you to interact with
CodeTek VirtualDesktop Pro (see Figure 11, above). Clicking on the red button in
the upper-left corner of the pager will quit CodeTek VirtualDesktop Pro. Clicking
on the blue button in the bottom-center of the pager will open the CodeTek
VirtualDesktop Pro preferences window (see Figure 12).
19
Figure 12: Preferences window
With the preferences window, you can adjust all of the features in CodeTek
VirtualDesktop Pro to your liking. For example, many users will want more than
just four virtual desktops (the default number of virtual desktops). To change the
number of virtual desktops, go to the Desktops tab of the preferences window,
and select the number of rows and columns you want the pager to display. The
total number of virtual desktops shown is the number of rows multiplied by the
number of columns.
There are many more ways to customize CodeTek VirtualDesktop Pro through
the preferences window. See the next section, Customizing CodeTek
VirtualDesktop Pro's Appearance and Behavior, page 21, for a complete
guide to configuring CodeTek VirtualDesktop Pro.
20
Customizing CodeTek VirtualDesktop Pro's Appearance
and Behavior
To modify your preferences, click on the blue preferences button on the pager,
select the "Preferences…" entry from the menu extra or press the "Show
Preferences" HotKey (control-option-; by default). This will bring up the
preferences window described below.
The Desktops Tab
The Desktops tab (see Figure 13) allows you to modify the number of virtual
desktops and the attributes of your virtual desktops. You may, for example, set
the number of virtual desktops, set custom desktop backgrounds, assign names
to virtual desktops, or edit the virtual desktop’s AppleScript triggers.
Figure 13: The Desktops tab
21
Desktops
You may select any layout of virtual desktops from 1 row and 1 column to 10
rows and 10 columns, giving you from 1 to 100 virtual desktops. Modifying the
‘Rows’ and ‘Columns’ pop-up buttons configures the layout.
When checked, the "Pager Edges Wrap Around to Opposite Edge" option allows
you to switch virtual desktops "through" the edge of the pager to the opposite end
of the pager. For example, if you were using 4 virtual desktop columns in a single
row and each virtual desktop was numbered 1 to 4 from left to right, enabling this
option would allow you to change from virtual desktop 1 to virtual desktop 4
directly using the "Change Desktops with Mouse" feature or the Left HotKey (ctrloption-left arrow by default). If this option is disabled, you cannot switch from
virtual desktop 1 to virtual desktop 4 directly using either of these methods.
The “Virtual desktops only affect main display” will cause CodeTek
VirtualDesktop Pro to only “virtualize” the main display. This means that
CodeTek VirtualDesktop Pro will only use the main display for it’s virtual
desktops. Other displays will behave as if CodeTek VirtualDesktop Pro is not
running and all application windows on other displays will not change when you
switch between virtual desktops. To allow CodeTek VirtualDesktop Pro to
“virtualize” all displays, uncheck this checkbox.
Names, Backgrounds, and AppleScript Triggers
To change the default name of your virtual desktops, either select the virtual
desktop you wish to rename and click the “Edit Desktop Name” button or double
click on the “Name” column in the table.
CodeTek VirtualDesktop Pro allows you to run AppleScipts when you switch
between virtual desktops. Each virtual desktop has two AppleScript Triggers: an
AppleScript that is run when you leave that virtual desktop and an AppleScript
that is run when you enter that virtual desktop. To edit the AppleScript Triggers
for a virtual desktop, select a virtual desktop, click the “Edit AppleScript Triggers”
button, and edit the AppleScripts.
By default each virtual desktop will use the desktop background you have set in
your System Preferences, but you may set a custom desktop background for any
of your virtual desktops. To set a custom background, select a virtual desktop,
click the “Select Custom Background” button and choose the file that you want to
use for your custom background.
22
The Switching Tab
The Switching tab (see Figure 14) allows you to modify behavior of CodeTek
VirtualDesktop Pro when you switch between virtual desktops. You may, for
example, enable virtual desktop switching using the mouse, enable focus follows
mouse, and display pop-ups when switching virtual desktops.
Figure 14: The Switching tab
Desktop Switching
In addition to being able to switch between your virtual desktops using the pager,
the menu extra, and HotKey combinations, you may switch virtual desktops by
placing the mouse on the extreme edges of your screen. In order to enable
virtual desktop switching using the mouse, check the “Switch desktops using
mouse” checkbox. To disable this option, uncheck the checkbox.
23
By default, when your mouse is placed at the extreme edges of the screen, a
virtual desktop switch occurs, regardless if you are dragging a window. To
prevent this, you may enable the “Only switch if dragging a window” option.
When this option is enabled, changing virtual desktops will only occur with the
mouse when you are dragging a window.
If you wish to only switch virtual desktops using the mouse when depressing a
key, enable the “Only switch if depressing…” option and choose the Control,
Shift, or Option key from the drop down list.
To prevent accidental virtual desktop switching when your mouse enters the
corners of your screen, enable the “Do not switch at desktop corners” option.
Uncheck this checkbox to allow switching along the entire length of each screen
edge.
By adjusting the slider labeled “Mouse speed required to switch desktops”, virtual
desktop switching can be controlled depending on the speed at which you
approach the extreme edge of your screen.
Focus Follows Mouse
The focus follows mouse feature allows you to give keyboard and input focus to
that window by simply pointing at the window with your mouse instead of clicking
on that window. To enable this feature, check the “Enable focus follows mouse”
checkbox.
Normally, when a window is given focus, it comes to the forefront. To give
keyboard and input focus to a window, but to prevent a focused window from
coming to the forefront, enable the “Do not raise window when focused” option.
To enable the normal behavior where a window comes to the forefront when
focused, uncheck the “Do not raise window when focused” checkbox. NOTE:
This option only affects windows of X11 and Cocoa applications. See the
Troubleshooting and Questions section on page 43 for more detailed
information.
If, at times, you find that windows are being given focus accidentally when
moving the mouse, you may enable the “Do not focus if mouse is in motion”
option. This will only give focus to windows when your mouse pointer has
stopped moving.
Another option that tailors the focus follows mouse behavior is the slider labeled
“follow mouse focus after… (seconds)”. You can set this option from zero to 2
seconds.
Lastly, if you wish to disable the focus follows mouse feature if a Classic window
24
is on your virtual desktop, check the “Disable if a classic window is on the
desktop” checkbox.
Pop-ups
Pop-ups tell you which virtual desktop you have just changed to (see Figure 15).
Pop-ups always appear in the center of the screen. On systems with multiple
displays, Pop-ups will appear in the center of the screen that contains the menu
bar. You may disable the Pop-ups completely by unchecking the “Display pop-up
when switching desktops” checkbox.
Figure 15: Example Virtual desktop Change Information Pop-up
You can change the length of time that Pop-ups are displayed on your screen
through the slider labeled "Pop-up dissolve speed.” To test your settings for Popups, click the “Test Pop-up…” button to display a sample Pop-up.
To customize the font of Pop-ups, click the “Select Font…” button to display the
font panel. Within the font panel, you can choose the font family, typeface, size,
and color, among other font attributes.
By default, Pop-ups will display an image behind the virtual desktop’s name. To
change the default image of Pop-ups, click the “Select Image…” button and
choose the image you want to use. Click the “Restore Default” button to return to
using the default Pop-up image. You can disable the Pop-up image by
unchecking the “Display pop-up image” checkbox.
25
The Pager Tab
The Pager tab (see Figure 16) allows you to modify the appearance and behavior
of CodeTek VirtualDesktop Pro’s pager. You may, among other things, select a
new skin, modify the pager’s visual appearance, modify the pager’s size, or
modify the appearance of the pager.
Figure 16: The Pager tab
Appearance
The pager’s appearance is completely customizable by skins that are released
both by CodeTek Studios and by third parties. To view the current list of
available skins and to download them, click the "Open Skins Webpage…" button.
To use a new skin, download it from the Skins repository, click the "Select
Skin…" button, locate the skin file and click the "Open" button. You may always
26
switch back to the default "Brushed Metal Panel" skin by pressing the "Restore
Default" button.
If you want to use a different pager background instead of the default background
for the skin you are using, simply click the “Select Image…” button, locate a
background image, and click the “Open” button.
To further customize the pager’s appearance you may click on the respective
color wells to modify the grid color, activate highlight color, or modify the miniwindow border color.
Pager
To adjust the visual size of the pager, change the value for the slider labeled
“Pager Size”.
To dim the opacity of the pager, change the value for the slider labeled “Opacity”.
The "Display Icons in Pager" option allows you to show the icon of the application
associated with a mini-window in the pager. Unchecking this option displays
blank, white mini-windows (see Figure 17 and Figure 18).
Figure 17: Pager with icons in mini-windows
Figure 18: Same pager, but without icons in mini-windows
The "Disable shadow for pager" option allows you to remove the display of the
shadow on the pager window (see Figure 19 and Figure 20).
27
Figure 19: Pager with shadow
Figure 20: Same Pager without shadow
Using the pager, you can always move mini-windows from one virtual desktop to
another simply by dragging them within the pager. By default, CodeTek
VirtualDesktop Pro you may not reposition windows by repositioning the miniwindows in the pager. If you want to allow this behavior, enable the “Allow
windows to be moved from pager” option. After this option is checked, you can
drag mini-windows to new locations within a virtual desktop and their
corresponding windows will be relocated on the screen.
By default, CodeTek VirtualDesktop Pro’s pager can be positioned anywhere on
your screen. To prevent the pager from being detached from the edge of your
screen, check the “Lock pager to screen edge” option. To allow the pager to be
positioned anywhere upon your screen, uncheck this checkbox.
Much like the Dock, CodeTek VirtualDesktop Pro’s pager can be automatically
hidden when not in use and shown when your mouse is positioned where the
pager has been hidden. Check the “Autohide pager” checkbox to enable this
behavior. When the pager is hidden, you will only see a small strip of one edge
of the pager. To raise the pager, move your mouse over this edge and keep your
mouse within the boundaries of the pager. After your are finished using the
pager, simply move your mouse pointer outside of the pager boundaries and the
pager will again autohide.
You may customize the window level of the pager on this tab. Setting the window
level control to "Always on top" will make the pager float above all other windows
on your virtual desktop. Setting the window level control to "Normal window level"
will allow the pager window to be mixed in with the other windows on your virtual
desktop. Setting the window level control to "Always on bottom" will make the
Pager window stay below any other window on your desktop.
28
ToolTips
ToolTips are a handy method of obtaining information from the pager about miniwindows or the name of your virtual desktops. To enable ToolTips, check the
“Display ToolTips for pager information” checkbox. When you position your
mouse over a mini-window or virtual desktop in the pager, a rectangle with the
information about the mini-window or virtual desktop will be displayed. To
specify what information is displayed in the ToolTip, select “Display window
name only”, “Display desktop name only”, or “Display window and desktop
names.” Also, you can choose the color of the ToolTip text and the background
color by clicking the “Text color” and “Background color” color wells respectively.
29
The Menu Extra Tab
The Menu Extra tab (see Figure 21) allows you to modify appearance and
behavior of CodeTek VirtualDesktop Pro’s menu extra. You may, among other
things, disable the menu extra, choose what information is shown, and choose if
the window list is shown.
Figure 21: The Menu Extra tab
Menu Extra
You can disable the display of menu extra by unchecking the "Display CodeTek
VirtualDesktop menu extra" checkbox and enable the menu extra by checking
the checkbox. You can display the mini-window icon, the virtual desktop name or
both, in the menu extra by selecting the corresponding option. Check the
“Display window list in menu” checkbox to have the menu extra display the
30
window list in a hierarchical arrangement (see Figure 22 and Figure 23). Click the
“Select Font…” button to choose a font for the menu extra.
Figure 22: Menu Extra menu without window list
Figure 23: Window List in Menu Extra
31
The Startup Tab
The startup behavior of CodeTek VirtualDesktop can be customized on the
“Startup” tab of the preferences (see Figure 24). For example, you can restore
windows to their last known virtual desktop position, you can prevent the pager
from being displayed, and you can disable the splash screen.
Figure 24: Startup tab
Enabling the “Restore window positions” option will move windows back to the
virtual desktop they were on when you last quit CodeTek VirtualDesktop. To take
full advantage of this option, it is recommended that you always quit CodeTek
VirtualDesktop Pro before you shut down or restart your Mac. Disabling this
option will cause windows to start up on the startup virtual desktop (described
below). This option is always overridden by the per-application handling of
32
windows as configured on the “Applications” of the preferences (see
“Applications tab” section).
Enabling the “Display Pager” option will cause the pager to be displayed on the
screen at startup. The pager can be hidden after startup via the “Display/Hide
Pager” HotKey or the “Hide Pager” item of the menu extra. Disabling this option
will cause the pager to start up in the ‘hidden’ mode, and it will not be visible at
startup.
Enabling the “Display splash screen” option will display the informational splash
screen at startup. Disabling this option will prevent the display of the splash
screen.
You can choose which virtual desktop you would like to have active on startup by
choosing a virtual desktop name in the “After startup switch to desktop” menu list.
This will cause all currently open windows (not configured otherwise) to appear
on this virtual desktop.
Enabling the “Launch CodeTek VirtualDesktop at login” option will put CodeTek
VirtualDesktop Pro in the startup items list for your current user. Disabling this
option will remove it from the list so that it is not started up automatically when
you login.
33
The HotKeys Tab
HotKeys allow you to interact with CodeTek VirtualDesktop Pro by pressing
customizable key combinations. For example, you can set HotKeys to switch
virtual desktops, quit the application, show the preferences window, or display a
contextual menu to control a window (see Figure 25).
Figure 25: The HotKeys tab
HotKey Availability
If you do not wish to use any HotKey actions, you may disable them by
unchecking the “HotKeys are enabled” checkbox. You can also enable or disable
the other HotKeys via a HotKey, shown on the right side of the “HotKey
Availability” section of the HotKeys tab. That special “Master HotKey” has it’s
own “Set HotKey…” and “Clear HotKey” buttons which work as described below.
34
Desktop Switching and Action HotKeys
The following features are accessible through HotKeys:
• Enable/Disable all HotKeys listed below
• Move directionally between the virtual desktops
• Return to the virtual desktop that was active before the active virtual
desktop
• Move directly to any virtual desktop by name
• Quit CodeTek VirtualDesktop Pro
• Display the preferences window
• Display the contextual menu for the window under the mouse pointer
• Display a menu with a list of all virtual desktops and their windows
• Display the contextual menu for Classic applications
• Enable/disable switching virtual desktops using the mouse
• Enable/disable focus follows mouse
• Show/hide the pager GUI
• Hide/Display the windows on the active virtual desktop
You can assign a HotKey by selecting it in the appropriate table and hitting that
table’s “Set HotKey…” button. Clicking that button will cause a sheet to drop
down, (see Figure 26).
Figure 26: The Set HotKey sheet
Press the desired HotKey, and click the “Accept” button. If you do not wish to
change the HotKey, click the “Cancel” button. You can disable a single HotKey
by selecting it and clicking the appropriate “Clear HotKey” button. You can
restore the default HotKeys for virtual desktop switching by clicking the “Restore
Desktop Switching Defaults” button. You can restore the default action HotKeys
by clicking the “Restore Action Defaults” button.
35
The Applications Tab
The Applications tab gives you control over how CodeTek VirtualDesktop Pro
handles windows on a per-application basis. For example, you can make an
application’s windows appear on a specific virtual desktop when they are
created, make an application’s windows sticky, or have an application’s windows
ignore the focus follows mouse feature (see Figure 27).
Figure 27: The Applications tab
By adding an application to the “Application” list, you can change how that
application’s windows will be handled. By changing settings for the “OTHER
APPLICATIONS” entry, you can change how all other applications’ windows will
be handled. To add an application to the list, click the square “+” button below the
“Application” list. If you no longer want some applications to be specially handled,
you can remove those applications by selecting them and clicking the square “-“
36
button.
If you want to change the settings for multiple applications, you can select
multiple entries in the “Application” list by command-clicking them; the options
will affect all of the selected applications. You can also select all of the
applications in the list by clicking the “Select All” button, and then deselect some
entries by command-clicking on them. You can easily deselect all of the entries in
the table by clicking the “Deselect All” button.
You can make new windows for applications always appear on a particular virtual
desktop by choosing the desired virtual desktop from the drop-down list titled
“New windows for this application will start on the desktop named”. When a new
window for the selected applications is created, it will automatically move to the
assigned virtual desktop. If the “Any Desktop” option is selected for an
application, new windows created for that application will appear on the active
virtual desktop (subject to the setting for the “Place new windows…” option
discussed below).
Enabling the “Show this application’s windows on all desktops” option for an
application will make all of the windows for that application “sticky” by default, so
that they appear on all virtual desktops. If this option is not enabled for an
application, the application’s normal windows will appear only on one virtual
desktop.
Enabling the “This application’s windows will ignore focus follows mouse” option
for an application prevents input focus from being given to any window for this
application with the focus follows mouse feature. If this option is not enabled for
an application, the application’s windows will receive input focus from the focus
follows mouse feature.
Enabling the “Switch to the desktop of this application’s topmost window when it
becomes active” option for an application causes you to switch to the virtual
desktop of any window of this application when it becomes active. This option
allows you to switch virtual desktops by clicking on an application icon in the
Dock, or by using the command-tab application switcher.
Enabling the “Make palettes and other non-standard windows of this application
not sticky by default” option treats palettes and “floating windows” like normal
windows for the selected application. This feature allows you to place palettes on
one virtual desktop and content windows for the same application on a different
virtual desktop. It is recommended that you also disable the “Switch to the
desktop of this application’s topmost window when it becomes active” option if
you enable this option to prevent unwanted virtual desktop switches when
palettes are created. If this option is not enabled palettes and floating windows
37
will be sticky for the selected application.
By enabling the “Place new windows for this application on the same virtual
desktop as the application’s topmost window” option for an application, you can
easily group all of the windows for an application onto the same virtual desktop.
When a new window is created for this application, this option will cause it to
move to the virtual desktop of the current top-most window for that virtual
desktop. For example, if the last Safari window that you used is on the first virtual
desktop, and you are currently on the second virtual desktop and you open a
URL in an email (which causes a new Safari window to appear), it will appear on
the first virtual desktop with the other Safari window.
Enabling the “Restore unminimized or unhidden windows for this application to
their original desktop” option for an application, will cause windows be moved
back to the virtual desktop they were originally on when they are unminimized.
Also, windows of applications that are hidden (via the “Hide Application”
command in Mac OS X) will move to back to the virtual desktop they were
originally on when the application is unhidden. If this option is not activated for an
application, the windows will always appear on the active virtual desktop when
they are unhidden or unminimized.
38
The Registration Tab
The Registration tab (see Figure 28) allows you to register CodeTek
VirtualDesktop Pro. Registering for CodeTek VirtualDesktop Pro is covered in the
Registering CodeTek VirtualDesktop Pro section at the beginning of this
document. This tab also allows you to send feedback to CodeTek Studios and
check for product updates.
Figure 28: The Registration Tab
Communicate with CodeTek Studios, Inc.
To send CodeTek Studios feedback, please press the "Send Feedback…"
button, or send us an email at [email protected]. We appreciate receiving
your suggestions and comments! If you use the “Send Feedback” button, please
do not change the subject line of the email that pops up, as it contains important
39
version information for our records.
If you click the "Check For Product Update…" button while you are connected to
the Internet, the CodeTek Studios Web Site will be queried for any updates to
CodeTek VirtualDesktop Pro. When you purchase a registration code for a
product from CodeTek Studios, Inc., all updates (bug fixes and minor
enhancements) and customer support are free! We do charge for Upgrades
(major enhancements) released for public sale more than 90 days after date of
purchase.
40
Controlling CodeTek VirtualDesktop Pro through
AppleScript
Getting the List of Virtual Desktop Names
You can get a list of the virtual desktop names by accessing the "desktopNames"
attribute of the CodeTek VirtualDesktop Pro application with the "get" command.
Here is an example script that stores the list of desktop icon set names in a list
variable called "names":
tell application "CodeTek VirtualDesktop Pro"
set names to (get desktopNames)
end tell
This list can then be used for any purpose that you want. Switching to a virtual
desktop and moving an application refer to virtual desktop by name.
Getting the Name of the Current Virtual Desktop
You can get the name of the active virtual desktop by accessing the
"currentDesktop" attribute with the "get" command. Here is an example script
that speaks the name of the current virtual desktop:
tell application "CodeTek VirtualDesktop Pro"
say "The active virtual desktop is " & (get currentDesktop)
end tell
Switching to a Virtual Desktop
You can switch to a new virtual desktop by using the "switchToDesktop"
command. This command returns 0 if the change succeeded, or 1 if the switch
failed. Here is an example script that switches to the desktop named "Mail":
tell application "CodeTek VirtualDesktop Pro"
switchToDesktop named "Mail"
end tell
You can switch to a particular virtual desktop icon set by position in the list of
desktop names, by getting the "desktopNames" list. Here is an example script that
switches to the second virtual desktop:
tell application "CodeTek VirtualDesktop Pro"
switchToDesktop named (item 2 of (get desktopNames))
end tell
41
Moving an Applications Windows to a Virtual Desktop
You can move all windows for an application by giving the name of the
application you want to move and the name of the destination virtual desktop to
the "moveApplication" command. This command takes two parameters:
- "named" the name of the application to move
- "toDesktopNamed" the destination virtual desktop
The following AppleScript will move the application “Mail” to the virtual desktop
named “Email”:
tell application "CodeTek VirutalDesktop Pro"
moveApplication named "Mail" toDesktopNamed "Email"
end tell
42
Troubleshooting and Questions
My window straddles two or more virtual desktops in the pager. Why does
it only appear on one virtual desktop?
In this version of CodeTek VirtualDesktop Pro, each window is associated with
only one virtual desktop. This behavior maintains a clean separation between
different virtual desktops, and also provides a significant speed increase in virtual
desktop switching.
Can Classic windows be displayed in the pager?
Unfortunately, Classic applications cannot be displayed in the pager, as the Mac
OS X operating system does not provide a mechanism for programs to determine
the locations and sizes of Classic windows. Therefore, CodeTek VirtualDesktop
Pro treats Classic applications on a per-application basis rather than on a perwindow basis. This allows you to place individual Classic applications on different
virtual desktops (using the Classic context menu), but requires that all of the
windows for an individual application remain on the same virtual desktop.
Is it possible to have the focus follows mouse feature give focus to a
Carbon window without bringing it forward?
No, Carbon windows behave somewhat differently than other windows. We are
currently researching solutions to this issue. This feature is still a work-inprogress and it is possible that we will not find a suitable solution.
Why can’t I reposition Microsoft Word windows in the pager?
Because Microsoft Word windows use specialized drawing methods,
repositioning them via the pager results in corrupted windows. Therefore, we
have purposely disabled repositioning Microsoft Word windows via the pager to
prevent this problem from occurring. You can still move Word windows between
virtual desktops via the pager; only window repositioning has been disabled.
Why can’t I set different custom desktop backgrounds for each of my
displays?
At this time, CodeTek VirtualDesktop Pro does not support having different
backgrounds on each virtual desktop on additional displays. Because there is no
standard Mac OS X desktop background changing mechanism, we are
somewhat limited in what we can do at this time. We hope to be able to support
this feature in a future release.
43
Why do my HotKeys using F4 and F6 sometimes get unassigned?
In Jaguar (Mac OS X 10.2), the Keyboard Access feature will sometimes
unassign HotKeys that are in use by other applications if the “Use control key
with” option is “Function Keys”. This appears to happen even if Keyboard Access
is turned off. Keyboard Access if configurable via the Keyboard & Mouse control
panel in System Preferences. This problem does not occur in Panther (Mac OS X
10.3).
Where can I get up to date information to troubleshoot my problem when it
isn’t answered here?
Please visit our Information Center , which we update frequently with answers to
common questions about CodeTek VirtualDesktop Pro and our other products.
You can find our Information Center at:
http://www.codetek.com/support
If you don’t find an answer to your question or problem in our Information Center,
please send us an email at [email protected] and we will respond as soon
as possible.
Known Issues
•
•
•
•
Drawers don't give their windows focus through focus follows mouse.
Another window may cover pop-up windows when focus follows mouse is
active.
Changing custom desktop backgrounds during virtual desktop switches is
slow.
Large background images for pop-up information windows causes virtual
desktop switching to be slow.
44
Skin Creation
If you wish to make a new skin, you may download the skin creation tool package
directly from:
http://www.codetek.com/VirtualSkinTool.sit
Included in the skin creation tool package is a document that explains the skin
creation process and an application that will create the skin in a format that can
be read by CodeTek VirtualDesktop Pro. If you create a skin, you may submit it
for inclusion on the Skins homepage by emailing the skin file to
[email protected]. CodeTek Studios, Inc. reserves the right to accept or
reject any skin submitted. The submission of a skin includes, directly or
indirectly, the permission for any other person to use that skin without
compensation to the skin’s creator.
45
Special Thanks
We would like especially to thank the following people for their help on CodeTek
VirtualDesktop 3.0.
• Adrian Umpleby for his great work at getting OroborOSX and VirtualDesktop to
work well together. You may download OroborOSX from http://oroborosx.sf.net/
• The Apple X11 Users mailing list for their help in beta testing and advice on X
Window programming. In particular, John Harper of the Apple X11 Users mailing
list provided detailed help for several issues.
• Brian Hannan for the slick new “Mac OS X style” default pop-up background
image
• Mark Degg for his wonderful skin and icons. Please check out Mark's website at
www.osxp.net
• Red Shed Software/Jonathan “Wolf” Rentzsch for his mach inject and mach
override code that allows us to work some of our magic. Please check out
Jonathan's always interesting web log at http://rentzsch.com/
• Slava Karpenko for help with low level API's in Mac OS X. Slava works on
some great applications such as WindowShade X that can be found at
http://www.unsanity.com/
If you visit any of their sites, please tell them that we sent you there! CodeTek
VirtualDesktop Pro would not be where it is today without the help from these
people, and all of our beta testers who have helped so much! Thank you!
46
Index
HotKeys tab, 34
AppleScript
Using to get a list of virtual desktop names,
41
Using to get the active virtual desktop, 41
Using to send an application to a virtual
desktop, 42
Using to switch virtual desktops, 41
Application list
adding to, 36
handling non-specified applications, 36
removing applications from, 36
selecting entries in, 37
Applications tab, 36
autoraise
known issues with, 43
autostarting CodeTek VirtualDesktop Pro, 33
Information Center, 44
input focus
definition, 10
Keyboard Access
known issues with, 44
Known issues, 44
menu extra
customizing appearance, 30
definition, 8
Menu Extra tab, 30
Microsoft Word
known issues with, 43
Mini-windows
cutomizing behavior, 28
definition, 7
Classic, 35
Classic application pop-up menu, 9
Classic applications, 6
known issues with, 43
contextual menu, 35
Number of desktops, 22
Pager
autohiding, 28
changing opacity, 27
customizing colors, 27
customizing ToolTips, 29
definition, 7
hiding at startup, 33
locking to screen edge, 28
setting window level, 28
Pager contextual menu, 9
Pager Edges, 22
Pager tab, 26
Pager Visibility, 35
palettes, 37
Preferences, 20, 21
default HotKey, 21
opening, 19
Product updates, 40
Desktops tab, 21
Disable Pager Shadow, 27
disabling features, 10
HotKeys that toggle features, 10
override key, 10
Display Icons in Pager, 27
Finder desktop, 6
Focus follows mouse
autoraise, definition of, 11
customizing, 24
definition, 10
enabling, 23
setting application to ignore, 37
Grid
customizing color, 27
definition, 6
grouping application windows, 38
quitting, 19
with HotKey, 35
HotKey
"Master" (enable/disable others), 34
HotKeys
assigning, 35
available HotKey actions, 35
defintion, 6
disabling single, 35
Registering, 12, 15
Registration tab, 39
Restoring window positions, 32
Skins
creating and distributing, 45
downloading new, 26
47
setting, 26
splash screen
disabling, 33
Startup tab, 32
Sticky windows
definition, 6
making all windows for an application sticky,
37
Support information, 39
Switching tab, 23
customizing switching between, 23
definition, 6
moving windows, 38
moving windows between, 28
moving windows to, 9
renaming, 22
setting a custom desktop background for, 22
setting startup desktop, 33
switching between, 8
switching between with the mouse, 23
virtual desktops only affect main display, 22
Troubleshooting, 7, 24, 43
Window contextual menu, 9
Window list
definition, 7
displaying in menu extra, 30
displaying with HotKey, 35
Virtual desktops
assigning applications to, 37
automatically switching to, 37
carrying a window between, 9
Creating AppleScript triggers for, 22
48