1
V2.0
Quick and dirty user/reviewer guide
by Paolo Besser
About this manual
This manual is a quick-starter guide. It will help you dealing with Icaros Desktop basics like installing,
setting up the system and managing the GUI. A deeper, bigger user reference guide will be published later
on. Stay in touch with www.icarosdesktop.org for more information.
Table of contents
1. Introduction......................................................................................................................................5
1.1 What's new in this version?...................................................................................................6
1.2 Two ways to use Icaros Desktop Live!.................................................................................6
1.2.1 Using Icaros Desktop as a real operating system.....................................................6
1.2.2 Using Icaros Desktop Live! in the QEMU virtual machine.....................................7
Sound.................................................................................................................................7
Networking........................................................................................................................7
After “Installation”............................................................................................................7
Shared folder......................................................................................................................7
1.3 Before you start using Icaros Desktop Live!.........................................................................8
1.3.1 Desktop and icons.....................................................................................................8
1.3.2 Windows (and listers)...............................................................................................8
1.3.3 Magellan specific new items....................................................................................8
1.3.4 AmiStart....................................................................................................................9
1.4 Icaros “Workbenches”...........................................................................................................9
1.4.1 Wanderer...................................................................................................................9
1.4.2 Magellan.................................................................................................................10
1.5 The AROS Keyboard..........................................................................................................10
1.6 Right menu..........................................................................................................................10
1.7 Icons and files......................................................................................................................11
1.8 AmiStart..............................................................................................................................11
1.8.1 Compact and Full profiles.......................................................................................11
1.9 MyWorkspace....................................................................................................................12
1.9.1 MyWorkspace in DVD-Live mode.........................................................................12
1.9.2 MyWorkspace sub-directories and assign...............................................................12
1.10 Virtual Machines...............................................................................................................13
2. Installation......................................................................................................................................14
2.1 First boot configuration steps..............................................................................................17
2.1.1 Locale settings........................................................................................................17
2.1.2 Input settings...........................................................................................................18
2.1.3 Screen Mode settings..............................................................................................19
2.1.4 AHI (Sound) settings..............................................................................................19
2.1.5 IControl settings.....................................................................................................20
2.1.6 Icaros environment settings....................................................................................20
2.2 Create a “installation Pen-drive”...............................................................................21
3. Optimizing boot..............................................................................................................................24
3.0.1 Icaros Desktop (native graphics)......................................................................................24
3.0.2 VESA modes...........................................................................................................25
3.0.3 Detecting supported VESA resolutions..................................................................25
3.0.4 Use of a fixed, different VESA resolution..............................................................25
3.0.5 Icaros Desktop (True colour VESA, legacy drivers, no TLSF)..............................26
3.1 Modifying the initial menu (you need to install Icaros Desktop)......................................26
3.2 Customizing AROS.............................................................................................................28
3.2.1 Changing screen resolution.....................................................................................28
3.2.2 Changing desktop appearance................................................................................29
3.3 Enabling sound....................................................................................................................30
3.3.1 Choosing a startup sound........................................................................................31
3.4 Configuring the network.....................................................................................................32
3.4.1 Automatic IP address..............................................................................................32
3.4.2 Manual configuration..............................................................................................32
3.5 Configuring Icaros Desktop services.................................................................................33
3.5.1 Changing default file manager (GUI Choice)........................................................34
3.5.2 Automatic shell.......................................................................................................34
3.5.3 Enabling/disabling Opaque.....................................................................................34
3.5.4 Enabling/disabling FKey (Windows-like shortcuts)...............................................34
3.5.5 Enabling/disabling FTP server (file sharing)..........................................................34
3.5.6 Enabling/disabling AmiStart...................................................................................34
3.5.7 Changing AmiStart behavior..................................................................................34
3.5.8 Enabling VNC Server (remote admin)...................................................................34
3.5.9 Enabling AmiBridge Amiga™ Virtual Machine....................................................34
3.6 Configuring USB peripherals.............................................................................................35
4. Managing Icaros with Magellan.....................................................................................................36
4.1 Listers.................................................................................................................................37
4.1.1 Lister toolbar...........................................................................................................38
4.1.2 Source, Destination and neutral listers...................................................................40
4.2 The main menu....................................................................................................................41
4.2.1 The “Program” menu..............................................................................................41
4.2.2 The “Icaros” menu..................................................................................................42
4.3 Customizing Magellan........................................................................................................42
4.4 Environment........................................................................................................................44
4.4.1 Backgrounds...........................................................................................................44
4.4.2 Desktop...................................................................................................................45
4.4.3 Display....................................................................................................................46
4.4.4 Hide Method...........................................................................................................46
4.4.5 Icon Display............................................................................................................46
4.4.6 Icon Settings...........................................................................................................47
4.4.7 Locale and Miscellaneous.......................................................................................48
4.4.8 Sound events...........................................................................................................48
4.4.9 WB Emulation........................................................................................................49
5. Icaros and other computer on the local network.............................................................................50
5.1 Sharing files over the local network....................................................................................50
5.1.1 ...using YAFS FTP server.......................................................................................50
5.1.2 ...sharing folders with Windows XP.......................................................................50
6. Keeping Icaros Desktop updated (Icaros Desktop must be already installed on HD)...................53
6.0.1 File..........................................................................................................................53
6.0.2 Internet....................................................................................................................53
7. Running Amiga™ software inside Icaros Desktop........................................................................54
7.1 Running Amiga games and demos under Icaros Desktop...................................................54
7.1.1 Adding a single disk game/demo............................................................................54
7.1.2 Adding a multiple disks game/demo.......................................................................56
7.1.3 Running imported games........................................................................................57
8. Running classic M68K applications...............................................................................................58
8.1 AmiBridge's M68K environment........................................................................................58
8.1.1 Filesystem...............................................................................................................58
8.1.2 Running applications: required steps......................................................................58
8.2 Setting up the 68K environment................................................................................61
8.2.1 Presets.....................................................................................................................61
Integration........................................................................................................................62
Fullscreen: a full 68K experience on a new screen.........................................................62
New screen without GUI: a clean emulation screen for your classic apps......................63
Windowed layer: a 68K window on your Wanderer screen............................................63
8.2.2 Advanced Options...................................................................................................64
GUI..................................................................................................................................64
68K Auto Shell................................................................................................................65
Probe Coherency..............................................................................................................65
When ready......................................................................................................................65
Shared preferences...........................................................................................................67
8.3 Running AROS 68K............................................................................................................67
8.4 Running AmigaOS™ 3.X inside AmiBridge......................................................................68
8.4.1 Integrating AmigaOS™ 3.X...................................................................................68
8.4.2 Running AmigaOS™ 3.X.......................................................................................69
8.4.3 Running AmiBridge at startup................................................................................70
8.5 AROS 68K vs AmigaOS™ 3.X..........................................................................................71
9. Something you should know about applications............................................................................72
9.1 Browsing the web with Odyssey Web Browser..................................................................72
9.1.1 Watch YouTube videos with OWB and MPlayer...................................................72
9.2 Record your music like professionals do, with AudioEvolution 4.....................................74
9.3 Burn your DVDs with FryingPan.......................................................................................74
9.4 68K Applications.................................................................................................................75
9.4.1 TVPaint...................................................................................................................75
9.5 Read your PDF files with ArosPDF....................................................................................76
9.6 Write your best-seller with Cinnamon Writer.....................................................................77
9.7 Play many SDL games and some great classics..................................................................77
9.7 Paint your pictures with LunaPaint.....................................................................................78
9.8 Develop your applications with GCC and Murks! IDE......................................................78
9.9 Play your favourite music, DVD and videos with Mplayer................................................79
9.10 Locate your friends of Messenger with SabreMSN..........................................................79
9.11 Make your own music with HivelyTracker, MilkyTracker and ProTrekkr.......................80
10. Credits...........................................................................................................................................81
Alexander Karpenko.................................................................................................................81
Andrea Lazzarotto.....................................................................................................................81
Delta Nine.................................................................................................................................81
Mark Sheeky.............................................................................................................................81
Olaf Schönweiß.........................................................................................................................82
Poke53280.................................................................................................................................82
1. Introduction
The AROS Research Operating System is a lightweight, efficient and flexible desktop operating system,
designed to help you make the most of your computer. It's an independent, portable and free project,
aiming at being compatible with AmigaOS 3.1 at the API level (like Wine, unlike UAE), while improving on
it in many areas. These lines, taken from the official Aros.org homepage, explain in a few words one of
the most interesting open source projects available. Being distant from both Linux and Windows
experiences, AROS is growing as a true alternative for people bored by the complex and resources-hungry
competition. A niche OS, whose strongest features are speed, compactness, responsiveness, amazingly fast
boot time and relatively tiny applications size.
However, like many other niche projects, AROS relies on few active developers. The team has already
done a great job, re-implementing most of the functions of the original AmigaOS while improving them
with modern features, such as an hardware abstraction layer, an original driver model, USB and TCP/IP
stack, which allow AROS to be used for virtually everything today. The main issue, anyway, is the lack of
drivers and applications, two holes that might be easily filled with more developers. Most of AROS
applications have been placed on a repository called "The Archives", located at http://archives.arosexec.org and a tool called AAEDT has been developed to help downloading software. These applications,
however, are often difficult to install and configure for a novice user. Even AROS itself, relying on the oldage Amiga lifestyle, it's enough user-friendly for the middle/skilled user, but slightly difficult to manage
for newbies.
And here Icaros Desktop steps in. Icaros Desktop started in November 2007 as VmwAROS, a pre-configured
AROS environment for the popular VMware virtual machines. It came with a collection of applications and
games already installed and configured, often with some hand-made scripts, that let the user run them as
easily as clicking twice on a icon. Since then, Icaros Desktop turned into a real distribution which can
easily run on real hardware or virtual machines. It is now available in two different flavours:
Icaros Desktop LIGHT is a reduced version of the LIVE! DVD, which provides the core features of
Icaros Desktop and can be burnt onto a single CD-ROM. Only ISO file is provided, there's no pre-configured
QEMU virtual machine. It includes AROS system files, Icaros mandatory applications (web browser, text
editor, word processor, timidity MIDI renderer, Audio Evolution 4, media player) and the AmiBridge
subsystem, which allows almost-seamless integration of binary Amiga 68K games and applications.
Icaros Desktop LIVE! is a pre-configured environment on a bootable live-DVD which includes
everything the Light version has, plus about 2 gigabytes of games, emulators, multimedia editors, song
trackers, graphics applications and many more: not the whole AROS software available on the Archives,
Aminet and developer websites, but certainly a good amount of. Icaros Desktop Live also includes a
complete SDK and many development tools and languages: in other words, everything you need to start
your own AROS app which will make you rich and famous! (well, this might be a little difficult...).
Icaros Desktop Live! is tailored to give the best AROS experience, providing the best example of what this
wonderful operating system can do. You don't even need to install it on your real hardware: for a quick
test, you may even run it on top of Windows using the provided QEMU virtualizer, which does not need
installation. It will be considerably slower, however. For this reason, we warmly suggest a native setup on
a real PC or, if you don't own supported hardware, in a VMware or VirtualBox virtual machine.
1.1 What's new in this version?
Icaros Desktop 2.0 introduces a fair amount of new features:
The whole ABIv0-on-trunk AROS backport: all system files, including kernel, libraries and device
drivers, have been backported from ABIv1 to ABIv0. In simplier words, this means that the core of the
operating system has changed with a more advanced one. It should be fully compatible with your current
applications and make them work better.
A new, faster and more reliable TLSF memory manager, which will reduce RAM fragmentation and
progressive degradation of performances users of former releases experienced until today.
A better consistent M68K environment for classic applications. Running Amiga programs is a
mandatory task for Amigans and former Amigans, but it required original OS and KickStart™. This is not
true anymore, since we can use AROS 68K both for playing games that hit the hardware and to run classic
Workbench™ applications. But if you prefer, you can always integrate Amiga Forever as usual.
Newer, exciting applications like the quick image viewer/editor ZuneView.
The ability to mount and dismount with ease ISO, ADF disk images.
Magellan and Scalos as workbench replacements, if you feel Wanderer is too much limited for your
needs. Magellan is already configured to interact with other Icaros components, so everydays file
management tasks will be quicker and easier to perform. Scalos port is still in alpha stage and not preconfigured, though, so its use as desktop replacement is discouraged.
The most updated AROS SDK environment
A more advanced web browser: Webkit-based OWB 1.23 lets you browse websites that didn't work
anymore with former AROS version 1.16.
1.2 Two ways to use Icaros Desktop Live!
Icaros Desktop LIVE! comes in a package which includes these files
Icaros-pc-i386.iso: the Icaros Desktop Live! ISO image you can burn into a physical DVD
IcarosDesktop_manual.pdf: a quick and dirty user guide with installation steps
Emulator: a drawer that contains the free virtual machine QEMU
Share: a drawer that may be used to make host contents available to Icaros virtual machine
Run_Icaros_in_Windows.bat: a launch script for Windows 2000, XP and upwards
aroshdrive.img: virtual hard drive for QEMU installations.
You can either run Icaros Desktop Live! as a normal operating system for a real PC or simply “look at” it by
running it into the included virtual machine. There are advantages and drawbacks in both cases.
1.2.1 Using Icaros Desktop as a real operating system
If your hardware is supported by AROS, you can consider installing it onto the hard drive, and use it as
an alternative operating system along with any other eventually installed in the same hard drive. You will
need some blank (unpartitioned) space on the drive, and maybe you'll have to edit a little GRUB2
configuration files to access all the other systems (Windows should be added automatically at the end of
the list by AROS installer, but if you have any other OS installed, you have to edit /boot/grub/grub.cfg file
accordingly). For security reasons, you might prefer to use a blank EIDE or SATA drive for Icaros Desktop,
or install it on a USB pendrive, so you will be sure you won't hurt any existing and important data.
Installing Icaros Desktop on the hard drive is the best way to enjoy all AROS features: amazingly fast boot
times (about 12 seconds on the average nowadays PC, but it can be even faster), instant-response to user,
sound support (if you have the right audio cards) and accelerated 3D for many Nvidia and Intel cards (if
you have problems, though, you can switch to VESA modes). There is no real drawbacks in using Icaros
Desktop on real hardware, just the time spent preparing, installing and configuring it. You can even just
use the Live version without a real installation: you won't be able to save your preferences, files and
boot/loading times will be considerably slower.
1.2.2 Using Icaros Desktop Live! in the QEMU virtual machine
Icaros Desktop Live! includes a free, open source virtual machine to let you “test” the OS even without
installing it on your real hard drive. It can run inside Windows exactly as any other applications. Just
execute Run_Icaros_in_Windows.bat file to launch QEMU and the right virtualizer (32 or 64 bit) will run
Icaros Desktop Live! DVD without the need of burning it on a physical DVD-R. You will be almost in the
same conditions as a user who has launched the DVD on a real computer. In fact, you will need to install
Icaros Desktop on a virtual hard drive (it's provided with the virtual machine, so no problems here) and
configure it to get the most of it. QEMU doesn't use your real hardware, so you will need to configure AROS
using the QEMU emulated hardware.
Sound
Newer revisions of QEMU (including the one provided with Icaros Desktop Live!) include emlation of
several sound cards (AC97, SB128 and HDAudio). In order to hear sound from AROS, though, you'll have to
set the “SB128” audio drivers in prefs/AHI for music and audio units. AHI should be able to detect it
automatically.
Networking
Networking in QEMU is possible, and network should be configured automatically.
After “Installation”
Once you'll have installed Icaros Desktop on your virtual machine (follow chapter 3 like it was on a real
computer), you might need to edit Run_Icaros_in_Windows.bat with a text editor, in order to switch the
boot peripheral from the virtual DVD drive to the virtual hard drive. To get rid of the virtual DVD you may
delete the highlighted part:
start %emulator% -vga vmware -name "Icaros Desktop" -hda "..\aroshdrive.img"
-cdrom "..\icaros-pc-i386.iso" -hdb fat:..\Share -soundhw ac97 -net
nic,vlan=0,model=pcnet -net user,vlan=0 -usb -localtime -m 1024
Shared folder
We've added a 'share' subdirectory in our file extraction path where you can easily place whatever file you
want to share with your Icaros environment, and have it shown by Icaros Desktop among the virtual drives.
This shared portion of Windows filesystem is read only: you can copy things from Windows to Icaros using
it as a temporary directory (just place your files there), but not vice-versa.
1.3 Before you start using Icaros Desktop Live!
AROS is still alpha software and this means it could not work correctly on your computer. If you are totally
new to AROS, you'd want to know the following:
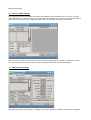
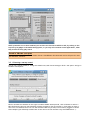
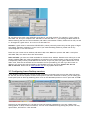
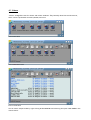
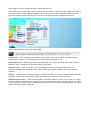
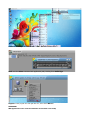
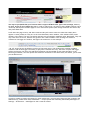
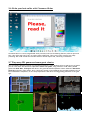
1.3.1 Desktop and icons
1. Icons lay on desktop's top left corner. Icons can be mounted volumes, shortcuts or iconized applications
already running on system. The RAM Drive (RAM:) is a special volume mounted directly in your volatile
memory. It can be used as a fast place to unpack files or a temporary buffer for your operations.
Remember that its contents will be lost when you reset or power off the machine. Icons layout and
position might vary with file managers but their functions are unchanged. Hard drives and other volumes
can have labels. You can use the RELABEL command to change them. In a shell, you can use both labels
and volume identifiers.
You can't normally place custom icons on the desktop like other operating systems allows to. If you're using
Magellan, however, you can turn on the “Files in desktop drawer” option, which will let you use a
directory as desktop. Although this option is normally disabled by default, Icaros Desktop already provides
a “Desktop” directory in MyWorkspace for this purpose.
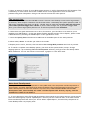
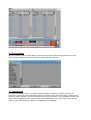
1.3.2 Windows (and listers)
2. and 3. these are Wanderer or Magellan windows, with icons inside. Icons in AROS are meant to
identify important files only, and can be used to open the described file with a different tool, to set file
properties and so on. They are mostly PNG files with the .info extension. The Show all files option allows
to see all drawers contents. You can see contents both as icons (2) or file names (3). Layout will change
according to the file manager in use.
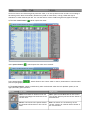
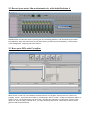
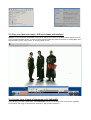
1.3.3 Magellan specific new items
4. and 5. When using DirectoryOpus 5 Magellan, windows are called “listers”. They can be set either as
“source” (SRCE), “destination” (DEST) or neutral (OFF) for file operations. A copy operation, for instance,
will copy all selected files from the source directory to the destination one.
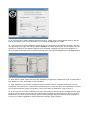
6. Magellan allows to see listers in three different modes: icon only, icon action and name (detail view).
Except icon only, other modes will introduce a lister toolbar with most common in-lister operations. Left
and mouse right buttons will perform different actons.
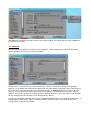
7. Magellan also introduces context menus, something traditionally considered “alien” to the Amiga
philosophy, but increasingly adopted by Amiga applications. Right clic on items like lister bar, buttons and
icons to get a list of specific actions you may apply to them.
8. The right side Action Bar replicates most lister toolbar functions and adds some other. If you're getting
confused by icons (Magellan does not provide bubble hints), you can toggle to a textual action bar thorugh
Icaros → Action Bar (Textual) option right click menu option.
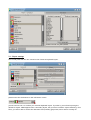
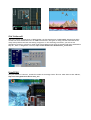
1.3.4 AmiStart
9. this nice bar is not part of AROS itself, but is a program called AmiStart. It will help you launching
programs and previewing images. Just remember it behaves differently from Windows start menu. You
can delete icons by dragging them out of the bar. You can add new ones by dragging them from Wanderer.
To close a menu, just select an option in a parent menu. To close all, click on the Icaros Desktop button on
the left side.
1.4 Icaros “Workbenches”
Icaros Desktop provides at least four different file managers: Wanderer, Magellan, Workbook and Scalos.
Only the first two, however, are already configured and mature enough to sustain everydays file
management tasks.
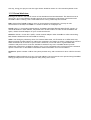
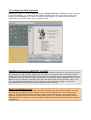
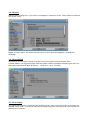
1.4.1 Wanderer
AROS' Workbench is called Wanderer. You can copy programs and files simply dragging their icons from
their location to another. You can open Windows and launch program by clicking twice on their icons. Now
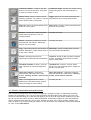
let's talk about windows. This is a window:
Windows interface contains some gadgets which can be quite handy and, when understanding their
functionality, will help you get more proficient with AROS:
1. The close gadget (
2. The iconify button (
) is on the left side of the title bar, and closes the window.
) on the right turns the current window into a icon on the desktop.
3. The toggle dimensions button (
size, or expand it again.
) on the right allows either to reduce the window to the minimum
4. The depth gadget (
) on the top right corner places the window before or after the others. AROS
behaves quite differently from most operating systems: clicking on a window won't give it the focus
immediately. You can hide a window under the others either if you're using them or not.
5. The scroll bars (
) show hidden parts of the window contents.
6. The dimension gadget (
) on the right bottom corner resizes the window as you like. This is the only
active part of the boundaries which allow you to do so.
7. The parent button (
) goes up in the directory tree, opening the parent one.
8. The path field (
) shows the current path of the window. You can edit it
to go wherever you want in the filesystem.
9. The title bar (
) shows the window name. You can move windows
wherever you want, handling them by their title bar, keeping the left mouse button pressed.
NOTE
In this manual we'll often talk about directories calling them drawers instead of folders. That
naming is a legacy from the Amiga age that AROS has proudly inherited.
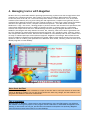
1.4.2 Magellan
BSzili's DirectoryOpus 5 port to AROS, aka “Magellan”, is the new (and default) desktop environment for
Icaros Desktop. When used in “workbench replacement” mode, it allows a fine-grained management of
files, which can be copied, moved, opened using Magellan's own instruments instead of the system ones
(which can stil be used as fallback option). Magellan provides its own configuration tools for desktop
wallpaper, sound, file recognization and associated default programs. Magellan's windows are called
listers, and can be viewed in three modes: name (details), icon and icon action. In name and icon action
modes, a cosy toolbar appears in every lister, while a general file managemnt toolbar (the “Action bar”) is
at disposal on the right side of screen.
1.5 The AROS Keyboard
Please assume this convention: whenever you read about lAros and rAros keys on this manual, we mean
the left and right Aros keys respectively. Since no keyboard manufacturer has decided yet to sell an AROS
specific one, lAros corresponds to left Windows (command on Mac, Amiga on Amiga) key and rAros to the
right one(s). Some keyboards, mainly compact, notebook and really old ones, might lack these keys. The
scheme above shows the Italian layout, some character will change depending on the language you're
using.
1.6 Right menu
AROS doesn't use context menus like Windows or
Linux. With Wanderer you won't get the familiar
context menu over an object by selecting it with the
right mouse key. Like it was in AmigaOS, you will get
the active program's option menu while you're
pressing it. Keep the RMB (right mouse button)
pressed until you have selected the option you want,
then release it. In order to have something similar to a context menu, however, Icaros Desktop sets the
Icontrol applet in Prefs, selecting Pop-Up in the Type field by default. You can change this as you like,
obviously, to get back to the classic Amiga habits. Magellan, on the other hand, provides a full contextmenu system.
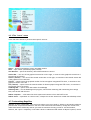
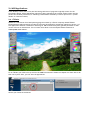
1.7 Icons and files
In AROS, as similar in AmigaOS, not all files have icons. This allows two levels
of presentation and keeps the windows noticeably cleaner. On the other
hand, this may lead to misinterpretations of the actual contents of a
directory. You can view all files by selecting the View > All files option on
the Window menu of Wanderer. Use your right mouse button to do this. You
can “fix” the method for any drawer and volume using the Snapshot →
Window and Snaphost → All options.
Once Forever (Wanderer only)
Wanderer allows the user to choose whether to use “show all files” or “icons only” by default. This
setting, however, can be over-ridden using the show → all files/only icons options in any specific drawer.
To change default view mode in Wanderer, open Prefs/Wanderer, go to the Appearance tab and click on
the Advanced button for drawers. Then look for the Default view mode option of this panel. Click OK and
save.
Warning!
Before Icaros Desktop 1.4, default view for volumes without a “disk.info” file in their root was “show all
files” (mainly good for PC CD-ROMs and pendrives). This is not true anymore, but it can be changed using
the Default view mode option as explained in the gray box above.
1.8 AmiStart
AmiStart is Icaros Desktop' toolbar and docking application (well, every serious operating system has one).
Menu |
dock section
| task list (gray = hidden, orange = active)
| clock
AmiStart behaves somewhat like Windows' task bar. There is a starting menu placed on the left, a dock
section to quick launch your favorite applications, a task list on the right and a digital clock on the right.
The dock section is really easy to customize. To delete a icon, just grab it with the left mouse button and
drag it out of the bar. If you want to add a new application, just open its drawer, grab it with the left
mouse button and drop it in the dock section of the bar (to get rid of the label, right click on the icon and
set the “hide string” option active). That's all.
1.8.1 Compact and Full profiles
Starting from Icaros Desktop 1.2.5, there are two different profiles available for AmiStart: FULL and
COMPACT. Full allows the traditional behavior of the bar, with the program menu and the task manager. It's
more complete, but it needs a very long time to load from optical devices like DVD and from slower USB
pendrives. For this reason, there is now also the Compact profile, which loads faster, doesn't need caching
of programs icon files, and behaves just like a dock applauncher. You can choose your profile using the
Services program in Prefs.
1.9 MyWorkspace
Starting from Icaros Desktop 1.2.5, a special drawer appears on the workbench screen, MyWorkspace.
Even if we don't like operating systems suggesting people where they should keep all their documents –
pardon, projects! ;-) - it's now common use for any mainstream OS to provide such a place, so we did it as
well. MyWorkspace is created during installation of Icaros onto the hard drive, in the same partition where
the user has decided to put 'extras' and eventually the 'Development' dirs. If you've installed extras in
AROS:, you'll find MyWorkspace in AROS:. If you did it in Work:, then you'll spot MyWorkspace in Work:, and
so on. For your convenience, an alias of the same drawer has been put on the desktop. Do not delete or
disable MyWorkspace: many vital components of Icaros need it to properly work!
Easy to access
Starting with Icaros Desktop 1.4, MyWorkspace is also set as default directory for the built-in FTP server,
instead of the formerly used PUB: drawer. You can move your favourite files from any other computer of
the local network straight to your MyWorkspace directory, or to any of its sub-drawers.
1.9.1 MyWorkspace in DVD-Live mode
When you're running Icaros Desktop in Live-DVD mode, without installation, you'll have MyWorkspace
temporarily created in RAM:, so don't forget that you'll loose everything you save there at the next
startup, if you don't copy it on a writable media, such as a USB pendrive. If you start Icaros in Live-DVD
mode on a system where it's already installed, you'll find two MyWorkspace directories. That's normal.
1.9.2 MyWorkspace sub-directories and assign
MyWorkspace includes five sub-directories: Documents, Downloads, Music, Pictures and Videos. What they
should contain, should be obvious. It's important to know they are accessible from the shell, and from any
application file requester, with these assigns:
MyWorkspace:
Documents:
Dowloads:
Music:
Pictures:
Videos:
this way, saving your projects into the right drawer should be matter of a few mouse/keyboard clicks.
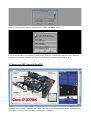
1.10 Virtual Machines
Starting from Icaros 1.2.4, the VE version of the distribution has been dismissed. This should not be an
issue at all, since Icaros Desktop already supports most virtualization technologies, like Vmware and
VirtualBox. When creating a new virtual machine for Icaros, please keep this in mind:
RAM: please allow 768 MB of RAM or more on most powerful configurations. You may run test
environments in 512 MB, but 768 MB or 1 GB are far better for everyday's use.
Sound: Icaros 1.3.2 introduced sound support for VMware emulated Ensoniq Audio ES1371 chipset. So
choose SB128 driver under VMware, but please don't use HIFI modes. On other VT like VirtualBox and
Qemu, choose the AC97 adapter for your virtual sound board.
Network: choose a “Pcnet-PCI II (NAT)” virtual network adapter under VirtualBox to allow networking.
Both Vmware emulated Pcnet and e1000 are working.
Video: even though a preliminary driver for Vmware SVGA exists, all VT should run in VESA mode only.
VMware already provides support for widescreen resolutions, but maybe it will be a good idea to limit the
SVGA resolution size to the one of your monitor. Otherwise, Icaros will start in a giant 2560x1600
resolution and you'll have to scroll the workbench window every time. VirtualBox doesn't provide
widescreen resolutions in its BIOS by default, but it can be configured to do so using some line-command
options. Please refer to VirtualBox communities and documentation for more information.
Hard drive: please consider 2 GB for the system partition only, and a minimum of other 4 GB for the work
one.
Pendrives: USB peripherals work very well under VMware, but some issues were reported using VirtualBox.
Setting up USB ports to work with Qemu is really tricky, but it works.
2. Installation
Installation on the hard drive is recommended in order to use AROS programs and save their files.
However, AROS is still alpha code and may be dangerous for any operating system already installed on your
hard drive. Keep in mind that Icaros Desktop discourages installation on production machines with
important data on them: please, use only an old drive, possibly clean and with no other partitions.
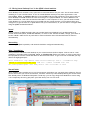
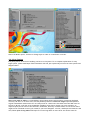
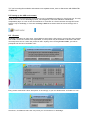
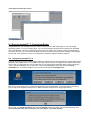
1. Open Icaros Desktop Live CD-ROM by double clicking on its workbench icon, then open your Tools
drawer
2. Launch InstallAROS and carefully read what's written in the first page. Keep it in mind and don't shout
at us if something goes wrong: you were warned. Click on proceed.
If you're installing on a USB pendrive, be sure you've cleaned it first from pre-existing partitions
(please refer to your main operating system's documentation to learn how to do so) and to choose
“USB” instead of “IDE” in the Type selector. Device should be USB mass storage and Unit number might
vary. Please use a SINGLE partition for Icaros installation onto a pendrive.
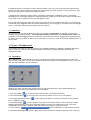
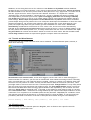
3. The first time you install Icaros Desktop, please kill anything already present on your hard drive by
selecting the wipe disk option. If you can't, or you're installing Icaros Desktop using the remaining free
space of your hard drive, just select Only use free space.
WARNING!
Please beware of the content of “device” field: if you're destroying the wrong drive, you may regret it.
If you're installing Icaros to a USB pendrive, be sure it's a USB device. See chapter 2.1 for information.
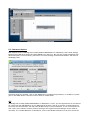
4. Check the Specify Size option on the right.
5. Select an amount of space for your AROS system partition. It will be formatted with SFS filesystem. This
is mandatory in order to boot this version of AROS and to run all applications. Some of them have
problems using other filesystems. Giving a size limit will activate the other options.
The correct size:
Bare AROS system needs less than 200 MB to install. However Icaros Desktop comes with a huge amount
of software, which require a minimum of 4 GB. Please select a reasonably thin system partition (4 GB – 8
GB), and a reasonably large work one (8 GB – 120 GB). Keep in mind that currently AROS SFS filesystem
can't handle partitions bigger than 128 GB. So, don't create a larger one. If you have a bigger hard
drive, just create a large system partition too. Or add new partitions with HDToolBox.
6. Unless there are good motivations not to do so (for instance, your hard drive is too small or you’re
installing on a USB pendrive – in this case please read the apposite section of this chapter), please create
a Work Partition by checking the Create option in the right bottom corner.
7. Leave the Specify Size unchecked to let AROS use all available space for the work partition.
8. When asked, reboot. It will take just a bunch of seconds.
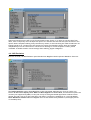
9. Repeat points 1 and 2, however, this time select Use existing AROS partitions and click on proceed.
10. To install a complete Icaros Desktop system, just check all the options below, except “Change
language options”. By unchecking Extra and Development software, you'll get a bare and barely usable
AROS installation. You can also choose to have either a graphic or a text boot menu.
Note about Development:
Development software is really important for many AROS tasks, like compression and decompression in
tar.gz format, and some applications that need executables from the Development:bin directory won't
work if Development has not been installed. To prevent this, if the user has chosen not to install
Development stuff, Icaros Desktop will create a SYS:Development/bin directory anyway, with the
needed files. Please do not delete it.
11. If you're planning to move Extras and Development files outside of the system partition, please specify
this in the following step. Special “MyWorkspace” directory will be created as well, in the same volume
Extras and Development files will be put. Do not delete “MyWorkspace”, because many components of
Icaros Desktop need it to properly work.
12. If you selected to choose language options at step 10, please select your keyboard layout in the left
side of this window. This can be done later, by launching the Input panel in Prefs.
13. If you selected to choose language options at step 10, please select your default language. The first
one appearing in the right side will be used by Wanderer and other applications. The second one will be
used only if catalogs for the default language aren't available. Language will fall back to English if no
other language is available.This can also be selected later, opening the Locale panel of the Prefs drawer.
14. Files will be copied. Please wait until the installation program has completed its task. It should take a
few minutes to 1 hour, depending on your hardware.
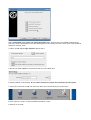
15. After installation, you will be prompted to perform either a Full or a Custom installation. The full
installation will install all the components provided with your version of Icaros. The Custom one will allow
you to choose between groups of programs. If you choose the Full installation, jump to step 17.
16. If you went for the Custom installation, please choose what to install with our package selector. Each
group of software will be shown with a brief description. Please notice that Icaros will give you as much
freedom as it can about groups selection, however some packages may be needed by other programs to
correctly run. When suggested to install a particular package, please install it.
When you're done with selection, press Continue to extract all files.
17. Files will be extracted. Please wait until the installation program has completed its task. It may take
from few minutes to 2 hours, depending on your hardware. When finished, just remove Icaros Desktop cdrom and reset your PC, to boot AROS from the hard drive.
2.1 First boot configuration steps
When booting for the first time from the hard drive (or a writable USB unit) Icaros Desktop will let you
configure most impotant system and environment settings. You may decide to proceed, to be reminded
later (at next reboot) or to completely skip this procedure. In the latest case, you will need to manually
open the control panels in the /Prefs drawer.
2.1.1 Locale settings
Icaros Desktop will let the user translate system interface to its native language, if available. Please
notice that not all locales are up to date, and some languages may lack of proper translations, making the
interface a funny mixture of english and foreign terms. Moreover, Icaros specific programs and scripts may
not support locale at all, so they will always be in english. If you can speak english, we warmly suggest to
choose your nationality on the left but keep the english language on the right.
2.1.2 Input settings
The second panel lets the user choose his/her favourite keyboard layout.
please notice the Set buttons on the left bottom corner:
you will need to use it to confirm your national keyboard layout. If you don't, you will end up using the
default US layout. AROS supports also a secondary layout, but you have to enable “Layout Switching” first.
Then, you will be able to choose the Alternate field (normally grayed out) and to select a hotkey for
keyboard switching.
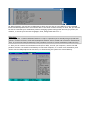
2.1.3 Screen Mode settings
The third panel will be ScreenMode. This will set the default screen resolution for your screen. If you're
using VESA mode, you won't be able to choose any different resolution from the one chosen at boot. But if
you're using a native driver for a supported video card, you will have much more choices here.
You can also set a wider area then your screen can show by unmarking the “default” checkboxes. In this
case, you will need to scroll the area to see what's hidden outside your monitor's boundaries.
2.1.4 AHI (Sound) settings
AHI preference panel will allow you to configure your audio hardware. Unluckily, only specific integrated
codecs and discrete audio cards are supported, so AROS will try to find a suitable adapter here. If it won't,
you'll end up with the VOID driver which basically 'fouls' applications letting 'em think there is an audio
device on the system, otherwise they wouldn't work. Play a test sound to be sure your hardware is actually
working.
2.1.5 IControl settings
This control panel allows to customize menus, windows and screens behavior. Icaros Desktop is already
configured to use 3D-like menus (this actually depends on themes, though) in a pop-up fashion, so the
right click menu will appear near the pointer instead of in the original Amiga top-screen bar. But you can
restore the old habits if you like. Normally, Icaros windows can be moved out of the boundaries of your
screen, but you can decide to stop this to happen, like the original Amiga workbench did.
2.1.6 Icaros environment settings
A complete description of this tool will follow in the next chapters. For now we will just describe the main
options here.
In the Environment panel we may choose the default file manager (GUI), between AROS classic Wanderer
and BSzili's port of DirectoryOpus 5 Magellan. The former is an almost complete reproduction of AmigaOS'
Workbench, so users loyal to Amiga habits might find this a better fit for them. Magellan, however, offers
a much wider set of instruments for file management, making life a lot easier. Icaros Desktop already
configured it to mimic Wanderer as much as it can, but also providing more and more functionalities.
The AmiStart option allows to select AmiStart's behavior. See chapter 1.8 and 1.8.1 for a better
explanation. The Automatic Shell checkbox enables a command line parser at startup: good if you are a
coder and/or a shell-centric user. The Opaque option allows to make AROS move contents of windows
along with their boundaries when you decide to place them elsewhere, while the FKey shortcuts option let
user disable Icaros' keyboard shortcuts that don't belong either to Wanderer or Magellan themselves.
The Networking panel allows to enable or disable two network daemons that may greatly improve Icaros'
interaction with other machines over the local network. The FTP file share option allow to run a FTP
server on the local machine, allowing users to read and write contents of MyWorkspace drawer from a
remote computer. The VNC remote workbench option, instead, allows to manage the current session from
another computer (or tablet, or smartphone) using a VNC client.
The Boot Sound panel, in the end, allows to choose a mp3 file you may play at boot time, when the
system is ready. We're skipping AmiBridge panel for now.
2.2 Create a “installation Pen-drive”
Starting with version 1.5, Icaros Desktop installations on pendrives can't be directly used to install Icaros
again onto a hard drive, using the pendrive themselves as boot devices. This is a side effect of new
installation procedure, which expects Extras and Development stuff to be archived. So, what to do if you
need to install Icaros on a hard drive, starting with a pendrive? The solution is building a pendrive which
looks like a CD-ROM. We provided a script to do that in a semi-automated way, here's what to do step by
step to use it correctly:
1. Follow chapter 3.1 to create a suitable pendrive, but in this case it's better to avoid creating FAT
partitions. Just use the whole space of a 2 GB USB pendrive, wiping all existing partitions and creating the
AROS SFS volume only.
2. Boot from your Icaros Desktop Live or Light optical media (or use the ISO image if you're doing this in a
virtual environment like VMware or VirtualBox)
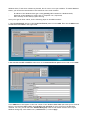
3. Run InstallAROS and follow normal USB installation. However, at this panel:
select Install AROS core system and Install Bootloader ONLY. They are the only needed components at
this time, while installing also extras and development stuff would just waste a lot of time. They would be
ripped off, anyway, later.
4. Select to use only a single partition and format it
5. Be sure to install GRUB on the pendrive and not on the hard drive
6. When finished, click Proceed. Do not reboot and do not remove the pendrive from the system.
7. Open your Icaros' CD or DVD root and scroll down the contents until you see this icon:
8. Click twice to run the “Create Installation Pendrive” script.
9. Wait for it to finish:
10. When finished, you will have a USB pendrive which will act like an Icaros DVD/CD, with packaged
Extras and Development stuff. You won't be able to use these contents directly as usual, but you will still
be able to customize your installation pendrive changing system settings with the ones you prefer (for
instance, to choose your favourite languages, fonts, background and so on...).
Warning:
Do not apply the “Create Installation Pendrive” script to a pendrive you're already using as 'production'
system: contents in Extras, Prefs and Development drawers will be erased and overwritten with default
ones, so you'll loose them permanently! This procedure is meant to create installation pendrives only!
11. Now you can remove the installation media (CD or DVD), turn off your computer, remove the USB
pendrive and use it to install Icaros Desktop on the same computer, or on other ones. Remember you'll
need to set the USB peripheral as boot drive, to allow booting the system into Icaros Desktop.
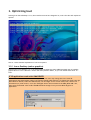
3. Optimizing boot
Starting from Icaros Desktop 1.2.6, the initial boot menu has changed a lot, with a few but self-explained
options.
Here is a more detailed explanation of our boot options:
3.0.1 Icaros Desktop (native graphics)
Starting with Icaros Desktop 1.2.6, the distribution provides the classic AROS/AmigaOS way of handling
graphic drivers. A new “Monitors” drawer has been placed in DEVS:, so you can choose what driver to
start.
If 3D applications crash with GMA DRIVER
GMA driver allocates 64 MB of video RAM by default, but users may change this size. Some 3D
applications like Cube2 might crash if not fed with enough video memory. To change this value enter the
devs/Monitors drawer, select the GMA monitor icon and right click to access menu, then choose icon →
Information (or press rAros+I). Go to the ToolTypes section and uncomment the GMA_MEM=<MB> line,
then enter the desired value in MB. 256 MB should be enough for any current AROS 3D game or
application.
3.0.2 VESA modes
If no native drivers are applicable, Icaros Desktop will fall back to a VESA mode matching (or at least near
to) your screen resolution. But don't worry, AROS VESA modes are fast. Don't be fooled by other operating
systems' bulk VESA support: under AROS VESA modes, you'll get about the same experience you'll have with
native drivers, with some minor differences, the biggest one being the inability to open secondary screens
of different resolution than the one you must choose at startup. And, currently, you can't change this
resolution once the system has loaded. VESA modes have slightly improved over time. You may choose any
resolution supported by your system BIOS. For this reason, AROS will check what is the best VESA
resolution supported by your monitor and your BIOS, and then will choose it to boot AROS. This
mechanism, however, might not work for every card/motherboard produce weird results (for instance,
opening a 2560x1600 screen on some VMware versions...), we kept teo “legacy resolutions” like 800x600
and 1024x768 with 32 bit (true colour) palette (millions of colours), you can edit at boot-time (and after)
as explained in the following chapters.
NOTE: this driver also provides the screen-dragging feature.
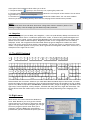
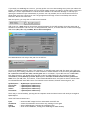
3.0.3 Detecting supported VESA resolutions
To list supported VESA resolutions of your system, just press C at the boot menu and enter the vbeinfo
command. Maybe you'll get a long list and you won't be able to read it. Anyway, you should read at least
some lines like:
just look at the resolution size parts, like “1280 x 800 x 32”. These are actually the screen sizes you can
use, providing that your monitor supports them. To return to the main menu list, press ESC.
3.0.4 Use of a fixed, different VESA resolution
Now that you have understood what VESA resolutions are supported (see chapter 4.0.2), you can boot
AROS in a resolution other than 1024x768 and 1280x1024. This can be extremely useful in VMware. For
instance, to boot AROS in a 1280x800 screen, just highlight any VESA boot option...
...and press E. You will enter edit mode for this grub line.
Move the cursor using the right arrow key in the position above, immediately after “vesa=32bit”, and
delete “32bit” using the backspace button 5 times. Now enter only the screen size, without any reference
to the palette. You can't choose colour depth, so, for now, just enter 1280x800, this way:
and don't press Enter, just press Ctrl+X instead, and AROS will start booting to the desired resolution.
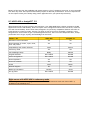
Here is a list of some interesting values you can give to the vesa setting:
16bit
Use the highest VESA resolution with 65536 colours (high colour)
32bit
Use the highest VESA resolution with 16 millions colours (true colour)
1024x768x32
Use the legacy 1024x768x32 mode (1)
1024x768x16
Use the legacy 1024x768x16 mode (1)
NNNNxMMMM
Use the NNNN pixels large and MMMM pixels high resolution (2) at the best palette available
Notes: (1) can be also 640x480, 800x600 and 1280x1024. Palette depth can be explicitly chosen only for these ones.
(2) must be supported by your BIOS VGA extensions. Please refer to chapter 4.0.4 to get a list of supported one.
Out of range?
You can also choose screen refresh rate. This will be usfeul to stop your monitor getting out of sync
when booting AROS in VESA modes. You just have to add @75 to your favourite resolution. For instance,
to force the driver running at 75Hz, you may edit the line this way:
VESA=1024x768x32@75
for compatibility reasons, Icaros defaults to a 60Hz refresh rate, which should be good for most
nowadays LCD panels. But users running Icaros on a old CRT display will prefer a higher refresh rate, in
order to keep their eyes relaxed.
3.0.5 Icaros Desktop (True colour VESA, legacy drivers, no TLSF)
This safer mode allow booting AROS with enhanced compatibility settings. This option might be slower,
and slowdown AROS' access to files, but at least it will run.
If Icaros doesn't boot correctly
Please try loading it disabling DMA. Highlight the Grub option you prefer and press E, move the cursor
over ATA=32bit and replace it either with ATA=nodma or ATA=nodma,32bit or ATA=nopci. Press Ctrl+X to
continue booting. If one among the three works for you, follow the next chapter to learn how to modify
Grub's menu file, and make these settings permanent.
Note: disabling DMA will reduce considerably AROS speed when accessing drives (like from 5 MB/sec to
about 750 KB/sec). Since Icaros updates don't modify the Grub.cfg file to keep your changes, please try
booting with ATA=32bit when a new release of Icaros Desktop is installed. AROS' ata.device is one of the
key components which is under heavier reworks by the development team.
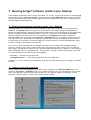
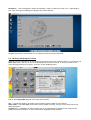
3.1 Modifying the initial menu (you need to install Icaros Desktop)
Before starting
The grub.cfg file in /Arch/pc/grub may be write-protected. So you'll have to un-protect it first, or you
won't be able to save your modifications. Unluckily, the editor won't advice you loudly about this. To unprotect the file, just open a new shell (rAros+W) and type in these commands:
sys:arch/pc/grub
protect grub.cfg RWED ADD
Scrolling that long list of resolutions every time is boring, right? Well, there's a speedy way to get rid of it.
Just open the editor by clicking here:
and load the grub.cfg file located in the /arch/pc/grub directory. You'll find something like this:
# Timeout for menu
set timeout=5
# Set default boot entry as VESA Gfx
set default=1
followed by groups of lines like these:
menuentry "Icaros Desktop (native graphics)" {
multiboot /Arch/pc/bootstrap.gz ATA=32bit floppy=disabled
module /Arch/pc/kernel.gz
module /Arch/pc/Devs/battclock.resource
module /Arch/pc/Devs/processor.resource
module /Arch/pc/Devs/timer.device
module /Arch/pc/Libs/expansion.library
module /Classes/USB/bootkeyboard.class
module /Classes/USB/bootmouse.class
module /Classes/USB/hub.class
module /Classes/USB/hid.class
module /Classes/USB/massstorage.class
module /Devs/Drivers/hiddclass.hidd
module /Devs/Drivers/graphics.hidd
module /Devs/Drivers/keyboard.hidd
module /Devs/Drivers/mouse.hidd
module /Devs/Drivers/ata_pci.hidd
module /Devs/Drivers/i8042.hidd
module /Devs/Drivers/vesagfx.hidd
module /Devs/Drivers/vgah.hidd
module /Devs/Drivers/pci.hidd
module /Devs/Drivers/pcipc.hidd
module /Devs/Drivers/serial.hidd
module /Devs/Drivers/parallel.hidd
module /Devs/USBHardware/pciusb.device
module /Devs/usbromstartup.resource
module /Devs/bootloader.resource
module /Devs/dosboot.resource
module /Devs/FileSystem.resource
module /Devs/lddemon.resource
module /Devs/efi.resource
module /Devs/hpet.resource
module /Devs/console.device
module /Devs/input.device
module /Devs/gameport.device
module /Devs/keyboard.device
module /Devs/ahci.device
module /Devs/ata.device
module /L/afs-handler
module /L/cdrom-handler
module /L/sfs-handler
module /L/ram-handler
module /L/con-handler
module /Libs/acpica.library
module /Libs/partition.library
module /Libs/poseidon.library
module /Libs/aros.library
module /Libs/debug.library
module /Libs/dos.library
module /Libs/graphics.library
module /Libs/intuition.library
module /Libs/keymap.library
module /Libs/layers.library
module /Libs/oop.library
module /Libs/utility.library
}
well, every one of these walls of text (included in { and } brackets) will manage an entry of the early
startup menu. As you may notice if you already know how AROS booted in the past, with Icaros Desktop
2.0 kernel has become fully modular, meaning that you can exclude from booting any problematic
component. Icaros already 'cut out' NTFS and FAT32 handlers since they were known for bringing issues.
This doesn't mean, though, that NTFS and FAT partitions can't be used once system has loaded: AROS can
still access them if their handlers are included in the L drawer.
If you need to make the initial menu more compact, please delete all the lines you don't need, and you're
almost done. Just notice the first four lines, that you must keep: the timeout value indicates the number
of seconds to show the startup menu, while the default one select the option which will be chosen
automatically. Please notice that the count begins with 0, not with 1, so to choose the second entry, you
have to insert 1 here and not 2. And so on.
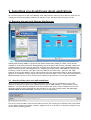
3.2 Customizing AROS
Almost all AROS settings can be accessed and changed from the Prefs drawer in AROS:. Most of options are
self-explanatory, so we won't talk about them. Some other allow deep system customization, and would
need too space for a quick guide like this. Icaros Desktop comes with João Ralha's AROS manuals: please
read them for any further information. We will cover here only the common operations.
3.2.1 Changing screen resolution
Screen resolution and colour depth can be accessed only when using ATI or Nvidia accelerated drivers (by
selecting one of them during boot). Just launch ScreenMode to change them.
3.2.2 Changing desktop appearance
You can change desktop and windows wallpaper, icon spacing and behaviour, label length, font and effects
by launching the Wanderer applet.
The General tab allow switching between the Enhanced (default) Wanderer behaviour and the Classic one.
The former opens new drawers in the same window, the latter in a new one, exactly as AmigaOS 3.x.
Please notice the Wanderer Screen Title option in the bottom of the page: it changes the default
message on the top title bar of the screen (normally Wanderer %pc graphics mem %pf other mem).
Now the Toolbar tab:
The Toolbar Enabled selector decides whether showing the path bar in every window or not. Eliminating
it, you get more "old Amiga feeling". You will prefer enabling it again.
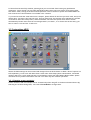
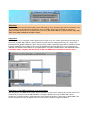
The Appearance tab is maybe the most interesting one. Click on the Workbench and Drawer buttons (the
right cyan and orange squares in the upper shot) to change wallpaper. You can select either any datatypesupported image or a colour effect. You'll find some nice wallpapers starting from the
SYS:Prefs/Presets/Patterns directory.
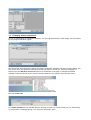
Now, let's click on Advanced. A more complex options window will appear:
< The Draw Mode option will select how the background
image
will fit in the screen
< The following options will decide how icons appear and
font/dimensions of labels under them. Change the Max
Label line length if you see truncated file names on your
volumes.
3.3 Enabling sound
Sound will be normally disabled by default. Only few audio chipsets are currently supported. Just look at
the beginning of this guide for a handsome list of supported chipsets. Anyway, to enable sound you'll need
the AHI preference applet in Prefs.
AHI is the de-facto AmigaOS and derived standard audio layer. More informations about this are available
at http://arp2.berlios.de/ahi.
Please select your hardware in the left top window and associate it to your Music unit and Unit 0, 1, 2 and
3 devices. If your hardware is supported, you'll be allowed to change options in the right side of the
window. Play a test sound to check whether your card is working or not. Some quite old AC97 chipsets are
working, but the best option for hearing sound in AROS is using a cheap and easy-to-spot Creative
SoundBlaster Live! card. AROS fully supports the EMU10K1 audio processor. Click on SAVE to make your
choice permanent.
NOTE: please be sure to have enabled your card for ALL the units available in AHI, by cicking on the
top-left cycle gadget in the Mode settings panel, or you may still encounter mute applications, when
they should correctly play sound.
Sound in VMware (and QEMU)
Sound in VMware is now available. Please choose a SoundBlaster PCI128 sound card in AHI prefs for units
0-3 and Music, and save.
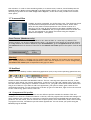
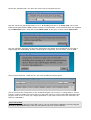
3.3.1 Choosing a startup sound
You can set a startup sound (or change the default one) with Icaros Settings in Prefs. Just open it and go to
the Boot Sound panel:
Mark or unmark the checkbox on the right to enable/disable startup sound, click on Browse to select a
MP3 file between the ones Icaros Desktop already provides or Play to preview it. Click either on Save or
Use to set it as default sound. You can use whatever MP3 file you like, but we heavily suggest to choose
short samples (you definitely wouldn't like to hear the hit of the moment every time AROS boots...).
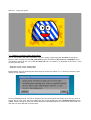
3.4 Configuring the network
Networking on AROS is now easy like in any other operating system, at least if you have a supported
network or wireless card. AROS recently got DHCP support and a new preference tool called Network,
however there's no autoprobe yet for network cards and, as usual, there is still a limited number of NIC
drivers available. Luckily, those drivers cover a wide range of network cards and it's extremely easy to find
one.
DHCP may be slower
We have noticed some network slowdowns when using DHCP (automatic configuration). While we are
addressing the origin of the issue, you have better using a fixed IP address and enter a fixed domain
name server (DNS) using the Manual IP Mode. Please ask your provider for a reliable DNS address.
In order to configure the network, you need to have Icaros Desktop Live! already installed on your hard
drive (configuration files must be saved and system rebooted). When ready, just launch Network from the
Prefs drawer.
3.4.1 Automatic IP address
Icaros Desktop can be set up to look for an automatic IP address. However, it can't detect your network
card and needs your help to find a reliable driver. Please open the Network prefs panel, look at the right
of the Device field and press the down arrow icon. Choose a driver that fits your needs. You must know
what is your network card, and it must be already supported by AROS. On iMica systems, please choose
the rtl8169.device driver.
3.4.2 Manual configuration
Configuring the network by hand might be useful for people that often move files from other machines
using YAFS. This will give AROS a fixed IP address that won't change every time it starts, depending on
other machines' ones.
IP: Just edit as you wish, using addresses according to your local network. For instance, if your router is
192.168.0.100, and your computers are 192.168.0.10 and 192.168.0.11, you should give AROS another IP
address starting with the first three numbers (192.168.0.) and another number, different from 100, 10 and
11: 20 might be a good choice. So correct it to 192.168.0.20.
Netmask: a good value for netmask is 255.255.255.0, which practically means only the last group of digits
will change, between computers, in your LAN. If you need something different, please look at any
networking how-to over the Internet.
Place also your router/server address (192.168.0.100) in the Gate line (remove 192.168.2.1 and place
192.168.0.100). You need to know this information.
DNS1 and DNS2: you have two fields available for domain server address. Domain server allow you to use
human-readable URLs like 'www.icarosdesktop.org' and they will transform them in their real IP address
transparently. Many routers provide DNS service as well, so you can place your gate's address also in the
'DNS1' field, while the second DNS server should be the one provided by your ISP. If you don't know its
address, you can use the ones provided by the OpenDNS.com site, which are 208.67.222.222 and
208.67.220.220. Please look at www.opendns.com for any update about them.
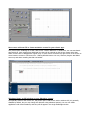
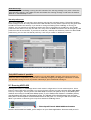
3.5 Configuring Icaros Desktop services
Icaros Desktop comes with the network already configured, and with some services that make life easier
for the user, but at the expense of some clock cycles. If you don't need some of them, you can easily gain
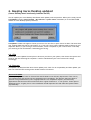
some speed (even at boot-up) disabling them. Just run the Services preference tool in prefs and click OK:
Starting from Icaros Desktop 2.0, the old Services tool has been replaced by a new one called Icaros
Setting (which is, BTW, its direct evolution). You can recall a bubble hint by placing the pointer over any
option name, and wait for a few seconds.
3.5.1 Changing default file manager (GUI Choice)
You can choose between Wanderer and Magellan. This setting will apply at startup, no matter if you SAVE
or USE new settings on exit. Although both programs can co-exist in a single session, only one of them can
be seen by AROS as current Workbench. You can also set this option to NONE. In this scenario, no GUI will
be loaded at next startup except AmiStart (which can, indeed, be disabled as well using one of the
following options), and a shell will automatically be loaded by system.
3.5.2 Automatic shell
If you're frequently using AROS shell, you might prefer having it immediately at your fingers when the
system boots. Just mark this checkbox to enable this feature (which will automatically turned on if you
select Gui Choice option to NONE).
3.5.3 Enabling/disabling Opaque
Opaque is the commodity which enables dragging of whole windows over the screen, with their decoration
and contents. You can disable it, showing only borders while moving windows, but this will “block”
temporarily their update.
3.5.4 Enabling/disabling FKey (Windows-like shortcuts)
Windows, but now also most other operating systems, use Alt+tab to browse between open applications.
Icaros Desktop does this too with FKey, but since some users might find it “not enough amigan”, they can
disable it. Please notice that this option also enables some advanced shortcuts for calling Scout, the file
finder and so on (see the first chapters of this guide for a better explanation). This option won't affect
Wanderer and Magellan specific shortcuts, that will go on working.
3.5.5 Enabling/disabling FTP server (file sharing)
There are many ways to transfer files from/to AROS. The best one is Icaros Desktop' embedded FTP server
(YAFS), which runs automatically when network is enabled and DHCP is disabled. If you don't need it,
however, you can turn it off. Turning on file sharing will enable networking too.
3.5.6 Enabling/disabling AmiStart
AmiStart is the nice dock/toolbar sitting on the bottom of the screen. It helps Icaros Desktop being a userfriendly operating system, since it is really fine for browsing files and executing applications. On rare
occasions, AmiStart creates glitches and interferes with other applications (for example, DirectoryOpus
and AmiBridge), so maybe you'd like to disable it. Users of Icaros Desktop with old hardware will prefer
disabling AmiStart, since it needs memory to run, and can slowdown the AROS experience while opening
its menus.
3.5.7 Changing AmiStart behavior
If you've choosen to enable AmiStart, you will be prompted also to choose its behavior. See chapter 1.8 for
more information about this.
3.5.8 Enabling VNC Server (remote admin)
Starting from Icaros Desktop 1.2.5, you can enable a VNC server to remotely control your Icaros computer.
Enabling this, your workbench can be exported to another computer of the local network and displayed in
a window, using a VNC client of your choice. We suggest using TightVNC on Windows.
3.5.9 Enabling AmiBridge Amiga™ Virtual Machine
Icaros Desktop can now run the Janus-UAE Emulator in coherency mode at startup (see chapter 7 of this
guide). This way, people that heavily use old AmigaOS M68K applications can now run them immediately
after bootstrap. This option lets now choose between AROS M68K and AmigaOS 3.x for legacy applications.
See chapter 8 for further information about Amiga M68K integration.
Warning!
Janus-UAE has improved a lot in the latest months, but please notice it is not perfect yet. Some times it
may crash, and can make the whole system unstable. We suggest to keep this option disabled unless you
are practically using Icaros as an Amiga™ replacement system.
3.6 Configuring USB peripherals
Starting with version 1.1.3, Icaros Desktop integrates Poseidon USB stack, enabled by deafult at startup.
From Icaros Desktop 1.1.5, Poseidon has been loaded as ROM module and can be used to boot Icaros
straight from a USB DVD drive. In order to configure USB peripherals, you need to open the Trident
application from the Prefs drawer in your System partition.
IMPORTANT: Devices are DETECTED, not USED!
Please remember that Poseidon is only a USB stack, not a collection of drivers for your devices. Its job is
just scanning your USB hardware, detecting it, and report to the system what is connected to the PC.
Reading that a “CanonScan LIDE scanner has been detected” unluckily doesn't mean that AROS can use it
to capture pictures. In order to do that, specific drivers and software must be developed first. For now,
AROS can use only pendrives, keyboards, mice and some other similar human controllers. Other “real
life” USB applications like networking, audio and video capturing are still missing or only partly
implemented. We're still working on them, please be patient or helpful...
Where's my USB drive icon?
AROS' USB mass storage support still has some flaws. Although every USB pendrive should be correctly
detected and recognized, not every partition on them can be mounted. We are still ironing out the
issue, but in the meanwhile at least a good part of them should already work. Just try some other
pendrive, and you'll surely find one with a FAT partition you can use. Speed issues with FAT partitions
have been fixed since version 1.2.2, however please prefer FAT partitions over FAT32 ones, for the best
compatibility.
4. Managing Icaros with Magellan
We don't feel very comfortable with PC operating systems acting as phone ones. We strongly believe that
computers are computers and their users expect to use them accordingly. While phones have limited
screen size (even at full HD, a 6” screen will always been harder to focus than a 23” one, at the same
resolution) and relatively few, big icons calling the main applications, computer users generally love to
customize their desktops and keep their files in handy locations. In other terms, while phones and tablets
interfaces are application-centric, computer GUIs have always been – since Mac Finder and Amiga
Workbench 1.0 age – file-centric, allowing people to perform common and uncommon file operations (like
copying them between directories or adding a comment to them, or packing them in a compressed
archive) with simple menus and tools. Standard Amiga interface (being it AmigaOS Workbench or AROS
Wanderer) was elegant and really ahead of its times, but, unluckily, time has not been a gentleman with
her. File managers for mainstream operating systems improved a lot, introducing tools, toolbars, options
and concepts that made life easier, which are now available to Icaros Desktop users as well, thanks to the
recently re-released (and open-sourced) DirectoryOpus 5 “Magellan” file manager. We've almost thrown
away its standard configuration and changed every toolbar, added custom menus and set its environment
options in order to create a good replacement for Wanderer which would, obviously, make the most of the
default programs in Icaros Desktop.
Icaros Desktop's default view with Magellan
Note about AmiStart
AmiStart works in Magellan like in Wanderer, except for the fact that it can't open drawers in listers like
it does in Wanderer windows. You can still access all files the same way, though, and use AmiStart to run
programs like Wanderer and wbrun command do.
This is a summary
DirectoryOpus 5 “Magellan” comes with its own documentation, more than 500 pages in two different
PDF manuals covering every aspect of the program. Please read them to understand all Magellan's inner
working. In this section we will give just the basic informations and explain how (and why) Magellan
options and environment have been set in Icaros Desktop.
4.1 Listers
“Listers” is Magellan name for drawer and volume windows. They basically show files and directories,
which can be represented as names (details) and icons.
Lister in Icon mode
Lister in Icon Action mode
Lister in Name Mode
You can switch output modes by right clicking on the title bar and selecting the option view mode in the
context menu:
You can 'freeze' output mode with the Snapshot options, in the same menu. The Show All option will apply
in icon modes only and it will act exactly as on original workbench, showing or hiding files without a
icon .info file. Fields like name, size, date and access (protection attributes) can be moved, resized and
ordered as preferred. We've tried to stay as much compatible to Wanderer as we could, so that
informations like position and view mode might be interchangeable between Magellan and Wanderer.
These settings, however, can be changed by users whenever they want.
Different behavior
Magellan manages file differently in name mode than in icon modes. In name mode it will always use its
own detection routines and internal filetypes to run programs and start associated applications, while in
icon modes it will use a sort of hybrid between its own and AROS system routines. For example, double
clicking on a PDF file in name mode will make Magellan look into its own data base of file types, detect
that it is a PDF file and open its own associated program (ArosPDF). But double clickin on the same file
in any icon mode will make Magellan follow another path, using system default application set in the
envarc:SYS def_*.info files. This will work for all files but executables, which will be handled by
Magellan no matter the lister mode. In all modes, moreover, Magellan will keep the right click context
menu associated to files in its own filetypes. More about this in the following sections.
4.1.1 Lister toolbar
In name and icon action modes, listers include a toolbar we configured to allow in-window management
actions like (multi)select, rename, copy and protect files, quickly create LHA and ZIP archives, generate
thumbnails for datatype-known image files. Operations which involve more than a single lister, like
copying or moving files from a directory to another, can be accessed by the Actions Bar on the right. The
Actions Bar also provides almost all features of lister toolbar, since users may decide to show only icons in
listers, without the toolbar.
Icaros Desktop provides lister toolbars configured like this:
This bar includes a noticeable number of elements:
1) the lister sum of contents, with the number of selected/total directories, files and bytes. In this
example
we have 0 selected directories from a total of 17, 0 selected files from 13 and 0 selected bytes from a
total of 114,638.
2) Fields for name mode:
Click on a filed to sort files using that particular order, or on the up/down arrow to select a increasing or
decreasing order. Move the boundary between any field to resize them, or drag a field and drop it
elsewhere to order fields as you like. You can also add or remove fields using DirectoryOpus 5 settings.
3) The lister menu button (
4) the parent button (
) which opens this menu:
), which opens this other menu instead:
5) the status button (
(see next paragraph).
), which allows to set a lister either in source, destination or neutral status
6) The Actions buttons, which act differently when clicked with either the left (default option) or the
right (secondary option) button.
Button
Left click
Right click
Home: turns back to the device list. All
volumes and assigns will be shown in the
current lister.
Shell: opens a new AROS shell on the screen.
The current directory will be the one shown in
selected lister.
Parent: turns back to the parent drawer.
Its contents will be shown in the current
lister.
Root: turns back to root directory of the
current volume. Its contents will be shown in
the current lister.
Create new drawer: creates a new subdirectory in the current lister. You'll have
to enter its name in a field.
Create new assign: lets the user create a new
Assign that point to the opened drawer in
lister.
Pattern select: allows to select all files
Toggle: selects all currently unselected files,
matching a pattern. For instance *.txt will and unselects all currently selected files.
select all files with txt extension.
Select all: selects all files and directories
shown in current lister.
Select none: unselect all files and directories
shown in current lister.
Rename: renames the current selected
files(s) and/or drawer(s), even in a
multiple fashion.
Currently not used
Delete: permanently deletes all current
selected files and drawers. Warning! It
may be not-recoverable.
Currently not used
Copy: copies selected files and drawers to Datestamp: allows to modify date and time
another destination, either a dest lister or for selected files and drawers.
a new one to choose.
Protect: changes protection bits
(attributes) to selected files and drawers.
Comment: allows to add a personal comment
to files. Comments can be shown in listers
when in name mode.
Thumbnail selected: creates a .info file
with a preview for selected image files
only.
Thumbnail all: creates a .info file with a
preview for every datatype-known image file
found in current lister
Quick LHA compress: compresses
Quick ZIP compress: compresses selected
selected files and folders into a LHA
files and folders into a ZIP archive. Warning:
archive. Warning: at least 2 files must be at least 2 files must be selected!
selected!
Help: since Magellan does not allow
bubble hints, this button shows a quick
reference image for lister toolbar
Currently not set
4.1.2 Source, Destination and neutral listers
This concept has always been one of Dopus' strength but, strangely enough, no mainstream operating
system ever replicated it. Yes, it is not so much intuitive and this might be the reason, but we're truly
excited to take advantage of it. With DirectoryOpus 5 you can open as much drawer windows as you like,
but you can also set a lister as source (SRCE) and another as destination (DEST) for your file operations.
Source and Destination listers are easy to spot, because the upper part of their toolbars changes color
either to green or red. Listers with grey toolbar, on the other hand, are completely neutral and classified
as “OFF” in the status button.
Lister in neutral (OFF) status
lister in source (SRCE) status
lister in destination (DEST) status
Once you set a lister as source, and another one as destination, most of file operations will start from file
selected in the source lister, to end up into the destination one. For instance, you can set lister “A” as
source and lister “B” as destination, select some files from lister “A” and click on the “Copy” action
button, then selected files from “A” will be copied into the “B” drawer. In Icaros Desktop, Dopus has been
set to change source and destination folders dynamically: this should make selection easier, but you can
force listers to become either source, destination or neutral directories by clicking on the status button
(see above), after activating it.
The status button also allows to open a setting editor for listers and to lock position of a lister. After
selecting the latest option, the windows can not be moved until the 'lock position' option will be disabled.
4.2 The main menu
You may call Magellan's main menu by right-clicking on a empty position of the workbench. It will show file
manager's main sub menus and two customized ones called 'Programs' and 'Icaros'.
We'll leave the first four sub-menus because their options are either self-explanatory, or better explained
in Dopus documentation (which comes, as we said, bundled among Icaros manuals in PDF format). We will
now concentrate on the last two, while the Settings menu will be explained later.
4.2.1 The “Program” menu
Program allows to run Icaros default applications with ease. It somehow replaces AmiStart so you can
quietly quit it without loosing its main functionalities.
4.2.2 The “Icaros” menu
Icaros sub-menu allows to perform some specific actions:
About → Shows Icaros Desktop version and AROS authors
Shell → open a shell (command propmt) window
User Manuals → opens the directory where PDF manuals are stored
Actions Bar → turn on/off the graphical actions bar on the right, or returns to the graphical actions bar if
the text bar is selected
Actions (Textual) → turn on/off the textual actions bar on the right, or switches to the textual actions bar
if the graphical one is selected
FTP Bar → opens/closes the graphical toolbar for DirectoryOpus' integrated FTP client, or switches to the
graphical version of the bar
FTP (Textual) → opens/closes the textual toolbar for DirectoryOpus' integrated FTP client, or switches to
the textual version of the bar
AmiBridge Bar → opens/closes the toolbar for AmiBridge
DiskImage GUI → run the DiskImage GUI program, which allows mounting and unmounting drive image
files, such as ADF and ISO ones.
Reboot computer → cold-resets the whole system and restarts it from the POST screen
Reboot Icaros → equivalent to a warm reset, it keeps the current session but reloads Icaros Desktop alone
4.3 Customizing Magellan
Magellan is easily configurable. Once you know where to put your hands, it allows to do basically whatever
you like with its options and behavior. You can create new menus and toolbars, modify the current ones,
make them behave differently and set you work environment the way you like it. All this freedom,
however, has a price: complexity. It will take a while to understand and master all Dopus 5 options, menus
and concepts, but once aquired the skills, nobody will stop you.
In this section we'll concentrate on basic options, the ones used for customizing your desktop environment
as you like. How to change desktop wallpaper, lister colors and so on. More advanced subjects like file
types and toolbars will be explained later. Let's open the Settings menu from Magellan main one:
Clock → adds date and time to the main toolbar:
Create icons? → once selected, DirectoryOpus 5 will create a .info files for newly-created directories.
Most of times, however, you will still have the choice wether doing that or not.
Default PubScreen → makes Dopus' pubscreen the default one. It does not matter when used instead of
Wanderer, since it would run on the default pub screen anyway.
Recursive Filter → when the option is set to on, Magellan will ask for a different path whenver a
operation should be done on subdirectories. When turned off, instead, subdirectories will be treated
normally.
Themes → loads a 'theme' for DirectoryOpus 5. A theme is basically an archive including all Dopus settings
for layout, environment, backgrounds, fonts, system sounds, screenmode, menus and so on.
Load/Save Environment → loads a preconfigured environment (default is Icaros' current one). You can set
Dopus 5 to work in a different way a and save it as a new environment, giving a simple name to remember
it. Icaros already provides some preconfigured environments, for instace this is the Dopus4Type one, which
mimics how DirectoryOpus 4 behaved:
4.4 Environment
You can consider the Environment editor (from the Settings menu) the Dopus 5 equivalent for many
control panels in AROS' Prefs drawer. We will see here just some of them.
4.4.1 Backgrounds
The backgrounds panel allows to change background images for desktop, windows and even file
requesters. You may also change behavior between centered, tiled or stretched image, and decide the
rendering quality. Obviously, you should always keep the best result one, since nowadays processors are
many orders of magnitude more powerful than original 68000 ones. This option might still be helpful,
however, when setting quality of Dopus 5 for M68K inside of AmiBridge.
The WBPattern settings option does not have any impact on AROS, since AROS does not have a WBPattern
preference tool in Prefs.
4.4.2 Desktop
This panel allows to hide/show volumes on the workbench, enable/disable pop up windows and decide
what to do when you drop an icon onto the desktop.
Default action is “Create left-out” which is, basically, a shortcut in the classic Amiga spirit. Magellan,
however, can go ahead of this and use the desktop like any other modern operating system, letting user to
fill it with files, icons and (why not?) a lot of unused garbage. So Default action can change to “Move to
desktop” (file will be deleted from original position and placed in the desktop directory) and “Copy to
desktop” (file will be copied from original position to desktop directory – you will be able to edit the copy
but the original won't be affected) or even doing nothing (“None”).
You can set the default desktop directory with the Desktop Folder option. Icaros Desktop already sets it to
a MyWorkspace: subdirectory (which is normally hidden), even if the chance to use the desktop as a
normal drawer is turned off by default.
4.4.3 Display
Nothing really amazing here: if you wish to run Magellan in a different screen, with a different resolution,
you can set it here.
Notice: for some reason, we couldn't see more than 16 colors when using Magellan for M68K with
AmiBridge.
4.4.4 Hide Method
Pay attention to this panel! It allows to change the way the system will hide windows when
iconized/hidden. A wrong setting might make the hidden windows impossible to display again (there are
still some limitations with AROS. Be patient...). Keep it to “clock” for safety.
4.4.5 Icon Display
Icon Display panel allows to change the way Magellan renders icons on the screen. But most options are
disabled in RTG modes, so we will be able just to change foreground and background colors for labels on
desktop and in windows.
Notice the Mode: option. It allows to change style in order to create better contrast.
4.4.6 Icon Settings
Everything has to do with icon handling can be set in this panel. For a complete explanation of every
single option, please read Dopus 5 documentation. We will just explain why we have set some options and
skipped others.
Allow icons with no labels is a compatibility option which allows some (broken) icons being displayed
correctly. We set it on to avoid rare, but still possible problems. Cache icon images improved speed on
original Commodore machines but it's not really useful in a world were fast hard drives and SSD units are
the norm. We set it off also to force Magellan reloading icons after a change. You may activate it to
improve speed, bu be aware of the fact that, sometimes, directory contents shown in icon/action listers
might not be refreshed correctly (for instance: you have changed a .info file, and Dopus still shows the old
one). Force split of long labels tells Dopus 5 to write long labels on more lines: we did the same for
Wanderer, we are doing this here too for coherence. Icon borders on by default has been disabled,
because turning it on would “buttonize” icons, placing a square border around them. Perform all actions
on icons extends to icon files every action done on their parent file: copy “pippo.mod” from lister A to B,
and also “pippo.mod.info” will be copied as well. Rename “Pluto.doc” to “Jupiter.doc” and also
“Pluto.doc.info” will be renamed to “Jupiter.doc.info”, and so on. Disable this option to manage .info
files independently from their parent ones. Quick icon dragging, Real-time icon scrolling and Remap
icon images have been set to off-on-on for image quality reasons: weird glitches may happen changing
these settings. Remove Opus icon positions and Use Workbench icon position have been activated to
prevent Dopus saving its own positions for icons: we'd prefer both Dopus 5 and Wanderer to share the same
position informations, just to keep some coherence when switching GUI. Invert these settings if you
prefer, but maybe only when sure you wouldn't go back to Wanderer too much often. Select icons
automatically extends Perform all actions on icons: select a file, and its icon will be automatically
selected as well. Show arrow on left-out icons places a little arrow on a corner of desktop aliases: it can
be really useful when desktop folder is on, to clearly differentiate left-out icons from common files. Split
long icon labels has not been set because it would cut in half too much names. We also decided to Use
custom drag routines because we experienced graphic corruption with icons otherwise.
4.4.7 Locale and Miscellaneous
Locale panel sets date format and some other minor attributes. The Miscellaneous panel, however, is
much more intersting:
Mouse buttons over inactive banks, as the name suggests, lets the user click on tools belonging to a
inactive window. For instance, you can click on a button bar even without activating it before. Unluckily,
this is currently half true: even with this option is enabled, clicking on a button on a different lister than
the active one can produce no results. You may see this behavior with the actions bar (see later), when
you might need to click more times to have a command performed. Filetype Sniffer is a cosy utility which
lets you create a file-type association with (relative) ease. The Thin Gadget Borders option is a must on
RTG screens like AROS ones while the other options should be self-explanatory. Just an advise: the time
interval in Popup Delay is measured in 50th of seconds, so the default 4 value means 2 tenth of a second.
The Custom Screen Title... field allows to change default top bar caption when Dopus windows or screen
is selected. For a complete list of %variables please see the document “DOpus582.pdf” included in Icaros
user manuals, page 50 (of the document, so actually page 57 of 124 on ArosPDF), or use the inline-help
provided by the folder-icon button at the left of the input field. Default string for Icaros Desktop is:
Icaros Desktop | Free Memory %fcS (%fm%%%) | CPU %pu%% | %ta tasks
4.4.8 Sound events
This is probably one of the funniest options in Magellan, since it allows to set a specific sound for
practically every system/GUI event.
Supported sound format is AIFF. So you'll need sounds in this format, or a utility to convert them from
other, more conteporary ones. We kept this option 'as is' because we feel that everyone has his/her own
opinion about computers making funny sounds every minute, so the best thing we could do had been not
setting sounds at all. Please notice the options for startup and shutdown sound, which are handled
independently from the “Boot Sound” in Prefs/Icaros Settings: to avoid cacophonic results, please
remember to disable sound in Icaros Settings when enabling jingles in Magellan.
4.4.9 WB Emulation
Last but not least, the WB Emulation panel decides how Magellan should replicate Wanderer functions.
The Display AppIcons option allows Magellan to show minimized applications in form of a little icon.
Please do not enable Display 'Tools' Menu and Move AppIcons to 'Tools' Menu, because these options are
currently not supported by AROS, so they will end up in hiding minimized application windows forever
(unless you find a way to do this externally, with either a popup key combination or a tool like WiMP).
Show Workbench Leftout icons lets Magellan show screen aliases set by Wanderer (and happily stored
in .backdrop files).
5. Icaros and other computer on the local network
5.1 Sharing files over the local network...
In order to activate file sharing with the host operating system (Icaros Desktop) and/or the other
computers among the network (Icaros Desktop Live!) you need AROS networking manually configured, with
a fixed or automatic IP address and a supported network card. Please read chapter 4.4 for details.
5.1.1 ...using YAFS FTP server
Once the network has been setup, you may luanch a thin file server called YAFS at startup. You can enable
it from the “Networking” panel in Prefs/Icaros Settings. It will allow access to your MyWorkspace
directory. You only need to configure a FTP client on any other computer connected to the network (or the
host operating system for VMware users) and you're done. Please use these parameters:
FTP site: your AROS machine IP address
Login: anonymous
Password: write anything here
FTP type: active
Please notice the last parameter. It's important you set the FTP site as active, or you won't be able to
access your AROS machine. Most sites and ftp client use default passive mode. Here's an example
configuration of FileZilla:
5.1.2 ...sharing folders with Windows XP
Another feature of Icaros Desktop is support to Windows XP SMB shares (or 'shared folders' as you like).
Please notice only Windows XP will work for now: adding newer revisions of the protocol used by
Windows Vista, 7 and Server editions is planned, but for now it is not yet available. To enable Windows
shares, you must know some details of the machines in the local network:
IP address of the Windows host (get it using ipconfig /all command in a Windows shell)
hostname of the Windows PC (right click on computer icon, Properties)
share name(s) of the folder(s) you're sharing
Once you've got all these values, do the following steps on the AROS machine:
1. Open Prefs/Network and go to the Local Host Entries panel. Click on Add. Enter the IP address and
the Windows host name in the right fields.
2. Do not click on USE or SAVE for now. Move on the Mounted Shares panel instead and click on ADD.
A new SMB0 device will appear in the first column. Enter Windows host name (the same you've entered
before), the windows share name, the username and password for your account on the Windows
machine. For now, you can leave the Domain/Workgroup value to the default 'arosnet' even if your
Windows' workgroup is the default one (“WORKGROUP”). Click on Apply.
3. Save your network preferences. AROS will probably tell you it can't change network settings, and ask for
a reboot. Reboot the machine.
4. At the next boot, your Windows share will appear with the default icon of a floppy disk. You can move
files from the Windows host to the AROS one and vice-verse, if your user has write access to the share
(look at Windows manuals to learn how to correctly manage shares).
To disable the share, open Prefs/Network again, go to the Mounted shares panel, select the offending
share service and click on Remove. Reboot the machine.
Booting slow?
Wrong settings for Windows shares can make boot times loooooooooonger. If you get noticeable
slowdowns booting Icaros when Windows shares are active, you can disable them cleaning the Active
checkmark for the offending share service. This typically happens when a DHCP server manages the IP
addresses of the local network, and Windows machines use dynamic IP settings for the local network.
AROS can't manage them dynamically as well, so if you plan to use Windows shares on Icaros every day,
consider switching stable machines to fixed IP settings.
What is my address?
In order to show your current IP address, you need to use the ifconfig -a command. Either press
rAros+W or rAros+E and enter ifconfig -a. If you don't see any eth0: entry, it means your network is not
completely up and running.
6. Keeping Icaros Desktop updated
(Icaros Desktop must be already installed on HD)
You can update your Icaros Desktop installation with update packs and patches. When you're ready, launch
LiveUpdater from the Icaros Desktop > My Software > System menu of AmiStart (or in the Tools/LUPD
drawer of Icaros Desktop system partition).
LiveUpdater window will appear. Choose your source for new files or press Cancel to abort. Be aware that
your existing AROS files will be overwritten. So, if you aren't sure, before updating make a backup of your
important data or, if you're using a virtual machine, create a snapshot of your current state: it will help
you reverting to the old situation if something goes wrong.
6.0.1 File
Download a Icaros Update file and place it wherever you like on your system, then choose this option and
locate it with the following file requester. It will be installed and your Icaros version will change
accordingly.
6.0.2 Internet
LiveUpdater can download the latest Icaros update pack, check for its compatibility and then update your
files. You need ArosTCP running and a reliable Internet connection.
No more CD-ROMs?
Older updating system based on ISOs and burned CD-ROMs is now officially deprecated. From now on,
only update packs and patches will be compatible with LiveUpdater. This decision has been taken to
prevent wrong installations by users. Nightly Builds are not compatible anymore, because many
applications and files have been moved from their original locations to – in our opinion – better places.
Installing file for a nightly over a Icaros installation would duplicate files and make the system behave
unpredictably.
7. Running Amiga™ software inside Icaros Desktop
Icaros Desktop allows Amiga users to keep their habits. Or, at least, it gives a fair support to old Amiga 68K
applications using the Janus-Uae emulator. This technology is called AmiBridge, which consists of a series
of scripts that allow integrating workbench applications in the AROS system, and also running games and
demos straight from their ADF files.
7.1 Running Amiga games and demos under Icaros Desktop
Old Amiga games and coding demos are often available in ADF floppy-image files. Starting from Icaros
Desktop 1.4, AmiBridge adds direct support for them without even requiring original Amiga ROMs: by
default, the AROS KickStart replacement ROM will be used instead. You can also decide to integrate Amiga
Forever as explained in the following chapters: in this case, the options to use original Amiga™ ROMs
instead of AROS ones will be shown. You can add ADF files to AmigaApps menu either running the
ADD_ADF-GAME script from AmiStart's My Software > AmigaApps menu, or by double clicking on the icon
of an ADF file. Notice: differently from AmigaOS programs, ADF files may sit anywhere on the hard drive.
To keep things clean, however, we warmly suggest you to place ADF files in extras:AmiBridge/adf, which
has been created for this purpose from day one.
Every time you add a new ADF disk to AmiBridge, two files will be created in the AmigaApps/Floppy
directory: a launch script, with a custom name you'll be prompted for, and a setting (.urc) one with the
same name of the ADF file, but with the .urc extension added automatically. For instance, if you decide to
add to AmiBridge the file “myamigadisk.adf”, and you enter “my game” as game/demo name, at the end
of the procedure you'll spot two new files in AmigaApps:
- “my game” → the launch script for E-UAE
- “myamigadisk.adf.urc” → the E-UAE configuration file for that ADF disk
A different .urc file is used for every added ADF, so people can easily tweak emulator settings for that ADF
file only.
7.1.1 Adding a single disk game/demo
You can add ADF files to AmigaApps menu as well, either running the new ADD_ADF-GAME script from
AmiStart's My Software > AmigaApps menu, or by double clicking on the icon of an ADF file. In the former
case, a file requester will ask you to locate the ADF file. Let's add, for instance, Mr Beanbag, a funny
platformer freshly released of classic AGA machines (A1200/A4000)...
Choose the “beanbeta.adf” file. Enter the clean name of the game this way:
And now choose the right Amiga model to run it. Mr BeanBag runs best on an Amiga 1200. Since Icaros
Desktop uses AROS KickStart ROMs instead of Amiga™ ones by default, old OCS/ECS machines are indicated
by the AROS A500 option, while AGA ones by AROS A1200. In this case, we must choose AROS A1200.
The next requester will warn you that many Amiga games and demos were distributed on more than a
single floppy disk. Mr BeanBag, however, comes only on a single disk. For this reason, click on STOP.
Once you have done this, J-UAE will run. Just click on START to play the game:
You can fine tune the configuration of the emulated computer (for instance, to change audio or control
settings, enable or disable full-screen and so on) using the options in various Janus-UAE GUI panels. Don't
forget to click on Save to keep your changes permanent. If you need to turn back to the Janus GUI, the
shortcut is Ctrl+Alt+J.
Lost in full screen?
When the full-screen option of Janus-UAE is active, you can switch back to Wanderer's screen using the
lAros+M or lAros+Tab shortcuts, then you can press Ctrl+Alt+J to recall J-UAE GUI.
And now... enjoy your game!
7.1.2 Adding a multiple disks game/demo
You can use multiple ADF files if necessary, just start adding a game using the first disk (as explained
before), either running the new ADD_ADF-GAME script from AmiStart's My Software > AmigaApps menu,
or by double clicking on the icon of the first disk's ADF file. For instance, if “Defender of the Crown” came
on these two ADF files:
- “Defender-of-the-crown_disk1of2.adf”
- “Defender-of-the-crown_disk2of2.adf”
Please add the first one following the same steps you learned in chapter 7.5.1. However, this time, when
looking at this requester:
Click on Continue instead. You will be prompted for the second (third and fourth) drive until you click on
Cancel. But for now, enter the second disk's ADF. Then press Cancel next time. AmiBridge supports up to
4 disks. Games coming on more than 4 disks should be installed somehow on a hard drive file to load. You
may also use Janus-UAE GUI to switch disks.
7.1.3 Running imported games
Once you have “imported” a game or a demo with this procedure, you can easily start it with the icon that
AmiBridge just added in the Folppy subdirectory, introduced with Icaros Desktop 2.0.
Icaros Desktop already provides some free Amiga games, including a real gem like Putty Squad.
8. Running classic M68K applications
8.1 AmiBridge's M68K environment
Starting from version 1.4.4, the AmiBridge system had been extended to use the M68K port of AROS to run
old AmigaOS applications. This way, Janus-UAE can run old software without the need of original Amiga™
boot ROM (KickStart) and operating system (AmigaOS 2.x or 3.x). Please notice AROS M68K is still under
heavy development, so compatibility may not be perfect yet. But it's still improving over time.
AROS for PC (x86)
Janus-UAE running AROS for classic Amiga (M68K)
or AmigaOS™ 3.x from Amiga Forever
X86 program
X86 program
M68k program
X86 program
M68k program
X86 program
AmiBridge aims to be as much transparent to the user as it can, hiding all the necessary technology to
allow compatibility with old M68K software. Version 1.5 furtherly extended this concept, creating a
common environment for both AROS 68K and AmigaOS 3.X. Users of former versions of Icaros may have
noticed differences between virtual drives mounted by the two systems, now they are exactly the same.
AROS 68K and AmigaOS 3.X needed a completely different setup, now it's very similar, and so on. The new
version of AmiBridge gives the user a far more comfortable way to run his/her classic Amiga™ applications
on Icaros Desktop.
8.1.1 Filesystem
Both AROS 68K and AmigaOS 3.X (once integrated) will see these virtual drives:
AROS: → AROS M68K system files, located at host's sys:System/AmiBridge/AROS68K
Icaros: → the host system drive, readable and writable
Host RAM: → the host RAM: device, read only
MyWorkspace: → host's MyWorkspace
Work: → partition for Amiga software, located at host's extras:68K/Work
There are, also, some virtual devices mounted in form of ASSIGNs:
Downloads:
Pictures:
Videos:
Documents:
→
→
→
→
MyWorkspace
MyWorkspace
MyWorkspace
MyWorkspace
subdirectory
subdirectory
subdirectory
subdirectory
Please notice there are some little differences with the past. AmiBridge system files (emulator + AROS
68K) have been moved from Extras: to SYS:System, while 68K's Work partition has been relocated to
Extras:68K. This is due to our newer drawers layout, and allows people to avoid installation of Icaros' 68K
programs if they do not want them at all. If you wish to take advantage of some great Amiga™ applications
as well, be sure to install the 68K package with Icaros Desktop. While MyWorkspace will be seen as a
simple Assign by host applications, guest ones will access it like a whole drive.
8.1.2 Running applications: required steps
So, in a nutshell, what should you do to run a old application? It's quite easy, once you understand what to
do and why. Essentially, you have to
1) run the emulation environment, calling either the 'AROS M68K' script (whenever you want) or the
'Workbench' one (once you have integrated Amiga Forever)
2) run an Amiga application, starting with either with Wanderer, with AmiStart or with the wbrun command.
With Magellan, you'll have to right click on the icon and select the Wbrun option in the contextual menu
Wanderer: double click with left button
AmiStart: run the application from extras → 68K → Work and subdirectories
shell: use the wbrun command with application path, starting from AmiBridge:
Magellan: select program icon and right click on it, then choose WB Run
REMEMBER!
68K applications won't run if the emulation environment is not ready!
3) if you're running the emulation environment on a separate screen, move to that screen with lAROS+Tab
or lAROS+M.
8.2 Setting up the 68K environment
Icaros Desktop 2.0 eliminated the preferences script for AmiBridge introduced in /Prefs long ago. You may
decide to use one of new AmiBridge presets, like integration, full screen Wanderer/Workbench,
compatibility layer in a new screen and emulation-in-a-window at a fixed resolution through the Preset
Loader script in AmiBridge, or fine-tune AmiBridge's M68K environment with the Icaros Settings tool in
/Prefs.
8.2.1 Presets
AmiBridge can behave in many ways. Icaros Desktop comes with a few presets, covering the most common
user needs. Presets are meant to be expandable, so new presets may be available in the future and users
can easily learn how to create new presets as well. Anyway, when running Preset Loader, you will be
prompted with the list of available ones:
Every preset comes with a short description of its settings, so you can decide either to Enable it or not.
Once done, click Save to make the new preset your new behavior for AmiBridge.
Warning!
Presets are shell script that may modify Janus-UAE settings. Once enabled, they will be permanent even
if you choose just the USE option afterwards. You can disable them using Janus GUI or choosing a
different Preset which does a completely different thing. Be careful about 3rd party Presets, they may
harm your AROS installation if badly written.
Integration
AmiBridge will try to integrate classic applications as much as it can. Classic applications will appear on
the screen as AROS x86 windows, and to make them look as much integrated as they can, some host's
preferences like (global settings for) Zune. Fonts, Pointer, locale, icontrol and input will be copied from host
to guest at startup. Fonts: assign on the guest is extended to host fonts directory, so you won't have to
maintain two different fonts drawer for your applications. Just place needed fonts in the x86 AROS drawer.
Coherency mode, anyway, will work only if x86 and 68K screen resolutions are the same.
Fullscreen: a full 68K experience on a new screen
With this Preset, the M68K environment will be opened in a new screen, keeping the OS GUI active. This
means that you may have a full 68K Wanderer or Amiga™ Workbench on top of AROS x86 (classic
emulation). Fullscreen mode is generally faster than default integration, especially for AROS M68K, and
can be preferable because it doesn't suffer of menu issues and other integration glitches.
New screen without GUI: a clean emulation screen for your classic apps
This preset opens AmiBridge as a clean “68K screen” without Wanderer or Workbench. You can start classic
apps with their icons straight from AROS x86, but they will be opened on this screen. Please notice that
Janus screens can't be dragged like regular ones, so you'll have to reach the top right corner of the screen to
move between screens or use lAros+M or +Tab keyboard shortcuts. You can, however, drag the x86 AROS
screen up and down revealing the 68K one behind:
Windowed layer: a 68K window on your Wanderer screen
Conceptually similar to the former one, this preset opens a 68K screen with or without GUI (it's generally
disabled by default, but you may change this behavior using advanced options). You can run classic
applications with host's Wanderer, and they will all appear in the single AmiBridge window.
8.2.2 Advanced Options
With default preset, AmiBridge will normally disable 68K Wanderer or Workbench, share some settings
between host (x86) environment and guest (M68K) one, and so on. But you may change something with
advanced options. To access them, you need to run Icaros Settings from the Prefs drawer, and move to
AmiBridge panel:
Once done with your settings, click on the Save button to make them permanent, or on Use to try them
just for this AROS session. You won't need a reboot to enable them.
GUI
AmiBridge will normally disable 68K Wanderer or Workbench. In fact, you are supposed not to use them at
all. Just move with x86 Wanderer to your 68K program location, and run it as usual: it should appear on
the screen few seconds later. You may even decide to drop its icon on AmiStart, it will run from there as
well. There are occasions, however, when accessing to the original GUI/File Manager can be useful or
necessary. To re-enable Wanderer or Workbench, click on the Workbench button on the left. You will be
prompted either to enable or disable it. Remember that the M68K environment must be powered off
before making changes to this setting.
68K Auto Shell
For your convenience, AmiBridge can run a shell from the guest environment. It may be useful to run
command line programs or to perform installations, or other 68K tasks, without the need of loading the
whole GUI of the guest system.
When using the AROS M68K shell, you can always recognize it by its different prompt:
.
Probe Coherency
AmiBridge will try running your applications in coherency mode as much as it can. But you may change this
behavior by clicking on the Probe Coherency button. After disabling it, AmiBridge will stop re-enabling
coherency mode automatically when you change resolution using the proper scripts, or when you change
this setting in Janus GUI and then you reboot the system.
When ready...
Default way to warn user about the avilability of 68K environment is a message appearing on the screen:
If you usally run AmiBridge as a service, you may prefer not to see this message every time you reboot the
system. The Warning message button lets you decide wether showing or hiding it. Please notice with Icaros
Desktop 2.0 a new “Quit Emulation” button has been added to the welcome message. It will help you
quitting the emulation layer immediately if you have ran it by mistake, but it will become much more
handy when you'll use a shortcut to run a single application through a new Icaros Deskop 2.0 feature:
shortcuts. We will see them later.
With this option, you may also run UAE-Control instead:
UAE-Control is a M68K program that allows partial managing of the UAE emulator from the guest side of
emulation environment. You can use it to stop emulation, reset it, or mount ADF files in the virtual floppy
disk drives (DF0, DF1 only on AROS; DF0 to DF3 on AmigaOS)
The Insert buttons will ask you the path for an ADF file.
Click on the Select button to open a file requester, or manually enter path and file name in the left text
field. Once you're ready, press Enter to confirm selection. Please beware of the fact that your path must
be a valid one from the host side, not the guest one. In a nutshell, if your ADF files are in AROS X86's
DH1:Temp directory, you should enter this path in the form DH1:Temp/my_adf_file.adf. For your
convenience, Icaros Desktop provides MyWorkspace: and other shared virtual volumes, please use
them! Save your ADF files, for instance, in the Downloads:ADF drawer, and you'll be able to mount them
from Downloads:ADF with UAE-Control too! Shared virtual volumes, between host and guest, are:
MyWorkspace:
Downloads:
Pictures:
Videos:
Documents:
→
→
→
→
→
MyWorkspace special drawer
MyWorkspace subdirectory
MyWorkspace subdirectory
MyWorkspace subdirectory
MyWorkspace subdirectory
That's why, in Icaros Desktop, opening the file requester with the Select button will send you straight to
MyWorkspace.
Other UAE-Control buttons are:
Eject
Hard Reset
Debug
Quit UAE
→
→
→
→
unmounts ADF image file from associated virtual DF unit
resets the emulation environment only, making it boot again
starts UAE debugger, freezing the emulation layer
shuts Janus-UAE down, exiting from AmiBridge to AROS desktop
Alternative ways
You can easily make AmiBridge running the shell instead of the warning message every time it boots the
guest operating system: just enable the shell and disable the warning message. It had been the default
behavior in Icaros Desktop v1.4.5.
Shared preferences
When using AROS 68K, you can share some settings with the host operating system. Technically speaking,
these settings will not be really shared between x86 and 68k, but they will be imported by the guest when
the 68K environment will startup: if you decide to change something when AmiBridge is running, for
instance, the new settings in the x86 environment will not be reflected into the 68K one, nor the 68K
preferences will affect in any way the x86 ones. Every time the M68K environment will be brought up, 68K
preferences will be overwritten. If you wish to avoid that, and keep two different profiles for x86 and 68k
preferences, you can click the Shared prefs key. It will let you enable or disable this feature.
coherency mode: these are x86 and 68K locale prefs. Can you spot the differences?
Only AROS makes it possible
Please remember shared settings are possible only with AROS M68K. AmigaOS 3.X preference files are
different and not compatible, so you'll have to manually configure your AmigaOS™ installation to match
the x86 AROS settings as much as possible. Obviously if you're interested in doing so.
8.3 Running AROS 68K
Starting with Icaros 1.5, AmiBridge doesn't need manual configuration of screen mode anymore. Oliver
Brunner (Janus-UAE coder) provided a nice new tool which chooses the right resolution when AROS M68K
starts up. Once again, this only works with AROS M68K. From the user point of view, it's like M68K guest
windows are running in the X86 host desktop space. If you're familiar with VMware or VirtualBox product,
just think about their Unity and Integration modes. The cliboard will be shared between host and guest,
while parts of host filesystem will be accessible also from the guest. So, running the 68K environment with
AROS is just matter of launching this script from AmiStart's AmiBridge menu:
← This script will launch AROS M68K environment
Once the environment has loaded, you're ready to run your classic applications. Some are ready to run in
extras:68K/Work/68K-Apps drawer.
8.4 Running AmigaOS™ 3.X inside AmiBridge
If AROS M68K isn't just enough to fit your needs, and you wish to take advantage of “the real Amiga
operating system” to run your legacy apps, you can still integrate Amiga Forever's system files and ROM
into Icaros Desktop. The way is exactly the same as before. There are, however, some little differences
from the past: user can now activate/disable auto-shell, Workbench and welcome message with AmigaOS
as well and, most important, they're not supposed to manually disable backdrop anymore.
8.4.1 Integrating AmigaOS™ 3.X
If you're using Amiga Forever 2006, 2008 or 2009, all needed files will be automatically copied from the AF
CD-ROM in the right position. It is possible that older/newer releases of Amiga Forever behave differently.
In this case, you only need to copy the right files in the right drawers manually. Don't forget to keep the
“View” option in Wanderer set to “All files”. Look in the AmigaApp drawer and launch the SetupAmibridge icon. If you have Amiga Forever, mount its CD and press AmigaForever.
This will copy all needed rom, system and application files automatically. It will also add the necessary
lines to the users AmigaOS Startup files to enable seamless integration of Amiga applications.
Click on OK, the Amiga Workbench and the ScreenMode preference panel will load automatically. You
must choose the exact same resolution you are using for your AROS desktop.
You may notice a double pointer here. Don't worry, it's not a problem: just remember the right one is the
biggest, and scroll down the Display Mode option list to match your current AROS resolution. Use a uaegfx
voice. Then click on SAVE. Janus-UAE window size will change accordingly.
Manual integration
You can always integrate your own KickStart and AmigaOS files. Just remember that:
AmigaOS system files must be copied in the System drawer (which has a disk icon with a boing
ball over it)
Application files must be copied in the Work drawer (in Extras:68K/Work)
Amiga ROM images must be placed in the “rom” drawer.
You can use the Amibridge: assign for your convenience.
8.4.2 Running AmigaOS™ 3.X
Once installation has ended, two new entries will appear in AmiStart's AmiBridge menu:
ScreenMode → will run AmigaOS™ screen mode preferences without coherency mode. This will allow you
to change the emulated Amiga resolution after you've changed the AROS one.
Workbench → will run AmigaOS™ inside Icaros Desktop, either in coherency mode or not – depending by
your other settings in AmiBridge pref program and Janus-UAE GUI.
AmigaOS applications can obviously run in coherency mode as they do with AROS.
8.4.3 Running AmiBridge at startup
Normally, you are supposed to run the Amiga™ environment only when needed. However, if you heavily use
M68K applications, you can run the whole AmiBridge sub-system at startup. To do this, please run the
Icaros Settings preferences program, and move to the AmiBridge panel.
Look at the Amiga M68K VM field. You'll have three options:
OFF → selected by default. No Amiga virtual machine will be loaded at Icaros startup
AROS m68K → the AROS M68K environment will be loaded at startup, using current preset and current
advanced options
AmigaOS 3.X → AmiBridge will start AmigaOS 3.X, once integrated from Amiga Forever, using current
preset and advanced options. It won't work without AmigaOS already installed.
Beware of the fact that the AmiBridge sub-system requires a lot of computing resources. It may noticeably
slow down any other host operation and heavily impact on x86-side performances. You're not expected to
run this option unless you're always using classic applications for your personal productivity.
8.5 AROS 68K vs AmigaOS™ 3.X
What's better? Both choices have their pros and their cons. AROS M68K allow a better integration of 68K
applications into the x86 desktop, does not require much configuration efforts and, best of all, comes for
free with Icaros Desktop. On the other hand, AmigaOS 3.X is perfectly compatible and does not suffer of
some glitches in coherency mode, however you have to grab it from your old Amiga™ computer or buy
Amiga Forever from Cloanto to get it (www.amigaforever.com). Here is a little comparison table, to help
you decide. Don't forget, anyway, that AmiBridge can use both!
Feature / OS
AROS 68K
AmigaOS 3.x
Automatic screen resolution
Yes
No
Shared settings for locale, input, fonts,
Zune and pointer
Yes
No
Good
Perfect
Yes
Yes
Ready
Manual
Original KickStart
Not needed
Needed
Initial configuration
Not needed
Needed
Shared clipboard
Yes
Yes
Shared FS volumes
Yes
Yes
Good
Better
No
No
Perfect
Good
Not needed
Needed
Compatibility with classic software
Coherency mode
Icaros 68K apps setup
Sound
Network Support
Mouse syncronization
Set up phase
Right menus with AROS 68K in coherency mode
The old bug which forbid using right click menus on AROS 68K has been fixed with Janus-UAE 1.4,
included in Icaros Desktop 2.0.
9. Something you should know about applications
Ok, we have learnt how to use Icaros Desktop tools and functions. Now it's time to discover what you can
actually DO with Icaros Desktop' collection of software. There are many many things you can do.
9.1 Browsing the web with Odyssey Web Browser
Odyssey Web Browser (OWB) is a powerful and modern web browser based on webkit, and is already
available on many other platforms. Although being new to the game, this browser is already reliable and
provides support for many Internet sites such as Google Docs, Google Earth, Gmail, Facebook and every
Amiga community portal, like amigaworld.net, amiga.org and many others. AROS OWB also supports tabbrowsing: to open a new tab, just right click on the tab title and select tabs > open new tab. OWB
supports Javascript and HTML5: you can play games and use web applications based on both technologies,
but there is a limitation for this release. You can't play movies or music, since codecs aren't supported yet.
Maybe someday they will, so don't be sad. There's already a open bounty to encourage development.
9.1.1 Watch YouTube videos with OWB and MPlayer
While waiting for better support of HTML5 multimedia features, we can call MPlayer to play video
contents on YouTube and some other websites (have a look at OWB's Window → Scripts option). Icaros
Desktop 1.4.2 comes already configured to do this, however this option will be available only once the
operating system has been installed onto the hard drive or any other writable media. You can't play
YouTube videos in Live!-DVD mode. The steps to do so are quite easy.
First of all, enter the URL of your favourite video as usual. You can also get to YouTube from a link placed
on any popular website like Twitter, YouTube, Google and so on. In practice, do whatever you'd do on any
other browser/operating system.
You may be prompted that your browser doesn't support HTML5 video. Ignore this message, since 1)
it's true, and 2) it won't matter for now. In order to play movie, we won't be using HTML5 features, but a
JavaScript which parses YouTube pages to turn main movie options (like change resolution and select HD)
into plain HTML links.
Scroll down the page a little, and after some seconds you'll notice some new links that usually don't
appear on other platforms. They are in the form Download, some numbers, View without Flash, other
numbers, View Flash. The only part which interests are the numbers immeately after Downloads. They will
vary from movie to movie, however the general rule is that numbers in the 40 range are different
resolutions: the bigger the number, the higher the resolution. In this example...
…46, 45, 44 and 43 are all different versions of the same movie, with 43 being the smallest available
resolution and 46 the bigger. The ability to play each resolution will vary. The more complex and bigger
will be the frames, the more CPU and GPU horsepower will be needed to play them smoothly. In the
following screenshot, we have opened two different resolutions of the same video, 44 and 43, just to show
you the differences:
In order to enable a similar technology for other media sites, you must edit javascript files located in the
OWB directory, enable them with the Window → Scripts option and eventually add/modify MimeTypes in
Settings → Preferences → MimeTypes to use a external viewer.
9.2 Record your music like professionals do, with AudioEvolution 4
AudioEvolution 4 is the best audio-recording tool for the Amiga platform. Still developed by its author
Davy Wentzler (who also coded some of the audio drivers provided by Icaros Desktop), it allows multitrack management, sampling and sound effects.
9.3 Burn your DVDs with FryingPan
While former versions of Icaros Desktop included a demo of FryingPan, which was still a commercial
program, Icaros 1.4 provides the recently re-released open source version, freshly recompiled for AROS. In
order to use it, you should select your drive first, choosing the right device in the 'Drive' options of the
upper bar. If you're using a internal drive, you may choose the ata.device, while usbscsi.device will be
good for USB connected drives.
9.4 68K Applications
Icaros Desktop comes with a nice (and increasing) selection of programs originally written for the
Commodore Amiga, whose distribution rights have been granted by the original authors either directly
(under their written permission) or indirectly (redistribution allowed by a newer open source / public
domain or freeware license).
9.4.1 TVPaint
TVPaint is a well-known free-hand painting program written by a French company named TVPaint
Développement SARL and which till today is still being developed for mainstream platforms. Version 1 of
this application had been released for the Amiga in 1991 and we kindly have granted permission to add
version 3.5.9 to our distribution. You can learn more about current and past TVPaint solutions at
www.tvpaint.com website.
To run TVPaint you need to set up and run the M68K environment. Please see chapter 8 to learn how to do
that. Once you're done, you can start the application:
Choose your favourite resolution:
Enter your personal data and this registration key: LYFI-360AMNFR-0699
Then you will be able to start painting. Please notice there are a quick-start guide and a user manual in
the application drawer, in PDF format. You may use ArosPDF to read them (see chapter 9.5).
9.5 Read your PDF files with ArosPDF
ArosPDF is Icaros Desktop' embedded PDF reader. PDF files can be opened both by double clicking on their
icons, and by formerly running ArosPDF from AmiStart or Wanderer.
9.6 Write your best-seller with Cinnamon Writer
Cinnamon Writer is a new, Amiga-based word processor with text formatting features, able to open and
save .docx files and, best of all, to export them to PDF files. This is still a early version, but really
promising. We could include this release thanks to Pascal Papara and, obviously, Claus Desler.
9.7 Play many SDL games and some great classics
The Commodore Amiga® has been a great gaming platform. Icaros Desktop offers a wide choice of games
you can relax with: the shareware episodes of Doom and Quake, a big selection of SDL library-based
games like Blob Wars, X-Penguin and others, the great Revolution Software classic adventure Beneath a
Steel Sky and many, many others. And, if that isn't enough, Icaros Desktop also provides emulators for all
8-bit Commodore computers, for the Sony PlayStation™ and other exciting gaming platforms of the gold
age.
If you have problems running games and emulators with the ATI or Nvidia driver, please boot Icaros
Desktop in VESA mode, with a 32 bit palette.
9.7 Paint your pictures with LunaPaint
LunaPaint has probably been the first real AROS-based application. It's a paint and photo-editing software
using layers and nowadays features, with a simple menu and tool-based graphic interface. Load and edit
your images or create a new one from scratch: LunaPaint will help your creativity in a funny way.
9.8 Develop your applications with GCC and Murks! IDE
Icaros Desktop provides a full development chain based on gcc version 4.4.2 which includes all needed
tools to build AROS itself and its applications. Murks!IDE is a graphic integrated development environment
which should speed up your work. Besides with gcc, you can also find other programming languages
(python, perl, lua, PortablE, false, bwbasic), libraries (SDL, mesa, libidl, etc) and many, many examples.
9.9 Play your favourite music, DVD and videos with Mplayer
Mplayer is a full-featured multimedia player which allows you to have an amazing media experience even
in un-accelerated VESA modes. It plays the most popular audio and video file formats, including MP3, DivX,
XviD and many, many, many others. It can play DVDs as well.
9.10 Locate your friends of Messenger with SabreMSN
Icaros Desktop provides a MSN client called SabreMSN. There are currently some minor issues regarding
file transfers and using of international characters. They will be fixed soon.
9.11 Make your own music with HivelyTracker, MilkyTracker and ProTrekkr
Trackers were Amiga's best known music tools, allowing people to use sampled instruments in a easy and
reliable way. HivelyTracker, Protrekkr and MilkyTracker are available on many platforms, and on AROS as
well.
10. Credits
Icaros Desktop includes work from various artists, musicians and coders, which has been used free-ofcharge under written permission. We'd kindly like to thank them for their contribution, because they made
our distribution better and more complete. In particular, we'd like to mention
Alexander Karpenko
He's the author of “Abstract colors”, the image we used as desktop wallpaper for Icaros 2.0 series. See
more of his work here, http://aik-art.deviantart.com
Andrea Lazzarotto
He's the author of “Eat Triviality”, the amusing image we used as desktop wallpaper in Icaros 1.5.
Originally his image was about Linux, but he kindly gave us permission to use it and he personally modified
it to better fit our “AROS needs”. :-)
Find him and his blog here, http://andrealazzarotto.com.
Delta Nine
He's the author of “Magic Falls”, the wonderful picture used as desktop wallpaper in Icaros 1.4. You can
see other works from him at http://delta909.deviantart.com.
Mark Sheeky
Back in the 90s, he's been a prolific author of public domain games for the Amiga computers. He kindly
allowed us to freely redistribute his games with Icaros Desktop. You can find them in the AmiBridge menu,
in the Scorpius Games drawer. His website is http://marksheeky.co.uk.
Olaf Schönweiß
Olaf is the author and mantainer of AROS VISION, the first distribution of AROS M68K. Although we didn't
include the whole distribution into our M68K environment, Olaf gave us many precious hints and solved
many little problems we both met during integration. In the following screenshot, you will see his
distribution running in coherency mode inside Icaros Desktop (the whole screenshot had been published on
May 30th, 2012 on amiganews.it forum). http://www.natami-news.de/html/aros_vision.html
Poke53280
They are authors of Hurrican, wonderful remake of the Amiga classic Turrican. Meet them at this address,
http://turrican.gamevoice.de/hurrican_site.