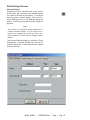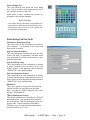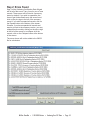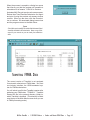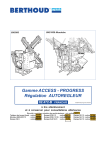
1
132 Venture Court, Suite 1
Lexington, KY 40511
http://www.tenmast.com
Support:
(877) 359-5492
[email protected]
Marketing:
(877) 836-6278
[email protected]
Fax:
(859) 367-7480
WINTEN TRANSNET
USER MANUAL 1/18/2005 EDITION
FOR PROGRAM VERSION 12/15/2004
© 2005 TENMAST SOFTWARE
AND LATER
© 2005 Tenmast Software. All rights reserved.
WinTen TransNet User Manual
This manual, as well as the software described in it,
is furnished under license and may be used and/or
copied only in accordance with the terms of such
license. The content of this manual is furnished for
informational use only, is subject to change without
notice, and should not be construed as a commitment by Tenmast Software. Tenmast Software assumes no liability for any errors or inaccuracies that
may appear in this manual.
Except as permitted by such license, no part of
this publication may be reproduced, stored in a
retrieval system, or transmitted, in any form or by
any means, electronic, mechanical, recording, or
otherwise, without the prior written permission of
Tenmast Software. Permission to produce copies
for official use is expressly granted to organizations
and individuals with a current Update and Support
Agreement with Tenmast Software for the maintenance and support of Tenmast Software’s WinTen
TransNet program.
Any references to company, housing authority,
or individual names or identities in examples or
screen images are for demonstration purposes
only and are not intended to refer to any actual
organization or person.
CONTENTS
Introduction
1-1
WinTen Basics
1-2
Navigation
Mouse Actions
Keyboard Actions
Buttons
Standard Buttons
Grayed Out Options
Pull-Down Menus
Dialog Boxes
Drop-Down Selection Boxes
Calendar Boxes
Check Boxes
Radio Buttons
Scrollbars
Tabs
Function Keys
Print Dialog Box
Wizards
Maintain Notes Sub-Screen
1-2
1-2
1-3
1-4
1-4
1-8
1-9
1-9
1-10
1-10
1-10
1-10
1-11
1-11
1-12
1-13
1-15
1-16
Program Overview
2-1
Main Menu
2-3
Setup
3-1
PIC Setup
3-2
TRACS and FMHA Setup
3-10
Gathering Your PIC Data
4-1
Gather and Submit TRACS Data
5-1
Gather and Submit FMHA Data
6-1
Submitting Your PIC File
7-1
Setup Screen
Default Settings Tab
Data Areas Tab
Setup Screen
Default Settings Tab
Data Areas Tab
Agency Information Tab
Select Gathering Requirements
Errors Found
Confirmation
Submitting TRACS Data
Submitting FMHA Data
PIC Data Validation
PIC Submission
Submission Errors
3-3
3-3
3-9
3-11
3-11
3-13
3-15
4-2
4-3
4-5
5-3
6-2
7-2
7-6
7-8
View Ticket Information
8-1
Reports
9-1
Index
i-1
Ticket Screen Functions
PIC Reports
Ticket Reports
Retrieving PIC Performance Data
8-4
9-2
9-5
9-7
INTRODUCTION
The WinTen TransNet program is a data management program designed for use on computers running the Windows 98, ME, NT, or 2000
operating system. The interface is designed
for use in a Windows environment and includes
point-and-click mouse actions, pull-down menus,
and Windows-based help functions. This manual
contains all of the information you need to use the
WinTen TransNet program (hereafter referred to as
TransNet).
Version Information
This manual is written for the 12/15/2004 release of
TransNet. It does not apply to previous versions of
the program (including MS-DOS-based ones) and
some sections may be inaccurate with regards to
later versions.
Whenever Tenmast issues an update to this program, we will notify your agency through e-mail. If
you have a current Update & Support Agreement
for this program, you may download and install
the update through the Tenmast Update Manager
program. During the download and installation
process, Update Manager will notify you of the
changes to the program.
We periodically update this manual to reflect significant changes to the program. You may download
this updated documentation from our Web site at
no charge.
Hint: Downloading Manuals
You can find the current version of this manual in the Client
Service Area of our Web site at http://www.tenmast.com.
All manuals are available in PDF file format. You must have
version 4.0 or newer of Adobe Acrobat Reader to open and
print manuals. You can also order printed copies of the
manual through our Marketing/Communication Services
Department.
Getting Help
Though we have made every effort to make this
manual as comprehensive as possible, no document can cover all contingencies. If you encounter
problems with TransNet, call the Tenmast Training
& Support Department toll-free at (877) 359-5492
or send an e-mail to [email protected].
Revisions
To better serve our clients, we constantly update our manuals, just as we constantly make
improvements in our programs. If you find an
error or omission in this documentation or have
a suggestion for improving it, call the Tenmast
Marketing/Communication Services Department
toll-free at (877) 836-6278 or send an e-mail to
[email protected].
WinTen TransNet • 1/18/2005 Edition • Introduction • Page 1-1
WINTEN BASICS
The WinTen modules are designed to provide quick
and easy access to commands and data throughout Tenmast’s programs. In WinTen modules, the
mouse is the primary navigation tool.
The WinTen system consists of more than twenty
independent data management programs that are
capable of sharing data with one another. Though
each program has its own unique functions and
features, they all share certain common ones. The
following WinTen introduction explains these common functions and features and how to use them.
Navigation
Mouse Actions
In many instances, this manual instructs you to
click something in order to give the program a
command. This refers to executing a command
with your mouse. There are four different ways
in which you may need to click to execute a command:
Click or Point-and-Click
Position the mouse pointer over the indicated object on the screen, then quickly press and release
the left mouse button once.
the mouse pointer
Double-Click
Position the mouse pointer over the indicated object on the screen, then quickly press and release
the left mouse button twice.
Right-Click
Position the mouse pointer over the indicated object on the screen, then quickly press and release
the right mouse button once.
Drag and Drop
Position the mouse pointer over the indicated object on the screen, then press and hold down the
left mouse button. While still holding down the button, move the mouse pointer to where you want to
place the object and then release the button.
WinTen TransNet • 1/18/2005 Edition • WinTen Basics • Page 1-2
Keyboard Actions
There are many ways to issue commands in the
WinTen programs with your keyboard. When this
manual instructs you to “press” a key or keys, it
refers to the keys on your keyboard. The manual
indicates a specific key by enclosing it in less-than
and greater-than signs. For example, <Enter>
means “the Enter key.”
Moving Focus
When you first enter a screen, “focus” is on a particular button or data field. The program shows focus with a dotted line around the inside of a button
(as shown at right) or a flashing cursor in a data
field. When a button has focus, you can activate it
by pressing <Enter>, which has the same effect as
if you had clicked on it. When a data field has focus, you can type data into it. You can move focus
in either situation by pressing <Tab>. If you are on
a menu of buttons, you can also move focus by using the arrow keys.
with focus
Keyboard Shortcuts
Some commands have “keyboard shortcuts.” This
means you can execute the command through a
combination of keys. Keyboard shortcuts use a
combination of a letter or number key plus either
the <Alt> (Alternate) or <Ctrl> (Control) key. The
manual abbreviates these commands in the format
<key+key>. For example, a command that you
give “by pressing <Alt+X>” is performed by holding
down <Alt> and pressing <X>.
The <Ctrl> and <Alt> keys are keys that modify
the way that the computer interprets other keys,
much like <Shift> does. When a key combination
includes one of these keys, it’s best to press and
hold the modifying key before pressing the other
key in the combination, because the modifying
key won’t type anything. To continue the previous
comparison, this is like using <Shift> to capitalize
the letter “a” while doing word processing. If you
pressed and held <A> before pressing <Shift>,
you’d type something like “aaaaaaaA.” However,
if you pressed and held <Shift> first, you’d just type
“A.” The same holds true for issuing commands
with key combinations that include <Alt> or <Ctrl>.
WinTen TransNet • 1/18/2005 Edition • WinTen Basics • Page 1-3
without focus
Buttons
In all WinTen programs, the screens contain buttons to access functions. Buttons are square or
rectangular and may contain pictures, text, or both.
This manual indicates a button with its name (“the
Reports button”) and/or a picture (as shown at
right). You can use buttons in three ways:
1. Point-and-click.
2. Move focus to the button and press <Enter>
(remember, you move focus with <Tab> or the
arrow keys).
3. Press the key that corresponds to the underlined letter on the button, if the button has text
on it. On the Reports button shown to the right,
this would be <R>.
Standard Buttons
Several buttons are standard in all WinTen programs. This means they always have the same
function regardless of the program in which they
appear.
Main Menu Buttons
These standard buttons are found on the Main
Menu screen.
Change Password Button
This button opens the Change Password dialog
box. To change your WinTen password, you must
first enter your old password to confirm your identity. Then type your new password in two separate
fields, which keeps you from incorrectly typing your
new password and setting it to something other
than what you intended. The OK button remains
disabled until you have the same thing in both new
password fields.
NOTE: The Change Password button is not
visible if you do not have Tenmast Security
activated.
Change Directories Button
This button opens the Program Directories dialog
box (shown at far right). This dialog box allows you
to change the data area in which you are working.
Click the desired data area to select it, then click
the OK button.
NOTE: The Change Directories button is not
visible if the program only has one data area in
which to work.
WinTen TransNet • 1/18/2005 Edition • WinTen Basics • Page 1-4
Version Button
This button opens a dialog box (shown at far right)
that displays the version date of the program. Click
the OK button to close this dialog box.
Reports Button
The Reports button opens the program’s Reports
screen. The specific reports you can view and print
from this screen vary depending on the program
in question. See the appropriate chapter of this
manual for details.
Index Button
The Index button allows you to re-index and/or
pack the program’s databases. See the appropriate chapter of this manual for details.
Setup Button
The Setup button opens the program’s Setup
screen. This screen allows you to change the basic information that the program uses to generate
reports and/or track and present data. See the appropriate chapter of this manual for details.
Exit Button
The Exit button shuts down the program and closes
all associated windows.
Toolbar Icons
Many screens in the WinTen programs contain a
toolbar at the top of the screen. The toolbar contains the icons used to execute commands specific
to that screen. The example below is the standard
toolbar found in many Add and Edit screens. The
following icons are standard in every WinTen program, and most toolbars contain some or all of
them.
Exit Icon
The Exit icon is a doorway. This icon closes the
current screen or window and returns you to the
program’s Main Menu screen or to the previous
screen or window.
Add Icon
The Add icon is a plus sign. This icon adds a new
record to the current database. After you click the
Add icon, the program allows you to enter the appropriate information for the record that you are
adding.
In some cases, this icon starts a wizard (described
later) for adding a new record to the database.
WinTen TransNet • 1/18/2005 Edition • WinTen Basics • Page 1-5
Delete Icon
The Delete icon is a minus sign. This icon deletes
the currently selected record from the database. In
most cases, the program prompts you to confirm
your intent to delete that record. This is a safeguard to prevent accidental loss of data. Once you
have deleted a record, you cannot bring it back there is no “undo” feature in WinTen programs.
Edit Icon
The Edit icon is a pencil eraser in action. Many
data screens in WinTen programs are “locked”
when you first open them. They display data but
do not respond to any attempt to change it. This is
a safeguard to prevent accidental loss of data. The
Edit icon “unlocks” the currently selected record
and allows you to enter updates or changes.
Hint: Edit Mode and View Mode
When a record is editable (usually after you click the Edit
icon), it is in edit mode. When it is not editable (before you
click the Edit icon, or after you edit data and click the Save
icon), it is in view mode.
Save Icon
The Save icon is a floppy disk. After editing or entering data, click this icon to save your work on the
currently selected record to the database.
Cancel Icon
The Cancel icon is a circle with a line through
it. This icon allows you to abandon any changes
you have made to the currently selected record.
In many cases, the program will prompt you to
confirm your cancellation. This is a safeguard to
prevent accidental loss of data.
Previous Icon
The Previous icon is a left-pointing arrow. Clicking
on this icon takes you to the previous record in the
current database.
Next Icon
The Next icon is a right-pointing arrow. Clicking on
this icon takes you to the next record in the current
database.
Print Icon
The Print icon is a picture of a printer. If you are in
the Reports screen of a program, this icon opens
the Print Report dialog box to print the currently
selected report. If you are in any other screen,
this icon opens a drop-down menu that allows you
to select and print a report that is relevant to that
screen.
Print Preview Icon
The Print Preview icon is a sheet of paper with a
starburst behind it. This icon opens a screen that
shows you what your document would look like if
you chose to print it. This feature allows you to
make sure that your print job is correct without using paper for a test print run.
WinTen TransNet • 1/18/2005 Edition • WinTen Basics • Page 1-6
Search Icon
The Search icon is a flashlight. It saves you time
by opening a Search screen which contains a table
of all the records in the current database. Use this
Search screen to find the desired record instead
of scrolling through records one at a time with the
Previous and Next icons.
Report Generator Icon
The Report Generator icon is an open book. This
icon accesses the user-defined data fields for the
current database. For more information, see the
Tenmast Report Generator manual. If your agency
does not use this program, this icon has no effect.
Other Functions Icon
The Other Functions icon is a set of tools. This
icon opens a drop-down menu of additional commands that are specific to the screen on which it is
located. If a screen has the Other Functions icon,
these commands will be described under the “Other Functions” or “Tasks” header for that screen.
Typically, the Other Functions menu allows you
to use one or more wizards (described later in this
chapter).
Notes Icon
The Notes icon is a (musical) note. It appears on
screens that contain one record in a database.
This icon opens the Maintain Notes sub-screen
(described later), which allows you to add, review,
and edit notes on the selected record.
Show/Hide Icon
The Show/Hide icon is a window shade. It appears
on screens which have both large tables and data
fields. This icon hides the data field portion of such
a screen, allowing you to view the table in the full
area of the screen. If the data fields have already
been hidden, clicking the Show/Hide icon again
brings them back into view. See the two screen
images below for an example of this icon in action:
WinTen TransNet • 1/18/2005 Edition • WinTen Basics • Page 1-7
Other Standard Buttons
The following buttons appear throughout the
WinTen programs. They allow you to make choices on screens and in dialog boxes.
OK and Yes Buttons
Click the OK or Yes button if you want to accept the
data presented or continue the action you started.
Some dialog boxes - those that only display information without giving you command options - have
OK buttons that close them when clicked.
Cancel and No Buttons
Click the Cancel or No button if you want to abandon the current screen or the action you started.
Grayed Out Options
Some controls, buttons, or data fields may appear
light gray rather than appearing with their normal
full-color images (these buttons are colorized in the
WinTen programs, even though they may appear
in black-and-white in this manual). We refer to this
condition as “grayed out.” This indicates that those
options are disabled and cannot be accessed at
the present time. Grayed out options return to their
normal colors and become accessible again once
the program reaches a set of conditions that allows
the option to work again.
For example, when you initially enter an Edit/Review
screen to review data, the Save icon is grayed out
(because you have not made any changes that
need to be saved). Once you click the Edit icon
and edit the data on the screen, the Save icon becomes active, returning to full color. You can then
use the Save icon to save your changes.
Save icon grayed out
Save icon active
WinTen TransNet • 1/18/2005 Edition • WinTen Basics • Page 1-8
Pull-Down Menus
Pull-down menus are located above the toolbar
and consist of one or more words, each with one
letter underlined. A pull-down menu is another way
to access the functions on the toolbar, and some
pull-down menus contain additional options that
are explained in each program’s documentation.
To open a pull-down menu, either click the word or
press <Alt+the underlined letter of the word>. For
example, to open the Tools menu shown to the
right, you would press <Alt+T>. When the menu
opens, it displays a list of commands that you can
execute, as shown to the right.
The open pull-down menu to the right contains
standard options such as Next Item, Previous Item,
and Search. It also contains additional commands
that are specific to the Tenant Accounts Receivable
program, the program in which this particular pulldown menu appears.
To execute pull-down menu commands with the
mouse, click on them. You can also use the keyboard to access the menu options in two ways:
1. Use the <up arrow> and <down arrow> keys to
move focus to the desired option, then press
<Enter> to execute it.
2. Some commands have a keyboard shortcut,
shown to the right of the menu option (see
Keyboard Shortcuts, above). These keyboard
shortcuts can be used at any time, even if the
pull-down menu is not open. Note that many of
the options that have keyboard shortcuts have
corresponding toolbar buttons.
Dialog Boxes
Occasionally, a small window appears on top of the
screen in which you’re currently working. This is
called a dialog box. The contents of dialog boxes
vary. Some contain pertinent information and have
a single button which makes them disappear, while
others allow you to specify options for a procedure
that you’ve told the program to perform.
WinTen TransNet • 1/18/2005 Edition • WinTen Basics • Page 1-9
Drop-Down Selection Boxes
Some screens have a data entry field with a small
black downward-pointing triangle to its immediate
right. Clicking on this triangle opens a small list of
pre-set options for that data field’s contents. This
is known as a drop-down selection box. Click an
option to select it.
Calendar Boxes
Some data screens require you to enter dates. The
data field for the date has a small button next to it
that depicts a calendar page. Clicking the button
opens a calendar box. The current system date
is circled in red. The currently selected date has
a gray oval over it. To move between months,
click the left- and right-pointing arrows at the top
of the calendar box. To select a day, click on it.
To change years, click on the displayed year. It
becomes highlighted and two small buttons with
up- and down-pointing arrows will appear next to
it. Click the appropriate arrow to move the year
forward or backward.
Check Boxes
A small white box like the one shown to the right
is a check box. Click in the box to “check” or “uncheck” it. Check boxes are used just like check
boxes on pencil-and-paper forms - they are simple
yes-no conditions. In the example at right, Receivables and Payables are checked and Payroll is
unchecked.
Radio Buttons
A cluster of small white circles, each with a label,
is a set of radio buttons. They have this name because they work in a manner similar to the preset
station buttons on your car radio - you can only
have one radio station, or one radio button, selected at a time. To select a radio button, click on it
and a black dot will appear in the circle. Radio buttons are used when you have two or more choices
but only one of those choices applies at any given
time.
WinTen TransNet • 1/18/2005 Edition • WinTen Basics • Page 1-10
Scrollbars
Many times, a table of records holds more records than the program can fit on the screen. The
scrollbar is found on the right edge of the table. To
move up or down through the table, click on the
small black triangles at the top and bottom of the
scrollbar. The small box between the triangles is
a rough indicator of where you are within the table;
think of it as being similar to an elevator’s display
that shows how close to the top or bottom of the
building the car is.
Some tables also have horizontal scrollbars if they
contain more information than will fit across the
screen. Use the small black triangles at the bottom
left and right corners of the table to move from side
to side within it.
NOTE: Some drop-down selection boxes have
vertical scrollbars if they have more options
than will fit in the selection box when it is open.
These function in exactly the same manner as
the scrollbars on tables of records.
Tabs
Some screens have large amounts of information
that must be divided so that it is easier to track and
access. In the WinTen programs, these screens
are divided into tabs, which are so named because
they resemble the index tabs on file folders. Clicking on a tab changes the data displayed on the
screen and the toolbar options available.
WinTen TransNet • 1/18/2005 Edition • WinTen Basics • Page 1-11
Sub-Tabs
Some tabs also have large amounts of information
that must be divided so that it is easier to track and
access. These tabs have a second row of tabs,
known as sub-tabs, along their bottom edge. Clicking on a sub-tab changes the data displayed on the
tab, and thus changes the data available on that
screen.
Function Keys
Across the top of your keyboard is a set of twelve
keys designated <F1> through <F12>. These are
the function keys. Currently, only <F1> and <F9>
have functions in the WinTen programs.
F1 Key (Help)
Pressing <F1> opens a Help dialog box for the
program. Help is context-sensitive; the Help information shown corresponds to the current field or
screen in the program. The WinTen programs use
the standard Windows-based help system. With
this type of help, you can search for any help topic,
print the current topic, mark a specific topic using a
bookmark, or jump to another help screen by clicking the underlined keywords.
F9 Key (Change Password)
Pressing <F9> is equivalent to clicking the Change
Password button. This only works when you are
at the Main Menu of a program in which Tenmast
Security is active.
WinTen TransNet • 1/18/2005 Edition • WinTen Basics • Page 1-12
Print Dialog Box
Because of the way in which the Windows family
of operating systems handles printing on various
types of printers, WinTen programs use a print
dialog box that differs from the standard one you
may be used to seeing in other Windows-based
programs. The following print dialog box appears
whenever you print from a WinTen program.
Print Dialog Box Features and Options
Printer
The Printer options allow you to select the printer to
which you want to send the material you are printing and to specify the font that it will use. Many of
these settings cannot be changed - they are determined by the report that you have chosen to print.
Name
This drop-down selection box lists the system
names of every printer that your computer can print
to. Use this drop-down box to select the printer to
which the report should be sent.
Type
This is the make and model of the selected printer.
This data field changes depending on the printer
that you have chosen with the Name drop-down
selection box.
Where
This is the network location of the selected printer.
This data field changes depending on the printer
that you have chosen with the Name drop-down
selection box.
Font Name
This drop-down selection box lists every font that
you can use to print the selected report. When the
Print dialog box opens, this field is set to the default
font of the selected report.
Paper Orientation
This data field tells whether the report will print
in portrait or landscape orientation. You cannot
change this setting; it is pre-set by your report selection.
Paper Size
This is the size of the paper on which the report
will be printed. You cannot change this setting; it is
pre-set by your report selection.
WinTen TransNet • 1/18/2005 Edition • WinTen Basics • Page 1-13
Draft
This check box is only available if you are sending
a report that supports fast draft printing to a dotmatrix printer. In such a case, you may check this
box to print the report in fast draft mode. If you do
not check this box, the report will print in letter-quality mode, which will look better but take significantly
longer.
Restore Report Font Button
Click this button to set the Font Name field to the
default font for the selected report.
Print Range
The Print Range set of radio buttons allows you
to specify whether to print all pages of the report
or just a selected range. If you select the Pages
radio button, the From and To data fields next to it
become available. Enter the starting and ending
page numbers of the range of pages you want to
print in these data fields.
Copies
Hint: Fast Draft Printing
Fast draft printing is a function that Tenmast has incorporated into this program to overcome the speed limitations of
the Windows operating systems when printing to dot-matrix
printers. For more information on this option, please refer
to the Fast Draft Printing Implementation Guide, available
on our Web site.
Number of Copies
This data field allows you to specify how many
copies of the report you want to print. This field is
always set to “1” when the dialog box first opens.
Collate
If you have chosen to print more than one copy of
the report and the printer to which you are sending the report supports multiple copy collation, this
check box becomes available. Check this check
box if you want the copies to be collated.
Output Options
Paper Source
This drop-down selection box allows you to select
the paper source that the printer will use for the
paper on which the report will be printed.
Duplex
If the printer support duplex (both sides of the paper) printing, this drop-down selection box is available. You can use it to select no duplexing, duplexing along the long side of the paper, or duplexing
along the short side of the paper.
WinTen TransNet • 1/18/2005 Edition • WinTen Basics • Page 1-14
Wizards
In software terms, a wizard is a part of a program
that guides you through the sequence of specific
tasks that make up a procedure. In the WinTen
programs, Tenmast uses wizards for specific data
processing tasks that require a step-by-step approach, such as processing checks or moving an
applicant into a vacant unit.
Step One
When you start a wizard, it opens as a dialog box,
as shown at right. The top of the wizard’s dialog
box summarizes the current step, which is always
Step One. The main area has data fields and controls for you to review and/or enter required data.
The bottom of the tab has a brief set of instructions
and a set of buttons. Click the Start button to begin
the wizard’s task and move to Step Two. Click the
Cancel button to cancel the wizard’s task and close
the wizard.
Intermediate Steps
When you continue to the next step, the wizard
changes to show the data fields and controls for
that step. Enter any data that is needed. Click
the Next button to move to the next step, the Back
button to return to the previous step, or the Cancel
button to cancel the wizard’s task and close the
wizard.
Last Step
When you continue to the last step, the wizard
changes to show a summary of the data you have
entered in all previous steps. Review it to make
sure it is correct. Click the Back button to return to
the previous step, the Cancel button to cancel the
wizard’s task and close the wizard, or the Finish
button to save all of the data you have entered and
complete the wizard’s task.
WinTen TransNet • 1/18/2005 Edition • WinTen Basics • Page 1-15
Maintain Notes Sub-Screen
The Maintain Notes sub-screen opens when you
click the Notes icon. It contains all of the notes for
one selected record in a database.
Notes icon
The very top of this sub-screen identifies the record
whose notes you are currently viewing. The table
in the middle of the sub-screen lists all of the notes
for that record in chronological order. The bottom
of the sub-screen displays the date, subject, and
contents of the currently selected note.
To add a new note, click the Add icon. Enter the
date, subject, and content of the note, then click
the Save icon.
To edit an existing note, select it in the table and
click the Edit icon. Make your changes, then click
the Save icon.
WinTen TransNet • 1/18/2005 Edition • WinTen Basics • Page 1-16
PROGRAM OVERVIEW
HUD and USDA require individual housing authorities to submit tenant data on a regular basis in order to receive housing subsidy funding. TransNet
is a tool to assist you when sending this data to the
appropriate agencies. The program creates data
files from information in the WinTen Occupancy
and Rent Calculation program’s databases, and
assists you in submitting those files to the PIC,
TRACS, and/or MINC reporting systems maintained by HUD and USDA.
PIC Submissions (50058 records)
TransNet gathers 50058 records from Occupancy and Rent Calculation’s files in PIC data
areas, checks them for errors, and composes the
50058.asc file that is required for PIC data submission.
TransNet features Tenmast’s QuicPIC system,
which allows you to perform one-button PIC data
submissions through TransNet. Your workstation
must have an Internet connection for this function
to work.
TRACS Submissions (50059 and MAT records)
TransNet gathers 50059 and MAT records from
Occupancy and Rent Calculation’s files in TRACS
data areas, checks them for errors, and composes
the submission file that is required for TRACS submission.
Each agency’s TRACS Contract Administrator has
its own method by which TRACS data files must be
submitted. Refer to your CA’s documentation for
detailed information on how to submit 50059 and
MAT records to its data collection system.
MINC Submissions (FMHA records)
TransNet gathers FMHA records from Occupancy
and Rent Calculation’s files in Rural Development
data areas and composes the submission file that
is required for submission to MINC (Management
Interactive Network Connection).
Hint: MTFS or MINC?
The MTFS Web site, where housing authorities previously submitted their FMHA data, has been replaced by the
MINC Web site.
To submit to MINC, you must use USDA’s Industry
Interface software. Please refer to that software’s
documentation for detailed information on how to
submit FMHA data to the MINC system.
WinTen TransNet • 1/18/2005 Edition • Program Overview • Page 2-1
Processing Mode
Your agency may have TransNet configured for
data submission in more than one of the three
reporting systems (PIC, TRACS, and FMHA) that
the program supports. If this is the case, whenever
you run TransNet, the first dialog box that appears
asks you to select the system for which you want to
process reports. This selects the processing mode
in which the program is operating. To change the
processing mode, you must exit and re-enter the
program, selecting the desired mode from this dialog box.
Hint: eTrans
Tenmast collectively refers to PIC, TRACS, and FMHA
electronic data submission records as eTrans records.
WinTen TransNet • 1/18/2005 Edition • Program Overview • Page 2-2
MAIN MENU
The Main Menu is the starting point for using each
function of the TransNet program. This manual
details the use of these functions in the following
chapters devoted to each primary task you can
perform in TransNet.
The top center of the Main Menu displays the
program’s name and the processing mode (PIC,
TRACS, or FMHA) in which it is currently operating.
The Main Menu is different, depending on the processing mode.
If you are in PIC processing mode, you will see a
Main Menu like the first picture below.
If you are in either TRACS or FMHA processing
mode, you will see a Main Menu like the bottom
picture.
WinTen TransNet • 1/18/2005 Edition • Main Menu • Page 2-3
WinTen TransNet • 1/18/2005 Edition • Main Menu • Page 2-4
SETUP
The first time you run TransNet, the first option
you should select from the Main Menu is Setup.
All WinTen programs have Setup functions. The
settings in the Setup screen control the program
environment, and you can change many aspects
of the program’s operation through these settings.
Be careful to enter the proper information, as inaccurate settings can cause TransNet to function in
an unexpected manner.
The individual in charge of your WinTen programs
should periodically review each program’s Setup to
ensure that it is still correct. Access to the Setup
screen should be restricted through the Tenmast
Security program after the initial settings have been
entered in order to prevent accidental changes to
the settings.
As with the Main Menu itself, your setup options
are different depending on which processing mode
you choose when you start TransNet.
If you are in PIC processing mode, you will have
one set of setup options. If you are in either TRACS
or FMHA processing mode, you will have a slightly
different set of setup options. (Except for one field,
the setup options are identical for both TRACS and
FMHA.)
We will discuss the two sets of setup options separately.
To use the Setup functions (no matter which processing mode you are in), click the Setup button or
press <S> at the Main Menu.
WinTen TransNet • 1/18/2005 Edition • Setup • Page 3-1
PIC SETUP
To use the Setup functions while in PIC processing
mode, click the Setup button or press <S> at the
Main Menu.
WinTen TransNet • 1/18/2005 Edition • Setup • Page 3-2
SETUP SCREEN
The Setup screen contains all of the setup information for TransNet. For PIC processing, it has
two tabs: Default Settings and Data Areas. This
screen always opens on the Default Settings tab,
as shown below.
Default Settings Tab
The Default Settings tab contains all of the necessary data for submitting files to PIC. Use the standard WinTen icons to edit the data on this tab and
save or cancel your changes.
WinTen TransNet • 1/18/2005 Edition • Setup • Page 3-3
Default Settings Tab Icons
Internet Settings
TransNet works on networks with proxy servers
and firewalls, but it requires some special settings
to be able to connect to the Internet. To configure
the proxy and/or firewall settings, click on the Internet Settings button on the Settings dialog box
toolbar. The following Internet Settings dialog box
appears:
Caution
You will need an IT specialist or network administrator to
configure the Internet settings. If you do not know if you
have a proxy or firewall or you do not know how to configure the settings, DO NOT make any changes to these
settings.
The Internet Settings dialog box contains a Proxy
Settings tab, a Firewall Settings tab, and an Advanced Settings tab. Follow the instructions below
for those settings.
WinTen TransNet • 1/18/2005 Edition • Setup • Page 3-4
Proxy Settings Tab
When you enter the Internet Setting dialog, the
Proxy Settings tab appears. First, determine if
your proxy server is a secure server. If not, complete the Proxy fields only. If it is a secure server,
complete the Secure Proxy fields only.
Address: Enter the proxy server IP address.
Port: Every proxy server uses a specific port to
filter Internet access. Enter the port number in this
field.
Type: Select the type of proxy server that is running on your system:
• Auto - Select this option if your proxy server uses
an auto-configuration file to filter Internet access.
• SSL - Select this option if your proxy supports
SSL connectivity.
• Non-SSL - Select this option if your proxy does
not support SSL connectivity.
• Tunnel - Select this option if your proxy is a tunnel
proxy.
Proxy User and Password: If your proxy server
requires a login ID for you to make changes to it,
enter the authorized ID and password.
WinTen TransNet • 1/18/2005 Edition • Setup • Page 3-5
Firewall Settings Tab
If you have a firewall, click on the Firewall Settings
tab and complete the configuration:
Firewall Address: Enter the IP address of the
firewall device that you are using.
Firewall Port: If your firewall requires port information, enter that port information here.
Firewall Type: Select the type of firewall that is
installed on your network:
• Tunnel - Select this option if you have a tunnel
firewall.
• Socks4 - Select this option if you have a Socks4
firewall.
• Socks5 - Select this option if you have a Socks5
firewall.
Firewall User and Password: If your firewall requires a login ID for you to make changes to it,
enter the authorized ID and password.
Advanced Settings Tab
The Advanced Settings tab provides additional settings for system administrators.
Default Settings
If you click the Default Settings dialog box and click
OK, the program saves a copy of its current internet settings in its installation directory (C:\Program
Files\TransNet). Click the Load Default button to
load these settings, replacing the current ones.
Timeout
This setting determines how many seconds
TransNet waits on an Internet request before returning a “time out” error.
WinInet
If you check the WinInet check box, the program
uses Microsoft Internet Explorer’s settings for Internet communications, rather than using its own settings. We recommend using this setting only if you
receive proxy server errors that you cannot resolve
inside TransNet’s own setup.
Hint: WinInet
The fourth letter of WinInet is a capital I, not a lowercase
L. WinInet (pronounced “win-eye-net”) is a computer programming term that means “Windows Internet.”
WinTen TransNet • 1/18/2005 Edition • Setup • Page 3-6
Color Settings Icon
The Color Settings icon opens the Color dialog
box. Click on a color to set the background color of
the TransNet screens to that color.
Some parts of some screens may remain unchanged so they remain readable.
Hint: Color Settings
A color setting, like any other setting, is only applied to the
current data area. Many agencies use this feature to colorcode their data areas so users can tell at a glance what
data area they’re currently using.
Other Functions Icon
Retrieve History PIC Tickets
This function has been built into the Setup of
TransNet so that you may retrieve all of your agency’s PIC tickets that currently reside on PIC. This
function will only be used upon set up of TransNet
for the first time.
WinTen TransNet • 1/18/2005 Edition • Setup • Page 3-7
Default Settings Tab Data Fields
PHA ID
This is the official ID HUD has assigned to your
public housing authority.
PHA Name
This is the full, official name of your PHA.
Tenmast User ID
This is your agency’s user ID for Tenmast’s Update
Manager system and Web site.
Tenmast Password
This is your agency’s password for Tenmast’s Update Manager system and Web site.
PIC Login User ID
This is your agency’s user ID for logging onto PIC.
PIC Login Password
This is your agency’s password for logging onto
PIC.
Housing Authority State
This is the state where your housing authority resides.
Field Office
This is the name of the field office your housing
authority reports to.
50058 File Path
This is the path where TransNet will store your
PIC submission file after it is generated. TransNet
stores your PIC submission file at the same location on your computer each time.
50058 Filename
This is the name of the PIC submission file stored
on your computer. The filename is the same each
time the file is created. (When editing this field, you
can type the filename or click the browse button to
locate the file.)
Path for Backup Copy
This is the location on your workstation or network
in which TransNet stores a history file of each
eTrans record it has gathered and processed.
Submission Validation (Enable Record Match
Validation)
If you check this box, TransNet will
error-check every 50058 submission file for “Record Match” errors (i.e., whether the 50058 matches the current PIC record) at the beginning of the
submission process.
Submission Editor (Enable Submission Editing)
This option allows you to edit a submission file
manually before you submit it to PIC.
CAUTION
Use the Enable Submission Editing option only temporarily
and only as directed by Tenmast Support staff. If you attempt to turn on this option, you will be prompted to contact
Tenmast for a security access code that you must enter to
activate it.
WinTen TransNet • 1/18/2005 Edition • Setup • Page 3-8
Data Areas Tab
TransNet can gather data from individual data areas or from more than one data area simultaneously when it creates submission files. The Data Areas
tab allows you to specify which data areas the program should use when you gather data while running the program in the current data area.
Data Areas Tab Fields
The Data Areas tab displays a list of all data areas
available to the program. Check the box next to
each data area from which TransNet should gather
data. (You can also click the Mark All or Unmark All
button, respectively, to check or uncheck all data
areas.)
Other Functions Icon
Reset Data Areas
This function “rolls back” the process of gathering
data if a data area becomes locked, which can
occur if there is an error during the gathering process.
CAUTION
Use the Reset Data Areas function only as directed by
Tenmast Support staff. If you attempt to use this function,
you will be prompted to contact Tenmast for a security access code that you must enter to activate it.
Verify Data Areas
This function verifies that the data areas exist on
your network and that the correct files exist within
each data area.
WinTen TransNet • 1/18/2005 Edition • Setup • Page 3-9
TRACS
AND
FMHA SETUP
To use the Setup functions while in either TRACS
or FMHA processing mode, click the Setup button
or press <S> at the Main Menu.
WinTen TransNet • 1/18/2005 Edition • Setup • Page 3-10
SETUP SCREEN
The Setup screen contains all of the setup information for TransNet. For TRACS and FMHA processing, it has three tabs: Default Settings, Data Areas,
and Agency Information. This screen always opens
on the Default Settings tab, as shown below.
Default Settings Tab
The Default Settings tab contains all of the necessary data for TRACS and MINC (FMHA) submissions. Use the standard WinTen icons to edit the
data on this tab and save or cancel your changes.
WinTen TransNet • 1/18/2005 Edition • Setup • Page 3-11
Color Settings Icon
The Color Settings icon opens the Color dialog
box. Click on a color to set the background color of
the TransNet screens to that color.
Some parts of some screens may remain unchanged so they remain readable.
Hint: Color Settings
A color setting, like any other setting, is only applied to the
current data area. Many agencies use this feature to colorcode their data areas so users can tell at a glance what
data area they’re currently using.
Default Settings Tab Data Fields
Filename for Submission Data
This is the name of the submission file stored on
your computer. The filename is the same each
time the file is created.
Path for Submission Data
This is the path where TransNet will store your submission file after it is generated. TransNet stores
your submission file at the same location on your
computer each time.
Path for Backup Copy
This is the location on your workstation or network
in which TransNet stores a history file of each
eTrans record it has gathered and processed.
“\EXE\MTCS\” is the default setting.
Path for Transaction History
This is the location on your workstation or network
in which TransNet stores a transaction history file of
each eTrans record it has gathered and processed.
“\EXE\MTCS\” is the default setting.
Mailbox ID
This is your agency’s unique ID for the reporting
system to which you send files from this data
area. If you are in a TRACS data area, this is your
agency’s TRACSMail ID.
TRACS Submission Version
This field is available only if TransNet is in TRACS
processing mode. Use this drop-down selection
box to specify the TRACS submission format your
agency uses. Unless otherwise instructed by
Tenmast or by your state Contract Administrator,
this should be set to “2.0.1.B.”
WinTen TransNet • 1/18/2005 Edition • Setup • Page 3-12
Data Areas Tab
Data Areas Tab Fields
TransNet can gather data from individual data areas or from more than one data area simultaneously when it creates submission files. The Data Areas
tab allows you to specify which data areas the program should use when you gather data while running the program in the current data area.
WinTen TransNet • 1/18/2005 Edition • Setup • Page 3-13
When you first enter the Data Areas tab, it contains
a list of all data areas (directories) from which the
program will gather information.
When you click the Edit icon, the screen changes
to display a list of all data areas available to the
program. Check the box next to each data area
from which TransNet should gather data.
WinTen TransNet • 1/18/2005 Edition • Setup • Page 3-14
Agency Information Tab
The Agency Information tab contains your
agency’s address information for TRACS and
MINC data submissions. It is available only in
TRACS and FMHA processing modes. Use the
standard WinTen icons to edit the data on this tab
and save or cancel your changes.
Agency Information Tab Data Fields
Agency Name
This is your agency’s official name as it should appear in all data submissions.
Agency Address
This is your agency’s street address.
City/State
These are your agency’s city and state.
Zip
This is your agency’s zip code.
WinTen TransNet • 1/18/2005 Edition • Setup • Page 3-15
WinTen TransNet • 1/18/2005 Edition • Setup • Page 3-16
GATHERING YOUR PIC DATA
To gather PIC data, start the program and select
PIC processing mode. At the Main Menu, click
the Gather button. This begins the Gathering
Certification Data Wizard.
WinTen TransNet • 1/18/2005 Edition • Gathering Your PIC Data • Page 4-1
Step 1: Select Gathering Requirements
Step 1 is where you will mark the gathering
requirements that the program will follow to create
your 50058 file. First select the data area you wish
to gather for.
Note: Only the data areas you selected in Setup
as being ones you want to gather from will appear. If you are missing a data area, be sure to
go back to Setup and add it.
For individual data areas, click the box next to the
data area you wish to gather for. If you wish to
gather for all data areas, click the Mark All button
on the bottom of the screen.
On this screen you will also select the Last
Effective Date you wish to gather data for. This
defaults to the last day of the previous month.
Once you have made your selections, click the
Start button on the bottom of the page. The
program will bring up a status bar and will run
though the gather process. This process includes
gathering all of your eTrans records (not submitted
prior to the last effective date) into one 50058 file
as well as error checking the eTrans records.
WinTen TransNet • 1/18/2005 Edition • Gathering Your PIC Data • Page 4-2
Step 2: Errors Found
Step 2 of the Gathering Certification Data Wizard
will list all of the errors, if any, found in your eTrans
records. These errors will be listed in a summary
status by default. If you wish to expand the line
items to get further details as to the errors found,
click on the plus sign to the left of the summary
record. If you wish to expand all records, click on
the Expand button at the bottom of the screen.
Likewise, if you have expanded all records and
want to go back to the summary version, you may
collapse each record by clicking on the minus sign
at the left of the record or to collapse all of the
records, click on the Collapse button at the bottom
of the screen.
The errors shown will not be added to the 50058
file for submission.
WinTen TransNet • 1/18/2005 Edition • Gathering Your PIC Data • Page 4-3
Errors Found Data Fields
Print Report
This button allows you to print the report of all the
errors found during gathering.
Total 50058 records gathered
This field is the total number of 50058 records that
were error checked and gathered for this PIC file.
Total 50058 records with errors
This is the total number of records that have
errors.
Total 50058 records to be submitted.
By default, the number of 50058 records to be
submitted is the total number of 50058 records
gathered minus the total number of 50058 with
errors.
Include Records with Errors in PIC Submission
If you wish to include all records in your PIC
submission, including those with errors, check this
box.
Note: If you choose to Include Records with
PIC Errors in Submission, your total number
of 50058 records to be submitted changes to
match your total number of 50058 records gathered.
WinTen TransNet • 1/18/2005 Edition • Gathering Your PIC Data • Page 4-4
Step 3: Confirmation
Step 3 of the Gather Certification Data Wizard is
the confirmation screen. This screen displays a
summary of the data you have chosen to base your
PIC file on.
Confirmation Data Fields
Last Effective Date
This field confirms the last effective date you selected on Step 1 of the wizard. This field is not
editable from this step. To edit it, you must first use
the back button to go back to Step 1.
Total 50058 records to be submitted
This number should match the Total 50058 records
to be submitted on Step 2 of the wizard.
Ticket Memo
This is a free form memo field that will be connected to this Submission file (and then later to the
Ticket #). These memos will not be submitted with
the file to PIC but can be viewed anytime you view
the ticket.
Note: Use the Ticket Memo field for any notes
you wish to keep. For example, you may wish to
note that a file excludes only one or two 50058
records due to errors. Then, when you view
the ticket, you know you have to go back and
submit those missing records once they are
corrected.
WinTen TransNet • 1/18/2005 Edition • Gathering Your PIC Data • Page 4-5
Submit to PIC now
If this field is checked, once the program has completed the Gather Certification Data Wizard, the
PIC Submission process will begin automatically.
By default, this field will be checked.
Print Submission List
If this field is checked, a Submission List will be
printed after you have clicked the Finish button on
Step 3 of the Gather Certification Data Wizard. If
you do not want to maintain a copy of this, you may
uncheck this field.
Print Error Report and Show Detailed Errors
If you have errors and you wish to print the error report, check the Print Error Report checkbox. Check
the Show Detailed Errors checkbox if you want the
report in a detailed format. Otherwise, you will receive a summary report.
If you have selected to Submit to PIC now, the
submission process will begin once you click the
Finish button. This process is detailed further in the
Submitting Your PIC File chapter of this manual.
WinTen TransNet • 1/18/2005 Edition • Gathering Your PIC Data • Page 4-6
GATHER
AND SUBMIT
TRACS DATA
To gather and submit TRACS data, start the program and select TRACS processing mode. At the
Main Menu, click the Gather button. This opens
the Gather TRACS Records dialog box.
The Gather TRACS Records dialog box has three
data fields and a single check box. The first two
data fields are the starting and ending dates for the
period for which you are submitting records. Enter
the correct dates in these fields.
The third data field is the date of the voucher that
the data you are submitting will affect. Enter the
correct date in this field.
If you want to include your request for HAP in this
data submission, check the appropriate box. If this
box is checked, the program will automatically create MAT30 files for every contract whose data you
are submitting.
When you have made your selections, click OK to
gather eTrans records.
Hint: Dates
Under normal circumstances, you will gather data for the
previous month and submit for next month’s voucher. For
example, if it is August, you will gather for July (starting date
of July 1st and ending date of July 31st) and submit for
September’s voucher (voucher date of September 1st).
When you click OK, TransNet gathers all records
that match the submission dates you provided and
that are not already marked as submitted. This
process may take up to several minutes, depending on the size of your databases.
WinTen TransNet • 1/18/2005 Edition • Gather and Submit TRACS Data • Page 5-1
When the process is complete, a dialog box opens
that summarizes the data you are submitting. Click
OK. If you did not choose to include your HAP request in the submission, the program returns to the
Main Menu. If you did choose to include your HAP
request in the submission, the process continues.
If you chose to include your HAP request in the
submission, the Select HAP Contracts dialog
box opens. This dialog box contains a list of all
HAP contracts represented in the submission file.
Check the box next to each contract whose HAP
request you want to include and click OK.
The Verify HAP Contract Information sub-screen
opens. This sub-screen allows you to review the
data for each HAP contract. Use the Prev and Next
buttons to move between contracts. When you are
done reviewing the contracts, click the Gather button to create MAT30 files.
WinTen TransNet • 1/18/2005 Edition • Gather and Submit TRACS Data • Page 5-2
A dialog box opens that displays the total amount of
assistance requested. Click OK to continue. You
may wish to confirm that this is the amount that appears on Form HUD-52670 for this submission.
A dialog box opens that displays the number of
MAT30 files created. Click OK. All associated
dialog boxes close and the program returns to the
Main Menu.
SUBMITTING TRACS DATA
The current version of TransNet is not equipped for
automatic submission of TRACS data. You must
use TRACSMail, the HUD-mandated system for
TRACS submissions. For more information on
TRACSMail, please refer to Tenmast’s TRACS
Submission Guide, available in PDF format on our
Web site.
You will submit two text files that TransNet creates
after gathering your TRACS data. The first file is
“f50059.txt”; it contains all of your 50059 forms.
The second file is “MAT3001.txt”; it contains your
request for funds. TransNet creates these files in
the network directory (folder) in which TransNet is
installed. (This directory is listed near the top of
the Main Menu screen when you are in TRACS
processing mode.)
WinTen TransNet • 1/18/2005 Edition • Gather and Submit TRACS Data • Page 5-3
WinTen TransNet • 1/18/2005 Edition • Gather and Submit TRACS Data • Page 5-4
GATHER
AND SUBMIT
FMHA DATA
To gather and submit FMHA data, start the program
and select FMHA processing mode. At the Main
Menu, click the Gather button. This opens the
Gather MINC Records dialog box.
The Gather MINC Records dialog box has three
data fields. The first two data fields are the starting and ending dates for the period for which you
are submitting records. Enter the correct dates in
these fields.
The third data field is the borrower ID for the data
you are submitting. Enter the correct ID in this
field.
When you have made your selections, click OK to
gather eTrans records.
When you click OK, TransNet gathers all records
that match the submission dates you provided.
This process may take up to several minutes, depending on the size of your databases.
WinTen TransNet • 1/18/2005 Edition • Gather and Submit FMHA Data • Page 6-1
When the process is complete, a dialog box opens
that informs you that the program will generate a
submission list of tenants. Click OK to continue.
A standard WinTen print preview sub-screen opens.
Review the eTrans Records Submission List report
and print it using the preview sub-screens toolbar
controls. When you are done, click the Close button to continue. All associated dialog boxes close
and the program returns to the Main Menu.
CAUTION
Check this report carefully. Be certain that the tenants listed
should be included in this submission. Keep a copy of this
report for your records so you can track your submission
data.
SUBMITTING FMHA DATA
The current version of TransNet is not equipped
for automatic submission of FMHA data. You must
use Industry Interface, the USDA-mandated system for FMHA submissions.
You will submit one file that TransNet creates after
gathering your FMHA data: “TRANS.fil.” TransNet
creates this file in the network directory (folder) in
which TransNet is installed. (This directory is listed
near the top of the Main Menu screen when you are
in FMHA processing mode.)
WinTen TransNet • 1/18/2005 Edition • Gather and Submit FMHA Data • Page 6-2
SUBMITTING YOUR PIC FILE
Once configured, TransNet will automatically submit your submission file to PIC and retrieve and
store the PIC Ticket Number issued by PIC for
each submission. This process will submit the current .ASC file.
NOTE: The computer running TransNet must
have an active Internet connection before you
start the submission process with the program.
Confirm that the computer is connected to the
Internet before clicking the Submit button on
the Main Menu screen.
When you click the Submit button on TransNet’s
Main Menu, a set of PIC submission wizards begin
the submission process and complete the process
with no further intervention on your part. (The program also starts this process automatically if you
choose to submit files at the end of the gathering
process.)
Before you Submit, confirm that you have gathered
your PIC data. When you are ready to submit, click
the Submit button on the TransNet Main Menu.
Hint
The Submit function in TransNet is the same as the QuicPIC
product we sell to clients outside of Tenmast. If you hear of
the QuicPIC program from other housing authorities, rest
assured that you have this function in your TransNet program, free of charge!
WinTen TransNet • 1/18/2005 Edition • Submitting Your PIC File • Page 7-1
PIC Data Validation
There are approximately 670 potential errors on a
50058 record, depending on the type of record you
submit. Of these 670 errors, there are two distinct
types of errors that PIC processes: “Field Data” errors and “Record Match” errors.
Field Data errors are errors in the way your housing
software system has formatted the 50058 records
you are submitting. TransNet’s error validation tool
is designed to scan each 50058 record in your submission file and return an error message for each
Field Data error found in each record.
Record Match errors arise when the 50058 record
you submit to PIC does not “match” the data that is
already in the PIC system. TransNet’s error validation tool is designed to retrieve the household and
unit information from PIC for each 50058 record in
your submission file and return an error message
for each Record Match error found in each record.
If any 50058 record in a submission file has a “fatal
error,” TransNet returns a detailed error message,
but also removes the record from the submission
file so you can submit the error-free records to PIC
while you are working to correct the fatal errors.
If you allow TransNet to error-check your records
and submit only error-free records, you will never
receive error reports from PIC.
The Data Validation Wizard starts when you click
the Submit button. This wizard automatically
checks the PIC submission file you are about to
send to PIC and reports on any data errors that
would cause PIC to reject the records.
WinTen TransNet • 1/18/2005 Edition • Submitting Your PIC File • Page 7-2
While TransNet is performing the 50058 data
validation, a progress bar appears on the screen,
along with a Record Match processing screen that
displays the steps of the Record Match validation
procedure. The time it takes for TransNet to complete the validation process depends on the number of 50058 records in your submission file and, in
the case of Public Housing records, the number of
Public Housing units in all of your developments.
While TransNet is performing the error validation,
you do not need to do anything.
WinTen TransNet • 1/18/2005 Edition • Submitting Your PIC File • Page 7-3
Submission Files with Errors
Once the error validation process is completed,
Step 1 of the data validation wizard appears if your
PIC submission file has any errors. This screen
displays a list of records that contain errors in a
“tree” view. Click on the plus sign next to a record
to open that “branch” of the tree and view the specific errors that the wizard found. Click the Expand
button near the bottom-right of the screen to open
all branches at once, or the Collapse button to collapse all branches at once.
Note that Record Match error messages are long
and an entire message will not appear in the tree
view. You can view and print the error report at the
end of the Data Validation Wizard to see the complete error message(s).
The bottom of the wizard screen indicates the total
number of 50058 records in the submission file
and the number of records with errors. By default,
TransNet removes any erroneous records from
your submission file before sending it. If you want
to send these records regardless of their errors,
you can check the Include Records with Errors
in PIC Submission box. (We do not recommend
doing this, since those records will be rejected by
PIC.)
If you want a printed copy of the error report from
the first Data Validation Wizard screen, click the
Print Report button. The error report will also appear automatically at the end of the data validation
wizard, and you can print the error report at that
time.
When you are finished reviewing the error list from
the first Data Validation Wizard screen, click the
Start button at the bottom of the wizard screen to
move to Step 2 of the submission process, or click
the Cancel button to cancel the submission process and return to TransNet’s Main Menu.
WinTen TransNet • 1/18/2005 Edition • Submitting Your PIC File • Page 7-4
Finish Submission Process
Step 2 of the Data Validation Wizard displays the
number of 50058 records you are about to submit
to PIC (which is the total number of records in the
submission file less the number of records with
fatal errors).
them before the actual PIC submission process begins. Once the report displays, click the Print button on the toolbar to print the report. Click the Close
button on the toolbar to close the report display and
start the PIC submission process.
If you want to save a short memo in TransNet with
this submission’s ticket record, enter one in the
Ticket Memo field.
By default, the program is designed to print a list of
50058 records you are submitting and a detailed
error report if errors were found. If you do not want
to print a copy of either report, uncheck the box
next to the report on wizard Step 2.
When you have completed making your report
selections on the Data Validation Wizard, click the
Finish button. The program then displays the reports that you selected so you can view and print
Hint: No Errors
If your submission file has no errors, the Data Validation
Wizard opens on Step 2.
WinTen TransNet • 1/18/2005 Edition • Submitting Your PIC File • Page 7-5
PIC Submission
Once the Data Validation Wizard is complete, the
following PIC Submission wizard screen appears:
WinTen TransNet • 1/18/2005 Edition • Submitting Your PIC File • Page 7-6
The PIC Submission wizard completes the entire
PIC submission process automatically, from checking the status of the PIC Web site to logging on to
PIC to uploading the submission file to retrieving
the PIC Ticket Number and logging out. The wizard screen displays the progress of the automated
submission process by placing a green check mark
next to each step on the left side of the wizard
screen as the steps are completed.
Hint: Why does TransNet need to check PIC’s status?
Before submitting, TransNet checks the site to make sure
that the site is up and accepting 50058 data submissions. If
the PIC site is down, TransNet notifies you of this.
Once TransNet has logged on to PIC, the right side
of the wizard screen displays HUD’s News and
Information from the PIC home page. Whenever
the program connects to the PIC site, the program
updates this screen with the latest HUD news and
information that appears on the site. If you still
have an active Internet connection, you can click
on the links that appear in these HUD news items,
and your Web browser will load and display the
linked pages.
When the PIC submission process is complete, the
following confirmation message appears:
Click Yes on the completion message to return to
the main menu. Click No to remain in the wizard.
If you click No, you can click the Exit button on
the wizard screen’s toolbar to return to the main
menu.
WinTen TransNet • 1/18/2005 Edition • Submitting Your PIC File • Page 7-7
Submission Errors
A number of errors could occur during the PIC
submission process. The most likely errors are
outlined below:
No Internet Connection
As noted above, TransNet requires an active
Internet connection on the computer in order to
complete the submission process. If no Internet
connection is available on the computer when you
start the submission process, the program displays
an error message indicating that it does not detect
a connection. Test your Internet connection by
starting your Web browser and searching for any
Web site. If you can connect to the site normally,
try your PIC submission again. If you cannot connect to any Web site, you may have a problem with
the Internet connection in your office.
PIC Is Unavailable
As you know, PIC is a computer system operated
by HUD, to which you connect for the purpose of
submitting 50058 data files and retrieving resulting data reports. Like all computer systems, the
PIC system may be unavailable for login when you
start the submission process in TransNet. If the
PIC system is unavailable for login when TransNet
attempts to complete the submission process, an
error message appears indicating that PIC is unavailable. You will have to attempt the submission
at a later time.
WinTen TransNet • 1/18/2005 Edition • Submitting Your PIC File • Page 7-8
VIEW TICKET INFORMATION
As part of the PIC submission process, TransNet
retrieves the PIC Ticket Number for each submission and stores the numbers with status and statistical data about the submission in the Ticket Table.
To view the Ticket Table, click the Tickets button on
the Main Menu.
WinTen TransNet • 1/18/2005 Edition • View Ticket Information • Page 8-1
Ticket Table Viewing
The View Ticket Information screen allows you to
organize and view your tickets in several different
ways. These options are listed under the “Filter
tickets by” box at the top of the screen. The filtering
options are based on the Ticket Table Data Fields
listed below.
Filter Tickets By
You can organize your ticket table to display your
tickets by a particular Field and Value. You can
choose any of the available fields on the ticket
table and the records will be arranged according to
the Value you choose. For example, if you wanted
to see only the Submitted Tickets. You would chose
“Ticket Status” for your Field and “Submitted” for
your value. Your Field choices include all data
fields on the ticket table: Ticket Status, Submitted
Date, Total 50058 records, and Total Fatal records.
The table defaults to Ticket Number in the order in
which they were submitted.
WinTen TransNet • 1/18/2005 Edition • View Ticket Information • Page 8-2
Order By
In the Order By data field, you can arrange your
tickets to be displayed in ascending order by number or letter according to the field you chose. For
example, if you wish to see the most recent submitted files, you could chose “Submitted Date” as your
order.
Search For
In order to use this function, you must have chosen
an Order By designation. Then, type in the information you want to locate in the Search For field and
click the Go button. For example, if you wanted to
see the ticket that you submitted on 2/31/04, you
would chose “Submitted Date” in the Order By field
and “2/31/04” in the Search for field.
Ticket Table Data Fields
Ticket Number
This is the ticket number that PIC generates for
each submission file once the file has been uploaded successfully to PIC.
Submitted Date
This is the system date when the file was submitted
to PIC.
Ticket Status
The ticket status is a status code generated by
TransNet for each submission ticket number.
There are several possible statuses that could be
generated for a ticket. These statuses change as
the submission files evolves through the submission and retrieval process. These statuses include
the following:
Unsubmitted: The submission file has not been
sent to PIC. This will appear when you gather a file,
but do not automatically send the file to PIC. The
ticket number will be empty. You can refer to your
notes to identify the file you want.
Submitted: This is a file that has been submitted to
PIC, but has not yet been processed.
Retrieved: This submission file has been sent. The
error report has been retrieved from the PIC Web
site, but has not been viewed.
Error: The submission file has been sent, and the
error report has been retrieved. The file contains
errors, but the error report has not been opened.
Reviewed: The submission file has been sent, the
error report has been retrieved, and the error report
has been opened.
WinTen TransNet • 1/18/2005 Edition • View Ticket Information • Page 8-3
Closed: The submission file has been sent, error
report retrieved and reviewed, and the ticket is now
closed out.
Failed: The submission file did not make it to the
PIC site. This could happen for a couple of reasons,
most commonly the submission file is improperly
formatted. If the process is not completed properly,
an improperly formatted file could result.
Total 50058 Records
This is the total number of 50058 records in the
ticket.
Total Fatals
This is the number of records in the ticket that have
fatal errors.
Tickets Screen Functions
The menu and toolbar on the Tickets screen contains a number of functions that enable you to manage your PIC tickets and the records in the Ticket
Table.
Reports Menu
You can access statistical reports about your
submission tickets from the Reports menu on the
Tickets screen.
HINT: RUNNING REPORTS
You can also access these reports from the Reports button
on the Main Menu screen. For information, please see the
Reports chapter of this manual.
Ticket Reports
The Tickets Reports function allows you to generate reports on all of your tickets as a whole. A ticket
can be in various states. For each of these states a
ticket can be in, a report can be generated from this
menu. The reports that can be generated include
the following:
All Tickets: The All Tickets report displays all records on the Ticket Table in a report format. The
report includes each ticket’s ticket status, error status, and statistical data from the error report, if an
error report has been downloaded.
Gathered Tickets: The Gathered Tickets report displays all tickets that have been gathered, but not
submitted. The report includes the gathered date
for each ticket.
Submitted Tickets: The Submitted Tickets report
displays all tickets that have been submitted to
PIC. The error report for these tickets has not been
WinTen TransNet • 1/18/2005 Edition • View Ticket Information • Page 8-4
retrieved. This report includes the ticket’s gathered
date, submitted date, and ticket number.
Retrieved Tickets: The Retrieved Tickets report
displays all tickets where an error report has been
retrieved from PIC. This report includes The ticket
number, ticket status, and submitted date.
Closed Tickets: The Closed Tickets report displays
only the records on the Ticket Table that have a
ticket status of “Closed.” For those records, the
report includes the ticket status, error status, and
statistical data from the downloaded error report.
Exported Tickets: The Exported Tickets report
displays all tickets that have been exported from
the PIC site to the TransNet program. This report
includes the ticket number, submitted date, and
any PIC errors.
PIC Error Report
This is the actual report that HUD generates when
your PIC submission file is processed. This report
includes all errors.
PIC Error Report w/o Warnings
This is your PIC error report that is generated by
HUD when your PIC submission file is process.
This report does not include all warning errors.
Tenmast Error Report
This is the Tenmast (English) version of your error
report from HUD. We have taken each error and
made the solution or fix available for viewing.
Tenmast Error Report w/o Warnings
This is the Tenmast (English) version of your error
report from HUD without the warning messages.
Failed Tickets: The Failed Tickets report displays all
PIC submissions that have failed to be processed.
History Tickets: The History Ticket Report displays
all history ticket numbers. This report includes the
ticket number, submitted date, number of transactions submitted, and any PIC errors.
Tickets w/Errors: The Tickets w/Errors report displays only the records on the Ticket Table that have
a error status of “w/Errors.” The “w/Errors” error
status indicates that the error report returned at
least one fatal error. For those records, the report
includes the ticket status, error status, and statistical data from the downloaded error report.
Tickets w/o Errors: The Tickets w/o Errors report
displays only the records on the Ticket Table that
have a error status of “w/o Errors.” The “w/o Errors”
error status indicates that the error report returned
no errors. For those records, the report includes
the ticket status, error status, and statistical data
from the downloaded error report.
Tickets w/Warnings: The Tickets w/Warnings report displays only the records on the Ticket Table
that have a error status of “w/Warnings.” The “w/
Warning” error status indicates that the error report
returned warning errors only. For those records, the
report includes the ticket status, error status, and
statistical data from the downloaded error report.
WinTen TransNet • 1/18/2005 Edition • View Ticket Information • Page 8-5
Action Menu
Submit One Ticket (or Submit Current Information icon)
The Submit One Ticket menu item and Submit Current Information icon allow you to submit the ticket
you have currently selected.
Retrieve One Ticket (or Retrieve Error Report
from PIC icon)
The Retrieve One Ticket menu item and Retrieve
Error report from PIC icon allow you to retrieve
the error report for the ticket you have currently
selected.
View Submission File (or View Submission File
icon)
The View Submission File menu item and toolbar
icon allow you to view the raw submission file you
sent to PIC for the ticket you have currently selected. “Submission text cannot be found” will be
displayed for History tickets.
Process Menu
This menu is used for those housing authorities
that may have remote offices that create submission files but do not submit them directly to PIC.
Import Ticket
This function allows you to import a submission
ticket from a remote network location to the location that submits the PIC submission file.
Export Ticket
This function allows you to export a submission
file to a remote network location so that it can be
imported at the main location where submissions
occur.
Create Submission Disc
This function allows you to compile one or more
submission files onto a 3.5” floppy disc so that you
can transfer them to a remote location that does
not have network access.
Mark Manual Submission
This function allows you flag a ticket that you must
submit manually.
Close Ticket Icon
This toolbar icon allows you to close the ticket that
you have currently selected.
WinTen TransNet • 1/18/2005 Edition • View Ticket Information • Page 8-6
REPORTS
You can access your complete PIC performance
data, as well as a large amount of other information, from the Reports area of the program. Click
the Reports button on the Main Menu to open the
TransNet Reports screen. These reports have
been classified into two categories, PIC Reports
and Ticket Reports
The program defaults to the PIC Reports tab.
WinTen TransNet • 1/18/2005 Edition • Reports • Page 9-1
To view a report on screen, select the corresponding radio button. A brief description of the report
appears on the right side of the screen. Click the
Preview button. All reports will feature the most
recent report information available on PIC. The
Print Preview screen opens with a preview copy of
the report. Review the error report, then click the
Print button (described below) on the Print Preview
screen’s toolbar to print the report.
To print a report, select the corresponding radio
button. A brief description of the report appears
on the right side of the screen. Click the Print button. A standard Windows printer control dialog box
opens. Select the printer to which you want to send
the report and click Print.
PIC Reports
PIC Reports are those reports that are generated from information located on the PIC Web site.
These reports are separated into three categories:
Public Housing, Section 8, and PIC Research Reports.
Public Housing Reports
Submission Rate
This report analyzes the percentage of your Public
Housing households that have current 50058 records in PIC. The percentage is based on the number of Public Housing households that HUD has
recorded in the PIC database as being occupied.
Re-Exams
This report shows the last re-exam date of each
household in Public Housing.
Section 8 Reports
Submission Rate
This report analyzes the percentage of your Section 8 households that have current 50058 records
in PIC. The percentage is based on the number of
Section 8 households that HUD has recorded in the
PIC database as being occupied.
Re-Exams
This report shows the last re-exam date of each
household in Section 8.
HQS
This report shows the last inspection date of each
Section 8 unit.
WinTen TransNet • 1/18/2005 Edition • Reports • Page 9-2
PIC Research Reports
The PIC Research Reports provide you with automated access to research data in the PIC system.
NOTE: The PIC Research Reports do not rely on
data stored on your system. They go directly to
the PIC site to find their data. You must have an
active Internet connection to use any of these
reports.
The PIC Research Reports include:
MTCS Transaction Data
This report provides a list of the current 50058
records in PIC for each household you currently
assist in either Public Housing or Section 8 (select
one from the pair of radio buttons that appears on
the right side of the screen when you select this
report). The report identifies the assisted family by
Head of Household name and SSN, the type of action currently on file, and the effective date of the
action. It also includes building and unit information
if the household is a Public Housing participant.
Summary 50058
When you select this report, an SSN data field
appears on the right side of the screen. Enter
the SSN or of the Head of Household whose records you want to see. When you run the report,
TransNet locates the current 50058 record for that
family and generates a summary report that includes the name and SSN, type of action currently
on file, and effective date of the action.
PHA Query
When you select this report, an SSN data field appears on the right side of the screen. Enter the
SSN of the Head of Household whose records you
want to see. When you run the report, TransNet
searches PIC for any Head of Household record
that matches that SSN. The query searches the
entire PIC database and identifies the PHA in which
that Head of Household is or has been housed.
WinTen TransNet • 1/18/2005 Edition • Reports • Page 9-3
Building/Unit Detail
This report lists the building and unit data in PIC
for all of your Public Housing developments. The
report includes the development number, building
number, entrance number, and unit number for
each unit.
Occupancy
This report lists all units in your Public Housing
developments that are occupied according to the
information in PIC. This reports includes Building
number, the Unit number, the Social Security number, the name of the head of household, and the
date of occupancy.
Vacancy
This report lists all units in your Public Housing
developments that are vacant according to the
information in PIC. This reports includes Building
number, the Unit number, and the number of days
the unit has been vacant.
WinTen TransNet • 1/18/2005 Edition • Reports • Page 9-4
Ticket Reports
The Ticket Reports tab of the Report section of
TransNet is the second location you can access
statistical reports about your submission tickets.
These are the same reports you can generate from
the Report menu on the Tickets screen.
All Tickets
The All Tickets report displays all records on the
Ticket Table in a report format. The report includes
each ticket’s ticket status, error status, and statistical data from the error report, if an error report has
been downloaded.
Gathered Tickets
The Gathered Tickets report displays all tickets that
have been gathered but unsubmitted. The report
includes the gathered date for each ticket.
WinTen TransNet • 1/18/2005 Edition • Reports • Page 9-5
Submitted Tickets
The Submitted Tickets report displays all tickets
that have been submitted to PIC. The error report
for these tickets has not been retrieved. This report
includes the ticket’s gathered date, submitted date,
and ticket number.
Retrieved Tickets
The Retrieved Tickets report displays all tickets
where an error report has been retrieved from PIC.
This report includes the ticket number, ticket status,
and submitted date.
Closed Tickets
The Closed Tickets report displays only the records on the Ticket Table that have a ticket status
of “Closed.” For those records, the report includes
the ticket status, error status, and statistical data
from the downloaded error report.
Exported Tickets
The Exported Tickets report displays all tickets
that have been exported from the PIC site to the
TransNet program. This report includes the ticket
number, submitted date, and any PIC errors.
Failed Tickets
The Failed Tickets report displays all PIC submissions that have failed to be processed.
History Tickets
The History Ticket Report displays all history ticket
numbers. This report includes the ticket number,
submitted date, number of transactions submitted,
and any PIC errors.
Tickets w/Errors
The Tickets w/Errors report displays only the records on the Ticket Table that have a error status
of “w/Errors.” The “w/Errors” error status indicates
that the error report returned at least one fatal error. For those records, the report includes the ticket
status, error status, and statistical data from the
downloaded error report.
Tickets w/o Errors
The Tickets w/o Errors report displays only the records on the Ticket Table that have a error status of
“w/o Errors.” The “w/o Errors” error status indicates
that the error report returned no errors. For those
records, the report includes the ticket status, error
status, and statistical data from the downloaded
error report.
WinTen TransNet • 1/18/2005 Edition • Reports • Page 9-6
Tickets w/Warnings
The Tickets w/Warnings report displays only the
records on the Ticket Table that have a error status of “w/Warnings.” The “w/Warning” error status
indicates that the error report returned warning errors only. For those records, the report includes the
ticket status, error status, and statistical data from
the downloaded error report.
Retrieving PIC Performance Data
To download your PHA’s PIC performance data
and ensure that you have a current data set in
TransNet, click the Update button on the Main
Menu. The program automatically logs onto PIC
and downloads a copy of the current performance
data.
Once the data is updated, TransNet displays it on
the Main Menu. The performance data display
indicates the HUD refresh date in the last data
update from PIC and displays the performance
statistics in each category. These statistics include
Submission Rate, Late Re-exams, and Section 8
Late HQS.
Submission Rate
This column shows your current PIC submission
scores for Public Housing and Section 8.
This is the percentage of households that have
current 50058 records in PIC, based on the total
number of households that HUD has recorded in
the PIC database as being occupied.
Late Re-exams
This column shows the number of Public Housing and Section 8 households with late re-exams
reported by PIC. This data is based on a PIC calculation of the number of households that have a
50058 record with an effective date that is older
than thirteen months.
Hint: PIC Data Updates
The performance data in PIC is not based on a “live” data
set. HUD “pulls” the data for these performance reports
from the PIC system once a month, generally on the first
Friday of every month. Thus, TransNet performance reports only reflect data as of the date the data was pulled by
HUD. That date appears above the performance data on
the TransNet Main Menu screen. Remember to update this
data in TransNet at least once a month.
Section 8 Late HQS
This column shows the total number of Section 8
units with late inspections. It also shows the percentage of the late inspections that were lease-up
inspections (between leases) vs. annual inspections.
WinTen TransNet • 1/18/2005 Edition • Reports • Page 9-7
WinTen TransNet • 1/18/2005 Edition • Reports • Page 9-8
INDEX
Symbols
P
50058. See PIC
50059. See TRACS
58. See PIC
59. See TRACS
password
PIC 3-8
Tenmast 3-8
performance data, PIC 9-7
PHA ID 3-8
PIC 2-1, 3-2, 4-1, 7-1
performance data 9-7
tickets 8-1
processing mode 2-2
proxy settings 3-5
A
agency information 3-15
D
data area 3-9, 3-13
data validation, PIC 7-2
default settings 3-3, 3-11
directory. See data area
R
record match validation 3-8, 7-2
reports 9-1
errors 8-4
PIC 9-2
ticket 8-4, 9-5
Rural Development. See FMHA
E
error reports 8-4
F
field data errors 7-2
file names for submission data 3-8, 3-12
firewall settings 3-6
FMHA 2-1, 3-10, 6-1
S
gather
FMHA data 6-1
PIC data 4-1
TRACS data 5-1
setup 3-1
submission file. See file names for submission data
submit
50058s. See submit: PIC data
50059s. See submit: TRACS data
FMHA data 6-2
MAT30s. See submit: TRACS data
PIC data 7-1
TRACS data 5-3
H
T
HAP request 5-2
tickets, PIC 8-1
TRACS 2-1, 3-10, 5-1
G
I
ID
PHA. See PHA ID
PIC. See user ID: PIC
Tenmast. See user ID: Tenmast
internet settings 3-4
M
MAT30 5-3. See also TRACS
MINC. See FMHA
MTCS. See PIC
MTFS. See FMHA
U
Update Manager ID. See user ID: Tenmast
USDA. See FMHA
user ID
PIC 3-8
Tenmast 3-8
V
voucher 5-1
WinTen TransNet • 1/18/2005 Edition • Index • Page i-1