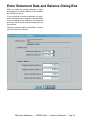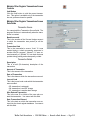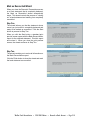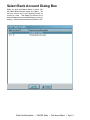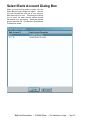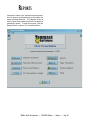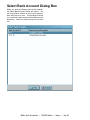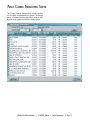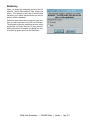
1
132 Venture Court, Suite 1
Lexington, KY 40511
http://www.tenmast.com
Support:
(877) 359-5492
[email protected]
Marketing:
(877) 836-6278
[email protected]
Fax:
(859) 367-7480
WINTEN CHECK RECONCILIATION
$
USER MANUAL VERSION 2/24/2003
FOR PROGRAM VERSION 2/24/2003
©2003 TENMAST SOFTWARE
AND LATER
©2003 Tenmast Software. All rights reserved.
WinTen Check Reconciliation User Manual
This manual, as well as the software described in it,
is furnished under license and may be used and/or
copied only in accordance with the terms of such
license. The content of this manual is furnished for
informational use only, is subject to change without
notice, and should not be construed as a commitment by Tenmast Software. Tenmast Software assumes no liability for any errors or inaccuracies that
may appear in this manual.
Except as permitted by such license, no part of
this publication may be reproduced, stored in a
retrival system, or transmitted, in any form or by
any means, electronic, mechanical, recording, or
otherwise, without the prior written permission of
Tenmast Software. Permission to produce copies
for official use is expressly granted to organizations
and individuals with a current Update and Support
Agreement with Tenmast Software for the maintenance and support of Tenmast Software’s WinTen
Check Reconciliation program.
Any references to company, housing authority,
or individual names or identities in examples or
screen images are for demonstration purposes
only and are not intended to refer to any actual
organization or person.
CONTENTS
Introduction
1.1
Program Overview
2.1
Cyclical Actions
2.2
Planning Questions
2.3
Main Menu
2.4
Setup
3.1
Setup Screen
Maintain Transactions
Select Bank Account Dialog Box
Maintain Transactions Screen
Maintain Register Checks Screen
Maintain Other Register Transactions Screen
Reconcile a Bank Account
Select Bank Account Dialog Box
Reconcile Bank Account Screen
Enter Statement Date and Balance Dialog Box
Reconcile Transactions Screen
Maintain Register Checks Screen
Maintain Other Register Transactions Screen
Bank Account Balance
Select Bank Account Dialog Box
Account Quick Balance Dialog Box
Post Transactions to Ledger
Select Bank Account Dialog Box
Post Manual Transactions Wizard
Reports
Select Bank Account Dialog Box
Reports Screen
Purge Transactions
Select Bank Account Dialog Box
Purge Cleared Transactions Screen
Reindex
3.2
4.1
4.2
4.3
4.6
4.9
5.1
5.2
5.3
5.4
5.5
5.8
5.11
6.1
6.2
6.3
7.1
7.2
7.3
8.1
8.2
8.3
9.1
9.2
9.3
10.1
Thiis page intentionally left blank.
INTRODUCTION
The WinTen Check Reconciliation program is a
data management program designed for use on
computers running the Windows 95, 98, ME, NT,
2000, or XP operating system. The interface is
designed for use in a Windows environment and
includes point-and-click mouse actions, pull-down
menus, and Windows-based help functions. This
manual contains all of the information you need
to use the WinTen Check Reconciliation program
(hereafter referred to as Check Reconciliation).
Version Information
This manual is written for the 2/24/2003 release of
Check Reconciliation. It does not apply to previous
versions of the program (including MS-DOS-based
ones) and some sections may be inaccurate with
regards to later versions.
Whenever Tenmast issues an update to this program, we will notify your agency through email. If
you have a current Update & Support Agreement
for this program, you may download and install
the update through the Tenmast Update Manager
program. During the download and installation
process, Update Manager will notify you of the
changes to the program.
We periodically update this manual to reflect significant changes to the program. You may download
this updated documentation from our Web site at
no charge.
Hint: Downloading Manuals
You can find the current version of this manual in the Client
Service Area of our Web site at http://www.tenmast.com.
All manuals are available in PDF file format. You must have
version 4.0 or newer of Adobe Acrobat Reader to open and
print manuals. You can also order printed copies of the
manual through our Marketing/Communication Services
Department.
Getting Help
Though we have made every effort to make
this manual as comprehensive as possible, no
document can cover all contingencies. If you
encounter problems with Check Reconciliation,
call the Tenmast Training & Support Department toll-free at (877) 359-5492 or send email to
[email protected].
Revisions
To better serve our clients, we constantly update our
manuals, just as we constantly make improvements
in our programs. If you find an error or omission in
this documentation or have a suggestion for improving it, call the Tenmast Marketing/Communication
Services Department toll-free at (877) 836-6278 or
send email to [email protected].
WinTen Check Reconciliation • 2/24/2003 Edition • Introduction • Page 1.1
WinTen Check Reconciliation • 2/24/2003 Edition • Introduction • Page 1.2
PROGRAM OVERVIEW
Check Reconciliation enables you to reconcile (balance) the transactions recorded in your financial records for a bank account against those cleared by
financial institutions for that same bank account.
Program Integration
General Ledger
Check Reconciliation posts manual entries in the
check register (e.g. entries for hand-entered deposits and bank deposits and handwritten checks,
as opposed to checks written in another WinTen
program) to General Ledger’s Manual Transaction
Journal.
Master Setup
The Master Setup program maintains the identifying data for your agency’s bank accounts.
If a posting to the Manual Transaction Journal (see
above) crosses funds, Check Reconciliation uses
Master Setup’s Inter-Fund Account data to balance
this transaction.
Accounts Payable, Payroll, and Section 8
All three WinTen programs that produce checks
add their checks to the check register database.
WinTen Check Reconciliation • 2/24/2003 Edition • Program Basics • Page 2.1
CYCLICAL ACTIONS
During the Month
Enter deposits as you make them.
Enter cleared transactions from your bank statements.
Enter NSF (Not Sufficient Funds) or bank charges
from your bank statements.
Print bank reconciliation reports.
Print listing reports.
WinTen Check Reconciliation • 2/24/2003 Edition • Program Basics • Page 2.2
PLANNING QUESTIONS
Before you begin using the Check Reconciliation
program, there are a few questions that you should
answer to ensure smooth and organized data management. These questions address both program
setup and agency procedures.
What are your ledger account numbers?
What programs do you use to print checks?
The Payroll, Accounts Payable, and Section 8 Tenant and Landlord programs all have the capability
to print checks. The programs that your agency
uses will determine the types of checks that Check
Reconciliation will process.
When do you purge old transactions?
How long does your agency keep a transaction on
the books once the check has cleared? For audit
purposes, this must be at least six months.
Work Flow
Who should have access to payroll data?
Who will enter deposit data in Check Reconciliation?
Who will record handwritten checks in Check
Reconciliation?
When does your agency usually receive its
bank reports?
Who will reconcile the bank reports?
Who will clear checks?
Who will enter NSF checks?
Who will enter bank charges?
Who will purge transactions?
Who will void transactions?
Which program(s) will you use to void transactions?
Who will be able to post to the General Ledger?
WinTen Check Reconciliation • 2/24/2003 Edition • Program Basics • Page 2.3
MAIN MENU
The Main Menu is the starting point for using each
function of the Check Reconciliation program. This
manual details each of these functions in its respective chapter.
WinTen Check Reconciliation • 2/24/2003 Edition • Program Basics • Page 2.4
SETUP
The first time you run Check Reconciliation, the
first option you should select from the Main Menu
is Setup. All WinTen programs have Setup functions. The settings in the Setup screen control the
program environment, and you can change many
aspects of the program’s operation through these
settings. Be careful to enter the proper information,
as inaccurate settings can cause Check Reconciliation to function in an unexpected manner.
The individual in charge of your WinTen programs
should periodically review each program’s Setup to
ensure that it is still correct. Access to the Setup
screen should be restricted through the Tenmast
Security program after the initial settings have been
entered in order to prevent accidental changes to
the settings.
To use the Setup functions, click the Setup button
or press <S> at the Main Menu.
WinTen Check Reconciliation • 2/24/2003 Edition • Setup • Page 3.1
SETUP SCREEN
The Setup screen contains all of Check Reconciliation’s setup data. Use the standard WinTen
controls to edit the data on this screen and save or
cancel your changes.
Setup Screen Controls
Color Button
The Color button opens the Color dialog box. Click
on a color to set the background color of the Check
Reconciliation screens to that color.
Some parts of some screens may remain unchanged so they remain readable.
Hint: Color Settings
A color setting, like any other setting, is only applied to the
current data area. Many agencies use this feature to colorcode their data areas so users can tell at a glance what
data area they’re currently using.
WinTen Check Reconciliation • 2/24/2003 Edition • Setup • Page 3.2
Setup Screen Data Fields
Housing Authority Information
Name
This is your agency’s name as it should appear on
all official transaction reports.
Address
This is your agency’s street address.
City, State, Zip
This is your agency’s city, state, and zip code.
Phone Number
This is your agency’s phone number.
Fax Number
This is your agency’s fax number.
Export File Specifications
Check Reconciliation is capable of creating export
files of data for two purposes. The first is for authentication of Positive Pay accounts: accounts in
which your bank will only honor those checks that
appear in export files you send them. This serves
as an anti-counterfeiting security measure. The
second is for manual analysis of your check databases in a spreadsheet or database program.
Export Format
This drop-down selection box enables you to specify the format in which the program creates export
files: Comma Separated for use in other spreadsheet or database programs, or Bank of America
Confirmation for Positive Pay use.
Export File Name
This is the name under which the program saves
export files.
Post to Ledger
If the Post to Ledger check box is checked, all new
manual check and deposit records are marked for
future posting to the General Ledger. The Post button on the Main Menu is enabled for use.
If the Post to Ledger check box is not checked, new
manual check records are not marked for posting
to the General Ledger, and the Post function is
disabled.
Version Date
This is the version of Check Reconciliation that you
are running. You cannot edit this field.
WinTen Check Reconciliation • 2/24/2003 Edition • Setup • Page 3.3
WinTen Check Reconciliation • 2/24/2003 Edition • Setup • Page 3.4
MAINTAIN TRANSACTIONS
Check Reconciliation’s primary purpose is to maintain a database of your agency’s financial transactions (checks and deposits). The Maintain Transactions area of the program is where you perform
these tasks. To enter this area of the program,
click the Maintain button or press <M> at the Main
Menu.
WinTen Check Reconciliation • 2/24/2003 Edition • Maintain Transactions • Page 4.1
Select Bank Account Dialog Box
When you first enter the Maintain Transactions
area of the program, the Select Bank Account dialog box opens. You can only maintain the transactions for one of your agency’s bank accounts at a
time. This dialog box allows you to select the bank
account whose data you are managing. Select the
desired account and click OK.
WinTen Check Reconciliation • 2/24/2003 Edition • Maintain Transactions • Page 4.2
MAINTAIN TRANSACTIONS SCREEN
When you select a bank account whose transactions you will maintain, the Maintain Transactions
screen opens. This screen contains a table of
every outstanding transaction in Check Reconciliation’s database for the selected account. The top
area of this screen contains a set of controls that
enables you to search for a specific transaction or
to filter the table of transactions.
WinTen Check Reconciliation • 2/24/2003 Edition • Maintain Transactions • Page 4.3
Maintain Transactions Screen Controls
Checks/Others
The Checks and Others buttons enable you to
switch between viewing all outstanding checks
and viewing all outstanding non-check transactions
(deposits, NSF charges/charge-backs, and other
bank charges).
Sort By
The Sort By set of radio buttons enables you to
select the order in which the table of transactions
is sorted.
Date Range
The Date Range data fields enable you to filter the
table of transactions to show only those transactions that occurred within a specific range of dates.
If you leave these fields blank, the table shows all
outstanding transactions. Change these fields,
then click the Apply button to apply your filtering
selections.
Journal Code
The Journal Code drop-down selection box enables you to filter the table of transactions to show
only those transactions of a specific type. If you
are viewing checks, you can view only Payables
checks (PB), Payroll checks (PR), or Section 8
checks (S8). If you are viewing other transactions,
you can view only deposits (OD), NSF charges/
charge-backs (ON), or other bank charges (OC).
Change this field, then click the Apply button to apply your filtering selections.
Search For
This data field allows you to search for a specific
transaction. Enter the target of your search in this
data field and click the Go button. The program
searches whichever set of fields you have selected
with the Search By radio buttons and highlights the
first record in the table that matches your search
target.
Add
Click the Add button to add a new transaction. If
you are currently viewing checks, this opens the
Maintain Register Checks screen. If you are currently viewing other transactions, this opens the
Maintain Other Register Transactions screen.
Edit
Click the Edit button to edit the currently selected
transaction. If you are currently viewing checks,
this opens the Maintain Register Checks screen.
If you are currently viewing other transactions, this
opens the Maintain Other Register Transactions
screen.
WinTen Check Reconciliation • 2/24/2003 Edition • Maintain Transactions • Page 4.4
Export
Click the Export button to send the table of transactions to an export file. The program automatically
creates the export file, then opens a dialog box that
informs you where the file was created and what it
was named. For more information on the types of
export files available in Check Reconciliation, see
the Setup chapter.
Table of Transactions Data Fields
Payee/Description
This is the name of the check’s payee, or a brief
description of the transaction.
Check #
This is the check’s number. This field is not available if you are viewing other transactions.
Date
This is the date the transaction was posted.
Amount
This is the transaction’s amount.
Journal
This is the journal in which the transaction was
recorded:
PB: Payables
PR: Payroll
S8: Section 8
OD: transaction is a deposit
ON: transaction is an NSF charge
OC: transaction is another bank charge
Cleared
If the transaction has been marked as cleared, a
“Cleared” label appears in this field.
Voided
If the transaction has been voided, a “Voided” label
appears in this field.
Source
This is the transaction’s source: “Auto” if it was
created during a check processing sequence in another WinTen program, “Manual” if it was entered
manually, or “Spoiled” if the check was voided in
Check Reconciliation.
Hint: “Spoiled” Source
This status only applies to manual checks that were entered in Check Reconciliation and later voided.
WinTen Check Reconciliation • 2/24/2003 Edition • Maintain Transactions • Page 4.5
MAINTAIN REGISTER CHECKS SCREEN
The Maintain Register Checks screen contains the
detailed information for a single check transaction.
Use the standard WinTen controls to edit the data
on this screen and save or cancel your changes.
Hint: I can’t edit this transaction!
You can only edit transactions that were manually entered
in Check Reconciliation.
WinTen Check Reconciliation • 2/24/2003 Edition • Maintain Transactions • Page 4.6
Maintain Register Checks Screen Controls
Void Button
Click the Void button to void the current transaction. This option is available only if the transaction is a manual transaction that has not yet been
cleared or posted.
Maintain Register Checks Screen Data Fields
Transaction Source
You cannot edit the Transaction Source fields. The
program fills them in automatically when the transaction is created.
Bank Account #
This is the number of the General Ledger account
to which the transaction was posted (or will be
posted).
Transaction Kind
This is the transaction’s source: “Auto” if it was
created during a check processing sequence in
another WinTen program, “Manual” if it was entered manually, or “Spoiled” if it is a check that
was manually entered in Check Reconciliation and
subsequently voided.
Transaction Details
Check Number
This is the check’s number.
Name on Check
This is the check’s payee.
Amount of Transaction
This is the amount for which the check was written.
Date of Transaction
This is the date on which the check was written.
Journal Code
This is the journal in which the check was recorded:
PB: Payables
PR: Payroll
S8: Section 8
Who Entered Transaction
This is the user ID or initials of the user who created the check. You cannot edit this field.
Date Transaction Entered
This is the date on which the transaction was entered into the check register database. You cannot
edit this field.
WinTen Check Reconciliation • 2/24/2003 Edition • Maintain Transactions • Page 4.7
Posting to Ledger Status
Post
If this box is checked, the transaction will be posted
to the General Ledger the next time you run the
Post function from the Main Menu.
Posted to Ledger
This field indicates whether or not the transaction
has been posted to the General Ledger.
Fund ID
This drop-down selection box enables you to select
the fund to which the transaction will be posted.
Account
This is the number of the General Ledger account
to which the transaction was posted (or will be
posted).
Clearing Status
You cannot edit the Clearing Status fields. The
program fills them in automatically as they become
relevant.
Current Status
If the check has been marked as cleared, a
“Cleared” label appears in this field.
Cleared Amount
This is the amount for which the check was
cleared.
Who Cleared Transaction
This is the user ID or initials of the user who cleared
the check.
Date Transaction Cleared
This is the date on which the check was cleared.
WinTen Check Reconciliation • 2/24/2003 Edition • Maintain Transactions • Page 4.8
MAINTAIN OTHER REGISTER TRANSACTIONS SCREEN
The Maintain Other Register Transactions screen
contains the detailed information for a single noncheck transaction. Use the standard WinTen controls to edit the data on this screen and save or
cancel your changes.
WinTen Check Reconciliation • 2/24/2003 Edition • Maintain Transactions • Page 4.9
Maintain Other Register Transactions Screen
Controls
Void Button
Click the Void button to void the current transaction. This option is available only if the transaction
has not yet been cleared or posted.
Maintain Other Register Transactions Screen
Data Fields
Transaction Source
You cannot edit the Transaction Source fields. The
program fills them in automatically when the transaction is created.
Bank Account #
This is the number of the General Ledger account
to which the transaction was posted (or will be
posted).
Transaction Kind
This is the transaction’s source: “Auto” if it was
created during a check processing sequence in
another WinTen program, “Manual” if it was entered manually, or “Spoiled” if it is a check that was
spoiled during printing and subsequently voided.
Transaction Details
Description
This is a brief (36-character) description of the
transaction.
Amount of Transaction
This is the amount of the transaction.
Date of Transaction
This is the date on which the transaction occurred.
Journal Code
This is the journal code under which the transaction
was recorded:
OD: transaction is a deposit
ON: transaction is an NSF charge
OC: transaction is another bank charge
Who Entered Transaction
This is the user ID or initials of the user who created the transaction. You cannot edit this field.
Date Transaction Entered
This is the date on which the transaction was entered into the check register database. You cannot
edit this field.
WinTen Check Reconciliation • 2/24/2003 Edition • Maintain Transactions • Page 4.10
Posting to Ledger Status
Post
If this box is checked, the transaction will be posted
to the General Ledger the next time you run the
Post function from the Main Menu.
Posted to Ledger
This field indicates whether or not the transaction
has been posted to the General Ledger.
Fund ID
This drop-down selection box enables you to select
the fund to which the transaction will be posted.
Account
This is the number of the General Ledger account
to which the transaction was posted (or will be
posted).
Clearing Status
You cannot edit the Clearing Status fields. The
program fills them in automatically as they become
relevant.
Current Status
If the transaction has been marked as cleared, a
“Cleared” label appears in this field.
Cleared Amount
This is the amount for which the transaction was
cleared.
Who Cleared Transaction
This is the user ID or initials of the user who cleared
the transaction.
Date Transaction Cleared
This is the date on which the transaction was
cleared.
WinTen Check Reconciliation • 2/24/2003 Edition • Maintain Transactions • Page 4.11
WinTen Check Reconciliation • 2/24/2003 Edition • Maintain Transactions • Page 4.12
RECONCILE A BANK ACCOUNT
Whenever you receive a bank statement, you need
to reconcile it with your own records. This process
involves establishing a one-for-one match between
the transactions in your agency’s records and the
transactions that the bank has recorded. To begin
the reconciliation process, click the Reconcile button or press <C> at the Main Menu.
WinTen Check Reconciliation • 2/24/2003 Edition • Reconcile a Bank Account • Page 5.1
Select Bank Account Dialog Box
When you first enter the Reconcile a Bank Account
area of the program, the Select Bank Account dialog box opens. You can only maintain the transactions for one of your agency’s bank accounts at a
time. This dialog box allows you to select the bank
account whose data you are managing. Select the
desired account and click OK.
WinTen Check Reconciliation • 2/24/2003 Edition • Reconcile a Bank Account • Page 5.2
RECONCILE BANK ACCOUNT SCREEN
When you select a bank account whose transactions you will maintain, the Reconcile Bank Account
screen opens. This screen contains a table of every bank statement (reconciliation) in Check Reconciliation’s database for the selected account.
To continue working with an existing statement,
select that statement in the table and click the Edit
button.
To add a reconciliation record for a new statement,
click the Add button.
If a statement is marked as reconciled and you
need to remove this status to edit it again, select
that statement, then select the Unmark as Reconciled option from the Other Functions menu.
WinTen Check Reconciliation • 2/24/2003 Edition • Reconcile a Bank Account • Page 5.3
Enter Statement Date and Balance Dialog Box
When you select an existing statement or add a
new statement, the Enter Statement Date and Balance dialog box opens.
If you are editing an existing statement, the statement’s identifying data is already in the data fields.
If you are adding a new statement, the data fields
are blank, and you must enter this data before you
can continue.
Change or enter the data in these fields, if necessary, and click OK to continue.
WinTen Check Reconciliation • 2/24/2003 Edition • Reconcile a Bank Account • Page 5.4
RECONCILE TRANSACTIONS SCREEN
The Reconcile Transactions screen contains a
table of every transaction that is in your records
for the selected statement. This screen enables
you to edit individual transactions, add new manual
transactions, and mark transactions as cleared.
WinTen Check Reconciliation • 2/24/2003 Edition • Reconcile a Bank Account • Page 5.5
Reconcile Transactions Screen Controls
Checks/Others
The Checks and Others buttons enable you to
switch between viewing all checks on the current
statement and viewing all non-check transactions
(deposits, NSF charges/charge-backs, and other
bank charges) on the current statement.
Sort By
The Sort By set of radio buttons enables you to
select the order in which the table of transactions
is sorted.
Date Range
The Date Range data fields enable you to filter the
table of transactions to show only those transactions that occurred within a specific range of dates.
If you leave these fields blank, the table shows all
outstanding transactions. Change these fields,
then click the Apply button to apply your filtering
selections.
Journal Code
The Journal Code drop-down selection box enables you to filter the table of transactions to show
only those transactions of a specific type. If you
are viewing checks, you can view only Payables
checks (PB), Payroll checks (PR), or Section 8
checks (S8). If you are viewing other transactions,
you can view only deposits (OD), NSF charges/
charge-backs (ON), or other bank charges (OC).
Change this field, then click the Apply button to apply your filtering selections.
Search For
This data field allows you to search for a specific
transaction. Enter the target of your search in this
data field and click the Go button. The program
searches whichever set of fields you have selected
with the Search By radio buttons and highlights the
first record in the table that matches your search
target.
Add
Click the Add button to add a new transaction. If
you are currently viewing checks, this opens the
Maintain Register Checks screen. If you are currently viewing other transactions, this opens the
Maintain Other Register Transactions screen.
Edit
Click the Edit button to edit the currently selected
transaction. If you are currently viewing checks,
this opens the Maintain Register Checks screen.
If you are currently viewing other transactions, this
opens the Maintain Other Register Transactions
screen.
WinTen Check Reconciliation • 2/24/2003 Edition • Reconcile a Bank Account • Page 5.6
Clear/Unclear
Click the Clear button to mark the currently selected transaction as cleared. Click the Unclear
button to mark the currently selected transaction
as not cleared.
Clear Range
Click the Clear Range button to clear a range of
check numbers. When you click this button, the
Enter Range of Check Numbers dialog box opens.
Select the type of checks you are clearing (paper
or direct deposit) and enter the starting and ending
check numbers, then click OK. The program marks
all matching checks as cleared.
Reconcile Transactions Screen Data Fields
Deposits/Credits
These three data fields show the current amount of
deposits and credits that is recorded on the statement, the current total amount of deposits and
credits that are marked as cleared in Check Reconciliation, and the difference between the two.
Checks/Fees
These three data fields show the current amount of
checks and fees that is recorded on the statement,
the current total amount of deposits and credits that
are marked as cleared in Check Reconciliation,
and the difference between the two.
Statement Balance
This is the bank account balance on the current
statement.
Outstanding Deposits/Credits
This is the total amount of all deposits and credits
in Check Reconciliation’s records that have not
been marked as cleared.
Outstanding Checks/Fees
This is the total amount of all deposits and credits
in Check Reconciliation’s records that have not
been marked as cleared.
Hint: When am I done reconciling?
The bank account is reconciled when the Difference field is
zero for both deposits/credis and checks/fee, and all deposits and/or checks on your bank statement have cleared.
Once the statement is balanced and you click the Close
button, the program starts the Mark as Reconciled wizard,
described at the end of this chapter. This wizard “closes
out” the bank statement and marks it as reconciled.
Balance to Compare with Ledger
This is the calculated ledger balance for the selected bank account, as determined by the three data
fields above it. Compare the calculated balance in
this field with the actual account balance in General
Ledger to determine if General Ledger balances to
Check Reconciliation.
WinTen Check Reconciliation • 2/24/2003 Edition • Reconcile a Bank Account • Page 5.7
MAINTAIN REGISTER CHECKS SCREEN
The Maintain Register Checks screen contains the
detailed information for a single check transaction.
Use the standard WinTen controls to edit the data
on this screen and save or cancel your changes.
Hint: I can’t edit this transaction!
You can only edit transactions that were manually entered
in Check Reconciliation.
WinTen Check Reconciliation • 2/24/2003 Edition • Reconcile a Bank Account • Page 5.8
Maintain Register Checks Screen Controls
Void Button
Click the Void button to void the current transaction. This option is available only if the transaction is a manual transaction that has not yet been
cleared or posted.
Maintain Register Checks Screen Data Fields
Transaction Source
You cannot edit the Transaction Source fields. The
program fills them in automatically when the transaction is created.
Bank Account #
This is the number of the General Ledger account
to which the transaction was posted (or will be
posted).
Transaction Kind
This is the transaction’s source: “Auto” if it was
created during a check processing sequence in
another WinTen program, “Manual” if it was entered manually, or “Spoiled” if it is a check that was
manually entered in Check Reconciliation and subsequently voided.
Transaction Details
Check Number
This is the check’s number.
Name on Check
This is the check’s payee.
Amount of Transaction
This is the amount for which the check was written.
Date of Transaction
This is the date on which the check was written.
Journal Code
This is the journal in which the check was recorded:
PB: Payables
PR: Payroll
S8: Section 8
Who Entered Transaction
This is the user ID or initials of the user who created the check. You cannot edit this field.
Date Transaction Entered
This is the date on which the transaction was entered into the check register database. You cannot
edit this field.
WinTen Check Reconciliation • 2/24/2003 Edition • Reconcile a Bank Account • Page 5.9
Posting to Ledger Status
Post
If this box is checked, the transaction will be posted
to the General Ledger the next time you run the
Post function from the Main Menu.
Posted to Ledger
This field indicates whether or not the transaction
has been posted to the General Ledger.
Fund ID
This drop-down selection box enables you to select
the fund to which the transaction will be posted.
Account
This is the number of the General Ledger account
to which the transaction was posted (or will be
posted).
Clearing Status
You cannot edit the Clearing Status fields. The
program fills them in automatically as they become
relevant.
Current Status
If the check has been marked as cleared, a
“Cleared” label appears in this field.
Cleared Amount
This is the amount for which the check was
cleared.
Who Cleared Transaction
This is the user ID or initials of the user who cleared
the check.
Date Transaction Cleared
This is the date on which the check was cleared.
WinTen Check Reconciliation • 2/24/2003 Edition • Reconcile a Bank Account • Page 5.10
MAINTAIN OTHER REGISTER TRANSACTIONS SCREEN
The Maintain Other Register Transactions screen
contains the detailed information for a single noncheck transaction. Use the standard WinTen controls to edit the data on this screen and save or
cancel your changes.
WinTen Check Reconciliation • 2/24/2003 Edition • Reconcile a Bank Account • Page 5.11
Maintain Other Register Transactions Screen
Controls
Void Button
Click the Void button to void the current transaction. This option is available only if the transaction
has not yet been cleared or posted.
Maintain Other Register Transactions Screen
Data Fields
Transaction Source
You cannot edit the Transaction Source fields. The
program fills them in automatically when the transaction is created.
Bank Account #
This is the number of the General Ledger account
to which the transaction was posted (or will be
posted).
Transaction Kind
This is the transaction’s source: “Auto” if it was
created during a check processing sequence in
another WinTen program, “Manual” if it was entered manually, or “Spoiled” if it is a check that was
spoiled during printing and subsequently voided.
Transaction Details
Description
This is a brief (36-character) description of the
transaction.
Amount of Transaction
This is the amount of the transaction.
Date of Transaction
This is the date on which the transaction occurred.
Journal Code
This is the journal code under which the transaction
was recorded:
OD: transaction is a deposit
ON: transaction is an NSF charge
OC: transaction is another bank charge
Who Entered Transaction
This is the user ID or initials of the user who created the transaction. You cannot edit this field.
Date Transaction Entered
This is the date on which the transaction was entered into the check register database. You cannot
edit this field.
WinTen Check Reconciliation • 2/24/2003 Edition • Reconcile a Bank Account • Page 5.12
Posting to Ledger Status
Post
If this box is checked, the transaction will be posted
to the General Ledger the next time you run the
Post function from the Main Menu.
Posted to Ledger
This field indicates whether or not the transaction
has been posted to the General Ledger.
Fund ID
This drop-down selection box enables you to select
the fund to which the transaction will be posted.
Account
This is the number of the General Ledger account
to which the transaction was posted (or will be
posted).
Clearing Status
You cannot edit the Clearing Status fields. The
program fills them in automatically as they become
relevant.
Current Status
If the transaction has been marked as cleared, a
“Cleared” label appears in this field.
Cleared Amount
This is the amount for which the transaction was
cleared.
Who Cleared Transaction
This is the user ID or initials of the user who cleared
the transaction.
Date Transaction Cleared
This is the date on which the transaction was
cleared.
WinTen Check Reconciliation • 2/24/2003 Edition • Reconcile a Bank Account • Page 5.13
Mark as Reconciled Wizard
When you close the Reconcile Transactions screen
on a bank statement that is completely balanced,
the Mark as Reconciled wizard automatically
starts. This wizard controls the process of “closing
out” a bank statement and marking it as completely
reconciled.
Step One
The wizard informs you that the statement whose
record you just exited is completely balanced and
ready to be marked as reconciled. Click the Start
button to proceed to Step Two.
When you click the Start button, a standard print
preview screen opens with the Bank Reconciliation
report for the selected statement. Print this report
and review it. When you close the print preview
screen, the wizard continues to Step Two.
Step Two
The wizard reminds you to review all information on
the Bank Reconciliation report.
Click the Finish button to close the wizard and mark
the bank statement as reconciled.
WinTen Check Reconciliation • 2/24/2003 Edition • Reconcile a Bank Account • Page 5.14
BANK ACCOUNT BALANCE
Check Reconciliation maintains a continuous record of the balance of each bank account from
which your agency writes checks. The Bank Account Balance function enables you to review this
data. To view an account’s balance, click the Balance button or press <B> at the Main Menu.
WinTen Check Reconciliation • 2/24/2003 Edition • Bank Account Balance • Page 6.1
Select Bank Account Dialog Box
When you click the Balance button or press <B>,
the Select Bank Account dialog box opens. You
can only review one of your agency’s bank accounts at a time. This dialog box allows you to
select the bank account whose balance you are reviewing. Select the desired account and click OK.
WinTen Check Reconciliation • 2/24/2003 Edition • Bank Account Balance • Page 6.2
Account Quick Balance Dialog Box
This dialog box contains a summary of the current status of the selected bank account, including
all outstanding transactions up to 30 days in the
future. Review this information, then click OK to
return to the Main Menu.
WinTen Check Reconciliation • 2/24/2003 Edition • Bank Account Balance • Page 6.3
WinTen Check Reconciliation • 2/24/2003 Edition • Bank Account Balance • Page 6.4
POST TRANSACTIONS
TO LEDGER
Whenever a transaction is created in a WinTen
program, the program in which it was created is
responsible for posting it to the General Ledger.
All of the transactions that Check Reconciliation
receives from other programs (Accounts Payable,
Tenant Accounts Receivable, and Section 8 Tenant
and Landlord) have been, or will be, posted to the
General Ledger by their parent programs. However, you must post any transactions that have been
created manually in Check Reconciliation. To start
the posting process, click the Post button or press
<O> at the Main Menu.
WinTen Check Reconciliation • 2/24/2003 Edition • Post Transactions to Ledger • Page 7.1
Select Bank Account Dialog Box
When you click the Post button or press <O>, the
Select Bank Account dialog box opens. You can
only post transactions from one of your agency’s
bank accounts at a time. This dialog box allows
you to select the bank account whose manual
transactions you are posting. Select the desired
account and click OK. This starts the Post Manual
Transactions wizard.
WinTen Check Reconciliation • 2/24/2003 Edition • Post Transactions to Ledger • Page 7.2
Post Manual Transactions Wizard
Step One
Select the order in which you want to sort the PrePosting Listing report.
Click the Start button to proceed to Step Two.
When you click the Start button, a print preview
screen opens with the Pre-Posting Listing report.
Review this report, then click the Close button to
continue.
Step Two
Review the Pre-Posting Listing report. Confirm
that all transactions are present and will be posted
to the correct accounts.
If all of the information on the report is correct,
click the Finish button. The program posts every
transaction on the Pre-Posting Listing report to the
General Ledger. When the process is complete,
the wizard closes and the program returns to the
Main Menu.
If any information on the report is incorrect, click
the Cancel button. Go to the Maintain Transactions
area of the program and edit the incorrect transactions.
WinTen Check Reconciliation • 2/24/2003 Edition • Post Transactions to Ledger • Page 7.3
WinTen Check Reconciliation • 2/24/2003 Edition • Post Transactions to Ledger • Page 7.4
REPORTS
Information needs to be summarized and presented in an easy-to-understand form so the reader can
make informed decisions. The Reports screen is
where Check Reconciliation turns all of its data into
meaningful reports. To enter this screen, click the
Reports button or press <R> at the Main Menu.
WinTen Check Reconciliation • 2/24/2003 Edition • Reports • Page 8.1
Select Bank Account Dialog Box
When you enter the Reports area of the program,
the Select Bank Account dialog box opens. You
can only produce reports on one of your agency’s
bank accounts at a time. This dialog box allows
you to select the bank account whose data you are
examining. Select the desired account and click
OK.
WinTen Check Reconciliation • 2/24/2003 Edition • Reports • Page 8.2
REPORTS SCREEN
The left half of the Reports screen contains a set
of radio buttons that correspond to the available
reports. The right side of the screen contains the
formatting options for the currently selected report.
Producing a Report
To produce a report, select its radio button. Set all
of the formatting options for the report, then click
the Print or Print Preview icon.
If you click the Print icon, a standard WinTen print
control dialog box opens. Select the printing options for the report and click OK.
If you click the Print Preview icon, a print preview
screen opens with the selected report. Review the
report from this screen and close it when you are
finished.
WinTen Check Reconciliation • 2/24/2003 Edition • Reports • Page 8.3
Available Reports
Transaction Listing Report
The Transaction Listing Report is a list of all transactions, or a selected group of transactions, that
Check Reconciliation has recorded for the selected
bank account.
You can choose to include outstanding, cleared,
and/or voided transactions on this report. You can
also include all transactions regardless of date or
check number, or only those transactions that occurred within a selected range of dates and/or that
had check numbers within a selected range. You
can sort the report by check number, journal and
date, or date and journal.
Account Reconciliation Report
The Account Reconciliation Report is a summary
of a selected statement and reconciliation for the
selected bank account. Select the desired statement date from the table of statements. There are
no sorting or filtering options for this report.
WinTen Check Reconciliation • 2/24/2003 Edition • Reports • Page 8.4
Transaction Edit Register Report
The Transaction Listing Report is a list of all transactions, or a selected group of transactions, that
Check Reconciliation has recorded for the selected
bank account.
You can choose to include transactions from all
journals and with all statuses, or from one or more
specific journals and/or with one or more specific
statuses. You can also include all transactions
regardless of date or check number, or only those
transactions that occurred within a selected range
of dates and/or that had check numbers within a
selected range. You can sort the report by check
number, journal and date, or date and journal.
Journal Report
The Journal Report lists all transactions for the selected bank account that are marked to be posted to
the General Ledger but have not yet been posted.
You can include all transactions regardless of date,
or only those transactions that occurred within a
selected range of dates. You can print the report in
debit/credit format or one-column format. You can
sort the report by date and reference number, account number and date, account number and reference number, or reference number only.
WinTen Check Reconciliation • 2/24/2003 Edition • Reports • Page 8.5
WinTen Check Reconciliation • 2/24/2003 Edition • Reports • Page 8.6
PURGE TRANSACTIONS
Over several years of operation, your Check
Reconciliation database can become quite large.
Eventually, this can slow down the program. When
this happens, you may need to purge old transaction records from the database to enhance performance. To purge, click the Purge button or press
<P> at the Main Menu.
WinTen Check Reconciliation • 2/24/2003 Edition • Purge Transactions • Page 9.1
Select Bank Account Dialog Box
When you enter the Purge area of the program, the
Select Bank Account dialog box opens. You can
only purge data from one of your agency’s bank
accounts at a time. This dialog box allows you to
select the bank account whose data you are purging. Select the desired account and click OK.
WinTen Check Reconciliation • 2/24/2003 Edition • Purge Transactions • Page 9.2
PURGE CLEARED TRANSACTIONS SCREEN
The Purge Cleared Transactions screen enables
you to select old transactions to purge. To change
the set of transactions that are shown, enter a starting and ending date and click the Apply button.
WinTen Check Reconciliation • 2/24/2003 Edition • Purge Transactions • Page 9.3
Purging Transactions
CAUTION
You should never purge transactions that you may need for
audit purposes. Tenmast recommends that you keep all
transaction records for at least three years. For this reason, the program will not allow you to purge transactions
that are not at least six months old.
To purge all of the cleared transactions currently
shown on the Purge Cleared Transactions screen,
click the Purge button.
A dialog box opens that asks if you are certain you
want to purge the selected transactions. Click Yes
to continue or No to cancel.
If you click Yes, the program purges every selected
transaction from the database. A progress dialog
box opens, showing how far the program is in this
process.
When the purge process is complete, a dialog box
opens that tells you how many transaction records
were closed. Click OK to close all associated
dialog boxes and the Purge Cleared Transactions
screen and return to the Main Menu.
WinTen Check Reconciliation • 2/24/2003 Edition • Purge Transactions • Page 9.4
REINDEX
This function rebuilds the indexes that Check Reconciliation uses to search for specific records within
its databases. Index files are similar to a library’s
card catalog - they tell the computer the location of
the data for which you are searching. Indexing databases is safe to do at any time - it does not need
to be done at a specific time of the month or the
year. To initiate the reindexing process, click the
Reindex button or press <I> from the Main Menu.
WinTen Check Reconciliation • 2/24/2003 Edition • Reindex • Page 10.1
When to Reindex
Occasionally, index files can become corrupted.
This means that such a file’s data is no longer complete, and it may not be in a form that Check Reconciliation can read. The most common indicator
of a corrupted index file comes when you search
for an entry that you know is present and the program does not find it. Reindexing solves this problem by going through the database and rebuilding
the index file for it.
CAUTION
You must make sure that no one else is using Check Reconciliation before using this feature. Reindexing rewrites
files, and cannot do so if they are already open when Check
Reconciliation attempts to index them.
When to Pack
While you are reindexing, you also have the option to pack the database. Packing is a process by
which Check Reconciliation removes all blank or
deleted entries from its database, thereby reducing
the size of the files.
CAUTION
Tenmast does not recommend you perform packing unless specifically instructed to do so by Tenmast Training &
Support personnel. Packing permanently removes deleted
records. Once you have packed, data that the packing
process erases will be irretrievably gone.
WinTen Check Reconciliation • 2/24/2003 Edition • Reindex • Page 10.2
Reindexing
When you begin the reindexing process, the Reorganize Check Reconciliation Data dialog box
opens. This dialog box has a pair of check boxes
that allow you to select which activities you wish to
perform with the database.
Select the check boxes that correspond to the functions you want to perform, then click the OK button.
The program begins the reindexing process, which
should take no longer than two or three minutes.
When the process is complete, the dialog box closes and the program returns to the Main Menu.
WinTen Check Reconciliation • 2/24/2003 Edition • Reindex • Page 10.3
WinTen Check Reconciliation • 2/24/2003 Edition • Reindex • Page 10.4
INDEX
A
Account Balance 6.1
Account Statement. See Statement
B
Balance 6.1
Bank Statement. See Statement
C
Checks
Edit 4.6, 5.8
Color 3.2
D
Deposits
Edit 4.9, 5.11
E
Export File 4.5
Setup 3.3
O
Overview 2.1
P
Posting 7.1
Setup 3.3
Purge 9.1
R
Reconcile 5.1
Reindex 10.1
Reports 8.1
Available List of 8.4
Printing 8.3
S
Setup 3.1
Color 3.2
Export File 3.3
Posting 3.3
Statement 5.4, 5.5
T
Transactions 4.1
Add 4.3
Edit 4.3, 4.9
Purge Old 9.1
Reconcile 5.1
WinTen Check Reconciliation • 2/24/2003 Edition • Index • Page i.1