1
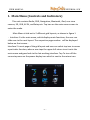
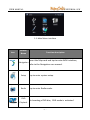
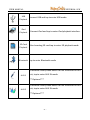
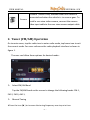
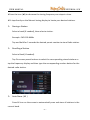
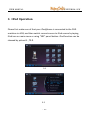
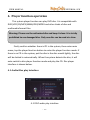
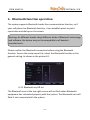
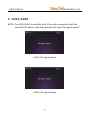
Contents 1. MAIN MENU (CONTROLS AND INDICATORS) - 2 2. TUNER ( FM/AM ) OPERATION - 5 3. IPOD OPERATION - 10 4. PLAYER FUNCTION OPERATION - 12 4.1 AUDIO FILES PLAY INTERFACE - 12 4.2 DISC PICTURE FILE PLAY INTERFACE - 15 4.3 DVD VIDEO FILE PLAY INTERFACE - 16 5. SD CARD AND USB OPERATION - 17 5.1 SD CARD/USB VIDEO FILE PLAYING INTERFACE - 17 5.2 SD CARD/USB IMAGE FILES PLAY INTERFACE - 19 5.3 SD CARD/USB VIDEO FILES PLAY INTERFACE - 21 6 . BLUETOOTH FUNCTION OPERATION - 22 6.1 PHONE - 23 6.1.1 Dial function - 24 6.1.2 telephone access listen to function - 24 6.2 CHECK CALL RECORDS FUNCTION - 24 6.3 BLUETOOTH SETUP - 25 6.4 BLUETOOTH STREAMING MUSIC(A2DP) - 28 7. EQ SETTINGS - 29 8. REAR VIEW CAMERA - 31 9. AUX1/AUX2 - 32 10. SYSTEM SETUP - 34 10.1 SYSTEM SETTINGS - 34 - USER MANUAL UNIVERSAL AVN 10.2 ASP SETTINGS - 35 10.3 GENERAL SETTINGS - 36 10.4 LANGUAGE SETTINGS - 37 10.5 NAVI SETTING - 38 10.6 TIME SETTING - 38 11. STEERING WHEEL FUNCTION STUDY - 39 - -1- USER MANUAL UNIVERSAL AVN 1. Main Menu (Controls and Indicators) This unit contains Radio, DVD, Navigation, Bluetooth, iPod, rear view camera, SD, USB, AV IN, and Setup etc. Tap icon on the main menu screen to enter the mode. Main Menu is laid out in 2 different grid layouts, as shown in figure 1 :Interface 1 is the main menu, which displays main functions, the user can slide over to the next layout. The respective page number will be displayed below on that screen. . Interface 2 is next page of the grid layout and user can select tap icon to access a particular function; when a user taps the upper left return icon it exits the main menu and goes back to the last working interface. Tap To turn off the screen tap once on the power display icon which is next to the return icon. -2- USER MANUAL UNIVERSAL AVN 1-1.Main Menu interface Icon Button Name Navigation Function description Insert the Map card and tap to enter NAVI interface, refer to the Navigation user manual. Setup Tap to enter system setup. Radio Tap to enter Radio mode. DVD Playback On Inserting a DVD disc; DVD mode is activated -3- USER MANUAL USB Playback iPod Playback SD Card Playback UNIVERSAL AVN Connect USB and tap to enter USB mode. Connect iPod and tap to enter iPod playback interface. After Inserting SD card tap to enter SD playback mode. Bluetooth Tap to enter Bluetooth mode AUX 1 An external audio/video device can be connected to this unit, tap to enter AUX IN mode. ***Optional*** AUX 2 An external audio/video device can be connected to this unit, tap to enter AUX IN mode. ***Optional*** -4- USER MANUAL Camera UNIVERSAL AVN "Camera” mode is only available when the camera is connected and when the vehicle is –in reverse gear. To install a rear view video camera, connect the camera video input cable to the rear view camera output cable. 2. Tuner (FM/AM) Operation Go to main menu, tap the radio icon to enter radio mode, tap home icon to exit the current mode. For more reference the radio playback interface is shown in figure 1. The user can follow these options for desired mode:- Select FM/AM Band Tap the FM/AM band on the screen to change the following bands: FM-1, FM-2, FM-3, AM-1。 Manual Tuning ● Press the icon (►) to increase the tuning frequency one step at a time. -5- USER MANUAL UNIVERSAL AVN ● Press the icon (◄) to decrease the tuning frequency one step at a time. ● Or tap directly on the Manual tuning display to locate your desired stations. Storing a Station Select a band (If needed), then select a station. Example: FM1 103.6MHz Tap and Hold for 3 seconds the desired preset number to store Radio station. Recalling a Station Select a Band (If needed). Tap On-screen preset buttons to select the corresponding stored stations or tap the frequency display and then type the corresponding number button for the desired radio station. Auto Store ( AS ) Press AS icon on the screen to automatically scan and store all stations in the current band. -6- USER MANUAL UNIVERSAL AVN Preset Scan ( PS ) Tap the PS icon on the screen for scanning the stations in the 6 preset channels in the current band. Scan Tap the Scan icon on the screen to automatically scan all stations in current band to preview stations. Press on AS icon to stop scanning and listen to the selected stations. -7- USER MANUAL UNIVERSAL AVN 2-1. Radio interface Icon Button name Function description Home Button Tap to go back to main menu. 10:30 System clock Display current time, press to enter screensaver. Left Open Tap to open Hide button. Right Open Tap to open Radio Preset frequency list. Current frequency Playing Source Program scan Current frequency, ③is the N umber in preset list. Change among the following bands: FM-1, FM-2, FM-3 and AM, preset 6 stations in each band. Press the PS button on the screen. Scan the stations in the 6 preset channels in the current band. -8- USER MANUAL Icon UNIVERSAL AVN Button name Function description Auto store Press AS button on the screen to automatically scan and store all stations in current band. activate/ Click on up/ down button to run number seeking the station, deactivate Scan Mode seek up seek down Frequency scale Click on scroll panel to change to digit keyboard . Tap to step down the current frequency. Tap to step up the current frequency Display current frequency and tap to select a new station. -9- USER MANUAL UNIVERSAL AVN 3. IPod Operation Please first make sure of that your iPod/phone is connected to the DVD machine via USB, and then switch current source to iPod source by taping iPod icon on main menu or using “SRC” panel button. iPod function can be showed by picture3-1, 3-2. 3-1 3-2 - 10 - USER MANUAL Icon Interface title 10:30 UNIVERSAL AVN Button name iPod play System clock current play progress bar Function description Display current interface Display the current system time, click to screen saver mode Display the current song's progress time The previous line displays current song, the song name ticker will display title. Play message The next line shows the song's ID3 information, including artist, album, time, and genre. Last song button Next song button Tap to play the last track of the song list. Tap to play the next track of the song list Play/Pause Press to begin playback. Press again to pause button EQ button playback. Press the icon to access the Equalizer menu. - 11 - USER MANUAL UNIVERSAL AVN 4. Player function operation This system player function can play DVD disc. It is compatible with DVD/VCD/CD/MP3/WMA/JPEG/MPEG and other kinds of disc and multimedia format files. Warning: Please use the authorized disc and keep it clean. It is strictly prohibited to use damaged disc. Only one disc can be used at a time. Firstly confirm whether there is CD in the system, then enter main menu, tap the player function button to enter the player function mode. If there is no CD in the system, put the disc in the disc mouth lightly, the disc will be slotted in automatically. When the system detects the disc, it will auto switch to disc player function mode and play the CD. Disc player interface is shown below. 4.1 Audio files play interface 4-1 DISC audio play interface - 12 - USER MANUAL UNIVERSAL AVN 4-2 multimedia format disc root directory menu 4-3 DVD picture play interface Function operation as below: Icon Interface title 10:30 Button name DVD play Function description Displays the name of current interface System clock Displays the current system time - 13 - USER MANUAL Icon UNIVERSAL AVN Button name Function description The previous line displays current song, the song name ticker will display. Play message The next line shows the song's ID3 information, including artist, album, time, genre etc. Return to root If the media files are in different sub folders directory button Last song button Next song button Play/Pause button Loop playback button press this button to return to the root directory. As the charts 4-2 Tap to play the last track of the song list. Tap to play the next track of the song list Press to begin playback. Press again to pause playback. Press to loop playback. Tapping multiple times will switch from single repeat to folder repeat and all repeat and repeat off. Random play Press to switch the shuffle mode on or off. - 14 - USER MANUAL Icon UNIVERSAL AVN Button name Function description button Number button EQ button Press to access the direct access song selection function. Press the icon to access the Equalizer menu. 4.2 Disc picture file play interface Click the picture; to view it to maximum mode. Refer to 4-4 Tap the shade at the bottom of the screen to see the stop and rotate button. Click again to hide the button. 4-4 disc picture file play interface - 15 - USER MANUAL Icon UNIVERSAL AVN Button Function description name Counterclockwise button Clockwise button Stop button Press this icon to rotate the image counter-clockwise in 90 degree increments. Press this icon to rotate the image clockwise in 90 degree increments. Press to return to image list interface Warning: Browsing large image files affect the display speed. So please use smaller image files to make sure you can view the picture properly. 。 4.3 DVD video file play interface In the media playing mode, tap to the DVD interface (as shown in the picture below). - 16 - USER MANUAL UNIVERSAL AVN 5. SD card and USB operation Make sure the SD card is inserted and USB is connected with the system before using SD card and USB function. The system would switch to USB playing interface directly when USB has connected properly with the system. For extending the service life of the SD card, we recommend not to extract SD card when in operation. 5.1 SD card/USB video file playing interface Enter the system main menu, click SD card/USB button to the corresponding function mode; click the home button located in the upper left corner to exit this mode. The SD card and USB has the same playing interface as shown in the 5-1: - 17 - USER MANUAL UNIVERSAL AVN 5-1 USB/SD Audio interface Icons Interface title 21:09 Button name Function description SD card play Display the name of current media System clock Display the current system time The previous line displays current song. The song name ticker will display. Play message The next line list the song's ID3 information, including artist, album, time, genre and etc. Return to If the media files are in different sub folders root directory press this button to return to the root button directory. This is shown in 4-2. - 18 - USER MANUAL Icons UNIVERSAL AVN Button name Last song button Next song button Play/Pause button Loop playback button Random play Number button EQ button Function description Press to play the last track of the song list. Press to play the next track of the song list Press to begin playback. Press again to pause playback. Press to loop playback. Tapping multiple times will switch from single repeat to folder repeat and all repeat and repeat off. Press to switch the shuffle mode on or off. Press to access the song directly. Press the icon to access the Equalizer menu. 5.2 SD card/USB image files play interface Tap the shade at the bottom of the screen to see the stop and rotate button. Click again to hide the button - 19 - USER MANUAL UNIVERSAL AVN 5-2 SD card/USB image files play interface Warning: Browsing large image files affect the display speed. So please use smaller image files to make sure you can view the picture properly. Icons Button name Counterclockwise button Clockwise button Stop button Function description Press this icon to rotate the image counterclockwise in 90 degree increments. Press this icon to rotate the image clockwise in 90 degree increments. Press to return to image list interface - 20 - USER MANUAL UNIVERSAL AVN 5.3 SD card/USB video files play interface Click the bottom of the screen to play, pause, skip forward and rewind. Click again to can hide the button. 5-3 SD card/USB video files play interface Warning: SD card and USB are removable storage devices; the system supports MP3, WMA, JPEG, MPEG video files. As different brands have different standard in SD card and USB manufacturing, some of the SD card and USB devices may not be supported by the system. Please use the SD card / USB from branded manufacturers. - 21 - USER MANUAL UNIVERSAL AVN 6 . Bluetooth function operation The system supports Bluetooth hands-free communication function, so if your cell phone has Bluetooth function, it can establish point-to-point connection and dial-up on the screen. Warning: As different brands adopt different kinds of Bluetooth technology and software, the device may not be compatible to all handset manufacturers. Please confirm the Bluetooth connection before using the Bluetooth function. Access the setup menu first; select the Bluetooth function in the general setting. As shown in the picture 6-1 6-1.1 Bluetooth on/off set The Bluetooth icon at the top right screen will not flash when Bluetooth equipment has connected properly with the system. The Bluetooth icon will flash if not connected with the system. - 22 - USER MANUAL UNIVERSAL AVN 6-1.2 Bluetooth phone interface. 6.1 Phone You can dial and receive phone calls through the system screen in the dialer interface. The specific as figure 6-1.2 Icon Button name Bluetooth mark Function description The Bluetooth icon flashes when Bluetooth is powered off . The Bluetooth icon does not flash be when Bluetooth is on. . 10:3 System clock Displays the current system time 0 Voice switching key Switch the voice call from the vehicle speaker phone to mobile phone when you click the voice switching key during a conversation. - 23 - USER MANUAL UNIVERSAL AVN Hold button The mobile phone is on hold button. Dial button The mobile phone dial button. Delete button Delete wrong numbers in the message box. 6.1 Dial function When a user wants to dial numbers from mobile phone or system screen he/she can simply click the dial button. 6.1.2 Telephone function The system will switch to Bluetooth function interface automatically from other function mode when a user receives a call. . It can also change the original mode voice to the caller ring tone. Click the call switch button to switch the voice call from the vehicle speaker phone to mobile phone. The caller ID will be indicated in the message box. 6.2 Check call record function - 24 - USER MANUAL UNIVERSAL AVN When a user clicks this button on the screen he/she can check call records (as the graph 6-3), double click the recorded number to make a call. The interface will change to call interface after the call is connected. 6.3Music Playback Interface 6.3 Bluetooth Setup Tap the icon on the left side of the screen to access to the Bluetooth setup interface, which contains the pairing mode, auto answer and connect mode (see the picture below). The interface returns to the keypad automatically when no settings are selected. - 25 - USER MANUAL UNIVERSAL AVN Bluetooth setup interface Bluetooth setup Interface Icon Function description Press the on-screen pair button to initiate the pairing, and then select yes or no. If your mobile phone pops Pairing up a dialog box requesting a pass key or pairing code after you select "Yes”, enter "1234" to connect. The Bluetooth will be disconnected when you select "No". Auto answer When the auto answer is on, the unit will answer the call automatically. Tap options to specify how incoming calls are Connect handled: Auto connects: the unit will automatically connect the - 26 - USER MANUAL UNIVERSAL AVN previous mobile phone. Manual connect is when a user has to connect manually. - 27 - USER MANUAL UNIVERSAL AVN 6.4 Bluetooth Streaming Music (A2DP) The Bluetooth provides the Advanced Audio Distribution Profile (A2DP) for streaming music. Playback controls are performed by the control bar in the transparent shade box below. Icon Button Play/Pause Stop Function Description Tap to play or pause the music Tap to return to the audio play list interface If the music starts playing for less than 2 Previous seconds, single tap to repeat the current music or double tap to play the previous file. Next Tap to play the next file. - 28 - USER MANUAL UNIVERSAL AVN 7. EQ settings A user can access the equalizer for each media file by clicking on EQ settings icon. . User can select Jazz, Pop, Classical, Rock or Custom according to your preference in the EQ adjustment menu. See picture below: EQ settings interface Icon mode Button Function Description Exit To exit the EQ interface tap to the return button on the topmost right corner. EQ mode switch You can switch the music genre by clicking the left and right arrows - 29 - USER MANUAL UNIVERSAL AVN Icon Button Function Description SW Subwoofer Scroll the blue rectangular bar to adjust the subwoofer bass Bass Scroll the blue rectangular bar to adjust the bass treble Treble Scroll the blue rectangular bar to adjust the tremble bal Balance Scroll the blue rectangular bar to adjust the balance fade Fade Scroll the blue rectangular bar to adjust the fade - 30 - USER MANUAL UNIVERSAL AVN 8. Rear View Camera NOTE: The camera function will work when the rear view camera is connected with the system. Camera image with rear view camera connection When the camera is installed, the rear view image of what's behind the vehicle will appear when the vehicle is placed in reverse gear. See the picture above. When you place the forward gear, the unit returns to the previous working mode automatically. If no camera is installed, when you place the reverse gear or click the Camera icon in the main menu, unit displays “No signal input". You can also watch what's behind the vehicle when camera is installed under the camera interface. - 31 - USER MANUAL UNIVERSAL AVN 9. AUX1/AUX2 NOTE: The AUX1/AUX 2 is available only if the unit is connected with the external A/V device; otherwise prompt will show "No signal import" AUX 1: No signal import AUX 2: No signal import - 32 - USER MANUAL UNIVERSAL AVN Our unit supports both AUX1 and AUX2 inputs, each input can be connected with camera, game consoles, walkmans and other playing devices. If there is no signal, screen displays "No signal import”. You can click the upper left corner to return to main menu. - 33 - USER MANUAL UNIVERSAL AVN 10. System Setup System setup consists of 6 sub-menu settings: system settings, ASP settings, general settings, language settings, Navigation settings and time settings. 10.1 System settings In system settings, there are options such as TS Calibrate, set password, Parental control, Factory default. See picture below: System settings interface TS Calibration: After selecting "Yes”, a crosshair + appears in the middle of the screen. To begin calibration, press and hold the crosshair for one second until + moves to the upper left quadrant. Continue to each quadrant until the calibration is completed. - 34 - USER MANUAL UNIVERSAL AVN Set password: Enter a 4-digit password to activate the "Parent Control" function. To reset the password, access the "Set Password" option and enter the current password to unlock the field. The default password is blank; you can enter 8888 to unlock the parent control anytime Parent Control: Select the appropriate rating level for the intended audience. You may override higher ratings by using your password. Factory default: Select "Yes “to restore the factory default settings for the rating system only. 10.2 ASP settings ASP settings have four sub-menu settings: Bass Freq, Tremble Freq, Sub Freq and Bass Q factor. See picture below: - 35 - USER MANUAL UNIVERSAL AVN 10.3 General settings General settings has five sub-menu settings: Beep, Camera, Bluetooth, Wallpaper and Version .See the picture below Beep: when turned on, an audible beep tone confirms each function selection. Camera: when turned on, the rear view camera function is on. Bluetooth: when turned on, the Bluetooth is on. Wallpaper: Select the wallpaper according to your preference. Version: software version information is displayed - 36 - USER MANUAL UNIVERSAL AVN 10.4 Language settings Language settings have three sub-menu settings: OSD language, Subtitle language and audio language. See the picture below. OSD language: set the show-on screen language display, language options include English, France, Spanish and Chinese. Audio language: set audio language display. Language options include English, France, Spanish and Chinese. Subtitle language: set the subtitle language. Language options include English, France, Spanish, Chinese,. - 37 - USER MANUAL UNIVERSAL AVN 10.5 Navi setting Navi settings includes: Navi volume, GPS time, Navi setting 10.6 Time setting Time setting includes: time setting and date setting. See picture below Date setting Time setting - 38 - USER MANUAL UNIVERSAL AVN Date setting: click the date setting which prompts the keypad " MM/YY/DD", then click the numeric keypad to set the date. Time setting: click the date setting which prompts the keypad " AM/TIME/ PM", then click the numeric keypad to set the time. Click the AM/PM to select 12H or 24H. Please pay attention to the following tips when resetting the DVD rating level: **Type the password to unlock the field, then the password is cleared. In order to validate the password please re-enter the password. **The rating of each disc is marked on the disc either on the disc pack or on the disc manual. If the rating is not available on the disc, the parental lock feature is unavailable. Some discs restrict only parts of the disc and only the appropriate content will be displayed. 11. Steering Wheel Function Study Enter the setup interface. The steering wheel function study interface is shown in the picture below: - 39 - USER MANUAL UNIVERSAL AVN The Steering Wheel Function Study is explained below: Enter into the study interface, click the function key, and push the same buttons on the steering wheel. After the study is completed, the function key will turn blue. After all the function study is finished, click the upper left corner to exit the study interface. If you pushed the wrong buttons on the wheel, please click the study mode options (such as general, mode 1 and mode 2) to do the study again. There are three modes of steering wheel function study: General, Mode 1 and Mode 2, each is with different parameters to match different vehicle series. The General and Mode 1 are suitable with most vehicles while Mode 2 is served to special vehicles. - 40 - USER MANUAL UNIVERSAL AVN System reset notes: ** If you reset the DVD settings, the Parental control password and rating level setting will not be changed. ** Please note that DVD reset is different from system reset.DVD reset is only to restore the DVD loading settings with other settings remaining unchanged. System reset is to erase all user settings and to restore the factory default settings. - 41 -