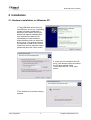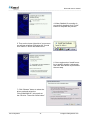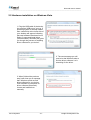
1
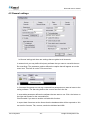
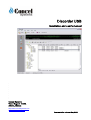
Diacorder USB
Installation and user’s manual
Concel Systems
Victor Hugo 2, 10438,
Athens, Greece
http://www.concelsystems.com
[email protected]
Documentation release: May 2008.
Diacorder user’s manual
_______________________________________________________________________________________
Copyright notice
This manual and the software it describes are protected by copyright. The manual and software as presented
are the object of a license agreement and may be used only in accordance with the license conditions. The
licensee bears all risk in regard to hazards and impairments of quality that may arise in connection with the
use of this product.
This manual and the software it describes may not be transmitted, reproduced or altered in whole or in part,
in any form, by any means. The creation of a backup copy for personal use is accepted.
The information hereby made available to the licensee may be communicated to third parties only with the
written permission of Concel Systems.
This software and documentation have been produced with all due care and checked for correctness. Concel
Systems disclaims all liability and warranties, whether express or implied, relating to this product’s quality,
performance or suitability for any given purpose which deviates from the performance specifications
contained in the product description.
Concel Systems will not be liable for damages arising directly or indirectly from the use of the manual or
related software, nor for incidental or consequential damages, except in case of intent or gross negligence.
Concel Systems expressly disclaims all liability for loss of or damage to hardware, software or data as a
result of direct or indirect errors or destruction and for any costs, related to the software and manual supplied
and due to incorrect installations.
The information in this manual and the software it describes are subject to change without notice for the
purpose of technical improvement.
Trademarks: Windows is a registered trademark of Microsoft Corporation. All other trademarks are
trademarks or registered trademarks of the respective owners.
______________________________________________________________________
Concel Systems
-2-
[email protected]
Diacorder user’s manual
_______________________________________________________________________________________
Table of Contents
1 General information .................................................................................. 5
1.1 Technical specifications.........................................................................................5
1.2 Software features ..................................................................................................6
1.3 Hardware and system requirements......................................................................6
1.4 Contents of the package........................................................................................6
2 Installation ................................................................................................. 7
2.1 Hardware installation on Windows XP...................................................................7
2.2 Hardware installation on Windows Vista .............................................................10
2.3 Software installation ............................................................................................13
3 Menu commands...................................................................................... 16
3.1 Files.....................................................................................................................16
3.2 Tree menu commands ........................................................................................16
3.3 Player ..................................................................................................................18
3.4 Tools ...................................................................................................................19
3.5 Help .....................................................................................................................19
4. Settings.................................................................................................... 20
4.1 Channels .............................................................................................................20
4.2 General settings ..................................................................................................23
4.3 Alarms .................................................................................................................26
4.4 Schedule .............................................................................................................27
4.5 Backup ................................................................................................................28
4.6 Storage................................................................................................................28
4.7 Filters...................................................................................................................30
4.8 Security ...............................................................................................................31
5 How to… ................................................................................................... 33
5.1 Use player ...........................................................................................................33
5.2 Monitor channel status ........................................................................................33
5.3 Manage the tree pad ...........................................................................................34
5.4 Manage file list ....................................................................................................34
5.5 Back up ...............................................................................................................35
______________________________________________________________________
Concel Systems
-3-
[email protected]
Diacorder user’s manual
_______________________________________________________________________________________
5.6 Search .................................................................................................................36
Appendix A. System wiring....................................................................... 38
Connecting splitter to device .....................................................................................38
Connecting splitter to wall socket ..............................................................................38
Connecting device to PBX trunk lines .......................................................................39
Connecting device to PBX station lines.....................................................................39
Appendix B. Troubleshooting.................................................................... 40
Appendix C. Voltages on analog lines ..................................................... 40
Inbound calls .............................................................................................................41
Outbound calls ..........................................................................................................41
Glossary....................................................................................................... 43
______________________________________________________________________
Concel Systems
-4-
[email protected]
Diacorder user’s manual
_______________________________________________________________________________________
1 General information
Diacorder USB is a versatile call recording solution for professional use. The
hardware uses a TMS320C54 high-performance digital signal processor from Texas
Instruments Company, delivering general DSP processing capability of 200 MIPS. It
adopts DSP algorithms to realize various advanced functions like precise
transmission/reception of DTMF, detection of process tone, adaptive echo cancellation,
speech compression, automatic gain control (AGC), etc. The method of tapping is
through high impedance circuit, which ensures unobstructed operation on the
telephone line. A high impedance circuit function as there is virtually no circuit on the
line. Triggering can be done in three modes. Voltage triggered, VOX triggered and on
demand triggered. The most convenient for call recording is Voltage triggering. VOX
triggering is used in radio communications recording. Setting the right voltage threshold
the circuit detects the voltage on the line and initiates or terminates recording
accordingly. You lift the handset the recorder begins to record. You hang up the
recorder completes the file at the hard disk. There is no human intervention. Every call
inbound or outbound is registered.
Galvanic separation isolates the recorder circuit with the rest of the line. Connection
is very easy. You plug the device to a free USB port of a computer and install the
driver. After that you install the software and make the wiring connections. The
connections are made in parallel to the lines using the splitters provided. For more
information check system wiring.
1.1 Technical specifications
1.
2.
3.
4.
5.
6.
7.
8.
9.
10.
11.
12.
13.
14.
Outline size: 170 * 130 * 20 mm
Weight: about 200g
Input/output interface:
one headset jack, Φ3.5 stereo jack
one microphone jack, Φ3.5 stereo jack
USB jack
Four large four-wire RJ11 connector
One small four-wire phone handle connector
USB2.0 protocol standard compliant
Record distortion degree:≤3%
Frequency response: 300-3400 Hz +3 dB
SNR: ≥38 dB
Max user line length: 5.5 km
Record codec: CCIIT A/µlaw 64 Kbps_IMA ADPCM 32 Kbps, GSM, MP3
Recording input impedance: ≥1M/500 VDC ≥10k/1000 Hz AC
Utmost assume power: ≤12W (only for PC power, feed electricity excluded)
Echo cancellation ratio: ≥40 dB
Phone line impedance: compliant with national specification three for component
network impedance.
Lighting protection Level 4
______________________________________________________________________
Concel Systems
-5-
[email protected]
Diacorder user’s manual
_______________________________________________________________________________________
1.2 Software features
•
•
•
•
•
•
•
•
•
•
•
•
•
•
•
•
•
•
•
•
•
•
•
•
•
•
Compliant with USB2.0 bus standard, support hot swap, perfect for high-portability
small scale systems
no power supply needed. It's fed from USB port
Connected to phone line through RJ11 connector.
Programmable Voltage Thresholds
Database storage. Channel, Date, Time, Duration, DNIS, Caller ID, Memo,
Storage medium
Channel monitoring activity
Playback, Stop, Pause, Track recording.
Tree pad for file classification.
Direct emailing of files.
Database extensive searching.
Runs as a system service
File annotation
File emailing
Voltage, VOX, on demand trigger
Adjustable recording gain
Automatic gain control
Adjustable voltage trigger threshold
Administrator and access password protection
Alarm notification
Scheduled channel recording
Inbound and outbound call duration rejection filters
Inbound caller ID rejection filter
Outbound DNIS rejection filter
Back up to CD, DVD, network
HDD recycling
Selectable storage medium
1.3 Hardware and system requirements
•
•
•
USB 1.1 or 2.0 port
sound card
Windows 2000/XP
1.4 Contents of the package
•
•
•
•
•
CVL-2/4-ARL-U device
Software CD (includes, manual, software, drivers)
2/4 channel splitters
2/4 phone RJ11 cable
USB cable
______________________________________________________________________
Concel Systems
-6-
[email protected]
Diacorder user’s manual
_______________________________________________________________________________________
2 Installation
2.1 Hardware installation on Windows XP
1. Plug USB cable device into one
free USB port of your pc. If operating
system is already loaded then a
small hint at the lower side of your
desktop will appear indicating that
new hardware has been found.
Immediately the new hardware
wizard shows to help you install the
device driver. The recording device
is presented as USB device. Select
“install from a list or specific location
(Advanced) and click “Next” button
2. Insert the CD provided to the CD
drive. Click browse button and select
the CD drive and the folder
“Driver\Win2000-XP”. Click “Next
button.
3 The ShdUsb IO controller is being
installed.
______________________________________________________________________
Concel Systems
-7-
[email protected]
Diacorder user’s manual
_______________________________________________________________________________________
4. When ShdUsb IO controller is
successfully installed click “Finish”
button to complete the process.
5. Then on the lower right side of your screen
you will see a balloon indicating the “Concel
CVL-2ARL-U” device has been found.
6. Once again select “Install from a
list or specific location (advanced)
and click “Next button to proceed to
the next step.
7. Click “Browse” button to select the
driver path and select the
“Driver\Win2000-XP” driver path at
the CD drive. Then click “Next button”
______________________________________________________________________
Concel Systems
-8-
[email protected]
Diacorder user’s manual
_______________________________________________________________________________________
8. The driver for the device “CVL2ARL-U” is installed. When finished
click “Next” button.
9. When installation completes you
will see that the device driver “Concel
CVL-2ARL-U” has been installed
successfully. Click the “Finish” button
to complete the process.
To verify that the driver has
been installed in your
system click
“Start” button -> “Settings”
-> “Control panel” ->
“System” icon ->
“Hardware” tab -> “Device
manager” button. At
Device manager click
“Sound, video and game
controllers. When the list
opens you can see the
device as “Concel CVL2ARL-U” as in the image.
______________________________________________________________________
Concel Systems
-9-
[email protected]
Diacorder user’s manual
_______________________________________________________________________________________
2.2 Hardware installation on Windows Vista
1. Plug the USB cable of the device
into one free USB port of your pc. If
operating system is already loaded
then a small hint at the lower side of
your desktop will appear indicating
that new hardware has been found.
Select “Locate and install driver
(recommended). Windows will guide
you though the process of installing
driver software for you device”.
2. The next message you will
receive is that Windows tries to
find the driver software. Let it
searching for the driver.
3. When finished the previous
step it will show you a message
that “Windows could not find
driver software for you device.
Click “Browse my computer for
driver software (advanced).
Locate and install driver
manually.
______________________________________________________________________
Concel Systems
- 10 -
[email protected]
Diacorder user’s manual
_______________________________________________________________________________________
4 On the next step Windows
shows a form prompting you
to browse for driver software
on your computer. Click
Browse button. Insert the CD
provided in the package to
the CD driver and browse to
the driver folder. Then click
“Next” button to continue.
5. Windows is looking for the
driver files and tries to install
them
6. During installation of
the driver software it
shows a security issue
that Windows can’t verify
the publisher of this driver
software. Click at the
option “Install this driver
software anyway”
Windows continues to
install the driver.
______________________________________________________________________
Concel Systems
- 11 -
[email protected]
Diacorder user’s manual
_______________________________________________________________________________________
7. The next message you
will receive is that the
software for this device has
been successfully installed.
The ShdUsb IO controller
has been installed.
8. The driver software has been
completed and the devices are
ready to use.
ShdUsb IO controller
Concel CVL-xARL-U
Click close button.
On the final step verify driver installation. Click start button -> control panel -> System.
Click device manager (upper left corner). When device manage shows click on “Sound,
video and game controller”. At that point you have to see the device installed with the
name Concel CVL-xARL-U.
______________________________________________________________________
Concel Systems
- 12 -
[email protected]
Diacorder user’s manual
_______________________________________________________________________________________
2.3 Software installation
1. To install the software, locate the
“Diacorder setup.exe” file in the
software CD. Double click on the
icon. The software installation wizard
will appear. Click next button.
2. Installation wizard will present you
software license agreement.
Read the license and if you accept it
check “I accept the agreement
button”. Next button will become
active. Click it to proceed to next step.
3. On the next step you will define
where the software will be installed.
The default folder is “c:\Program
files\Diacorder”. If you don’t want to
install it at this folder click “Browse”
button and select another folder”.
Once you define the folder you want
click next button.
______________________________________________________________________
Concel Systems
- 13 -
[email protected]
Diacorder user’s manual
_______________________________________________________________________________________
4. On the next form you define
program shortcuts in Start Menu
Folder. It is advised that you keep the
default prompt and click “Next”
button.
5. On the next step as shown there is
an option to create an icon on your
desktop.
If you need an icon on your desktop
check “Create a desktop icon” and
click “Next button to proceed to next
step.
6. Here your final settings are
presented before you proceed to
installation.
If you agree with the settings
selected click “Install” button to
proceed with software installation.
Otherwise click “Back” button to get
back to previous steps and define
new settings.
______________________________________________________________________
Concel Systems
- 14 -
[email protected]
Diacorder user’s manual
_______________________________________________________________________________________
7. Clicking “Install” button the next
form will show installation progress.
At any time during installation you
may click “Cancel” button to cancel
installation and start it from the
beginning.
8. When the process completes the
wizard will inform you that the process
was successful. Click “Finish” button
to close the wizard.
______________________________________________________________________
Concel Systems
- 15 -
[email protected]
Diacorder user’s manual
_______________________________________________________________________________________
3 Menu commands
3.1 Files
Memo
Click “Memo” command to write a comment for the selected file in the list. The
command is valid for multiple selected files. All selected files are commented with the
same script.
Delete
Deletes the selected file or files in the list. To select multiple files press:
shift and arrow down or arrow up keys or
Control key and right mouse button.
Move to
Click Move to command when you want to move a recording to a different list. It works
for multiple selected files.
Copy to folder
Click Copy to folder to copy one or more recordings selected to a different folder. By
default your recordings are store as wav files in a folder
”C:\Documents and Settings\%Current user%\Application Data\Diacorder\wav”
“Current user” is the user that has log on.
Email wav file to
The selected file or files can be saved directly to your outbox of your email client. Just
fill in the recipients email address and subject and send the mail to the recipients
Export data
Click export data to export the database table to one of the following formats
Tab delimited
Comma delimited
Semicolon delimited
XML
The file created has the name “calls.txt” for the three first formats tab, comma,
semicolon delimited and “calls.xml” for XML format
Exit
Terminates the software
3.2 Tree menu commands
______________________________________________________________________
Concel Systems
- 16 -
[email protected]
Diacorder user’s manual
_______________________________________________________________________________________
The tree is an efficient way to organize better information.
There is no limit to the number of "nodes" in the tree. There is also no limit to the length
of text that each note, or each tree "branch" can contain.
TREE FUNCTIONS
You can add an unlimited number of branches to the tree
There is no limit to how deep you can nest tree branches.
You can drag and drop branches in the tree.
You can rename nodes
You can drag a tree node and drop it in a new location. You can also drag a node onto
another note, to move the node at that point.
DRAG-AND-DROP OPERATIONS IN TREE
Each node in the tree can be dragged and dropped in a new position. Dragging a node
onto another node adds it as a child of this node. If you drag it just to the left of the
target node it will be added on the same lever level
Add node
Adds a node to the same level of the tree. "Sales" node is at
the same level of "Main" node and has been added using this
command
Add child node
Adds a child node to the current node which becomes the
parent. "Oct 2004" is the child node of “Sales” node.
Insert node
Inserts a node between the current and the upward node.
Delete node
Delete node deletes the node and all child nodes if existing.
Deleting one node deletes also the files associated with it. In
the above tree structure Deleting "orders 2004" node will cause to delete all of the
months from Jan to Dec and the files associated with them.
Rename node
Rename node puts the current selected node in edit mode where you can modify its
name.
Expand node
If the node contains children it expands all of them
______________________________________________________________________
Concel Systems
- 17 -
[email protected]
Diacorder user’s manual
_______________________________________________________________________________________
Collapse node
If the node is expanded then it shrinks
Expand all
Expands all the tree structure
Collapse all
Shrinks all the tree structure
3.3 Player
Play
Click the play menu command or press the play button to start playing the
current file in the list
Pause
Once, a file is being played by the recorder you can pause it by clicking the
pause command or by pressing the pause button. If you do this, the pause button
remains pressed. To continue playing the file, click again the start button. Once pause
button is pressed, rewind and fast forward buttons and
menu commands are activated, so you can track the current file in use.
Stop
At any time one file is being played you can stop it and reset its current position
by clicking the stop command or by pressing the stop button. This button is also used
when you want to terminate a call that is being recorded.
Start of recording
Sets the position to the start of the recording.
Rewind
Use this command to rewind the position of a file that is being played. This
button is activated only when you pause a file.
Fast forward
Use this command to fast forward the position of a file that is being played. This
button is activated only when you pause a file
End of recording
Sets the position to the end of the recording.
______________________________________________________________________
Concel Systems
- 18 -
[email protected]
Diacorder user’s manual
_______________________________________________________________________________________
3.4 Tools
Configuration
Shows the configuration dialog to change software parameters.
Diagnostics monitor
Shows the monitor where you can check how hardware parameters are affected
during operation.
3.5 Help
Contents
Shows the help file.
About
Shows, about dialog.
______________________________________________________________________
Concel Systems
- 19 -
[email protected]
Diacorder user’s manual
_______________________________________________________________________________________
4. Settings
4.1 Channels
Channels tab contains all the necessary parameters for configuring operation for
each channel. Each channel may be configured independently. On the left side of the
form you select the channel number you are going to configure. In the picture channel
#0 has been selected.
The first setting affecting channel operation is Triggering.
Triggering is the way that recording procedure is initiated and terminated. There are
three ways for triggering supported by the recording device. Voltage, VOX and On
demand triggering.
Voltage triggering
In voltage triggering the device constantly measures the voltage on the line. It acts as
a voltmeter. When the handset is on hook the line voltage is from 50V to 60V
depending on tel. company. When the handset goes off hook the voltage drops to a
much lower voltage from 5V to 10V, again depending on the line. There may be some
variations to these ratings depending on the telephone company network or the specific
PBX the device is connected to.
VOX triggering
______________________________________________________________________
Concel Systems
- 20 -
[email protected]
Diacorder user’s manual
_______________________________________________________________________________________
In VOX triggering the signal power is measured and when found above a threshold
recording is activated. Recording continues for a specified period of time (Run on).
When Run on expires another measurement of signal power takes place and so on.
It is mostly used where voltage triggering is not possible. Cases of VOX triggering are
in radio recording and on digital channel recording. On a digital extension the signal is
in digital form. There are two options. Either analogue to digital conversion has to be
applied before the signal is driven to the recorder or the signal is tapped from the
handset where it is actually analog.
The two parameters affecting VOX triggering are Level on and Run on. Level on
determines the signal power to trigger recording. It fluctuates from (0, 32). Default
value is 16. To determine the best setting testing has to be done. Run on ranges from
(0,100000) msec, in multiples of 1000ms = 1 sec. Again experiment with it to find the
best value. The default value is 2000 msec.
On demand triggering.
On on demand triggering the user determines when recording starts and when is
terminated. Dialing a combination of keys does this. These keys are set in General
settings tab. Default values are for start recording “*1” (asterisk one) and for recording
termination “*2” (asterisk two).
When this kind of triggering has been selected the user will press the start recording
keys to start recording during a conversation and then will stop it dialing stop recording
keys.
When this kind of triggering is selected and the user hangs up a call the recording will
be terminated by voltage triggering. If he starts recording pressing “*1” but doesn’t not
terminate it, the recording will be terminated when he hangs up if he hasn’t terminated
manually with “*2”.
Gain settings.
There are two gain parameters in channels tab. Recording gain, and Play gain.
Recording gain determines the gain during recording in (db). Values range from (-6,
+6) db.
Negative values contribute to signal attenuation whereas positive values to signal
amplification.
Best setting is determined by experiment.
Play gain has no meaning in a recording channel. It has meaning in trunk and station
channels where voice signal is output to the line.
Again negative values contribute to signal attenuation whereas positive values to signal
amplification.
Values range from (-6, +6) db.
Automatic-gain control.
______________________________________________________________________
Concel Systems
- 21 -
[email protected]
Diacorder user’s manual
_______________________________________________________________________________________
A very valuable setting in call recording. In general the signal levels in call recording
are not equal. In most cases the party close to the recording device has a higher signal
level than the party on the other side. Sometimes the signal levels differ too much
making the low level signal not distinctive. That’s where AGC takes place to remedy
this inherent call recording defect.
When AGC is enabled signal power is constantly measured and when found under a
threshold is being boosted. When signal power is found above the threshold the signal
remains as it is.
Voltage threshold.
Voltage threshold parameter is used in voltage triggering. It determines when the
handset is on hook or off hook. When the handset is on hook the voltage on an
analogue line is between 50-64 (V) depending on the PSTN or PBX. When the user
lifts the handset the voltage drops much lower to 8-12 (V). This is an indication of when
the user has lift the hand to make an action (start or answer a call). Actually the
recording device functions as a voltmeter on the line monitoring its voltage. The default
value of voltage threshold is 26 (V) sufficient in most cases.
How to set the voltage threshold?
To determine the voltage threshold we have to know the on hook and off hook line
voltages of your PSTN or PBX. Although the default value of 26 (V) in most cases is
the right value sometimes is necessary to adjust it.
How to measure on hook, off hook line voltages?
Click tools -> diagnostics main menu items. The diagnostics form shows. In diagnostics
form there are several parameters for each channel. The parameter of interest in our
case is Line Voltage. Keep the line voltage when handset is on hook (high value).
Then lift the handset and keep the line voltage (low value).
Set as voltage threshold = (High voltage + low voltage) / 2.
Tag
It’s a name given to the channel usually the person who uses it.
Type
It’s the type of the channel. In our case it’s always a recording channels.
Channel start / stop.
To set a channel in operation click start button, To set a channel out of operation
click stop button.
______________________________________________________________________
Concel Systems
- 22 -
[email protected]
Diacorder user’s manual
_______________________________________________________________________________________
4.2 General settings
In General settings tab there are settings that are global to all channels.
In external tool you may define third party software that you want to use with the wav
file recordings. The parameter caption defines the caption that will appear as a main
menu item. This item is under Tools menu item.
In Command line param we set any command line parameters we want to insert to the
calling software. The %s string defines the current wav file in the list.
In executable parameter defines the software that we want to use. Click the button on
the right and browse for the executable file.
Check enable if you want to enable or disable this function.
In export data format we set the format that the database table will be exported to. We
can set four formats. Tab, comma, semicolon delimited and XML.
______________________________________________________________________
Concel Systems
- 23 -
[email protected]
Diacorder user’s manual
_______________________________________________________________________________________
Semicolon delimited file
On demand keys determine the keys press to start and stop a recording when “on
demand” triggering has been selected.
Compression.
You may select one of the built-in compressions. a-law, u-law, IMA ADPCM, GSM,
MP3.
Each of them produces files with different sizes and sound quality.
Compression
Sampling freq
Duration
Size (Kbytes)
a-law
u-law
IMA ADPCM
GSM
MP3
8KHz
8KHz
8KHz
8KHz
8KHz
1 min
1 min
1 min
1 min
1 min
479
479
242
97.5
59.5
Sound quality
Excellent
Excellent
Good
Medium
Medium
Trim leading digits.
In most PBX’s we dial one or more digits to have a trunk line available. For example
we dial 9 to select a trunk line. So all external call numbers begin with 9. It’s not very
convenient all of the numbers post to the database to start with 9, so if you check this
option and define one or more digits, the numbers post to the database will don’t
contain that digits.
For the numbers
9524156847
9548425454
the following numbers will be posted to the database
524156847
548425454
Load at OS start-up
______________________________________________________________________
Concel Systems
- 24 -
[email protected]
Diacorder user’s manual
_______________________________________________________________________________________
If you check this option the software will load and run as a system service when
Windows loads to memory.
Selective recording.
In selective recording we may set to record only:
Incoming calls
Outgoing calls
All calls.
Create nodes per date
If you check this option then a tree
structure is created that saves
recordings to nodes according to year,
month and date under “Main” node. If
you don’t check the option the all calls
are saved in “Main” tree node
Save caller’s name in memo field.
Checking this option caller’s name provided in caller ID is saved in memo field. This
option works if your tel. Company provides caller’s name.
______________________________________________________________________
Concel Systems
- 25 -
[email protected]
Diacorder user’s manual
_______________________________________________________________________________________
4.3 Alarms
Hardware failure.
Hardware failure alarm is triggered when the software can not communicate with the
hardware.
HDD full
When main storage medium becomes full an “HDD full” alarm is triggered. That alarm
could notify system administrator to undertake further action such as take care of
backup.
Call overtime
Call overtime alarm is triggered when a call exceeds the time specified. The default
value is 180min. If recording time for a call is higher than the value specified, recording
is immediately terminated and alarm is triggered. System administrator in that case
must check the reason for the long length of the call. Maybe it is some handset left off
hook unintentionally.
Software error
When the software itself produces an error, it can be caught and sent to the system
administrator.
Thread failure
In case some thread gives an error an alarm is triggered to indicate that error.
______________________________________________________________________
Concel Systems
- 26 -
[email protected]
Diacorder user’s manual
_______________________________________________________________________________________
Alarms are not sent to the monitor but to email accounts to notify specific users. Alarms
notifications in order to be sent an SMTP server has to be set.
To enable SMTP server account you have to check enable checkbox.
Once you activate SMTP server you have to specify the server name.
Then you specify at least three recipients where alarm notifications will be directed.
To test if alarms notifications are sent to the recipients specified click “Test server”
button. A test email will be sent to the recipients if server name and email addresses
are correct. After you click “Test server” button you may check you email account to
see if you have received alarm notification.
4.4 Schedule
On the schedule tab you can set time functionality. Each channel can be configured
separately. Click on the channel list on the left to select the channel. On the right of the
form the current schedule is presented.
Each day of the week can be configured independently. For example you can check
that only the five working days of the week Diacorder will function. In that case you
check days Monday through Friday. If you want for a specific day the channel to be 24
hours functional then you check the responding checkbox on the right. If you don’t
select “24 hours” operation you may select the time range starting from “start time” and
ending to “Stop time”.
This way you program the schedule of operation for each channel.
______________________________________________________________________
Concel Systems
- 27 -
[email protected]
Diacorder user’s manual
_______________________________________________________________________________________
4.5 Backup
There are two ways to handle data store in hard disk drive.
The first is hard disk recycling. If you select this option (the simpler) you actually don’t
keep any back up data. When the hard disk becomes nearly full then automatically the
30% of the older files are being deleted. So each time you have your disk full a 30% of
you disk becomes available for storage. To activate this method check option: “Delete
30% of files when storage medium is full” in backup tab.
When the 30% of the older files are deleted, database is synchronized either.
The second method involves actual backup. In this method you set in your system’s
HDD a temporary folder where backup data will be stored. This folder is “Backup
folder”. In above image’s configuration the folder defined is “c:\Program files\Diacorder
USB\backup\”. You can even set this folder in an area different from your local hard
disk drive. For example it could be set to your network or to a portable drive such as a
zip drive or whatever storage medium. Below folder there is the capacity of the backup
medium. In above picture we have set it to 5000Mb. That’s the capacity of a DVD. If we
want to keep our data in a CD then we would set its capacity that’s 650Mb.
The backup medium parameter contains the actual backup medium we retrieve our
data. If we use our CD ROM to retrieve data then we have to set it there.
4.6 Storage
______________________________________________________________________
Concel Systems
- 28 -
[email protected]
Diacorder user’s manual
_______________________________________________________________________________________
In storage tab we set all storage parameters. We can also check the percentage of free
and used space in our storage medium. You can see in next image that the used space
is presented in red and free space in green. It’s not necessary to bind all of the capacity
of the storage medium. In case we use a HDD we may select only a portion of it for
storage. We set the capacity of storage medium in “Medium capacity” parameter. In the
case of the image we have set a very small capacity for demonstration purposes, that’s
4951 Mb.
It is recommended to have a separate partition at your hard disk drive for data storage.
This will ensure that you separate your other regular data (software, images,
documents) from the Diacorder’s data. If you use a new computer system then make a
partition exclusive for Diacorder. Install the software in your main partition that’s “C:”
and make a second partition “D:” for data. Then set the path for data storage to that
partition. This ensures that there is no conflict between your regular activities and call
recorder’s operation.
In folder we set the folder where actual data (wav files) will be stored. In above case
the folder is “c:\Program files\Diacorder USB\wav\”. We may choose even a network
area on our LAN to save data.
______________________________________________________________________
Concel Systems
- 29 -
[email protected]
Diacorder user’s manual
_______________________________________________________________________________________
Drive C:
Drive D:
Windows operating system
Main Storage Area
Program files
(Wav Files)
Diacorder
Other software
Backup area
4.7 Filters
In filters tab we can set conditions that will inhibit recording of calls. There are
conditions for inbound and outbound calls.
Inbound calls.
If we check the condition “Ignore calls with duration shorter than X sec then all inbound
calls with duration shorter than X sec will be ignored.
The second condition involves calls with specific caller ID. Clicking List button a form
with a list appears. There we can set a list with telephone numbers that we want to
avoid recording.
Outbound calls.
______________________________________________________________________
Concel Systems
- 30 -
[email protected]
Diacorder user’s manual
_______________________________________________________________________________________
If we check the condition “Ignore calls with duration shorter than X sec then all
outbound calls with duration shorter than X sec will be ignored. For example we lift the
handset and start dialing numbers but we misdial a key. So we hung up and start all
over again. Of course we don’t want to keep that short recording since doesn’t have
any valid information.
The second condition involves calls with specific DTMF digits. Clicking List button a
form with a list appears. There we can set a list with telephone numbers that we want
to avoid recording.
4.8 Security
Passwords restrict access to selected areas.
When administration password is checked a form appears asking for new
administration password. The administrator enters a password and then verifies it.
Once correct the password becomes valid.
Administration password is asked when configuration takes place.
Access password is determined the same way as administrator password.
The software in two cases asks access password. The first is when launching the
application. The second is when the application is restored after it has been minimized
to the system tray.
When “Administrator or Access passwords” has been checked you may change these
passwords at any time by click “change” button.
In this case the old password is asked first before the new.
Back up database
______________________________________________________________________
Concel Systems
- 31 -
[email protected]
Diacorder user’s manual
_______________________________________________________________________________________
Activating back up database takes a copy of database files and keeps them in a folder
“backupDB”. The frequency of this procedure is defined in number of days with a
minimum of one day.
It is an important feature and by default activated. In case there is a damage in main
database files then files from backup folder can fix the problem with the least of
damage. It is recommended that you keep it checked.
______________________________________________________________________
Concel Systems
- 32 -
[email protected]
Diacorder user’s manual
_______________________________________________________________________________________
5 How to…
5.1 Use player
To playback your recordings and managing the database is quite simple. Select a file
in the list and click the play button. Immediately you listen to your recording from your
sound card. At the same time you can see on the scope the part of the recording that’s
being played. At any time you may pause the procedure clicking pause button. You
may also fast forward or rewind, from the current point click the responding player’s
buttons. Clicking those buttons moves the current point at steps of 1/20 back or
forward. You can also move the another point of the player by setting the slider to point
you want. To do that put the mouse over the slider click it to grasp the slider and move
to the point you want and release it. The player will start playing from that point.
5.2 Monitor channel status
All channel activity can be monitored at channel activity monitor. Channel activity
monitor gives an overview of the whole system operation. Specific colors determine
the status of each channel. To move to monitor panel click monitor function.
The channel status panel in above picture shows each channel’s activity. Every
channel is marked users tag. Michael Gorin and Leonard lines are out of operation so
______________________________________________________________________
Concel Systems
- 33 -
[email protected]
Diacorder user’s manual
_______________________________________________________________________________________
colored red. Joe Cincotta is speaking on the phone and is recorded. Its status is
colored green. Channel for Ryan Adams is in operation but in idle state (he is not
speaking on the phone). It is colored blue.
When a channel is recording you can see the duration of the call.
5.3 Manage the tree pad
On the left of the list panel the tree pad is located. In the tree pad you can create
various nodes and classify your recordings. When the software is used for the first time
there is only one node in the tree the “Main” folder. The “Main” node is where all new
calls are stored. To create a new node right click on the tree pad area. A pop up menu
shows with items such as “Add node”, “Add child node”, “Insert node”, “Delete node”,
Rename node”, “Expand node”, “Collapse node”, “Expand all nodes”, “Collapse all
nodes”. To create a new node below the same level you select “Add node” command.
A rectangle shows asking for the name of the node. The node resides at the bottom of
the current level. Just fill in the name and click Enter key to save the node. To create a
node at a lower level of the current node select “Add child node”. To insert a node
between two current nodes at the same level use the “Insert node” command. To
delete a node select the node and click delete node.
Attention: Deleting a node deletes all files in that node. If the node contains any children
that node has and all recordings contained in children nodes. So be cautious when
deleting nodes.
“Expand and collapse node” commands perform respective actions, expand or collapse
the current node. The same result you have if you double click on the node.
“Expand and collapse all nodes” commands expand or collapse the whole tree
structure.
You may have noticed that some commands are disabled and coloured in grey. This just
prevents you from doing inappropriate actions. For example if you select the “Main”
node the delete function is disabled but in any other node the “Delete node” command
is enabled. This is because there always must be present the “Main” node. That’s why
you can’t delete it.
You may also use drag and drop operations in the tree pad. To relocate a node grab it
with the mouse and drop it to the location you want inside the tree pad.
5.4 Manage file list
The file list panel contains all information for the recordings. Each recording is
stamped with a unique signature. Its signature contains information regarding the
channel number, date, time it started, its duration, direction (inbound, outbound,
undefined), DNIS, Caller ID, and the medium it is stored. On the left on the tree pad
the node that it is saved. You can easily move a recording to a different node. There
are two ways.
______________________________________________________________________
Concel Systems
- 34 -
[email protected]
Diacorder user’s manual
_______________________________________________________________________________________
Drag and drop. Grasp it with the left button mouse and drag it on the node you want
to move it. When the file is on the node just release it and the recording is saved at that
node.
The second way is by clicking the left button mouse on the list panel area to show the
popup menu. Click move to command and select the desirable node to transfer the
recording.
To write a comment to a recording click left mouse and at the popup menu select
“memo” command.
To delete one file select “delete” command at the popup menu. To mark more files for
deletion left click the files on the list keeping “Ctrl” key down. Releasing “Ctrl” key
doesn’t deselect the files. To deselect files press “Esc” key or click “Unselect”
command at the popup menu.
To copy files to a different folder mark the files you want and click “Copy to folder”
command at the popup menu. Then select the folder where the files will be copied to.
Marking multiple files for copy is also allowed.
If your want to email one or more files then select the files and click “Email to”
command. This invokes your default email client usually “Outlook” or “Outlook express”
with the files selected as attachments. Fill in as usually destination addresses, subject
and content and send it.
5.5 Back up
When the storage area we have defined in Configuration -> storage -> medium
capacity reaches its limit, there are two ways to overcome the problem.
Hard disk recycling
Through hard disk recycling we free a 30% percentage of the storage area. The files
being deleted are the oldest in date.
Back up the oldest files to another storage medium.
When we select this type of back up a portion of oldest files have to be saved in
another storage medium. Every recording is stamped with a label defining the storage
medium that is being saved.
For every new recording this label is the “main storage medium”.
To enable back up we have to set some parameters in configuration back up tab. At
first uncheck the option “Delete 30% of files when storage medium is full” to disable
HDR.
Then define a folder that’s will be used as a temporary backup area. This is set in
“Back up folder”. This area can be the local HDD or a network area. Then set the
capacity of the back up medium.
You have to set to your actual capacity of your back up medium. For example when
you are going to use a CD for back up you set this to 700 (Mbytes). If you are going to
use a DVD you will set it to 5000 (Mbytes). The next definition is the back up medium.
______________________________________________________________________
Concel Systems
- 35 -
[email protected]
Diacorder user’s manual
_______________________________________________________________________________________
When the time comes for a back up a bundle of files consisting the capacity defined
is transferred to the back up area. At that time the administrator is notified with a mail
that he has to write the files to a CD or DVD. The files are stamped with a label
different than “Main storage medium”. The label is of the format “date, time”. This label
is used to annotate the CD or DVD.
The administrator will copy the files from the back up area to the CD or DVD. When
you want to play a file that is not located in main storage medium insert the CD or DVD
with the responding label and play the file.
5.6 Search
Searching is done clicking search function moving to search panel.
At first filters are reset so there are no results.
As you can see in above image on the left of the panel there are searching parameters
you may set queries and receive database result-sets.
In Date box you may check “From date” to enable results from that date and enable “To
date” to narrow result up to that date.
In Time box you set timing range in which calls have been done.
In channel box you may enable to search for a specific channel or a specific folder
containing recordings.
______________________________________________________________________
Concel Systems
- 36 -
[email protected]
Diacorder user’s manual
_______________________________________________________________________________________
In call box you may set Call direction, Caller ID DNIS and Memo fields. If you set two
parameters for searching then both conditions have to be satisfied to take a result
(AND function).
You may use wildcards % and _ in your queries.
Examples
Memo -> John%
will result in
John Smith
John Laucht
Memo -> %Smith
will result in
John Smith
Tery smith
Memo -> %John%
will result in
George John Smith
Memo -> _mith
will result in
smith
Smith
(DNIS or Caller ID)-> 125_67
will result in
125067
125167
125267
125367
125467
125567
125667
125767
125867
125967
(DNIS or Caller ID)-> 125478%
will give you
1254785684
1254786587
1254786257
1254786582
etc..
______________________________________________________________________
Concel Systems
- 37 -
[email protected]
Diacorder user’s manual
_______________________________________________________________________________________
Appendix A. System wiring
Connecting splitter to device
Connecting splitter to wall socket
______________________________________________________________________
Concel Systems
- 38 -
[email protected]
Diacorder user’s manual
_______________________________________________________________________________________
Connecting device to PBX trunk lines
Connecting device to PBX station lines
______________________________________________________________________
Concel Systems
- 39 -
[email protected]
Diacorder user’s manual
_______________________________________________________________________________________
Appendix B. Troubleshooting
When I launch the software I receive the message. “Error. PCI board not found! Please
check if the boards has been correctly installed.”
The driver for the device has not been installed or has been disabled. To check if the
driver has been installed click “start” button -> “settings” -> “control panel” -> “System” > “Hardware” tab -> “device manager” button.
The device manager launches. Click at “sound video and game controllers. Check if
the device CVL-xARL-U exists. If it doesn’t exist then install the driver. To install the
driver in Windows XP go to installation section.
Sometimes I receive “overtime alarms”
Check if there are unconnected ports at the device. If there are actually unconnected
ports you have to disable its operation in the software. To do that click “Tools” ->
“settings” -> “channels” tab. Select the channel that is not connected to a line and click
“stop” button to disable it. Then click “Ok” button to save changes.
There is a channel that doesn’t record.
Possible causes.
1. Check if the channel is enabled. Click “Tools” -> “settings” -> “channels” tab. Select
the channel check if it enabled. If not click “start” button and then click “Ok” button to
save changes.
2. Check if it is in schedule. Click “Tools” -> “settings” -> “Schedule” tab. Select the
responding channel and check its schedule.
3. When voltage triggering has been selected the voltage threshold that has been set is
out of range.
The led on the device is blinking.
This is normal when the driver has been loaded. The driver is loaded only when the
software is in operation. When the software is not loaded the led is just on showing that
the device is powered by the USB port.
Caller ID is not saved.
The telephone company or the PBX the device is connected to doesn’t provide caller
ID. If you are sure that caller ID is provided then the device can not decode it. This is
due to incompatible format. The device can decode FSK and DTMF caller ID.
I reset the system but the software didn’t load.
You have to enable “Load at start up” option. To do that click “Tools” -> settings ->
“General settings” and check “Load at start up” check box. Then click “ok” button to
save changes.
Appendix C. Voltages on analog lines
______________________________________________________________________
Concel Systems
- 40 -
[email protected]
Diacorder user’s manual
_______________________________________________________________________________________
Inbound calls
In the next schematic we see typical voltages on an analog line on an inbound call. In
idle state there is a 50-60 (v) across the line. When we lift the handset (off hook) state
the voltage drops to 10V and
on the phone microphone there is a 20-30 mA current. The PSTN or PBX recognizes
the voltage drop across the line and responds sending dial tone. Now dialing may start.
The user sends DTMF digits on the line. After dialing the PSTN or PBX makes the
connections between caller and called parties and send the caller ring-back or busy
signal. The called party receives ringing signal. When the conversation has been
completed the voltage resets to 50-60V.
Outbound calls
In the case of an outgoing call PSTN or PBX sends to the line a call signal with
frequency 25Hz and amplitude 70-80V. The ringing circuit of the phone is activated and
ringing begins.
______________________________________________________________________
Concel Systems
- 41 -
[email protected]
Diacorder user’s manual
_______________________________________________________________________________________
This is repeated until the user lifts the handset. Then PSTN or PBX terminates ringing
signal and the voltage drops to 10V and conversation begins. After both parties hang
up voltage resets to 50-60V.
______________________________________________________________________
Concel Systems
- 42 -
[email protected]
Diacorder user’s manual
_______________________________________________________________________________________
Glossary
ADPCM
Adaptive Differential Pulse Code modulation. A technique used to
transmit data with a rate of 32Kbps
ANSI
American National Standards Institute
ASCII
American Standard Code for Information Interchange
ATM
Asynchronous Transfer mode. A technique used to transmit data in cells
of 53 bytes
Auto answer
A feature of modems to answer automatically in phone calls for data
communication
Baud rate
Modulation speed for analogue signals
BCD
Binary coded decimal. Binary code for decimal digits 0 to 9.
BPS
Bit per second. BPS is a transfer rate unit
Carrier
Signal of a specific frequency that is modulated and carries information
CCIT
International Telegraph and Telephone Committee.
Codec
Coder decoder
Compression
Data compression technique for faster transmission
CRC
Cyclic Redundancy Check. Error control checking
CTS
Clear to send. A signal used in RS232 interface for data manipulation
Datagram
Message routing method used in packet switching where every packet is
transferred independently from the previous packet in the same
message
Db
Decibel. A measuring unit of the ratio of two quantities
DTE
Data terminal equipment
FDM
Frequency division multiplexing
FDX
Full duplex.
ISO
International Standard Organisation.
ISDN
Integrated Services Digital Networks.
LDM
Limited distance modem.
Off-hook
The status of the phone when we have lifted the handset
On-hook
The status of the handset when it is on the phone.
PABX
Private Automatic Branch Exchange.
______________________________________________________________________
Concel Systems
- 43 -
[email protected]
Diacorder user’s manual
_______________________________________________________________________________________
PBX
Private Branch Exchange
PCM
Pulse Code Modulation
POTS
Plain Old Telephone System
PSTN
Public Switched Telephone Network
QAM
Quadrature Amplitude Modulation
RTS
Request to send
SNR
Signal to noise ratio
TDM
Time division multiplexing
URL
Universal Resource locator
______________________________________________________________________
Concel Systems
- 44 -
[email protected]