1
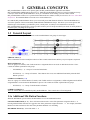
nativeKONTROL
ME_nanoKONTROL2 User Manual
Version 1.0.5
Copyright 2013 nativeKONTROL. All rights reserved.
This document, as well as the software described in it, is provided under license and may be used or copied only in accordance with
the terms of this license. The content of this document is furnished for informational use only, is subject to change without notice,
and should not be construed as a commitment by nativeKONTROL. Every effort has been made to ensure that the information in this
document is accurate. nativeKONTROL assumes no responsibility or liability for any errors or inaccuracies that may appear in this document.
All product and company names mentioned in this document, as well as the software it describes, are trademarks or registered trademarks of their respective
owners. This software is solely endorsed and supported by nativeKONTROL.
The Ableton Live MIDI Remote Scripts that are supplied with the software are released under the GNU Lesser General Public License. The source code for
these scripts is available upon request.
This software utilizes the macify library created by simplericity (http://simplericity.com/2007/10/02/1191336060000.html). This is released under the
Apache License version 2.0 (http://www.apache.org/licenses/LICENSE-2.0.html).
MapEase Series User Manual
I
1
GENERAL CONCEPTS
1.1
1.2
2
ME_NANOKONTROL2 WINDOWS
2.1
2.2
2.3
2.4
2.5
2.6
3
General Notes
Notes on Conflicts
TROUBLESHOOTING
4.1
4.2
5
Main Window
Global Controls Editor
Track Strip Editor
Global Strip Editor
Key Strip Editor
Advanced Options
MIDI MAPPING
3.1
3.2
4
General Layout
Creating/Editing a Preset
ME_nanoKONTROL2 Error Messages
Other Problems
SUPPORT
MapEase Series User Manual
II
CHANGES IN THIS VERSION
General Changes:
-
Fixed issue where Slave Mode wouldn’t work correctly past the first 8 tracks in a set.
Create Troubleshoot Log will now delete Live’s Log.txt after generation.
Live script transfer will now remove old Live scripts before transferring new versions.
MapEase Series User Manual
III
1 GENERAL CONCEPTS
ME_nanoKONTROL2 consists of two primary parts; the ME_nanoKONTROL2 application itself and the
ME_nanoKONTROL2 MIDI Remote Script for Live. Both ME_nanoKONTROL2 and Live need to be running and set up
correctly in order for ME_nanoKONTROL2 to do its job. Information on the settings you need to make in both
ME_nanoKONTROL2 and in Live is provided in the Midi Preferences window, which you can access via View – Show Midi
Preferences. The nanoKONTROL2 also needs to be connected/turned on.
In a nutshell, ME_nanoKONTROL2 allows you to create/edit presets that dictate the behavior of the nanoKONTROL2 as
well as the operation of the associated ME_nanoKONTROL2 MIDI Remote Script. This allows you to create presets with
different types of functionality (a performance preset, a studio preset, etc) that you can switch between on-the-fly.
ME_nanoKONTROL2 keeps things as open as possible to allow you to create presets that fit your needs. It merely defines a
General Layout, everything else is up to you.
1.1 General Layout
ME_nanoKONTROL2 separates the controls on the nanoKONTROL2 into groups of control types.
SHIFT BUTTON (1)
This is a button that is used to modify the behavior of other controls much like the Shift key on your computer’s keyboard.
MIX CONTROLS (2 – 6)
These are groups of 8 controls, each of which can have 8 assignments that are accessed via Mix Mode selection. These
controls are further separated into sub-groups.
-
ENCODERS (2 – 3) – Groups of 8 encoders/faders/knobs.
-
BUTTONS (4 – 6) – Groups of 8 buttons. These buttons also access some additional functionality when the Shift
Button is pressed.
GLOBAL CONTROLS (7 – 8)
These are a group of a variable number of controls, each of which can have 2 assignments; a default assignment and a Shifted
assignment that is accessed when the Shift Button is pressed. The controls are further separated into sub-groups.
-
BUTTONS (7 – 8) – Group of variable number of buttons.
OTHER CONTROLS (9)
These are controls that are not modified by ME_nanoKONTROL2. These controls have a fixed assignment.
1.1a Additional Mix Button Functions
When the Shift Button is pressed down, the Mix Buttons access some additional functions.
SOLO/MUTE BUTTONS (4 – 5) – These will Increase/Decrease the value of the parameters assigned to Knobs 1 – 8.
Pressing both Solo/Mute will Reset or Toggle the value of the parameters assigned to Knobs 1 – 8. For example, Solo/Mute
Button 2 will Increase/Decrease the value of the parameter that Knob 2 is controlling.
RECORD BUTTONS (6) – Select Mix Mode 1 – 8.
MapEase Series User Manual
1
1.1b Other Control Functions
PREV/NEXT TRACK (9) – These buttons will navigate Track Banks (groups of 8 Tracks). The currently selected Track
Bank will be identified by a Grid Selector (aka red ring) that will outline the Track Bank. When the Shift Button is pressed
down, these buttons will navigate Tracks.
1.2 Creating/Editing a Preset
To edit the main assignments of Mix Controls, first choose the Mode to edit (Mode 1 – Mode 8) by using the MODE section
in the Main Window. You can change the main assignment of a set of Mix Controls by right-clicking on the corresponding
section in the Main Window and selecting a new function from the popup menu. If the assigned function is Editable, the
editor for the Editable function will open. You can then use the sections in this editor for editing the Editable function.
To edit Global Control assignments, use View – Show Global Controls Editor to open the Global Controls Editor. Then,
choose the Mode to edit (Default or Shifted) by using the GLOBAL MODE section in the Global Controls Editor. You can
change the assignment of a Global Control by right-clicking on the corresponding section in the Global Controls Editor and
selecting a new function from the popup menu.
While editing, you can test out the changes you’ve made by saving the preset (CTRL/CMD + S). If the preset contains
unsaved changed, the title of the Main Window and other editor windows will contain an asterisks (*) to indicate that a save
is needed.
Please keep in mind that, although each preset has 8 Mix Modes, you don’t necessarily need to use all 8 Mix Modes or have
different assignments in each Mix Mode. Likewise, although each Global Control can have a Default and Shifted
assignment, you can set up Global Controls to perform the same function for Default and Shifted. The point here is that the
presets you create can be as simple or complex as your needs require.
MapEase Series User Manual
2
2 ME_NANOKONTROL2 WINDOWS
This section describes each of ME_nanoKONTROL2’s windows as well as the functions they provide.
NOTE: The screenshots shown in this section are an approximation of what each of ME_nanoKONTROL2’s windows will
look like. The windows you will actually see may differ somewhat.
2.1 Main Window
This is the primary window you will interact with/see when using ME_nanoKONTROL2. This window provides info on the
assigned functions of the current Mix Mode, allows you to edit these assignments and provides access to other parts of the
application. Closing this window will close ME_nanoKONTROL2.
The MODE section indicates the current Mix Mode. You can select a
different Mix Mode by either using the Plus/Minus buttons in this section or
by right-clicking on the section and selecting a Mix Mode.
You can set the name for the current Mix Mode by right-clicking on this
section and choosing Edit Mode Name.
You can copy the settings of the current Mix Mode to other modes or swap
the settings of the current Mix Mode with another mode by right-clicking on
this section and using the Copy Mode To or Swap Mode With menus.
The other sections of this window all work in the same way. Each section
shows the assigned function of a set of Mix Controls for the current Mix
Mode. You can change this assignment by right-clicking on a section and
choosing a new function.
Some of the available functions are marked (Editable). Functions of this sort have their own editor, which will be opened
when you select the function. You can also re-open this editor by either holding down Shift and clicking on the section or by
right-clicking on the section and selecting Edit Assignment.
NOTE: The Main Window will not allow you to assign two sets of Mix Controls to the same function in the same Mix Mode.
For example, in the screenshot, the Main Window would not allow you to assign FADERS to Pan because KNOBS are
already assigned to Pan. The only exception to this rule is with the Button Key Strip (Editable) function and the None
function. Multiple sets of Mix Controls can be assigned to these functions.
2.1a File Menu
Open Preset – (CTRL/CMD + O) – Open a saved preset.
Recent Presets – Display a menu of recently opened/saved presets.
Save Preset – (CTRL/CMD + S) – Save the current preset.
Save Preset As – Save the current preset to a new file.
Clear Recent Preset List – Remove any/all files listed in the Recent Presets menu.
Export Preset To HTML – Export the current preset to an HTML file that contains tables that show all of the preset’s
assignments.
Transfer ME_nanoKONTROL2 Script To Live – Transfer the ME_nanoKONTROL2 script to Live. This option should
be used when updating to a new version of ME_nanoKONTROL2 or when installing Live to a new location.
2.1b View Menu
Show Global Controls Editor – (CTRL/CMD + G) – Show the Global Controls Editor.
MapEase Series User Manual
3
Show Midi Preferences – (CTRL/CMD + P) – Show the Midi Preferences window.
Show Advanced Options – Show the Advanced Options window.
Main Window: Show Info View – (CTRL/CMD + F12) – Set whether or not the Main Window will display information on
assigned functions. When on, hovering your mouse cursor over a Mix Control section will display information about the
current assignment.
Main Window: Use Horizontal Layout – Set whether or not the Main Window should use a horizontal layout. A vertical
layout is used by default.
Main Window: Select Color – Select the color to use for the section borders in the Main Window and Strip Window.
Main Window: Show Close Confirmation – Set whether or not a confirmation dialog will be shown when an attempt is
made to close the Main Window.
Main Window: Always On Top – Set whether or not the Main Window should stay on top of other windows.
Strip Window: Show – Set whether or not to show the Strip Window, which shows the Editable assignments of the current
Mix Mode. When on, upon selecting a Mix Mode that contains Editable assignments, the Strip Window will be shown.
Otherwise, the window will be closed.
Strip Window: Use Vertical Layout – Set whether or not the Strip Window should use a vertical layout. A horizontal
layout is used by default.
2.1c Help Menu
Open User Manual – Open this manual.
Export Function Reference To HTML – Export documentation for all of the Functions accessible in
ME_nanoKONTROL2 to an HTML file.
Run Setup Assistant – Run the Setup Assistant utility, which provides information on the setup steps that need be completed
in order to use ME_nanoKONTROL2.
Create Troubleshoot Log – Create a log file to assist in troubleshooting problems with ME_nanoKONTROL2.
2.2 Global Controls Editor
This window allows you to edit the assignments of Global Controls. You can access this window from the Main Window via
View – Show Global Controls Editor.
The GLOBAL MODE section indicates the current Global
Mode (either Default or Shifted). You can use the buttons
in this section to select the Global Mode to edit.
The other sections on the left side of this window all work
in the same way. Each section shows the assigned function
of a Global Control for the current Global Mode. You can
change this assignment by right-clicking on a section and
choosing a new function.
You can see information on assigned functions by hovering
your mouse cursor over a Global Control section.
NOTE: The editor will not allow you to assign two Global
Controls to the same function in the same Global Mode.
For example, in the screenshot, the editor would not allow
you to assign MASTER FADER to Cue Level because
MASTER KNOB is already assigned to Cue Level.
MapEase Series User Manual
4
2.3 Track Strip Editor
This window allows you to edit the Track Strip (Editable) function. The Track Strip (Editable) function controls parameters
on the selected Track. This editor allows you to choose which parameters should be controlled.
To access this window, you first need to assign a set of Mix Controls to Track Strip (Editable) in the Main Window.
All of the sections on the left side of this window
work in the same way. Each section shows the
assigned function of a Mix Control in the Track
Strip for the current Mix Mode. You can change
this assignment by right-clicking on a section and
choosing a new function.
You can see information on assigned functions by
hovering your mouse cursor over a Mix Control
section.
NOTE: The editor will not allow you to assign two
Mix Controls to the same function. For example, in
the screenshot, the editor would not allow you to
assign 1 to Pan because 2 is already assigned to
Pan.
2.4 Global Strip Editor
This window allows you to edit the Global Strip (Editable) function. The Global Strip (Editable) function controls global
parameters and also parameters of the selected Track. This editor allows you to choose which parameters should be
controlled.
To access this window, you first need to assign a set of Mix Controls to Global Strip (Editable) in the Main Window.
All of the sections on the left side of this window
work in the same way. Each section shows the
assigned function of a Mix Control in the Global
Strip for the current Mix Mode. You can change
this assignment by right-clicking on a section and
choosing a new function.
You can see information on assigned functions by
hovering your mouse cursor over a Mix Control
section.
NOTE: The editor will not allow you to assign
two Mix Controls to the same function. For
example, in the screenshot, the editor would not
allow you to assign 1 to Solo because 2 is already
assigned to Solo.
MapEase Series User Manual
5
2.5 Key Strip Editor
This window allows you to edit the Key Strip (Editable) function. The Key Strip (Editable) function sends keystrokes. This
editor allows you to choose which keystrokes should be sent.
To access this window, you first need to assign a set of Mix Buttons to Key Strip (Editable) in the Main Window.
All of the sections in this window work in the
same way. Each section shows the assigned
keystroke function of a Mix Button in the Key
Strip for the current Mix Mode.
Each keystroke function has a Main Key
assignment, which is the main keystroke that the
function will send. You can change this
assignment by right-clicking on a Main Key
section and choosing a new keystroke.
Each keystroke function also has Modifier Key
assignments, which allow you to add/remove
modifier keys to the Main Key in order to create
keystroke combinations.
2.6 Advanced Options
This window allows you to modify some of the behaviors of the ME_nanoKONTROL2 MIDI Remote Script. The options
available in this window are global settings that apply to all presets. You can access this window from the Main Window via
View – Show Advanced Options.
The General tab provides
general options.
The User Device tab provides
options related to the User
Device functions.
The ClyphX Strip tab provides
options related to the ClyphX
Strip function.
The window may also contain
an additional tab with options
specific to the
nanoKONTROL2.
NOTE: If Live is running, you
will need to close and then reopen it in order for changes you
make in Advanced Options to
take effect.
MapEase Series User Manual
6
3 MIDI MAPPING
When using the default Live settings as described in the Midi Preferences window, it is not possible for other
controllers/MIDI devices to conflict with the nanoKONTROL2 as the nanoKONTROL2 has a direct line of communication
with Live. However, the default settings also prevent you from remapping controls via MIDI mapping.
In order to allow for MIDI mapping, you will need to turn on the Remote switches for ME_nanoKONTROL2 Input and
Output.
3.1 General Notes
-
If you’d like to remap Global Controls in Shifted Mode, press down the Shift Button before entering MIDI mapping
mode. Once you’ve entered MIDI mapping mode, you can release the Shift Button.
-
When a control is remapped via MIDI mapping, it still retains its function mapping. For example, if Mix Encoders
are assigned to Volume and are remapped, the Main Window will still reflect that the Mix Encoders are assigned to
Volume.
-
Additional Mix Button Functions that apply to Mix Encoders do not apply to MIDI mapping. For example, if Mix
Encoders are assigned to Volume and are remapped, any associated increase/decrease or reset functions will
continue to apply to Volume.
-
Unless otherwise noted, you should only remap Mix Controls and Global Controls. You should NOT remap Other
Controls.
3.2 Notes on Conflicts
Once you’ve turned on Remote switches for ME_nanoKONTROL2, this will open up the potential for conflicts with other
controllers/MIDI devices whose Remote switches are turned on. Review the following notes for help with avoiding these
conflicts.
-
The nanoKONTROL2 operates on MIDI channel 16 by default. This exposes MIDI messages on channel 16 to the
MIDI mapping system and so other controllers should not use channel 16 for MIDI mapping.
-
The controls in each Mix and Global Mode are internally translated. For example, the controls in Mix Mode 1 will
be translated to MIDI channel 1, Mix Mode 7 will be translated to MIDI channel 7, etc. This allows the controls in
each mode to be mapped independently of other modes. However, it also exposes MIDI messages on channels 1 – 8
to the MIDI mapping system and thus makes conflicts more likely.
-
The Advanced Options window includes MIDI Mapping Accommodation options. These options allow you to
choose which Mix and Global Modes should be translated, which will limit the number of MIDI channels that are
exposed to the MIDI mapping system. For example, if you only every use Mix Mode 3 for MIDI mapping, you can
turn accommodation off for every other Mix Mode. This will make it so only channel 3 (in addition to channel 16 of
course) is exposed to the MIDI mapping system (instead of channels 1 – 8). By default, accommodation is turned
on for all modes.
MapEase Series User Manual
7
4 TROUBLESHOOTING
This section covers errors/problems that you may run into when using/setting up ME_nanoKONTROL2. If you’ve tried the
resolutions listed here and you’re still receiving errors/having problems, please send an email to Support with as much info
on the problem as possible. Also, please include a troubleshooting log with your email. You can create a troubleshooting log
via Help – Create Troubleshoot Log.
4.1 ME_nanoKONTROL2 Error Messages
This section covers error messages you may receive when starting, setting up and/or using ME_nanoKONTROL2.
Error Opening MIDI Port – This error is typically due to the MIDI port being in use by another application. To resolve
this, please close all applications including ME_nanoKONTROL2 and then re-launch ME_nanoKONTROL2.
Insufficient MIDI Ports Error – This error indicates that the number of detected MIDI ports is too few. To resolve this,
first close ME_nanoKONTROL2 and then verify the following before re-launching ME_nanoKONTROL2 again:
-
Ensure that the nanoKONTROL2 is connected/turned on.
Ensure that you’ve enabled some virtual MIDI ports to use with ME_nanoKONTROL2. If you need help with this,
run the Setup Assistant via Help – Run Setup Assistant.
User Directory Error – This error indicates that there was a problem creating a user directory, which is used to store global
settings and such. The typical cause for this error is related to permissions and/or environment variables. To resolve this,
first close ME_nanoKONTROL2 and then create the user directory manually as follows:
In your User folder, create a folder named nativeKONTROL. Within the nativeKONTROL folder, you should create
another folder named ME_nanoKONTROL2.
Fatal Error – This error indicates that files needed for ME_nanoKONTROL2 to run are missing. Please reinstall
ME_nanoKONTROL2 to recover from this error.
4.2 Other Problems
This section covers other problems related to ME_nanoKONTROL2 that you may encounter.
1. Correct settings have been made for the nanoKONTROL2 in ME_nanoKONTROL2, but the nanoKONTROL2’s status
is still listed as OFFLINE.
To resolve this, please close all applications including ME_nanoKONTROL2 and then re-launch ME_nanoKONTROL2.
2. Correct settings have been made for Live in ME_nanoKONTROL2, but Live’s status is still listed as OFFLINE.
To resolve this, please restart ME_nanoKONTROL2.
3. ME_nanoKONTROL2 reflects that both the nanoKONTROL2 and Live are ONLINE, but moving controls on the
controller has no effect in Live.
There are a couple of potential causes for this problem.
The first is that the scene data transferred from ME_nanoKONTROL2 to the controller failed for some reason. To resolve
this, you can transfer the scene data manually using Korg’s Kontrol Editor. The scene data (ME_nanoKONTROL2 Preset) as
well as instructions on how to transfer it can be found in the ME_nanoKONTROL2 program directory.
On Windows:
Program Files\nativeKONTROL\ME_nanoKONTROL2\Resources
On OS X, first right-click on the ME_nanoKONTROL2 app bundle and select Show Package Contents:
Contents/Resources/Java
MapEase Series User Manual
8
The second potential cause is specific to Windows. If you are using Windows, Korg recommends that you use the driver
they supply instead of the standard Windows driver that automatically gets installed when you initially connect the controller
to a USB port. We would second this recommendation.
4. ME_nanoKONTROL2 is not listed in Live’s Control Surface list.
To resolve this, first close Live and then transfer the ME_nanoKONTROL2 script to Live via File – Transfer
ME_nanoKONTROL2 Script to Live.
5. When multiple tracks are selected and Track I/O settings are changed, control LEDs and/or displays related to
controlling Track I/O do not update properly. Only control LEDs/displays related to the track the change was made from
are updated properly.
This is a Live bug that affects all Control Surfaces that provide feedback regarding Track I/O states. ME_nanoKONTROL2
has no control over this unfortunately. If you’d like to see this fixed, please contact Ableton.
5 SUPPORT
Email:
[email protected]
Forum:
Beatwise Network
Videos:
Stray's YouTube Channel
MapEase Series User Manual
9