1
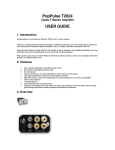
PopPulse PCM1796 DAC User Manual
Congratulations on purchasing this superior quality audiophile product.
The PopPulse PCM1796 USB DAC has both the performance and credentials to become
the new benchmark in the highly competitive affordable DAC market.
Keeping it simple, this unit forgoes any needless extra features such as being a preamplifier or doubling as a headphone amplifier.
Instead all effort has gone into making the PopPulse PCM1796 a superior quality Digital
to Analogue Converter.
The two piece aluminium box chassis design serves to separate the high quality mains
power transformer from the sensitive DAC conversion circuitry. In doing so, the signal to
noise ratio is enhanced by interference being reduced.
As well as featuring optical toslink and coaxial digital SPDIF inputs, the PopPulse
PCM1796 DAC features a very high quality USB 2 input.
Using the excellent CM-108 receiving chip, this USB 2 input directly converts and feeds
the data stream into the high performance BB / TI PCM1796 DAC chip in the superior
I2S format (avoiding any needless jitter inducing conversion into SPDIF).
The PopPulse PCM1796 DAC has both the resolution and finesse to take on and beat the
competition.
In the Box
Carefully unpack the PCM1796 DAC making sure all the below are present:
•
•
•
•
Mains Power Lead
Optical Toslink Digital Interconnect
Coaxial Digital Interconnect
Audiophile Grade USB 2 Cable
Operating the PCM1796 as a USB DAC
Please switch OFF all devices before making any connections with the PCM1796.
Using an analogue interconnect cable (not supplied), plug one end of the cable into the
RCA Analogue Outputs of the PCM1796 and the other end of the cable into a spare input
of a suitable amplifier (make sure amplifier is not switched on).
Using the supplied mains power lead, plug one end of the lead into the IEC AC mains
input on the rear panel of the DAC and (make sure AC outlet is not switched on) plug
the other end into a spare AC mains power outlet.
Switch on the AC mains power outlet and using the power switch on the rear panel of
DAC, switch on the device.
If powered on correctly, one of the input LEDs on the front panel of the DAC should be
illuminated. Using the input “Select” button on the front panel of the DAC, change input
to “USB”.
Using the supplied USB Cable, plug one end into the USB input on the rear panel of the
U-II and the other end of the cable into a spare USB socket on the PC.
If plugged in correctly, the Windows Operating System on the PC should automatically
recognise the DAC (assuming Windows version is XP or later).
Using a software media player such as Winamp, playback an audio file (It could be a
WAV, MP3, CD, Internet radio stream, etc…).
Making sure the volume control is turned down on the amplifier, switch on amplifier.
Adjust volume to suit. Enjoy the music!!
Operating the PCM1796 with other digital devices
Please switch OFF all devices before making any connections with the PCM1796.
Basically the same procedures described previously except rather than connecting to a PC
or Mac, the DAC will be connected to another audio playback device such a DVD or CD
player by either the Coaxial or Optical digital input.
Using a suitable digital interconnect (Coaxial and optical supplied), plug one end into the
relevant digital input on the rear panel of the DAC.
Plug the other end of the digital interconnect into the SPDIF digital output (either optical
toslink or coaxial) of a suitable playback device.
Using an interconnect cable (not supplied), plug one end of the cable into the RCA
Analogue Outputs of the DAC and the other end of the cable into a spare input of a
suitable amplifier (make sure amplifier is not switched on).
Using the supplied mains power lead, plug one end of the lead into the IEC AC mains
input on the rear panel of the DAC and (make sure AC outlet is not switched on) plug
the other end into a spare AC mains power outlet.
Switch on the AC mains power outlet and using the power switch on the rear panel of
DAC, switch on the device.
If powered on correctly, one of the input LEDs on the front panel of the DAC should be
illuminated. Using the input “select” button on the front panel of the DAC, change input
to either “Opti” or “Coax” .
Switch on the playback device and play some music / audio.
Making sure the volume control is turned down on the amplifier, switch on amplifier.
Adjust volume to suit. Enjoy the music!!
Features:
•
•
•
•
•
•
High Performance BB PCM-1796 DAC Chip
High quality USB Input
Optical Toslink Digital Input
Coaxial Digital Input
CS8416 Receiver Chip
High quality internal mains transformer
Specifications:
•
Input impedance: 75Ω
•
•
•
•
•
•
•
•
D/A converter: 24 bit / 192 KHz
Audio output: 2.0v
S/N: 116dB
Dynamic range: 118dB
Frequency response: 15Hz - 80kHz
Max power dissipation: 50W
Dimension: L: 24.5 cm, W: 12 cm, H: 4.5 cm
Weight: 1.5kg