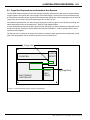
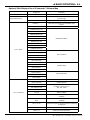
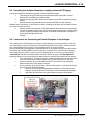
1
User’s Manual TDLS220 Tunable Diode Laser Spectroscopy Analyzer IM 11Y01B02-01E-A Yokogawa Corporation of America Yokogawa Corporation of America 2 Dart Road, Newnan, Georgia U.S.A. 30265 Tel: 1-800-258-2552 Fax: 1-770-254-0928 IM 11Y01B02-01E-A 3rd Edition i PREFACE This Instruction Manual has been compiled for Owners/Operators of the Model TDLS220 Tunable Diode Laser Analyzer SAFETY should be considered first and foremost importance when working on the equipment described in this manual. All persons using this manual in conjunction with the equipment must evaluate all aspects of the task for potential risks, hazards and dangerous situations that may exist or potentially exist. Please take appropriate action to prevent ALL POTENTIAL ACCIDENTS. AVOID SHOCK AND IMPACT TO THE ANALYZER THE LASERS CAN BE PERMANENTLY DAMAGED THE LASERS CAN BE PERMANENTLY DAMAGED “This analyzer contains a Class 1 laser source (EN 60825-1 classification; eye-safe under all operating conditions). However, it is recommended to avoid direct eye exposure to the laser radiation. • • • • • This manual should be passed on to the end user. The contents of this manual are subject to change without prior notice. The contents of this manual shall not be reproduced or copied, in part or in whole, without permission. This manual explains the functions contained in this product, but does not warrant that they are suitable the particular purpose of the user. Every effort has been made to ensure accuracy in the preparation of this manual. However, if you find mistaken expressions or omissions, please contact the nearest Yokogawa Electric representative or sales office. • This manual does not cover special modifications. This manual may not reflect change of specifications, construction or parts when the change does not affect the functions or performance of the product. • If the product is not used in a manner specified in this manual, the safety and performance of this product may be impaired. Yokogawa is not responsible for damage to the instrument, poor performance of the instrument or losses resulting from such, if the problems are caused by: The Instrument is packed carefully with shock absorbing materials, nevertheless, the instrument may be damaged or broken if subjected to strong shock, such as if the instrument is dropped. Handle with care. Notice • • • • Improper operation by the user. Use of the instrument in improper applications Use of the instrument in an improper environment or improper utility program Repair or modification of the related instrument by an engineer not authorized by Yokogawa. Safety and Modification Precautions • Follow the safety precautions in this manual when using the product to ensure protection and safety of the human body, the product and the system containing the product. Media No. IM 11Y01B02-01E-A 3rd Edition :June. 2012 (USA) All Rights Reserved Copyright © 2012, Yokogawa Corporation of America IM 11Y01B02-01E-A 3rd Edition June 19, 2012-00 ii Safety Precautions Safety Precautions Safety, Protection, and Modification of the Product Safety, Protection, and Modification of the Product • In order to protect the system controlled by the product and the product itself and ensure safe operation, • observe In order tothe protect theprecautions system controlled by the in product and the productWe itselfassume and ensure safe operation, safety described this user’s manual. no liability for safety if users observe the safety precautions described this user’s the manual. We assume no liability for safety if users fail fail to observe these instructions wheninoperating product. observe these instructions operating product.in this user’s manual, the protection provided by this • Iftothis instrument is used inwhen a manner not the specified • If this instrument is used in a manner not specified in this user’s manual, the protection provided by this instrument may be impaired. instrument may be impaired. • If protectionoror safety circuit is required forsystem the system controlled by theorproduct or for the • If any any protection safety circuit is required for the controlled by the product for the product itselfproduct itself, prepare it separately. prepare it separately. touse usethe thespare spare parts approved by Yokogawa Electric Corporation (hereafter simplytoreferred to •• Be Be sure sure to parts approved by Yokogawa Electric Corporation (hereafter simply referred as YOKOGAWA) when replacing parts or consumables. as YOKOGAWA) when replacing parts or consumables. •• Modification Modification ofof the product is strictly prohibited. the product is strictly prohibited. •• The The following following safety symbols areare used on the as wellas aswell in this safety symbols used onproduct the product asmanual. in this manual. DANGER This symbol indicates that an operator must follow the instructions laid out in this manual in order to avoid the risks, for the human body, of injury, electric shock, or fatalities. The manual describes what special care the operator must take to avoid such risks. WARNING This symbol indicates that the operator must refer to the instructions in this manual in order to prevent the instrument (hardware) or software from being damaged, or a system failure from occurring. CAUTION This symbol gives information essential for understanding the operations and functions. Note! This symbol indicates information that complements the present topic. This symbol indicates Protective Ground Terminal This symbol indicates Function Ground Terminal (Do not use this terminal as the protective ground terminal.) Warning and Disclaimer The product is provided on an “as is” basis. YOKOGAWA shall have neither liability nor responsibility to any person or entity with respect to any direct or indirect loss or damage arising from using the product or any defect of the product that YOKOGAWA cannot predict in advance. <images are just to match up, please use correct image in pdf not these here End of page ii content> IM 11Y01B02-01E-A 3rd Edition June 19, 2012-00 iii SAFETY should be considered first and foremost importance when working on the equipment described in this manual. All persons using this manual in conjunction with the equipment must evaluate all aspects of the task for potential risks, hazards and dangerous situations that may exist or potentially exist. Please take appropriate action to prevent ALL POTENTIAL ACCIDENTS. 1) Safe lifting and carrying If it is necessary to relocate the analyzer, it should be lifted by at least two people wearing protective gloves and steel toe boots. The analyzer should be always transported either in a vertical position as shown in the picture, or in a horizontal position with the mounting plate facing down. If transported horizontally, it must be held by the mounting plate only. In vertical position, it is acceptable to hold the analyzer by the elements in the “grip” area. Never hold the analyzer by applying force to the elements in the “Do not grip” zone or to the conecting cables and tubes. If a winch or another hoisting device is used, it can be hooked to the upper mounting holes. 2) Electrical hazard The areas of potentially hazardous voltage are labeled with this sign: The analyzer is powered by either a ~220V, 50 Hz or ~120V, 60 Hz (model specific). During normal operation this voltage is not accessible from outside of the enclosure. However, end user is responsible for connecting the mains to the analyzer terminals in the Power/Temperature Controller box (right bottom block in the diagram above). THE WIRES BEING CONNECTED MUST BE DISCONNECTED FROM ANY VOLTAGE SOURCES DURING THIS PROCEDURE. Protective ground wire must be connected to the designated terminal labeled by the corresponding symbol. DO NOT OPEN THE POWER MODULE ENCLOSURE WHEN THE ANALYZER IS ENERGIZED. Some maintenance and troubleshooting operations require opening the Electronics Controller box (left bottom block in the diagram above) while the analyzer is powered. The highest voltage present in this box is 24V and is not hazardous. A higher voltage (+65V, 10 mA) is shielded with an isolating plate and labeled. . 3) Thermal hazard The gas cell can be heated up to +120 ºC and cause thermal injury to unprotected skin at direct contact. In normal configuration the cell is wrapped in a thermal isolation jacket that prevents such incidents. DO NOT REMOVE THERMAL JACKET WHEN THE ANALYZER IS POWERED. Prior to performing service operations that require removal of the thermal jacket, power the analyzer down and wait 30 minutes to let the temperature drop to a safe level. Areas of a potentially hazardous temperature are labeled with the following symbol: IM 11Y01B02-01E-A 3rd Edition June 19, 2012-00 iv 4) Chemical hazard Analyzer can measure a wide variety of chemical species in various gas mixtures. CHEMICAL COMPOSITION OF SAMPLE SUPPLIED TO THE ANALYZER AND ITS VARIATION LIMITS MUST BE APPROVED BY YOKOGAWA to ensure safe operation of the device. Gas stream supplied to the analyzer gas cell for analysis can be potentially harmful for people and environment. DO NOT DISCONNECT THE ANALYZER GAS TUBES (INLET OR OUTLET) DURING ITS OPERATION. CHECK FOR LEAKS AFTER INSTALLATION BEFORE SUPPLYING THE GAS SAMPLE. FLUSH ANALYZER WITH NITROGEN OR INSTRUMENT AIR FOR 15 MINUTES BEFORE DISCONNECTING FROM THE GAS LINES. The inlets and outlets of the sampled gas are labeled with the warning sign: 5) Other labels used on this analyzer The areas of potentially hazardous voltage are labeled with this sign: Caution, refer to the user manual Alternating current Direct current Protective ground terminal Function ground terminal (do not use this terminal as the protective ground terminal.) Warranty and service Yokogawa products and parts are guaranteed free from defects in workmanship and material under normal use and service for a period of (typically) 12 months from the date of shipment from the manufacturer. Individual sales organizations can deviate from the typical warranty period, and the conditions of sale relating to the original purchase order should be consulted. Damage caused by wear and tear, inadequate maintenance, corrosion, or by the effects of chemical processes are excluded from this warranty coverage. In the event of warranty claim, the defective goods should be sent (freight paid) to the service department of the relevant sales organization for repair or replacement (at Yokogawa discretion). The following information must be included in the letter accompanying the returned goods: • Part number, model code and serial • Number • Original purchase order and date • Length of time in service and a description of the process • Description of the fault, and the circumstances of failure • Process/environmental conditions that may be related to the failure of the device. • A statement whether warranty or nonwarranty service is requested • Complete shipping and billing instructions for return of material, plus the name and phone number of a contact person who can be reached for further information. Returned goods that have been in contact with process fluids must be decontaminated/ disinfected before shipment. Goods should carry a certificate to this effect, for the health and safety of our employees. Material safety data sheets should also be included for all components of the processes to which the equipment has been exposed. IM 11Y01B02-01E-A 3rd Edition June 19, 2012-00 TOC-1 Table of Contents Preface.......................................................................................................................................... i Safety Precautions...................................................................................................................... ii 1 Quick Start....................................................................................................................... 1-1 2 Introduction and General Description.......................................................................... 2-1 2.1 Functional Decription.................................................................................................2-1 2.1.1 Measurement........................................................................................................2-2 3 General Specifications.................................................................................................. 3-1 4 Analyzer Components................................................................................................... 4-1 4.1 Main Electronic Housing............................................................................................4-1 4.2 Process Interface.......................................................................................................4-4 4.3 Communications.........................................................................................................4-4 4.4 Software......................................................................................................................4-7 4.5 Data Reporting, Storage and Retrieval.......................................................................4-7 5 Installation and Wiring................................................................................................... 5-1 5.1 Mounting the Analyzer................................................................................................5-1 5.2 Sample Inlet and Outlet considerations......................................................................5-2 5.3 Wiring Details..............................................................................................................5-3 5.4 Purge Gas Requirements and Hazardous Area Systems...........................................5-5 6 Basic Operation.............................................................................................................. 6-1 6.1 Menu Structure Map...................................................................................................6-1 6.2 Software Guide...........................................................................................................6-5 6.3 Non-Process Parameters..........................................................................................6-14 6.4 Stream Switching and Valve Control Outputs...........................................................6-16 6.5 Controlling the Analyzer Remotely or Locally via External PC/Laptop.....................6-19 6.5.1 Instructions from Connecting an External Computer to the Analyzer...............6-19 6.5.2 Using Ultra-VNC Software.................................................................................6-20 6.5.3 Remote Interface Unit (RIU)...............................................................................6-21 6.5.4 Virtual Analyzer Controller (VAC) Operating Software Map................................6-21 6.5.6 Virtual Analyzer Controller (VAC) Operating Software Guide.............................6-22 7 Routine Maintenance..................................................................................................... 7-1 7.1 Maintaining Good Transmission..................................................................................7-1 7.1.1 Maintaining Window and Mirror...........................................................................7-1 7.2 Analog Signal Field Loop Check...............................................................................7-10 7.3 Data Reporting, Storage and Retrieval.....................................................................7-10 7.4 Validation and Calibration.........................................................................................7-11 7.4.1 Off-Line Manuall/Automatic Checking/ Validation..............................................7-11 7.4.2 Off-Line Manual/Automatic Calibration..............................................................7-14 IM 11Y01B02-01E-A 3rd Edition June 19, 2012-00 TOC-2 8 Troubleshooting............................................................................................................. 8-1 8.1 Common Troubleshooting Step..................................................................................8-2 8.1.1 On Process Gas or Zero Gas or Span Gas...........................................................8-2 8.1.2 Trouble Shooting procedure for lost and /or Low Transmission...........................8-3 8.2 Analyzer Warnings......................................................................................................8-3 8.3 Analyzer Faults............................................................................................................8-4 9 Data Files and Format................................................................................................... 9-1 9.1 Configuring Data Capture...........................................................................................9-5 9.2 downloading the Data.................................................................................................9-8 Revision Record........................................................................................................................... i IM 11Y01B02-01E-A 3rd Edition June 19, 2012-00 <1 Quick Start> 1-1 1 Quick Start Step Title Description 1.0 Preparation Carefully un-pack and check equipment for any obvious damage. 1.1 Ensure the appropriate utilities are available and ready for connection. These may include electrical power, nitrogen purge gas, instrument air, validation gas, etc. Make sure the sample handling and conditioning system meets the sample inlet and outlet requirements for TDLS220. Refer to Section XX “Installation” for details. 1.2 Ensure you comply with any local and/or site specific safety requirements. 1.3 Read the appropriate sections of the Instruction Manual BEFORE starting any installation work – Contact Yokogawa Laser Analysis Division or Local Agent if any doubts! 2.0 Installation Ensure there is sufficient physical space to mount the analyzer and allow suitable space for any future maintenance access. Mount the analyzer/panel to a secure vertical surface using appropriate style shake-proof fasteners. Avoid areas prone to vibration to ensure long term reliability – the analytical measurement itself is not affected by vibration. 3.0 Wiring Ensure that all wiring will meet local codes and site requirements 3.1 Connect protective ground wire to the protective ground terminal of TDLS220. Use minimum 14 AWG wire or equivalent. 3.2 Connect the appropriate single phase AC electrical power supply. • 110/240 50/60 Hz to the power/heater control line filter using supplied cable crimp terminal plugs. A suitable mains disconnect device must be supplied. Refer to the “Installation” section of this manual for details. 3.3 Check termination details before proceeding to prevent damage to electronics. Connect any analog I/O signals to the optional analog I/O Board. Outputs land on TB8 and any pressure inputs land on TB9. Heated flow cells have the gas temperature signal already terminated at TB9. A table of wiring terminations is included in this Instruction Manual 3.4 Connect any other equipment such as Ethernet, solenoid valves, digital I/O, etc. Note. Solenoids require directional diode or ferrite coil on field wires at terminal block to prevent noise spikes. 3.5 Check terminations and ensure all cable shields are landed per supplied wiring details. 4.0 Utilities and Sample NOTE! – All purge, Validation Gas and other gas utility lines should be thoroughly cleaned, dried and purged prior to connecting to the analyzer – Failure to do so can result in serious damage to the TDLS220 or contamination to the internal optical elements resulting in poor performance Connect the appropriate analyzer purge gas (nitrogen for oxygen analyzers) and make site connections per the supplied purge gas sequence details (including any Hazardous area purge system). Start the purge gas flow accordingly. Some Oxygen analyzers may be capable of operating with Instrument Air purge alone or in conjunction with Nitrogen purge of the measurement enclosure. 4.1 Connect process gas sample to the inlet port and the process sample return/vent to the flow cell outlet port. Ensure all inlet lines are clean and dry before connecting to prevent contamination of the flow cell and flow cell window/mirror. IM 11Y01B02-01E-A 3rd Edition June 19, 2012-00 <1 Quick Start> 1-2 Leak-check all connections and ensure pressure ratings are not exceeded! 4.2 5.0 Power-Up Make sure the power module door is closed. Do not open this door when the analyzer is powered. Apply the AC power to the analyzer. 5.1 Open the Control module door. Inside this module use the internal On-Off switch to power-up the analyzer (located lower right hand side). 5.2 Observe the various LED clusters on the backplane and FPGA boards. All blue LEDs located lower right side on the back-plane should be on. 5.3 Observe the Green power indicator on the SBC. 5.4 Observe the LEDs on the optional analog I/O board. 6.0 Checking If there is an installed optional 6.5” Display and Keypad – Observe the Main Menu messages and status information. 6.1 If there is no installed User Interface, then connect a laptop PC via Ethernet to the SBC mounted on the backplane. Initiate the supplied UltraVNC software from the laptop to initiate a VNC session with the ‘blind’ analyzer and observe the analyzer Main Menu via the laptop. 6.2 AT this time there may be alarm or warning messages due to low transmission, out of range parameters or other – final system configuration is still required! 6.3 If the analyzer displays a Warning “Validation Required” then this indicates that there is no target gas absorption peak found at start-up. Either, shut down the analyzer, introduce some measured gas into the flow cell and re-start, or perform a validation. This will ensure that the analyzer is correctly tuned to the measurement gas absorption peak. If this Warning cannot be cleared by either method, please contact Yokogawa Laser Analysis Division or your local agent for further assistance. 7.0 Configure BASIC 7.1 By way of the appropriate user interface, the correct process parameters and other parameters can now be entered. Enter the Basic Menu and go to Configure. 7.2 Gas Pressure Enter in the correct process gas pressure (if Active, see Advanced Configure). 7.3 Gas Temperature Enter in the correct process gas temperature (if Active, see Advanced Configure). 7.4 If any other parameters are required to be set (such as analog I/O ranges, alarms levels, Auto Validation sequences) then the Advanced Menu needs to be accessed. Advanced Menu access is Password protected (default 1234, can be changed by user if necessary) and should only be used by skilled and trained persons - Contact Yokogawa Laser Analysis Division or Local Agent if any doubts! Go to the Data section under Basic and configure the appropriate ‘Record Result Data’ settings. This will ensure the analyzer stores important information during operation that may be used to verify operation/ status/diagnostics and other trouble shooting. 8.0 8.1 Configure ADVANCED Using the correct password (Default 1234), enter in to the Advanced Menu, then the Configure. Select the desired measurement units for path length, pressure and temperature. IM 11Y01B02-01E-A 3rd Edition June 19, 2012-00 <1 Quick Start> 1-3 8.2 Gas Pressure Select Fixed or Active. If Fixed, enter in the correct process gas pressure. If Active, enter in the 4-20mA input signal range proportional to the pressure transmitter output range. 8.3 Gas Temperature Select Fixed or Active. If Fixed, enter in the correct process gas temperature. If Active, enter in the 4-20mA input signal range proportional to the temperature range. 8.4 Configure the system I/O by entering in to the System I/O sub menu in Configure. 8.5 If the optional Analog I/O board is installed, then select Analog Output and set the appropriate 4mA and 20mA values for Ch1 Concentration and Ch2 Transmission. 8.6 Select what mode (Block, Track or Hold) the 4-20mA outputs are to be when the analyzer is in Warning, Fault, Export Data and Calibration Modes. 8.7 Configure Digital I/O – Warnings and Faults. Many of these will be factory pre-set so if unsure about any settings then leave as Factory Default. Select and set level for Alarm Limit to either the Measured Gas or Transmission. 8.8 Go to the Data screen and set the appropriate parameters for ‘Record Result Data’ and ‘Spectrum Capture’. These will ensure the analyzer stores important information during operation that may be used to verify operation/status/diagnostics and other trouble shooting.. 8.9 Go to the Trends screen and review/plot several of the listed parameters to check analyzer performance over a period of time. 8.10 Non-Process Parameters If the application is to using purge gas containing the target gas (e.g. Oxygen measurement with Instrument Air Purge) then the Non-Process parameters should be configured as detailed later in this manual under the Software Section. 9.0 Normal Operation When the site/field configuration is complete and the analyzer has operated for at least two hours without any functional alarms, then perform an export data routine. 9.1 To Export Data, simply insert an empty USB memory stick in to a USB port on the launch unit back plane. The data transfer may take several minutes. DO NOT REMOVE THE MEMORY STICK DURING THIS TIME! 9.2 Close out the VNC software and disconnect the service PC – if connected. 9.3 Ensure the doors/lids are closed and tightly sealed. 9.4 The system is now in normal operation mode. 9.5 We RECOMMEND sending all the Exported Data files to Yokogawa Laser Analysis Division along with any notes and comments. We will then be able to store these files on a master record for future reference. Please carefully read the appropriate Sections of this Instruction Manual. The TDLS220 Tunable Diode Laser (TDL) Analyzer is a technologically advanced instrument that requires the appropriate care when handling, installing and operating. Failure to do so may result in damage and can void any warranty! If there is any doubt about any aspect of the Instrument installation or use, please contact Yokogawa Laser Analysis Division and/or your authorized Representative/Distributor. IM 11Y01B02-01E-A 3rd Edition June 19, 2012-00 <2 Introduction and General Description> 2-1 2 Introduction and General Description The TDLS220 TDL analyzer is designed to measure concentrations of selected target chemical species (most often Oxygen or Moisture) in gas phase samples that have been extracted from the process. Typically, there is a continuous flow of analyzed gas through the TDLS220 optical gas cell. The gas should be pre-conditioned to meet the sample inlet requirements including (but not limited to) particulate removal, dew point control (heated), flow and pressure control, etc. Chemical composition of the sampled gas mixture is determined by the end user. It is the end user responsibility to ensure safe delivery of the sampled gas to the analyzer and the subsequent return of the gas to the process or its utilization after analysis. The analyzer measures chemical concentrations on a path averaged basis. Unless the extractive sampling system up-stream removes water (or other condensables) then, the measurements are considered to be on a ‘Wet Basis’. Measurements are possible (with correct analyzer configuration) at the following conditions: • Gas temperatures up to 120˚C (248˚F) • Gas pressures up to 4 BarG ( 75psig) Each application may differ in maximum limitations depending upon the combination of gas temperature, gas pressure, and concentration of the gas being measured. The standard analyzer is designed for operation in a Safe Area (General Purpose). The addition of a Purge System facilitates operation in Hazardous Areas. The basic TDLS220 analyzer comprises a mounting panel with three units attached, the Controller housing, the Power Supply/Heating enclosure and Flow Cell (or optional heated flow cell). Several options may be added to the standard analyzer such as: • Mini Display (4 line, 20 character) or 6.5” screen and keypad • Remote Interface Unit (not required for normal operation) • Insulated and Heated flow cell • Hazardous Area purge systems • Other options may also be added 2.1 Functional Description Tunable Diode Laser (or TDL) measurements are based on absorption spectroscopy. The TDLS220 Analyzer is a TDL system and operates by measuring the amount of laser light that is absorbed (lost) as it travels through the gas being measured. In the simplest form a TDL analyzer consists of a laser that produces infrared light, optical lenses to focus the laser light through the gas to be measured onto a mirror and back through the gas and then on to a detector, the detector, and electronics that control the laser and translate the detector signal into a signal representing the gas concentration. Gas molecules absorb light at specific colors, called absorption lines. This absorption follows Beer’s Law. Using a Tunable Diode Laser as a light source for spectroscopy has the following benefits: • Sensitivity. As low as 10-6 by volume, lower with pathlength enhancement. • Selectivity. The narrow line width of the laser is able to resolve single absorption lines. This provides more choices of a particular peak to use for measurement, usually allowing one isolated peak to be used. • Power. Diode lasers have power ranging from 0.5mW to 20mW. • Monochromatic, no dispersive element (filter, etc.) required. Light source itself is selective. • Tunable. Wavelength can be swept across the entire absorption feature, which allows resonant (peak) and non resonant (baseline) measurement during every scan. IM 11Y01B02-01E-A 3rd Edition June 19, 2012-00 <2 Introduction and General Description> 2-2 2.1.1 Measurement Current ramp to laser Signal at Detector • • • • • • During measurement the laser is held at a fixed temperature. This is the coarse wavelength adjustment. A current ramp is fed to the laser. This is the fine wave length adjustment. The current is ramped to scan across the wavelength region desired. The collimated light passes through the gas to be measured. The amount of light absorbed by the peak is pro proportional to the target gas concentration. The light is then focused on a detector. This signal is used to quantify the light absorbed by the target gas. Processed Detector Signal Figure 1- Basic Layout IM 11Y01B02-01E-A 3rd Edition June 19, 2012-00 <3 Generl Specifications> 3-1 3 General Specifications Measurement range: Dependent on application. Ranges from 0-1% up to 0-25% for analysis of Oxygen. Output signal: (3x) 4- 20mA DC with maximum load of 900 Ohm Three isolated outputs for concentration, transmission of light and may be used for gas concentration, transmission, retransmission of data inputs or dual range 3.3 or 20mA user configurable on warnings and faults Output Span: Programmable within measuring range Contact outputs: (3x) configurable relays for Status (Fault, Warning, concentration level, etc.) Form C Single Pole Double Throw (SPDT) contact outputs with maximum 1A@24VDC or 0.5A@125 VAC. Valve control: Current Input: (3x) 24VDC power supply to activate calibration solenoid valves for zero and span gas. Maximum load 1A (max 10W/ valve for zero and span gas. (2x) 4-20 mA inputs for mA transmitters for pressure and temperature (Loop or lined powered). Environmental Specifications Ambient Temperature: -10 to +50 °C Humidity: 0- 90 % RH non-condensing or 0- 100% with correct purge gas specifications Altitude: Maximum 3000 m. Area Classification: The analyzer is designed for operation in General Purpose area. The addition of a Purge System facilitates operation in Hazardous Area for gaseous releases. Class 1 Division 2 Group B, C and D (ATEX/CE Pending) (Optional) CSA Special Acceptance certification. Weather resistance: IP65 which is equivalent to NEMA 4X or indoors Cable entries: ¾” FNPT threads (unused holes are plugged) Gas Connections: Analyzer - ¼” welded Swagelok® connection Enclosures: Digital Communication: Ethernet IEEE 802.3 10/100 mbps, RJ45 and SAK 2.5 screw terminals Data storage: Internal storage on CF card (result files, spectra capture, configuration data, etc.) USB1 and USB2 connection for data transfer using USB memory stick, Capture rate is configurable, typically 7-10 days of data are stored. Warm-up time: 5 min for functioning, 60 min for full operation within specifications Die Cast copper free Aluminum grade AL SI 12 with a powder coat exterior finish. The alloy is particularly resistant to salt atmosphere, Sulfur gases and galvanic corrosion Stainless Steel captive screws and optional keypad. Laminated Safety Glass for optional display(s) Sample Gas Temperature: Maximum 120°C, with ambient temperature ≤ 40˚C. Maximum 100˚C with ambient temperature ≤50˚C Sample Gas Pressure: Maximum 100 psig Power Consumption: 80w (analyzer); with headed cell option, power consumption varies based on application (typical max 380W @ 100˚C cell temperature) Mounting: Size: Note: Each application may differ in maximum limitations depending upon the combination of gas temperature, gas pressure, and concentration of gas being measured. Weight: WxHxD 750mm x 600mm x 200mm (30” x 24” x 10”) approx: 67lbs., or 30.4kg Vertical wall, 24” x 24” plate 316L Stainless back plate . IM 11Y01B02-01E-A 3rd Edition June 19, 2012-00 <3 Generl Specifications> 3-2 Performance specification Precision* 0.01% 02 Linearity* Typically R2 > 0.999 Response time 5 or 10 seconds plus transport time to analyzer Drift* Span drift (6-12 month calibration) <+/0.1% 02 Zero drift (6-12 month Calibration) <+/0.05% 02 Analog I/O (Optional) Outputs: Concentration/Transmission (3@ 4-20mA isolated) Sub 4mA for warnings/ faults Inputs: Pressure/Temperature Feed for Compensation (2@ 4-20mA isolated, powered or loop power) Digital I/O Communications Calibration Outputs: Warning/Fault/Concentration Limit Relays (3 Form C Relay SPDT rated 1A@ 24VDC) • Valve Control (3@ 24VDC, Max 10W per valve), zero/span • Inputs: Remote Validation (3 voltage free floating contacts) for zero/span Ethernet, IEEE 802.3, 10/100 Mbps, RJ45 Automatic USB data transfer (upload/ download settings and data) Recommended Calibration Check Interval 3-6 Months Gas Sampling The extracted sample should be typically Conditions filtered, clean and dry (non-condensing) Cell volume = 260 cc Flow rate of 1~20L/min, typically 6 L/min Pressure of -3 psig to 100 psig Temperature of -20°C(4°F) to 50°C (122°F un-heated or 120˚C (248˚F) heated Gas Measured* O2: 0.01% detection limit, Min Range 0-1%, Max range 25% Performance Specifications are application dependant. *Consult Yokogawa for ranges; All performance specifications are for 25ºC at 1 bar. Installation Specifications By Design: The analyzer is designed for operation in General Purpose area. The addition of a Purge System enables operation in Hazardous Area for gaseous releases. Class 1 Division 2 Group B, C and D C (ATEX/CE Pending) (Optional) CSA U Special Acceptance certification. Flow Cell Wetted Parts Standard: 316L, Sapphire windows, Teflon encapsulated Viton O-rings, and protected gold mirror Optional: Monel Alloy 400, Kalrez 4079 O-rings Mains voltage: CE/230V model - 210 to 240V AC, 50-60 Hz, single phase 110V model - 100 to 130V AC, 50-60 Hz, single phase Surge and temporary overvoltage immunity in compliance with EN 61326-1. Integration Configuration •S ample is fully extracted from process (and should be conditioned before measurement) • Process pressure and temperature can be controlled or the analyzer may require pressure and temperature inputs (application dependant) • Length of flow cell is fixed Purge Gas & Validation Available systems (standard or custom) for: • Manual or Automatic Validation • Manual or Automatic Calibration • Manual or Automatic Stream Switch • Analyzer purge gas control • Other options Available Display and Software Functions: TruePeak software has multiple levels, the default (or start page) is the Main Menu: Main Menu Displays: Gas Concentration Transmission % Status (warm-up, OK, Warning, Fault, etc.) Temperature (Fixed, Active Ambient or Active) Pressure (Fixed or Active) Main Menu: Basic Menu Configure, 3 functions View Spectra, 2 functions Data, 3 sub-menus Trends Advanced Menu: Configure, 9 sub-menus (User Password) Calibrate & Validate, 3 sub-menus Data, 4 sub-menus Trends Active Alarms: List of active alarms Shut Down Analyzer: Instructions to close TruePeak local or VAC IM 11Y01B02-01E-A 3rd Edition June 19, 2012-00 <3 Generl Specifications> 3-3 Model and Suffix Codes Model TDLS220 Type Model TDLS220 Model TDLS220 Tunable Diode Laser Gas Analyzer Tunable Diode Laser Gas Analyzer Suffix Option Description ------------------------------------------------ --------- Tunable Diode Laser -G1--------------------------------------------- --------- General Purpose -D2--------------------------------------------- --------- NEC Class 1 Div 2 BCD -K1--------------------------------------------- --------- CSA U Special acceptance certification for general purpose C C -K2---------------------------------------------- --------- CSA U acceptance certification for Class 1 Div 2 -X1 ----------------------------------- --------- Basic 02: 0-1% up tp 0-25% oxygen -S6 -------------------------- --------- Stainless Steel 316L back plate -SST ------------------ --------- 316L flow cell, sapphire windows and teflon encasulated viton o-rings -SSK ------------------ --------- 316L flow cell, sapphire windows and Kalrez o-rings -MSK ----------------- --------- Monel A400 flow cell, sapphire windows and Kalrez o-rings 316L flow cell, sapphire windows and -SSX ----------------- --------Kalrez 6375 o-rings -MSX ----------------- --------- Monel A400 flow cell, sapphire windows and Kalrez 6375 o-rings -TC --------- --------- No Heat, Temp sensor/ insulation jacket (Active T.comp) -GP ---------- --------- General Purpose/Safe Area cell heating, max 120˚C - Insulated Jacket -CE --------- --------- General Purpose/Safe Area cell heating, max 100˚C - Insulated Jacket -D2 --------- --------- Div. 2 cell heating, 120˚C-Insulated Jacket -N --- --------- Blind Controller Options -1 --- --------- Integral Mini Display -2 --- --------- Integral Color LCD Backlit /U ---- Ext. USB Port IP66 w/cap (can be used with general purpose, safe area, only NOTE: Select an item from each section. Example: TDLS220-G1-X1-S6-SST-GP-1/U IM 11Y01B02-01E-A 3rd Edition June 19, 2012-00 <4 Analyzer Components> 4-1 4 Analyzer Components Figure 2 - System Overview 4.1 Main Electronics Housing Enclosure Die cast copper free aluminum grade AL Si 12 alloy (A413.0) with a powder coat exterior finish. The copper free aluminum alloy is particularly resistant to salt atmospheres, sulfur gases and galvanic corrosion. An externally hinged door opening to the left incorporates a weather tight gasket seal and four captive fastening screws (stainless steel). The external dimensions are approx 16” W x 12” H x 7” D (400mm x 300mm x 180mm). The environmental protection rating is considered IP65 (EN 60529) or NEMA 4X. Cable entries are located on the bottom face of the enclosure. They are typically ¾” Myers hubs that have ¾” NPT female threads. Each has a ground lug to facilitate the grounding of cable shields to the analyzer chassis as needed. When an analyzer has been supplied with the optional Mini Display (4x20 VFD), the normally blank (blind) door has a different configuration. The center of the door has a cut-out measuring approx 3” W x 1” H (75mm x 25mm). A clear laminated safety glass window is mounted to the inside of the door with stainless steel fasteners and a weather tight gasket. This allows for external viewing of the actual VFD display without opening the door. When an analyzer has been supplied with the optional integral 6.5” display and keypad, then the normally blank (blind) door has a different configuration. The left hand side of the door has a cut-out measuring IM 11Y01B02-01E-A 3rd Edition June 19, 2012-00 <4 Analyzer Components> 4-2 approx 5” W x 4” H (130mm x 100mm). A clear laminated safety glass window is mounted to the inside of the door with stainless steel fasteners and a weather tight gasket. This allows for external viewing of the actual display without opening the door. The right hand side of the door accommodates a keypad (30 keys, stainless steel) which is also operated externally without opening the door. Backplane Circuit Board Large (approx. 10” H x 15” W) printed circuit board that mounts inside the enclosure. The board has several integral circuits and several connectors to accommodate various plug-in boards. The board is designed such that any field terminations are located along the lower edge of the board via pluggable terminal blocks for customer or field cable interface. All components and devices on the board are designed for extended temperature (-10 to +80ºC) and low drift operation. The Backplane Circuit Board contains the following integrated circuits: • DC Power Input • DC Power Distribution • Watchdog Circuit • Display Backlight Power Interrupt • Alarm Relays • Remote Calibration Initiation • Calibration Valve Driver Relays • Laser Temperature and Current Control • Board temperature DC Power Input. There are four pluggable screw terminals located on the lower right hand side of the Back Plane. These are used for connecting the 24VDC power input supply. These are factory configured to receive power from the adjacent power supply enclosure. Therefore, the analyzer power input requirement is AC voltage and a 24VDC power supply is integrated to the analyzer. There is an adjacent On/Off miniature toggle switch and re-settable thermal fuse. The single 24DVC power supply is distributed to various output power channels. Each output power channel has the appropriate DC-DC converter, regulator(s), filtering capacitors and status LEDs, etc. All accessible voltages in the Control module are below 24V. A 65V, 10 mA power source is protected by a cover with a “High voltage” warning sign. Watchdog Power Interrupts The power output channels for microprocessors have control logic lines (TTL activated). These allow for watchdog interrupt/reset functionality. Alarm Relays There are three alarm relay circuits on the board. These are capable of actuating Form C Single Pole Double Throw (SPDT) relays. The three connections of each relay (Common, Normally Open and Normally Closed) are routed through the board to field terminals. The contacts are rated for a maximum of 1A @ 24VDC. We do not recommend applying AC voltage across these relay contact. The pluggable field terminals are mounted on the lower edge of the board, just to the left side of the DC power input terminals. The appropriate relay(s) is actuated when there is an analyzer Warning, Fault and/or Level Alarm. The Power off condition is the same as alarm condition i.e. they are powered in ‘normal’ (or no alarm) condition. Remote Calibration Initiation A calibration routine can be initiated from a remote location (up to 300m away) using contact closures. The Back Plane has circuitry such that it can monitor for a return voltage. The return voltage comes from remote Volt Free Contacts (VFCs) at the customer DCS (or other control system). The circuits include suitable protection against inadvertent shorting/grounding of the supply 24VDC or the application of excess power to the monitoring circuit. There are three sets of remote contact monitoring circuits on the Back Plane. IM 11Y01B02-01E-A 3rd Edition June 19, 2012-00 <4 Analyzer Components> 4-3 Calibration Valve Relays There are three calibration valve relay circuits on the board. These are capable of actuating Form C SPDT relays. The common pole is connected to 24VDC power and the normally open pole is routed to the field terminal block. Digital ground is also routed to the terminal block TB3 as shown below. FPGA TTL out Relay Coil Drive Circuit Relay Coil Relay Contacts 24VDC to C and to NO 24VDC DGND NOTE; Use ferrite coil or direction diode on TB6 wired outputs to prevent switching spikes TB3 24VDC 12W max to external solenoid valve when relay is energized Figure 3 - Calibration Valve Relay Diagram Connections of each relay (Common and Normally Open) are routed through the board to field terminals. The contacts are rated for a maximum of 1A @ 24VDC (or 0.5A @ 125VAC). The pluggable field terminals are mounted on the lower edge of the board, just to the left side of the DC power input terminals. The appropriate relay(s) is actuated when a calibration gas check valve is to be initiated. Laser Temperature & Current Control The board has two main laser control function circuits, temperature control and laser current control. Board Temperature The board has a temperature sensing chip/circuit that monitors temperature of the board inside the main electronics enclosure. The sensor is located on the top edge of the Back Plane. Analog I/O Board outputs the analyzer results and reads input process gas compensation values (pressure and temperature). The board has power status LEDs as well as voltage test points for the input and output channels. • Output channels (three) are ranged 4-20mA. They can be assigned to measured values Oxgen, Transmission or compensation signal re-transmission. • Input Channels (two) are used by the analyzer to read active values for process gas temperture and/or process gas pressure. These are application dependant and may or may not be required inputs. There are two channels, one for temperature and one for pressure. Each may be used to read 4-20mA signals that are isolated or to read and loop power (with integral 24VDC) signals. Optional Mini Display (4x20 VFD) mounts on the analyzer enclosure door. The display itself is an industrial grade 4 line 20 character vacuum fluorescence display (VFD) that is self illuminating (i.e. no back light required). IM 11Y01B02-01E-A 3rd Edition June 19, 2012-00 <4 Analyzer Components> 4-4 Optional 6.5” Display is an industrial grade 6.5” VGA color TFT LCD Module that has a built-in CCFL backlight. Both the display and interface board are mounted to a cover plate that attaches to the inside of the enclosure door. Keypad is an industrial rated 30 key unit that has a PS/2 (6-pos miniDIN) interface direct to the SBC. It has an Ingress Protection Rating of IP65 equivalent to NEMA 4X and is of low profile design. TDLS220 Field Terminal Blocks: • TB2 – Remote Initiate Validate • TB3 – External Calibration Solenoid Valve(s) Drivers (12w EA) • TB4 – Alarm Contacts (Warning Alarm & Fault Alarm) • TB5 – Alarm Contacts (User Alarm & optional Purge Alarm) • TB6 – Ethernet 10/100 4.2 Process Interface The TDLS220 is provided with a flow cell through which the process sample gas flows. Different cell materials and window seal materials may be used pending application. ¼” Swagelok tube fittings are typical connection size for the purge and process gases. Typical cell volume <300cc 4.3 Communications Stand Alone Options The analyzer is capable of fully independent operation with no external computer or interface required. A number of options are available for a built in user interface (mounted on Launch Unit) • Blind with no display or keypad. Access to the analyzer through; Ethernet connection (local or remote computer), Remote Interface Unit (RIU), Universal Remote Display (remote display only - no keypad) with menu access via external computer • Mini display which is an Integral display 4X20 smart VFD (cycles information). No keypad, menu access via local or remote external computer (Ethernet connected) • Keypad with 6.5” display • Regardless of the user interface selected the analyzer will continuously record results, diagnostics and spectra. Data can be transferred from the analyzer via USB or Compact Flash IM 11Y01B02-01E-A 3rd Edition June 19, 2012-00 <4 Analyzer Components> 4-5 Remote Interface Options A number of options are available for remote access to the analyzer Remote Interface Unit (RIU) shown below allows remote analyzer control and data transfer from analyzer to RIU (data can be transferred from RIU via USB memory stick or Compact Flash card. • Allows multi-unit field communication via central user interface • Not required for individual analyzer operation, interface and data transfer only • Connects with 1-7 analyzers via Ethernet switch • Integral Keypad and 6.5” display External Computer via Ethernet. A separate computer can be connected to the analyzers locally or through an Ethernet network to allow analyzer control and data transfer Figure 4 - Networked Analyzers The optional Remote Interface Unit (RIU) consists of: • Back Plane circuit board, SBC, Display and Keypad • Optional Analyzer Feed-through circuit board and/or Ethernet switch • All field electrical terminals are located on the Back Plane. A single RIU can be used in conjunction with up to 7 analyzers via Ethernet (more with additional/custom Ethernet switches). The unit acts as a remote interface for the analyzer. Should the physical location of the actual analyzer(s) be inconvenient for easy access, then the RIU can be used. It can be mounted up to 100m (330ft) away from the analyzer(s) using the standard 10-BaseT twisted pair wiring method. It communicates to the analyzer(s) through a Virtual Network Connection (VNC). If there is more than one analyzer connected to the RIU, then they are routed via an industrial Ethernet switch. Up to four analyzers can be routed through one RIU switch. The RIU Enclosure is die cast copper free aluminum grade AL Si 12 alloy (A413.0) with a powder coat exterior finish. The copper free aluminum alloy is particularly resistant to salt atmospheres, sulfur gases and galvanic corrosion. An externally hinged door opening to the left incorporates a weather tight gasket seal and four captive fastening screws (stainless steel). The external dimensions are approx 16” W x 12” H x 7” D (400mm x 300mm x 180mm). Wall mounting brackets are included with the RIU. The environmental protection rating is considered IP66 (EN 60529) or NEMA 4X. Cable entries are located on the bottom face of the enclosure. They are typically ¾” Myers hubs that have ¾” NPT female threads. Each has a ground lug to facilitate the grounding of cable shields to the chassis. The RIU is supplied with standard integral display and keypad. IM 11Y01B02-01E-A 3rd Edition June 19, 2012-00 <4 Analyzer Components> 4-6 RIU Interconnect to TDLS220 Control Unit(s) When connecting just one analyzer to the RIU there are two twisted pair wires to consider , there are only four wires to be terminated to make the 10/100 Ethernet connection Analyzer Integral SBC RIU Integral SBC RIU Switch or Field Terminals TB6 Tx+ Tx- Rc+ Rc- Tx Tx Rc Rc Figure 5 - Connecting RIU to Analyzer(s) RIU Optional Ethernet Switch If there is more than one analyzer connected to the RIU, then they are routed via an industrial Ethernet switch. Up to four analyzers can be routed through one RIU switch. The switch is powered by 24VDC from the back-plane and includes several status LEDs. RIU SBC Analyzer 1 SBC Analyzer 2 SBC Analyzer TB6 Tx Tx Rc Rc Analyzer TB6 Tx Tx Rc Rc Ethernet Switch Feed‐ Through Board Tx Tx Rc Rc Feed‐through Board Tx Tx Rc Rc Figure 6 - RIU Ethernet Switch IM 11Y01B02-01E-A 3rd Edition June 19, 2012-00 <4 Analyzer Components> 4-7 4.4 TruePeak TDLS220 Software The TDLS220 Analyzer Software has three significant design criteria based on the previously field proven TDLS200 software (TruePeak): • Extensive Capabilities & Features • Intuitive Menu Structure & Commands • Easy Operation The software loads itself automatically upon analyzer power-up and the initial display is the MAIN MENU. From the Main Menu, several key parameters are displayed as well as access to the different User Levels (Basic or Advanced) and Active Alarms. NOTE: Please use the “Shut-Down” option on the Main Menu to correctly close the program and Windows BEFORE removing power from the analyzer. This will prevent potential corruption of the Windows XPe operating system software image. 4.5 Data Reporting, Storage and Retrieval The TDLS220 analyzer has been designed with extensive data reporting capabilities. All data is available in the analyzer as a text file for import into a spreadsheet for analysis Data stored in the analyzer: • Results. Every measurement the gas concentration, transmission, diagnostic data are stored. • Spectra. The analyzer records spectra at a timed interval, in the event of an analyzer warning or fault (including concentration values) and manually via the user interface. • Calibration History is stored during every calibration or validation event. • Alarm Fault History • Events History which includes any changes made to the system settings All data can be retrieved using a USB flash drive (at the analyzer), via the RIU, or over an Ethernet connection. IM 11Y01B02-01E-A 3rd Edition June 19, 2012-00 <4 Analyzer Components> 4-8 Basic Menu Typical Trend Screen Figure 7 - Software Overview IM 11Y01B02-01E-A 3rd Edition June 19, 2012-00 <5 Installation and wiring> 5-1 5 Installation and Wiring 5.1 Mounting of the Analyzer Refer to the SAFETY section (Safe handling and relocation) for instructions on holding and moving the analyzer. The TDLS220 is suitable for wall mounting by means of the four corner located mounting holes as shown below: The holed are ½” sized for typically 3/8” or ¼” bolts and should be used with appropriate sized flat and locking washers. Ensure the analyzer is securing fastened and that there is suitable access for maintenance, etc. The analyzer is designed for operation outside buildings, at normal environmental conditions (see Environmental specifications, page 11). However, it must be protected from direct rain and snow fall. Mounting in a vibration free environment will ensure prolonged service life. Mounting in vibration prone areas may introduce operational issues. Please consider mounting location with care. The actual measurement is NOT affected by vibration, it is an instrument life-time reliability consideration. 22” 22” 22” Figure 8 - Mounting Dimensions IM 11Y01B02-01E-A 3rd Edition June 19, 2012-00 <5 Installation and wiring> 5-2 5.2 Sample Inlet and Outlet Considerations The following criteria should be considered when selecting the installation point in respect to the process conditions (1/4” OD Swagelok tube fittings): Process Gas Condition: - The sample should be clean, dry, non-condensing at the inlet to the sample cell. The dew point of the sample should be below the sample cell operating temperature. If the sample cell is not heated and un-insulated then the sample must be non-condensing through the entire ambient operating conditions. NOTE: Oils, waxes, impure cleaners, and other deposits on the sample cell/mirror will cause optical noise and subsequent analytical performance degradation. Please take all necessary precautions to ensure the incoming sample gas is clean and dry at all times! Process Gas Flow Conditions – Typically 1-10lts/min sample flow. A so-called normal flow-rate would be in the order of 2-3lts/min. Higher flow-rates will improve the sample lag time within the measurement cell. Sample flowmeter can be typically installed on the inlet when equipped with needle valve. Excessive flow-rates may result in gas temperature control issues if the delta T of incoming gas and cell temperature set-point exceed 15 deg C. Process Gas Temperature – It is recommended that the sample gas inlet remains within +/-15deg C of the sample cell temperature set-point. If the sample cell is un-heated then the sample gas should be with +/-10 deg C of the ambient temperature. Please ensure that the process gas entering the sample cell is above the dew point. If necessary, utilize membrane or coalescing type filter device on the inlet. Lower gas temperatures generally lead to better measurements. • Process Gas Pressure – It is recommended that the analyzer be installed at a location where pressure fluctuations are minimized. Generally as a guide, if the temperature of the gas at the point where the analyzer is to be installed is to vary by more than +/-0.05Bar (+/-0.725psi) then an “Active” input signal should be used for compensation. Ensure the analyzer has been selected and configured to suit the maximum operating gas pressure. Ensure the process isolation windows have been selected and configured to suite the maximum design gas pressure. Lower gas pressures generally lead to better measurements. Process Dust/Particulate Matter – It is recommended that the process gas is filtered to <2u using process analytical grade filtration systems. IM 11Y01B02-01E-A 3rd Edition June 19, 2012-00 <5 Installation and wiring> 5-3 5.3 Wiring Details Connect protective ground to the designated terminal of the analyzer. Use minimum 14 AWG or equivalent. The analyzer mains must be connected to an end user provided disconnect device with 250V, 10 A ratings. Screw Terminal Block (SAK2.5) Details: (also see following diagram for internal wiring). TB 1 2 Field or Factory Terminal No. Factory 1 +24 VDC 2 0 VDC 3 +24 VDC 4 0 VDC 1 SV 1 remote Cal/Val initiate signal loop (SV # 1) to Remote voltage free contacts/switch. Do not apply external power! SV 2 remote Cal/Val initiate signal loop (SV # 2) to Remote voltage free contacts/switch. Do not apply external power! SV 3 remote Cal/Val initiate signal loop (SV # 2) to Remote voltage free contacts/switch. Do not apply external power! 1 SV 1 + 2 SV 1 - 24VDC power output signal to actuate external solenoid valve # 1. Max 12 Watts requires ferrite coil on wires. 3 SV 2 + 4 SV 2 - 5 SV 3 + 6 SV 3 - 1 Warning Alarm Field Function 2 3 4 5 6 3 4 Field Field 2 3 4 Field DC power from the 24 power supply in adjacent enclosure. 24VDC power take-off to integral purge indicator/ switch unit (when fitted) 24VDC power output signal to actuate external solenoid valve # 2. Max 12 Watts requires ferrite coil on wires. 24VDC power output signal to actuate external solenoid valve # 3. Max 12 Watts requires ferrite coil on wires. NC - Closed contact on Warning/Power-off state C - Common contact – rated max 1A @ 24VDC NO - Open contact on Warning/Power-off state Fault Alarm NC - Closed contact on Warning/Power-off state 6 NO - Open contact on Warning/Power-off state 1 User Alarm NC - Closed contact on Warning/Power-off state 5 5 Notes/Comments C - Common contact – rated max 1A @ 24VDC 2 C - Common contact – rated max 1A @ 24VDC 3 NO - Open contact on Warning/Power-off state 4 5 Purge Alarm C - Common contact – rated max 265V AC/DC, 150mA NO - Open contact on loss of purge pressure IM 11Y01B02-01E-A 3rd Edition June 19, 2012-00 <5 Installation and wiring> 5-4 6 Factory 7 Factory 8 Field 9 Factory and/or Field 1 - Transmit 3 + Receive 4 - Receive Internal connections only – do not use 1-8 Detect Analog #1 output + Analog #2 output + Analog #3 output + 1 Gas Temperature Compensation Externally powered 4-20mA gas temperature signals are wired to 1 (+) and 2(-), 3 not used. Loop powered temperature transmitter can be connected to 1 (-) and 3 (+24VDC), 2 not used Gas Pressure Compensation Externally powered 4-20mA gas pressure signals are wired to 1 (+) and 2(-), 3 not used. Loop powered pressure transmitter can be connected to 1 (-) and 3 (+24VDC), 2 not used 2 3 5 6 Factory + Transmit 2 4 14 Ethernet 1-4 - - - Mini-Display Cal/Val initiate signal loop (SV # 1) to Remote voltage free contacts/switch. Do not apply external power! Cal/Val initiate signal loop (SV # 2) to Remote voltage free contacts/switch. Do not apply external power! Cal/Val initiate signal loop (SV # 2) to Remote voltage free contacts/switch. Do not apply external power! Internal connections only – do not use Figure 9 – Internal Wiring Diagram, including optional cell heating and optional purge unit IM 11Y01B02-01E-A 3rd Edition June 19, 2012-00 <5 Installation and wiring> 5-5 5.4 Purge Gas Requirements and Hazardous Area Systems The TDLS220 Analyzer requires a continuous nitrogen (optionally instrument air) gas purge to prevent ambient oxygen ingress to the optical path, when oxygen is the measured gas. The flow rate can be minimized as long as it prevents any ambient oxygen ingress to the measurement optical path. Other purge gases may be used as long as they do not contain any of the measured gas and a clean, dry, etc. For hazardous area operation, the same nitrogen purge gas is used to purge the entire analyzer (including nonoptical path sections such as the electronics). Refer to purge diagrams below. In some applications, Instrument Air (I/A) may be used as the purge gas. Special software configurations must be set-up under the “Configure” section called “Non-Process Parameters” – refer to software section of this manual for further details. The flow rate can be minimized as long as it prevents any ambient oxygen ingress to the measurement optical path. Other purge gases may be used as long as they do not contain any of N Purge Inlet N2 2 Purge Inlet LASER & DETECT FLOW CELL ELECTRONICS CONTROLLER POWER HEAT TRACE N2 Purge Vent N Purge Vent 2 Figure 10 – Safe Area/General Purpose N2 Analyzer Purge Schematic IM 11Y01B02-01E-A 3rd Edition June 19, 2012-00 <5 Installation and wiring> 5-6 I/A Purge Inlet LASER & DETECT FLOW CELL ELECTRONICS CONTROLLER POWER HEAT TRACE I/A Purge Vent Figure 11 – Safe Area/General Purpose I/A Analyzer Purge Schematic I/A Purge Inlet FLOW CELL N Purge Inlet N2 Purge Inlet 2 LASER & DETECT General Purpose or Safe Area NN2 Purge Vent 2 Purge Vent ELECTRONICS CONTROLLER POWER HEAT TRACE I/A Purge Vent Figure 12 – Safe Area/General Purpose Dual/Split N2 & I/A Analyzer Purge Schematic IM 11Y01B02-01E-A 3rd Edition June 19, 2012-00 <5 Installation and wiring> 5-7 N Purge N2 Purge Inlet Inlet 2 FLOW CELL ELECTRONICS CONTROLLER LASER & DETECT POWER HEAT TRACE Hazardous Area Div 2 BCD ATEX CAT3 N2 Purge Purge Vent N Vent 2 Figure 13 – Hazardous Area N2 Analyzer Purge Schematic I/A Purge Inlet FLOW CELL ELECTRONICS CONTROLLER LASE R& DETE CT POWER HEAT TRACE Hazardous Area Div 2 BCD ATEX CAT3 Purge Pressure Switch with Indicator Div 2 BCD ATEX CAT3 I/A Purge Vent Figure 14 – Hazardous Area I/A Analyzer Purge Schematic Please also refer to any separate Purge System Original Manufacturers Operating Instructions and Manuals in conjunction with this Instruction Manual. IM 11Y01B02-01E-A 3rd Edition June 19, 2012-00 <6 Basic operation> 6-1 6 Basic Operation Only the numerical keys, arrow keys, ENTER, ESC and BACKSPACE keys are used to control the analyzer. Their functions are determined by the context-sensitive menus of the analyzer software. The misuse of keys is not possible (rejected by software). 6.1 Menu Structure Map Online Menu Level 1 Menu Level 2 Menu Level 3 Menu Level 4 Menu Basic MENU Select A/O Mode -Block -Track -Hold Configure Process Path Length Old New Pressure* Temperature* *(Similar to Process Path) IP Address Serial No. Version *Password Protected TRENDS View Spectra Raw Detect Spectrum Absorption Spectrum Spectrum Capture Spectrum Capture Data Alarm History Cal History Record Data View Data on-screen View Data on-screen User data Factory data Process Path Length Current New Confirmation of Change Confirmation of Change Pressure Fixed Current-New 4-20 mA & Backup Desired, Range, Center of Pressure control Confirmation of Change Confirmation of Change Confirmation of Change Current-New 4-20 mA & Backup Offset Range of second peak option Desired range of tem control Confirmation Confirmation Confirmation Confirmation Confirmation Refresh Refresh Current Trend screen Gas 1 Concentration Min Max Minutes STDEV of Gas 1 Concentration* Gas 2 Concentration* STDEV of Gas 2 Concentration* Transmission* Laser Temp Setpoint* Peak Center Position* Gas Temperature* Gas Pressure* Level 5 Menu *(Similiar to Gas 1 Concentration) ADVANCED *Password Protected Configure Active* Control* *(similar to Fixed) Temperature Fixed of of of of of Change Change Change Change Change Active Input* Active Ambient* Active Peaks* Control* *(similar to Fixed) Non-Process Parameter Path Length Current New Pressure* Concentration* *(similar to Path Length) Temperature Units Fixed or Active value or offset Path Length Select from in, ft, cm, m Pressure Select from psiA, barA, kPa, torr, atm Tempterature Select from ˚F, ˚C, ˚K IM 11Y01B02-01E-A 3rd Edition June 19, 2012-00 <6 Basic operation> 6-2 Online Menu Level 1 Menu Level 2 Menu Level 3 Menu Level 4 Menu Level 5 Menu ADVANCED *Password Protected Configure System I/O Analog Output Channel 1 Conc1/Conc2/Tran/Temp/Pres/ None 4 mA- 20 mA Channel 2* Channel 3* *(similar to Channel 1) Warning Mode Block Mode Track mode Hold Mode Fault Mode* *(similar to Warning) Block Mode Field Loop Check AO CH Calibration System High (20 mA) Low (3.3 mA) CH 1 check, mA value CH 2 check, mA value CH 3 check, mA value CH 1 Calibration CH 2 Calibration CH 3 Calibration Analog Input CH 1 Calibration CH 2 Calibration Digital Output Warnings Detector signal low Transmission Low Spectrum noise hig Process pressure out of range Process temperature out of range Concentration out of range Board temperature out of range Validation failure Faults Laser temperature out of range Detector signal high Dectecor signal lost Outlier rejection Peak center out of range Alarm Limit Conc/ Trans/ Val/ Cal High/Low and limit Field Loop Check CH 1 Check Ch 2 Check Ch 3 Check Serial Number Password Old Password New password Confirmation of Change Software Version Valve Control Date & Time New Date New Time System Temperature Launch Unit (˚C) Detect Unit (˚C) Serial Communication Choose serial type between CPU & FPGA Valve 1 Manual On/Off Time Sequence Next Valve Selection Valve-on duration in minutes Restore Override Remote control channel Valve 2* Valve 3* *(similar to valve 1) Signal Processing Laser Spectra & Control Concentration Concentration 2 or Tranmission Laser Temperature in ˚C Gas temperature Gase Pressure Peak Position Control Mode Current Center Laser Temp Set Spectrum Capture LTSP Limits IM 11Y01B02-01E-A 3rd Edition June 19, 2012-00 <6 Basic operation> 6-3 Online Menu Level 1 Menu Level 2 Menu Level 3 Menu Level 4 Menu ADVANCED *Password Protected Calibration Offline Calibration Zero Calibraton Manual Offline Calibration Automatic Local Initate Remote Initiate: control channel Time Initate: frequency Settings: valve, purge, tiime, AO mode Restore Old Calibration Factory Calibration Zero Offset Current New Span Calibration Manual Transmission Level 5 Menu Automatic Local Initiate Remote Initiate: control channel Time Initiate: frequency Settings: conc, opl, temp, pres Restore Old Calibration Factory Calibration Current New Dark Current Peak Search Peak with Lower WL Opeak with Higher WL All Peaks Result Display Offline Validation Check Gas 1 Manual Automatic Check Gas 2* Check Gas 3* *(similar to Gas 1) Online Validation Local Initate Remote Initate: control channel Time Initiate: frequency Settings: conc, opl, temp, pres Manual Automatic Local Initiate Remote Initate: control channel Time Initiate: frequency Settings: conc, opl, temp, pres valves, purge times, AO mode Alarm History Cal History Spectrum Capture Manual Automatic Trends Record Data User Data Factory Data Refresh Refresh Current Trend screen Gas 1 Concentration Min Max Minutes Updated Relative Absolute Warning Fault STDEV of Gas 1 Concentration* Gas 2 Concentration* STEV of Gas 2 Concentration* Transmission* Laser Temp Setpoint* Laser Temp in DegC* Peak Center Position* Gas Temperature* Gas Pressure* *(Similar to Gas 1 Concentration) IM 11Y01B02-01E-A 3rd Edition June 19, 2012-00 <6 Basic operation> 6-4 Optional “Mini-Display 4 line x 20 character” Software Map Line 1 - Measurement Line 2 – Transmission or Second Gas Measurement Display Text Description O2 xx.x % Measured gas and unit of measurement Transmission xx.x % Laser light transmission strength (0-100% range) CH4 xx.x % Second measurement gas and unit Initializing…… shown during the power-up and initialization of the analyzer System OK Normal Operation condition with no active alarms WARNING Det Sig Low WARNING Trans Low WARNING Spectr Noise WARNING Gas Pres WARNING Gas Temp WARNING Conditions WARNING Gas Level WARNING Board Temp WARNING Val Failure Line 3 - Status WARNING Val Require FAULT Laser Temp FAULT Det Sig High FAULT Det Sig Lost FAULT Conditions FAULT Outlier FAULT Peak Center Zero Calibrating… Span Calibrating… Validation Status Offline Validating… Online Validating… Data Transferring… Transfer Success Data Transfer Status Transfer Failure YOKOGAWA TDLS220 Analyzer Name SN 76-1xxx-05-xx Analyzer Serial No. AO1: CONC xx-xx%/ppm/ppb AO2: TRANS xx-xx% Configured 4-20mA output for AO1, AO2, & AO3 AO3: TEMP xx-xxF/C/K Line 4 - Information 10.0.0.35 Static IP Address TEMP Act/Con/Fix xx F/C/K Process Gas Temperature used for gas concentration calculation PRES Act/Con/Fix xx.x PsiA/ BarA Process Gas Pressure used for gas concentration calculation OPL xx.x in/cm Optical Path Length over which the analyzer is measuring the target gas Launch xx C Launch unit internal temperature Detect xx C Detect unit internal temperature IM 11Y01B02-01E-A 3rd Edition June 19, 2012-00 <6 Basic operation> 6-5 6.2 Software Guide MAIN MENU Display of Concentration & Transmission Status Window – notification of initiating, working properly, warnings or faults Gas Temperature Gas Pressure Selection of Basic or Advanced Menu Active Alarm Display Button Analyzer Shut Down Button Tag number and serial number Analyzer date and time After selection of either Basic or Advanced Menu you will see the Output Selection screen. This allows control of the analog output while the user is working in the analyzer software. • Block will hold outputs at 3.8mA until return to Main Screen • Track will allow outputs to continue to report concentration and transmission until return to Main Screen • Hold will hold outputs at their current value until return to Main Screen BASIC MENU Configure – allows setting of Path Length, Gas Temperature, Gas Pressure View Spectra – user will select display of raw detector signal or absorption spectra Data – Alarm History, Calibration History, Record Result Data Trends – allows for the displaying of data in a trend format IM 11Y01B02-01E-A 3rd Edition June 19, 2012-00 <6 Basic operation> 6-6 BASIC CONFIGURE PATH LENGTH – Factory set, do not adjust. Typical 40” (distance the laser beam is exposed to the process gas) PRESSURE – allows adjustment of the gas pressure value if using fixed pressure. If the analyzer is using active pressure compensation, no changes are allowed. Active pressure compensation settings are found in Advanced Menu. TEMPERATURE – allows adjustment of the gas pressure value if using fixed pressure. If the analyzer is using active temperature compensation, no changes are allowed. Active temperature compensation settings are found in Advanced Menu. IP ADDRESS – displays the analyzer IP address SERIAL NO. – displays analyzer serial number VERSION – software version number The spectra screen (raw detect or absorption) allow capture and view of current spectra. The screen auto scales the vertical axis, which will result in a visually noisy absorption spectrum when at low gas levels. In fact the spectra may not be noisy, but simply that the display range is extremely low. The BASIC DATA MENU allows the user to select: ALARM HISTORY – displays the last 50 alarms and faults with brief description, date and time CALIBRATION HISTORY - displays the last 50 calibration events with adjustment amount, date and time RECORD RESULT DATA – The default setting during normal operation is “User Data”. The system should only be switched to “Factory Data” when advised by Yokogawa Laser Analysis Division. Note: recording Factory Data is only for specific diagnostic purposes and should not be selected under normal operation. IM 11Y01B02-01E-A 3rd Edition June 19, 2012-00 <6 Basic operation> 6-7 The TREND SCREEN is identical for BASIC or ADVANCED MENUS. It allows the user to trend up to the last 750 minutes (of current day) of data for: REFRESH - The trend will not update automatically, use the refresh button to update the trend GAS 1 – analyzer reading of gas 1 concentration STDEV1 – the standard deviation of 25 consecutive concentration readings of Gas 1 GAS 2 – analyzer reading of gas 2 concentration STDEV2 – the standard deviation of 25 consecutive concentration readings of Gas 2 TRANS. – transmission % of laser light through the process LTS – analyzer laser temperature set point LT – analyzer laser temperature PCP – peak center position for the absorption peak TEMP – process gas temperature PRES – process gas pressure Alongside the selection buttons the current value is displayed. When selecting the information to trend user will be prompted to enter minimum value, maximum value and time to trend. ADVANCED CONFIGURE MENU PROCESS PATH LENGTH – DO NOT ADJUST, factory set typical 40” (distance laser beam is exposed to process gas). PROCESS PRESSURE – allows selection of FIXED (value entered into software), ACTIVE (analyzer fed pressure value from external transducer), or CONTROL (cell pressure controlled at a desired value with a proportional valve and pump). In Active mode, a Back-Up value can be entered, in case of active input failure. TEMPERATURE – allows selection of FIXED (value entered into software), ACTIVE INPUT (analyzer fed temperature value from external transducer), ACTIVE AMBIENT (ambient gas temperature derived from internal sensor), ACTIVE PEAKS (value calculated from the measurement spectrum), or CONTROL (cell temperature controlled at a desired value with a heater and relay). In Active Input mode, a Back-Up value can be entered, in case of active input failure. NON-PROCESS PARAMETER – if the analyzer is not purged with a gas that is free of the component being measured (i.e. oxygen), this allows user to enter the Path Length, Pressure, Temperature and Concentration of the purge gas that is present in the non-measurement optical path (internal analyzer optical path).. For details, see section 4.4. Use this feature if the TDLS220 is being purged with Instrument Air (I/A) IM 11Y01B02-01E-A 3rd Edition June 19, 2012-00 <6 Basic operation> 6-8 UNITS – selection of units for path length (in, ft, cm, m), pressure (psiA, barA, kPa, torr, atm) and temperature (ºF, ºC, ºK). SYSTEM I/O – allows set up and assigning of analyzer Analog and Digital I/O. SYSTEM – displays analyzer information (serial number, Fat date, password, software version, launch/detect unit temperatures), allows setting of date/time, gas type. VALVE CONTROL ¬– allows for manual and/or automatic control of the valve driver output signals. SIGNAL PROCESSING – Factory set parameters only LASER SPECTRA & CONTROL – displays spectra and allows manual control of laser. SYSTEM I/O - ANALOG OUTPUT CHANNEL 1 to 3 – configuring each 4 to 20mA channel to output Concentration, Transmission, Gas Temperature, Gas Pressure or None. WARNING MODE – setting of mA output response during analyzer warnings (Block, Track, Hold). FAULT MODE – setting of mA output response during analyzer warnings (Block, Track, Hold). BLOCK MODE LEVEL – specifies the analog output level in block mode (high 20mA or low 3.3mA). FIELD LOOP CHECK – allows specified 4-20mA output levels to check and distinguish between the three analog output connections; select analog output channel 1, 2, or 3 to check and input new value to output and press enter to activate. AO CH CALIBRATION – Pre-Calibrated at factory and not normally required. Allows calibration of 4 to 20mA output channels; follow onscreen instructions. IM 11Y01B02-01E-A 3rd Edition June 19, 2012-00 <6 Basic operation> 6-9 SYSTEM I/O – ANALOG INPUT Pre-calibrated at factory and not normally required. Allows calibration of 4 to 20mA input channels; follow onscreen instruction. SYSTEM I/O - DIGITAL OUTPUT Setting of Digital Output assignments (DO 1-3) CHANNEL 1 WARNINGS – Setting of levels that will trigger analyzer warning and subsequent DO. CHANNEL 2 FAULTS – Setting of levels that will trigger analyzer fault and subsequent DO. CHANNEL 3 USER ALARM – Setting of either Concentration or Transmission level (high or low) that will trigger analyzer warning and subsequent DO. FIELD LOOP CHECK – allows wiring connection check during field installation. CHANNEL 1 WARNINGS menu allows setting of various analyzer WARNING conditions. Warning is an event that will reduce but not eliminate the measurement integrity, it is an indication that maintenance is required but the analyzer is still operational. DETECTOR SIGNAL LOW – level at which low detector signal will trigger a warning – ONLY ADJUST WITH FACTORY ASSISTANCE. TRANSMISSION LOW – level at which low transmission will trigger a warning – ONLY ADJUST WITH FACTORY ASSISTANCE. SPECTRUM NOISE HIGH – level at which excessive spectrum noise will trigger a warning - – ONLY ADJUST WITH FACTORY ASSISTANCE. PROCESS PRESSURE OUT OF RANGE – upper and lower levels at which process gas pressure reading will trigger a warning. PROCESS TEMPERATURE OUT OF RANGE – upper and lower levels at which process gas temperature reading will trigger a warning. IM 11Y01B02-01E-A 3rd Edition June 19, 2012-00 <6 Basic operation> 6-10 CONCENTRATION OUT OF RANGE – upper and lower levels at which process gas concentration reading will trigger a warning. BOARD TEMPERATURE OUT OF RANGE – warning that analyzer internal temperature is excessive. VALIDATION FAILURE – a validation failure will trigger a warning; there are no settings associated with this. CHANNEL 2 FAULTS menu allows setting of various analyzer FAULT conditions. FAULT is an event that will eliminate the measurement integrity, it is an indication that maintenance is required and the analyzer is not operational. – ONLY ADJUST WITH FACTORY ASSISTANCE – FAULT CONDITIONS ARE CRITICAL SETTINGS THAT CAN RESULT IN DAMAGE TO THE ANALYZER IF IMPROPERLY PROGRAMMED. LASER TEMPERATURE OUT OF RANGE – upper and lower fault conditions for laser temperature. DETECTOR SIGNAL HIGH – upper raw detector signal limit. DETECTOR SIGNAL LOST – lower raw detector signal limit. OUTLIER REJECTION – threshold of spectrum noise that will result in rejection of measurement. PEAK CENTER OUT OF RANGE – loss of peak center control. SYSTEM Some settings are not adjustable by user, user adjustment is possible for: PASSWORD – changes password for ADVANCED menu access. DATE & TIME – changes analyzer date and time. IM 11Y01B02-01E-A 3rd Edition June 19, 2012-00 <6 Basic operation> 6-11 VALVE CONTROL Typically used when the analyzer is configured with a flow cell in an offline application. VALVE CONTROL The valve control includes manual and automatic control. MANUAL – allows for manual ON/OFF control of the valve driver output signals. TIME SEQUENCE – allows automatic valve switching based on time sequence. It is normally used for measurement that needs stream switching. REMOTE OVERRIDE – allows remote valve control by digital contact. LASER SPECTRA & CONTROL Displays Raw Detector Signal and Absorption Spectrum as well as Gas Concentration, Gas Temperature, Gas Pressure, Transmission, Laser Temperature and Peak Center Position. CAPTURE – allows a manual spectra capture (user will be prompted to enter a unique file name for captured spectra). For Display Only: CONTROL MODE – allows selection of Automatic (laser temperature is controlled to keep peak centered using peak center position as set point) or Manual (laser temperature is controlled using integral laser temperature sensor) – ONLY ADJUST WITH FACTORY ASSISTANCE. LASER TEMP – In manual mode allows adjustment of laser temperature – ONLY ADJUST WITH FACTORY ASSISTANCE. LTSP LIMITS – setting of guard limits for laser temperature set point – ONLY ADJUST WITH FACTORY ASSISTANCE. CUR CENTER – setting of center point for laser current ramp –ONLY ADJUST WITH FACTORY ASSISTANCE. IM 11Y01B02-01E-A 3rd Edition June 19, 2012-00 <6 Basic operation> 6-12 ADVANCED CALIBRATE & VALIDATE MENU OFFLINE CALIBRATIONS – allows zero calibration, zero offset, span calibration, transmission adjustment, dark current calibration, and peak search. OFFLINE VALIDATIONS – allows manual or automatic configuration of check gases 1 through 3. ONLINE VALIDATIONS – DO NOT USE THIS FEATURE on TDLS220 OFFLINE CALIBRATIONS – use for all TDLS220 ZERO CALIBRATION – manual or automatic calibration of Zero. ZERO OFFSET – allows manual adjustment of Zero by applying a concentration offset. SPAN CALIBRATION – manual or automatic calibration of Span. TRANSMISSION – adjustment of transmission value. DARK CURRENT – calibration of detector dark current. PEAK SEARCH – initiates a system scan of absorption peaks to validate current peak selection is correct. OFFLINE VALIDATIONS CHECK GAS 1 to 3 – allows manual or automatic configuration up to 3 check gasses. See section 5.5.4. IM 11Y01B02-01E-A 3rd Edition June 19, 2012-00 <6 Basic operation> 6-13 ONLINE VALIDATIONS – DO NOT USE FOR TDLS220 ADVANCED DATA MENU ALARM HISTORY – shows chronological list of analyzer’s most recent alarms. CAL HISTORY – shows chronological list of analyzer’s recent calibrations. SPECTRUM CAPTURE – selection of AUTOMATIC (user will be prompted to select capture interval, number of UPDATES to trigger capture, RELATIVE concentration level trigger which is a % of reading change, or ABSOLUTE concentration level to trigger capture); in addition the software will prompt for number of spectra to capture when a Warning or Fault occurs. MANAUL selection will result in spectra capture only when requested by user. RECORD RESULT DATA – The default setting during normal operation is “User Data”. The system should only be switched to “Factory Data” when advised by Yokogawa Laser Analysis Division. Note: recording Factory Data is only for specific diagnostic purposes and should not be selected under normal operation. IM 11Y01B02-01E-A 3rd Edition June 19, 2012-00 <6 Basic operation> 6-14 6.3 Non-Process Parameters (required when Instrument Air Purging) Non-Process Parameters is the Yokogawa Laser Analysis Division term used to define regions of the optical path that may be purged with a gas containing the actual target (measured) gas. The most common application of this is to use Instrument Air (~20.9% O2) as the purge gas for analyzers measuring Oxygen in the process. The Laser & Detect measurement unit will contain some oxygen molecules which must be mathematically cancelled out using the Non-Process process parameters. In order for the analyzer to measure correctly under these purge conditions, the analyzer must know the correct parameters such that the measured output value has been compensated i.e. the oxygen in the purge gas has been taken into account when determining the process oxygen concentration. Calibration – The analyzer MUST be calibrated (Zero and Span) as per the normal methods outlined in the standard User’s Guide. When performing a Zero Calibration, ensure that the entire optical path is purged with Nitrogen. When performing a Span Calibration, ensure the correct procedures are followed! ADVANCED CONFIGURE MENU (UPDATED) The Advanced Configure Menu has been updated with a sub-section titled Non-Process Parameters. NON-PROCESS PARAMETERS These non-process parameters are for the measured gas in the optical path but outside of the process path length. These parameters MUST be entered for an accurate measurement if the purge is not nitrogen (when measuring Oxygen). IM 11Y01B02-01E-A 3rd Edition June 19, 2012-00 <6 Basic operation> 6-15 NON-PROCESS PATH LENGTH This is the optical path length inside the laser & detect measurement unit. Typical values would be 3.5” to 4” with the default value to use at 3.75”. Note that this dimension will vary between analyzers. Contact Yokogawa if unsure. NON-PROCESS PRESSURE This is the pressure of the non-process gas. Typically, this will be close to atmospheric pressure of 1.01BarA or 14.7PsiA. Check the actual operating conditions and enter the appropriate value. Contact Yokogawa if unsure. NON-PROCESS TEMPERATURE This is the temperature of the non-process gas with two modes of input: ACTIVE AMBIENT - ambient gas temperature derived from integral sensor on detector circuit with offset adjustment (typically -18 deg C). Note this off-set is due to the internal heat of the controller unit, where the detect board is located in TDLS220 FIXED – manual input of fixed temperature value NON-PROCESS CONCENTRATION This is the concentration of the non-process measurement gas. For Instrument Air purge gas, the typical value would be 20.9% O2. If measuring CO in the process gas and the purge gas is Instrument Air, then these parameters are not applicable because the CO concentrations typically found in Instrument Air are below practical detection limits. IM 11Y01B02-01E-A 3rd Edition June 19, 2012-00 <6 Basic operation> 6-16 6.4 Stream Switching & Valve Control Outputs The TDLS220 has three valve drivers (24VDC each @ 12W max each) terminated at TB-3. These can be used for either calibration/Validation and/or stream switching functions. If using these valve drivers for any type of Calibration/Validation function then please refer to the appropriate section of Instruction Manual. As shown in the following drawing, 3 process streams are connected to 3 gas valves then to the inlet of the TDLS220 flow cell. The gas valves are controlled by three 24V relay output signals from the launch unit of the analyzer. During normal operation, only one valve can be open at a time. The connected solenoid wires at TB-3 may require the installation of a ferrite coil to eliminate noise spikes – this is totally dependant on the site specific electrical grounding conditions. If the analyzer appears to be re-booting when one or more of the solenoids is activated then this means some noise protection is required. Either add a ferrite coil to the connecting wires (contact Yokogawa for further assistance if necessary) or add a 3A 50V directional diode across the +/- terminals at TB-3. Stream 1 Valve 1 Inlet 24V relay control signals from Control Unit Valve 2 Stream 2 TDLS220 Sample Flow Cell Stream 3 Valve 3 Outlet Figure 15 - Valve Control Figure 15- Typical Stream Switching Scheme IM 11Y01B02-01E-A 3rd Edition June 19, 2012-00 <6 Basic operation> 6-17 There are 3 ways to control the valves: manual control in software, automatic valve change in time sequence and remote override though digital contact. The following software description defines how to configure the sequencing and timing of the valves when used in a stream switching configuration: ADVANCED CONFIGURE MENU The software setup for the stream switching is configured in Advanced Configure -> Valve Control. STATUS OF VALVES This panel shows the current status of all three valves. User can enter any valve to modify the settings. Note: only one valve can be open at a time during normal operation. VALVE CONTROL MODE There are three ways to change the valve status: Manual, automatic Time Sequence and Remote Override. MANUAL VALVE CONTROL By toggling the switch in this panel, user can manually turn on/ off the valve. Note: when user toggles the switch to on while there is another valve was on previously, the valve control will turn the other valve off. Only one valve can be open at a time. IM 11Y01B02-01E-A 3rd Edition June 19, 2012-00 <6 Basic operation> 6-18 Note: all three valves can be off at same time. TIME SEQUENCE The valves can be controlled automatically based on the time sequence. As an example of the left setting, Valve 1 stays on for 60 minutes before switching to Valve 2. By setting the Time Sequence of all 3 valves, the stream switching can be implemented continuously and periodically. REMOTE OVERRIDE Each valve can also be manually turned on by remote digital contact from control room or DCS. This panel specifies digital input channel for valve control. IM 11Y01B02-01E-A 3rd Edition June 19, 2012-00 <6 Basic operation> 6-19 6.5 Controlling the Analyzer Remotely or Locally via external PC/Laptop A number of methods is available to remotely control the TDLS220 analyzer. • Local Access using VNC and an external computer/Laptop (Ultra-VNC via direct Ethernet link using Ethernet crossover cable) • Remote Access using VNC via Ethernet connection (Ultra-VNC via external computer/ laptop) • Remote Access using optional Remote Interface Unit (RIU with VAC software) Whether directly connected, or connected via network, operating the analyzer with an external connection allows two basic functions: • Remote control of the analyzer via TDLS220 software allows full control of the analyzer. The user will see the same screen with the same access functions as if controlling using a built in keypad and display. Data transfer via UltraVNC software allows upload and download of data files to/from the analyzer. 6.5.1 Instructions for Connecting an External Computer to the Analyzer If the remote access via Ethernet link is used on a regular basis during normal operation, it is the end user responsibility to equip the Control box with appropriate approved connectors. Inside the Control box, a standard Ethernet connector is to be plugged as shown in the picture below. During troubleshooting and diagnostics, Ethernet cable can be connected directly to the SBC with the Control box open. Windows 98SE or later (is required on computer to be connected to the analyzer), and crossover Ethernet cable. Contact your local Yokogawa agent for a free copy of the necessary “Ultra-VNC.exe” file that will enable the VNC connection with the analyzer. This Ulta-VNC.exe file should be loaded on to the connecting PCs desktop ready for use when connecting with the analyzer. • From Control Panel – Network Connections, make sure Ethernet Local Area Connection is set to Enabled status. Disable wireless and any other networking connections. • Connect crossover (or on most 2008 onwards PC’s a crossover is not necessary) Ethernet cable from client system to Analyzer. • On the computer, go to Control Panel – Network Connections - Local Area Connection, Internet Protocol (TCP/IP) Properties. o Set IP to 10.255.255.254 & Subnet Mask to 255.0.0.0. Select OK to accept changes on Internet Protocol (TCP/IP) and Local Area Connection Properties. o Start Ultra-VNC software, running from Desktop using the Guide below: Figure 16 - Connecting External Computer to the analyzer IM 11Y01B02-01E-A 3rd Edition June 19, 2012-00 <6 Basic operation> 6-20 6.5.2 Using Ultra-VNC Software Start the Ultra-VNC software by double-clicking on the “vncviewer.exe” ICON (as shown below): Within the VNC Server field, enter the correct IP address for the analyzer to which you are connecting then click on “Connect” button. If a successful connection is established then use the default password for entering the VNC connection screen is 1234 – see screen below that shows an example IP address of 10.0.200.2 (TDLS220 analyzer Serial number 220-XX-1402-XX etc.): DO NOT attempt to change of the “Quick Options” or any other settings on this menu! If the analyzer connection cannot be established (see error message below) then check the external computer IP settings, connection wires/Cat5 cable and IP address. Make sure any other LAN devices (and WiFi) are disabled to prevent conflicts. IM 11Y01B02-01E-A 3rd Edition June 19, 2012-00 <6 Basic operation> 6-21 6.5.3 OPTIONAL Remote Interface Unit (RIU) The OPTIONAL RIU runs the Virtual Analyzer Controller (VAC) software described below. 6.5.4 Virtual Analyzer Controller (VAC) Operating Software Map IM 11Y01B02-01E-A 3rd Edition June 19, 2012-00 <6 Basic operation> 6-22 6.5.6 OPTIONAL Virtual Analyzer Controller (VAC) Operating Software Guide Once an Ethernet connection has been established, the VAC software can be started. To load the software on to a laptop or desktop PC, follow these steps: Create folder under c:\asiini Copy all files from the CDROM to this folder Create a shortcut from the desktop by browsing for the ASI-VAC.exe file Test the shortcut by double clicking on it and the VAC software should open Once the software is open, follow the on-screen options. Function keys have been pre-assigned to certain tasks allowing a RIU keypad to perform all necessary tasks. The primary functions of the software are: Create a virtual network computing connection to an analyzer thus allowing for control of the analyzer, typically for start-up, service, calibration, etc. Allow for file transfer from an analyzer to a local USB port (for memory device) Create connections by name and/or IP address OFFLINE CALIBRATIONS – use for all TDLS220 ZERO CALIBRATION – manual or automatic calibration of Zero. ZERO OFFSET – allows manual adjustment of Zero by applying a concentration offset. SPAN CALIBRATION – manual or automatic calibration of Span. TRANSMISSION – adjustment of transmission value. DARK CURRENT – calibration of detector dark current. PEAK SEARCH – initiates a system scan of absorption peaks to validate current peak selection is correct. After selecting “Copy Data – F3” you will be allowed to select the analyzer (with description and IP address) you wish receive data from. This will initiate a data transfer for all results and configuration files stored on the analyzer. IM 11Y01B02-01E-A 3rd Edition June 19, 2012-00 <6 Basic operation> 6-23 C onfiguration C onfiguration - Options After selecting “Configuration – F4” you will be allowed to select the analyzer (with description and IP address) you wish to configure. You will be given the following menu choices: Create Connection - F2: This will allow programming of Tag Name and IP Address for future connections Delete Connection - F3: This is to delete an existing connection Options - F4: (see next section) F5 – Backlight Toggle On/Off Password - Ctl-Ins: Allows changes to the access password VAC Options (Configuration Menu): Data Dump Options. This sets the directories to receive data from (analyzer) and send data to (on system running VAC software) Source Directory: This is the analyzer data file folder; it should not be changed without factory consultation. Target Directory: This is the remote computer or RIU directory to receive data files File Masks: These are the extensions of the files to be transferred; it should not be changed without factory consultation. VNC Viewer Location specifies the location of the software to remotely control an analyzer; it should not be changed without factory consultation. APPLY-F2 must be selected to save changes . From the VAC Main Menu Ctrl-F1 will bring up the Help Screen. This will give at system text help describing the shortcut keys and their function. IM 11Y01B02-01E-A 3rd Edition June 19, 2012-00 <7 Routine Maintenance> 7-1 7 Routine Maintenance The TDLS220 TDL analyzer requires little routine maintenance if it has been correctly installed, set-up and calibrated. This section will outline the routine maintenance procedures. Maintenance procedures require opening enclosures of certain modules. Make sure that there is no ingress of water or other liquids into the analyzer modules during these procedures. 7.1 Maintaining Good Transmission The % Transmission of the laser light through the process gas flow cell is the most important variable to consider for routine maintenance and troubleshooting. Under normal operating conditions (non-failure) transmission will be affected by: • Window/Mirror fouling. For most applications TDLS220 extractive the sample gas should be pre-conditioned and clean thus avoiding any window fouling issues. o It is VERY IMPORTANT to keep the process gas clean and non-condensing. Deposits, oily films and other residues depositing on the window/mirror may cause performance degradation/cyclical drift. • Alignment of the Laser Beam - not necessary for TDLS220 as it is pre-fixed at factory • Particulate in the process. For most applications TDLS220 extractive the sample gas should be pre-filtered and clean thus avoiding any window fouling issues. 7.1.1 Maintaining Window and Mirror: The incoming process gas should be pre-conditioned to remove any entrained liquids. The sample gas should always be maintained above the dew point to prevent condensation within the flow cell. It is recommended that a coalescing membrane type filter be installed up-stream of the flow cell inlet. Should transmission become lower and/or the results become noisy/un-expected then it is possible the process wetted optical surfaces need cleaning or replacement. Use the following procedures to check the Mirror and Window. Locations are as shown below: IM 11Y01B02-01E-A 3rd Edition June 19, 2012-00 <7 Routine Maintenance> 7-2 Figure 17 - Mirror and Window Locations Mirror Removal for Cleaning or Replacement: Follow the precautions outlined in the “Thermal hazard” and “Chemical hazard” sections of the SAFETY chapter. If the flow cell becomes contaminated then it may be cleaned using the following procedure: • discontinue the process gas flow and initiate nitrogen (or instrument air) purge of the analyzer. • shut down the analyzer and disconnect from AC power supply. Wait 30 minutes to let the gas cell cool down to safe temperature. • If installed, remove the flow cell insulation end cap as shown below. • Potentially HOT SURFACES on heated or insulated flow cells Using 7/64” Allen key wrench remove the four fastening screws and lock washers. IM 11Y01B02-01E-A 3rd Edition June 19, 2012-00 <7 Routine Maintenance> 7-3 • Carefully remove all four fasteners and lock washers and the mirror mounting plate The mirror is not fastened or adhered to the mounting plate so during removal, keep the mounting plate tilted up-wards to prevent the mirror from falling out of the mounting plate • Visually inspect the mirror surface for any signs of contamination, dirt, deposits, films, oils, etc. If in any doubt about the quality of the mirror surface then cleaning is recommended. If obvious severe damage to the actual mirror surface can been seen then a replacement mirror should be installed. IM 11Y01B02-01E-A 3rd Edition June 19, 2012-00 <7 Routine Maintenance> 7-4 • Visually inspect the o-ring and replace if necessary. • Cleaning of the mirror should be performed as follows while taking great care not to scratch the surface of the mirror. First, any loose impediments and dirt should be blown off the surface using a clean compressed gas source. Take care not to spray liquid propellants onto the mirror surface! • IM 11Y01B02-01E-A 3rd Edition June 19, 2012-00 <7 Routine Maintenance> 7-5 • • • • • • • • • • Using optical grade glass cleaner or IPA, wet the surface of a non-abrasive lint-free tissue. Place the wetted tissue on the surface of the mirror and drag across the mirror face in one direction only. Use a second clean, dry tissue and wipe in one direction only to dry the surface. Inspect for cleanliness and if necessary, repeat the process. NOTE: If suitable cleaning media are not available then contact Yokogawa service group and a cleaning kit can be purchased. If the mirror cannot be cleaned such that there are no traces of any films, dirt, etc. then it should be replaced with a new mirror – contact Yokogawa for replacement parts. Once the mirror is ready for re-installation and the o-ring has been inspected/replaced, then the mirror within its mounting plate can be re-installed. Carefully check the mirror surface again from different angles to ensure it is thoroughly clean before re-installation! The rotational position of the mirror within the mounting plate is not specific. The rotational position of the mounting plate onto the end of the flow cell is also not specific. Carefully install the mirror and mounting plate onto the cell and rotate such that the holes align with the threads, hand tighten the fasteners with lock washers in position. Using the 7/64” Allen key wrench, carefully hand tighten each screw using a diagonal pattern and gradually increase each screw incrementally – do not fully tighten one screw at a time, tighten them down evenly and incrementally to a maximum of 18 lb/in torque. When the mirror is fully fastened, turn on the analyzer and check the transmission level to see if normal levels have been restored and if the measurements now appear normal. Be careful not to touch hot surface of the gas cell. If so the transmission level is restored, replace the insulation end cap and al low 30 minutes for temperature stabilization. Check the Zero and Span with appropriate gases. If there is no change in transmission and/or the results are still noisy/unexpected then proceed with removal and cleaning of the window. IM 11Y01B02-01E-A 3rd Edition June 19, 2012-00 <7 Routine Maintenance> 7-6 Window Removal for Cleaning or Replacement: Follow the precautions outlined in the “Thermal hazard” and “Chemical hazard” sections of the SAFETY chapter. If the flow cell becomes contaminated then it may be cleaned using the following procedure: • Discontinue the process gas flow and initiate nitrogen (or instrument air) purge of the analyzer. • Shut down the analyzer, disconnect from AC power, and wait for 30 minutes to let the gas • Open the measurement unit cover by loosening the four Philips head screws (use a #2 Phillips head type screw driver) IM 11Y01B02-01E-A 3rd Edition June 19, 2012-00 <7 Routine Maintenance> 7-7 • • • Using 7/64” Allen key carefully insert through the access holes and remove the four window retaining screws and lock washers – use long needle nose pliers to carefully hold each screw as it comes lose. TAKE CARE not to touch the detector or laser collimation lens! Carefully extract the process window – handle with care! IM 11Y01B02-01E-A 3rd Edition June 19, 2012-00 <7 Routine Maintenance> 7-8 THE WINDOW COULD BE HOT FROM THE HEATED CELL • • • • • • • • This process wetted window is constructed of sapphire and is therefore more durable than the mirror surface. Use a clean, dry instrument air or nitrogen pressure (or canned air) supply to first blow off any particulate matter. Using warm water and mild soap detergent, gently clean the window surface with a soft, non-abrasive cloth. If the deposits do not come off then use a small amount of IPA and a soft, non-abrasive cloth. Use the same clean, dry instrument air or nitrogen pressure supply to blow dry the surface. Carefully check the entire surface of the window from different angles to ensure it is thoroughly cleaned and ready for service. If the window does not appear to clean up well, then replace the window assembly with a new one. If the window appears to have an etched (or pitted) surface then it has probably been contaminated with HF or other similar corrosive gas! A new window should be installed. Check and replace if necessary the window o-ring. IM 11Y01B02-01E-A 3rd Edition June 19, 2012-00 <7 Routine Maintenance> 7-9 • • • • • • Once the window has been thoroughly cleaned, it should be re-installed using a reverse procedure as above. CAUTION! – Ensure the window is installed in the correct orientation with the stainless steel ring clamping the window onto the o-ring. Note the window holder holes a distinct hole pattern and can only fit in one rotational position on the cell. Carefully install the window onto the cell and rotate such that the holes align with the threads, hand tighten the fasteners with lock washers in position with 7/64” Allen key... Using the 7/64” Allen key wrench, carefully hand tighten each screw using a diagonal pattern and gradually increase each screw incrementally – do not fully tighten one screw at a time, tighten them down evenly and incrementally to a maximum of 18 lb/in torque. When the window is fully fastened, check the transmission level to see if normal levels have been restored and if the measurements now appear normal. If so, replace the enclosure cover and allow 30 minutes for temperature stabilization. CAUTION! – Do not pinch wires between cover and enclosure CAUTION! – Do not cross-thread the Phillips head screws into the cover Check the Zero and Span with appropriate gases. If there is no change in transmission and/or the results are still noisy/unexpected then contact Yokogawa for further assistance. IM 11Y01B02-01E-A 3rd Edition June 19, 2012-00 <7 Routine Maintenance> 7-10 7.2 Analog Signal Field Loop Check 1. To perform a field loop check of the analog output signals, follow the software map below. Ensure properly calibrated multi-meter and read instructions fully before starting this operation. The Multi-meter on analog mode should be connected to the appropriate terminals and with correct polarity to prevent damage. 2. Software Map a. Advanced Menu i. Password ii. Block/Track/Hold iii. Configure iv. System I\O v. Analog Output vi. Field Loop Check vii. CH 1, 2, or 3 Check viii. mA Value - input new value and observe reading Once finished with the loop check, go back to the main menu using the ESC key 7.3 Data Reporting, Storage and Retrieval The TDLS220 analyzer has been designed with extensive data reporting capabilities. All data is available in the analyzer as a text file for import into a spreadsheet for analysis Data stored in the analyzer: • Results. Every measurement the gas concentration, transmission, diagnostic data are stored. • Spectra. The analyzer records spectra at a timed interval, in the event of an analyzer warning or fault (including concentration values) and manually via the user interface. • Calibration History is stored during every calibration or validation event. • Alarm Fault History • Events History which includes any changes made to the system settings All data can be retrieved using a USB flash drive (at the analyzer), via the RIU, or over an Ethernet connection. If opening the protective enclosure is not desired for safety reasons, end user can install approved hermetic Ethernet and USB throughputs on the box glands. See below for USB data download port location inside control unit. Figure 18 - USB Port Location IM 11Y01B02-01E-A 3rd Edition June 19, 2012-00 <7 Routine Maintenance> 7-11 7.4 Validation and Calibration There are several methods that can be used to validate and/or calibrate the TDLS220 TDL analyzer. Generally, we recommend routine validation of the analyzer either on-line (if appropriately set-up) or offline. Actual calibration should only be performed if certain performance criteria have not been met during the validations and should only be performed by appropriately qualified personnel. The options for Validation and Calibration are: Validate Off-Line (or Cal Check) Manual (Zero - Span) Manual introduction of zero or span gas and follow manual procedure via user interface Calibrate Off-Line Manual (Zero – Span) Manual or automatic introduction of Zero and Span gases for validation or calibration (when equipped with appropriate hardware, valves, etc.) 7.4.1 Off-Line Manual/Automatic Checking/Validation MANUAL OFFLINE VALIDATIONS Enter into the Advanced Menu, Calibrate & Validate section, Off-Line Validations. Choose Check gas 1, 2 or 3 and select Manual Validation. IM 11Y01B02-01E-A 3rd Edition June 19, 2012-00 <7 Routine Maintenance> 7-12 Following the on screen directions, enter in the: Pressure= Cell Pressure Temperature= Cell Temperature Cell length= 40” Concentration of the target gas inside the gas flow cell. Press Enter to proceed. Wait for the reading to stabilize. Press 9 to proceed. AUTOMATIC OFFLINE VALIDATIONS The Offline Validations can also be automatically configured. Refer to section 5.5.3 for details. Local Initiate will start the automatic online validation sequence when selected. It will use the existing ‘Settings’ (see below for details on ‘Settings’). Remote Initiate will enable/disable monitoring of the selected “Remote Initiate” contacts on TB-2 within the Launch Unit. When enabled, the analyzer will detect the chosen contact closure and automatically start the online validation sequence. Time Initiate will allow input of a specified time to automatically start online validation sequence once every day, every week, every 2 weeks, or every 4 weeks. IM 11Y01B02-01E-A 3rd Edition June 19, 2012-00 <7 Routine Maintenance> 7-13 AUTOMATIC OFFLINE VALIDATION SETTINGS Please see below for detailed explanations of Validation Settings. There are several critical parameters that must be preconfigured in the TDLS220 software when using the automatic validation sequence. These parameters MUST be correctly set otherwise the analyzer will report false/incorrect validation results. • • • • • • • • Check Gas Concentration specifies the concentration (ppm or %) of the gas within the offline flow cell. Check Gas Pathlength specifies the optical path length of the offline flow cell. This is typically preset to 40” (or metric equivalent) Check Gas Temperature can be selected for either Fixed or Active. o If Active Temperature, then follow on screen instructions. o If Fixed Temperature, then enter in the temperature of the gas within the offline flow cell. Remember that this value will be used whenever the auto validate is used so try to select a value that is representative of when the auto validate might take place (day/night, etc.) Press ENT to proceed. Check Gas Pressure specifies the pressure at which the gas within the offline line flow cell. Valve Selection specifies which analyzer’s solenoid valve driver is used for the check gas. Check Gas Purge Time specifies how long the check gas will purge the flow cell. N2 Purge Time specifies how long N2 will purge the flow cell. Analog Output Mode specifies Block, Track, or Hold of all 4 to 20 mA output during offline check. IM 11Y01B02-01E-A 3rd Edition June 19, 2012-00 <7 Routine Maintenance> 7-14 7.4.2 Off-Line Manual/Automatic Calibration To perform off-line calibration, the TDLS220 flow cell is already capable of being validated/calibrated in off-line mode. Using external switching valves or reconfigured tubing connections to allow the introduction of appropriate calibration gases 1 With the appropriate user interface, go to either Basic Menu (to Check Zero or Span) or Advanced Menu (to Check Zero or Span and/or perform actual Calibration). 2 Follow the detailed on-screen instructions 3 We do not recommend calibrating the Zero. If the Zero reading appear incorrect, then ensure all data results and spectra have been stored and send the files to Yokogawa Laser Analysis Division for further evaluation. 4 5 When an acceptable zero has been established, follow the on-screen instructions for Span calibration. ENSURE all parameters are correct for the actual TDLS220 flow cell conditions. IM 11Y01B02-01E-A 3rd Edition June 19, 2012-00 <7 Routine Maintenance> 7-15 IM 11Y01B02-01E-A 3rd Edition June 19, 2012-00 <8 Troubleshooting> 8-1 8 Troubleshooting The TDLS220 TDL Analyzer troubleshooting is fairly simple for a process analyzer. First, virtually all components used in the system have a long Mean Time Between Failures (MTBF) with rated life of components typically exceeding 10 years (when operating within their stated specifications). Second, most probable failures and problems are diagnosed by the system, generating internal warning and fault conditions. The intent of this guide is to provide common troubleshooting steps, it does not detail specific repair procedures (such as laser module replacement), as these are unlikely and are detailed in other sections of the manual. Routine maintenance procedures are also detailed in other sections of the manual. The most common issues are divided into two categories: • • Warnings. These are conditions which will affect the analyzer reading but not cause complete loss of measurement integrity. An example would be reduction of transmission (amount of laser power at the detector) which could indicate window fouling, where the measurement is still being made, but further loss of transmission will cause loss of measurement. Faults. These are conditions where the measurement is lost, or degraded past the point of reliability. An example would be loss of transmission, which could indicate complete missalignment or laser failure. The TDLS220 system will diagnose many common warnings and faults, taking the following actions: • • • • • • The analyzer generates a status flag that is displayed on the main screen; if only one warning/ fault is present the system will display this on the screen. The “ACTIVE ALARM” menu selection will allow the user to view all active Warnings and Faults The system will log the warning/fault in a log file along with a description, time-triggered and time-cleared. The 4-20mA signal can change to 3.3mA (or 20ma) under a fault or warning condition (user changeable). The digital output of the analyzer will trigger (Channel 1 – Warnings, Channel 2 – Fault, Channel 3 – Concentration or Transmission) The analyzer will capture spectra for diagnostic assistance The Results file will indicate a Warning (1) or Fault (2) in the continuous Results file IM 11Y01B02-01E-A 3rd Edition June 19, 2012-00 <8 Troubleshooting> 8-2 8.1 Common Troubleshooting Steps For most conditions the troubleshooting steps are common. In general, the most common issues with the analyzer revolve around ensuring an adequate amount of the laser light is received at the detector. Under any warning conditions it is recommended that the following steps are carried out prior to contacting YOKOGAWA. 8.1.1 On Process Gas or Zero Gas or Span Gas • Check Status LEDs. This will ensure that power is routed properly to the system components. Status LEDs are listed below: Blue LED # (from left to right) Voltage Use D20 +5V Laser temp control power supply D26 -15V Isolated power supply D27 +15V Isolated power supply D24 +8V DFB laser driver power supply D23 -8V DFB laser driver power supply D22 -12V DFB laser driver power supply D16 -12V Detector board power supply D19 -12V VCSEL laser driver power supply D6 -15V Analog IO board power supply D12 -15V FPGA board power supply D18 +12V VCSEL laser driver power supply D7 +12V LCD power supply D8 +24V Main power supply D9 +15V Analog IO board power supply D10 +5V SBC power supply D11 +15V FPGA board power supply D13 +5V FPGA board power supply D14 +6V FPGA board power supply D15 +12V Detector board power supply D17 +12V General 12V power supply IM 11Y01B02-01E-A 3rd Edition June 19, 2012-00 <8 Troubleshooting> 8-3 • Record Results. Download data files from the analyzer for e-mail to Yokogawa Laser Analysis Division. 8.1.2 Trouble Shooting Procedure for Lost and/or Low Transmission For a TDL analyzer to function correctly there must be a suitable amount of the laser light reaching the detector. There are several factors (or combinations of) that can affect the amount of light that is detected on a flow cell of TDLS220: • • • • Alignment: The mechanical alignment of the laser beam with the detector unit o The beam is not directed at the mirror and not reflected to the detector o The detector not aligned with the incoming laser beam (from the mirror) Contamination of Window and/or Mirror: The process gas or other contaminants have fouled the cell window and/or mirror – cleaning required and improvements to sample system to prevent repeat incident. Particulate: The process gas optical clarity o Excessive smoke density/opacity and/or particulate matter that prevents sufficient light from reaching the detector. Improvements to the sample handling/conditioning system should be made to remove particulate Weak Laser: The output power of the laser module itself o Weak or dead laser diode source not outputting sufficient light 8.2 Analyzer Warnings Warning Action Steps Detector Signal Low. This is based on the amount of signal generated by the detector. Refer to Low or Lost Transmission procedure Transmission Low. This is the most important diagnostic feature of the analyzer. Transmission is a measurement of the laser power striking the detector. It is an arbitrary number (%) that can be calibrated. The analyzer with a clean sample flow cell is calibrated at 100% transmission when leaving the factory. Clean window and/or mirror Refer to Low or Lost Transmission procedure Spectrum Noise High. This is based on a measurement of the noise (standard deviation) of the absorption peak baseline regions. Clean window and/or mirror Contact Yokogawa if fault cannot be cleared Process Pressure out of range. The gas pressure range for the application is programmed into the analyzer. Check pressure transducer feed to analyzer Check to ensure software setting (Advanced Menu, Configure) is correct IM 11Y01B02-01E-A 3rd Edition June 19, 2012-00 <8 Troubleshooting> 8-4 Yokogawa Process Temperature out of range. The gas temperature range for the application is programmed into the analyzer. Check temperature transducer feed to analyzer from the heat trace controller Check to ensure software setting (Advanced Menu, Configure) is correct If operating outside of temperature range, a re-calibration may be required – contact Yokogawa Concentration out of range. The process pressure range for the application is programmed into the analyzer. Check to ensure software setting (Advanced Menu, Configure) is correct L or D unit temp out of range. The Controller Unit has two built in temperature sensors (backplane and detect board). This diagnostic is triggered if they sense the ambient temperature is outside of the analyzer design range (-10 to 50C) – causing the internal temperatures to exceed the preset limit Check purge system flows and excessive heat output from SBC and/or other electronic components Look for excessive heat output from adjacent processes and/or radiant process and/or direct sunlight 8.3 Analyzer Faults For analyzer faults it is recommended that you contact Yokogawa Laser Analysis Division immediately. There is typically no user intervention that should be attempted unless specifically diagnosed or directed by Yokogawa. Yokogawa Laser Analysis Division personnel will step you through diagnostic and repair steps. Laser Temperature Out of Range. This is an indication that the system can not control the laser temperature, resulting in wavelength instability of the laser. Detector Signal High. Detector is saturated (i.e. too much detector signal gain) or has been damaged. Detector Signal Lost. The analyzer is not receiving a detector signal – please check all electrical connections and follow the procedure for Troubleshooting Low or Lost Transmission. Outlier Rejection. Future feature – yet to be implemented. Peak Center Out of Range. Indication that the system can not keep the peak centered in the scan range. Please review the absorption spectra to check the actual peak position, check that some target gas in the optical path – capture spectra and send to Yokogawa Laser Analysis Division or local agent for further assistance. IM 11Y01B02-01E-A 3rd Edition June 19, 2012-00 <9 Data Files and Format> 9-1 9 Data Files and Format The TDLS220 TDL analyzer is capable of automatically storing many important pieces of information. All the files are stored in simple ASCII text format for easy importing to MS Excel spreadsheets (or other data manipulation software as appropriate). The rate at which data is captured may be configured from within the TDLS220 software. There are several files that are stored in the system: Example of files contained within the serial number specific data export folder (or the !Data folder when viewing through a File Transfer function on Ultra-VNC connection) Daily Results 092407 .res Allows for review of daily results and diagnostic data on a measurement-bymeasurement basis Daily Spectra 092407 .spe Allows for review of daily results and diagnostic data on a measurement-bymeasurement basis Daily Results - in the form of ASCII data files that can be opened with Microsoft “Notepad” as simple .txt file formats. The content can then be copied and pasted into Microsoft Excel spread. Each day as a separate file name in the MMDDYY format with the .res file extension (meaning result). Each file starts with the first updated measurement set of data for that date and then sequentially contains every up-dated measurement set of data in the same dated file until the end of that date. A new dated file is created each day. Files are deleted automatically on a First-In/First-Out (FIFO) basis if the allowable Data folder has no spare memory. Daily Spectra - in the form of ASCII data files that can be opened with Microsoft “Notepad” as simple .txt file formats. The content can then be copied and pasted into Microsoft Excel spread. Each day as a separate file name in the MMDDYY format with the .spe file extension (meaning spectra). Each file contains spectra captured automatically during that day depending on what rate of spectra capture has been set-up. Typically, the analyzer will capture one spectrum every 300 measurement up-dates (if the capture rate is set 300 up-dates). Additionally, if the analyzer goes into “Warning” of “Fault” mode during that day, there will be spectra captured during these times (typically configured for 5 captures in each mode). A new dated file is created each day. Files are deleted automatically on a First-In/First-Out (FIFO) basis if the allowable Data folder has no spare memory. IM 11Y01B02-01E-A 3rd Edition June 19, 2012-00 <9 Data Files and Format> 9-2 -------- alarms alarms calibr .cap .his .bak .his Capture These files are the individually named spectra that are “Captured” by the user at any given date or time during operation. Each file can have up to 8 numerals in its name which are entered at the time the “Capture” is performed. Example: 110307.cap 100008.cap Alarms History Alarm History - in the form of ASCII data files that can be opened with Microsoft “Notepad” as simple .txt file formats. The content can then be copied and pasted into Microsoft Excel spread. Each Alarm incident is logged with the date (MM-DD-YYYY) and time that it occurred, the Mode (Warning or Fault or User Alarm), the specific condition within the Mode (e.g. Detector Signal Lost) and the state (ON or OFF). Example: 10-10-2007 13:21:36 Fault(peak center out of range) OFF 10-10-2007 19:00:25 Warning(detector signal low) ON Individually named spectra captured manually A historical log of analyzer alarm events Alarms History Back-Up A back-up of the historical log of analyzer alarm events Calibration History A historical log of analyzer calibrations Alarm History Back-up - When the alarms.his file exceeds 100KB size the contents is saved to this .bak file and the .his file is emptied. This .bak file is in the form of ASCII data files that can be opened with Microsoft “Notepad” as simple .txt file formats. The content can then be copied and pasted into Microsoft Excel spread. Each Alarm incident is logged with the date (MM-DDYYYY) and time that it occurred, the Mode (Warning or Fault or User Alarm), the specific condition within the Mode (e.g. Detector Signal Lost) and the state (ON or OFF). Example: 10-10-2007 13:21:36 Fault(peak center out of range) OFF 10-10-2007 19:00:25 Warning(detector signal low) ON Calibration History - in the form of ASCII data files that can be opened with Microsoft “Notepad” as simple .txt file formats. The content can then be copied and pasted into Microsoft Excel spread. Each Calibration and/or Validation event is logged with the date (MM-DD-YYYY) and time that it occurred, the Mode (Calibration or Validation), the specific type (Transmission Calibration, Zero Calibration, etc.) and the ‘K’ (constant) factor used for the event Example: 11-14-2007 14:11:19 span_calibrate 612814.89 9250.84 152665.88 11-14-2007 14:50:16 transmission_cal 14.95 IM 11Y01B02-01E-A 3rd Edition June 19, 2012-00 <9 Data Files and Format> 9-3 Calibration History Back-Up Calibration History - When the calibr.his file exceeds 100KB size the contents is saved to this .bak file and the .his file is emptied. This .bak file is in the form of ASCII data files that can be opened with Microsoft “Notepad” as simple .txt file formats. The content can then be copied and pasted into Microsoft Excel spread. Each Calibration and/or Validation event is logged with the date (MM-DD-YYYY) and time that it occurred, the Mode (Calibration or Validation), the specific type (Transmission Calibration, Zero Calibration, etc.) and the ‘K’ (constant) factor used for the event Example: 11-14-2007 14:11:19 span_calibrate 612814.89 9250.84 152665.88 11-14-2007 14:50:16 transmission_cal 14.95 calibr .bak calibr .pik Calibration Pick List - Factory Use Only FACTORY PERSONNEL ONLY S .dat Chemometric Model File Parent spectra for chemometric model used only for specialized applications that utilize the TruePeak CLS measurement capability. span00 span01 to span10 .spe .spe A back-up of historical log of analyzer calibrations Span Calibration Spectra Absorption Spectrum and coefficients at time of calibration Historical Span Calibration Spectra Previous Absorption Spectrum and coefficients at time of previous calibrations System Configuration system system .cfg .his All essential analyzer & installation specific parameters required by the analyzer for the given application & installation System History A historical log of configuration changes This file is essential to the analyzer calibration - if this file does not exist or is corrupted, modified or otherwise tampered with then the analyzer calibration is invalid. It contains essential information relating to the Span Calibration of the analyzer. span01 through span09 are previous files with span01 being the most recent. The most recent previous span01 can be restored in the analyzer as ‘Previous Calibration’. The factory calibration which can also be restored in the analyzer is named span10. This file is essential to the analyzer - if this file does not exist or is corrupted, modified or otherwise tampered with then the analyzer cannot function. It contains analyzer specific parameters relating to every detail of the measurement, calibrations, compensation factors, I/O configurations, Valve control configurations, signal processing, etc. This file is used by FACTORY PERSONNEL ONLY to evaluate if the configuration is appropriate for the analyzers intended use. System Configuration History - in the form of ASCII data files that can be opened with Microsoft “Notepad” as simple .txt file formats. The content can then be copied and pasted into Microsoft Excel spread. Each configuration change is logged with the date (MM-DD-YYYY) and time that it occurred, the parameter (e.g. opl) and the new value. Also, whenever the analyzer is started-up or shut-down the ‘TruePeak Open/Close” parameter will be logged. Example: 11-20-2006 08:13:10 opl(inch) 39.96 43.31 11-20-2006 08:13:26 temperature(F) 509.0 86.0 11-20-2006 08:13:40 pressure(psi) 14.50 14.50 IM 11Y01B02-01E-A 3rd Edition June 19, 2012-00 <9 Data Files and Format> 9-4 system .bak System History Back-Up A back-up of historical log of configuration changes System Configuration History - When the system.his file exceeds 100KB size the contents is saved to this .bak file and the .his file is emptied. This .bak file is in the form of ASCII data files that can be opened with Microsoft “Notepad” as simple .txt file formats. The content can then be copied and pasted into Microsoft Excel spread. Each configuration change is logged with the date (MMDD-YYYY) and time that it occurred, the parameter (e.g. opl) and the new value. Also, whenever the analyzer is started-up or shutdown the ‘TruePeak Open/Close” parameter will be logged. Example: 11-20-2006 08:13:10 opl(inch) 39.96 43.31 11-20-2006 08:13:26 temperature(F) 509.0 86.0 11-20-2006 08:13:40 pressure(psi) 14.50 14.50 system .usr valspe .his valspe .bak System User This contains all ‘Factory’ configuration settings as the analyzer was shipped. This is used for reference purposes only. Validation Spectra Spectra captured for historical Validations (On-Line and Off-Line) are stored in this file. Validation Spectra Back-Up When the valspe.his file exceeds 1MB size the contents is saved to this .bak file and the .his file is emptied. This .bak file is Spectra captured for historical Validations (On-Line and Off-Line) are stored in this file. Zero Calibration Spectra Absorption Spectrum and coefficients at time of calibration This file is essential to the analyzer calibration - if this file does not exist or is corrupted, modified or otherwise tampered with then the analyzer calibration is invalid. It contains essential information relating to the Zero Calibration of the analyzer. Historical Zero Calibration Spectra zero01 through zero09 are previous files with zero01 being the most recent. The most recent previous zero01 can be restored in the analyzer as 'Previous Calibration'. The factory calibration which can also be restored in the analyzer is named zero10. System Configuration System Configuration at the time of current Zero Calibration (zero00.spe) System configuration as shipped from the factory All spectra captured during On-Line and Off-Line Validations Backed-up spectra captured during OnLine and Off-Line Validations zero00 .spe zero01 to zero10 ..spe zeroref .cfg memory .res File Size Management for Results FACTORY PERSONNEL ONLY - used by TruePeak software to manage the .res files memory .spe File Size Management for Spectra FACTORY PERSONNEL ONLY - used by TruePeak software to manage the .spe files Previous Absorption Spectrum and coefficients at time of previous calibrations At the time of current Zero Calibration IM 11Y01B02-01E-A 3rd Edition June 19, 2012-00 <9 Data Files and Format> 9-5 9.1 Configuring Data Capture: Select Data Select Record Result Data Select either User Data result or Factory Data. The default setting during normal operation is “User Data”. The system should only be switched to “Factory Data” when advised by Yokogawa Laser Analysis Division. Note: recording Factory Data is only for specific diagnostic purposes and should not be selected under normal operation. IM 11Y01B02-01E-A 3rd Edition June 19, 2012-00 <9 Data Files and Format> 9-6 To select the Spectrum capture, stay in Advanced Menu user mode and the Data sub section – select Spectrum Capture To store spectrum automatically, select Auto. If you do not wish to store any spectrum file during normal analyzer operation, then select Manual mode. Determine the rate at which you would like the analyzer to capture spectrum files and under what condition. The default condition is related to the number of measurement however, the user can select Relative or Absolute changes pending the site specific conditions/ requirements. The more frequently spectrum are stored then the larger the MMDDYY.spe files will become. NOTE: Capturing every spectrum for one day can create a single day file in excess of 30MB. This will reduce the number of daily results that are stored in the analyzer – Choose the parameters carefully! IM 11Y01B02-01E-A 3rd Edition June 19, 2012-00 <9 Data Files and Format> 9-7 Determine whether or not the analyzer should capture spectrum files under a WARNING condition. Note: this may be useful to do so however, if the Warning alarm conditions are not set correctly then there could be excessive files created for less meaningful Warning alarm conditions. An example is a low transmission warning alarm set at 70% for an application that often runs at less than 70% transmission. Determine whether or not the analyzer should capture spectrum files under a FAULT condition. Note: this may be useful to do so however, if the Fault alarm conditions are not set correctly, then there could be excessive files created for less meaningful Fault alarm conditions. These files are often useful for Factory based diagnostics. IM 11Y01B02-01E-A 3rd Edition June 19, 2012-00 <9 Data Files and Format> 9-8 9.2 Downloading (Transferring/Exporting) the Data: All the files can be easily transferred from the analyzer to the supplied USB memory device. NOTES: Please use the supplied “SanDisk” USB memory device with when getting data from the analyzer. Each analyzer is supplied with one pre-tested USB memory devices – please retain them and use with each appropriate analyzer. If an un-recognized USB memory device is used, then the MS Windows XPe operating system may attempt to install new hardware. This will not affect the normal operation of the analyzer however, if you have a full display interface operational a Windows based pop-up may ask for a system reboot. Do not attempt to plug in any other USB based products (keyboards, WiFi, etc.) in to the USB ports – Windows based hardware conflicts may occur. Figure 19 - USB Data Port Simply insert the memory device and wait for the Data Transfer to complete. Do not remove the device before the transfer is complete. The analyzer will advise via the user interface when Data Transfer is complete. For totally blind units (i.e. no user interface) wait for the indicating LED to stop blinking/ flashing for at least 5 minutes to ensure the transfer is complete. IM 11Y01B02-01E-A 3rd Edition June 19, 2012-00 <REVISION RECORD> i 1 Manual Title: Model TDLS220 Tunable Diode Laser Spectroscopy Analyzer Start-up Manual Manual Number: IM 11Y01B02-01E-A Edition Date Remark (s) 1 April 2008 Newly Published 2nd Feb 2012 Revisions: Formatting was corrected 3 June 2012 Revisions: 1. Format issues were corrected 2. Preface section was modified. 3. Safety Precautions section was added. 4. Quick Start section 1 was modified. 5. General Specifications section updated. 6. Section 7, Routine Maintience updated. 7. Section 8, Troubleshooting updated. 8. Section 8.4 removed 9. Corrected image numbers st rd IMIM 11Y01B02-01E-A 11Y01B02-01E-A3rd3rd Edition Edition June June 19,19, 2012-00 2012-00 2 Yokogawa Corporation of America North America 2 Dart Road, Newnan, GA 30265-1094, USA Phone: 800-258-2552 Fax: 770-254-0928 12530 West Airport Blvd., Sugar Land, TX 77478 Phone: 281-340-3800 Fax: 281-340-3838 Yokogawa has an extensive sales and distribution network. Please refer to the website (www. yokogawa.com/us) to contact your nearest representative. Mexico Melchor Ocampo 193, Torre C, Oficina 3”B” Veronica Anzures D.F., C.P. 11300 Phone: (55) 5260-0019, (55) 5260-0042 Yokogawa Canada, Inc. Bay 4, 11133 40th Street SE, Calgary, AB Canada T2C2Z4 Phone: 403-258-2681 Fax: 403-258-0182 IM 11Y01B02-01E-A Subject to change without notice Copyright ® 03-1206 (A) I Printed in The USA IM 11Y01B02-01E-A 3rd Edition June 19, 2012-00