1
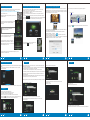
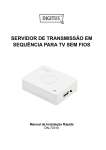
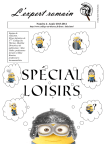
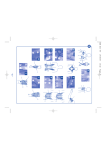
Multumim pentru achizitia facuta. Va rugam sa cititi urmatoarele instructiuni
inainte de utilizarea produsului pentru a evita defectarea dispozitivului.
- Nu utilizati dispozitivul in conditii extreme de caldura, frig, praf sau umiditate
- Evitati contactul cu obiecte dure, pentru a pastra integritatea dispozitivului
- Evitati lovirea sau scaparea dispozitivului pe jos
- Nu udati sau stropiti dispozitivul cu nici un fel de lichide
- Nu stergeti dispozitivul cu alcool sau alte substante de curatat
- Nu incercati sa desfaceti sau sa reparati singuri dispozitivul
- Cand este utilizat, temperatura dispozitivului va creste putin, acest fenomen
este normal.
Manual de utilizare
Distribuitor imagini wireless
Descriere produs
Introducere
PNI AV601 este un receptor portabil de imagini fara fir. Acesta copie imaginea
de pe ecranul telefonului/laptopului dv pe un televizor/monitor cu intrare HDMI.
Poate fi utilizat pentru redarea filmelor, fotografiilor, melodiilor, jocurilor, a
prezentarilor in salile de conferinta sau a numitor materiale informative in salile de
clasa din scoli.
PNI AV601 permite o imperechere usoara cu telefonul sau calculatorul dv si apoi
puteti controla continutul si realiza operatiuni direct din telefon.
Este compatibil cu orice dispozitiv cu ecran LCD si internet wireless.
LED
Senzor IR
pentru telecomanda
Caracteristici
- Redarea instantanee a imaginilor de pe un telefon, tableta, laptop sau calculator
pe un televizor, monitor sau proiector
- Compatibil cu IEEE802.11/b/g/n & DLNA & Miracast
- Poate fi imeperecheat cu telefoane mobile, tablete sau calculatoare
- suport sisteme de operate pe multiple platforme
- suporta redare video si audio Full HD 1080P
- suporta redare de pe o memorie USB
- mod Miracast: ecranul telefonului mobil sau a calculatorului dv va fi copiat pe
un televizor, monitor sau proiector
- mod DLNA: fisierele video, audio si foto pot fi redare wireless de pe telefonul,
tableta sau calculatorul dv pe un televizor, monitor sau proiector
- bucurati-va de continutul telefonului, calculatorului dumneavoastra pe un ecran
mare
- functionare wireless pana la 15m
NOTA: Telefonul/calculatorul dv trebuie sa suporte functiile Miracast sau DLNA
Continutul pachetului
- Receptor wireless
- Telecomanda
- Cablu HDMI
- Adaptor alimentare
- CD cu soft de instalare
- Manual de utilizare
·De pe micul pe marele ecran
·Cel mai bun dispozitiv de sharing compatibil cu Miracast
·Suport DLNA pentru toate smartphone-urile, tabletele si calculatoarele
port USB
iesire HDMI
redare de pe memorie USB
actualizare firmware
media player local
Conectare
TV/monitor/proiector
DC 5V
port LAN
pentru conexiune la internet
DC 5V
intrare alimentare
1. Plasati dispozitivul in apropierea televizorului/monitorului
/proiectorului
2. Conectati cablul HDMI intre dispozitiv si monitor
3. Conectati dispozitivul la internet prin intermediul unui cablu ethernet, daca
doriti redarea fisierelor prin internet
4. Conectati adaptor de alimentare
5. Selectati intrarea HDMI corecta din televizor/monitor/proiector
Odata urmati acesti pasi, dispozitivul este gata de utilizare, trebuie doar sa porniti
toate dispozitivele.
·Transmisii 1080p HD fara pierderi
RO
01
RO
Pornire dispozitiv
Telecomanda
ATENTIE: Nu expuneti bateriile sau telecomanda cu tot cu baterii la temperaturi
ridicate.
Dupa pornirea tuturor dispozitivelor, asteptati cateva secunde pentru ca TV-ul dv
sa detecteze dispozitivul PNI AV601. Daca nu-l detecteaza va trebuie sa schimbati
sursa de semnal din TV. Consultati manualul de utilizare al televizorului.
RO
03
Modul Miracast / AllSharecast
MIRROR
Odata detectat dispozitivul, pe ecran va aparea imaginea de pornire a acestuia, apoi
pagina principala. Puteti incepe utilizarea.
Pornire/oprire dispozitiv
MODE
02
Accesare meniu setari
Inapoi
OK
OK
Modul DLNA / MirrorOP
In acest mod de utilizare, imaginile de pe telefonul, tableta sau
calculatorului vor fi redate in timp real pe televizor sau
proiector.
Astfel puteti utiliza televiroul sau proiectorul pentru aplicatii
dedicate telefoanelor sau tabletelor.
In mod implicit, din fabrica, dispozitivul este setat in modul de utilizare DLNA, iar
pentru activarea modului Miracast trebuie doar sa apasati butonul “MODE” de pe
telecomanda. Pe ecran va fi afisat mesajul “Press again to switch to Wifi Display”.
Apasati din nou butonul “MODE” si veti intra in modul de utilizare Mirecast.
Schimbare mod functionare
(DLNA / Miracast)
RO
DLNA
In mod implicit, din fabrica, dispozitivul este setat in modul de utilizare DLNA, dar
daca l-ai utilizat in modul Miracast, pentru a reveni la modul DLNA apasati butonul
“MODE” de pe telecomanda. Pe ecran va fi afisat mesajul “Press again to switch
to DLNA”. Apasati din nou butonul “MODE” si veti intra in modul de utilizare
DLNA.
Confirmare selectie
Navigare prin meniu
Volum + / Mute
OPTION
Functii media player
MODE
Derulare inainte/inapoi
ZOOM
Anterior / Urmator
Dispozitivul are 2 moduri de functionare:
Redare / Stop
OPTION
DEL
ZOOM
Accesare meniu
Mod1
Zoom video
(Implicit)
Informatii
Mod2
DLNA: Pentru toate smartphone-urile si Pc-urile
MirroOp: pentru dispozitivele cu soft MirroOp
Media Player: Redare de pe o memorie USB
Miracast: Pentru smartphone-urile si dispozitivele cu android
Allsharecast: Pentru smartphone-urile si tabletele Samsung.
Puteti schimba usor modul de functionare:
- din telecomanda: apasati butonul “Mode”
- din soft: consultati paginile ce urmeaza
04
RO
05
RO
1. Asigurati-va ca telefonul/tableta dv are optiunea de internet Wifi
2. Activati functia de redare imagine din telefonul/tableta dv si efectuati conexiunea
intre acestea si dispozitivul PNI AV601
3. Daca sunt conectata corect, pe ecranul TV-ul dv va aparea imaginea exacta de pe
telefon/tableta
06
RO
In modul DLNA pteti reda pe televizor/proiector imagini si filme
HD redare prin internet de pe telefonul/tableta/calculatorul dv.
Dispozitivul suporta redarea in timp real a continului online
la rezolutie 1080P de pe telefonul/tableta dv pe televizor sau
proiector.
07
RO
Redare fisiere de pe tableta/smartphone
1. Va ruga instalati aplicatia gratuita AirFun inainte de utilizarea dispozitivului
Aplicatia o aveti pe CD sau o puteti descarca de la adresa:
https://play.google.com/store/apps/details?id=com.realtek.airfun.client
sau prin scanarea codului:
Dupa finalizarea instalarii veti gasi iconita programului intre
aplicatiile instalate.
Redare fisiere dintr-un calculator cu sistem de operare Windows
1. Va rugam instalati soft-ul Airfun pentru windows de pe CD-ul din colet. Dupa
finalizarea instalarii, pe ecran va aparea iconita.
2. Porniti internetul WiFi pe calculator si efectuati conexiunea intre acesta si
dispozitivul PNI AV601 : “WIHD xxx”
3. Pentru a porni aplicatia selectati iconita Airfun. Pe ecran va aparea fereastra de
mai jos.
4. In aceasta fereastra puteti adauga fisiere pentru redare prin selectarea si tragerea
lor in iconita
sau
. Prin selectarea uneia din cele 2 iconite si selectand optiunea
“Play now”, fisierele selectate vor fi redate direct pe televizor sau proiector.
Copiere ecran calculator cu Windows XP/Vista/7/8
MirrorOp este cea mai rapida aplicatie de copiere a ecranului unui calculator cu
Windows XP/Vista/7/8. Cu aceasta aplicatie instalata pe calculatoarele din reteaua
de internet privata, puteti controla calculatorul, reda fisiere si naviga pe internet pe
ecranul unui televizor sau printr-un proiector.
5. Pe ecran va aparea o fereastra cu meniul principal al programului.
Copiere ecran
2. Proniti internetul WiFi pe telefonul/tableta dv si realizati
conexiunea intre aceasta si dispozitivul PNI AV601
“WIHD xxx”
Redare fisiere
6. Apasati iconita
pe televizor.
! Nota: Orice schimbare in setari va cauza restartarea
dispozitivului. Dupa pornire realizati din nou
conexiunea si apoi continuati.
pentru a porni/opri vizualizarea ecranului calculatorului
1. Instalati aplicatia MirrorOP de pe CD-ul din pachet. Dupa finalizarea instalarii pe
ecran va aparea iconita programului.
2. Porniti internetul WiFi pe calculator si efectuati conexiunea intre acesta si
dispozitivul PNI AV601 : “WIHD xxx”
3. Pentru a porni aplicatia selectati iconita
. Programul va incepe cautarea
automata a dispozitivelor PNI AV601 din retea.
4. Programul va completa automat adresa IP si numele utilizatorului din dispozitivul
dv AV601 apoi trebuie doar sa selectati optiunea “Connect”
3. Pentru a porni aplicatia AirFun, apasati pe iconita.
Pe ecran va aparea fereastra alaturata.
4. Selectati fisierele pe care doriti sa le redati din
telefon/tableta apoi apasati butonul “Menu”de
unde selectati optiunea“Play now” pentru a reda
fisierele direct pe marele ecran.
Pornire/oprire
Nota: Aplicatia AirFun are o telecomanda virtuala
Apasati pe iconita
pentru setari.
Nota: Puteti descarca si alte aplicatii DLNA din Google Play, cum ar fi:
iMedishae, online Video APP…
08
RO
Redare fisiere de pe o memore USB
Puteti reda fisiere video/audio/foto de pe o memorie USB conectata la dispozitivul
AV601
1. Conectati memoria USB in portul USB al dispozitivului. Pe ecran va aparea
urmatoarea interfata:
09
RO
10
RO
RO
Setari sistem
Setari Retea
Puteti configura setarile pentru conexiune, cum ar fi numele retelei (SSID) si parola.
Exista 3 tipuri de conexiuni:
- Virtual AP (implicit din fabrica): pentru a reda fisiere multimedia de pe telefonul sau
tableta dv pe televizor sau proiector fara o retea privata
- Conexiune wireless: conectati dispozitivul la router prin internet wireless
- Conexiune prin ethernet: conectati dispozitivul la router printr-un cablu de internet
11
4. Setari mod Virtual AP: setarea parolei
Conexiunea prin internet (wireless sau cablata): puteti reda fisiere multimedia sau
naviga pe internet.
Prin intermediul aplicatiei iMediaShare puteti chiar impartasi continutul video de pe
Facebook, Picasa sau Youtube cu prietenii si familia dv.
Mai jos gasiti setarile pentru modul Virtual AP, Bridge wireless si Bridge prin ethernet.
1. Conexiune cablata: mod DHCP
5. Conexiune Virtual AP: setarea conexiunii dispozitivului la router
Conexiune wireless
Conexiune prin cablu
2. Selectati iconita memoriei USB si apoi redati fisierele dorite, stocate pe aceasta.
Setare limba meniu:
Selectati limba dorita pentru meniu.
Setari avansate
Exista 2 moduri de setare a dispozitivului:
- setare rapida din telecomanda (inclusa in pachet)
- din browser-ul de internet sau aplicatia Airfun
Pentru a economisi timp, va recomandam setarea din telecomanda.
Apasati butonul
de pe telecomanda. Pe ecran va aparea interfata de mai jos.
Setarile principale sunt pentru Retea, Audio, Video si Setari sistem.
2. Nume dispozitiv: reprezinta numele retelei dv private de internet
3. Conexiune Wifi: Selectati optiunea Wireless SSID pentru a continua, apoi
introduceti parola.
Factory default: revenire la setarile din fabrica
Toate setarile efectuate de dv vor fi sterse si aduse la valorile implicite din fabrica.
12
RO
13
RO
14
RO
15
RO
Introduction
Thank you for purchasing this Wireless Display Share. Please read the following instructions
carefully for your safety and prevention of property damage.
• Do not use the product in the extreme hot, cold, dusty or humid environments.
• Prevent friction with hard objects, or it may lead to surface abrasion, components fall¬off or
hardware damage.
• Avoid the product falling down from a high place, or it may damage the hardware.
• The product is not water proofed so please do not get any liquid into the unit.
• Do not wipe the surface of the product with alcohol, benzene or thinners.
• Do not dismantle, assemble or alter the product arbitrarily.
•When the product is operating, the surface temperature will increase slightly. This is normal.
User Manual
Product Overview
IR Sensor
for Remote Control
Features
• Instantly share movies and photos, smart phones, tablets, Laptops, Desktop computer screen
played on TV, monitor or projector.
• Compatible with IEEE802.11 b/g/n & DLNA & Miracast
• Supports smart phones, PAD and PC
• Supports multi-platform OS operating system
• Supports Full HD 1080P video and audio
• Supports USB Storage for local media play
• Miracast Mode: the screens of Smartphone, tablets, and laptops can be mirrored to TVs and
projectors in real time.
• DLNA Mode: the HD videos, images, or audios can be wirelessly streamed from your
smartphone/tablet/laptop to TVs or projectors for a high quality display.
• Enjoy All Your Phone / Pad / Laptop Content on a Big Screen with Big Sound
• Share content to a display up to 50 feet away. No line of sight is required
Note: the smartphone / pad / laptops needs to support Miracast or DLNA.
Package Contents
• Wireless Display Share
• Remote Control
• HDMI Cable
·From small to big screen
LED
The WD-Share is a compact and portable Wi-Fi Display (Miracast / DLNA) receiver. It mirrors
your phone / laptops screen on an HDTV.
It can be used for entertainment
like movies, pictures, music, and games. You can even use it for presentations in conference
rooms or for in an education setting for classroom lectures or assignments. The WD-Share
allows for quick and easy pairing with your pc or phone and you can control content and
perform actions from your phone. It's compatible with any Wi-Fi display capable device.
• DC 5V Adapter
• Installation CD
• Quick Install Guide
USB Port
HDMI OUT
USB Storage, support
firmware update, local
media player
DC 5V
LAN Port
Connect your HDMI display
DC 5V IN
For Internet Share
1. Place the WD-Share unit near you HDMI display/projector, Connect HDMI display/projector
and WD-Share to the HDMI Output port by HDMI cable
2. Connect the WD-Share to the router or Ethernet switch/hub by RJ45 cable
(if you need internet share).
3. Connect the power adapter (included) to the DC IN ports.
4. Select correct HDMI input from the TV, Monitor or projector.
Once these steps have been completed the WD-Share is ready to use, simply power on all
devices to begin operation.
·Best multi-media sharing device Compatible with Miracast
·Perfect support for DLNA with all smartphones, tablets, PC
·Supports lossless transmission of 1080p HD media
EN
Remote Control
01
EN
Power on Device
CATUION: Do not expose the batteries or the remote control with batteries to over-heat place (direct
sunlight, fire, etc.).
When power on all devices , Wait a few seconds for your TV to detect the WD-Share. If it is not
detected, you may need to change the input source on your TV to HDMI. Check the user
documentation of your TV for more information.
Once the WD-Share is detected, the splash screen displays to indicate system bootup, Then the
following main page will be displayed on your screen. It is ready for use.
02
EN
03
Miracast / AllSharecast mode
EN
DLNA / MirrorOP mode
In this mode, the screens of smartphones, tablets, and laptops can
With the DLNA mode, the HD videos, images, or audios can be
be mirrored to TVs and projectors in real time. Smartphone Apps.
MIRROR
wirelessly streamed from your smartphone/tablet/laptop to TVs or
Displayed on TVs. Screencast over a half million smartphone
DLNA
applications onto your TV via Miracast, and have fun with your
supports 1080p wireless display of online video content from
family.
smartphone/tablet on the TV, beating all top-sets instantly.
The Remote control support Device operation setting and Media player control
Power ON / Standby
MODE
Mode Switch
(DLNA / Miracast)
Open the Setup Menu
The factory default setting is DLNA mode, press the Remote control “MODE” button, one time the
The factory default setting is DLNA mode, (if already switch to Miracast mode, Please press the Remote
screen will show “Press again to switch to WiFi Display
control “MODE” button, one time the screen will show “Press again to switch to DLNA ”. Please
”. Please follow the instruction to press the
“MODE”button to access Miracast mode.
follow the instruction to press the “MODE” button to access DLNA mode.),
The following interface will be displayed on your screen. It is ready for use
The following interface will be displayed on your screen. It is ready for use.
Back to previous screen
OK
OK
Confirm selection
Moves the highlight to
select a displayed item.
Volume + / Mute
OPTION
Media Player Functions
MODE
Fast / Slow / Freeze frame
ZOOM
( Previous / Next)
Skips to the Previous/Next
chapter, track, or file.
The WD-Share has two Mode
Play / Stop
OPTION
DEL
ZOOM
Player Menu
Mode1
Video zoom in / out
(Default)
Media Information
Mode2
DLNA: For all smartphones and PC devices
MirroOp: For devices with MirroOp software
Media Player: Play from USB Storage
Miracast: For Android smartphones and tablets
Allsharecast: For Samsung smartphones & tablets
You can easy change the function mode:
Remote Control: Over the Mode button to switch DLNA or Miracast mode
Soft Remote Control: Please refer the software section
1. Please Make sure your device(smartphone,tablet) with WiFi Display function.
2. Turn on the WiFi Display function on your device (smartphone, tablet).
Make connection to “WiHD xxxxxxx ”. (please refer your smart device’
s manual)
3. If connected, your device will mirror to big screen.
04
EN
projectors for a high quality display.
Online play HD video, While connected to the TV via Wi-Fi, the adapter
05
EN
06
EN
07
EN
Media Play from smar tphone, tablets
1. Please install the free AirFun APP first before use the WD-Share
To get above APP from CD or download from website:
https://play.google.com/store/apps/details?id=com.realtek.airfun.client
or Scanning QR code:
After the installation completes, a shortcut will be
created on your smartphone/tablet.
Media Play from Windows OS
1. Please install the free AirFun Software first before use the WD-ShareTo get above Software
from CD.
Mirror Desktop from Windows XP/Vista/7/8
MirrorOp is the fastest multimedia remote desktop sender for Windows! With MirrorOp for
5. The Main Page will pop up.
Windows installed on your Windows computers in the home network, you can remotely
After the installation completes, a shortcut will be created on your computer.
operate the PCs from a WD-Share to watch videos, play games, surf the internet, or anything
2. Please turn on the WiFi on your computer and make connection to WD-Share SSID
you like as if you were in front of your PC!
Mirror Desktop
“WIHD xxx ” before Play.
3. To start the AirFun, simply click on the shortcut. It will connect the WD-Share automatically.
The window will pop up.
4.You can drag PC’s photo, music or video to the ocation of the AirFun playback folder
or
2. Please turn on the WiFi on your device (smartphone, tablet)
. By accessing folder and choosing “Play now”, the selected files will be streamed
and played directly on TV, monitor or projector.
Media Play
and make connection to WD-Share SSID “WIHD xxx ”
Mirror On/Off
before Play.
Mirroring
! Note: Any change of Setup will cause the disconnection of
WiFi and restart. Please re-connect the WiFi and proceed with
6. Click
to your TV
icon to star/stop your PC’s screen showed on big screen.
1. Please install the free MirrorOP Software first before use the WD-ShareTo get above
setup and playback.
Software from CD.
After the installation completes, a shortcut will be created on your computer.
2. Please turn on the WiFi on your computer and make connection to WD-Share SSID
3. To start the AirFun, simply click on the shortcut.
“WIHD xxx ” before Play.
The window will pop up
3.To start the MirrorOP, simply click on the shortcut
. it will start to search the available
WD-Share in the network.
4. Then software auto fill the IP address, Login Name with your WD-Share, and press
“Connect”.
4. Select the photo, music or video which you want to
play from your device, then tap “Menu” for options of
“Play Now”, the selected multimedia content will be
Note: AirFun support virtual remote
controller, press
icon for Settings.
streamed and played directly on big screen.
Note: You may download others DLNA Player from Google Play by search “DLNA”,
Example: iMedishae, online Video APP…
08
EN
09
Media Play from USB Storage
EN
EN
11
Network Setup
You can play video/music/photo files on the connected USB Storage.
You could configure the settings for communication, such as Network Name (SSID) and key.
1. Connect the USB Storage to the USB port on the WD-Share. The following interface will be
There are 3 modes of connection:
displayed on your screen.
10
EN
System Setup
4. Virtual AP Setup:
setting the wireless key.
• Virtual AP only Mode(F actory Default setting: To share multimedia content from your smart
phone , tablet and computer to the TV monitor or projector without home network
• Bridge to Wireless Mode: Connect the media player to Router with WIFI.
• Bridge to Ethernet Mode: Connect the media player to Router with RJ-45 Cable.
Bridge mode: When you stream the multimedia content of Bridge to wireless Mode or Bridge to
Ethernet Mode, you can also receive other information from internet, With free APP of
iMediaShare, you can even share web video from Facebook, Picasa or YouTube with your friends
and family on a larger display.
Below are settings for Virtual AP only Mode, Bridge to wireless Mode and Bridge to Ethernet.
1. Wired Connection : DHCP mode
5. Virtual AP Bridge: Setting the mode of Connect the WD-Share to Router
Bridge to Wireless: Connect the WD-Share to Router with WIFI
Bridge to Ethernet: Connect the WD-Share to Router with RJ45 Cable
Language:
Choose the right language you want.
2. Navigate to the Home screen, and select the USB Storage icon for media content you wish
to access. It can be Video, Music, or Photo.
Advanced Setting
Two ways for setup the WD-Share:
• Remote control (Include) , this is a quick setup
• Web Browser or AirFun Software
For saving time, we recommend to setup by remote control.
Press button
on the remote control. The interface will be displayed on your screen.
Main functions have Network, Audio, Video, and System Setting.
2. Device Name: Main Service Set Identifier. It’s the "name" of your wireless network.
3. WiFi Connection: Select Wireless SSID to continue, insert the Network Key.
(Virtual AP Bridge must be Bridge to Wireless mode)
Factory Default:
Remove all settings and restore to factory default settings
12
EN
13
EN
14
EN
15
EN