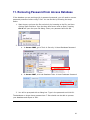
1
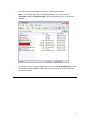
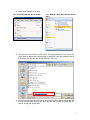
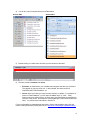
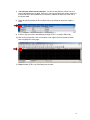
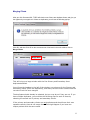
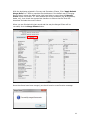
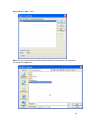
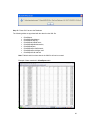
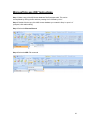
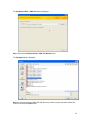
Tool for RSR Export (T-REX) User’s Guide For the Ryan White Services Client-Level Data Report Version 3.3 Table of Contents 1. About the Tool for RSR Export (T-REX) ................................................................................. 1 2. System Requirements .............................................................................................................. 2 3. Installing T-REX ........................................................................................................................ 2 4. Loading the MS Access Database .......................................................................................... 6 5. Validating Data ........................................................................................................................ 11 6. Tips on Saving Data Files ...................................................................................................... 14 7. Converting Access Data to XML ........................................................................................... 14 8. Customizing T-REX ...................................................................... Error! Bookmark not defined. 9. Creating the eUCI ................................................................................................................... 20 10. When Your Variables Do Not Match the RSR Elements ................................................. 20 11. Database Configuration ....................................................................................................... 20 12. Getting Additional Support................................................................................................... 22 Appendix A: Client-Level Data (CLD) XML File MSFT Access 2003 Import Instructions……19 Appendix B: Client-Level Data (CLD) XML File MSFT Access 2007 Import Instructions…...30 Release History Version Date Description 1.1 August 2009 T-REX 1.11 August 2009 Client Services error fixed. Drop down lists added to RsrClients Access database. 1.14 August 2009 Client URN column added to the ClientReport Table. 2.0 December 2009 Support for SQL Server added. 3.0 September 2010 3.1 March 2011 3.2 April 2011 3.3 January 2012 Additional directions re: extracting zip files and data validation queries added. Appendix A: XML/Access import. Directions: Added, moved, and simplified information, with emphasis on the extraction and XML creation processes. Added section on removing Access passwords. Updated section 2A Import XML directions to use RsrClientImport.mdb instead of starting with a blank database. Added section on merging duplicate records, and updated instructions to include reporting year validation. 1. About the Tool for RSR Export (T-REX) The Ryan White Services Reporting System (RSR) requires that grantees and providers submit de-identified client-level demographic, service, and clinical data. Rather than filling out a clientlevel report for the RSR, the client-level data are provided as an electronic file, with a record for each client. You must upload these data to the HAB server in a specific XML (eXtensible Markup Language) format. XML is a simple and widely adopted method of formatting data so that it can be exchanged across different computer platforms, languages, and applications. T-REX: Definition “T-REX” is a Tool for RSR Export created to assist grantees currently not using CAREWare, a Provider Data Import (PDI), or other RSR-compliant vendors in the conversion of their ClientLevel Data into an XML Format. Purposes The primary purposes of the Tool for RSR Export (T-REX) are to: 1. Convert your Client-Level Data into XML format that meets the requirements for the RSR. 2. Serve as a template for you to develop your own data extraction and/or XML conversion tools. 3. Take your RSR XML file import and translate it for viewing in the Access Tables About the User Manual This user manual is specifically for grantees seeking to convert their Client-Level Data into XML format for submittal to HAB, and assumes that the grantee staff person(s) using T-REX are familiar with or have facility with the following software, including accessing and modifying files: Microsoft Access or Microsoft SQL Server Microsoft Excel This user manual is not written for programmers and assumes that programmers using T-REX are equipped and prepared to modify the files to fit their needs, without the aid of a user manual. As an option, this user manual also provides instructions for users who use SQL Server. Other Resources/ Documents The following documents are available for Grantee reference and use during the RSR reporting process, from data collection to data reporting. RSR Client-Level Data Elements: This document should be used in conjunction with the RSR Client-Level Data Elements document, which describes the rationale for collecting the client-level data elements. The RSR Client-Level Data Elements document is available at http://careacttarget.org/library/rsr/datafields.pdf RSR Instructions: The RSR Instructions document contains detailed information needed for completing the RSR reports. This document may be cross-referenced with the section, Client-Level Data Fields, in the RSR Instructions document. The RSR 1 Instructions document is available at http://careacttarget.org/library/RSR_Instruction_Manual.pdf The Instruction Manual Supplement is available at: http://careacttarget.org/library/RSRSupplement_color_11-11-09_%28508%20compliant%29.pdf RSR CLD Dictionary and XML Schema Implementation Guide RSR Client-Level Data Dictionary, Version 2.0 http://careacttarget.org/library/RSR_Client_Level_Data_Dictionary.pdf. 2. System Requirements To run T-REX, you will need the following programs: Windows XP or higher An archiving tool such as WinZip or 7-zip to extract the .zip files (free): o Note: If you have Windows 7 or Window Vista, you don’t need this. o WinZip: http://download.winzip.com/winzip150.exe o 7-Zip: http://downloads.sourceforge.net/sevenzip/7z920.exe Microsoft .Net 2.0 Framework. Available free at http://www.microsoft.com/downloads/details.aspx?FamilyID=0856EACB-4362-4B0D8EDD-AAB15C5E04F5&displaylang=en The following is applicable to programmers only: To modify or debug T-REX, you will need Microsoft Visual Studio 2008 or Microsoft Visual Basic 2008 Express Edition. Microsoft Visual Studio 2008 Express Edition can be downloaded for free from http://www.microsoft.com/exPress/download/. The file you need to open with Microsoft Visual Studio is called “RsrXmlGenerator.sln”. 3. Installing T-REX Note As you update your Client-Level Data frequently, you will need to follow the steps below each time you wish to upload a new set of Client-Level Data for reporting. The steps describe how to import data into the provided Access files for XML conversion. Each time prior to importing data into the Access file, you must rename and save the file on your computer or server. Detailed instructions are provided below. The Access files are not saved to HAB’s servers. As such, HAB cannot retrieve these files for you if you lose them. You will receive the T-REX files as a zip file from either a technical assistance representative via email or via an FTP site (a File Transfer Protocol site, where you log in and download the zip file) depending on what your system allows. A zip file is a compressed file that contains multiple files within it. 2 When you receive/download the RrsFiles.zip, double click on the file to open it and then locate and open the T-RexFiles.zip file. For Windows 7 or Vista Users: If you have Winzip (you would see the screen below), continue with the directions normally. If the .zip file appears to open in a normal folder window, it is actually still a compressed file. Copy (drag & drop) all of these files to C:\TRexFiles and skip to Step 4. Extract the zip files into the location of your choice. Ensure that no files are selected, or Winzip will try to export only those files. Note: The archive will automatically extract to a ‘T-RexFiles’ folder. We recommend that you extract to the C:\ Drive. 3 When the Extract window appears, ensure that the following options are checked and that you have entered the correct path into ‘Extract to’. Then, click Extract. If you are asked for a password, the password is 12345678. This password is not for security purposes, but to prevent email spam filters from altering the zip file. Once extraction is completed, you should see the folder window appear with your C:\ Drive. Double-click the T-RexFiles folder to open it. You can create a shortcut to this folder by right clicking and selecting Send to->Desktop (shortcut) for later easy access. Note: If all you see is a T-RexFiles folder, double-click that and continue the instructions as normal. 4 The folder contents should appear as they do in the screenshot below. Note: Your computer may not be set to show extensions, so you may see only ‘RsrClients’ instead of ‘RsrClients.mdb’. This is not a problem and you can continue normally. The file that we will be copying the data from Excel into is the RsrClients.mdb file, which is a Microsoft Access database. Double-click it to open Access, and continue with the instructions in Step 4. 5 4. Loading the MS Access Database There are multiple ways to import data. For those who are not familiar with Access programming, the following instructions present a basic approach for grantees working with Client-Level Data from any spreadsheet. We are providing instructions for both Access 2003 and Access 2007. To complete the following steps, you will need your source datasheet which should be in Excel. This approach involves exporting the RSR-required data elements from your system into an Excel spreadsheet and then copying and pasting the data from the Excel spreadsheet into the T-REX Access tables. The sheet names in Excel should match up with the Access Table names that you will see in the instructions below. Those who are familiar with Access programming may choose to create scripts to extract data from their current database into the correct categories in an access database. Creating Access scripts is not covered in this manual. You must refer to the data dictionary as you go along to ensure you are loading the correct information. The data dictionary is located here: http://careacttarget.org/library/RSR_Client_Level_Data_Dictionary.pdf. To load the database, double-click file name RsrClients.mdb in the T-RexFiles folder. This will open Microsoft Access. Then, follow the steps on the next page. Note: If your database is password protected, remove the password by following the steps in Section 11 before continuing. 6 1) Back up the database by clicking: File > Back Up Database (Access 2003) File > Manage > Back Up Database (Access 2007) 2) Save the copy to the location of your choice. We suggest keeping all your copies in a single location. Note that the automatically produced file name will contain the date of the backup. This will help you identify datasets in the future. 3) Once the backup copy has been saved, go back to the folder window and double-click the new file with today’s date to open that copy. This way, you will be working with the backup, leaving the original intact. 7 4) You will see a list of compiled Client-Level Data tables: Access 2003 Access 2007 5) Double-clicking on a table name will show you the contents of the table: 6) The table contains elements and values. Elements, as shown above, are variables that categorize the data you will submit. They appear in gray in the first row. In this example, the elements are ID, ReportPeriodID, ClientFirstName, etc. Values refers to the data you input into each element or variable. For example, for element “ClientFirstName”, you can input the value “John” or “Jane”. Each element can have multiple values. In some cases, the Data Dictionary specifies the structure of the values. An example is noted regarding the client services delivered table. You will find more information in Section 10. For more information on data elements and values, visit the data academy and review the module “Getting Data from Existing Sources” at: http://www.careacttarget.org/dataacademy/ 8 7) You will input values into the elements. You will cut and paste the values from your source spreadsheet into the table. Before you can copy and paste the values, make sure that the first row of the spreadsheet, the elements, matches the order of the first row of the Access table. 8) Select all sells by pressing CTRL+A (Select All) or by clicking the upper-left square in Excel. 9) In Excel, copy your source spreadsheet pressing CTRL+C or going to Edit>Copy. 10) Now on the Access table, click on the square in the upper-left corner below the menu bars to highlight the entire page: 11) Paste the data (CTRL+V or Edit>Paste) into the table. 9 12) Data is automatically saved in the Access database when it is entered (Click Yes to continue with the paste operations pop-ups if any). 13) Repeat this process for each of the 9 ClientReport tables. These are the table names: Note: For the ClientReportServicesDelivered table, indicate whether a service was delivered with the following values in the column or element called DeliveredID: 1 = Service Not Delivered 2 = Service Delivered 3 = Unknown If you enter only delivered services into ClientReportServicesDelivered, you must still enter in a value of "2" (e.g. Service Delivered) in the DeliveredID column or element. If you do not do so, the service will not be recognized as delivered. Once you have completed the cut and paste process for your Client-Level Data, you will then begin converting the data into XML format for submittal to HAB. 10 5. Validating Data The following three queries were created within Access to search for inconsistent and missing data: Check First Service Dates Check First Service Dates Against Services Missing Values Access 2003 Access 2007 Double-clicking on the query name will show you the contents of each query. 11 CheckFirstServiceDates: The purpose of this query is to ensure that the ambulatory service was provided AFTER the client’s first service date. The query compares the “ServiceDate” value in the ClientReportAmbulatoryService table to the “FirstServiceDate” value in the ClientReport table. Review and edit the values in these two tables as required and re-run query to ensure accuracy of the data. CheckFirstServiceDatesAgainstServices: The purpose of this query is to ensure that services were provided AFTER the client’s first service date. Please note the corresponding dates for “QuarterID” values: 1 = 3/31/09, 2 = 6/30/09, 3 = 9/30/09, 4 = 12/31/09. The query compares the “QuarterID” values in the ClientReportSevicesVisit table AND the ClientReportServiceDelivered table to the “FirstServiceDate” value in the ClientReport table. Review and edit the values in these three tables as required and re-run query to ensure accuracy of the data. 12 MissingValues: If a client received service 8, ALL data elements must be reported for this client. The purpose of this query is to ensure that all required data is captured in the ClientReport table. The query cycles through all of the tables and reports missing information. Unless you receive one of the following messages, all of the “Issues” can be addressed directly in the ClientReport table: o “Missing Race”: Refer to the ClientReportRace and ClientReport tables o “Missing HIV Risk Factor”: Refer to ClientReportHivRiskFactor and ClientReport tables o “Missing Services”: Refer to the ClientReportServiceVisits, ClientReportServiceDelivered, and ClientReport tables o “Missing Ambulatory Services”: Refer to the ClientReportAmbulatoryService and ClientReport tables o “Missing CD4 Test Results”: Refer to the ClientReportCD4Test and ClientReport tables o “Missing Viral Load Results”: Refer to the ClientReportViralLoadTest and ClientReport tables Review and edit the values in the appropriate table(s) as required and re-run query to ensure accuracy of the data. Please refer to the data dictionary if you have any questions about the reporting requirements. http://careacttarget.org/library/RSR_Client_Level_Data_Dictionary.pdf. If you want to see what your XML file data will look like when it is uploaded, you can view it in the T-REX Access Tables. Go to Section 2 for instructions on how to import your RSR XML file into T-Rex. 13 6. Tips on Saving Data Files Use RSRClients.mdb as a template. Do not work directly in the file called RSRClients.mdb. You want to make a copy of it and use that for the steps. Each time you seek to convert a new cycle of data to XML format, create a copy of RSRClients.mdb with the identifying date (e.g. RSRClients_Date.mdb). This way, you can keep track of the datasets you are converting and reference them when necessary. We do this by right-clicking the file name, clicking “Copy”, and then right-clicking in the whitespace (eg. Not on the file name, but in the same folder window) and selecting “Paste”. This will create a copy. Click on the newly copied file (it will be called “Copy of RSRClients.mdb”). Rename this to “RSRClients_DATE.mdb”, with the date in for format of YYYY_MM_DD (eg. 2001_02_23 for 02/23/2011). This is because file names cannot have slashes. Create a database file for each provider. Make a copy of RSRClients.mdb for each provider. Use an easy naming convention such as “ProviderName_Date.mdb” to keep track of the data you are uploading. 7. Converting Access Data to XML The XML Convertor is located in \RsrXmlGenerator\RsrXmlGenerator\bin\Debug. The file name you are seeking in this folder is called RsrXmlGenerator.exe. Go to \RsrXmlGenerator\RsrXmlGenerator\bin\Debug Double-click the file called RsrXmlGenerator.exe. You should see the following screen: Note: For first time use, you should click on the ‘Database Setup’ Menu Option. 14 Setting up for the first time 1. Click the Database Setup menu item. Then select MS Access from the drop down list, regardless of which version of Access you used. 2. Click “Browse…” and browse to the backup file that you created and pasted the information into from Step 4. It is quickest to do this by clicking “My Computer” > (C:) > TRexFiles. Once you select the file, click open. 3. Once the file is selected, click Close to return to the main T-REX screen where you will create the XML file. 4. When you are back at the below screen, you can type in any path to export the XML file to (such as the one below). You can also click Browse to find an already existing XML file to be overwritten, such as the one in the path below. (Note: it will overwrite without prompting) 15 Ensure that the reporting year is entered correctly as well. This is used in validation to ensure that only services delivered during the reporting period are included in the XML output. Once the XLM File Name path is entered, click the “Generate XML button”. You should then see a confirmation message: Note: If you receive the following error, you did not specify your database file correctly in the Database Setup: If this happens, go back to Database Setup and be sure to choose the .mdb file that you pasted all of the information from Excel into. If you receive a different error, be sure that you ran the 3 queries to ensure that all of your data was entered properly and valid, fix any errors and try this step again. If you received a notice indicating that there duplicate clients were detected, see the next section on Merging Clients. 16 Merging Clients After you click Generate XML, T-REX will check to see if there are duplicate clients, and give you the opportunity to merge them. If there are duplicates, you will see the following pop-up. Click OK, and then Click OK on the success screen. Now back in the main window, click on Merge Clients. This will bring up a large window with the first Primary and Secondary client duplicate detected. You will see the headers to the left of the window, two columns for the Primary and Secondary clients (which are duplicates), and finally the last column shows what the record will look like once merged. The duplicates should already be selected, but you may do so if they are not. If you have multiple duplicates, you would do the following step for each of those by selecting the second set of primary and secondary clients. If the primary and secondary clients are not duplicates and should have their own separate records, then do not merge them. This might happen if you have two unique patients with the same name. 17 With the duplicates selected in Primary and Secondary Clients, Click “Apply Default Merge Rules” to T-REX to populate the checkboxes in the default way of merging. Once clicked, review the data on the right-hand side to ensure that the Merged Client record is accurate. If T-REX selected the wrong checkbox (eg. Wrong status, dates, etc), then check the appropriate checkbox to ensure that the final XML document includes the correct record. When you are finished with that record and the way the Merged Client will be recorded, click the Merge Clients button. Once the clients have been merged, you should receive a confirmation message. 18 Click OK to the confirmation message, and then click Close in the Merge Clients window. Before moving forward, click Merge Clients in the menu again to ensure that there is not another set of duplicates. You should see the following message: Until you see this message, continue to merge clients until all duplicates are merged (unless two records are meant to be separate as they are different individuals). When there are no more duplicates, click Generate XML in the main window to update the XML file with the merged clients. You should again receive the confirmation message with a slightly smaller amount of records. The XML generation is now complete. 19 8. Creating the eUCI T-REX will use the value in the ClientUci column if it is provided in the ClientReport table. If the ClientUci is not provided for a client and the ClientUrn is provided, then T-REX will use this value to generate the eUCI. If neither the ClientUci or ClientUrn is provided then T-REX will use the client’s first name; last name; date of birth and gender code to create the UCI and subsequent eUCI. If the eUCI is to be generated from the component parts and to ensure data quality and limited errors, make sure none of the following eUCI components begin or end with blanks or special characters: First name Last name Data of birth Gender code The eUCI is generated using the file named UCI_Generator.dll. This file is linked into the program. The input values are read from the ClientReport database and the ClientUci is added to the XML file. For more information on the eUCi, see “Guidelines for Creating the eUCI” http://www.careacttarget.org/library/Guidelines_for_Creating_the_eUCI.pdf 9. When Your Variables Do Not Match the RSR Elements Consult the RSR Data Dictionary for details on the proper formatting of data and transactions. http://careacttarget.org/library/RSR_Client_Level_Data_Dictionary.pdf For frequently asked questions regarding RSR elements and data submittal, see http://careacttarget.org/rsr.asp If you need more information about data variables, you will find it in the Data Academy module “Getting Data from Existing Sources” at http://www.careacttarget.org/dataacademy/ 10. Database Configuration for connecting to a remote SQL Server These steps are only intended for those who choose to connect to a remote server rather than using their own Access database files. Before you can generate the RSR Client-Level Data XML file, you must configure your database for first time use through the Database Setup page. Once this step has been completed, you do not need to repeat it unless your database information has changed. Main Menu o Exit does just that, it exits the application. o Database Setup displays a form for configuring the database information. 20 Main Form o File Name is where the name and location of the RSR client-level data XML file will be created. o Browse allows you to search for a path and specify the name of the RSR client-level data XML file. o Generate XML starts the process to create the RSR client-level data XML file. o Exit exits the application. Setup Form o Database Type is used to specify either a Microsoft Access or Microsoft SQL Server database. Depending on which type of those two databases you choose to use, the following items will be displayed. o Database Server is the name of the machine where your SQL Server database is installed that has the RSR client-level data tables. o Database Name is the name of the database where your SQL Server tables are installed. o Access Mode determines if you are connecting to the SQL Server database using a user name and password (Normal mode) or using Windows Authentication (Integrated Security mode). o You must enter the User Name if Normal Access Mode is selected. The User Name must be a valid database user. o You must enter the Password if Normal Access Mode is selected. The Password must be a valid password for the provided User Name. o You can use the Test Connection to test the connection to your database using the values provided on the form. o Click on Save to save the values on the form to the applications configuration file so that they will be available the next time you use the application. o Click on Close to close the Setup form. Sample Database Configuration o Create SQL Server Sample Tables is an SQL script to create the sample RSR client-level data tables used by T-REX to generate the RSR client-level data XML files. The tables are created in the “dbo” schema within SQL Server. o Empty SQL Server Sample Tables is an SQL script that will empty the sample data from the RSR client-level data tables without removing the tables themselves. o Drop SQL Server Sample Tables is an SQL script that will delete the database objects created with the Create SQL Server Tables script. 21 11. Removing Password from Access Database If the database you are working with is password protected, you will need to remove password protection before using T-Rex. You can do this by following the steps below. 1. Start Access, and open the file exclusively by browsing to the file, and then clicking ‘Open Exclusive’ from the drop down arrow next to Open. Pressing Ctrl-O will open the open file dialog. Enter your password and click OK. 2. a. In Access 2003, go to Tools Security Unset Database Password b. In Access 2007, click tab Database Tools Unset Database Password 3. You will be prompted with a dialog box. Type in the password and click OK. The database no longer has a password set. T-Rex should now be able to process your database and export to XML. 22 12. Getting Additional Support SAIC (Original Developer of T-REX) Michael Dols [email protected] Sphere/Abt Contact [email protected] For questions related to the content or submission of the RSR: [email protected] Please also reference the Target Center website at: http://www.careacttarget.org. 23 Section 2A: Client-Level Data (CLD) XML File Microsoft Access 2003 Import Instructions This section provides instructions for importing RSR CLD XML files into the Microsoft Access 2003 databases. Importing an RSR XML file into T-REX gives you the ability to view the RSR data in the Access Tables. Essentially, this is turning the XML file back into the Access Database. Requirements Valid RSR CLD XML file Microsoft Access 2003 RsrClientImport.mdb RsrClientXmlToMicrosoftAccessMap.xslt The two necessary RsrClient files can be downloaded from https://performance.hrsa.gov/HAB/RSRFiles/ Please see Section 3 (Installing T-Rex) of User’s Guide for directions on how to extract required files. The downloaded folder structure: 24 Microsoft Access 2003 Instructions Step 1 Make a copy of the MS Access database RsrClientImport.mdb. This can be accomplished by clicking the file and then pressing Ctrl-C followed by Ctrl-V. Step 2 Double-click the copy of the MS Access database you created in Step 1 to open it. If prompted, click enable editing. Step 3 Import the XML file File -> Get External Data -> Import Step 4 Browse to the folder containing your RSR client-level data XML file. Select Files of type XML (*.xml; *.xsd) 25 Step 5 Select the file and select the Import button 26 Step 6 Select the Options button Step 7 Select the Transform…button 27 Step 8 Select the Add… button Step 9 Browse to the RsrClientXmlToMicrosoftAccessMap XSL transformation file, highlight the file and select the Add button 28 Step 10 Select the Import Transform dialog OK button Step 11 Select the Append Data to Existing Table(s) radio button. Then, click OK. 29 Step 12 Press Ctrl-S to save the Database. The following tables are populated with the data from the XML file: ClientReport; ClientReportAmbulatory; ClientReportCd4Test; ClientReportHivRiskFactor; ClientReportMedicalInsurance; ClientReportRace; ClientReportServiceDelivered; ClientReportServiceVisits; and ClientReportViralLoadTest Note: Tables that did not have data in the XML file will not be created. Example of data contained in ClientReport table: 30 Section 2B: Client-Level Data (CLD) XML File Microsoft Access 2007 Import Instructions This document provides instructions for importing RSR CLD XML files into Microsoft Access 2003 databases. Requirements Valid RSR CLD XML file Microsoft Access 2003 RsrClientImport.mdb RsrClientXmlToMicrosoftAccessMap.xslt The two necessary RsrClient files can be downloaded from https://performance.hrsa.gov/HAB/RSRFiles/ Please see Section 3 (Installing T-Rex) of User’s Guide for directions on how to extract required files. The downloaded folder structure: 31 Microsoft Access 2007 Instructions Step 1 Make a copy of the MS Access database RsrClientImport.mdb. This can be accomplished by clicking the file and then pressing Ctrl-C followed by Ctrl-V. Step 2 Double-click the copy of the MS Access database you created in Step 1 to open it. If prompted, click enable editing. Step 3 Select the External Data tab Step 4 Select the XML File command 32 The Get External Data – XML File dialog is displayed. Step 5 Select the Get External Data – XML File Browse button The File Open dialog is displayed. Step 6 Locate and select the RSR CLD XML file that you want to import and either double-click on the file or select the Open button. 33 Step 7 Select the Get External Data – XML File OK button Step 8 Select the Import XML Transform button 34 Step 9 Select the Import Transforms Add button. Step 10 Select the RsrClientXmlToMicrosoftAccessMap.xslt file and either double-click on the file or select the Add button. 35 Step 11 Select the Import Transforms OK button to accept the changes. Step 12 Select the Append Data to Existing Table(s) radio button. Then, click OK. 36 The Get External Data – XML File dialog is displayed. Step 13 Select the Get External Data – XML file Close button. Step 14 Press Ctrl-S to save the Database. The following tables are populated with the data from the XML file: ClientReport; ClientReportAmbulatory; ClientReportCd4Test; ClientReportHivRiskFactor; ClientReportMedicalInsurance; ClientReportRace; ClientReportServiceDelivered; ClientReportServiceVisits; and ClientReportViralLoadTest Note: Tables that did not have data in the XML file will not be created. 37 Example of data contained in ClientReport table 38