1
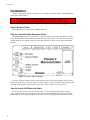
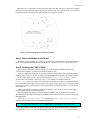
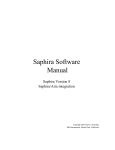
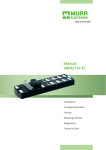
Pioneer
with Pioneer Server Operating System Software
TCM2
Integrated Compass,
Inclinometer,
Magnetometer,
& Thermometer
Copyright © 1999, ActivMEDIA ROBOTICS, LLC
All rights reserved.
Under international copyright laws, this manual or any portion of it
may not be copied – or in any way duplicated – without the
expressed written consent of ActivMEDIA ROBOTICS.
The software on disk and on the Pioneer 2 controller ROM, which accompany the robot
and / or are available for network download by Pioneer Mobile Robot customers,
are solely owned and copyrighted or are products of SRI International or Videre Designs
as licensed for distribution by ActivMEDIA ROBOTICS.
Pioneer developers and users are authorized by revocable license to develop and
operate custom software for personal research and educational use only.
Duplication, distribution, reverse-engineering, or commercial
application of the Pioneer software and hardware
without the expressed written consent of
ActivMEDIA ROBOTICS. is explicitly forbidden.
The various names and logos for products used in this manual are often
registered trademarks or trademarks of their respective companies.
Mention of any third-party hardware or software constitutes
neither an endorsement nor a recommendation.
ActivMEDIA ROBOTICS, LLC
44 Concord Street, Peterborough, NH 03458, USA •
www.ActivRobots.com
603-924-9100 • Fax 603-924-2184
Pioneer 2 TCM2 Manual, September 1999
ii
TCM2 Module
Contents
The P2 TCM2.................................................................................................... 1
Pioneer 2 TCM2 Package ...............................................................................................................1
Package Components.................................................................................................................................. 1
User Supplied Components......................................................................................................................... 1
Basic Pioneer 2 Platform.................................................................................................................1
The P2 TCM2 Module ....................................................................................................................2
Required Components.....................................................................................................................2
Additional Resources ......................................................................................................................2
Pioneer Web Software Archive ................................................................................................................... 2
Pioneer and Saphira Newsgroups ............................................................................................................... 2
Support ...................................................................................................................................................... 3
Installation......................................................................................................... 4
Step 1: Remove Power ....................................................................................................................4
Step 2a: Locate Auxiliary Extension Cable ....................................................................................4
Step 2b: Install AUX Extension Cable............................................................................................4
Step 3: Mount the Module to the Robot .........................................................................................5
Step 4: Enabling the TCM2 in P2OS..............................................................................................5
Step 5: Test the Assembly...............................................................................................................6
Operation and Programming............................................................................ 7
TCM2 I/O .......................................................................................................................................7
P2OS TCM2 Servers ......................................................................................................................7
Mode 0....................................................................................................................................................... 8
Default Mode 1 .......................................................................................................................................... 8
Modes 2 and 3; TCM2 Server Information Packet ...................................................................................... 8
Calibration Modes 4-6.............................................................................................................................. 10
Reset Mode 7............................................................................................................................................ 10
Saphira TCM2 Plugin...................................................................................................................10
TTY2 and GETAUX ....................................................................................................................10
Out-of-Pioneer Operation .............................................................................................................11
Maintenance & Repair.....................................................................................12
Factory Repairs.............................................................................................................................12
Appendix A.......................................................................................................13
Index .................................................................................................................13
Warranty & Liabilities ....................................................................................14
iii
iv
TCM2 Module
The P2 TCM2
Congratulations on your purchase and welcome to the rapidly growing community of researchers, developers,
and enthusiasts of the Pioneer Mobile Robot.
This Pioneer 2 TCM2 Manual provides the general and technical details you will need to install and operate
your new TCM2 Module (Compass, Inclinometer, Magnetometer, and Thermometer) with your the Pioneer 2
Mobile Robot.
We also encourage you to use these companion resources that come with your Pioneer:
ü
ü
ü
ü
ü
Pioneer 2 Operation Manual
Saphira, Ayllu and PAI Software Manuals
Pioneer Registration & Account Sheet
Personal Account for the http://robots.activmedia.com Internet server
Pioneer- and [email protected] support newsgroups
Pioneer 2 TCM2 Package
Our experienced robotics manufacturing staff wired and configured your TCM2 Module for use with any
Pioneer 2 Mobile Robot. And we put the Module through a “burn-in” period while carefully testing it for
performance before we shipped the hardware and software to you. Our care extends beyond: Besides the companion
resources listed above that bring the whole community of Pioneer to you, we warranty the TCM2 Module against
mechanical and electronic parts and labor defects for 90 days. All of these precautions ensure that you have many
years to enjoy your new accessories for the Pioneer 2 Mobile Robot.
Even though we’ve made every effort to make your package complete, please check the components once again
after you unpack it from the shipping crate.
Package Components
ü
ü
ü
ü
ü
ü
Pioneer 2 TCM2 Module complete with mounting hardware and cabling
TCM2 Power and Serial Adapter Cable
Auxiliary serial breakout cable
This P2 TCM2 Manual
TCM2 User's Manual
P2OS update and TCM2 software disk (Win32 and Linux)
User Supplied Components
ü Pioneer 2 Mobile Robot
ü 9 Volt battery (optional)
Basic Pioneer 2 Platform
Pioneers are small, intelligent mobile robots originally developed by Kurt Konolige of SRI International and
Videre Designs and now available exclusively through ActivMedia ROBOTICS. The basic Pioneer 2 Mobile Robot
platform contains all of the components for sensing and navigation in a real-world environment, including battery
power, drive motors and wheels, position encoders, and range-finding ultrasonic sonar transducers—all managed
via an onboard Siemens C166-based microcontroller board (Figure 1-1).The Pioneer 2 DX and CE models are twowheel, differential drive mobile robots intended for indoor, albeit less than ideal surface operation (wheel-chair
accessible areas, for example). The Pioneer 2-AT is a four-wheel drive, differential skid-steering version of the
Pioneer 2 intended for outdoor, all-terrain (AT) operation. Otherwise, the platforms are nearly identical and share
accessories, including the P2 Gripper.
All Pioneers come with onboard robotics server software (Pioneer 2 Operating System) and an open API for
client software control of the robot’s systems and accessories. Users access the onboard servers from their client
workstation connected wirelessly, or via a piggyback laptop or integrated onboard PC through an RS232 serial
communication port.
1
Introduction
The P2 TCM2 Module
We have packaged and integrated the TCM2 Compass, Inclinometer, Magnetometer, and module from
Precision Navigation, Inc. with the Pioneer 2 (P2) Mobile Robot system. The module attaches to the
Auxiliary serial port on the P2 microcontroller for both signal and power.
As part of the Pioneer 2 Operating System (P2OS version 1.6 and later), onboard software servers
interface with the TCM2 Module electronics and sensors to fully manage their operations. In it's "plug-nplay" default mode, the TCM2 module reports magnetic north compass heading (±2°) in P2OS's standard
Server Information Packet. Client software may also issue simple commands to reconfigure and actuate
other TCM2 features, included an expanded, special Information Packet through P2OS.
Required Components
The P2 Gripper will fit and operate on any Pioneer 2 DX, CE, or AT Mobile Robot and work with all
versions of client software. The only caveat is P2OS: You need version 1.6 or later and its related utilities
to operate your new accessory and its various I/O ports and connections.
If the TCM2 Module came with your new robot, you should already have the necessary software.
Otherwise, use the disk that comes with the package, or a version that supports your computing platform
as downloaded from our support website (see Additional Resources below).
If still in doubt, please contact [email protected] for help in updating your robot's
server software.
Additional Resources
Every Pioneer customer gets three additional and valuable resources: a private account on ActivMedia
Internet server for downloading Pioneer software, updates, and manuals; access to private
Pioneer and Saphira robotics newsgroups; and e-mail access to the Pioneer support team.
ROBOTICS'
Pioneer Web Software Archive
We have a World Wide Web server connected continuously to the Internet where customers may obtain
Pioneer software and support materials. Point your favorite Web browser to:
http://robots.ActivMedia.com
Some access areas are restricted to licensed customers, including Pioneer owners. To gain restricted
access, use the username and password that are written on the Pioneer Registration and Account Sheet
that accompanied your robot.
Pioneer and Saphira Newsgroups
ActivMedia ROBOTICS also maintains a special e-mail-based newsgroup for Pioneer owners and
Saphira programmers to share ideas, software, and questions. We strongly encourage you to sign up. For
details, send E-mail:
To: [email protected]
From: <your return email address goes here>
Subject: <choose one commands:)
help (returns instructions)
lists (returns list of newsgroups)
subscribe
unsubscribe
Our SmartList-based listserver will respond automatically. Once subscribed, send your email
comments, suggestions, and questions intended for the worldwide community of Pioneer users:
2
TCM2 Module
To: [email protected]
From: <your return email address goes here>
Subject: <something of interest to all members of pioneer-users>
Access to the pioneer-users newslist is limited to subscribers, so your address is safe from spam.
However, the list currently is unmoderated, so please confine your comments and inquiries to that
concerning Pioneer operation and programming.
Support
Have a problem? Can’t find the answer in this or any of the accompanying manuals? Know a way that
we might improve Pioneer? Share your thoughts and questions directly with us:
[email protected]
Your message goes to our team of Pioneer developers who will help you directly or point you to where
you may find help. Because this is a support option, not a general-interest newsgroup like pioneer-users
described above, we must reserve the option to reply only to questions about bugs or problems with
Pioneer and its accessories.
3
Installation
Installation
Please read through this chapter carefully before you attempt to attach the Pioneer 2 TCM2 Module to
your Pioneer 2 Mobile Robot.
The P2 TCM2 Module requires P2OS version 1.6 or later.
Contact [email protected] if you need to update P2OS.
Step 1: Remove Power
Switch the Main power to the Pioneer 2 Mobile Robot off.
Step 2a: Locate Auxiliary Extension Cable
The TCM2 Module attaches to your Pioneer 2’s microcontroller's AUX serial port (Figure 2-1). Some
robots, including those with radio Ethernet and/or the Sony robotic camera, come with an extension cable
already attached to the auxiliary serial port on the microcontroller to which you may plug in the TCM2
Module.
Figure 2-1. Pioneer 2 Microcontroller
Locate the Auxiliary extension cable by removing the Access plug from the Top Plate. Inside, you may
find the extension cable. If one exists and has an open connector, simply insert the 10-pin IDC plug at the
end of the TCM2 Module's cable into that 10-pin socket. That's all there is to it; skip to Step 3.
Step 2b: Install AUX Extension Cable
If your robot does not have an AUX extension cable, or if the one installed does not have an open
socket, install the AUX extension cable that comes with your TCM2 Module. Deft fingers can locate the
port through the Access plug (locking tab on top of the connector) and plug in the AUX extension cable.
4
TCM2 Module
Otherwise (not recommended), use the hex wrenches that come with your robot to remove the Top Plate
and expose the microcontroller connection ports. Do not remove the screws that attach the microcontroller
board and the front sonar ring to the top plate (Figure 2-2 for DX /CE example).
Figure 2-2. Removing the Pioneer 2 DX/CE top plate.
Step 3: Mount the Module to the Robot
We supply Velcoin mounting tabs so that you may secure the TCM2 Module to your Pioneer 2 Mobile
Robot. We recommend mounting it away from the motors, since they are a source of most interference.
Step 4: Enabling the TCM2 in P2OS
P2OS versions 1.6 and later contain TCM2 servers which integrate the Module with Pioneer 2
software. Please upgrade, if you plan to use the P2OS TCM2 servers.
On the accompanying TCM2 disk are the P2OS software, with installation and configuration utilities.
Install the P2OS version 1.6 or later, according to the README instructions that come with the software.
Briefly, either double-click the Win32 self-extracting icon p2osV_r.EXE (“V” and “r” are the
Version and revision numbers, respectively; p2os1_6, for example) or uncompress/untar the
p2osV_r.tgz Linux version that is on the disk that accompanied your TCM2 or a distribution that you
have downloaded from the http://robot.activmedia.com support website. In all cases, the extracted archive
creates a p2os directory containing the necessary download and configuration utilities, as well as the new
P2OS image file.
Tether your computer’s serial port with the one on Pioneer’s Console unless you are performing the
P2OS download from an onboard integrated PC.
Power up and put your Pioneer 2’s microcontroller into BOOT mode by holding down the white
MOTORS button, pressing and releasing the red RESET button, then after about 5 seconds, releasing the
MOTORS button.
Execute the p2os/p2osdl_tcm2(.exe) program (type p2osdl_tcm2 p2os1_6.hex, for
example) to download the new servers, then RESET Pioneer 2.
You may need to run p2oscf to enable the TCM2 Module servers in P2OS.
If all goes well, the P2OS-update program automatically will install the P2OS upgrade and append a
new parameter, compass, to your current operating parameters. The p2osdl_tcm2 download utility
5
Installation
that comes with the compass automatically enables the TCM2 Module by setting the compass parameter
value to 2. If you use the generic p2osdl utility, also run the p2oscf utility and manually set the
compass value to 2; it may otherwise be set to 0, which disables the TCM2 servers.
In fact, reset the P2OS compass parameter to 0 if you remove or otherwise disable the Module, or if
you plan to operate the TCM2 with software other than the supplied P2OS TCM2 servers. See details in
the next chapter.
Details for operation of the P2OS utility programs are given in the Pioneer 2 Operations Manual.
Step 5: Test the Assembly
Time to test your new TCM2 Module. Reset P2OS and turn on RADIO power. P2OS comes with test
routines for all of the main functions of the robot. This section describes the TCM2 Module’s self-test.
Consult the Pioneer 2 Operation Manual for a detailed description of the location and operation of the
various Console function buttons and switches and for how to test the drive, I/O, and sonar subsystems.
Do not perform Pioneer 2 Mobile Robot self-tests on a tabletop.
Enable P2OS self-test mode by pressing and releasing the white MOTORS button twice. Careful! The
robot will start moving during its motors self-test! Press and release the MOTORS button to bypass the
self-tests which precede the compass one, such as those for the sonars and for the User I/O. The compass
self-test is last.
If you have properly installed the TCM2 Module and software, a compass reading should appear in the
LCD on the microcontroller, for example:
COMPASS: 023.8
13.2*
Of course, rotate the compass to see different compass heading values.
Calibrate the TCM2 Module for your environment.
See Calibration Modes 4-6 in the next chapter.
6
TCM2 Module
Operation and Programming
The TCM2 Module comes fully integrated with the Pioneer 2 Mobile Robot’s systems and software.
The latest versions of Pioneer 2’s operating servers, P2OS (version 1.6 and later), contain support for bidirectional communication through Pioneer’s AUX serial port by which you run the TCM2 Module, as
well as state-based software control routines that manage the Module’s functions for you.
In turn, the TCM2 P2OS servers are supported in all versions of Pioneer 2-related client software that
support P2OS, including Saphira and Ayllu. We supply simple Saphira-based examples for programming
the P2 TCM2 Module in this manual. Please consult the various Pioneer-related Operation and Software
Manuals for more details about P2OS, Saphira, Ayllu, PAI, and P-LOGO.
We also provide a special cable so that you may power (user-supplied 9 VDC battery) the TCM2
Module and attach it to a serial port on your own computer. This way, you may configure and control the
TCM2 Module using your own or the supplied TCM2 application.
Table 3-1 TCM2 Connections with the Pioneer 2 Microcontroller’s AUX serial Port
TCM2 Label
Description
AUX Label
Pin
Pin
1
nc
2
Vsupply +6-25VDC unregulated
4
Vpp (battery 12VDC);
RADIO switched
3
GND
Power ground
6
GND
4
RxD
RS232 serial
3
TxD
5
TxD
RS232 serial
5
RxD
6
nc
7
GND
Data ground
9
GND
8
nc
9
nc
10
nc
nc = no connection
TCM2 I/O
The RS232 standard serial baud rate for the TCM2 Module and the AUX serial port on the Pioneer 2
microcontroller are factory configured for 9600 baud, 8-bit data, 1 stop, no parity. You may change these
settings, but with caution: You may lose connection if the TCM2 port doesn’t match its controller’s
settings, or you may lose connection with another accessory, for instance the PTZ Robotic Camera which
is 9600-baud only.
Switch RADIO power on the Pioneer 2 Console to power the TCM2 Module.
You may directly control the various TCM2 Module functions and read its sensors using the TTY2 and
GETAUX native P2OS commands that manage AUX serial input and output. Or, use the P2OS TCM2
servers and related TCM2 P2OS convenience functions.
P2OS TCM2 Servers
The TCM2 Module comes with a substantial set of configuration and sensor commands. Read the
TCM2 User’s Manual for details.
We’ve collected the command set into P2OS servers that come with P2OS version 1.6 or later.
7
TCM2 Operation and Programming
Table 3-2 TCM2 P2OS Command Set
Argument
(TCM2
P2OS
Action
Command
Command)
0
Module off (software only; not low-power standby)
1
Compass only (default); reading in standard SIP
2
Send single TCM2 SIP
45
3
Send TCM2 SIPs continuous (~5 Hz)
(TCM2)
4
Enable user calibration
5
Enable auto calibration
6
Stop calibration and send one TCM2 SIP, then revert to
default mode 1.
7
Soft reset (cycle power to hard reset)
Mode 0
Disable the TCM2 servers by sending the TCM2 P2OS command 45 with a 0 argument. For example,
from the Saphira Colbert interaction window, type:
sfRobotComInt(45,0);
In mode 0, the TCM2 Module’s P2OS servers are disabled, but not necessarily the Module itself.
Use mode 0 when you disconnect the Module from the robot, or when you power it down by sliding the
RADIO power switch off. Also, put the P2OS TCM2 servers in disabled mode 0 when you control and
query the Module with the alternative TTY2 and GETAUX P2OS features (see next section).
Using the P2OS configuration utility, p2oscf, reset the compass parameter value to 0 and save the
setting to the microcontroller EEPROM to permanently disable the TCM2 P2OS servers. Change the
compass parameter value to 2 to enable the TCM2 servers in P2OS version 1.6 or later.
Default Mode 1
By default, after startup or RESET, or when disconnected from or first connected to a client, the
TCM2 Module reverts to mode 1. When in mode 1, the P2OS TCM2 servers only read the Module’s
compass. That compass reading relative to magnetic north gets included in the standard Server
Information Packet (SIP) that P2OS regularly sends to the connected client. Saphira version 6.2, for
example, displays the compass reading as part of the robot information segment of its main GUI window
(Comp: in Figure 3-1).
Appendix A contains the standard SIP details. The compass value has a ±2° precision.
Modes 2 and 3; TCM2 Server Information Packet
Your Pioneer 2-connected client software may request more detailed information from the TCM2
Module. In response to the TCM2 P2OS command 45 from a connected client, the TCM2 server will
send one (command argument 2) or a continuous stream (command argument 3) of a special Server
Information Packet containing compass, inclinometer, magnetometer, and thermometer readings (Table 33).
Details about the meaning and precision of the TCM2 values are found in the TCM2 User’s Manual
that came with the Module. You may also change the units for the values by configuring the Module with
the TCM2 software or by sending discrete TCM2 commands via the P2OS TTY2 command.
8
TCM2 Module
Figure 3-1. TCM2’s compass reading automatically gets displayed in the Saphira 6.2 main window
Table 3-3. TCM2 Server Information Packet
Label
Data
Value/Description
integer
0xFAFB
Header
byte
0xC0
Packet type
byte
23; Number data bytes
N
integer
0-3649; compass heading relative to magnetic
Compass
north in degrees times ten
integer
Degrees times ten; maximum pitch depends
Pitch
on TCM2 Module type
integer
Degrees times ten; maximum roll depends on
Roll
TCM2 Module type
integer
Magnetic field x-component; ±µT times 100
X
integer
Magnetic field y-component; ±µT times 100
Y
integer
Magnetic field z-component; ±µT times 100
Z
integer
Temperature degrees C times 10
Temperature
integer
Bit-mapped error code (see TCM2 User’s
Error
Manual for meanings)
byte
H score (0-9)
Calibration
byte
V score (0-9)
Scores
integer
M score times 100
integer
SIP checksum
Checksum
The Module transmits its data in ASCII format, which the P2OS servers convert into integers for
transmission in the TCM2 SIP. It is up to the client software to parse an incoming TCM2 SIP and extract
the salient information. We provide a Saphira plugin that extracts the TCM2 SIP and stores the values in
a Saphira/Colbert-accessible data structure. See the next section for details.
In “on-demand” mode 2, only one TCM2 SIP gets sent to the client. It takes about 200 milliseconds
after P2OS receives the command before it responds.
When in continuous mode 3, the P2OS TCM2 servers automatically query the module and report the
readings in TCM2 SIPs that get sent to the connected client approximately once every 200 milliseconds.
9
TCM2 Operation and Programming
Calibration Modes 4-6
Place the TCM2 Module into User or Auto Calibration mode by sending the TCM2 server the P2OS
command 45 with the argument 4 or 5, respectively. Stop either calibration mode by sending the TCM2
P2OS command with the argument 6 or 7.
You should calibrate your TCM2 Module at least once after installing it on your Pioneer Mobile Robot.
We also recommend that you calibrate it whenever you change operating environments. Detailed
descriptions and operations of the TCM2 Module in calibration modes are provided in the TCM2 User’s
Manual.
P2OS command mode 6 automatically causes the TCM2 module to save its calibration settings and
reverts to mode 1 after returning a single TCM2 SIP containing the updated calibration score to the
connected client. It and subsequent SIPs contain that latest calibration score on which you may evaluate
the calibration settings.
Note that the TCM2 P2OS command 7 automatically cancels a calibration session, too, but will not
necessarily cause a TCM2 SIP to be sent.
Reset Mode 7
The reset TCM2 command argument forces a soft Module reset. Cycle RADIO or MAIN power to
force a hard reset. When started or upon reset, the P2OS TCM2 module reverts to its default state. From
the factory, the Moule is set up to communicate at 9600 baud, include compass, inclinometer, temperature
(in degrees Farenheit) and magnetmometer data in its standard output word, be in standby mode, and
respond to the single "h" character to halt. Change the module parameters manually with P2OS-mediated
TTY2 commands or through the Win32 TCM2 software provided by the manufacturer and included on
the TCM2 Compass diskette.
Saphira TCM2 Plugin
For convenience, we supply a Saphira 6.2 plugin that parses the P2OS TCM2 SIP and puts the data
into into a user-accessible structure.
Place the TCM2_plugin.EXE (Win32) or TCM2_plugin.tgz (Linux) into the top-level directory
of your Saphira 6.2 distribution (Saphira/ver62, for example) and either execute the self-extracting
archive (.EXE) or unzip/untar the .tgz file (tar -zxvf TCM2_plugin.tgz). The process creates a
devices/tcm2 directory containing the plugin sources and makefiles. The tcm2.dll (Win32) or
tcm2.so plugin get placed in Saphira's colbert directory.
To use the plugin software, simply load the dynamic link library tcm2.so (Linux/Unix) or tcm2.dll
(Win32) into a Saphira 6.2 running Colbert. Type “help tcm2” in the Colbert interaction window to
review the list of implemented variables. Examine the source files for details.
TTY2 and GETAUX
The P2OS TTY2 and GETAUX commands let you send and receive data through the client-connected
HOST serial port on the Pioneer microcontroller to and from a serial device attached to the AUX serial
port. Consequently, you may bypass the TCM2 P2OS servers and send commands directly to and receive
responses back from the Module. This way, you may send occasional commands to reconfigure the
Module even while running the TCM2 servers, or take complete control with your client software.
When exerting client-direct control of the Module, we recommend that you disable the TCM2 P2OS
servers, either temporarily (mode 0) or permanently (compass configuration parameter set to 0).
Otherwise, the P2OS TCM2 servers may interfere with the Module’s responses.
The TCM2 Module accepts and sends ASCII-encoded commands and data. Compose your TTY2
commands and parse GETAUX packets accordingly. Details on use of the TTY2 and GETAUX P2OS
commands and response packets are in the Pioneer 2 Operations Manual. The collection of TCM2
commands and data are detailed in the TCM2 User’s Manual.
For example, you might want the TCM2 Module to send the temperature in Fahrenheit instead of
Centigrade degrees. Change that configuration setting using the following Saphira/P2OS command
sequence:
sfRobotComInt(45,0); /* disable the TCM2 servers */
10
TCM2 Module
sfRobotComStr(42,"ut=f\15\0"); /* change to Fahrenheit */
sfRobotComInt(45,2); /* Send me a packet to see if it worked */
Note that "\15" and "\0" are the octal representation of a new-line character (don't use "\n") and the
NULL terminator for the string, as required by Saphira's RobotComStr command.
Out-of-Pioneer Operation
The TCM2 manufacturer supplies a DOS-based application, TCM2.EXE, that lets you exercise and
configure the Module from a PC. You may also communicate with the TCM2 Module through any
common serial-ASCII terminal program, such as minicom under Linux or Hyperterminal for Microsoft
Windows®.
With the Pioneer 2 TCM2 package, we supply a serial and power adapter for the Module so you can make
the right connections. Simply attach a 9 VDC battery to the adapter’s power socket, plug the Module’s
cable into the 10-pin IDC connector, and attach a “pass-through” (not a cross-over NULL-modem) cable
between the serial port on your computer and the PC standard 9-pin serial connector on the adapter.
11
Maintenance and Repair
Maintenance & Repair
The Pioneer 2 TCM2 Module is built to last a lifetime and requires no maintenance.
Factory Repairs
If you are having hardware problems with your Pioneer and, after reading this manual, you are
satisfied that it needs repair, here’s who to contact:
[email protected]
(603) 924-2184 fax
In the body of your E-mail or fax message, give your Pioneer 2’s serial number, so we can look up its
configuration, and describe the problem in as much detail as possible. Also include your name, e-mail and
mail addresses, as well as phone and fax numbers, and when and how we can best contact you (we will
assume e-mail is the best manner, unless otherwise notified).
12
TCM2 Module
Appendix A
P2OS Standard Server Information Packet
Name
Header
Byte
Count
Data Type
integer
byte
Status
byte = 0x3S; where S =
sfSTATUSSTOPPED (1)
sfSTATUSMOVING (2)
Xpos
unsigned integer (15 ls-bits)
Ypos
unsigned integer (15 ls-bits)
Th pos
signed integer
L vel
signed integer
R vel
signed integer
Battery
byte
integer
signed integer
Bumpers
Control
PTU
Compass
Sonar readings
unsigned integer
byte
byte
Sonar number
Sonar range
byte
unsigned integer
Description
Exactly 0xFA, 0xFB
Number of data bytes + 2; must be
less than 201 (0xC9)
Motors status
Motors stopped
Robot moving
Wheel-encoder integrated
coordinates; platform-dependent
units; multiply by
DistConvFactor in the parameter
file to convert to millimeters
Orientation in platform-dependent
units—multiply by
AngleConvFactor for degrees.
Wheel velocities (respective Left
and Right) in platform-dependent
units—
Multiply by VelConvFactor to
convert to millimeters per second
Battery charge in tenths of volts
Motor stall indicators; left = msb
Setpoint of the server’s angular
position servo—multiply by
AngleConvFactor for degrees
Pulse width of selected servo #1
Compass heading in 2-degree units
Number of new sonar readings
included in information packet;
readings follow:
Sonar number
Sonar reading—multiply by
RangeConvFactor for mm
…rest of the sonar readings…
User I/O
Timer
unsigned int
Analog
byte
Diginput
Digoutput
Checksum
byte
byte
signed integer
MSB = P2 Gripper status; LSB =
currently selected analog port
number 1-5 (default is 5)
User analog input reading (0-255)
on selected port #1-5
Digital input port values
Digital output ports
Checksum
Index
13
Warranty & Liabilities
Your Pioneer Mobile Robot is fully warranted against defective parts or assembly for one year after it is
shipped from the factory. Pioneer accessories are warrantied for 90 days. This warranty explicitly does not
include damage from shipping or from abuse or inappropriate operation, such as if the robot is allowed to
tumble or fall off a ledge, or if it is overloaded with heavy objects.
The developers, marketers, and manufacturers of Pioneer shall bear no liabilities for operation and use
of the robot or any accompanying software except that covered by the warranty and period. The
developers, marketers, or manufacturers shall not be held responsible for any injury to persons or property
involving the Pioneer Mobile Robot in any way. They shall bear no responsibilities or liabilities for any
operation or application of the robot, or for support of any of those activities. And under no circumstances
will the developers, marketers, or manufacturers of Pioneer take responsibility for or support any special
or custom modification to Pioneer.
Pioneer 2 TCM2 Manual, August 1999.
44 Concord Street
Peterborough, NH 03458
(603) 924-9100
(603) 924-2184 fax
http://www.ActivRobots.com
15