1
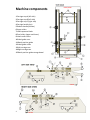
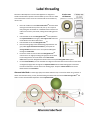
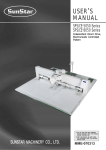
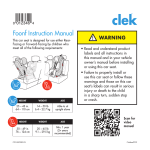
Custom Label Applicator
User guide
1
Machine components
BACK/REAR
1 Carriage stop A (left side)
2 Carriage stop B (left side)
3 Carriage stop C (right side)
4 Carriage handle (top)
5 Release handle (bottom)
6 Upper rollers
7 Label separator blade
8 Feed rollers (upper and lower)
9 Label cradle rollers
10 Label guide arms
11 Bottle position guide
12 Label guide rollers
13 Left carriage cam
14 Right carriage cam
15 Bottle position guide storage dowel
FRONT
FRONT
15
2
FRONT
Label threading
Momentum Development’s Custom Label Applicator is designed to
handle standard rolls of pressure sensitive labels up to six inches in width
and a roll diameter of nine inches. The machine will accommodate any
roll core size.
•
•
•
•
•
•
9 inches max
roll diameter
(9)
Place roll of labels onto the label cradle rollers with the labels
coming forward off the top of the roll, face up. You may find
that placing the roll of labels on a table behind the machine will
make more room for your hands, making the threading process
easier.
(12)
Feed the labels under the label guide roller and up between
the separator blade and the gray rubber upper roller. Place the
roll of labels on the label cradle rollers.
(12)
Feed the labels under the label guide roller .
Place the leading edge of the label backing paper between the
gray rubber upper and lower feed rollers(8), then push the
carriage handle forward an inch or so to pull the label paper
9
through the feed rollers.
(10)
Loosen the thumb screws and slide the label guide arms
until the arms are slightly touching (not tight) the roll of labels.
Horizontally position the roll of labels on the label cradle
rollers where you wish. Retighten the thumb screws to keep the label guide arms in place.
(5)
Lift the release handle to move the labels into alignment with the label roll and make sure the labels
are aligned (straight) with the edge of the separator blade. Pull the label backing paper toward the
front of the machine to remove slack in the backing paper. Drop the release handle to secure the
labels between the feed rollers.
Alternate label feed: For both larger (full) and smaller diameter rolls, as well as for labels using a thinner or
(9)
thicker than standard stock, you may find that feeding the labels under the forward label carriage roller will
aide in a more consistent label separation at the separator blade.
3
Setting the carriage stops for a single label
•
•
•
•
•
•
•
•
4
Start with carriage stops A, B and C at the back of the
machine. Only stop A is used to apply a single label.
With the labels threaded, jog (slightly push) the
carriage forward slightly until the label stickout is
nd
th
1/32 to 1/16 of an inch above the separator
(7)
blade .
Place container to be labeled on the upper rollers.
(11)
Remove the bottle position guide from the storage
dowel located at the front of the machine. Attach
bottle position guide to either the left or right dowels
to the rear of the upper rollers. Move the container
(10)
and guide, in conjunction with the label guide arms
to set the vertical position of the label on the
container. Retighten the thumb screws.
With the carriage pulled completely to the front of the
machine, slowly push the carriage handle away from
you. The label will separate from the backing paper
and adhere to the container as you push the carriage
forward and the label passes over the separator
(7)
blade . Watch closely as you continue to push the
carriage. When the label has been applied to the
container and the next label becomes barely visible above the separator blade, stop pushing.
Loosen the thumb screws on carriage stop A (the foremost stop on the left side of the machine). Slide
(13)
the stop forward until in connects with the left carriage cam . Retighten the thumb screws.
Remove the container from the upper rollers. Pull the carriage handle back toward you until the
carriage stops. Check the label stickout height and adjust as needed. The machine is now ready to
accept the next container for labeling.
A slight adjustment to the label stickout height may be needed periodically as labeling proceeds to
compensate for any progressive error in label spacing.
Setting the stops for a front and back label
First thing:
Determine the gap between the front and back labels
You’ll need to take three measurements:
The distance around the container (circumference) = C
The width of the front label = FL
The width of the back label = BL
Use the measurements in the following formula to determine the spacing between front and back labels:
C – (FL+BL) ⁄ 2 = S (label spacing between front/back labels)
•
•
Place container to be labeled on the upper rollers and apply the
front label by slowly pushing the carriage handle toward the back
of the machine. Stop pushing the carriage when the front label
has just come off the separator blade. The back label should not
be visible at this point. Slide stop A to contact the left carriage
cam. Tighten thumb screws on stop A. Do not move the carriage.
Left carriage cam
Stop A
Use the formula described at the top of this page to determine
the spacing between labels. Add .25 inches to the result to determine the gap between the right carriage
cam and stop C. Using a measuring tape or ruler, slide stop C toward the right carriage cam until the gap
equals the label spacing plus .25 inches. Tighten thumb screws on stop C to set the gap.
Gap = label spacing + ¼ inch
•
(5)
With the left carriage cam in contact with stop A, lift the release handle
and push the carriage forward until the right carriage cam contacts stop C.
Right carriage cam
5
•
•
•
(5)
Drop the release handle and slowly push the carriage forward until the
back label is applied to the container. Watch closely, and when the back
label has come off the separator blade, remove the container.
Continue to push the carriage forward until the next front label sticks out
nd
th
1/32 to 1/16 of an inch above the separator blade. Slide stop B forward
until it contacts the left carriage cam. Tighten the thumb screws on stop B.
Stop C
Left carriage cam
Pull the carriage back to the start position. The machine is now ready for
Stop B
Stop A
production use. Place container on upper rollers, push carriage forward
until it stops, lift and hold release handle and push until carriage stops,
drop release handle and push until carriage stops. Remove container and return carriage to start position.
Note: Verify the two gaps between the front and back labels are the same. Slightly move stop C forward or backwards
th
to equalize the gaps if needed. If the gap difference is 1/4 of an inch, move stop C by 1/8 of an inch to adjust. For example,
if the first gap between the front and back label is 1/4 less than the second gap, move stop C toward the front of the
th
machine by 1/8 of an inch. If the first gap is 1/4 inch greater than the second gap, move stop C toward the back of the
th
machine by 1/8 of an inch.
5
5
Troubleshooting
Problem
Labels are not straight
when applied to
container
Gap between front and
back labels not the
same on both sides
Machine carriage sticks
or hangs up while
pushing forward
Label corners/edges
fold over or crease
Labels are not applied
at the same height on
the container
Label stick out at start
position is not
consistent during
operation
Possible solutions
Make sure label is even with edge of separator blade. Lift tension release handle and move backing
paper to straighten labels.
Make sure label machine is square with counter or table. Waste label backing paper should come out
of machine unimpeded and square with edge of counter or table. Do not position label machine on
corner or at angle with table/counter edge.
Make sure containers are placed flush with both rubber container rollers.
Adjust stop C to reduce or increase the gap. If the first gap is larger than the second gap, move stop C
to the rear of the machine. If the first gap is smaller than the second gap, move stop C to the front of
the machine. Move stop C in small increments. A 1/4 inch difference in gaps is adjusted by an 1/8th
inch movement of the stop.
Do not step on waste label backing paper that may be lying on the floor. Route the waste into a
receptacle or tear off and throw away waste paper frequently.
When applying back label, release the tension release handle before continuing to push the carriage
forward to allow the right carriage cam to return to the up position.
Do not push forward with downward or upward pressure on carriage handle.
Label stickout above the separator blade is too high. Stick out should be no more than an 1/8th of an
inch, or just visible between roller and separator blade. Adjust start position label stickout for
front/single label or stop C for back label. There should be no stickout for back label.
Labels were stored in a hot place. Store label rolls in ambient temperature condition.
Operator is not placing container on upper rollers in consistent position. Butt container up against
bottle position guide each time.
Bottle position guide thumb screws are not tight, changing position during operation. Tighten.
Label guide arms thumb screws are not tight, changing position during operation. Tighten
Readjust stops to ensure proper label stickout.
Tighten stop A/B/C thumb screws to make sure they are not moving at impact with carriage cams.
Operator error. Do not step on waste backing paper that may be lying on the floor. Push carriage all
the way to the stops. Return carriage all the way to the start position.
Progressive error. Slight variations in label spacing on the roll can compound over the course of use.
It may be necessary to periodically adjust label stick out without adjusting stops. Make sure labels
and machine is at room temperature before beginning operation.
Care and maintenance
•
•
•
•
While the Custom Label Applicator is an extremely safe
machine to use, please use caution and keep your fingers
away from the rollers during operation to avoid pinching.
The upper rollers and feed rollers are made of natural
rubber. Do not use petroleum based solvents for cleaning.
If the rollers or other machine parts need to be cleaned, use
mild soap and water and a soft cloth.
Bearings are internally lubricated. Momentum Development
does not recommend the use of any lubrication.
Tips
•
•
•
•
Service and support
Momentum Development, Inc.
PO Box 850
Morton, WA 98356
360-496-0882
[email protected]
Contact us about special labeling requirements and
machine customizations.
www.momentumdevelopment.com
6
•
When finished labeling and removing a roll of labels from the
machine, always leave 18-24 inches of label backing paper at
the beginning of the roll to make rethreading easier and
eliminate label waste.
Some labels are made with a thicker stock and may need
extra tension on the roll of labels near the end of a roll.
Slightly increasing side pressure on the side of the label roll
using the label guide arms, provides additional tension to the
roll for proper label feed.
Push the carriage handle straight forward and pull straight
back – do not apply downward or upward pressure on the
handle while pushing or pulling the carriage.
Labels feed better at room temperature. Too cold and the
labels get stiff. Too hot and the labels and backing paper can
stretch and fold over.
Setting the stops using an empty bottle will make it easier to
see when the labels have completely come off the separator
blade.
One year warranty