1
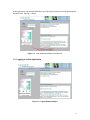
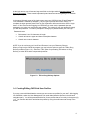
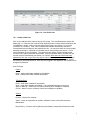
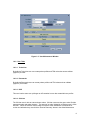
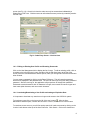
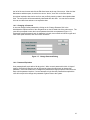
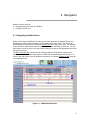
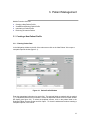
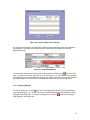
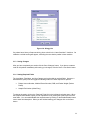
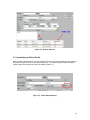
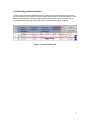
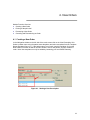
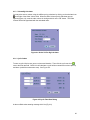
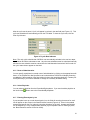
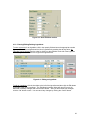
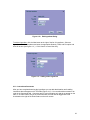
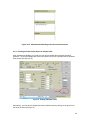
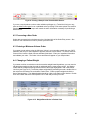
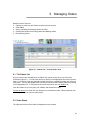
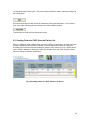
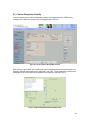
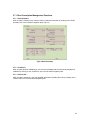
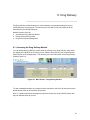
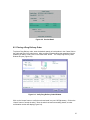
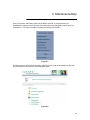
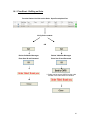
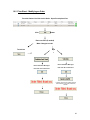
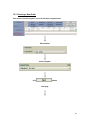
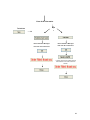
® CAPSLink User Manual VERSION 1.04 Updated on February 1st 2012 1 Table of Contents 1. BEFORE YOU BEGIN .................................................................................... 4 1.1 SYSTEM REQUIREMENTS ................................................................................................................. 4 1.2 ACCESSING CAPSLINK AND ADDING CAPSLINK TO YOUR BROWSER’S FAVORITES ...................... 4 1.3 LOGGING IN TO THE APPLICATION ................................................................................................... 5 1.4 CREATING/EDITING CAPSLINK USER PROFILES. ............................................................................ 6 1.4.1 Adding a New User ................................................................................................................. 7 1.4.2 User Titles .............................................................................................................................. 8 1.4.3 Editing an Existing User Profile and Resetting Passwords .................................................... 9 1.4.4 Inactivating/Reactivating a User Profile and setting an Expiration Date .............................. 9 1.4.5 Changing a Password ........................................................................................................... 10 1.4.6 Password Expiration ............................................................................................................ 10 2. NAVIGATION ............................................................................................... 11 2.1 NAVIGATING THE MAIN SCREEN ................................................................................................... 11 3. PATIENT MANAGEMENT ........................................................................... 12 3.1 CREATING A NEW PATIENT PROFILE ............................................................................................. 12 3.1.1 Entering Patient Data ........................................................................................................... 12 3.1.2 Assigning Allergies ............................................................................................................... 13 3.1.3 Saving Changes .................................................................................................................... 14 3.1.4 Setting Required Fields......................................................................................................... 14 3.2 VIEW/EDIT AN EXISTING PATIENT PROFILE .................................................................................. 15 3.3 INACTIVATING A PATIENT PROFILE ............................................................................................... 16 3.4 RETRIEVING AN INACTIVE PATIENT .............................................................................................. 17 4. NEW ORDERS ............................................................................................. 18 4.1 CREATING A NEW ORDER.............................................................................................................. 18 4.1.1 Header Field ......................................................................................................................... 19 4.1.2 Entering a Volume/Rate........................................................................................................ 19 4.1.3 Volume/Kg Calculator .......................................................................................................... 20 4.1.4 Cyclic Orders........................................................................................................................ 20 4.1.5 Route of Administration ........................................................................................................ 21 4.1.6 Select Physician .................................................................................................................... 21 4.1.7 Entering Electrolytes by Ion ................................................................................................. 21 4.1.8 Entering/Editing/Deleting Ingredients ................................................................................. 22 4.1.9 Instructions/Comments ......................................................................................................... 23 4.1.10 Printing an Order Profile Report or Sample Label .............................................................. 24 4.2 PROCESSING A NEW ORDER .......................................................................................................... 25 4.3 ENTERING A MINIMUM VOLUME ORDER ....................................................................................... 25 4.4 CHANGING A PATIENT WEIGHT ..................................................................................................... 25 5. MANAGING ORDERS.................................................................................. 26 5.1 5.2 5.3 5.4 5.5 5.6 THE PATIENT LIST ......................................................................................................................... 26 ORDER STATUS ............................................................................................................................. 26 ORDER PROCESSING ...................................................................................................................... 27 SENDING ORDERS TO CAPS FROM THE PATIENT LIST ................................................................... 29 CALCIUM PHOSPHATE SOLUBILTY ................................................................................................ 30 PHARMACY ‘CUT-OFF’ TIME ......................................................................................................... 31 2 5.7 OTHER PRESCRIPTION MANAGEMENT FUNCTIONS ........................................................................ 32 5.7.1 Order Summary .................................................................................................................... 32 5.7.2 View Errors .......................................................................................................................... 32 5.7.3 Order Profile ........................................................................................................................ 32 6. RELEASED TO CAPS WINDOW ................................................................. 33 6.1 RELEASED TO CAPS WINDOW ...................................................................................................... 33 7. REPORTS .................................................................................................... 34 7.1 RELEASED TO CAPS ..................................................................................................................... 34 7.2 MIN/MAX LEVELS ......................................................................................................................... 34 7.3 ACTIVE ORDERS ............................................................................................................................ 34 7.4 ACTIVE PATIENTS ......................................................................................................................... 34 7.5 OTHER REPORTS ........................................................................................................................... 35 7.5.1 Order Approval Report ......................................................................................................... 35 8. DRUG DELIVERY ........................................................................................ 36 8.1 ACCESSING THE DRUG DELIVERY MODULE .................................................................................. 36 8.2 PLACING A DRUG DELIVERY ORDER ............................................................................................. 37 8.3 DRUG DELIVERY ORDER MANAGEMENT....................................................................................... 38 8.3.1 Order History ....................................................................................................................... 38 9. MAINTENANCE/HELP ................................................................................. 39 10. APPENDIX – ORDER FLOW SHEETS ........................................................ 40 10.1 FLOW SHEET - REFILLING AN ORDER ............................................................................................ 41 10.2 FLOW SHEET - MODIFYING AN ORDER .......................................................................................... 42 10.3 ENTERING A NEW ORDER .............................................................................................................. 43 3 1. Before You Begin Welcome to CAPSLink. CAPSLink is a web based system for ordering TPN and other IV solutions from your CAPS pharmacy. Module Function Overview System Requirements Accessing CAPSLink and Adding CAPSLink to your Browser’s Favorites. Logging into CAPSLink Creating/Editing CAPS Link User Profiles Inactivating User Profiles Changing a Password 1.1 System Requirements Internet Explorer 7.0 or greater Adobe Acrobat Reader 9.0 or greater Windows 2000, XP, Vista, Window 7 Adobe Flash plug-in version 10 or greater 100MB free memory Dual core 2GHz recommended Citrix or VMware View virtual environment supported 1.2 Accessing CAPSLink and Adding CAPSLink to your browser’s Favorites To connect to CAPSLink open your Internet browser and enter the following link in the address field: http://www.capspharmacy.com/weblink * Note: The URL for the CAPSLink site may change depending on which version you intend to utilize. If you are unsure, check with your CAPS pharmacy for the most current URL. 4 At the login screen you can add CAPSLink to your Favorites by clicking on the link located below the CAPS Icon. See Fig 1-1 below. Figure 1-1. Login window and Add to Favorites Link 1.3 Logging in to the Application Figure 1-2. Logon Window Example 5 At the login screen you will see two large text fields on the right entitled Important Notices and News & Information. These contain important tips and announcements regarding the CAPSLink system (see Fig 1-2). In the upper left hand corner of the login screen enter your CAPSLink User ID and Password. Your Password is masked by asterisks (*) as you type to prevent others from viewing. To complete the logon process press Enter on your keyboard or left mouse click the Secure Login button. If this is the first time logging into CAPSLink you must use the password that was assigned to you when your user profile was created. The creator of your user profile will supply you with this password. You will be prompted to change your password after your first login. Passwords must: Be between 6 and 10 characters in length Contain at least one upper and lower case alpha character Contain one numeric character. NOTE: If you do not know your User ID and Password, see your Pharmacy Director. When you log into the CAPSLink program you may have the option to enter the TPN or Drug Delivery modules (Figure 1-3). Select the ‘TPN’ option for processing TPN orders or ‘Drug Delivery’ to order other sterile compounded products. Figure 1-3. TPN or Drug Delivery Options 1.4 Creating/Editing CAPSLink User Profiles. If you are a user with Administrative access you can create user profiles for your staff. After logging into CAPSLink, select the ‘User Management’ link under Administrative Options in the left hand navigation pane. You will be presented with a list of user profiles that are currently in the system (fig 1-4). You can filter this list for active/inactive profiles by using the radio buttons at the top of the screen: 6 Figure 1-4. User Profile List 1.4.1 Adding a New User Click on the ‘Add New User’ button at the top of the page. The User Maintenance window will display (fig 1-5). Enter the user’s last and first names and enter a unique User ID between 6 and 10 characters in length. Select a user title using the drop-down (see section 1.3.3 for more information on user titles). After a title is selected the software automatically selects the recommended user privileges for the selected user title. You may also select the user privileges manually by clicking or ‘unclicking’ the checkbox next to each privilege (see section 1.3.2 for more information on User Privileges). The system will also assign a random password that conforms to the system password requirements. Enter an expiration date if you want this user account to expire automatically (see section 1.3.5 below). Write down the user ID and new password for the user, as you will not be able to retrieve the same password later. Click ‘Save’ after you have completed the user profile. The user can log into the system with their User ID and randomly generated password. After they have logged in, the application will prompt them to change their password. User Privileges: Patient Read – patient profile data viewable but not editable Write – patient profile data viewable and editable TPN Order Entry Read – Order data viewable but not editable Write – Order data viewable and editable. Can create/edit/save/approve an order. Approve Warning – allows user to override a Warning level message on validation. Critical – allows a user to override a Critical level message on validation. System Reports – Reports are viewable Admin – Ability to create/edit user profiles, read/write access to Prescriber and Area Maintenance. Drug Delivery – Access to the Drug Delivery (Anticipatory Compounded Products) module. 7 Figure 1-5. User Maintenance Window 1.4.2 User Titles 1.4.2.1 Technician By default a Technician user can create patient profiles and TPN orders but cannot validate (approve) an order. 1.4.2.2 Pharmacist By default a Pharmacist user can create patient profiles and TPN orders and can validate (approve) TPN orders. 1.4.2.3 DOP This user has the same user privileges as a Pharmacist but can also create/edit user profiles. 1.4.2.4 Clinician The Clinician user is able to enter and save orders. Clinician users can also open other Clinician generated orders and make changes. The status of an order initiated by a Clinician user is ‘With Clinician’. When the Clinician user is ready to make the order available to a Pharmacist for review and validation they must click the ‘Send to Pharmacy’ button in the Order Maintenance 8 screen (see Fig 1-6). Once this is done the order can only be accessed and validated by a Pharmacist or DOP user. Clinician users can edit orders that were previously created by another Clinician user. Fig 1-6 Order Entry Screen – Clinician User 1.4.3 Editing an Existing User Profile and Resetting Passwords Click on the User Management link to display the list of users. To edit an existing profile, click on checkbox to the left of the user’s name, and then click the Edit User button at the top of the screen. After the User Maintenance window opens, make your changes and click the Save button when finished. You can reset a password by clicking on the Reset PW button. This will reset the password which will be displayed in the password field. The user can then login using this newly generated password. After the user logs in, the application will prompt them to change their password. Passwords must be between 6 and 10 characters in length, must contain at least one upper and lower case alpha character, and one numeric character. 1.4.4 Inactivating/Reactivating a User Profile and setting an Expiration Date It is important to inactivate any users that no longer need access to the CAPSLink system. To inactivate a user click on the icon to the left of the user’s name . After the User Maintenance window opens, uncheck the box next to “Active”, then click on the Save button. To reactivate a user account, you will first need to search for inactive accounts by clicking on the ‘Inactive’ radio button at the top of the User Profile list. Click Search. Click on the checkbox to 9 the left of the user’s name and click the Edit User button at the top of the screen. After the User Maintenance window opens, check the box next to “Active”, then click on the Save button. An optional expiration date can be set for a user profile by entering a date in the expiration date field. The user profile will be automatically inactivated after this date. You can also re-activate this user at a later time and set a new expiration date. 1.4.5 Changing a Password A user can change his/her password by clicking on the ‘Change Password’ link in the Administrative Options section of the navigation bar on the left hand side of the main screen. The user will be prompted to enter their current password and their new password (Figure 1-7). Passwords must be between 6 and 10 characters in length, must contain at least one upper and lower case alpha character, and one numeric character. Figure 1-7. Change Password Dialog 1.4.6 Password Expiration User passwords will expire after a 90 day period. When a user’s password is within 14 days of expiring, CAPLink will warn the user at login and give them the opportunity to change their password. If the user decides not to change their password the login prompt will count down the days until the password expires. If a user attempts to login after the password has expired the user will be required to change their password to gain access to the system. 10 2. Navigation Module Function Overview Navigating the Main screen of CAPSLink Filtering the Order List 2.1 Navigating the Main Screen When you first log into CAPSLink, the main screen of the application is displayed (Figure 2-1). By default, the main screen will display a list of patients with current orders. This list can be filtered based on order status by clicking the Order Filters at the top of the screen. For example, to filter the list for orders with a status of ‘Ready to Send’, click the Ready to Send link. You can also retrieve a list of all active or inactive patient profiles by clicking on the appropriate filter link at the top of the screen. The Main Navigation Bar contains links for managing Patients, Prescriptions, Reports, and Administrative options. When these links are clicked, the corresponding window will open. To return to the main screen, click the window’s close button, or click the ‘Patient List’ link at the top of the Navigation Bar. Figure 2-1. CAPSLink Main Screen 11 3. Patient Management Module Function Overview Creating a New Patient Profile View/Edit and Existing Patient Profile Inactivating a Patient Profile Retrieving an Inactive Patient 3.1 Creating a New Patient Profile 3.1.1 Entering Patient Data In the Navigation sidebar on the left of the main screen click on the ‘New Patient’ link to open a new patient profile window (figure 3-1). Figure 3-1. Patient Profile Window Enter the appropriate information into each field. The required fields are marked with an asterisk (*). If a duplicate Patient Account number is found, the Duplicate Patient Account number window will display (see figure 3-2). To select the duplicate account, click on the patient listed in the Duplicate Patient Account window and click ‘Open’. To close the window and continue entering a new patient profile, click ‘Cancel’. 12 Figure 3-2 Duplicate Patient Acct. Number If a date of birth is entered in the DOB field, CAPSLink will automatically assign the appropriate age category. If the format of the DOB is incorrect, CAPSLink will prompt you to enter the appropriate format. Figure 3-3 Invalid DOB format icon next to the You can build custom lists for the Area and Physician fields by clicking on the field. If a weight is entered in either the ‘kg’ or ‘lb’ field the ‘kg’ or ‘lb’ equivalent will be calculated and entered into the corresponding field. Similarly if a height is entered in the cm or ft/in fields the equivalent height (in cm or ft/in) will be calculated and entered into the corresponding field. 3.1.2 Assigning Allergies To enter an allergy click on the icon next to the allergy field and select from the predefined list of allergies (figure 3-4). Click the ‘OK’ button and the selected drug or drug categories will be assigned to the allergy field. To remove an allergy click on the icon to the left of the drug or drug category in the allergy field. 13 Figure 3-4 Allergy List If a patient has a history of latex sensitivity, place a check in the ‘Latex Sensitive?’ checkbox. On validation a critical warning will appear, reminding the user that the patient is latex sensitive. 3.1.3 Saving Changes After you have completed your entries click the ‘Save Changes’ button. If you plan to create an order for this patient immediately after saving your changes, click the ‘Save + New Order’ button. 3.1.4 Setting Required Fields The Last Name, First Name, and Age Category are hard coded as required fields. However, a Administrative (DOP) user can toggle the following fields to be either required or optional: Patient Account Number, Medical Record Number, DOB, and Patient Weight (Patient Profile) Hosptial Rx Number (Order Entry) To change the setting, click on the ‘Required Fields’ link in the left hand navigation pane. When the Required fields window opens you can expand the list by clicking the arrow to the left of the area folder. You can enable/disable the required status by clicking on the Enable/Disable button next to each field description. When you are finished making your changes click on the Save button. 14 Figure 3-5 Setting Required Fields 3.2 View/Edit an Existing Patient Profile If the patient is not currently displayed in the TPN management window, click on the ‘All Active Patients’ link in the upper portion of the screen (see figure 3-5). Figure 3-5. All Active Patients Link When the Patient List displays, double click anywhere on the corresponding line. When the Select View dialog opens, click ‘Patient View’. After making changes to the profile click the ‘Save Changes’ button or click the ‘Save + New Order’ button if you want to save the changes and create a new order for the patient. At the bottom of the Patient Profile window is a list of the patient’s orders (Figure 3-6). You may click on the Rx number to open the Order window. Once the order is open you can click the Edit button to create a copy of the order and make any necessary changes needed for the current day’s order. 15 Figure 3-6. Patient Order list 3.3 Inactivating a Patient Profile After a patient is discharged or no longer receiving TPN you may want to inactivate their profile so that they no longer come up on the Active Patient List. To inactivate a patient open the patient profile window and uncheck the ‘Active’ checkbox (Figure 3-7). Figure 3-7. Active Patient Setting. 16 3.4 Retrieving an Inactive Patient You can retrieve an inactive patient account by clicking on the “All Inactive Patients” link at the top of the patient list (see figure 3-8). Once you have retrieved the list of inactive patients you can open the patient profile by double clicking anywhere on the patient record. Once opened, you can reactivate the account by clicking the ‘Active’ checkbox and saving your changes. Figure 3-8. Inactive Patient Link 17 4. New Orders Module Function Overview Creating a New Order Printing a Sample Label Processing a New Order Canceling and Discontinuing an Order 4.1 Creating a New Order In the Navigation sidebar on the left side of the main screen click on the ‘New Prescription’ link. Select a patient name using the patient name dropdown and select a template from the Template Name dropdown (figure 4-1). If the patient name is not found, cancel this window, click on the New Patient link on the left side of the main window, enter a new patient, and then create the order. Note: New templates can only be added by contacting your local CAPS Pharmacy. Figure 4-1. Starting a New Prescription 18 Figure 4-2. Order Entry Screen 4.1.1 Header Field At the top of the main order window (below the template name) there is an editable ‘Header’ field. The text in this field will print at the top of the ingredient list on the product label (figure 4-2). 4.1.2 Entering a Volume/Rate If you enter values into any two of the order, duration, and flow rate fields, CAPSLink will automatically calculate the third parameter. Also, if you make a change to one of these fields, you will be prompted to have CAPSLink calculate one of the other two fields (figure 4-3). Click the button corresponding to the field you want CAPSLink to recalculate. If you click the Cancel button, CAPSLink will not recalculate either field. Figure 4-3. Select Field Dialog 19 4.1.3 Volume/Kg Calculator You may also enter a volume using the milliliter per kg calculator by clicking on the calculator icon to the right of the Order Volume field. When the Order Volume per Kg Calculator pop-up appears (figure 4-4), enter the order volume in mls/kg and click on the ‘OK’ button. The Order Volume field will be populated with the calculated value. Figure 4-4 Order Vol Per Kg Calculator 4.1.4 Cyclic Orders To enter a cyclic infusion rate, enter a volume and duration. Then click the cyclic rate icon next to the flow rate field. CAPS Link will calculate a cyclic infusion rate with a one hour taper up and down (at half the maintenance rate). See Figure 4-5. Figure 4-5 Cyclic Flow Rate Dialog At the modified values warning message click Yes (Fig 4-6). 20 Fig 4-6 After the cyclic rate is saved, ‘Cyclic’ will appear in red text in the rate field (see Figure 4-7). This cyclic rate schedule will automatically print on the TPN label. To clear the cyclic rate, click the Clear Cyclic button. Figure 4-7 Cyclic Rate Indicator Note: The only cyclic schedule that CAPSLink can automatically calculate is the one hour taper up and down at half the maintenance rate. Any other rate schedules must be calculated manually and then the rate schedule must be entered into the ‘Administration Instructions’ field in order for the cyclic instructions to appear on the label. 4.1.5 Route of Administration You can specify a peripheral or central route of administration by clicking on the appropriate radio button. If the Peripheral or Not Specified route is selected then CAPSLink will display a warning on validation if the osmolarity of the final solution is above the osmolarity threshold. Contact your CAPS pharmacy if you need to establish or change an osmolarity threshold setting. 4.1.6 Select Physician You can select a physician from the Prescribed By dropdown. If you need to add a physician to the list click the button next to the Prescribed By dropdown. 4.1.7 Entering Electrolytes by Ion If your template is set up to order electrolytes by ion, the fields for entering the amount for each ion will appear on the screen in the ‘Base Elements’ section (Figure 4-8). Enter in the ordered amounts and specify the ‘Per’ option by using the dropdown on the right. Acetate and Chloride can be ordered by % or by milliequivalent amounts (if your template is set for ordering by salts, the ‘Base Elements’ section will not be visible). 21 Figure 4-8. Base Elements section. 4.1.8 Entering/Editing/Deleting Ingredients To enter a quantity for an ingredient, click in the quantity field and enter the appropriate number (figure 4-9). You can navigate down the list of ingredients by pressing the tab key twice. An ingredient can be deleted from the order by clicking on the checkbox to the left of the ingredient and clicking the Delete button to the right of the ingredient list. Figure 4-9. Editing an Ingredient To edit an ingredient, click the checkbox to the left of the ingredient and then click the Edit button to the right of the list of ingredients. The ‘Edit New Ingredient’ dialog will open (Figure 4-10). Make the necessary changes and click the Save button. After you have made your changes click the ‘OK’ button to save. You can cancel any changes by clicking the ‘Cancel’ button. 22 Figure 4-10. Edit Ingredient Dialog To add an ingredient, click the New button at the right of the list of ingredients. Select an ingredient in the Item dropdown and enter the appropriate Quantity, UOM, and Per option and click OK to save (see figure 4-11 ). Click ‘Cancel’ to cancel the entry. Figure 4-11. Adding a New Ingredient. 4.1.9 Instructions/Comments After you have completed entering the ingredients you can add administration and handling instructions that will appear on the TPN label (Figure 4-12). You can also add comments to an order in the Comments field. Comments are for user information only and do not appear on the label. If an order has an entry in the comments field, the order will be flagged with a red checkmark to the right of the Order Status on the main screen. 23 Figure 4-12. Administration/Handling Instructions and Comments 4.1.10 Printing an Order Profile Report or Sample Label After entering and validating your order you may print a sample label for double checking purposes. To print the sample label click on the printer icon on the right hand side of the Order Entry screen (see figure 4-13). Fig 4-13. Printing a Sample Label Alternatively, you may print a sample label from the Main screen by clicking on the print icon to the left of the order (see fig 4-14). 24 Fig 4-14 Printing a Sample Label from the Main Screen. If you are a user that does not have order validation privileges (e.g. Technician User) you may print an Order Profile report for an unvalidated order by clicking on the same printer icon used for printing sample labels. This report will contain the order information necessary for performing a double check. 4.2 Processing a New Order Orders are processed using the buttons on the right hand side of the Order Entry screen. See section 5.3 for instructions on how to process your new order. 4.3 Entering a Minimum Volume Order If you want to enter orders using the ‘Minimum Volume’ you must make certain that your CAPS pharmacy has set your order template to process minimum volume orders. To enter a minimum volume order, leave the Order Volume and Rate fields blank. Enter your ingredient information and validate your order. The Order Volume and Rate will appear on your sample label. 4.4 Changing a Patient Weight If you want to edit or re-submit an order that contains weight based ingredients, you may need to edit the patient weight so that the order is calculated with the most current weight. Any patient orders that have weight based ingredients will have the weight highlighted in red in the Patient List view (see Figure 4-15). To edit the patient weight before processing an order, double click on the order from the Patient List, and select ‘Patient View’. Edit the patient weight and click the Save Changes button. The updated weight should be visible in the Patient View window. Double click on the order and select ‘Prescription View’ to edit and process your order. Figure 4-15. Weight Based Order in Patient View 25 5. Managing Orders Module Function Overview Opening an order from the Patient List Screen (Home screen). Order Status Saving, Validating, and Sending Orders to CAPS Creating New Order from Existing Orders and Refilling Orders Discontinuing Orders Figure 5-1. Patient List – Current Orders view 5.1 The Patient List A list of current orders is displayed in the Patient List (Home) screen when you first log into CAPSLink (Figure 5-1). You may filter this list by clicking on the appropriate link at the top of the page. For example, to list only yesterday’s orders click on the ‘Yesterdays Orders’ link at the top of the page. You may also display a list of All Active Patients and All Inactive patients by clicking on the appropriate link. To return the list of current orders click on the All Orders Link. From the Patient List you may refill, edit, validate, and discontinue orders. To open an order in the Order List click anywhere on the Patient’s Order. When prompted, click on Prescription View to open the order screen. 5.2 Order Status The right hand column of the Order List displays the order’s status. 26 This order was entered into CAPSLink yesterday. The order can be opened and edited (click ‘Edit’ button) to create a new order for the current day. You can also refill the order by opening it and clicking on the ‘Refill’ button. The order has been entered and saved by a Clinician user. The order can be reopened and edited by any Clinician user. The Clinician user must click on the ‘Send to Pharmacy’ button to make it available for validation by a pharmacist. Order has been entered and saved but requires validation and will need to be released to CAPS before the order can be filled by your CAPS pharmacy. Indicates that the order has been approved and released to CAPS for order processing. Order has been received by your CAPS pharmacy and is currently being compounded. Note: If you need to change an order that has already been received by CAPS, contact the pharmacy to let them know that you will be sending a new order. Order has been validated and is ready to send to the CAPS pharmacy for compounding. 5.3 Order Processing While entering and editing orders there are several buttons available on the right hand side of the Order maintenance screen that allow you to process an order: The ‘Save’ button allows you to save an order in its current state. A saved order can be accessed later for editing by clicking the ‘Unlock’ button or can be validated and sent to CAPS (see sections below). 27 After completing an order click the ‘Validate’ button to validate an order. CAPSLink will screen the order for proper dosing, allergies, incompatibilities, etc. and display appropriate warnings to the user. A user with appropriate privileges can override these warnings by checking the checkbox next to each warning and entering a username and password at the bottom of the validation screen and clicking the ‘OK’ button (figure 5-2). To cancel validation click the ‘Cancel’ button. After validation is complete you can send the order to CAPS by clicking the ‘Send to CAPS’ button from within the order or you can send it to CAPS from the TPN Management screen (see section 5.4). Fig 5-2 After validating an order it will be available for sending to CAPS. Click this button to make the order available for import by your CAPS pharmacy. Alternatively you can send a group of orders to CAPS from the TPN Management screen (see section 5.4). After opening an order you can click on the ‘Edit’ button to create a new order containing all the same information as the previous order. If the previous order was active it will be automatically discontinued. To close an order and discard all changes click the ‘Close’ button. After an order has been saved all editable fields will become locked and the ‘Unlock’ button will be enabled. To unlock the fields and make them editable click the ‘Unlock’ button. Note: An order is saved after clicking the Save button or after the following operations are performed: printing a sample label, running the Order Summary report, viewing Calcium Phosphate Curves, 28 or viewing the Order Profile report. The order must be unlocked in order to make any changes to the existing order. An order from the previous day can be be repeated by clicking the Refill button. This creates a copy of the order and brings the user directly to the order validation window. To discontinue an order click the Discontinue button. 5.4 Sending Orders to CAPS from the Patient List After you validate an order it will be ready to send to CAPS for compounding. An order can either be sent to CAPS from the Order Entry window or from the Patient List screen by clicking the checkbox to the left of the order and clicking the ‘Send to CAPS’ button (Fig 5-3). Orders can be sent to CAPS in batches by clicking the ‘Select All’ checkbox at the top of the checkbox column and then clicking the Send to CAPS button. Fig 5-3 Sending Orders to CAPS – Patient List Screen 29 5.5 Calcium Phosphate Solubilty You can compare known calcium phosphate solubility curves against an open TPN order by clicking on the CaPO4 Curves link in the left navigation pane (Fig 5-4). Fig 5-4 Link to Calcium Phosphate Curves After clicking on the CaPO4 link, a window will open that displays the current order’s amino acid, dextrose, and lipid concentration in the graph title on the right. The concentration of calcium and phosphate for the current order will be plotted on the graph as a red star (Fig 5-5). Fig 5-5 Calcium Phosphate Concentration Plot 30 A list of know curves are available on the left hand side of the window. To view a curve in the graph on the right, scroll down to the appropriate curve (i.e. the curve that most closely matches the amino acid, dextrose, and lipid concentration in your order) and click on it. The curve will appear on the calcium phosphate graph on the right (Fig 5-6). Fig 5-6 Calcium Phosphate Curve – Sample Curve 5.6 Pharmacy ‘Cut-Off’ time Your CAPS pharmacy may choose to employ a ‘Cut-off’ time for order submissions. When a user opens an order or a patient profile after the order cut-off time has passed, a warning message will display in the upper portion of the screen (see Fig 5-7). If you need to place orders after the cutoff time you will need to notify your CAPS pharmacy by phone. Fig 5-7 Pharmacy Cut-Off Time 31 5.7 Other Prescription Management Functions 5.7.1 Order Summary After an order is saved you can view the order’s nutritional information by clicking on the ‘Order Summary’ link in the left hand navigation pane (Fig 5-8). Fig 5-8 Order Summary 5.7.2 View Errors After an order has been validated you can view the messages that were previously displayed at validation by clicking on the ‘View Errors’ link in the left hand navigation pane. 5.7.3 Order Profile After an order is saved you may view detailed information regarding the order by clicking on the ‘Order Profile’ link in the left hand navigation pane. 32 6. Released to CAPS Window 6.1 Released to CAPS Window Clicking the ‘Released to CAPS’ link in the left hand navigation pane will display a list of all orders that have been released to CAPS (Fig 6-1). The view defaults to the current date but a different date range can be entered as needed. Click on the ‘Print’ button to print a Released to CAPS Report. The order can be opened by clicking on the Bag # link and a sample label can be printed by clicking on the printer icon to the left of the order. Fig 6-1 Released to CAPS window 33 7. Reports Module Function Overview Description of CAPSLink Reports Displaying and Printing CAPS Reports Several reports are available from your CAPSLink application. The reports can be displayed and printed by clicking on the Reports links in the Navigation Bar on the left hand side of the CAPSLink main screen. 7.1 Released to CAPS Displays a list of orders that have been released to CAPS. The date range defaults to the current day but can be changed by entering a new date range and clicking the ‘Search’ button. Click the ‘Print’ button to display a preview of the report in a printable ‘pdf’ format. 7.2 Min/Max Levels Displays a list of Minimum and Maximum dose settings for all CAPSLink ingredients. When an order is validated a warning message will display if an ingredient amount is above or below these settings. 7.3 Active Orders Displays a list of active orders 7.4 Active Patients Displays a list of active patients 34 7.5 Other Reports Clicking the ‘Other Reports’ link displays a window that allows you to select from several reports that can be filtered by date range (Figure 7-1). Select the desired report in the report dropdown on the left, edit the date range if necessary, and click the Search button to display the report. Click the ‘Print’ button to display the report in a printable ‘pdf’ format. Figure 7-1. Other Reports Screen 7.5.1 Order Approval Report In the ‘Other Reports’ section you will find the Order Approval Report. This report contains a record of which user entered, approved, and released each order (Fig 7-2). Fig 7-2 Order Approval Report 35 8. Drug Delivery The Drug Delivery module allows you to order anticipatory compounded products from your CAPS pharmacy via the Internet. The items that you are able to order via CAPSLink will be determined by your CAPS Pharmacy. Module Function Overview Accessing the Drug Delivery Module Placing a Drug Delivery Order Drug Delivery Order Management 8.1 Accessing the Drug Delivery Module You can access the Drug Delivery module either by clicking on the ‘Drug Delivery’ option when first logging into CAPSLink or by clicking on the ‘Switch to Drug Delivery Link’ in Administrative Option section of the navigation bar. This will bring you to the main screen of the Drug Delivery module (Figure 8-1). Figure 8-1. Main Screen – Drug Delivery Module. To view a detailed description of a product click the checkbox to the left of the item and click the Details button at the top of the screen (Figure 8-2). Note: If a product name does not appear as expected, contact you local CAPS Pharmacy and they can add new items to your list. 36 Figure 8-2. Product Detail 8.2 Placing a Drug Delivery Order To place a Drug Delivery order, enter the desired quantity of each product in the ‘Cases’ field on the right hand side of the main screen. After you have finished entering the quantities of all the products you want to order, click on the ‘Place Order’ button. The Verify Drug Delivery Order window will open (Figure 8-3). Figure 8-3. Verify Drug Delivery Order Window Click on the ‘Accept’ button to verify the order and send it to your CAPS pharmacy. Click on the ‘Cancel’ button to cancel the order. Once the order has been successfully placed, an order confirmation number will display (Figure 8-4). 37 Figure 8-4. Drug Delivery Order Confirmation After clicking the ‘OK’ button, a sample packing list will display. You may print a copy of this packing list for your records by clicking on the the ‘Print’ button. 8.3 Drug Delivery Order Management The number of cases that have been previously ordered during the day is listed in the ‘Ordered Today’ column on the main Drug Delivery Order screen (Figure 8-5). This allows the user to determine what quantities have already been requested by CAPS to avoid duplicating orders. Figure 8-5. Units Ordered Today 8.3.1 Order History You may view a history of Drug Delivery Orders by clicking on the ‘History’ link in the Order Management section of the main navigation bar (Figure 8-6). A list of all orders that have been released to CAPS can be displayed by clicking on the ‘Released to CAPS’ link on the navigation bar. Both lists can be filtered by date range by entering the desired date range in the ‘From’ and ‘To’ fields and clicking the ‘Search’ button. A printable ‘pdf’ of the report can be displayed and printed by clicking on the ‘Print’ button. Figure 8-6. Drug Delivery Order History 38 9. Maintenance/Help Users, Physicians, and Patient Areas can be added, removed, or inactivated from the Administrative Options menu in the lower left hand portion of the Navigation pane (Figure 9-1). See section 1.3 for more information on adding and editing User Profiles. Figure 9-1 A training manual, online help, and training videos (Figure 9-2) can be accessed from the Help and Training link in the lower left of the Navigation pane. Figure 9-2 39 10. Appendix – Order Flow Sheets The following pages contain “Flow Sheets” that serve as a quick, easy to follow reference for various types of order processing. These sheets can be copied and placed next to a computer workstation for quick reference. 40 10.1 Flow Sheet - Refilling an Order From the Patient List Click on the Order. Open Prescription View Verify Order contents OR Review Validation Messages Review Validation Messages Enter User ID and Password Enter User ID and Password ** Orders can be sent to CAPS from the order window or the main CAPS Link window. 41 10.2 Flow Sheet - Modifying an Order From the Patient List Click on the Order. Open Prescription View Click Button Enter new Rx # (if needed) Make Changes to order Rph Technician or Review Validation Messages Enter User ID and Password Review Validation Messages Enter User ID and Password ** Orders can be sent to CAPS from the order window or the main CAPS Link window. 42 10.3 Entering a New Order Click on the “New Prescription” link in the left hand navigation pane. Select Patient Select Template Click Button Next page 43 Enter Order Information Rph Technician or Review Validation Messages Enter User ID and Password Review Validation Messages Enter User ID and Password ** Orders can be sent to CAPS from the order window or the main CAPS Link window. 44 Notes ________________________________________________ ________________________________________________ ________________________________________________ ________________________________________________ ________________________________________________ ________________________________________________ ________________________________________________ ________________________________________________ ________________________________________________ ________________________________________________ ________________________________________________ __________________________________________ 45