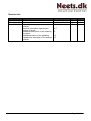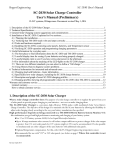
1
Neets Central Control
To be used with Neets Control EU panel software 1.30 and forward
Doc. No: 309-002 Rev 1.02
Foreword:
The purpose of this document is to describe how to install, set-up, and configure Neets central
control. Included in this manual is also a description on how to use the software. This program can
be downloaded from Neets.dk.
The document is split into 3 sections:
1. Hardware configuration.
2. Software setup.
3. End-user manual.
COPYRIGHT - All information contained in this Manual is the intellectual property of and
copyrighted material of Neets. All rights are reserved. You may not allow any third party access to
content, information or data in this manual without Neets’ express written consent and you may
only use such information for the care and operation of Neets Control.
Questions, AFTER reading this manual may be addressed to your local dealer or:
Neets
Torvet 4
8700 Horsens
Denmark
by E-Mail: [email protected]
Or you may use our contact form at www.neets.dk
Page 1 of 17
Doc. no: 309-002 Rev 1.02
Revision list:
Author : Date
Description
Pages
TSA : 27-07-06
SDV : 03-10-06
SVL : 23-06-08
First release
Spelling error
Header in the document has been
change.
Remove information regarding the
lockup of panels
Added the description of the renaming
functions.
Added description of the relabeling
Updated the description of the settings
options.
All
1.00
5,7,8,9,10,13,15,16 1.01
All
1.02
Doc. no: 309-002 Rev 1.02
Doc ver
SW ver
1.00
1.00
1.1.0
6,7
6
12
13
Page 2 of 17
Table of content:
Foreword: .................................................................................................................................... 1
Revision list: ................................................................................................................................ 2
Table of content: ......................................................................................................................... 3
Install and start-up software and hardware. ................................................ 4
System requirements .................................................................................................................. 4
Install software. ........................................................................................................................... 4
Install hardware. .......................................................................................................................... 4
Configure system ............................................................................................ 5
Group Design .............................................................................................................................. 6
Group control configuration ......................................................................................................... 9
Preference ................................................................................................................................ 13
End-user manual ...........................................................................................14
Overview ................................................................................................................................... 14
Icon description. ........................................................................................................................ 15
Timer function. .......................................................................................................................... 16
Group control ............................................................................................................................ 17
Single Control ........................................................................................................................... 18
Page 3 of 17
Doc. no: 309-002 Rev 1.02
Install and start-up software and hardware.
This section describes how to install the “Neets Central Control” on a Windows computer.
Furthermore, it describes how to set-up the hardware.
System requirements
450 MHz Intel Pentium III processor or equivalent
Windows 2000 or Windows XP
Microsoft .Net Framework 1.1
256 MB RAM (512 MB recommended)
Minimum screen resolution 1024 x 768 pixel.
100 MB available disk space
One Ethernet port.
Install software.
Download the new version of “Neets central control” from www.neets.dk and un-zip the file, run
the setup.exe and follow the instruction on the screen.
Install hardware.
The Neets Control panels (standard and professional) can all be used with “Neets Central Control”
(IP control). The panels needs a unlock code that can be obtained at www.neets.dk or at your
local dealer/distributor.
All panels that is required to be used with Neets Central Control, has to be in the same physical
network.
Connect network cable to the back side of the Neets Control EU panel, and the other end to a
router/switch/hub or equal. Remember to setup the IP address, subnet mask and network speed
in the “Neets Control EU product configurations utility” software. The Windows computer
that is required to run the software must also be connected to this network.
Doc. no: 309-002 Rev 1.02
Page 4 of 17
Configure system
This section describes how to configure the software to give the end user the best view and
performance.
When the system is started the first time, it will look like below (depending on selected windows
scheme).
Select [Functions] -> [Configure system] (as shown bellow).
Now you are in the system configure part of the program, it is here you decide which panels there
shall be visible on the overview page, and therefore what the end-user can see. You can also put a
password on, so the end user cannot change anything in here.
Page 5 of 17
Doc. no: 309-002 Rev 1.02
Group Design
In the top of the window you will find a toolbar containing the following items:
Make a new configuration project
Open an existing configuration project (eg. One from another computer or server)
Save this configuration project to disk
If you want to rename the name of the control system or the label of the buttons.
Add a new group (eg: “building 200”)
Remove the selected group.
Rename the selected group
Retrieve settings file from panels (only working when in groups)
These tools will be useful to you on a later state in the configuration. But first you will have to find
all the panels available on the network. That is done by pressing the
middle right hand side of the window.
Doc. no: 309-002 Rev 1.02
button on the
Page 6 of 17
That will give you all the panels available on the network. That will look something like bellow:
Here we have found 8 available panels on the network, and the different information about the
panel is shown here bellow:
The panel can be used with central control
This panel firmware version do not support Neets
Central Control
There has been uploaded a new settings file to the
panel, that one is newer than the one used for
design in central control software. Or the file is
missing.
The panel was found in last lookup
The windows software has lost contact
to the panel, it might help to do a new
“find panels”
Page 7 of 17
Doc. no: 309-002 Rev 1.02
When having the complete list of all you controls systems available in the network, it is time to
assign the different panels the correct group. The group might be one global group or several
different (to obtain the “big picture”). You can either right click in the left window and press add,
or use the tools in the tool box in the top as shown in the figure below
Give the group a meaningful name (eg. Office) and select an icon (if you want it).
Now you can “drag and drop” the panels (by holding shift or Ctrl you can select more than one)
either to the left direct into the group, or select the group on left hand window, and “drag and
drop” to the lower window (as shown below).
If you do not want to make a group, you can “drag and drop” the panels into Root (this one can
also be renamed by right click). To remove a panel you press on the group on left side and then in
the lower window you find the panel and click on it the pres [Delete] you can also in the column
“Group” click and then in the drop down menu select group.
When they are all copied into different groups or the Root folder, press the “
” icon in the tool
bar (to retrieve the different settings files from the panels). This will also happen when you move
on to the next page.
The panels you do not copy either into Root folder or a group, cannot be seen or used
anywhere else in the program (not even in the viewing part)
Doc. no: 309-002 Rev 1.02
Page 8 of 17
Group control configuration
This part is enabling you to make group controls (control more than one panel from one button).
First we have to make a button, this is done in the following way:
First you press on the group you want to make a button in (here building 1) and then right click in
yellow square (Blue highlight below) a select add, or use toolbox in top (Blue highlight).
Then this box will appear, and you give the button a useful name (here off, but can be anything, it
is just a label). Select an icon if you want to have that, there is a image catalog in the installation,
but if you have some other icons you like to use, then fell free…
Page 9 of 17
Doc. no: 309-002 Rev 1.02
Now we have to put some functions on the key that is done by “drag and drop” from the functions
in top to the key or to left box. Now you have a control for the desired functions.
Doc. no: 309-002 Rev 1.02
Page 10 of 17
Now we will make it possible to turn off all units in Building 1 and Building 2 by one press. This is
done by making a global button.
Simply just click on “Root” and then make a new button here, and then “drag and drop” the “off”
button like before…
Page 11 of 17
Doc. no: 309-002 Rev 1.02
Renaming a control system or its button
When you have added a panel to the system you sometimes want to change the name of ether the
control system or the button on the control system.
Changing the names are only possible when you are in “System design” mode.
There are two ways of doing this.
1. Pressing the
button in ether the menu bar or under “Functions->Change panels name”,
you get a list of all the panel that has been collected.
(if you do not find you panel in the list make sure that it is assigned to at group)
Now double click on the control system that you want to change.
2. In the Design group control you can right click on the control system that you want to
change.
After selecting the panel that you want to edit you get
the screen below.
Here you can simply change the names of the buttons
by clicking on them.
After you have pressed to OK button your settings will
be uses by the system.
Doc. no: 309-002 Rev 1.02
Page 12 of 17
Preference
Here you can setup various things for the software…
How often must the
panel give status (when
no keys are pressed)?
How long time with no
answer from panel,
before alarm to user
Password to system
design pages (this tab)
Update settings for
software, to check on
the Internet for new
versions..
When the user takes
control over a system
and presses a button,
must he then be
warned?
Page 13 of 17
Doc. no: 309-002 Rev 1.02
End-user manual
This section describes the end-user possibility in the program
Overview
Here you can select what you want to see by right clicking in the yellow area, and then select
“Field chooser” then you can “drag and drop” the columns you do not want to see into the field
chooser, and then they will disappear from the view.
You can also use the “group by box” sort functionality to sort your view after what you want to
see.
One last customizing thing is sort function. Simply press the column you want to be alphabetic
sorted and a small arrow indicated that you are sorting after this column.
Doc. no: 309-002 Rev 1.02
Page 14 of 17
Icon description.
Next to all panels you will find a icon indicating status of the panel.
Bellow you will find the description for the icons..
Icon
Description
Everything is running smooth, data shown in windows
software is equal to panel
The windows software has lost contact complete to the panel,
it might be powered off, or network cable not connected.
There has been uploaded a new settings file to the panel, that
one is newer than the one used for design in central control
software.
The panel has been without contact for more than x minutes
(value is set in design).
Central control software is currently updating the information
for this panel.
Page 15 of 17
Doc. no: 309-002 Rev 1.02
Timer function.
There is a build in timer function for lamp hour and filter hour. That gives you the possibility to see
if it is time to call for service on one of your rooms.
By right clicking on the timer field (lamp or filter column), and selecting “edit timer” you can preset
the timer and also set the warning and max (alarm) value.
Then timer value is between 0 and “Warning value” the field will be colour green. Then Timer
value is between “Warning value” and “Max value” the field will be yellow. If timer excide “Max
value” the field will be red.
Doc. no: 309-002 Rev 1.02
Page 16 of 17
Group control
This section is about how to use the desired group control buttons.
It is simple, select the group you want to control, and then you just press the desired button, and
a pop up will ask if you are sure, click yes or no…
Then the program will inform you about what it do.
Page 17 of 17
Doc. no: 309-002 Rev 1.02
Single Control
Here you can control the individual room / panels.
You select the room / panel you want to control, then press the key you want to use (just like you
would do if you were in the room).
If you have selected to get a warning before executing the action of a button press you will see this
warning:
Pressing “Yes” will execute the function assigned to it.
Doc. no: 309-002 Rev 1.02
Page 18 of 17