1
GoldenGate Database Connector
First Steps
For Macromedia Director®
Version 1.1
©2001-2002, Integration New Media Inc | 2002-02-18
Table of Contents
Table of Contents
2
Introduction
3
Best Practices
3
Before you Start
4
Firewall considerations
4
Explore the landscape
5
Initializing GoldenGate
6
Searching Data
7
SetCriteria / Select
7
The IsNicknameUnique handler
7
Retrieving Data
8
GetField
8
Retrieving the user's last name
8
Adding a New Record
9
AddRecord / SetField / UpdateRecord
9
The AddNewAccount handler
9
Modifying Data: Quick Implementation
10
User Interface Elements
10
Scripting
10
Modifying Data: Methodology
12
Step 1: Objective
12
Step 2: Requirements and Specifications
12
Step 3: Architecture
13
Step 4: Implementation
14
Step 5: Testing
14
Error Checking
15
Be Proactive
15
The CheckError handler
15
Appendix: Database Structure
16
GoldenGate Database Connector™ – First Steps for Director
2
Introduction
Thank you for using GoldenGate Database Connector!
This First Steps manual is a quick overview of GoldenGate's
most common features. It uses the Logon sample Director movie
provided at http://www.GGdbc.com/getting-started/ to
illustrate:
• How a Director movie opens a connection to a GoldenGate
server;
• How to search data;
• How to retrieve data;
• How to modify data.
In these First Steps, you will use your own Director movie and
connect to Integration New Media's GoldenGate and MS SQL
Servers through the Internet.
Most of all, you will realize that all of this requires very little
scripting in your Director movie and no scripting at all on the
server side.
Best Practices
This First Steps manual also emphasizes on some recommended
practices such as development process and error management.
Such techniques apply to a wide variety of projects and are
beyond the scope of GoldenGate. They nonetheless constitute
the core of our expertise at Integration New Media.
GoldenGate Database Connector™ – First Steps for Director
3
Before you Start
Before you start, make sure that you have:
• Director 7 or later, for MacOS or Windows;
• The Logon sample movie (available from
http://www.GGdbc.com/getting-started/);
• The GoldenGate Client Xtra for Director (available from
http://www.GGdbc.com), and that it is located in Director's
Xtras folder;
• An Internet connection.
Firewall considerations
If you are using these First Steps with a GoldenGate Server
installed on your own computer or local area network, you don't
need to worry about firewall issues.
It you want to connect to the GoldenGate Server located at
Integration New Media and if you are behind a firewall and if
your firewall is configured to disallow outbound queries, ask
your system administrator to allow outbound queries from your
computer so your GoldenGate client can contact the GoldenGate
Server located at Integration New Media
You don't need to worry about firewall issues in all other
situations.
GoldenGate Database Connector™ – First Steps for Director
4
Explore the landscape
First, run the Logon sample movie and make sure it works
properly on your computer.
• Create a new account.
• Try to logon using your newly created nickname and
password.
• Keep your nickname and password on hand as you will need
them in the next few steps.
GoldenGate Database Connector™ – First Steps for Director
5
Initializing GoldenGate
1 Open the Logon.DIR movie. If you have Director 8 or later,
you may want to immediately save the movie back with a
new name so you can easily save your upcoming
modifications.
2 Open the "Initialize" movie script (cast member #2).
3 The InitGG handler performs everything you need to open a
connection to the remote database. This is a three step
process.
If both the server and the client are
running on your own computer, use
"localhost" as the Server name
instead of
"GG.IntegrationNewMedia.com".
a
Open a connection to the GoldenGate Server:
gCX = new(xtra "GGConnection",
"GG.IntegrationNewMedia.com", 1729,
"AnyUser", "top secret")
where:
GGConnection
is the GoldenGate connection Xtra's name;
is the GoldenGate Server's
name (hosted at Integration New Media);
GG.IntegrationNewMedia.com
1729
is the GoldenGate Server's TCP/IP port;
is the name under which your project will identify
itself when connecting to the GoldenGate Server
AnyUser
top secret
b
is AnyUser's password.
Open a database instance:
gDB=new(Xtra "GGDBE", gCX, "FirstSteps")
where:
GGDBE
gCX
is the GoldenGate database Xtra's name;
is the connection instance created above;
is the GoldenGate database connector's name.
It resides on the GG.IntegrationNewMedia.com server.
FirstSteps
c
Open a table instance:
gT=new(Xtra "GGRecordSet", gDB, "Users")
where:
GGRecordSet
gDB
is the GoldenGate recordset Xtra's name;
is the database instance created above;
is the name of the table required by this project. It
resides in the database identified as FirstSteps.
Users
The rest of the movie will only use the gT global variable to
search, retrieve and store data. gDB and gCX will not be directly
used.
GoldenGate Database Connector™ – First Steps for Director
6
Searching Data
Although GoldenGate accepts SQL statements for advanced data
searching, knowledge of SQL is not required in most projects
thanks to GoldenGate's simplified API.
In Logon.DIR, data is searched in two different situations.
• When granting access to a nickname/password combination:
to identify a nickname's record and make sure the user
supplied password matches the one stored in that record. This
is done in the IsLogonInfoValid handler.
• When creating a new account: to make sure a nickname is
unique before adding it to the database. This is done in the
CheckAndLogon handler.
SetCriteria / Select
GoldenGate is also able to perform
searches on other types of data fields
(numerals, dates, etc.) with a wide range
of comparison operators (greater, smaller,
within range, full-text, etc.)
See the GoldenGate Developer's Manual
for details.
Searching data is performed in two steps in GoldenGate.
• Call SetCriteria with one or more search criteria, as in:
gT.SetCriteria(["Nickname", "=", nick])
• Call Select to actually trigger the search process on the server,
as in:
gT.Select()
Then you are ready to check the number of records selected (with
SelectCount), browse through the selected records (with GoNext,
GoPrevious, GoFirst, GoLast and Go), retrieve data (with GetField),
etc.
The IsNicknameUnique handler
This is the logic behind the IsNicknameUnique handler (in cast
member #4).
1 Tell GoldenGate to search for all records who's Nickname
field equals the user's entry:
gT.SetCriteria(["Nickname", "=", member("txt.Nickname").text])
2 Trigger the search
gT.Select()
3 Ask GoldenGate how many records were found.
n = gT.SelectCount()
4 If one or more records were found (i.e., the nickname already
exists), tell the user to pick another nickname.
if (n > 0) then -- found at least one occurrence
Alert ("This nickname already exists.")
end if
GoldenGate Database Connector™ – First Steps for Director
7
Retrieving Data
In Logon.DIR, data is retrieved from the remote database for a
few different reasons, such as
• matching a nickname's password against the one supplied by
the user, or
• retrieving the user's first name, last logon date and number of
logon's to display on the Welcome screen.
In this section, you will learn how to retrieve the user's last name
from the database and display it on the Welcome screen.
GetField
Other data retrieval methods are
GetSelection and GetMedia.
See the GoldenGate Developer's
Manual for details.
Data retrieval is primarily performed by the GetField method as
in this excerpt from the CheckAndLogon handler (in cast
member #3):
nbrOfLogons = gT.GetField("NumberOfLogons")
This statement retrieves the value of field NumberOfLogons of the
current record in table gT (which refers to table Users, as shown
in Initializing GoldenGate, 3c).
Retrieving the user's last name
As shown in Appendix: Database
Structure, the user's last name is stored
in a field named LastName, which is
the parameter passed to GetField.
1 To modify the CheckAndLogon handler and make it display the
user's last name as well as the first name and logon
information, first add this statement (shown in bold):
-- gets here if nickname and password valid
lName = gT.GetField("LastName")
fName = gT.GetField("FirstName")
nbrOfLogons = gT.GetField("NumberOfLogons")
lastLogon = gT.GetField("LastLogon", "d MMMM yyyy
hh:mm:ss")
2 Then, modify the last statement to:
Member("txt.WelcomeMsg").text = "Welcome back," && fName
&& lName & "." & RETURN & "You had last logged on:" &&
lastLogon & "." & RETURN & "You logged on a total of"
&& nbrOfLogons && "times to this system."
This same operation would have
involved server-side script
modification, query encoding, result
parsing and/or character set translation
in technologies other the GoldenGate.
3 Run the movie.
4 Log on with the nickname and account you created earlier in
Explore the landscape.
The Welcome screen will now display both your first and last
name.
GoldenGate Database Connector™ – First Steps for Director
8
Adding a New Record
In Logon.DIR, a new record is added to the remote database
every time a new account is created. This is performed by the
AddNewAccount handler. This section will show you how it is
implemented.
AddRecord / SetField / UpdateRecord
To add a new record with GoldenGate:
1 First call AddRecord to create a blank record. The new record is
not saved to the database yet.
2 Then, call SetField as many times as needed to populate the
fields of the new record.
3 Finally, call UpdateRecord to save the new record to the
database.
The AddNewAccount handler
This is the logic behind the AddNewAccount handler (in cast
member #4).
1 Tell GoldenGate to add a blank record.
gT.AddRecord()
2 Assign user's entry to the fields of the new record.
It is always a good practice to initialize
all the fields of a new record. In this
case, it is not necessary to initialize the
ID field because it is defined to
automatically increment in the MS SQL
database. See database structure in
Appendix: Database Structure.
gT.SetField("FirstName", Member("txt.FirstName").text)
gT.SetField("LastName", Member("txt.LastName").text)
gT.SetField("Nickname", Member("txt.Nickname").text)
gT.SetField("Password", Member("txt.Password").text)
gT.SetField("FavoriteColor",
Member("txt.FavoriteColor").text)
gT.SetField("Mission", Member("txt.Mission").text)
3 Initialize the fields that do not depend on user interface.
GetCurrentDateTime is a handler defined in movie script #5. It
returns the current date and time as a property list.
gT.SetField("LastLogon", GetCurrentDateTime() )
gT.SetField("NumberOfLogons", 1)
4 Save the record to the database.
gT.UpdateRecord()
GoldenGate Database Connector™ – First Steps for Director
9
Modifying Data: Quick Implementation
In this section, you will learn step-by-step how to modify
Logon.DIR to let users modify their own account information
(nickname, first name, last name, favorite color, etc.).
The next section will guide you through a more global and
systematic approach to project development and modification
through the same example.
User Interface Elements
The following user interface elements are provided in
Logon.DIR for your convenience.
• A Modify Account button (member #15 of Castlib UI)
• A Save button (member #16 of Castlib UI)
• A Cancel button (member #17 of Castlib UI)
The same Text members as New Account, laid out the same way
on the ModifyAccount screen (frames 60 through 74).
Place the Modify Account sprite on the "Welcome" screen at any
convenient location.
Scripting
If you don't feel like scripting the new
additions, you can copy/paste them
from the "Copy/Paste into your scripts"
Castlib, or just download a completed
version of Logon.DIR from
http://www.GGdbc.com/getting-started
1 Create a new behavior for the Modify Account sprite. Type
this script:
on MouseUp
DoPopulateAccountInfo()
end MouseUp
2 Type this handler at the top of movie script #4 (Create or
Modify Account):
on DoPopulateAccountInfo
global gT -- GG table instance
global gCurrentNickname -- keep for later verification
gCurrentNickname = Member("txt.Nickname").text
DisplayMsg("Retrieving account info from database...")
gT.SetCriteria(["Nickname", "=", gCurrentNickname])
gT.Select()
DisplayMsg(EMPTY)
if CheckGGError() then return FALSE
-- populate user interface
-- nickname and password are already in req'd members
Member("txt.FirstName").text = gT.GetField("FirstName")
Member("txt.LastName").text = gT.GetField("LastName")
Member("txt.Password").text = gT.GetField("Password")
Member("txt.FavoriteColor").text =
gT.GetField("FavoriteColor")
Member("txt.Mission").text = gT.GetField("Mission")
GoldenGate Database Connector™ – First Steps for Director
10
go to frame "ModifyAccount"
end DoPopulateAccountInfo
This handler selects the current nickname's record in the
database and then retrieves First Name, Last Name, Password,
Favorite Color and Mission to the user interface. Nickname is
already in the appropriate text member. Once
DoPopulateAccountInfo() completes, the user is ready to edit
his/her account.
3 Create a new behavior for the Save sprite. Type this:
on MouseUp
CheckAndSaveAccount()
end MouseUp
4 Type this handler at the top of movie script #4 (Create or
Modify Account):
on CheckAndSaveAccount
global gT -- GG table instance
global gCurrentNickname -- initial nickname
if NOT IsUserEntryValid() then exit -- fail if entered
text ii empty or too long
if (Member("txt.Nickname").text <> gCurrentNickname)
then -- nickname was modified, check uniqueness.
if NOT IsNicknameUnique() then exit -- fail. User
must pick another nickname.
end if
-- make sure you got the right Current Record
gT.SetCriteria(["Nickname", "=", gCurrentNickname])
gT.Select()
gT.EditRecord()
-- set UI data
gT.SetField("FirstName", Member("txt.FirstName").text)
gT.SetField("LastName", Member("txt.LastName").text)
gT.SetField("Nickname", Member("txt.Nickname").text)
gT.SetField("Password", Member("txt.Password").text)
gT.SetField("FavoriteColor",
Member("txt.FavoriteColor").text)
gT.SetField("Mission", Member("txt.Mission").text)
gT.UpdateRecord()
if CheckGGError() then exit
-- gets here if data valid and modification successful
Member("txt.WelcomeMsg").text = "Your account
information was successfully modified."
go to frame "Welcome"
end CheckAndSaveAccount
5 Finally, drop the "Go to Frame Label" behavior on the Cancel
sprite and choose "Welcome" in the popup menu.
You are now ready to test the new feature.
GoldenGate Database Connector™ – First Steps for Director
11
Modifying Data: Methodology
Any project, regardless of its size or scope, and independently of
GoldenGate, must undergo a systematic analysis phase.
Oftentimes, that phase is short but it lets you identify pitfalls
before they actually become problems.
A typical development process for multimedia projects is:
1 Identify clear objectives;
2 List requirements and specify how they would look and
interact once implemented;
3 Architect the solution and put together a blueprint that would
guide the implementation;
4 Implement the solution (create graphics and write scripts);
5 Test, test, test.
Let's apply this process to Logon.DIR's Modify Account project.
Step 1: Objective
Let users modify their own account information.
Step 2: Requirements and Specifications
Requirements
• Users can only modify their own accounts.
• A nickname cannot be changed to another one that already
exists.
• Allow users to review their modifications and cancel the
account modification operation along the way.
Specifications
• A new Modify Account screen displays a user's account and
allow him/her to modify it.
• A user must supply a password before viewing or modifying
an account information.
• A Cancel button sends the user back to where s/he came from.
• A Save buttons makes sure that:
a
the modified data is valid (i.e. no excessively long fields,
no empty nickname, first name, last name, etc.);
b
the new nickname is unique throughout the database;
GoldenGate Database Connector™ – First Steps for Director
12
c
the account information is saved back to the same record
from which it was read.
• A Modify Account button is added to the Welcome screen . It
gives access to the Modify Account area, while at the same
time authenticating a user before allowing modifications.
Step 3: Architecture
• A new Modify Account screen is laid out in frames 60 through
74 using the same Text members as those used in Add
Account.
• The Cancel button is in sprite 19. It basically does "go to frame
Welcome".
• The Save button is in sprite 20. It does the following:
a
Checks IsUserEntryValid() (see handler in member #4);
b
Checks if the nickname is unique. Two distinct scenarios
can occur:
The depth of this text's indentation
reveals that there actually were pitfalls
in this area of the project and that we
identified them before we proceeded to
the implementation.
Thus, the application of methodology
turned out to be an efficient approach.
c
o
If the user modifies his/her nickname, the new
nickname must not be already used by any other
user. Call IsNicknameUnique() to check if the new
nickname is unique.
o
If the user keeps the same nickname, then there is no
need to check for uniqueness. Otherwise, we will
certainly find it not to be unique: The query will
identify the account's original record in the
database.
If both preceding tests succeed, it calls a handler similar
to AddNewAccount(), except that it calls GoldenGate's
EditRecord() method instead of AddRecord().
• The Modify Account button is in sprite 19. It basically:
a Preserves the current nickname, to check for possible
modifications later on;
b
Locates the user's record;
c
Retrieves and displays account information;
d
Goes to frame "ModifyAccount".
GoldenGate Database Connector™ – First Steps for Director
13
Step 4: Implementation
Note that the step-by-step
implementation you performed in
Modifying Data: Quick Implementation is
a direct result of Step 1: Objective,
Step 2: Requirements and Specifications
and Step 3: Architecture.
This is precisely what we focused on in the previous section.
User Interface Elements
See User Interface Elements in Modifying Data: Quick
Implementation (previous section).
Scripting
See Scripting in Modifying Data: Quick Implementation (previous
section).
Step 5: Testing
Testing is an important part of any project – not specifically those
that involve GoldenGate. Be persistent and systematic in your
testing. The earlier you catch errors, the less expensive they are to
fix.
In the specific case of this project, you must test at least two
exceptional cases identified in Step 3: Architecture:
• When a nickname is modified by a user;
• When a nickname is not modified by a user.
Other tests include:
• Leaving some or all entries empty;
• Entering very long strings;
• Trying entries with high ASCII characters or punctuation;
• Entering an existing nickname;
• Clicking on buttons in different sequences.
GoldenGate Database Connector™ – First Steps for Director
14
Error Checking
Error Checking is a very important part of any project that
accesses external files or databases, whether locally or through a
network.
Be Proactive
Not all errors are equal. Some errors are fundamentally fatal (e.g.
network connection dropped), some others are benign (e.g.
attempting to read a record that does not exist).
GoldenGate does not intrusively display alerts when errors
occur. Instead, it lets you take whatever action is appropriate
(e.g. branch to a different handler, terminate a session, display a
message in the appropriate language/style, etc.) whenever an
error occurs.
Therefore, you must make sure to check for errors after each call
to GoldenGate using one or both these methods:
•
GGStatus()
•
GGError()
returns the status of the last called GoldenGate
method. If no error occurred, GGStatus returns 0.
returns text, in English, explaining the error code. If
no error occurred, GGError returns an empty string.
The CheckError handler
Logon.DIR features a convenient and generic error handler
named CheckError:
Once your project is working and ready
for final testing, you may want to
remove some non-critical calls (those
that only trap programming errors).
In Logon.DIR, all CheckErrors() that
followed SetCriteria, GetField,
AddRecord and SetField were
removed to improve script legibility.
on CheckGGError
if GGstatus() then
alert(GGstatus() && GGError())
return TRUE
end if
return FALSE
end CheckGGError
This handler returns TRUE if the last call to GoldenGate was
successful, or it displays an alert and returns FALSE if the last
call to GoldenGate generated an error.
It is an excellent practice to insert a call to CheckError() after
each call to GoldenGate.
GoldenGate Database Connector™ – First Steps for Director
15
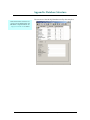
Appendix: Database Structure
The structure of the MS SQL database used by this sample is:
GoldenGate Database Connector also
supports Oracle, MSDE, MySQL and
other ODBC-compliant databases. See
http://www.GGdbc.com for details.
GoldenGate Database Connector™ – First Steps for Director
16