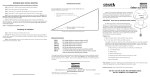
1
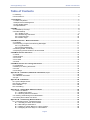
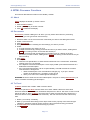
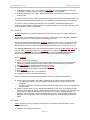
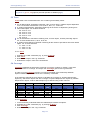
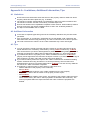
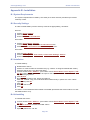
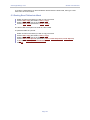
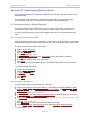
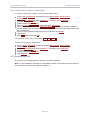
WTML User
Manual
Document Reference: WTML-UM-67.doc
Publication Date: 02-Jun-2010
Published By: Appin Design
www.appindesign.com
www.appindesign.com
WTML User Manual
Table of Contents
0.1 Glossary ............................................................................................................................. 5
0.2 Conventions ........................................................................................................................ 6
1. Introduction.............................................................................................................................. 7
1.1 Table Compilation................................................................................................................ 7
1.2 Requirements Management ................................................................................................. 7
1.3 How WTML Works ............................................................................................................... 7
1.4 Implementation .................................................................................................................... 8
2. WTML ....................................................................................................................................... 9
2.1 The Markup Concept ........................................................................................................... 9
2.2 WTML Markup..................................................................................................................... 9
2.2.1 WTML Syntax .............................................................................................................. 9
2.2.2 Allowed Tag Characters ............................................................................................. 10
2.2.3 Coloured Tags ........................................................................................................... 10
2.2.4 Hidden Tags .............................................................................................................. 10
3. WTML Processor - Ba sic Information ..................................................................................... 11
3.1 Toolbars ............................................................................................................................ 11
3.2 Processing, Progress and Warning Messages ..................................................................... 11
3.2.1 Log Worksheet ........................................................................................................... 11
3.2.2 Progress Messages.................................................................................................... 11
3.3 Defining W TML Vocabulary ................................................................................................ 11
3.4 Specifying the Documents to be Processed ......................................................................... 12
4. WTML Processor Functions ................................................................................................... 14
4.1 About ................................................................................................................................ 14
4.2 Documents ........................................................................................................................ 14
4.3 To Excel............................................................................................................................ 14
4.4 To Word ............................................................................................................................ 15
4.5 Value ................................................................................................................................ 15
5. WTML Processor for Tracing Hierarchies .............................................................................. 17
5.1 Int roduction ....................................................................................................................... 17
5.2 Markup for tracing hierarchies ............................................................................................ 17
5.3 Trace ................................................................................................................................ 18
5.4 Coverage .......................................................................................................................... 18
Appendix A - Limitations, Addi tional Information, Tips ............................................................. 19
A.1 Limitations ........................................................................................................................ 19
A.2 Additional Information ........................................................................................................ 19
A.3 Tips .................................................................................................................................. 19
Appendix B - Installation............................................................................................................ 20
B.1 System Requirements ....................................................................................................... 20
B.2 Security Settings ............................................................................................................... 20
B.3 Installation ........................................................................................................................ 20
B.4 Uninstalling ....................................................................................................................... 20
Appendix C - Useful Word & Excel Features .............................................................................. 22
C.1 Word Font Effects ............................................................................................................. 22
C.1.1 Hidden Font Effect ..................................................................................................... 22
C.1.2 Warning About Font Effects........................................................................................ 22
C.2 Inserting & Renaming Excel Worksheets ............................................................................ 22
C.3 Pasting Excel Tables Into Word ......................................................................................... 23
Appendix D - Customi sing Word and Excel ............................................................................... 24
D.1 Customising Word - Worked Example ................................................................................ 24
D.1.1 Creating a Custom Word Toolbar................................................................................ 24
D.1.2 Recording a Word Macro ........................................................................................... 24
D.1.3 Adding a Custom Button to a Word Toolbar................................................................. 25
D.1.4 Assigning Shortcut Keys to a Word Macro ................................................................... 26
Page 2
www.appindesign.com
WTML User Manual
D.2 Customising Excel............................................................................................................. 26
Appendix E - Typical Use s of WTML .......................................................................................... 27
Page 3
www.appindesign.com
WTML User Manual
The soft ware described in this manual is furnished under a license agreement and may be used
only in accordance with the terms of the agreement.
Information in this document is subject to change without notice. Companies, names, and data
used in examples herein are fictitious unless otherwis e noted. No part of this document may be
reproduced or transmitted in any form or by any means, electronic or mechanical, for any
purpose without the express written permission of Appin Design.
NO WARRA NTY. The technical document ation is being delivered to you AS IS, and Appin
Design makes no warranty as to its accuracy or use. Any use of the technic al documentation or
the information cont ained therein is at the risk of the user. Document ation may contain technical
or other inaccuracies or typographical errors. Appin Design reserves the right to make changes
without notice.
Access â, Excelâ, Projectâ and Wordâ are Registered Trademarks belonging to Microsoft
Corporation.
DOORSâ is a Registered Trademark belonging to International Business Machines Corporation.
© Copyright Appin Design 2009-2010. All rights reserved.
Page 4
www.appindesign.com
WTML User Manual
0.1 Glossary
Term
Meaning
Child
An object that has a hierarchical relationship with one or more
other objects and is one level below those objects in the
hierarchy.
Dependent
An object that has a hierarchical relationship with one or more
other objects and is one or more levels below those objects
in the hierarc hy.
Object
A segment of text having particular significance such as a
recommendation, a finding, an action, a definition, a
requirement, a finding, a hypot hesis etc.
Parent
An object that has a hierarchical relationship with one or more
other objects and is one level above those objects in the
hierarchy.
Precedent
An object that has a hierarchical relationship with one or more
other objects and is one or more levels above those objects
in the hierarc hy.
Property
A segment of text giving information about an object such as
the number of a recommendation, the severity of a finding, the
owner of an action etc.
WTML
Word Table Markup Language.
WTML-p
WTML-processor.
Workbook
A spreadsheet file.
Worksheet
A single sheet in a workbook.
Page 5
www.appindesign.com
WTML User Manual
0.2 Conventions
The following typographical conventions are used in this manual:
Key press = Key press
Item to be clicked = Item to be clicked
Typed input = Typed input
Where Office 2007 instructions differ from earlier versions they are given in brackets.
Page 6
www.appindesign.com
WTML User Manual
1. Introduction
1.1 Table Compilation
Documents often have data scattered throughout them, for example:
Findings
Requirements
Definitions...etc
It can be useful to gather this data into tables. WTML automates this process. WTML compiles
“virtual” tables (the scattered data) from Word documents into “real” tables in Excel.
You may then copy the “real” table back into Word as a summary, OR
Modify the “real” table in Excel and use WTML to update the “virt ual” table in Word.
1.2 Requirements Management
Where there are hierarchical relationships in the data WTML can automatically trace the
relationships and verify that higher levels in the hierarchy are covered by the lower levels. For
example W TML can verify that all findings have recommendations.
A particular application of WTML is requirements management. You can write a requirements
specification in Word and use W TML to create a table of requirements, requirements traceability
matrices and verity requirement coverage.
1.3 How WTML Works
WTML is a “markup” language for marking text that is part of a virtual table AND it is a
processor for marked up text (the proc essor is referred to as WTML-p). For example here is a
crudely “marked up” recommendation:
There continues to be a poor level of consumption of fruit and vegetables throughout
the population. Our recommendation is unchanged from last year. <Rec><Num>R1<\Num><Priority>High<\Priority><Txt>Eat five portions of fruit and vegetables eac h
day.<\Txt><\Rec>
The markup “voc abulary” of W TML is user-defined. Here is the same example with the markup
tags more subtly defined (and including colour in the tag definitions and values):
There continues to be a poor level of consumption of fruit and vegetables throughout
the population. Our recommendation is unchanged from last year. <R> [Number=R-1]
[Priority=High] [Recommendation=Eat five portions of fruit and vegetables each
day.]</R>
Tags may also be hidden:
There continues to be a poor level of consumption of fruit and vegetables throughout
the population. Our recommendation is unchanged from last year. R-1 High Eat five
portions of fruit and vegetables each day.
The WTML processor would creat e this table from the ex ample above (with a few extra rows
Page 7
www.appindesign.com
WTML User Manual
shown for illustration):
Number
R-1
R-2
R-3
Priority
High
Medium
High
Recommendation
Eat five portions of fruit and vegetables each day.
Do not snack between meals.
Eat complex carbohydrates.
1.4 Implementation
WTML-p is implemented via a custom Excel toolbar. It requires Excel (97 to 2007 versions) and
works with documents created in Word (97 to 2007 versions). No software other than Word is
necessary to prepare or read a W TML document.
Page 8
www.appindesign.com
WTML User Manual
2. WTML
2.1 The Markup Concept
“Mark up” is a series of codes embedded in text. The codes tell a markup processor what to do
with the text. For example the markup below tells a processor that “Oil Price Shock” is to be
treated as a level one heading. This is an example of the “hypertext markup language” whic h is
used to creat e web pages. The “processor” in this case is a web browser.
<H1>Oil Price Shock<\H1> The price of oil rose today by $10...
...process and view to give:
Oil Price Shock
The price of oil rose today by $10...
2.2 WTML Markup
2.2.1 WTML Syntax
WTML is a mark up language. In W TML text is marked up as either an “object” or a “property” of
an object.
An “object” corresponds to a row in a table.
A “property” corresponds to an ent ry in a row.
For example the text below has one marked up object – a “finding” delimited by <F> and <\F>
tags and three properties – an “identifier” delimited by <ID> and <\ID> tags, a “severity”
delimited by <S> and <\S> tags, and finding “text” delimited by <T> and <\ T> tags.
The audit examined backup procedures. <F> <ID>F23<\ID> <S>Major<\S> <T>A backup
procedure exists. It is not being followed.<\ T><\F>
The corresponding table would be:
Identifier
F23
Severity
Major
Text
A backup procedure exists. It is not being followed.
The properties of an object must appear between the object tags.
The syntax of W TML markup is “opening tag”, “value”, “closing tag”. WTML allows you to define
your own markup tags (see §3. 3 “Defining WTML Vocabulary ”). For example you may wish to
distinguish findings from recommendations so you would define t wo types of object tags and
your markup could look something like this:
The audit examined backup procedures. <F> <ID>F23<\ID> <T>A backup procedure exists.
It is not being followed.<\T><\F> <R> <ID> R3<\ID> <T>A named individual should be trained
and assigned responsibility for backup.<\ T> <\R>
The corresponding table would be:
Page 9
www.appindesign.com
Identifier
F23
R3
WTML User Manual
Text
A backup procedure exists. It is not being followed.
A named individual should be trained and assigned responsibility for backup.
2.2.2 Allowed Tag Characters
The WTML syntax allows the following characters to be used in a tag:
a-z, A-Z, 0-9
' - ! " # $ % & ( ) , . : ; @ [ ] _ ` | } + < = >\ /
space
The following characters may not be used:
*?~^
Opening and closing tags need not look the same. In the example below the tags for “ID” are
“<ID=” and “>”.
The audit examined backup procedures. <F> <ID=F23> <S>Major</S> <T> A backup
procedure exists. It is not being followed.</ T></F> <R> <ID=R3> < T>A named individual
should be trained and assigned responsibility for backup. </T></R>
Warning Be wary of using a tag that may appear in normal text. For example if you choose “]”
as a tag it must not appear any where in the value of a property.
2.2.3 Coloured Tags
WTML tags and their contents may be coloured. Example:
The audit examined backup procedures. <F> <ID>F23</ID> <S>Major</S> <T>A backup
procedure exists. It is not being followed.</ T></F> <R> <ID>R12</ID> <T>A named
individual should be trained and assigned responsibility for backup.</T></R>
2.2.4 Hidden Tags
WTML tags (and/or their values ) may be hidden if required. In the example below the object and
property tags have been hidden but their contents are displayed. WTML-p will still find them.
The audit examined backup procedures. F23 Major A backup procedure exists. It is not being
followed. R12 A named individual should be trained and assigned responsibility for backup.
Appendix C.1.1 “Hidden Font Effect” describes how to apply the hidden font effect.
Page 10
www.appindesign.com
WTML User Manual
3. WTML Processor - Basic Information
3.1 Toolbars
WTML-p is driven from a custom Excel toolbar (or the Add-ins ribbon in Excel 2007). The
toolbar becomes available on installation (s ee Appendix B - “Installation”).
The WTML-p toolbar has buttons for each WTML-p function.
In Excel versions prior to 2007 the toolbar may be displayed or hidden by choosing View,
Toolbars and checking or unchecking “WTML”.
3.2 Processing, Progress and Warning Messages
3.2.1 Log Worksheet
WTML-p keeps a log of what it has processed and any warning or failure messages. For each
log entry W TML-p records a timestamp. For warning and failure messages it records as many
as possible of (and as accurately as it can determine):
Location of the origin of problem.
Description of warning or failure.
Suggested remedy.
WTML-p tries at all times to continue after a warning and make a best effort to process the
remainder of dat a sensibly.
WTML-p keeps the log in a worksheet called “Log” which it will creat e if it doesn’t already exist.
The “Log” worksheet is cleared each time the To Excel or To Word functions are run.
3.2.2 Progress Message s
The To Excel, To Word and Trace functions of W TML-p display progress in Excel’s status bar.
To Excel and To Word show which document and which object type is being processed and
the current position in the document (as a perc entage of the starting length of the document
for To Excel and as an absolut e position for To Word).
Trace first has to build a net work of linked objects. During this it reports how many objects it
has proc essed as a percentage of the total number to be proc essed. It then exec utes the
trace. During this it reports which direction it is tracing (to dependents or to precedents), the
number of identifiers it has traced and the total number to be traced.
3.3 Defining WTML Vocabulary
In order for W TML-p to process a marked up document it needs to “learn” the markup
“vocabulary” you have used. To “teach” it:
Open an Excel workbook.
Create a worksheet called “V ocabulary ” (see Appendix C.2 “Inserting & Renaming Excel
Worksheets”).
Give it column titles as below.
Define your vocabulary, for example:
Page 11
www.appindesign.com
1
A
Class
2
3
4
5
6
Object
Object
Property
Property
Property
WTML User Manual
B
Opening
Tag
<F>
<R>
<ID>
<S>
<T>
C
D
Closing
Tag
</F>
</R>
</ID>
</S>
</T>
Type
Finding
Recommendation
Identifier
Severity
Text
E
Presentation
SSS
SSS
BSSS
BHSH
HSH
Class must be “Object” or “Property”.
Opening Tag marks the start of an object or property.
Type is used to label the rows (objects) and columns (properties) in the Excel table.
Closing Tag marks the end of an object or property.
Presentation The final definition is of the spacing and hidden text effects to be applied when
the WTML processor writes to Word.
- The spacing only applies to properties. This is defined by an optional “B” requesting that
the property is prefixed by a Blank space.
- The hidden text effects are defined by an optional three character code which is a
combination of “H” or “S” (Hide or Show) instructions. The first character in the three
character code applies to the opening tag, the second to the contents of the object or
property and the last character applies to the closing tag. In the case of an object the
“contents” are any text not part of a property. This part of the definition is optional and will
be interpreted as “SSS” if left blank.
Opening and Closing Tags are case-sensitive. The other parts of the definition are not casesensitive.
Tag and Type definitions may be coloured. The colours will be applied when the WTML
processor writes to Word. For example this definition:
1
A
Class
2
3
4
5
6
Object
Object
Property
Property
Property
B
Opening
Tag
<F>
<R>
<ID>
<S>
<T>
C
Type
Finding
Recommendation
Identifier
Severity
Text
D
Closing
Tag
</F>
</R>
</ID>
</S>
</T>
E
Presentation
SSS
SSS
HSH
HSH
HSH
…would lead to this in Word
The audit examined backup procedures. <F> F23 Major A backup procedure exists. It is not
being followed.</F> <R> R12 A named individual should be trained and assigned
responsibility for backup. </R>
Note: Anything bet ween object tags but not contained in a property tag will be ignored by
WTML-p.
Note: There are two property Types in WTML with special meaning – “Identifier” and “P arents”.
While the names of thes e Types are fixed the user defines their own opening and closing tags
to use with them. Their use is explained lat er in this document (§4.3 “To Excel”, §4.4 ”To Word”
and §5.2 “Markup for tracing hierarchies”).
3.4 Specifying the Documents to be Processed
WTML needs to know which documents you want to process. To “teach” it:
Page 12
www.appindesign.com
WTML User Manual
Open the Excel workbook containing your vocabulary definition.
Create a worksheet called “Doc uments” (s ee Appendix C.2 “Inserting & Renaming Excel
Worksheets”).
Give it column titles as below.
Use the Documents function to select the documents to be processed (see §4.2) or type the
document description and document file specification.
1
2
3
4
5
6
A
Document Description
System Specification
System Architecture
Sub-system A spec
Sub-system B spec
Sub-system C spec
B
Document File Specification
C:\P454X-SS.doc
C:\P454X-A. doc
C:\P454X-SSA.doc
C:\P454X-SSB.doc
C:\P454X-SS C.doc
Page 13
www.appindesign.com
WTML User Manual
4. WTML Processor Functions
This section describes the buttons on the W TML-p toolbar.
4.1 About
About displays the WTML-p version number.
1. Click the About button.
2. WTML-p will dis play its version number.
3. Click OK to dismiss the display.
4.2 Documents
Documents provides a dialog box via which you may select documents for processing
(alternatively you can type the list of documents).
1.
2.
3.
4.
5.
Decide at which row in the “Documents” worksheet you wish to start listing documents.
Select a cell in that row.
Click Documents.
Navigate to the folder containing the document(s) you wish to process.
Select
a. a single document (by clicking on it) or
b. multiple documents (by clicking on the first document you wish to select, holding down
CTRL and clicking on each of the other documents) or
c. multiple documents that are neighbours in the dialog box (by clicking on the first
document you wish to select, holding down SHIFT and clicking on the last document you
wish to select).
6. Click Open.
7. WTML-p will
a. write the “File Specification” of each selected document to the “Documents” worksheet,
starting at the row you selected,
b. if the adjacent “Document Description” cell is empty WTML-p will add the filename as a
default document description.
c. If the “Document Description” cell is occupied WTML-p will not overwrite its contents.
This behaviour is designed to
i. retain the description even if the filename changes (e.g. if you put a version
number in the filename e.g. SysSpec-v3.doc) and to
ii. allow you to add a more meaningful file description.
WARNI NG Be sure to clear the “Document Description” cell prior to clicking Documents if you
wish to overwrite the existing file description.
4.3 To Excel
To Excel extracts each “hidden” table in Word to Excel.
To be more precise To Excel extracts each row of each “hidden” table from each Word
document listed in the “Documents” worksheet and places it in Excel. The order of rows in Excel
will be the order in which To Excel found the rows in Word (it processes all the objects for a
document before moving on to the next document). The user can then sort the rows as they
wish.
1. Define your markup vocabulary.
2. Mark up your Word document(s). Each object must have a property of the reserved type
“Identifier”. Identifiers must be unique across the list of documents being processed.
3. Use Documents to choose the doc ument (s) to process.
4. Click To Excel.
Page 14
www.appindesign.com
WTML User Manual
5. Examine the output in the “Log” worksheet. To Excel checks for potentially “rogue” tags
embedded in property values and reports these in the “Log” worksheet.
6. Examine the output in the “Table” worksheet (W TML-p will create the worksheet if it doesn’t
already exist).
The first two columns in the “Table” worksheet will contain the document description given in the
“Doc uments” worksheet and the object type. The subsequent columns contain the properties.
The order in which properties are defined in the “Vocabulary” worksheet determines the
columns in which WTML-p places them in the “Table” worksheet. The first defined property will
be in the leftmost column of properties.
4.4 To Word
To Word updat es each “hidden” Word table from the values in the Excel “Table” worksheet.
For an object to be updated it must have a property of the reserved type “Identifier”. Identifiers
must be unique across the list of documents being processed.
Prior to opening each Word document To Word makes a backup copy of it in the same folder
nd
but with the date and time appended to the file specification, e.g. fred.doc processed on 2
March 2010 at 22:21hrs and 19 seconds will be backed up as fred.doc_2010-3-2_22-21-19.
It is strongly advi sed that you save each document before running To Word (Edit, Undo will
not work after To Word has been run). To Word does not make a backup of any Word
document already open. It leaves the document open and it i s incumbent on the user to
ensure processing has been successful prior to closing and saving the document.
To run To Word:
1. Define your markup vocabulary.
2. Mark up your Word document(s). Each object must have a property of the reserved type
“Identifier”. Identifiers must be unique across the list of documents being processed.
3. Use Documents to choose the doc ument (s) to process.
4. Populate the “Table” worksheet (e.g. by using To Excel).
5. Make any changes you require in the Excel table.
6. Click To Word.
7. Examine the output in the “Log” worksheet.
8. Examine the output in the Word documents.
WTML-p searches through eac h Word document looking for objects with identifiers:
When it finds one it looks in the “Table” worksheet for an object with the same identifier.
- If it finds one it replaces the Word object’s properties with the “Table” version of its
properties.
- If it doesn’t find one it concludes the object has been deleted from “Table” and deletes the
object in Word.
Finally it checks “Table” for any objects with identifiers it hasn’t seen in the document and
whos e file description in “Table” matches that of the document. If it finds one it concludes it is
a new object. It appends the object to the document. The order in which properties are
defined in the “V ocabulary” worksheet det ermines the order in which WTML-p places the
properties in the new Word object. The first defined property will be placed first within the
object.
4.5 Value
Value displays (in a pop-up window) the properties of an object whose identifier is in the
selected Excel cell.
1. Select a cell containing an identifier.
Page 15
www.appindesign.com
WTML User Manual
2. Click the “Di splay Object” button on the toolbar.
3. WTML-p will look for the object identifier in the “Table” worksheet and display its properties.
Value is typically used to examine the properties of identifiers on the precedents and
dependants worksheets.
Page 16
www.appindesign.com
WTML User Manual
5. WTML Processor for Tracing Hierarchies
This section describes the buttons on the W TML-p toolbar used to analyse hierarchical
relationships.
5.1 Introduction
WTML-p is designed to answer questions such as:
“Are all system requirements traceable to test cases?”
“If I change a requirement which related requirements may be impacted?”
Consider the illustration below representing a hierarchy of objects where each object has been
given a unique identifier:
System requirement S2 has dependents M1.2, M1.3, M1.4, M1.5, T1, T3 and T4.
The chains of dependency starting from S2 are:
- S2 à M1.2 à T1
- S2 à M1.3 à T3
- S2 à M1.4 à T3
- S2 à M1.4 à T4
- S2 à M1.5.
Test case T1 has precedents M1.1, M1.2, S1 & S2.
The chains of precedenc e from T1 are:
- T1 à M1.1 à S1
- T1 à M1.2 à S1
- T1 à M1.2 à S2.
There is 80% coverage of Module 1 requirements by test cases (M1.5 being the requirement
that has no coverage).
WTML-p can provide all this information from suitably marked up documents.
System Requirements
S1
S2
Module 1 Requirements
M1.1
M1.2
M1.3
M1.4
Test Cases
T1
T2
T3
T4
M1.5
5.2 Markup for tracing hierarchies
The following are pre-requisites for running WTML-p:
Objects must contain a property of the reserved type “Identifier”.
The value of each Identifier must be unique across the set of documents being processed.
Each child object must contain a property of type “Parents”, the value of the property being a
comma delimited list of the identifier(s ) of the object’s parents. For example:
Page 17
www.appindesign.com
WTML User Manual
[R] [ID=M1.2] [P=S1, S2] [T]Each port shall operate at 10Gbit/s.[/T][/R]
5.3 Trace
Trace builds a set of worksheets each one containing a traceability matrix:
An “All Dependents” worksheet containing a list, for each object, of all the objects dependent
on it. For S2 these would be M1.2, M1. 3, M1.4, M1.5, T1, T3 and T4.
A “Chains of Dependents” worksheet containing all the chains of dependency flowing from
each linked object. For S2 thes e would be
- S2 à M1.2 à T1
- S2 à M1.3 à T3
- S2 à M1.4 à T3
- S2 à M1.4 à T4
- S2 à M1.5
An “All Precedents” worksheet containing a list, for each object, of all its preceding objects.
For T1 these would be M1.1, M1.2, S1 & S2.
A “Chains of Precedents” worksheet containing all the chains of prec edents from each linked
object. For T1 these would be
- T1 à M1.1 à S1
- T1 à M1.2 à S1
- T1 à M1.2 à S2
To run Trace:
1.
2.
3.
4.
Populate the “Table” worksheet (e.g. by using To Excel).
Click Trace.
Examine the output in the Log worksheet.
Examine the output in each of the worksheets.
5.4 Coverage
Coverage calculates the percentage coverage of one type of object by another. It also lists
objects that have no coverage. The output from Coverage goes to the Log worksheet.
In order to run the Coverage function you need to tell WTML-p the relationship between
objects. Relationships are defined in the “Vocabulary” worksheet.
In the following example the us er wishes to calculate the coverage of “System Requirement ”
objects by “Test Case” objects and also coverage of “System Requirement” objects by “Module
Requirement” objects. Further relationships may be defined using further columns.
1
A
Class
2
3
4
5
6
Object
Object
Object
Property
Property
B
Opening
Tag
[SR]
[MR]
[T]
[ID]
[P]
C
Type
System Reqs
Module Reqs
Test Case
Identifier
Parents
D
Closing
Tag
[/SR]
[/MR]
[/T]
[/ID]
[/P]
E
Presentation
SSS
HSH
SSS
F
Relationship
G
Relationship
Parent
Parent
Child
Child
To run Coverage:
1.
2.
3.
4.
In the Vocabulary worksheet define the relationships between the objects.
Populate the “Table” worksheet (e.g. by clicking To Excel).
Click Coverage.
Examine the output in the “Log” worksheet.
Page 18
www.appindesign.com
WTML User Manual
Appendix A - Limitations, Additional Information, Tips
A.1 Limitations
Excel cannot store information about the format of the property values it reads from Word.
Property values should be plain text (e.g. no bullets).
The maximum number of dependents or precedents an object may have is limited to 250.
The maximum number of levels in a hierarchy of relationships is 20.
Word 97 has limited colour capabilities compared to later versions. When WTML-p writes to
Word 97 it will apply the nearest available colour to that in the vocabulary definition.
An object cannot straddle cells in a table.
A.2 Additional Information
In the case of duplicate types being used in the vocabulary definitions only the first will be
processed.
If the “Documents” or “V ocabulary” worksheets do not exist WTML-p will creat e them but
leave them blank and then stop processing, as it has no instructions as to what to process.
The order of the first two columns in the “Table” worksheet may not be rearranged.
A.3 Tips
You can change the format of all tags and their contents in your Word documents to the
format defined in the “Vocabulary” worksheet by running To Excel followed by To Word.
This can be useful if you wish to hide tags/text for publication but during editing you wish to
avoid the complications of editing with formatted text (Appendix C.1 “Word Font Effects”).
If you delete the value of a property in the “Table” worksheet and then run To Word the
property and its tags will be removed from the object in Word. If you want to leave the tags in
place replace the property value with a space rather than deleting it.
If you need to further process the output in the “Table” worksheet it is worthwhile inserting
another worksheet and using formulae in it to do the processing. The formulae in this
worksheet will be immune from being cleared when To Excel is run and can stay stable as
the data in the “Table” worksheet is updated.
A simple way to add a property to each object in a document is to:
- Add the definition of the property to the vocabulary.
- Run To Excel.
- To Excel will create a column in the “Table” worksheet for the new property.
- Populate the column with the values of the property for each object.
- Run To Word.
- The property will be added to each object. The position of the property within the object
will be determined by the order in which properties are defined in the vocabulary. The
order of properties within the object will follow the order in which the properties are
defined.
Page 19
www.appindesign.com
WTML User Manual
Appendix B - Installation
B.1 System Requirements
The system requirements for WTML-p are Word (97 to 2007 versions) and Excel (97 to 2007
versions) or later.
B.2 Security Settings
In order to install WTML-p Excel’s security must be set appropriately, as follows:
Excel 97
Choose Tool s, Options.
Click the General tab.
Uncheck Macro Virus Protection.
Excel 2003
Choose Tool s, Macro, Security.
In the Security dialog box click the Trusted Source s tab.
Check the Trust All Installed Add-ins and Templates box.
Excel 2007
Click the Office Button.
Choose Excel Options, Trust Center, Trust Center Settings, Add-ins.
Uncheck all the options.
B.3 Installation
To install WTML-p:
Download the Add-In.
Choose or create a folder for the add-in file (e.g. create a “C:\Program Files\W TML” folder).
Place the Add-in (the “.xla”) file in this folder.
In Excel choose Tool s, Add-Ins... (Excel 2007 choos e Offi ce Button, Excel Options, AddIns, Go). Note: a workbook needs to be open for this step otherwise the Add-Ins… menu
option will be greyed-out.
Click Browse.
Browse to the location of the .xla file and select it.
Click OK. If asked “Copy xxx to Microsoft Excel Add-in library?” (where xxx is the .xla file
specification) click No.
Click OK.
Enter the licence key.
Click OK.
The add-in is now installed and the toolbar is available (Excel 2007 the Add-ins ribbon now has
the WTML buttons on it).
B.4 Uninstalling
To uninstall the Add-in:
In Excel choose Tool s, Add-ins... (Excel 2007 choos e Offi ce Button, Excel Options, AddIns, Go).
In Add-Ins available uncheck the WTML add-in.
Click OK.
Optionally delete the “.xla” file.
Page 20
www.appindesign.com
WTML User Manual
The add-in is now uninstalled and the toolbar is no longer available.
Page 21
www.appindesign.com
WTML User Manual
Appendix C - Useful Word & Excel Features
C.1 Word Font Effects
C.1.1 Hidden Font Effect
Alongside well-known font effects such as “Bold”, “Italic” or “Underline” Word provides a “Hidden
Text” effect. Depending on how Word’s View options are set “Hidden” text will either be shown
(with a dotted line underneath) or hidden.
To set View options:
choose Tool s, Options, View (Word 2007 Office Button, Word Options, Di splay),
check/uncheck Hidden Text to view/hide hidden text or
check/uncheck All (Word 2007 Show all formatting marks) to view/hide all non-printing
characters,
click OK.
An alternative is to click the “¶” button on the Standard Menu bar (Word 2007 on the Home
ribbon, Paragraph tab). This toggles bet ween viewing/hiding all non-printing characters.
To apply the “Hidden” effect:
For existing text:
- select the text, choose Format, Font and choose the Font tab (Word 2007 Home, Font
tab, Font dialog box),
- check Hidden,
- click OK.
For new text:
- click where you want to insert the text,
- choose Format, Font and choose the Font tab (Word 2007 Home, Font tab, Font
dialog box),
- check Hidden,
- click OK.
To remove a hidden effect repeat the process, this time unchecking Hidden.
STRONG WARNI NG Be careful while editing a document containing hidden text. If View
options are set to hide the text you can mistakenly overwrite it, add to it or delet e it. It may be
wort h considering only using hidden text for final presentation. See Appendix A.3 “Tips”.
C.1.2 Warning About Font Effects
When you type in Word the format of the next character, by default, is inherited from the format
of the character preceding the insertion point. This means that if you have applied a font effect
and then start to type immediat ely next to it the new text will also have the font effect applied.
To revert to “normal” formatting:
set the font colour at the insertion point to “automatic” and follow the procedure in Appendix
C.1.1 “Hidden Font Effect” for hiding new text but uncheck Hidden.
You could record a macro to revert to normal formatting. See Appendix D.1.2 “Recording a
Word Macro”.
C.2 Inserting & Renaming Excel Worksheets
To insert a new worksheet in an Excel workbook choose Insert, Worksheet (Excel 2007 Click
the Insert Worksheet tab).
Page 22
www.appindesign.com
WTML User Manual
To rename a worksheet in an Excel workbook double-click the sheet’s tab, then type a new
name over the current name.
C.3 Pasting Excel Tables Into Word
Select all cells in Excel that you wish to copy into Word.
Choose Edit, Copy (Excel 2007, Home, Copy).
Select the insertion point in the document.
Choose Edit, Paste (Word 2007, Home, Paste).
The Excel cells will be placed in Word as a Word table.
To paste the table as a picture:
Select all cells in Excel that you wish to copy into Word
Choose Edit, Copy (Excel 2007, Home, Copy).
Select the insertion point in the document.
Choose Edit, Paste Special (Word 2007, Home, Paste drop-down, Paste Special).
In As, select Picture (Enhanced Metafile).
Click OK.
Page 23
www.appindesign.com
WTML User Manual
Appendix D - Customising Word and Excel
This section illustrates how to automat e routine tasks such as typing tag pairs. It does so via a
work ed example.
This is intended as an introduction to customisation rather than a comprehensive guide.
Comprehensive guidance on customisation is available on the World Wide Web.
D.1 Customising Word - Worked Example
The example in this section shows how to create a custom Word toolbar, a Word mac ro, a
custom button on the toolbar to run the macro and assigns a short-cut key to the macro.
The macro automates typing of the tag pair [ID][/ID], leaving the curs or plac ed between the
tags.
D.1.1 Creating a Custom Word Toolbar
This sub-section does not apply to Office 2007. In Office 2007 it is not possible to create custom
toolbars without programming (the rest of the sections in this appendix do apply to Office 2007).
To create a custom Word toolbar called “Tags”:
Choose Tool s, Customi se.
Select the Toolbars tab.
Click New...
In Toolbar Name type Tags.
In Make toolbar available to select normal.dot (or other template as you desire).
Click OK.
A new, empty, toolbar called “Tags” will appear.
Click Close.
Left-click on the new toolbar and drag it to your desired position within the Excel window.
If you want to delete the toolbar:
Choose Tool s, Customi se.
Select the Toolbars tab.
In Toolbars select Tags.
Click Delete.
Click OK.
Click Close.
D.1.2 Recording a Word Macro
To record a Word macro to type the tag pair “<ID></ID>”:
Choose Tool s, Macro, Record New Macro..., (Word 2007 choose Offi ce Button, Word
Options, Popular, check Show Developer tab in the Ribbon, click OK, then Developer,
Record Macro).
In Macro name type IdentifierTags.
In Store macro in select All Documents (Normal.dot) (or other template of your choice)
(Word 2007 All Documents (Normal.dotm)).
In De scription type Type Identifier tags, leaving the cursor between the
tags.
Click OK. Type <ID></ID>.
Click Left-A rrow five times to leave the cursor bet ween the tags.
Choose Tool s, Macro, Stop Recording (Word 2007 Developer, Stop Recording).
To run the macro:
Page 24
www.appindesign.com
WTML User Manual
Choose Tool s, Macro, Macros (Word 2007 choose Developer, Macros).
In Macro Name select IdentifierTags.
Click Run.
If you want to delete the macro:
Choose Tool s, Macro, Macros (Word 2007 choose Developer, Macros).
In Macro name select IdentifierTags.
Click Delete.
Click Yes.
Close Close.
D.1.3 Adding a Custom Button to a Word Toolbar
This section describes how to add and delete toolbar buttons in pre Offic e 2007 versions and
then, separately, in Office 2007.
To create a custom button to run the “IdentifierTags” macro (pre Office 2007):
Choose Tool s, Customi se.
Select the Commands tab.
In Categories select Macros.
In Commands left-click on IdentifierTags (which may appear as something like
Normal.NewMacros. IdentifierTags) and drag it and drop it on the Tags toolbar (or other
toolbar of your choic e).
Right -click on the new custom button.
Replace whatever is in Name with <ID>.
Press ENTE R.
Click Close.
You may now run the macro by clicking on the <ID> button.
If you want to delete the button (pre Office 2007):
Choose Tool s, Customi se.
Left click on the <ID> button and drag it off the toolbar.
In Office 2007 unless you resort to programming it is only possible to add buttons to the Quick
Launch Toolbar. In Office 2007 to create a custom button on the Quick Launch Toolbar:
Choose Office Button, Word Options, Customi se.
In Choose Commands From select Macros.
In the list of Mac ros select IdentifierTags (which may appear as something like
Normal.NewMacros. IdentifierTags).
Click Add.
Click Modify.
Replace whatever is in Di splay Name with <ID>.
Click OK.
Click OK again.
If you want to delete the button (Office 2007):
Choose Office Button, Word Options, Customi se.
In Choose Commands From select Macros.
In the list of items under Customise Quick Access Toolbars select IdentifierTags.
Click Remove.
Click OK.
Page 25
www.appindesign.com
WTML User Manual
D.1.4 Assigning Shortcut Keys to a Word Macro
To assign a shortcut key sequence to the “IdentifierTags” macro:
Choose Tool s, Customi se (Word 2007 Choose Office Button, Word Options,
Customi se).
Select the Commands tab, Click Keyboard..., (Word 2007 click Customi se).
In Categories select Macros.
In Macros select IdentifierTags.
Click in Press new shortcut key (Word 2007 Click Customi se).
Press a key-combination such as CTRL -ALT-SHIFT-I. If the key-combination is already in
use the dialogue box will show its current use – you would normally avoid using already used
key-combinations.
When you have selected an appropriate key-combination click Assign.
Click Close.
Click Close (Word 2007 click OK).
You may now run the macro by pressing CTRL -ALT-SHIFT-I.
To reset all shortcut key assignments:
Choose Tool s, Customi se (Word 2007 Choose Office Button, Word Options,
Customi se).
Select the Commands tab, Click Keyboard..., (Word 2007 click Customi se).
In Categories select Macros.
In Macros select IdentifierTags.
Click Reset All.
D.2 Customising Excel
The process for customising Excel is similar to that described above.
Note: It is not advisable to add buttons to the WTML-p toolbar as the toolbar would be replaced
and your buttons lost during an upgrade of WTML-p.
Page 26
www.appindesign.com
WTML User Manual
Appendix E - Typical Uses of WTML
WTML-p has the effect of compressing “wordy” documents into short lists e.g. a fifty page
specification in a Word document may reduce to a list of 100 requirements in an Excel
worksheet, making for simpler discussions with the customer.
Example Application Areas
- Project planning (extract a list of actions from Word to Excel for import to Project).
- Project time and cost estimation (add cost or timescale properties to requirement objects,
assign values and use WTML-p to draw up a table of time and cost).
- Impact analysis & risk management (If I change a requirement what connected
requirements are impacted?).
- Product roadmaps (define a release property for requirement objects in a Word document
and export to Excel to produce a list of requirements per release).
- Progress tracking (e.g. assign a “progress” property for a “requirement” object with values
of specified, designed, built, tested; use Excel to summarise progress and To Word to
update the document at any time).
- Demonstrating system requirements coverage by sub-system specifications, design
documents, or test documents (assign requirements as parents of sub-system
requirements, design objects or tests and then run the “Coverage” function).
- Creating document catalogues – define title, author, date and version properties within a
“document information” object and use these to build a catalogue.
- MoSCoW analysis (Must, Should, Could, Won’t – use W TML-p to creat e a table of
requirements for discussion during MoS CoW analysis, define a MoSCoW property and
mark each requirement as Must, Should, Could, Won’t).
- Demonstrating traceability from specification through design to test.
- Interfacing to tools that accept Excel as an input format (e.g. Micros oft Access, Microsoft
Project, HP Quality Center, DOORs).
Examples of Objects
- findings
- actions
- conclusions
- recommendations
- requirements
- test cases
- definitions
- assumptions
Examples of Properties
- text (of a finding)
- severity (of a finding e. g. critical, major, minor)
- priority (of an action e.g. high, medium, low)
- owner (of an action)
- status (of a requirement e.g. agreed, under discussion)
- release (product release number in which a requirement will first be supported)
- identifier (for a requirement )
Page 27