1
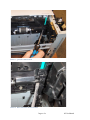
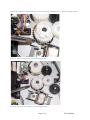
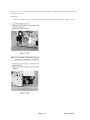
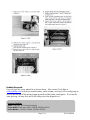
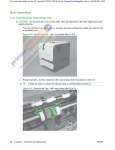
emerging
issue
HP LaserJet P3010 Printer Series –
Loud noise when printing, along with
a 13.05, 13.20, or 13.6 paper jam
or “clearing jam” message
Security Level: For HP and Channel Partner Internal Use
Date Written/Updated: February 10, 2011
Document Number: c02539637
Top Issue: Yes Top issue date range: 270 days
Document keywords: Loud noise when printing, noisy, chatter, paper jam, clearing jam, Tray 2,
13.5, 13.20, 13.6
Document description: Customers may experience a loud noise on their P3010 series product. It can
happen right out of the box.
Issue:
Customers may experience a loud noise from the Tray 2, near the bottom front of the printer.
This is not related to a fuser – and via troubleshooting steps may appear to be related to the
main motor (M8001). However, it is due to the Gear #21 out of position, and a white
plastic locking arm behind the gear out of position or broken. Placing the plastic locking
arm in the correct position will allow the gear to be in the correct position and will solve the
issue. If the locking arm is broken, replace the pick-up assembly:
Paper Pickup Assembly, duplex model: RM1-6269-000CN
Paper Pickup Assembly, simplex model: RM1-6299-000CN
Here is a link to a file that depicts the noise caused by the above issue:
\\wpcfs.corp.hp.com\TECHWEB_WPC\documents\ P3015noisefile.m4a
Solution or Work around:
To find the cause of the noise, first inspect the drive shaft which drives the Tray 2 pick roller –
see if it is moved to the right.
Page 1 of 6
HP Confidential
Picture 1 – good drive shaft location.
Picture 2: Drive shaft in the incorrect location
Page 2 of 6
HP Confidential
With the drive shaft out of location, the gear is also out of position, causing the noise: (SL2 not working properly)
Picture 3: Gear 21 out of position, SL2 not working properly.
Picture 4: Gear 21 in correct position – SL2 working properly.
Page 3 of 6
HP Confidential
To ensure that Gear 21 is correctly seated, remove the gear #21. Check if the white plastic locking arm is in the
correct position.
Picture 5: Shaft lock in incorrect position
Picture 6: Shaft lock in correct position
Page 4 of 6
HP Confidential
If the locking arm is broken, the Paper Pick-up Assembly will need to be replaced. Instructions on how to do the
replacement are below:
Initial Steps:
1) Follow the instructions in the service manual to remove the Cassette Pick-up Solenoid. (Pages 115-116).
Page 5 of 6
HP Confidential
Feedback Requested:
If you do have this issue, please fix as shown above. Also contact Cindy Kyle at
[email protected] with printer model number, serial number, and copy of the config page so
we can see the age of the printer (pages printed) and do further investigation. If we see this
issue growing, we may also ask for the faulty part to be shipped to us.
Document Attributes
Author: Cindy Kyle , IPG Technical Marketing
Product Models: P3015 series: P3015, P3015d, P3015dn, P3015x
Product Numbers:: CE525A, CE526A, CE528A, CE529A
Page 6 of 6
HP Confidential